Owner's Manual
Vacuum Cleaner
CAUTION:
Read and follow all
safety and operating
instructions before first
use of this product.
Sears, Roebuckand Co.,HoffmanEstates,IL60179 U.S.A.
www,sears.com
PART NO, CO1ZAVGOOUOO-8174924 Printed in U,S_A,
Before Using Your New Vacuum ......... 2
Kenmore Vacuum Cleaner Warranty .o. 2
Important Safety Instructions ....... 3
Upright Vacuum Cleaner Parts and
Features ..................... 4
Assembly Instructions ............... 5.6
Operating Instructions .............. 6
Releasing the Handle ................. 7
ON/OFF Switch ....................... 7
Pite Height Selection and Setting ......... 7
Agitator OnlOff Selector ................ 8
Attachments ...................... 8q 0
Attachment Use Chart ................ 11
Vacuuming Tips .................. 11
PerformancelSafety Features ........ 12-13
Vacuum Cleaner Care ................ 14
Vacuum Storage .................... 14
Cleaning Exterior and Attachments ..... 14
Dust Bag Changing ................ 15
Filter Changing ................... 16
Light Bulb Changing .................. 17
Agitator Cleaning ................. 17
Clog Removal ....................... 18
Troubleshooting .................... ! 9
Requesting Assistance Or Service ,_, 2o
Please read this guide° It will help you assemble and operate your new Kenmore vacuum in
the safest and most effective way.
For more information about the care and operation, call your nearest Sears store. You will
need the complete model and serial numbers when requesting information. 'four vacuum's
model and serial numbers are located on the Model and Serial Number Platen
Use the space below to record the model number and serial number of your new Kenmore
vacuum.
Model No,
Serial No.
Date of Purchase
Keep this book and your sales check (receipt) in a safe place for future reference.
FULL ONE-YEAR WARRANTY
When used for private household purposes, if within one year from the date of purchase, this
vacuum cleaner fails due to a defect in material or workmanship, RETURN rTTO THE
NEAREST SEARS SERVICE CENTER/DEPARTMENT IN THE UNITED STATES, and Sears
will repair it free of charge.
This warranty gives you specific legal rights, and you may also have other rights which vary
from state to state.
SEARS, ROEBUCK AND CO., D/817 WA, Hoffman Estates, IL 60179
2

G
Your safety is important to us, To reduce the risk of fire, electrical shock, injury
to persons or damage when using your vacuum cleaner, follow basic safety pre-
cautions including the following:
Read this manual before assembling or
using your vacuum cleaner.
Use your cleaner only as described in
this manual. Use only with Sears recom-
mended attachments.
To reduce the risk of electrical shock-
Do not use outdoors or on wet surfaces°
Disconnect electrical supply before any
servicing or cleaning. Failure to do so
could result in electrical shock or person-
al injury..
Always turn cleaner off before unplug-
ging,
Do not unplug by pulling on cord_ To
unplug, grasp the plug, not the cord.
Do not use with damaged cord or plug. If
cleaner is not working as it should, has
been dropped, damaged, left outdoors, or
dropped into water, return it to a Sears
Service CentedDepartment.
Do not pull or carry by cord, use cord as
a handle, close door on cord, or pull cord
around sharp edges or corners. Do not
run cleaner over cord. Keep cord away
from heated surfaces,
Do not leave cteaner when plugged in.
Unplug from outlet when not in use and
before servicing,
Do not allow to be used as a toy. Close
attention is necessary when used by or
near children..
Do not handle plug or cleaner with wet
hands.
Do not put any objects into openings.
Do not use with any opening blocked;
keep free of dust, lint, hair and anything
that may reduce air flow.
Keep hair, loose clothing, fingers, and alt
parts of body away from openings and
moving parts.
Do not use cleaner without dust bag
and/or filters in ptaceo
Always change the dust bag after vacu-
uming carpet cleaners or freshener, pow-
ders and fine dust,. These products clog
the bag, reduce airflow and can cause
the bag to burst, Failure to change bag
could cause permanent damage to the
cleaner.
Do not use the cleaner to pick up sharp
hard objects, small toys, pins, paper
clips, etc_ They may damage the cleaner
or dust bag.
Do not pick up anything that is burning
or smoking, such as cigarettes, matches,
or hot ashes.
Do not use cleaner to pick up flammable
or combustible liquids (gasoline, cleaning
fluids, perfumes, etc.), or use in areas
where they may be present. The fumes
from these substances can create a fire
hazard or explosion.
Use extra care when cleaning on stairs_
Do not put on chairs, tables, etco Keep
on floor,.
You are responsible for making sure that
your vacuum cleaner is not used by any-
one unable to operate it properly.
THESE INSTRUCTIONS
Proper assembly and safe use of your vacuum cleaner are your responsibilities. Your
cleaner is intended only for household use. Read this Owner's Manual carefu!ly for
important use and safety information_ This guide contains safety statements under
warning and caution symbols. Please pay special attention to these boxes and follow
any instructions given. WARNING statements alert you to such dangers as fire, electri-
cal shock, burns and personal injury. CAUTION statements alert you to such dangers
as personal injury and!or property damage.
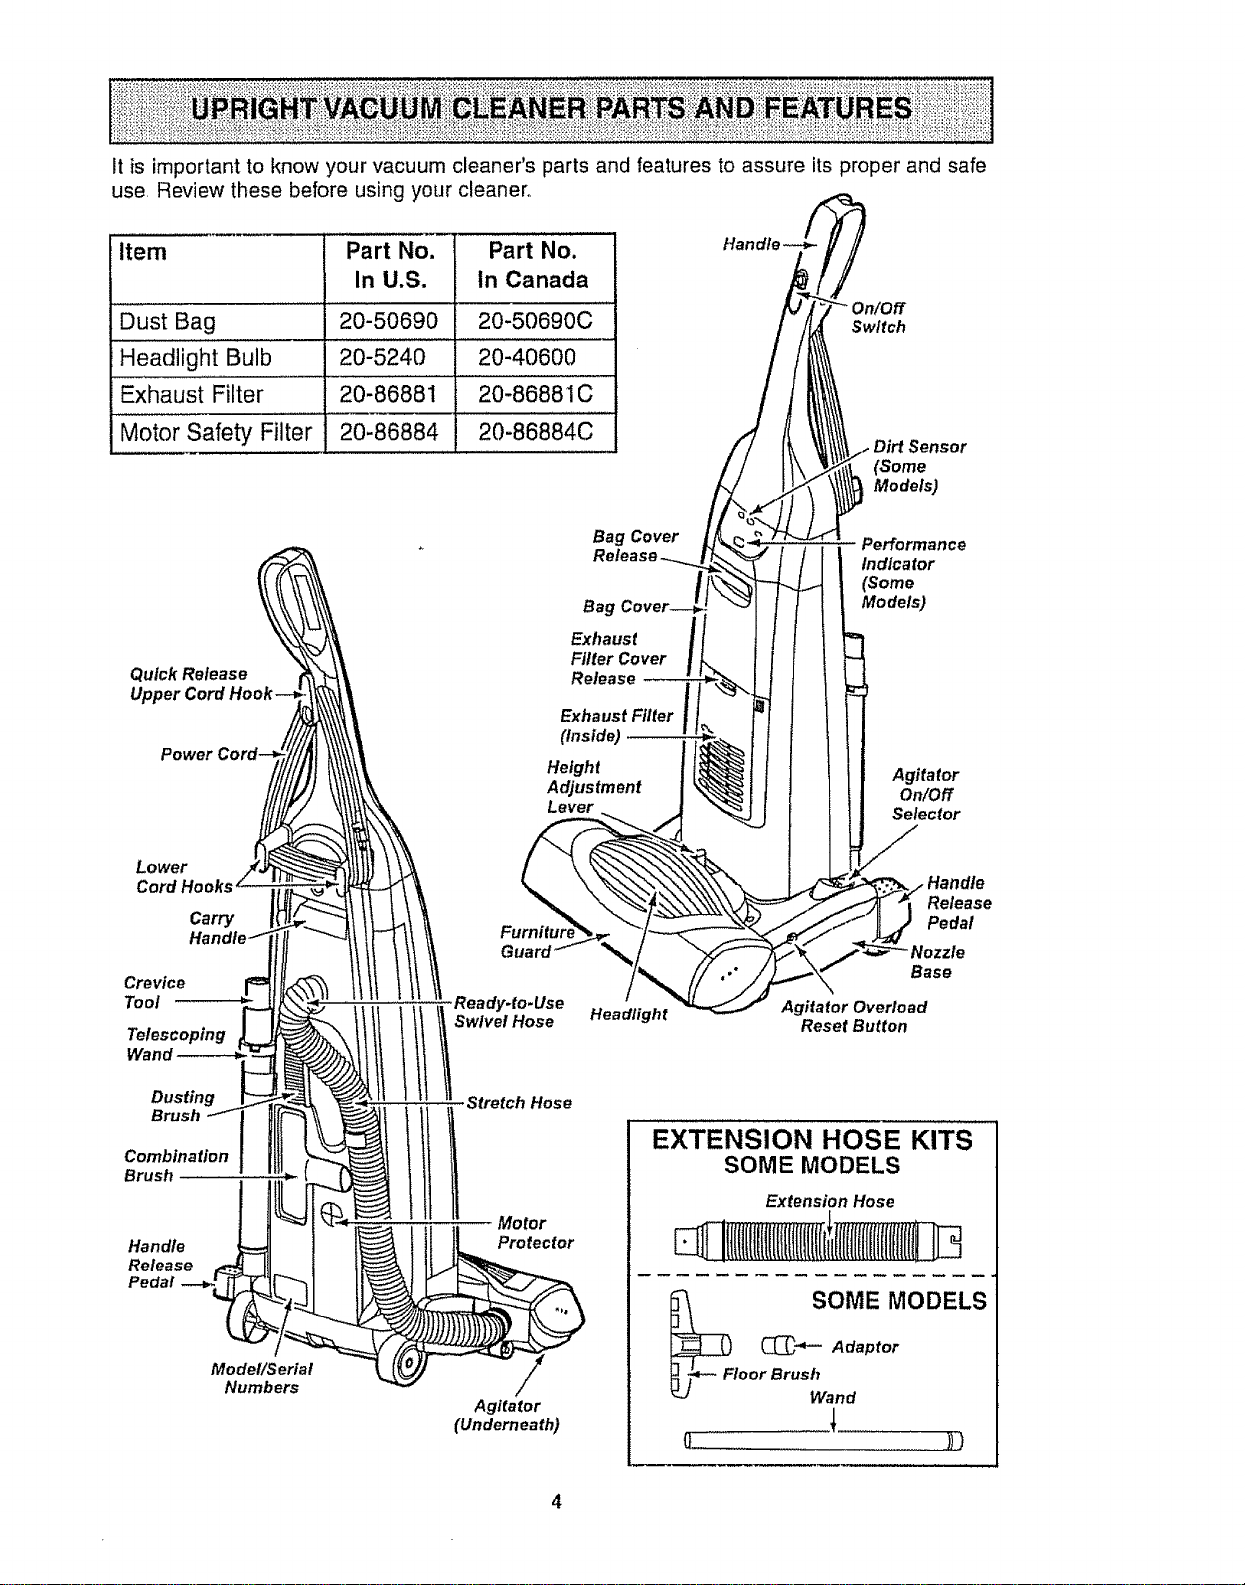
Itisimportanttoknowyourvacuumcleaner'spartsandfeaturestoassureitsproperandsafe
use,Reviewthesebeforeusingyourcleaner,,
item Part No. Part No.
In U.S. In Canada
Dust Bag ................2"0'-50690 20-50690C ......
Headlight Bulb 20-5240 20-40600
Exhaust Filter 20-86881 20-86881C
Motor Safety Filter 20-86884
Switch
(Some
Models)
Quick Release
Upper
Lower
Cord Hooks
Carry
Crevice
Tool
Wand
Dusting
Brush
Combination
Brush
Handle
Release
Pedal
Model!Serial
Numbers
Bag Cover
Bag
Exhaust
Filter Cover
Release --
Exhaust Filter
(inside)
Height
Adjustment
Lever
Performance
Indicator
(Some
Models)
Agitator
On/Off
Selector
Ready.to.Use
! Swivel Hose
Headlight
Release
Pedal
"Nozzle
Base
Agitator Overload
Reset Button
Stretch Hose
Motor
Protector
Agitator
(Underneath)
EXTENSION HOSE KITS
SOME MODELS
Extension Hose
tlIlff(flftlfillftflfil
_l :OME MODELS
C_" Adaptor
oor Brush and
o )))
4
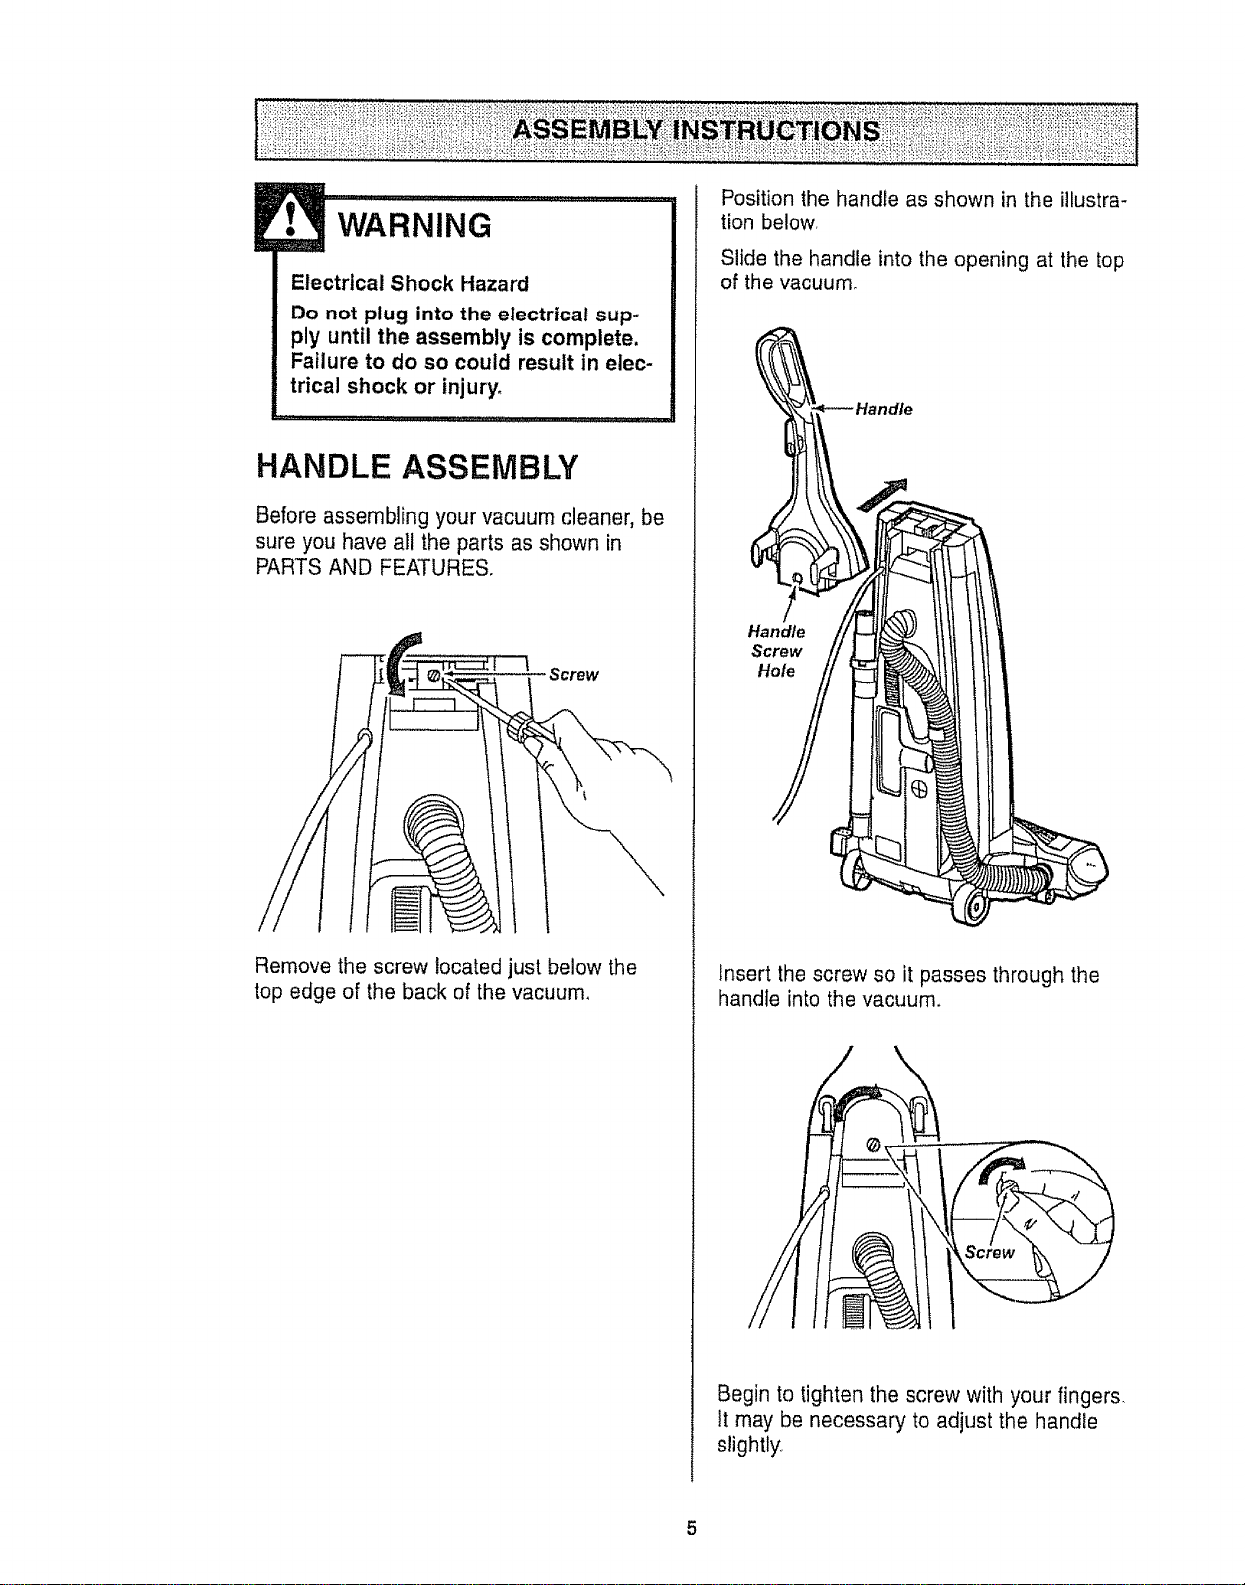
WARNING
Electrical Shock Hazard
Do not plu 9 into the electrical sup-
ply until the assembly is complete.
Failure to do so could result in elec-
trical shock or injury°
HANDLE ASSEMBLY
Before assembling your vacuum cleaner, be
sure you have all the parts as shown in
PARTS AND FEATURES,
Screw
Remove the screw located just below the
top edge of the back of the vacuum,
Position the handle as shown in the illustra-
tion below,
Slide the handle into the opening at the top
of the vacuum.
Handle
Screw
Hole
tnsert the screw so it passes through the
handle into the vacuurn_
Begin to tighten the screw with your fingers.
It may be necessary to adjust the handle
slightly_,
5
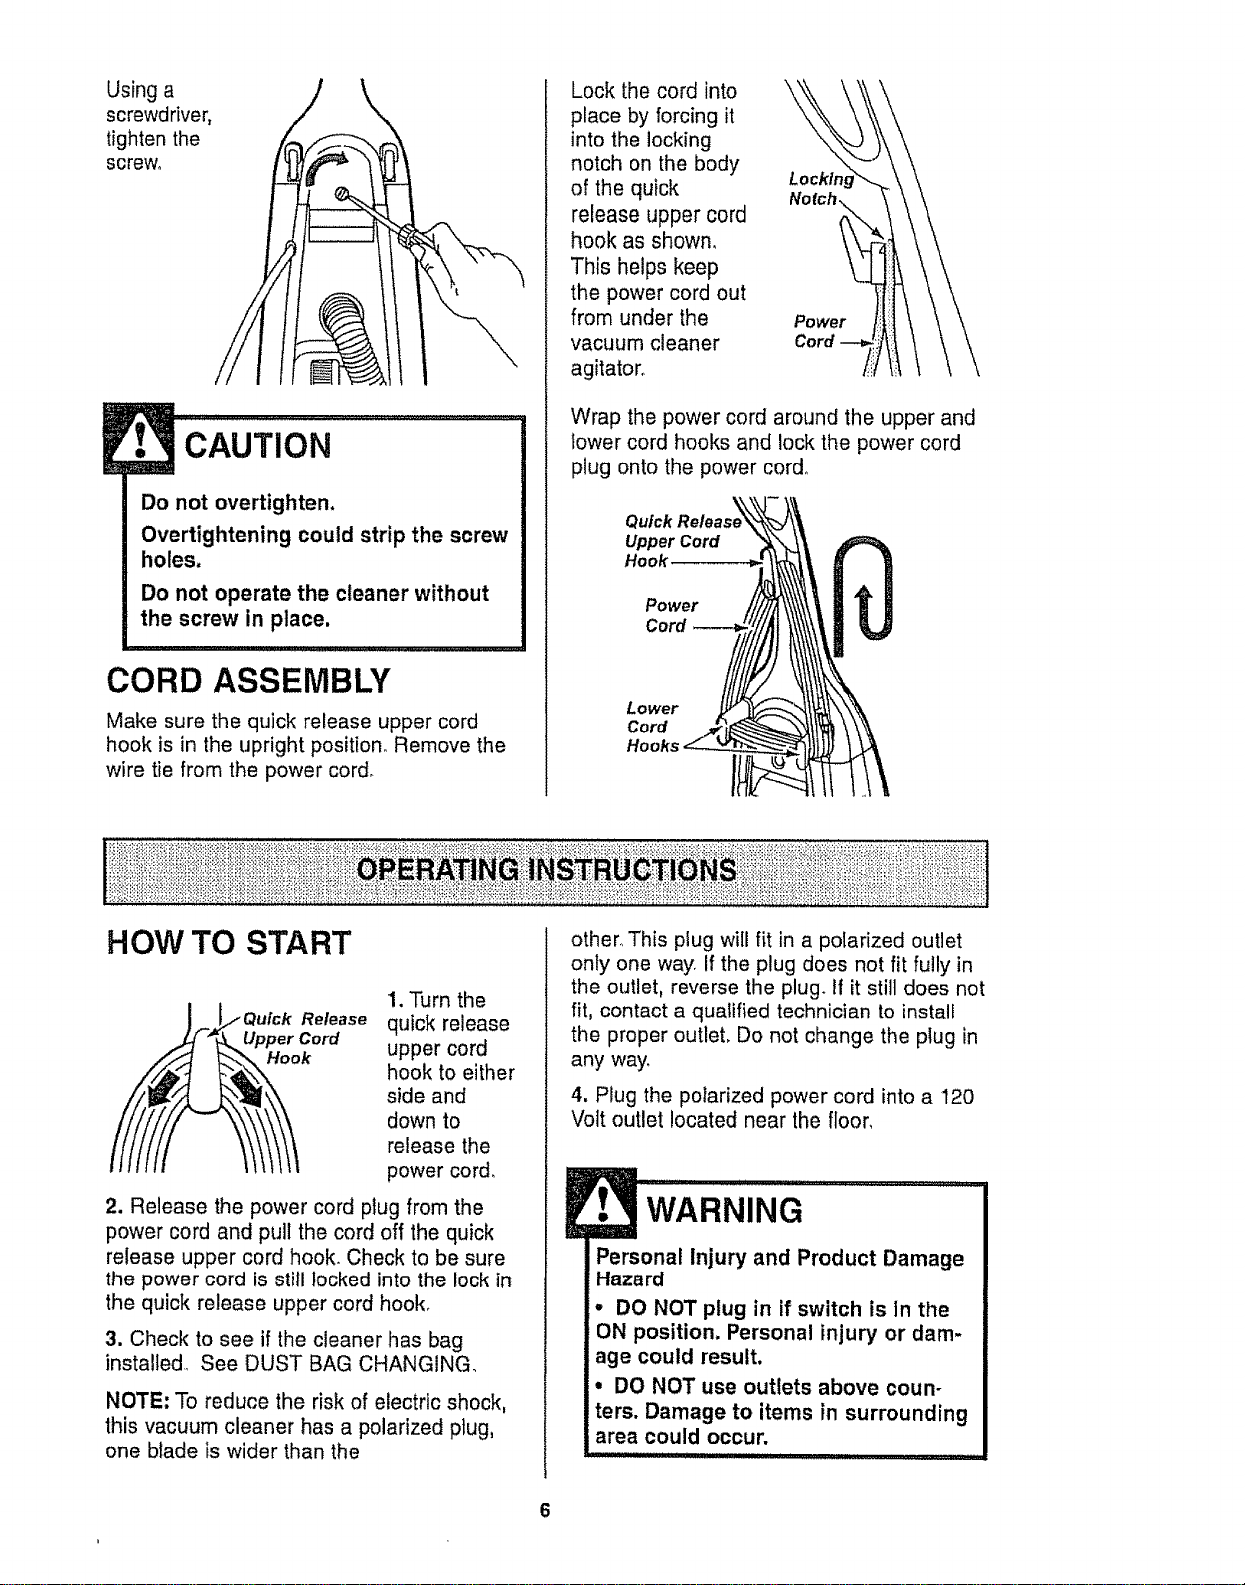
Usinga
screwdriver,
tighten the
screw°
CAUTION
Do not overtighten,
Overtightening could strip the screw
holes.
Do not operate the cleaner without
the screw in place.
CORD ASSEMBLY
Make sure the quick release upper cord
hook is in the upright position. Remove the
wire tie from the power cord.
Lock the cord into
place by forcing it
into the locking
notch on the body
of the quick
release upper cord
hook as shown,
This helps keep
the power cord out
from under the
vacuum cleaner
agitator,.
Power
Wrap the power cord around the upper and
lower cord hooks and lock the power cord
plug onto the power cord°
Quick
Upper Cord
Hook
Power
Cord
Lower
Cord
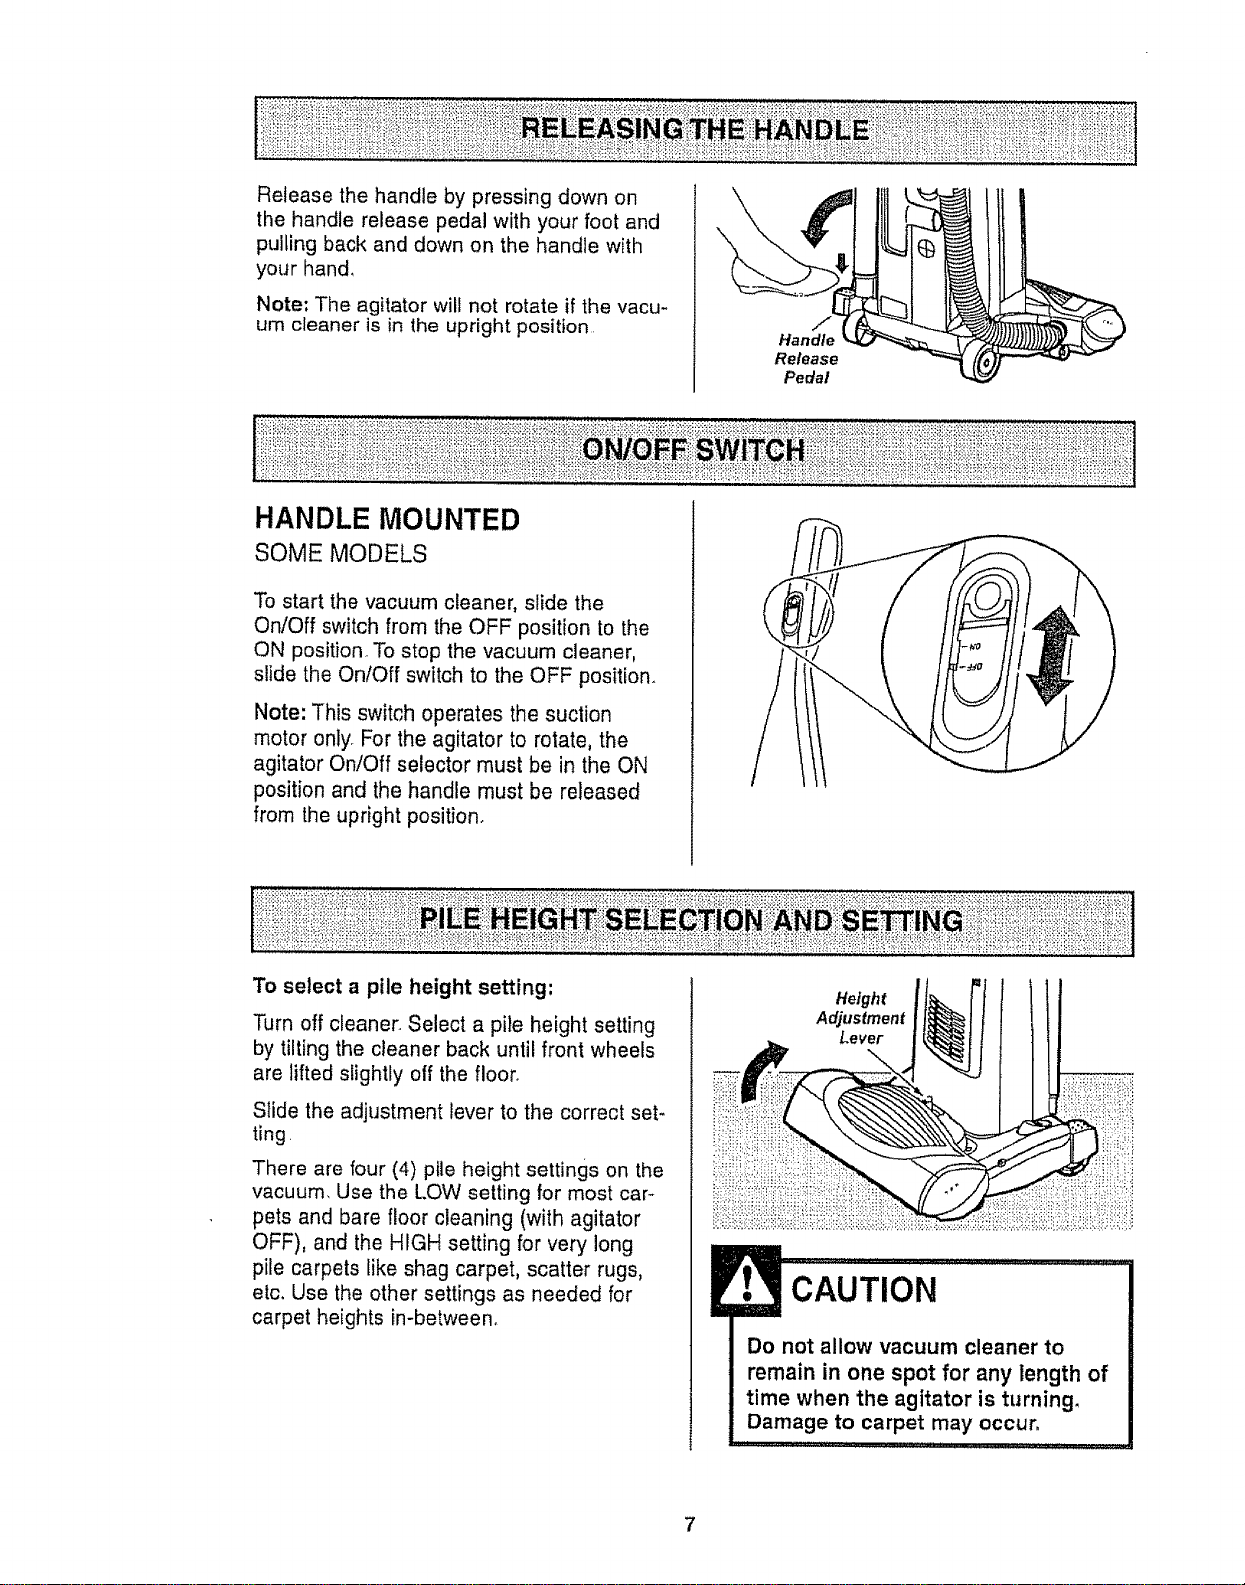
HOW TO START
Quick Release
_ " _ Upper Cord
1. Turn the
quick release
upper cord
hook to either
side and
down to
release the
power cord.
2. Release the power cord plug from the
power cord and pull the cord off the quick
release upper cord hook. Check to be sure
the power cord is still locked into the lock in
the quick release upper cord hook.
3. Check to see if the cleaner has bag
installed,, See DUST BAG CHANGING.
NOTE: To reduce the risk of electric shock,
this vacuum cleaner has a polarized plug,
one blade is wider than the
other° This plug will fit in a polarized outlet
only one way. If the plug does not fit fully in
the outlet, reverse the plug. if it still does not
fit, contact a qualified technician to install
the proper outlet, Do not change the ptug in
any way.
4. Plug the polarized power cord into a 120
Volt outlet located near the floor,
WARNING
Personal Injury and Product Damage
Hazard
• DO NOT plug in if switch is In the
ON position. Personal injury or dam-
age could result.
° DO NOT use outlets above coun-
ters. Damage to items in surrounding
area could occur.
IIII "11111 IIIII ,i i I IIIJll _IL
6
Release the handle by pressing down on
the handle release pedal with your foot and
pulling back and down on the handle with
your hand,
Note: The agitator will not rotate if the vacu-
um cleaner is in the upright position
HANDLE MOUNTED
SOME MODELS
\
Handle
Release
Pedal
To start the vacuum cleaner, slide the
On/Off switch from the OFF position to the
ON position. To stop the vacuum cleaner,
slide the On/Off switch to the OFF position.
Note: This switch operates the suction
motor only. For the agitator to rotate, the
agitator On/Off selector must be in the ON
position and the handle must be released
from the upright position.
To select a pile height setting:
Turn off cleaner_ Select a pile height setting
by tilting the cleaner back until front wheels
are lifted slightly off the floor.
Slide the adjustment lever to the correct set-
ting.
There are four (4) pile height settings on the
vacuum, Use the LOW setting for most car-
pets and bare floor cleaning (with agitator
OFF), and the HIGH setting for very long
pile carpets like shag carpet, scatter rugs,
etc. Use the other settings as needed for
carpet heights in-between.
Height i
Adjustment I
Lever I
CAUTION
Do not allow vacuum cleaner to
remain in one spot for any length of
time when the agitator is turning.
Damage to carpet may occur.
,i,,,1111,,,i,111,, I i,i iN i LI_,L ,,
OFF Position: Step on the back half of the
peda! to turn off the agitator for use on bare
floors,
In the OFF position, the agitator does not
rotate. This setting should be used for
cleaning hardwood and tile floors.
Note: The light will remain on when vacu-
uming with the agitator in the OFF Position,
provided the vacuum is not fully upright.
ON Position; Step on the front half of the
pedal to turn on the agitator for use on car-
petlng.
In the ON position, the agitator wilt turn.
When carpets are being cleaned the selec-
tor should be in this position..
Attention; Refer to your carpet manufac-
turers cleaning recommendations° Some
more delicate carpets may require that they
be vacuumed with the agitator turned off, to
prevent carpet damage.
WARNING
Personal Injury Hazard
DO NOT place hands or feet under-
neath the unit when changing the
Agitator On/Off Selector to the On
position, The agitator begins to
revolve rapidly,
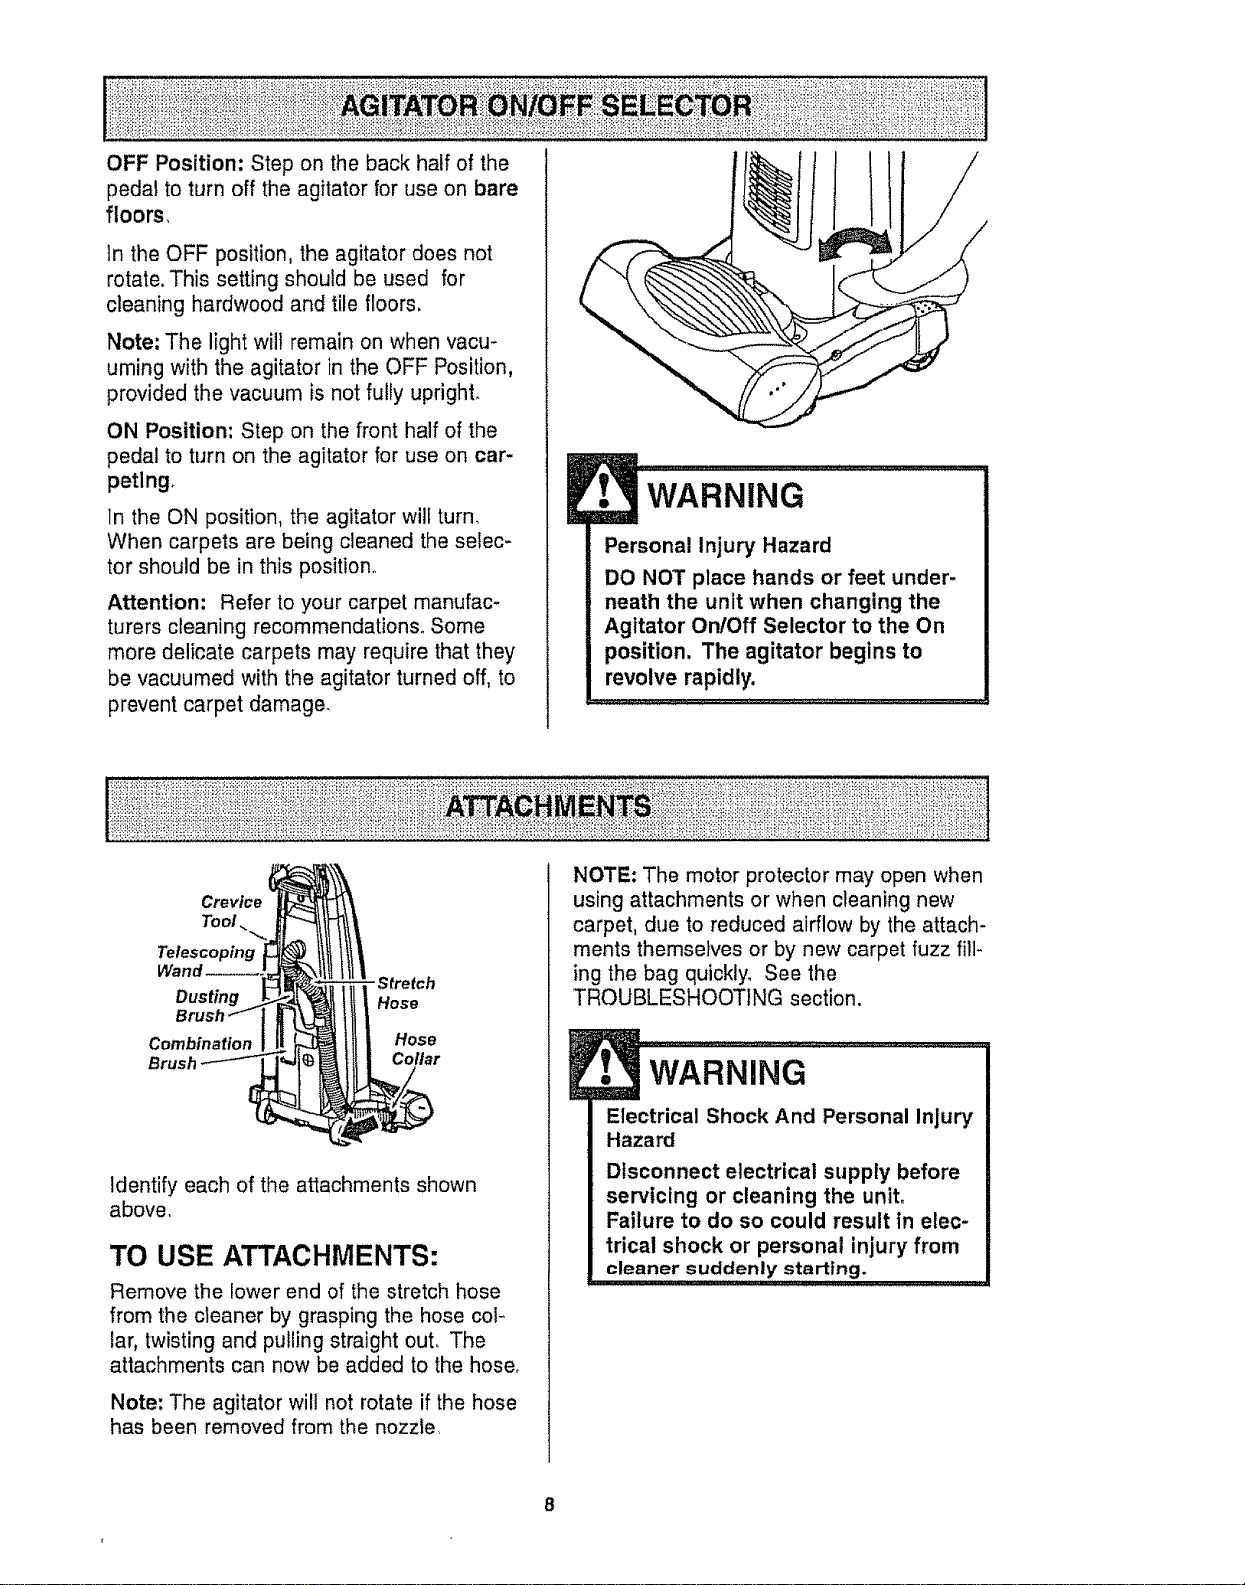
Crevice
Tool
Telescoping
Dusting
Combination
Brush
- Stretch
Hose
Hose
Collar
Identify each of the attachments shown
above.
TO USE ATTACHMENTS:
Remove the lower end of the stretch hose
from the cleaner by grasping the hose col-
lar, twisting and pulling straight out. The
attachments can now be added to the hose.
Note: The agitator wilt not rotate if the hose
has been removed from the nozzle.
NOTE: The motor protector may open when
using attachments or when cleaning new
carpet, due to reduced airflow by the attach-
ments themse}ves or by new carpet fuzz fill-
ing the bag quickly. See the
TROUBLESHOOTING section.
Electrical Shock And Personal Injury
Hazard
Disconnect electrical supply before
servicing or cleaning the unit.
Failure to do so could result in elec-
trical shock or personal injury from
cleaner suddenly starting.
8
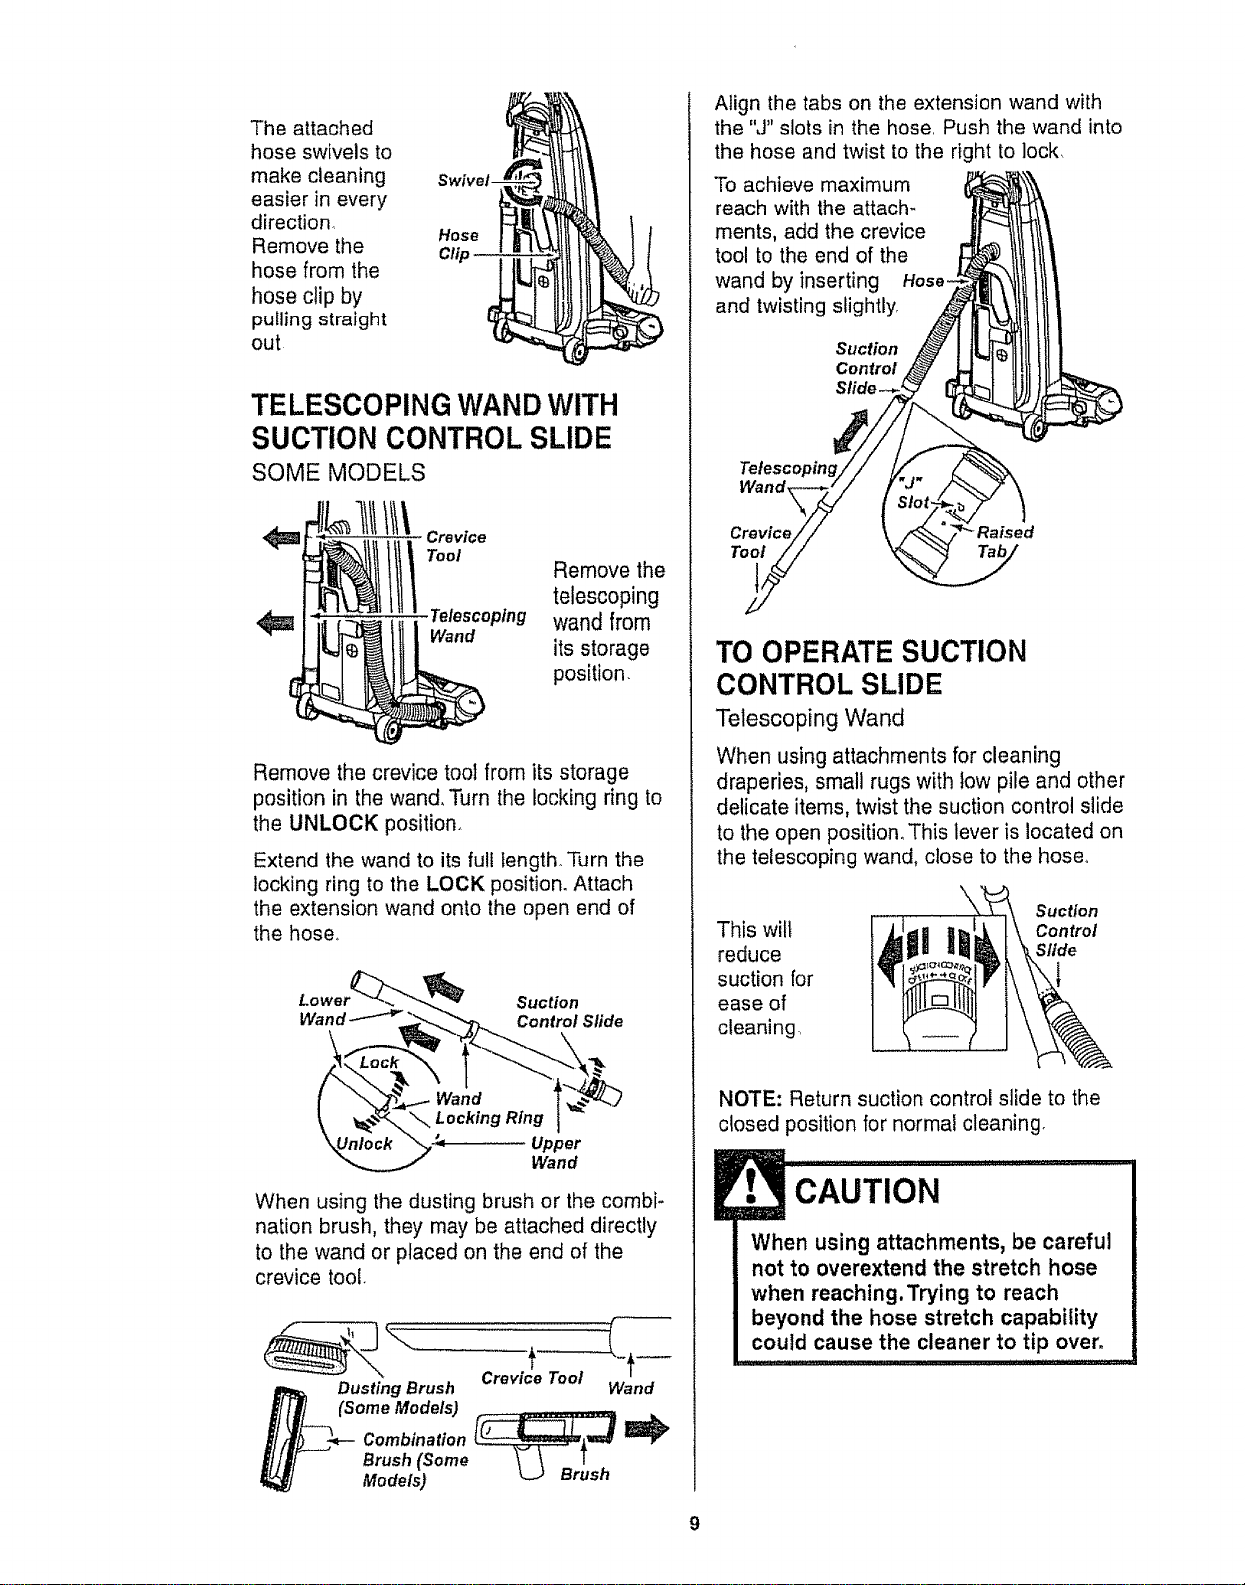
The attached
hose swivels to
make cleaning
easier in every
direction.
Remove the
hose from the
hose clip by
pu_ling straight
out
Hose
Clip
TELESCOPING WAND WITH
SUCTION CONTROL SLIDE
SOME MODELS
t1!1lit\ ,o.oo
<_ Telescoping
Wand
Remove the
telescoping
wand from
its storage
position.
Remove the crevice tool from its storage
position in the wand, Turn the locking dng to
the UNLOCK position,
Extend the wand to its full length. Turn the
locking ring to the LOCK position. Attach
the extension wand onto the open end of
the hose,
Suction
Wand _ Control Sfide
Upper
Wand
When using the dusting brush or the combi-
nation brush, they may be attached directly
to the wand or placed on the end of the
crevice tool.
Dusting Brush Wand
(Some Models)
Combination _
Brush (Some
Models)
Align the tabs on the extension wand with
the "J" slots in the hose. Push the wand into
the hose and twist to the right to lock.
To achieve maximum
reach with the attach-
ments, add the crevice
tool to the end of the
wand by inserting Hose-
and twisting slightly,
Suction
Control
Tetescopm_
Wand
Crevice _Raised
Tool
TO OPERATESUCTION
CONTROL SLIDE
Telescoping Wand
When using attachments for cleaning
draperies, small rugs with low pile and other
delicate items, twist the suction control slide
to the open position. This lever is located on
the telescoping wand, close to the hose°
This wilt
reduce
suction for
ease of
cleaning,
Suction
Control
Slide
NOTE: Return suction control slide to the
closed position for normal cleaning.
CAUTION
When using attachments, be careful
not to overextend the stretch hose
when reaching. Trying to reach
beyond the hose stretch capability
could cause the cleaner to tip over.
9
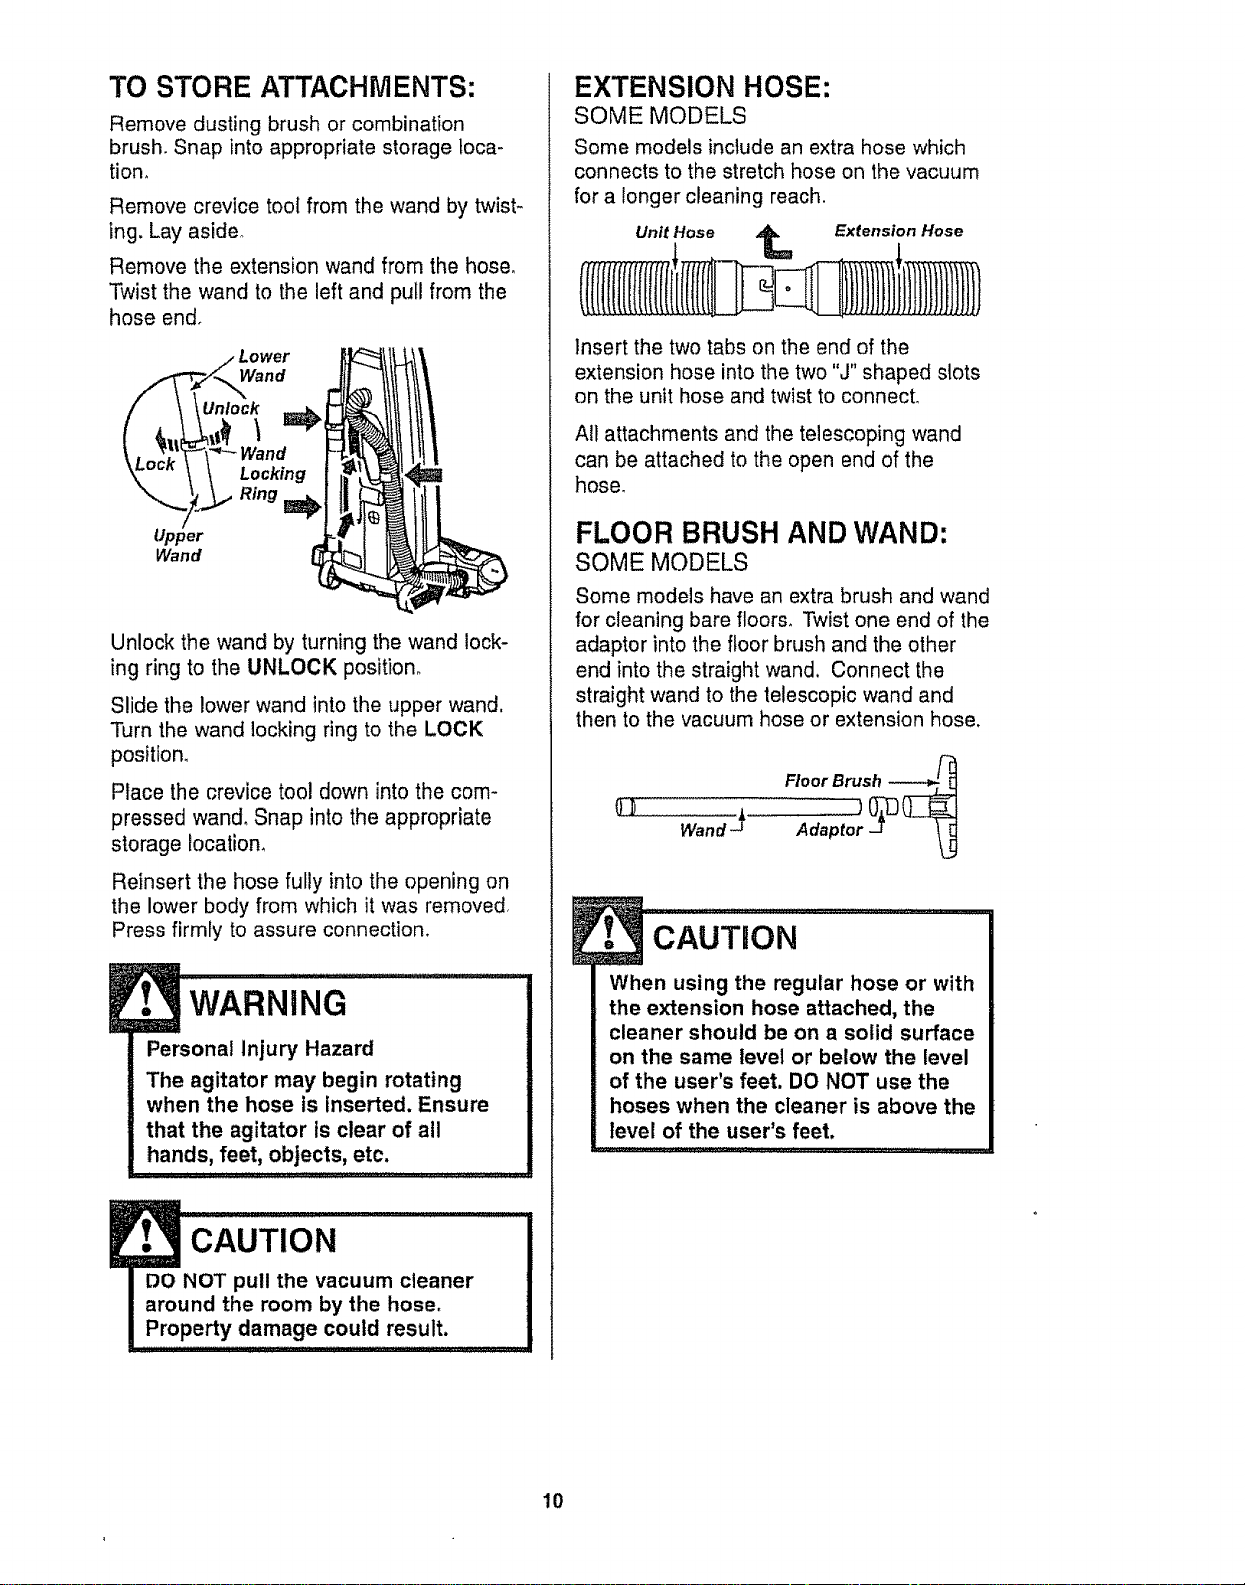
TO STORE ATTACHMENTS:
Remove dusting brush or combination
brush. Snap into appropriate storage loca-
tion_
Remove crevice tooI from the wand by twist-
ing. Lay aside,
Remove the extension wand from the hose°
Twist the wand to the left and pull from the
hose end°
Lower
\\\Unlock
Locking
Ring _
Upper
Wand
Unlock the wand by turning the wand lock-
ing ring to the UNLOCK position°
Slide the lower wand into the upper wand.
Turn the wand locking ring to the LOCK
position,
Place the crevice tool down into the com-
pressed wand, Snap into the appropriate
storage location,
Reinsert the hose fully into the opening on
the lower body from which it was removed,
Press firmly to assure connection,
WARNING
Personal Injury Hazard
The agitator may begin rotating
when the hose is inserted. Ensure
that the agitator is clear of all
hands, feet, objects, etc.
CAUTION
EXTENSION HOSE:
SOME MODELS
Some models include an extra hose which
connects to the stretch hose on the vacuum
for a longer cleaning reach.
Unit Hose _ Extension Hose
insert the two tabs on the end of the
extension hose into the two "J" shaped slots
on the unit hose and twist to connecL
All attachments and the telescoping wand
can be attached to the open end of the
hose,
FLOOR BRUSH AND WAND:
SOME MODELS
Some models have an extra brush and wand
for cleaning bare floors_ Twist one end of the
adaptor into the floor brush and the other
end into the straight wand. Connect the
straight wand to the telescopic wand and
then to the vacuum hose or extension hose,
Wand _"
l cAuTuoN ........
When using the regular hose or with
the extension hose attached, the
cleaner should be on a solid surface
on the same level or below the level
of the user's feet. DO NOT use the
hoses when the cleaner is above the
level of the user's feet.
10
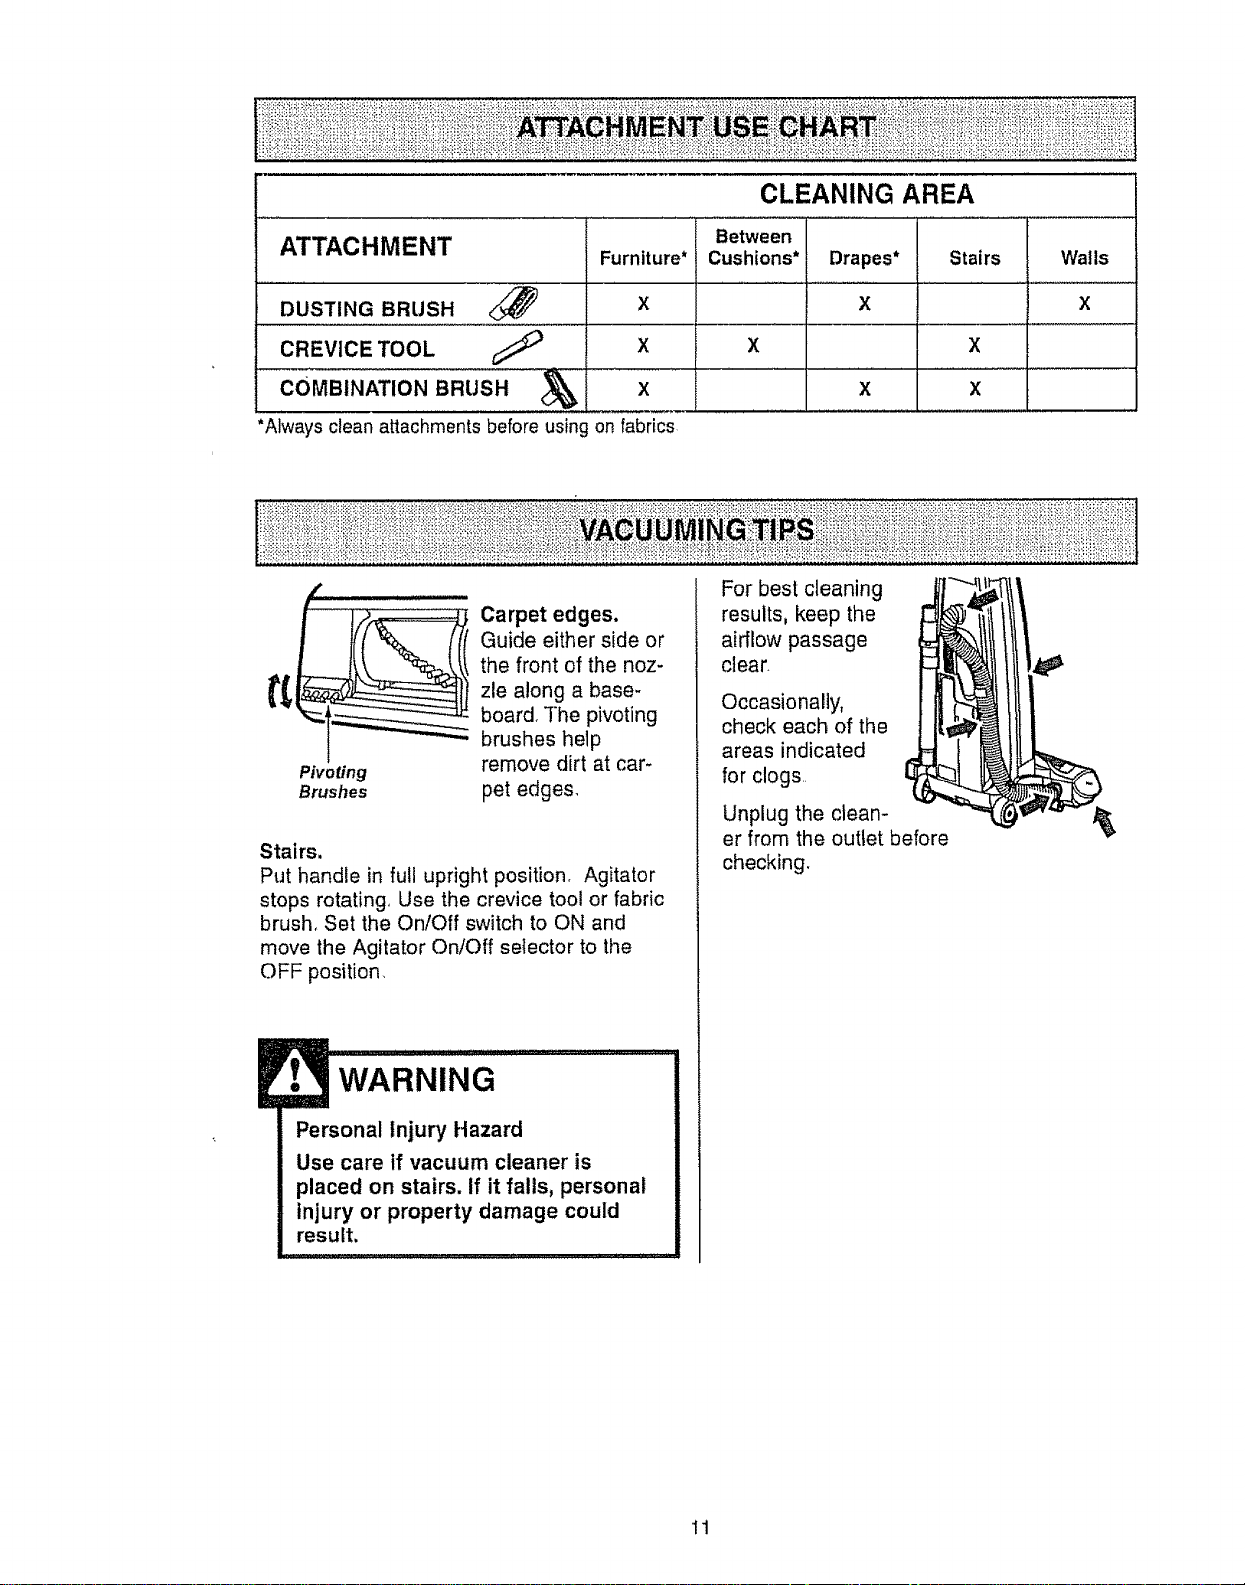
CLEANING AREA
ATTACHMENT
DUSTING BRUSH
CREVICE TOOL
Furniture*
X
X
COMBINAT'ONBRusH x
*Always clean attachments before using on fabrics
Between
Cushions* Drapes*
X
X
X
Stairs
X
x
Walls
X
Pivoting
Brushes
Carpet edges.
Guide either side or
the front of the noz-
zle along a base-
board. The pivoting
brushes help
remove dirt at car-
pet edges.
Stairs,
Put handle in full upright position, Agitator
stops rotating, Use the crevice tool or fabric
brush, Set the On/Off switch to ON and
move the Agitator On/Off selector to the
OFF position.
WARNING
Personal Injury Hazard
Use care if vacuum cleaner is
placed on stairs. If it falls, personal
injury or property damage could
result.
, ,, , L
For best cleaning
results, keep the
airflow passage
clear.
Occasionally,
check each of the
areas indicated
for clogs,,
Unplug the clean-
er from the outtet before
checking.
11
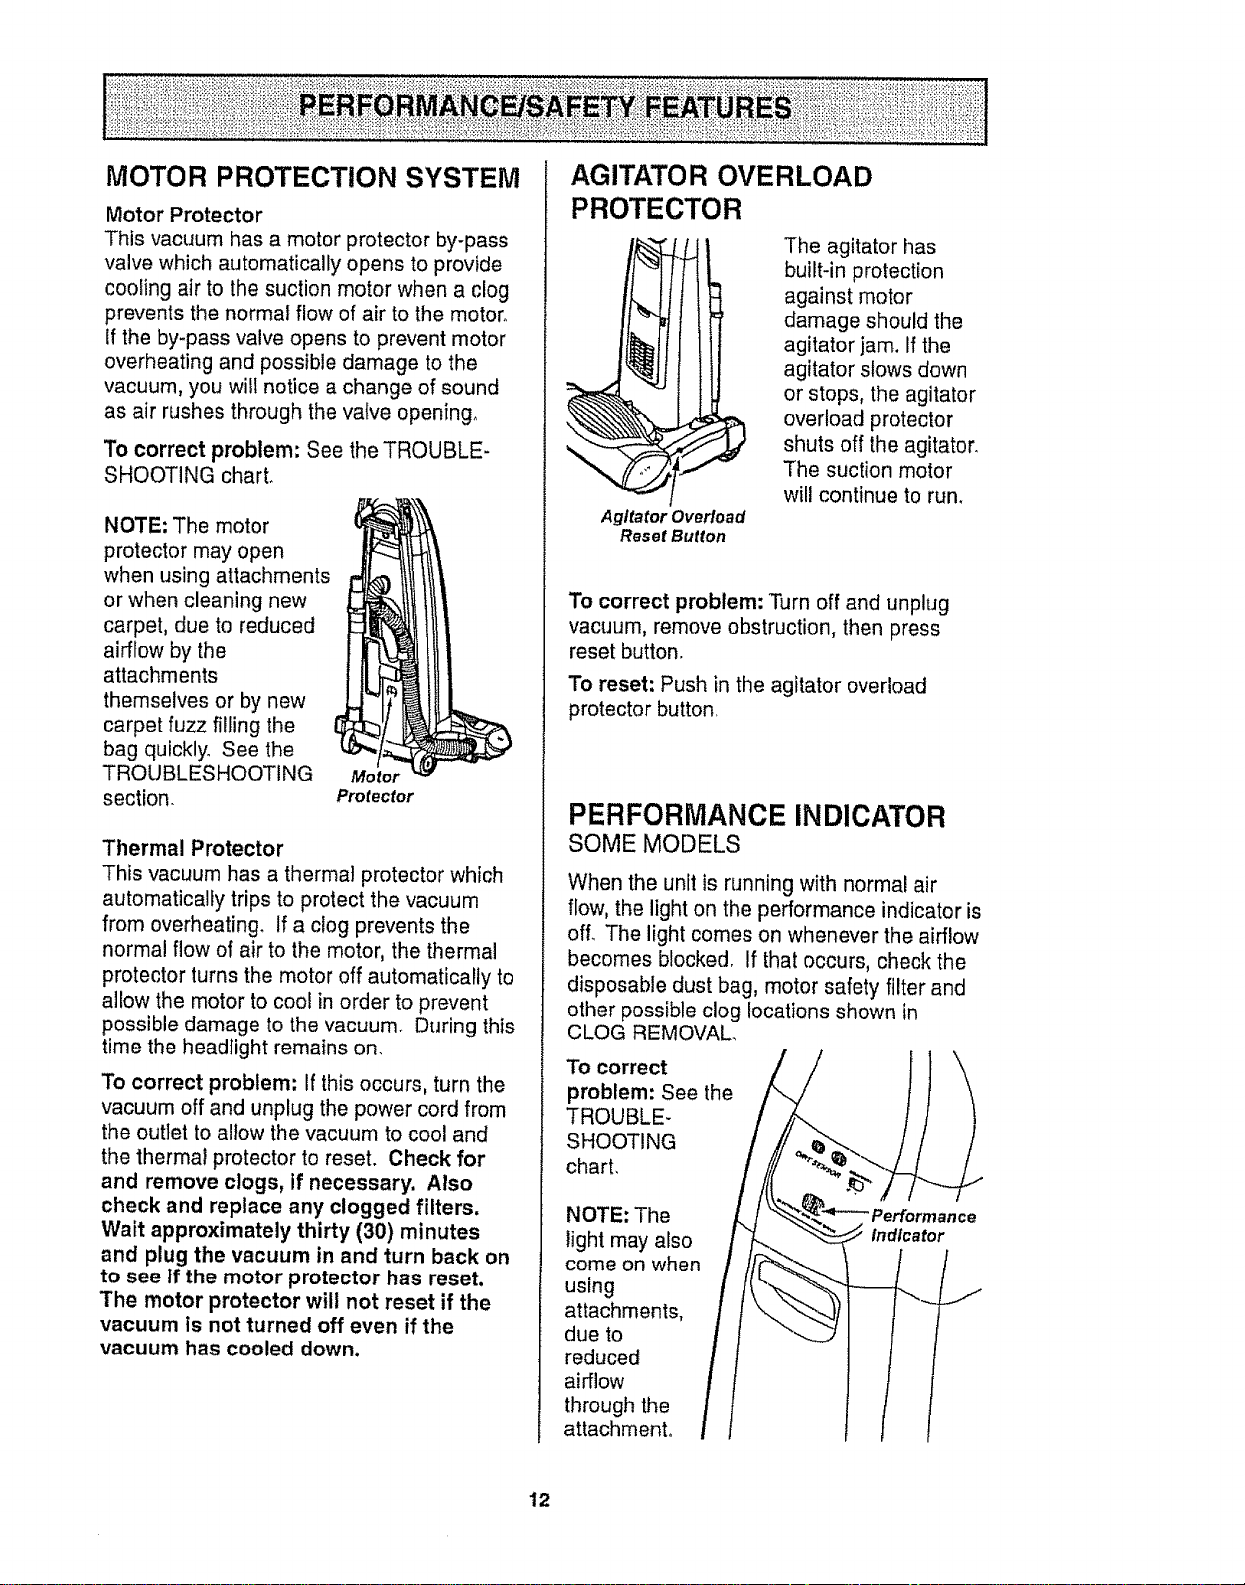
MOTOR PROTECTION SYSTEM
Motor Protector
This vacuum has a motor protector by-pass
valve which automatically opens to provide
cooling air to the suction motor when a clog
prevents the normal flow of air to the motor°
if the by-pass valve opens to prevent motor
overheating and possible damage to the
vacuum, you wilt notice a change of sound
as air rushes through the valve opening.
To correct problem: See the TROUBLE-
SHOOTING chart.
NOTE: The motor
protector may open
when using attachments
or when cleaning new
carpet, due to reduced
airflow by the
attachments
themselves or by new
carpet fuzz filling the
bag quickly. See the
TROUBLESHOOTING
section.
Motor
Protector
Thermal Protector
This vacuum has a thermal protector which
automatically trips to protect the vacuum
from overheating. If a clog prevents the
normal flow of air to the motor, the thermal
protector turns the motor off automatically to
allow the motor to cool in order to prevent
possible damage to the vacuum° During this
time the headlight remains on.
To correct problem; If this occurs, turn the
vacuum off and unplug the power cord from
the outlet to allow the vacuum to cool and
the thermal protector to reset. Check for
and remove clogs, if necessary. Also
check and replace any clogged filters,
Wait approximately thirty (30) minutes
and plug the vacuum in and turn back on
to see tf the motor protector has reset.
The motor protector wilt not reset if the
vacuum Is not turned off even if the
vacuum has cooled down.
AGITATO R OVERLOAD
PROTECTOR
The agitator has
built-in protection
against motor
damage should the
agitator jam. If the
agitator slows down
or stops, the agitator
overload protector
shuts off the agitator.
The suction motor
will continue to run,
Agitator Overload
Reset Button
To correct problem: Turn off and unplug
vacuum, remove obstruction, then press
reset button,
To reset: Push in the agitator overload
protector button.
PERFORMANCE INDICATOR
SOME MODELS
When the unit is running with normal air
flow, the light on the performance indicator is
off. The light comes on whenever the airflow
becomes blocked. If that occurs, check the
disposable dust bag, motor safety filter and
other possible clog locations shown in
CLOG REMOVAL
To correct
problem: See the
TROUBLE-
SHOOT! NG
chart,
NOTE: The
light may also
come on when
using
attachments,
due to
reduced
airflow
through the
attachment,
"Performance
indicator
12
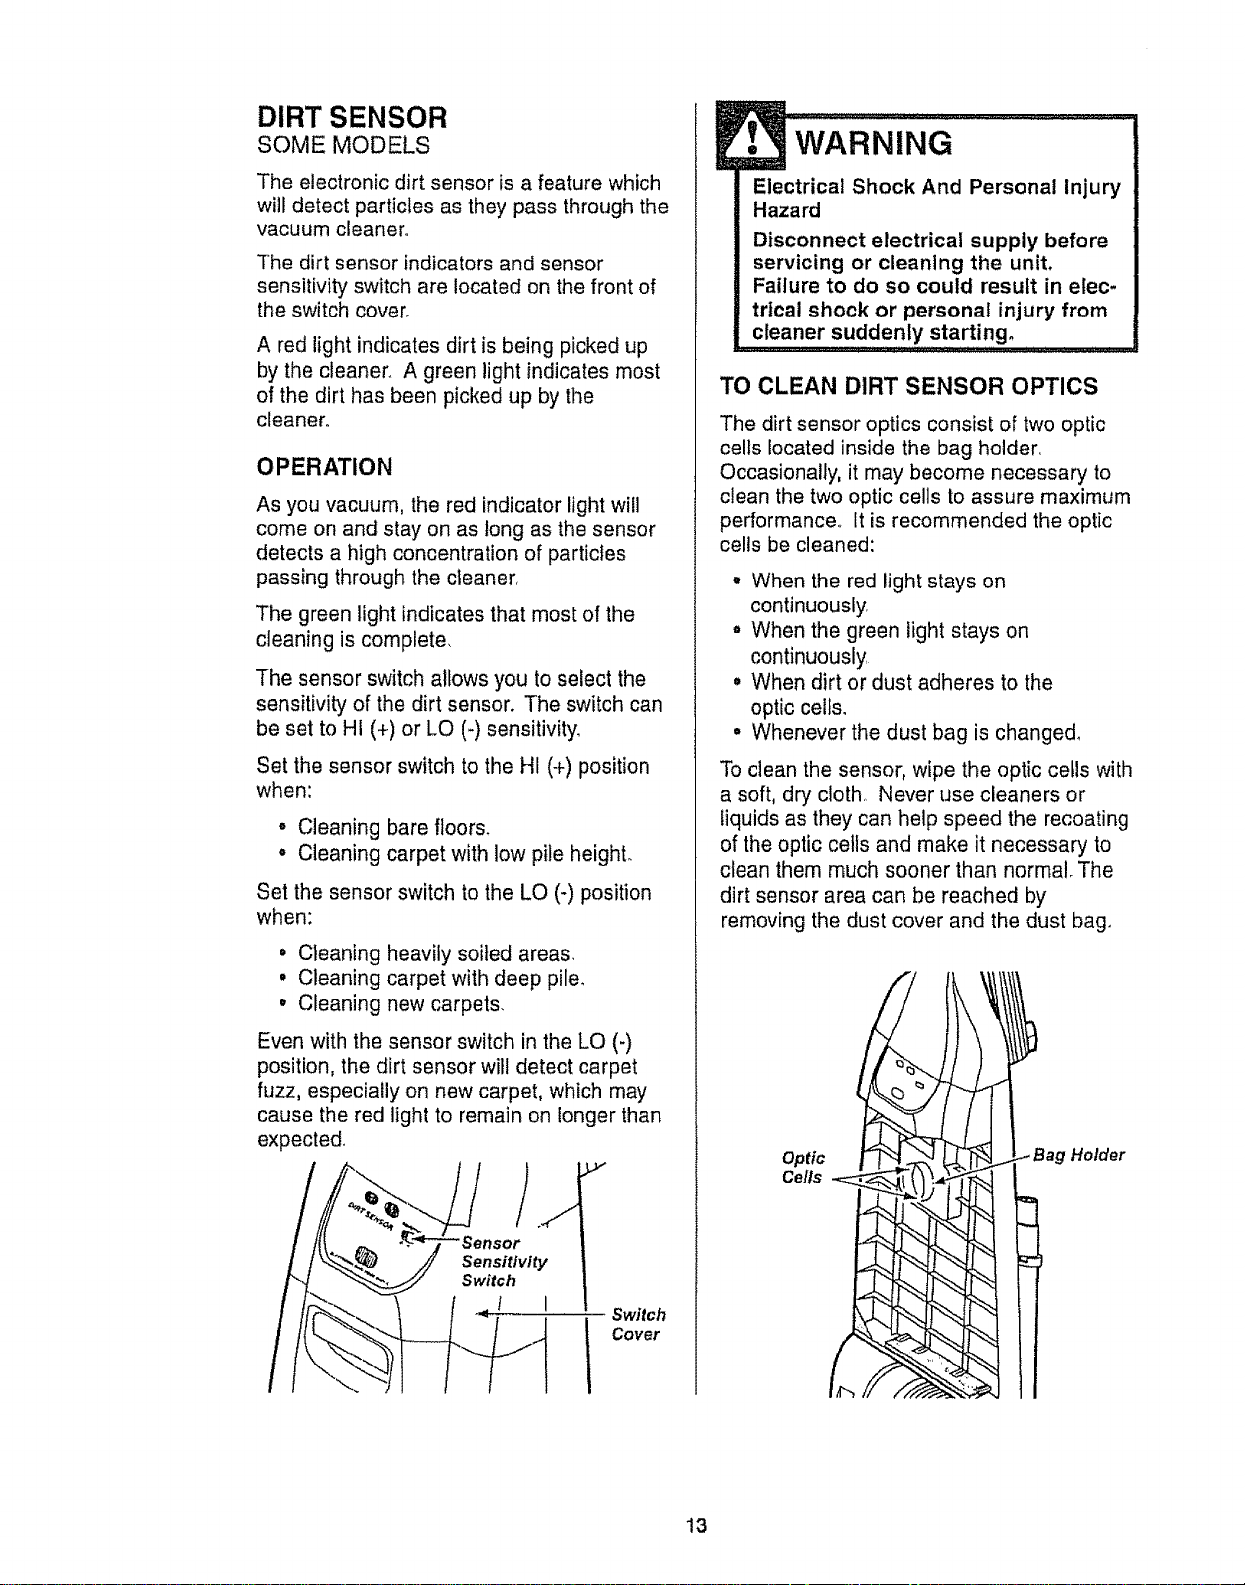
DIRT SENSOR
SOME MODELS
The electronic dirt sensor is a feature which
will detect particles as they pass through the
vacuum cleaner°
The dirt sensor indicators and sensor
sensitivity switch are located on the front of
the switch cover_
A red light indicates dirt is being picked up
by the cleaner. A green light indicates most
of the dirt has been picked up by the
cleaner,,
OPERATION
As you vacuum, the red indicator light will
come on and stay on as tong as the sensor
detects a high concentration of particles
passing through the cleaner,
The green light indicates that most of the
cleaning is complete,
The sensor switch allows you to select the
sensitivity of the dirt sensor. The switch can
be set to HI (+) or LO (-) sensitivity.
Set the sensor switch to the HI (+) position
when:
• Cleaning bare floors,
° Cleaning carpet with lowpile heighL
Set the sensor switch to the LO (-) position
when:
= Cleaning heavily soiled areas,
, Cleaning carpet with deep pile.
• Cleaning new carpets.
Even with the sensor switch in the LO (-)
position, the dirt sensor will detect carpet
fuzz, especially on new carpet, which may
cause the red light to remain on longer than
expected,
Sensitivity
Switch
! I
Switch
Cover
WARNING
Electrical Shock And Personal Injury
Hazard
Disconnect electrical supply before
servicing or cleaning the unit,
Failure to do so could result in elec-
trical shock or personal injury from
cleaner suddenly starting.
TO CLEAN DIRT SENSOR OPTICS
The dirt sensor optics consist of two optic
cells located inside the bag holder,
Occasionally, it may become necessary to
clean the two optic cells to assure maximum
performance° It is recommended the optic
cells be cleaned:
• When the red light stays on
continuously.
. When the green light stays on
continuously
° When dirt or dust adheres to the
optic cells.
° Whenever the dust bag is changed_
To clean the sensor, wipe the optic cells with
a soft, dry cloth,, Never use cleaners or
liquids as they can help speed the recoating
of the optic cells and make it necessary to
clean them much sooner than normal_ The
dirt sensor area can be reached by
removing the dust cover and the dust bag.
Optic
Cells
'Holder
13
Always follow all safety precautions when
cleaning and servicing the vacuum
cleaner.
WARNING
Electrical Shock And Personal Injury
Hazard
Disconnect electrical supply before
servicing or cleaning the unit.
Failure to do so could result in elec-
trical shock or personal injury from
cleaner suddenly starting.
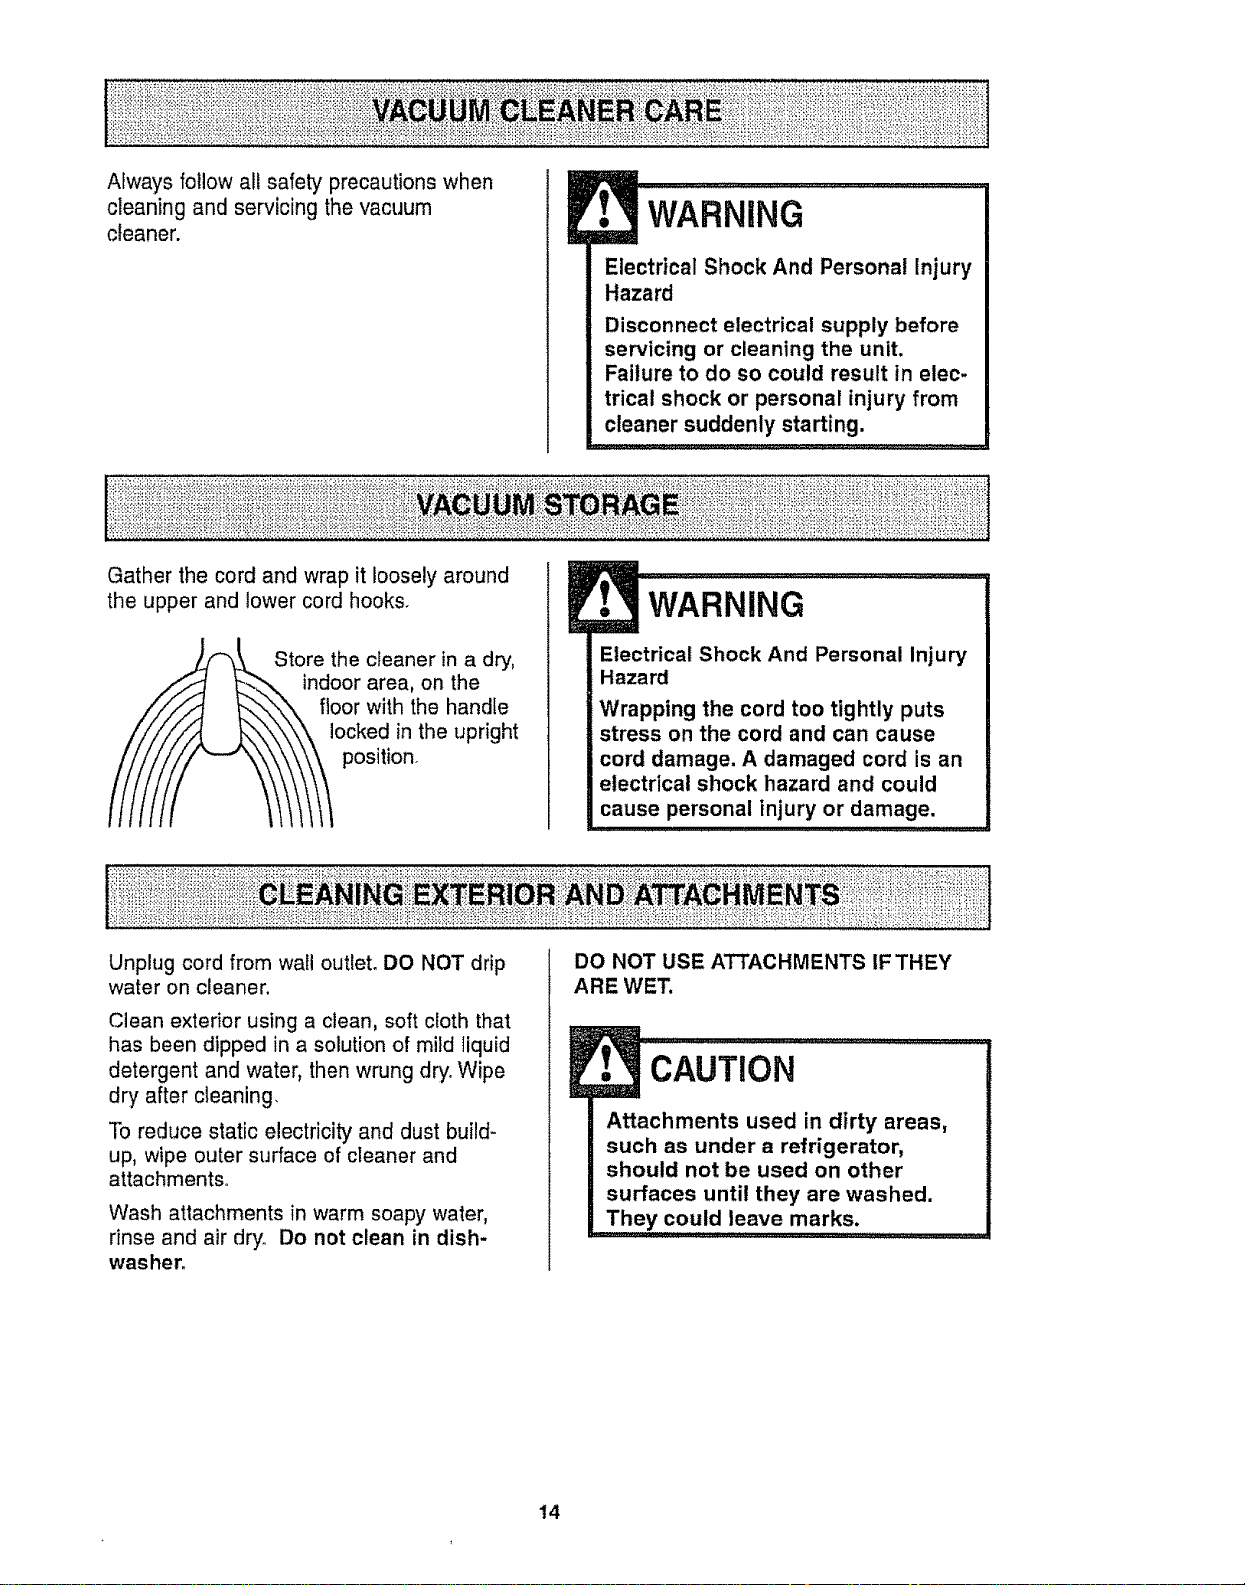
Gather the cord and wrap it loosely around
the upper and lower cord hooks.
Store the cleaner in a dry,
area, on the
with the handle
locked in the upright
position.
WARNING
Electrical Shock And Personal Injury
Hazard
Wrapping the cord too tightly puts
stress on the cord and can cause
cord damage. A damaged cord is an
electrical shock hazard and could
cause personal injury or damage.
Unplug cord from wall outlet° DO NOT drip
water on cleaner.
Clean exterior using a clean, soft cloth that
has been dipped in a solution of mild liquid
detergent and water, then wrung dry. Wipe
dry after cleaning.
To reduce static electricity and dust build-
up, wipe outer surface of cleaner and
attachments..
Wash attachments in warm soapy water,
rinse and air dry. Do not clean in dish-
washer.
DO NOT USE ATTACHMENTS IF THEY
ARE WET.
!. CAu N...............................................
Attachments used in dirty areas,
such as under a refrigerator,
should not be used on other
surfaces until they are washed.
They could leave marks: .............
14
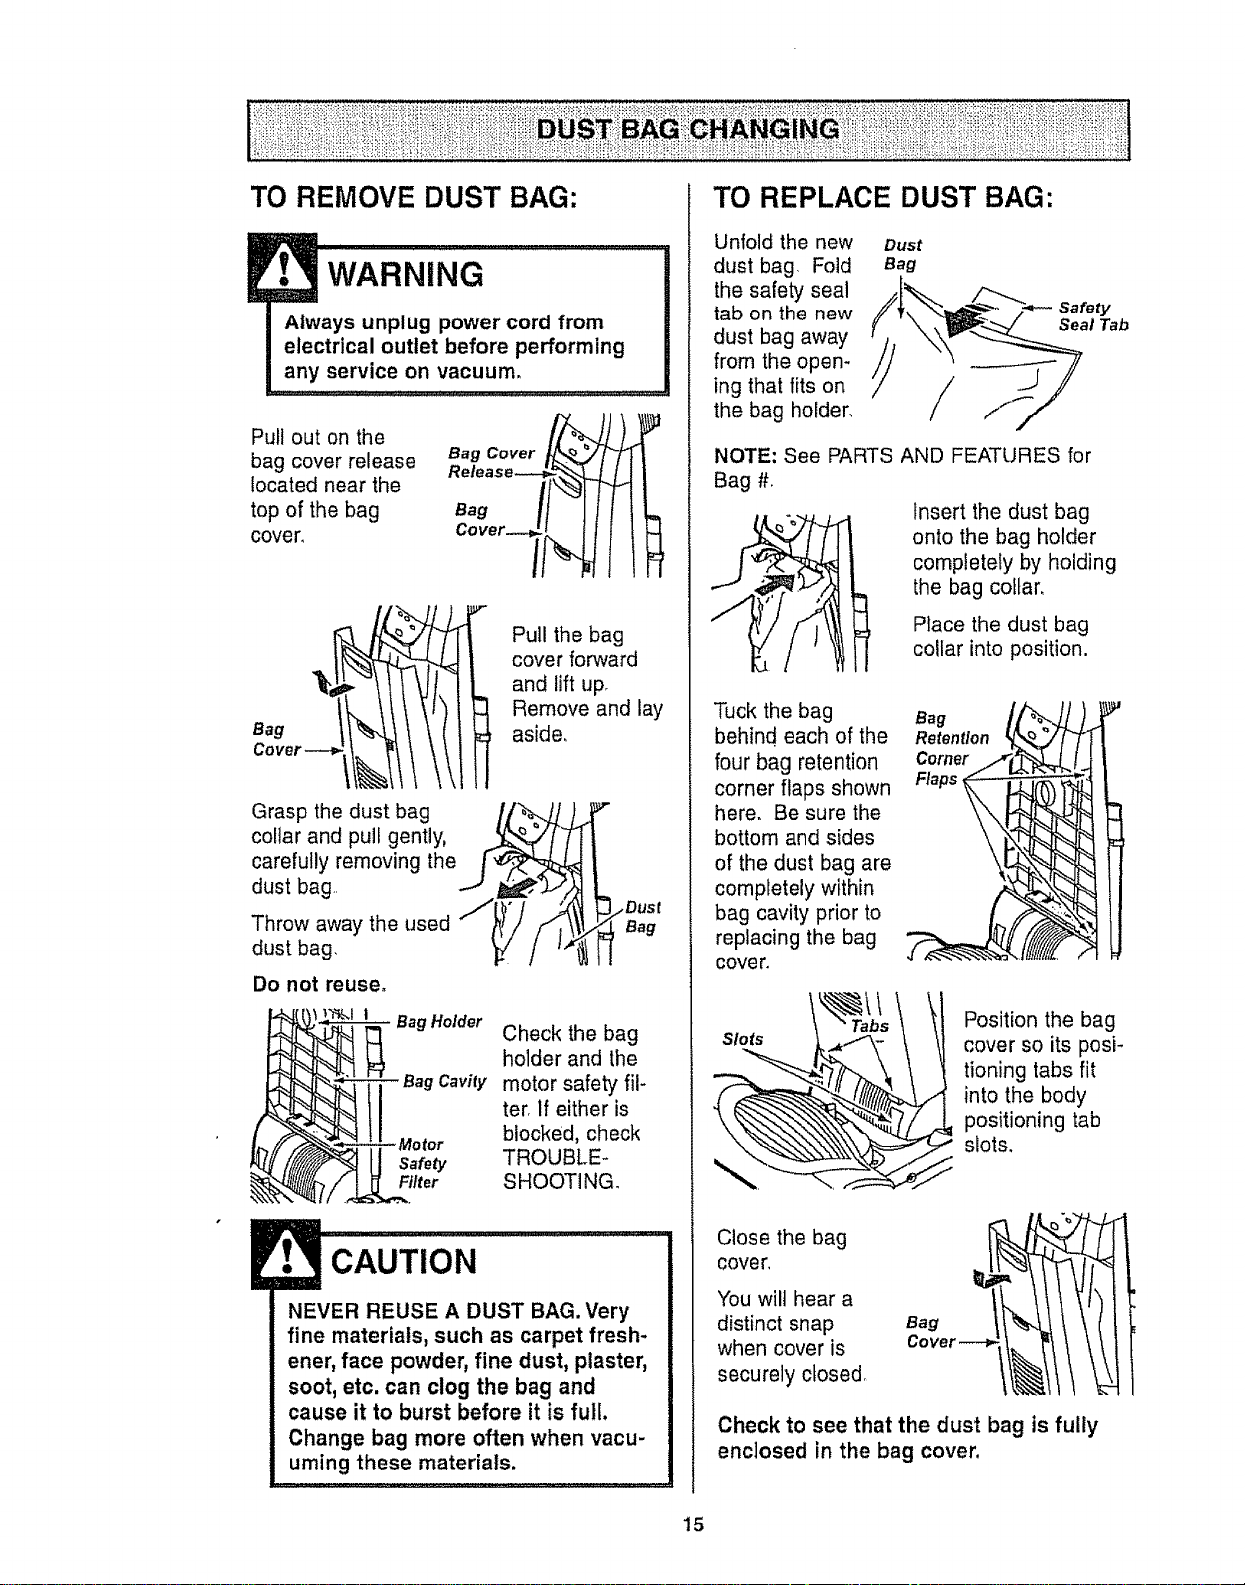
TO REMOVE DUST BAG:
Pull out on the
bag cover release Bag Cover
Release_
located near the
top of the bag Bag
cover, Cover-- I
\,tl
Grasp the dust bag /p_..J/).
collar and pull gently, .._ °
carefully removing the i "_
dust bag .J tl_,
Throw away the used i"ittl/"''
_t
dust bag. _./
Do not reuse,
Bag Holder
Pull the bag
cover forward
and lift up
Remove and lay
aside,
!m
Dust
Bag
Check the bag
holder and the
Bag Cavity motor safety fil-
ter, If either is
blocked, check
Safety TROUBLE-
Filter SHOOTING.
CAUTION
NEVER REUSE A DUST BAG. Very
fine materials, such as carpet fresh-
ener, face powder, fine dust, plaster,
soot, etc. can clog the bag and
cause it to burst before it is full.
Change bag more often when vacu-
uming these materials.
TO REPLACE DUST BAG:
Unfold the new
dust bag, Fold
the safety seal
tab on the new
dust bag away
from the open-
ing that fits on
the bag holder.
Dust
Bag
/
Safety
Seal Tab
NOTE: See PARTS AND FEATURES for
Bag #_
Insert the dust bag
onto the bag holder
completely by holding
the bag collar,
Place the dust bag
collar into position.
Tuck the bag
behind each of the
four bag retention
corner flaps shown
here. Be sure the
bottom and sides
of the dust bag are
completely within
bag cavity prior to
replacing the bag
cove r.
Slots [_"_C \
Retention _",_/
Corner__J
Flaps --" " "_.
Position the bag
cover so its posi-
tioning tabs fit
into the body
positioning tab
slots.
Close the bag
cover,
You wilt hear a
distinct snap
when cover is
securely closed,
Check to see that the dust bag is fully
enclosed in the bag cover,
15

Check motor safety filter frequently and
change when dirty,
WARNING
Electrical Shock Hazard
Unplug power cord from electrical
outlet. Do not operate the cleaner
without the motor safety filter. Be
sure the filter is dry and properly
installed to prevent motor failure
andtor electrical shock.
.......................... , , , ,,, ,, , ,,
Remove the dust bag as outlined in the
DUST BAG CHANGING section.
MOTOR SAFETY FILTER
ELECTROSTATIC
1, This white & grey
filter must be
replaced when dirty,
It should be replaced
regularly depending
on use conditions,
The filter CANNOT
be washed as it will
lose its dust trap-
ping ability.
Motor
Safety ir_"tj_-__ "_
Filter ....../ "_'_'_.._...."_]_._"
NOTE: See PARTS AND FEATURES for
motor safety filter #.
Motor
Safety
2. If the filter, locat-
ed in the bottom of
the bag cavity, is
dirty, remove it by
pulling forward out
from under the
ribs.
3, Replace the
filter, white side
up, by sliding it
back into place
under the ribs in
the bag cavity.,
Motor
Safety
Replace the bag as outlined in the DUST
BAG CHANGING section.
EXHAUST FILTER
ELECTROSTATIC
The electrostatic filter cartridge must be
replaced when dirty. It should be replaced
regularly depending on use conditions. The
filter CANNOT be washed as it will lose
its dust trapping ability_
NOTE: See PARTS AND FEATURES for the
exhaust filter #o
Slide the exhaust Bag
filter cover Cover
release down,
Exhaust Filter
Pull out on Cover Release
exhaust filter
cover to remove Exhaust
from bag cover_
Bag
Cover--> !
Exhaust
Filter
Remove the elec-
trostatic filter cart
tridge from the bag
cover,
Replace the electro-
static filter cartridge, Bag
carefully positioning it
so that it fits into the
bag cover. The side Exhaust
labeled "This side Filter
out" should be facing
the operator.
Push only on filter
cartridge frame, not on filter itself.
Exhaust Filter
Cover Release
Exhaust _[
Filter Cover --4
Replace the
exhaust filter
cover and
secure the
latch by push-
ing it upward.
J
16
WARNING
Electrical Shock Or Personal injury
Hazard
Disconnect electrical supply before
servicing or cleaning the unit.
Failure to do so could result in elec-
trical shock or personal injury from
cleaner suddenly starting.
................ i..... , , _ _ _u,:,,,,,,,,,,,,,,,,,,,, .....
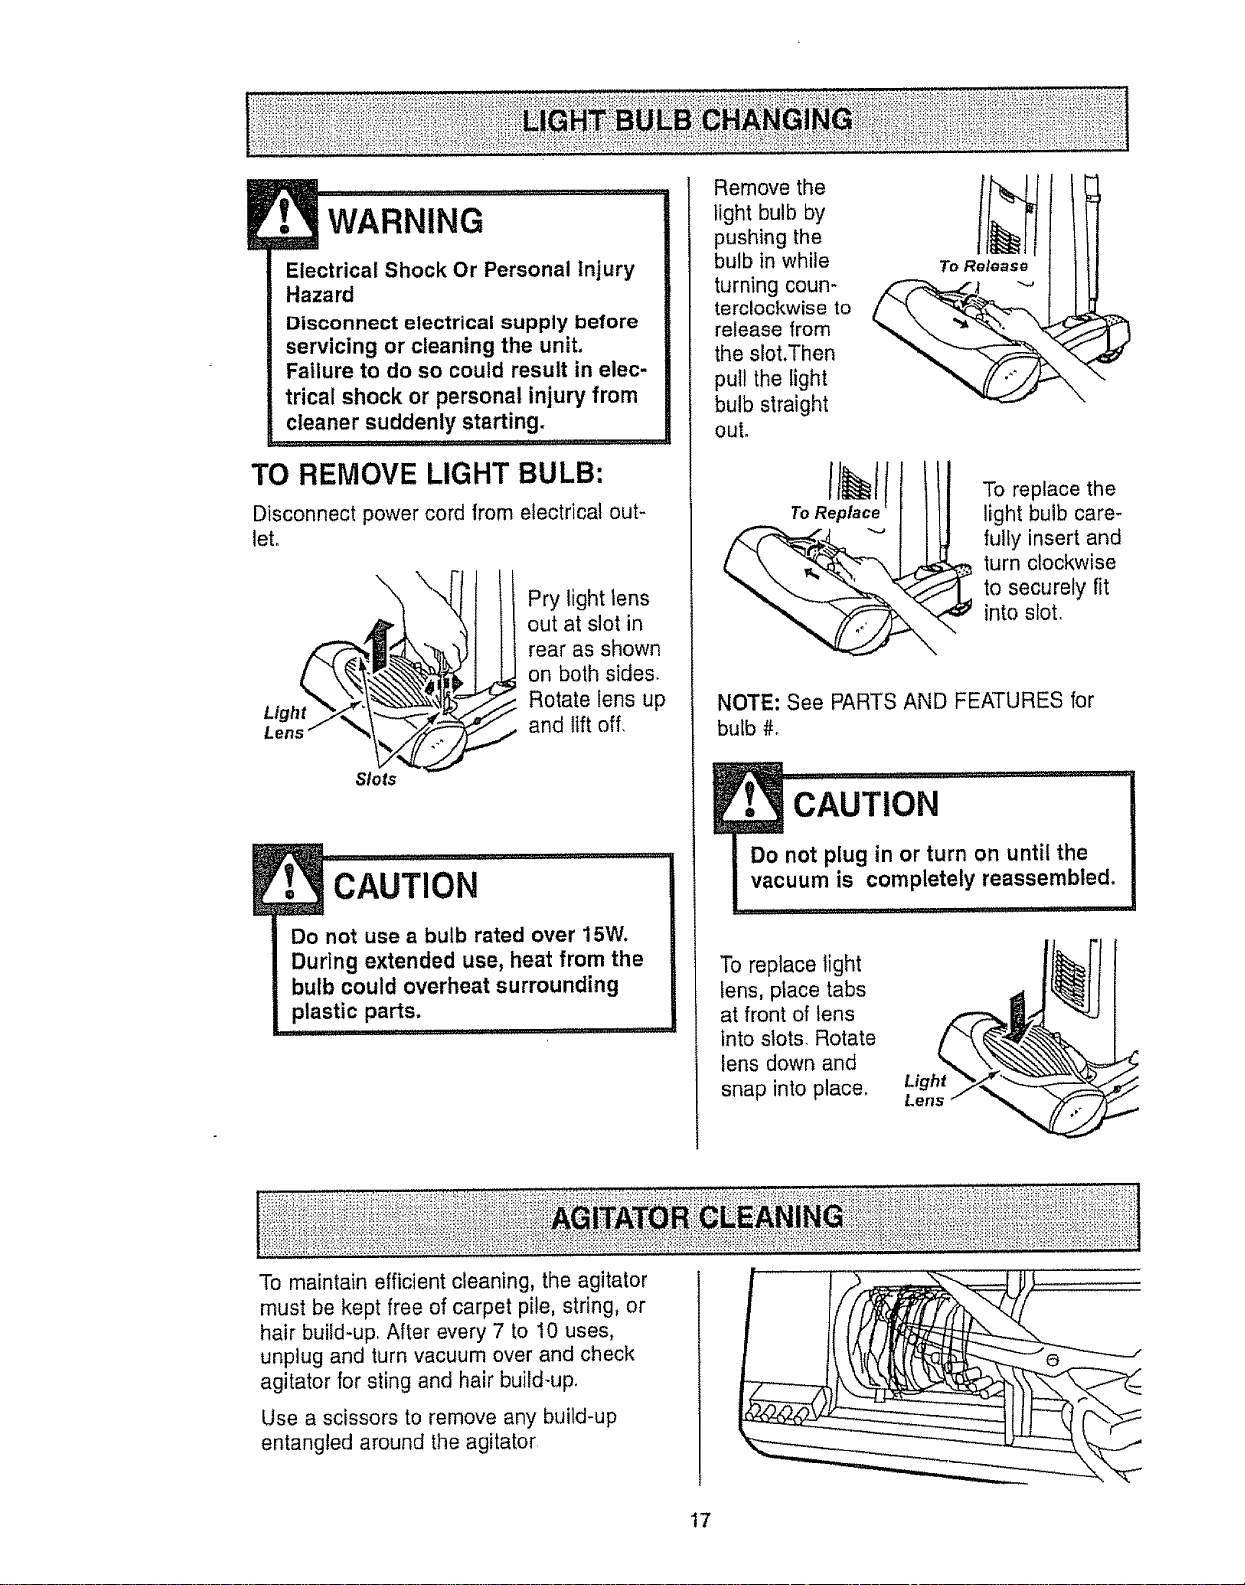
TO REMOVE LIGHT BULB:
Disconnect power cord from electrical out-
let.
Light
Lens
Slots
Pry light lens
out at slot in
rear as shown
on both sides.
Rotate lens up
and lift off,
CAUTION
Do not use a bulb rated over 15W.
During extended use, heat from the
bulb could overheat surrounding
plastic parts.
Remove the
light bulb by
pushing the
bulb in while
turning coun-
terclockwise to
release from
the slot.Then
pull the light
bulb straight
out.
To Release
\
To replace the
light bulb care-
fully insert and
turn clockwise
to securely fit
into slot,
NOTE: See PARTS AND FEATURES for
bulb #°
1
Do not p!ug in or turn on until the
vacuum ,s completely reassembled.
......... i,, ,11,, ir
To replace light
tens, place tabs
at front of tens
into slots, Rotate
lens down and
snap into place. Light
Lens
To maintain efficient cleaning, the agitator
must be kept free of carpet pile, string, or
hair build-up,, After every 7 to 10 uses,
unplug and turn vacuum over and check
agitator for sting and hair build-up,
Use a scissors to remove any build-up
entangled around the agitator
17
Alwaysfollowallsafetyprecautionswhen
cleaningandservicingthevacuum
cleaner,
t WARN,NG..........
Electrical Shock Or Personal Injury
Hazard
Disconnect electrical supply before
servicing or cleaning the unit.
Failure to do so could result in elec-
trical shock or personal injury from
cleaner suddenly starting.
If the cleaner does not seem to have ade-
quate suction, first check if the dust bag is
full or if a filter is clogged. See DUST BAG
CHANGING and FILTER CHANGING_
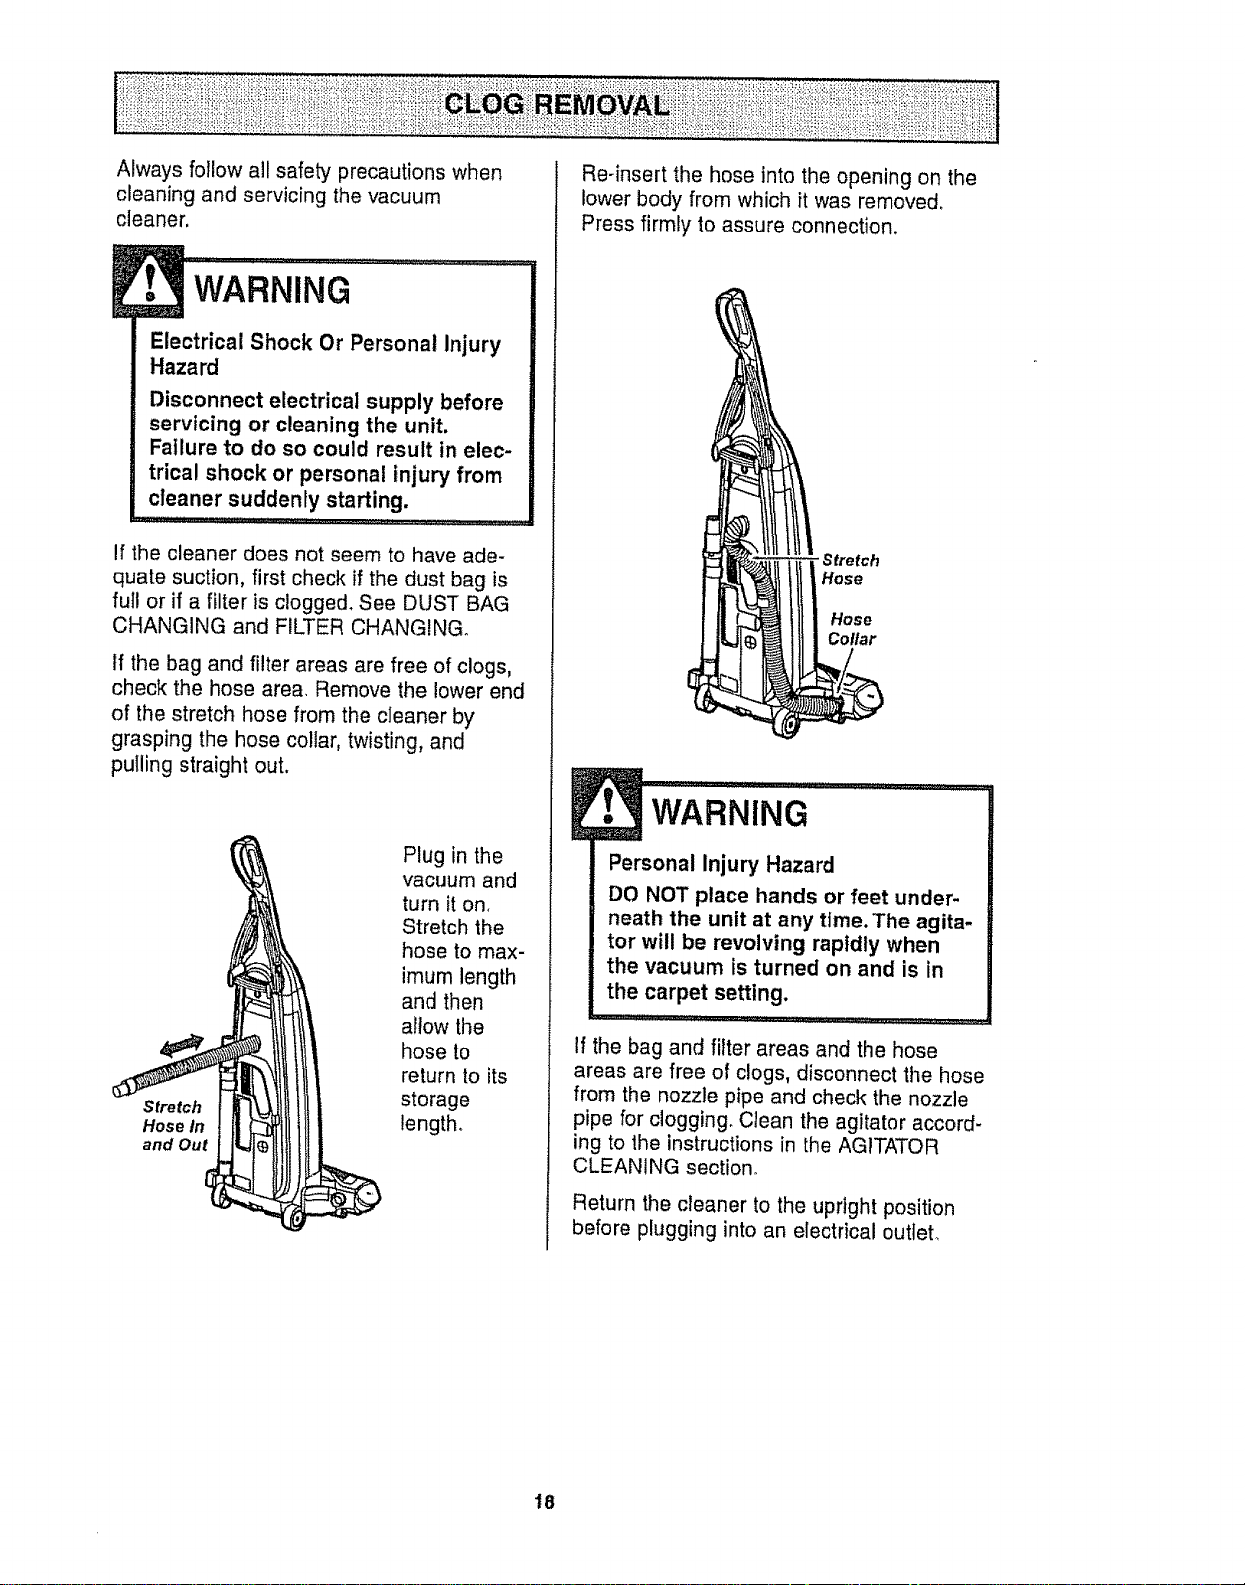
If the bag and filter areas are free of clogs,
check the hose area. Remove the lower end
of the stretch hose from the cleaner by
grasping the hose collar, twisting, and
pulling straight out.
Stretch
Hose in
and Out
Plug in the
vacuum and
turn iton,
Stretch the
hose to max-
imum length
and then
allow the
hose to
return to its
storage
length.
Re-insert the hose into the opening on the
lower body from which it was removed,
Press firmly to assure connection.
"Stretch
Hose
Hose
Collar
!
Personal Injury Hazard
DO NOT place hands or feet under-
neath the unit at any time. The agita-
tor will be revolving rapidly when
the vacuum is turned on and is in
the carpet setting.
If the bag and filter areas and the hose
areas are free of clogs, disconnect the hose
from the nozzle pipe and check the nozzle
pipe for clogging. Clean the agitator accord-
ing to the instructions in the AGITATOR
CLEANING section.
Return the cleaner to the upright position
before plugging into an electrical outlet.
18
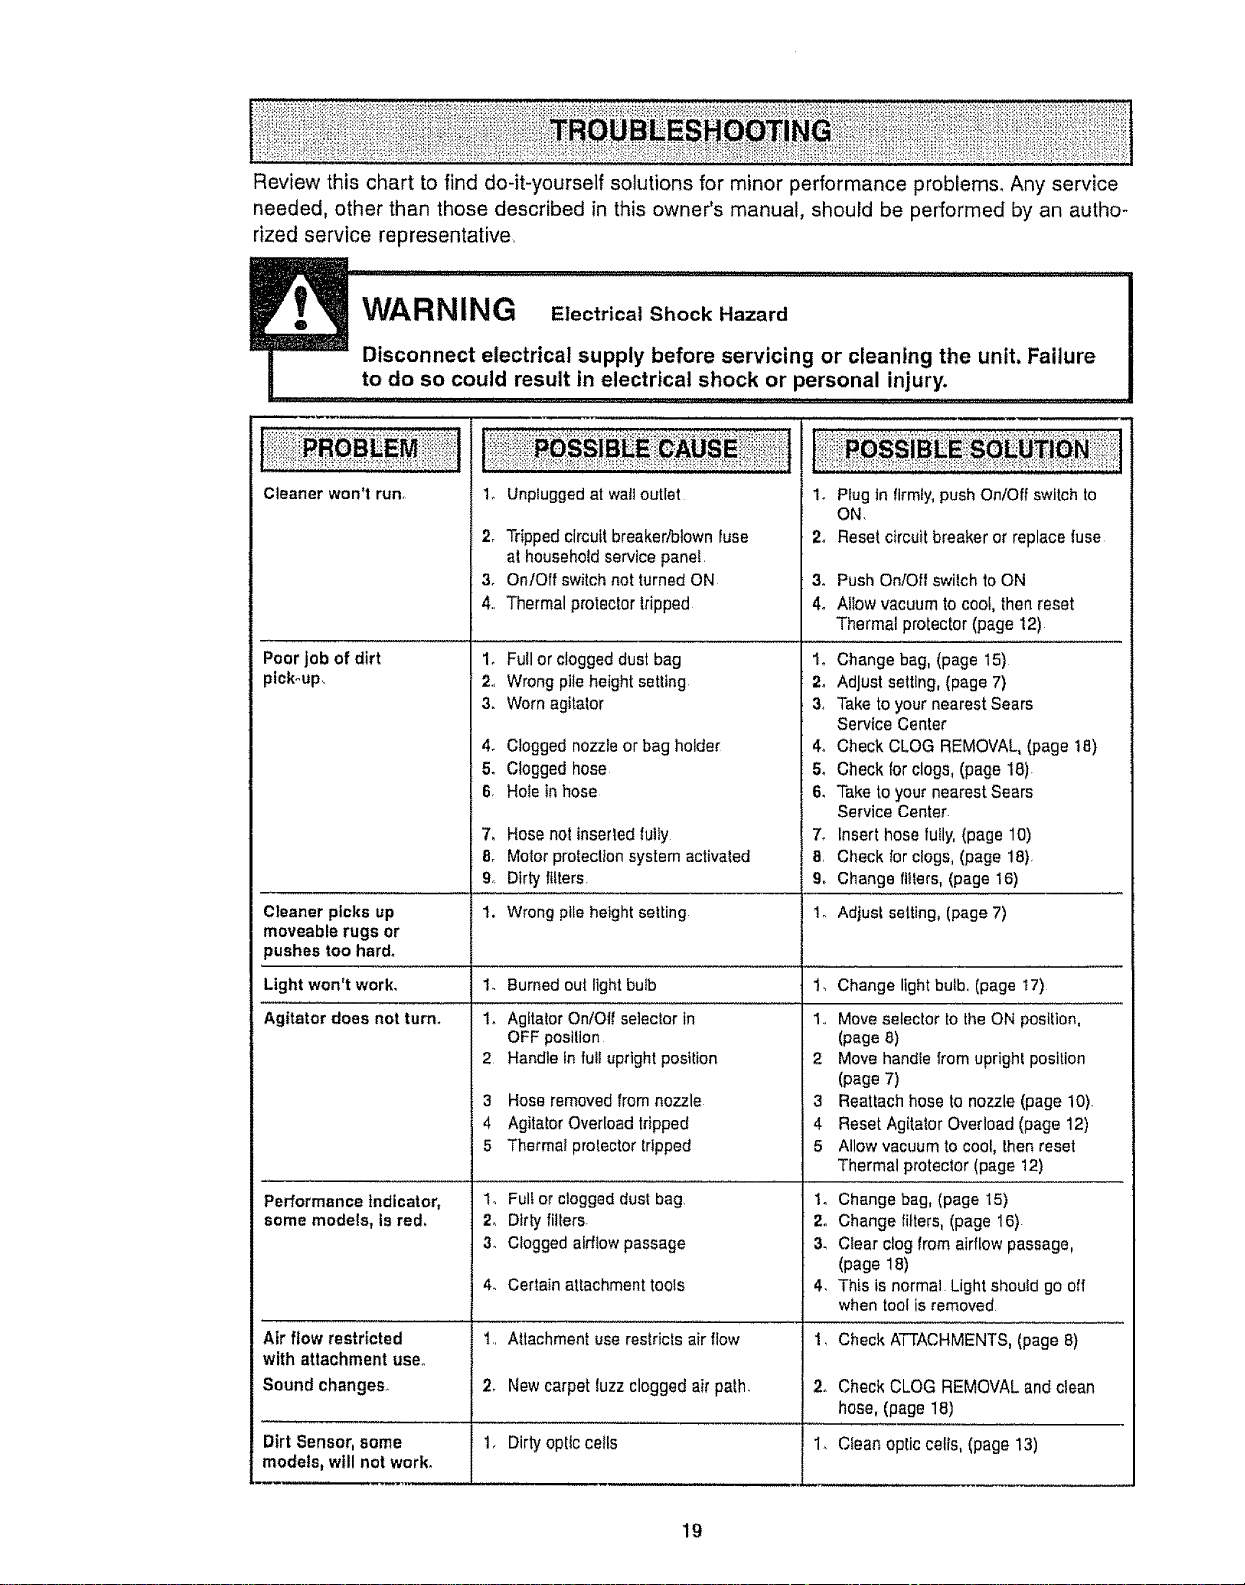
Review this chart to find do-it-yourself solutions for minor performance probiems, Any service
needed, other than those described in this owner's manual, should be performed by an autho-
rized service representative,
WARNING Electrical Shock Hazard
Disconnect electrical supply before servicing or cleaning the unit, Failure
!o do so could result in e!.ectrical shock or personal injury. ...........................
Cleaner won't run,
Poor job of dirt
pick-up,
1. Unplugged at wailoutlet
2_ Tripped circuitbreaker/blown fuse
at household service panel.
3. On/Off switch not turned ON
4., Thermal protectortripped
1. Futl or clogged dust bag
2., Wrongpileheight setting
3. Worn agitator
4. Clogged nozzle or bag holder
5. Clogged hose
6, Ho_ein hose
7, Hose not inserledIulty
8_ Motor proteclton system activaled
9.. Dirty filters.
1. Plug In firmly, pushOn/Off switch to
ON,
2. Reset circuitbreaker or replace fuse
3. Push OnfOIt switch toON
4o Allow vacuum tocool, thenreset
Thermal protector (page 12)
1o Change bag, (page 15)
2_ Adjust setting, (page 7)
3, Take to your nearest Sears
Service Center
4o Check CLOG REMOVAL,(page t8)
5o Check forclogs, (page 18).
6. Take to your nearest Sears
Service Center.
7. Insert hose tully,(page 10)
8, Check forclogs, (page 18),
9_ Change ttfters,(page 16)
1. Burned out light bulb
1. Agitator On/Off se]ecior in
OFF position
2 Handle in fu_Iupright position
Cleaner picks up 1. Wrong pile height se|Ling Io Adjust setting, (page 7)
moveable rugs or
pushes too hard.
Light won't work, Change light bulb, (page t7)
Agitator does not turin
3 Hose removed from nozzle
4 Agitator Overload tripped
5 Thermal protector tripped
1_ Full or clogged dust bag,
2. Dirty filters.
3_ Clogged airflow passage
4_ Certain attachment tools
Performance indicator,
some models, is red.
Air flow restricted
with attachment use.,
Sound changes,
1,, Attachment use reslricls air flow
2, New carpetluzz clogged air path.
1,, Moveselector to the ON position,
(page 8)
2 Move handle from uprigh_position
(page 7)
3 Reattach hose to nozzle (page 10).
4 Reset Agitator Overload (page 12)
5 Allow vacuum to cool, thenreset
Thermal protector(page 12)
1o Change bag, (page 15)
2. Change filters, (page 16).
3_ C_earclog from airflow passage,
(page 18)
4, This is normal Lightshould go oil
when tool is removed
1, Check ATTACHMENTS, (page 8)
2. Check CLOG REMOVAL and clean
hose, (page 18)
Dirt Sensor, some 1. Dirtyoptic ceils 1. Clean oplic cells,(page 13)
models, will not work,
19
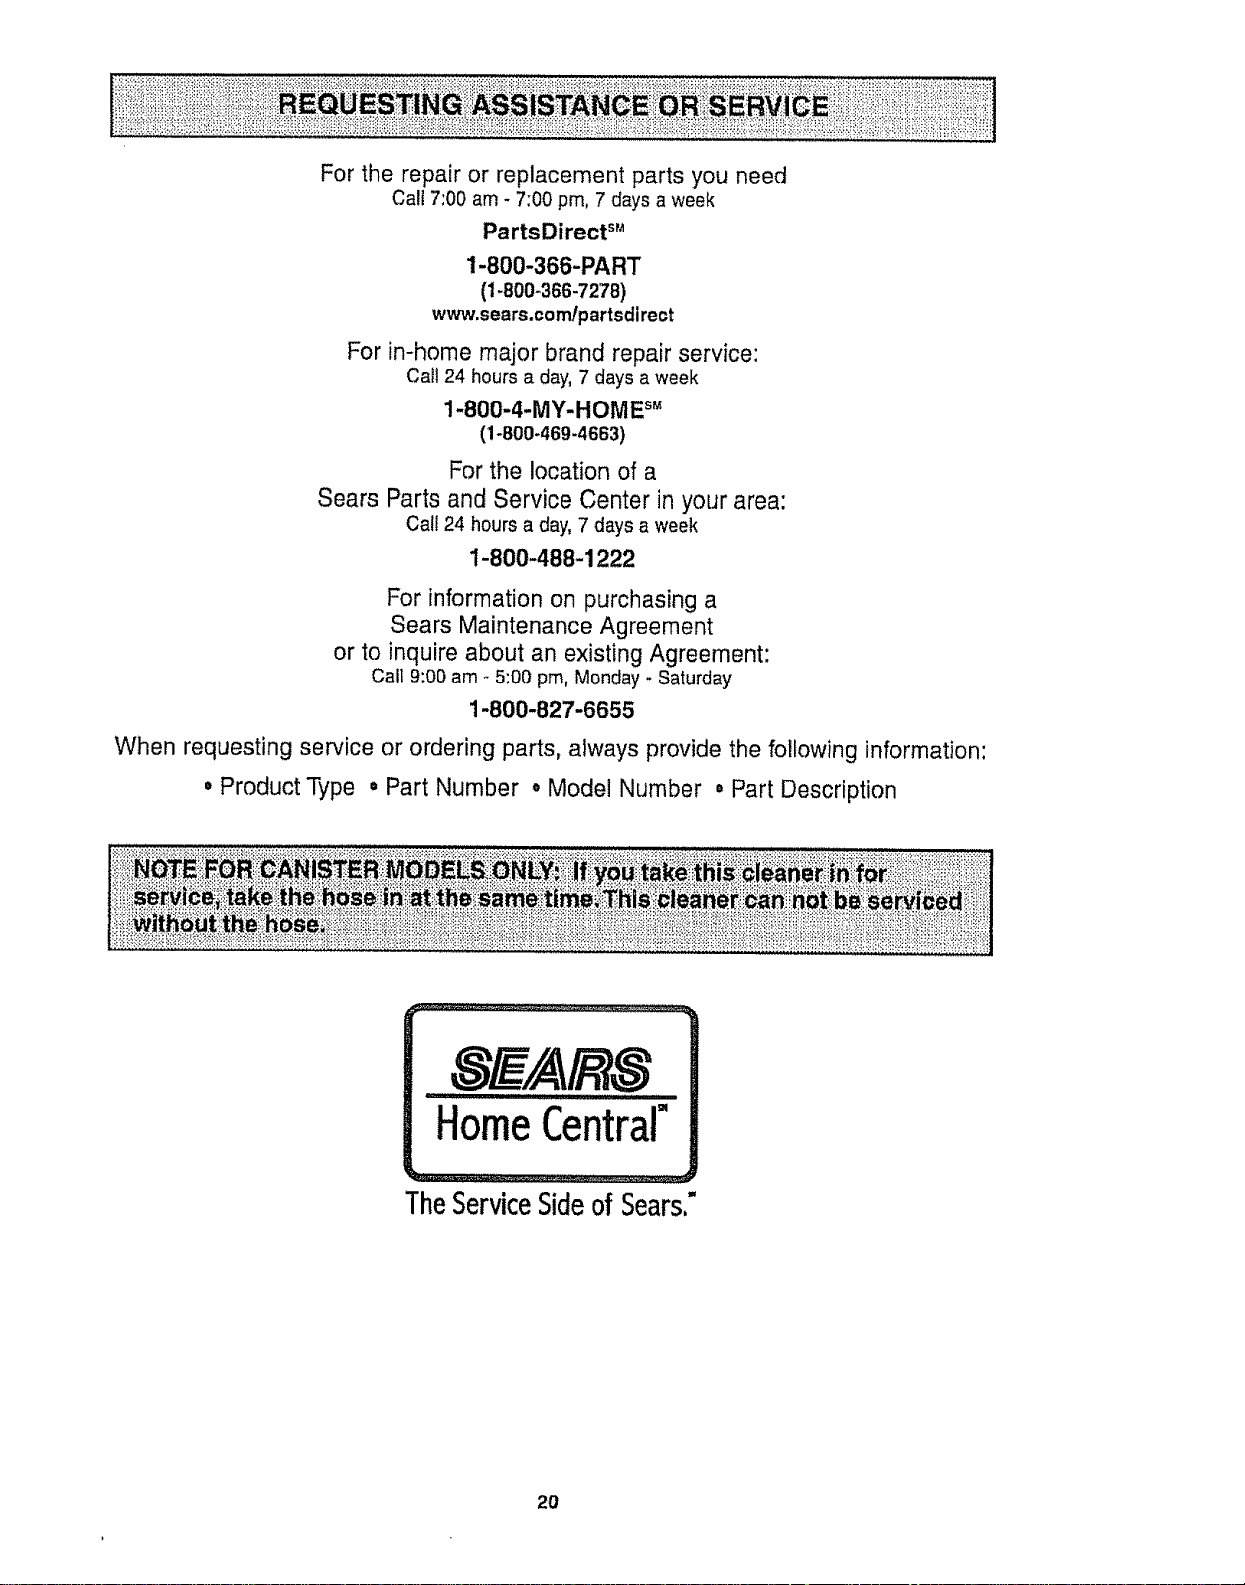
For the repair or replacement parts you need
Call 7:00 am - 7:00 pm, 7 days a week
PartsDirect sM
1-800-366-PART
(1-800-366-7278)
www.sears.com/partsdi rect
For in-home major brand repair service:
Cait 24 hours a day,7 days a week
1-800-4-MY-HOME s_
(1-800-469-4663)
For the location of a
Sears Parts and Service Center in your area:
Calf 24 hours a day, 7 days a week
1-800-488-1222
For information on purchasing a
Sears Maintenance Agreement
or to inquire about an existing Agreement:
Call 9:00 am _5:00 prn, Monday - Saturday
1-800-827-6655
When requesting service or ordering parts, always provide the following information:
• Product Type oPart Number • Model Number ° Part Description
TheServiceSideof Sears,"
2O

Manuel Del Propietado
Aspiradora
CUIDADO:
Lea y sigue todas las
instrucciones de operaci6n
y seguridad antes del uso de
este producto.
Sears, Roebuck and Co., Hoffman Estates, IL 60179 U.S.A.
www.sears°com
PIEZA N-°C_1ZAVGO_UOO-8174924 Impreso en EUA
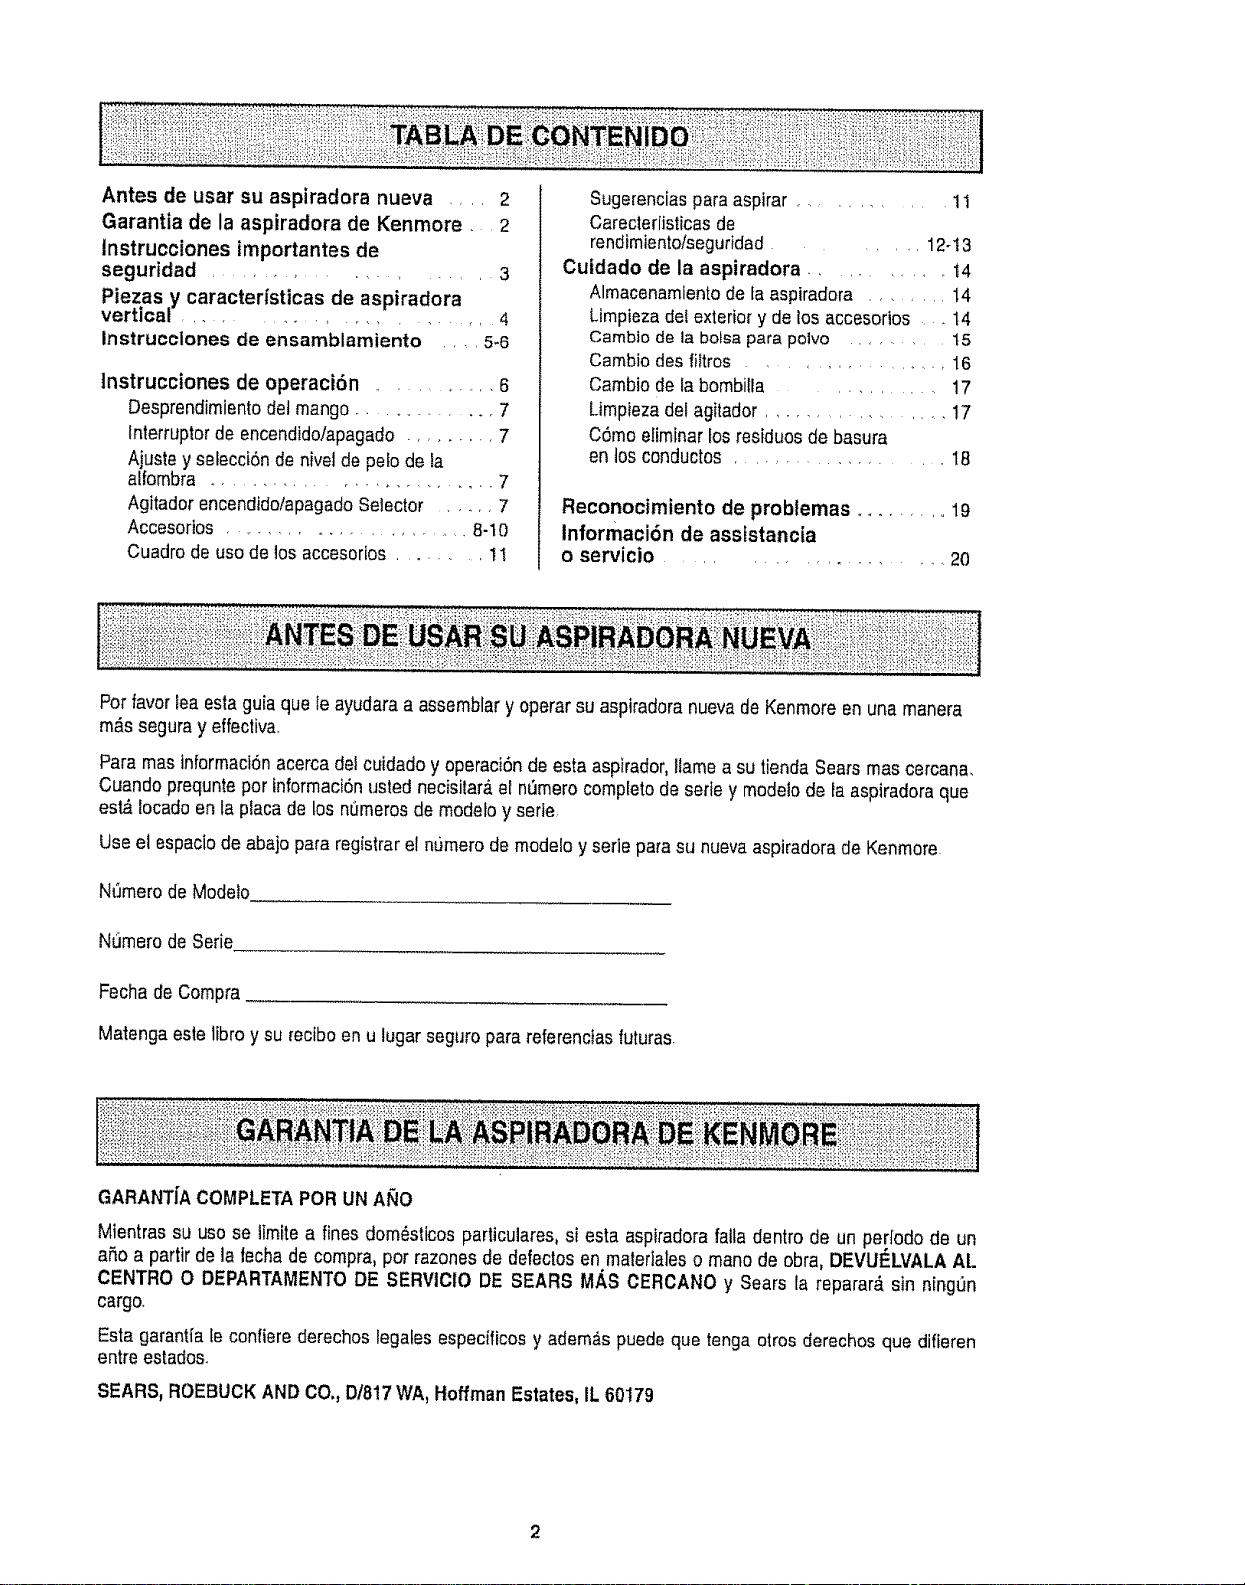
Antes de usar su aspiradora nueva ..... 2
Garantia de la aspiradora de Kenmore. 2
Instrucciones importantes de
seguridad .................. 3
Piezas y caractedsticas de aspiradora
vertical .................... 4
Instrucclones de ensamblamiento 5-6
lnstrucciones de operaci6n .......... 6
Desprendimientodetmango .............. 7
lnterruptor de encendido/apagado......... 7
Ajustey selecciSnde nivelde pelo de fa
alfombra ......................... 7
Agitadorencendido!apagadoSelector ...... 7
Accesorios ........................ 8-10
Cuadro de usode losaccesorfos .......... 11
Sugerenciaspara aspirar ............ 11
Carectedisticas de
rendimiento/seguridad...... 12-13
Cuidado de la aspiradora ......... t4
Almacenamlentode faaspiradora ........ 14
Limpieza detexterior y de tos accesorios . t4
Cambio de la bolsa para potvo ......... t5
Cambio des fiItros ................ 16
Cambio de tabombilJa .......... 17
Limpieza clefagitador ................. 17
C6mo eliminar losresiduos de basura
en los conductos .................... 18
Reconocimiento de problemas .......... 19
Informaci6n de asststancia
o servicio .................... 20
Pot favor tea esta guia que Ie ayudaraa assemblary operar suasptradora nuevade Kenmore enuna manera
m&s seguray effectiva.
Para mas lnformaci6nacerca dei cuidado y operaci6nde esta aspirador, ltamea su tiendaSears mas cercana.
Cuando prequntepor informaci6nusted necisitar,_el nt_merocompletode serley modetode ta aspiradoraque
est_ locadoen Iaptaca de los numerosde modetoy serte,
Use el espaciode abajo para registrar el numerode modetoy serie para su nuevaaspiradorade Kenmore
Nt3merode Modelo
NtJmerode Serie
Fecha de Compra
Matenga este libro y su [ecibo en u tugar seguropara referenciasfuturas.
GARANTIACOMPLETAPOR UN ANO
Mientras su uso se lImttea finesdom_sticos particulares, si esta aspiradora falla dentro de un pedodo de un
aSo a partir de la techa de compra, por razones de defectos en matedaleso manode obra, DEVUt_LVALAAL
CENTRO O DEPARTAMENTODE SERVICIO DE SEARS M.4S OERCANO y Sears la reparar,_sin ningOn
cargo.
Esta garant[a teconfiere derechos legalesespedficos y adem_,spuede que tenga otros derechos que difieren
entre estados_
SEARS, ROEBUCKANDCO., Dt817WA,HoffmanEstates, IL 60179
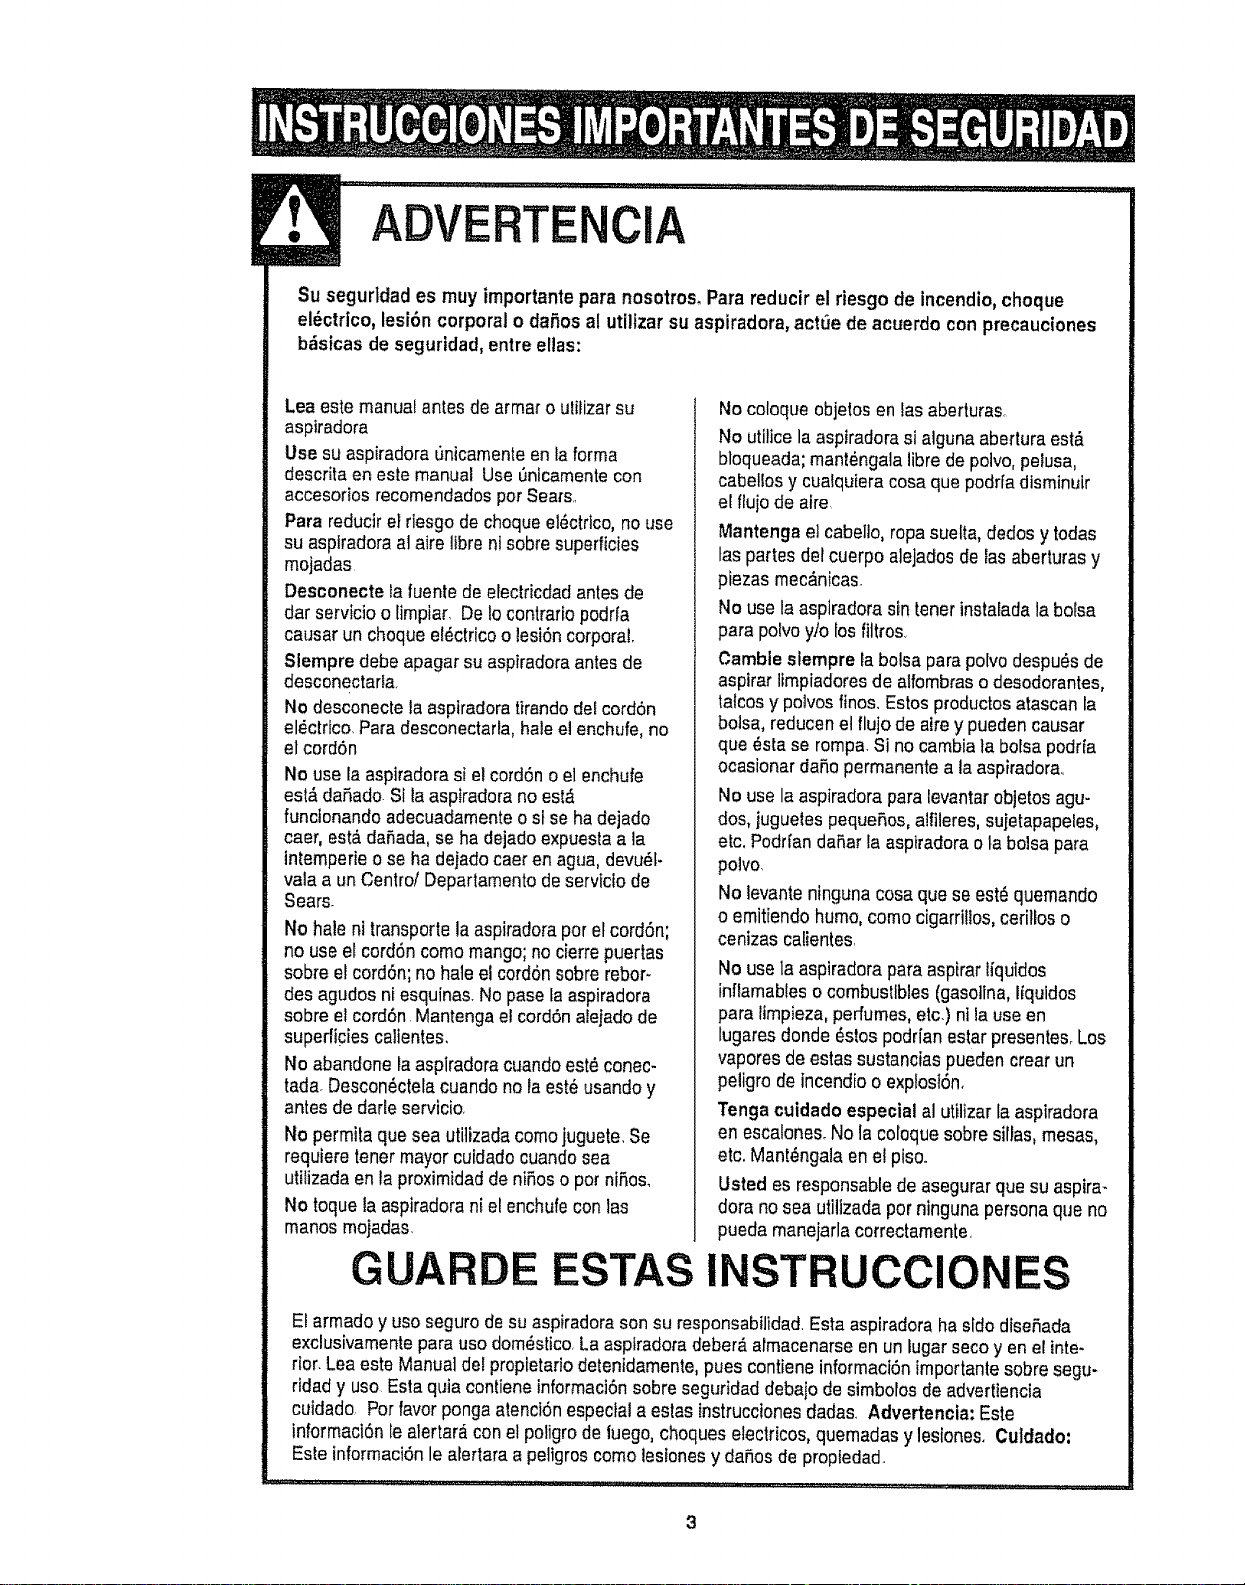
ADVERTENCIA
Susegurldad es muy importantepara nosotros, Para reducirel riesgo de incendio,cheque
el_ctrico,lesi6n corporal o dafios a! utilizar su aspiradora,actOede acuerdo con precauciones
b_sicas de seguridad,entre elias:
Lea este manualantes de armaro ulilizarsu
aspiradora
Use su aspiradera_nicamenteen la forma
descritaen este manual Use _nicamentecon
accesorios recomendadosper Sears
Para reducirel riesgode chequeel6ctdco, no use
su asplradoraal aim librenlsobre superficies
mojadas
Desconecte la fuente de electricdadantes de
dar servicio o limpiar De lecontrario podrfa
causar un cheque e!6ctricoo lesi6ncorporat
Slempredebe apagar su aspiradoraantes de
desconectarta
No descenecte la aspiradoratirandodel cord6n
el6ctrico_Para desconectaria,haleel enchufe,no
el cord6n
No usela aspiradorasi el cord6no el enchufe
est,,dafiado Stlaasptradorano est,_
functonandoadecuadamenteo st seha dejado
caer, est_ daSada,se ha dejado expuestaa la
tnlemperieo se ha deiado caeren agua,devu6l-
vala a un Centre/Departamento de serviclo de
Sears
No hale nl transportela aspiradoraper etcord6n;
no use el cord6n come mango;no cierrepuertas
sobre etcord6n; no hale el cord6nsobre rebor-
des agudosni esquinas.No pase faaspiradora
sobre etcord6n Mantengaetcord6n alejadode
superficies caltentes.
No abandone la asplradoracuandoest6 conec-
tada Descon6ctelacuandono faest6 usando y
antes de darle servicio
No permita que sea utitizadacomejuguete_Se
requiem tenetmayor cuidadocuandosea
utilizada enla proxirnidadde nifios o per nifios_
No toque la aspiradorani el enchufecon las
manes mojadas
GUARDE
No coloque objelosen lasaberturas_
No utilice la aspiradorasi alguna abertura est_
bloqueada;mant6ngala libre de polvo, pelusa,
cabetlosy cuatquieracosa que podrfadisminuir
el flujode atre
Mantengaet cabelto,ropa suetta, dodosy todas
taspartes de!cuerpo alejadosde lasaberturas y
piezas rnec&nicas
No use la aspiradorasfn lener instaladala bolsa
para polvoy/o losfiltros
Camble slempre la bolsapara polvodespu_sde
aspirar ltmpiadoresde alfombrasodesodorantes,
talcosy pelves fines.Estosproductosatascan la
bolsa, reducenel flujo de aimy pueden causar
que 6sta se rompa Si no cambiata bolsapodrla
ocasionar dafio permanente a laasplradora.
No use la aspiradorapara levantarobjetosagu-
dos, juguelespequefios,a!fileres,suietapapeles,
elc. Podrfandafiar la aspiradoraota bolsapara
potvo,
No levanteninguna cosa que se est6quemando
o emitiendo humo,come cigarritlos,cerillos o
cenizas calientes
No usela aspiradorapara aspirartiquidos
inflamableso combustibles(gasotina,Ifquidos
para ltmpieza,perfumes, etc) ntla useen
lugaresdonde 6stos podr[anestar presentes_Los
vapores de estas sustanciaspueden croat un
peligro de incendioo exp!est6n.
Tonga cuidado especialal utilizar la aspiradora
en escalones No la coloquesebre sillas,mesas,
etc. Mant6ngataen e! pisoo
Usted es responsablede asegurarque su aspira-
dora no sea utillzada per ninguna personaque no
pueda manejarlacorrectamente
INSTRUCCIONES
El armadoy useseguro de suaspiradorason su responsabilidad Esta aspiradoraha side disefiada
exclusivamentepara usedom6stico La asplradoradeber& afmacenarseen un lugarseco yen el inte-
rior Lea este Manualdel proptetartodetenidamente,pues contiene informaci6nimportantesobre segu-
ridad y use Esta quia centiene informaci6nsobreseguridad debajo de simbolos de advertiencia
cuidado Perfavor pongaatencl6n especial a estas tnstruccionesdadas Advertencia:Este
informaci6nle alertara conel poligrode luego,cheques electricos,quemadas y leslones. Culdado:
Este informaci6nle alertara a peligroscome lesionesy dafios de propledad
: '"IiiI_'II_IJlllilil' 111 III I 'llll'"ll ' , I t_ _ .... _ .................. L [ _ _ r,
3
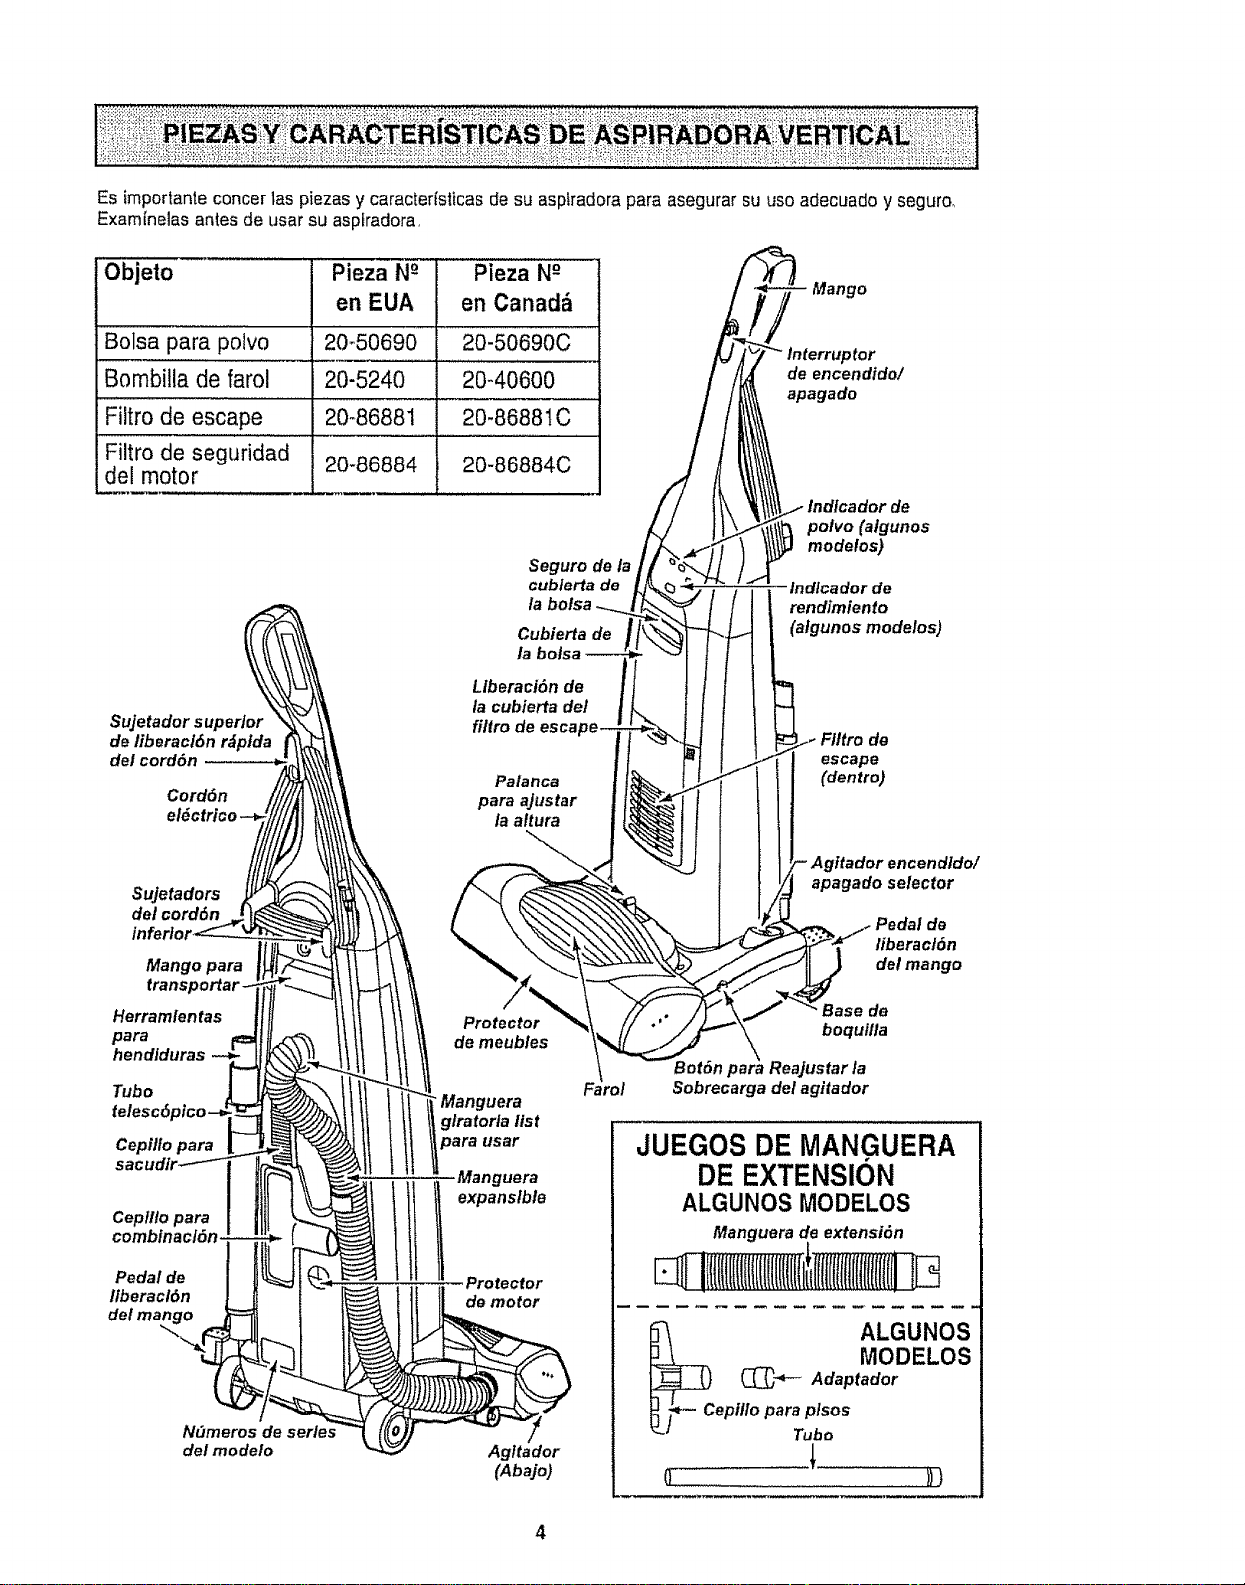
Es importante concer 1aspiezas y caracterlsticas de su asplradora para asegurar su use adecL_ado y seguro_
Examfnelas antes de usar su aspkadora,
Objeto
Bolsa para poivo
Bombitla de farol 20-5240
Filtro de escape 20_8688t
Filtro de seguridad
del motor 20-86884
Pieza N-° Pieza N-°
en EUA en Canad_
20-50690 20-50690C
20-40600
20-86881C
20-86884C
Suje tadors upertor
de fiberacl6n r_ptda
del cord6n
Cord6n
Seguro de la
cublerta de
la bolsa
Cubierta de
la bolsa
LIberaci6n de
la cubierta del
filtro de esca
Palanca
para ajustar
la altura
Sujetadors
del cord6n
inferior
Mango para
trans
Herramfentas
para
hendiduras
Tubo
Cepillo para
Cep/l!o para
comblnacl6n.
Pedal de
ltberacl6n
del man
Protector
de meub/es
•Manguera
glratorla list
usar
Manguera
Protector
de motor
N_meros de series
del modelo
Agltador
(Abajo)
Mango
_tor
de encendido/
apagado
Indfcador de
polvo (atgunos
modelos)
Indlcador de
rendimfento
(afgunos modelos)
de
escape
(dentro)
encendldo/
apagado selector
de
liberac/6n
del mango
Base de
boquilla
Bet6n Reajustar la
Sobrecarga del agitador
JUEGOS DE MANGUERA
DE EXTENSION
ALGUNOS MODELOS
Manguera de extensi6n
l ffliiiIlftlfIlfIIII!i
ALGUNOS
MODELOS
(_"_- Adaptador
epil/o para plsos
Tube
o-............... ))t
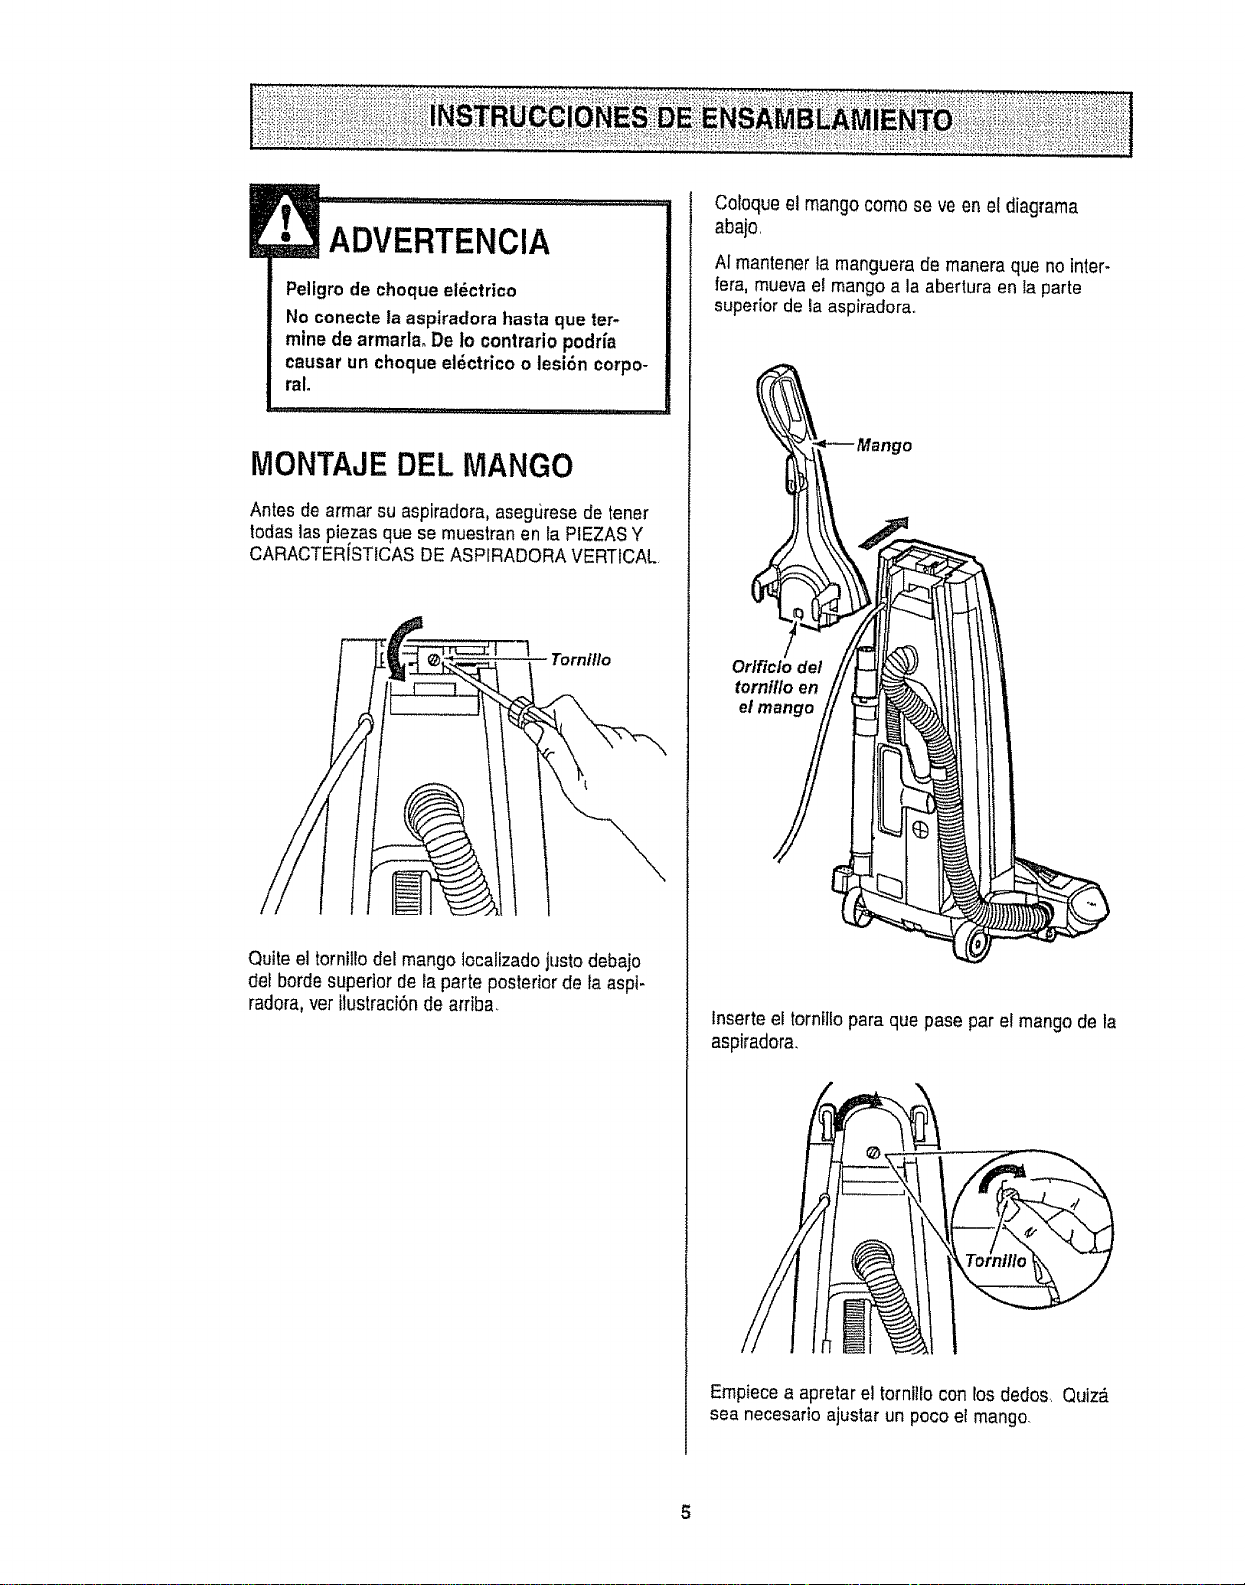
ADVERTENCIA
Peligrode chequeel_ctrico
No conecte laaspiradora hasta que ter-
mine de armarla_De Io contrario podr{a
causar un cheque el_ctrico o lesi6n corpo-
ral.
MONTAJE DEL MANGO
Antesde armar su aspiradora, asegLJresede tener
todaslaspiezasque se muestran en la PIEZASY
CARACTERISTICASDEASPIRADORA VERTICAL
Tornillo
Quite el torniltodel mango lecallzadojustodebajo
det borde supeder de ta parte posterior de {aaspi-
radora,vet tlustraciSnde arriba_
Cotoque el mango come se veen el diagrama
aba}o,
AI mantener la manguera de manera que no inter-
fera, mueva ei mango a la abertura en la parte
superior de la aspiradora+
Odficlo de/
torntf/o en
et
tnserte el torntllo para que pase par el mangode la
aspiradora+
Emp+ecea apretareJtorniito con tos dedos. Quiz_,
sea necesario ajustar un poco er mango.
5
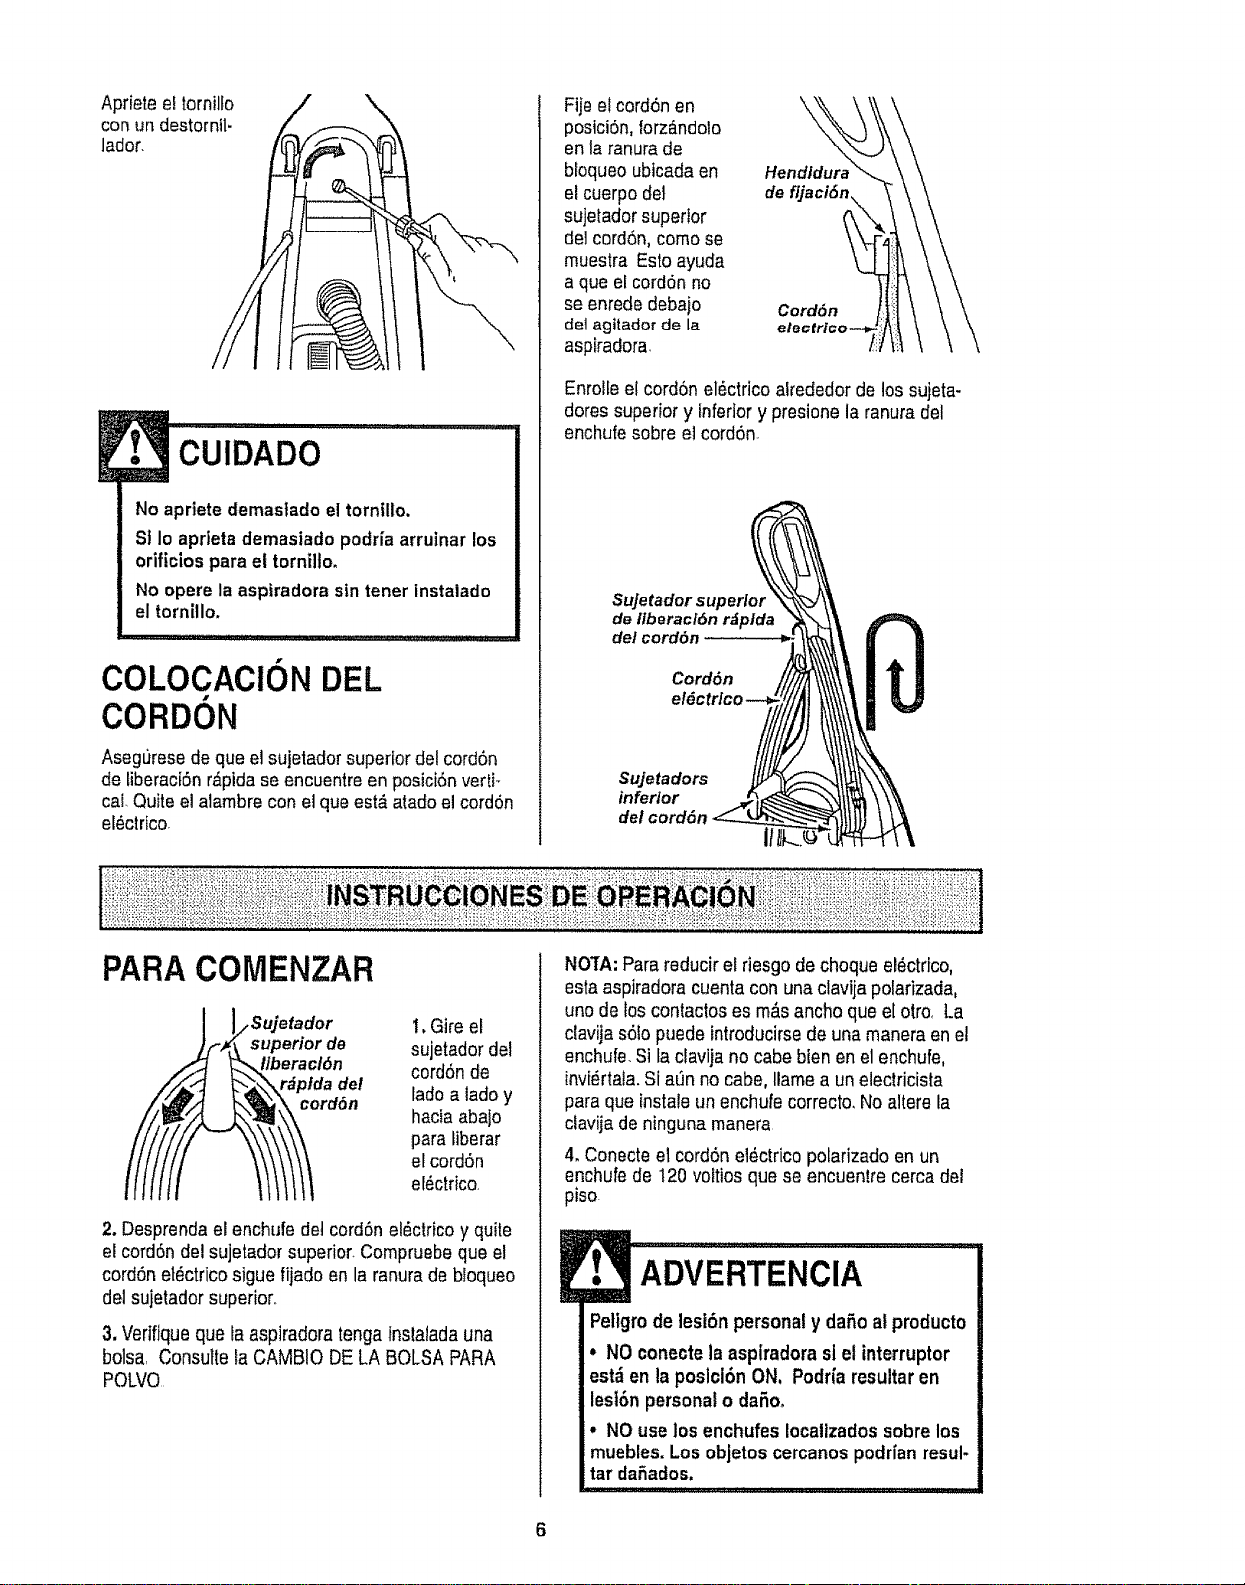
Aprieteeltornillo
conun destornll.
lador.
CUIDADO
No apriete demastado el tornillo,
St 1o aprieta demasiado podria arruinar los
orificios para el tornilto.
No opere la aspiradora sin tener instalado
el tornitlo.
COLOCACION DEL
CORDON
Asegt)resede que el sujetador superiordel cord6n
de tiberaci6nrdpida se encuentreen posici6nvertF
col.Quite el alambrecon el que est_ atadoel cord6n
eldctrico
Ftjeel cordSnen
poslci6n,lorz_ndolo
en la ranura de
bloqueo ubtcadaen
elcuerpo del
sujelador superior
del cerd6n, como se
muestra Esto ayuda
a que el cord6nno
seenrede debajo
dot agitador de la
aspiradora
de
Cord6n
Enrolle elcord6n el6ctrico akededor de los sujeta-
doressuperior y Inferiory presione la ranura del
enchufesobre el cord6n.
SuJetador superior
de liberacl6n rdplda
de/cord6n
Cord6n
el6c
Sujetadors
inferior
dot cord6n
ill
PARACOMENZAR
_ii sujetad°r
uperior de
eracl6n
plda de!
rdSn
t, Gire el
sujetador del
cord6nde
lade a lado y
hacia abajo
para fiberar
el cord6n
el_ctrico,
2. Desprendael enchufe dotcord6n el_ctricoy quite
el cord6n del sujetador superior.Compruebeque el
cord6net_ctrico sigue fijado en la ranura de btoqueo
del sujetador superior,,
3.Verifiqueque faaspiradora tengatnslatadauna
bolsa, Consulte la CAMBIO DE LA BOLSA PARA
POLVO
NO3rA:Parareducir el desgode choque el_ctrlco,
esta aspiradoracuenta con una clavija polarizada,
uno de los contactoses m_tsancho que el otro, La
clavija s61opuede introducirsede una manera en el
enchufe.Si faclavija no cabe blenen elenchufe,
invi_rtala.Si at)nno cabe, Ilamea un eleclricista
para que instale un enchufecorrecto. Noaltere la
ctavijade ninguna manera
4. Conecteel cord6n el_.ctricopolarizado enun
enchufe de t20 voltiosque se encuentre cerca dei
piso.
ADVERTENCIA
Peligm de lesi6n personaly da5o alproducto
• NOconecte laasplradora slel interruptor
est_ en la poslci6nON, Podr{aresultaren
lesl6n persona!o daSoo
• NOuse los enchufes Iocalizados sobrelos
muebles. Los objetos cercanospodr[an resul-
tar daSados.
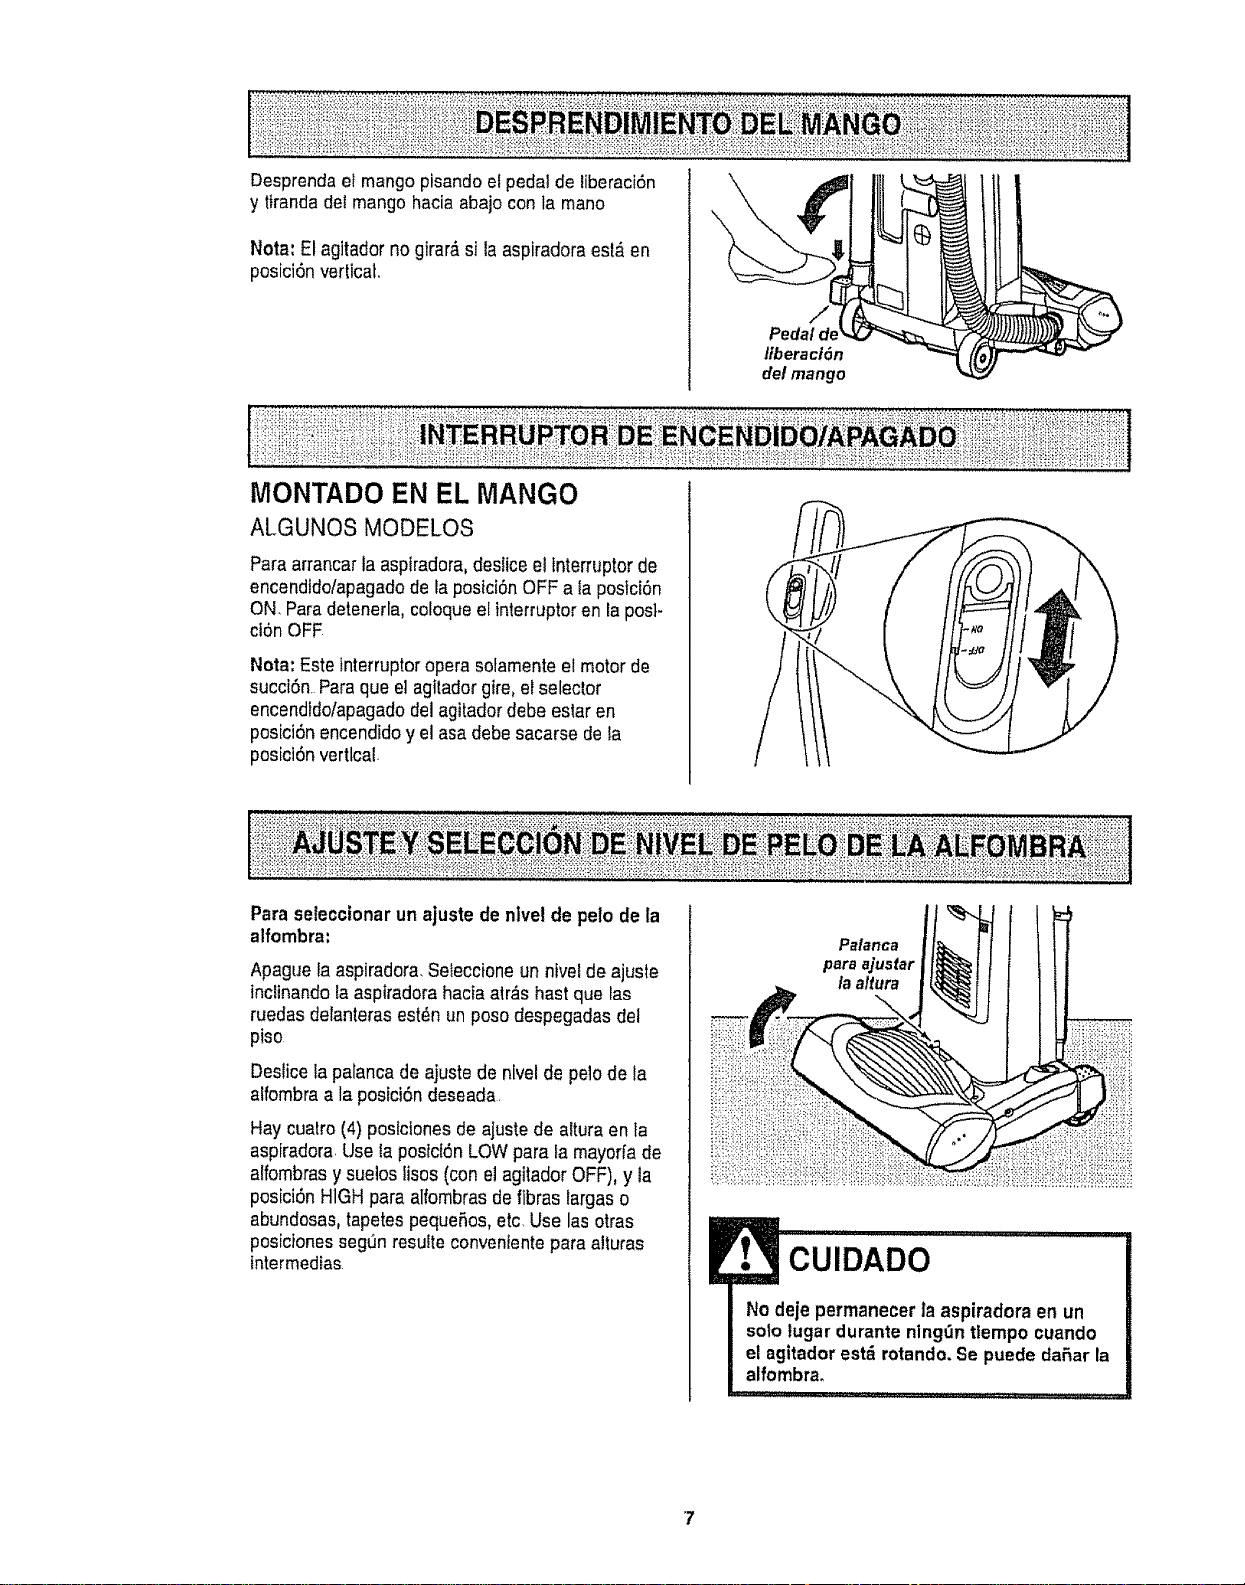
Desprenda el mango pisando el pedal de liberaci6n
y tiranda del mangohacia abajo con la mano
Note: El agitador no girar_ si la aspiradoraest_ en
posici6n vertical.
\
ji
Pedal de
liberactSn
(letmango
MONTADO EN EL MANGO
ALGUNOS MODELOS
Paraarrancarla aspiradora,deslice el lnterruptorde
encendido/apagadode la postci6nOFF a la postd6n
ON. Paradetenerla, cotoqueel interruptor en la posl-
ct6n OFF
Nota: Estetnterruptoropera sofamenteel motor de
sucd6n Para que el agitadorgire, el selector
encendido/apagadodel agitadordebe estar en
posici6n encendidoy el asadebe sacarse de la
posict6nvertical.
Para seleccionar un ajuste de nlve! de pelo de la
1
alfombra:
Apague la aspiradora. Sefeccioneun nivel de ajuste
inclinandola aspiradorahacia atr,_shast que las
ruedas delanterasest_n un poso despegadas del
piso
Deslicefa palancade ajuste de nivelde pelo de ta
alfombra a la posici6n deseada
Hay cuatro (4) postctonesde ajuste de altura enta
aspiradora.Use taposici6nLOWpara la mayorfade
alfombrasy sueios lisoe (cone! agitadorOFF), y la
posiciSnHIGHpara alfombrasde fibras largaso
abundosas,tapetespequeRos,etc Use las otras
posicionessegt]n resulte convenientepara alturas
tntermedias
Palanca
para ajusfar
la a/tura
CUIDADO
No deje permanecer la aspiradora en un
sotolugar durantenlng_n tlempo cuando
el agitadorest_ rotando. Se puede daRar la
alfombra_
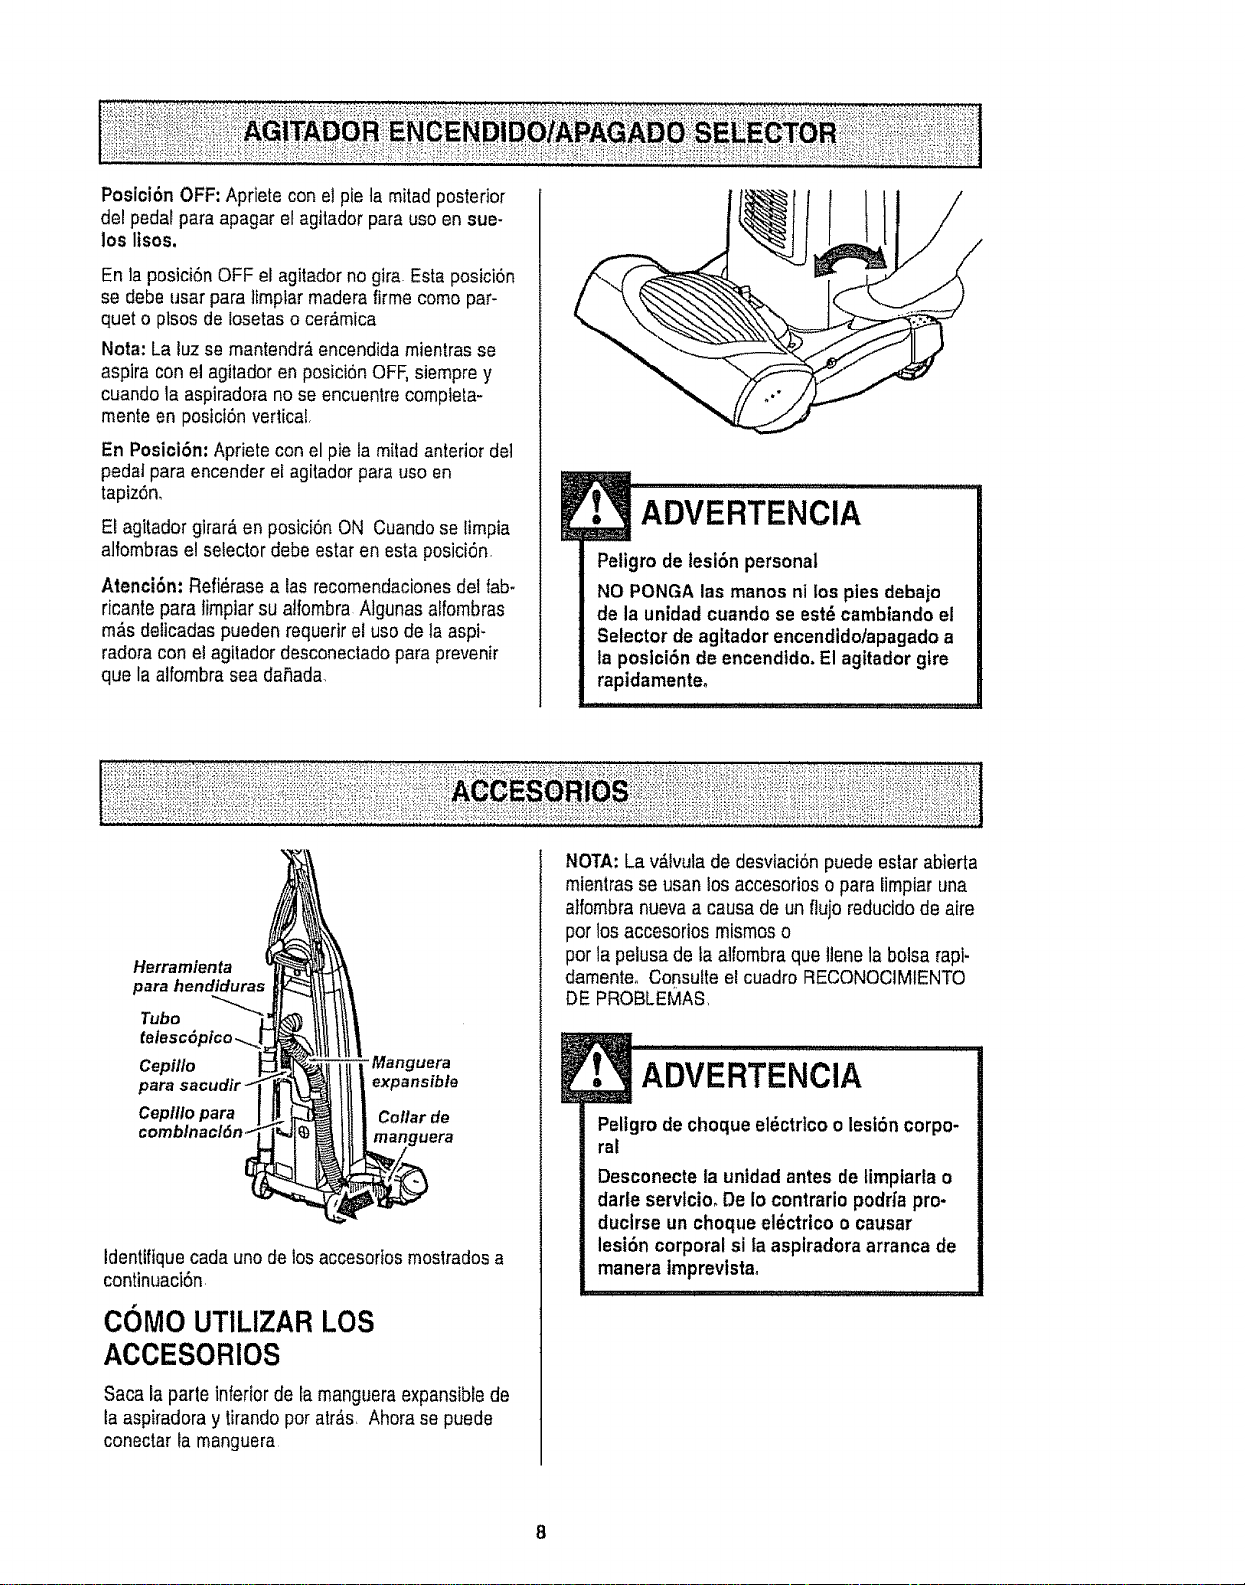
Posici6n OFF:Apriete conel pie ta mitad posterior
de! pedal para apagar etagitador para use en sue-
los Itsos.
En laposiciSnOFF el agitadorno gira. Esta posici6n
se debe usar paratimplar maderafirme come par-
quet o plsos de losetaso ceramica
Nora: La luz se mantendr&encendidamientrasse
aspira con el agitadoren posici6n OFF,siempre y
cuando la aspiradorano seencuentre completa-
mente en posfcf6n vertical,
En Posici6n: Apriete con el pie la mitadanterior del
pedal para encender el agitador para use en
tapiz6n,
E!agitador gtrar&en posiciOnON Cuandose limpia
alfombras e!selector debe estar en estaposiciOn
Atenci6n: Refi_rasealas recomendacionesdel fab-
ricante para lirnpiar su atfombra Algunas alfombras
m_s deiicadas pueden requerir e! usede la aspF
radoracon elagitador desconectadopara prevenir
que Ia alfombrasea daSada,
ADVERTENClA
Petigro de lesi6n personal
NO PONGA las manes ni los pies debajo
de la unidad cuando se est'- cambiandoel
Selector de agitador encendidotapagadoa
la posici6n de encendtdo.El agitador gire
rapidamenteo
Herramienta
para hendiduras
Tube
Cepfllo "Manguera
expansible
Cepilto para Coflar de
uera
Identifiquecadauno de losaccesortosmostradosa
continuacl6n,
COMOUTILIZARLOS
ACCESORIOS
Sacala parte inferior de fa mangueraexpansiblede
la aspiradoray tirandoper atr_s_ Ahorase puede
conectar la manguera
NOTA:La v&Ivulade desvfaci6n puede estarabierta
mtentras se usan losaccesorios o para limpiaruna
atfombranuevaa causa de un flujo reducidode aire
per losaccesorios mismos o
per la pelusa de taaifombra que llenela bolsa rapi-
damenteo Consulte el cuadro RECONOCIMIENTO
DE PROBLEMAS,
l• ADVERTENCiA...............
Pellgrodecheque el6ctrico o lesiSn corpo-
ral
Desconecteta unfdad antes detimptarla o
darle servtcio, De io contrario podrfa pro-
duclrse un cheque eldctricoo causar
lesi6n corporal si la aspiradoraarranca de
manera imprevistao
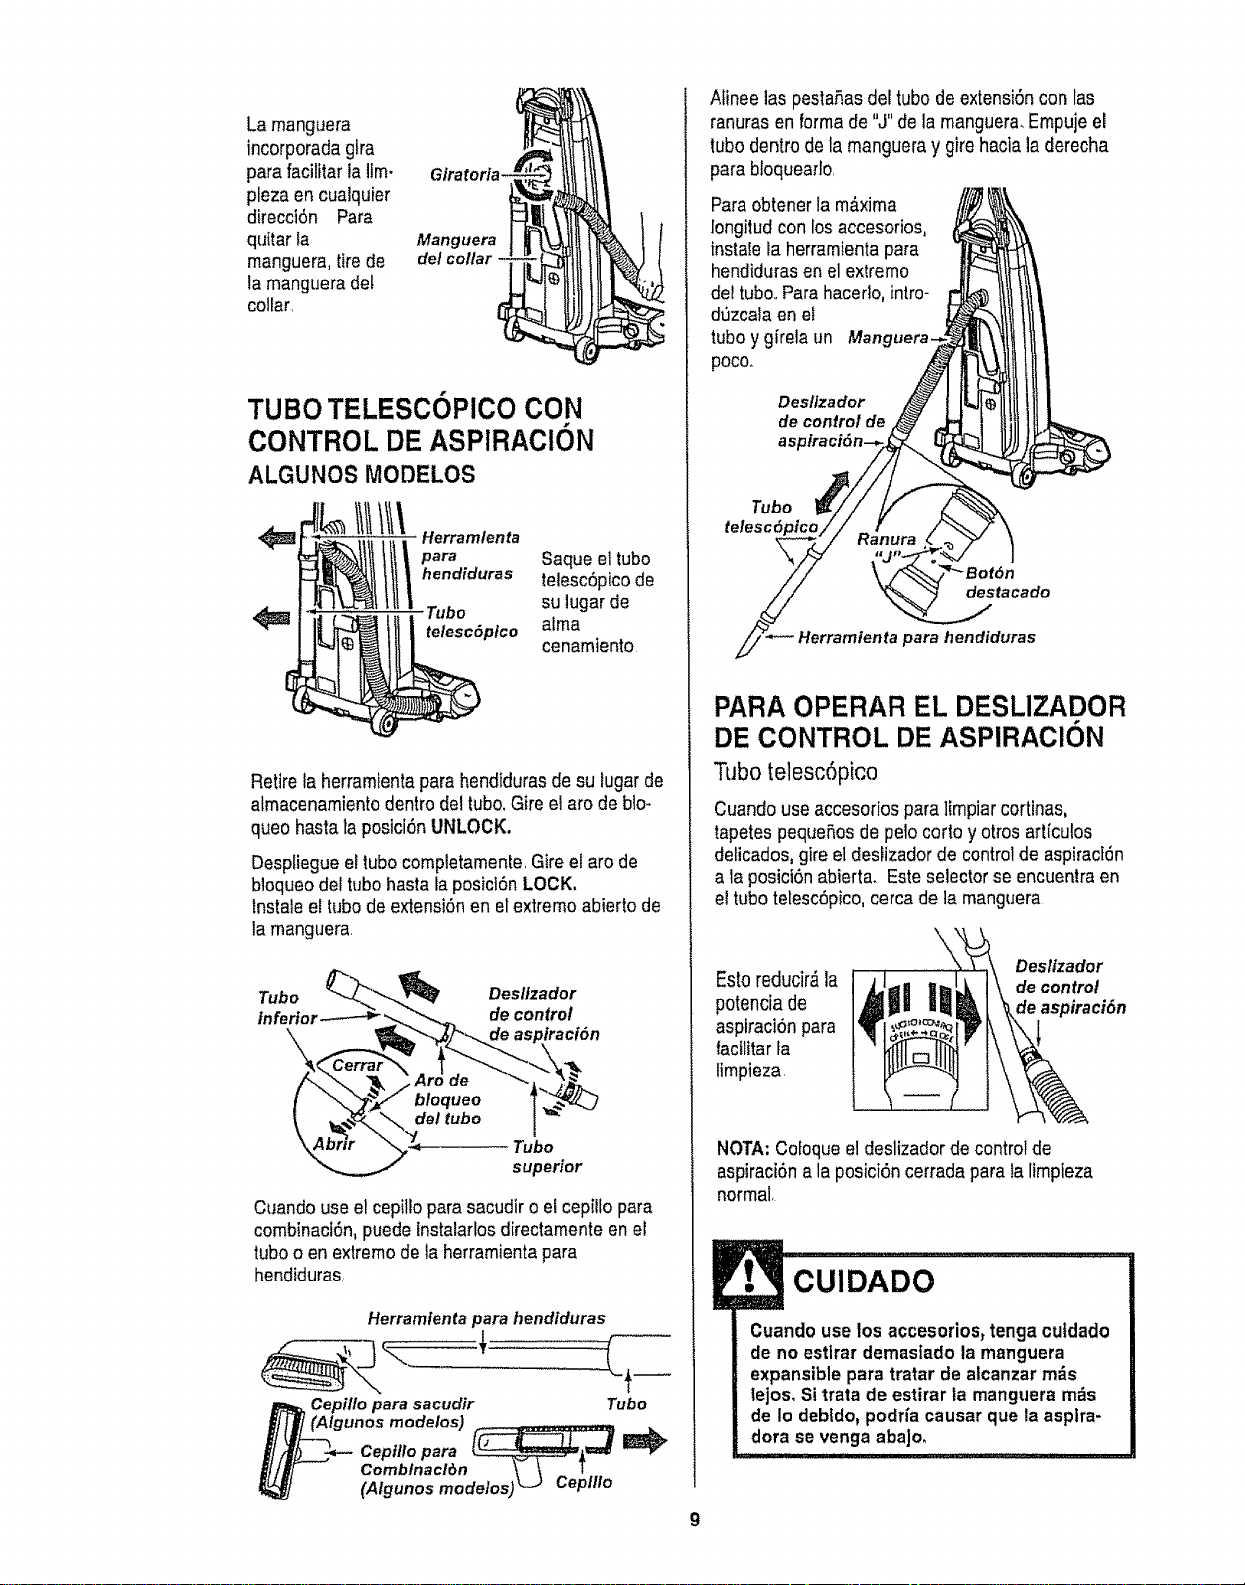
La manguera
incorporadagira
para facilitaria Um-
pleza en cuaiquier
direcci6n Para
qultar ta
manguera, tirede
la mangueradel
collar
Glratoria-
Manguera
de/collar -
TUBO TELESCOPICO CON
CONTROL DE ASPIRACION
ALGUNOS MODELOS
Illlltt\.o..o ,oo,a
hendiduras telesc6pico de
Tubo su lugarde
<_ telesc6plco aima
cenamiento
Retire la herramientaparahendidurasde su lugarde
almacenamientodentrodel tub& Gire etarc de blo-
queo hasta la posici6n UNLOCK.
DespliegueeltubocomptetamenteGire el arc de
b]oqueodel tubo hasta la posicl6n LOCK,
lnstale el tubode extensi6nen el extremoabierto de
tamanguera
Tubo Desl/zador
tnfertot de control
Tubo
supedor
Cuando use elcepilloparasacudir o e! cepillopara
combinacl6n, puede instalarlosdirectamenteen el
tuboo en extremode la herramientapara
hendiduras
Herramlentapara hendiduras
Cepillo para sacudir Tubo
r (Algunos modelos) .... _ .........
Cepillopara [__-_
Comblnaclr_n _'-_-_t--
(Algunosmodelos)L-J Ceplllo
Afineelas pestaP,as deftubode extensi6ncon las
ranurasen formade "J"de la manguera.Empujeel
tubodentro de la mangueray gire haciala derecha
para bloquearto
Paraobtener la m_.xima
longitudcon losaccesorios,
instatelaherramienta para
hendidurasenel extremo
de!tubo. Parahacedo, intro-
d_zcaia en el
tubo ygirela un Manguera.
poco.
Deslfzador
de control de
as
Tubo
telesc6ptco
destacado
para hendiduras
PARA OPERAR EL DESLIZADOR
DE CONTROL DE ASPIRAClON
Tubo telesc6pico
Cuandouse accesoriospara ]impiarcortinas,
tapetespequePtosde pelo corto y otros art[cutos
delicados,gire el deslizador de control de aspirac[_n
a la posict6nabierta. Esteselector seencuentra en
el tubo telesc6pico,cercade la manguera
Deslizador
Estoreducir_ la de control
potencia de de aspiraci6n
aspiraci6n para
facflitar fa
limpieza
NOTA: Cofoqueel deslizadorde controlde
aspiraci6n a la posici6n cerradapara ta limpleza
normal.
CUIDADO
Cuandouse los accesorios_ tenga cutdado
de no estlrar demas[ado la manguera
expansiblepara tratar de alcanzarm_s
lejos, Sitrata de estirar la manguera m_s
de Io deb{do,podria causar que la asplra-
dora se venga aba]o.
9

ALMACENAJE DE LOS
ACCESORIOS:
Retireel ceplttopara sacudir oet cepillopara
combinaci6n,Col6quelos firmemente en su tugarde
almacenamientocorrespondiente,
Retire la herramienta para hendiduras det tubo
gir&ndola P6ngala a un lado
Retireel tubode extensi6nde la manguera-Gire el
tubo hacla la tzquierda y tfre del extremo de la
manguera,
Cerrar
Tubo
superior
"ubo
inferior
Abrir
de
bloqueo
deltubo
E,,
Desbloqueeel tubo girando el aro de b!oqueohasta
la posici6n UNLOCK.
Desticeel tuboinferiordentrodel tubosuperior. Gfre
el aro de bloqueodel tubo a faposici6n LOCK.
lntroduzca taherramientapara hendidurasdentro
del tubo compdmtdo,instals bien en su posici6n de
almacenamiento+
Aseg_rese de que taunidad est_apagada,tnserte
nuevamentela mangueracompletamentedentrode
ta aberturaubicadaen la parts inferiorde la
aspiradora, de donde la sac6 inicialmente.
ADVERTENCIA
Peligrode lesl6n personal
El agitadorpuedeempezar a girar cuando
se Inserta la manguera.Aseg,3resede que el
agitadorest_ libre de manos, pies,objetos,
etc,
CUIDADO
MANGUERA DE EXTENSI6N
ALGUNOS MODELOS
Unosmodelos incluyenuna mangueraauxiliarque
conectacon la manguerade estirar en la aspiradora
para una extensi6nm_s larga para limpiar.
Mangueradela unidad Manguerade extension
tnserte tasdos fengLietasen el extremode ta
manguerade extensi6nen lasdos ranurasformadas
como taletraJ en taaspiradoraygire para coneclar.
Se puede conectartodaslasherramientasy el tubo
te]esc6picocon etextremoabierto de la manguera
CEPILLO PARA PISOSYTUBO:
ALGUNOS MODELOS
Unos modelostienen un cepiltoy un tubo auxillares
para limplar lossuelos sin atfombras Gire ei extremo
del adaptadorhaciael cepillode sueloy el otto
extremohaciael tubo recto Conecte el tuborecto
con el tubo telesc6pico yluego con la manguera en
la aspiradarao con la manguerade extensi6n.
!
Cepillopara plsos ---_
Tubo -J AdaptadorO__
Cuandouse ta mangueraen forma normal o
con la manguera de extensl6n instalada,la
aspiradora debe mantenersesobre una
superficiefirme al mismo nivelo a un nivel
inferiorque los pies del usuario. NO use las
mangueras cuando la aspiradora est_ a un
nivel m_s alto que los pies del usuario.
10
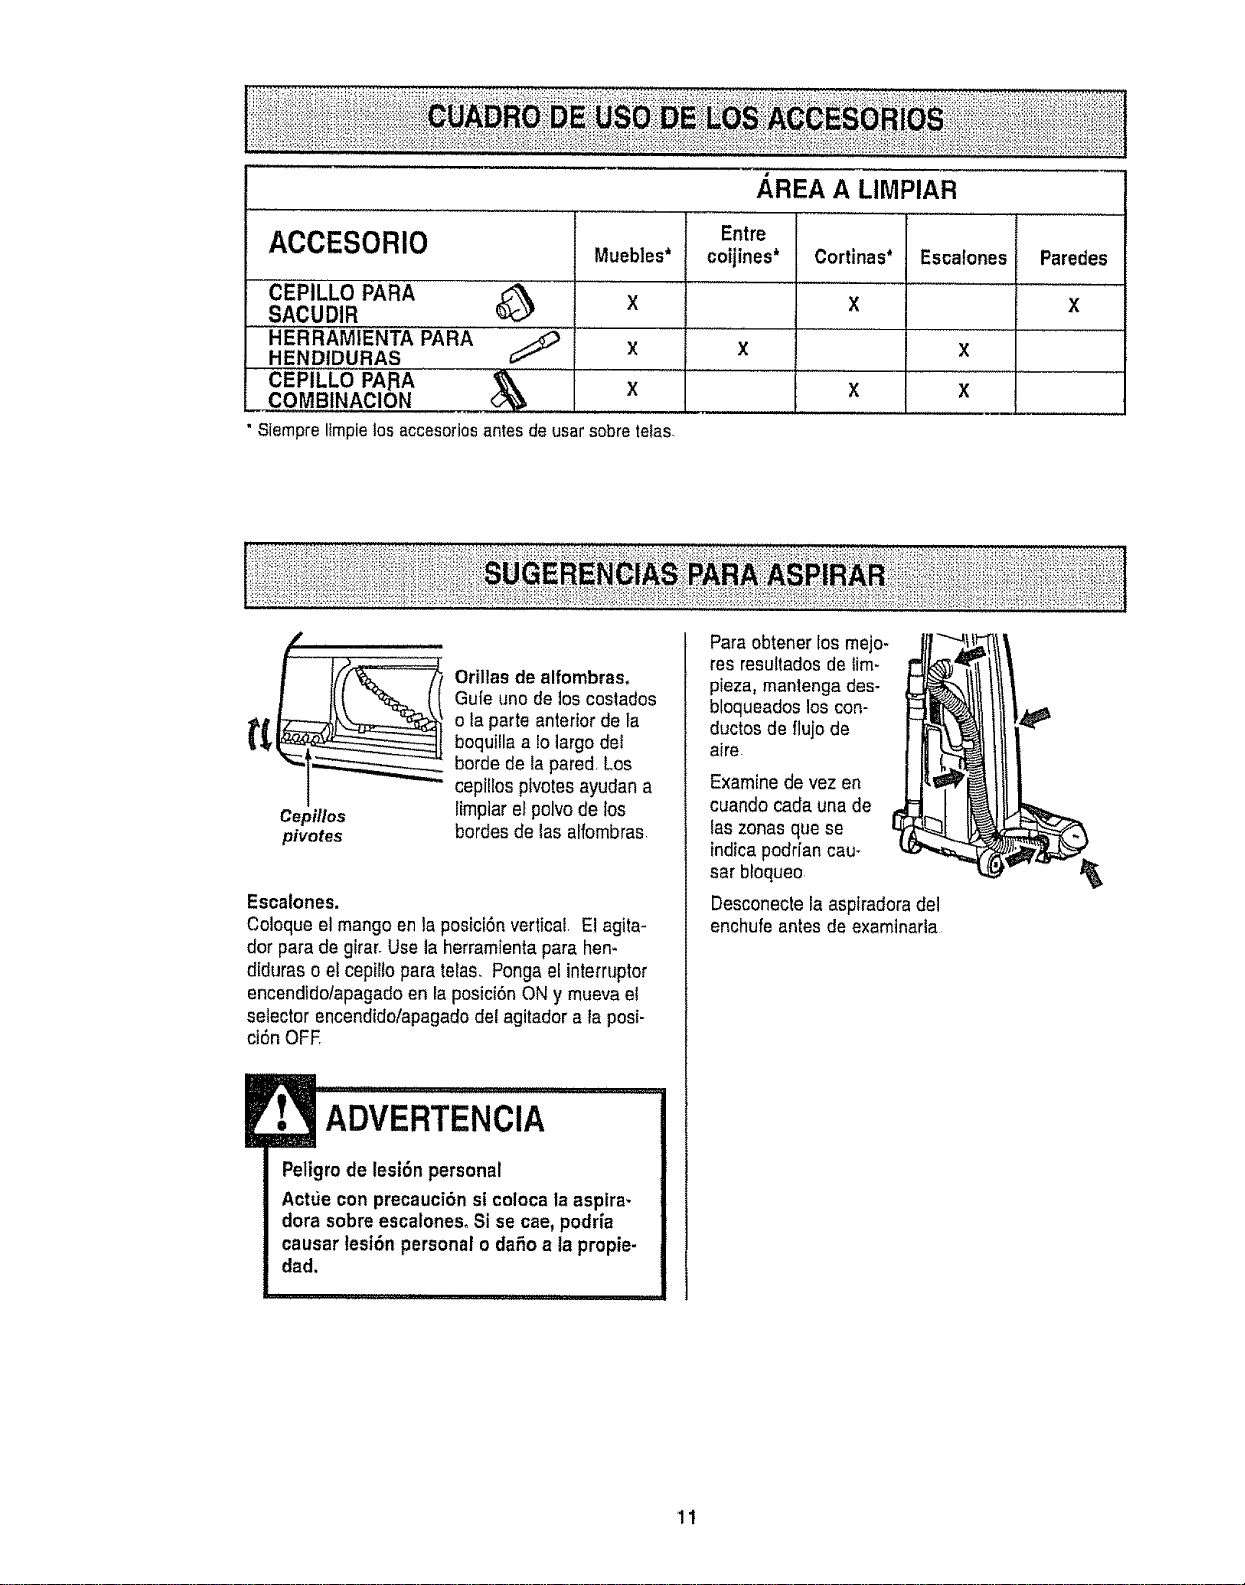
ACCESORIO
CEPILLO PARA _ X
SACUDIR
HERRAMIENTA PARA .......
HENDIDURAS X
CEPILLO '"I_A,RA _'\ ................. X
AREA A LIMPIAR
Entre
Muebles* cotjines*
X
Cortinas* Escatones Paredes
X X
X
X X
Siempre ltmpie los accesorios antes de usar sobre tefas.
Cepillos
pivotes
Orillas de alfombras,
Gu[euno de los coslados
o la parteanterior de ta
boquiila alo largo det
borde de tapared,Los
ceptllosptvotesayudan a
l{mpiarel polvode los
hordes de las alfombras_
Escalones.
Coloque el mango en la posiciSnvertical, El agita-
dor para de girar.Use ta herramientapara hen-
diduras o el cepilto para telas, Pongael interrupter
encendldo/apagado en la posicibnON y mueva el
selector encendido/apagadodel agitador a laposi-
ci6n OFE
ADVERTENCIA
Peligrode lesi6n personal
Actue con precauci6n st colocala aspira-
dorasobre escalonesoSi se cae,podria
causar tesi6n personalo daSoa ta propie-
dad.
Paraobtener los mejo-
res resultadosde iim-
pieza, mantengades-
bloqueados los con-
ductos de flujode
aire
Examinede vez en
cuando cada una de
{aszonas que se
indicapodr[an cau-
sar bloqueo
Desconectela asplradoradel
enchufe antes de examinarla
11
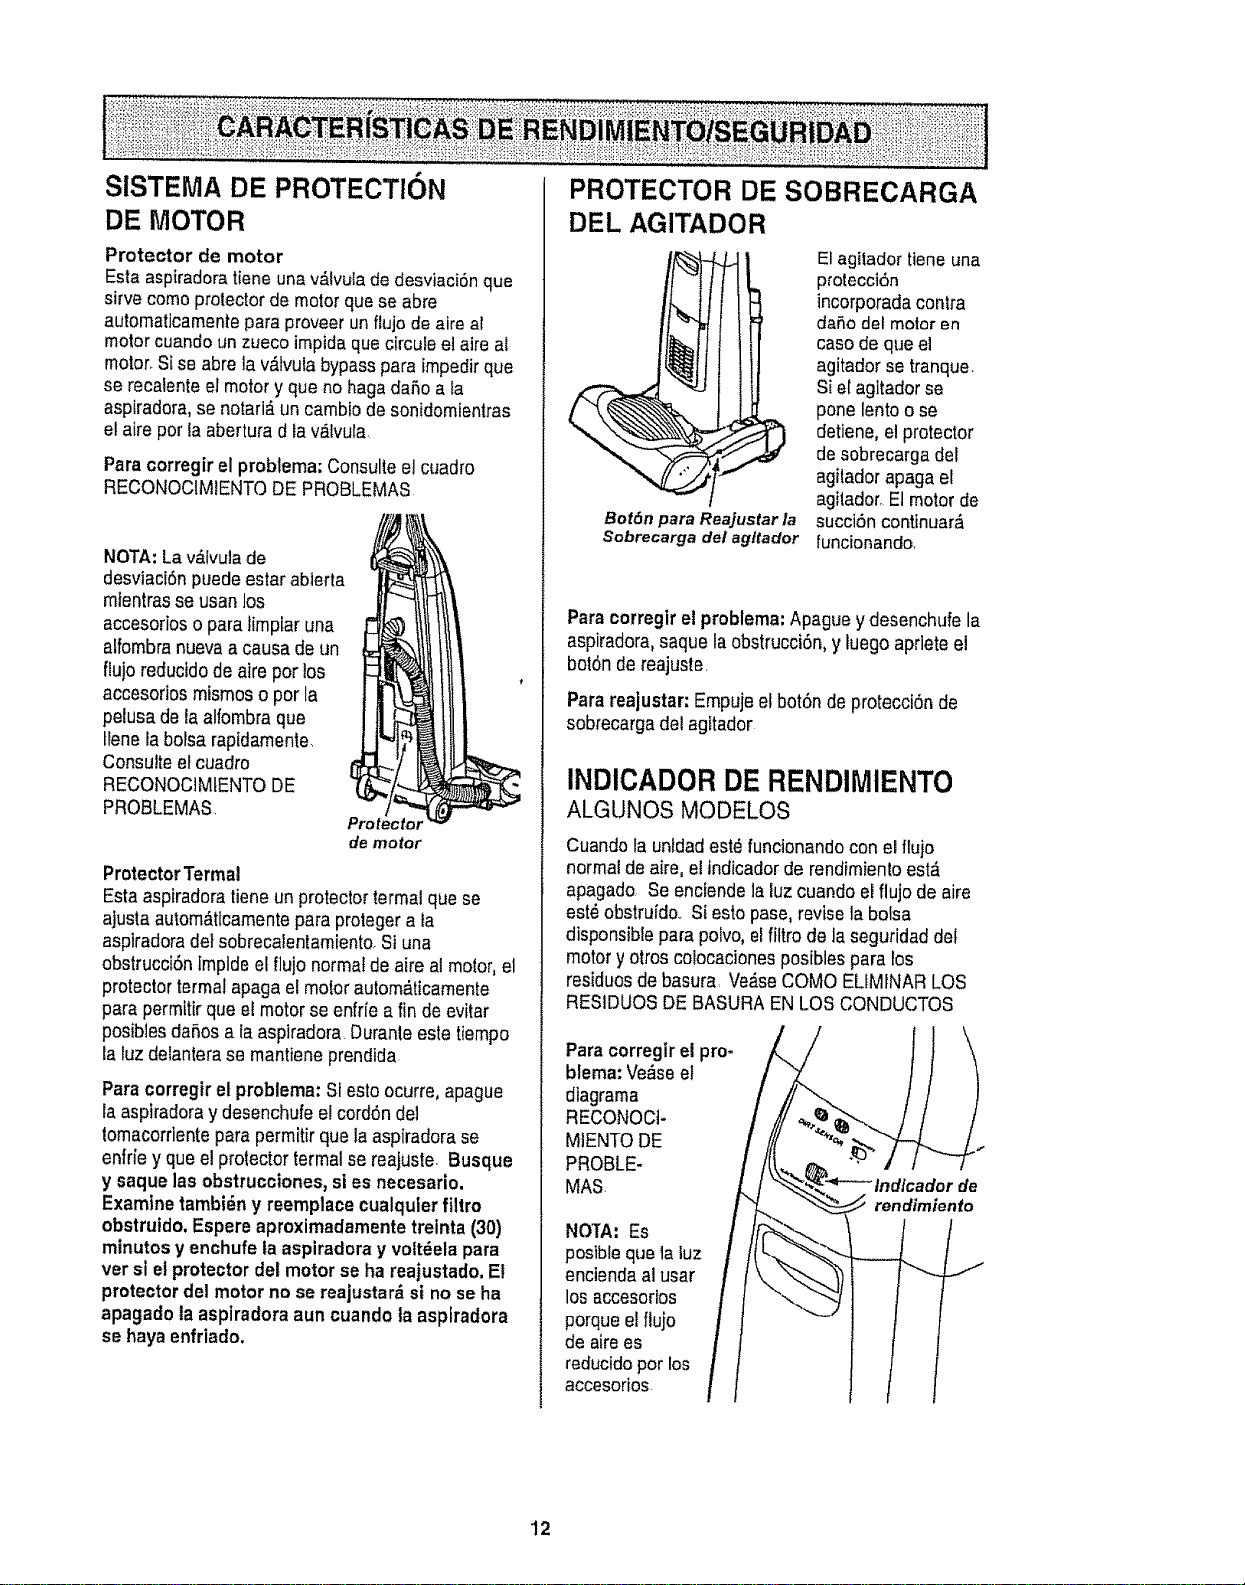
SlSTEMA DE PROTECTION
DE MOTOR
Protector de motor
Esta aspiradoratiene una v_lvula de desviaciSnque
sirve como protectorde motor quese abre
automaticamentepara proveerun flujo de aire al
motor cuandoun zueco impidaque circule etaire al
motor_Sise abre la v_lvula bypasspara impedirque
se recalenteel motor y que no haga daSoa fa
aspiradora,se notarl_,un cambio de sonidomienlras
el aire pot la aberturad la valvula,
Paracorregirel problema:Consulteel cuadro
RECONOCIMIENTODE PROBLEMAS
NOTA:La v&Ivulade
desviaciSnpuede estarabierta
mtentrasse usan los
accesorios o para tirnptaruna
alfombra nuevaa causa de un
ftujo reductdode aire por los
accesorios misrnoso por la
pelusa de la alfombra que
tlenela bolsarapidarnente.
Consulteetcuadro
RECONOCIMtENTODE
PROBLEMAS.
Protector
de motor
Protector Termal
Esta aspiradoratieneun protectortermal que se
ajusta autom,_tlcamentepara proteger a la
aspiradorade}sobrecalentamiento.Si una
obstrucci6ntrnpldeetflujo normal de aire el motor,el
protectorterrnatapaga et motor autom_ticamente
para permitir que elmotorse enfrfe a fin de evitar
posiblesda_,osa Iaasplradora. Duranteeste tiempo
la luz delanterase mantiene prendida
Paracorregir el problema:Si esto ocurre, apague
la aspiradoray desenchufeel cordSndel
tomacorrlenteparapermitir que la aspiradorase
enfriey que elprotectortermal se reajuste. Busque
y saque las obstrucciones,si es necesario.
Examine tambi_n y reemplace cualquler filtro
obstruido,Espere aproximadamente treinta (30)
minutos y enchufe ta aspiradora y volt_ela para
ver sl et protectordel motor se ha reajustado, El
protector del motor no se reajustar_ si no se ha
apagado la aspiradora aun cuandota aspiradora
se hayaenfriado,
PROTECTOR DE SOBRECARGA
DEL AGITADOR
Bot6n para Reajustar la
Sobrecarga del agltador
Etagitadortieneuna
protecci6n
incorporadaconlra
da_o det motor en
caso de que el
agitadorse tranque.
Si el agitador se
pone lentoo se
detiene, el protector
de sobrecarga del
agilador apaga el
agilador,El motor de
succiSncontinuar,:_
funcionando.
Paracorregir el problema"Apague y desenchufe la
aspiradora,saque la obstrucci6n,y luego aprleteel
bot6n de reajuste.
Parareajustar: Empujeelbot6n de protecci6nde
sobrecargadel agitador
INDICADOR DE RENDIMIENTO
ALGUNOS MODELO$
Cuandola untdadestdfuncionando con elfluio
normalde aire, eltndicadorde rendimiento est,_
apagado, Se enciendelaluzcuandoel flujo de aire
est_ obstruido.. Si estopase,revise la bolsa
disponsible parapolvo, el fittrode la seguridad del
motory otros colocaciones posibles para los
residuosde basura, Verse COMO ELIMINARLOS
RESIDUOSDE BASURA ENLOS CONDUCTOS
Para corregirel pro-
blema: Verse el
diagrama
RECONOCt-
MIENTO DE
PROBLE-
MAS
NOTA: Es
postbleque la luz
enciendaal usar
los accesorios
porque el flujo
de airees
reductdopor los
accesorios.
rendimiento
indi_dor
12
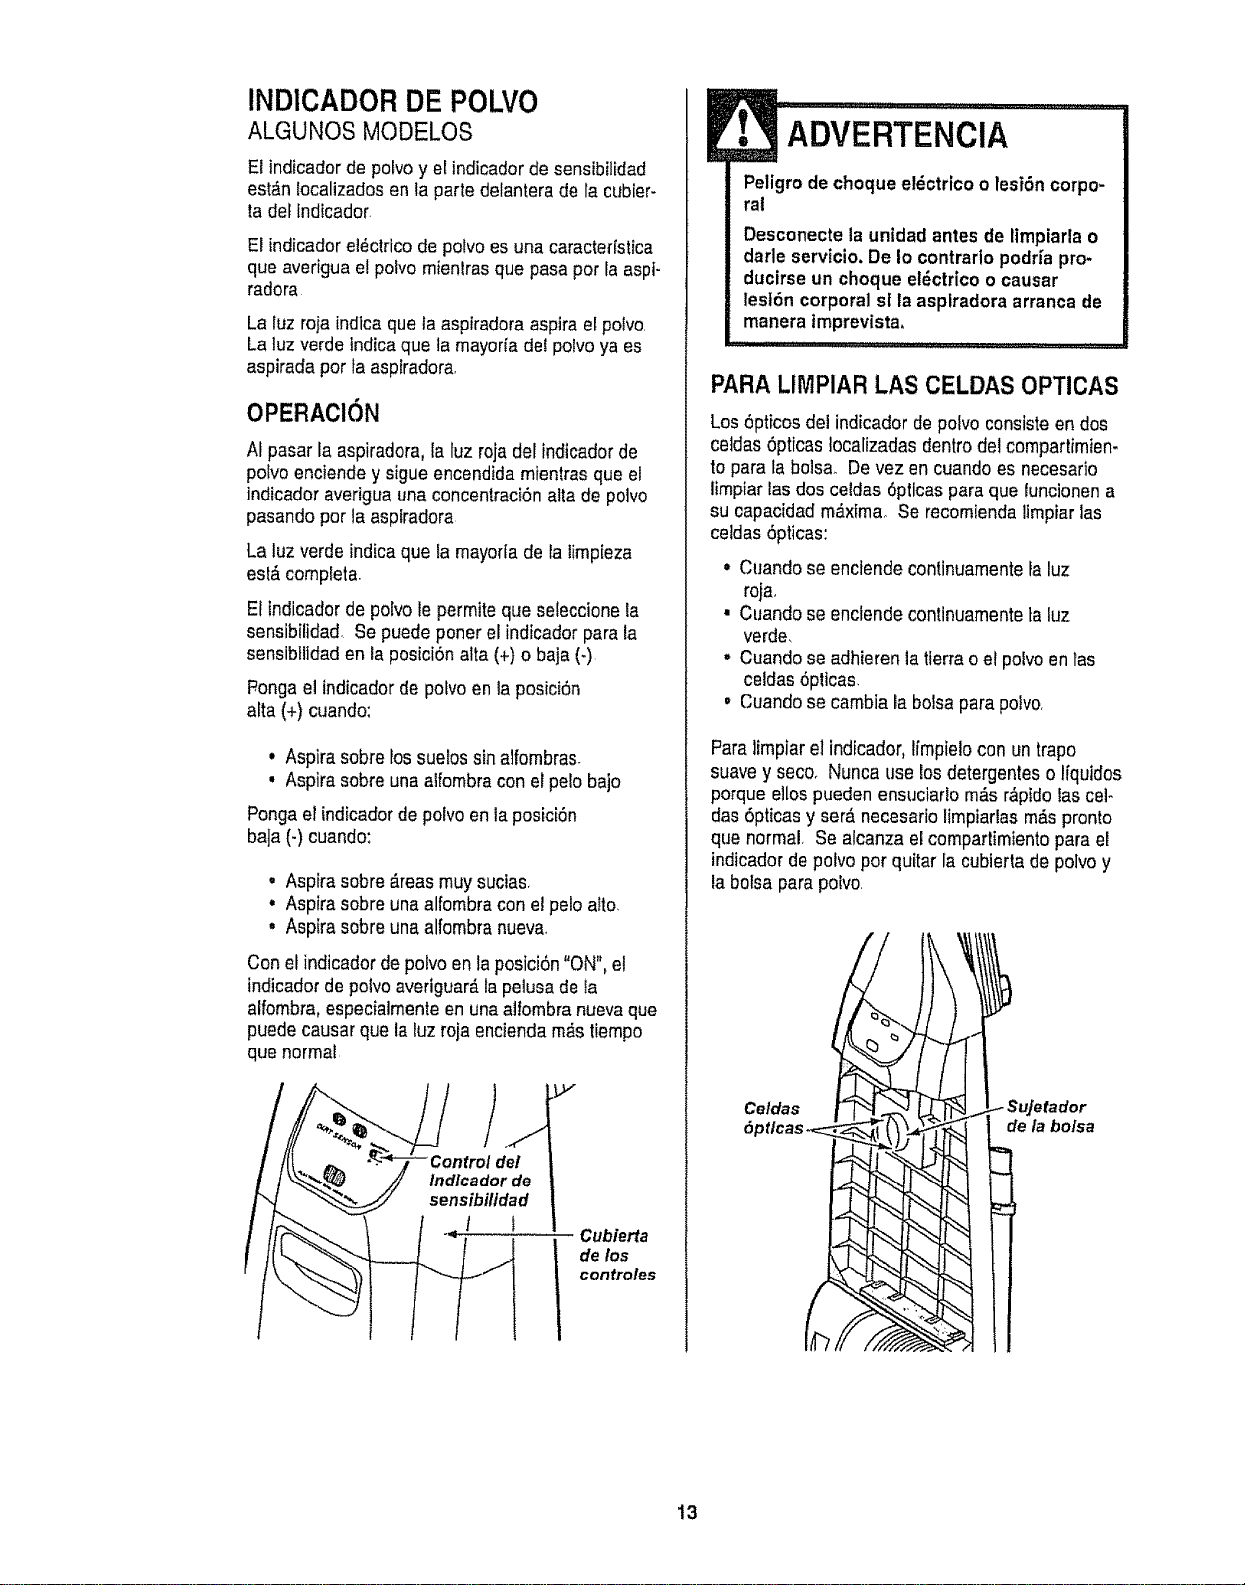
INDICADOR DE POLVO
ALGUNOS MODELOS
El indicador de potvo y el indicadorde sensibilidad
est_,nlocalizadosen la parte delanterade la cubter-
ta del indicador.
El indicador el_clrico de polvo es una caracterfstica
que averiguael polvo rnienlrasque pasa por la aspi-
radora
La luz roja indlcaque la asplradoraasptra etpolvo.
La luz verdelndica que la mayorfadel polvoya es
aspirada por fa asplradora,
OPERAClON
AIpasar la aspiradora, la luz roja delindtcadorde
poivo enciendey sigue encendida mientrasque el
indicador averiguauna concentraci6nalta de polvo
pasando por la aspiradora
La luz verdeindica que famayorla de la limpieza
esl&completa.
El Indicadorde polvo le permite que seteccionela
sensibilidad. Se puede poner elindicador para la
sensibtlidaden la posici6n alta (+) o baja (-)
P,onga el indicadorde polvoen la posici6n
afta (+) cuando:
° Aspira sobre lossue!ossin alfornbras.
, Aspira sobre unaaifornbracon el pelo bajo
Ponga el indicadorde polvoen la posici6n
ba]a(-) cuando:
° Aspira sobre &teasmuy sucias,
° Aspira sobre unaalfombra con elpelo alto,
° Aspira sobre unaalfombra nueva,
Con el indicador de polvo en la posicidn"ON", el
indicador de potvo averiguar_,la peiusade ta
alfombra,especialmente enuna alfombra nuevaque
puede causar que la luz roja encienda rn_stiernpo
que normal
de!
indlcador de
sensibilldad
l I
Cubierta
de los
confroles
ADVERTENClA
Peligrode choque el_ctrico o lesi6n corpo-
ral
Desconecte la unidadantes de limpiarla o
darle servicio. De io contrarlo podrfa pro-
ducirse un choque et_ctricoo causar
lest6n corporal sl la aspiradoraarrancade
manera imprevista,
i ,111,11................. i i ......... .......
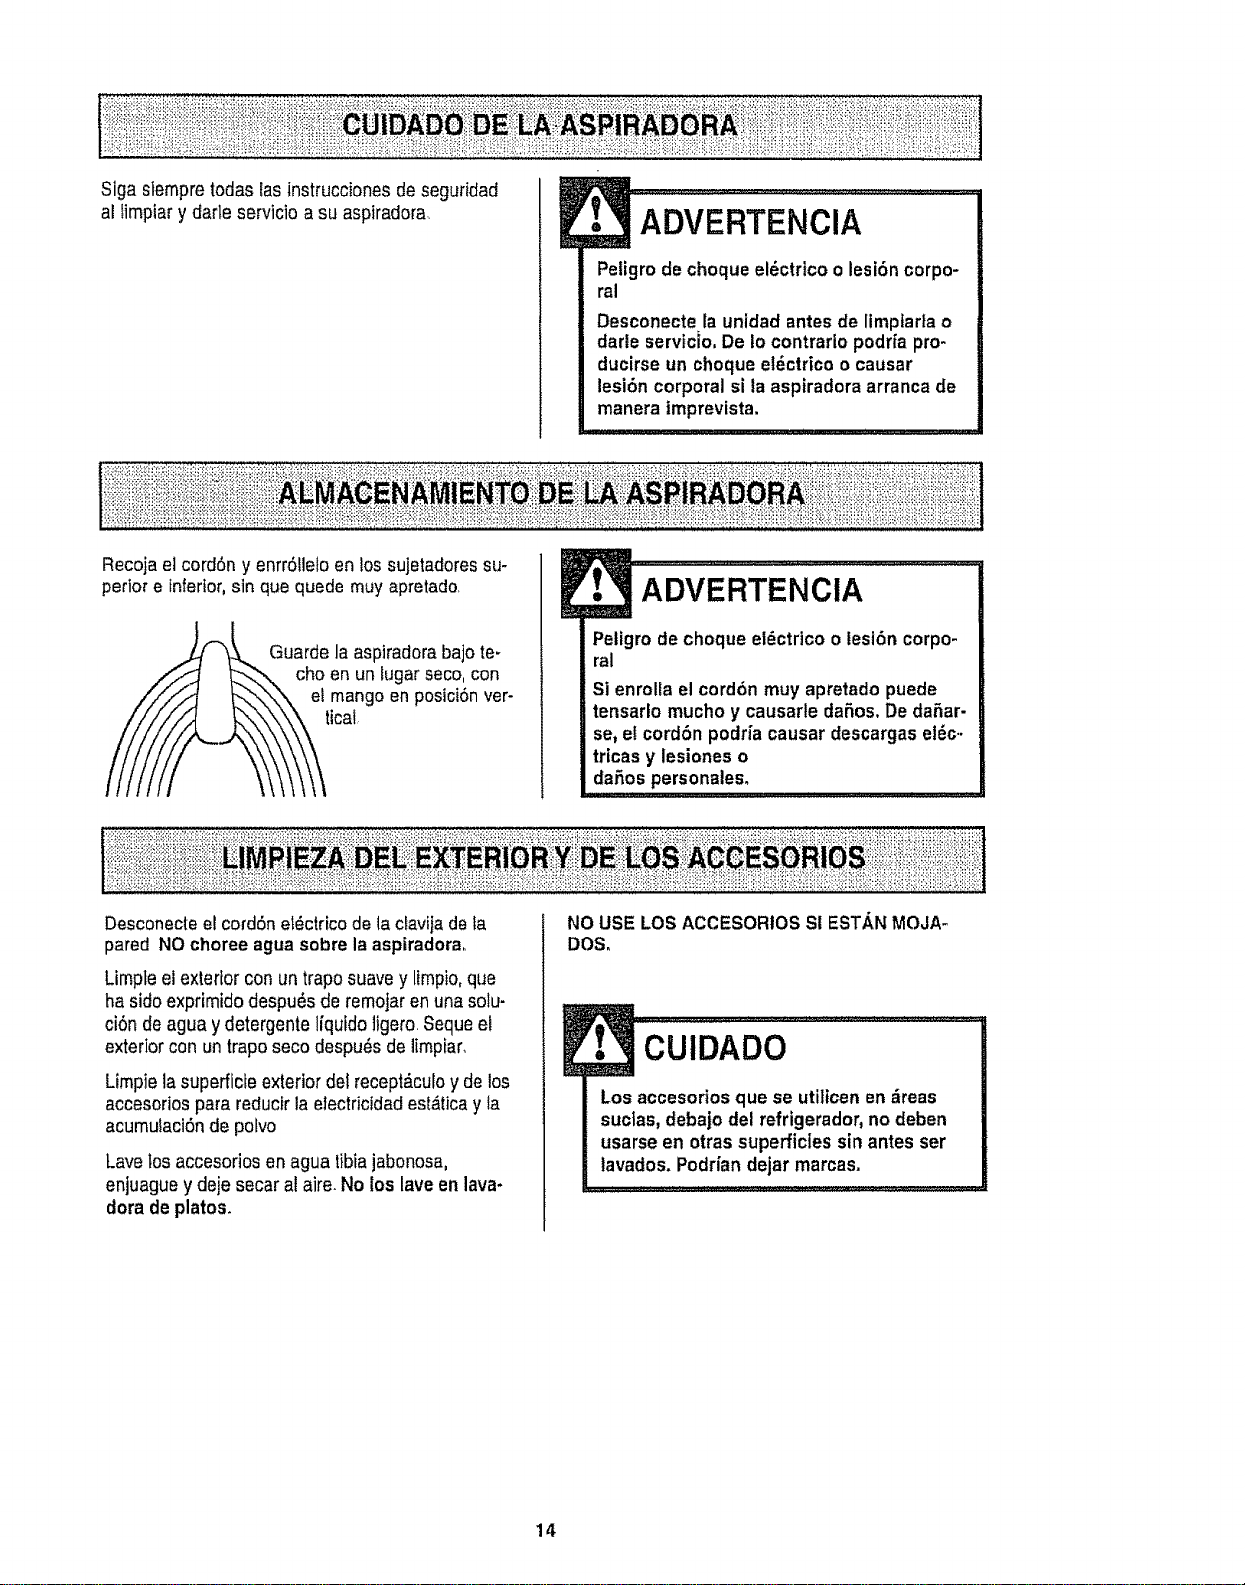
PARALIMPIAR LAS CELDAS OPTICAS
Los6pticos del indicador de polvo consiste en dos
celdas 6pticas localizadas dentrodel compartirnien-
to para la bolsa_ Devez encuando es necesario
limpiar lasdos celdas 6pticas para que luncionen a
su capacidad m__xima_Se recorniendalirnpiar las
ceidas 5pticas:
• Cuando se enclendecontinuarnentela luz
roja,
, Cuando se enciendecontinuarnentetaluz
verde,
° Cuando se adhieren la tierra o et polvoen las
celdas 6pticas,
, Cuandose carnbiala bolsapara poivo<
Para limpiarel indicador, Ifrnpielocon un trapo
suavey secoo Nunca use los detergenteso lfquides
porque ellos pueden ensuciarlo m&sr&ptdoiascel-
das 6pticasy ser,_necesario lirnpiarlasrn_spronto
que normal, Se alcanza el compartimtento para el
indicador de polvo por quitar la cubierta de polvoy
la bolsa para polvo.
Celdas
6ptlcas
de la bolsa
13
SigasiempretodasEasinstruccionesdeseguridad
a!timpiarydarleservicioasuaspiradora.
ADVERTENCIA
Peligro de choqueel_ctrtcoo lesi6n corpo-
ral
Desconecte la unidad antesde limptarta o
darle servicio.De Io contrario podfia pro-
ducirse un choque el_ctrico o causar
lesi6n corporal si la aspiradoraarranca de
manera tmprevista.
Recoja elcord6n y enrr6tleloen lossujetadoressu-
perior e _nfertor,sin que quede muy apretado.
Guarde la aspiradorabajo te-
cho en un fugarseco,con
et mango en posiciSnver-
icat
ADVERTENCIA
Peligrode choque el_ctrico o lesi6n corpo-
ral
Si enrolla el cord6n muy apretadopuede
tensarlo mucho y causarle daSos, De daSar-
se, el cord6n podriacausar descargas el_c.,
trtcasy lesiones o
daSos personales,
Desconecteel cord6n et_ctricode lactavilade ta
pared NO choreeagua sobre la aspiradora,
Limpteel exterior con un traposuave y limpio,que
ha sido exprimido despu6s de remojaren una solu-
ci6n de agua y detergente Iiquido ligero.Seque el
exterior con un trapo seco despu_s de limpiar,
Limpie lasuperficie exteriordel recept_.culoy de los
accesorios para reducirla electricidadest_tica y la
acumuiaci6nde polvo
Lave losaccesorios en agua tibiajabonosa,
enjuague y deje secar al aim. No los lave enlava-
dora de platos.
NO USE LOSACCESORIOSS! ESTANMOJA-
DOS,
!
Los accesorios que se utilicenen zireas
suctas,debajo del refrigerador, no deben
usarse en otras superficies sin antes ser
iavados. PodHandejar marcas,
14
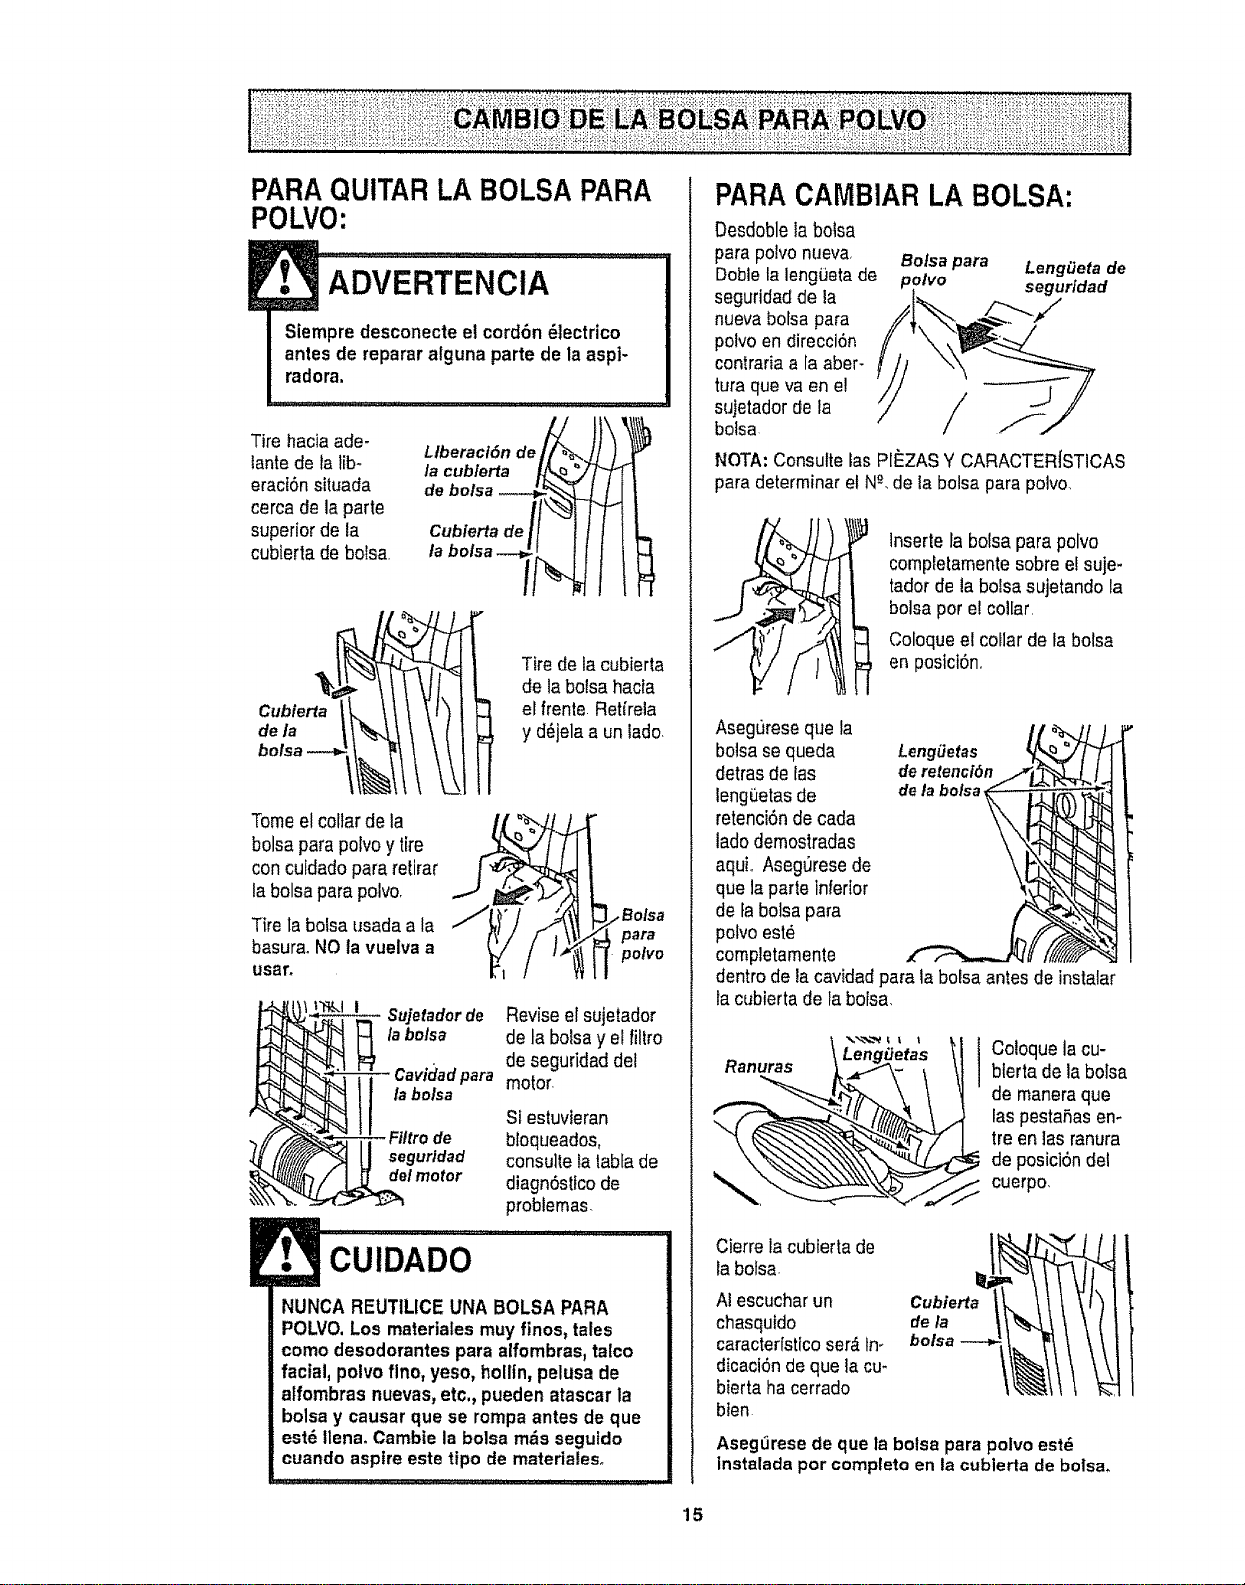
PARAQUITARLA BOLSAPARA
POLVO:
Tire hacia ade-
lante de talib-
eraci6nsituada
cerca de la parte
superior de la
cubierta de bolsa
Llberacl6n de_"_..
/a cub/erta
c:zr
tabolsa-- .It
c,..o.otk tIt I fq
Tire de la cubierta
de la boisa hacfa
el frente.Retireia
y d_jela a un tado.
Tomeel collarde la
bolsaparapolvoy tire ..
concuidadopara retirar
j,
la bolsapara polvo.
Tire tabolsa usada a la
basura.NO la vuelva a
Llsar.
' "_',,Jl •
/Bolsa
para
polvo
Su]etadorde Revise el sujetador
la bolsa de ta bolsay el filtro
de seguridaddel
para motor.
la bolsa
SI estuvieran
bbqueados,
segurldad consulte latabfa de
del motor diagn6stfco de
problemas.
CUIDADO
NUNCA REUTILICE UNA BOLSA PARA
POLVO.Los materiales muyfinos, tales
como desodorantespara alfombras,talco
facial, polvoflno, yeso, hollin,pelusa de
aifombras nuevas_etc,, pueden atascarla
bolsay causar que se rompaantes de que
est_ tlena_Cambte la bolsa mrs segutdo
cuandoaspire este tipo de materlales.
PARA CAMBIAR LA BOLSA:
Oesdoblela bolsa
para polvonueva, Botsa para LengOeta de
Dobtela leng0etade polvo segurtdad
seguridadde ia
nuevabofsa para
polvoen direcci6n
contraria a la aber-
turaque va en e!
sujetador de la /
bolsa /
NOTA:Consulte las PIISZASY CARACTER[STICAS
para determinar el N_,de la bolsa para polvo,
Inserte la bolsapara polvo
completamentesobre e!suje-
tador de ta bolsasujetando la
bolsa por e! collar.
Coloqueel collar de la bolsa
en posict6n,
Asegurese que la
bo!sa sequeda Lengiietas
detras de las deretenci6n
leng0etas de delabolsa
retenci6n de cada
lado demostradas
aquL Aseg_resede
que la parle inferior
de fabolsapara
polvo est_
completamente
dentro de la cavidad para la bolsa antes de instalar
la cubierta de la bolsa,
Ranuras \ LengiJet_...._\..as
Coloque la cu-
blerta de la bolsa
de maneraque
laspestaSasen-
tre en las ranura
de posici6ndel
cuerpo,
Cierre la cubierta de
la botsa.
Al escucharun
chasquido
caracterfsticoser,_tn_
dicaci6nde que tacu-
bierta ha cerrado
bten
AsegLirese de que la bolsa para polvo est_
instalada por compteto en la cubierta de bolsa,
15
Examineelfiltrodeseguridaddelmotordevezen
cuandoycambiocuandoest6sucio,
ADVERTENClA
Peligro de choque el_ctrieo
Desenchufe el cord6n de lacorriente el6c-
trica. No opera taaspiradora sin el fittro de
seguridad del motor, Aseg6uresedeque
el filtro est8 seco e instaladoadecuada-
mente para impedirque el motorfalle y!o
qua se produzca un choque et_ctrico,
Paraquitar la bolsa, siga las instruccionesenCAM-
B!O DELA BOLSA PARAPOLVQ
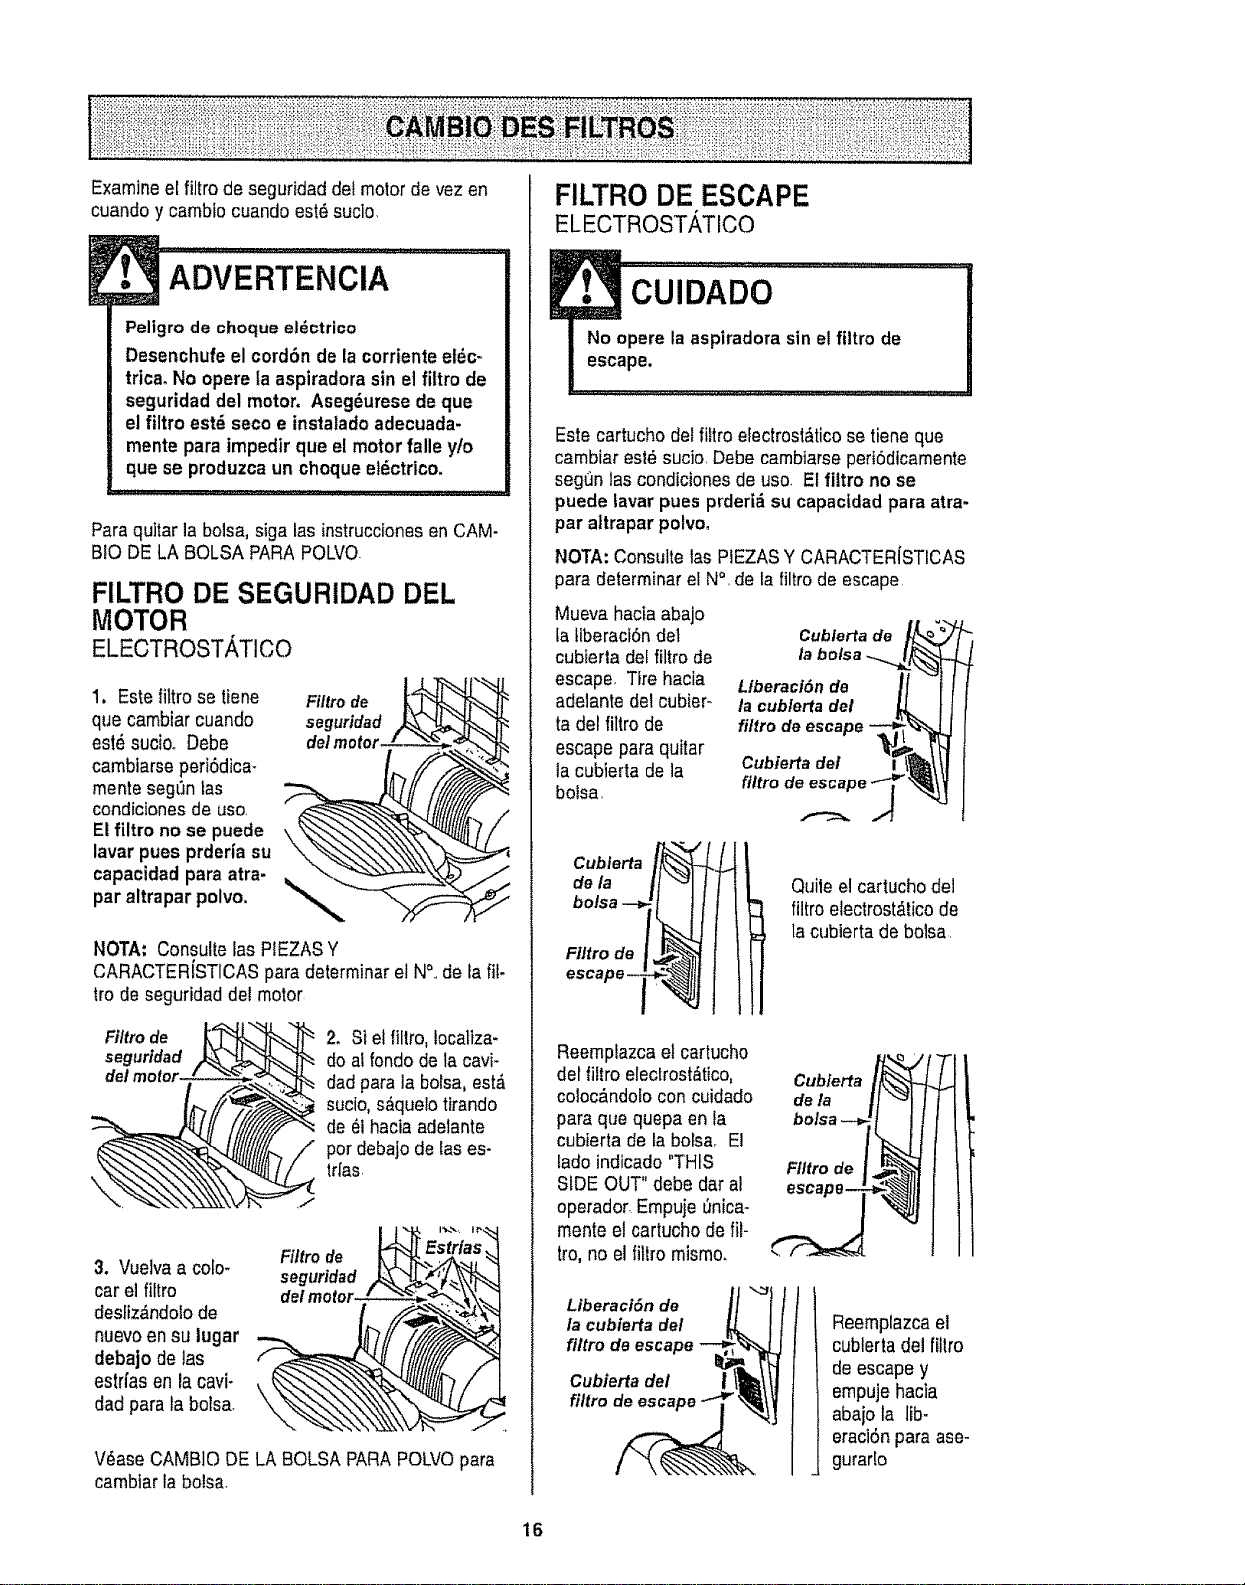
FILTRO DE SEGURIDAD DEL
MOTOR
ELECTROSTATICO
1, Estelittro se tiene
qua cambiar cuando
est_ sucioo Debe
cambiarseperi6dica-
mente segt_nlas
condicionesde uso,
El filtro no se puede
lavar pues prderia su
capacidad para atra.
par altrapar polvo,
Filtro de
seguridad
NOTA: Consulte las PIEZASY
CARACTERfSTICASpara determinar elN&,de la fif.
fro de seguridad del motor
Fi/tro de
seguridad
2. St elfittro,locatiza-
do ai rondode la cavi-
dad para la bolsa, est,_
sucio,s_.que!otirando
de _I haciaadelante
per debajo de las es-
trfas
3. Vuelvaa colo-
carel filtro
desliz&ndolode
nuevoensu lugar
debajo de las
estrfas en la cavi-
dad para tabolsa.
Filtro de
seguridad
V6ase CAMBIO DELA BOLSA PARAPOLVOpara
cambtarla bolsa.
FILTRO DE ESCAPE
ELECTROSTATICO
Este cartucho del fittroefectrost_ticose tiene qua
cambiar est_ sucio Debe cambtarsepert6dicamente
segl]n las condicionesde uso. El filtro no se
puede lavar pues prderi_ su capacidadpara atra-
par altrapar polvo.
NOTA:Consulte las PIEZASY CARACTER{STICAS
para determinar el N°, de ta tiltro de escape
Mueva hacia abajo
la tiberaci6ndel
cubierla del filtro de
escape. Tire hacia
adelante del cubier-
ta del filtro de
escape para quitar
ta cubierta de la
bolsa,
Cubferta de
la bolsa .-...
Liberaci6n de
la cub/erta del
fi/tro de escape
Cubierta del
filtro
Flltrode !_
escape _ '_-_I
Quite el cartucho de]
filtro etectrost&ticode
la cubierta de bolsa,
Reemplazca el cartucho
del liltro eleclrost_tico,
coloc_ndolo con cuidado
para que quepa en fa
cubierta de la bols& El
lado indicado "THIS
SiDE OUT" debe dar al
operador.Empuje _nicao
mente etcartucho de ilt-
tro, no el tittromismo.
Cubierta
]:
FIItrede [_...
escape_
r
Liberaci6nde
la cubiertadel
filtrode escape--_
_J
Cubiertadel I
flit o
l
Reemplazcael
cublerta del ftltro
de escape y
empujehacia
abajo ta lib-
eraclSnpara ase-
gurar!o
16
ADVERTENCIA
Peligrodechoque el_ctrico o lesi6n corpm
ral
Desconectela unldadantesde limpiarla o
darle servicio.De Io contrario podriaprodu-
ctrseun choqueel6ctrico o causar tesi6n
corporalsi la aspiradoraarranca de manera
imprevista,
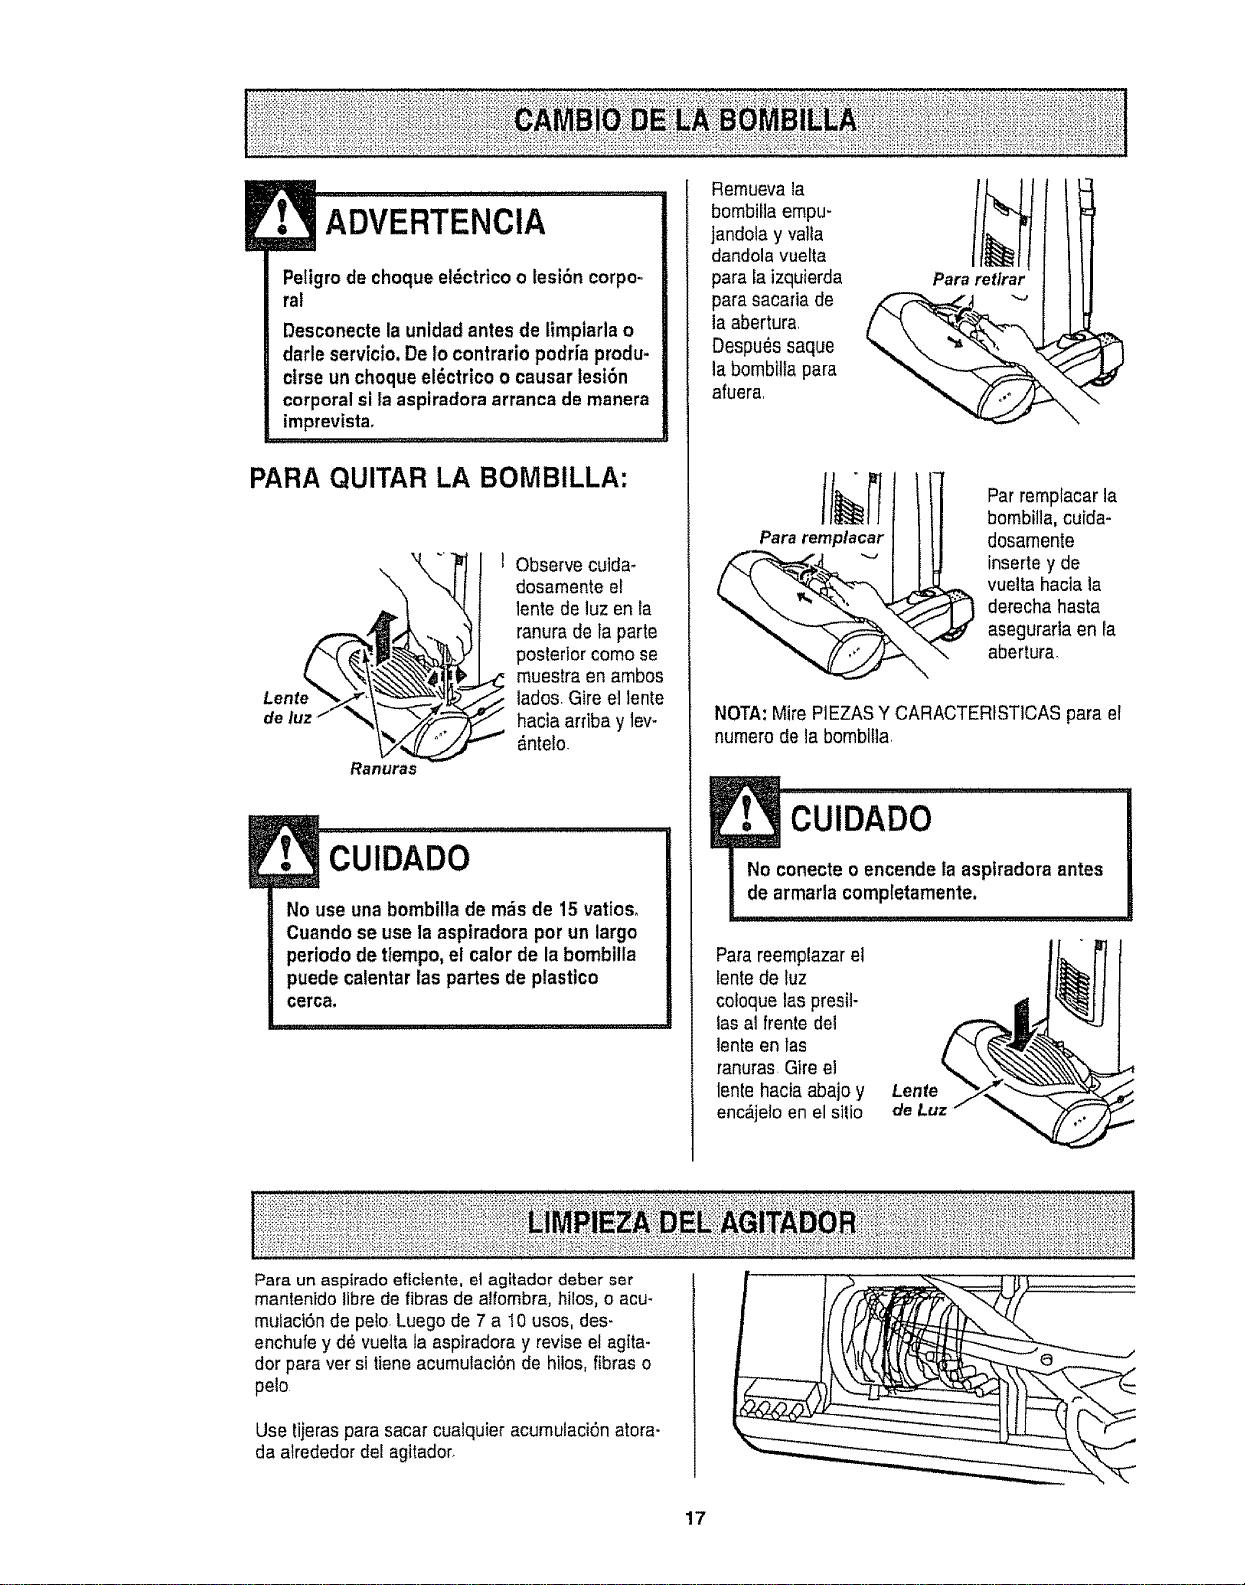
PARA QUITAR LA BOMBILLA:
Lente
de luz
Ranuras
1 Observe cuida_
dosamenteel
lente de luz en la
ranura de ta parte
posterior como se
muestra en ambos
lados.Gire el lento
hacia arriba y lev-
&ntelo.
No use una bombilla de m_s de 15 vatioso
Cuando se usela asplradora porun largo
periodo detiempo, e! calor de labombilla
puede catentarlas partes de plastico
cerca,
Remuevala
bombillaempu-
jandola y va!ta
dandola vuelta
para la izquierda
para sacaria de
la abertura
Despu_s saque
la bomblltapara
afuera,
bombilla, cuida-
Pa
dosamente
_ inserte y de
vuelta haciala
derecha hasta
asegurarta en ra
abertura
NOTA:Mire PIEZASY CARACTERfSTICASparael
numerode la bombitla,
1
No conecte oencende la asptradoraantes
de armada completamente.
Parareemp{azarel
lentede luz
cotoquelas presil-
lasal frente del
lentoen las
ranuras Gire el
lentohacia abajo y Lente
enc_jetoen el sitio de Lu
Para un aspirado ef{cfente, el agitador deber set
mantenido librede fibras de aitombra,hilos, o acu-
muiact6nde peso.Luego de 7 a I0 usos, des-
enchufe y dd vuettala aspiradoray revise el agIta-
dor para ver si tiene acumuiaci6nde hiios, fibras o
pelo
Use tijeras para sacar cuatquier acumulaciSnatora-
da airededor del agitador_
17

Procedasiempreconprecaucionesdeseguridadal
limptarydarserviciolaaspiradora
ADVERTENCIA
Pellgro de cheque ele_ctrtco o lest6n oorpo-
ral
Desconecte la unidad antesde limplarla o
darte servtcio.De 1ocontrario podrfaprodu-
cirse un chequeel6ctrico o causar lesi6n
corporalsi la aspiradoraarranca de manera
imprevista,
Si considera que la aspiradorano aspira bien
asegLt[esepfimem de que la bolsano est6 tlenay
de qua el filtro no est_ atascado Consultelas ins-
trucciones sobreCAMB!ODE LA BOLSA PARA
POLVOy LIMPIEZADES FILTROS.
Si las zonas del filtro y la boisa no est_n atascadas,
examine la zona de ta manguera Retire el extreme
inferiorde la manguera expansible de la aspiradora
tom,_ndola per el collar y tirando de hacia arriba.
Extienda y
afloje la
manguera
Enchufefa
asplradoray
enci_ndala
Estire al m,_ximo
la mangueray
tuegopermtta
que se encoja
hasla su tamaf_o
normal de alma-
cenamiento,
lnserte nuevamentela manguera enlaabertura de
la parteinferiorde donde la retIr6,Empujecon fir-
meza para asegurarsede que quede bien conec-
tada,
-Manguera
expansible
Collar de la
manguera
1
ADVERTENciA .....
I Peligrode lesi6npersonal
NO coloque nuncalas manos ni los pies
debajo de la unldad. Et agitador dar_
vueltas rdpidamentecuanda la aspiradora
est_ encendiday est_ en la postct6n"car-
pet setting"(con alfombra).
Si las _,reasde la bolsa y del filtro y las&teas de la
mangueraest&n tibresde obstrucciones,
desconeOe la mangueradel tube de la boquilla y
revise si hay residues de polvo en la tube de la
boquitta,V_ase LtMPIEZA DELAGITADORpara
limpieelagitador
Cotoquela aspiradoraen la posici6n vedica[ antes
de conectarlaenel enchufe,
18
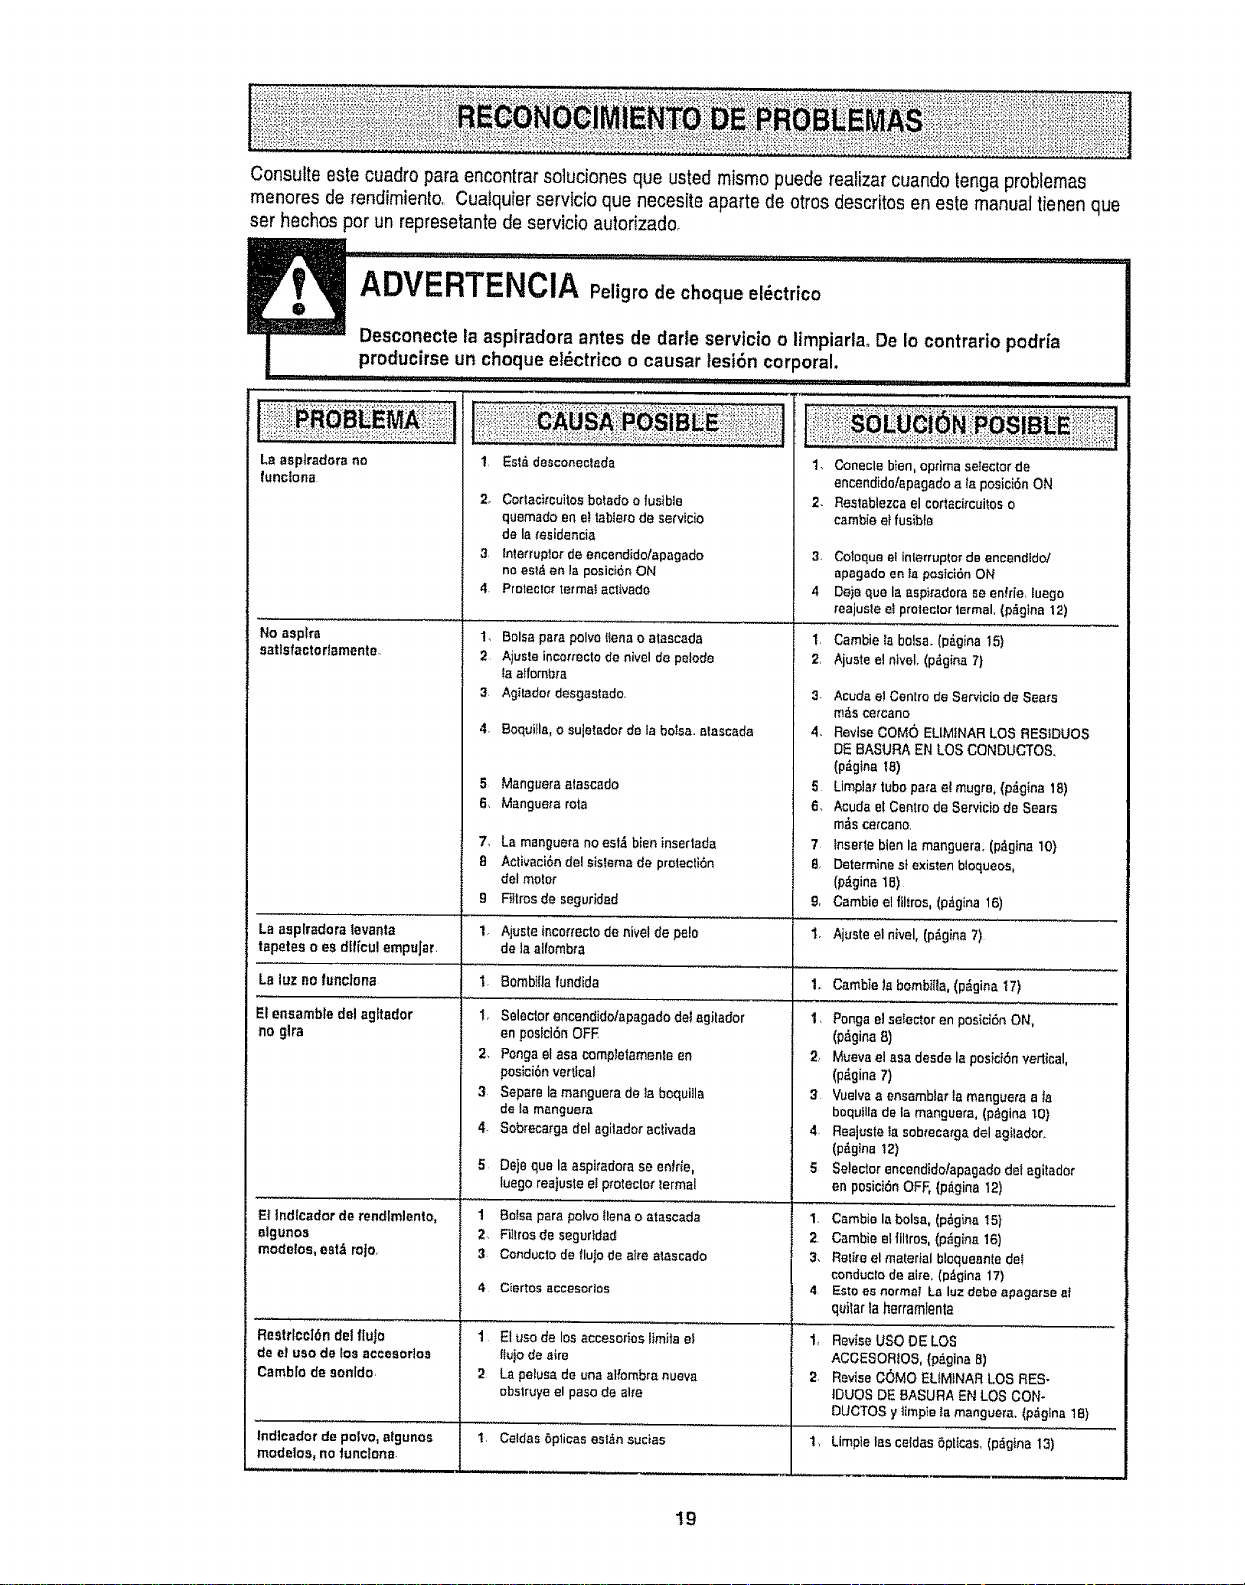
Consulteestecuadroparaencontrarsoludones que usted rnismo puede realizarcuando tenga problemas
menores de rendimiento, Cualquierservic{o qua necesite aparte de otros descritos en este manualtienen que
set hechos per un represetantedeservicio aulofizado,
ADvERTFNCIA pe;;; iod: c,oq _C r;co I''!...........
ue el t
Desconectela asplradora antes de darle servicio o limpiarla. De Io contrado podria
producirseun cheque ei6ctnco o causar lesi6n corporal.
.................. I1"' '1'I..... I,I I,, i I j, Ull
La asptradora no
Iunciona
No asplra
satisfactodamente.
LB BspIr_doratevanta
tepetes o es dtf{cul empuJar.
LB luz no funciona
El ensemble dal agltador
no glra
El Indlcador de rendlmlento,
algunos
modelos, estd roJo,
Resttlccl6n del flulo
de et use de los aeceaodoa
CambIo de eonldo,
Indieadot de polvo, aigunos
modelos, no functone.
1. Est,. desconectada
2_ Corlac)rcuitos belado o Ius'tble
quemado en e! Iabtero de servido
de le_'esidencis
3. lnterruplor de encendido/apagado
no estd an la pasici6n ON
4. Proteclor termai aativado
14 Balsa para polvo tfena o alaaeada
2 Ajuste inca,'rectode nivel de petode
Isaffombra
3. Agilador desgastado.
4. BoquiIla, o suletador de la balsa, atascada
Ajusteincor{ectode niveIde p_{o
de laaifombra
BombiIla fundida
Selador encandido/apagada det agitador
en posici6n OFF
Pongs el asa compIetamenta en
pos_ci6nvertical
Sepere la manguers de _a boquilla
de lamanguera
Sobrecm'gs del agilador activada
5 Manguera afascado
6. Manguera mf_a
7. Ls manguera no est,i bien inserlada
B Activaci6n del sisIema de prolecti6n
del meier
9 Ftltrosde seguridad
1.
I,
t.
2,
3
4-
5 Deje qua la asp|radars se entree,
luego reajuste el pfoteclo_ _ermal
1 Balsa para polvotlena o atascada
2, FiIltos de segurIdad
3 Conducto de flulo de aire alascado
Ciar|05 $1CCeSOrIOS
1 El use de los accesorias ltmila et
fiu}o de aire
2 Ls petusa de una al_'ombranueva
obslruye el paso de alre
......... i
I .........................................................
1. Conecle b}en, optima selector de
encendido/apsgados {aposicidnON
2- Restablezca el cortaci_cui_oso
csmbie e} fusible
3. Co'_oqueel interrup{orde encendldol
apagado en la pastci6n ON
4 De}a qua la aspicadore se entrle, iuego
tealuste e_ptolecto_lermal, (p_gtna 12}
t. Cambie Iabalsa. (p_gins 15)
2. Aiuste el niveL (p_gina 7)
3. Acuda e! Centre da Servicla de Sears
m_,see_cano
4. Revise COMe ELIMfNAR LOS RESIDUES
DE BASURA EN LOS CONDUCTOS,
(p_gina 18)
5 Limpla_tube para e! mugre+ (p,_gina 18)
6. Acuda el Centre de Servicio de Sears
m_,sce_cano.
7 fnserte bien Is manguera. (p_glna 10}
8 Determine slexistenbloqueos,
Ip_,gina 1B)
9, Gamble el filtros, (p_gina 16)
I. Ajusteelnivel,(p_gins7)
1. Gambie _ebombilia, (p_gina IT)
I, Ponga el seIector en posici6n ON,
(p_gina 8)
2. Mueva el ass desde la pesi_t6n vertical,
(p,_gina 7)
3 Vuelvs a ensamblar !a msngueta a is
boquilla de la manguera, (p&gina 10}
4. Reajuste Is sobteca_ga del sgilador.
(p6gina 12)
5 Setecior encendido/apagade det agitador
en posici5n OFF, (p_igina 12)
1. Cambie la balsa, (p_gina I5)
2. Cambie el |Iltros, (p_gina 16)
3, Retire el material bloqueanle de_
conduclo de ah'e_(p_oina 17)
4 EsIo es normal La luz debe apagarae aI
quitar la herramlenta
1, Rev{se use DE LOS
ACGESORtOS, (p_gina B)
2. Revise C_MO ELIMINAR LOS RES-
IDUES DE BASURA EN LOS CON-
DUCTOS y timple la manguers. (pdglna tB)
I. Celdas 5plicas estdn sudas I, Limpie las celdas6pt{css. (p_gina 13)
19
Sears se complace en ofrecer a sus clientes servicio de reparaci6n de aparatos
electrodom_sticos y electr6nicos de todas las marcas,
En Sears, usted puede contar con operadores en espaSol, a los que puede Ilamr
sin cargo alguno.
Para pedir servicio de reparaci6n a domocillio, Llame 24 horas al dfa, 7 dfas a la semana
1-800-676-5811
Para ordenar piezas con entrega a domocilfio, Llame 24 horas af dfa, 7 dfas a la semana
1-800-659-7084
TheServiceSideof Sears."
20