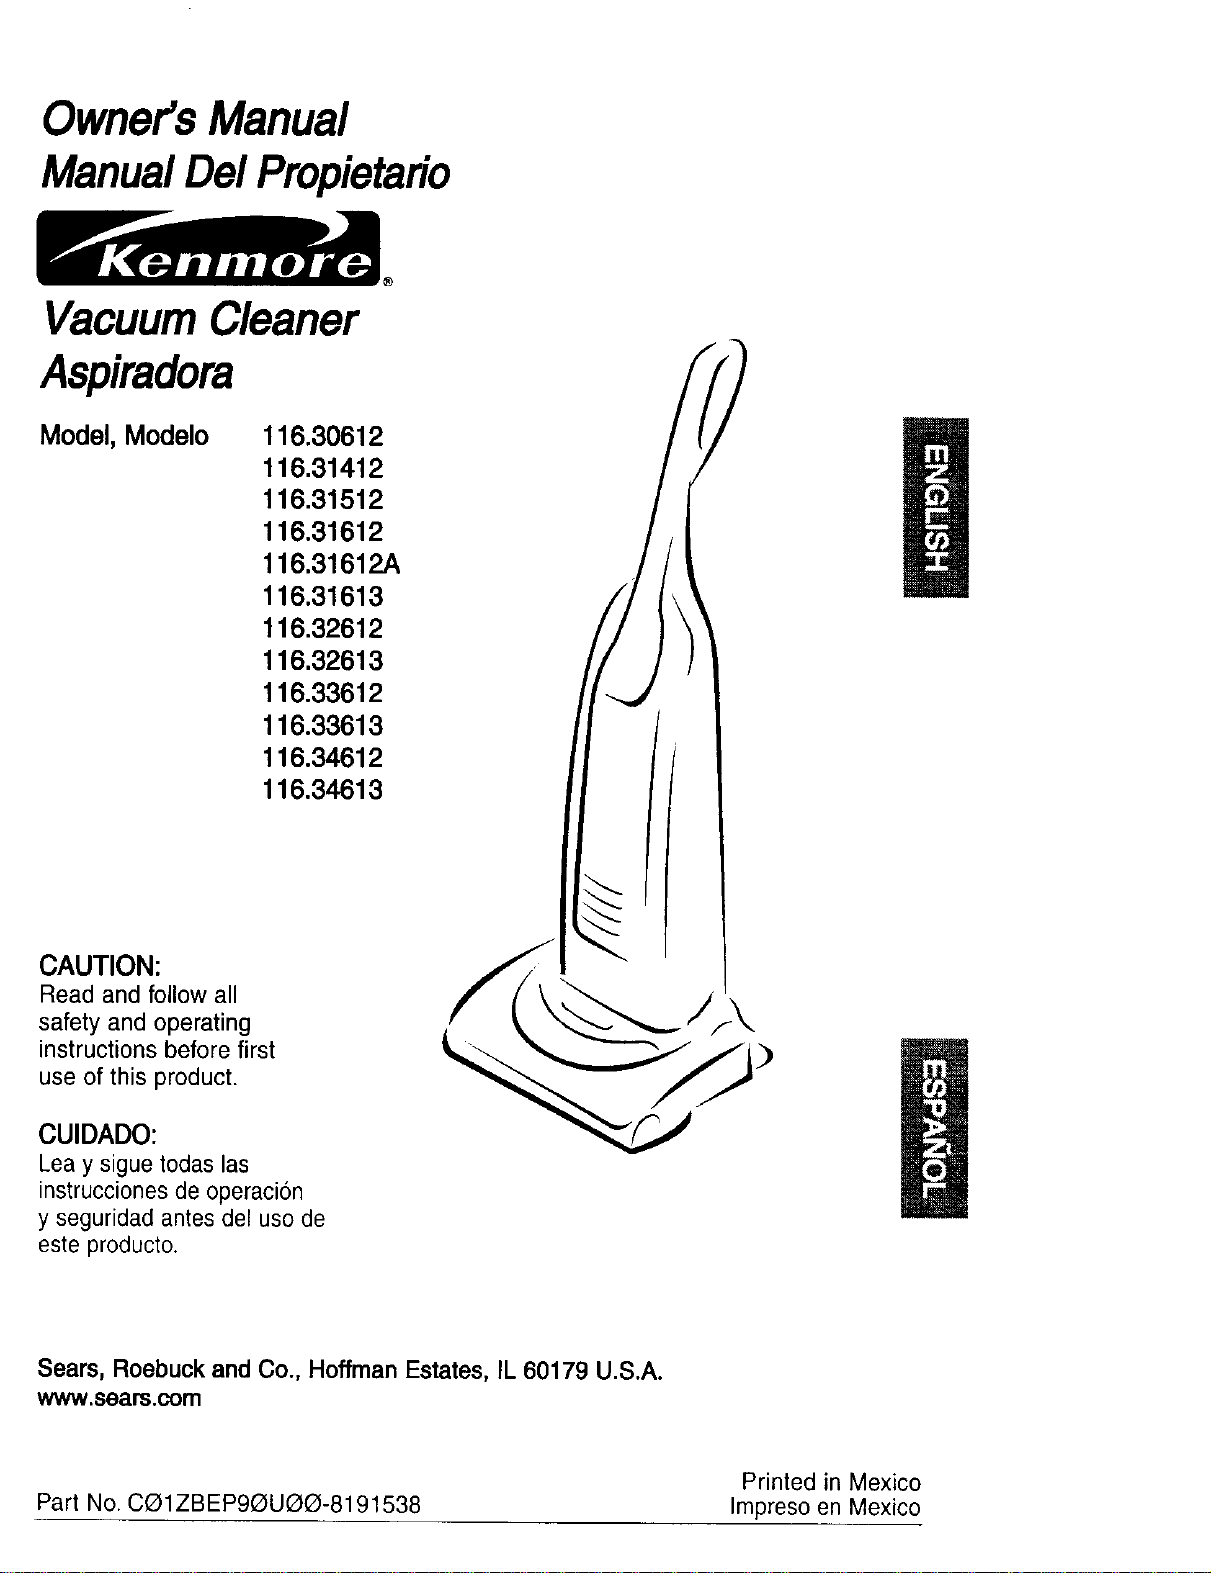
Owner'sManual
ManualDelPropietario
VacuumCleaner
Aspiradora
Model, Modelo
116.30612
116.31412
116.31512
116,31612
116.31612A
116.31613
116,32612
116,32613
116.33612
116.33613
116.34612
116.34613
CAUTION:
Read and follow all
safety and operating
instructions before first
use of this product.
CUIDADO:
Lea y sigue todaslas
instrucciones de operacion
y seguridad antes del uso de
este producto.
Sears, Roebuck and Co., Hoffman Estates, IL 60179 U.S.A.
www.sears.com
Printed in Mexico
Part No. C_1ZBEP90UO(3-8191538 Impreso en Mexico
Before UsingYour New Vacuum ........ 2
KenmoreVacuum Cleaner Warranty .... 2
ImportantSafety Instructions ........... 3
Parts and Features ................... 4
Assembly Instructions ............... 5-6
Operating Instructions................. 6
Pile HeightSelection and Setting ........ 7
Carpet/Bare FloorSelector ............ 7
Releasing the Handle ................. 8
ON/OFF Switch ..................... 8
Attachments ..................... 8-10
AttachmentUse Chart ............... 10
VacuumingTips .................... 11
PerformanceFeatures ............. 11-12
Vacuum Cleaner Care ............... 13
vacuum Storage ................... 13
Cleaning Exteriorand Attachments ..... 13
Dust Bag Changing ................. 14
FilterChanging .................... 15
Belt Changingand AgitatorCleaning .. 16-18
Clog Removal ..................... 19
LightBulb Changing ................. 20
AgitatorServicing ................... 21
AgitatorAssembly .................. 21
Troubleshooting ..................... 22
RequestingAssistance
Or Service ................... BackPage
Please read this guide. It will help you assemble and operate your new Kenmore vacuum in
the safest and most effective way.
For more information about vacuum cleaner care and operation, call your nearest Sears store.
You will need the complete model and serial numbers when requesting information. Your vacu-
um's model and serial numbers are located on the Model and Serial Number Plate.
Use the space below to record the model number and serial number of your new Kenmore
vacuum. \.
Model No.
Serial No.
Date of Purchase
Keep this book and your sales check (receipt) in a safe place for future reference.
LIMITED ONE YEAR WARRANTY ON KENMORE VACUUM CLEANER
This warranty is for one year from the date of purchase, and includes only private household
vacuum cleaner use. During the warranty year, when this vacuum cleaner is operated and
maintained according to the owner's manual instructions, Sears will repair any defects in
material or workmanship free of charge.
This warranty excludes vacuum bags, belts, light bulbs, and filters, which are expendable parts
and become worn during normal use.
Forwarranty service, return this vacuum cleaner tothe nearest Sears Service Center inthe
UnitedStates.
This warranty applies only while this product is in use in the United States. This warranty gives
you specific legal rights, and you may also have other rights which vary from state to state.
Seam, Roebuck and Co., D/817 WA, Hoffman Estates, IL 60179
Your safety Is importantto us.To reducethe riskoffire, electricalshock, Injury to
personsor damage when usingyourvacuum cleaner, follow basicsafety precautions
including the following:
Read this manual before assembling or
using your vacuum cleaner.
Use your cleaner only as described in
this manual. Use only with Sears recom-
mended attachments.
To reduce the risk of electrical shock -
Do not use outdoors or on wet surfaces.
Disconnect electrical supply before any
servicing or cleaning. Failure to do so
could result in electrical shock or per-
sonal injury.
Always turn cleaner off before unplug-
ging.
Do not unplug by pulling on cord. To
unplug, grasp the plug, not the cord.
Do not use with damaged cord or plug.
If cleaner is not working as it should,
has been dropped, damaged, left out-
doors, or dropped into water, return it to
a Sears Service Center.
Do not pull or carry by cord, use cord as
a handle, close door on cord, or pull
cord around sharp edges or corners.
Do net run cleaner over cord. Keep cord
away from heated surfaces.
Do not leave cleaner when plugged in.
Unplug from outlet when not in use and
before servicing.
Do not allow to be used as a toy. Close
attention is necessary when used by or
near children.
Do not handle plug or cleaner with wet
hands.
Do not put any objects into openings.
Do not use with any opening blocked;
keep free of dust, lint, hair and anything
that may reduce air flow.
Keep hair, loose clothing, fingers, and
all parts of body away from openings
and moving parts.
Do not use cleaner without dust bag
and/or filters in place.
Always change the dust bag after vacu-
uming carpet cleaners or freshener,
powders and fine dust. These products
clog the bag, reduce airflow and can
cause the bag to burst. Faiture to
change bag could cause permanent
damage to the cleaner.
Do not use the cleaner to pick up sharp
hard objects, small toys, pins, paper
clips, etc. They may damage the clean-
er or dust bag.
DO not pick up anything that is burning
or smoking, such as cigarettes, match-
es, or hot ashes.
DO not use cleaner to pick up flammable
or combustible liquids (gasoline, clean-
ing fluids, perfumes, etc.), or use in
areas where they may be present. The
fumes from these substances can cre-
ate a fire hazard or explosion.
Use extra care when cleaning on stairs.
Do not put on chairs, tables, etc. Keep
on floor.
You are responsible for making sure
that your vacuum cleaner is not used by
anyone unable to operate it properly.
SAVE THESE INSTRUCTIONS
Proper assembly and safe use of your vacuum cleaner are your responsibilities. Your
cleaner is intended only for household use. Read this Owner's Manual carefully for
important use and safety information. This guide contains safety statements under
warning and caution symbols. Please pay special attention to these boxes and follow
any instructions given. WARNING statements alert you to such dangers as fire, elec-
trical shock, burns and personal injury. CAUTION statements alert you to such dan-
gers as personal injury and/or property damage.
3
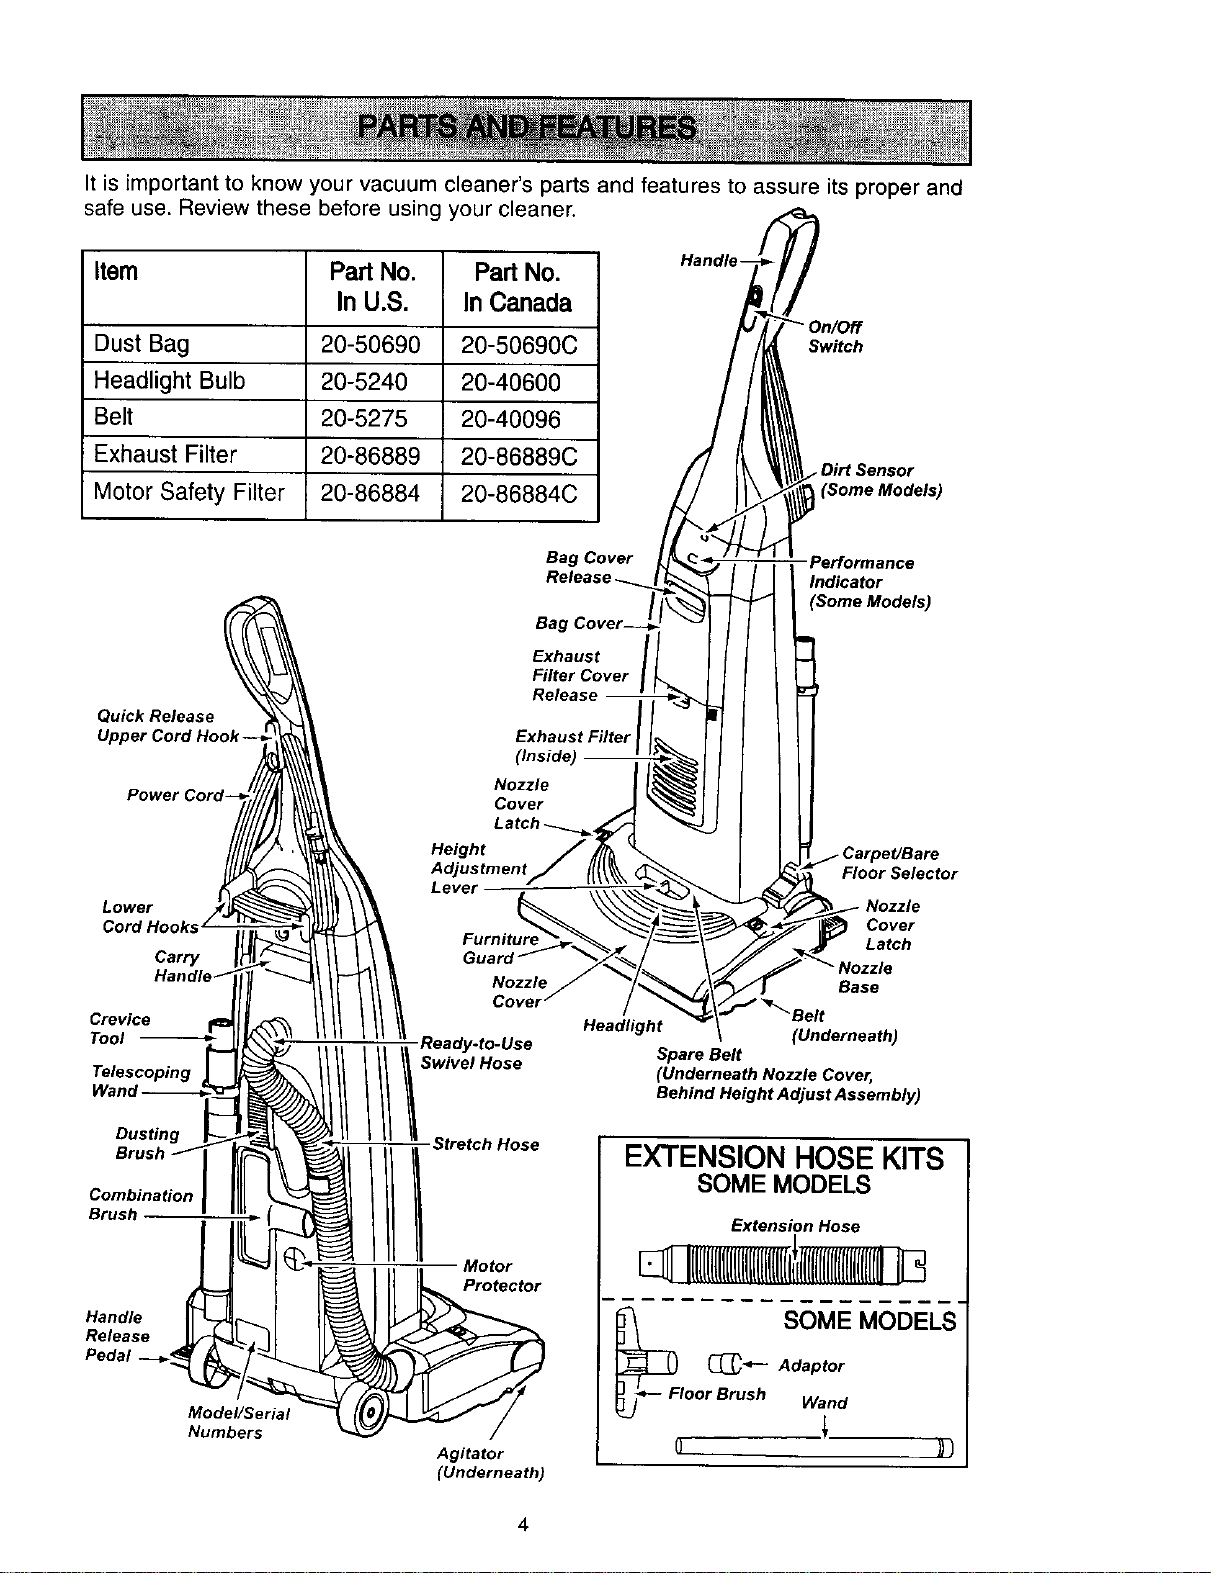
It is important to know your vacuum cleaner's parts and features to assure its proper and
safe use. Review these before using your cleaner.
Item Part No. Part No.
In U.S. In Canada
Dust Bag 20-50690 20-50690C
Headlight Bulb 20-5240 20-40600
Belt 20-5275 20-40096
Exhaust Filter 20-86889 20-86889C
Motor Safety Filter 20-86884 20-86884C
Switch
Bag Cover
Performance
Indicator
(Some Models)
Quick Release
Exhaust
Filter Cover
Release
Exhaust Filter
Power
Lower
Cord Hooks
Carry
Han
Crevice
Tool
Telescoping
Dusting
Combination
Brush
Handle
Release
Pedal
Model/Serial
Numbers
Height
Lever
Swivel Hose
Stretch Hose
Motor
Protector
Agitator
(Underneath)
Headlight
Floor Selector
Nozzle
Cover
Latch
Base
(Underneath)
Spare Belt
(Underneath Nozzle Cover,
Behind Height Adjust Assembly)
EXTENSION HOSE KITS
SOME MODELS
Extension Hose
[lUIUUIHIIlllIIII
_FI SOME MODELS"
_-t--- Adaptor
oor Brush Wand
4
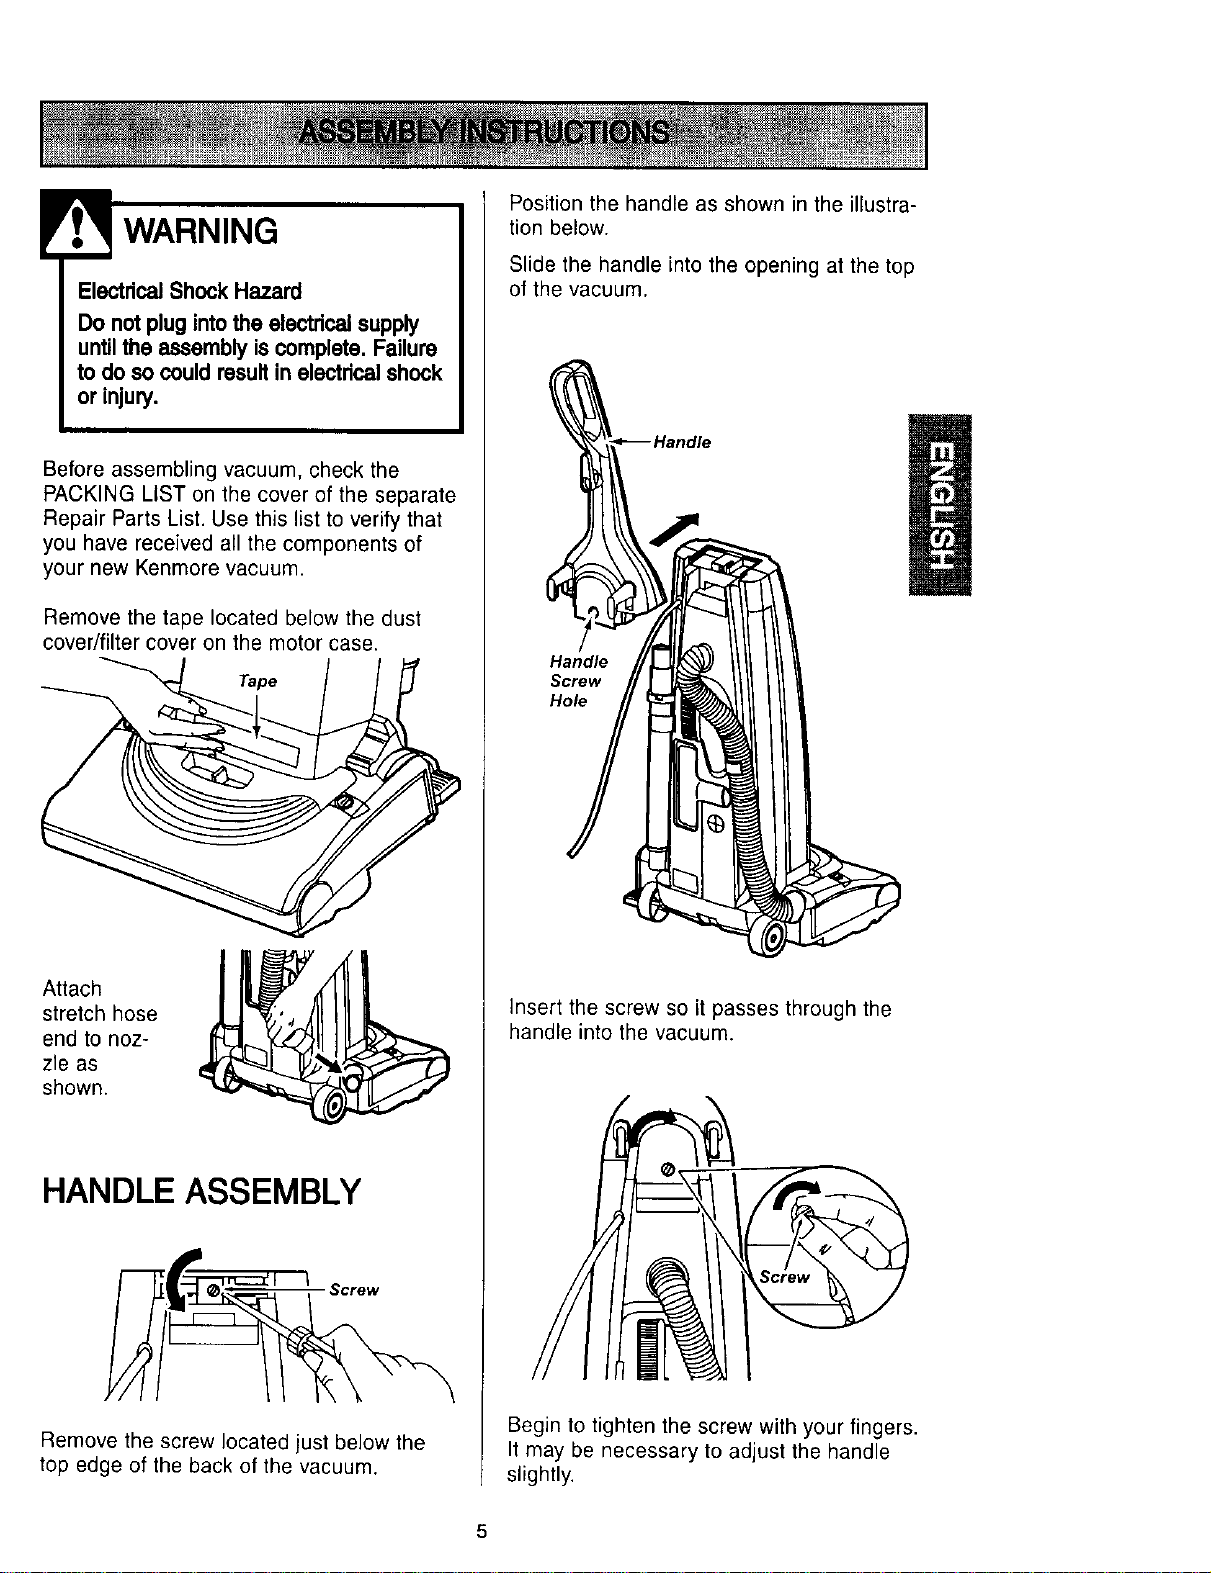
! WARNING
ElectricalShock Hazard
Do not plugintothe electricalsupply
untilthe assembly iscomplete. Failure
to do so could resultin electrical shock
or injury.
Before assembling vacuum, check the
PACKING LIST on the cover of the separate
Repair Parts List. Use this list to verify that
you have received all the components of
your new Kenmore vacuum.
Remove the tape located below the dust
cover/filter cover on the motor case.
Tape
Attach
stretch hose
end to noz-
zle as
shown.
HANDLE ASSEMBLY
Screw
Remove the screw located just below the
top edge of the back of the vacuum.
Position the handle as shown in the illustra-
tion below.
Slide the handle into the opening at the top
of the vacuum.
Handle
Screw
Hole
Insert the screw so it passes through the
handle into the vacuum.
Begin to tighten the screw with your fingers.
It may be necessary to adjust the handle
slightly.
5

Using a
screw-
driver,
tighten
the
screw.
Do not overtighten.
Overtightening could stdp the screw
holes.
Do not operate the cleaner without
the screw in place.
CORD ASSEMBLY
Make sure the quick release upper cord
hook is in the upright position. Remove
the wire tie from the power cord.
Lock the cord
into place by
forcing it into the
locking notch on
the body of the
quick release
upper cord hook
as shown. This
helps keep the
power cord out
from under the
vacuum cleaner
agitator.
Power
Cord
Wrap the power cord around the upper
and lower cord hooks and lock the power
cord plug onto the power cord.
Quick Releas
Upper Cord
Hook
Power
Cord
Cord
HOW TO START
Quick Release
er Cord
1. Turn the
quick
release
upper cord
hook to
either side
and down to
release the
power cord.
2. Release the power cord plug from the
power cord and pull the cord off the quick
release upper cord hook. Check to be
sure the power cord is still locked into the
lock in the quick release upper cord hook.
3. Check to see if the cleaner has bag
installed. See DUST BAG CHANGING.
NOTE: To reduce the risk of electric
shock, this vacuum cleaner has a polar-
ized plug, one blade is wider than the
other.
This plug will fit in a polarized outlet only
one way. If the plug does not fit fully in the
outlet, reverse the plug. If it still does not
fit, contact a qualified technician to install
the proper outlet. Do not change the plug
in any way.
4. Plug the polarized power cord into a
120 Volt outlet located near the floor.
• WARNING
Personal Injury and Product Damage
Hazard
• DO NOT plug in if switch is in the ON
position. Personal injury or damage could
result.
• DO NOT use outlets above counters.
Damage to items in surrounding area
could occur.
I
i
I
6
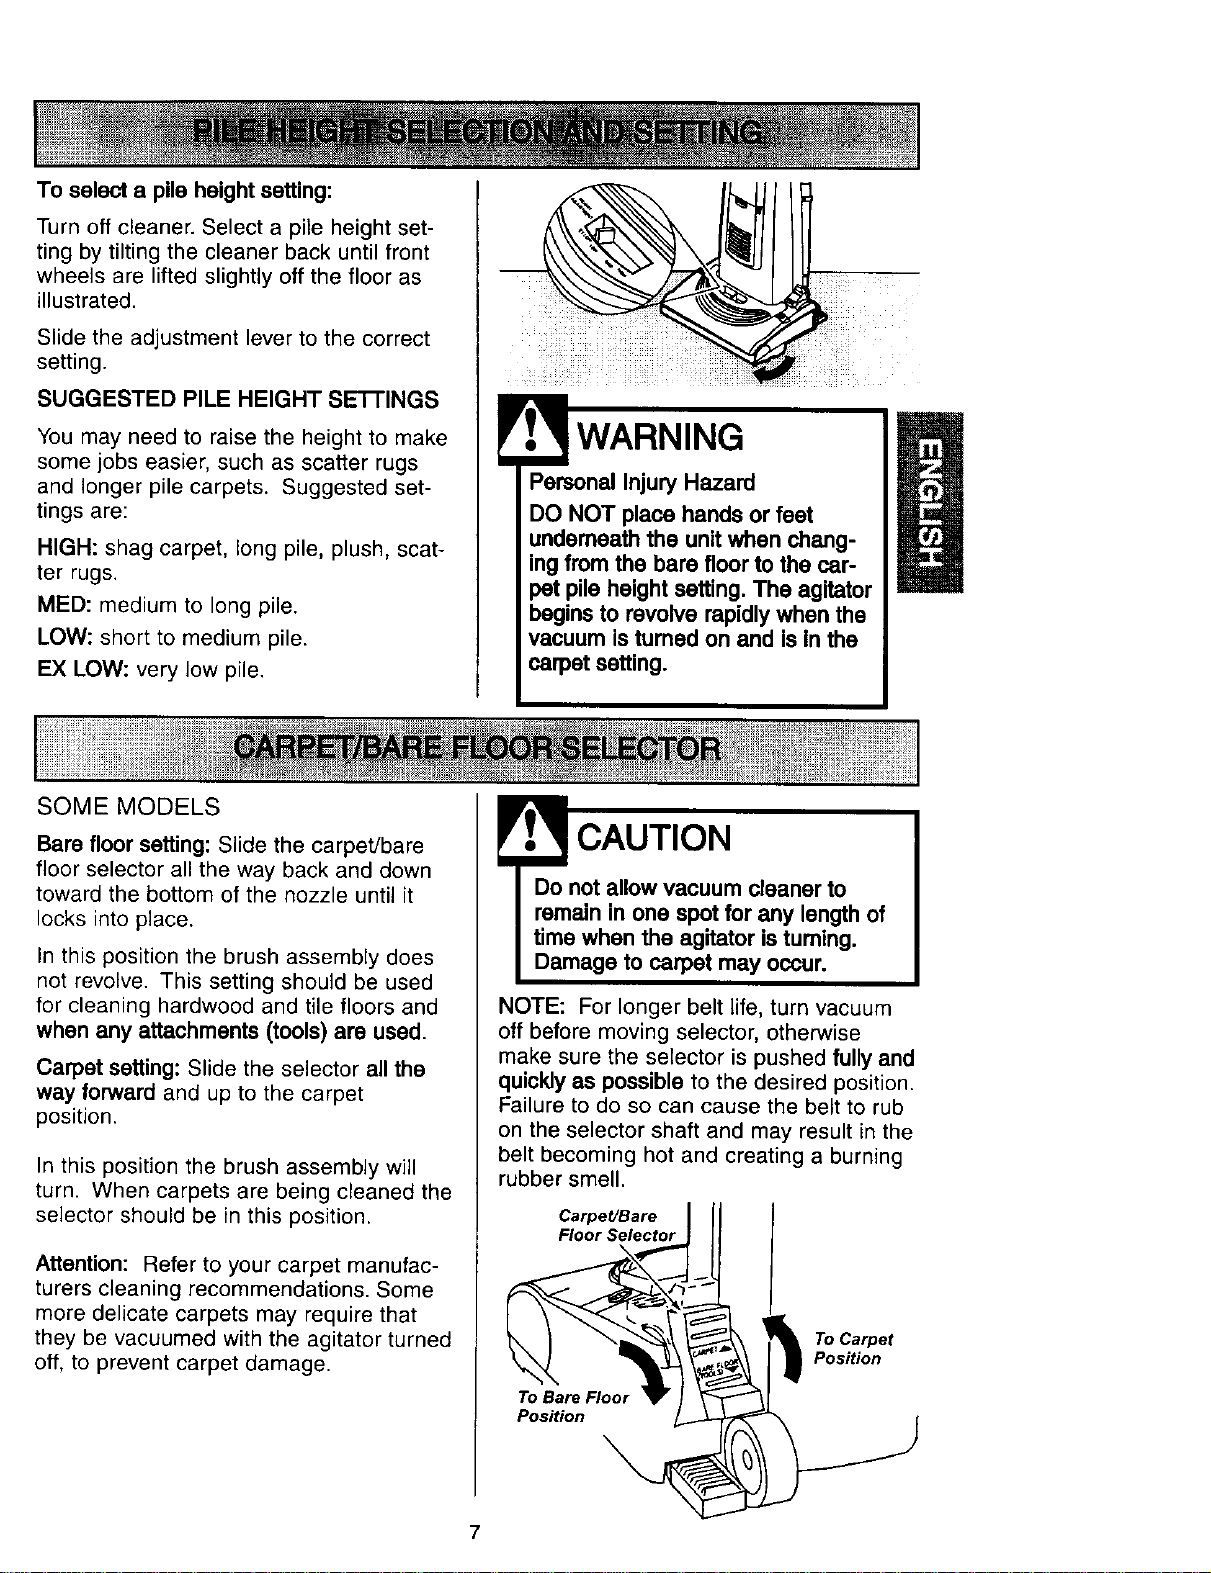
To select a pile height setting:
Turn off cleaner. Select a pile height set-
ting by tilting the cleaner back until front
wheels are lifted slightly off the floor as
illustrated.
Slide the adjustment lever to the correct
setting.
SUGGESTED PILE HEIGHT SE'I-FINGS
You may need to raise the height to make
some jobs easier, such as scatter rugs
and longer pile carpets. Suggested set-
tings are:
HIGH: shag carpet, long pile, plush, scat-
ter rugs.
MED: medium to long pile.
LOW: short to medium pile.
EX LOW: very low pile.
SOME MODELS
WARNING
Personal Injury Hazard
DO NOT place hands or feet
underneath the unit when chang-
ing from the bare floor to the car-
pet pile height setting. The agitator
begins to revolve rapidly when the
vacuum is tumed on and Is In the
carpet setting.
Bare floor setting: Slide the carpet/bare
floor selector all the way back and down
toward the bottom of the nozzle until it
locks into place.
In this position the brush assembly does
not revolve. This setting should be used
for cleaning hardwood and tile floors and
when any attachments (tools) are used.
Carpet setting: Slide the selector all the
way forward and up to the carpet
position.
In this position the brush assembly will
turn. When carpets are being cleaned the
selector should be in this position.
Attention: Refer to your carpet manufac-
turers cleaning recommendations. Some
more delicate carpets may require that
they be vacuumed with the agitator turned
off, to prevent carpet damage.
CAUTION
Do not allow vacuum cleaner to
remain in one spot for any length of
time when the agitator is turning.
Damage to carpet may occur.
NOTE: For longer belt life, turn vacuum
off before moving selector, otherwise
make sure the selector is pushed fully and
quickly as possible to the desired position.
Failure to do so can cause the belt to rub
on the selector shaft and may result in the
belt becoming hot and creating a burning
rubber smell.
Carpet/Bare
Floor Selector
To Bare Floor
Position
To Carpet
Position
7
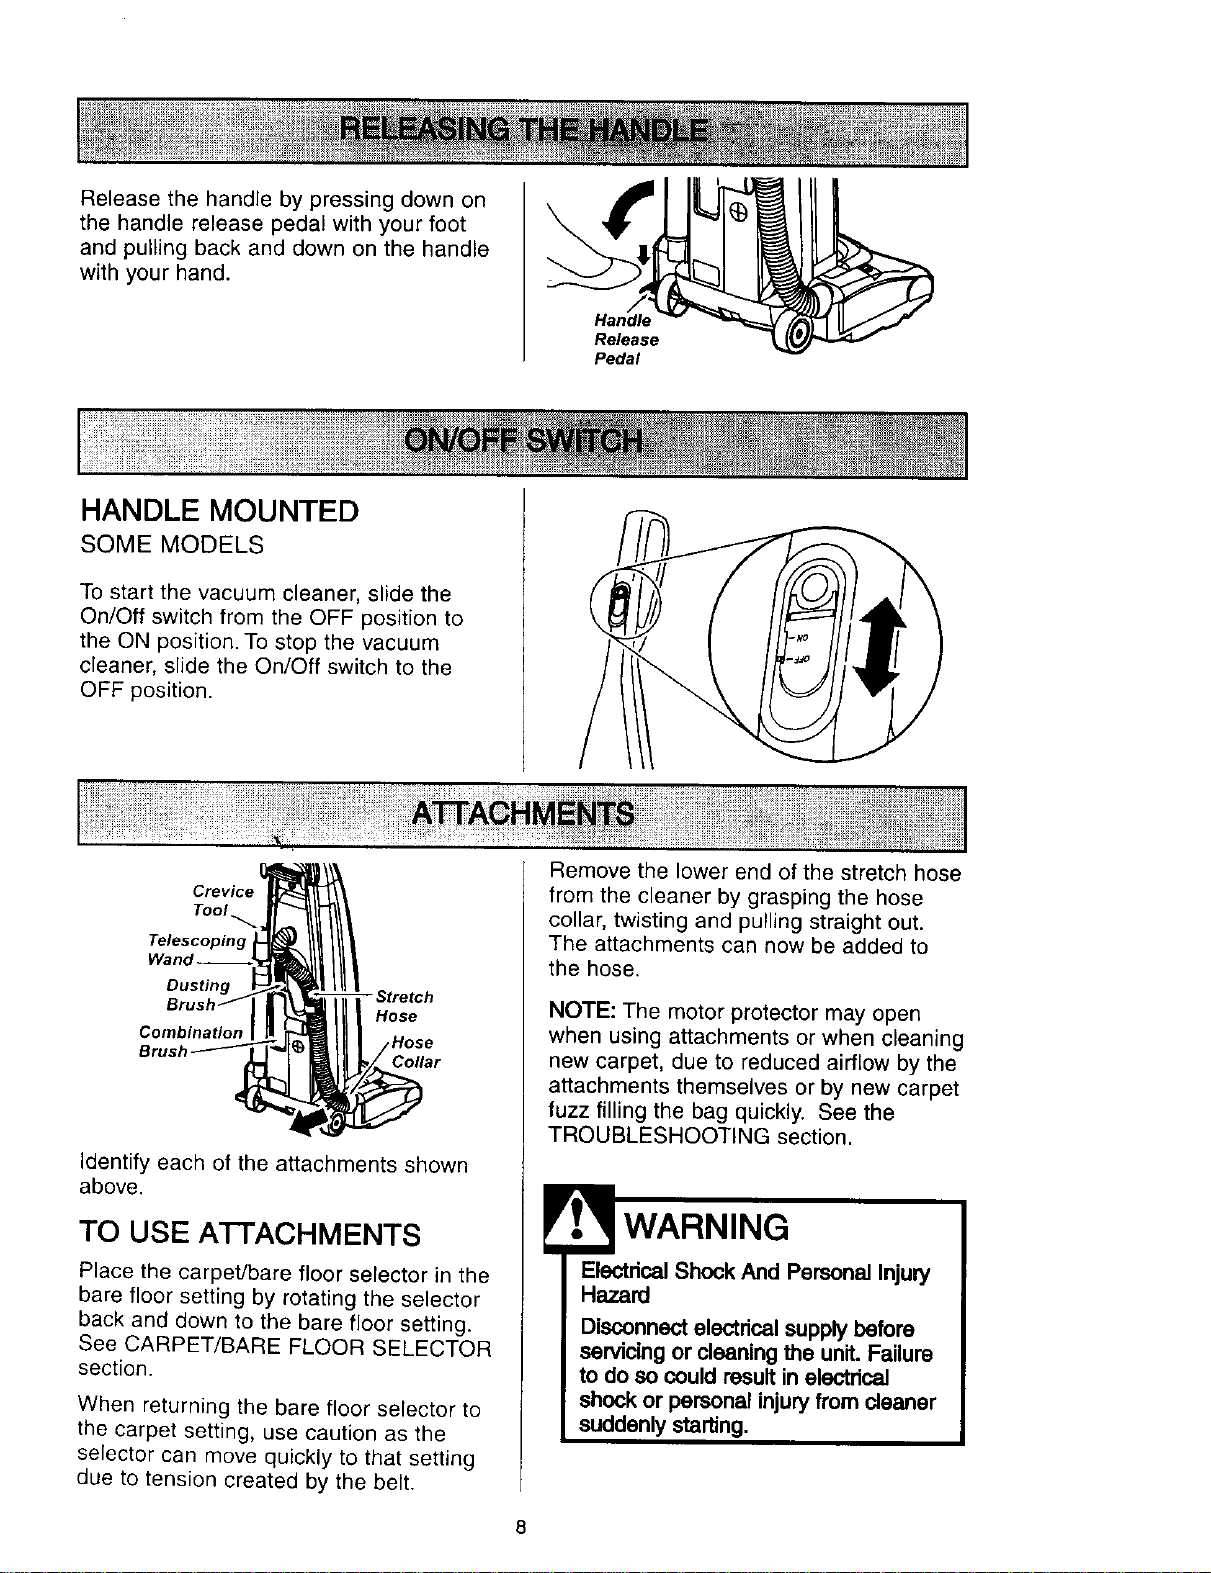
Release the handle by pressing down on
the handle release pedal with your foot
and pulling back and down on the handle
with your hand.
HANDLE MOUNTED
SOME MODELS
iL,
To start the vacuum cleaner, slide the
On/Off switch from the OFF position to
the ON position. To stop the vacuum
cleaner, slide the On/Off switch to the
OFF position.
Crevice
Tool
Telescoping
Wanq
Dusting
Combination
- Stretch
Hose
Collar
Identify each of the attachments shown
above.
TO USE ATTACHMENTS
Place the carpet/bare floor selector in the
bare floor setting by rotating the selector
back and down to the bare floor setting.
See CARPET/BARE FLOOR SELECTOR
section.
When returning the bare floor selector to
the carpet setting, use caution as the
selector can move quickly to that setting
due to tension created by the belt.
Remove the lower end of the stretch hose
from the cleaner by grasping the hose
collar, twisting and pulling straight out.
The attachments can now be added to
the hose.
NOTE: The motor protector may open
when using attachments or when cleaning
new carpet, due to reduced airflow by the
attachments themselves or by new carpet
fuzz filling the bag quickly. See the
TROUBLESHOOTING section.
WARNING
Electrical Shock And Personal Injury
Hazard
Disconnect electrical supplybefore
servicing or cleaning the unit.Failure
to do so could resultin eloctrical
shock or personal injuryfrom cleaner
suddenly starting.
8
The attached
hose swivels to
make cleaning
easier in every
direction.
Remove the
hose from the
hose clip by
pulling straight
out.
TELESCOPING WAND WITH
SUCTION CONTROL SLIDE
SOME MODELS
Crevice Remove the
Toot telescoping
wand from
,Telescoping its storage
Wand position.
Remove the crevice tool from its storage
position in the wand. Turn the locking ring to
the UNLOCK position.
Extend the wand to its full length. Turn the
locking ring to the LOCK position. Attach the
extension wand onto the open end of the
hose.
Suction
Wand _ _. Control Slide
Upper
Wand
Align the tabs on the extension wand with
the "J" slots in the hose. Push the wand into
the hose and twist to the right to lock.
To achieve maximum reach with
the attachments, add the
crevice
tool to the end of
the wand by Suction
inserting and Control
Slide--_
twisting slightly.
Wand
Crevice
Tool
When using the
dusting brush
or the combina-
tion brush, they
may be
attached direct-
ly to the wand
or placed on
the end of the
crevice tool.
TO OPERATE SUCTION
CONTROL SLIDE
Telescoping Wand
When using
attachments Suction
for cleaning Control
Slide
draperies,
small rugs
with low pile
and other
delicate
items, twist
the suction control slide to the open position.
This lever is located on the telescoping
wand, close to the hose.
This will reduce suction for ease of cleaning.
NOTE: Return suction control slide to the
closed position for normal cleaning.
CAUTION
Whenusingattachments,becarefulnot_o
overextendbhes_ch hosewhenreaching.
T_ng toreach_ thehosestretch
capabililycouldcauselhe clearerto_pova-.
Makesuretheca,'l:mM:m_floorselectorisin
the barefloorposition.Damagetolhefloor
surfacemayoccurifthecaipet_ is
used.
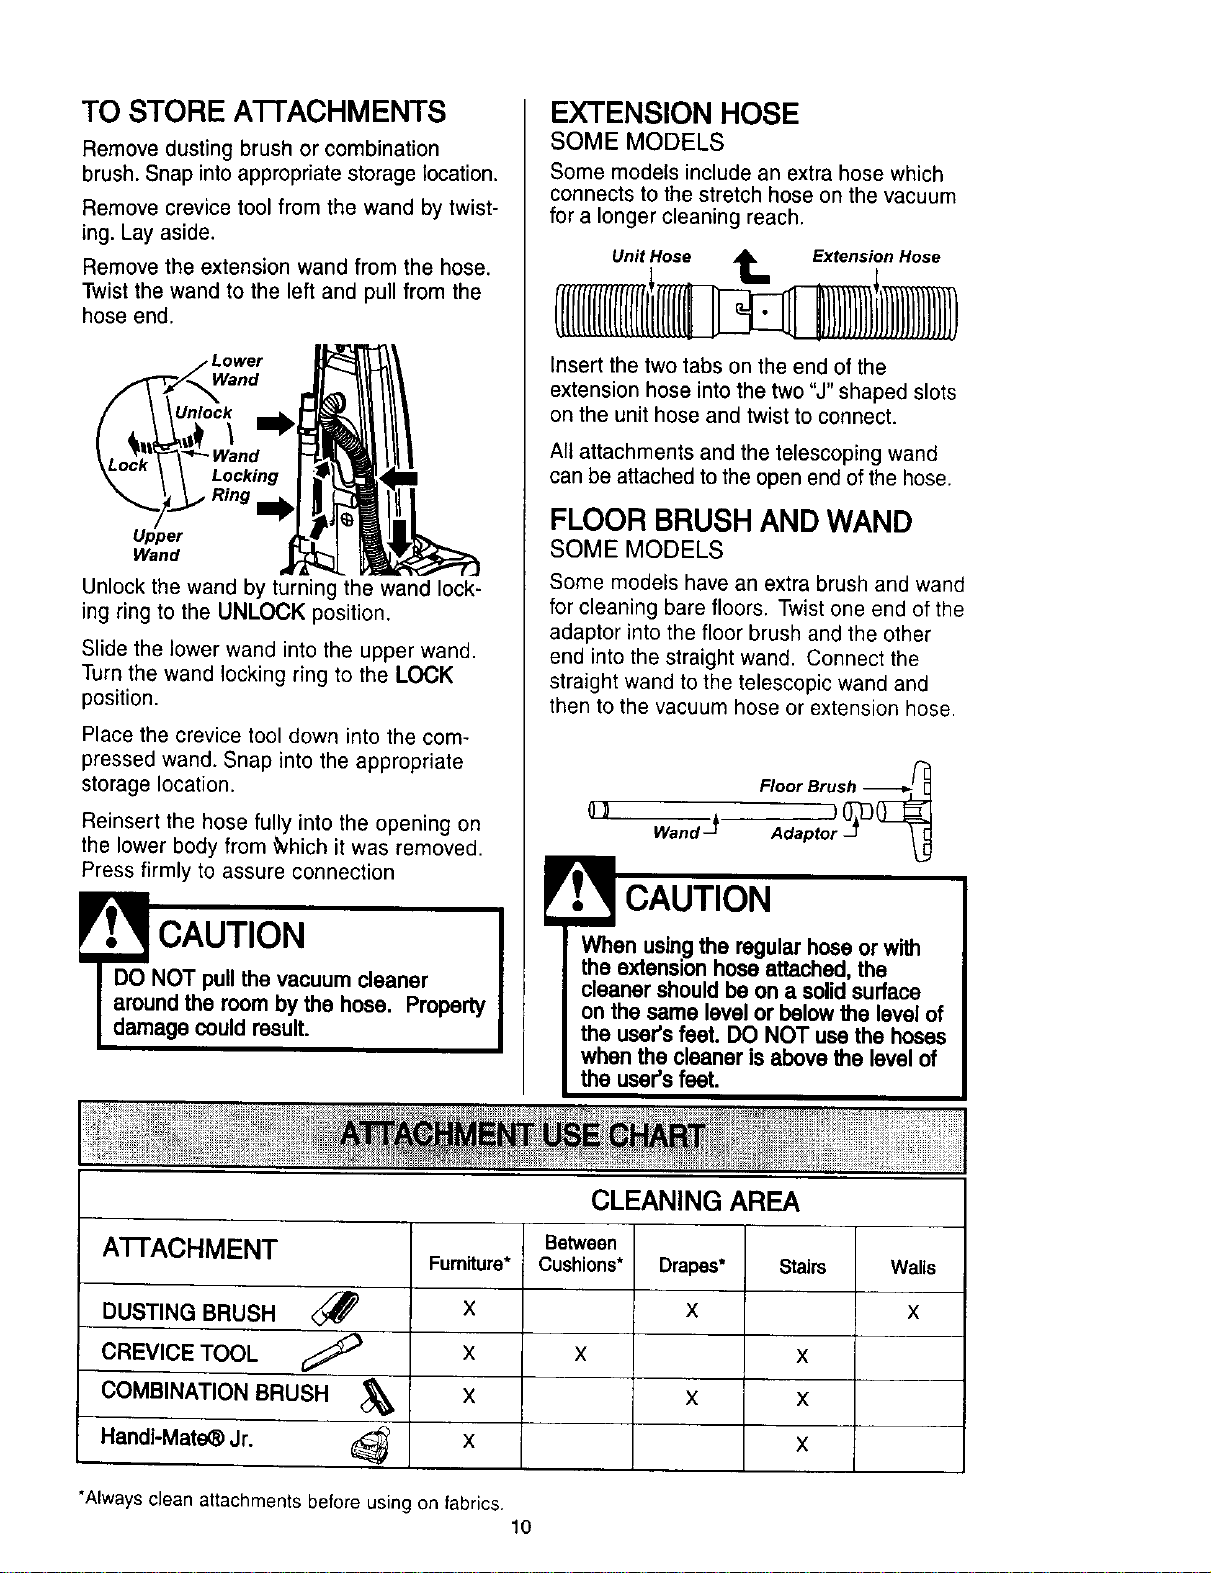
TO STORE A'I-I'ACHMENTS
Remove dusting brush or combination
brush. Snap into appropriate storage location.
Remove crevice tool from the wand by twist-
ing. Lay aside.
Remove the extension wand from the hose,
Twist the wand to the left and pull from the
hose end.
ower
Wand
Unlock
\
Locking
Ring
Upper
Wand
Unlock the wand by turning the wand lock-
ing ring to the UNLOCK position.
Slide the lower wand into the upper wand.
Turn the wand locking ring to the LOCK
position.
Place the crevice tool down into the com-
pressed wand. Snap into the appropriate
storage location.
Reinsert the hose fully into the opening on
the lower body from _hich it was removed.
Press firmly to assure connection
DO NOT pull the vacuum cleaner
around the room by the hose. Property
damage could result.
EXTENSION HOSE
SOME MODELS
Some models include an extra hose which
connects to the stretch hose on the vacuum
for a longer cleaning reach.
Unit Hose _ Extension Hose
Insert the two tabs on the end of the
extension hose into the two "J" shaped slots
on the unit hose and twist to connect.
All attachments and the telescoping wand
can be attached to the open end of the hose.
FLOOR BRUSH AND WAND
SOME MODELS
Some models have an extra brush and wand
for cleaning bare floors. Twist one end of the
adaptor into the floor brush and the other
end into the straight wand. Connect the
straight wand to the telescopic wand and
then to the vacuum hose or extension hose.
Floor Brush -_'-_L_
wandJ
When usingthe regular hose orwith
the extension hose attached,the
cleaner shouldbe on a solidsurface
on the same level or below the levelof
the user'sfeet. DO NOT usa the hoses
when the cleaner isabove the level of
the user'sfeet.
CLEANING AREA
A'I-FACHMENT
DUSTING BRUSH <_
CREVICE TOOL
COMBINATION BRUSH
Handi-Mate_ Jr.
Furniture*
X
X
X
X
Between
Cushions*
Drapes*
X
Stairs
X X
X X
X
"Always clean attachments before using on fabrics.
10
Walls
X
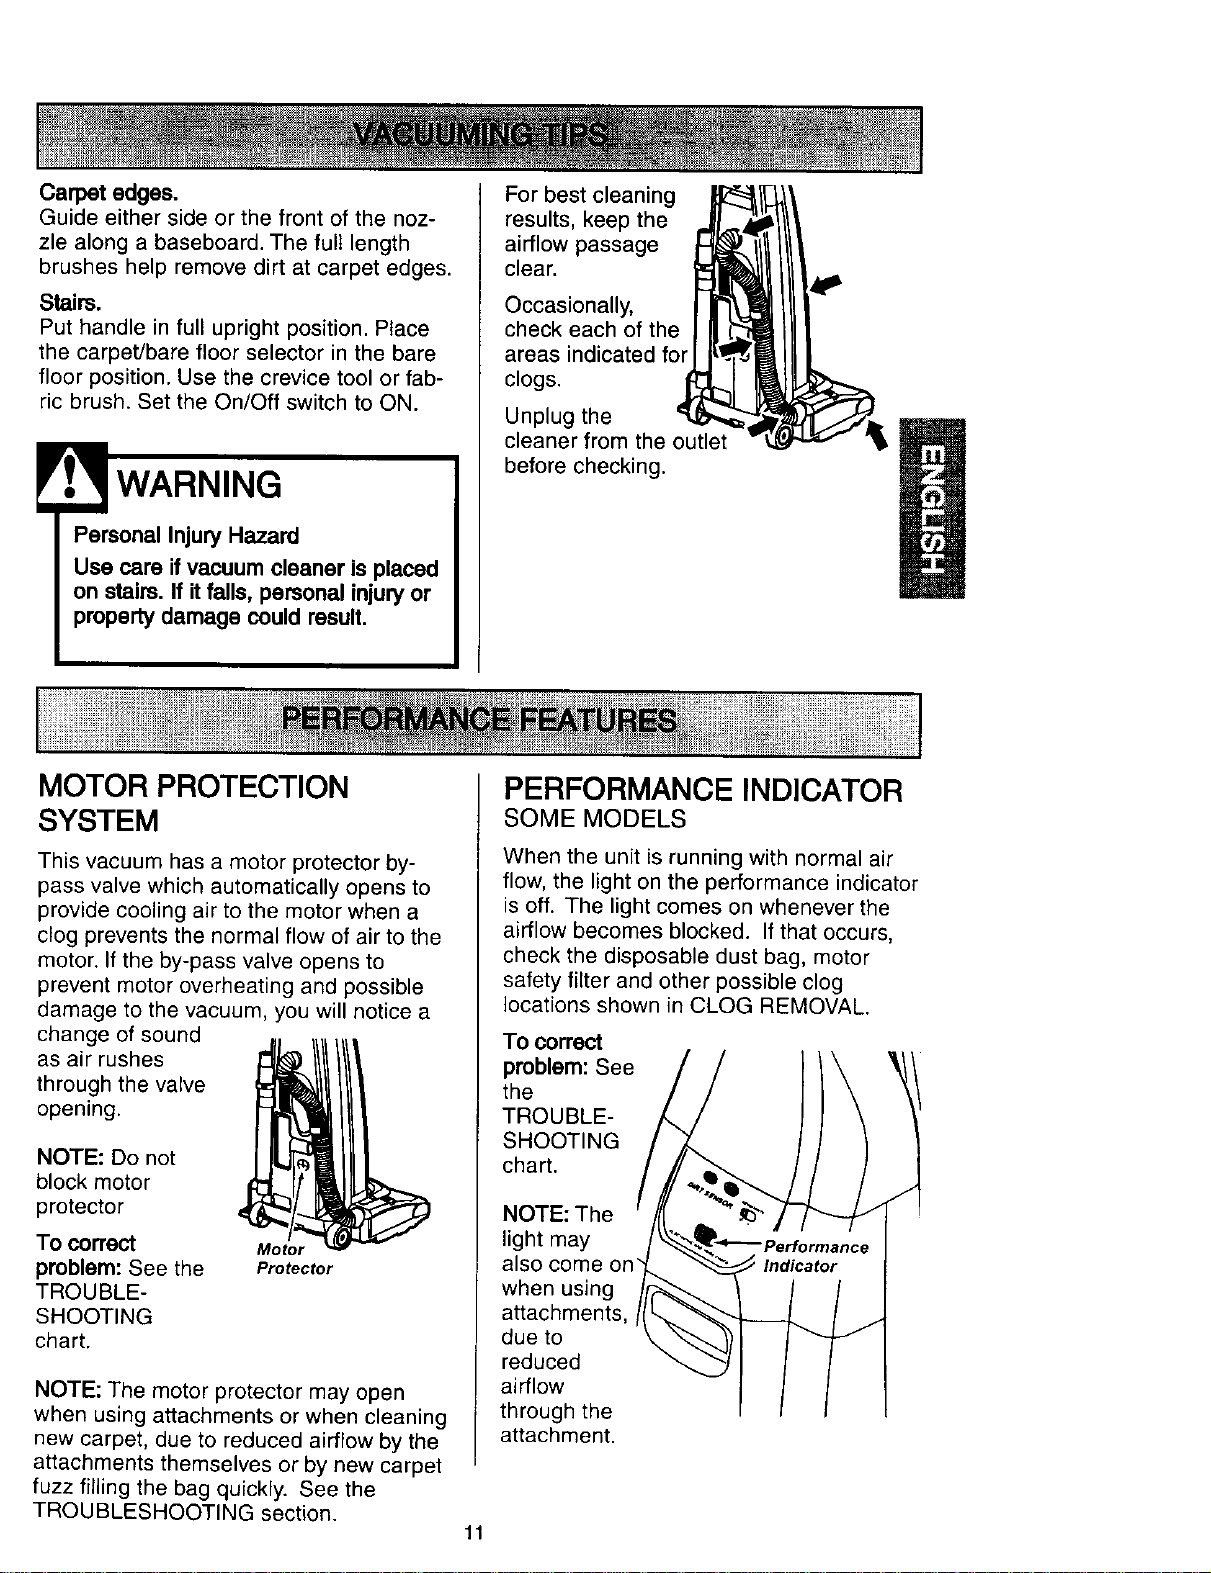
Carpet edges.
Guide either side or the front of the noz-
zle along a baseboard. The full length
brushes help remove dirt at carpet edges.
Stairs.
Put handle in full upright position. Place
the carpet/bare floor selector in the bare
floor position. Use the crevice tool or fab-
ric brush. Set the On/Off switch to ON.
WARNING
Personal Injury Hazard
Use care if vacuum cleaner is placed
on stairs. If it falls, personal injury or
property damage could result.
For best cleaning
results, keep the
airflow passage
clear.
Occasionally,
check each of the
areas indicated for
clogs.
Unplug the
cleaner from the outlet
before checking.
MOTOR PROTECTION
SYSTEM
This vacuum has a motor protector by-
pass valve which automatically opens to
provide cooling air to the motor when a
clog prevents the normal flow of air to the
motor. If the by-pass valve opens to
prevent motor overheating and possible
damage to the vacuum, you will notice a
change of sound
as air rushes
through the valve
opening.
NOTE: Do not
block motor
protector
To correct
problem: See the
TROUBLE-
SHOOTING
chart.
Motor
Protector
NOTE: The motor protector may open
when using attachments or when cleaning
new carpet, due to reduced airflow by the
attachments themselves or by new carpet
fuzz filling the bag quickly. See the
TROUBLESHOOTING section.
PERFORMANCE INDICATOR
SOME MODELS
When the unit is running with normal air
flow, the light on the performance indicator
is off. The light comes on whenever the
airflow becomes blocked. If that occurs,
check the disposable dust bag, motor
safety filter and other possible clog
locations shown in CLOG REMOVAL.
To correct
problem: See
the
TROUBLE-
SHOOTING
chart.
NOTE: The
light may
also come on"
when using
attachments,
due to
reduced
airflow
through the
attachment.
11
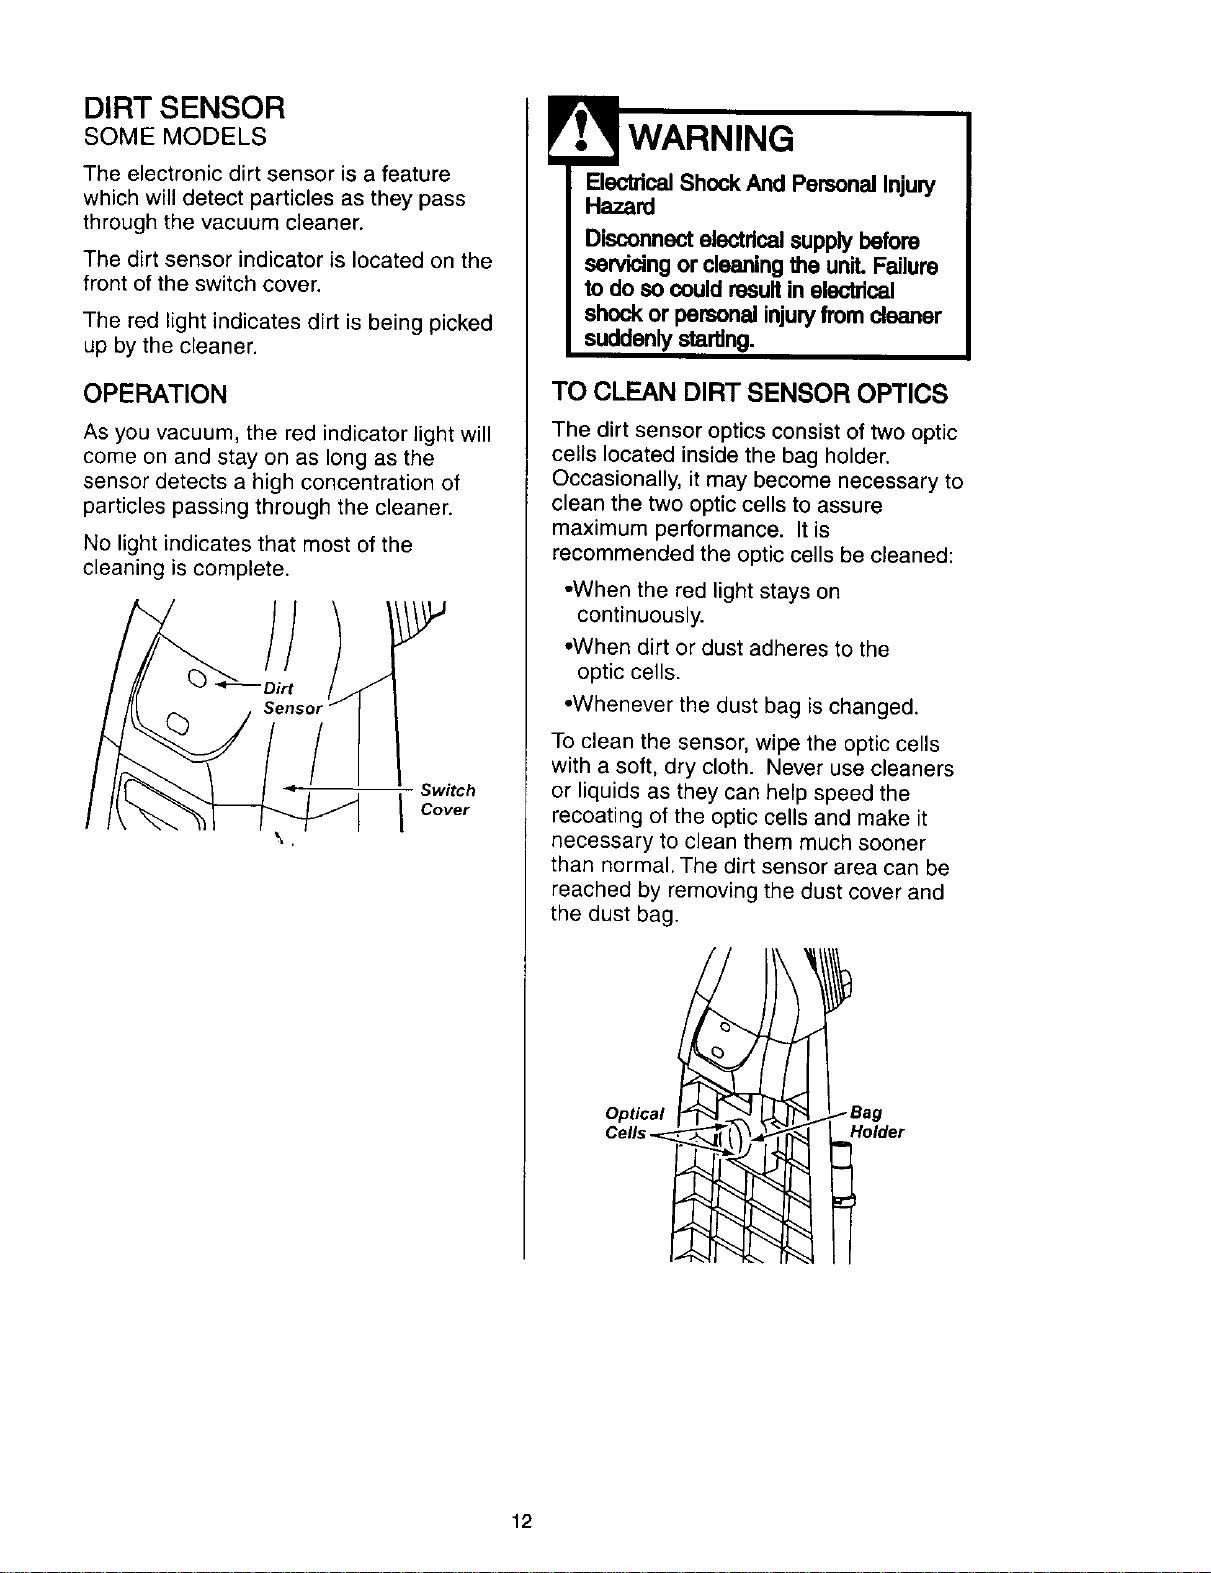
DIRT SENSOR
SOME MODELS
The electronic dirt sensor is a feature
which will detect particles as they pass
through the vacuum cleaner.
The dirt sensor indicator is located on the
front of the switch cover.
The red light indicates dirt is being picked
up by the cleaner.
OPERATION
As you vacuum, the red indicator light will
come on and stay on as long as the
sensor detects a high concentration of
particles passing through the cleaner.
No light indicates that most of the
cleaning is complete.
/
Switch
I Cover
ElectricalShock And Personal Injury
Hazard
Disconnect electricalsupply before
servicing or cleaning the unit. Failure
to do so could resultin electrical
shock or personal injuryfromcleaner
suddenly starting.
TO CLEAN DIRT SENSOR OPTICS
The dirt sensor optics consist of two optic
cells located inside the bag holder.
Occasionally, it may become necessary to
clean the two optic cells to assure
maximum performance. It is
recommended the optic cells be cleaned:
•When the red light stays on
continuously.
•When dirt or dust adheres to the
optic cells.
•Whenever the dust bag is changed.
To clean the sensor, wipe the optic cells
with a soft, dry cloth. Never use cleaners
or liquids as they can help speed the
recoating of the optic cells and make it
necessary to clean them much sooner
than normal. The dirt sensor area can be
reached by removing the dust cover and
the dust bag.
Optical
Cell,. Holder
12
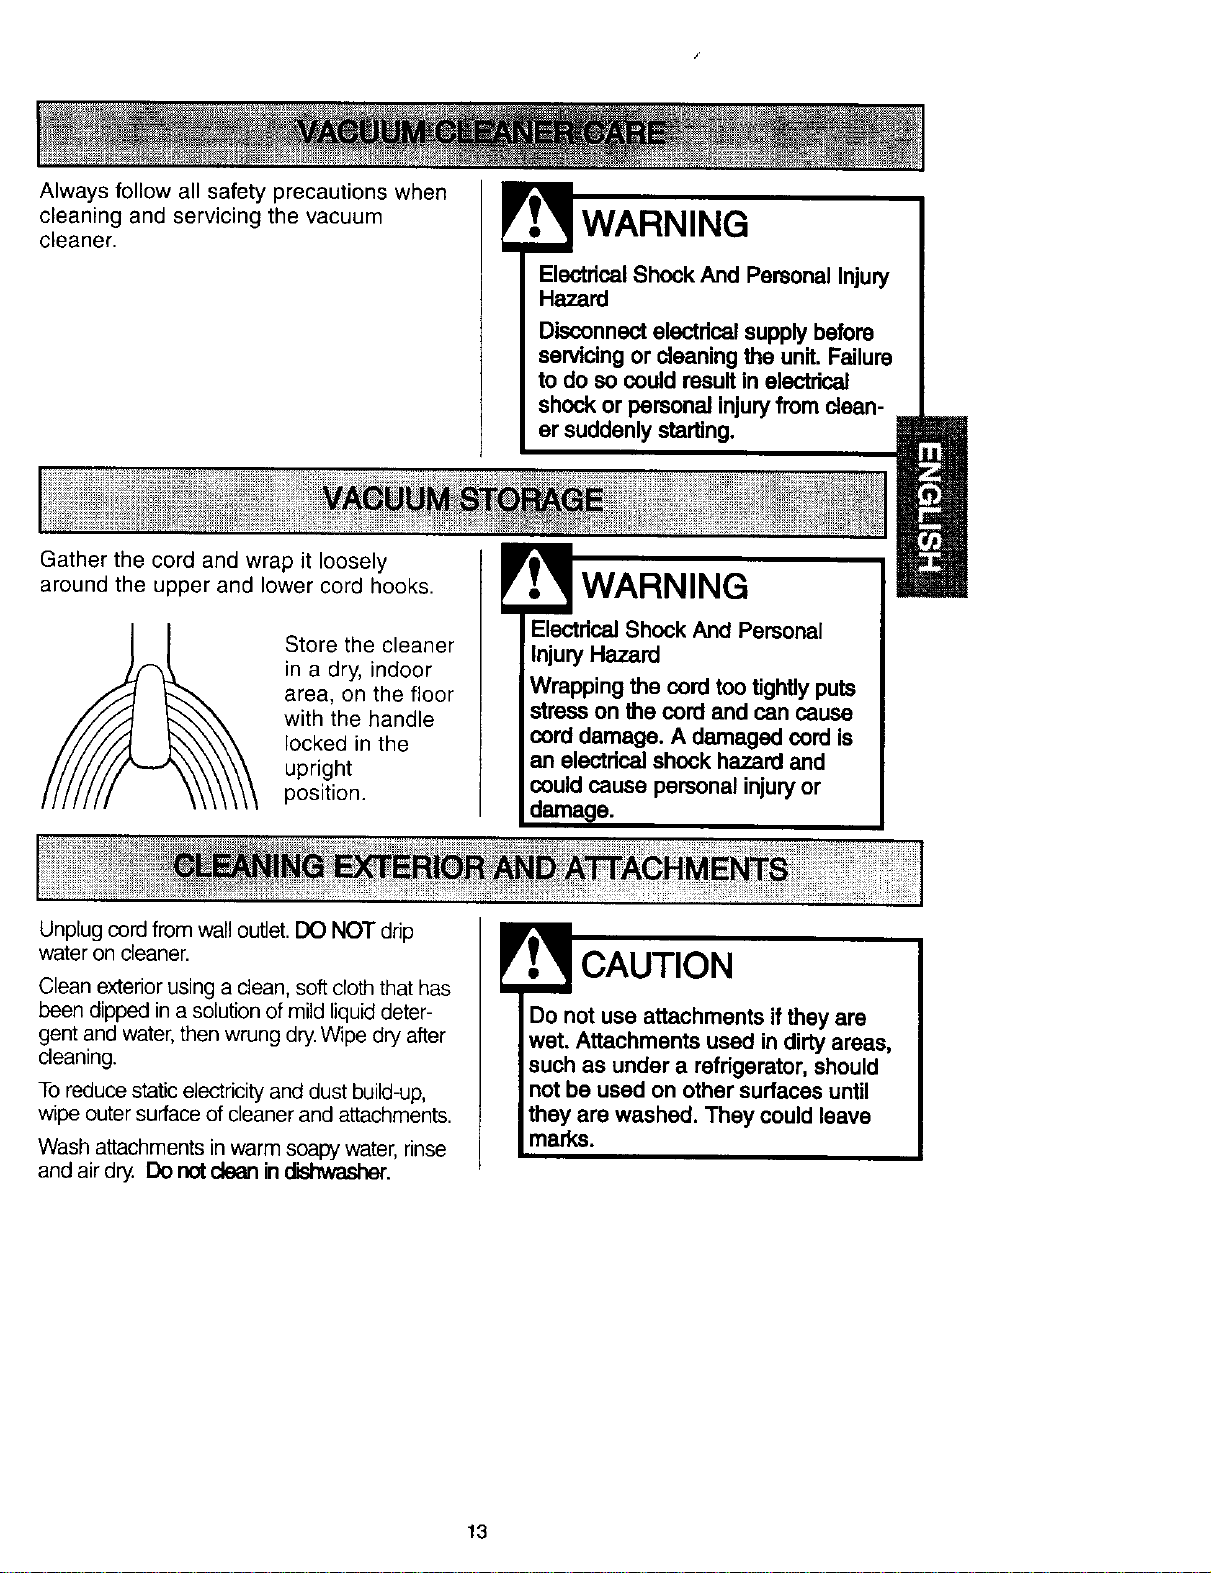
Always follow all safety precautions when
cleaning and servicing the vacuum
cleaner.
Gather the cord and wrap it loosely
around the upper and lower cord hooks.
! WARNING
Electdcal Shock And Personal Injury
Hazard
Disconnect electrical supplybefore
servicing or cleaning the unit. Failure
to do so could resultin aiectdcai
shock or personal injuryfrom clean-
er suddenly starting.
Store the cleaner
in a dry, indoor
area, on the floor
with the handle
locked in the
upright
position.
! WARNING
Electrical Shock And Personal
Injury Hazard
Wrapping the cord too tightly puts
stress on the cord and can cause
cord damage. A damaged cord is
an electrical shock hazard and
could cause personal injuryor
damage.
Unplug cord from wall outlet. DO NOT drip
water on cleaner.
Clean exterior using a clean, soft cloth that has
been dipped in a solution of mild liquid deter-
gent and water, then wrung dry. Wipe dry after
cleaning.
To reduce static electricity and dust build-up,
wipe outer surface of cleaner and attachments.
Wash attachments in warm soapy water, rinse
and air dry. Do not ctean in _.
Do not use attachments if they are
wet. Attachments used in dirty areas,
such as under a rafdgerator, should
not be used on other surfaces until
they are washed. They could leave
marks.
13
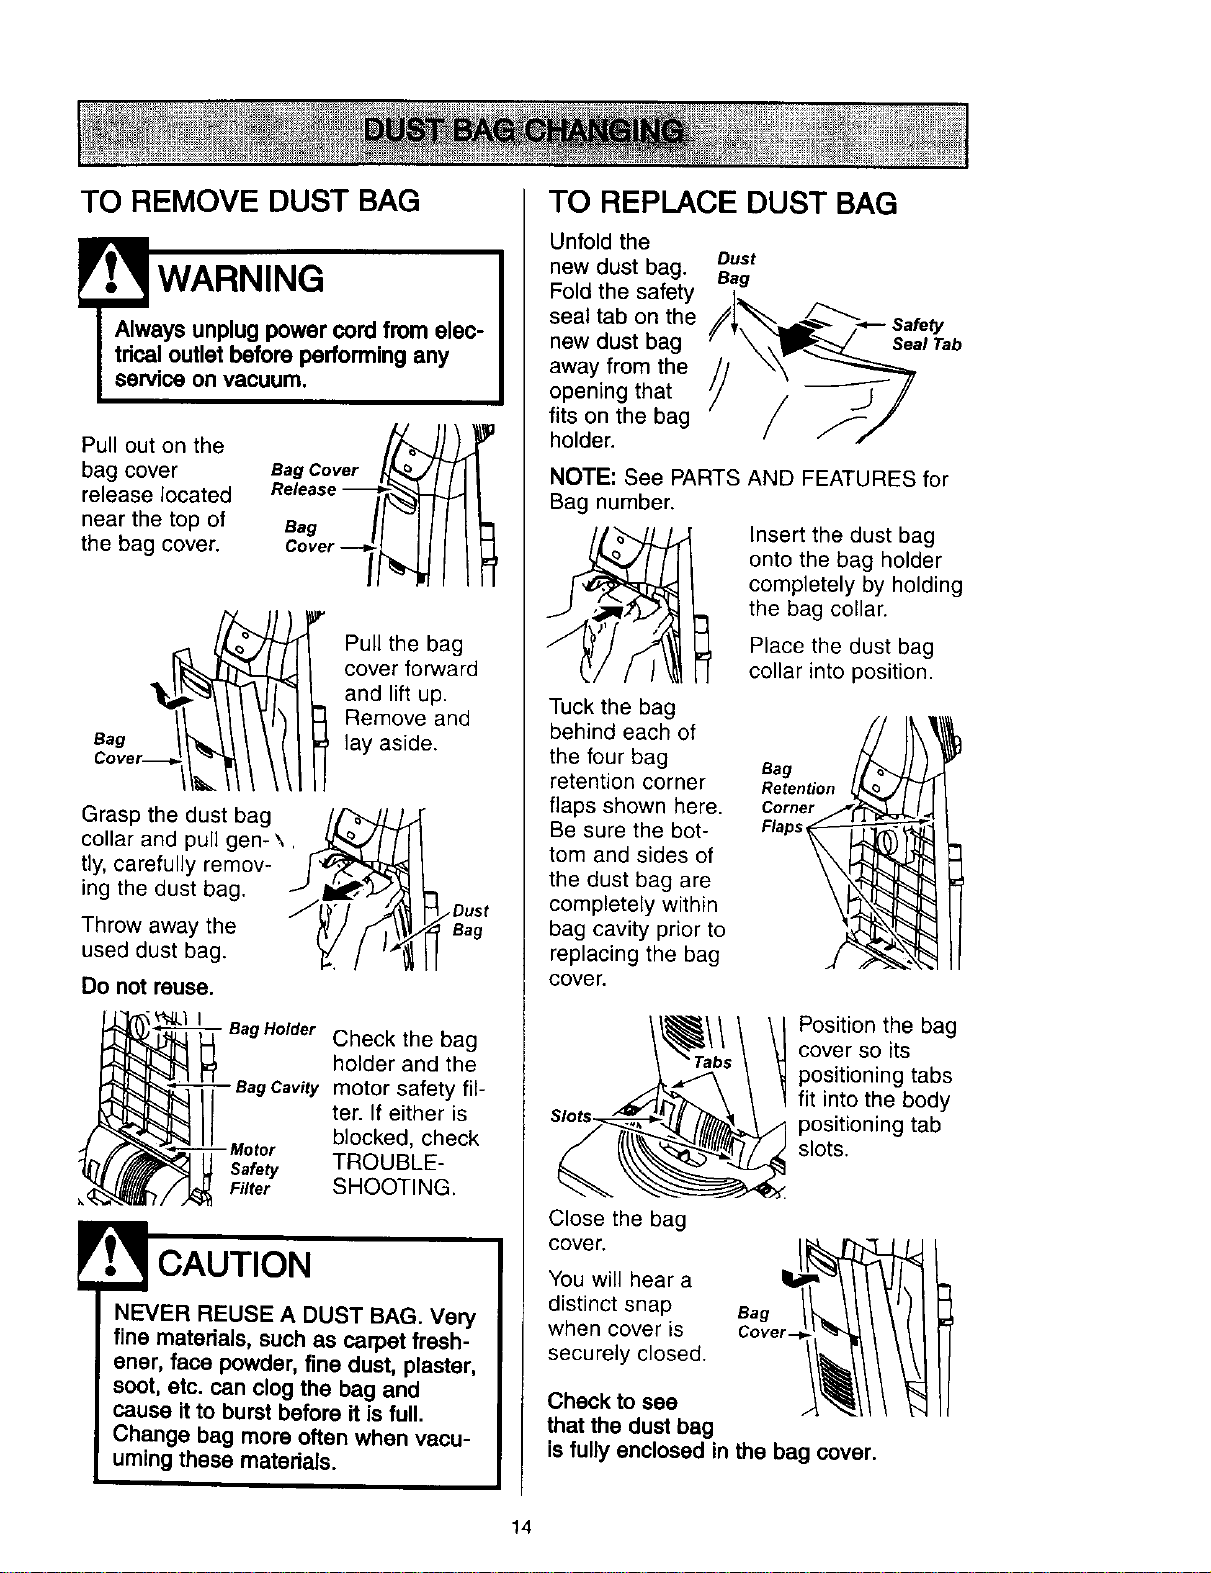
TO REMOVE DUST BAG
! WARNING
Always unplug power cord from elec-
trical outlet before performing any
service on vacuum.
Pull out on the
bag cover
release located
near the top of
the bag cover.
Bag Cover _J
Bag
Pull the bag
cover forward
and lift up.
Remove and
lay aside.
Grasp the dust bag
collar and pull gen- \.
tly, carefully remov-
ing the dust bag.
Throw away the
used dust bag.
/Dust
Bag
Do not reuse.
• BagHelder Check the bag
holder and the
motor safety ill-
ter• If either is
blocked, check
- Meter
Safety TROUBLE-
Filter SHOOTING.
! CAUTION
NEVER REUSE A DUST BAG. Very
fine materials, such as carpet fresh-
ener, face powder, fine dust, plaster,
soot, etc. can clog the bag and
cause it to burst before it is full.
Change bag more often when vacu-
uming these materials.
TO REPLACE DUST BAG
Unfold the
new dust bag. Dust
Bag
Fold the safety
seal tab on the _[_._ .=F--_...._ safety
new dust bag '/'__.t Tab
away from the
opening that _-'_/
fits on the bag
holder.
NOTE: See PARTS AND FEATURES for
Bag number.
Insert the dust bag
onto the bag holder
completely by holding
the bag collar.
Place the dust bag
cellar into position.
Tuck the bag
behind each of
the four bag
retention corner
flaps shown here.
Be sure the bot-
tom and sides of
the dust bag are
completely within
bag cavity prior to
replacing the bag
COVer.
Bag
Retention
Corner
Flaps
Position the bag
cover so its
positioning tabs
fit into the body
positioning tab
slots.
Close the bag
cover.
You will hear a
distinct snap
when cover _s
securely closed.
Check to see
that the dust bag
is fully enclosed in the bag cover.
14
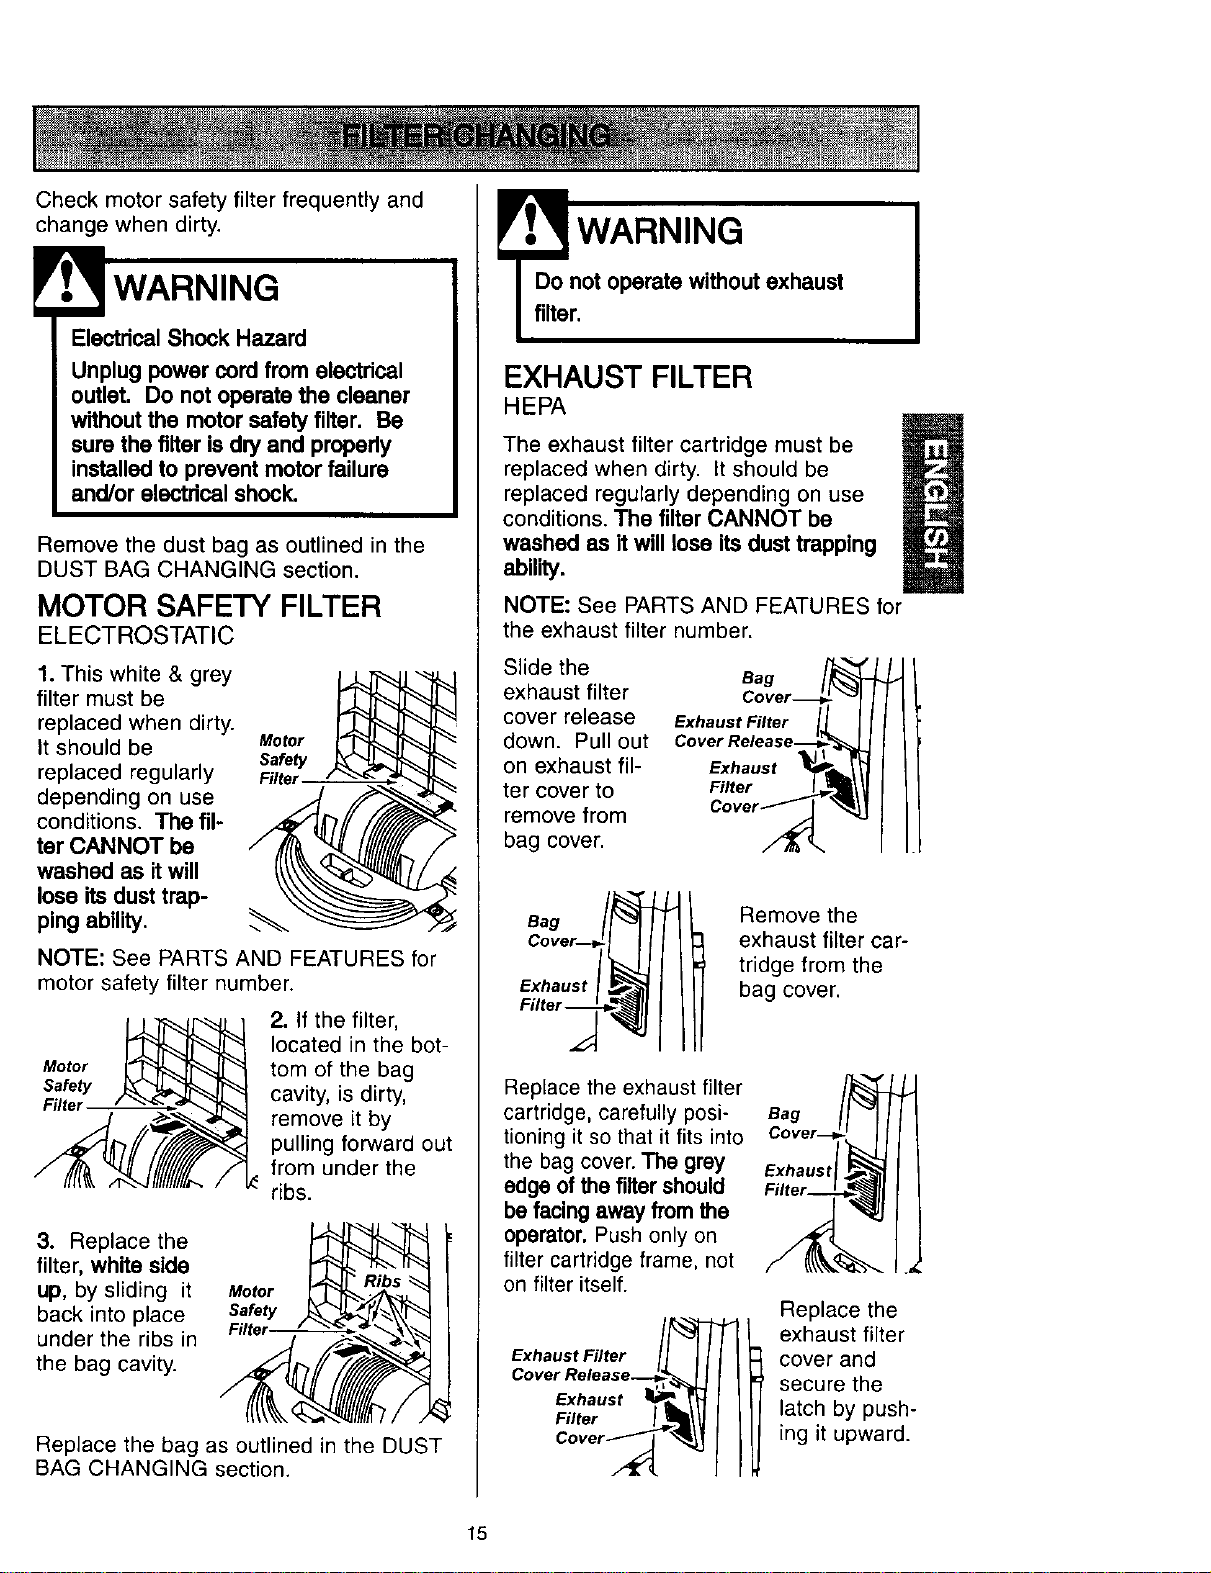
Check motor safety filter frequently and
change when dirty.
' lectWARNING
rical Shock Hazard
Unplug power cord from electrical
outlet. Do not operate the cleaner
without the motor safety filter. Be
sure the filter is dry and properly
installed to prevent motor failure
and/or electdcal shock.
Remove the dust bag as outlined in the
DUST BAG CHANGING section.
MOTOR SAFETY FILTER
ELECTROSTATIC
1. This white & grey
filter must be
replaced when dirty.
It should be Motor
Safety
replaced regularly Filler
depending on use
conditions. The fil-
ter CANNOT be
washed as it will
lose its dust trap-
ping ability.
NOTE: See PARTS AND FEATURES for
motor safety filter number.
Motor
Safety
Filter
2. If the filter,
located in the bot-
tom of the bag
cavity, is dirty,
remove it by
pulling forward out
from under the
ribs.
3. Replace the
filter, white side
up, by sliding it
back into place
under the ribs in
the bag cavity.
Motor
Replace the bag as outlined in the DUST
BAG CHANGING section.
WARNING
Do not operate without exhaust
filter.
EXHAUST FILTER
HEPA
The exhaust filter cartridge must be
replaced when dirty. It should be
replaced regularly depending on use
conditions. The filter CANNOT be
washed as it will lose its dust trapping
ability.
NOTE: See PARTS AND FEATURES for
the exhaust filter number.
Slide the
exhaust filter
cover release
down. Pull out
on exhaust fil-
ter cover to
remove from
bag cover.
Exhaust Filter II I
Cover Release_
Exhaust _i _
Filter _1!
cover/_
Bag
Exhaust
Remove the
exhaust filter car-
tridge from the
bag cover.
Replace the exhaust filter
cartridge, carefully posi-
tioning it so that it fits into
the bag cover. The grey
edge of the filter should
be facing away from the
operator. Push only on
filter cartridge frame, not
on filter itself.
Exhaust Filter
Cover Release--__,
Exhaust I_
Filter ICoverF
Bag
Exhaust
Replace the
exhaust filter
cover and
secure the
latch by push-
ing it upward.
15
! WARNING
ElectricalShock Or Personal Injury
Hazard
Disconnect electrical supply before
servicingor cleaning the unit. Failure
to do so could result in electrical
shock or personal Injury from cleaner
suddenly starting.
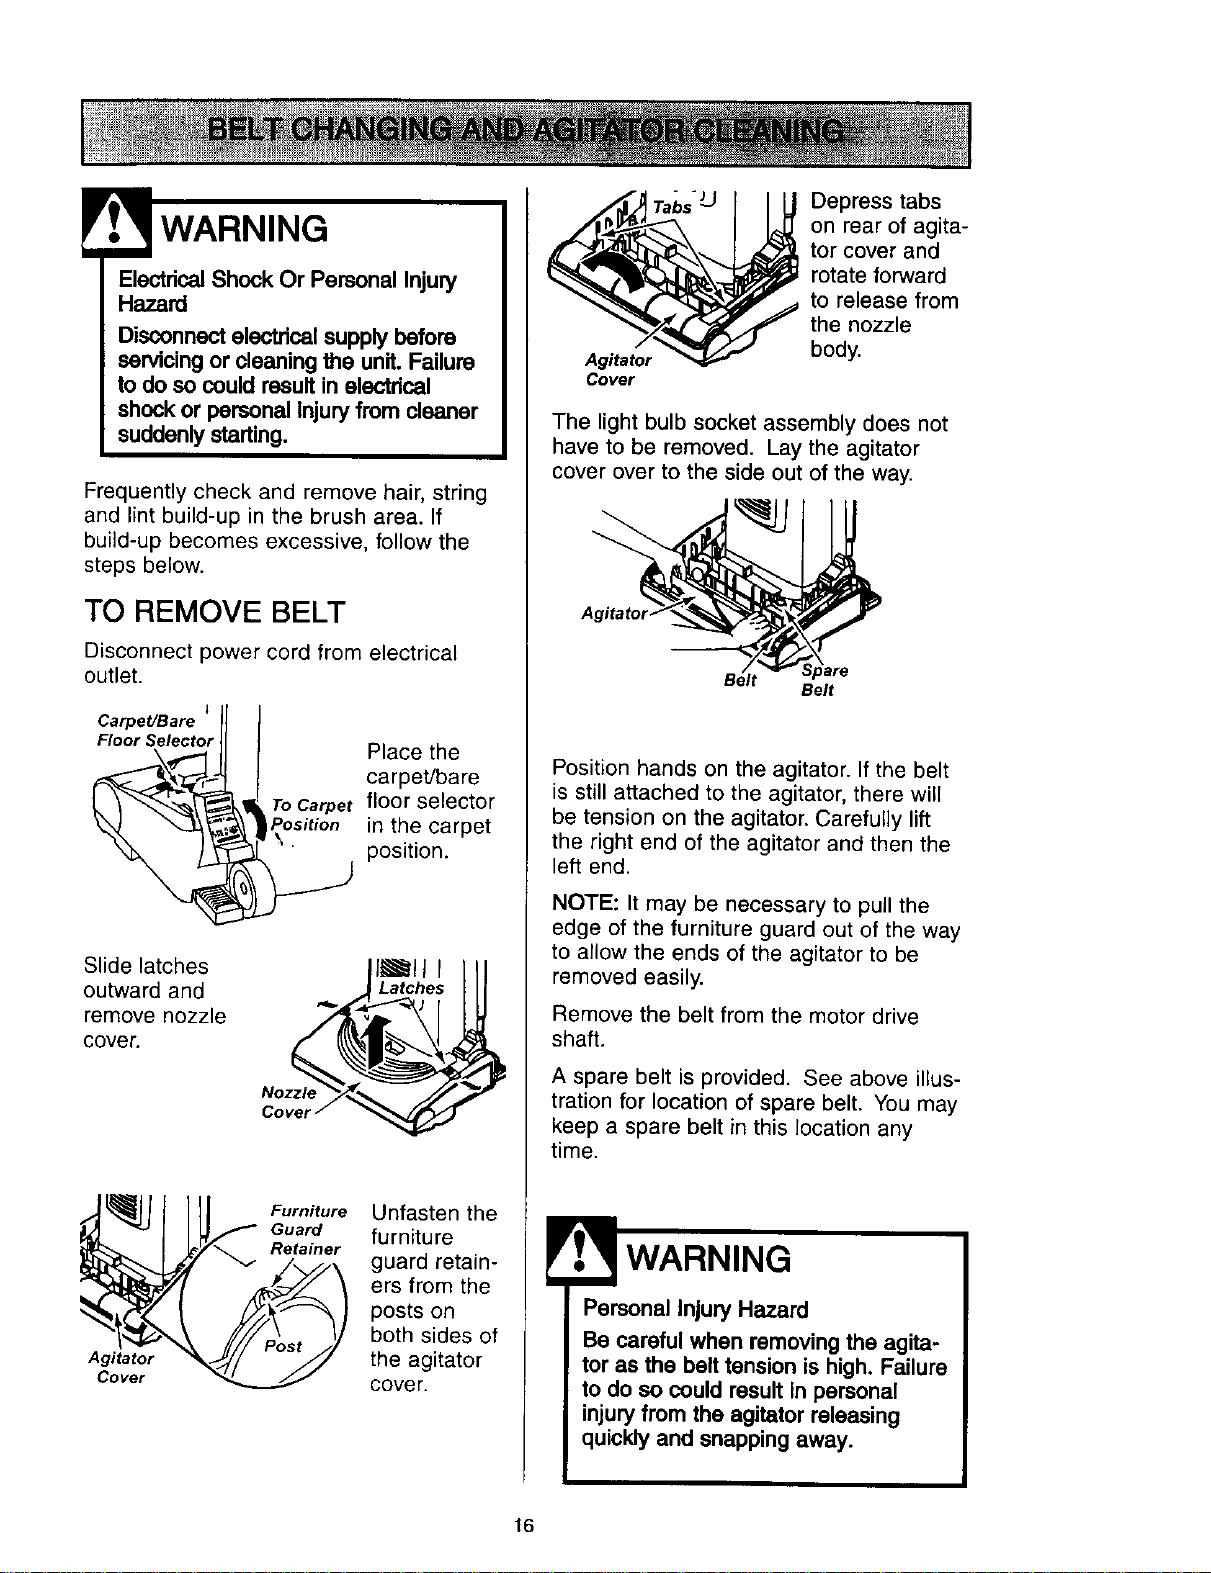
Frequently check and remove hair, string
and lint build-up in the brush area. If
build-up becomes excessive, follow the
steps below.
TO REMOVE BELT
Disconnect power cord from electrical
outlet.
Carpet/Bare J IJ I
Floor SelectorJl J Place the
_ arpet/bare
floor selector
in the carpet
position.
Slide latches I_lJ I
outward and Latches
remove nozzle
cover.
Nozzle
Agitator
Cover
Furniture
Guard
Retainer
Unfasten the
furniture
guard retain-
ers from the
posts on
both sides of
the agitator
cover.
Agitator
Cover
Depress tabs
on rear of agita-
tor cover and
rotate forward
to release from
the nozzle
body.
The light bulb socket assembly does not
have to be removed. Lay the agitator
cover over to the side out of the way.
Belt
Position hands on the agitator. If the belt
is still attached to the agitator, there will
be tension on the agitator. Carefully lift
the right end of the agitator and then the
left end.
NOTE: It may be necessary to pull the
edge of the furniture guard out of the way
to allow the ends of the agitator to be
removed easily.
Remove the belt from the motor drive
shaft.
A spare belt is provided. See above illus-
tration for location of spare belt. You may
keep a spare belt in this location any
time.
WARNING
Personal Injury Hazard
Be careful when removing the agita-
tor as the belt tension is high. Failure
to do so could result in personal
injuryfrom the agitator releasing
quickly and snapping away.
16

TO CLEAN AGITATOR
NOTE: In order to keep cleaning efficiency
high and to prevent damage to your vacu-
um, the agitator must be cleaned every time
the belt is changed.
The agitator must be cleaned according to
the following schedule:
Vacuum Use
HEAVY
(used daily)
MODERATE
(used 2-3 times/week)
Clean Agitator
every week
every month
LIGHT
(used 1 time/week)
every 2months
Remove ant dirt or derbris in the belt path
area or in the agitator area.
Exploded View - Agitator
Assembly
Carefully remove the brush end caps and
remove any string or debris located on the
agitator assembly, end caps, washers or
agitator shaft.
End
CiP Agitator Unit
Wa!her
End Cap
NOTE: Replace
the end caps. See
the exploded view
for correct assem-
bly.
TO REPLACE BELT
Make sure that the carpet/bare floor selec-
tor is in the carpet position.
Loop the new belt on the motor shaft.
Motor
Shaft
Belt Carpet/Bare Floor
Pulley Belt Selector Shaft
BELT ROUTING
Correct Routing of Belt
(Selector in CarpetPosition)
Agitator Motor
Carpet/Bare Floor Shaft
Selector Shaft
Incorrect Routing of Belt
(Belt on Selector Shaft)
"_" _,Carpe t/Bare
' Floor Pedal
Agitator Motor
Carpet/Bare Floor Shaft
Selector Shaft
Incorrect Routing of Belt
(Selector in Bare Floor Position)
Agitator Belt Carpet/Bare Floor
Selector Shaft
17
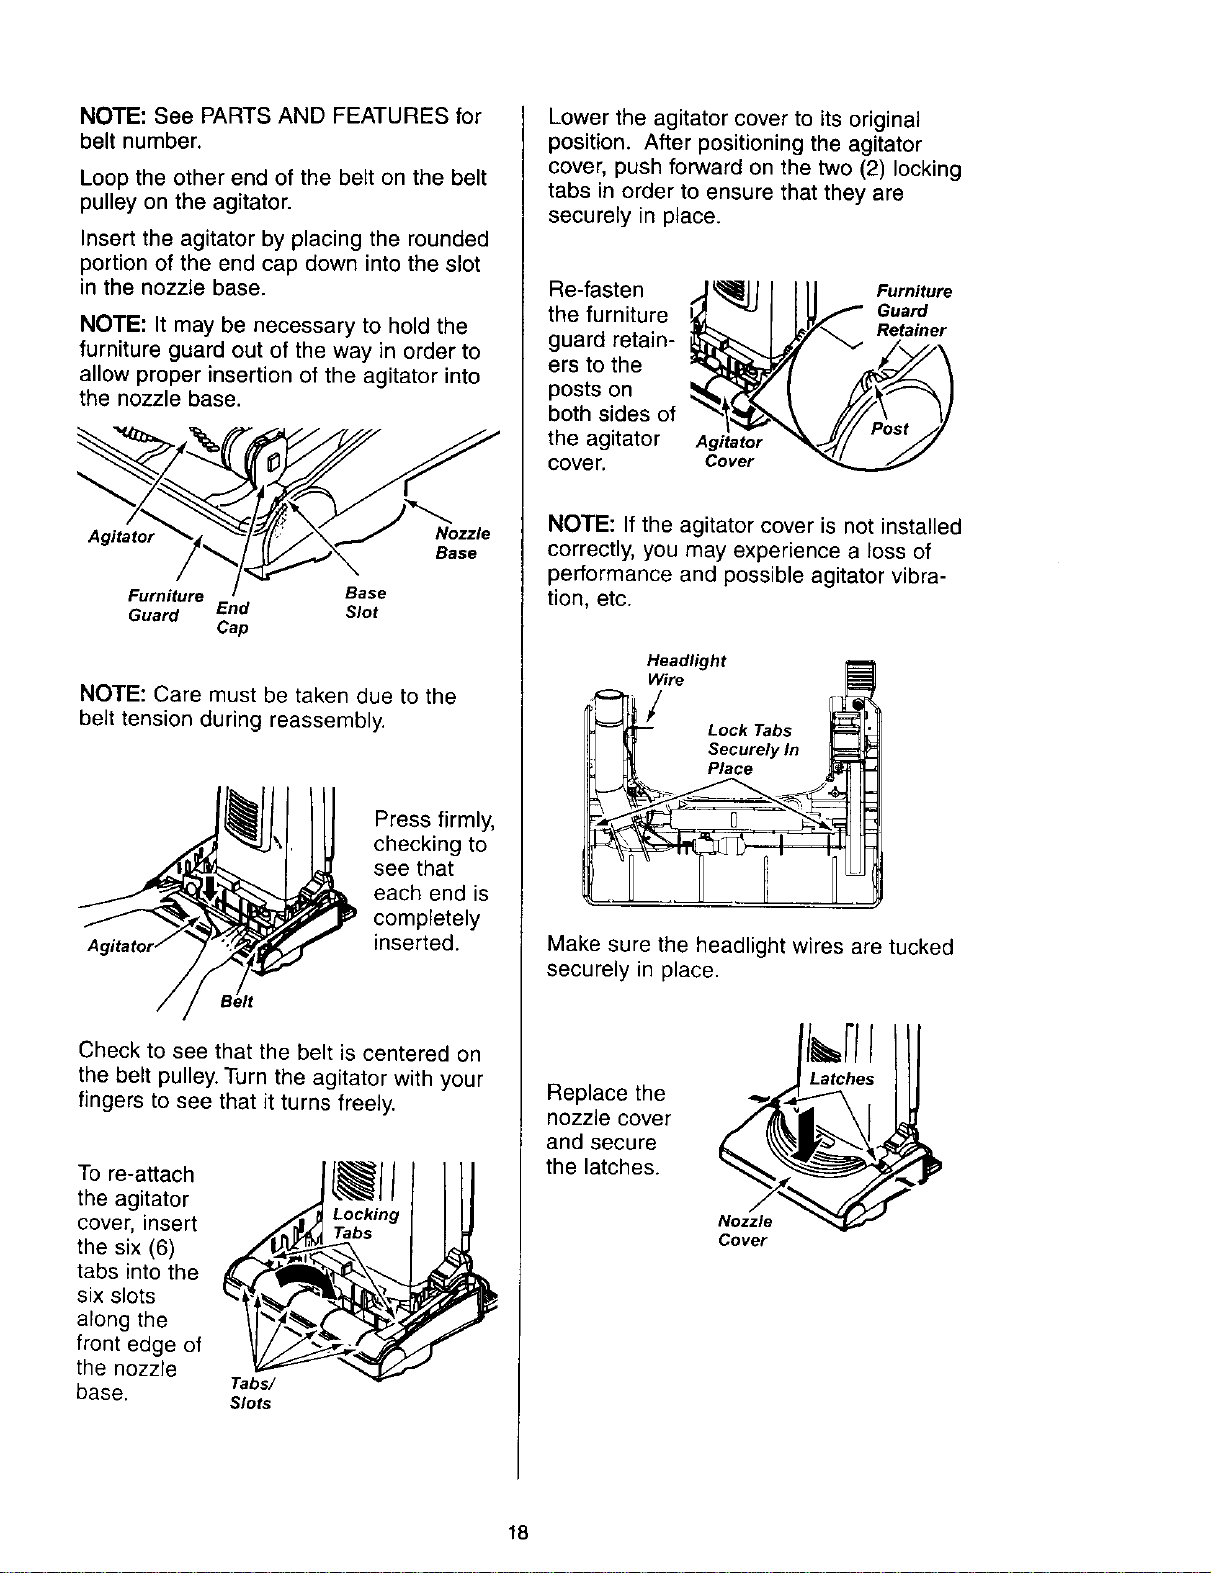
NOTE: See PARTS AND FEATURES for
belt number.
Loop the other end of the belt on the belt
pulley on the agitator.
Insert the agitator by placing the rounded
portion of the end cap down into the slot
in the nozzle base.
NOTE: It may be necessary to hold the
furniture guard out of the way in order to
allow proper insertion of the agitator into
the nozzle base.
Agitator Nozzle
Base
Furniture Base
Guard End Slot
Cap
NOTE: Care must be taken due to the
belt tension during reassembly.
Press firmly,
checking to
see that
each end is
completely
inserted.
Check to see that the belt is centered on
the belt pulley. Turn the agitator with your
fingers to see that it turns freely.
To re-attach
the agitator
cover, insert
the six (6)
tabs into the
six slots
along the
front edge of
the nozzle
Tabs/
base. Slots
Lower the agitator cover to its original
position. After positioning the agitator
cover, push forward on the two (2) locking
tabs in order to ensure that they are
securely in place.
Re-fasten
the furniture
guard retain-
ers to the
posts on
both sides of
the agitator
cover.
Agitator
Cover
Furniture
Guard
Retainer
NOTE: If the agitator cover is not installed
correctly, you may experience a loss of
performance and possible agitator vibra-
tion, etc.
Headlight
7°
Lock Tabs _
I _ Securely In
I _ Place
Make sure the headlight wires are tucked
securely in place.
Replace the
nozzle cover
and secure
the latches.
Nozzle
Cover
18
Always follow all safety precautions when
cleaning and servicing the vacuum
cleaner.
ElectricalShock Or Personal Injury
Hazard
Disconnect electrical supply before
servicingor cleaning the unit. Failure
to do so could result inelectrical
shock or personal injuryfrom cleaner
suddenly starting.
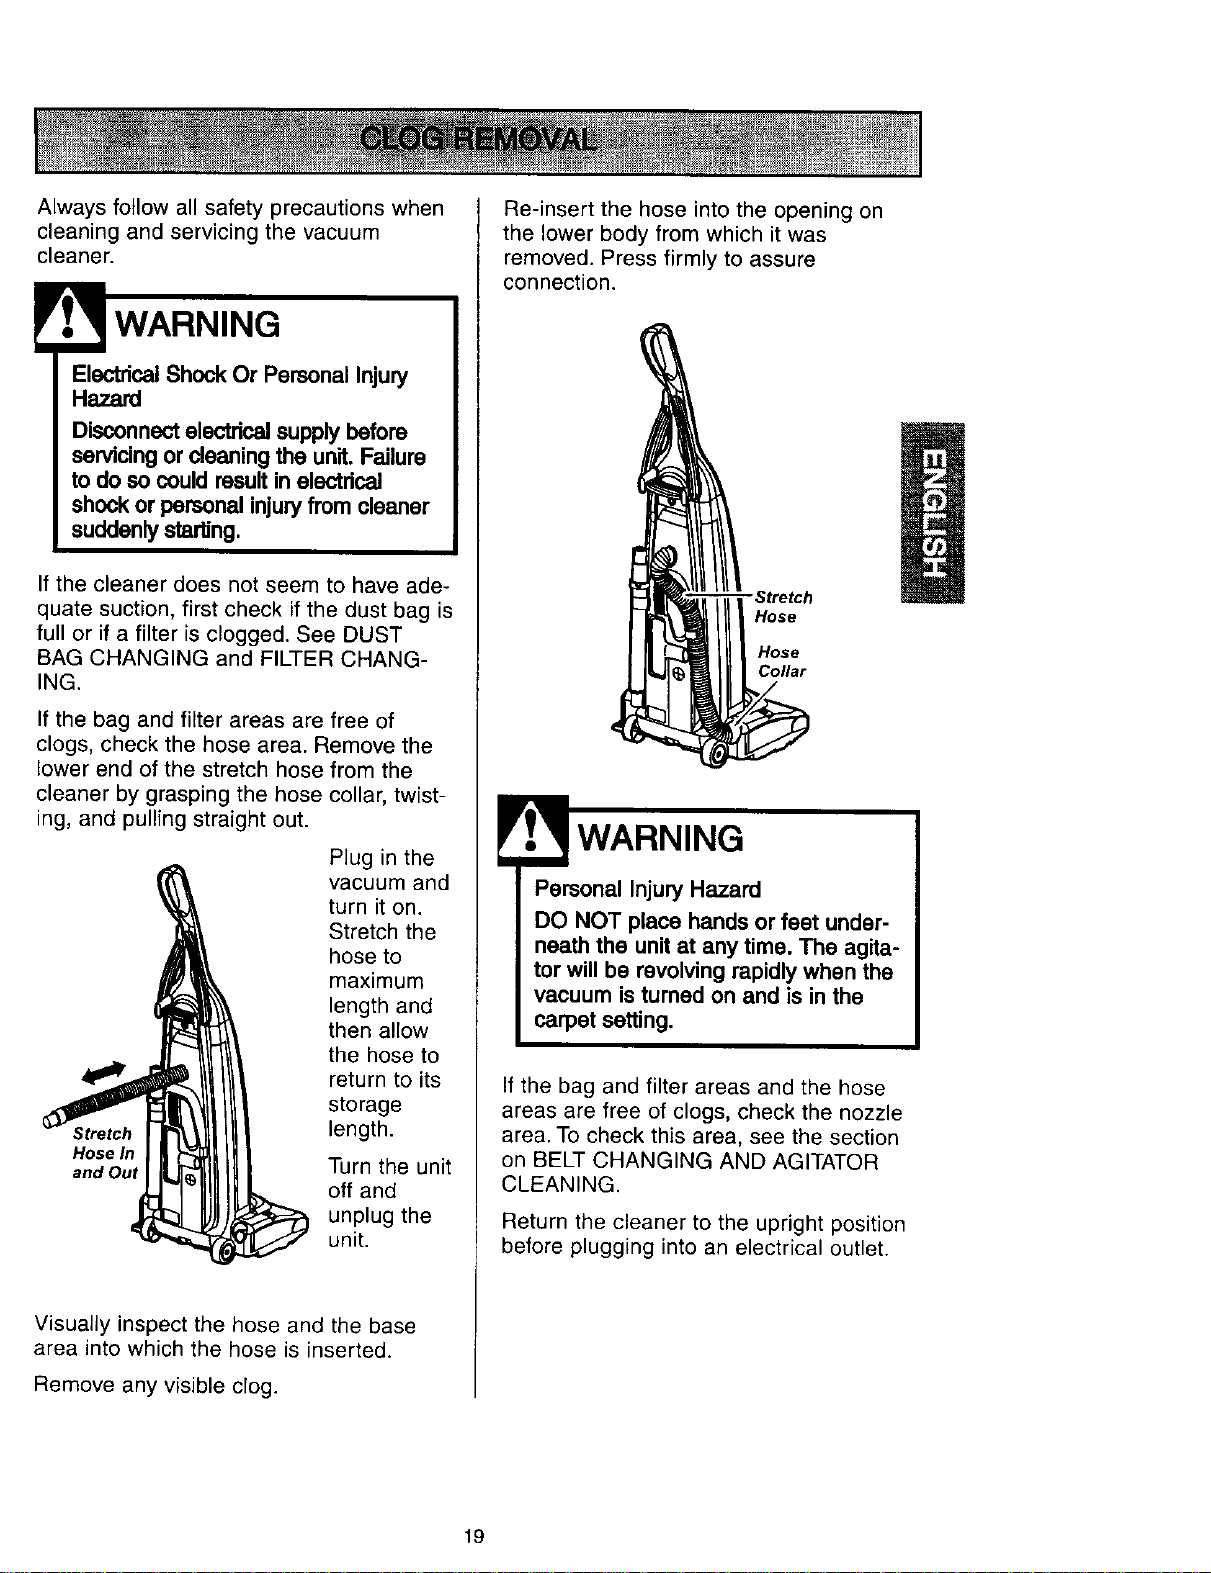
If the cleaner does not seem to have ade-
quate suction, first check if the dust bag is
full or if a filter is clogged. See DUST
BAG CHANGING and FILTER CHANG-
ING.
If the bag and filter areas are free of
clogs, check the hose area. Remove the
lower end of the stretch hose from the
cleaner by grasping the hose collar, twist-
ing, and pulling straight out.
Stretch
Hose In
and Out
Plug in the
vacuum and
turn it on.
Stretch the
hose to
maximum
length and
then allow
the hose to
return to its
storage
length.
Turn the unit
off and
unplug the
unit.
Visually inspect the hose and the base
area into which the hose is inserted.
Remove any visible clog.
Re-insert the hose into the opening on
the lower body from which it was
removed. Press firmly to assure
connection.
- Stretch
Hose
Hose
Collar
WARNING
Personal Injury Hazard
DO NOT place hands or feet under-
neath the unit at any time. The agita-
tor will be revolving rapidly when the
vacuum is turned on and is in the
carpet setting.
If the bag and filter areas and the hose
areas are free of clogs, check the nozzle
area. To check this area, see the section
on BELT CHANGING AND AGITATOR
CLEANING.
Return the cleaner to the upright position
before plugging into an electrical outlet.
19
! WARNING
Electdcal Shock Or Personal Injury
Hazard
Disconnect electdcal supply before
servicingor cleaning the unit. Failure
to do so could result in electrical
shock or personal Injuryfrom cleaner
suddenly starting.
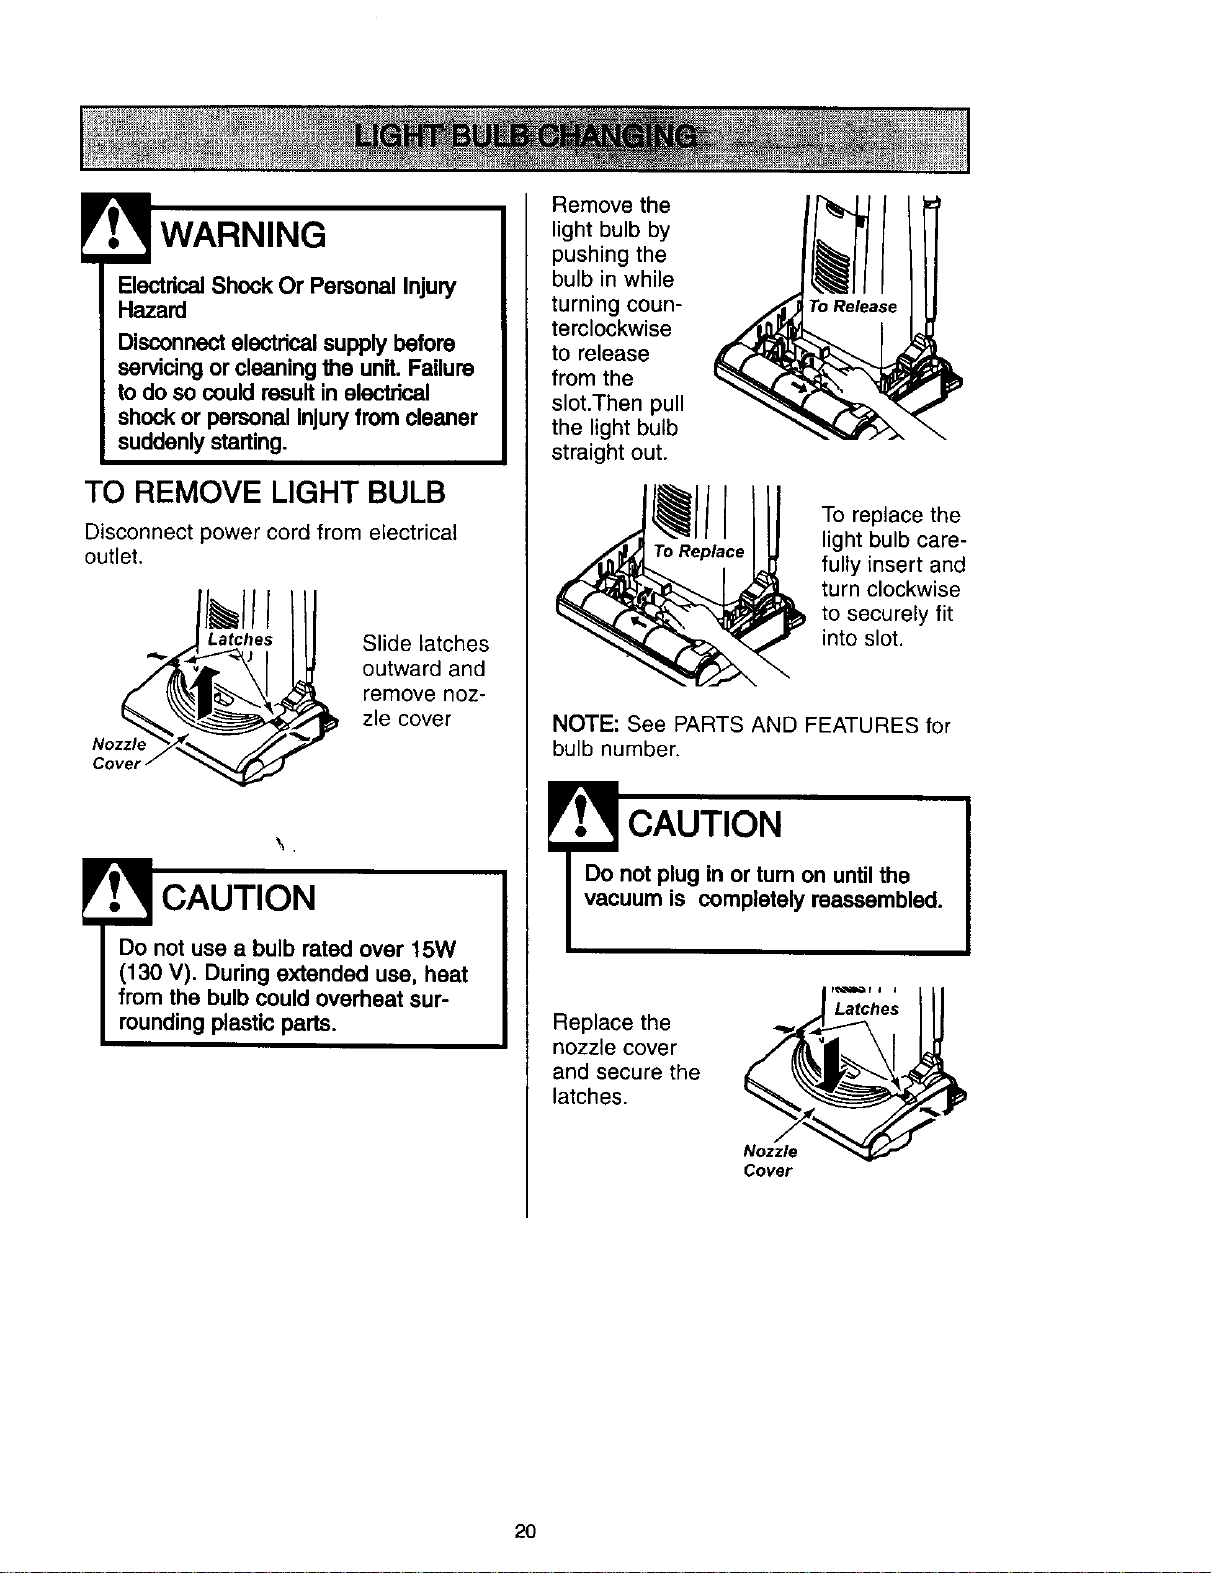
TO REMOVE LIGHT BULB
Disconnect power cord from electrical
outlet.
Nozzle
Slide latches
outward and
remove noz-
zle cover
CAUTION
Do not use a bulb rated over 15W
(130 V). During extended use, heat
from the bulb could overheat sur-
rounding plastic parts.
Remove the
light bulb by
pushing the
bulb in while
turning coun-
terclockwise
to release
from the
slot.Then pull
the light bulb
straight out.
I
To replace the
light bulb care-
fully insert and
turn clockwise
to securely fit
into slot.
NOTE: See PARTS AND FEATURES for
bulb number.
CAUTION
Replace the
nozzle cover
and secure the
latches.
Nozzle
Cover
2O
! WARNING
EloctricalShock Or Personal Injury
Hazard
Disconnect electdcal supply before
servicing or cleaning the unit. Failure
to do so could result in electrical
shock or personal injuryfrom cleaner
suddenly starting.
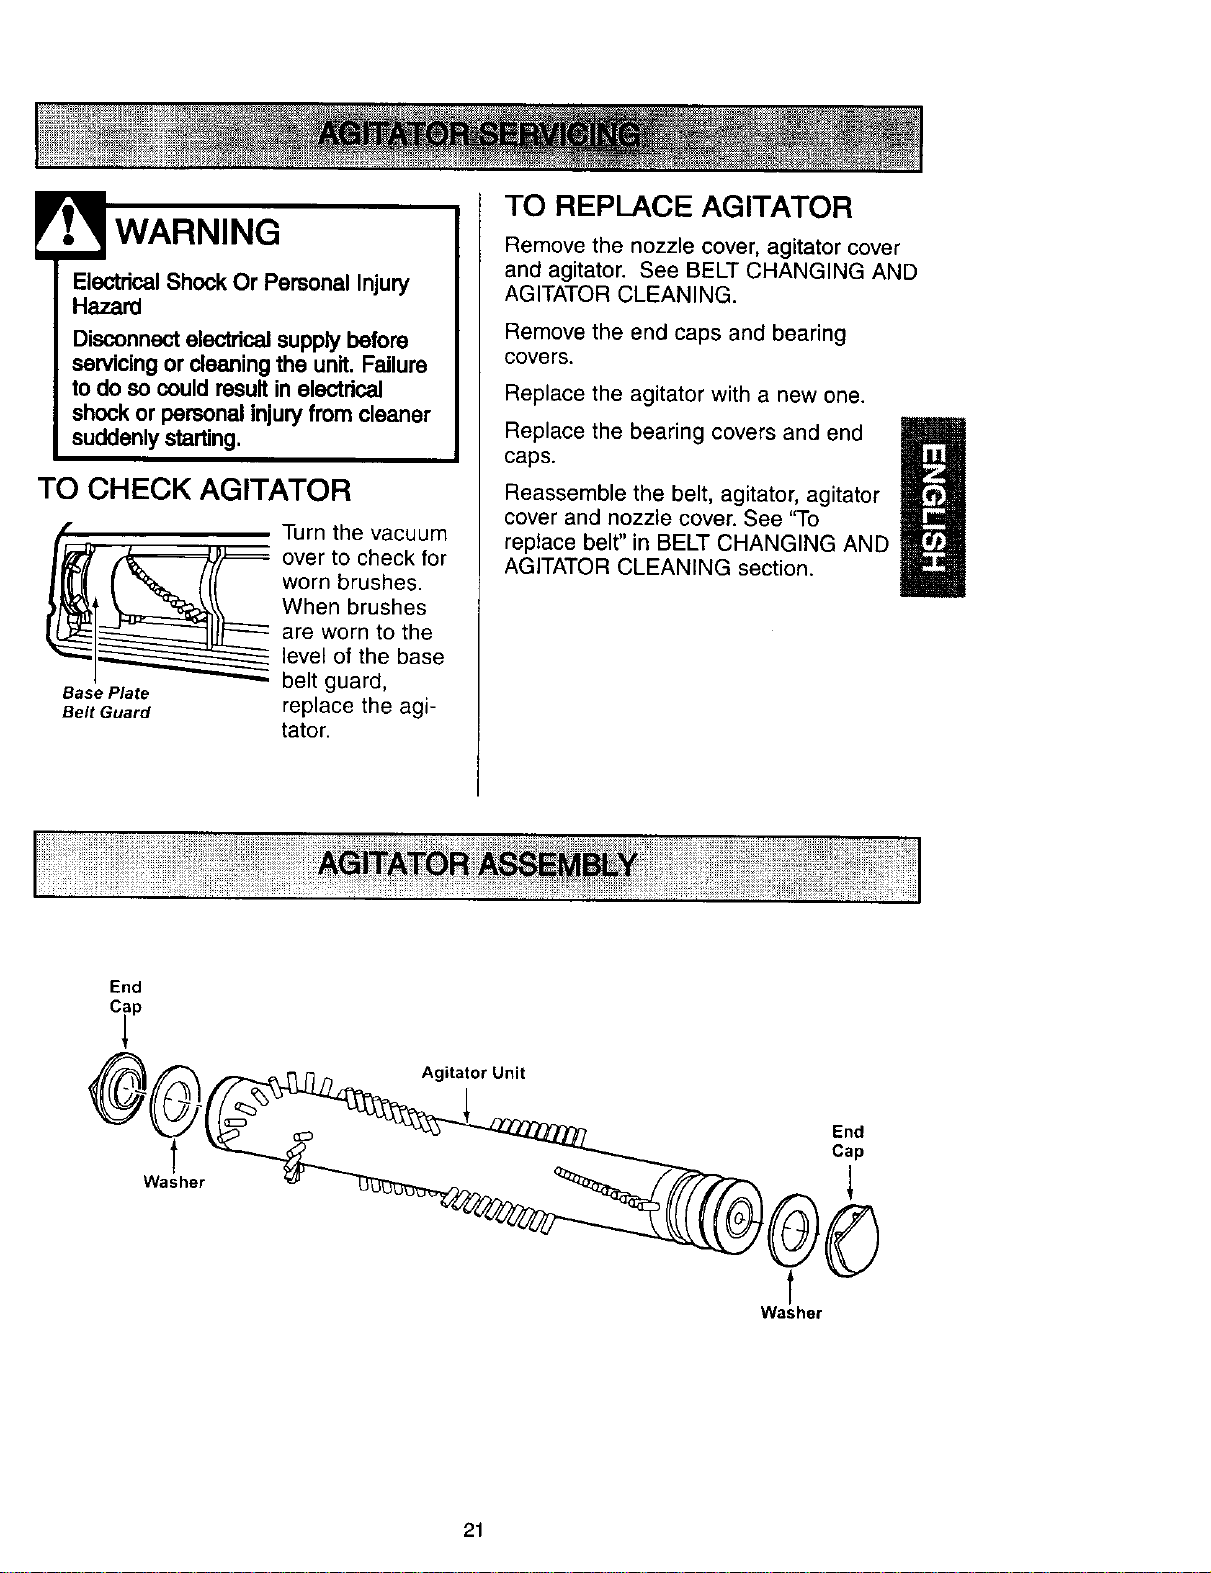
TO CHECK AGITATOR
Base Plate
Belt Guard
Turn the vacuum
over to check for
worn brushes.
When brushes
are worn to the
level of the base
belt guard,
replace the agi-
tator.
TO REPLACE AGITATOR
Remove the nozzle cover, agitator cover
and agitator. See BELT CHANGING AND
AGITATOR CLEANING.
Remove the end caps and bearing
covers.
Replace the agitator with a new one.
Replace the bearing covers and end
caps.
H
Reassemble the belt, agitator, agitator
cover and nozzle cover. See "To
replace belt" in BELT CHANGING AND
AGITATOR CLEANING section.
End
Agitator Unit
Washer
End
Cap
t
t
Washer
21
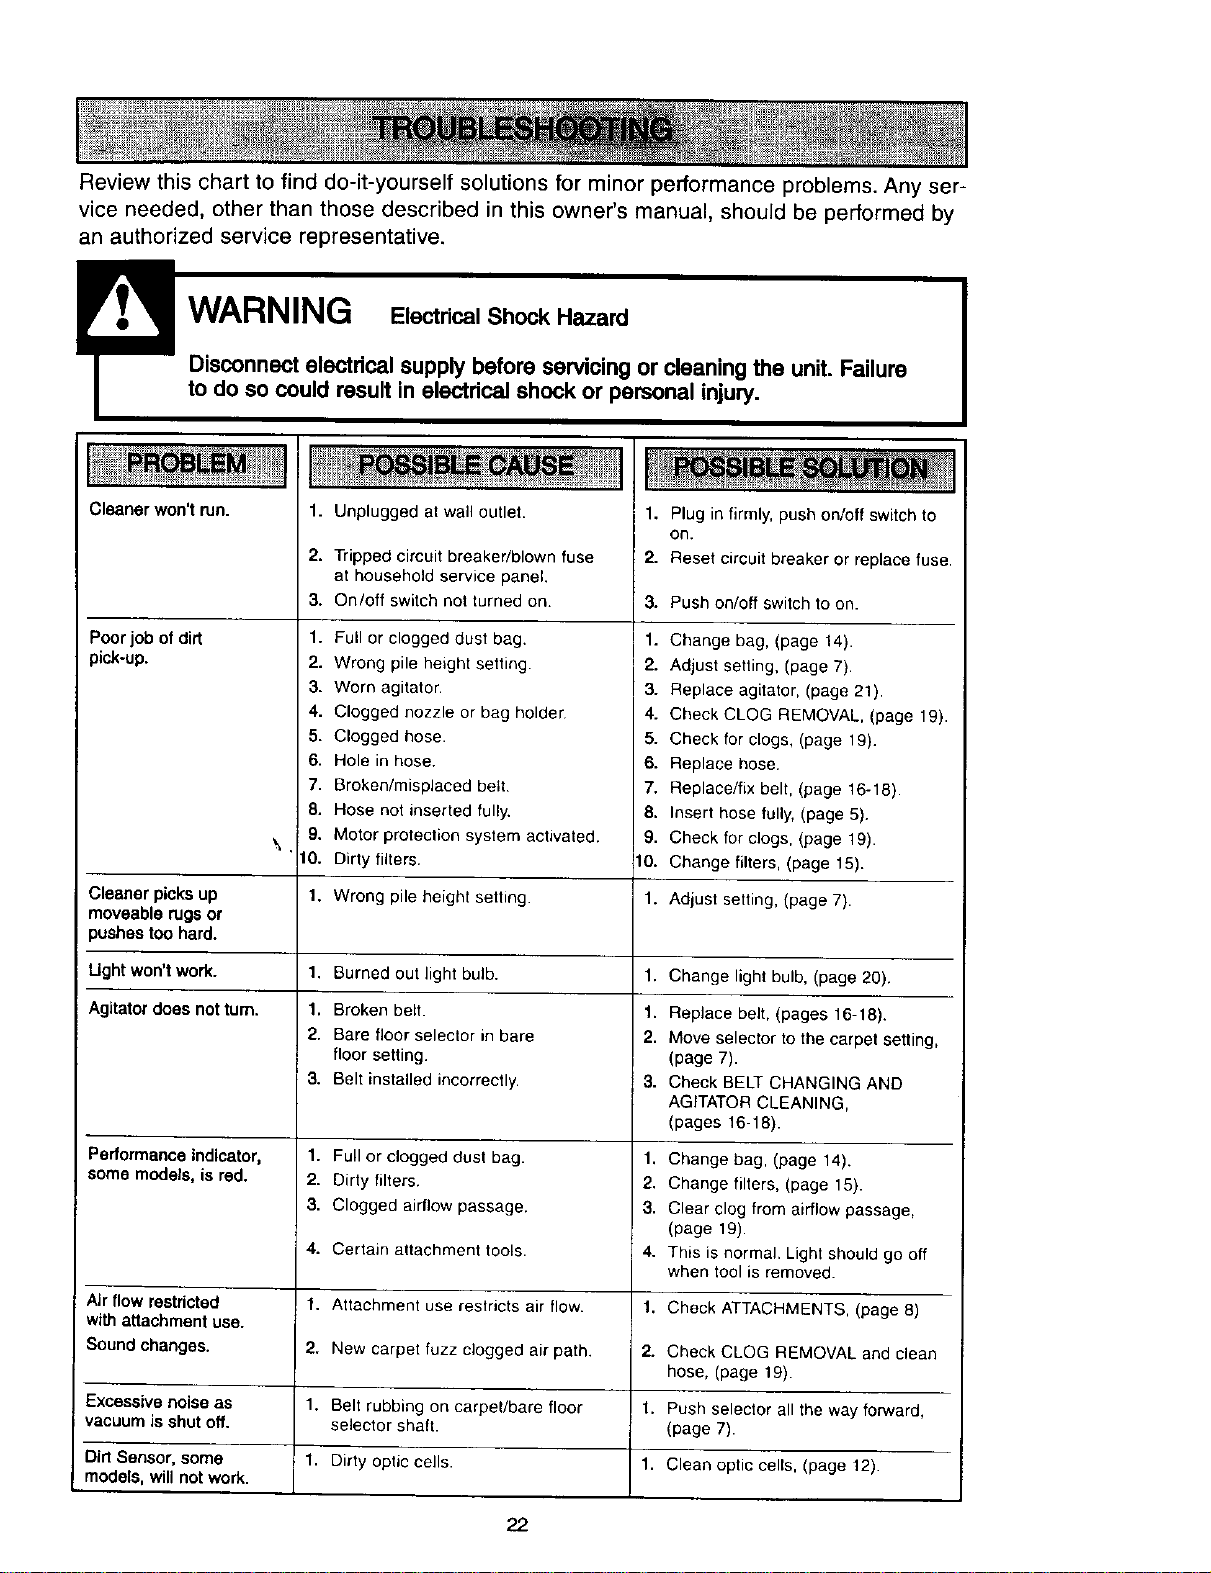
Review this chart to find do-it-yourself solutions for minor performance problems. Any ser-
vice needed, other than those described in this owner's manual, should be performed by
an authorized service representative.
Disconnect electrical supply before servicing or cleaning the unit. Failure
to do so could result in electrical shock or personal injury.
Cleaner won't run.
Poorjob of dirt
pick-up.
1. Unplugged at wall outlet.
2=
Tripped circuit breaker/blown fuse
at household service panel.
On/off switch not turned on.
3.
1.
2.
3.
4.
5.
6.
7.
8.
9.
\
10.
1.
1.
1.
2.
3.
1.
2.
3.
4.
1.
2.
1.
1.
Full or clogged dust bag.
Wrong pile height setting.
Worn agitator.
Clogged nozzle or bag holder
Clogged hose.
Hole in hose.
Broken/misplaced belt.
Hose not inserted fully.
Motor protection system activated.
Dirty filters.
1. Plug in firmly, push on/off switch to
on.
2. Reset circuit breaker or replace fuse.
3. Push on/off switch 1o on.
1. Change bag, (page 14).
2. Adjust setting, (page 7).
3. Replace agitator, (page 21).
4. Check CLOG REMOVAL, (page 19).
5. Check for clogs, (page 19).
6. Replace hose.
7. Replace/fix belt, (page 16-18).
8. Insert hose fully, (page 5).
9. Check for clogs, (page 19).
10. Change filters, (page 15).
Cleaner picks up Wrong pile height setting. 1. Adjust setting, (page 7).
moveable rugs or
)ushes too hard.
Ught won'twork. Burned out light bulb. 1. Change lightbulb, (page 20).
Agitatordoes not turn. Broken belt. 1. Replace belt, (pages 16-18).
Bare floor selector in bare 2. Move selector to the carpet setting,
floor setting. (page 7).
Belt installed incorrectly. 3. Check BELT CHANGING AND
AGITATOR CLEANING,
(pages 16-18).
Performance indicator, Full or clogged dust bag. 1. Change bag, (page 14).
some models, is red. Dirty filters. 2. Change filters, (page 15).
Clogged airflow passage. 3. Clear clog from airflow passage,
(page 19).
Certain attachment tools. 4. This is normal. Light should go off
when tool is removed.
Air flow restricted Attachment use restricts air flow. 1. Check ATTACHMENTS, (page 8)
with attachment use.
Sound changes. New carpet fuzz clogged air path. 2. Check CLOG REMOVAL and clean
hose, (page 19).
Excessive noise as Belt rubbing on carpet/bare floor 1. Push selector all the way forward,
vacuum is shut off. selector shaft. (page 7).
Dirt Sensor, some Dirty optic cells. 1. Clean optic cells, (page 12).
models, will not work.
22
Antesde usarsu aspimdoranueva ....... 1
Garantiade la aspiradorade Kenmore..... 1
Instrucclonesimportantesde
seguridad ............................. 2
Plazasy caracterfsticas ................. 3
Instruccionesde ensamblamiento ....... 4-5
Instrucciones de operaci6n............... 5
Ajustey selecci6nde nivelde pelode la
alfombra ............................ 6
Selectordepisosconalfombray .......... 6
sinalfombra
Desprendimientodel mango .............. 7
Interruptorde encendido/apagado ......... 7
Accesorios ......................... 7-9
Cuadrode uso de los accesorios .......... 9
Sugerencias para aspirar ............... 10
Caracterfsticas de rendimiento ........ 10-11
Cuidado de la aspiradora ............... 12
Almacenamientode laaspiradora ........ 12
Limpiezadelexteriory de losaccesorios... 12
Cambio de la bolsapara polvo........... 13
Cambio del filtros .................... 14
Cambio de la correay limpiezadel
agitador ......................... 15-17
C6mo eliminar los residuos de basura
en los conductos ..................... 18
Cambio de la bombilla ................. 19
Cuidadodel agitador .................. 20
Ensamble del agitador ................. 20
Reconocimiento de problemas ........... 21
Informaclbn de asslstancia
o servicio ................. PosteriorCubierta
Potfavor lea esta guia que le ayudara a assemblary operar su aspiradora nuevade Kenmoreen una manera
mas segura y effectiva.
Para mas informaci6nacerca del cuidado y operaci6nde esta aspirador, llama a su tienda Sears mas cercana.
Cuandoprequnte por informacion usted necisitar_ el nt_merocompleto de serie y modelo de la aspiradoraque
esta Iocado en la placa de los numeros de modelo y serie.
Use el espacio de abajo para registrar el nOmerode modeloy serie para su nueva aspiradorade Kenmore.
Numero de Modelo
Numero de Serie
Fecha de Compra
Matenga este libroy su recibo en u lugar seguropara referenciasfuturas.
GARANT[ALIMITADADE UNANO DELA ASPIRADORA KENMORE
Esta garantia esporun aflo desde la fecha de compra, e incluye solamente el uso de la aspiradoraen
hogaresprivados. Duranteel aflo degaranfia, cuando la aspiradora esoperada y mantenidade acuerdoal
manual de instrucciones defduefio, Searsreparara cualquier defectoen materialeso fabricacionlibre de cargo.
Esta garantfaexcluye las bolsas de coleccion, correas, lamparillas,y filtros, lascuales son partes gastablesque
se deteriorancon el uso normal.
Para el serviciode garantia,retorne esta aspiradora al Centro de Servicio Sears m&scercanoan losEstados
Unidos.
Esta garantia se aplica solamente mientraseste produclo esta en uso en los Eslados Unidos. Estagarantfa le
da a usted derechos legales especfficos,y usted puede tener tambienotrosderechos los cuales varian de
eatadoa estado.
Sears, RoebuckandCo., D/817 WA,HoffmanEstates,IL 60179
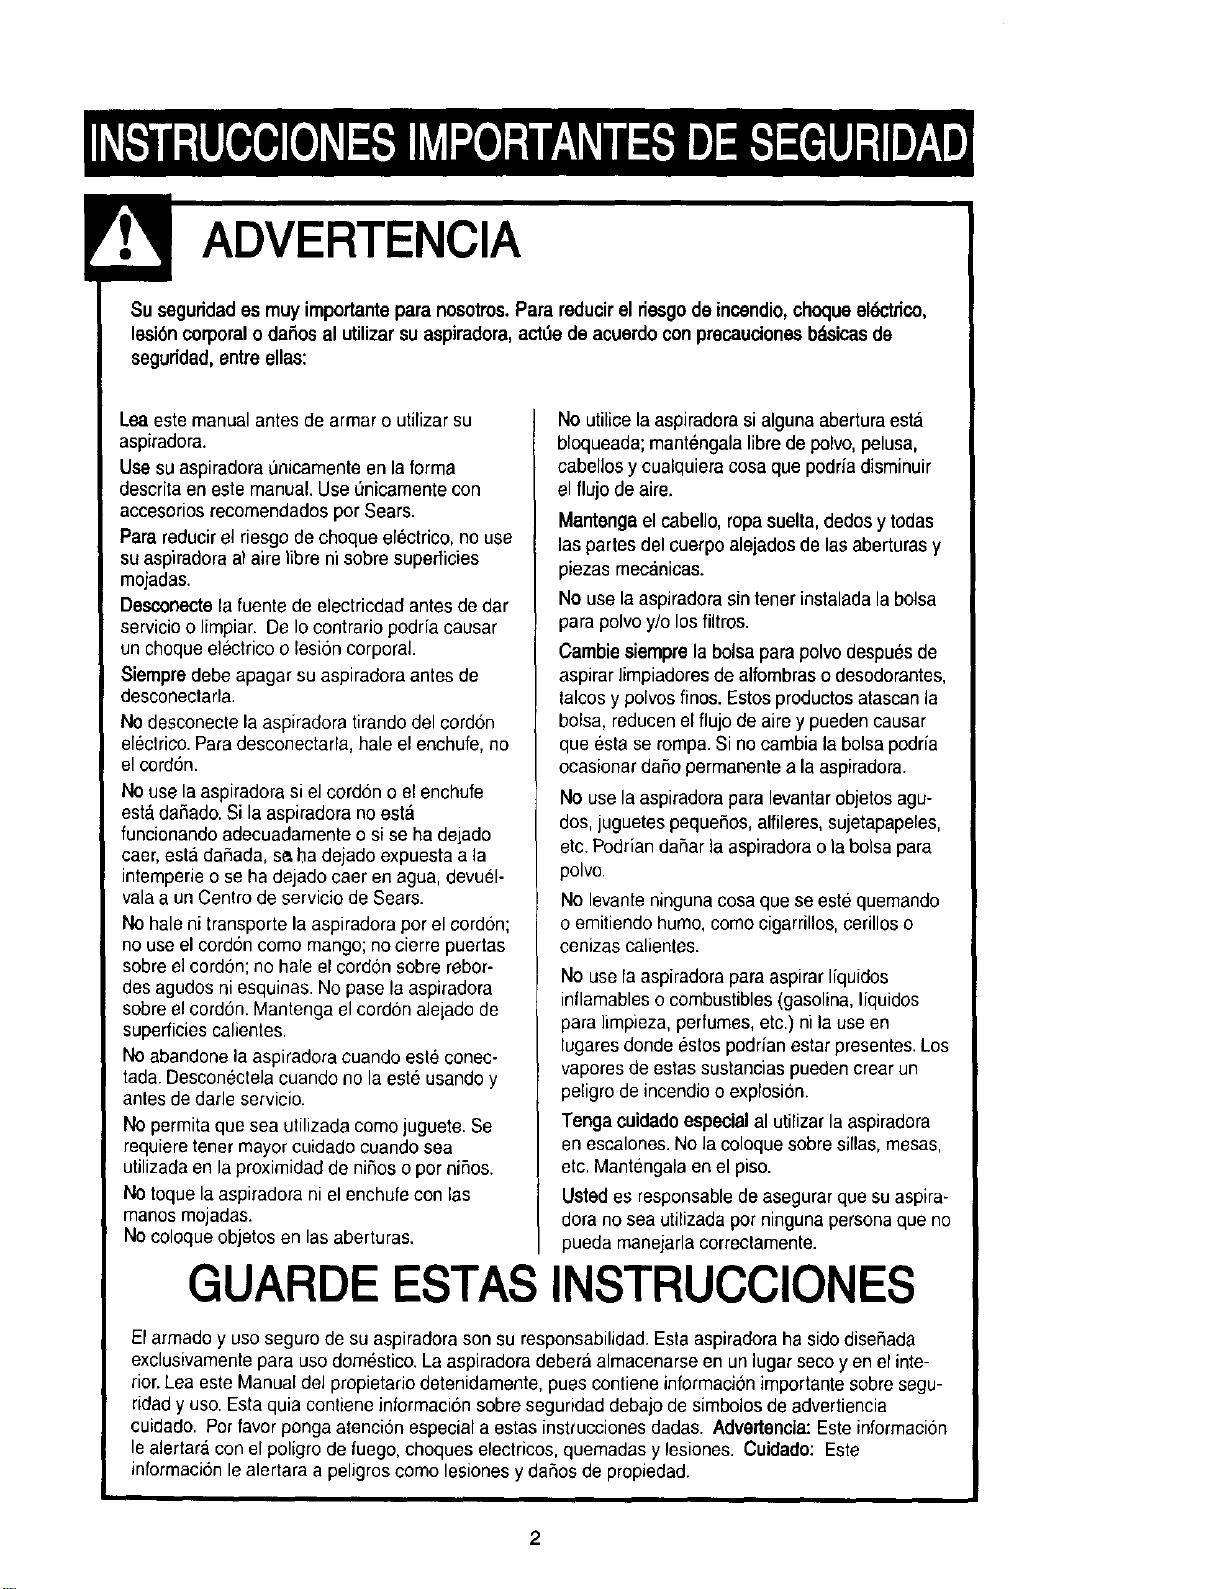
! ADVERTENCIA
Suseguridades muyimportante para nosotros. Parareducir el desgode incendio,choqueel_trico,
lesi6n corporal o dafios al utilizar su aspiradora, act_e de acuerdo con precaudenes bdsicasde
seguridad, entreelias:
Lea este manualantes de armar o utilizar su
aspiradora.
Use su aspiradorat_oicamenteen la forma
descrita en este manual. Use Onicamentecon
accesorios recomendadospor Sears.
Para reducirel riesgo de choque electrico, no use
su aspiradoraal aire Iibre ni sobresuperficies
mojadas.
Desconectela fuente de electricdad antesde dar
servicioo Iimpiar. De Iocontrario podria causar
un choque electrico o lesion corporal
Siempredebe apagar su aspiradora antesde
desconectarla.
No desconecte la aspiradora tirandodel cordon
electrico.Para desconectarla, hale el enchufe,no
el cord6n.
No use la aspiradora si eIcordon o el enchufe
esta dafiado. Si la aspiradora no esta
funcionando adecuadamente o si se ha delado
caer, esta dafiada, se,ba dejado expuestaa la
intemperieo se ha dejado caer enagua,devuel-
valaa un Centro de servicio de Sears.
Nohale ni transporte la aspiradora pot el cordon;
no use el cord6ncomo mango; no cierre puertas
sobre el cordon; no hale el cordon sobre rebor-
desagudos ni esquinas. No pase laaspiradora
sobreel cordon. Mantenga el cordon aleladode
superficies calientes.
Noabandone la aspiradora cuando esteconec-
tada. Descon_ctelacuando no la este usandoy
antes de darle servicio.
No permita que sea utilizada como juguete. Se
requiere tenet mayor cuidado cuando sea
utilizada en la proximidad de niflos o por nifios.
No toque la aspiradora ni el enchufe con las
manos mojadas.
Nocoloque objetes en las aberturas.
No utilice la aspiradorasi alguna aberturaesta
bloqueada;mantengala libre de polvo,pelusa,
cabellos y cualquieracosa que podfia disminuir
el flujo de aire.
Mantengael cabello, ropa suelta, dedosy todas
las partes del cuerpo alejadosde las aberturasy
piezas mecanicas.
No use la aspiradorasin tenerinstalada la bolsa
para polvo y/o losfiltros.
Carnbiesiemprela bolsa parapolvodespu_s de
aspirar limpiadores de alfombraso desodorantes,
talcos y polvos finos.Estos productosatascanla
bolsa, reducenel flujo de aire y pueden causar
que esta se rompa. Si no cambia la bolsapodrfa
ocasionar dafio permanente a la aspiradora.
No use la aspiradorapara levantarobjetos agu-
dos,juguetes pequefios, alfileres,sujetapapeles,
etc.Podrian daflar la aspiradorao la bolsa para
polvo.
No levante ningunacosa que se este quemando
o emitiendo humo,como cigarrillos,cerillos o
cenizascalientes.
No use la aspiradora paraaspirar Ifquidos
inflamableso combustibles(gasolina,liquidos
para limpieza, perfumes, etc.)ni la use en
lugares donde estos podrian estar presentes.Los
vapores de estas sustancias puedencrear un
peligro de incendioo explosion.
Tenga coidado especial al utilizar la aspiradora
en escalones.No la coloque sobresillas, mesas,
etc. Mantengalaen el piso.
Ustedes responsablede asegurar quesu aspira-
dora no sea utilizada porninguna personaque no
pueda manejarlacorrectamente.
GUARDE ESTAS INSTRUCClONES
El armado y uso seguro de su aspiradora son su responsabilidad.Esta aspiradoraha sido disefiada
exclusivamentepara uso domestico.La aspiradora debera almacenarseen un lugar seco yen el inte-
rior.Lea este Manualdel propietario detenidamente, pues contiene informaciOnimportante sobresegu-
ridady uso.Esta quia contiene informacibn sobre seguridaddebajo de simbolosde advertiencia
cuidado. Pot favorponga atenci6n especial a estas instruccionesdadas. Advertencia: Este informacion
le alertara con el poligrode fuego, choques eleclricos, quemadas y lesiones. Cuidado: Este
informacion le alertara a peligroscomo lesiones y dafios de propiedad.
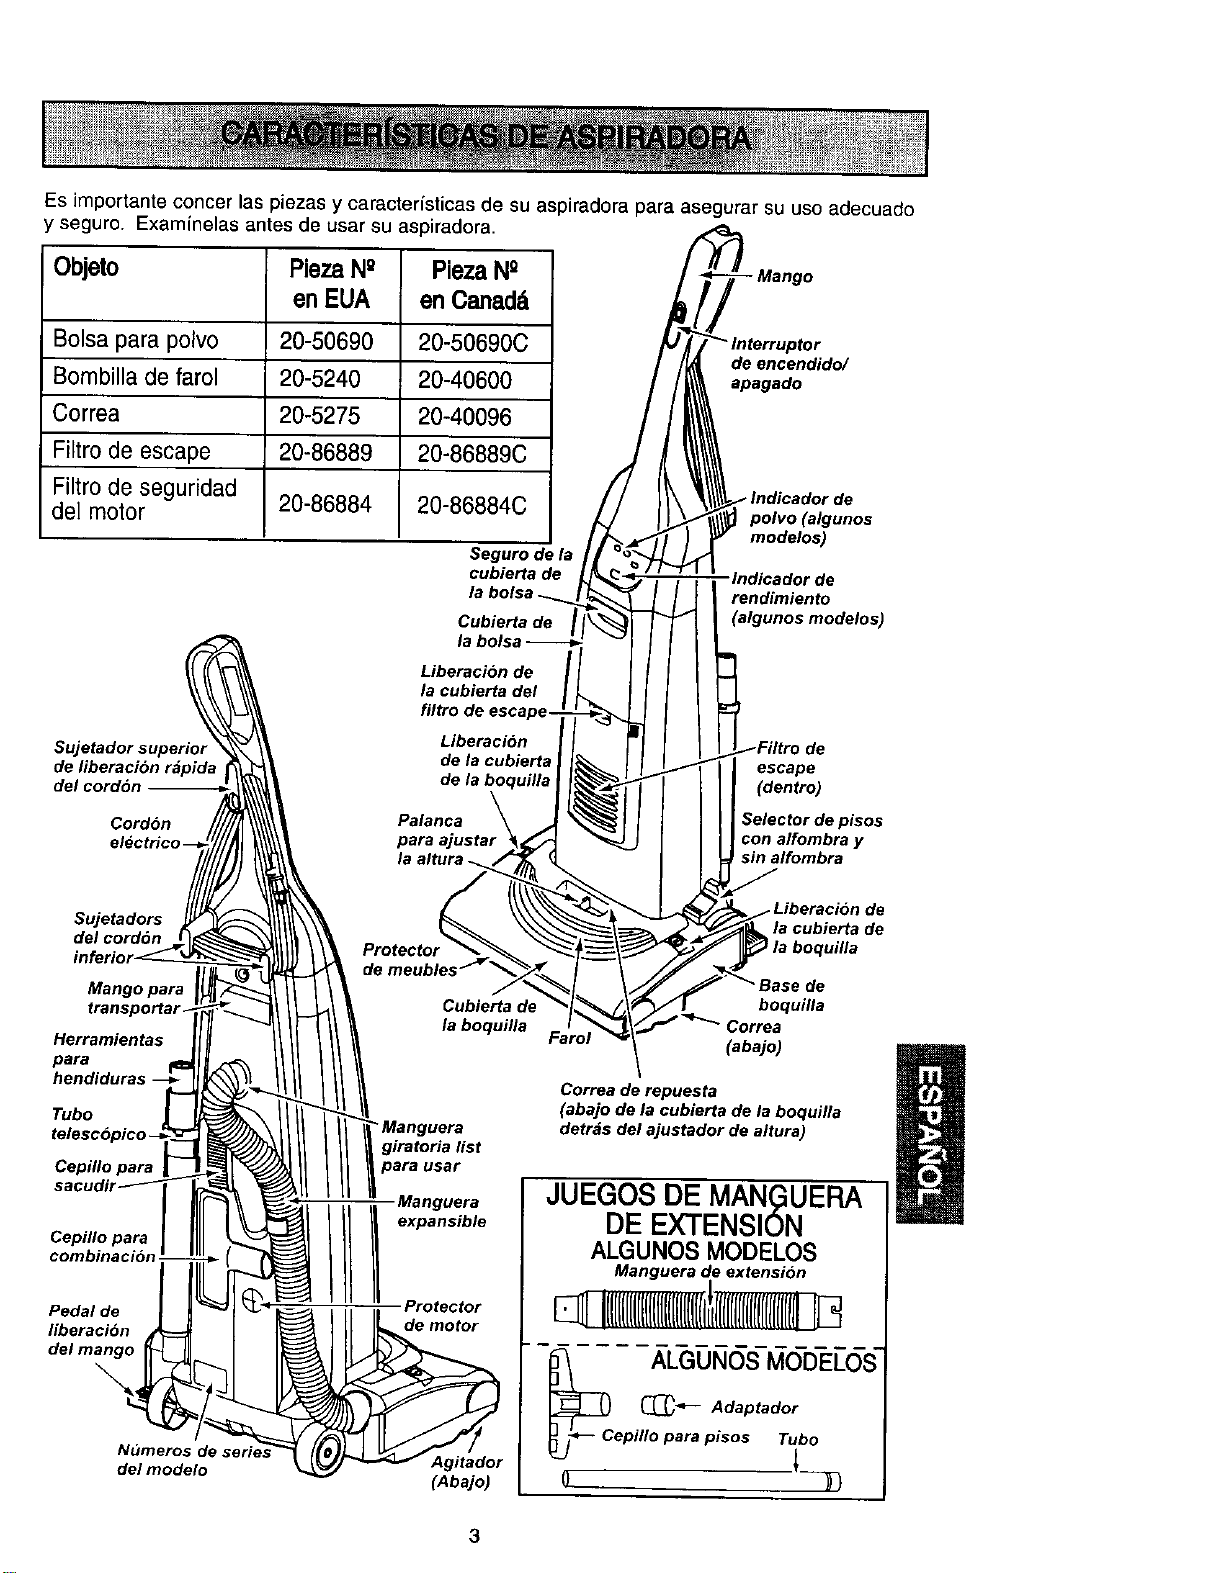
Esimportanteconcerlaspiezasycaracteristicasdesuaspiradoraparaasegurarsuusoadecuado
yseguro.Examinelasantesdeusarsuaspiradora.
Objeto Pieza N° Pieza N°
en EUA en Oanad&
Bolsa para polvo 20-50690 20-50690C
Bombilla de farol 20-5240 20-40600
Correa 20-5275 20-40096
Filtro de escape 20-86889 20-86889C
Filtro de seguridad
det motor 20-86884 20-86884C
Seguro de la
cubierta de
Cubierta de
- Mango
de encendido/
apagado
'e
polvo (algunos
modelos)
•lndicador de
rendimiento
(algunos modelos)
Sujetadorsuperior
de fiberacion r_pida
delcord6n
Cordon
electHc
Liberacion de
la cublerta del
filtro de escape-
Liberacibn
de la cubierta
de la boquilla
Palanca
para _ustar
de
escape
(dentro)
Selector de pisos
con alfombra y
sin alfombra
Sujetadors
del cordon
Mango para
t_nspo_ar_
Herramientas
para
hendiduras
Tubo
Cepillo para
Cepillo para
comblnacibn J
Pedal de
fiberaclbn
del mango
Numeros d*
del modelo
Cubierta de
la boquilla
• Manguera
giratoria list
para usar
Manguera
///!ex n-e
Protector
de motor
Agitador
(Abajo)
la cubierta de
boquilla
boquilla
(abajo)
Correa de repuesta
(abajo de la cublerta de la boqultla
detrds del ajustador de altura)
JUEGOS DE MAN(_UERA
DE EXTENSION
ALGUNOS MODELOS
Manguera de extension
l
!llll([[lIlIll[[lllll[{l[(Iti
_c LGG_UNOSMODELOS-
(_ Adaptador
epilloparapisos Tuto
3
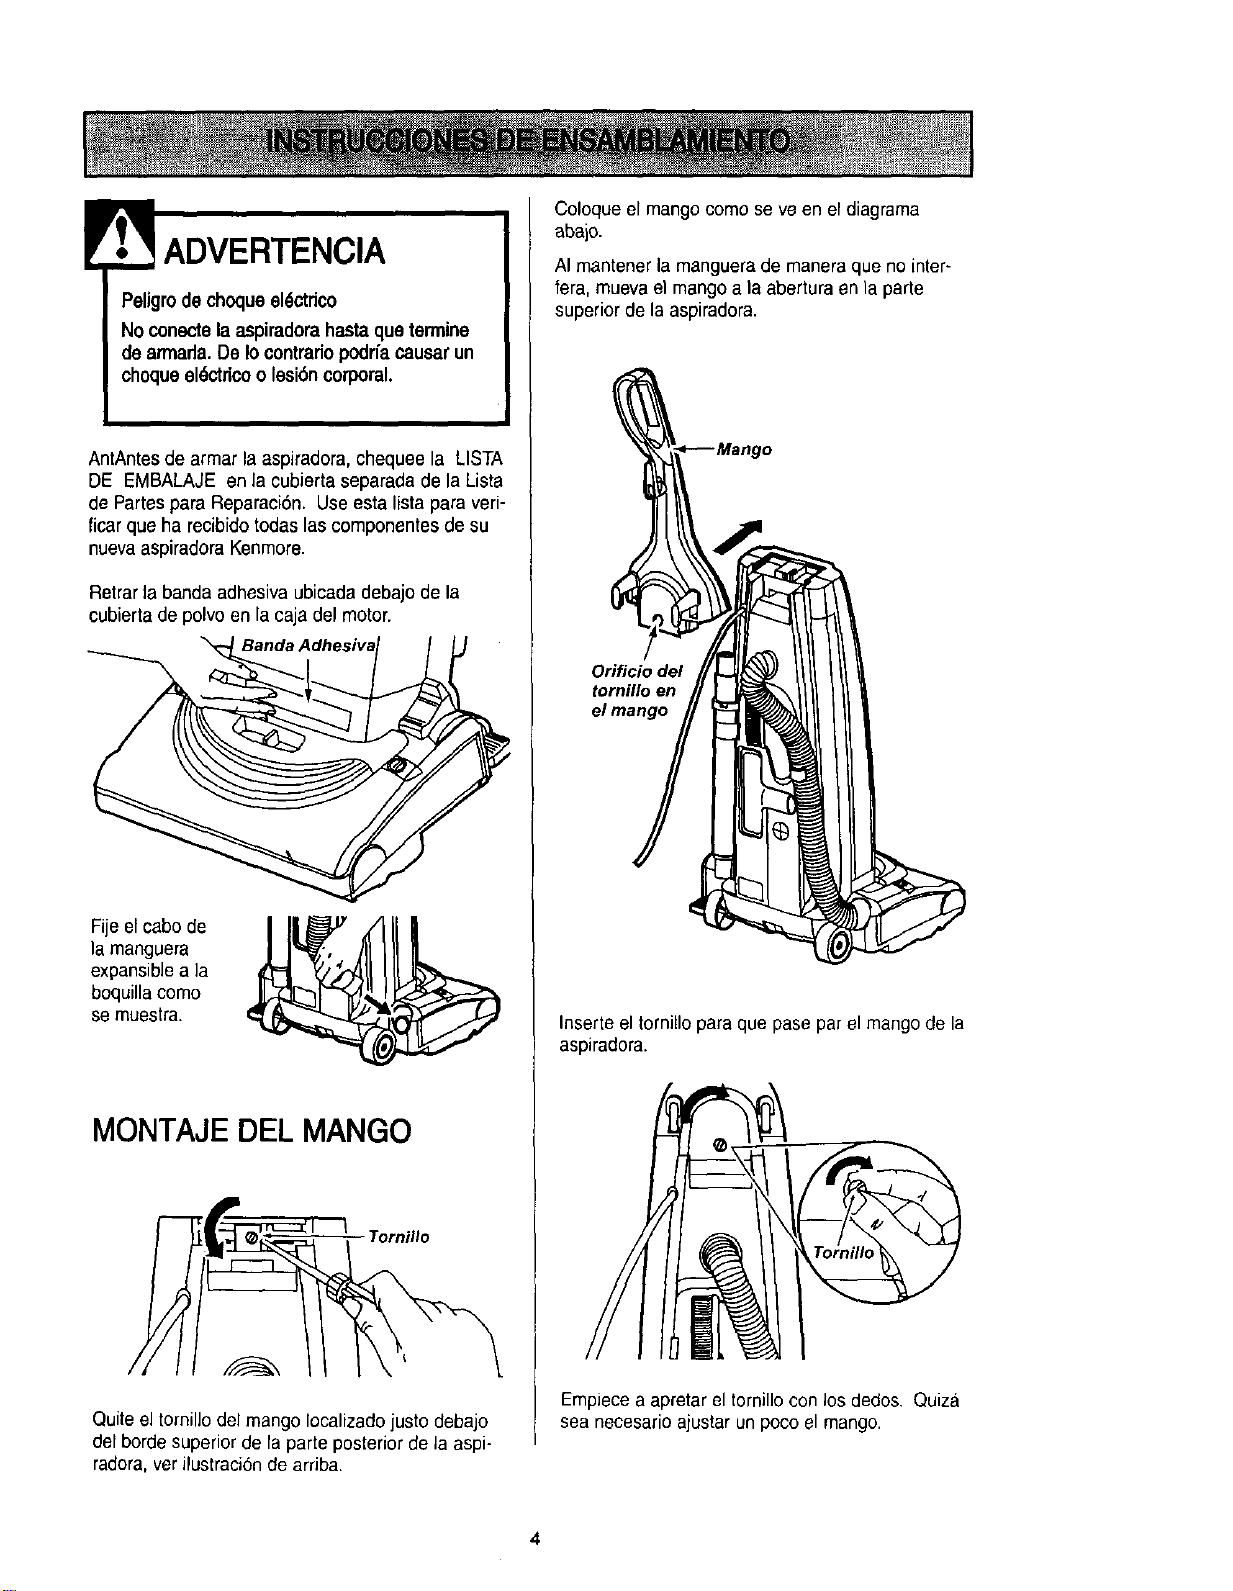
IrL ADVERTENCIA
PeUgrode choqueel_ctrico
No conectelaaspiradorahastaquetermine
de armada.De Io contrariopodrfacausarun
choqueel_;_ctricoo lesi6ncorporal.
AntAntesde armar la aspiradora,chequee la LISTA
DE EMBALAJE en la cubierta separada de la Lista
de Partespara Reparaci6n. Use esta Iista para veri-
ficar que ha recibido todas las componentes de su
nuevaaspiradora Kenmore.
Retrarla banda adhasiva ubicadadebajo de la
cubierta de polvo en la caja del motor.
Fije el cabo de I ]|_
la manguera
expansiblea ]a
boquilla como
se muestra.
MONTAJE DEL MANGO
Tornil/o
Quiteel tornillo del mango Iocalizadojusto debajo
del borde superiorde la parte posterior de la aspi-
radora,ver ilustraci6nde arriba.
Coloque el mangocomo seve en el diagrama
abajo.
AI mantener la manguerade maneraque no inter-
fera, muevael mango a la abertura en la parle
superior de la aspiradora.
Orificio del
tornillo en
Inserteel tornillo para que pase par el mangode la
aspiradora.
Empiecea apretar el tornillo con los dedos. Quiza
sea necesario ajustar un poco el mango.
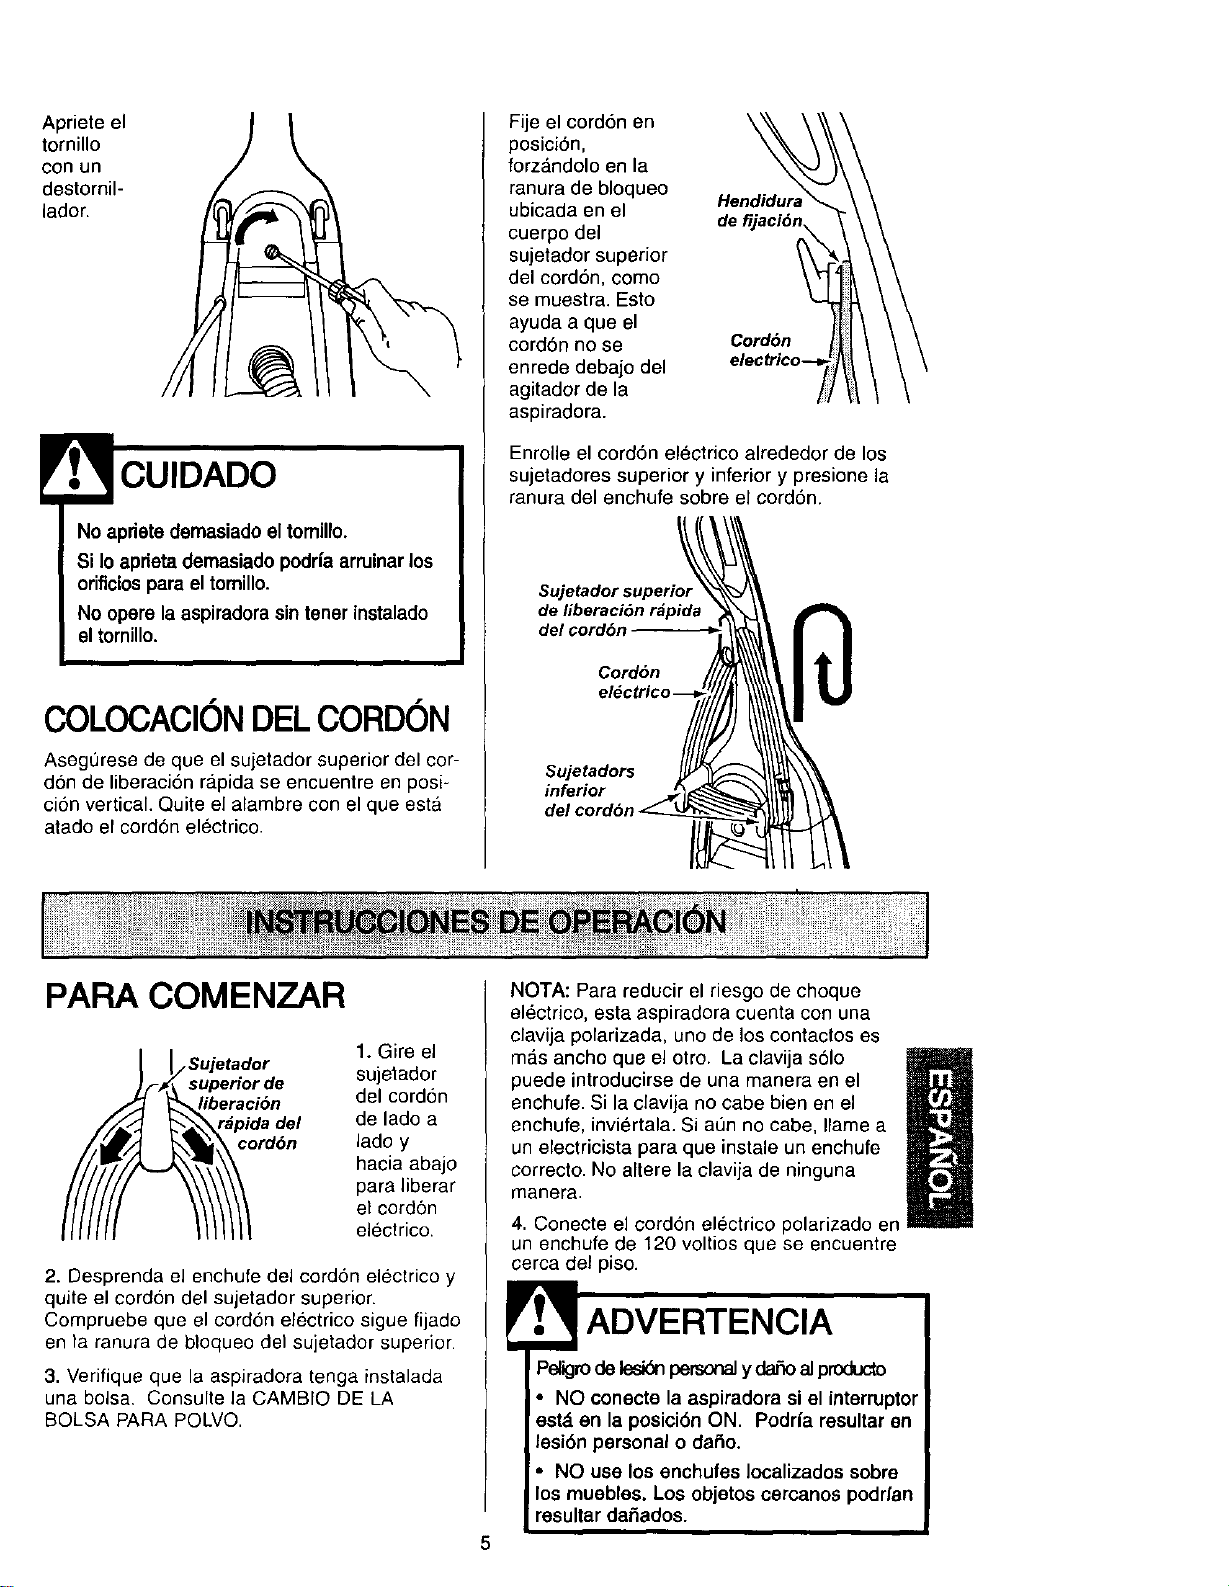
Aprieteel
tornillo
con un
destornil-
lador.
No aprietedemasiado el tomillo.
Si Io apfleta demasiado podrfa arruinarlos
orificios para el tomillo.
No opere la aspiradorasin tener instalado
] eltornillo.
I
COLOCACl0NDELCORDON
Asegt)rese de que el sujetador superior del cor-
don de liberaci6n ra.pidase encuentre en posi-
ci6n vertical. Quite el alambre con el que esta
atado el cord6n el6ctrico.
Fije el cordon en
posici6n,
forz&ndolo en la
ranura de bloqueo
ubicada en el
cuerpe del
sujetador superior
del cord6n, como
se muestra. Esto
ayuda a que el
cord6n no se
enrede debajo del
agitador de la
aspiradora.
de f
Cordbn
Enrolle el cord6n electrico alrededor de los
sujetadores superior y inferior y presione la
ranura del enchufe sobre el cord6n.
Sujetador superior
de liberaci6n r_pida
del cord6n
Cord6n
inferior
PAPA COMENZAR
_oSUjetado r 1. Gire el
uperior de sujetador
eraci6n del cordon
pida d.el de lado a
rdon lade y
hacia abajo
para liberar
el cordon
electrico.
2. Desprenda el enchufe del cordon electrico y
quite el cord6n del sujetador superior.
Compruebe que el cordon electrico sigue fijado
en la ranura de bloqueo del sujetador superior.
3. Verifique que la aspiradora tenga instalada
una bolsa. Censulte la CAMBIO DE LA
BOLSA PARA POLVO.
NOTA: Para reducir el riesgo de choque
electrico, esta aspiradora cuenta con una
clavija polarizada, uno de los contactos es
m_s ancho que el otro. La clavija s61o
puede introduoirse de una manera en el
/
enchufe. Si la clavija no cabe bien en el
enchufe, invi_rtala. Si at]n no cabe, Ilame a
un electricista para que instale un enchufe
correcto. No altere la clavija de ninguna
manera.
4. Conecte el cord6n electrico pelarizado en
un enchufe de 120 voltios que se encuentre
cerca del piso.
ADVERTENCIA
Peligrode lesi6qpersonaly daSoal pmducto
• NO conecte la aspiradora si el interruptor
est_ en la posici6n ON. Podrfa resultar en
lesi6n personal o daSo.
• NO use los enchufes Iocalizados sobre
los muebles. Los objetos cercanos podrfan
resultar dai_ados.
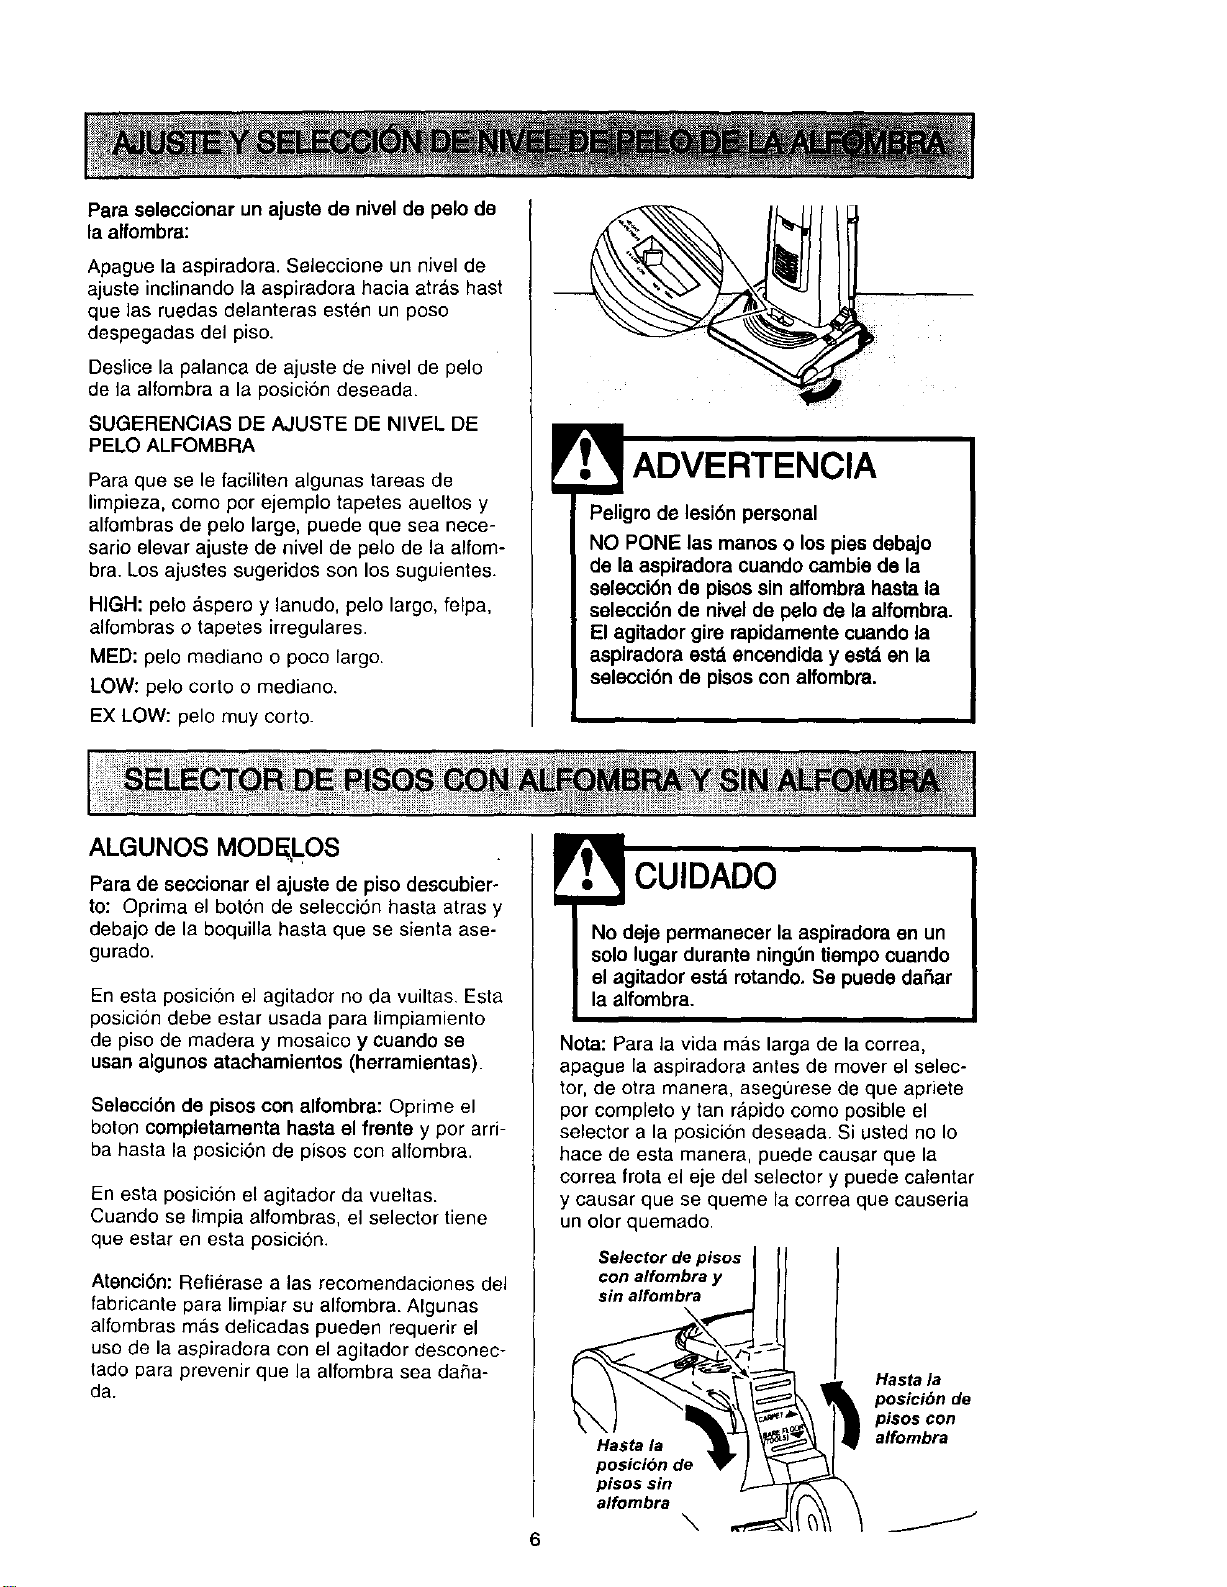
Para seleccionar un ajuste de nivel de pelo de
la alfombra:
Apague la aspiradora. Seleccione un nivel de
ajuste inclinando la aspiradora hacia atras hast
que las ruedas delanteras esten un poso
despegadas del piso.
Deslice la palanca de ajuste de nivel de pelo
de la alfombra a la posici6n deseada.
SUGERENCIAS DE AJUSTE DE NIVEL DE
PELO ALFOMBRA
Para que se le faciliten algunas tareas de
limpieza, como por ejemplo tapetes aueltos y
alfombras de pelo large, puede que sea nece-
sario elevar ajuste de nivel de pelo de la alfom-
bra. Los ajustes sugeridos son los suguientes.
HIGH: pelo &spero y lanudo, pelo largo, felpa,
alfombras o tapetes irregulares.
MED: pelo mediano o poco largo.
LOW: pelo corto o mediano.
EX LOW: pelo muy corto.
Peligro de lesi6n personal
NO PONE las manos o los pies debajo
de la aspiradora cuando cambie de la
selecci6n de pisos sin alfombra hasta la
selecci6n de nivel de pelo de la alfombra.
El agitador gire rapidamente cuando la
aspiradora est_ encendida y est_ en la
selecci6n de pisos con alfombra.
ALGUNOS MODELOS
Para de seccionar el ajuste de piso descubier-
to: Oprima el boron de selecci6n hasta atras y
debajo de la boquilla hasta que se sienta ase-
gurado.
En esta posici6n el agitador no da vuiltas. Esta
posicion debe estar usada para limpiamiento
de piso de madera y mosaico y cuando se
usan algunos atachamientos (herramientas).
Selecci6n de pisos con alfombra: Oprime el
boton completamenta hasta el frente y por arri-
ba hasta la posici6n de pisos con alfombra.
En esta posicion el agitador da vueltas.
Cuando se limpia alfombras, el selector tiene
que estar en esta posici6n.
Atenci6n: Refierase alas recomendaciones del
fabricante para limpJar su alfombra. AIgunas
alfombras m&s delicadas pueden requerir el
uso de la aspiradora con el agitador desconec-
tado para prevenir que la alfombra sea da,_a-
da.
!
No deje permanecer la aspiradora en un
solo lugar durante ning0n tiempo cuando
el agitador est_ rotando. Se puede daSar
la alfombra.
Nota: Para la vida mas larga de la correa,
apague la aspiradora antes de mover el selec-
tor, de otra manera, aseg0rese de que apriete
por completo y tan rapido como posible el
selector a la posici6n deseada. Si usted no Io
haee de esta rnanera, puede causar que la
correa frota el eje del selector y puede calentar
y causar que se queme la correa que causeria
un olor quemado.
Selector de pisos
con alfombra y
sin alfombra
Hasta la
posicion de
pisossin
alfombra
\
Hasta la
posicibn de
pisos con
alfombra
J
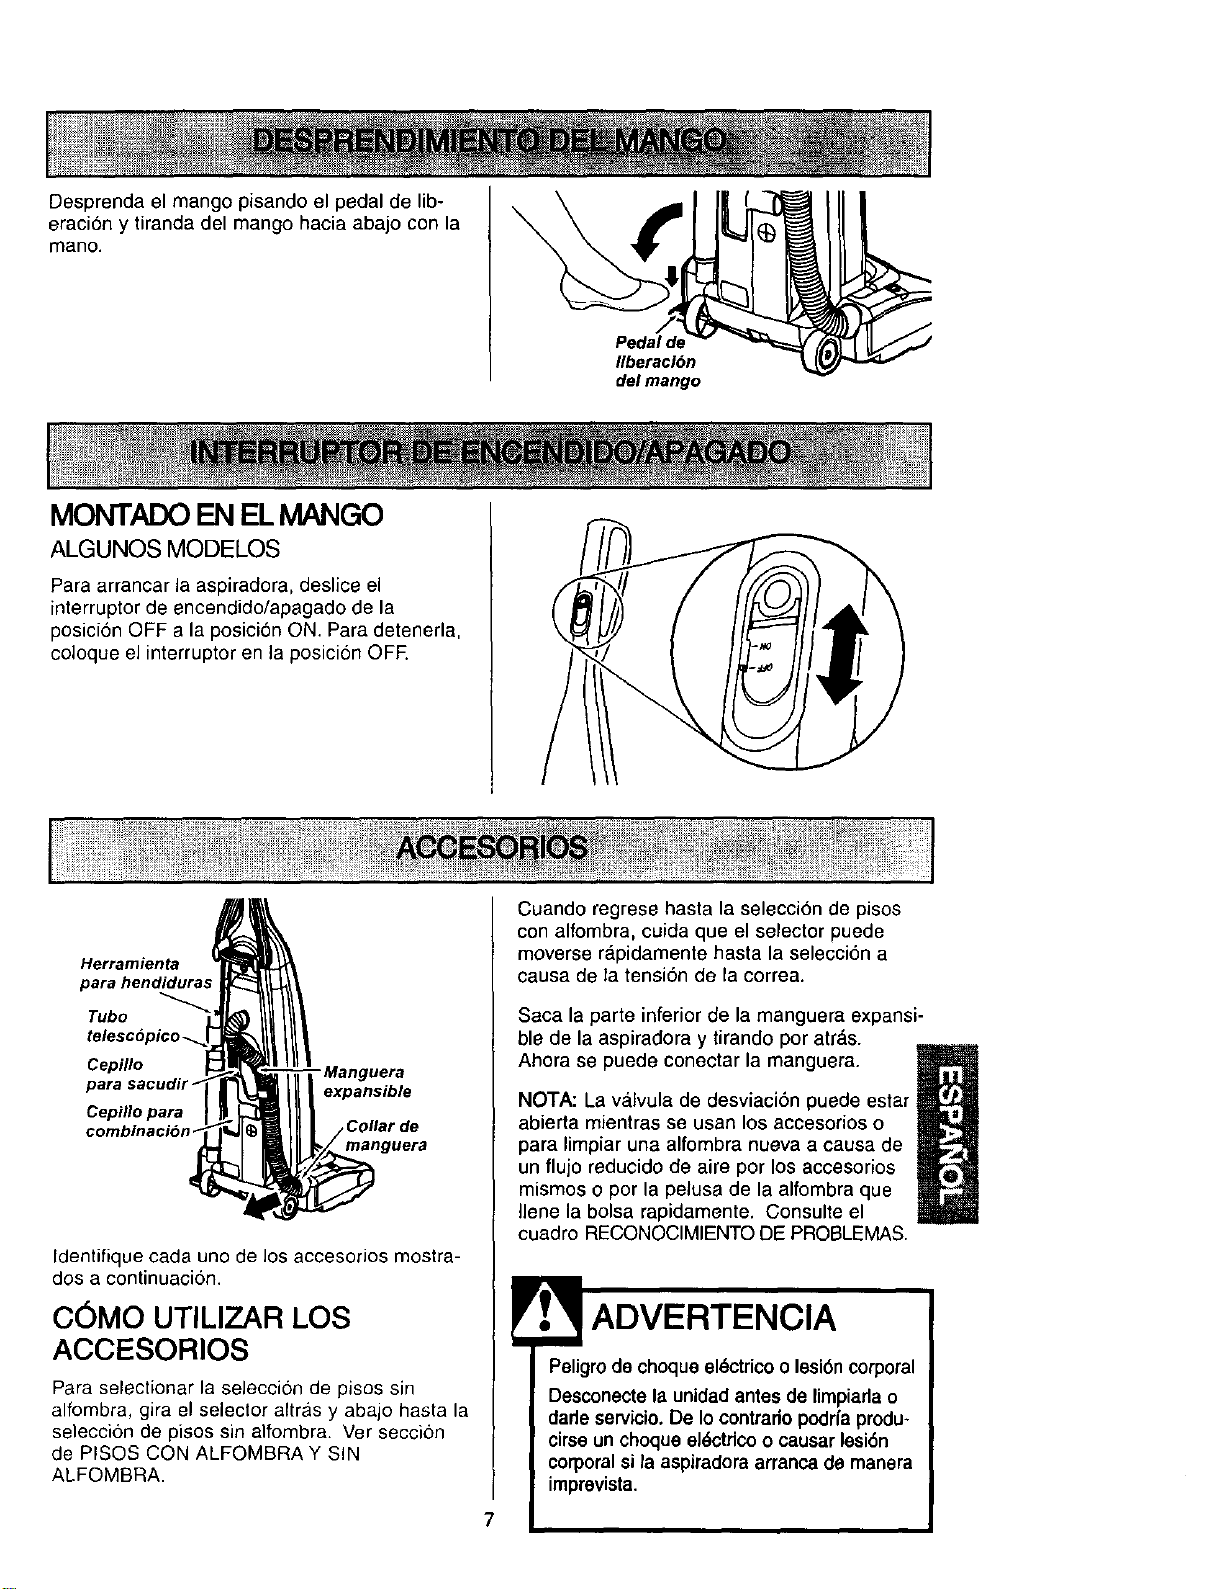
Desprenda el mango pisando el pedal de lib-
eracion y tiranda del mango hacia abajo con la
mano.
MONTADO EN EL MANGO
ALGUNOS MODELOS
Pedal de
Ilberaci6n
del mango
Para arrancar la aspiradora, deslice el
interruptor de encendido/apagado de la
posici6n OFF a la posici6n ON. Para detenerla,
coloque el interrupter en la posici6n OFE
Herramienta
para hendidura,.
Tubo
Cepillo - Manguera
para expansible
Cepillo para
combinacion
manguera
Identifique cada uno de los accesorios mostra-
dos a continuacion.
C6MO UTILIZAR LOS
ACCESORIOS
Para selectionar la selecci6n de pisos sin
alfembra, gira el seleclor altras y abajo hasta la
selecci6n de pisos sin alfombra. Ver seccion
de PISOS CON ALFOMBRA Y SIN
ALFOMBRA.
Cuando regrese hasta la selecci6n de pisos
con alfombra, cuida que el selector puede
moverse rdpidamente hasta la selecci6n a
causa de la tensi6n de la correa.
Saca la parte inferior de la manguera expansi-
ble de la aspiradora y tirando por atr_,s.
Ahora se puede conectar la manguera.
M
NOTA: La va.lvula de desviaci6n puede estar
abierta mientras se usan los accesorios o
U
para limpiar una alfombra nueva a causa de
un flujo reducido de aire por los accesorios
mismos o por la pelusa de la alfombra que
Ilene la bolsa rapidamente. Consulte el
cuadre RECONOCIMIENTO DE PROBLEMAS.
ADVERTENClA
Peligro de choque el6ctrico o lesi6ncorporal
Desconecle la unidad antes de limpiarla o
dade servicio.De Io contrario podrfaprodu-
cirse un choque eldctflco o causar lesi6n
corporalsi la aspiradora arranca de manera
imprevista.

Lamanguera
incorporadagira Giratorla-
para facilitar la
Iimpieza en cual-
quier direcci6n.
Para quitar la
manguera, tire
de la manguera
del collar.
TUBO TELESOOPICO CON
CONTROL DE ASPIRACI6N
ALGUNOS MODELOS
Saque el tubo
Herramlenta telesc6pico
////- oesu, 0a,
hendiduras de alma
Tubo cenamJento.
telesc6pico
Retire la herramienta para hendiduras de su
lugar de almacenamiento dentro del tube. Gire
el arc de bloqueo hast_ !a posici6n UNLOCK.
Despliegue el tubo completamente. Gire el arc
de bloqueo del tubo hasta la posici6n LOCK.
Inslale el tube de extensi6n en el extremo
abierto de la manguera.
Tubo _'.._ Deslizador
inferior--.------# __ de control
\ _l_'_/_de aspiracibn
superior
Alinee las pestaSas del tubo de extensi6n con
las ranuras en forma de "J" de la manguera.
Empuje el tubo dentro de ]a manguera y gire
hacia la derecha para bloquearlo.
Para obtener la maxima
Iongitud con los acceso- Manguera.
dOS,instale la herramienta
para hendiduras
en el extreme Deslizador
del tubo. de controlde
Para hacerlo,
introd0zcala en
el tubo
y gireta Tubo
un telescbpic_
poco.
destacado
para hendiduras
Cuando use el
cepino para
sacudir o el
cepillo para
combinaci6n,
puede instalarlos
directamente en
el tube o en
extremo de la
herramienta para
hendiduras.
PARA OPERAR EL
DESLIZADOR DE CONTROL
DE ASPIRACI6N
Tubo telesc6pico
Cuando use accesorios para limpiar cortinas,
tapetes pequeSos de pelo corto y otros
articulos delicados, gire el deslizador de control
de aspiraci6n a la posici6n abierta. Este
selector se
Deslizador
Esto reducira decontrol
la potencia de de aspiracion
aspiracion
para tacilitar la
limpieza.
NOTA:
Coloque el deslizador de control de aspiracion
a la posici6n cerrada para la limpieza normal.
CUIDADO
Cuandouselos accesorios,tengacuidadode
noe_rar demasiadolamangueraexpansible
parattatarde alcanzar_ lejo6.Sitratade
' eslJmrlamanguera_ de Iodebido,podrfa
causarque laaspiradorase vengaabajo.
Aseg_resede que el selectorpara alfombra/sin
elfombra est6 enlaposick_ para "sinalfom-
bra'.Se puede hacerdaSoa lasuperrldedel
i p_so _ el selec_r para alfombra/sinalfombra
est6en laposidbnpara"elfombra".
8
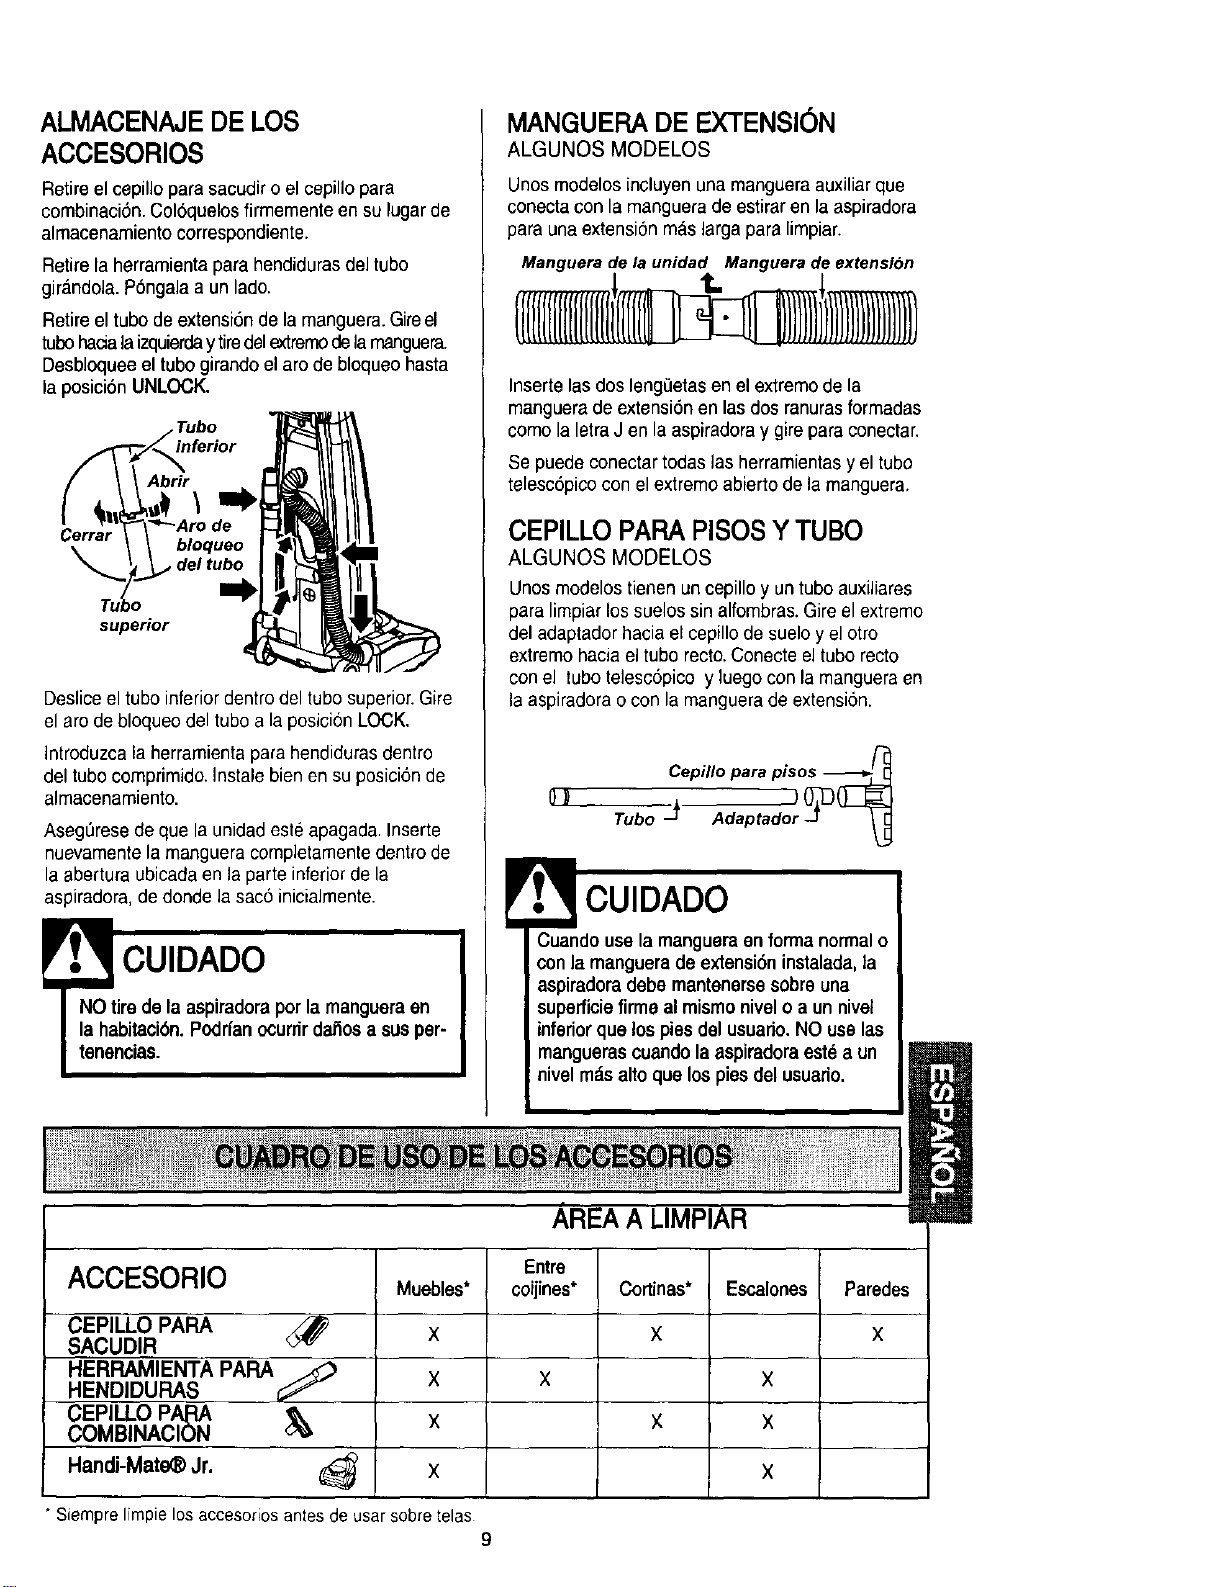
ALMACENAJEDE LOS
ACCESORIOS
Retire el cepillo para sacudir o el cepillo para
combinaci6n. Col6quelos firmemenle en su lugarde
almacenamiento correspondiente.
Retire la herramienta para hendidurasdel tube
girandola. P6ngala a un lade.
Retire el tube de extensi6n dela manguera.Gireel
tubehacialaizquierday tiredelextremede lamanguera.
Desbloqueeel tube girando el are de bloqueo hasta
la posici6n UNLOCK.
Tube
Abrir
\
Cerrar
bloqueo
, del tube
supeHor
Desliceel tube inferior dentrodel tube superior.Gire
el are de bloqueodel tube a la posicionLOCK.
Introduzca la herramienta para hendidurasdentro
del tubecomprimido. Instale bien en su posici6n de
almacenamiento.
AsegL_resede que la unidad este apagada.Inserte
nuevamentela manguera completamentedentro de
la abertura ubicadaen la parte inferiorde la
aspiradora, de deride la sac6 inicialmente.
CUIDADO
NO tire de la aspiradoraper la manguera en
la habitaci6n. Pcdrfan ocurrir dai'3osa sus per-
tenencias.
MANGUERADE EXTENSION
ALGUNOS MODELOS
Unos modelos incluyen una mangueraauxiliar que
conecta con la manguera de estirar en la aspiradora
para una extensionm_s largapara limpiar.
Manguera de la unidad Manguera de extensi6n
Inserte las dos lengeetasen el extremede la
manguerade extensi6n enlas dos ranurasformadas
come la letraJ en la aspiradora y gire para conectar.
Se puede conectar todas las herramientasy el tube
telesc6picocon elextremeabierto de la manguera.
CEPILLO PARA PISOS Y TUBe
ALGUNOS MODELOS
Unosmodelos tienen un cepillo y un tube auxiliares
para limpiarlos suelos sin alfombras.Gire el extreme
del adaptador hacia el cepillode sueloy el etro
extreme haciael tube recto.Conecte el tube recto
con el tubetelesc6picoy luego con la mangueraen
la aspiradorao con la manguerade extensi6n.
!
Q_
Cepillo para pisos -_-_
Tube j Adaptado_ O_
CUIDADO
Cuando usela mangueraen formanormalo
conla mangueradeextensi6ninstalada,la
aspiradora debe mantenersesobreuna
superficiefirmeal mismonivelo a un nivel
inferior que los piesdelusuado.NO uselas
manguerascuandolaaspiradora est_a un
nivelm_.saltoque lospiesdel usuario.
AREA A LIMPIAR
ACCESORIO
CEPILLO PARA
SACUDIR
HERRAMIENTA PAPA
HENDIDURAS
CEPILLO PAPA
COMBINACION
HandJ-Mate_ Jr. (_
Muebles*
X
X
X
X
Entre
coijines*
X
Cortinas*
X
Escalones
x
x
X
Paredes
X
• Siemprelimpielosaccesoriosantesdeusarsobretelas
9
Orillas de alfombras.
Guie uno de los costados o la parte anterior
de la boquilla a Io largo del borde de la pared.
Los cepillos largos ayudan a aspirar la tierra en
las orillas de las alfombras.
Escalones.
Coloque el mango en la posici6n vertical.
Mueva el selector de piso con alfombras y sin
alfombras a la posici6n sin alfombras. Use la
herramienta para hendiduras o el cepillo para
telas. Coloque el interrupter de
encendido/apagado en ON.
ADVERTENCIA
Peligro de lesiSn personal
Act_ie con precauci6n si coloca la aspira-
dora sobre escalones, Si se cae, podrfa
causar lesiSn personal o daSo a la pro-
piedad.
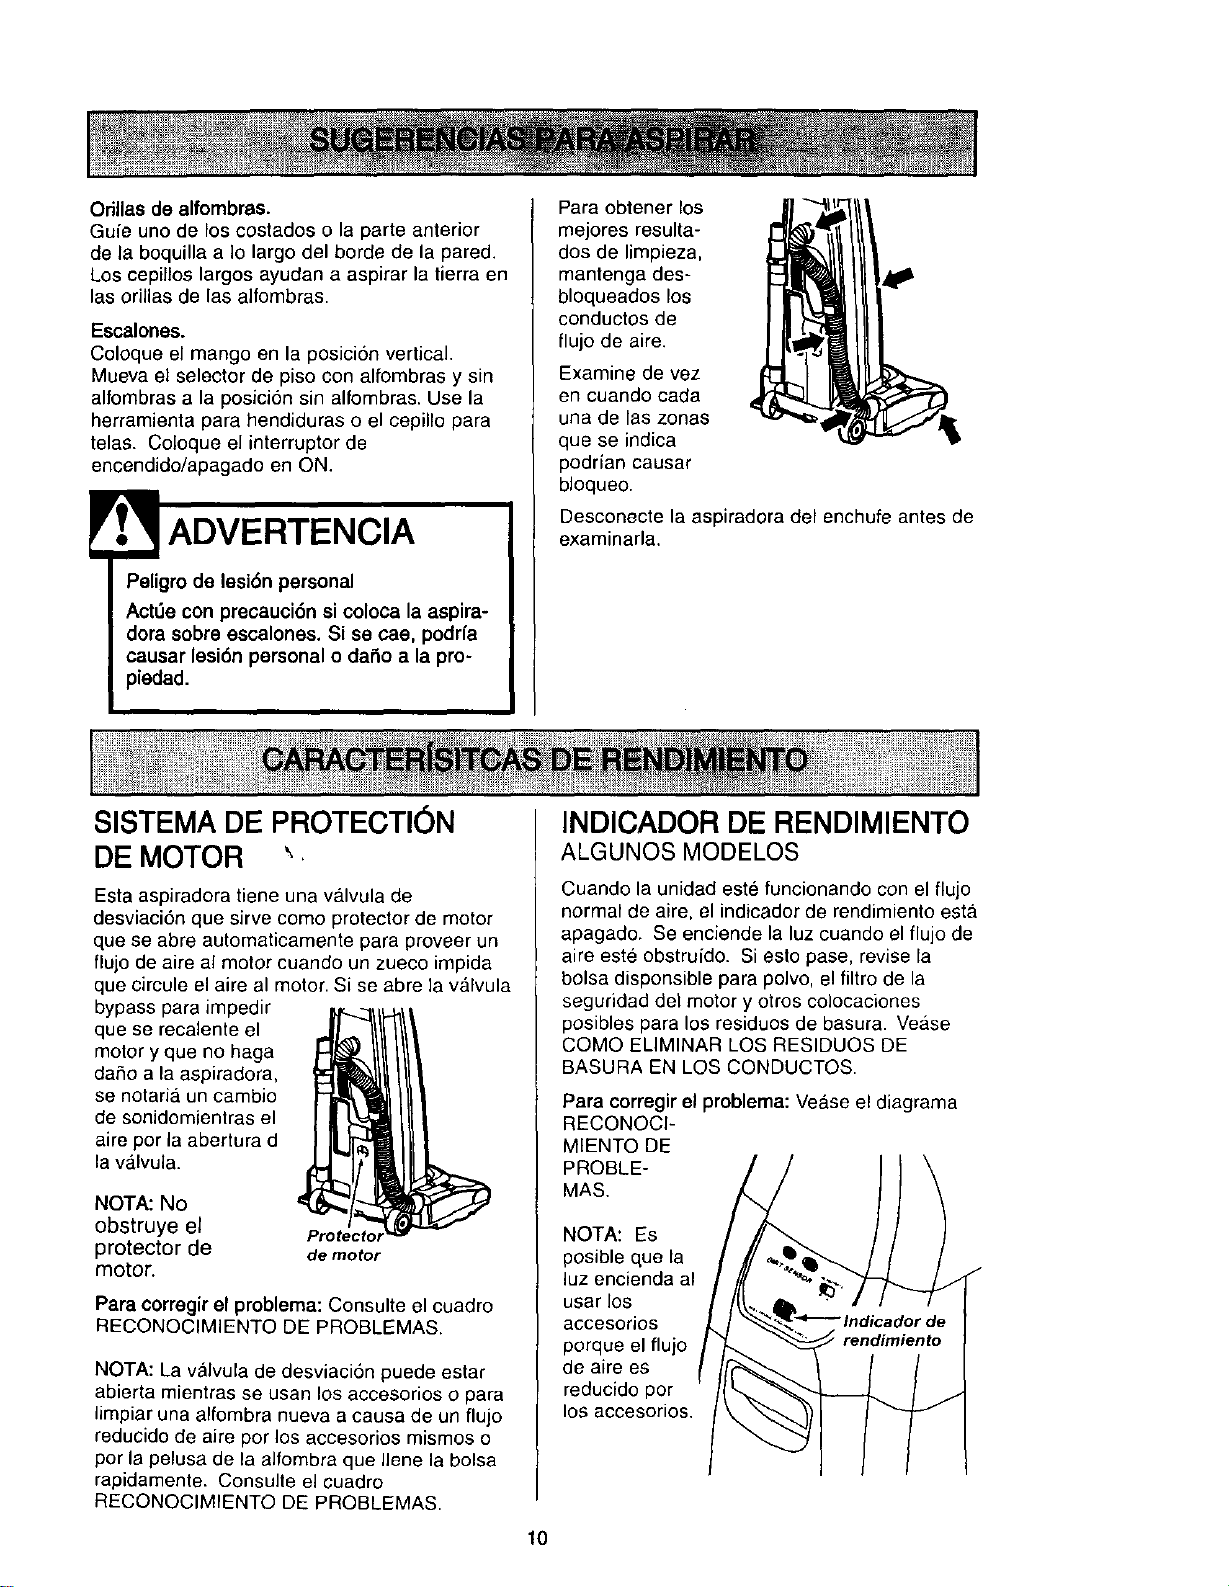
Para obtener los
mejores resulta-
dos de limpieza,
mantenga des-
bloqueados los
conductos de
flujo de aire.
Examine de vez
en cuando cada
una de las zonas
que se indica
podrfan causar
bloqueo.
Desconecte la aspiradora del enchufe antes de
examinarla.
SISTEMA DIEPROTECTION
DE MOTOR
Esta aspiradora tiene una valvula de
desviaci6n que sirve come protector de motor
que se abre automaticamente para proveer un
flujo de aire al motor cuando un zueco impida
que circule el aire al motor. Si se abre la valvula
bypass para impedir
que se recalente el
meier y que no haga
daSo a la aspiradora,
se notaria un cambio
de sonidomientras el
aire per la abertura d
la v_lvula.
NOTA: No
obstruye el Protectol
protector de de motor
motor.
Para corregir el problema: Consulte el cuadro
RECONOCIMIENTO DE PROBLEMAS.
NOTA: La valvula de desviaci6n puede estar
abierta mientras se usan los accesorios o para
limpiar una alfombra nueva a causa de un flujo
reducido de alre per los accesorios mismos o
per la pelusa de la alfombra que Ilene la bolsa
rapidamente. Consulte el cuadro
RECONOCIMIENTO DE PROBLEMAS.
INDICADOR DIERENDIMIENTO
ALGUNOS MODELOS
Cuando la unidad est6 funcionando con el flujo
normal de aire, el indicador de rendimiento estA
apagado. Se enciende la luz cuando el flujo de
aire este obstruido. Si esto pase, revise la
belsa disponsible para polvo, el filtro de la
seguridad del motor y otros colocaciones
posibles para los residues de basura. Vease
COMe ELIMINAR LOS RESIDUES DE
BASURA EN LOS CONDUCTOS.
Para corregir el problema: VeAse el diagrama
RECONOCI-
MIENTO DE
PROBLE-
MAS.
NOTA: Es
posible que la
luz encienda al
usar los
accesorios
porque el flujo
de aire es
reducido per
los accesorios.
10
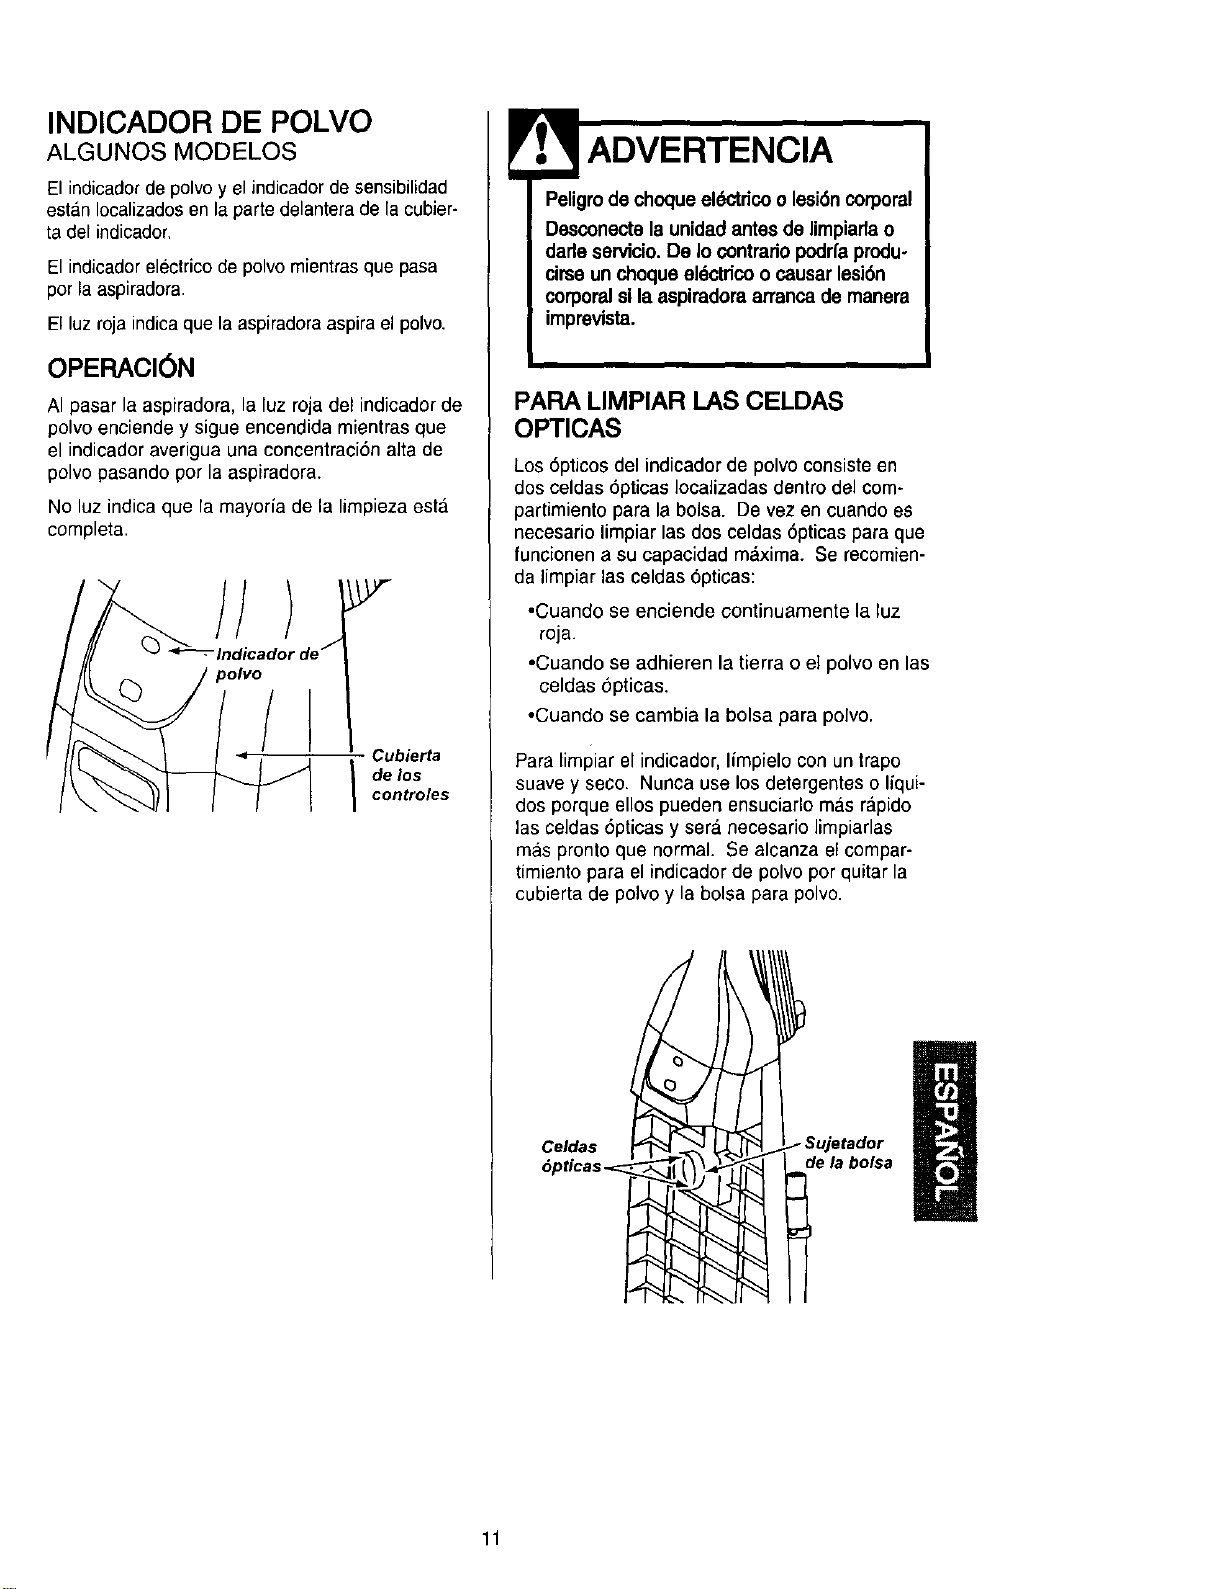
INDICADOR DE POLVO
ALGUNOS MODELOS
El indicadorde polvo y el indicadorde sensibilidad
estan Iocalizadosen la parte delantera dela cubier-
ta del indicador.
El indicador eleclrico de polvo mientras que pasa
por la aspiradora.
El luz roja indicaque la aspiradoraaspira el polvo.
OPERACION
AI pasar la aspiradora, la luz roja del indicador de
polvo enciende y sigue encendida mientras que
el indicador averigua una concentraci6n alta de
polvo pasando pot la aspiradora.
No luz indica que la mayorfa de la limpieza esta
completa.
iJ
Cubierta
I delos
controles
Peligrode choqueek_'tdco o lesi6n corporal
Desconecte la unidadantesde limpiarlao
dade servicio.De Io contradopodrfaprodu-
drse un choque eldctricoo causar lesi6n
corporalsila aspimdoraarrancade manera
imprevista.
PARA LIMPIAR LAS CELDAS
OPTICAS
Los 6pticos del indicador de polvo consiste en
dos celdas 6pticas Iocalizadas dentro del com-
partimiento para la bolsa. De vez en cuando es
necesario limpiar las dos celdas 6pticas para que
funcionen a su capacidad maxima. Se recomien-
da iimpiar las celdas 6pticas:
•Cuando se enciende continuamente la luz
roja.
•Cuando se adhieren la tierra o e] polvo en las
celdas 6pticas.
•Cuando se cambia la bolsa para polvo.
Para limPiar el indicador. Ifmpielo con un trapo
suave y seco. Nunca use los detergentes o liqui-
dos porque ellos pueden ensuciarlo mas rapido
las celdas 6pticas y sera necesario Iimpiarlas
mas pronto que normal. Se alcanza el compar-
timiento para el indicadorde polvo por quitar la
cubierta de polvo y la bolsa para polvo.
I. Sujetador
de la bolsa
I
11

Sigasiempretodaslasinstruccionesde
seguridedallimpiarydarleservicioasu
aspiradora.
Peligro dechoque el6ctrico o lesi6ncorporal
Desconecte la unidadantes de limpiarla o
darleservicio.De Io contrariopodrfaprodu-
cirse un choque eldctdcoo causer lesi6n
corporalsi la aspiradora arrancade manera
imprevista.
Recoja el cord6n y enrr611eloen los sujetado-
res superior e inferior, sin que quede muy
apretado.
Guarde la aspira-
dora bajo techo en
un lugar seco, con
el mango en posi-
ci6n vertical.
Paligro de choqua el6ctrico o lesi6n corpo-
ral
Si enrolla el cord6n muy apretado puede
tensado mucho y causade dafios, De de-
flame, el cordSn podrfa causar descargas
elL_ctdcasy lesiones o
dafios personales.
Desconecte el cord6n electrico de la clavija de
la pared. NO choree ague sobre la aspiradora.
Limpie el exterior con un trapo suave y limpio,
que ha side exprimido despu_s de remojar en
una soluci6n de agua y detergente liquido
ligero. Seque el exterior con un trapo seco des-
pues de limpiar.
Limpie la superficie exterior del receptaculo y
de los accesorios para reducir la electricidad
esta.tica y la acumulaci6n de polvo.
Lave los accesorios en ague tibia jabonosa,
enjuague y deje secar al aire. No los lave en
lavadora de platos.
CUIDADO
No usa los accesorios si est_n mojados.
Los accasorios qua se utilicenen _reas
sucias, debajo del refrigerador, no deben
usarse en otras superficies sin antes set
lavados. Podrfan dejar marc.as.
12
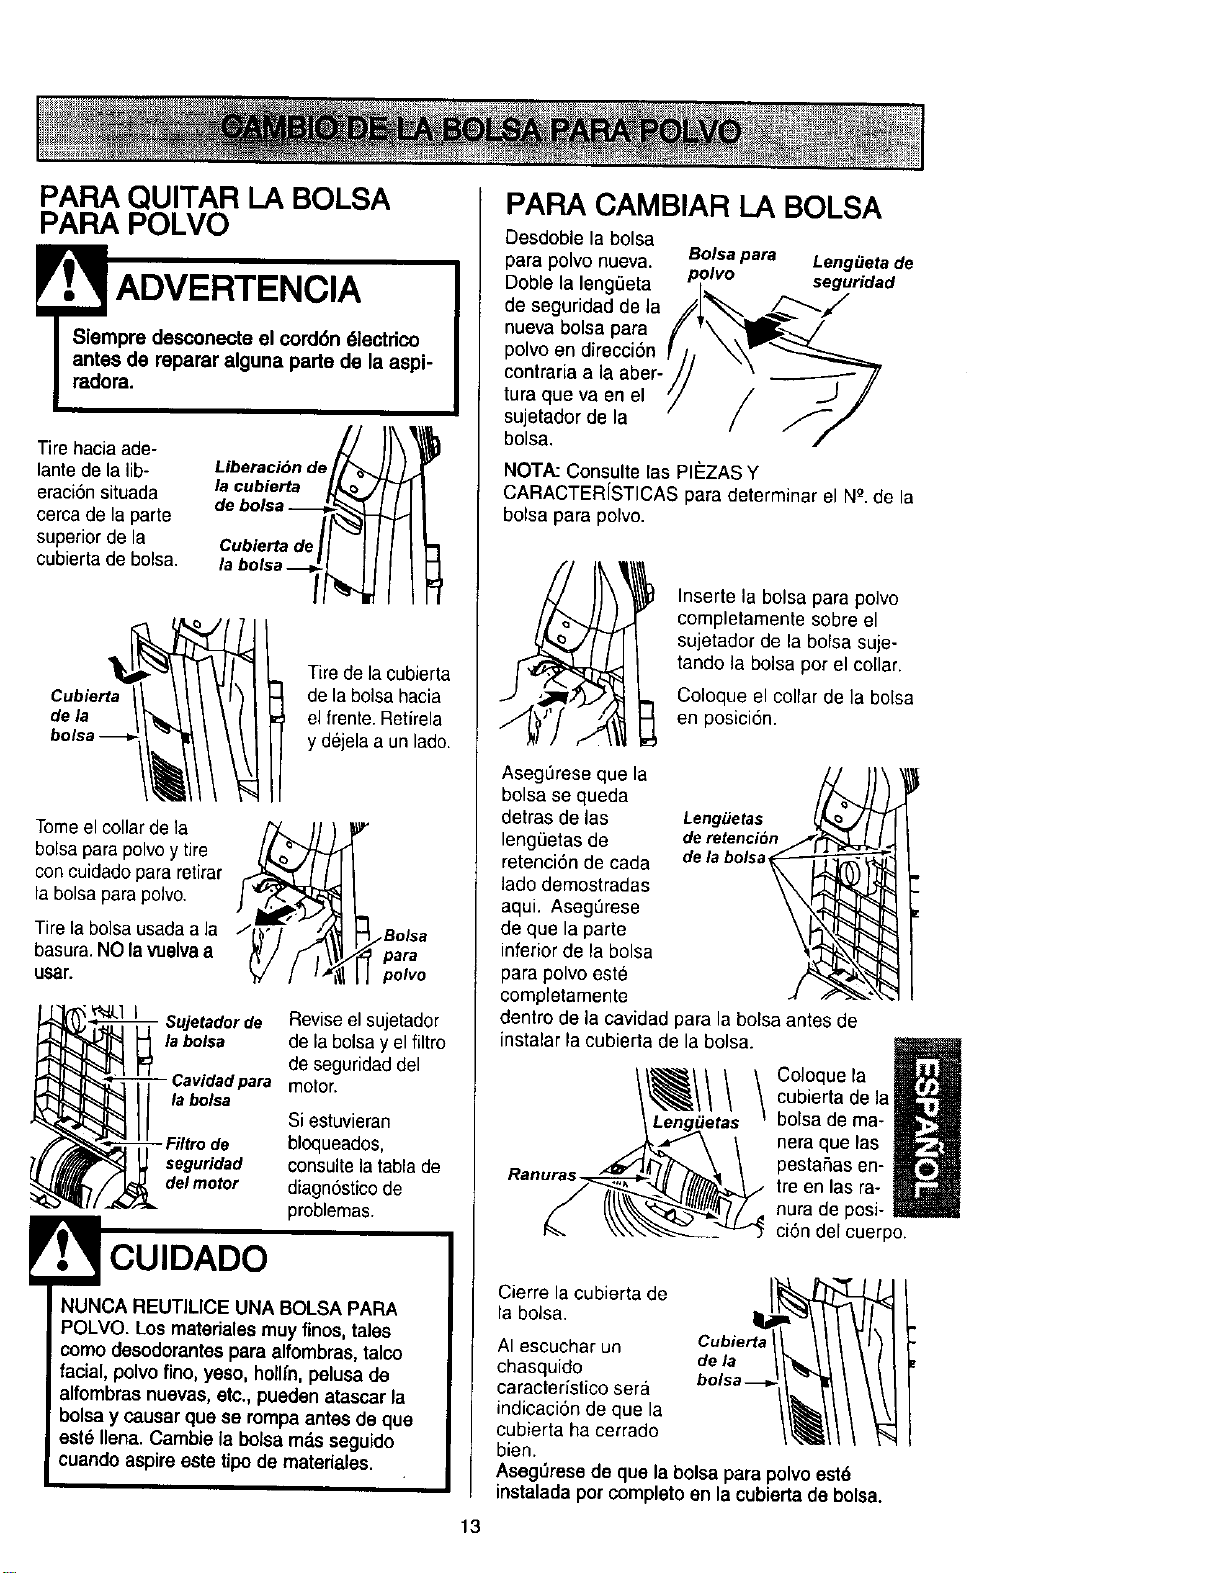
PARA QUITAFI LA BOLSA
PAPA POLVO
ADVERTENCIA
Siempre desconecte el cord6n dlectdco
antes de reparar alguna parte de la aspi-
radora.
Tire hacia ade-
lante de la lib-
eraci6n situada
eereade la parte
superior de la
cubierta de bolsa.
Liberaci6n de_
Cubierta de I_ "_]
labolsa-_
Cubierta
de la
Tirede la cubierta
de la bolsa hacia
el frente. Retirela
y dejela a un lado.
Tomeel collar de la
bolsapara polvoy tire
concuidado para retirar
la bolsa para polvo.
Tire la bolsa usadaa la
basura.NO la vuelva a
LIsar.
/__'_Bolsa
para
polvo
Sujetadorde Reviseel sujetador
la bolsa de la bolsay el filtro
de seguridaddel
- Cavidadpara motor.
labolsa
Si estuvieran
bloqueados,
seguridad consultelatablade
delmotor diagn6sticode
problemas.
NUNCA REUTILICE UNA BOLSA PARA
POLVO. Los materiales may finos, tales
como desodorantespara alfombras, talco
facial, polvo fino, yeso, hollfn, pelusa de
alfombras nuevas, ate,, pueden atascar la
bolsa y causar qua se rompa antes de qua
est_ liana. Cambie la bolsa rods seguido
cuando aspire este tipo de materiales.
13
PARA CAMBIAR LA BOLSA
Desdoble la bolsa
para polvo nueva. Bolsapara LengiJetade
Doble la leng_eta p_lvo seguridad
de seguridad de la //1_'_ .=_/_"'_/
nueva bolsa para f v\ "_l__-_/
polvoendirecciSn _]j _W'_
eontraria a la aber- // .---------- 7/
que va en el _/ / -..J /
tura
sujetador de la / _._
bolsa.
/
NOTA: Consulte [as PI#ZAS Y
CARACTERfSTICAS para determinarel N_.de la
bolsa para polvo.
Inserte la bolsa para polvo
completamente sobre el
sujetador de la bolsa suje-
tando ]a bolsa porel collar.
Coloque el collar de la bolsa
_[ en posici6n.
AsegL_reseque la
bolsa se queda
detras de tas Leng_etas
leng_3etasde de retencion
retenci6n de cada dela bolsa
ladodemostradas
aqui. Aseg_rese
de que la parte
inferior de la bolsa
para polvo este
completamente
dentro de la cavidad para la bolsa antes de
instatar ta cubierta de la botsa.
Coloque la
cubierta de la
bolsa de ma-
nera que las
pesta,Sasen-
tre en las ra-
nura de posi-
ciSn del cuerpo.
Cierre la cubierta de
la bolsa.
AI escuchar un Cubierta
chasquido de la
caracter/stico sera
indicaci6n de qua la
cubierta ha cerrado
bien.
AsegOrese de qua la bolsa para polvoeat6
instalada pot completo en la cubierta de bolsa.
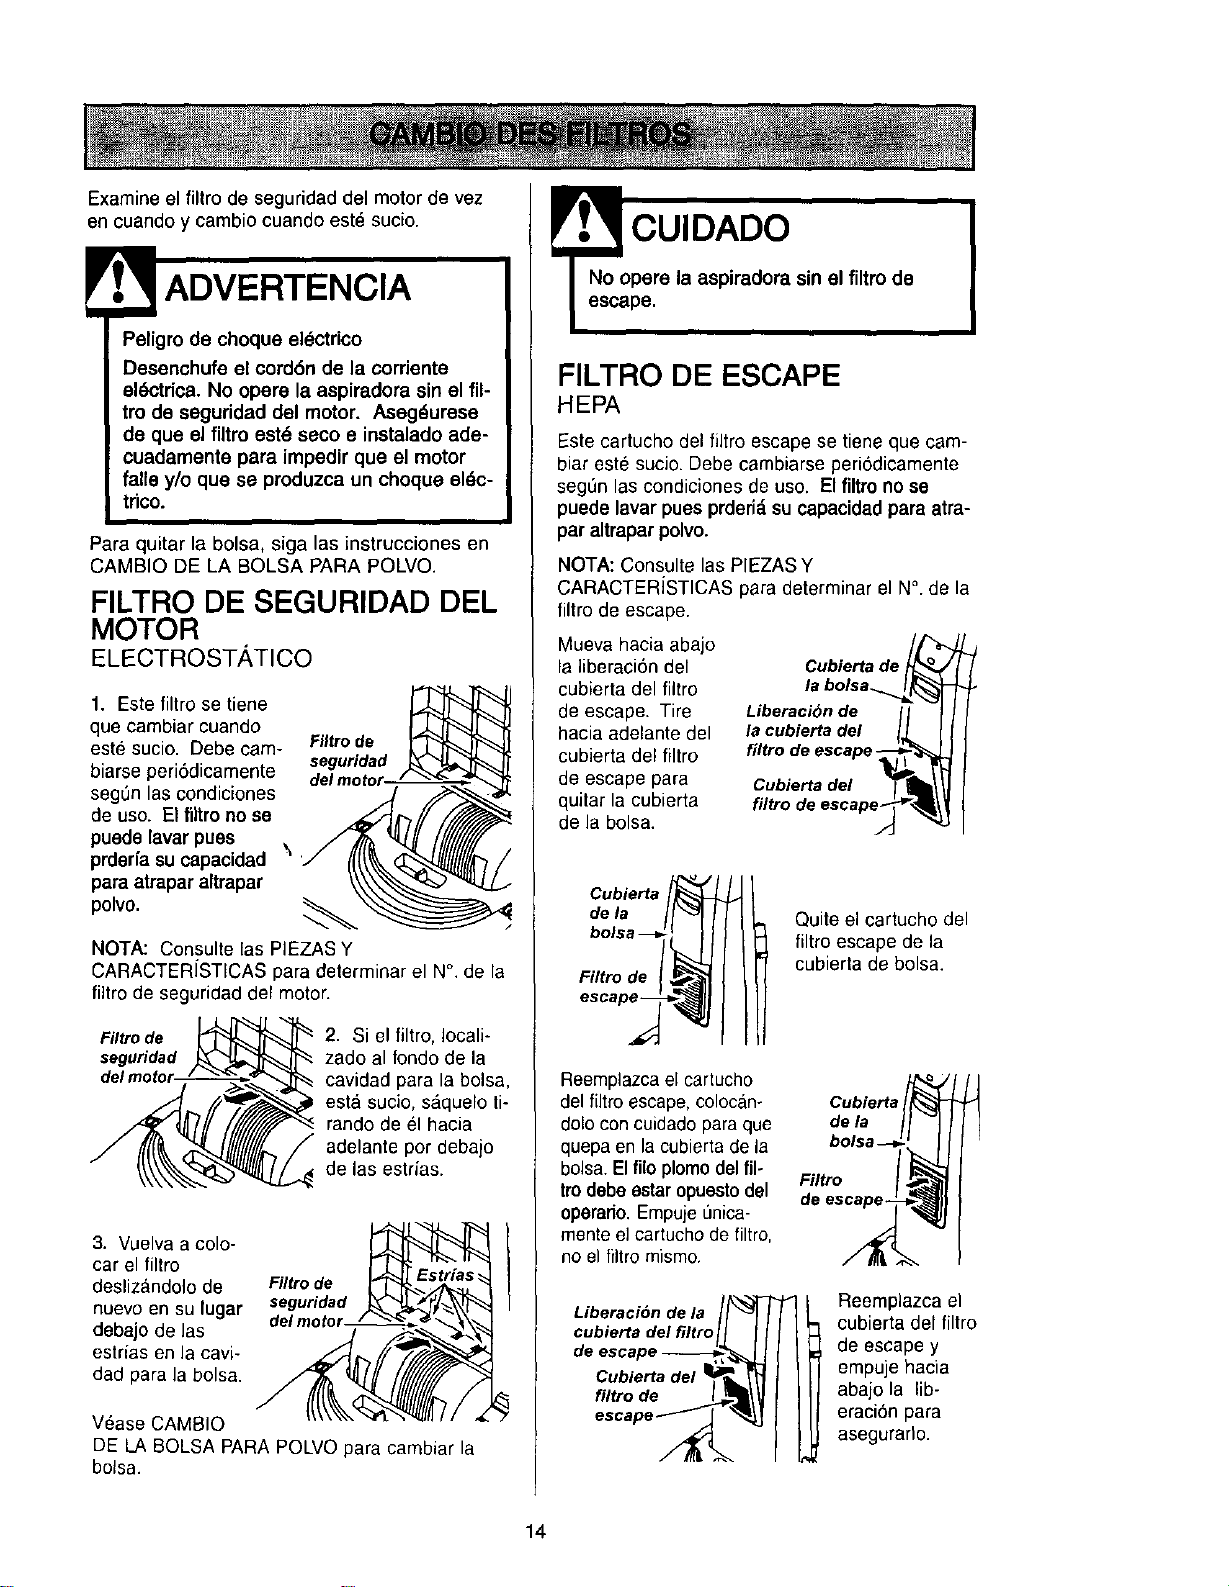
Examineelfiltrodeseguridaddelmotordevez
encuandoycambiocuandoest_sucio.
Peligro de choque el_ctrico
Desenchufe el cordSn de la corriente
eldctdca. No opere la aspiradora sin el ill-
tro de seguridad del motor. Asegdurese
de que el filtro est_ seco e instalado ade-
cuadamente para impedir que el motor
falle y/o que se produzca un choque el_c-
tdco.
Para quitar la bolsa, siga las instrucciones en
CAMBIO DE LA BOLSA PARA POLVO.
FILTRO DE SEGURIDAD DEL
MOTOR
ELECTROST/_TICO
1. Este filtro se tiene
que cambiar cuando
este sucio. Debe cam-
biarse periSdicamente
seg0n las condiciones
de uso. El filtro no se
puede lavar pues \
prderfa su capacidad
para atrapar altrapar
polvo.
Filtro de
seguridad
NOTA: Consulte las PIEZAS Y
CARACTERfSTICAS para determinar el N°. de la
fiitro de seguridad del motor.
Filtro de
seguridad
2. Si el filtro, Iocali-
zado al rondo de la
cavidad para la bolsa,
esta sucio, s_quelo li-
rando de el hacia
adelante por debajo
de las estrias.
3. Vuelva a cole-
car el filtro
deslizandolo de
nuevo en su lugar
debajo de las
estrias en la cavi-
dad para la bolsa.
Filtro de
seguridad
del motor / "_'_ '
V6ase CAM810
DE LA BOLSA PARA POLVO para cambiar la
bolsa.
CUIDADO
No opere la aspiradora sin el filtro de
escape.
FILTRO DE ESCAPE
HEPA
Este cartucho del filtro escape se tiene que cam-
biar este sucio. Debe cambiarse periSdicamente
segSn las condiciones de uso. El filtro no se
puede lavar pues prderi_,su capacidad para atra-
par altrapar polvo.
NOTA: Consults las PIEZAS Y
CARACTERiSTICAS para determinar el N°. de la
filtro de escape.
Mueva hacia abajo
la liberaci6n del
cubierta del filtro
de escape. Tire
hacia adelante del
cubierta del filtro
de escape para
quitar la cubierta
de la bolsa.
Cubierta de _oo
la bolsa.._L_
Liberaci_n de [ I
la cubierta del I_L
filtro de escape-_f_'_
_iltbioe_:edse/ape_
Cubierta
de la
Filtro de
Quite el cartucho del
filtro escape de la
cubierta de bolsa.
Reemplazca el cartucho
del filtro escape,colocano Cubiarta
dolo con cuidado para que de la
quepa en la cubierta de la
bolsa. El filo plomo del fil-
Filtro
trodebesstaropuesto del de escape-
operario.EmpujeL_nica-
mente el cartucho de filtro,
no el filtro mismo.
Liberaci6n de la "_l
cubierta del filtro
de escape_,,
Cubiertadel
escape _
I eemplazca el
cubierta del filtro
de escape y
empuje hacia
abajo la lib-
eraciSn para
asegurarto.
14
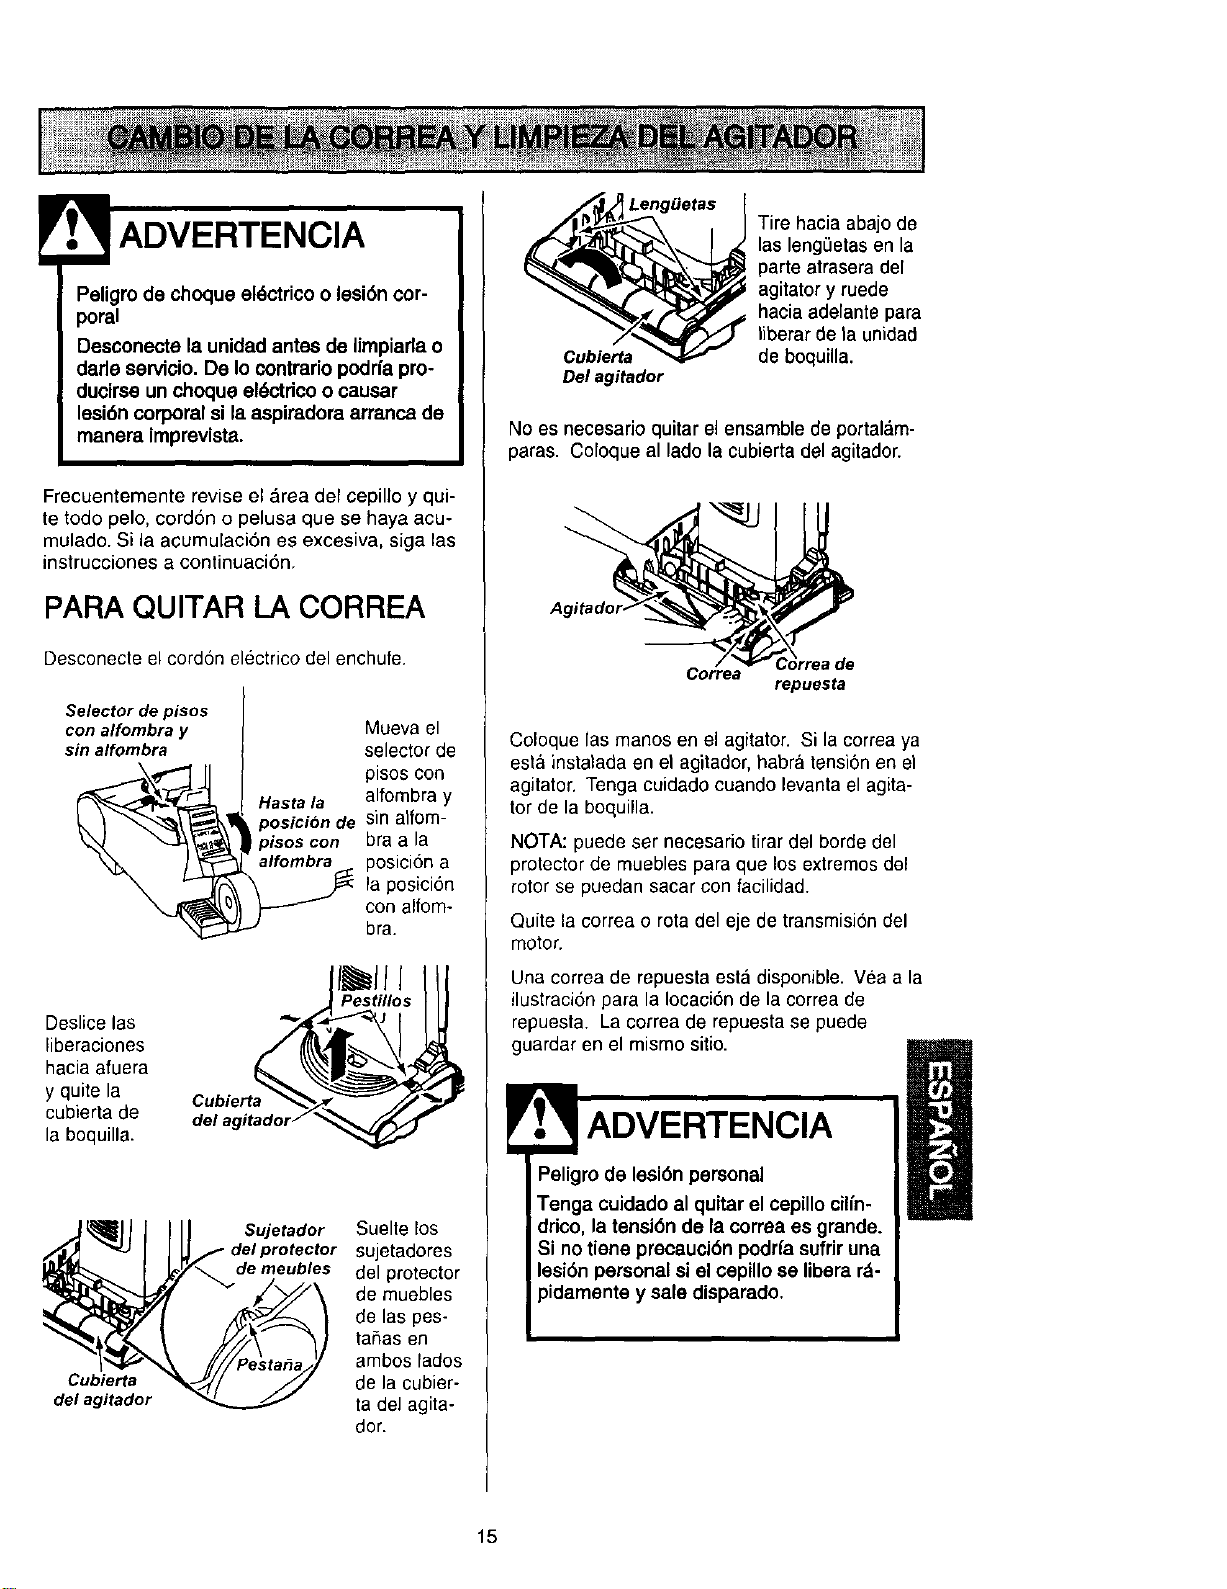
Peligro de choque eldctrico o lesi6n cor-
poral
Desconecte la unidad antes de limpiarla o
darle servicio. De Io contrario podrfa pro-
ducirse un choque el_ctdco o causar
lesi6n corporal si la aspiradora arranca de
manera imprevista.
Frecuentemente revise el Area def cepillo y qui-
te todo pelo, cordon o pelusa que se haya acu-
mulado. Si la acumuEaci6n es excesiva, siga las
instrucciones a continuaci6n,
PARA QUITAR LA CORREA
Desconecte el cordon electrico del enchufe.
Selector de pisos
con alfombra y
sin alfombra
Deslice las
liberaciones
hacia afuera
y quite la
cubierta de
la boquilla.
Mueva el
selector de
pisos con
Hasta la alfombra y
posicion de sin alfom-
ptsos con bra a la
_ posicidn a
la posicidn
con alfom-
bra.
I ll l
Pestillos
Cubierta
del agitador
Sujetador Suelte Eos
del protector sujetadores
de meubles del protector
de muebles
de las pes-
taflas en
ambos fados
de la cubier-
ta del agita-
dor.
LengBetas
Cubierta
Del agitador
Tire hacia abajo de
las lengeetas en la
parte atrasera del
agitator y ruede
hacia adelante para
tiberar de ta unidad
de boquilla.
No es necesario quitar el ensamble de portal&m-
paras. Coloque al lado la cubiertadel agitador.
Corre
\
orreade
repuesta
Coloque las manos en el agitator. Si la correa ya
esta instalada en el agitador, habra tensi6nen el
agitator. Tenga cuidado cuando levanta el agita-
tor de la boquilla.
NOTA: puede ser necesario tirar del horde del
protector de muebles para que los exlremos del
rotor se puedan sacar con facilidad.
Quite la correa o rota del eje de transmisi6n del
motor.
Una correa de repuestaesta disponible. Yea a la
ilustraci6n para la Iocaoi6n de la correa de
repuesta. La correa de repuesta se puede
guardar en el mismo sitio.
ADVERTENClA
Peligro de lesi6n personal
Tenga cuidado al quitar el cepillo cilfn-
drico, la tensi6n de la correa es grande.
Si no tiene precauci6n podrfa sufrir una
leai6n personal si el cepillose libera rd-
y sale disparado.
15
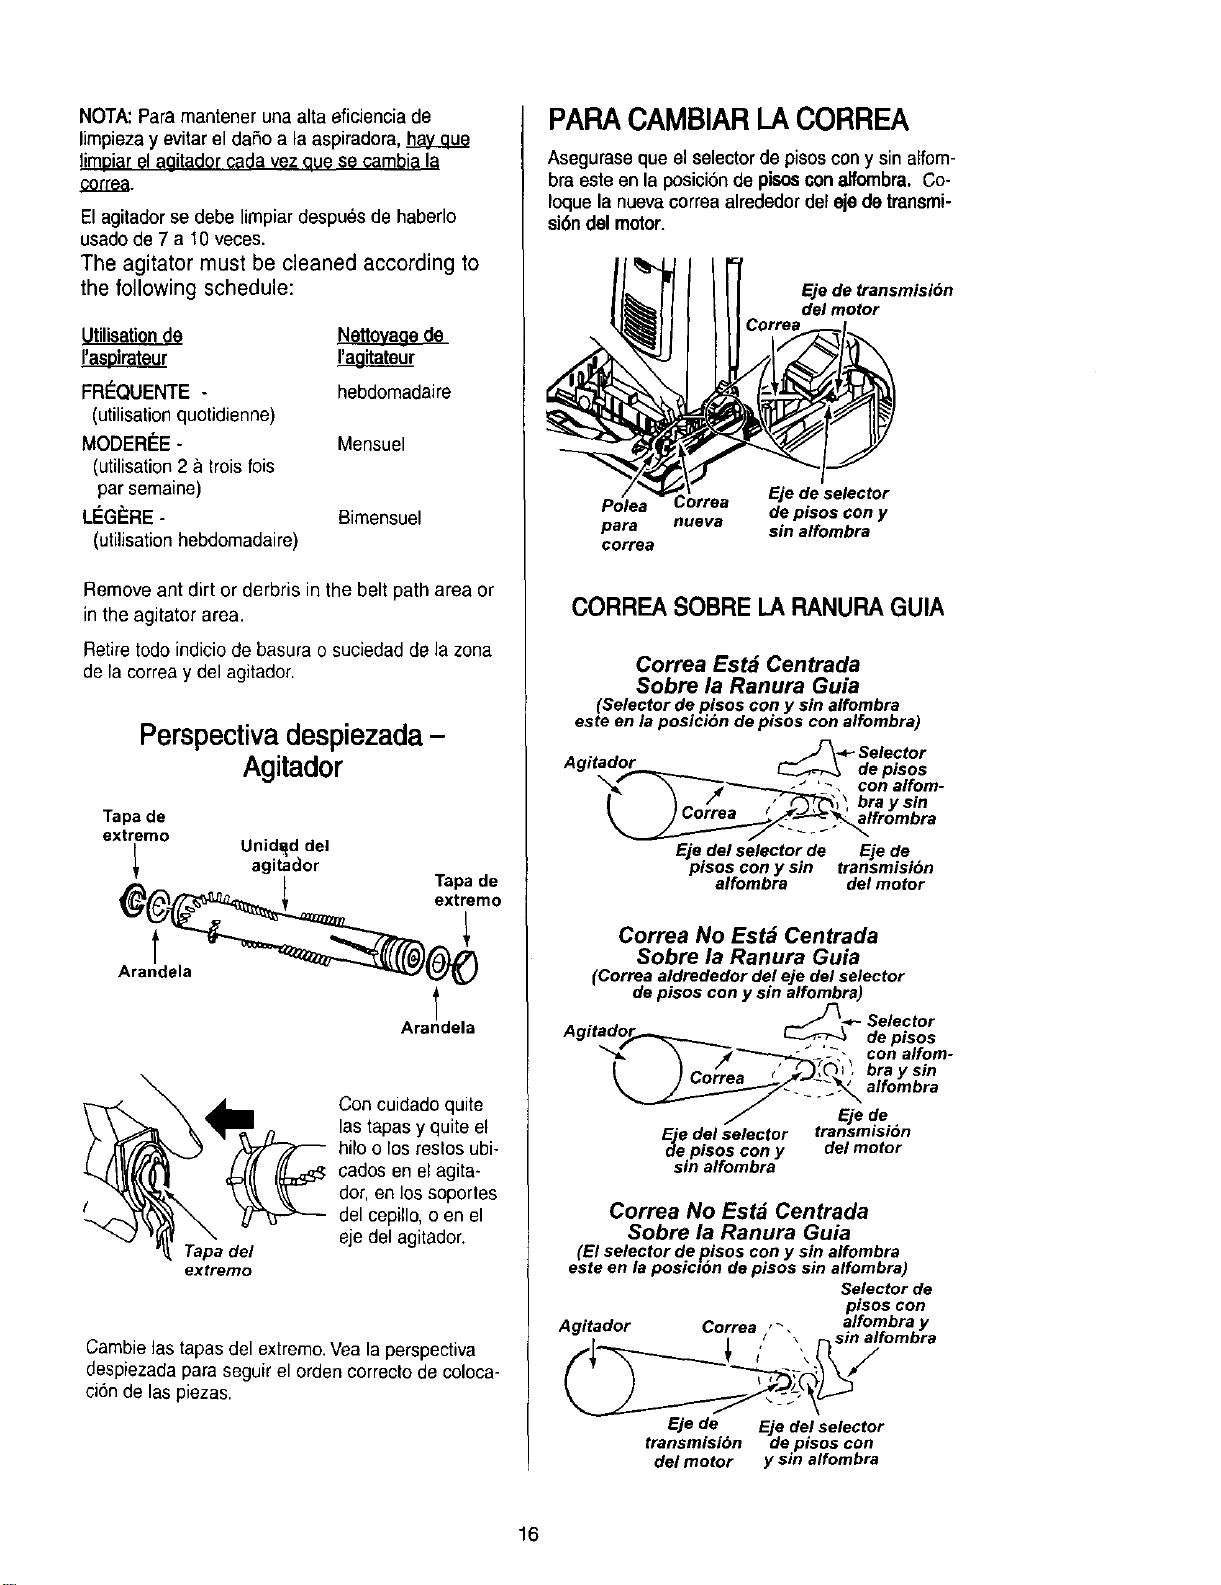
NOTA:Paramantenerunaaltaeficienciade
limpiezayevitar el dafio a la aspiradora,
limDiar?! aaitador ¢_da vez que se cambi_ la
correa.
El agitador se debe limpiar despues de haberlo
usadode 7 a 10 veces.
The agitator must be cleaned according to
the following schedule:
Nettoyage de
I'a__Loirateur I'a_g]tateur
FR_QUENTE - hebdomadaire
(utilisationquotidienne)
MODERI_E- Mensuel
(utilisation2 & trois fois
par semaine)
LEG_:RE- Bimensuel
(utilisation hebdomadaire)
Remove ant dirt or derbris in the belt path area or
in the agitator area.
Retire todo indiciode basura o suciedad de la zona
de la correa y del agitador.
Perspectivadespiezada -
Agitador
Tapa de
extremo
Unid_d del
agitador
g(___z_ eTxatPade
Ara!___
Arandela
Tapa del
extremo
Con cuidado quite
las tapas y quite el
hilo o los reslos ubi-
cados en el agita-
dot, en los soportes
del cepillo, o en el
eje del agitador.
Cambielas tapasdel extremo.Vea la perspectiva
despiezadapara seguir el orden correcto de coloca-
cion de las piezas.
PARACAMBIARI_ACORREA
Asegurase queel selectordepisoscony sin alfom-
bra este en la posiciSnde pisosconalfombra.Co-
Ioquela nuevacorrea alrededor del ejedetransmi-
si6ndill motor.
Eje de transmision
del motor
Polea Correa Eje de selector
de pisos con y
para nueva sin alfombra
correa
CORREA SOBRE LARANURAGUIA
Correa Est_ Centrada
Sobre la Ranura Guia
(Selector de pisos con y sin alfombra
este en la posicion de pisos con alfombra)
lJ_ - Selector
Agitador___.__._.._ _ depisos
"_'__._E '__, conalfom-
Eje del selector de Eje de
pisos cony sin transmisibn
alfombra del motor
Correa No Est_ Centrada
Sobre la Ranura Guia
(Correa aldrededor del eje del selector
de pisos con y sin alfombra)
• _ ._- Selector
Agltad°5._-_ _ de pisos
_, _'_"-----_,.__'-"-_ con alfom-
I }Co/;es brays,.
_._-"-'__ _-_ alfombra
F Eje de
Ejee d.el selector transmision
plsos con y del motor
sin alfombra
Correa No Estd Centrada
Sobre la Ranura Guia
(El selector de pisos con y sin alfombra
este en la posici6n de pisos sin alfombra)
Selector de
pisos con
Agitador Correa , _, alfombra y
/ \ sm altomora
Eje de Eje del selector
transmisibn de pisos con
del motor y sin alfombra
16
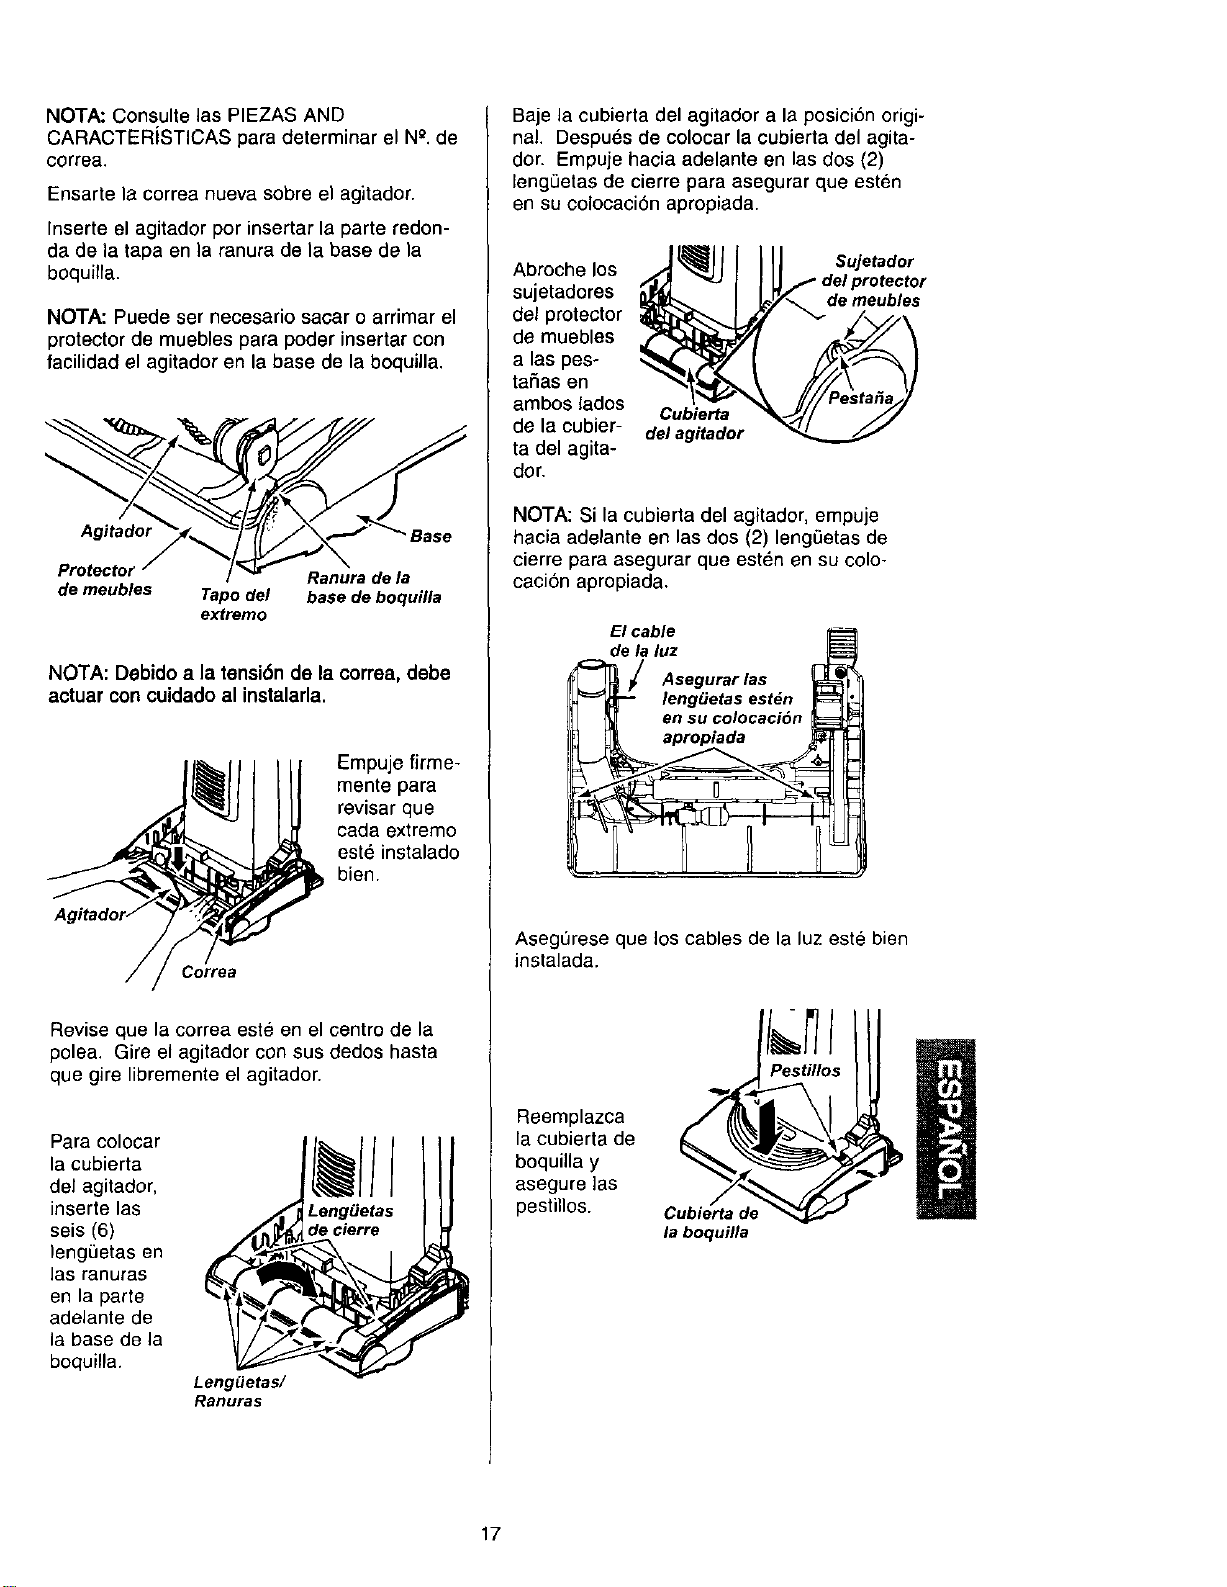
NOTA:ConsultelasPIEZASAND
CARACTERiSTICASparadeterminarelN_.de
correa.
Ensartelacorreanuevasobreelagitador.
Inserteelagitadorporinsertarlaparteredon-
dadeiatapaenlaranuradelabasedela
boquilla.
NOTA: Puede ser necesario sacar o arrimar el
protector de muebles para poder insertar con
facilidad el agitador en la base de la boquilla.
Agitador Base
Protector Ranura de la
de meubles Tapo del base de boquilla
extremo
NOTA: Debido a la tensiCn de la correa, debe
actuar con cuidado al instalarla.
Empuje firme-
mente para
revisar que
oada extremo
este instalado
bien.
Correa
Revise que la correa este en el centro de la
polea. Gire el agitador con sus dedos hasta
que gire libremente el agitador.
Para colocar
la cubierta
del agitador,
inserte las
seis (6)
lengi3etas en
las ranuras
en la parte
adelante de
la base de la
boquilla.
Leng_etas/
Ranuras
Leng_etas
de cierre
Baje la cubierta del agitador a la posiciCn origi-
nal. Despues de colocar la cubierta del agita-
dor. Empuje hacia adelante en las dos (2)
leng0etas de cierre para asegurar que esten
en su colocaciCn apropiada.
Abroche los
sujetadores
del protector
de muebles
a las pes-
tafias en
ambos lados
de la cubier-
ta del agita-
dor.
Cubierta
del agitador
Sujetador
de meubles
NOTA: Si la cubierta del agitaclor, empuje
hacia adelante en las dos (2) leng=3etasde
cierre para asegurar que esten en su colo-
caciCn apropiada.
Elcable
dela luz ILS_
_ I Asegurarlas _'
leng_etas est_n r_[
j _ en SUcolocaciCn
Asegurese que los cables de la luz este bien
instalada.
Reemplazca
la cubierta de
boquilla y
asegure las
pestillos.
Cubierta de
la boquflla
I
I
17

Proceda siempre con precauciones de seguri-
dad al limpiar y dar servicio la aspiradora.
! ADVERTENCIA
Peligro de choque eldctdco o lesi6n cor-
poral
Desconecte la unidad antes de limpiarla o
darle servicio. De Io contrario podrfa pro-
ducirse un choque eldctdco o causar
lesi6n corporal si la aspiradora arranca de
manera imprevista.
Si considera que la aspiradora no aspira bien
aseg6rese primero de que la bolsa no est_
Ilena y de que el filtro no est_ atascado. Con-
suite las instrucciones sobre CAMBIO DE LA
BOLSA PARA POLVO y LIMPIEZA DES
FILTROS.
Si las zonas del filtro y la bolsa no estan atas-
cadas, examine la zona de la manguera. Retire
el extremo inferior de la manguere expansible
de la aspiradora tom&ndola por el collar y
tirando de hacia arriba.
Enchufe la
aspiradora y
enciendala.
Estire al
maximo la
manguera y
luego permita
que se encoja
hasta su
tamafio normal
de almacena-
miento.
Extienda y
afloje la Apague la
manguera unidad y
desconectela.
Examine visualmente la zona de la base donde
se inserta la manguera.
Retire cualquier material bloqueante.
Inserte nuevamente la manguera en la abertura
de la parte inferior de donde la retir6. Empuje con
firmeza para asegurarse de que quede bien
conectada.
- Manguera
expansible
Collar
dela
manguera
Peligro de lesi6n personal
NO coloque nunca las manos ni los pies
debajo de la unidad. El agitador dar_
vueltas r_pidamente cuanda la aspiradora
est_ encendida y est_ en la posici6n "car-
pet setting" (con alfombra).
Si las zonas del filtro y la bolsa y las zonas de
la manguera no estan atascadas, examine la
zona de la boquilla. Para examinar dicha zona,
consulte la seccion sobre CAMBiO DE LA
CORREAY LIMPIEZA DEL AGITADOR.
Coloque la aspiradora en la posicion vertical
antes de conectada en el enchufe.
18
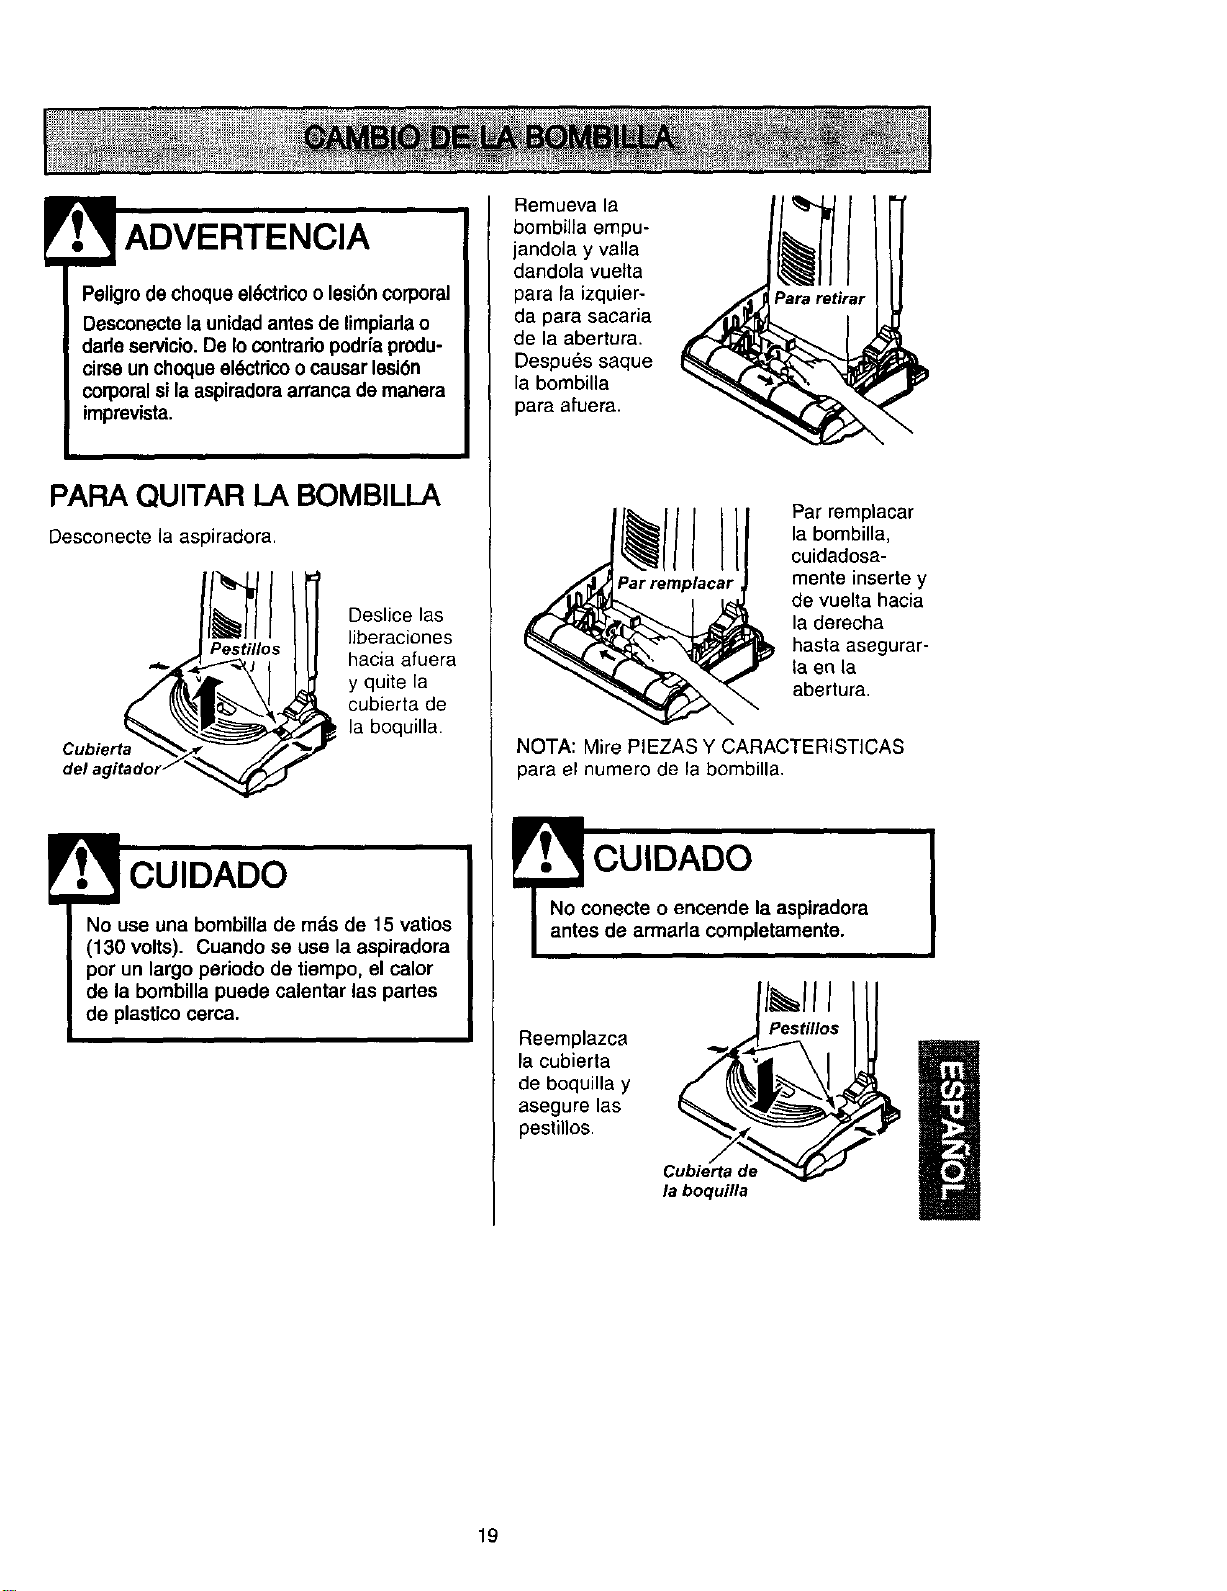
ADVERTENCIA
Peligrode cheque el6ctdcoo lesi6n corporal
Desconectela unidadantes de limpiarlao
darle servicio.De Io contrariopodrfa produ-
cirse un ehoque ek_'trico o causar lesi6n
corporal si la aspiradora arranca de manera
imprevista.
PARA QUlTAR LA BOMBILLA
Desconecte ia aspiradora.
Ill
Pestillos
del agitador__
Deslice las
liberaciones
hacia afuera
y quite la
cubierta de
_la boquilla.
CUIDADO
No use una bombilla de mds de 15 vatios
(130 volts). Cuando se use la aspiradora
pot un largo periodo de tiempo, el calor
de la bombilla puede calentar las partes
de plastico cerca.
Remueva la
bombilla empu-
jandola y valla
dandola vuetta
para la izquier-
da para sacaria
de la abertura.
Despu6s saque
la bombilla
para afuera.
Par remplacar
la bombilla,
cuidadosa-
mente inserte y
de vuelta hacia
la derecha
hasta asegurar-
la en la
abertura.
NOTA: Mire PIEZAS Y CARACTERISTICAS
para el numero de la bombilla.
CUIDADO
onecte o encende la aspiradora
s de armada completamente.
Reemplazca
la cubierta
de boquilla y
asegure las
peslillos.
Cubierta de
la boquilla
19
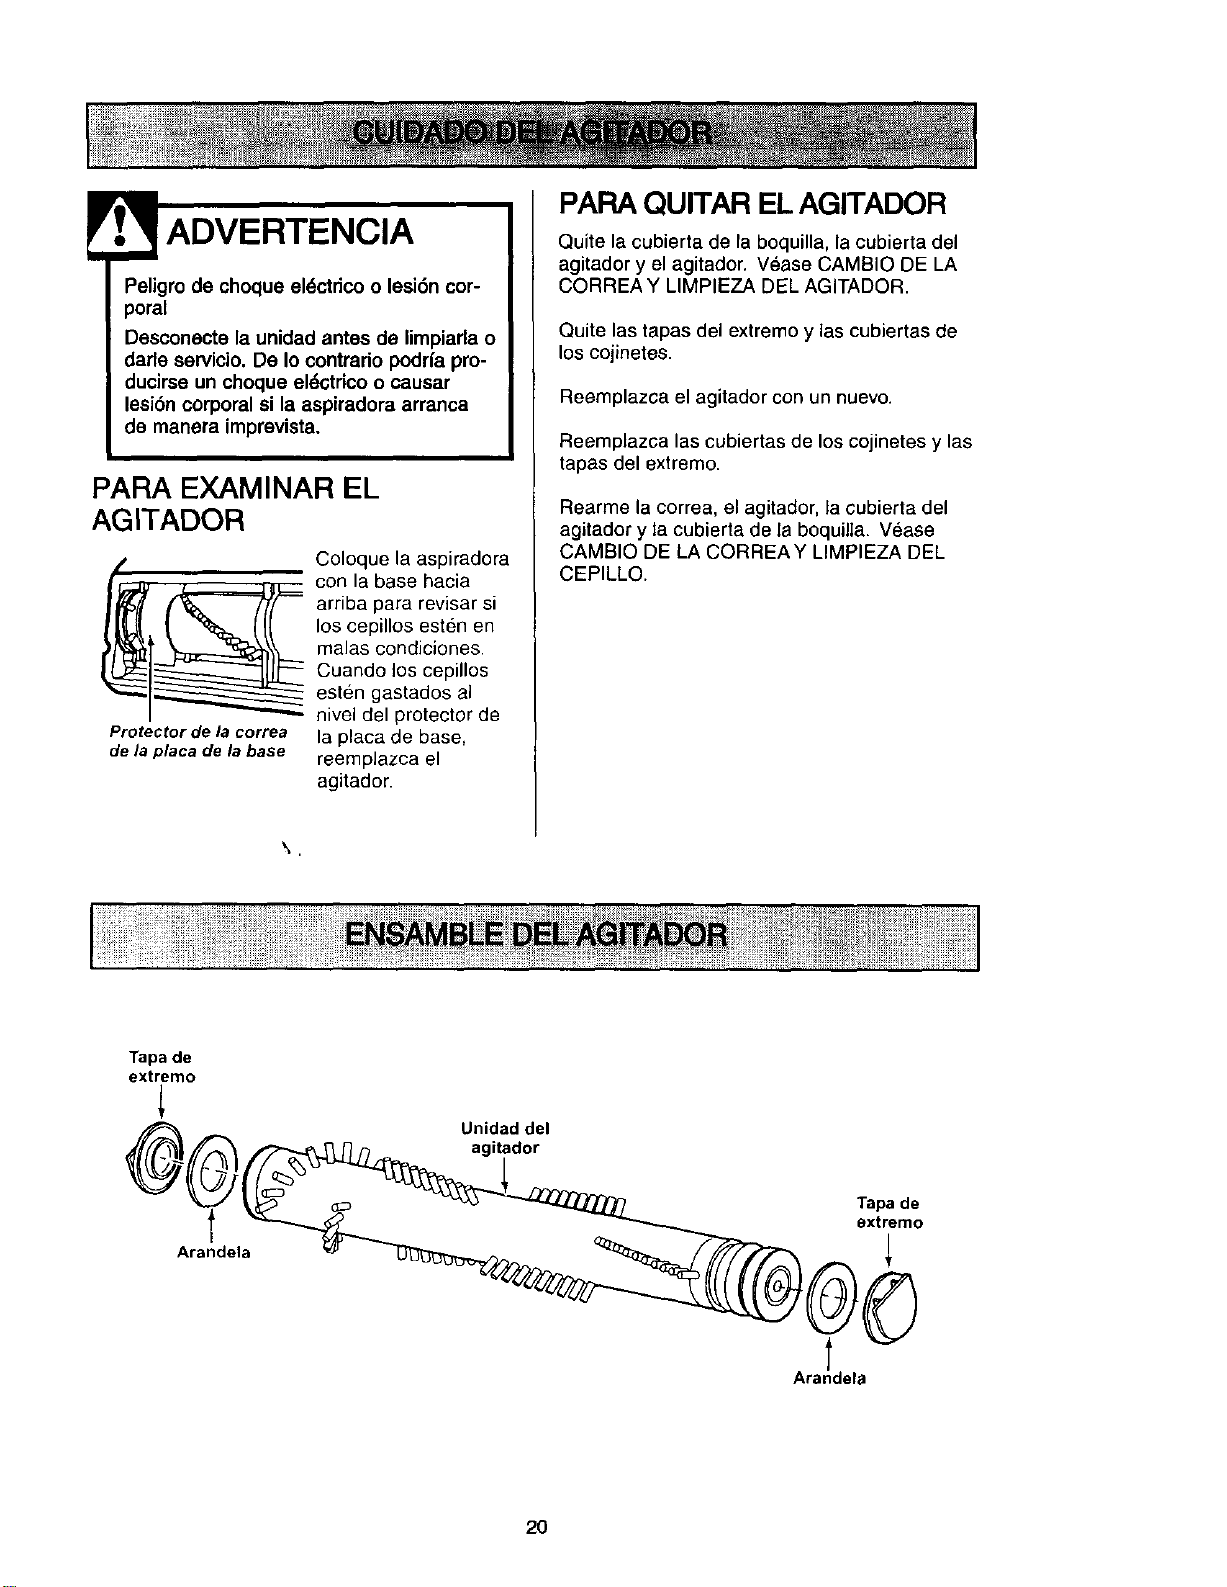
Peligro de choque el6ctrico o lesi6n cor-
poral
Desconecte la unidad antes de limpiarla o
darle servicio. De Io contrario podrfa pro-
ducirse un choque el_,ctdcoo causar
lesi6n corporal si la aspiradora arranca
de manera imprevista.
PARA EXAMINAR EL
AGITADOR
Protector de la correa
de la placa de la base
Coloque la aspiradora
con la base hacia
arriba para revisar si
los cepillos esten en
malas condiciones.
Cuando los cepillos
esten gastados al
nivel del protector de
la placa de base,
reemplazca el
agitador.
PAFIAQUITAR EL AGITADOR
Quite la cubierta de la boquilla, la cubierta del
agitador y el agitador. Vease CAMBIO DE LA
CORREA Y LIMPIEZA DF:LAGITADOR.
Quite las tapas del extreme y las cubiertas de
los cojinetes.
Reemplazca el agitador con un nuevo.
Reemplazca las cubiertas de los cojinetes y las
tapas del extremo.
Rearme la correa, el agitador, la cubierta del
agitador y la cubierta de la boquilla. Vease
CAMBIO DE LA CORREAY LIMPIEZA DEL
CEPILLO.
Tapa de
extremo
_A_ Unidad del
/"2"..-.._ _"__ ,'_ agitador
Arandela
2O
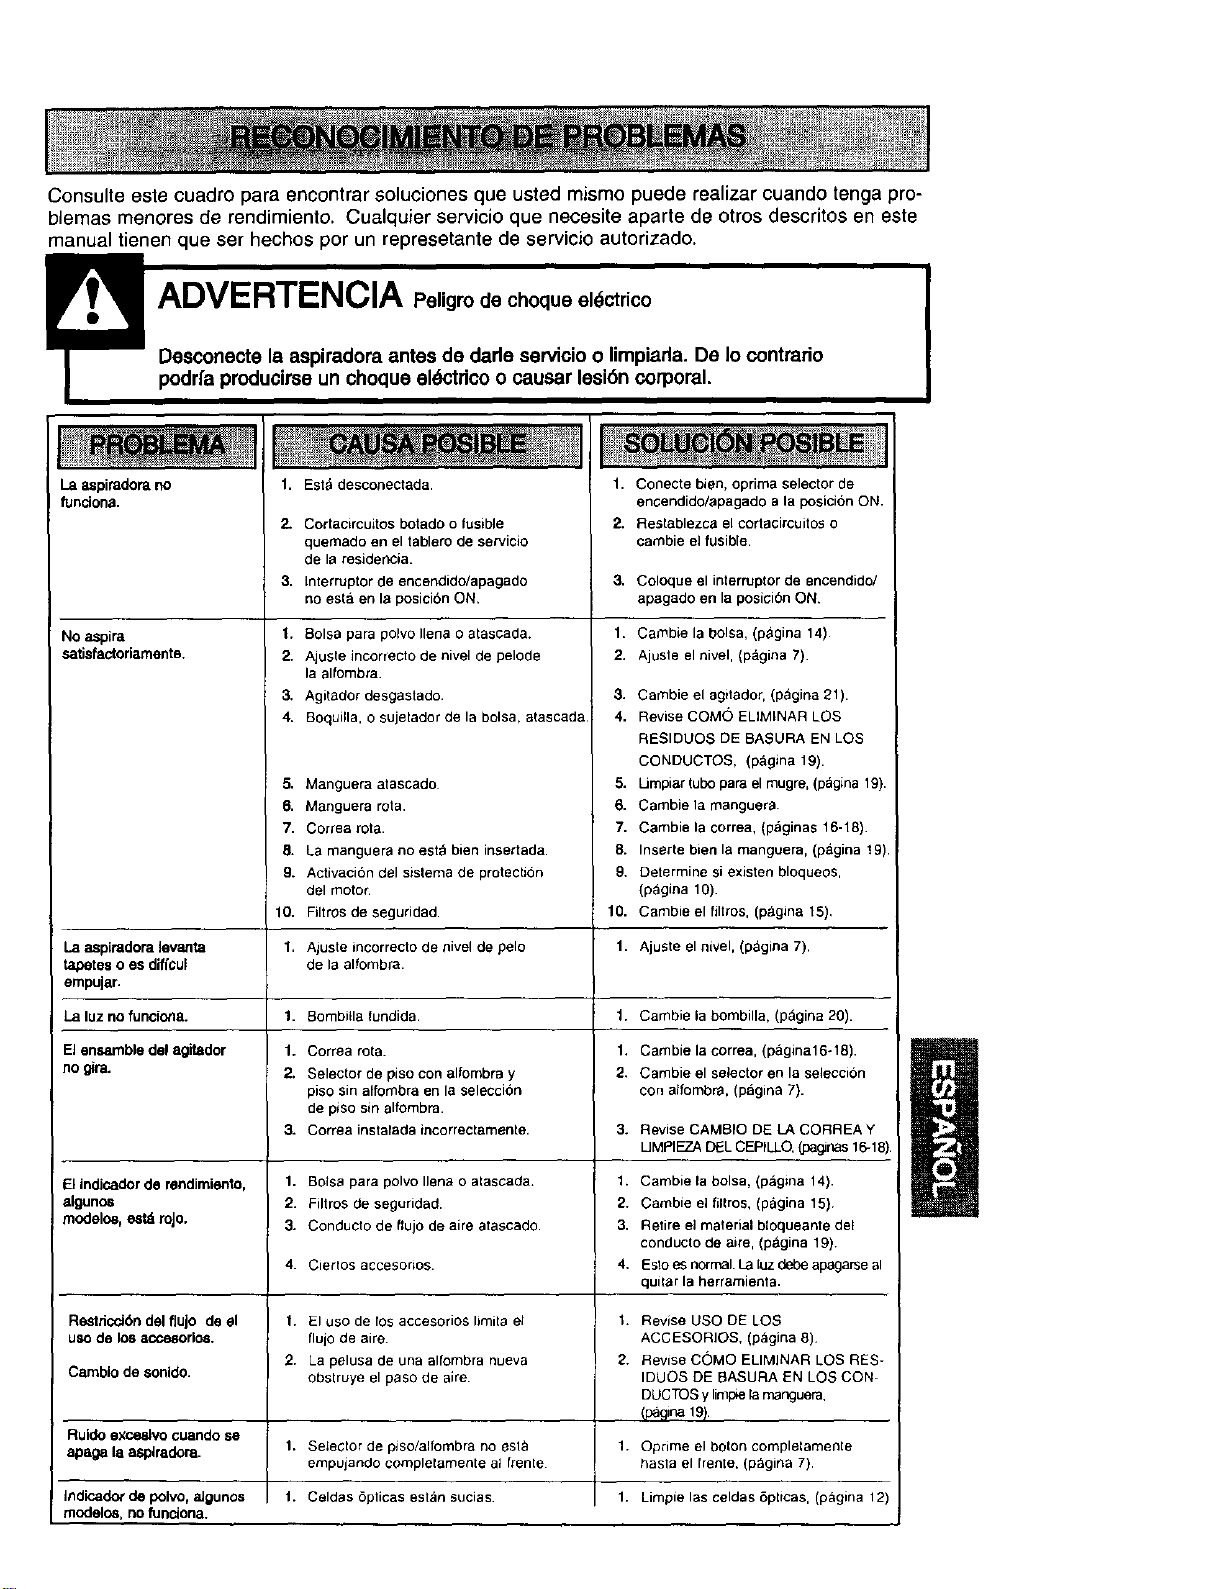
Consulteestecuadroparaencontrarsolucionesqueustedmismopuederealizarcuandotengapro-
blemasmenoresderendimiento.Cualquierservicioquenecesiteapartedeotrosdescritoseneste
manualtienenqueserhechosporunrepresetantedeservicioautorizado.
podr/a producirse un choque eldctdco o causar lesibn corporal.
La aspiradom no
funciona.
No aspire
satisfactoriamente,
La aspiradoralevatlta
tapetes o es diffcul
empujar.
La luz no funciona.
El ensemble del agitador
RO _ra.
Elindicador de rendimiento,
algunos
modelos,estd roJo.
1. Est,*desconectada.
2.
3,
Cortacircuitos botado o fusible
quemado en el tablero de servicio
de la residerK:ia.
Interruptor de encendido/apagado
no esta en la posicibn ON,
1. Boise para polvo Ilena o atascada.
2. Ajuste incorrecto de nivel de pelode
la alfombra.
3. Agitador desgastado.
4. Boquilla, o sujetador de la bolsa, atascada
5. Manguera atascado
6. Manguera rote.
7. Correa rota.
8. La nnanguera no est_ bien insertada.
9. Activacibn clel sistema de protectibn
del motor.
10. Filtros de seguridad.
1. Aluste incorrecto de _3ivel de pelo
de la alfombra.
1. Bombitla fundida.
1. Correa rote.
2. Selector de piso con alfombra y
piso sin alfombra en la seleccion
de piso sin alfombra.
3. Correa instalada incorrectamente.
1. Boise pare polvo Ilen_ o atasceda+
2. Filtros de seguridad.
3. Conducto de flujo de aire atascado.
1. Conecte bien, oprima selector de
enGendido/apagado ala posicibn ON.
2. Restablezca el cortacircuitos o
cambie el fusible.
3. ColOque el interrupterde encendido/
apagado en la posicibn ON.
1. Cambie la bolsa. (p_gina 14)
2. Ajuste el nivel. (pagina 7).
3. Carnbie el agitador, (pagina 21).
4. Revise COMO ELIMINAR LOS
RESIDUOS DE BASURA EN LOS
CONDUCTOS, (p&gina 19).
5. Umpiar tubo pare el rnugre, (p_gina 19).
6. Cambiela manguera.
7. Cambie la correa, (p&ginas 16-18).
8. Inserte bien la manguera, (pagina 19).
9. Determine si existen bloqueos,
(pagina 10).
10. Carnbieel filtros, (p_gina 15),
1. Ajuste el nivel, (p&gina 7).
1. Carnbie la bombilla, (pagina 20).
1. Cambie la correa. (pagina16÷18).
2. Carnbie el selector en la seleccion
con alfombra. (pagina 7).
3. ReviseCAMBIO DE LA CORREA Y
UMPIEZA DELCEPILLO.(pagJnas16-18).
1. Cambie la bolsa, (pagina 14).
2. Cambie el filtros, (pagina 15)
3. Retire el material bloqueante del
conducto de aire, (p_gina 19)
4. Esto es normal. La luz debe apagarse al
quitter la herramienta.
4. Ciertos accesorios.
RestriccJ_n del flujo de el 1. El uso de los accesorios limita eJ 1. Revise USO DE LOS
uso de los accesorlos, flujo de aire. ACGESORIOS, (pagina 6).
2. La pelusa de una alfombra nueva 2. Revise COMO ELIMINAR LOS RES-
Camblo de sonido, obstruye el paso de aire. IDUOS DE BASURA EN LOS CON-
DUCTOS y limple 1,3manguera,
_na 19_
Ruido exceslvo cuando se
apaga la asptradora. 1. Selector de pJso/alfornbra no esl_ 1. Oprime el bolon completamente
empujando cornplelarnente at frente haste el fren[e, (p_gina 7)
Indicado_ de polvo, aJgunos f. Celdas 6pticas estan sucias. 1. Limpie las celdas 8pUcas, (pagina 12)
modelos, no funciona.
Your Home
For repair - in your home - of all major brand appliances,
lawn and garden equipment, or heating and cooling systems,
no matter who made it, no matter who sold it!
For the replacement parts, accessories and
owner's manuals that you need to do-it-yourself.
For Sears professional installation of home appliances
and items like garage door openers and water heaters.
1-800-4-MY-HOME ® Anytime, day or night
(1-800-469-4663) (U.S.A. and Canada)
www.sears.com www.sears.ca
Our Home
For rep_airof carry-in products like vacuums, lawn equipment,
and electronics, call or go on-line for the nearest
Sears Parts and Repair Center.
1-800-488.1222 Anytime, day or night (U.S.A only)
www.sears.com
To purchase a protection agreement (U.S.A.)
or maintenance agreement (Canada) on a product serviced by Sears:
1-800-827-6655 (U.S.A.)
1-800-361-6665 (Canada)
Para pedir servicio de reparaci6n
a domicilio,y para ordenar piezas:
1-888-SU-HOGAR sM
(1-888-784-6427)
Au Canada pour service en fran_ais:
1-80O-LE.FOYER Mc
(1-800-533-6937)
www.sears.ca
8E/.4VRS
@ Sears, Roebuck and Co.
® Registered Trademark / TMTrademark / s_ Service Mark of Sears, Roebuck and Co.
® Marca Registrada / TMMarca de F_ibrica / SMMarca de Servicio de Sears, Roebuck and Co
Mc Marque de commerce / uo Marque deposee de Sears, Roebuck and Co.