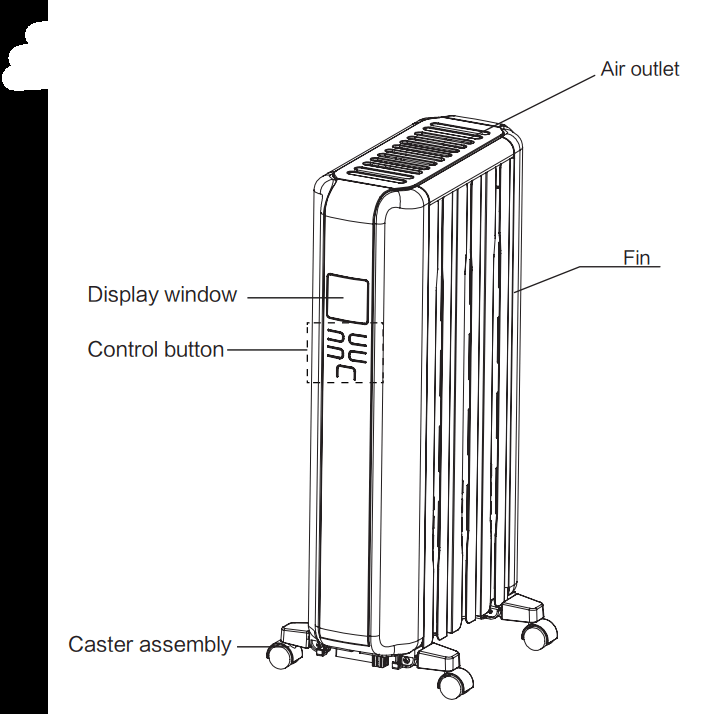
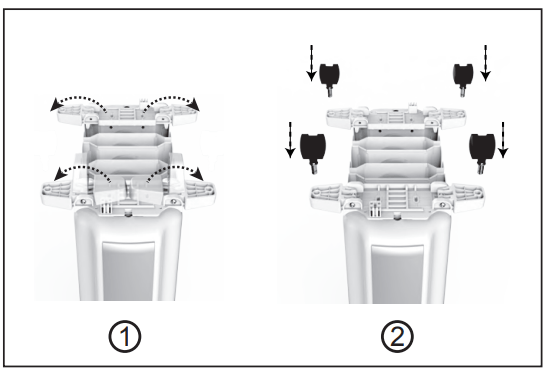
Place the heater body inversely with the bottom upward.
Figure 1, expand the supporting foot outward into place.
Figure 2, align the four casters to the supporting foot mounting holes and press them into the holes.
Note: The universal wheels are placed inside the foam at the bottom of the package.
OPERATING INSTRUCTION
[Inspection before start]
The power cord shall not be damaged or fractured.
Please verily the rated current of the power socket is in line with the requirements in the table above and is equipped with a safety grounding device before use; otherwise, replace the socket.
[Operating Instructions]
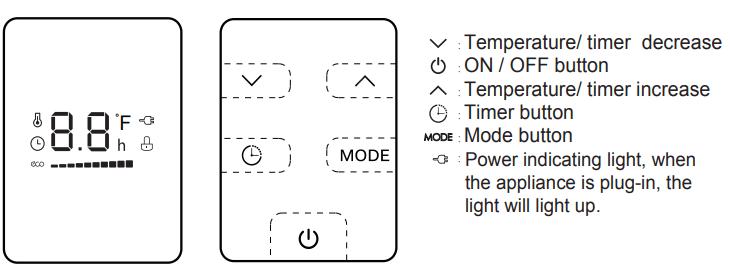
<Turn on/Turn off>: Plug in power, buzzer gives off a sound of "beep”, press the on-off key"()” to enter heating status at high gear and then press the on-off key “” for closing down.
<Gear selections>: For work status, press the gear key “MODE” gently to select one of work modes such as high gear, medium gear, low gear and energy saving gear.
[Timer function]
This function can be activated in two different ways
1) Delayed start: with the appliance off, press the timer button “”, the timer “” is displayed and hour is flashing. Change the hours by pressing “” and “” buttons, then wait a few seconds for program to be stored. Once delayed start is settled, the delayed start hour and timer symbol "” remains on display.
2) Delayed stop: with the appliance on, press time button “ ”, the timer “” is displayed and hour is flashing, change the hours by pressing “ ” and “” buttons, then wait a few seconds for program to be stored. The current setting and timer symbol “” are displayed.
Note: the timer is settable from 0 to 24 hours.
Cancel the timer: There are three options for canceling delayed start/ stop setting:
a) Press on-off button “”
b) Press timer button “” and set the timer to 0 hour
c) Unplug the appliance.
[Temperature setting]
To select the desired temperature .press button “” or “", By pushing the or ‘’’button once , the temperature (shown on the display) will increase or decrease by 1 °F. Holding the “”or “" button depressed the value will increase or decrease rapidly.
Attention: When the heater is on ECO mode, The appliance allows the temperature range from 40°F to 95°F.
If the set temperature is higher than the room temperature, the heater will continue heating. The current settings and “ ’’symbol are displayed; Once the room temperature reaches the set temperature, the heating element will stop heating , The “’’symbol disappears from the display.
If the set temperature is lower than or equal to the room temperature , The heating element will stop heating .The current setting remains on but the” ” symbol will not be displayed until the room temperature falls to below the set temperature, the appliance will resume heating. The current setting and the” ” symbol are displayed.
<Children Lock Function>When the turning-on and standby status are valid without children lock, press on both “” and “MODE” for 3s at the same time to boot the children lock function. When the turning-on and standby status are valid with children lock, press on both “" and “MODE” for 3s at the same time to close down the children lock function.
Remarks:
1. When the children lock function works upon turning on, turn-off may be conducted and other operations are invalid (except for children lock releasing). Children lock function is canceled upon turn-off.
2. If the children lock function works upon standby status, all operations are invalid (except children lock releasing).
<Memory functions> When the apparatus is closed down normally, it will run based on the latest status prior to closing down in the case of restarting. Power is off and the apparatus is closed down; the apparatus also runs based on the status prior to the power off in the case of power on for starting. Close down the apparatus normally, and cut off power; if the apparatus is energized for starting-up again, it runs based on factory default, namely, high gear operation, and the setting temperature is 95°F by default.
Note:
After power failure, the children lock function is not be memorized.
<Safety protection functions> If the indoor temperature (Th) exceeds 122°F, all output commands are terminated, the buzzer gives off an urgent sound for 10 times and digital screen displays “FF”, with 75s for 1 Hz, whether standby or power-on. Even if the environmental temperature is less than 122°F, the running or operation cannot be recovered, as long as the protection exists; the only thing is to unplug the power cable, and then power up for operation.
[Stop]
Turn off the heater and then pull out the power plug.
[Movement of the heater]
To move the heater, turn it off first, and pull out the power plug; then push the body to make the four casters below the body to roll.
[Note]
To use the machine for the first time or to re-insert the socket, please pay attention to check whether the plug and the socket are fitted well.
<inspection method>
Insert the power plug into the socket and start for use; after about half an hour, turn off and pull out the plug. Check whether the plug pins are hot; replace the socket if so (more than about 122°F) to avoid burning the plug or even causing a fire caused by overheating of the socket due to poor contact.
Special Note: This heater is provided with a safe feature to de-energize the power of heater when over-heating because of any abnormal operation. When it occurs, unplug the heater and check the abnormal conditions and eliminate them before attempting to use it. After cooling down, it may be energized for reuse.
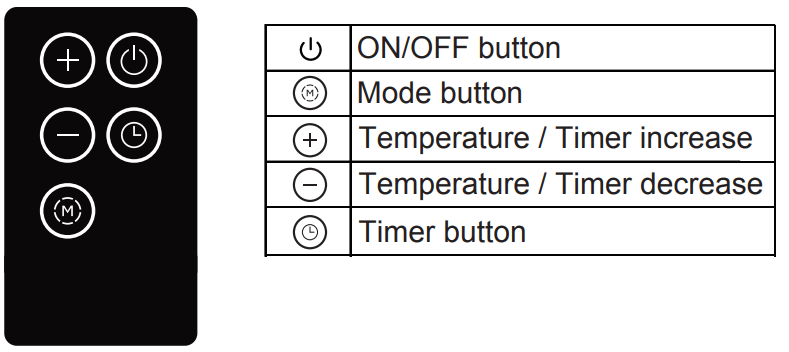
USING THE REMOTE CONTROL
Instructions for remote control button function are basically consistent with the operation panel of the body, and the remote-control unit cannot control the combination key.
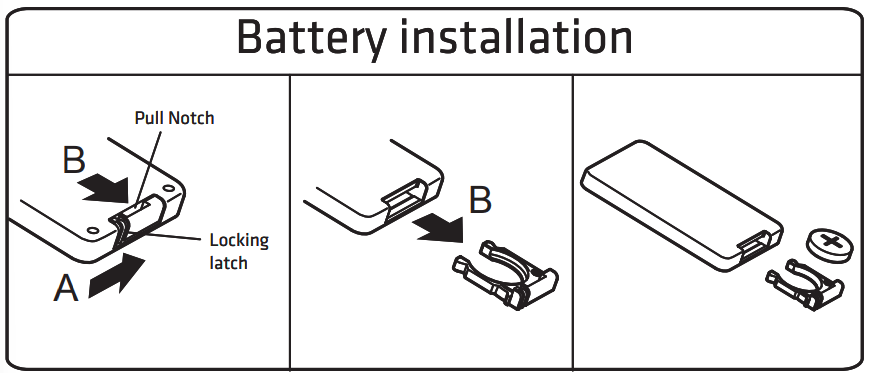
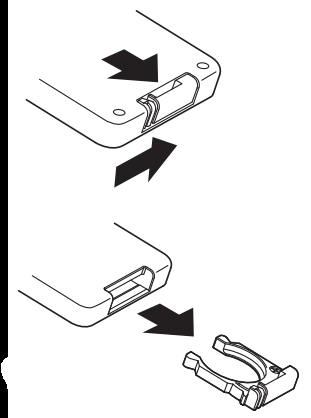
BATTERIES INSTRUCTIONS (included)
Please push locking latch in the direction of Arrow A, and pull out the pull notch in the direction of Arrow B at the same time.
Use 1 "CR2032" lithium battery (included)
Insert the batteries, making sure that the positive terminals are facing the proper way.
Replace the cover.
BATTERY WARNING
Do not dispose of batteries in fire, batteries may explode or leak.
Do not mix old and new batteries.
Do not mix alkaline, standard (carbon-zinc) or rechargeable (nickel-cadmium) batteries.
Non-rechargeable batteries are not to be recharged.
Batteries are to be inserted with the correct polarity.
Exhausted batteries are to be removed from the product.
The batteries must be removed from the remote controller before it is scrapped and that they are disposed of safely
CARE AND CLEANING
Always remove the plug from the power socket and allow heater to cool. Wipe heater with a soft, damp cloth. Do not use detergents and abrasives.
If the heater is not in use over some days, wind the cable around the holder and store it in a dry place.
In case of malfunction, do not try to repair the heater by yourself. It may result in fire hazard or electric shock.
For any other service not mentioned in this instruction, it should be performed by an authorized service representative.
SPECIFICATIONS
Model No.: NY1506-18SRA
Voltage: 120V, 60Hz
Current: Maximum continuous draw: 12.5 Amps.
Rated Power: 1500W
IMPORTANT INSTRUCTIONS
PLEASE READ AND SAVE THESE IMPORTANT SAFETY INSTRUCTIONS
When using electrical appliances, basic precautions should always be followed to reduce the risk of fire, electric shock, and injury, including the following:
Read all instructions before using this heater.
This heater is hot when in use. To avoid burns, do not let bare skin touch hot surfaces. If provided, use handles when moving this heater. Keep combustible materials, such as furniture, pillows, bedding, papers, clothes, and curtains at least 3 feet (0.9m) from the front of the heater and keep them away from the sides and rear.
Extreme caution is necessary when any heater is used by or near children or invalids and whenever the heater is left operating and unattended.
Always unplug heater when not in use.
Do not operate any heater with a damaged cord or plug or after the heater malfunctions, has been dropped or damaged in any manner. Discard heater or return heater to authorized service facility for examination, electrical or mechanical adjustment, or repair.
Do not use outdoors.
This heater is not intended for use in bathrooms, laundry areas and similar indoor locations. Never locate heater where it may fall into bathtub or other water container.
Do not run cord under carpeting. Do not cover cord with throw rugs, runners, or similar coverings. Do not route cord under furniture or appliances. Arrange cord away from traffic area and where it will not be tripped over.
To disconnect heater, first turn controls to off, then remove plug from outlet.
Do not insert or allow foreign objects to enter any ventilation or exhaust opening as this may cause an electric shock or fire, or damage the heater.
To prevent a possible fire, do not block air intakes or exhaust in any manner. Do not use on soft surfaces, like a bed, where openings may become blocked.
A heater has hot and arcing or sparking parts inside. Do not use it in the areas where gasoline, paint, or flammable liquids are used or stored.
Use this heater only as described in this manual. Any other use not recommended by the manufacturer may cause fire, electric shock, or injury to persons.
CAUTION: Always plug heaters directly into a wall outlet/receptacle. Never use with an extension cord or relocatable power tap (outlet/power strip).
This heater draws 12.5 amps during operation. To prevent overloading a circuit, do not plug the heater into a circuit that already has other appliances working.
It is normal for the plug to feel warm to the touch; however, a loose fit between the AC outlet (receptacle) and plug may cause overheating and distortion of the plug. Contact a qualified electrician to replace loose or worn outlet.
The output of this heater may vary and its temperature may become intense enough to burn exposed skin. Use of this heater is not recommended for persons with reduced sensitivity to heat or an inability to react to avoid burns.
Don't leave the heater on unattended.
CAUTION: TO PREVENT ELECTRIC SHOCK, MATCH WIDE BLADE OF THE PLUG TO WIDE SLOT AND FULLY INSERT.
 )” to enter heating status at high gear and then press the on-off key “


 ” remains on display.