User manual Icemaker
USING THE ICEMAKER
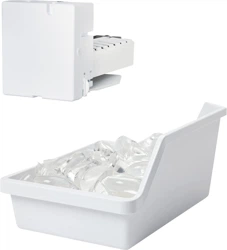
Automatic Icemaker
A newly-installed refrigerator may take 12 to 24 hours to begin making ice.
The icemaker will produce seven cubes per cycle-approximately 100-130 cubes in a 24-hour period, depending on freezer compartment temperature, room temperature, number of door openings and other use conditions.
-29274.png)
If the refrigerator is operated before the water connection is made to the icemaker, set the power switch to OFF.
When the refrigerator has been connected to the water supply, set the power switch to ON.
The icemaker will fill with water when it cools to freezing. A newly-installed refrigerator may take 12 to 24 hours to begin making ice cubes.
You will hear a buzzing sound each time the icemaker fills with water.
Throw away the first few batches of ice to allow the water line to clear.
Be sure nothing interferes with the sweep of the feeler arm.
When the bin fills to the level of the feeler arm, the icemaker will stop producing ice.
It is normal for several cubes to be joined together.
If ice is not used frequently, old ice cubes will become cloudy, taste stale and shrink. IM4LED only:
This icemaker is equipped with LED lights that are activated by a motion sensor when the freezer door is opened.
Preparing for Vacation
Set the icemaker power switch to OFF and shut off the water supply to the refrigerator.
If the temperature can drop below freezing, have a qualified servicer drain the water supply system (on some models) to prevent serious property damage due to flooding.
When you should set the icemaker power switch to OFF
- When the ice storage bin is removed for more than a minute or two.
- When the refrigerator will not be used for several days.
- When the water supply will be shut off for several hours.
Normal sounds you may hear
- The icemaker water valve will buzz when the icemaker fills with water. If the power switch is in the ON position, it will buzz even if it has not yet been hooked up to water.Keeping the power switch in the ON position before it is hooked up to water can damage the icemaker. To prevent this, move the power switch to the OFF position. This will stop the buzzing.
- The sound of cubes dropping into the bin and water running in the pipes as the icemaker refills.
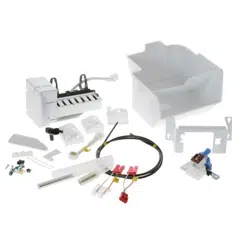
Installation Instructions
CONTENTS OF KIT IM4D and IM4LED
-273196.png)
-632002.png)
ICEMAKER INSTALLATION INSTRUCTIONS [U] [V] [W] OR [X]
Are these the right instructions for your model? Follow the Installation Instructions indicated by the label on the back of the refrigerator - [U] [V] W or \X\- For letter [T], go to page 10 for instructions.
BEFORE YOU BEGIN
-51121.png)
Read these instructions completely and carefully.
WARNING To reduce the risk of electric shock or injury during installation, you must first unplug the refrigerator before proceeding.
TOOLS YOU WILL NEED
-506671.png)
SELECT FILL TUBE FOR YOUR REFRIGERATOR
Which fill tube should you use?
- There is a label on the back of the refrigerator that will tell you which to use: 8 V W or X The fill tube you use will depend on the model and size of your refrigerator.
For letter [U]
Use long fill tube assembly #12 and cut off 1/2” of length from the tip of the fill tube. This will ensure the correct length fill tube for your model. This will provide proper water flow into your fill cup and icemaker. It will prevent the fill tube from freezing up with water and ice.
-847136.png)
For letter [V] and [X]
It is important to use the correct fill tube assembly because the length is critical to the performance of your icemaker. It is also critical to prevent any leaking from the fill tube into the freezer itself.
• Open the fresh food door and locate the label in the upper left corner of the compartment.
• Find the model number in bold listed under MODEL NO.
• Match the two digit number in the model number to the fill tube number in the table below.
NOTE: The desired number starts at the fourth character.
-756633.png)
For letter W
Use short fill tube assembly #11 and cut off 1” of length from the tip of the fill tube. This will ensure the correct length fill tube for your model. This will provide proper water flow into your fill cup and icemaker. It will prevent the fill tube from freezing up with water and ice.
-272360.png)
REPOSITION FREEZER SHELF
• Make sure the freezer shelf is in the lowest position.
REMOVE THE OUTLET COVER
Peel off the outlet cover.-783560.png)
PREPARE FOR INSTALLATION
- Inside the freezer, remove the two small white plug buttons (on some models) from the side wall. (If screws are present instead of plugs, leave them in place.)
- A large white plug or a white cap secured by a 1/4" screw will be covering the fill tube opening in the rear freezer wall.
- Remove the large white plug using a flat-blade screwdriver. Remove the white cap by unscrewing the 1/4" screw.
- Remove the outlet cover with a flat-blade screwdriver.
-951086.png)
INSTALL FILL TUBE
Go to the back of the refrigerator. On the refrigerator side of the fill tube assembly (11 or 12 depending on model), there is an adhesive backing. Remove the adhesive backing and slide the tube into the hole near the top at the back of the refrigerator. Firmly press on the fill tube assembly to secure it to the refrigerator.
-919454.png)
SET POWER SWITCH TO OFF
Set the icemaker power switch to OFF. Leave the power switch in the OFF position until the-369772.png)
INSTALL THE ICEMAKER FILL CUP
- For letters [U] , [V] & [X]
Install the icemaker fill cup (13) into the icemaker as shown.
-548798.png)
Install the icemaker fill cup that came with your refrigerator into the icemaker as shown. If the fill cup has been misplaced, call 1.800.626.2002 and order part WR29X10074. If the correct fill cup is not installed into the icemaker, there is the possibility of water leaking into the freezer and not into the icemaker.
PLUG IN THE ICEMAKER
Holding the icemaker in place, insert the icemaker power cord plug into the socket on the side wall, making sure the prongs and holes are matched. Press the plug firmly into the socket. Lock the plug in place by clipping the restraints onto each side of the plug. Make sure the restraints click into place.
Make sure the power cord is still in the hook on the back of the icemaker.
-40193.png)
MOUNT THE ICEMAKER
- Lift the icemaker so the fill tube assembly (11 or 12 depending on model) fits in the fill cup opening (D). Hang the icemaker on the two mounting screws (B).
Make sure:
- The power cord is still firmly in the socket.
- The fill tube assembly (11 or 12 depending on model) extends into the fill cup opening at the back of the icemaker. (Check the rear of the refrigerator to make sure the fill tube has not been pushed out of the back of the refrigerator).
- The icemaker mounting screws are located in the uppermost position of the mounting slots on the icemaker bracket.
- The icemaker is level.
- The icemaker power switch is in the OFF position.
SECURELY TIGHTEN THE ICEMAKER MOUNTING SCREWS.
-898823.png)
INSTALL THE ICE BUCKET
Place the ice bucket (8) under the icemaker.
-431424.png)
ATTACH WARRANTY LABEL
A label (7) is provided with this kit to record the date of installation for warranty purposes. Apply it to the back of the refrigerator.
KEEP THIS MANUAL
The warranty for the icemaker is printed in this manual. Keep this manual with your Refrigerator Owner’s Manual.
The icemaker installation inside the freezer is now complete. Continue to the Water Valve Assembly section on page 12.
ICEMAKER INSTALLATION INSTRUCTIONS T - IM4D ONLY
BEFORE YOU BEGIN
Read these instructions completely and carefully.
WARNING To reduce the risk of electric shock or injury during installation, you must first unplug the refrigerator before proceeding. Failure to follow these instructions can result in electrical shock.
TOOLS YOU WILL NEED
-400137.png)
PREPARE FOR INSTALLATION
• Remove the storage basket (on some models) by pulling it out to the stop position and lifting it up and out.
NOTE: After removing the basket, push the extension arms back into the freezer compartment.
• Remove the chiller shelf (on some models) by pulling it straight out.
• Remove the center vertical shelf support (on some models) by lifting it and rotating its bottom to the right.
• Inside the freezer, remove the two small white plug buttons (on some models) from the side wall. (If screws are present instead of plugs, leave them in place.)
• If present, remove and discard the large white plug from the left rear freezer wall.
• Remove the outlet cover with a flat-blade screwdriver.
-323909.png)
-893956.png)
SET POWER SWITCH TO OFF
Set the icemaker power switch to OFF. Leave the power switch in the OFF position until the refrigerator is connected to the water supply to prevent premature operation.
INSTALL THE MOUNTING SCREWS
- Skip to Step 4 if screws are already in place in the freezer side wall.
- Install two self-tapping Phillips head screws (10) from the kit in the holes in the side wall. The screw heads should extend about 1/2" (13 mm) from the side wall.
-192771.png)
INSTALL THE ICEMAKER FILL CUP
Install the icemaker fill cup (end-mounted) that came with your unit into the icemaker as shown. If the fill cup has been misplaced, call 1.800.626.2002 to order a new part. Refrigerator models GBE21D order part WR29X26688. All other models order part WR29X10092.
-575127.png)
PLUG IN THE ICEMAKER
Holding the icemaker in place, insert the icemaker power cord plug into the socket on the side wall, making sure the prongs and holes are matched. Press the plug firmly into the socket. Lock the plug in place by clipping the restraints onto each side of the plug. Make sure the restraints click into place and the power cord is still in the hook on the back of the icemaker.
-849857.png)
MOUNT THE ICEMAKER
- Lift the icemaker so the fill tube that was already installed in the refrigerator fits in the fill cup opening. Hang the icemaker on the two mounting screws in the side wall.
Make sure:
- The power cord is still firmly in the socket.
- The fill tube extends into the fill cup opening at the back of the icemaker. (Check the rear of the refrigerator to make sure the fill tube has not been pushed out of the back of the refrigerator).
- The icemaker mounting screws are located in the uppermost position of the mounting slots on the icemaker bracket.
- The icemaker is level.
- The icemaker power switch is set toOFF.
SECURELY TIGHTEN THE ICEMAKER MOUNTING SCREWS.
-312853.png)
RE-INSTALL THE SHELF SUPPORT, BUCKET, SHELF AND BASKET
Replace the center vertical shelf support, ice bucket, chiller shelf and storage basket by reversing the steps in Step 1.
ATTACH WARRANTY LABEL
A label (7) is provided with this kit to record the date of installation for warranty purposes. Apply it to the back of the refrigerator.
KEEP THIS MANUAL
The warranty for the icemaker is printed in this manual. Keep this manual with your Refrigerator Owner’s Manual.
The icemaker installation inside the freezer is now complete. Continue to the Water Valve Assembly section on page 14.
Troubleshooting Tips... Before you call for service
Save time and money! Review the charts on the following pages first and you may not need to call for service. If needed, service can be scheduled by visiting us online GEAppliances.com or calling 800.GECARES 800.432.2737. In Canada visit GEAppliances.ca or call 800.561.3344.
| Problem |
Possible Causes |
What to Do |
Automatic icemaker does not work
|
Freezer compartment too warm. |
After installing the kit, allow the refrigerator to completely cool down for 24 hours. Once the compartment is cool, the icemaker will begin ice production. |
| Icemaker is not turned on. |
Move the icemaker power switch to the ON
-45633.png)
|
| Icemaker is not plugged in correctly. |
Check that the icemaker cord plug is fully inserted into the
socket. See "Plug in the icemaker" in the Installation Instructions.
-452470.png)
|
| Water line kinked. |
Check that the plastic water line running from the valve to the water tube inlet is not kinked. See "Connect the water line" in the Installation Instructions. A kink in the water line will restrict flow to the water line.
-116248.png) |
| Water supply turned off or not connected. |
After installing the kit, make sure the house water supply to the refrigerator has been turned on. |
| Piled up cubes in the storage bin cause the icemaker to shut off. |
Level cubes by hand.
|
| Water valve is not plugged in correctly. |
Check that the valve wire adapter is completely plugged onto the terminals on the water valve. See "Attach the water valve" in the Installation Instructions.
-141319.png)
|
Leaking water around the fill cup
|
Foam in the fill cup from installing the fill tube.
|
If the fill tube was installed by sliding it through the back of the refrigerator, it may have picked up pieces of foam as it was pushed through. This foam can ' interfere with the water flow in the fill cup. Check the cup and make sure there are no foam pieces.
-494384.png) |
| Fill tube not correctly seated in the fill cup. |
Check that the fill tube is corr inserted in the fill cup opening. See "Mount the icemaker" in the Installation Instructions.
-495405.png) |
Leaking water behind the refrigerator
|
House supply not properly connected to the water valve. |
Check that the house supply is firmly attached to the water valve. See Water line installation instructions. |
Water line not connected to the water tube inlet.
|
Check that the plastic water line running from the valve to
the water tube inlet is firmly attached with the water line
-293703.png) |
Slow ice/freezer not cold enough
|
Door left open. |
Check to see if package is holding door open.
|
Temperature control not set cold enough.
|
See About the Temperature Control in the Owner's Manual ofthe refrigerator.
|
Ice cubes too small/ slow ice
|
Water shutoff valve connecting refrigerator to house water line may be clogged |
We recommend drilling a 1/4" hole in the water pipe to connect the water shut-off valve. Failure to drill a 1/4" in water hole may result in reduced ice production or smaller cubes. See Installing the water line.
-577950.png)
|
| Water line kinked. |
Check that the plastic water line running from the valve to the water tube inlet is not kinked. See "Connect the water line" in the Installation Instructions. A kink in the water line will restrict flow to the icemaker.
-960282.png)
|
| Ice cubes not landing in bucket |
Icemaker cord causing icemaker/ bucket misalignment |
Be sure icemaker power cord is in the hook as stated in the Installation Instructions. |
Ice cubes have odor/ taste
|
Ice storage bin needs cleaning. |
Empty and wash bin. Discard old cubes. |
| Food transmitting odor/taste to ice cubes. |
Wrap foods well. |
| Interior of refrigerator needs cleaning. |
See "Care and cleaning" in the Owner's Manual ofthe refrigerator. |
| Frequent “buzzing” sound |
Normal operation. |
During normal operation, the water valve will “buzz” when the icemaker fills with water. |
| Icemaker LED lights turning off (IM4LED only) |
Normal operation. |
The LED lights are set to turn off after a period of time if no motion is detected in front of the sensor. |
| Icemaker LED lights not turning on (IM4LED only) |
Blocked sensor |
Ensure no food iems are covering the sensor. Wipe condensation or frost from the sensor with a clean cloth or paper towel.
-513173.png)
|