Loading ...
Loading ...
Loading ...
12
To Turn Off:
Touch the surface cooking area Off keypad.
Melt
The Melt function can be used with all surface cooking areas.
To Use
To Turn On:
1. Check that a surface cooking area has been selected.
2. Touch MELT. “A” will appear in the display, and then the
indicator light next to Melt will light.
The cooktop timer remains visible and can be set if desired.
To Turn Off:
Touch the surface cooking area Off keypad.
Bridge
The Bridge function can be activated when surface cooking areas
are ON or OFF. The Bridge function allows you to use 2 cooking
zones as an extra-large cooking zone.
To Turn On the Bridge:
1. Touch BRIDGE.
The heat setting levels for the 2 left surface cooking areas
will default to “0” and can be set from a minimum of “1” to a
maximum of “9.” If the cooktop timer was active, it will turn off.
2. Slide a finger on the heat level slider to change the power level
up or down.
The selected heat level will show in the heat level display for
each surface cooking area using the bridge.
To Turn Off the Bridge:
1. Touch BRIDGE.
The surface cooking areas will resume operation as
2 separate areas.
NOTE: Performance Boost cannot be used on the same
elements in combination with the Bridge function.
Pan Detection
If the system cannot recognize the pan, or if the pan has been
removed from the surface cooking area, the “replace pan”
animation appears in the cooking area display as a reminder.
See the following illustration.
If the pan is not placed within 30 seconds, the element(s) will
switch off.
If the cooktop Timer is running when a pan is removed from the
selected element, the countdown will continue until the element
switches OFF.
Control Lock
The Control Lock avoids unintended use of the surface cooking
areas.
If Control Lock is activated when power to the cooktop is OFF, the
cooktop is locked out and the surface cooking areas cannot be
turned on by the cooktop touch controls.
If Control Lock is activated when power to the cooktop is ON, all
keypads are locked out except for the Power and Off keypads.
To Lock Cooktop:
Touch and hold the Control Lock keypad for 3 seconds. After
3 seconds, a tone will sound and the indicator light above the
Control Lock keypad will light, indicating that the cooktop controls
are in the lockout position.
If the cooktop is in use when Control Lock is activated, cooking
will proceed as normal and any cooktop timers that have been set
will continue their countdown.
To Unlock Cooktop:
Touch and hold the Control Lock keypad for 3 seconds.
Performance Boost Function
This function allows you to increase the heat setting level above
the maximum heat setting “9” for 10 minutes or less.
NOTE: Performance Boost function is available on only 1 surface
cooking area at a time within a zone. See the following illustration
for zones.
If you attempt to use Performance Boost on more than 1 surface
cooking area in the same zone, “P” will briefly flash in the display,
and then the first surface cooking area selected for Performance
Boost will automatically be set back to the highest available
power level. The last surface cooking area selected will be set to
Performance Boost.
1. Check that a surface cooking area has been selected.
2. Touch BOOST on the heat level slider. “P” will appear in
the display.
3. Touch BOOST again when finished. The “P” will no longer be
visible in the display and the Performance Boost function will
no longer be active. The surface cooking area turns back to
the highest available power level.
NOTE: The Performance Boost function may automatically
deactivate to keep the internal electronic components of the
cooktop from becoming too hot.
Timer
Use the cooktop timer to set times from 1 to 90 minutes. The
cooktop timer is independent of any other control settings. The
timer can be associated with only 1 surface element at a time
which is indicated by blinking LEDs. The timer will not shut the
surface element off at the end of the countdown.
To Use:
1. Touch TIMER “+” or “-” keypad. “01” appears in the cooktop
timer display.
2. Touch TIMER “+” keypad to increase the time in 1-minute
increments.
OR
Touch TIMER “-” keypad to decrease the time in 1-minute
increments.
3. The cooktop timer will start to count down after a few
seconds.
To change the time, touch TIMER “+” or “-” keypad.
4. When the countdown is finished, “00” flashes and a tone
will sound.
NOTE: The surface element being timed must remain active
or the timer will stop and reset to “00.”
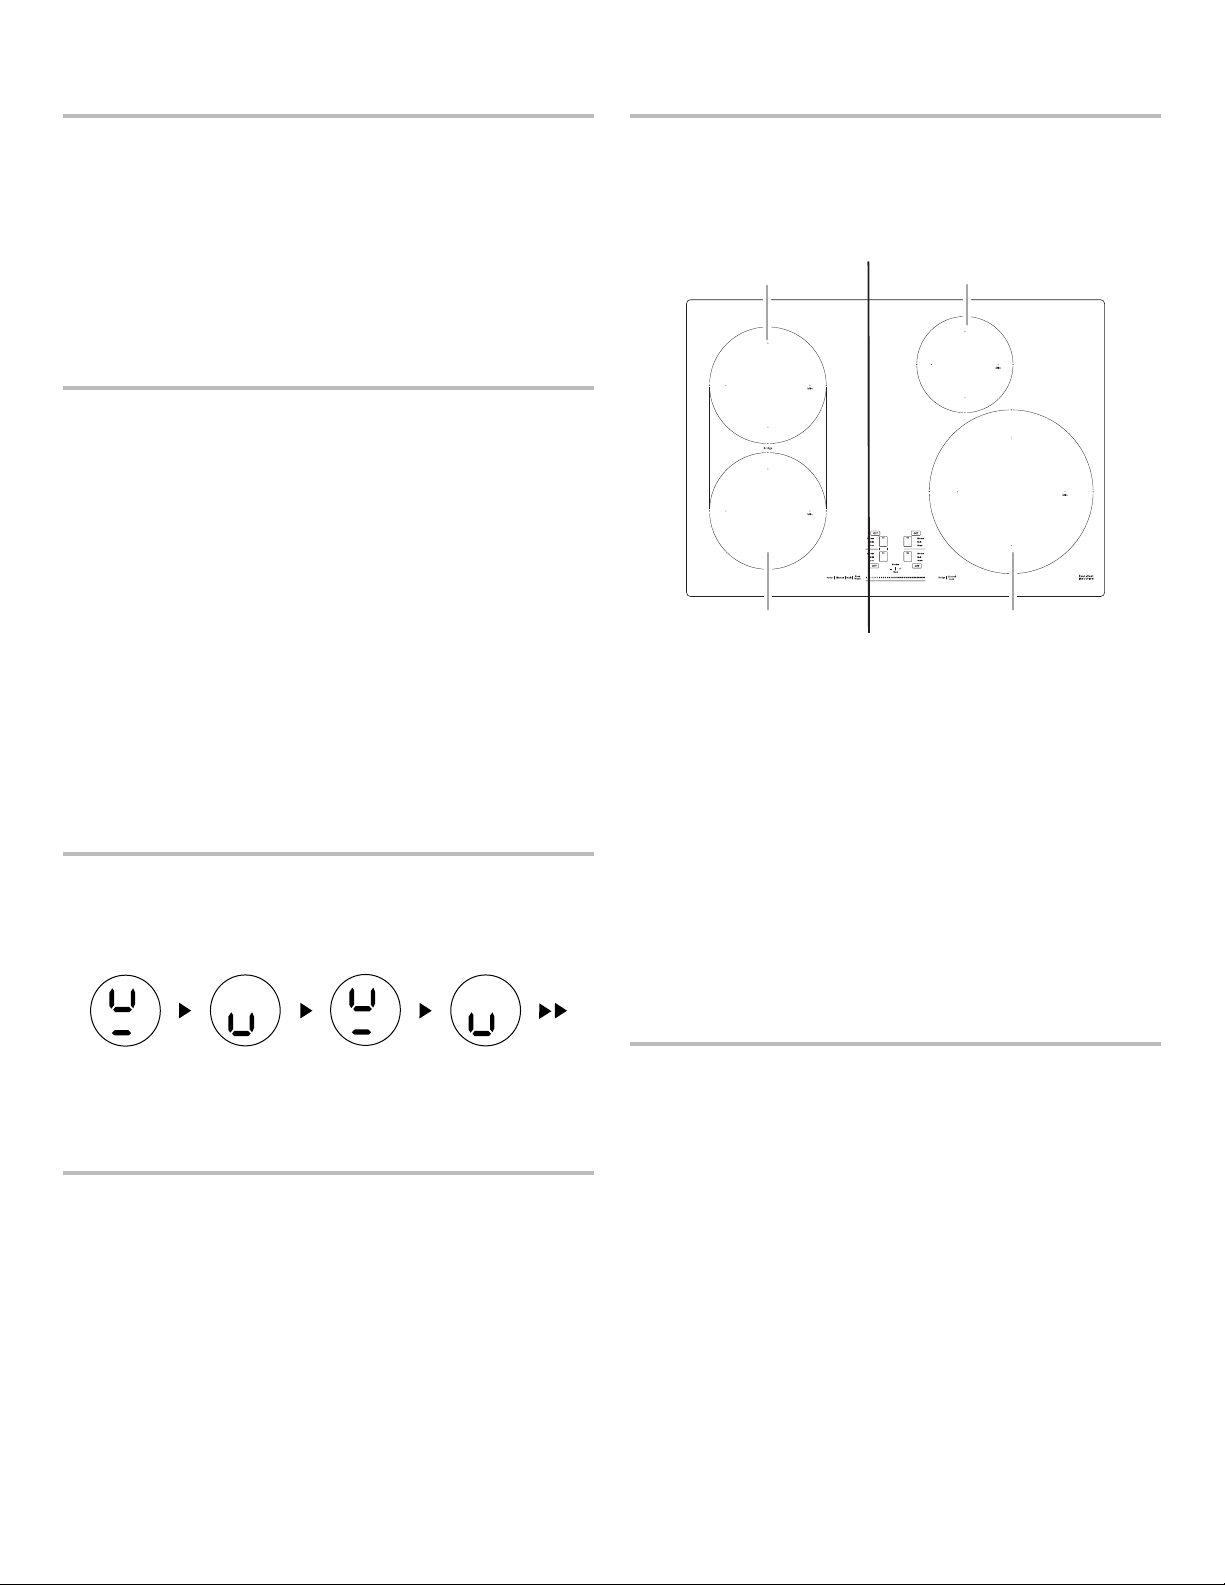
A
B
C
D
Zone 1
A. Surface cooking area 1
C. Surface cooking area 2
Zone 2
B. Surface cooking area 3
D. Surface cooking area 4
Loading ...
Loading ...
Loading ...