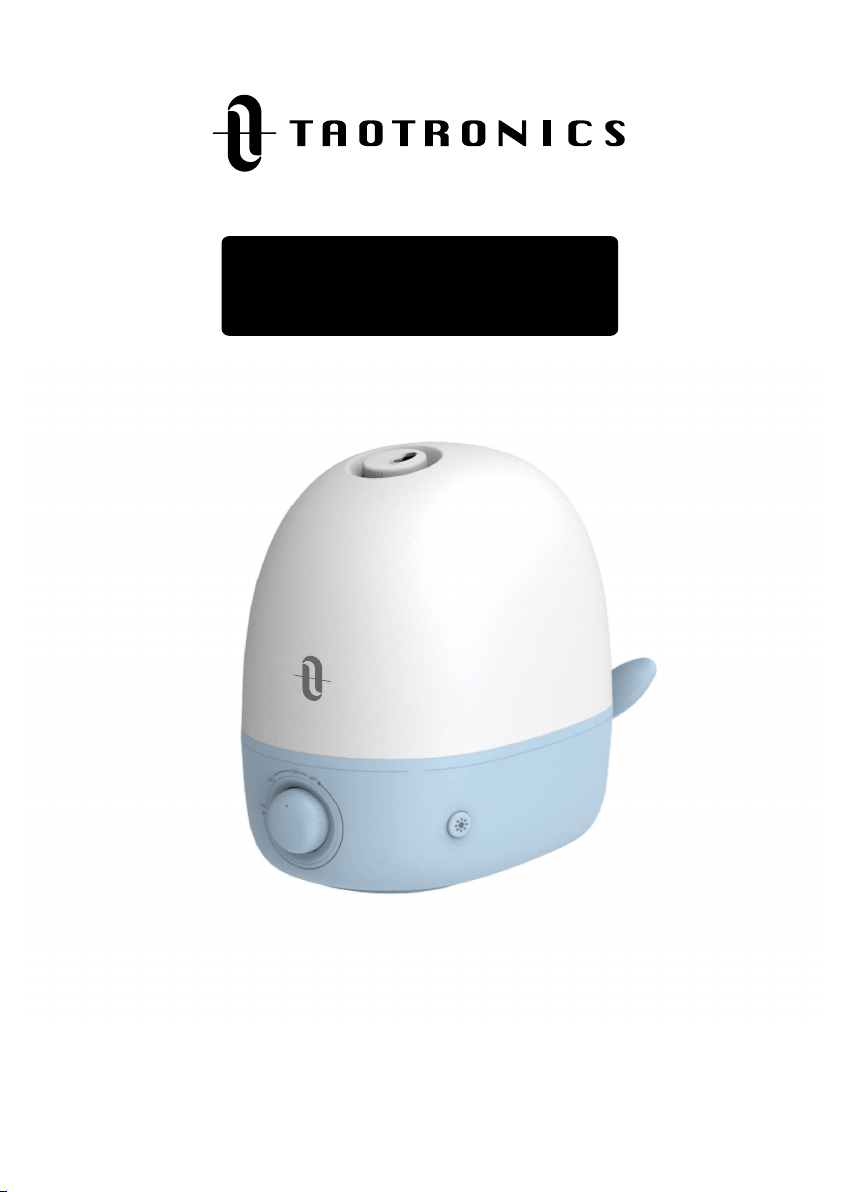
MODEL: TT-AH038
3 IN 1 HUMIDIFIER
User Manual
NORTH AMERICA
E-mail: support@taotronics.com(US)
support.ca@taotronics.com(CA)
Tel: 1-888-456-8468 (Monday-Friday: 9:00 – 17:00 PST)
US Distributor: SUNVALLEYTEK INTERNATIONAL INC.
Address: 46724 Lakeview Blvd, Fremont, CA 94538
Manufacturer: Shenzhen NearbyExpress Technology Development Co.,Ltd.
Address: 333 Bulong Road, Shenzhen, China, 518129
MANUFACTURER
Learn more about the EU Declaration of Conformity:
https://www.taotronics.com/downloads-TT-AH038-CE-Cert.html
www.taotronics.com
Register to extend your 18 months warranty by visiting
taotronics.com/warranty:
support@taotronics.com(US)
support.ca@taotronics.com(CA)
support.uk@taotronics.com(UK)
10-29-2019
TT-AH038_V1.1 EN
ASIA PACIFIC
E-mail: support.jp@taotronics.com(JP)
JP Importer: SUNVALLEY JAPAN
Address: 104-0032 3 18-6 PMO 9F
EUROPE
E-mail:
support.uk@taotronics.com(UK)
support.de@taotronics.com(DE)
support.fr@taotronics.com(FR)
support.es@taotronics.com(ES)
support.it@taotronics.com(IT)
EU Importer: ZBT International Trading GmbH
Address: Halstenbeker Weg 98C, 25462 Rellingen, Deutschland

STATEMENT
SAFETY INSTRUCTIONS
BEFORE USING THE HUMIDIFIER
WHEN USING THE HUMIDIFIER
AFTER USING THE HUMIDIFIER
PACKAGE CONTENTS
SPECIFICATIONS
PRODUCT DIAGRAM
INFORMATION ON USE OF ESSENTIAL OILS FOR BABY ROOM NURSERY
Patch Test
Dilution Recommendations for Babies/Children
Safety Tips for Babies /Children
OPERATIONS AND FUNCTIONS
Add water
Power On / Off and Mist Adjustment
Nightlight Control
Low Water Protection: Auto Shut-off the Humidier
CLEANING AND MAINTENANCE
Caution
Daily Maintenance
Weekly Maintenance
Scale Removal Instructions
Disinfecting Instructions
End-Of-Season Care and Storage
TROUBLESHOOTING GUIDE
WARRANTY
TAOTRONICS CUSTOMER CARE
CONTENTS
01
01
06
08
10
12/13
07
14
14
06
02/03
04
05
08
09
09
10
11
11
12
12
12
12
15
18
18
11

STATEMENT
Thank you for purchasing a TaoTronics product that has been tested to meet our stringent
quality standards. This product is covered with TaoTronics product and labor warranty for 18
months from the date of its original purchase.
Please email us with your order ID and problem or issue via [email protected] or
Distributor Support, we will respond within 24 hours.
Please read the User Manual thoroughly. Clean and maintain the product as instructed. If any
abnormalities occur, please refer to the Troubleshooting Guide rst.
This warranty is void if the defect is caused by accidental damage, misuse, abuse, neglect,
improper repair or alteration by unauthorized persons, or a failure to follow operating instruc-
tions provided with the product including adding essential oils directly into the tank and base.
This warranty does not apply to normal wear and tear or commercial use.
In no event shall liability exceed the purchase price paid by the purchaser of the product.
Under no circumstances shall there be liability for any loss – direct, indirect or incidental – or
consequential damage arising out of, or in connection with the use of the product.
SAFETY INSTRUCTIONS
The humidier was made with safe and environmental protection materials, it has been
certied and complied with the requirement of sale regions’ related regulations or laws.
IMPORTANT: Please read and save this SAFETY INSTRUCTIONS before using the device.
Basic precautions should always be followed to reduce the risk of re, electrical shock, and
injury to persons or damage to the product.
BEFORE USING THE HUMIDIFIER
1. Please extend the cord and check any signs of damage. Do not use the humidier if the cord
has been damaged.
2. DO NOT place this humidier in wet environments.
Please always keep the humidier out of reach of patients & children & pet. The humidier is
not a toy, do not allow children to play with it.
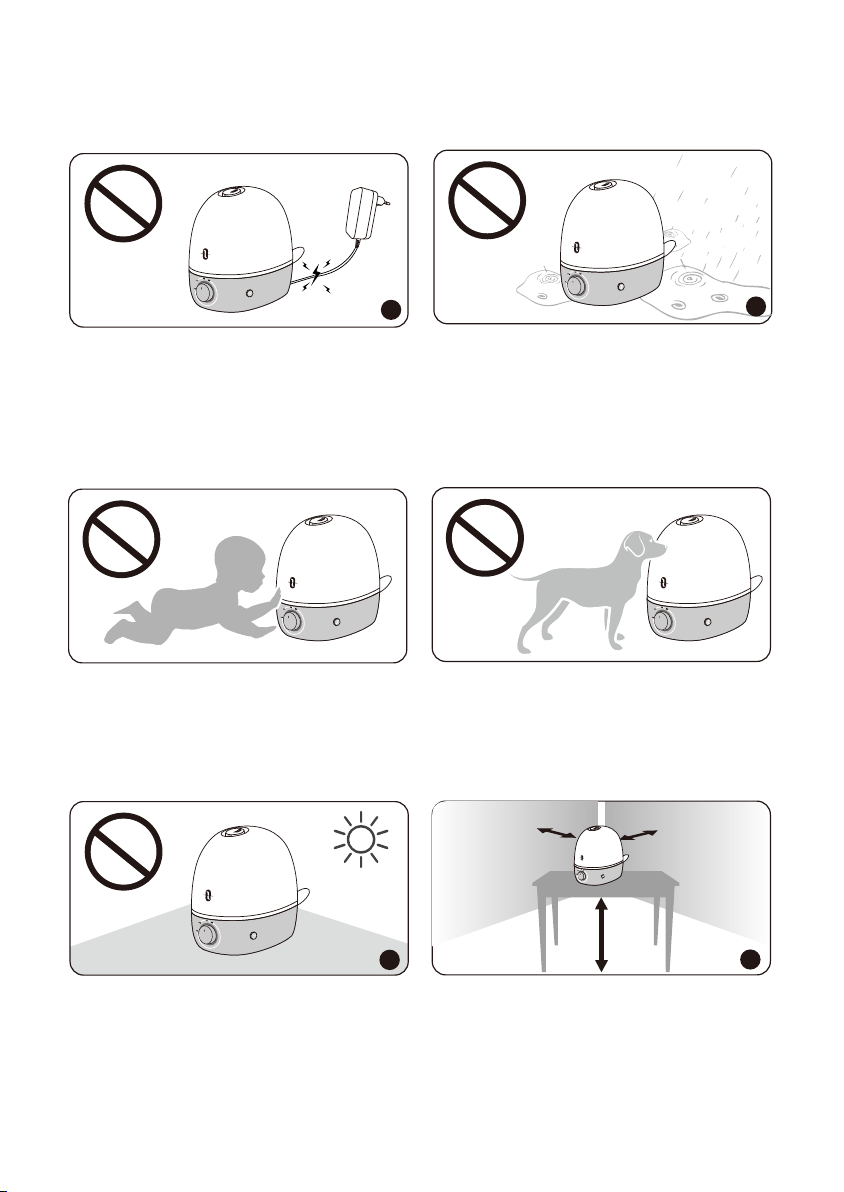
1. Please always place the unit on a smooth, at, lint-free, non-metallic, waterproof and level
surface and keep it away from direct sunlight.
2. Always place the unit at least two feet above the oor, 12 inches (30 cm) away from the wall,
other appliances or wooden furniture.
02
01
2
1
30 CM
60 CM
2
30 CM
TaoTronics Warranty
1
STATEMENT
Thank you for purchasing a TaoTronics product that has been tested to meet our stringent
quality standards. This product is covered with TaoTronics product and labor warranty for 18
months from the date of its original purchase.
Please email us with your order ID and problem or issue via support@taotronics.com or
Distributor Support, we will respond within 24 hours.
Please read the User Manual thoroughly. Clean and maintain the product as instructed. If any
abnormalities occur, please refer to the Troubleshooting Guide rst.
This warranty is void if the defect is caused by accidental damage, misuse, abuse, neglect,
improper repair or alteration by unauthorized persons, or a failure to follow operating instruc-
tions provided with the product including adding essential oils directly into the tank and base.
This warranty does not apply to normal wear and tear or commercial use.
In no event shall liability exceed the purchase price paid by the purchaser of the product.
Under no circumstances shall there be liability for any loss – direct, indirect or incidental – or
consequential damage arising out of, or in connection with the use of the product.
SAFETY INSTRUCTIONS
The humidier was made with safe and environmental protection materials, it has been
certied and complied with the requirement of sale regions’ related regulations or laws.
IMPORTANT: Please read and save this SAFETY INSTRUCTIONS before using the device.
Basic precautions should always be followed to reduce the risk of re, electrical shock, and
injury to persons or damage to the product.
BEFORE USING THE HUMIDIFIER
1. Please extend the cord and check any signs of damage. Do not use the humidier if the cord
has been damaged.
2. DO NOT place this humidier in wet environments.
Please always keep the humidier out of reach of patients & children & pet. The humidier is
not a toy, do not allow children to play with it.
1. Please always place the unit on a smooth, at, lint-free, non-metallic, waterproof and level
surface and keep it away from direct sunlight.
2. Always place the unit at least two feet above the oor, 12 inches (30 cm) away from the wall,
other appliances or wooden furniture.
02
01
2
1
30 CM
60 CM
2
30 CM
TaoTronics Warranty
1
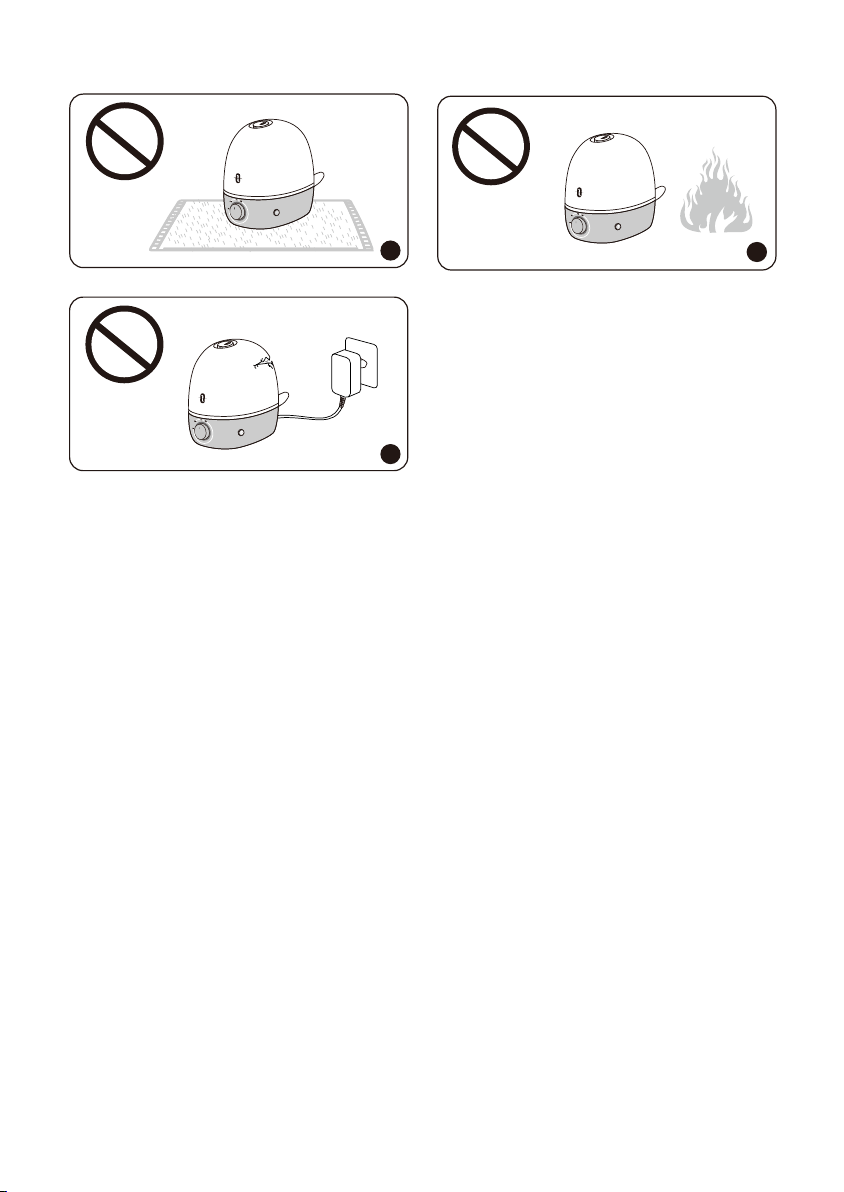
1. DO NOT place the unit on carpet, towel or wood surface, which will block the vent and may
damage the unit.
2. DO NOT place the humidier near naked ames and heat sources, such as stove tops,
ovens, radiators or computers.
3. DO NOT use if the water tank becomes damaged or cracked.
WHEN USING THE HUMIDIFIER
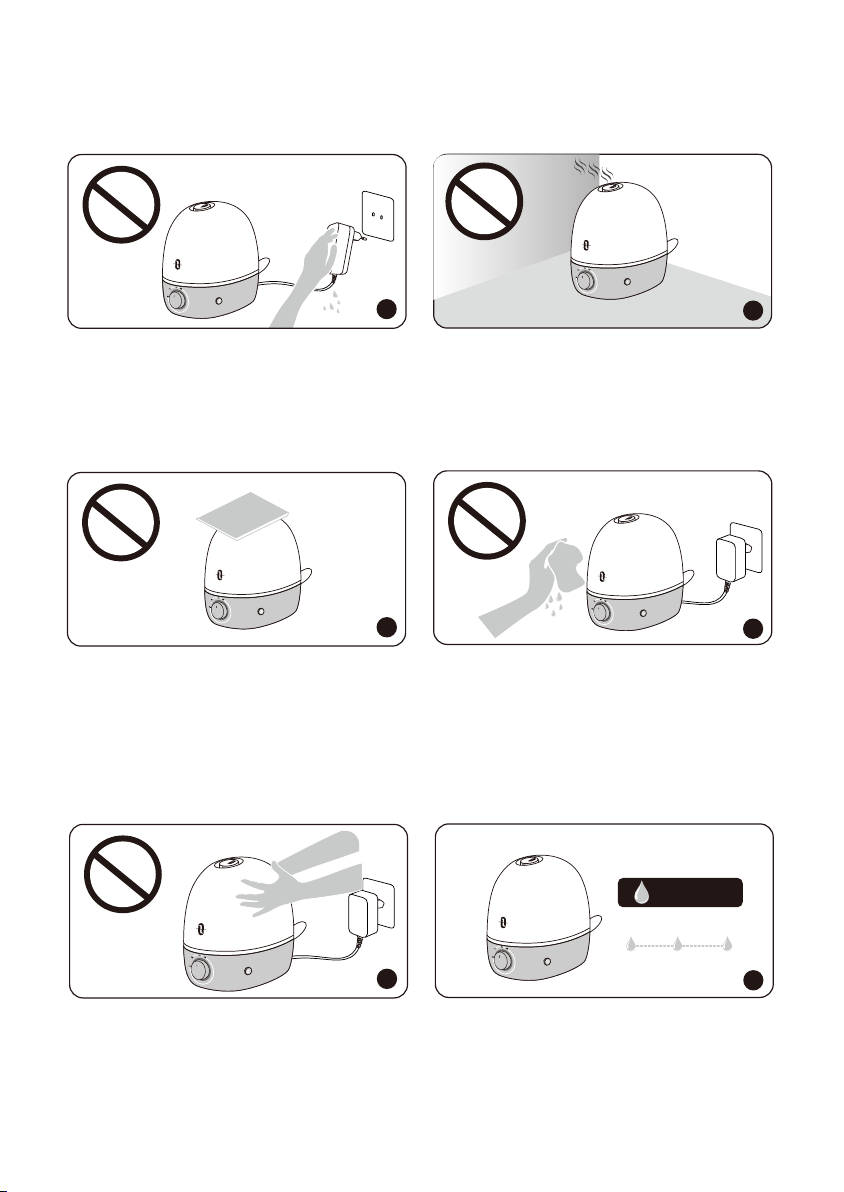
1. DO NOT plug the unit with wet hands.
2. DO NOT direct the mist nozzle against the wall.
1. DO NOT use your hand or any other object to cover the nozzle while the unit is on to avoid
damaging the product or causing injury.
2. DO NOT clean the unit while it is connected to a power source or while it is on.
1. DO NOT move or tilt the humidier while it is in operation.
2. The most comfortable environmental humidity is between 40%-60%. Please adjust the mist as
needed.
04
03
1
2
2
1
2
1
Humidity
40% 60%
2
3
1
1. DO NOT place the unit on carpet, towel or wood surface, which will block the vent and may
damage the unit.
2. DO NOT place the humidier near naked ames and heat sources, such as stove tops,
ovens, radiators or computers.
3. DO NOT use if the water tank becomes damaged or cracked.
WHEN USING THE HUMIDIFIER
1. DO NOT plug the unit with wet hands.
2. DO NOT direct the mist nozzle against the wall.
1. DO NOT use your hand or any other object to cover the nozzle while the unit is on to avoid
damaging the product or causing injury.
2. DO NOT clean the unit while it is connected to a power source or while it is on.
1. DO NOT move or tilt the humidier while it is in operation.
2. The most comfortable environmental humidity is between 40%-60%. Please adjust the mist as
needed.
04
03
1
2
2
1
2
1
Humidity
40% 60%
2
3
1
AFTER USING THE HUMIDIFIER
1. Always disconnect from a power source by pulling the plug when not in use.
2. Humidier requires regular cleaning. Please refer to, and follow the Cleaning and
Maintenance instructions.
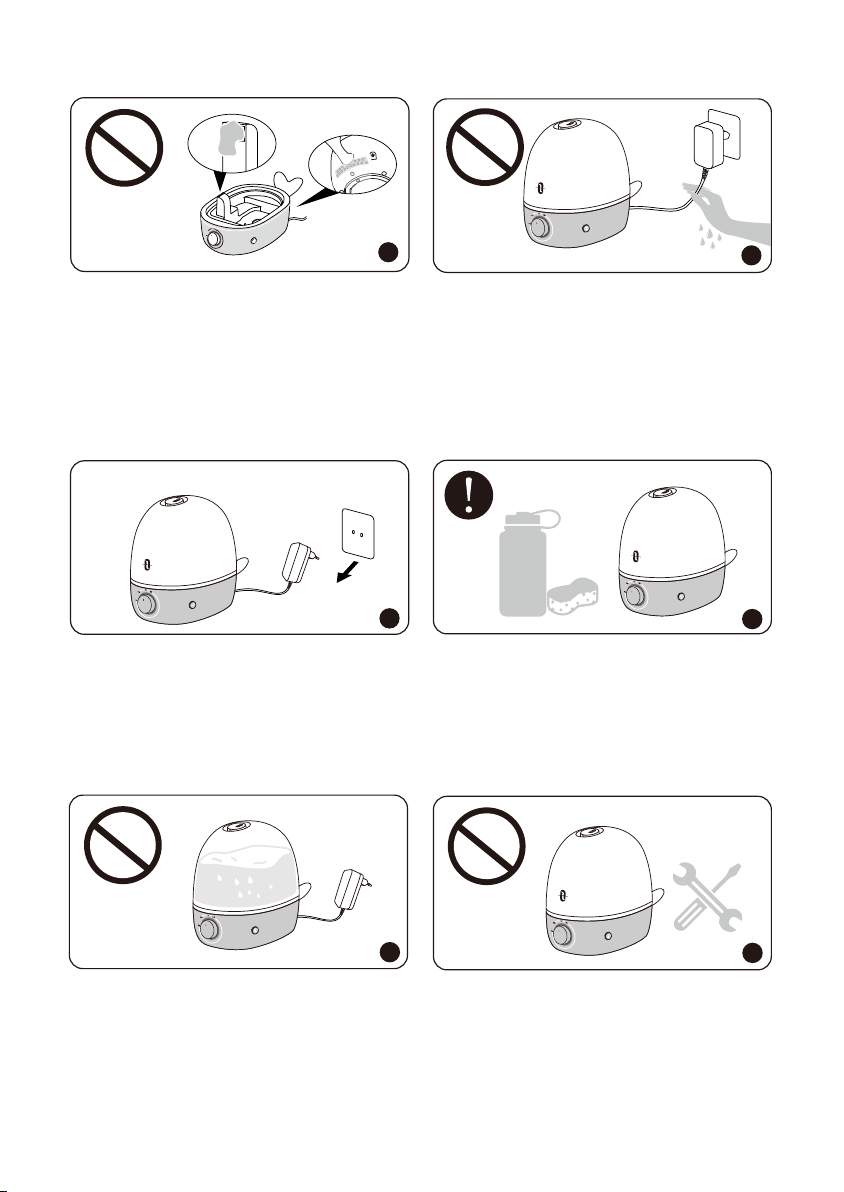
1. DO NOT keep water in the tank when not in use for an extended period of time and/or when
no one is home.
2. DO NOT attempt to repair or adjust any electrical or mechanical functions on this humidier.
Doing so will void your warranty.
· 1 x TaoTronics Humidier (Model: TT-AH038)
· 1 x Cleaning Brush
· 1 x Thank You Card
· 1 x User Manual
TT-AH038
AC 100-120V 50/60Hz
DC 24V
18W
2.5L / 0.67Gal
Min: 60ml/h
Max: 160ml/h
12-30h
10-25m²/107-270ft²
28dB
287 x 215 x 153mm / 11.3 x 8.5 x 6.0in
720g/25.4oz
Model
PACKAGE CONTENTS
SPECIFICATIONS
06
05
1
2
2
1. DO NOT block air inlet or air outlet.
2. The humidier should always be shut off and unplugged with dry hands before moving or
while being cleaned. Never pull by cord.
Power
Water Tank Capacity
Input
Mist Output
Working Time on a Full Tank
Recommended Room Size
Noise
Dimensions
Net Weight
1
1
2

AFTER USING THE HUMIDIFIER
1. Always disconnect from a power source by pulling the plug when not in use.
2. Humidier requires regular cleaning. Please refer to, and follow the Cleaning and
Maintenance instructions.
1. DO NOT keep water in the tank when not in use for an extended period of time and/or when
no one is home.
2. DO NOT attempt to repair or adjust any electrical or mechanical functions on this humidier.
Doing so will void your warranty.
· 1 x TaoTronics Humidier (Model: TT-AH038)
· 1 x Cleaning Brush
· 1 x Thank You Card
· 1 x User Manual
TT-AH038
AC 100-120V 50/60Hz
DC 24V
18W
2.5L / 0.67Gal
Min: 60ml/h
Max: 160ml/h
12-30h
10-25m²/107-270ft²
28dB
287 x 215 x 153mm / 11.3 x 8.5 x 6.0in
720g/25.4oz
Model
PACKAGE CONTENTS
SPECIFICATIONS
06
05
1
2
2
1. DO NOT block air inlet or air outlet.
2. The humidier should always be shut off and unplugged with dry hands before moving or
while being cleaned. Never pull by cord.
Power
Water Tank Capacity
Input
Mist Output
Working Time on a Full Tank
Recommended Room Size
Noise
Dimensions
Net Weight
1
1
2
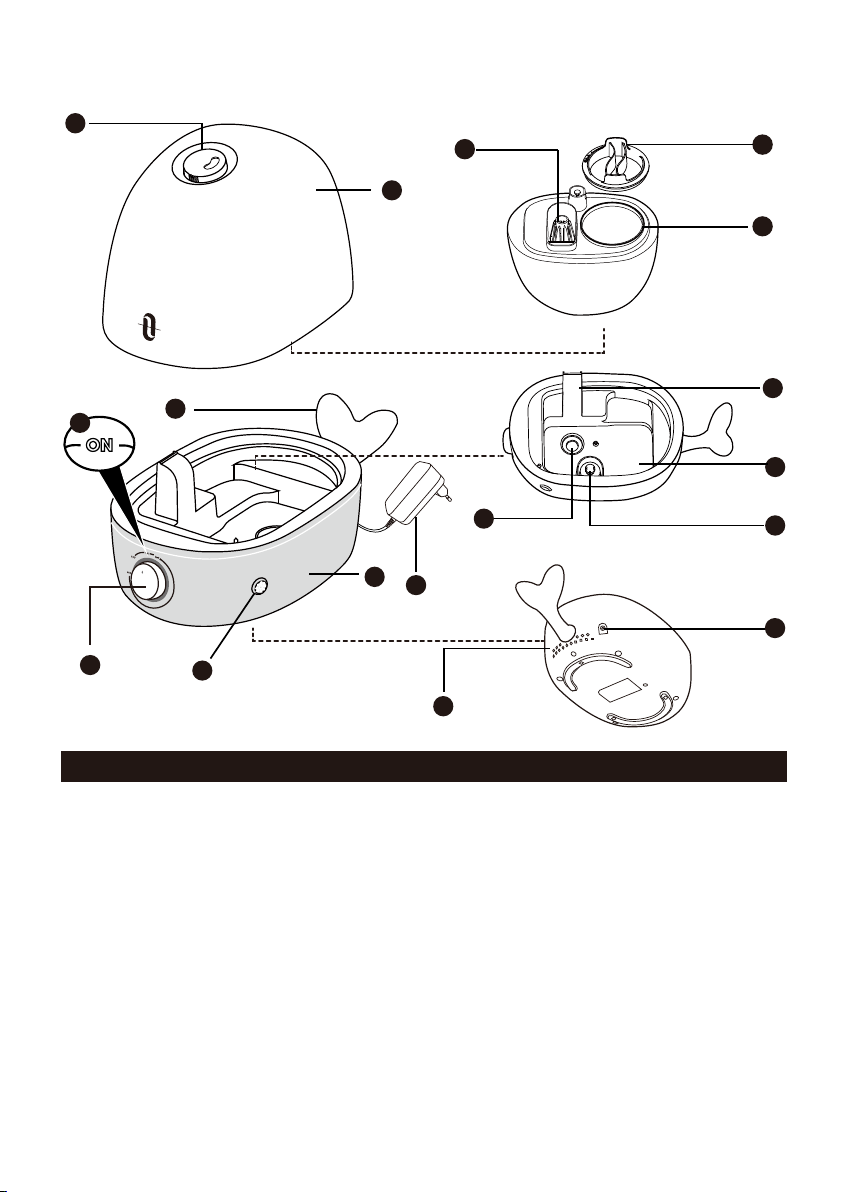
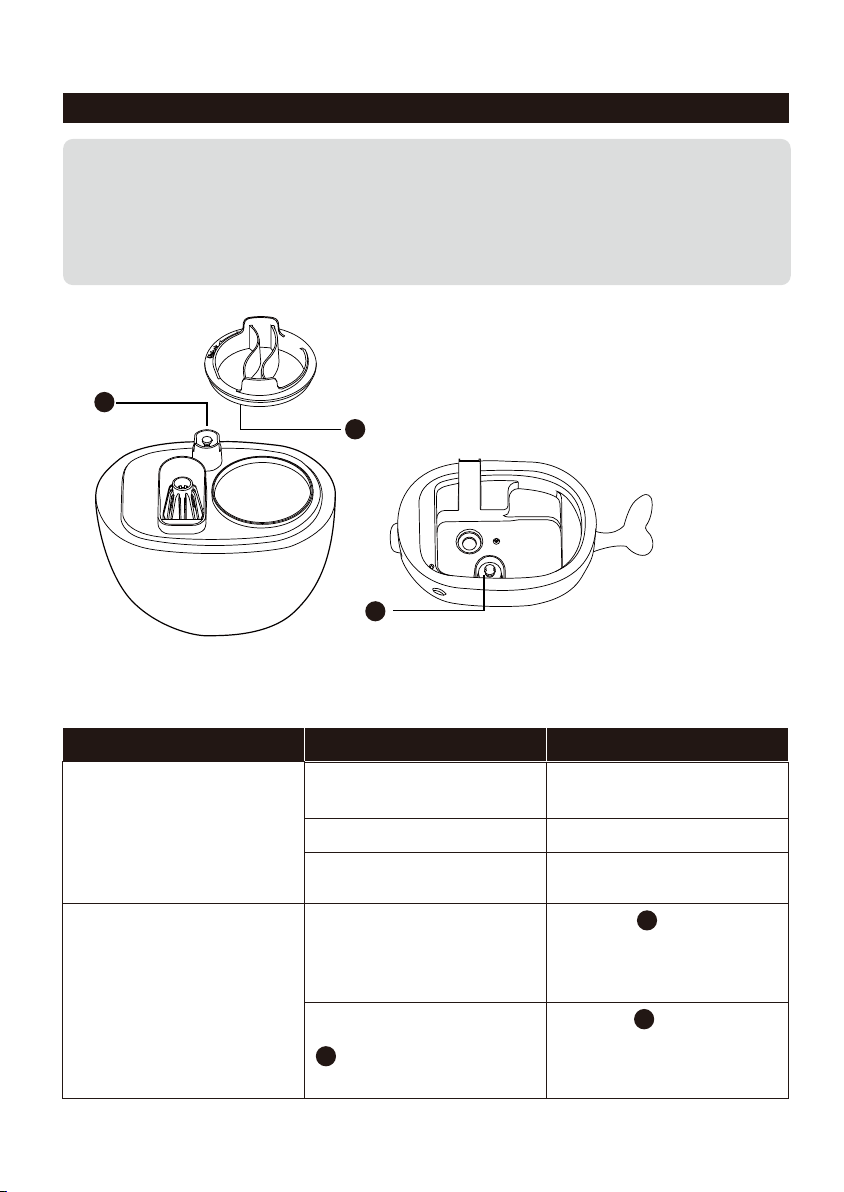
1. Nozzle
2. Water Tank
3. Base
4. DC 24V Input Port
5. Power Adapter
6. Control Knob
7. Night Light Button
8. LED Indicator
9. Tail/Tap
10. Mufer
11. Tank Cap
12. Water Inlet
13. Air Inlet
14. Atomizer
15. Air Outlet
16. Water Reservoir
17. Water Floater
PRODUCT DIAGRAM
08
07
INFORMATION ON USE OF ESSENTIAL
OILS FOR Baby ROOM NURSERY
Please be sure to follow our recommendations on how to use essential oils for baby room
nursery with your humidier. Failure to do so may result in malfunction or damage to the
humidier or even harm to the babies.
Younger children or babies have super sensitive skin. The thin, sensitive skin is much more
permeable to essential oils than the skin of an older child or adult. Too high a dilution could
cause skin irritation and other problems later down the road.
Therefore, before applying essential oils to babies, it’s important to understand proper dilution
ratios and application methods.
Even when essential oils are diluted with a carrier oil, they may cause skin irritation and sun
sensitivity, especially in children. It’s recommended that a patch test (also sometimes called a
“spot test”) be performed on the skin, with each new oil introduced.
Patch Test
A simple patch test can give you an understanding of how your baby will react to the oil.
1. Apply a very small amount of diluted essential oil on your baby’s skin on the leg or on the
arm.
2. Wait for about 24 hours and check for any signs of irritation, redness or inammation of the
skin.
3. If you notice a reaction, stop using that particular oil. If your baby has no reactions, then
you can proceed using that oil.
1
2
3
4
5
6
7
9
10
11
12
13
14
16
17
8
15

OPERATIONS AND FUNCTIONS
1 2
3 4
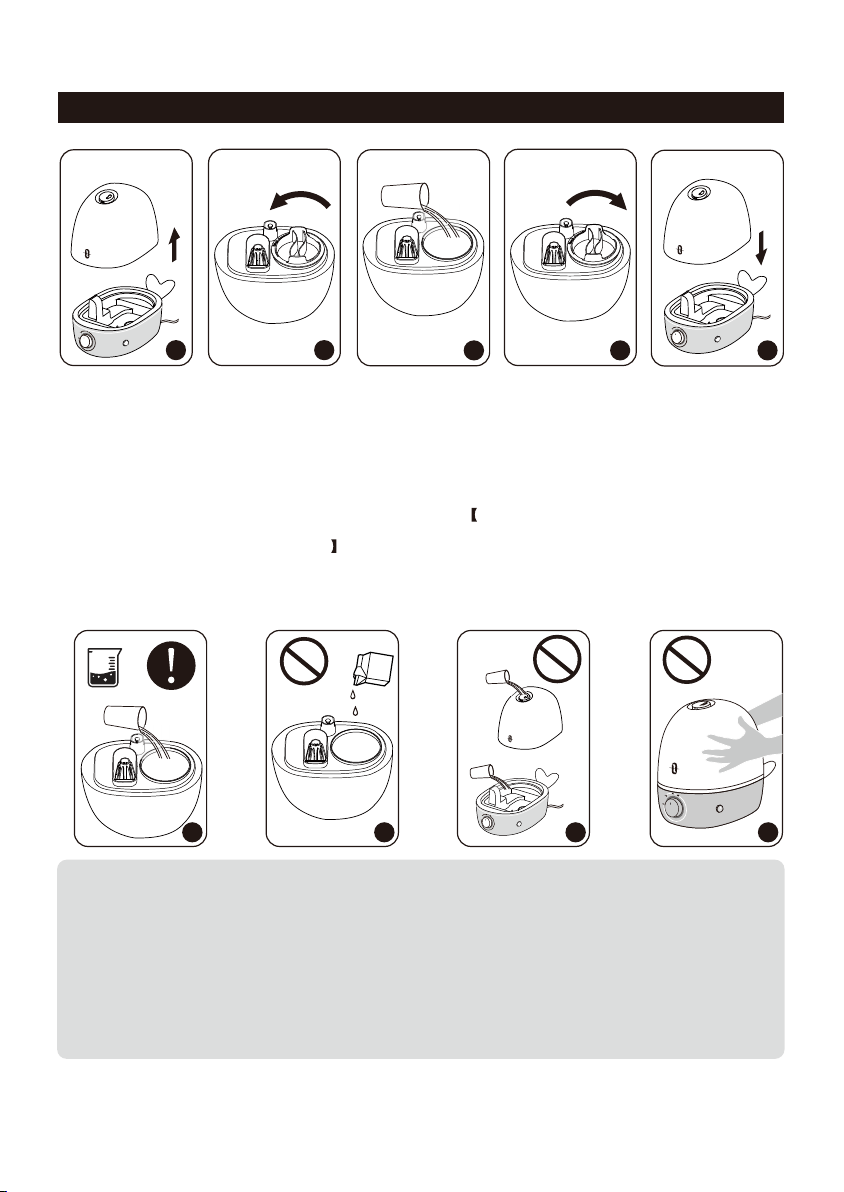
Add water
1. Turn the water tank upside down. Remove the tank cap and ll the tank with clean and
cool water only.
[Optional] Add diluted aromatherapy-grade essential oils into the tank, if you use the
humidier for baby room nursery, please read the INFORMATION ON USE OF ESSENTIAL
OILS FOR BABY ROOM NURSERY rst.
2. Attach the tank cap and place the tank back onto the base. Please make sure it ts
together securely so that water can go from the tank to the reservoir.
5
1 2 3 4
1. If tap water is too hard, it is recommended to use ltered or distilled water to avoid white
dust. DO NOT use hot water.
2. DO NOT put anything other than water or diluted essential oil into the water tank.
3. DO NOT add water into the base or through nozzle.
4. DO NOT move the humidier while the water tank is full of water to avoid leakage or base
overlling.
Dilution Recommendations for Babies/Children
It is not recommended to use any essential oils on babies under 3 months.
Safety Tips for Babies /Children
Essential oils need to be used with proper care and precautions to avoid any risks. We
recommend to limit diffusion to 30-60 minutes, a few times a day as needed.
• Due to the strong concentration, there are many essential oils that may not be best for your
child at a specic age. It is best to ensure that you have a discussion with your baby’s
doctor about which are the best kid-friendly essential oils that are ideal for your little one.
Also get the directions of usage as not all oils can be used on all routes.
• Must keep essential oils out of the reach of your child to prevent accidental ingestion.
• Ensure that you buy essential oils of good quality from a trusted brand.
• Do not expose children to direct sunlight after using essential oils like citrus oils, as it can
cause severe irritation, rash or pigmentation on the skin.
• Make sure the room is well-ventilated so the oils are not too potent in the room. If you nd
that oil is potent, then you will need to lower the quantity being used.
0-1(≥3months)
Ages
1 drop
Essential Oil
10 drops
Carries Oil
1-2 2 drops 10 drops
2-6 4 drops 10 drops
7-11 6 drops 10 drops
12+ 10 drops 10 drops
10
09
OPERATIONS AND FUNCTIONS
1 2
3 4
Add water
1. Turn the water tank upside down. Remove the tank cap and ll the tank with clean and
cool water only.
[Optional] Add diluted aromatherapy-grade essential oils into the tank, if you use the
humidier for baby room nursery, please read the INFORMATION ON USE OF ESSENTIAL
OILS FOR BABY ROOM NURSERY rst.
2. Attach the tank cap and place the tank back onto the base. Please make sure it ts
together securely so that water can go from the tank to the reservoir.
5
1 2 3 4
1. If tap water is too hard, it is recommended to use ltered or distilled water to avoid white
dust. DO NOT use hot water.
2. DO NOT put anything other than water or diluted essential oil into the water tank.
3. DO NOT add water into the base or through nozzle.
4. DO NOT move the humidier while the water tank is full of water to avoid leakage or base
overlling.
Dilution Recommendations for Babies/Children
It is not recommended to use any essential oils on babies under 3 months.
Safety Tips for Babies /Children
Essential oils need to be used with proper care and precautions to avoid any risks. We
recommend to limit diffusion to 30-60 minutes, a few times a day as needed.
• Due to the strong concentration, there are many essential oils that may not be best for your
child at a specic age. It is best to ensure that you have a discussion with your baby’s
doctor about which are the best kid-friendly essential oils that are ideal for your little one.
Also get the directions of usage as not all oils can be used on all routes.
• Must keep essential oils out of the reach of your child to prevent accidental ingestion.
• Ensure that you buy essential oils of good quality from a trusted brand.
• Do not expose children to direct sunlight after using essential oils like citrus oils, as it can
cause severe irritation, rash or pigmentation on the skin.
• Make sure the room is well-ventilated so the oils are not too potent in the room. If you nd
that oil is potent, then you will need to lower the quantity being used.
0-1(≥3months)
Ages
1 drop
Essential Oil
10 drops
Carries Oil
1-2 2 drops 10 drops
2-6 4 drops 10 drops
7-11 6 drops 10 drops
12+ 10 drops 10 drops
10
09
1 2 3
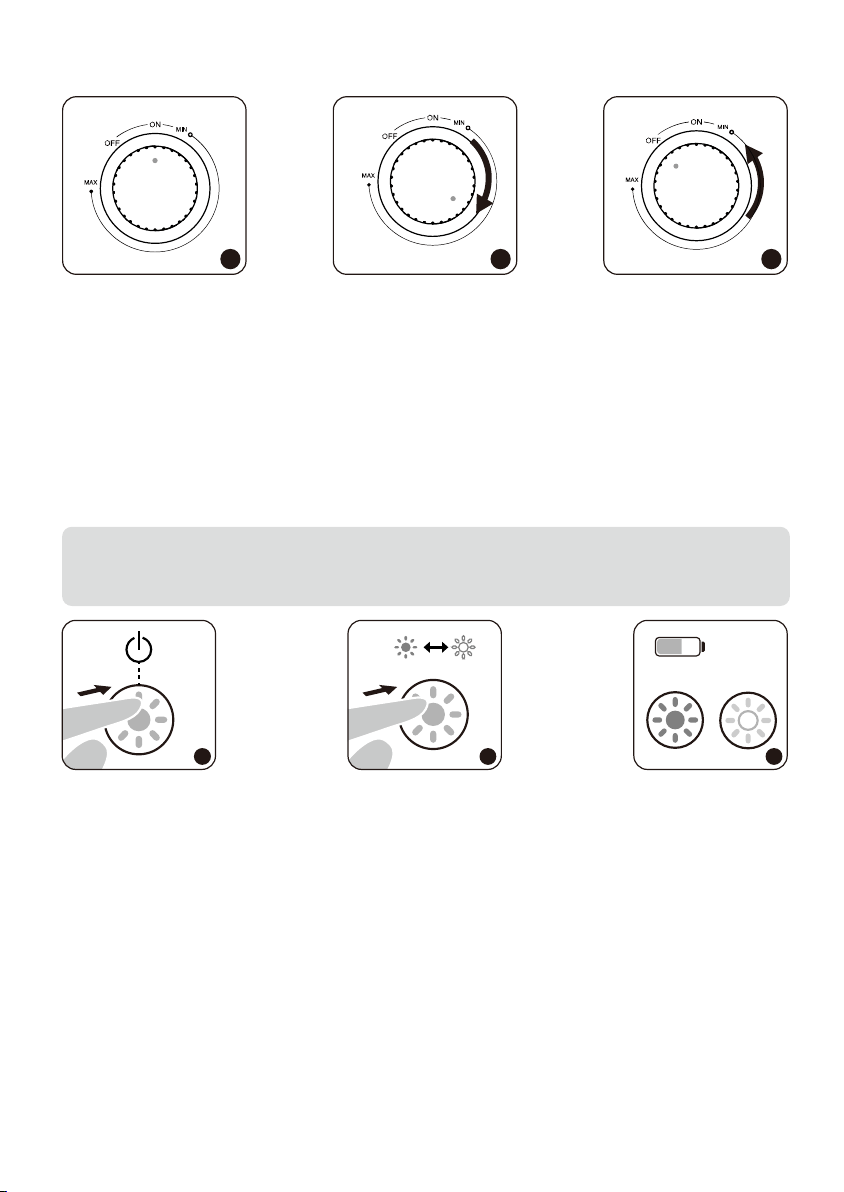
Power On / Off and Mist Adjustment
Connect the power adapter to humidier input port and plug the adapter into a wall
socket. Now the humidier is ready for use.
1. Rotate the control knob clockwise to the ON position. The LED indicator will light up,
indicating the humidier has been turned on to a minimum mist level.
2. Keep rotating the control knob clockwise to increase the mist level.
3. Rotate the control knob counterclockwise to the OFF position to turn off the humidier. The
LED indicator will turn off. The fan will work for another 2 minutes to dry the mist tube.
The most comfortable environmental humidity is between 40%-60%. Please adjust the mist
as needed.
Low Water Protection: Auto Shut-off the Humidier
When there is not enough water inside the water reservoir, the humidier will stop misting and
the LED indicator will become red. It is designed for safety to prevent the humidier from
possibly overheating and damaging the atomizer.
CLEANING AND MAINTENANCE
Caution
1. DO NOT submerge the base in water.
2. Make sure water does not enter the base through the air outlet, air inlet,
or the control knob.
3. DO NOT wash any part of this humidier in dish washer which will
damage the humidier and void the warranty.
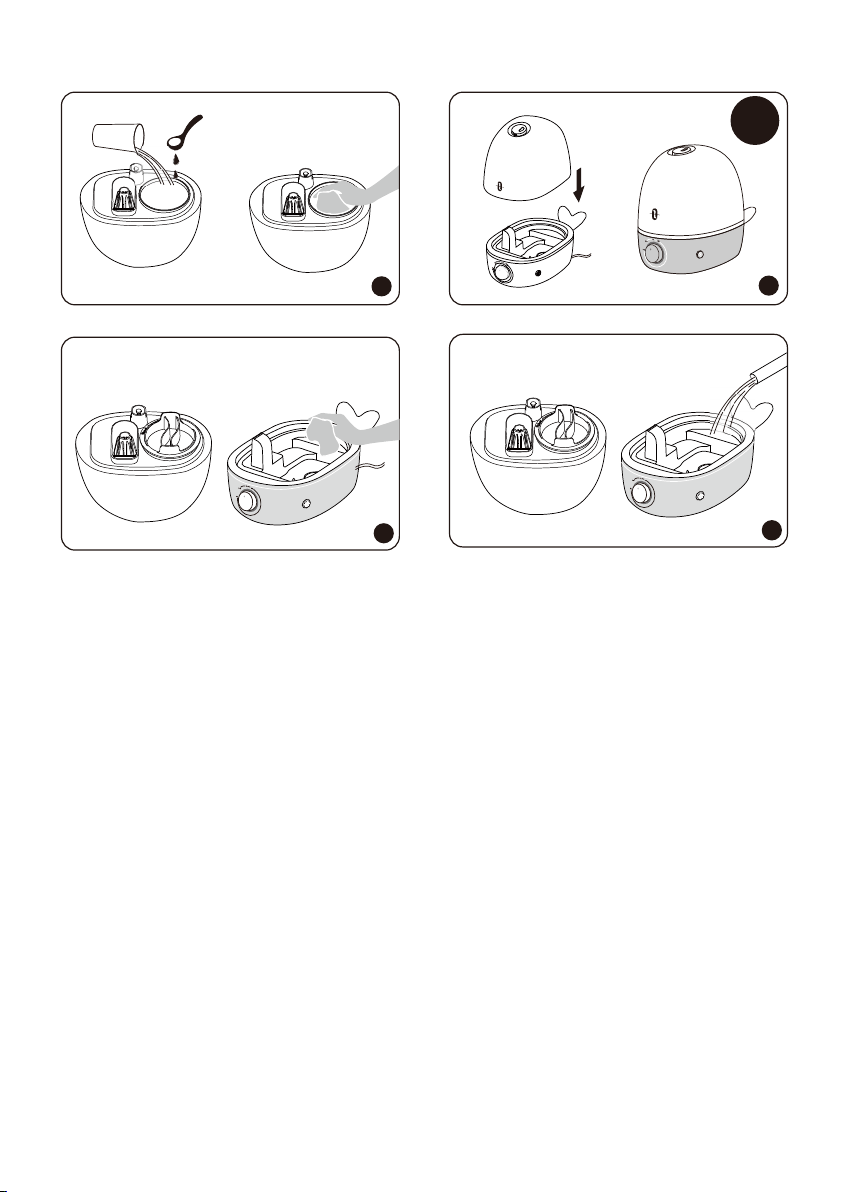
Daily Maintenance
Turn off the humidier, unplug it from the power source. Drain water from the tank, reservoir
and base.
Weekly Maintenance
1. To properly clean your humidier, we recommend you to remove scale and disinfect the
humidier separately.
2. DO NOT mix vinegar and bleach solutions together. Do not use more than 1/2 tsp. of
bleach to avoid damaging your humidier.
3. Please make sure the sealing ring on the tank cap is installed properly after cleaning to
avoid water leakage. Please refer to the diagram on page 15.
4. DO NOT scrub or scrape the atomizer, please always wipe clean it with a soft cloth.
1 2
Scale Removal Instructions
12
11
Nightlight Control
1. Press the button to turn on/off the nightlight, the brightness is at the default medium range.
2. Press and hold the button for 1.5 seconds to adjust the light brightness, release at the
desired level. Press and hold it again to adjust the brightness to the opposite direction.
3. The nightlight has memory function, If power is not disconnected, the unit will remember
the brightness setting of the last time when the nightlight or humidier was turned off.
31 2
1.5S OFF ON

1 2 3
Power On / Off and Mist Adjustment
Connect the power adapter to humidier input port and plug the adapter into a wall
socket. Now the humidier is ready for use.
1. Rotate the control knob clockwise to the ON position. The LED indicator will light up,
indicating the humidier has been turned on to a minimum mist level.
2. Keep rotating the control knob clockwise to increase the mist level.
3. Rotate the control knob counterclockwise to the OFF position to turn off the humidier. The
LED indicator will turn off. The fan will work for another 2 minutes to dry the mist tube.
The most comfortable environmental humidity is between 40%-60%. Please adjust the mist
as needed.
Low Water Protection: Auto Shut-off the Humidier
When there is not enough water inside the water reservoir, the humidier will stop misting and
the LED indicator will become red. It is designed for safety to prevent the humidier from
possibly overheating and damaging the atomizer.
CLEANING AND MAINTENANCE
Caution
1. DO NOT submerge the base in water.
2. Make sure water does not enter the base through the air outlet, air inlet,
or the control knob.
3. DO NOT wash any part of this humidier in dish washer which will
damage the humidier and void the warranty.
Daily Maintenance
Turn off the humidier, unplug it from the power source. Drain water from the tank, reservoir
and base.
Weekly Maintenance
1. To properly clean your humidier, we recommend you to remove scale and disinfect the
humidier separately.
2. DO NOT mix vinegar and bleach solutions together. Do not use more than 1/2 tsp. of
bleach to avoid damaging your humidier.
3. Please make sure the sealing ring on the tank cap is installed properly after cleaning to
avoid water leakage. Please refer to the diagram on page 15.
4. DO NOT scrub or scrape the atomizer, please always wipe clean it with a soft cloth.
1 2
Scale Removal Instructions
12
11
Nightlight Control
1. Press the button to turn on/off the nightlight, the brightness is at the default medium range.
2. Press and hold the button for 1.5 seconds to adjust the light brightness, release at the
desired level. Press and hold it again to adjust the brightness to the opposite direction.
3. The nightlight has memory function, If power is not disconnected, the unit will remember
the brightness setting of the last time when the nightlight or humidier was turned off.
31 2
1.5S OFF ON
3
15-20
minutes
4
5
6
1. Turn off and unplug the humidier.
2. Drain water from the water tank and base.
3. Fill the water tank half full. Add in 1 teaspoon of undiluted distilled white vinegar. Wash the
water tank by your hands.
4. Place the tank onto the base. The vinegar solution will enter the water reservoir to loosen
mineral buildup (scale) on the atomizer, water oater and the bottom of the water tank. Set
still for 15-20 minutes.
5. Drain the solution. Wipe the atomizer and oater with a soft cloth to remove loosened
mineral deposits.
6. Rinse both the water reservoir and water tank until the smell of vinegar (for scale removal)
or bleach solution (for disinfecting, see below) is gone.
Disinfecting Instructions
1. Follow steps 1-2 of the previous section on scale removal.
2. Fill the water tank half full. Add in ½ tsp of bleach. Place the tank cap back on. Swish the
solution around in tank. Place the tank on the base. The bleach solution will enter and
disinfect the water reservoir as well as the other components. Set still for 15-20 minutes.
3. Follow steps 4-6 of the previous section on scale removal to complete disinfecting the
humidier.
End-Of-Season Care and Storage
1. Follow the cleaning instructions when the humidier will not be used for at least one week,
or at the end of the season. Remove any accessories used with the humidier and allow the
humidier and accessories to dry completely before storing.
2. DO NOT store with water inside the base, water reservoir, or tank.
3. Pack the unit safely and store in a cool, dry location.
14
13
TROUBLESHOOTING GUIDE
1. If the information listed in the troubleshooting guide can’t solve your problem, please
email us for help.
2. Failure to keep this unit clean from mineral deposits may affect operation of this unit.
3. Customer failure to follow these instructions may void the warranty.
1
3
2
1. Spring
2. Water Floater
3. Sealing Ring
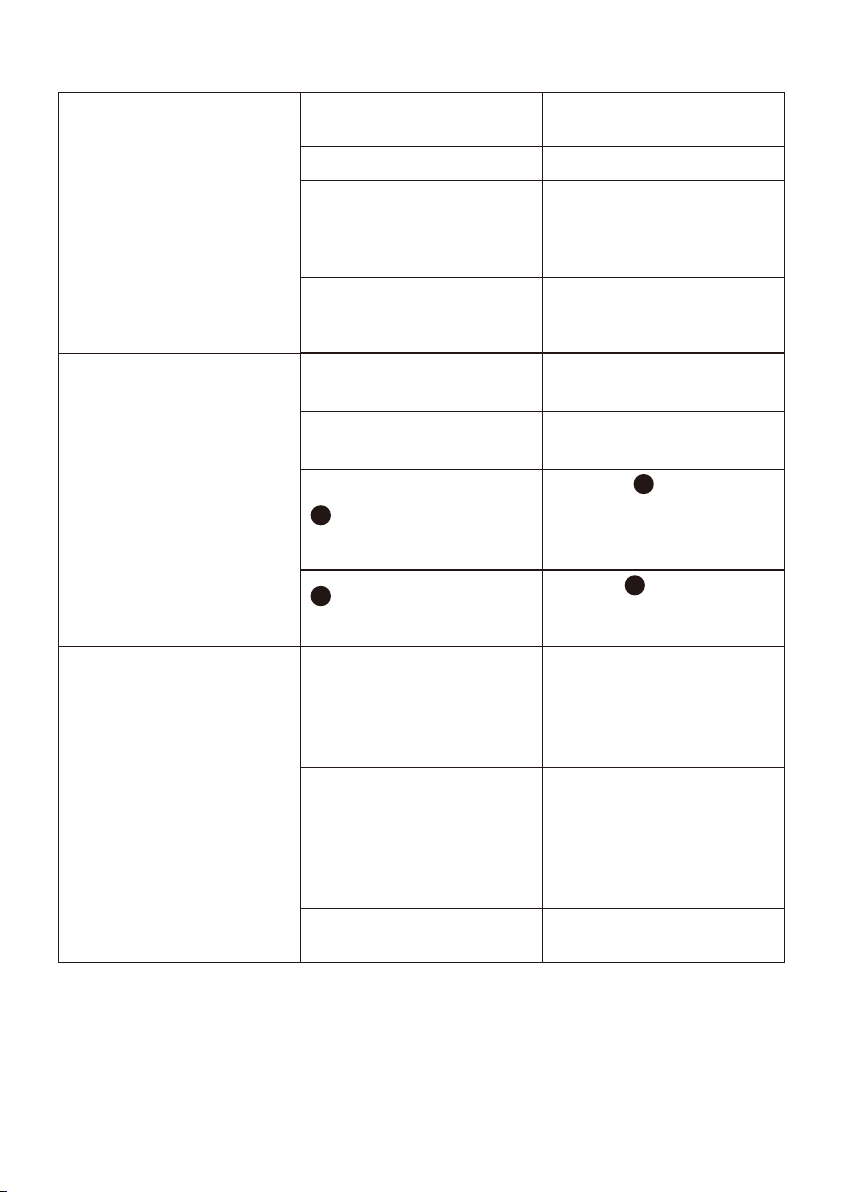
Problem Possible Cause Solution
Power adapter not plugged in
No power from power outlet
Power adapter not connect
to the input port
Ensure the power adapter is
properly plugged in
Try another power outlet
Connect power adapter to
the input port.
LED indicator is off
Ensure the oater is
secured properly to the tank
bottom allowing water to pass
through to the base
2
Adjust the water oater to
a horizontal position and
make sure it can rise up with
water
2
Water oater stuck
2
No water in the water
reservoir
LED indicator stays red
Not enough water inside the
tank
Rell and reinstall the water tank
The LED Indicator will light up,
but no mist or little mist is
produced
Mist level is set too low Adjust to maximum mist
Mineral buildup on the
atomize
Feel if any air comes out from
the nozzle. If yes, then clean
water scale on the atomizer
with s soft cloth as instructed
The base might be overlled
Remove the tank, empty the
base and place the lled tank
on the empty base
Tank leakage
Tank may be damaged
Check for possible cracks in
the tank, replace if necessary
Tank cap is not tightened
securely
Tighten the tank cap
Spring stuck
Ensure the spring is
properly secured to the tank
bottom allowing water to
pass through to the base.
1
1
Sealing ring was not
installed on tank cap
Install the sealing ring on
the tank cap, please contact
us if it is missing
3
3
Mist level is set too high for
the room size
1. Check if the room is too
humid and adjust to lower
mist. 40%-60% works best
2. Open door and windows,
or change to a larger room
Air inlet is blocked
Humidier should be placed
on a hard at surface, 2 feet
above the oor, 12 inches
away from the wall. Point
nozzle away from wall or
window
Low indoor temperature
leads to liquefaction
Raise the room temperature
to 25°C / 77°F
Mist height is low, damping
surrounding desk or oor.
Condensation forms around
humidier or on windows
and walls
16
15
TROUBLESHOOTING GUIDE
1. If the information listed in the troubleshooting guide can’t solve your problem, please
email us for help.
2. Failure to keep this unit clean from mineral deposits may affect operation of this unit.
3. Customer failure to follow these instructions may void the warranty.
1
3
2
1. Spring
2. Water Floater
3. Sealing Ring
Problem Possible Cause Solution
Power adapter not plugged in
No power from power outlet
Power adapter not connect
to the input port
Ensure the power adapter is
properly plugged in
Try another power outlet
Connect power adapter to
the input port.
LED indicator is off
Ensure the oater is
secured properly to the tank
bottom allowing water to pass
through to the base
2
Adjust the water oater to
a horizontal position and
make sure it can rise up with
water
2
Water oater stuck
2
No water in the water
reservoir
LED indicator stays red
Not enough water inside the
tank
Rell and reinstall the water tank
The LED Indicator will light up,
but no mist or little mist is
produced
Mist level is set too low Adjust to maximum mist
Mineral buildup on the
atomize
Feel if any air comes out from
the nozzle. If yes, then clean
water scale on the atomizer
with s soft cloth as instructed
The base might be overlled
Remove the tank, empty the
base and place the lled tank
on the empty base
Tank leakage
Tank may be damaged
Check for possible cracks in
the tank, replace if necessary
Tank cap is not tightened
securely
Tighten the tank cap
Spring stuck
Ensure the spring is
properly secured to the tank
bottom allowing water to
pass through to the base.
1
1
Sealing ring was not
installed on tank cap
Install the sealing ring on
the tank cap, please contact
us if it is missing
3
3
Mist level is set too high for
the room size
1. Check if the room is too
humid and adjust to lower
mist. 40%-60% works best
2. Open door and windows,
or change to a larger room
Air inlet is blocked
Humidier should be placed
on a hard at surface, 2 feet
above the oor, 12 inches
away from the wall. Point
nozzle away from wall or
window
Low indoor temperature
leads to liquefaction
Raise the room temperature
to 25°C / 77°F
Mist height is low, damping
surrounding desk or oor.
Condensation forms around
humidier or on windows
and walls
16
15

Mist level is set too low for
the room size
1. Adjust to maximum mist
2. Close door or windows to
reduce air ventilation, or
change to a smaller room
Poor humidication
Air inlet is blocked
Humidier should be placed
on a hard at surface, 2 feet
above the oor, 12 inches
away from the wall
Low indoor temperature
leads to liquefaction
Raise the room temperature
to 25°C / 77°F
Tap water may contain too
much minerals
Replace with ltered or
distilled water or use a
TaoTronics Demineralization
Cartridge
White dust appears or the
black coating on the base
akes off
Clean the unit
1. Clean the humidier as
instructed
2. Leave the empty and
opened water tank in a
cool place for 12 hours
without the tank cap
attached
Strange Odor
Water is going down to the
water reservoir
This is normal while it is
working
Strange water noise
Unit works for too long
Power off and place in a
well-ventilated place for 10
minutes
Humidier is getting too hot
This product is covered with TaoTronics product and labor warranty for 12 months from the
date of its original purchase. You will be given a warranty extension of 18 months if the
product is registered on our website (www.taotronics.com).
Any defective part will be, at the discretion of SUNVALLEYTEK INTERNATIONAL INC. , repaired
or replaced at no charge if the appliance has not been tampered with and has been used
according to these printed directions.
If any problems occur, please contact TaoTronics support (support@taotronics.com) immedi-
ately to launch a warranty claim. Specify model number and your Amazon order number. Our
Consumer Service Representative will respond within 1 business day, advise you how to
correct the problem yourself, or instruct you on how to return the defective unit back to us for
repair or replacement.
We can only provide after sales service for products that are sold by TaoTronics or TaoTronics
authorized retailers and distributors. If you have purchased your unit from a different place,
please contact your seller for return and warranty issues.
PLEASE CONTACT US BEFORE RETURNING THIS PRODUCT TO THE STORE.
EMAIL TAOTRONICS CUSTOMER CARE FOR PROBLEMS AND QUESTIONS.
WE WILL RESPOND WITHIN 1 BUSINESS DAY.
WARRANTY
CONTACT / TAOTRONICS CUSTOMER CARE
Sunvalleytek USA, Inc.
Address: 46724 Lakeview Blvd, Fremont, CA 94538
E-mail: support@taotronics.com(US)
support.ca@taotronics.com(CA)
support.uk@taotronics.com(UK)
Tel: 1-888-456-8468 (Monday-Friday: 9:00 – 17:00 PST)
Website: www.taotronics.com
18
17

Mist level is set too low for
the room size
1. Adjust to maximum mist
2. Close door or windows to
reduce air ventilation, or
change to a smaller room
Poor humidication
Air inlet is blocked
Humidier should be placed
on a hard at surface, 2 feet
above the oor, 12 inches
away from the wall
Low indoor temperature
leads to liquefaction
Raise the room temperature
to 25°C / 77°F
Tap water may contain too
much minerals
Replace with ltered or
distilled water or use a
TaoTronics Demineralization
Cartridge
White dust appears or the
black coating on the base
akes off
Clean the unit
1. Clean the humidier as
instructed
2. Leave the empty and
opened water tank in a
cool place for 12 hours
without the tank cap
attached
Strange Odor
Water is going down to the
water reservoir
This is normal while it is
working
Strange water noise
Unit works for too long
Power off and place in a
well-ventilated place for 10
minutes
Humidier is getting too hot
This product is covered with TaoTronics product and labor warranty for 12 months from the
date of its original purchase. You will be given a warranty extension of 18 months if the
product is registered on our website (www.taotronics.com).
Any defective part will be, at the discretion of SUNVALLEYTEK INTERNATIONAL INC. , repaired
or replaced at no charge if the appliance has not been tampered with and has been used
according to these printed directions.
If any problems occur, please contact TaoTronics support ([email protected]) immedi-
ately to launch a warranty claim. Specify model number and your Amazon order number. Our
Consumer Service Representative will respond within 1 business day, advise you how to
correct the problem yourself, or instruct you on how to return the defective unit back to us for
repair or replacement.
We can only provide after sales service for products that are sold by TaoTronics or TaoTronics
authorized retailers and distributors. If you have purchased your unit from a different place,
please contact your seller for return and warranty issues.
PLEASE CONTACT US BEFORE RETURNING THIS PRODUCT TO THE STORE.
EMAIL TAOTRONICS CUSTOMER CARE FOR PROBLEMS AND QUESTIONS.
WE WILL RESPOND WITHIN 1 BUSINESS DAY.
WARRANTY
CONTACT / TAOTRONICS CUSTOMER CARE
Sunvalleytek USA, Inc.
Address: 46724 Lakeview Blvd, Fremont, CA 94538
E-mail: [email protected](US)
Tel: 1-888-456-8468 (Monday-Friday: 9:00 – 17:00 PST)
Website: www.taotronics.com
18
17

MODEL: TT-AH038
3 IN 1 HUMIDIFIER
User Manual
NORTH AMERICA
E-mail: support@taotronics.com(US)
support.ca@taotronics.com(CA)
Tel: 1-888-456-8468 (Monday-Friday: 9:00 – 17:00 PST)
US Distributor: SUNVALLEYTEK INTERNATIONAL INC.
Address: 46724 Lakeview Blvd, Fremont, CA 94538
Manufacturer: Shenzhen NearbyExpress Technology Development Co.,Ltd.
Address: 333 Bulong Road, Shenzhen, China, 518129
MANUFACTURER
Learn more about the EU Declaration of Conformity:
https://www.taotronics.com/downloads-TT-AH038-CE-Cert.html
www.taotronics.com
Register to extend your 18 months warranty by visiting
taotronics.com/warranty:
support@taotronics.com(US)
support.ca@taotronics.com(CA)
support.uk@taotronics.com(UK)
10-29-2019
TT-AH038_V1.1 EN
ASIA PACIFIC
E-mail: support.jp@taotronics.com(JP)
JP Importer: SUNVALLEY JAPAN
Address: 104-0032 3 18-6 PMO 9F
EUROPE
E-mail:
support.uk@taotronics.com(UK)
support.de@taotronics.com(DE)
support.fr@taotronics.com(FR)
support.es@taotronics.com(ES)
support.it@taotronics.com(IT)
EU Importer: ZBT International Trading GmbH
Address: Halstenbeker Weg 98C, 25462 Rellingen, Deutschland