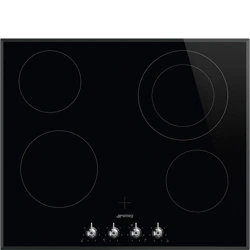
User manual Ceramic Hob for Smeg SE364ETBM
Instructions
Use
Preliminary operations
In order to remove any moisture that could have accumulated during the manufacturing process and for the electronic circuits and control keypad to work properly:
- Remove the protective films from the external surfaces of the appliance and accessories.
- Remove any labels (apart from the technical data plate).
Using the cooking hob
- All the appliance’s control and monitoring devices are located together on the front panel. The hob is controlled by means of the Touch Control sensor buttons.
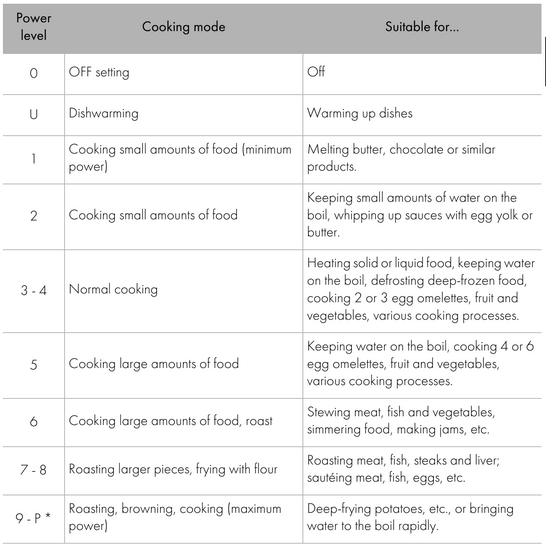
- The power in the cooking zones can be adjusted to various levels.
- Lightly touch a symbol on the glass ceramic surface. A beep will sound to confirm every effective touch.
Advice on energy-saving
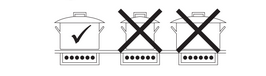
- The diameter of the base of the pan must correspond to the diameter of the cooking zone.
- When buying a saucepan, check whether the diameter indicated is that of the base or the top of the container, as the top is almost always larger than the base.
- The base of the cookware must be thick and completely flat. It should also be clean and dry. The hob should be clean and dry as well.
- When preparing dishes with long cooking times, you can save time and energy by using a pressure cooker, which also makes it possible to preserve the vitamins in the food.
- Make sure that the pressure cooker contains enough liquid as, if there is not enough and it overheats, this may cause damage to both the pressure cooker and the cooking zone.
- If possible, always cover saucepans with a suitable lid.
- Choose a pan suitable for the quantity of food to be cooked. A large, half-empty saucepan leads to a waste of energy.
- Do not use cast-iron cookware or cookware with a rough base.
Limiting the cooking time
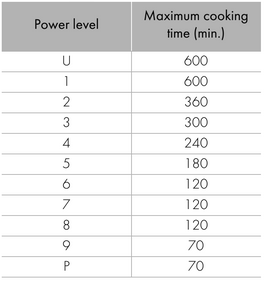
- The hob has an automatic device which limits the duration of use.
- If the cooking zone settings are not changed, the maximum duration of operation for each zone depends on the power level selected.
- When the device for limiting the duration of use is activated, the cooking zone turns off, a short alert sounds and, if the zone is hot, the symbol
 appears on the display.
Protection from overheating
- If you are using the hob at full power for a long time, for the electronics it could be difficult to cool down, especially if the room temperature is high.
- In this case a device intervenes to cut off the power supply to the front cooking zones and the display shows
 and
and  flashing.
- If the temperature of the electronic circuit board does not decrease, the device will disconnect power to all the cooking zones and


 will appear on the display (on some models only).
- Cooking can be resumed once the temperature returns below alarm levels.
Cleaning and maintenance
Cleaning the surfaces
To keep the surfaces in good condition, they should be cleaned regularly after use. Let them cool first.
Ordinary weekly cleaning
- Clean and maintain the hob once a week using an ordinary glass cleaning product.
- Always follow the manufacturer’s instructions. The silicon in these products creates a protective, water-repellent membrane which also resists dirt. All marks stay on the membrane and can therefore be removed easily. After cleaning, dry the surface with a clean cloth. Make sure that there is no detergent left on the cooking surface as it will undergo a corrosive reaction when heated up and could modify the structure of the cooking surface.
Food stains or residues
- Light coloured marks from pans with aluminium bases can be easily cleaned off with a cloth moistened in vinegar.
- Remove any burnt-on residue after cooking; rinse with water and dry thoroughly with a clean cloth.
- Dirt which may have fallen on the hob while cleaning lettuce or potatoes can scratch the hob when moving pans.
- Consequently, remove any dirt from the cooking surface immediately.
- Changes in colour do not affect the operation and stability of the glass. These are not alterations to the material of the hob but just residues which have not been removed and have then carbonised.
Installation
Safety instructions
- Veneers, adhesives or plastic coatings on adjacent furniture should be temperature- resistant (>90°C), otherwise they might warp over time.
- The minimum clearance between a ventilation hood and the cooking surface must be at least the distance indicated in the ventilation hood installation instructions.
- The minimum clearances must also be respected for the edges of the hob on the back as indicated in the mounting illustrations.
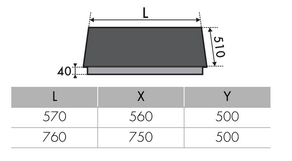
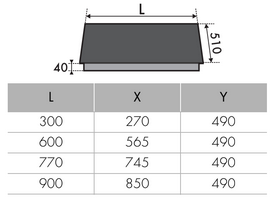
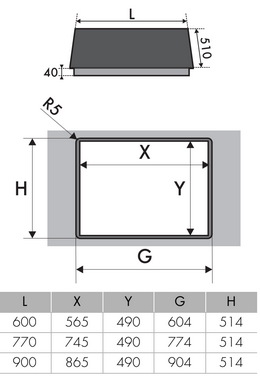
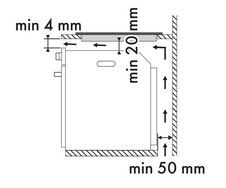
Section cut from the countertop
Make a hole in the countertop of the unit according to the dimensions shown in the figure (mm).
Hobs with a frame
Hobs with bevelled edge
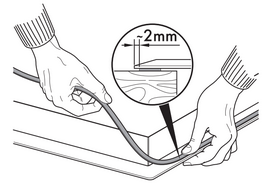
Hob seal
To prevent leakage of liquid between the frame of the hob and the countertop, place the adhesive seal provided along the entire outer edge of the hob before assembly.
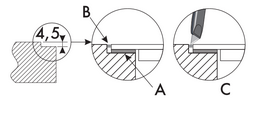
Hobs with a straight edge
For this kind of hobs additional milling is needed in the recessed hole if you wish to install the hob flush with the work surface.
After laying the adhesive seal (A) on the glass surface and after positioning and securing the hob, fill the edges with insulating silicone (B) and wipe away any excess.
In the event the hob needs to be removed, cut the silicone using a cutter before attempting to remove it (C).
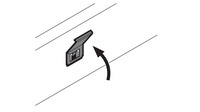
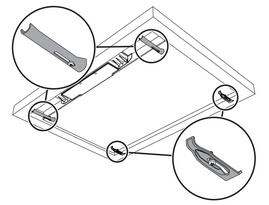
Spring clips
To ensure the hob is fixed and centred as accurately as possible, the clips provided must be positioned as described below:
- Fit the clips by gently pressing them horizontally into the appropriate space.
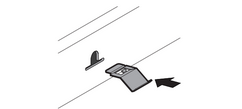
- Then turn them upwards to fix them in place.
Fixing brackets
- Screw the fixing brackets into the holes on the sides of the bottom casing to properly fasten the hob to the structure.
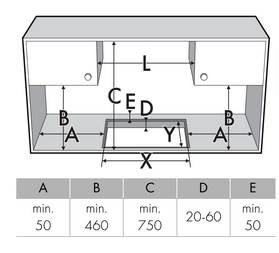
Mounting
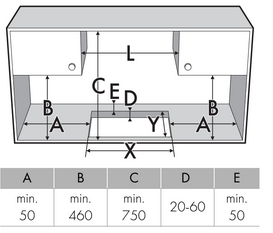
Over built-in oven unit
The clearance between the hob and the kitchen furniture or other installed appliances must be enough to ensure sufficient ventilation and air discharge.
If installed above an oven, a space must be left between the bottom of the hob and the top of the appliance installed below.
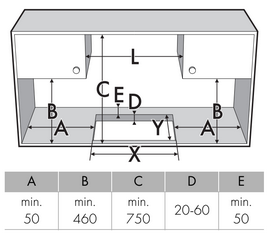
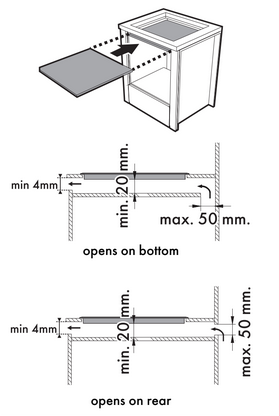
On top of an empty kitchen unit or drawers
If there are other pieces of furniture (lateral walls, drawers, etc.), dishwashers or fridges under the hob, a double-layer wooden base must be installed at least 20 mm from the bottom of the hob to avoid any accidental contact. It must only be possible to remove the double-layer base by using suitable tools.
Electrical connection
- Have the electrical connection performed by authorised technical personnel.
- Use personal protective equipment.
- The appliance must be connected to earth in compliance with electrical system safety standards.
- Disconnect the mains supply.
- Use cables withstanding a temperature of at least 90°C.
- The tightening torque of the screws of the terminal supply wires must be 1.5 - 2 Nm.
- The power cable must only be installed or replaced by a qualified technician.
- Use the cable provided (depending on the model) following the instructions below.
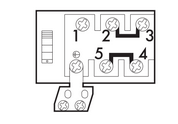
Check the grid characteristics against the data indicated on the plate.
The identification plate bearing the technical data, serial number and brand name is visibly positioned on the appliance. Do not remove this plate for any reason. Perform the ground connection using a wire that is 20 mm longer than the other wires. The appliance can work in the following modes:
30 cm models:
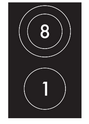

Use the 3 x 1.5 mm2 three-core cable that is fitted.
Connection with plug and socket
- Make sure that the plug and socket are of the same type.
- Avoid using adapters and shunts as these could cause overheating and a risk of burns.
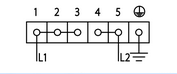
60 cm models:
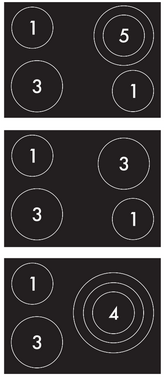
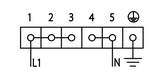
The diagram below illustrates the power supply terminal from below, with no cables connected. Terminals 2 and 3 and terminals 4 and 5 must be connected at all times.
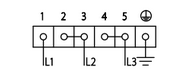
60 - 77 - 90 cm models:

The diagram below illustrates the power supply terminal from below, with no cables connected. Terminals 4 and 5 must be connected at all times.

Use the 3 x 6 mm2 three-core cable provided.
Use the 3 x 6 mm2 three-core cable provided.
If the cable is replaced, the appliance can also function in the following modes:

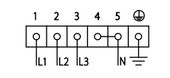
60 - 90 cm models (only 3kW):
The diagram below illustrates the power supply terminal from below, with no cables connected. Terminals 1, 2 and 3 and terminals 4 and 5 must be connected at all times.

3 x 1.5 mm2 three-core cable provided.
Fixed connection
- Fit the power line with an omnipolar circuit breaker in compliance with installation regulations.
- The circuit breaker should be located near the appliance and in an easily reachable position.
- Run the power cable in the rear part of the unit. Make sure that it does not come into contact with the lower part of the hob or a built- in oven below it.
- Be careful when connecting additional electrical appliances. Connection cables must not come into contact with hot cooking zones.
Testing
- At the end of installation, carry out a brief inspection test. If it fails to work, after making sure that you have carried out the instructions correctly, contact Technical Support.
Instructions for the installer
- Do not bend or trap the power cable.
- The appliance must be installed according to the installation diagrams.
- If the appliance does not work correctly after having carried out all the checks, contact your local Authorised Service Centre.
- Once the appliance has been installed, please explain to the user how to use it correctly.