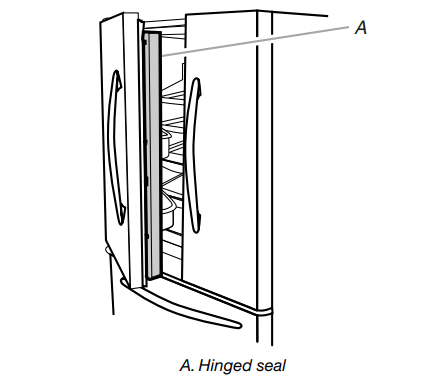
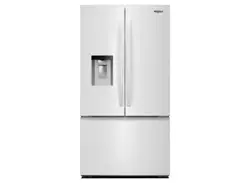
There are two refrigerator compartment doors. The doors can be opened and closed either separately or together.
There is a vertically-hinged seal on the left refrigerator door.
■ When the left side door is opened, the hinged seal automatically folds inward so that it is out of the way.
■ When both doors are closed, the hinged seal automatically forms a seal between the two doors.
Using the Controls
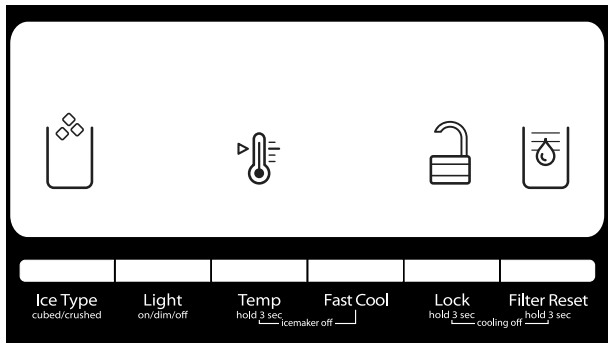
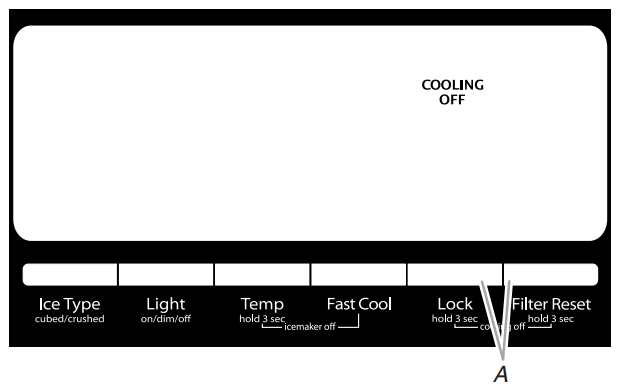
The refrigerator and freezer controls are located on the dispenser panel.
IMPORTANT: The display screen on the dispenser control panel will turn off automatically and enter “sleep” mode when the control buttons and dispenser levers have not been used for 2 minutes or more. While in “sleep” mode, the first press of a control button will only reactivate the display screen, without changing any settings. After reactivation, changes to any settings can then be made. If no changes are made within 2 minutes, the display will re-enter “sleep” mode.
■ Touch any control button on the dispenser panel to activate the display screen. The home screen will appear as shown.
Adjusting the Controls
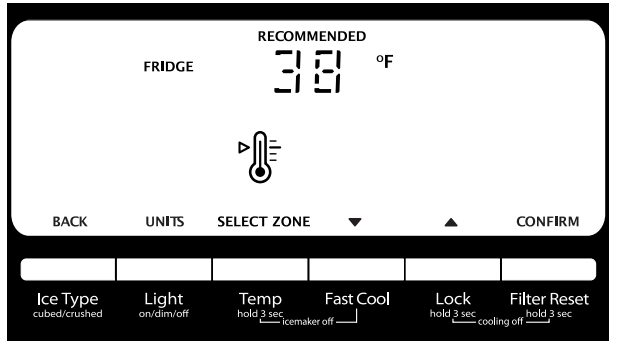
For your convenience, your refrigerator and freezer controls are preset at the factory. When you first install your refrigerator, make sure that the controls are still set to the “mid-settings.” The factory recommended set points are 38°F (3°C) for the refrigerator and 0°F (-18°C) for the freezer.
IMPORTANT:
■ Wait 24 hours before you put food into the refrigerator. If you add food before the refrigerator has cooled completely, your food may spoil.
NOTE: Adjusting the set points to a colder than recommended setting will not cool the compartments any faster.
■ If the temperature is too warm or too cold in the refrigerator or freezer, first check the air vents to be sure they are not blocked before adjusting the controls.
■ The preset temperatures should be correct for normal household usage. The controls are set correctly when milk or juice is as cold as you like and when ice cream is firm.
■ Wait at least 24 hours between adjustments. Recheck the temperatures before other adjustments are made.
To view and adjust the set points, press and hold the TEMP button for 3 seconds. When adjust mode is activated, adjusting information will appear on the display screen.
NOTE: To view Celsius temperatures, press the LIGHT button when adjust mode is activated. To return the display setting to Fahrenheit, press LIGHT again.
■ When adjust mode is activated, the display screen shows the refrigerator set point and “FRIDGE” appears.
■ Press LOCK to raise the set point, or press FAST COOL to lower the set point.
■ When you have finished viewing (and adjusting if desired) the refrigerator set point, press TEMP to change the display to show the freezer set point. When the zone has been changed, “FREEZER” appears on the display screen.
■ Press LOCK to raise the set point, or press FAST COOL to lower the set point.
■ When you have finished viewing (and adjusting if desired) both the refrigerator and freezer set points, press FILTER to save the settings.
NOTE: To exit without saving changes, press ICE TYPE at any time while in adjust mode, or allow about 60 seconds of inactivity and adjust mode will turn off automatically
Cooling On/Off
Your refrigerator and freezer will not cool when cooling is turned off.
■ To turn cooling off, press and hold the LOCK and FILTER buttons at the same time for 3 seconds. When cooling is off, “COOLING OFF” will appear on the display screen.
■ Press and hold LOCK and FILTER for 3 seconds again to turn cooling back on.
Additional Features
Fast Cool
The Fast Cool feature assists with periods of high refrigerator use, full grocery loads, or temporarily warm room temperatures.
■ Press FAST COOL to set the freezer and refrigerator to the lowest temperature setting. When the feature is on, the Fast Cool icon will appear on the dispenser display screen. The Fast Cool feature will remain on for 24 hours unless manually turned off.
■ To manually turn off the Fast Cool feature, press FAST COOL again or adjust the refrigerator temperature set point. The Fast Cool icon will disappear when the feature is off.
Door Ajar Alarm
The Door Ajar Alarm feature sounds an alarm when the refrigerator or freezer door is open for 5 minutes and the product cooling is turned on. The alarm will repeat every 2 minutes. Close both doors to turn it off. The feature then resets and will reactivate when either door is left open again for 5 minutes.
NOTE: To mute the audible alarm while keeping the doors open, such as while cleaning the inside of the refrigerator, press any button on the control panel. The alarm sound will be temporarily turned off, but the Door Ajar icon will still be displayed on the dispenser control panel.
Water Filter Status Light and Filter Reset
The filter reset control allows you to restart the water filter status tracking feature each time you replace the water filter. See “Water Filtration System.”
■ Press and hold FILTER RESET for 3 seconds, until the “Replace Filter” light turns off.
Ice Maker and Ice Storage Bin
Turning the Ice Maker On/Off
The ice maker has an automatic shutoff. When the ice maker is on, sensors will automatically stop ice production when the storage bin is full. The ice maker will remain set to ON, and ice production will resume when the bin is no longer full.
To manually turn off the ice maker, press TEMP and FAST COOL at the same time and hold for 3 seconds until the “Ice Maker Off” icon lights up. When the ice maker is set to OFF, it will stop producing ice.
Pressing and holding TEMP and FAST COOL again for 3 seconds turns on the ice maker and the “Ice Maker Off” icon disappears.
Removing and Replacing Ice Storage Bin
To Remove the Ice Storage Bin:
Hold the base of the storage bin and press the release button.
Pull out the storage bin.
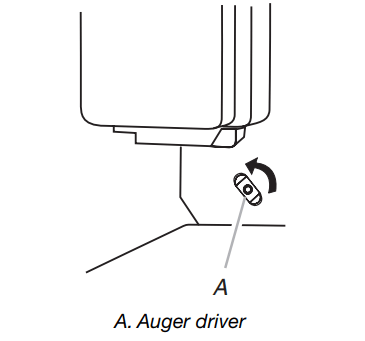
To Replace the Ice Storage Bin:
IMPORTANT: It may be necessary to turn the auger driver, behind the ice bin, counterclockwise to properly align the ice bin with the auger driver. The ice storage bin must be locked in place for proper ice dispensing.
Slide the ice bin into the guide rails located on either side of the enclosure.
Push the ice bin in until resistance is felt. Raise the front slightly and push the ice bin in until an audible “click” is heard.
Ice Production Rate
■ Allow 24 hours to produce the first batch of ice. Discard the first three batches of ice produced.
■ The ice maker should produce approximately 8 to 12 batches of ice in a 24-hour period.
■ To increase ice production, lower the freezer and refrigerator temperature. See “Using the Controls.” Wait 24 hours between adjustments.
Remember
■ The quality of your ice will be only as good as the quality of the water supplied to your ice maker. Avoid connecting the ice maker to a softened water supply. Water softener chemicals (such as salt) can damage parts of the ice maker and lead to poor quality ice. If a softened water supply cannot be avoided, make sure the water softener is operating properly and is well maintained.
■ Do not use anything sharp to break up the ice in the bin. This can cause damage to the ice bin and dispenser mechanism.
■ Do not store anything in the ice storage bin.
Water and Ice Dispensers
The Water Dispenser
To Dispense Water:
Press a sturdy glass against the water dispenser lever.
Remove the glass to stop dispensing.
The Ice Dispenser
Ice dispenses from the ice maker storage bin in the freezer when the dispenser lever is pressed. To turn off the ice maker, see “Ice Maker and Storage Bin.”
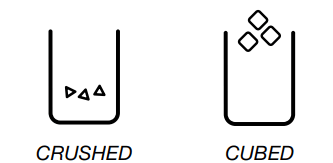
Your ice maker can produce both crushed and cubed ice. Before dispensing ice, select which type of ice you prefer by pressing the ICE TYPE button.
The display screen indicates which type of ice is selected.
For crushed ice, cubes are crushed before being dispensed. This may cause a slight delay when dispensing crushed ice. Noise from the ice crusher is normal, and pieces of ice may vary in size. When changing from crushed to cubed, a few ounces of crushed ice will be dispensed along with the first cubes.
To Dispense Ice:
Make sure the desired type of ice is selected. To switch between cubed and crushed, press ICE TYPE
Press a sturdy glass against the ice dispenser lever. Hold the glass close to the dispenser opening so ice does not fall outside of the glass.
Remove the glass to stop dispensing.
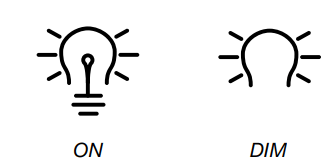
The Dispenser Light
When you use the dispenser, the light will automatically turn on. If you want the light to be on continuously, you may choose either ON or DIM. The display screen indicates which mode is selected.
ON: Press LIGHT to turn the dispenser light on.
DIM: Press LIGHT a second time to select DIM mode. The dispenser light will remain on, but at a lower intensity.
OFF: Press LIGHT a third time to turn the dispenser light off.
The dispenser lights are LEDs that cannot be changed. If it appears that your dispenser lights are not working, see “Troubleshooting” for more information.
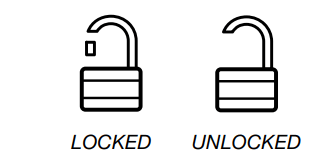
The Dispenser Lock
The dispenser can be turned off for easy cleaning or to avoid unintentional dispensing by small children and pets.
NOTE: The lock feature does not shut off power to the refrigerator, to the ice maker, or to the dispenser light. It simply deactivates the controls and dispenser levers. To turn off the ice maker, see “Ice Maker and Storage Bin.”
■ Press and hold LOCK for 3 seconds to lock the dispenser.
■ Press and hold LOCK, for 3 seconds, a second time to unlock the dispenser.
The display screen indicates when the dispenser is locked.
REFRIGERATOR CARE
Cleaning
Both the refrigerator and freezer sections defrost automatically. However, clean both sections about once a month to avoid odor buildup. Wipe up spills immediately.
IMPORTANT:
■ Because air circulates between all compartments, any odors formed in one compartment will transfer to the other. You must thoroughly clean all compartments to eliminate odors. To avoid odor transfer and drying out of food, wrap or cover foods tightly.
■ Do not use abrasive or harsh cleaners such as window sprays, scouring cleansers, flammable fluids, cleaning waxes, concentrated detergents, nail polish remover, bleaches or cleansers containing petroleum products. Do not use paper towels, scouring pads, or other harsh cleaning tools that may scratch or damage the materials.
Clean the Interior
Unplug refrigerator or disconnect power.
Using a clean sponge or soft cloth and a mild detergent in warm water, hand wash, rinse, and dry removable parts and interior surfaces thoroughly.
Plug in refrigerator or reconnect power
Clean the Touch Screen Display on the Dispenser Panel
1. Make sure the refrigerator is unplugged or the power is disconnected before wiping the screen, to avoid unintentionally changing the settings.
2. Mix a solution of mild detergent in warm water. Dampen a soft, lint-free cloth with the solution and gently wipe the screen.
NOTE: Do not spray or wipe liquids directly onto the screen, or over-saturate the cloth.
3. Plug in refrigerator or reconnect power.
Clean the Exterior Surfaces
1. Unplug refrigerator or disconnect power.
2. Using a clean sponge or soft cloth and a mild detergent in warm water, wash, rinse and thoroughly dry stainless steel and painted metal exteriors.
■ To keep your stainless steel refrigerator looking like new and to remove minor scuffs or marks, it is suggested that you use the manufacturer’s approved Stainless Steel Cleaner and Polish, Part Number 4396095. To order the cleaner, call 1-800-253-1301 U.S.A. or 1-800-807-6777 Canada.
IMPORTANT: This cleaner is for stainless steel parts only!
Do not allow the Stainless Steel Cleaner and Polish to come into contact with any plastic parts such as the trim pieces, dispenser covers or door gaskets. If unintentional contact does occur, clean plastic part with a sponge and mild detergent in warm water. Dry thoroughly with a soft cloth.
3. Plug in refrigerator or reconnect power.
Clean the Condenser
There is no need for routine condenser cleaning in normal home operating environments. If the environment is particularly greasy or dusty, or there is significant pet traffic in the home, the condenser should be cleaned every 2 to 3 months to ensure maximum efficiency.
To clean the condenser:
Unplug refrigerator or disconnect power.
Remove the base grille.
Use a vacuum cleaner with a soft brush to clean the grille, the open areas behind the grille and the front surface area of the condenser.
Replace the base grille when finished.
Plug in refrigerator or reconnect power.
Changing the Light Bulb
NOTE: Not all appliance bulbs will fit your refrigerator. Be sure to replace the bulb with an appliance bulb of the same size, shape, and wattage (no greater than 40 watts).
■ The dispenser lights are LEDs that cannot be changed.
■ On some models, the interior lights are LEDs that cannot be changed.
■ Some models may have LEDs in one compartment and an appliance bulb in another compartment.
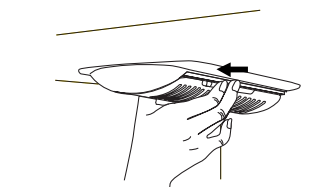
To Replace an Appliance Bulb:
1. Unplug refrigerator or disconnect power.
2. Remove the light shield(s), if necessary.
■ Squeeze both sides of the light shield while pulling downward to remove.
3. Replace burned-out bulb(s) with appliance light bulb(s) no greater than 40 watts.
4. Replace the light shield(s) by inserting the tabs on the shield into the liner holes and snap into place.
NOTE: To avoid damaging the light shield, do not force the shield beyond the locking point.
5. Plug in refrigerator or reconnect power.
TROUBLESHOOTING
Refrigerator Operation
The refrigerator will not operate
■ Power cord unplugged? Plug into a grounded 3 prong outlet.
■ Is outlet working? Plug in a lamp to see if the outlet is working.
■ Household fuse blown or circuit breaker tripped? Replace the fuse or reset the circuit breaker. If the problem continues, call an electrician.
■ Are controls on? Make sure the refrigerator controls are on. See “Using the Control(s).”
■ New installation? Allow 24 hours following installation for the refrigerator to cool completely.
NOTE: Adjusting the temperature controls to coldest setting will not cool either compartment more quickly
The motor seems to run too much
Your new refrigerator may run longer than your old one due to its high-efficiency compressor and fans. The unit may run even longer if the room is warm, a large food load is added, doors are opened often, or if the doors have been left open.
The refrigerator seems noisy
Refrigerator noise has been reduced over the years. Due to this reduction, you may hear intermittent noises from your new refrigerator that you did not notice from your old model. Below are listed some normal sounds with explanations.
■ Buzzing - heard when the water valve opens to fill the ice maker
■ Pulsating - fans/compressor adjusting to optimize performance
■ Hissing/Rattling - flow of refrigerant, movement of water lines, or from items placed on top of the refrigerator
■ Sizzling/Gurgling - water dripping on the heater during defrost cycle
■ Popping - contraction/expansion of inside walls, especially during initial cool-down
■ Water running - may be heard when ice melts during the defrost cycle and water runs into the drain pan
■ Creaking/Cracking - occurs as ice is being ejected from the ice maker mold.
The doors will not close completely
■ Door blocked open? Move food packages away from door.
■ Bin or shelf in the way? Push bin or shelf back into the correct position.
The doors are difficult to open
■ Gaskets dirty or sticky? Clean gaskets and contact surfaces with mild soap and warm water. Rinse and dry with soft cloth.
Temperature and Moisture
Temperature is too warm
■ New installation? Allow 24 hours following installation for the refrigerator to cool completely.
■ Door(s) opened often or left open? Allows warm air to enter refrigerator. Minimize door openings and keep doors fully closed.
■ Large load of food added? Allow several hours for refrigerator to return to normal temperature.
■ Controls set correctly for the surrounding conditions? Adjust the controls a setting colder. Check temperature in 24 hours. See “Using the Control(s).”
Temperature is too cold in refrigerator
■ Refrigerator air vent blocked? If the air vent located in the top, left, rear corner of the refrigerator compartment is blocked by items placed directly in front of it, the refrigerator will get too cold. Move items away from the air vent.
■ Ice storage bin in correct position? See “Ice Maker and Ice Storage Bin.”
■ Controls set correctly for the surrounding conditions? Adjust the controls a setting warmer. Check temperature in 24 hours. See “Using the Control(s).”
There is interior moisture buildup
NOTE: Some moisture buildup is normal.
■ Humid room? Contributes to moisture buildup.
■ Door(s) opened often or left open? Allows humid air to enter refrigerator. Minimize door openings and keep doors fully closed.
Ice and Water
The ice maker is not producing ice or not enough ice
■ Refrigerator connected to a water supply and the supply shutoff valve turned on? Connect refrigerator to water supply and turn water shutoff valve fully open.
■ Kink in the water source line? A kink in the line can reduce water flow. Straighten the water source line.
■ Ice maker turned on? Make sure ice maker is on. See “Ice Maker and Ice Storage Bin.”
■ New installation? Wait 24 hours after ice maker installation for ice production to begin. Wait 72 hours for full ice production.
■ Refrigerator door closed completely? Close the door firmly. If it does not close completely, see “The doors will not close completely.”
■ Large amount of ice recently removed? Allow 24 hours for ice maker to produce more ice.
■ Ice cube jammed in the ice maker ejector arm? Remove ice from the ejector arm with a plastic utensil.
■ Water filter installed on the refrigerator? Remove filter and operate ice maker. If ice volume improves, then the filter may be clogged or incorrectly installed. Replace filter or reinstall it correctly.
■ Reverse osmosis water filtration system connected to your cold water supply? This can decrease water pressure. See “Water Supply Requirements.”
The ice cubes are hollow or small
NOTE: This is an indication of low water pressure.
■ Water shutoff valve not fully open? Turn the water shutoff valve fully open.
■ Kink in the water source line? A kink in the line can reduce water flow. Straighten the water source line.
■ Water filter installed on the refrigerator? Remove filter and operate ice maker. If ice quality improves, then the filter may be clogged or incorrectly installed. Replace filter or reinstall it correctly.
■ Reverse osmosis water filtration system connected to your cold water supply? This can decrease water pressure. See “Water Supply Requirements.”
■ Questions remain regarding water pressure? Call a licensed, qualified plumber.
Off-taste, odor or gray color in the ice
■ New plumbing connections? New plumbing connections can cause discolored or off-flavored ice.
■ Ice stored too long? Discard ice. Wash ice bin. Allow 24 hours for ice maker to make new ice.
■ Odor transfer from food? Use airtight, moisture proof packaging to store food.
■ Are there minerals (such as sulfur) in the water? A water filter may need to be installed to remove the minerals.
■ Water filter installed on the refrigerator? Gray or dark discoloration in ice indicates that the water filtration system needs additional flushing. Flush the water system before using a new water filter. Replace water filter when indicated. See “Water Filtration System.”
The water and ice dispenser will not operate properly
■ Refrigerator connected to a water supply and the supply shutoff valve turned on? Connect refrigerator to water supply and turn water shutoff valve fully open.
■ Kink in the water source line? Straighten the water source line.
■ New installation? Flush and fill the water system. See “Water and Ice Dispensers.”
■ Is the water pressure at least 35 psi (241 kPa)? The water pressure to the home determines the flow from the dispenser. See “Water Supply Requirements.”
■ Water filter installed on the refrigerator? Remove filter and operate dispenser. If water flow increases, the filter may be clogged or incorrectly installed. Replace filter or reinstall it correctly.
■ Refrigerator door closed completely? Close the door firmly. If it does not close completely, see “The doors will not close completely.”
■ Recently removed the doors? Make sure the water dispenser wire/tube assembly has been properly reconnected at the top of the refrigerator door. See “Refrigerator Doors and Drawer.”
■ Reverse osmosis water filtration system connected to your cold water supply? This can decrease water pressure. See “Water Supply Requirements.”
Water is leaking from the dispenser system
NOTE: One or two drops of water after dispensing is normal.
■ Glass not being held under the dispenser long enough? Hold the glass under the dispenser 2 to 3 seconds after releasing the dispenser lever.
■ New installation? Flush the water system. See “Water and Ice Dispensers.”
■ Recently changed water filter? Flush the water system. See “Water and Ice Dispensers.”
Water from the dispenser is warm
NOTE: Water from the dispenser is only chilled to 50°F (10°C).
■ New installation? Allow 24 hours after installation for the water supply to cool completely.
■ Recently dispensed large amount of water? Allow 24 hours for water supply to cool completely.
■ Water not been recently dispensed? The first glass of water may not be cool. Discard the first glass of water.
■ Refrigerator connected to a cold water pipe? Make sure the refrigerator is connected to a cold water pipe. See “Water Supply Requirements.”
Q: why is it so hard to reset cooling off switch back to on. Reply
Q: Just moved into a apt and the previous owner has turned the ice maker off citing too noisy. Checked the manual to turn ice make back on but does not show the same as manual. However it does show a button to push to remove cover. but that does not work. Door comp show ice make off. I am not sure what to do now. Thank you any help would be appreciated. Reply