ADS-2400N
ADS-2800W
ADS-3000N
ADS-3600W
Version D
USA
User’s Guide ADS-2400N / ADS-2800W / ADS-300 0N / ADS-3600W

i
Brother Numbers
IMPORTANT
For technical help, you must call the country where you bought the machine. Calls must be made from
within that country.
Register your product online at
www.brother.com/registration
By registering your product with Brother, you will be recorded as the original owner of the product.
Your registration with Brother:
• may serve as confirmation of the purchase date of your product should you lose your receipt;
• may support an insurance claim by you in the event of product loss covered by insurance; and,
• will help us notify you of enhancements to your product and special offers.
Register your new product online at www.brother.com/html/registration
FAQs (Frequently Asked Questions)
The Brother Solutions Center is our one-stop resource for all your Brother machine needs. Download the
latest software and user documentation, read FAQs and troubleshooting tips, and learn how to get the most
from your Brother product.
support.brother.com
NOTE
• Check here for Brother driver updates.
• To keep your machine performance up to date, check here for the latest firmware upgrade. Otherwise,
some of your machine’s functions may not be available.

ii
For Customer Service
If you have comments or suggestions, write us at:
Service center locator (USA only)
For the location of a Brother authorized service center, call 1-877-BROTHER (1-877-276-8437) or visit us
on-line at www.brother-usa.com/service
Service center locations (Canada only)
For the location of a Brother authorized service center, visit us at www.brother.ca/support
In USA: 1-877-BROTHER (1-877-276-8437)
1-901-379-1215 (fax)
In Canada: www.brother.ca/support
In USA: Scanner Customer Support
Brother International Corporation
200 Crossing Boulevard
Bridgewater, NJ 08807-0911
In Canada: Brother International Corporation (Canada), Ltd.
Customer Experience Team
1, rue Hotel de Ville Dollard-des-Ormeaux, PQ, Canada H9B 3H6
Internet addresses
Brother Global Web Site: www.brother.com
For Frequently Asked Questions (FAQs), Product Support and Technical Questions, Driver Updates and Utilities, and
User’s Guides: support.brother.com
For Brother Accessories & Supplies:
In USA: www.brothermall.com
In Canada: www.brother.ca

iii
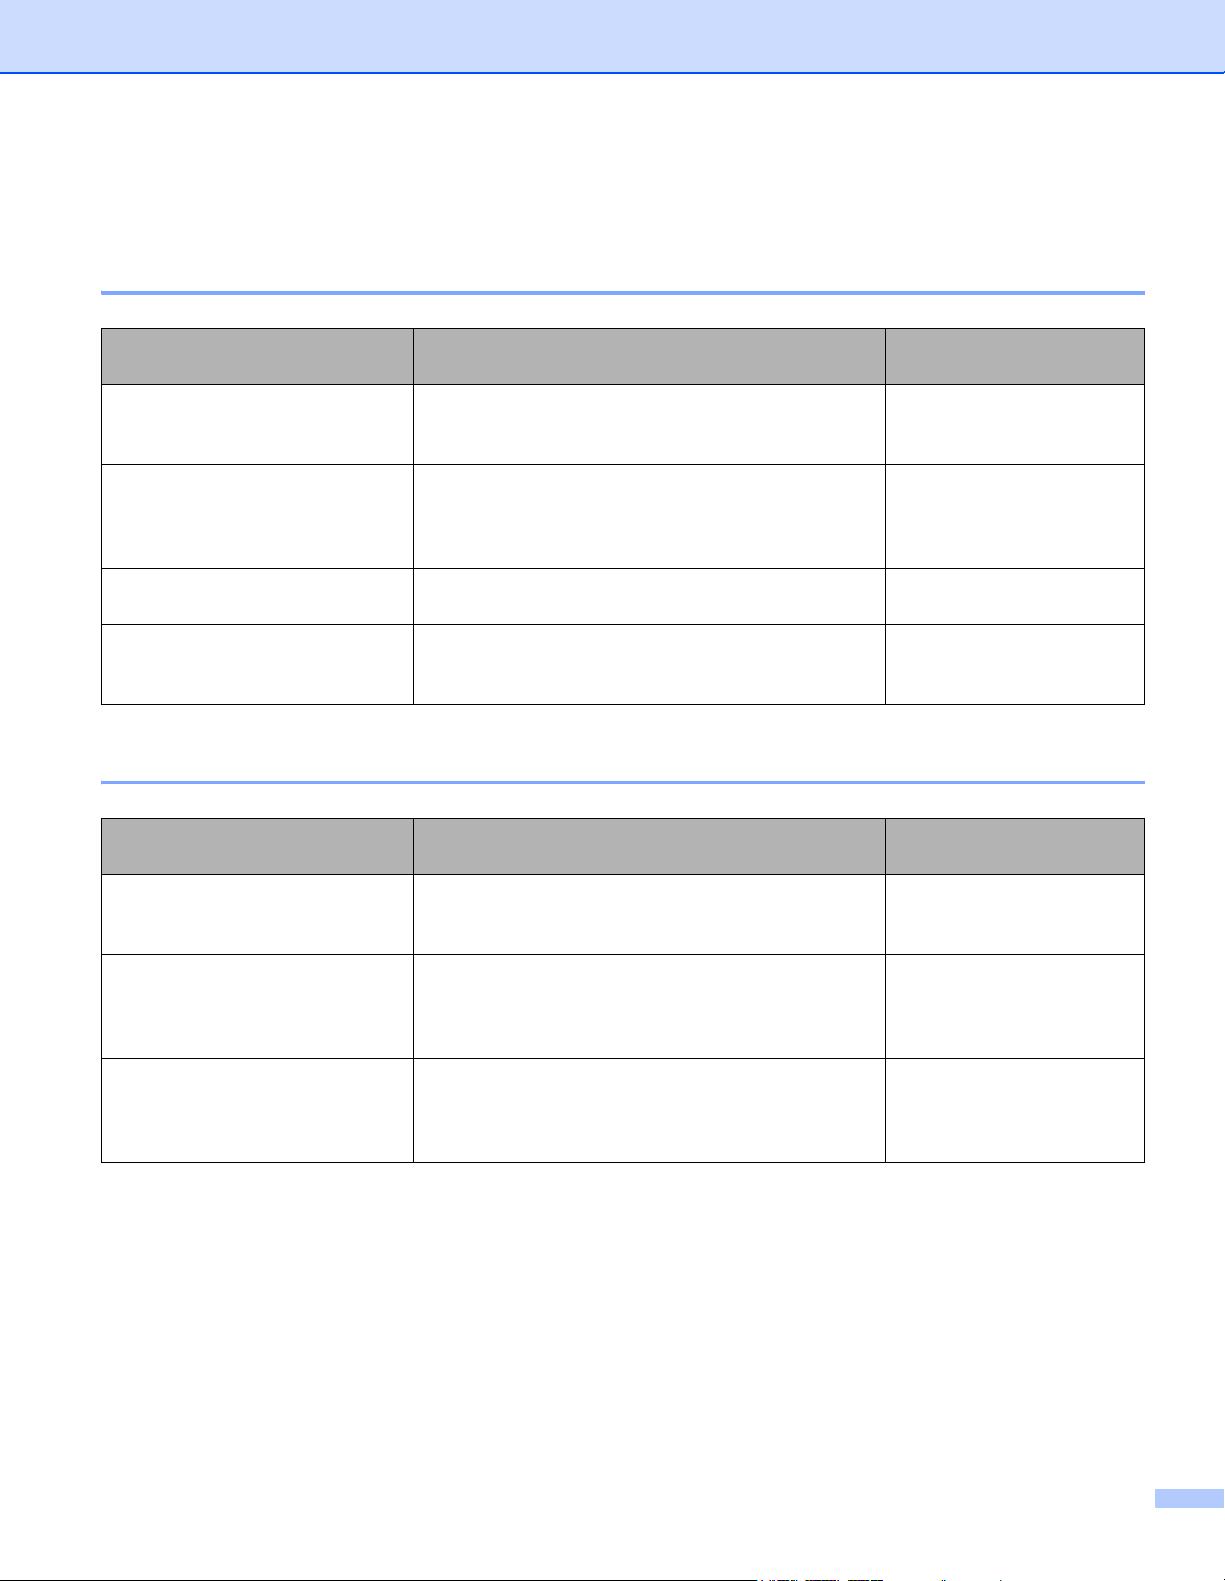
User’s Guides and Where Do I Find Them?
1
Visit Brother Solutions Center at support.brother.com
Which manual? What’s in it? Where is it?
Quick Setup Guide Follow the instructions for setting up your machine and
installing the drivers and software for the operating
system and connection type you are using.
Printed / In the box
Product Safety Guide Read this Guide first before you set up your machine.
See this Guide for the operating system and
connection type you are using.
Printed / In the box
User’s Guide Learn the Scan operations and security features,
learn how to perform routine maintenance, and see
troubleshooting tips.
PDF file / Brother
Solutions Center
1
Network User’s Guide This Guide provides useful information about
Ethernet network settings and security settings using
the Brother machine. You can also find supported
protocol information for your machine and detailed
troubleshooting tips.
PDF file / Brother
Solutions Center
1
Web Connect Guide
(ADS-2800W / ADS-3600W)
This Guide provides useful information about
accessing Internet services from the Brother
machine, as well as downloading images and
uploading files directly from Internet services.
PDF file / Brother
Solutions Center
1
Mobile Print/Scan Guide for
Brother iPrint&Scan
(ADS-2800W / ADS-3600W)
This Guide provides useful information about
scanning from your Brother machine to your mobile
device when connected to a WiFi network. See this
Guide for information about using this app to print from
a mobile device to a device that supports printing.
PDF file / Brother
Solutions Center
1
Brother Image Viewer Guide for
Android™
This Guide provides useful information about using
your Android™ mobile device to view and edit
documents that were scanned by a Brother machine.
PDF file / Brother
Solutions Center
1

iv
Getting Started
Features Applications What Can I Do?
Where Should I Go for More
Information?
Scan to PC Scan to Image ControlCenter4
(Windows
®
)
Brother iPrint &
Scan (Mac)
Scan your document directly
into a graphics application for
image editing.
For scanning from the Control
Panel of the machine:
Home Mode: Save Scanned
Documents on Your Computer
in Home Mode on page 132
Advanced Mode: Save
Scanned Documents on Your
Computer in Advanced Mode
on page 135
For scanning from ControlCenter4
(Windows
®
):
Home Mode: Basic Scan
on page 80
Advanced Mode: Basic Scan
on page 87
Scan to OCR Scan your document and
convert it to text. This text can
be edited using your favorite
word processing software.
For scanning from the Control
Panel of the machine:
Home Mode: Save Scanned
Documents on Your Computer
in Home Mode on page 132
Advanced Mode: Save
Scanned Documents on Your
Computer in Advanced Mode
on page 135
For scanning from ControlCenter4
(Windows
®
):
Home Mode: Basic Scan
on page 80
Advanced Mode: Basic Scan
on page 87

v
Scan to PC
(continued)
Scan to email ControlCenter4
(Windows
®
)
Brother iPrint &
Scan (Mac)
(continued)
Scan your document to your
default email application, to
send the scanned job as an
attachment.
For scanning from the Control
Panel of the machine:
Home Mode: Save Scanned
Documents on Your Computer
in Home Mode on page 132
Advanced Mode: Save
Scanned Documents on Your
Computer in Advanced Mode
on page 135
For scanning from ControlCenter4
(Windows
®
):
Home Mode: Basic Scan
on page 80
Advanced Mode: Basic Scan
on page 87
Scan to File Scan your document and save
it to a folder on your hard disk
in one of the file types shown
in the file type list. To scan
your document as a PDF file,
select this method.
For scanning from the Control
Panel of the machine:
Home Mode: Save Scanned
Documents on Your Computer
in Home Mode on page 132
Advanced Mode: Save
Scanned Documents on Your
Computer in Advanced Mode
on page 135
For scanning from ControlCenter4
(Windows
®
):
Home Mode: Basic Scan
on page 80
Advanced Mode: Basic Scan
on page 87
Features Applications What Can I Do?
Where Should I Go for More
Information?

vi
Scan to PC
(continued)
Scan Using the
TWAIN/WIA
Driver for
Windows
®
Users
Applications
supporting
TWAIN/WIA
driver include:
Nuance™
PaperPort™
14SE
Windows
®
Fax
and Scan
Windows
®
Photo Gallery
Use the Nuance
™
PaperPort
™
14SE application
included in the scanner driver, or
other applications supporting
TWAIN or WIA specifications,
for scanning.
For scanning using the
TWAIN/WIA driver:
Scan Using Nuance™
PaperPort™ 14SE or Other
Windows
®
Applications
on page 107
Scan Using the
TWAIN/ICA
Driver for
Macintosh Users
Applications
supporting ICA
driver such as:
ABBYY
FineReader Pro
Applications
supporting
TWAIN/ICA
driver include:
Apple Image
Capture
Use the applications supporting
TWAIN specifications, for
scanning.
After installing the scanner
driver, you can also use the
Apple Image Capture
application for scanning.
For scanning using the TWAIN
driver:
Scan Using TWAIN Applications
(Macintosh) on page 124
For scanning using the ICA driver:
Scan Using Apple Image Capture
(ICA Driver) on page 128
WS Scan
(Windows
®
users only)
(ADS-2800W /
ADS-3600W)
Windows
®
Fax
and Scan
Windows
®
Photo Gallery
Scan your document by using
the Web Services protocol.
The Web Services protocol
enables you to scan over the
network using your machine
and a computer running
Windows Vista
®
, Windows
®
7,
Windows
®
8, Windows
®
8.1 or
Windows
®
10.
For installing drivers:
Install Drivers Used for
Scanning via Web Services
(Windows Vista
®
, Windows
®
7,
Windows
®
8, Windows
®
8.1,
Windows
®
10) in the Network
User’s Guide
For scanning from the Control
Panel of the machine:
Scan Using Web Services
(Windows Vista
®
, Windows
®
7,
Windows
®
8, Windows
®
8.1 and
Windows
®
10) on page 180
Features Applications What Can I Do?
Where Should I Go for More
Information?
vii
Scan from
the Control
Panel of the
Machine
Scan to USB — Scan your document and save
the scanned image on a USB
flash drive.
(ADS-2800W / ADS-3600W)
You can configure the settings
on the machine’s control panel.
Save Scanned Documents on a
USB Flash Drive on page 138
Scan to FTP Scan your document directly
to an FTP server on your local
network, or on the Internet.
Scan Documents to an FTP
Server on page 142
Scan to SFTP Scan your document directly
to an SFTP server on your
local network, or on the
Internet.
Scan Documents to an SFTP
Server on page 152
Scan to
SharePoint
Scan your document directly
to SharePoint server.
Scan Documents to SharePoint
on page 172
Scan to Apps Convert the scanned data to
a MS compatible document.
Network User’s Guide
Scan to Network
(Windows
®
users only)
Scan your document directly
to a shared folder on your local
network, or on the Internet.
Scan Documents to a Shared
Folder / Network Location
(Windows
®
) on page 162
Scan to email
Server
(ADS-2800W /
ADS-3600W)
— Scan your document and send
it directly to an email address
from the machine. In addition,
because this feature can
assign an email address to the
machine, you can use the
machine to send documents
over your local network or the
Internet to computers.
Send Scanned Documents
Directly to an Email Address
(ADS-2800W / ADS-3600W)
on page 182
Scan to Web
(ADS-2800W /
ADS-3600W)
Scan your document and
upload it directly to Web
Services, such as Evernote,
Dropbox, Box, and OneDrive,
without using a computer.
Web Connect Guide
Features Applications What Can I Do?
Where Should I Go for More
Information?

viii
From
Mobile
Devices
Scan
Documents
(Brother
iPrint&Scan)
Brother
iPrint&Scan
Scan your document directly
from your Android™ devices,
iOS devices, and Windows
®
Phone without using a
computer.
Download and install
Brother iPrint&Scan from
the Google Play, App Store,
or Windows
®
Phone Store.
Mobile Print/Scan Guide
for Brother iPrint&Scan
View or Edit
Scanned Data
(Android™)
(ADS-2800W /
ADS-3600W)
Brother Image
Viewer
Use your Android™ mobile
device to view and edit
documents that were scanned
by a Brother machine.
Download and install
Brother Image Viewer from
Google Play.
Brother Image Viewer Guide
for Android™
Features Applications What Can I Do?
Where Should I Go for More
Information?
ix
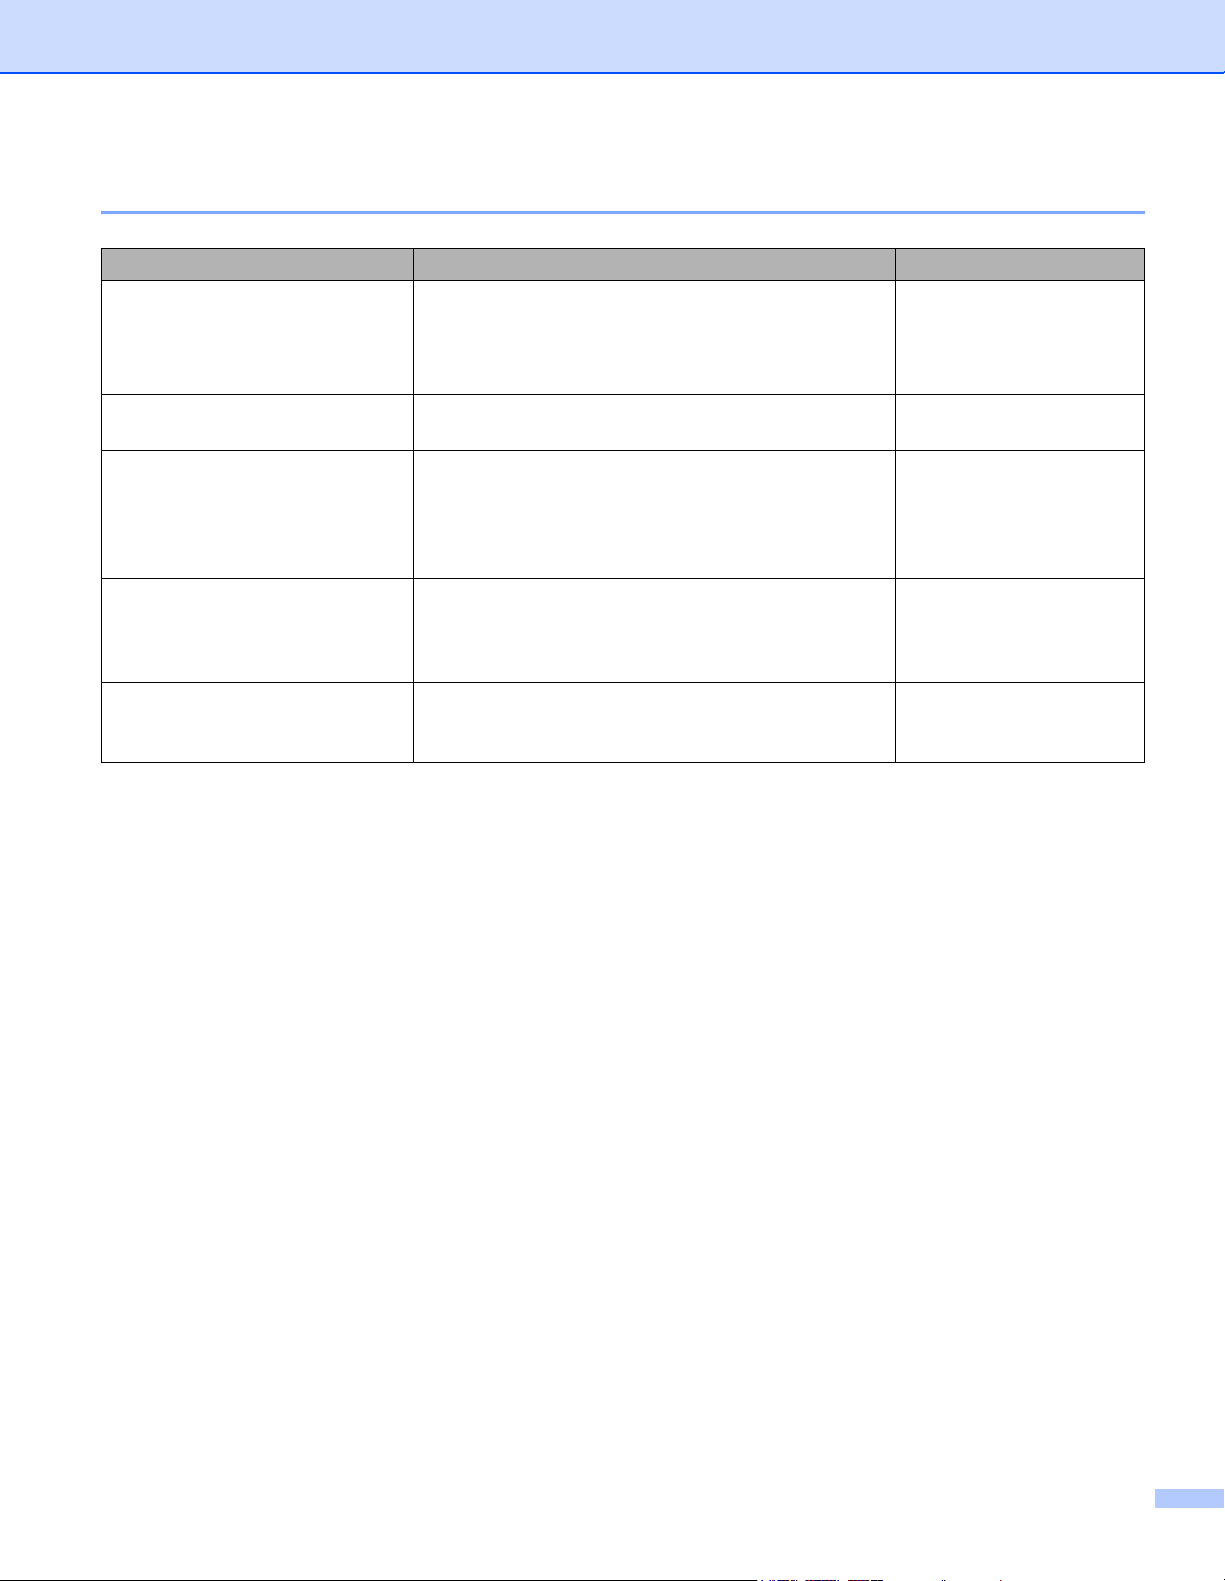
You Can Use the Following Features
Manage the machine securely
Streamlining Work
Feature Description
Where Should I Go for
More Information?
Secure Function Lock 3.0
(ADS-2800W / ADS-3600W)
Allows users to choose which functions each user
can use.
Secure Function Lock 3.0
(ADS-2800W /
ADS-3600W) on page 41
Active Directory Authentication
(ADS-2800W / ADS-3600W)
Restricts the use of the Brother machine unless
users enters the user ID and password.
Active Directory
Authentication
(ADS-2800W /
ADS-3600W) on page 49
Setting Lock
(ADS-2800W / ADS-3600W)
Allows only users who know the password to change
the machine’s settings.
Setting Lock (ADS-2800W /
ADS-3600W) on page 39
LDAP Authentication Restricts the use of the Brother machine unless
users enter the user name and Password.
LDAP Authentication
(ADS-2800W /
ADS-3600W) on page 50
Feature Description
Where Should I Go for
More Information?
Scan Using Near Field
Communication (NFC)
(ADS-3600W)
Allows you to scan using the settings you saved
when you registered your NFC ID card to a Shortcut.
Adding ID Card Shortcuts
(ADS-3600W only)
on page 16
BRAdmin Light (Windows
®
only)
BRAdmin Professional 3
(Windows
®
only)
Allows you to manage a Brother machine connected
to the network. Using a computer, search for Brother
machines on the network, display device status
information, and change network settings.
Launch the BRAdmin Utility
(Windows
®
) on page 75
One touch scan
(ADS-2800W / ADS-3600W)
Allows you to use one button to scan documents
with your favorite settings. To use this function, you
must to create a one touch setting in your shortcut
and add the shortcut number on your Home screen.
Shortcut Settings
(ADS-2800W /
ADS-3600W) on page 12
x
Saving Space and Managing Your Data
Feature Description See
Scan to FTP/SFTP Allows you to transmit scanned data directly to an
FTP/SFTP server without using a computer. This
feature makes it easy to share large data files that
cannot be sent by email.
Scan Documents to an
FTP Server on page 142
Scan Documents to an
SFTP Server on page 152
Scan to SharePoint Allows you to transmit scanned data directly to
SharePoint without using a computer.
Scan Documents to
SharePoint on page 172
Scan to Email server
(ADS-2800W / ADS-3600W)
Allows you to scan a document and send it directly to
an email address from the machine.
Send Scanned
Documents Directly to an
Email Address
(ADS-2800W /
ADS-3600W) on page 182
Scan to Web
(ADS-2800W / ADS-3600W)
Allows you to scan a document and upload it directly
to Web Services.
Upload Scanned
Documents to the Web
(ADS-2800W / ADS-3600
W) on page 189
Scan to Network Allows you to scan your documents and upload it
directly to a Network.
Scan Using Scan to
Network Profiles
on page 170

xi
Table of Contents
1 General Information 1
Using the Documentation ..........................................................................................................................1
Symbols and Conventions Used in the Documentation ......................................................................1
About This Machine ...................................................................................................................................2
Control Panel Overview (ADS-2400N / ADS-3000N) ................................................................................3
Control Panel Overview (ADS-2800W / ADS-3600W)...............................................................................5
Touchscreen LCD................................................................................................................................6
Basic Operations ...............................................................................................................................11
Shortcut Settings (ADS-2800W / ADS-3600W) .......................................................................................12
Adding Scan Shortcuts ......................................................................................................................12
Adding Web Connect Shortcuts ........................................................................................................14
Adding Apps Shortcuts .....................................................................................................................15
Adding ID Card Shortcuts (ADS-3600W only)...................................................................................16
Changing Shortcuts ...........................................................................................................................16
Editing Shortcut Names.....................................................................................................................17
Deleting Shortcuts .............................................................................................................................17
Recalling Shortcuts............................................................................................................................17
Accessing Brother Utilities (Windows
®
)...................................................................................................18
General Setup (ADS-2400N / ADS-3000N).............................................................................................19
Set Date&Time ..................................................................................................................................19
Set Sleep Time ..................................................................................................................................23
Select Your Language .......................................................................................................................27
Assign the Scan Feature to the Network Device Key 1-3..................................................................31
General Setup (ADS-2800W / ADS-3600W) ...........................................................................................34
Set the Backlight Brightness..............................................................................................................34
Set the Dim Timer for the Backlight...................................................................................................34
Set the Home Screen ........................................................................................................................34
Select Your Language ......................................................................................................................35
Memory Storage ................................................................................................................................35
Beep Volume .....................................................................................................................................35
Automatic Daylight Saving Time........................................................................................................36
Sleep Time ........................................................................................................................................36
Auto Power Off ..................................................................................................................................37
Multifeed Detection............................................................................................................................38
Setting Lock (ADS-2800W / ADS-3600W)...............................................................................................39
Set the Password ..............................................................................................................................39
Change the Password .......................................................................................................................39
Turn Setting Lock On/Off...................................................................................................................40
Secure Function Lock 3.0 (ADS-2800W / ADS-3600W)..........................................................................41
Before You Use Secure Function Lock 3.0 .......................................................................................42
Turning Secure Function Lock On/Off ...............................................................................................43
Configure Secure Function Lock 3.0 Using Web Based Management .............................................44
Setting Up Card Authentication for Users (For ADS-3600W)............................................................46
Setting Up and Changing the Public Mode........................................................................................46
Switching Users.................................................................................................................................48
Active Directory Authentication (ADS-2800W / ADS-3600W) .................................................................49
Turning Active Directory Authentication Lock On/Off ........................................................................49
LDAP Authentication (ADS-2800W / ADS-3600W) .................................................................................50
Turning LDAP Authentication Lock On/Off ........................................................................................50

xii
2 Document Specifications 51
Acceptable Documents............................................................................................................................51
Unacceptable Documents........................................................................................................................53
Loading Capacity...............................................................................................................................54
Area Not to be Perforated..................................................................................................................55
Conditions for Multifeed Detection.....................................................................................................55
Scanning a Mixed Batch....................................................................................................................56
Carrier Sheet Recommendations ............................................................................................................57
Notes for Using Carrier Sheets................................................................................................................58
3 Scan Preparation 59
Set Up Your Scanner...............................................................................................................................59
Load Documents......................................................................................................................................60
Standard-size Documents .................................................................................................................60
Business Cards .................................................................................................................................62
Plastic Cards .....................................................................................................................................64
Documents Longer than Standard Size.............................................................................................65
Documents Printed on Non-standard Size Paper..............................................................................66
Documents with Facing Pages ..........................................................................................................67
Receipts, Clippings, Photos, and Other Documents .........................................................................67
4 Prepare Your Network for Scanning with Your Computer 69
Before Scanning ......................................................................................................................................69
Before Network Scanning ........................................................................................................................70
Network License (Windows
®
)............................................................................................................70
Configure Network Scanning for Windows
®
......................................................................................70
Configure Network Scanning for Macintosh ......................................................................................74
Launch the BRAdmin Utility (Windows
®
)...........................................................................................75
5 Before Scanning 76
6 Scan Using Your Computer 77
Change the ControlCenter4 User Interface (Windows
®
).........................................................................77
Scan Using ControlCenter4 in Home Mode (Windows
®
) ........................................................................80
Basic Scan.........................................................................................................................................80
Scan Documents Using the Carrier Sheet.........................................................................................81
Scan Plastic Cards ............................................................................................................................83
Scan Documents to SharePoint ........................................................................................................85
Scan Using ControlCenter4 in Advanced Mode (Windows
®
)..................................................................87
Basic Scan.........................................................................................................................................87
Scan to Image ...................................................................................................................................88
Scan to OCR .....................................................................................................................................89
Scan to E-mail ...................................................................................................................................90
Scan to File........................................................................................................................................91
Change a Scan Button’s Default Settings .........................................................................................92
Scan Using the Carrier Sheet............................................................................................................92
Scan Plastic Cards ............................................................................................................................93
Scan Documents to SharePoint ........................................................................................................95

xiii
Create a Custom Tab (ControlCenter4 Advanced Mode) (Windows
®
) ...................................................97
Create a Custom Tab ........................................................................................................................97
Create a Custom Button in a Custom Tab.........................................................................................98
Change Scan Settings (ControlCenter4) (Windows
®
).............................................................................99
Scan Using Brother iPrint&Scan (Mac)..................................................................................................106
Change Scan Button Settings from Brother iPrint&Scan (Mac) ......................................................106
Scan Using Nuance™ PaperPort™ 14SE or Other Windows
®
Applications ........................................107
Scan Using Nuance™ PaperPort™ 14SE.......................................................................................107
Scan Using Windows
®
Photo Gallery or Windows
®
Fax and Scan................................................122
Use ABBYY FineReader........................................................................................................................123
Scan Using TWAIN Applications (Macintosh)........................................................................................124
Scan Using TWAIN Applications (for example, Presto! PageManager) ..........................................124
TWAIN Driver Settings ....................................................................................................................125
Scan Using Apple Image Capture (ICA Driver) .....................................................................................128
Scan Using Apple Image Capture ...................................................................................................128
ICA Driver Settings ..........................................................................................................................130
7 Scan Using the Control Panel 132
Save Scanned Documents on Your Computer in Home Mode .............................................................132
Save Scanned Documents on Your Computer in Advanced Mode.......................................................135
Save Scanned Documents on a USB Flash Drive.................................................................................138
Scan Documents to an FTP Server .......................................................................................................142
Start Web Based Management .......................................................................................................142
Configure the FTP Default Settings.................................................................................................145
Scan Using FTP Server Profiles......................................................................................................150
Scan Documents to an SFTP Server.....................................................................................................152
Start Web Based Management .......................................................................................................152
Configure the SFTP Default Settings ..............................................................................................155
Scan Using SFTP Server Profiles ...................................................................................................160
Scan Documents to a Shared Folder / Network Location (Windows
®
) .................................................162
Start Web Based Management .......................................................................................................162
Configure the Scan to Network Default Settings .............................................................................165
Scan Using Scan to Network Profiles..............................................................................................170
Scan Documents to SharePoint.............................................................................................................172
Start Web Based Management .......................................................................................................172
Set Up a Scan to SharePoint Profile ...............................................................................................175
Scan Using Web Services (Windows Vista
®
, Windows
®
7, Windows
®
8, Windows
®
8.1 and
Windows
®
10) ....................................................................................................................................180
Configuring Settings for Scanning ...................................................................................................181
Send Scanned Documents Directly to an Email Address (ADS-2800W / ADS-3600W) .......................182
Select an Email Address from the Address Book............................................................................183
Enter an Email Address Manually ...................................................................................................184
Set Up the Address Book (ADS-2800W / ADS-3600W) ........................................................................185
Register an Email Address ..............................................................................................................185
Change an Email Address...............................................................................................................185
Delete an Email Address .................................................................................................................186
Set Up a Group................................................................................................................................187
Change a Group .............................................................................................................................187
Delete a Group ................................................................................................................................188

xiv
Upload Scanned Documents to the Web (ADS-2800W / ADS-3600W) ................................................189
Change Scan to PC Settings (Windows
®
) ............................................................................................190
Scan Options Using the Touchscreen (ADS-2800W / ADS-3600W).....................................................198
Skip Blank Page Function ...............................................................................................................198
Adjust the Scanning Position...........................................................................................................198
Split a Scanned File and Save ........................................................................................................198
Scan a Specific Area .......................................................................................................................199
Automatically Detect Whether a Document Uses Color ..................................................................199
Auto Color Detect Adjust ................................................................................................................199
8 Managing the Machine from Your Computer 200
Monitor the Machine’s Status from Your Computer (Windows
®
) ..........................................................200
Status Monitor Indicators.................................................................................................................201
Set Up the Brother Machine from Your Computer.................................................................................203
9 Routine Maintenance 207
Clean the Outside of the Machine .........................................................................................................207
Clean the Scanner and Rollers..............................................................................................................209
Replace Supplies...................................................................................................................................213
Part Names, Numbers, and Life Cycles ..........................................................................................213
Check Supplies Replacement Cycle (ADS-2400N / ADS-3000N)...................................................215
Check Supplies Replacement Cycle (ADS-2800W / ADS-3600W) .................................................218
Replace the Pick Up Roller..............................................................................................................218
Replace the Reverse Roller.............................................................................................................222
Reset the Usage Counters ..............................................................................................................224
Reset the Usage Counters (ADS-2800W / ADS-3600W)................................................................227
Packing and Shipping the Machine .......................................................................................................228
10 Troubleshooting 230
Overview................................................................................................................................................230
Identifying Your Problem .......................................................................................................................230
Error and Maintenance Messages.........................................................................................................230
Document Jam ................................................................................................................................234
Operational and Software Difficulties.....................................................................................................236
Machine Information ..............................................................................................................................243
Check the Serial Number (ADS-2400N / ADS-3000N)....................................................................243
Check the Serial Number (ADS-2800W / ADS-3600W) ..................................................................245
WLAN Enable/Disable (ADS-2800W / ADS-3600W).......................................................................245
LAN Enable/Disable ........................................................................................................................246
USB Enable/Disable ........................................................................................................................246
Reset Functions...............................................................................................................................247
Reset the Machine (ADS-2400N / ADS-3000N)..............................................................................247
Reset the Machine (ADS-2800W / ADS-3600W) ............................................................................248

xv
A Specifications 249
General..................................................................................................................................................249
Scanner .................................................................................................................................................251
Direct Scan Feature (Scan to USB).......................................................................................................251
Interfaces...............................................................................................................................................252
Network..................................................................................................................................................252
Computer Requirements........................................................................................................................253
B Appendix 254
Entering Text (ADS-2800W / ADS-3600W) ...........................................................................................254
Inserting Spaces .............................................................................................................................254
Making Corrections..........................................................................................................................254
LED Indications (ADS-2400N / ADS-3000N).........................................................................................255
Service Call Indications ...................................................................................................................266
Scan Settings ........................................................................................................................................267
C Index 273
1
1
1
Using the Documentation 1
Thank you for buying a Brother machine! Reading the documentation will help you make the most of your
machine.
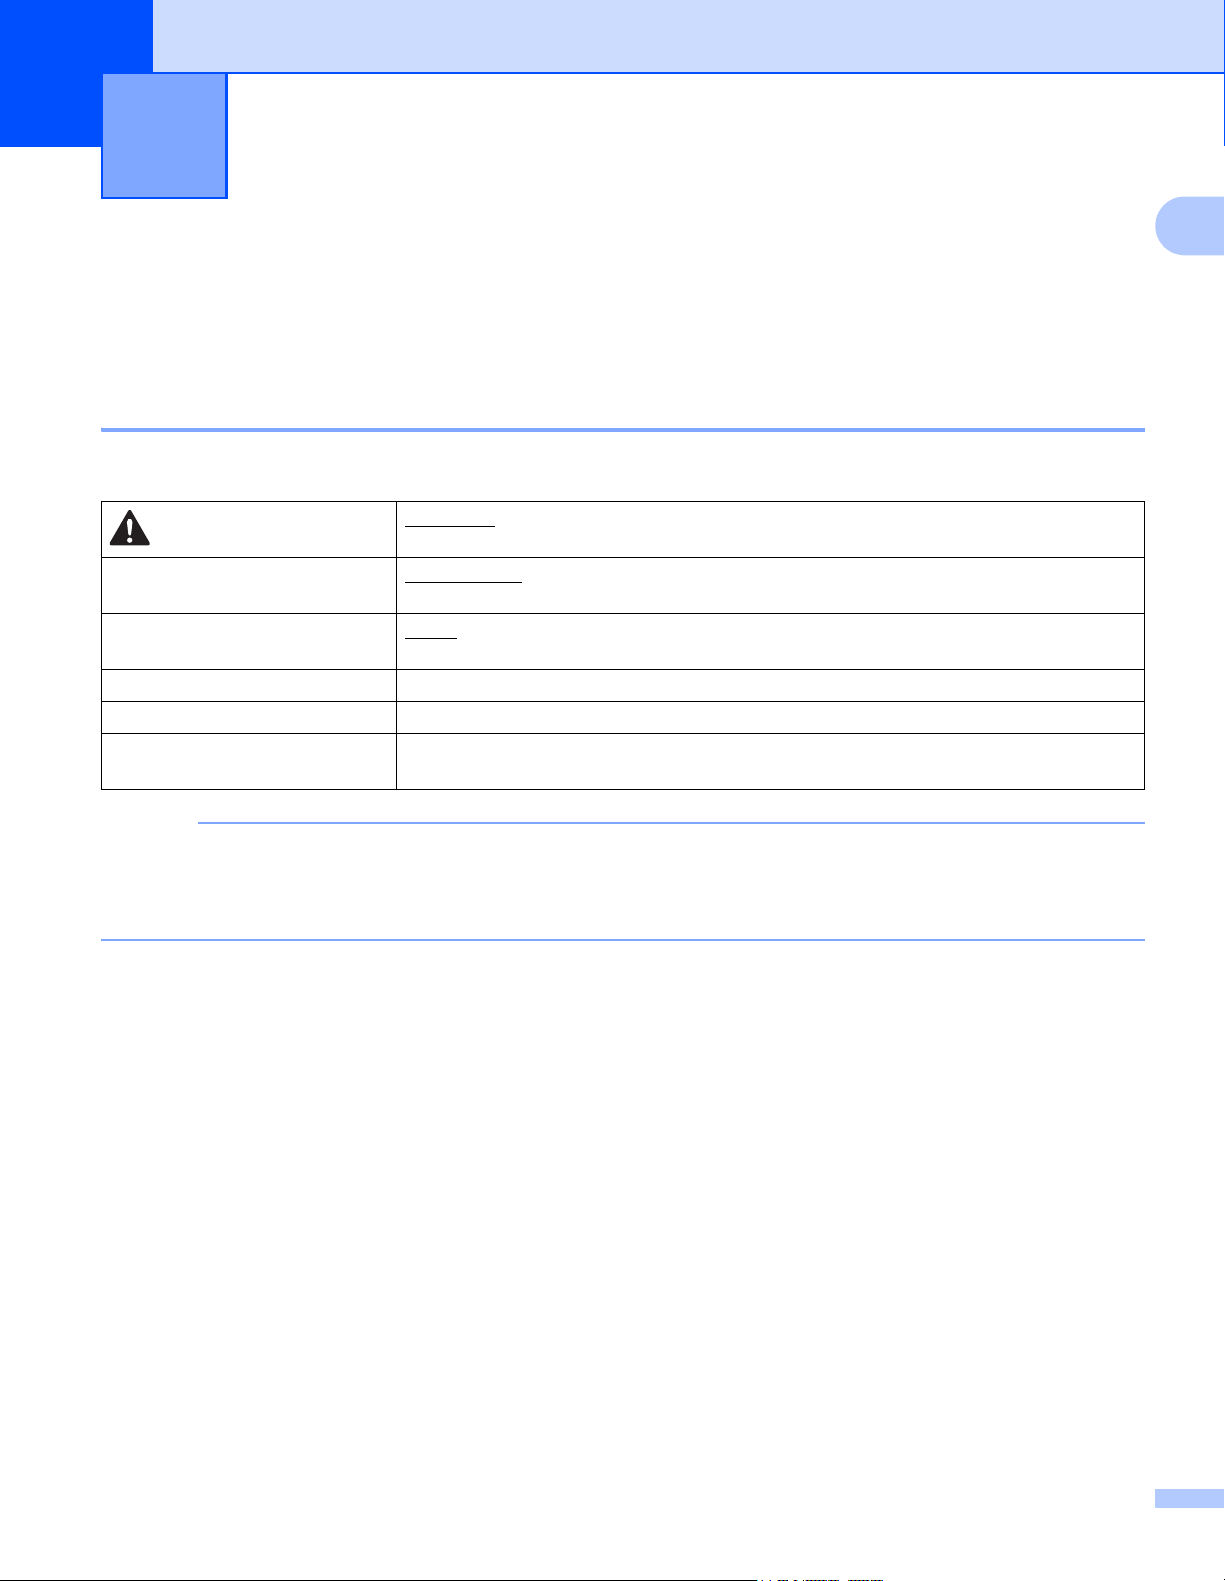
Symbols and Conventions Used in the Documentation 1
The following symbols and conventions are used throughout the documentation.
NOTE
• Unless otherwise specified, screens and illustrations in this guide show the ADS-3600W.
• Unless otherwise specified, the screens in this manual are from Windows
®
7 and OS X 10.10.x. Screens
on your computer may vary depending on your operating system.
General Information 1
CAUTION
CAUTION indicates a potentially hazardous situation which, if not avoided,
may result in minor or moderate injuries.
IMPORTANT
IMPORTANT indicates a potentially hazardous situation which, if not avoided,
may result in damage to property or loss of product functionality.
NOTE
Notes tell you how you should respond to a situation that may arise or give tips about
how the operation works with other features.
Bold Bold typeface identifies keys on the machine control panel or computer screen.
Italics Italicized typeface emphasizes an important point or refers you to a related topic.
Courier New
(ADS-2800W / ADS-3600W)
Text in Courier New font identifies messages on the machine’s Touchscreen.
General Information
2
1
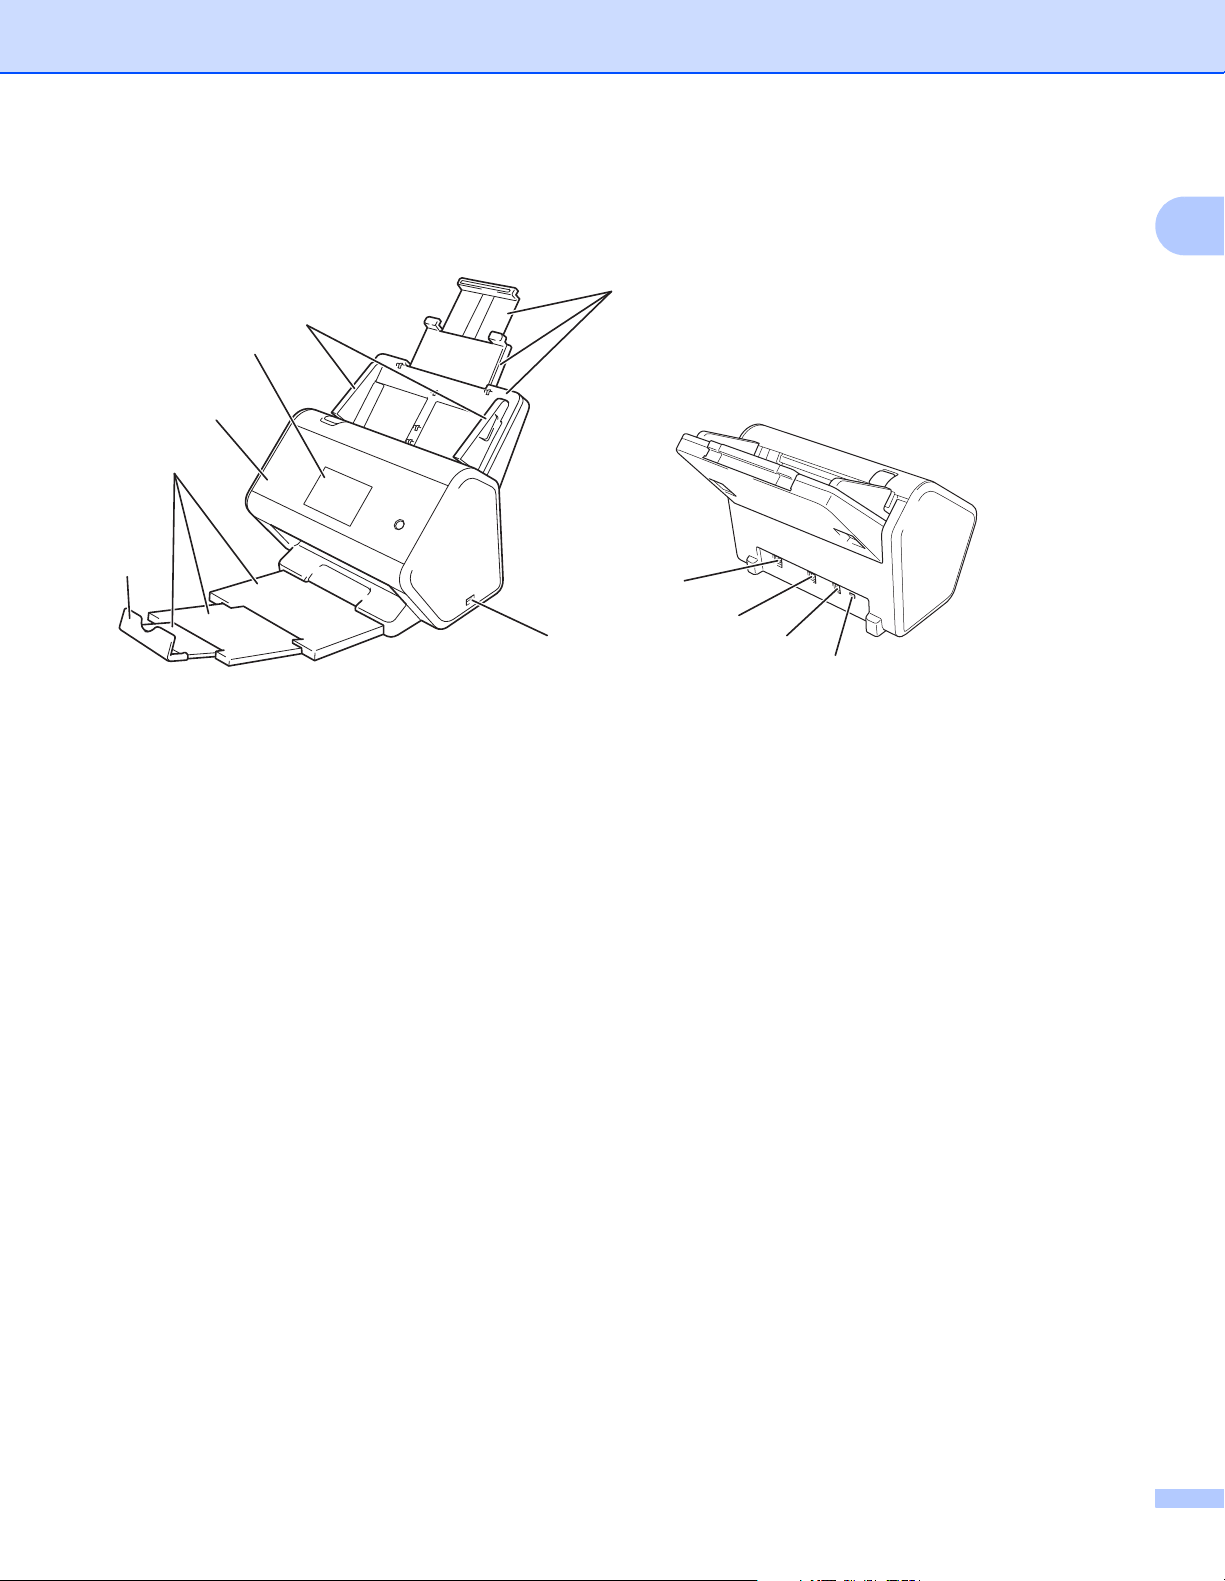
About This Machine 1
1 Extendable Automatic Document Feeder (ADF)
2 Paper Guides
3 Control Panel
4 Front Cover
5 Extendable Output Tray
6 Document Stopper
7 USB 2.0 Port
8 Ethernet Cable Port
9 Hi-Speed USB 2.0 Port (ADS-2400N / ADS-2800W)
USB 3.0 SuperSpeed Port (ADS-3000N / ADS-3600W)
10 AC Adapter Connector
11 Security Slot
4
1
2
7
5
6
8
3
9
10
11
General Information
3
1
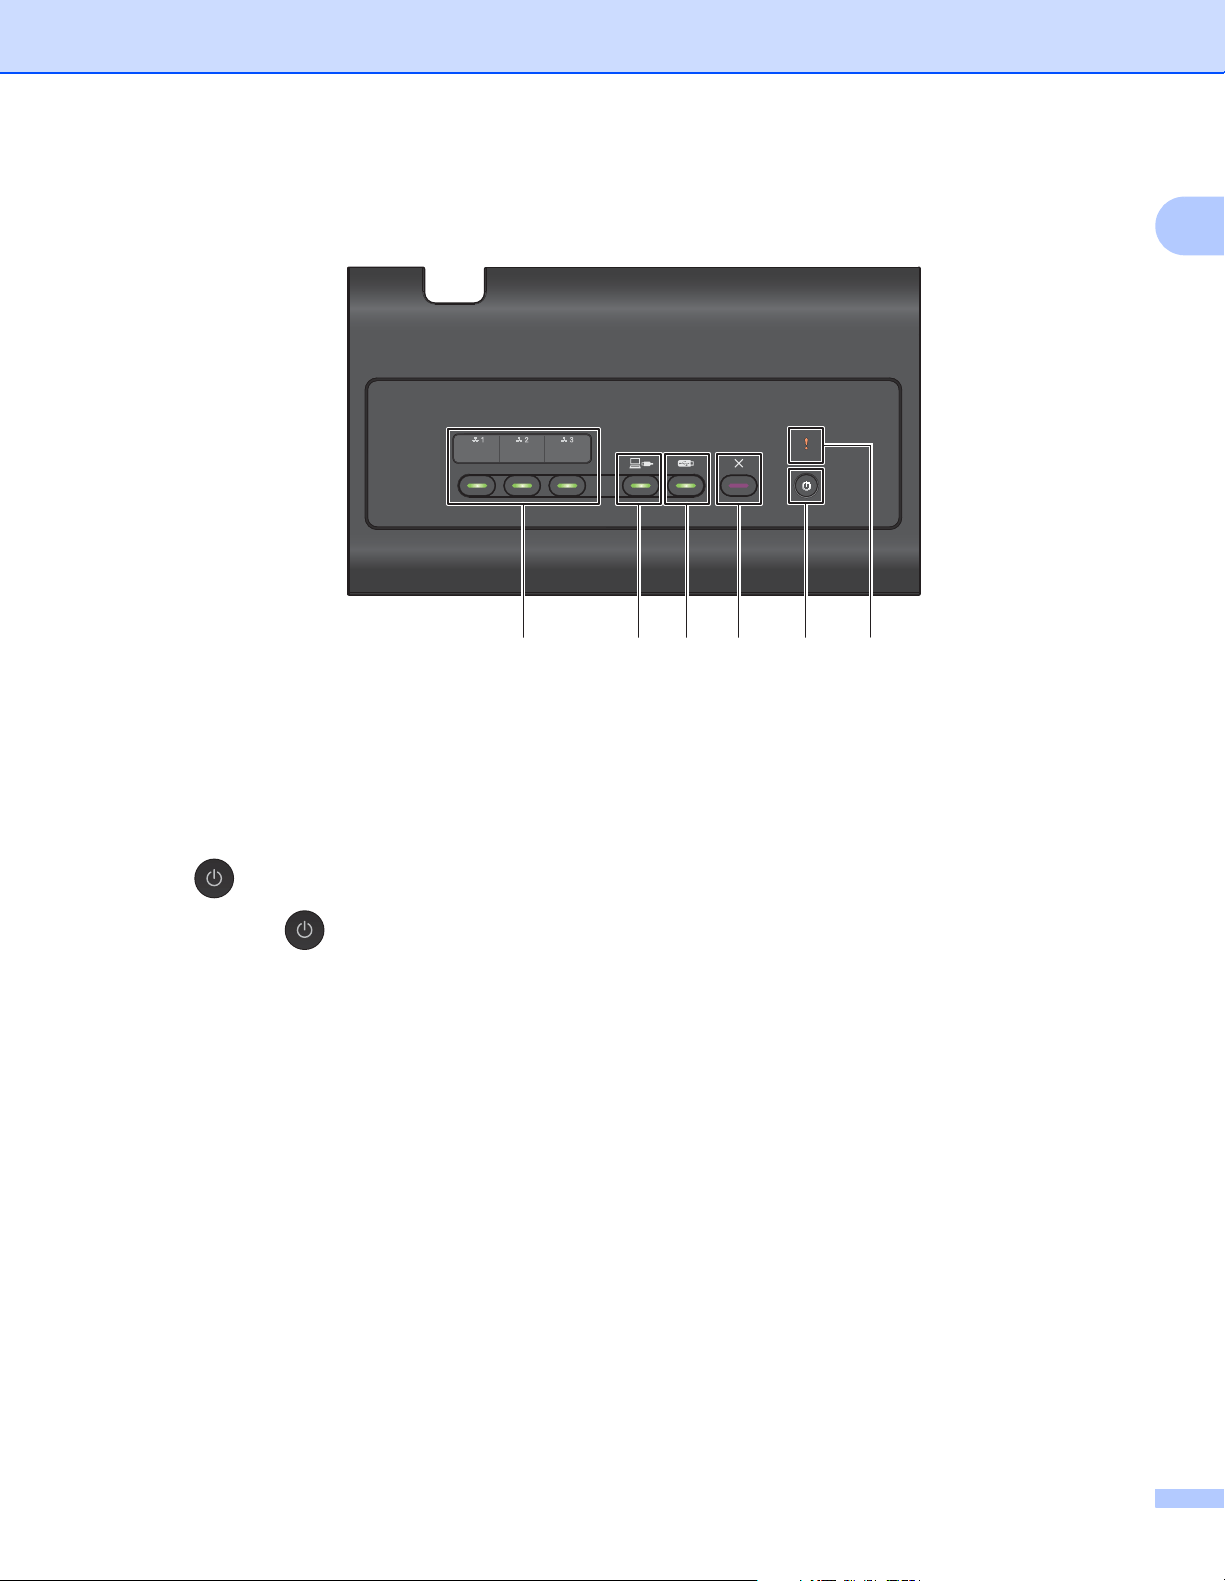
Control Panel Overview (ADS-2400N / ADS-3000N) 1
1 Error Indicator (with LED)
The Error Indicator blinks when the machine is in an error state. For more information, see LED Indications
(ADS-2400N / ADS-3000N) on page 255.
2 Power button (with LED)
Turn the machine on and off.
Press to turn the machine on.
Press and hold to turn the machine off.
3 Stop button
Press the Stop button to:
Stop document feed
Cancel a job
Wake the machine up
Recover from an error
Disconnect Remote Setup
4 Scan to USB button (with LED)
Press the Scan USB button to:
Scan to USB
Wake the machine up
5 Scan to PC button (with LED)
Press the Scan to PC button (USB Connect) to:
Scan to PC
Wake the machine up
654321

General Information
4
1
6
Assign the Scan to FTP/SFTP, Scan to Network, Scan to Sharepoint, Scan to PC (Network Connect),
or WS Scan function to these keys. After configuring the settings, press to select your assigned function.
These buttons are available only when the machine is set up using the wired network method with the
installation disc and a USB cable (see the Quick Setup Guide). For more information, see Scan
Documents to an FTP Server on page 142, or Scan Using Web Services (Windows Vista
®
, Windows
®
7,
Windows
®
8, Windows
®
8.1 and Windows
®
10) on page 180.
General Information
5
1
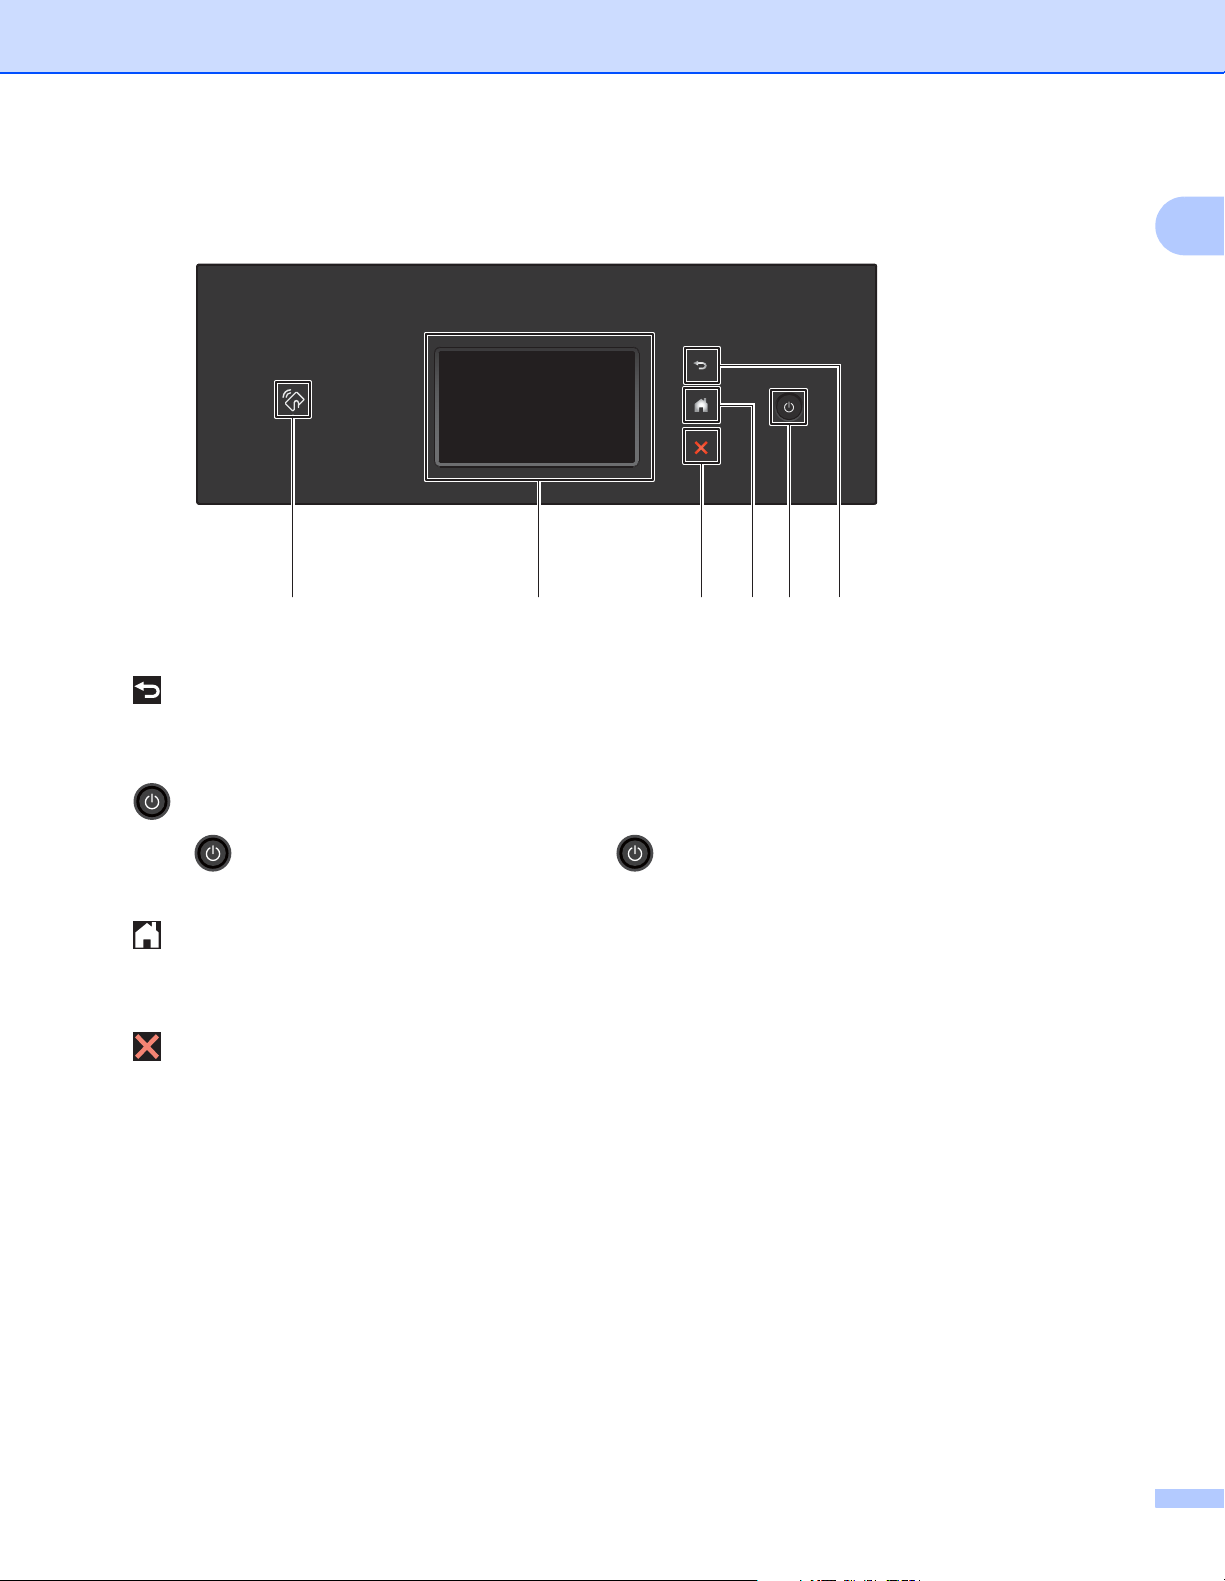
Control Panel Overview (ADS-2800W / ADS-3600W) 1
1 (Back Button)
Press to go back to the previous screen or menu. The Back button lights up only when this option is
available.
2 (Power On/Off)
Press to turn on the machine. Press and hold to turn off the machine. The Touchscreen displays
Shutting Down and stays on for a few seconds before going off.
3 (Home Button)
Press to return to the Home Screen and Ready Mode. The Home button lights up only when this option is
available.
4 (Stop Button)
Press to stop or cancel your current action and return to Ready Mode. The Stop button lights up only when
this option is available.
5 Touchscreen LCD
Access the menus and options by pressing the Touchscreen.
6 NFC (Near Field Communication) Reader
(ADS-3600W)
Use card authentication by touching the IC card to the NFC Reader on the control panel.
If your Android™ device supports the NFC standard, scan to your device by touching it to the NFC logo.
You must download and install Brother iPrint&Scan to your Android™ device to use this feature.
5436 2 1
General Information
6
1
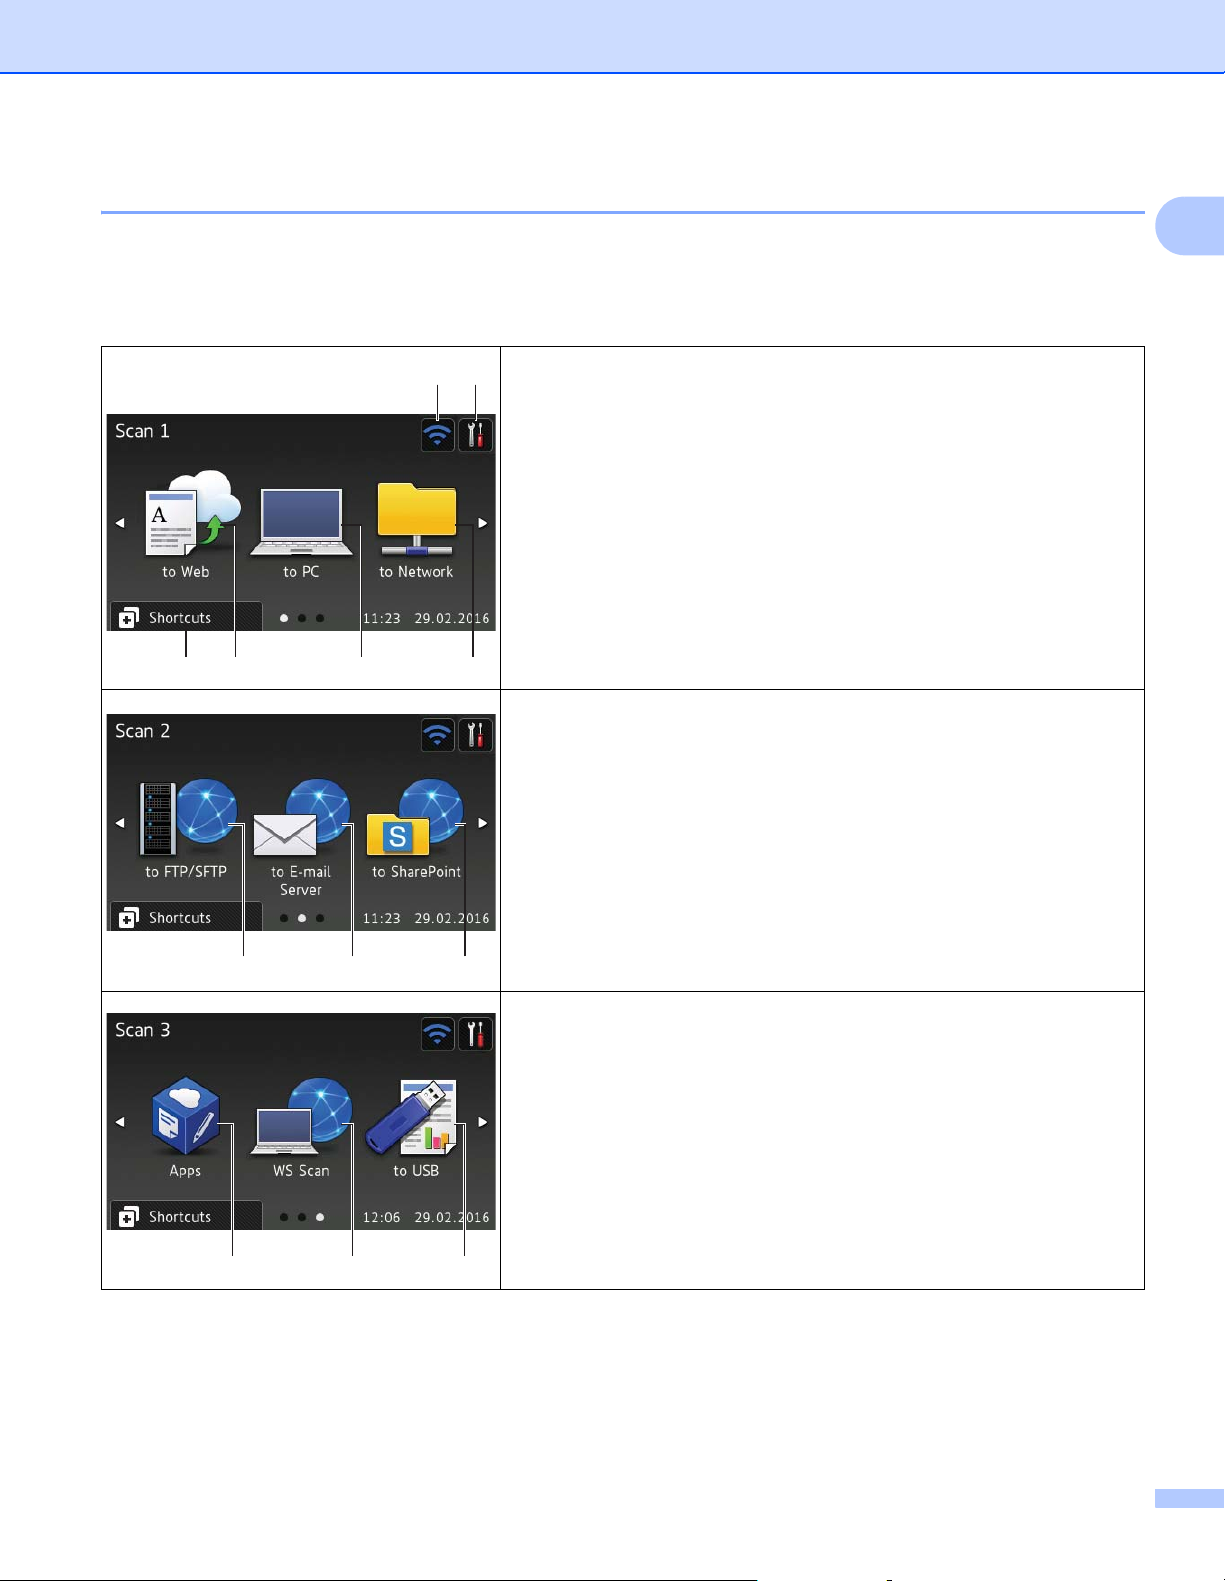
Touchscreen LCD 1
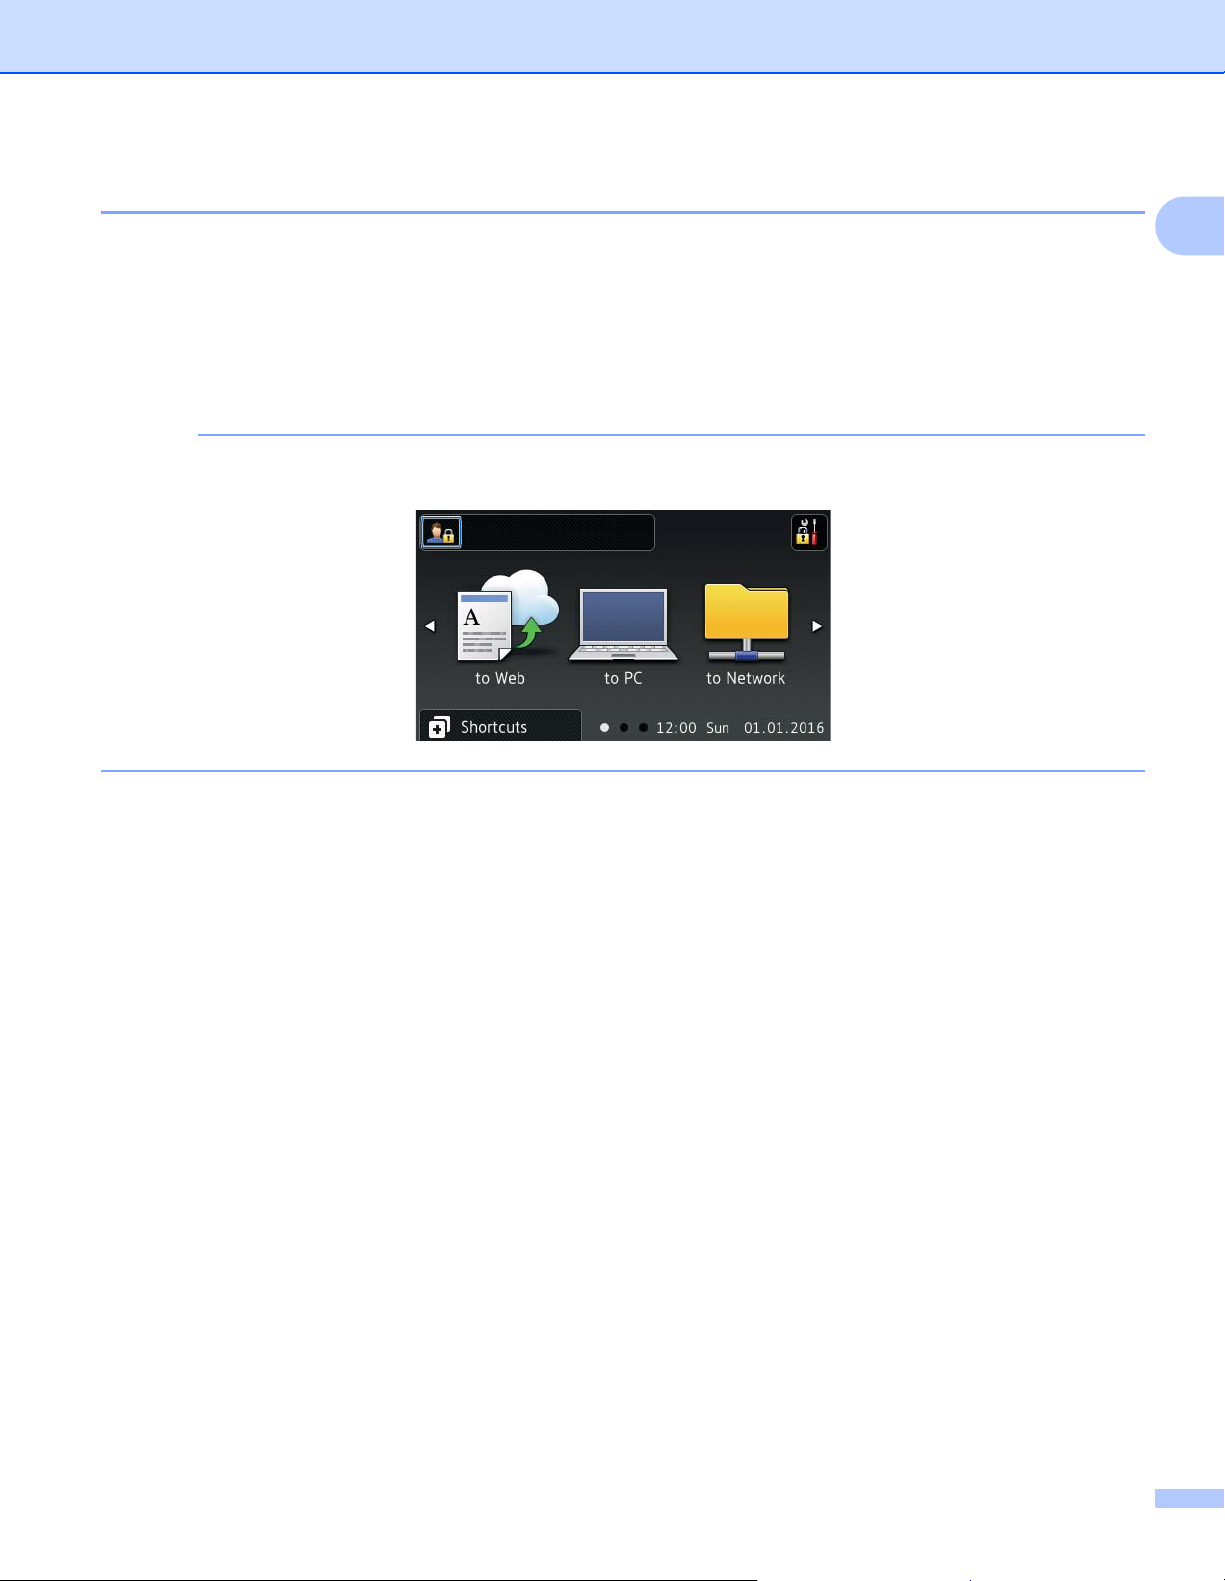
Select from four types of screens for the Home screen. When the Home screen appears, change the
displayed screen by swiping left or right, or pressing d or c.
The following screens display the machine’s status when the machine is idle.
Scan 1 screen
The Scan 1 screen provides access to the scan features, such as Scan
to Web, Scan to PC, and Scan to Network.
Scan 2 screen
The Scan 2 screen provides access to the scan features, such as Scan
to FTP/SFTP, Scan to E-mail Server, and Scan to SharePoint.
Scan 3 screen
The Scan 3 screen provides access to scan features, such as WS-Scan,
Scan to USB, and Apps.
4 5 63
1 2
7 8 9
10 11 12
General Information
7
1
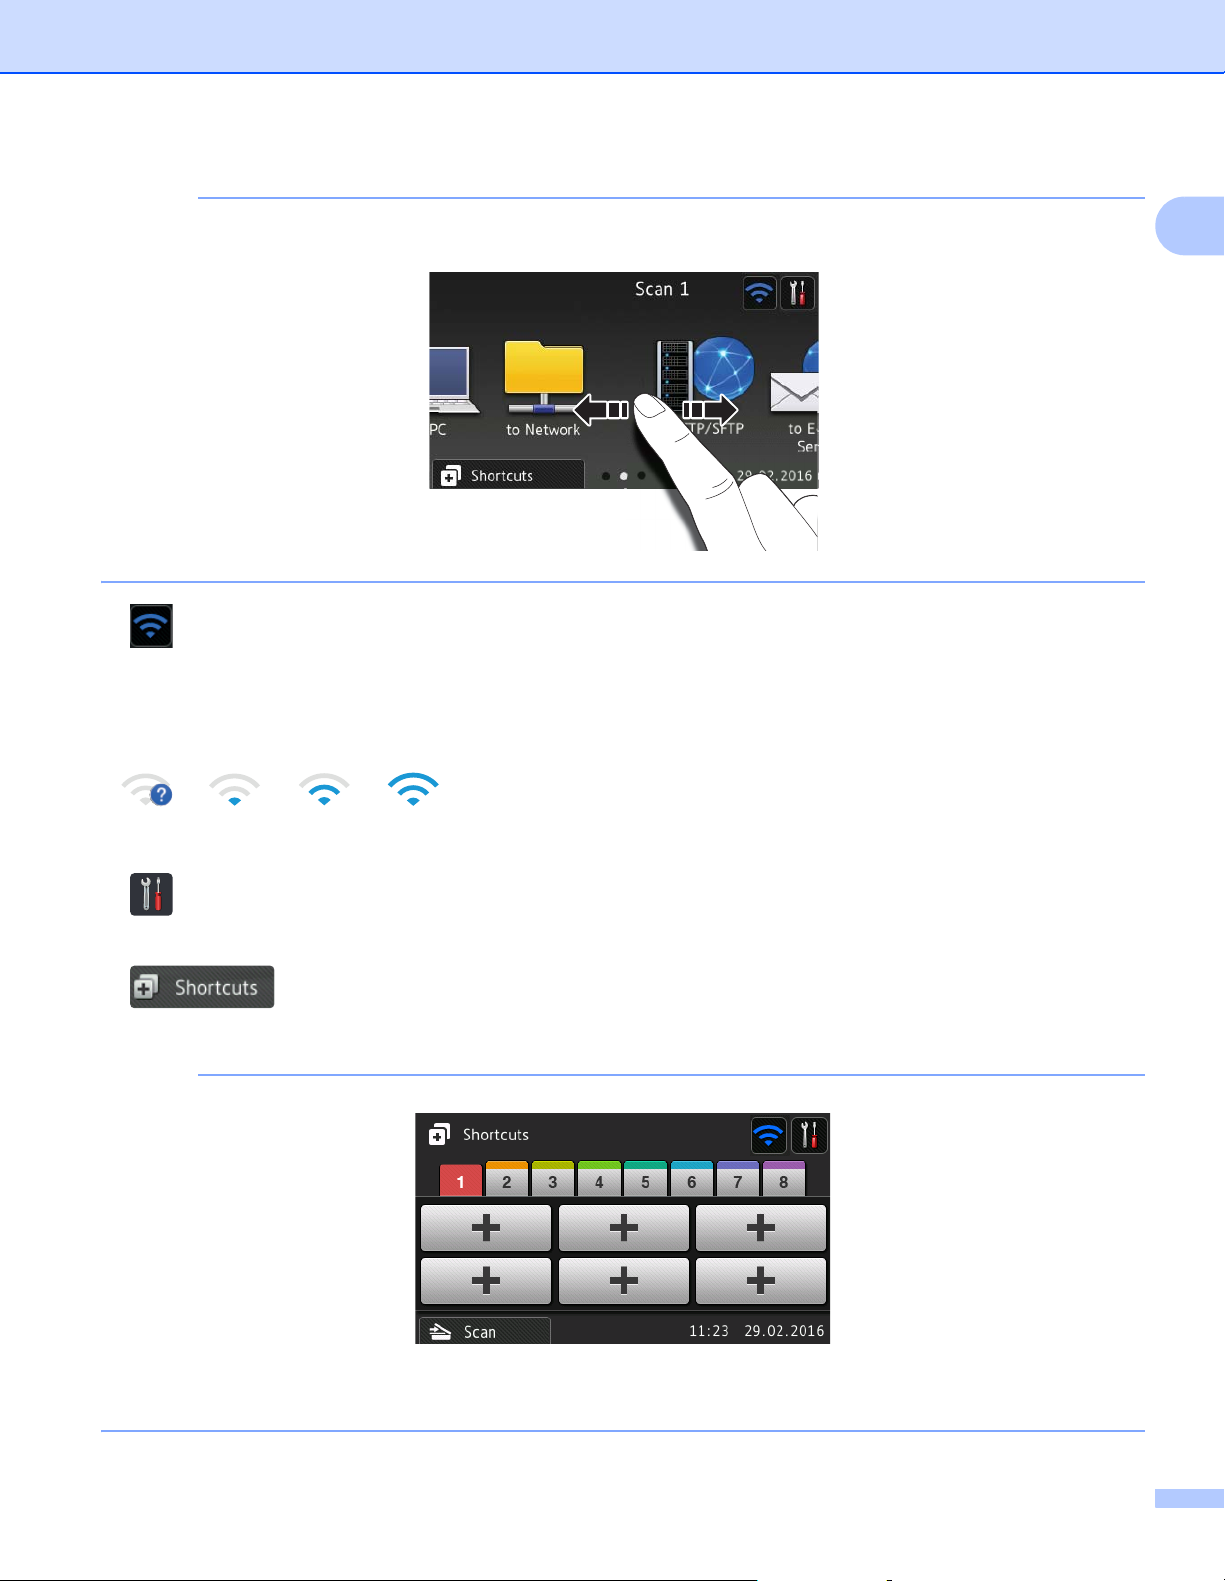
NOTE
“Swiping” means sliding your finger across the Touchscreen to display the next page or item.
1 (WiFi Setup)
A four-level indicator on the Ready mode screen displays the current wireless signal strength if you are
using a wireless connection.
2 (All Settings)
Press to access a menu of all machine settings, (see Settings Screen on page 10).
3 (Shortcuts)
Press to add Shortcuts.
NOTE
Eight Shortcut screens are available with up to six Shortcuts in each Shortcut screen. A total of
48 Shortcuts are available.
0Max

General Information
8
1
4to Web
Press to connect the Brother machine to an Internet service (for more information, see the Web Connect
Guide).
5to PC
Press to access the Scan to PC function.
6 to Network
Press to access the Scan to Network function.
7 to FTP/SFTP
Press to access the Scan to FTP/SFTP function.
8 to E-mail Server
Press to access the Scan to E-mail Server function.
9 to SharePoint
Press to access the Scan to SharePoint function.
10 Apps
Press to connect the Brother machine to the Brother Apps menu (for more information, see the Web
Connect Guide).
11 WS Scan
Press to access the WS Scan function (for more information, see the Network User’s Guide).
12 to USB
Press to access the Scan to USB function.
General Information
9
1
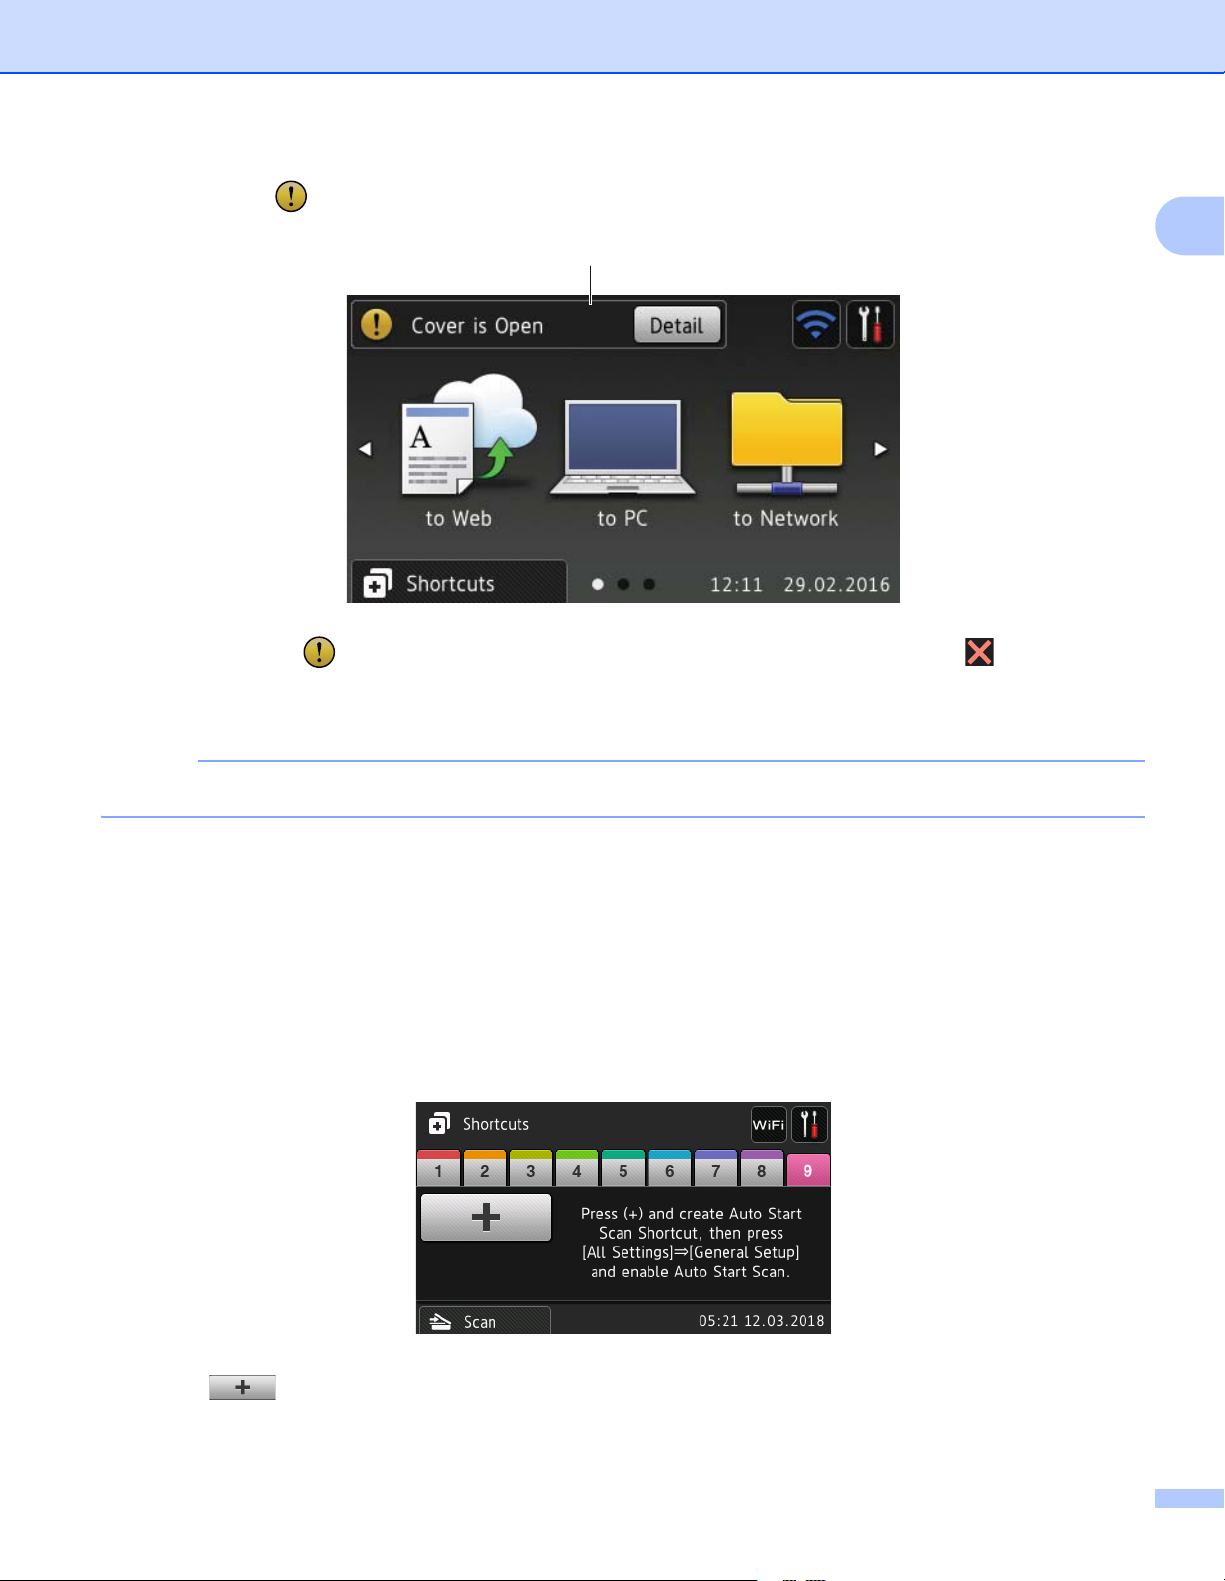
13 Warning icon
The warning icon appears when there is an error or maintenance message; press to return to
Ready mode.
For more information, see Error and Maintenance Messages on page 230.
NOTE
This product adopts the font of ARPHIC TECHNOLOGY CO., LTD.
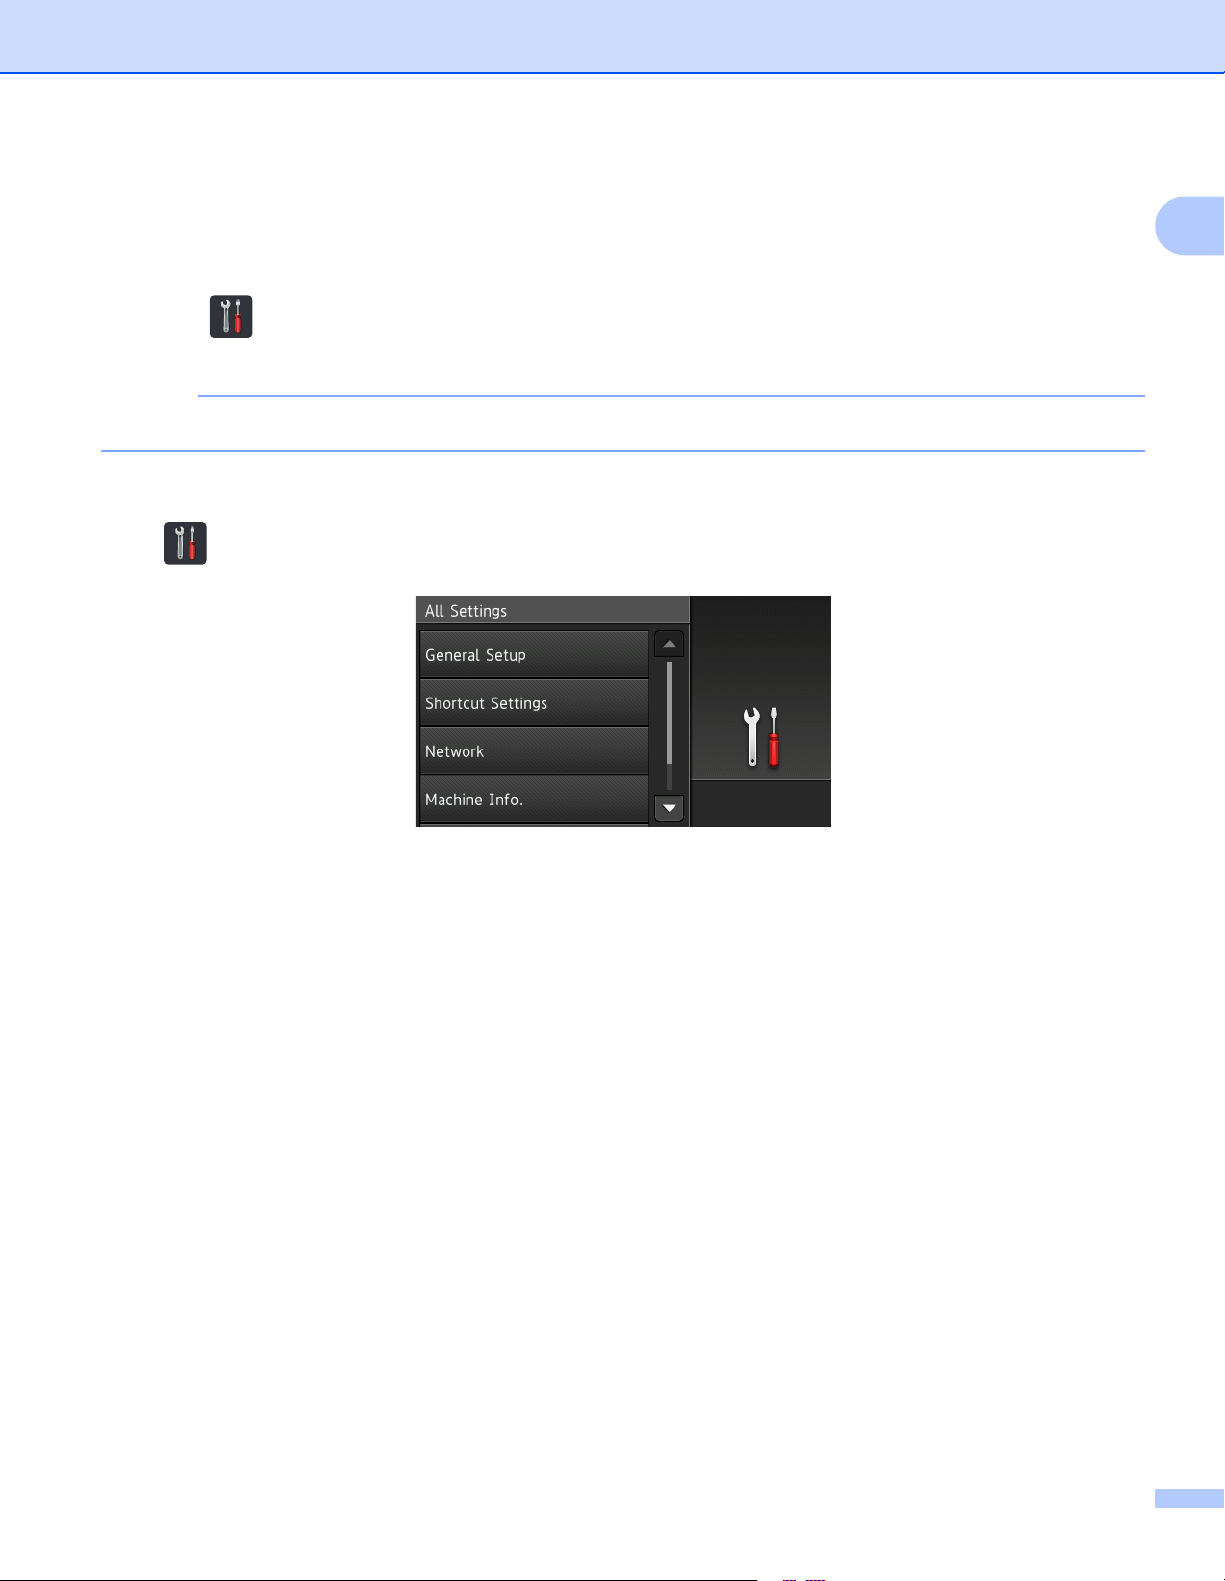
Auto Start Scan 1
The Auto Start Scan feature allows you to start scanning automatically as soon as a document is placed in
the ADF.
To use Auto Start Scan, you must first create an Auto Start Scan Shortcut, and then enable the Auto Start
Scan setting in General Setup:
1 Press Shortcuts.
2 Press the 9th Shortcut tab.
3 Press to add the Auto Start Scan Shortcut.
4 Select the Shortcut function (for example, Scan to PC).
13
General Information
10
1
5 Press Save as Shortcut. When the LCD displays These settings will be saved as a
shortcut., press OK.
6 Enter the Shortcut Name. When the LCD displays Make this a One Touch Shortcut?, press OK.
7 Press (All Settings) to access the Settings menu. Press General Setup > Auto Start Scan
Mode and select On.
NOTE
Only one Auto Start Scan profile can be saved at a time.
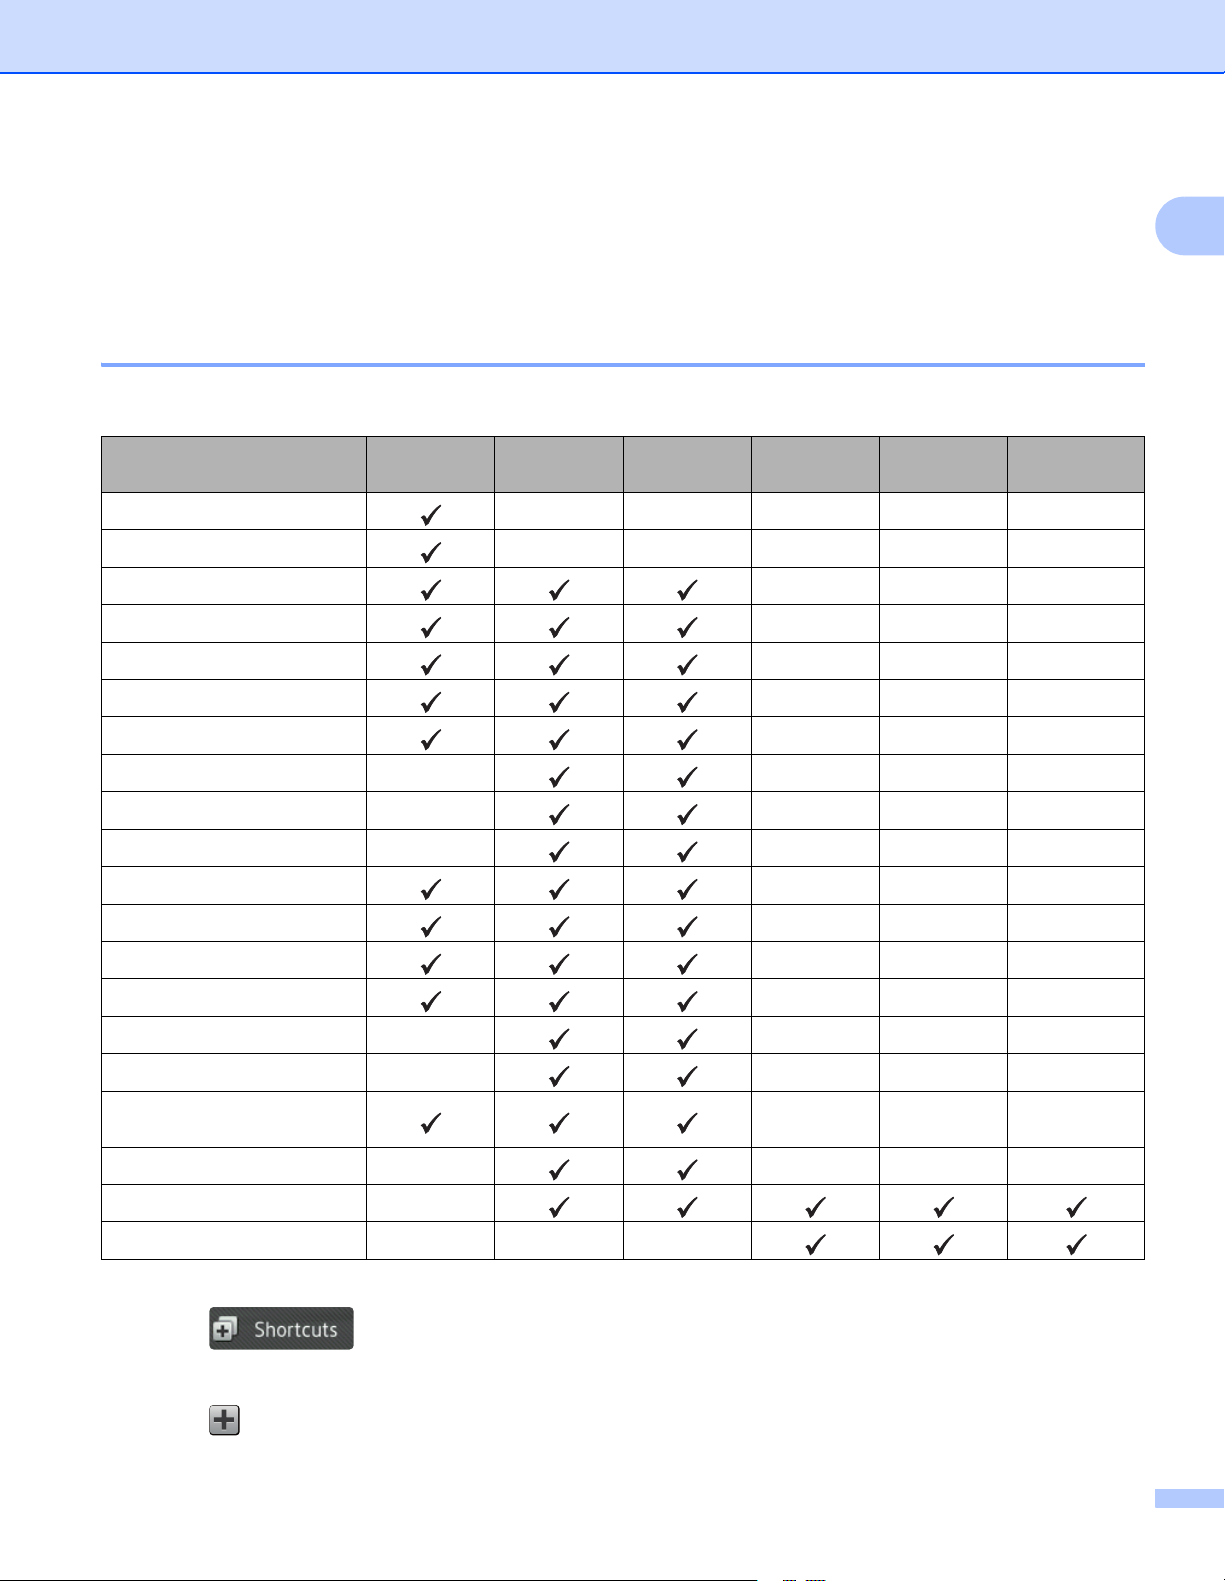
Settings Screen 1
Press (All Settings) to check and access all the machine’s settings.
General Setup
Press to access the full Settings menu.
Shortcut Settings
Press to add Shortcuts.
For more information, see Shortcut Settings (ADS-2800W / ADS-3600W) on page 12.
Network
Press to access Network settings.
Machine Info.
Press to check the machine’s information.
Initial Setup
Press to access the Date & Time, Scan offset correction, Reset, and Local Language menu.

General Information
11
1
Basic Operations 1
Press your finger on the Touchscreen to operate it. To display and access all the screen menus and options,
swipe left, right, up, down, or press d c or a b to scroll through them.
IMPORTANT
DO NOT press the Touchscreen with a sharp object, such as a pen or stylus. It may damage the machine.
The following example shows how to change a machine setting. In this example, the Document Size setting
in Scan to USB is changed to Auto.
1 Swipe left or right, or press d or c to display Scan 3.
2 Press to USB.
3 Press Options.
4 Press a or b to display Document Size.
5 Press Document Size.
6 Press a or b to display Auto.
7 Press Auto.
NOTE
Press to go back to the previous screen or menu.
General Information
12
1
Shortcut Settings (ADS-2800W / ADS-3600W) 1
Add the scan and Web Connect settings you use most frequently as your Shortcuts. Later recall and apply
these settings. Add up to 48 Shortcuts.
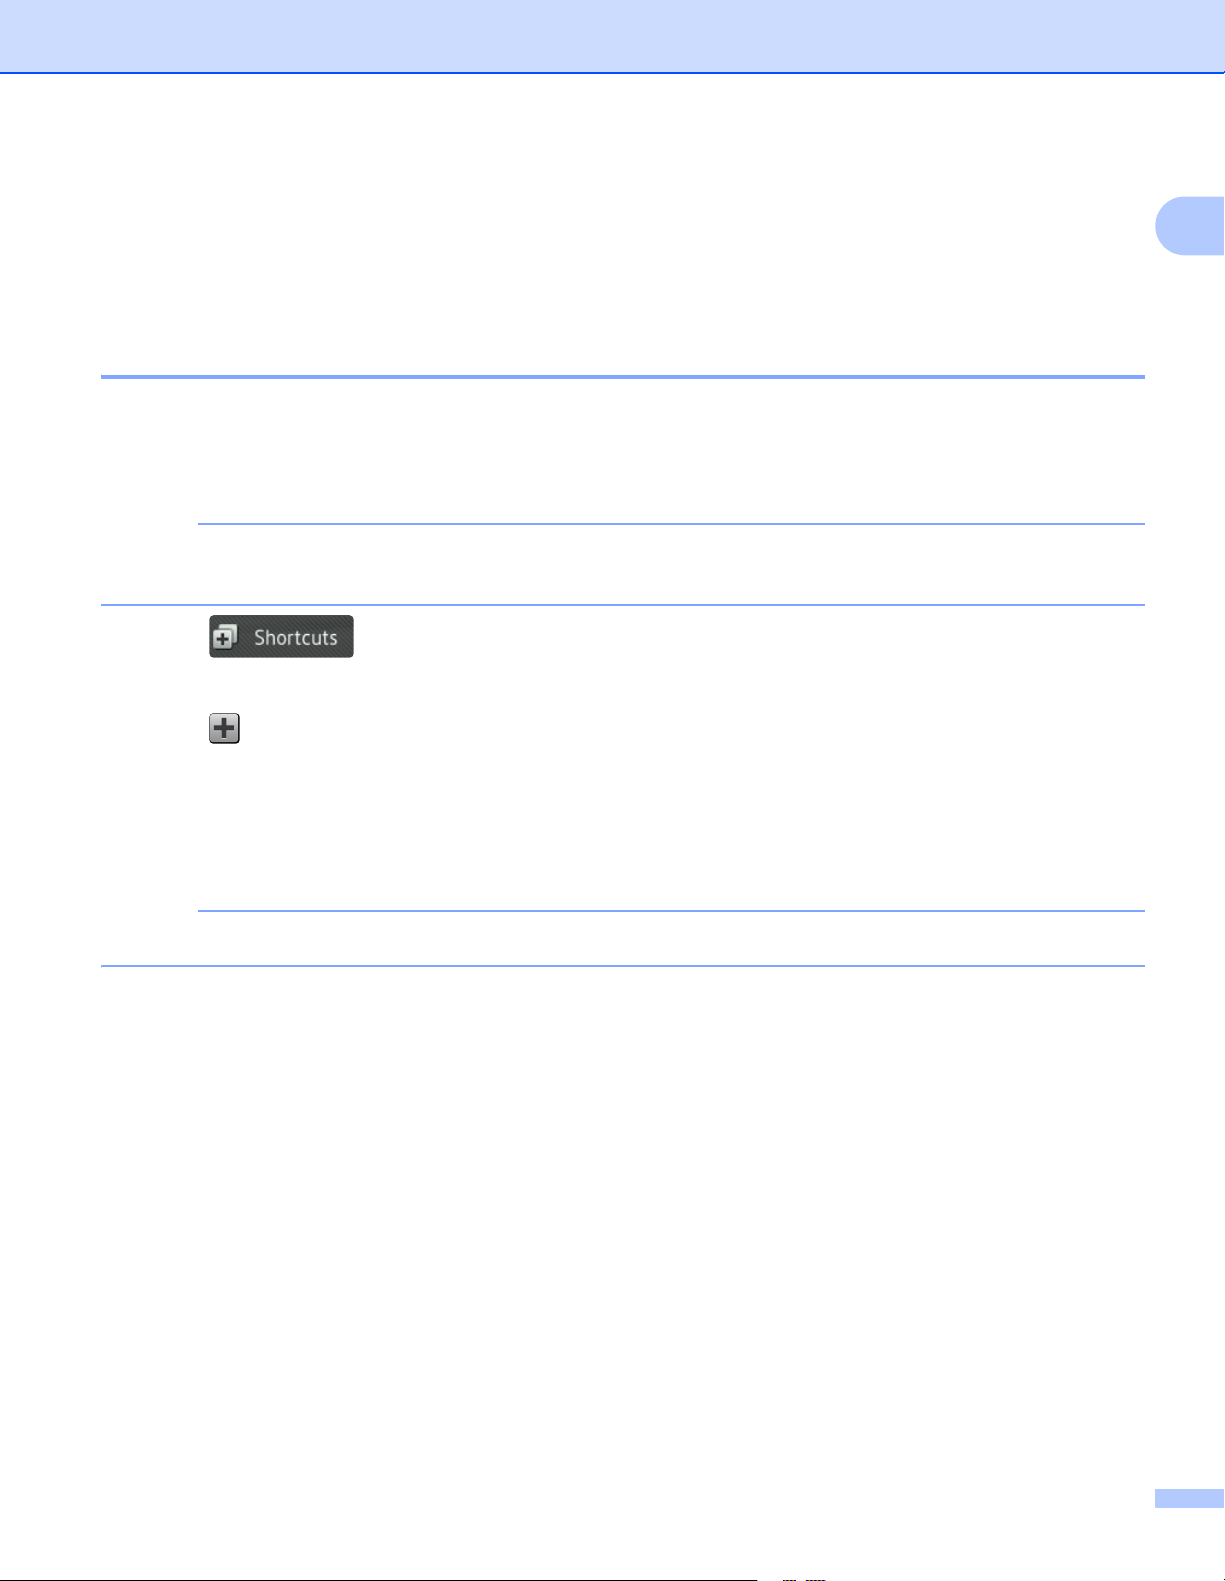
Adding Scan Shortcuts 1
The following settings can be included in a scan Shortcut:
*1
The Profile name setting contains many items. For more information, see the Network User’s Guide.
1 Press .
2 Press a tab from 1 to 8.
3 Press where you have not added a Shortcut.
Setting to PC to USB
to E-mail
Server
to FTP /
SFTP
to Network
to
SharePoint
PC Name
---- -
Scan Settings
---- -
2-sided Scan
-- -
Scan Type
-- -
Resolution
-- -
File Type
-- -
Document Size
-- -
File Name
-
-- -
File Name Style
-
-- -
File Size
-
-- -
Auto Deskew
-- -
Skip Blank Page
-- -
Brightness
-- -
Contrast
-- -
Color
-
-- -
Black and White/Gray
-
-- -
Skip blank page
sensitivity
-- -
Margin Settings
-
-- -
Document Separation
-
Profile name
*1
---

General Information
13
1
4 Swipe up or down, or press a or b to display the type of scan you want, and then press it.
5 Do one of the following:
If you pressed to USB, go to step 8.
If you pressed to E-mail Server, go to step 6.
If you pressed to OCR, to File, to Image or to E-mail, go to step 7.
If you pressed to FTP/SFTP, to Network or to SharePoint, swipe up or down, or press a or b
to display the Profile Name, and then press it. Go to step B.
NOTE
To add a Shortcut for to FTP/SFTP, to Network or to SharePoint you must have added the Profile
Name beforehand. See the Network User’s Guide: Web Based Management.
6 Do one of the following:
To enter an email address that is not in the Address Book, press Manual. Enter the email address
using the keyboard on Touchscreen. (For help entering letters, see Entering Text (ADS-2800W /
ADS-3600W) on page 254.)
Press OK.
To enter an email address from the Address Book, press Address Book. Swipe up or down,
or press a or b to display the email address you want, and then press it.
Press OK.
Confirm the email address and press OK. Go to step 8.
NOTE
Press Detail to view the list of addresses you have entered.
7 Do one of the following:
When the machine is connected to a computer via USB:
Press USB to confirm USB is selected as the PC Name. Go to step A.
When the machine is connected to a network:
Swipe up or down, or press a or b to display the PC Name, and then press it. Go to step 8.
8 Press Options.
9 Swipe up or down, or press a or b to display the available settings, and then press the setting you want.
0 Swipe up or down, or press a or b to display the available options for the setting, and then press the
option you want.
Repeat steps 9 and 0 until you have selected all the settings for this Shortcut.
Press OK.
A Review the settings you have selected:
To make more changes, return to step 8.
When finished, press Save as Shortcut.

General Information
14
1
B Review your settings on the Touchscreen, and then press OK.
C Enter a name for the Shortcut. (For help entering letters, see Entering Text (ADS-2800W / ADS-3600W)
on page 254.)
Press OK.
D Press OK to save your Shortcut.
Adding Web Connect Shortcuts 1
The settings for these services can be included in a Web Connect Shortcut:
Box
Google Drive™
Evernote
®
Evernote Business
Dropbox
OneDrive
OneNote
NOTE
• Web services may have been added and service names may have been changed by the provider since
this document was published.
• To add a Web Connect Shortcut, you must have an account with the web service (for more information,
see the Web Connect Guide).
1 Press .
2 Press a tab from 1 to 8.
3 Press where you have not added a Shortcut.
4 Press to Web.
5 If information about the Internet connection appears, read and confirm it by pressing OK.
6 Swipe left or right, or press d or c to display the available services, and then press the service you want.
7 Press your account.
If the account needs a PIN code, enter the PIN.
Press OK.
8 Press the function you want.
NOTE
The available functions may vary depending on the service.
9 Read and confirm the displayed list of functions you have selected, and then press OK.
General Information
15
1
0 Enter a name for the Shortcut. (For help entering letters, see Entering Text (ADS-2800W / ADS-3600W)
on page 254.)
Press OK.
A Press OK to save your Shortcut.
Adding Apps Shortcuts 1
The settings for these services can be included in an Apps Shortcut:
NoteScan
Outline&Scan
NOTE
Web services may have been added and service names may have been changed by the provider since
this document was published.
1 Press .
2 Press a tab from 1 to 8.
3 Press where you have not added a Shortcut.
4 Press Apps.
5 If information about the Internet connection appears, read the information and confirm it by pressing OK.
6 Swipe left or right, or press d or c to display the available apps, and then press the app you want.
NOTE
The available apps may vary depending on the service.
7 Press your account.
If the account requires a PIN code, enter the PIN.
Press OK.
8 Read and confirm the displayed list of apps you selected, and then press OK.
9 Enter a name for the Shortcut. (For help entering letters, see Entering Text (ADS-2800W / ADS-3600W)
on page 254.)
Press OK.
0 Press OK to save your Shortcut.
General Information
16
1
Adding ID Card Shortcuts (ADS-3600W only) 1
1 Press .
2 Press a tab from 1 to 8 to display the Shortcut you want.
3 Hold down the Shortcut button.
4 Press Register NFC.
NOTE
• You cannot use the same ID card for different Shortcuts.
• To use the ID card for another Shortcut, unregister the card first, and then register it with the new Shortcut.
Changing Shortcuts 1
NOTE
You cannot change a Web Connect Shortcut. To change the Shortcut, you must delete it, and then add
a new Shortcut.
(For more information, see Deleting Shortcuts on page 17 and Adding Web Connect Shortcuts on page 14.)
1 Press .
2 Press a tab from 1 to 8 to display the Shortcut you want to change.
3 Press the Shortcut you want, and then press Options. The settings for the Shortcut that you chose
appears.
4 Change the settings for the Shortcut you chose in step 3 (for more information, see Shortcut Settings
(ADS-2800W / ADS-3600W) on page 12).
5 When finished, press OK, and then press Save as Shortcut.
6 Press OK to confirm.
7 Do one of the following:
To overwrite the Shortcut, press Yes.
If you do not want to overwrite the Shortcut, press No to enter a new Shortcut name. Go to step 8.
8 To create a new Shortcut, press and hold down to delete the current name, and then enter a
new name. (For help entering letters, see Entering Text (ADS-2800W / ADS-3600W) on page 254.)
Press OK.
9 Press OK to confirm.
General Information
17
1
Editing Shortcut Names 1
Edit a Shortcut name.
1 Press .
2 Press a tab from 1 to 8 to display the Shortcut you want.
3 Hold down the Shortcut button.
4 Press Rename.
5 To edit the name, hold down to delete the current name, and then enter a new name. (For help
entering letters, see Entering Text (ADS-2800W / ADS-3600W) on page 254.)
Press OK.
Deleting Shortcuts 1
Delete a Shortcut.
1 Press .
2 Press a tab from 1 to 8 to display the Shortcut you want to delete.
3 Hold down the Shortcut button.
4 Press Delete to delete the Shortcut that you chose in step 3.
5 Press Yes to confirm.
Recalling Shortcuts 1
The Shortcut settings appears on the Shortcut screen. To recall a Shortcut, simply press the Shortcut name.
1 Press .
2 Press a tab from 1 to 8 to display the Shortcut you want.
3 Press the Shortcut.
General Information
18
1
Accessing Brother Utilities (Windows
®
) 1
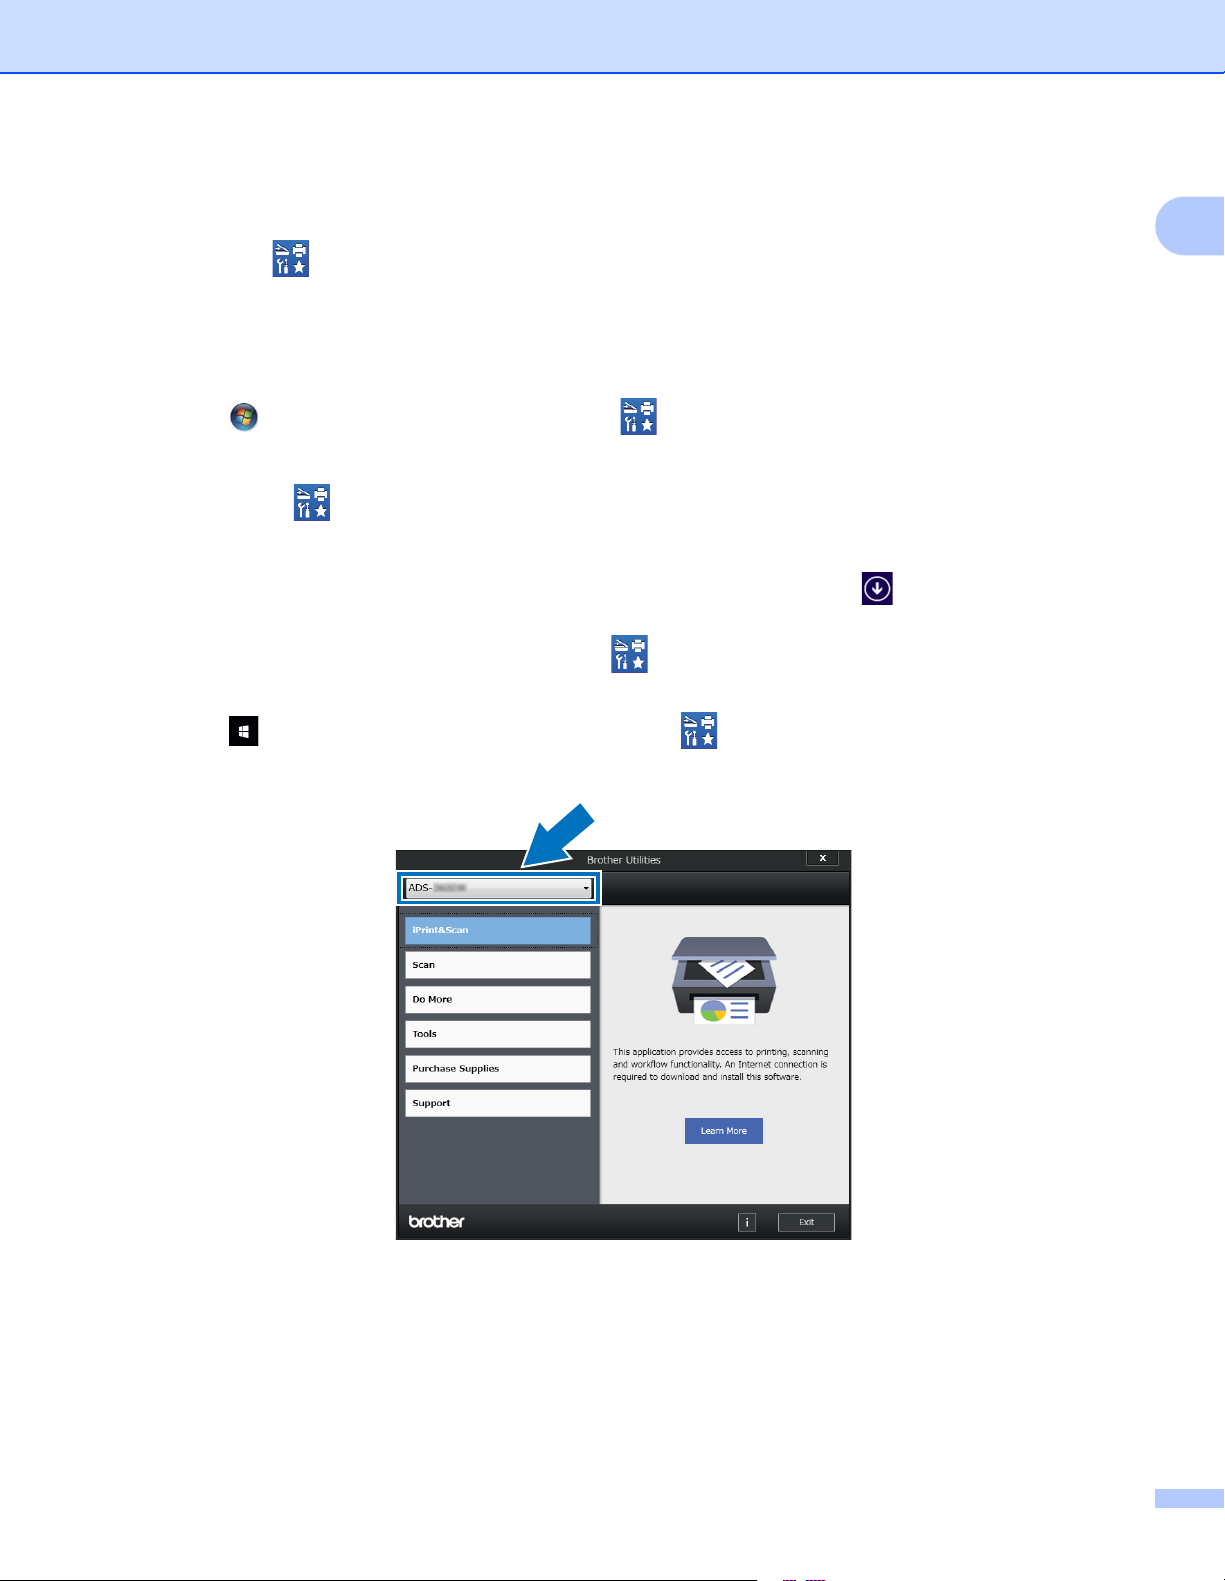
Brother Utilities is an application launcher that offers convenient access to all Brother applications
installed on your device.
1 Launch Brother Utilities for your operating system:
Windows
®
7 / Windows Vista
®
/ Windows
®
XP
Click (Start) > All Programs > Brother > (Brother Utilities).
Windows
®
8
Tap or click (Brother Utilities) either on the Start screen or the desktop.
Windows
®
8.1
Move your mouse to the lower left corner of the Start screen and click (if you are using a
touch-based device, swipe up from the bottom of the Start screen to bring up the Apps screen).
When the Apps screen appears, tap or click (Brother Utilities).
Windows
®
10
Click (Start) menu, select All apps > Brother > (Brother Utilities).
2 Select ADS-XXXXX (where XXXXX is the name of your model).
3 Select the operation you want to use.
General Information
19
1
General Setup (ADS-2400N / ADS-3000N) 1
Set Date&Time 1
1 Start the application.
Windows
®
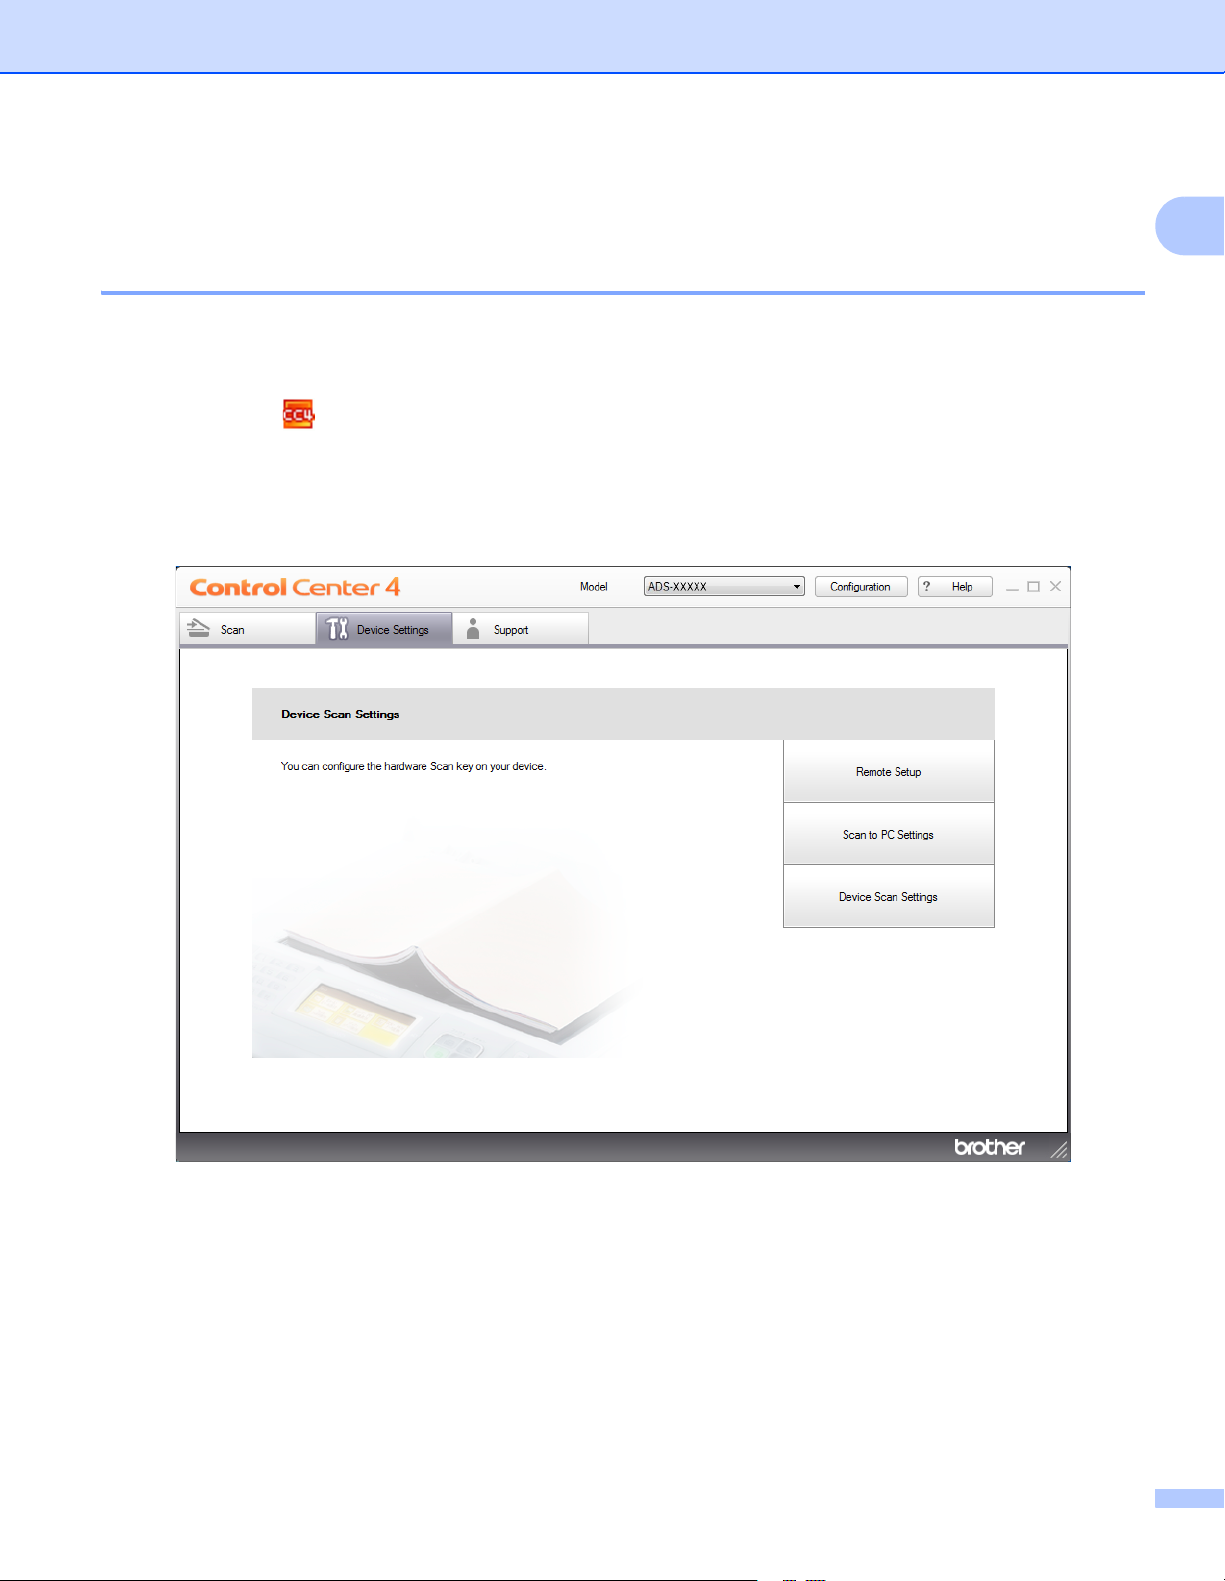
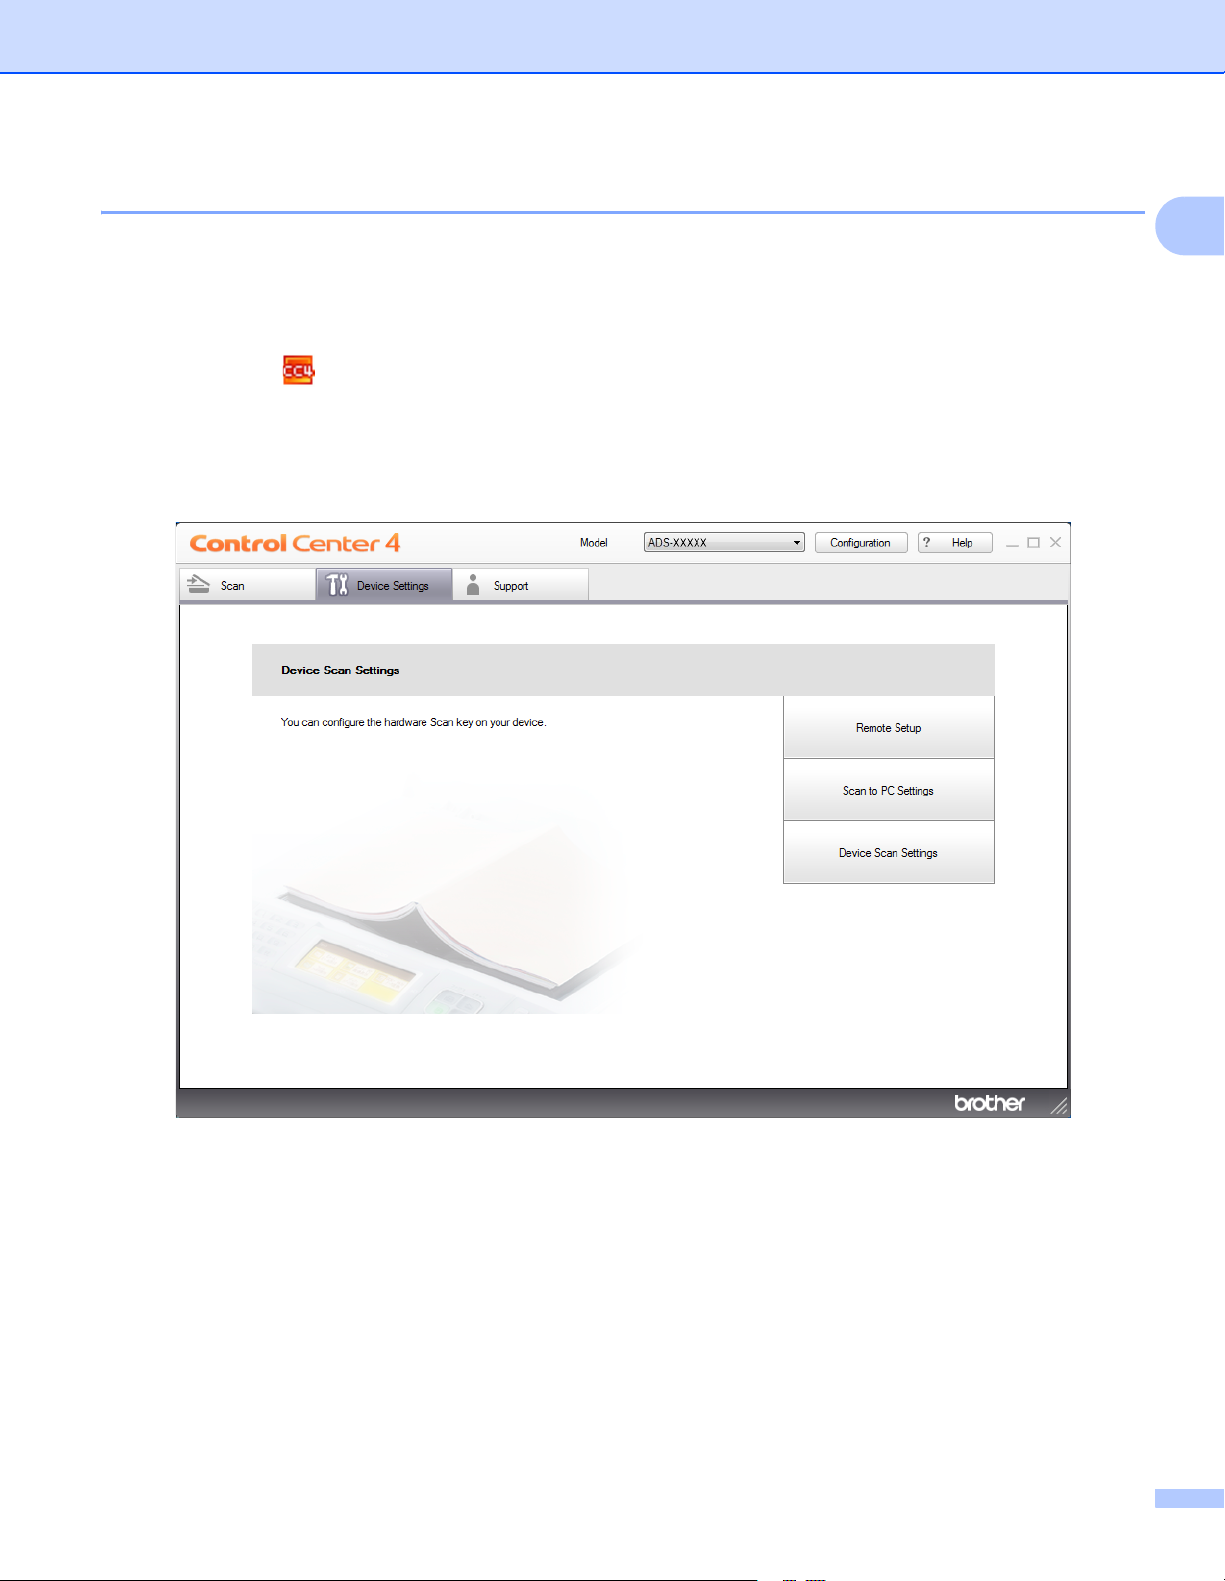
a Click the (ControlCenter4) icon in the task tray and select Open from the menu.
The ControlCenter4 window appears.
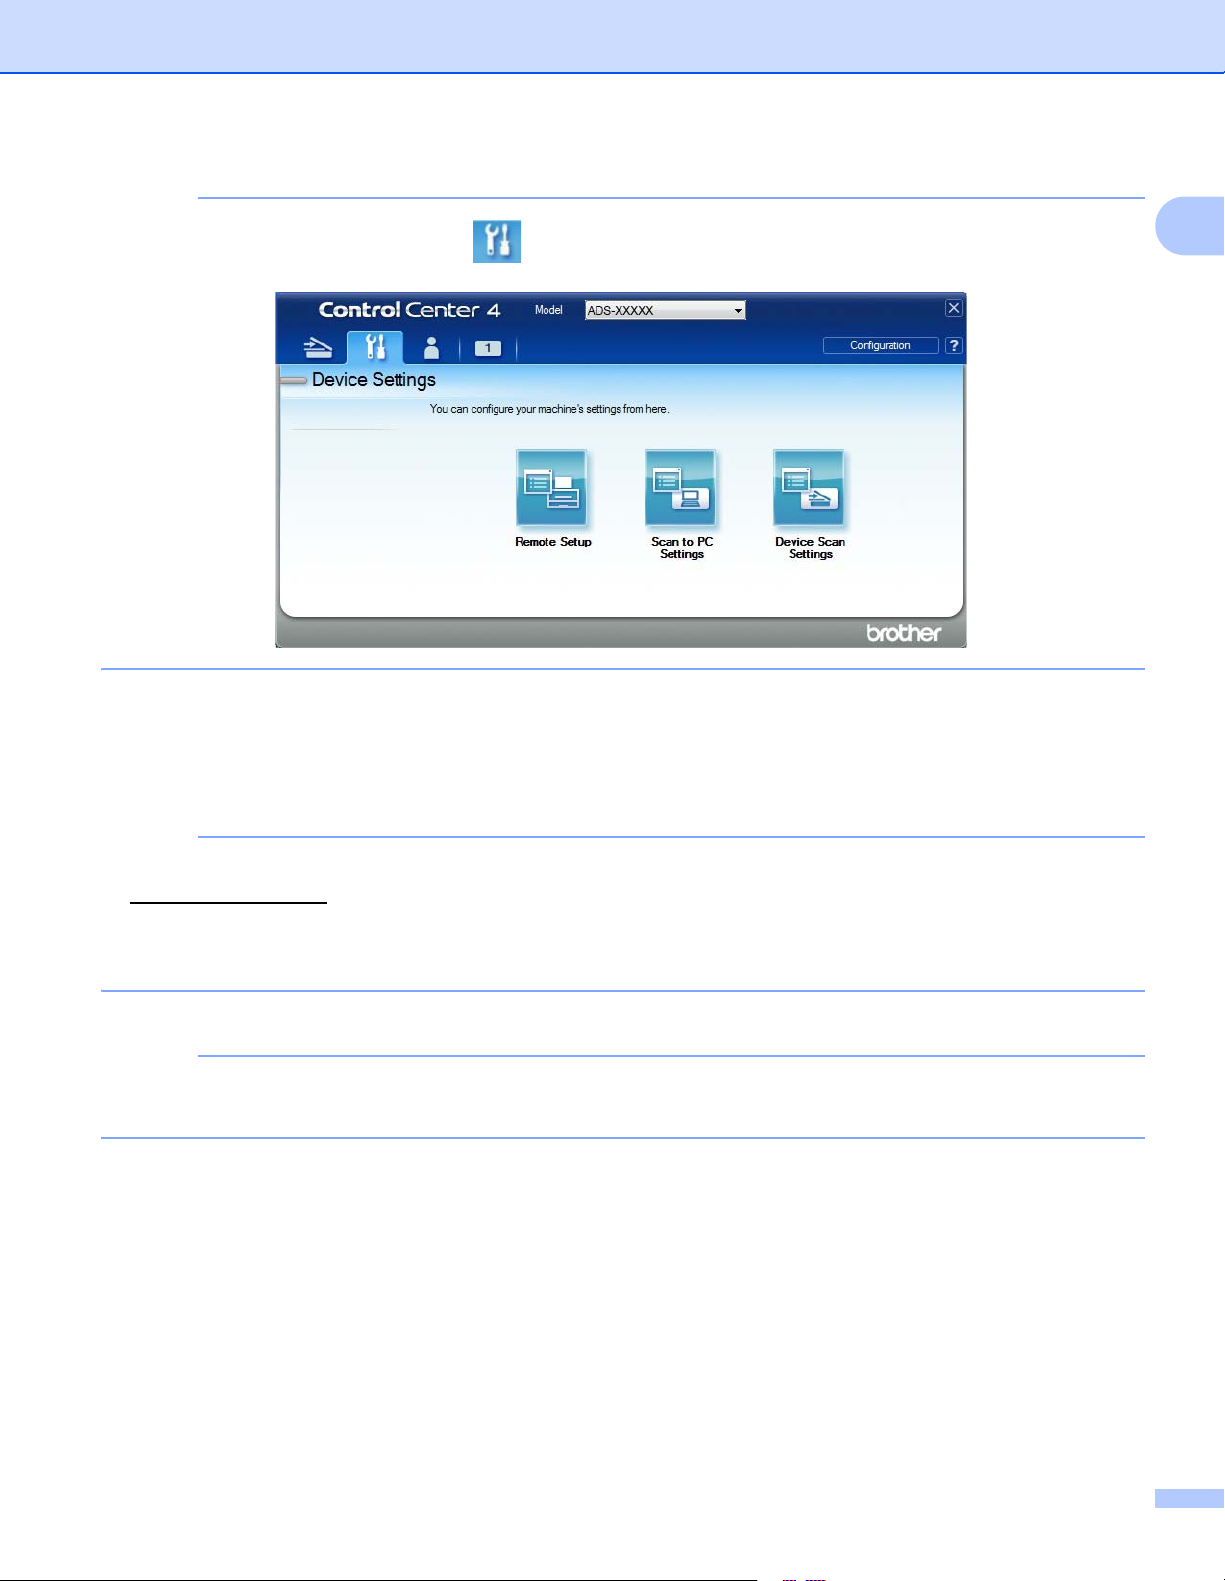
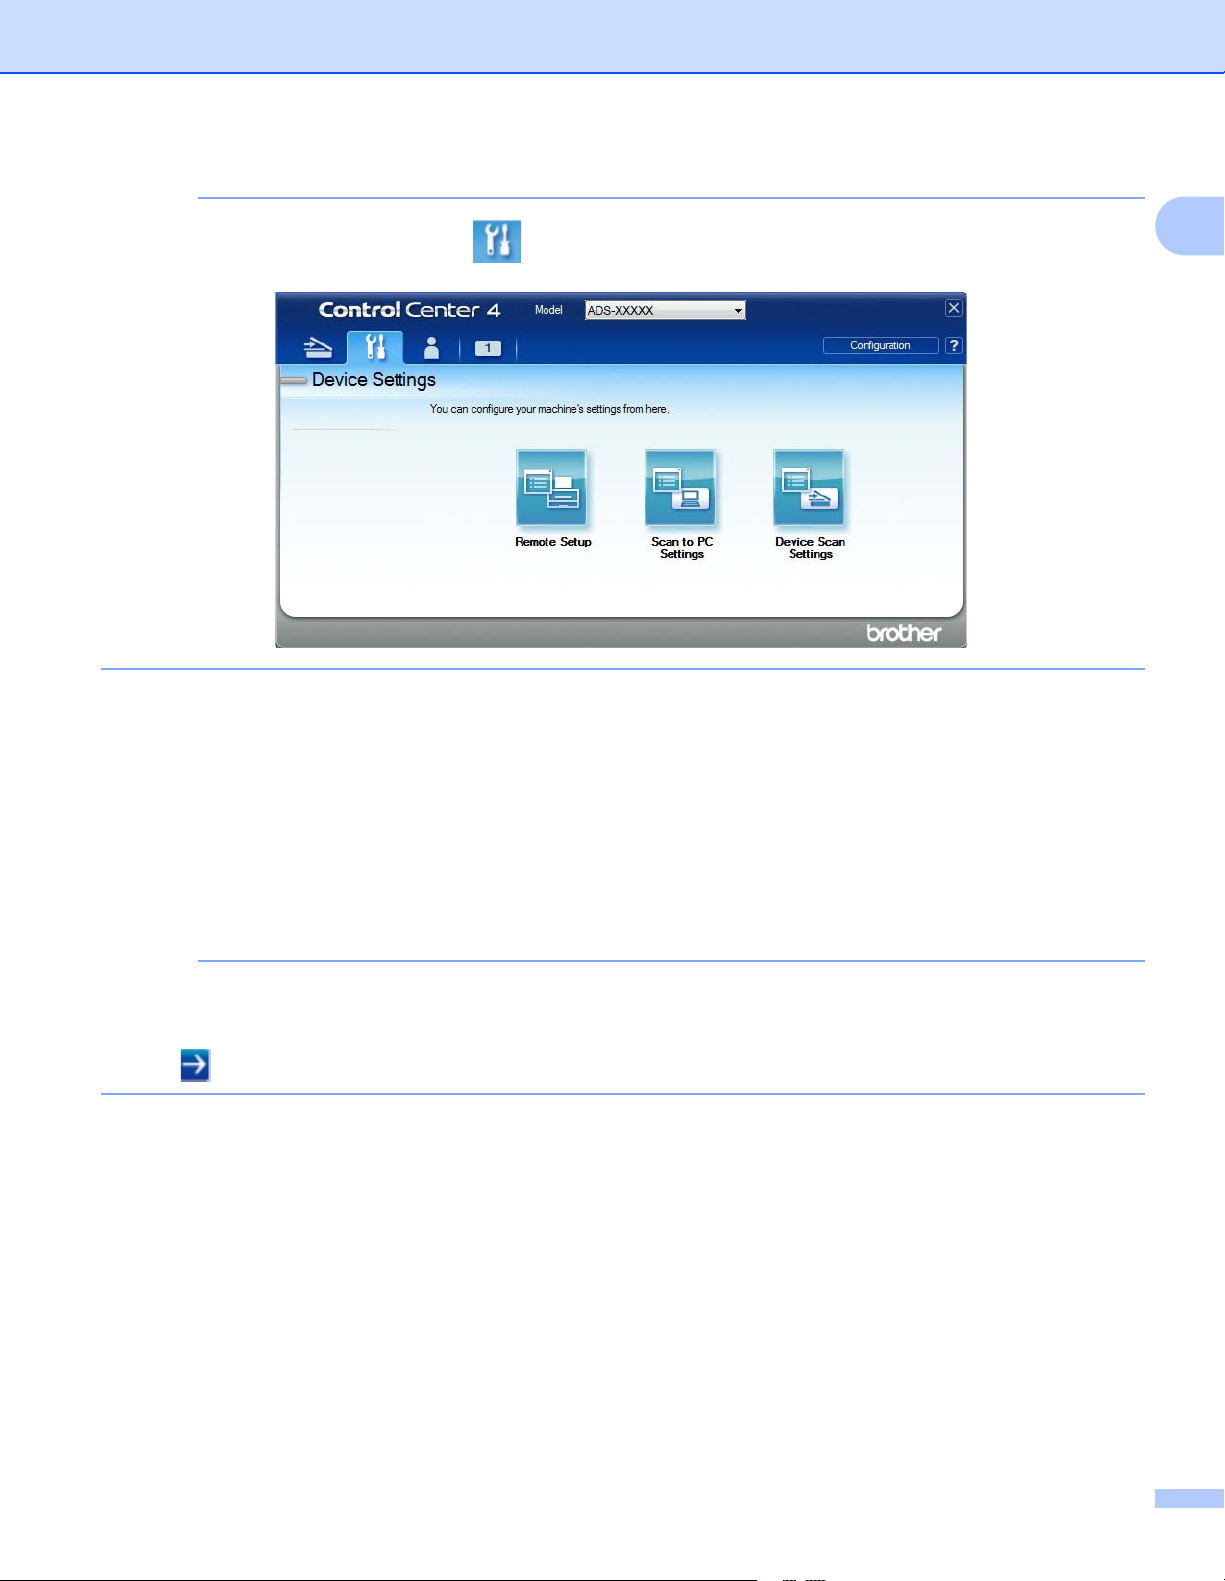
b Click the Device Settings tab (the example below uses Home Mode).
c Click the Remote Setup button.

General Information
20
1
NOTE
If using Advanced Mode, click the (Settings) icon to access Device Settings.
Macintosh
a In the Finder menu bar, click Go > Applications > Brother.
b Double-click the Remote Setup icon.
NOTE
• To use Remote Setup, go to your model's Downloads page on the Brother Solutions Center at
support.brother.com
and download Remote Setup from Utilities.
• Remote Setup for Mac supports USB connections only.
• Remote Setup for Mac supports macOS 10.13 or earlier.
2 Click the Remote Setup button. The Remote Setup window appears.
NOTE
For more information about Remote Setup, see Set Up the Brother Machine from Your Computer
on page 203.
General Information
21
1
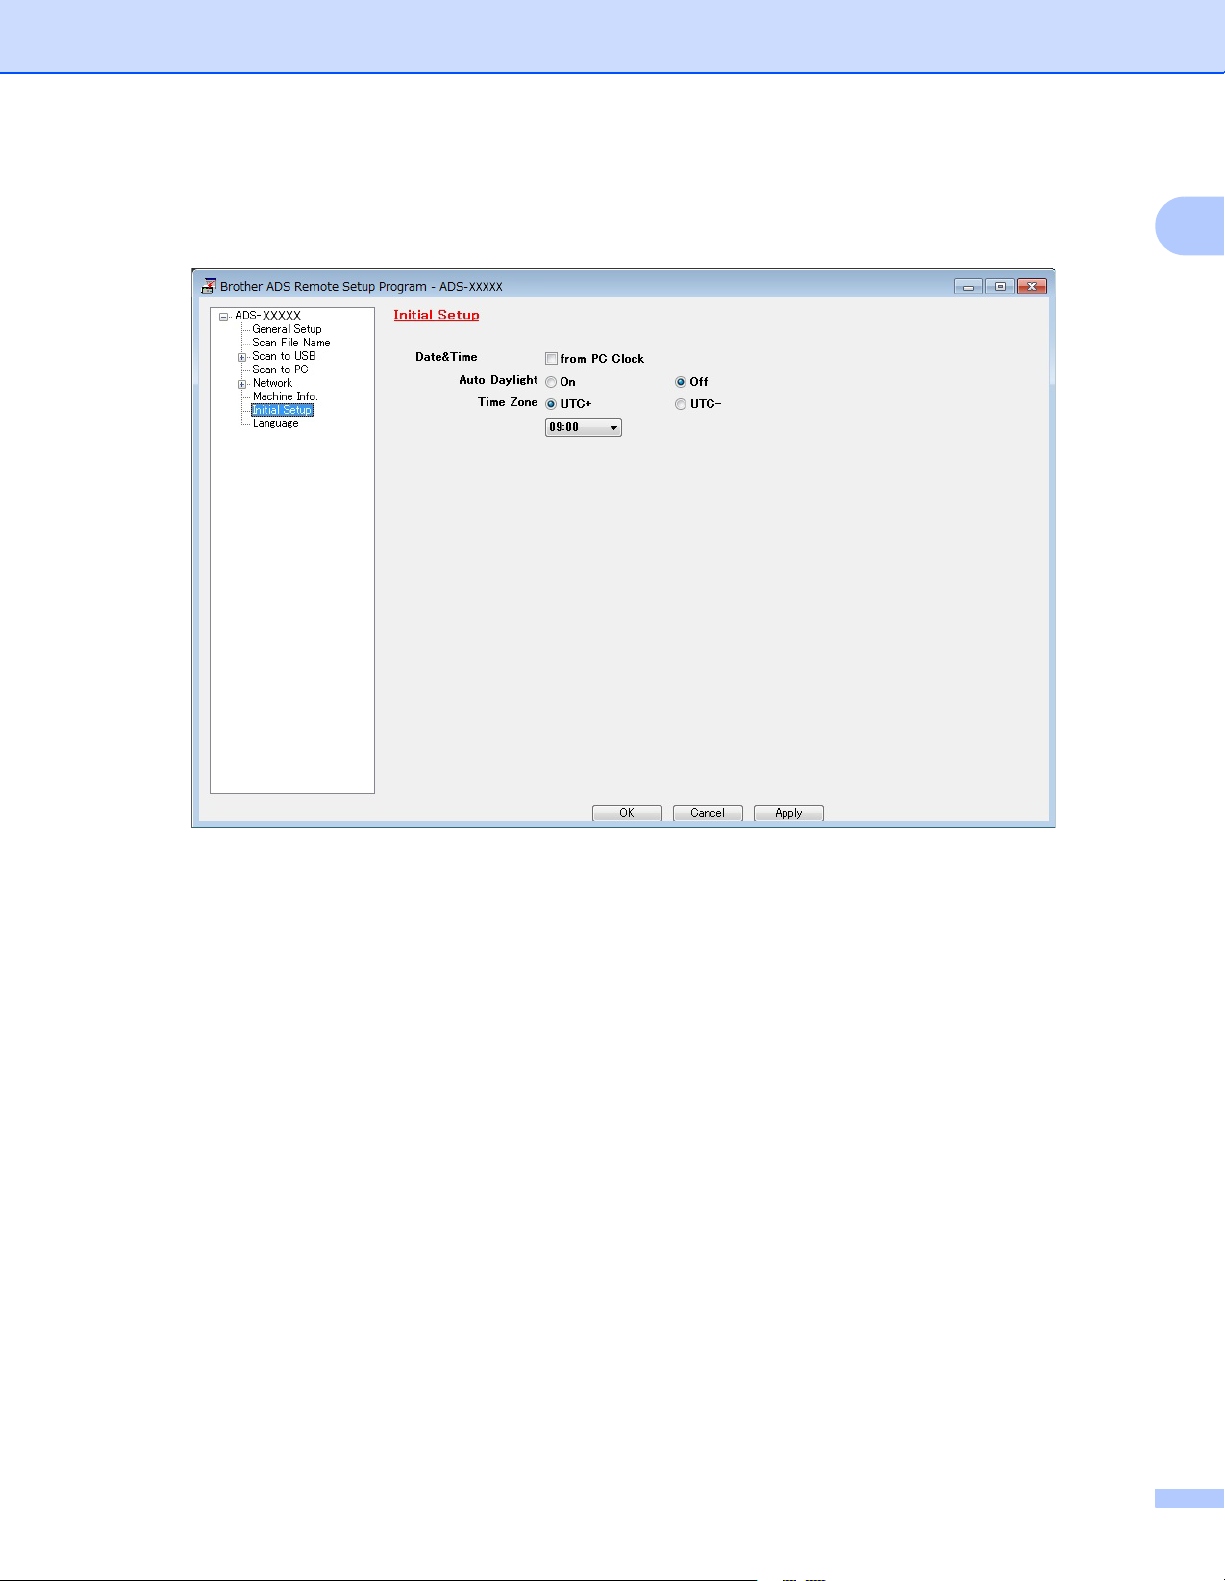
3 Select Initial Setup in the left navigation pane.
Windows
®
General Information
22
1
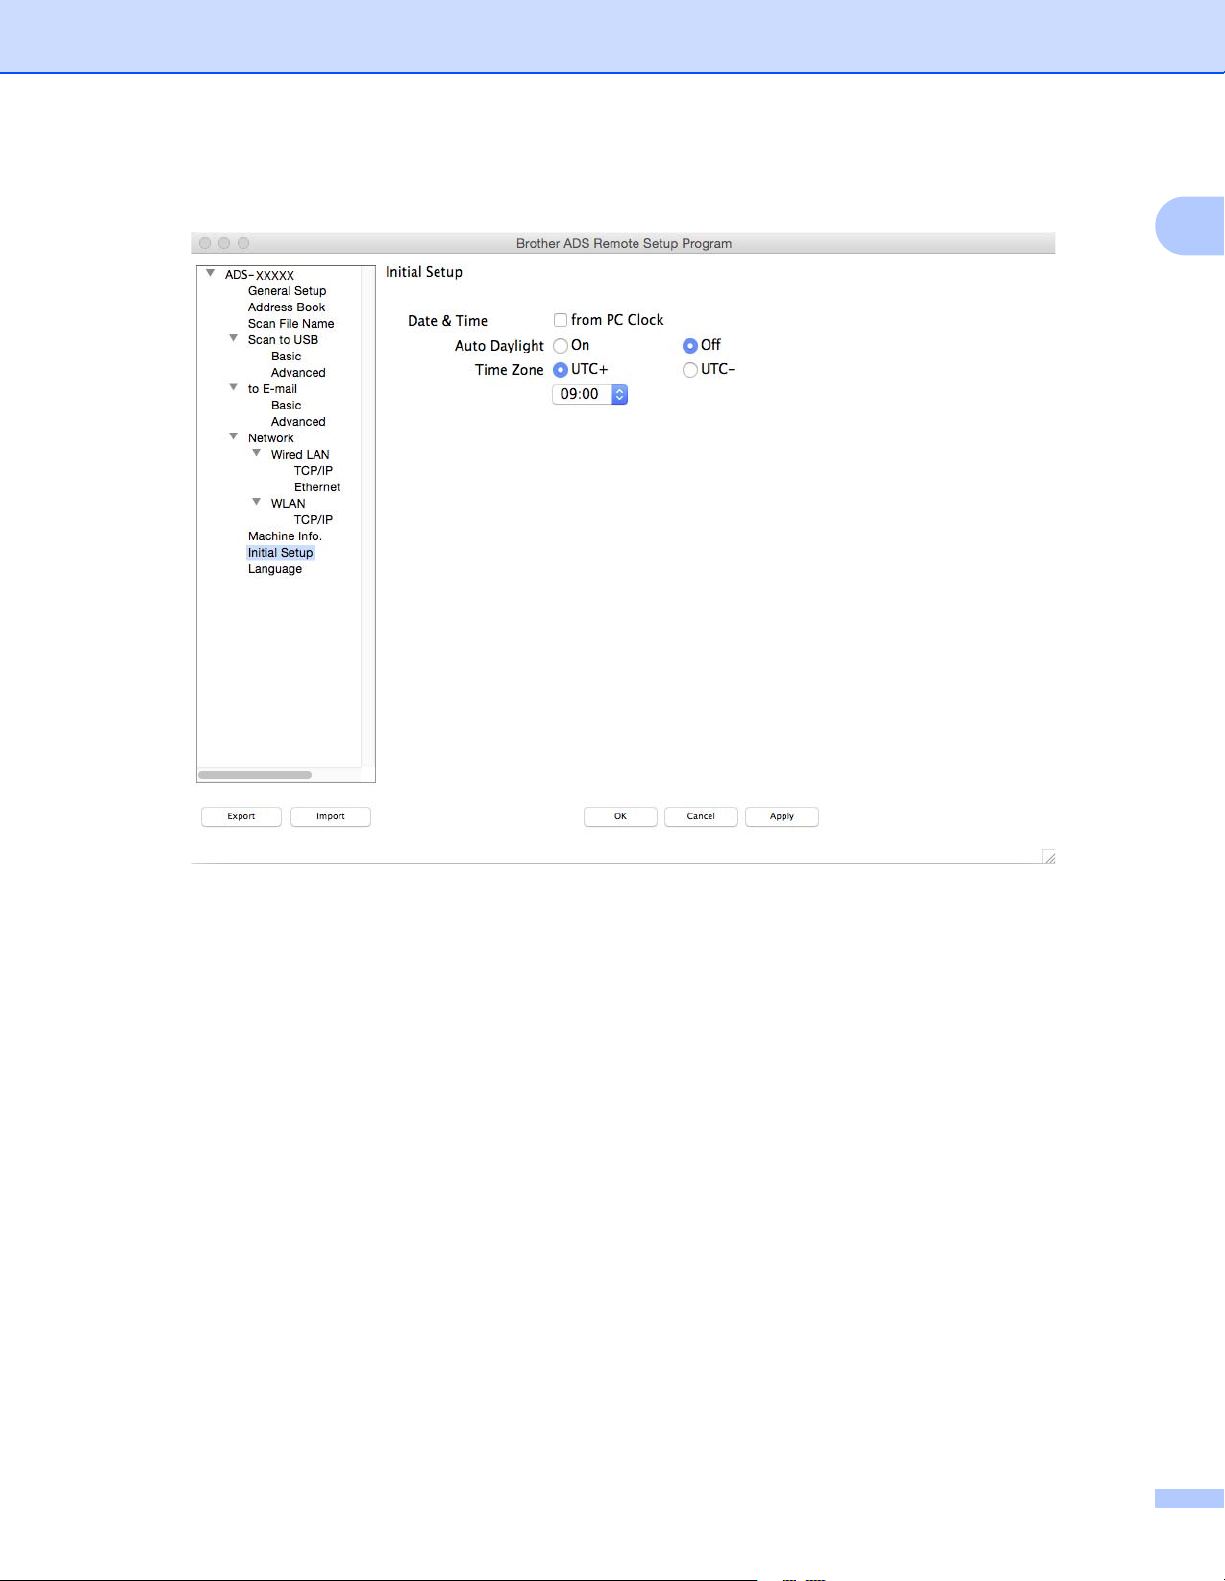
Macintosh
4 Select Date&Time.
If you set Auto Daylight to On, the time will be adjusted forward one hour in the spring and adjusted
backward one hour in the autumn.
5 Click OK.

General Information
23
1
Set Sleep Time 1
1 Start the application.
Windows
®
a Click the (ControlCenter4) icon in the task tray and select Open from the menu.
The ControlCenter4 window appears.
b Click the Device Settings tab (the example below uses Home Mode).
c Click the Remote Setup button.
General Information
24
1
NOTE
If using Advanced Mode, click the (Settings) icon to access Device Settings.
Macintosh
a In the Finder menu bar, click Go > Applications > Brother.
b Double-click the Remote Setup icon.
NOTE
• To use Remote Setup, go to your model's Downloads page on the Brother Solutions Center at
support.brother.com
and download Remote Setup from Utilities.
• Remote Setup for Mac supports USB connections only.
• Remote Setup for Mac supports macOS 10.13 or earlier.
2 The Remote Setup window appears.
NOTE
For more information about Remote Setup, see Set Up the Brother Machine from Your Computer
on page 203.
General Information
25
1
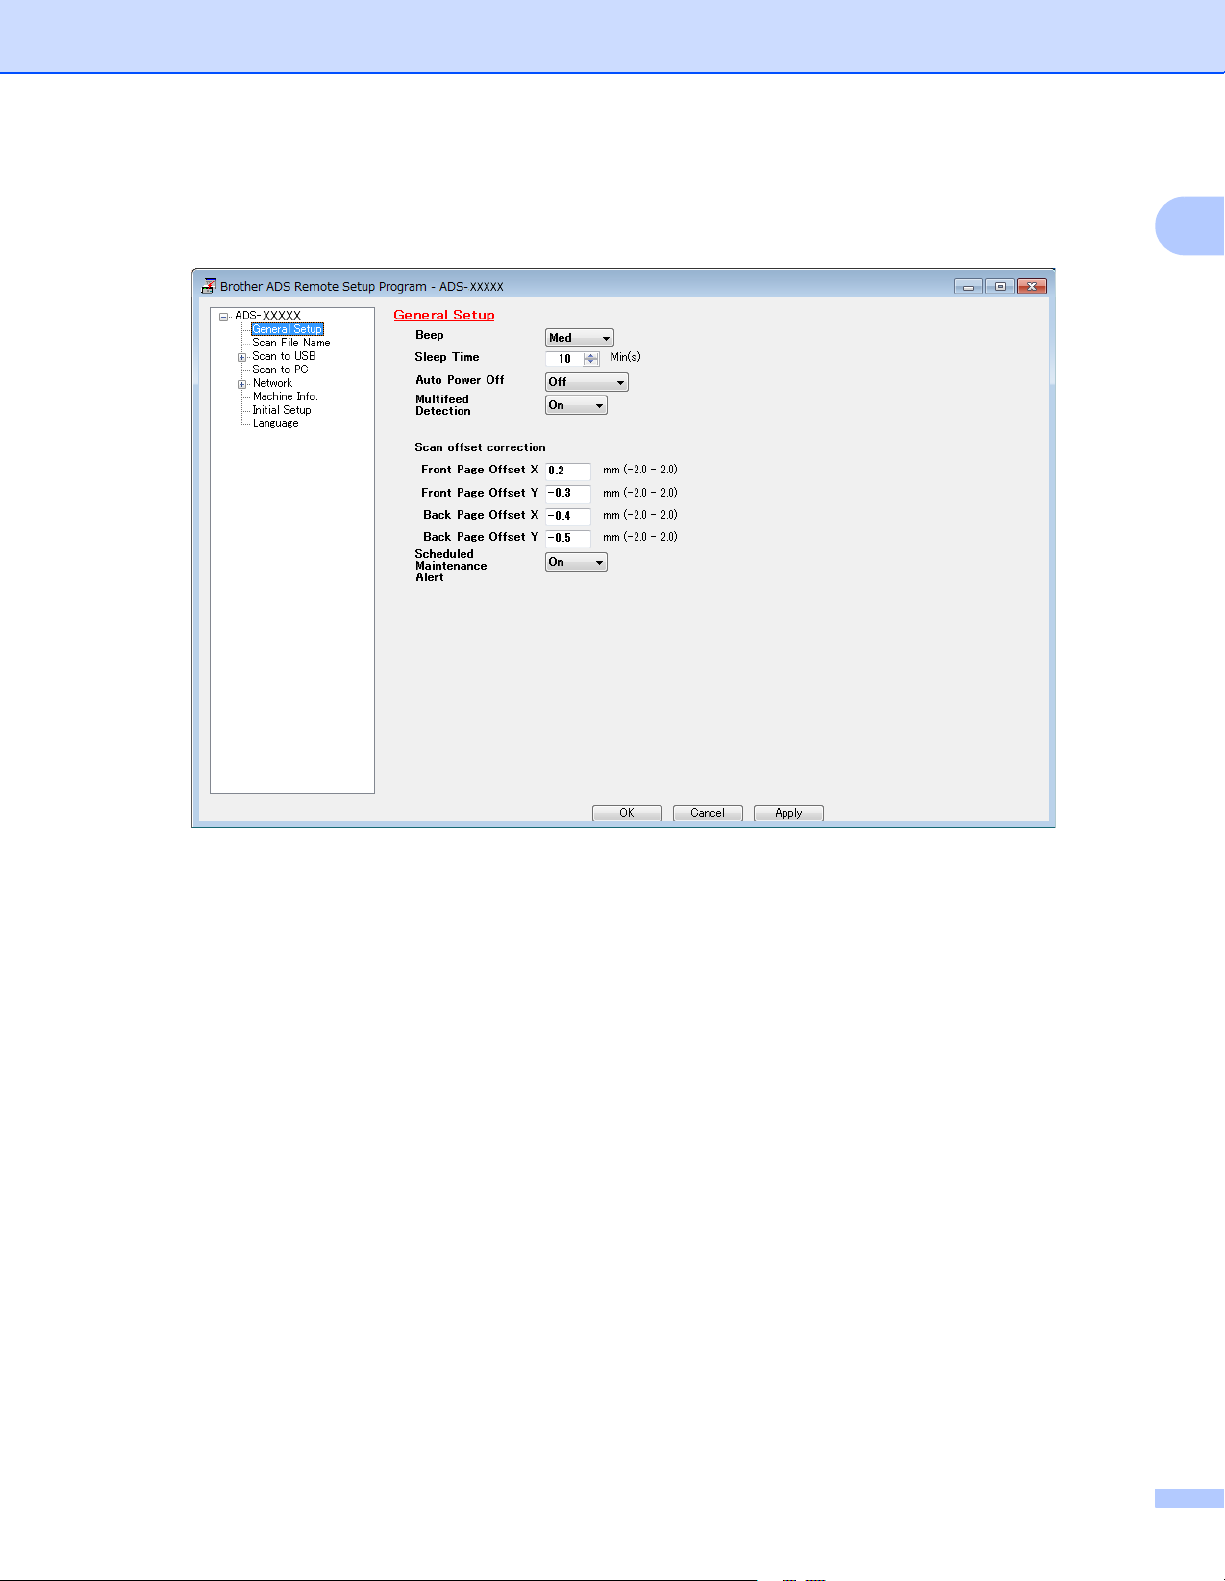
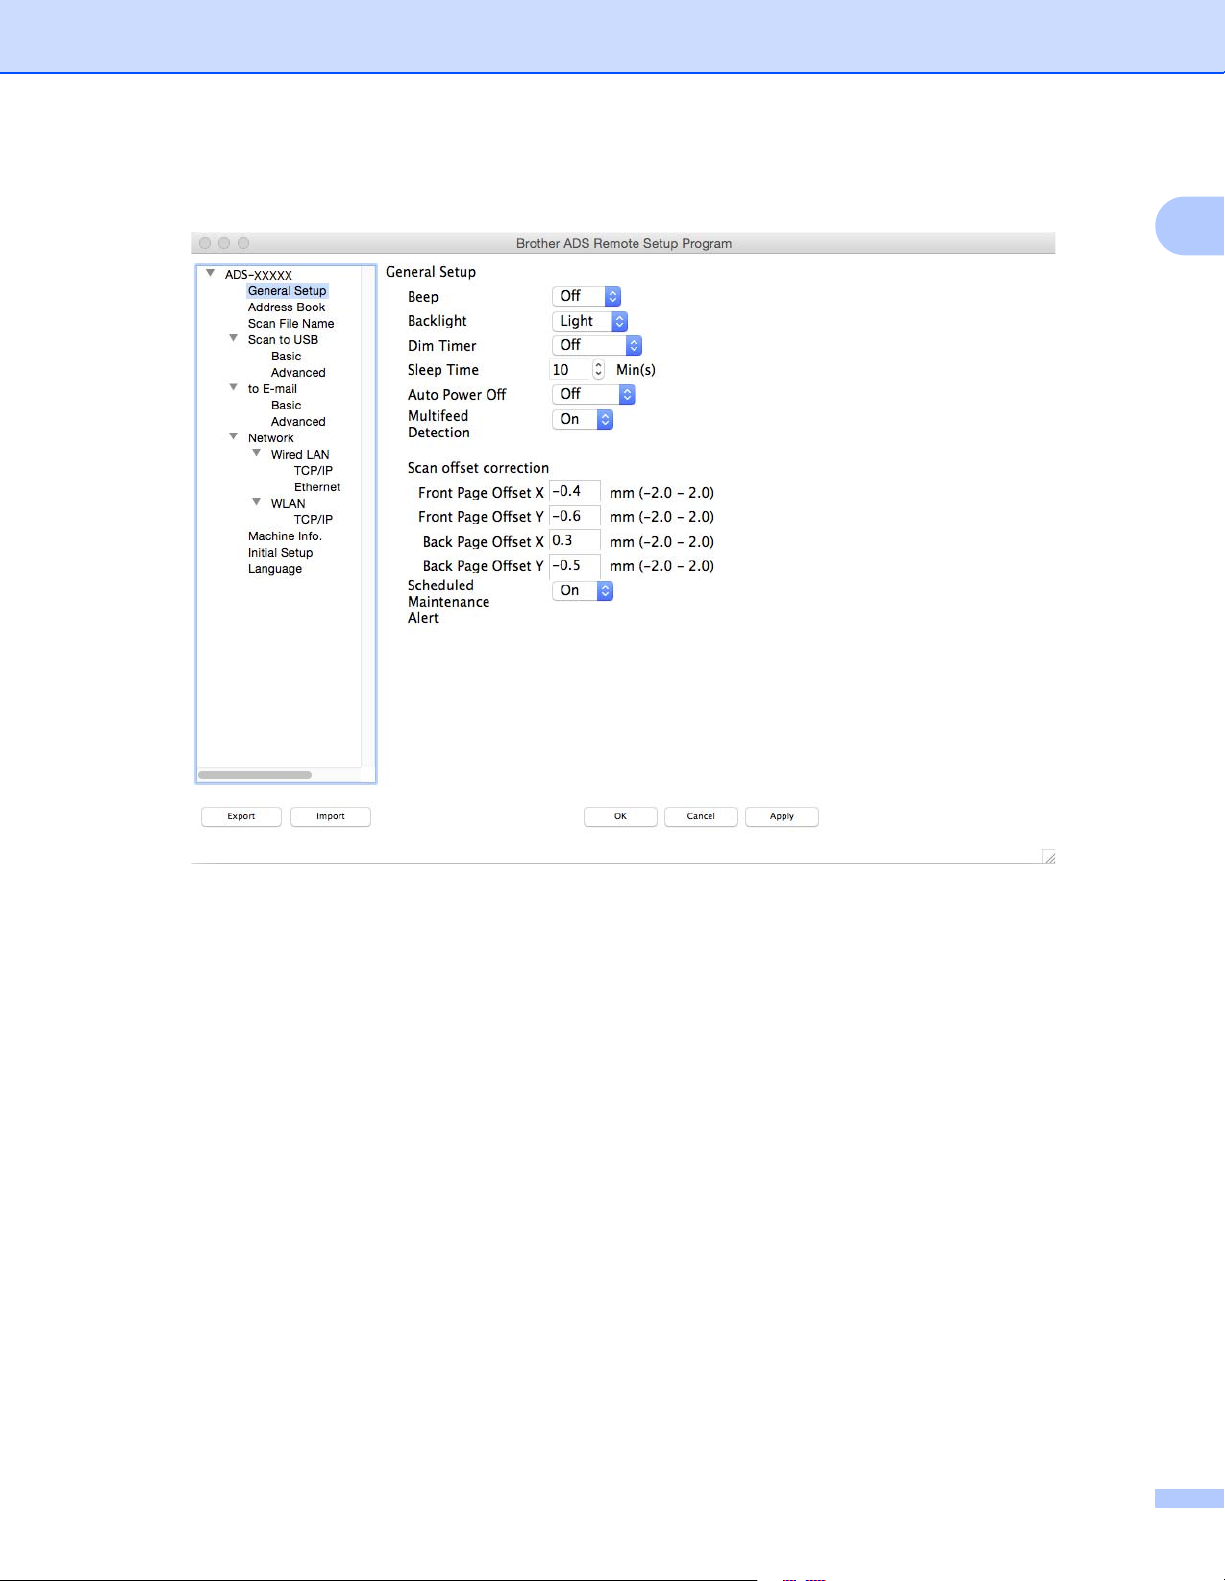
3 Select General Setup in the left navigation pane.
Windows
®
General Information
26
1
Macintosh
4 Select how long the machine must be idle before going to sleep. To wake the machine do one of the
following:
Press any key.
Open the Top Cover.
Load your document.
Touch the Screen.
Touch IC Card to the NFC reader.
5 Click OK.

General Information
27
1
Select Your Language 1
1 Start the application.
Windows
®
a Click the (ControlCenter4) icon in the task tray and select Open from the menu.
The ControlCenter4 window appears.
b Click the Device Settings tab (the example below uses Home Mode).
c Click the Remote Setup button.

General Information
28
1
NOTE
If using Advanced Mode, click the (Settings) icon to access Device Settings.
Macintosh
a In the Finder menu bar, click Go > Applications > Brother.
b Double-click the Remote Setup icon.
NOTE
• To use Remote Setup, go to your model's Downloads page on the Brother Solutions Center at
support.brother.com
and download Remote Setup from Utilities.
• Remote Setup for Mac supports USB connections only.
• Remote Setup for Mac supports macOS 10.13 or earlier.
2 The Remote Setup window appears.
General Information
29
1
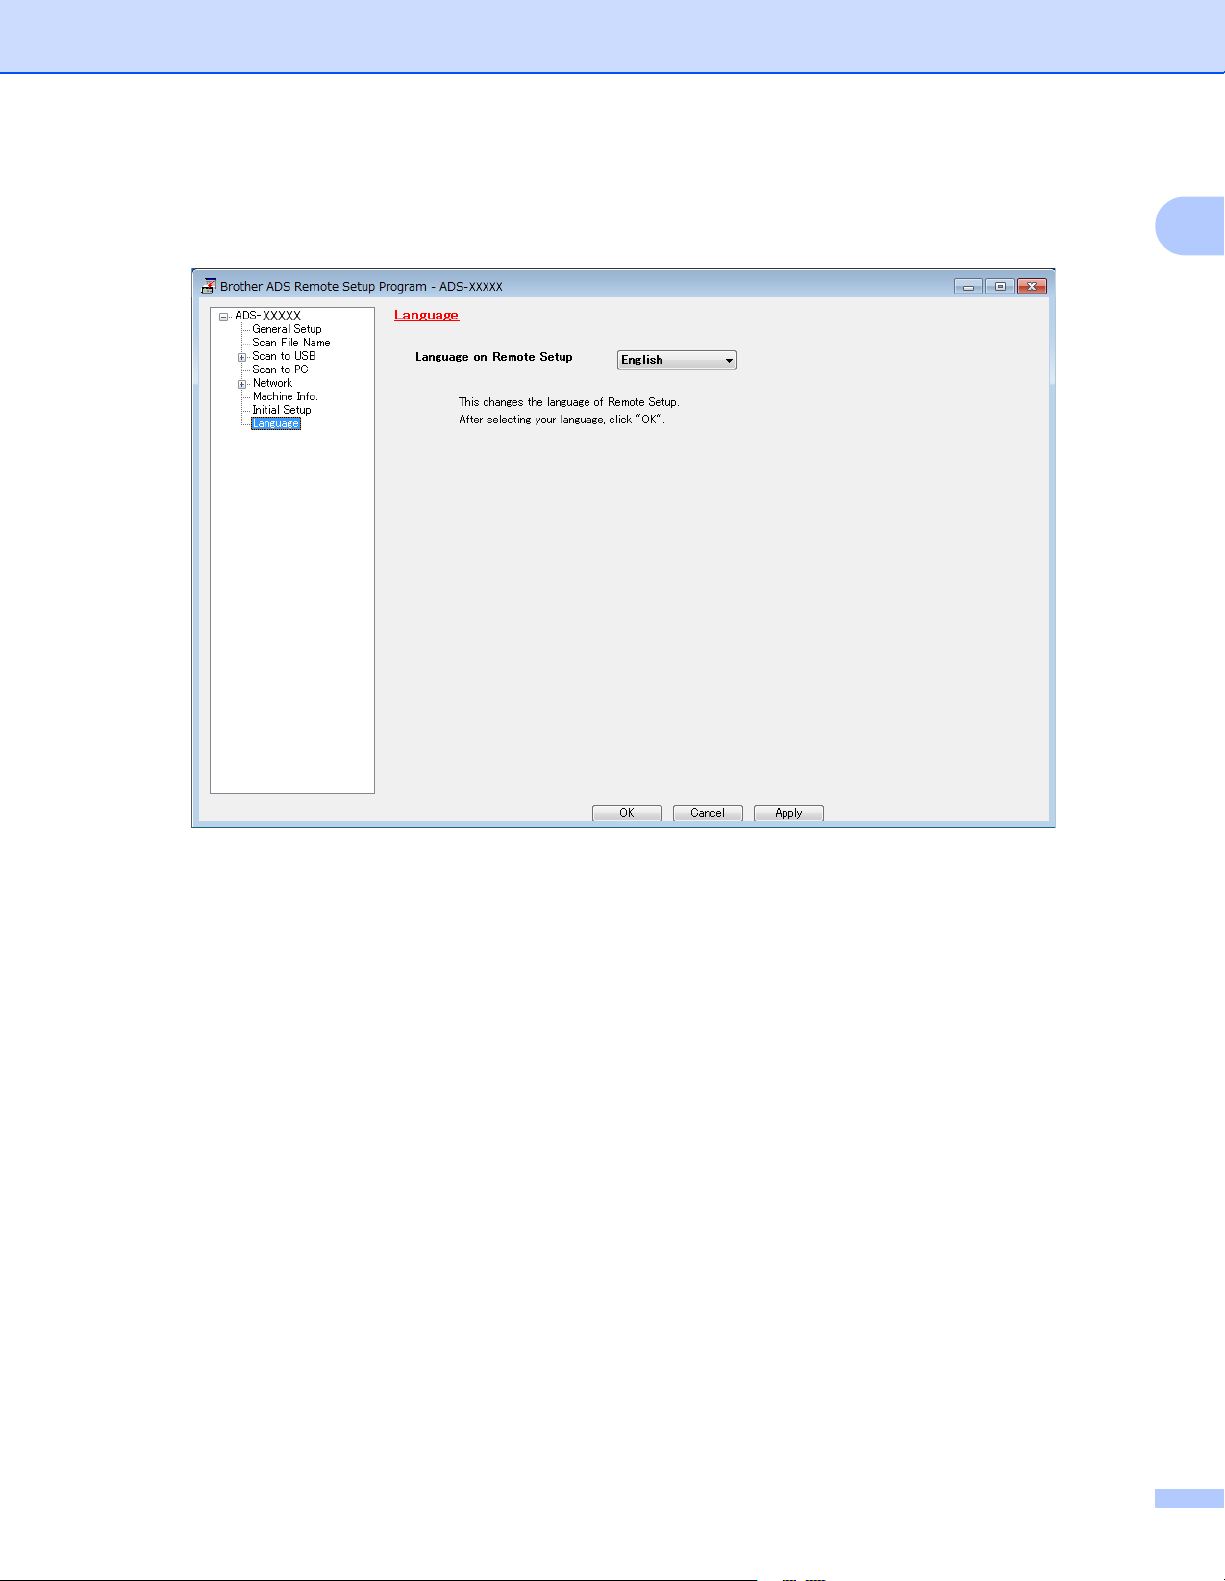
3 Select Language in the left navigation pane.
Windows
®
General Information
30
1
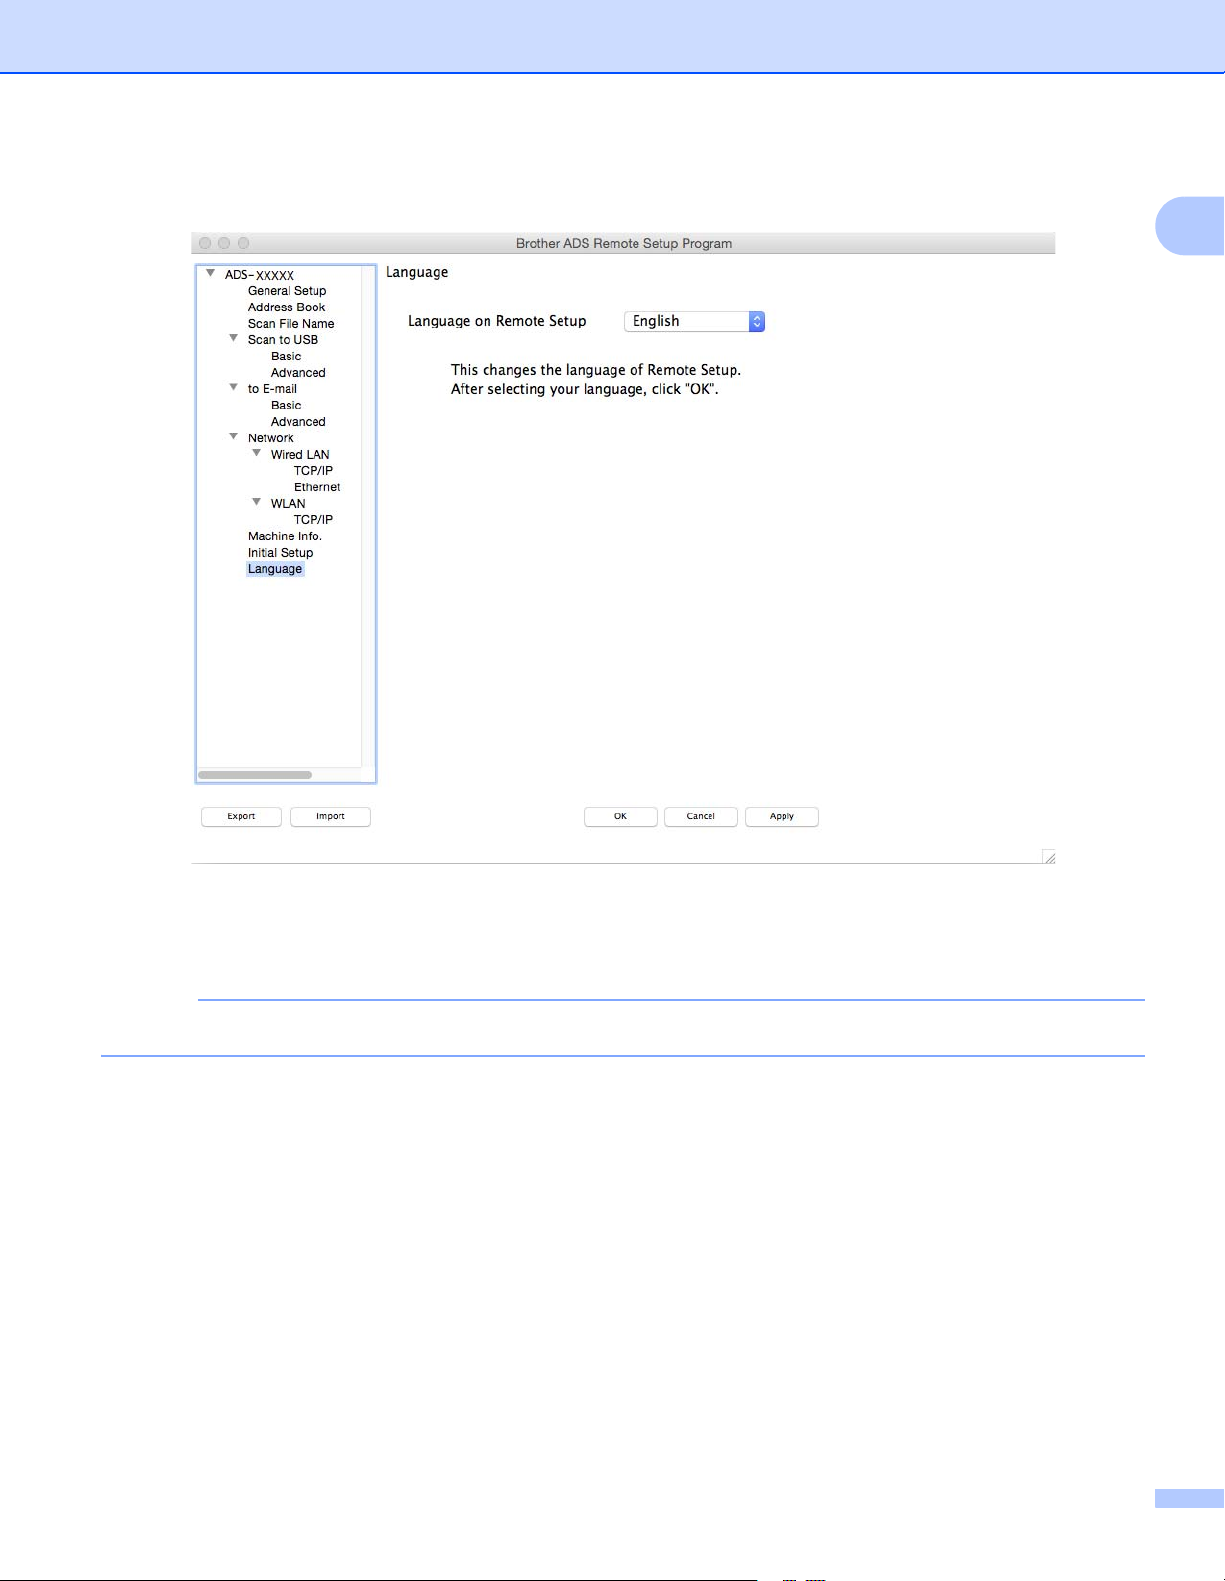
Macintosh
4 Select a language from the Language on Remote Setup drop-down list.
5 Click OK.
NOTE
You must close the Remote Setup window to save the language change.
General Information
31
1
Assign the Scan Feature to the Network Device Key 1-3 1
(ADS-2400N / ADS-3000N)
1 Start the application.
Windows
®
a Click the (ControlCenter4) icon in the task tray and select Open from the menu.
The ControlCenter4 window appears.
b Click the Device Settings tab (the example below uses Home Mode).
c Click the Scan to Net Settings button.
General Information
32
1
NOTE
If using Advanced Mode, click the (Settings) icon to access Device Settings.
Macintosh
a Confirm that your Brother machine is connected to the same network as your computer or mobile
device.
b Start your web browser.
c Type "http://machine's IP address" in your browser's address bar (where "machine's IP address" is
the machine's IP address).
For example: http://192.168.1.2
NOTE
• You can see your machine’s IP address in the Network menu on the control panel of your machine.
• If you have set a login password for Web Based Management, type your password in the Login box, then
click .
General Information
33
1
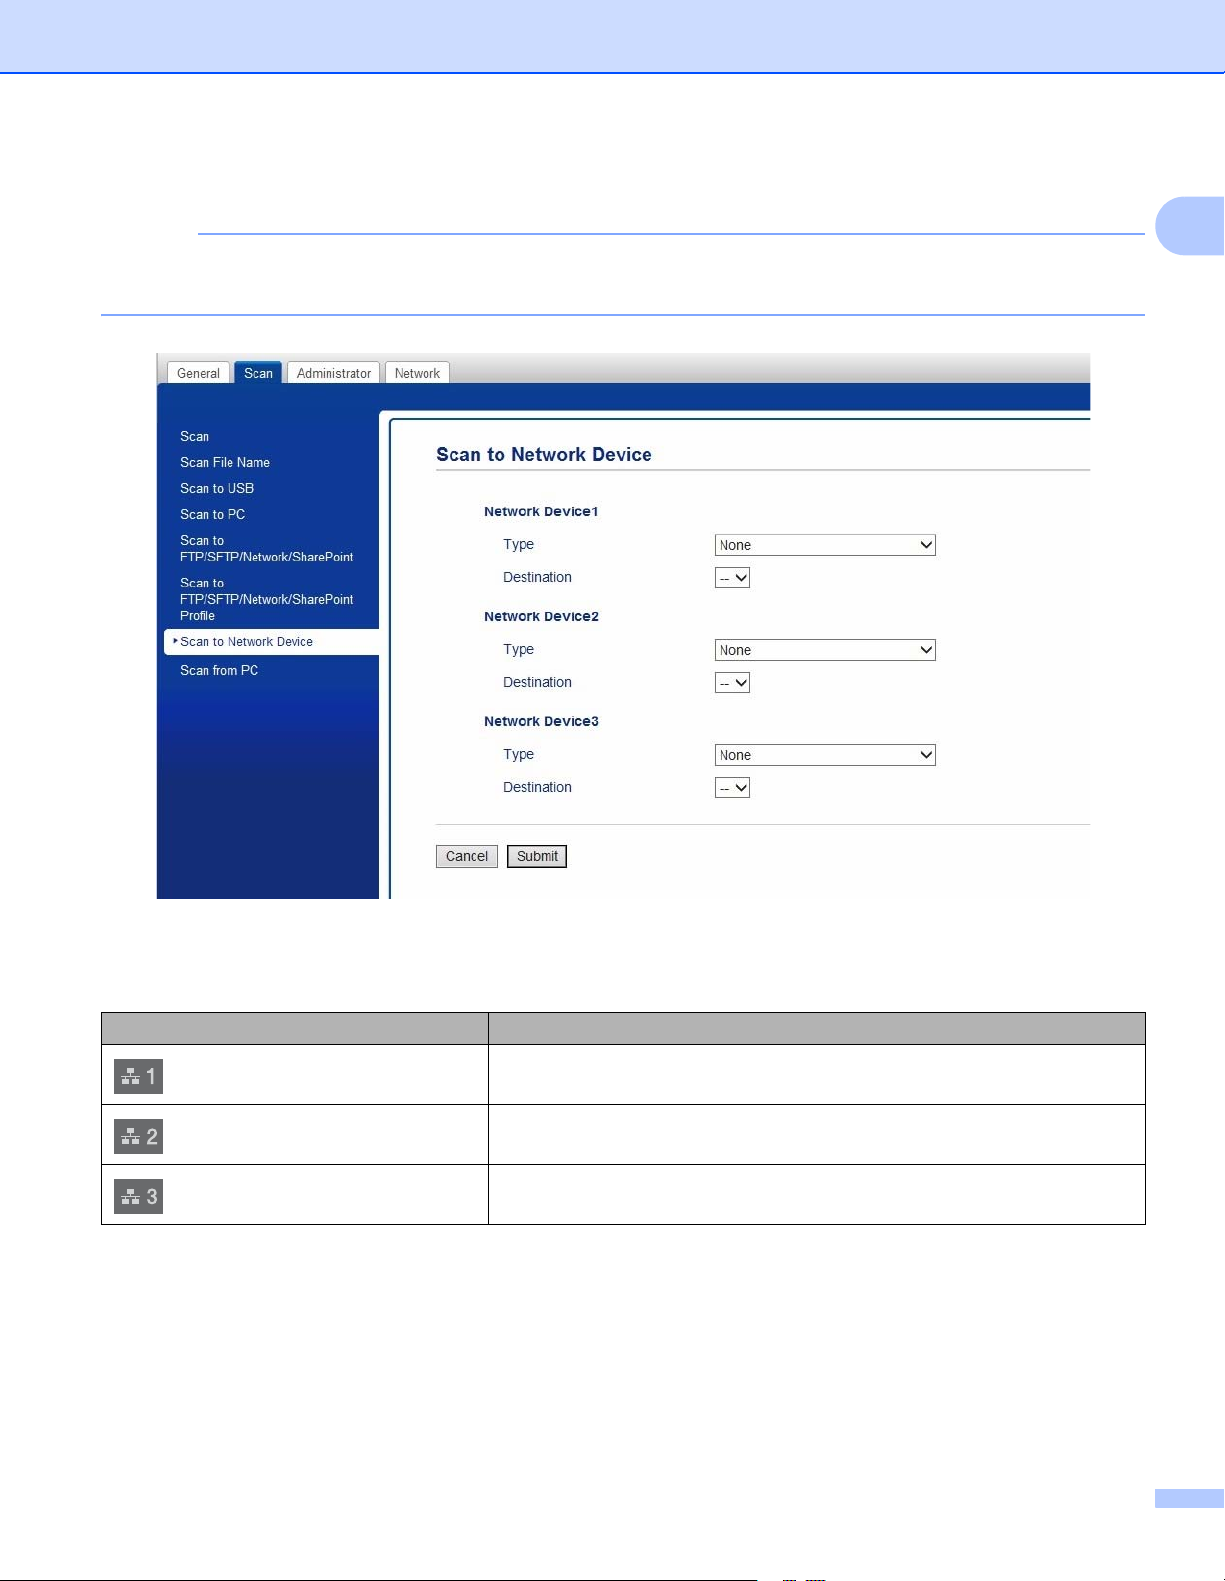
2 The Web Based Management window appears.
NOTE
The Scan to Network Device option appears only if you select LAN as the connection interface at the
time of installation.
3 Select Network Device 1, Network Device 2 or Network Device 3 to which you want to assign the
Scan to Network feature.
4 Select Scan to Network, Scan to Sharepoint, Scan to FTP/SFTP, Scan to PC, WS Scan or None
from the Type drop-down list for the device you have selected in 3.
5 Select a profile name from the Destination drop-down list for the device you have selected in 3.
6 Click Submit.
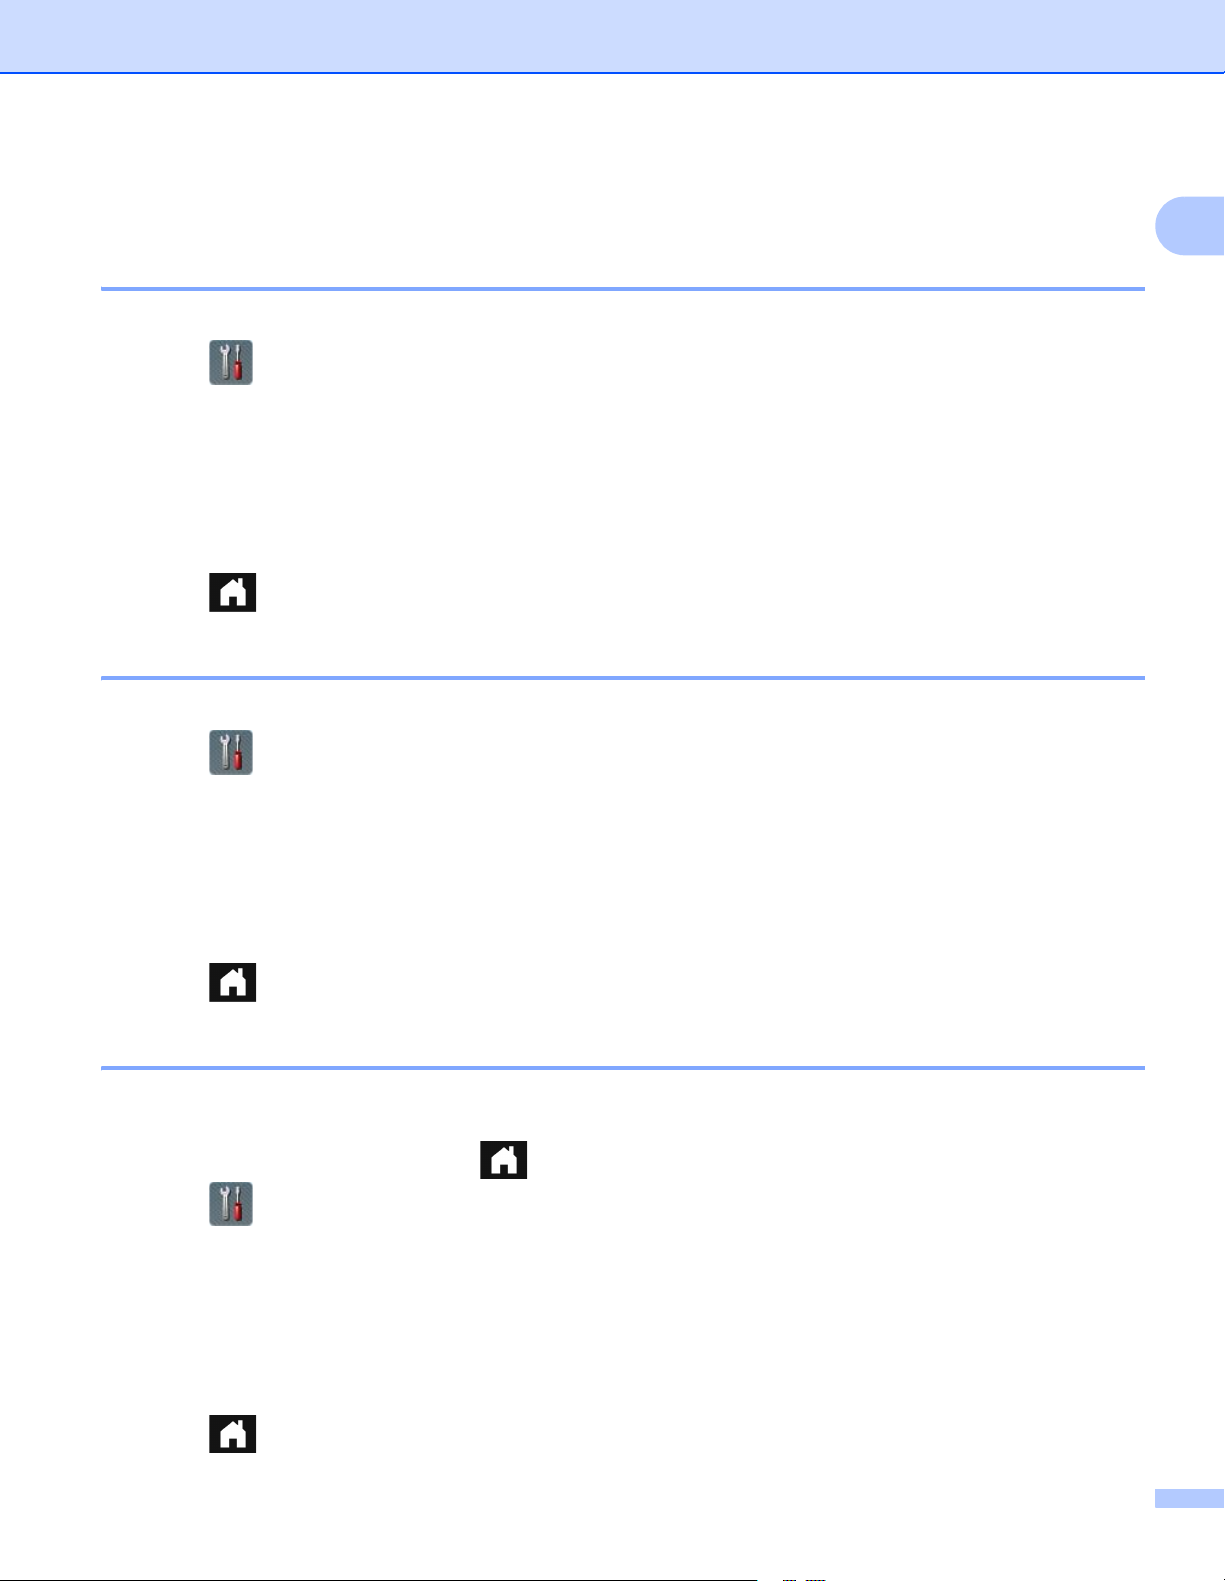
Your Machine’s Control Panel Icon Setting
Network Device 1
Network Device 2
Network Device 3
General Information
34
1
General Setup (ADS-2800W / ADS-3600W) 1
Set the Backlight Brightness 1
If you are having difficulty reading the Touchscreen, try changing the brightness setting.
1 Press (All Settings).
2 Press General Setup.
3 Press LCD Settings.
4 Press Backlight.
5 Press Light, Med or Dark.
6 Press .
Set the Dim Timer for the Backlight 1
You can set how long the Touchscreen backlight stays on after the Home Screen appears.
1 Press (All Settings).
2 Press General Setup.
3 Press LCD Settings.
4 Press Dim Timer.
5 Press Off, 10Secs, 20Secs or 30Secs.
6 Press .
Set the Home Screen 1
Set the Home screen to either Scan 1-3 or Shortcut 1-8.
For examples of these screens, see Touchscreen LCD on page 6.
When the machine is idle or you press , the Touchscreen will return to the screen you have set.
1 Press (All Settings).
2 Press General Setup.
3 Press Screen Settings.
4 Press Home Screen.
5 Press Scan 1-3 or Shortcut 1-8.
6 Press .
General Information
35
1
Select Your Language 1
1 Press (All Settings).
2 Press a or b to display Initial Setup.
3 Press Initial Setup.
4 Press Local Language.
5 Press a or b to display your language.
Press your language.
6 Press .
Memory Storage 1
Your menu settings are stored permanently and, in the event of a power failure, will not be lost. Temporary
settings will be lost. If you have chosen Set New Default for your Scan to USB and Scan to E-mail Server
preferred settings, those settings will be saved. During a power failure, the machine will retain the date and
time for approximately 24 hours.
Beep Volume 1
When the Beep setting is Low, Med or High, the machine will beep when you press a key and make a
mistake.
Choose a range of beep volume levels from Low to High, or choose Off.
1 Press (All Settings).
2 Press General Setup.
3 Press Volume.
4 Press Beep.
5 Press Low, Med, High or Off.
6 Press .

General Information
36
1
Automatic Daylight Saving Time 1
You can program the machine to change automatically for Daylight Saving Time. It will reset itself forward
one hour in the spring and backward one hour in the fall. Make sure you have set the correct date and time
in the Date & Time setting.
Set Automatic Daylight Saving Time to On as follows:
1 Press (All Settings).
2 Press a or b to display Initial Setup.
3 Press Initial Setup.
4 Press Date & Time.
5 Press Auto Daylight.
6 Press On.
7 Press .
Sleep Time 1
The Sleep Time setting can reduce power consumption. When the machine is in Sleep Time, it acts as though
it is turned off. Enter how long the machine must remain idle before it enters Sleep Time. The maximum
setting is 90 Mins and the default setting is 10 Mins. The timer will restart if any operation is carried out on
the machine.
1 Press (All Settings).
2 Press General Setup.
3 Press Ecology.
4 Press Sleep Time.
5 Enter the length of time the machine is idle before entering Sleep Time.
6 Press OK.
7 Press .
General Information
37
1
Auto Power Off 1
The Auto Power Off feature can save power consumption. Set the length of time that the machine will be
in Sleep Time before it automatically powers off. When this feature is set to Off, you must power off the
machine manually. To turn on the machine after the Auto Power Off feature has turned it Off, press .
The timer will restart if you do one of the following:
Press .
Press any buttons.
Open the ADF.
1 Press (All Settings).
2 Press General Setup.
3 Press Ecology.
4 Press Auto Power Off.
5 Select the length of time the machine is idle before entering Auto Power Off Mode.
6 Press .
Auto Power Off will be activated when all of these conditions are met:
Network cable is not plugged in.
Wireless LAN is disabled.
Auto Power Off setting is not set to Off.
The machine has been in Sleep Time for more than the preset period.
General Information
38
1
Multifeed Detection 1
Multifeed is when multiple pages were fed at the same time. When this feature is set to On, the machine will
detect a multifeed error. When a multifeed occurs, confirm that the data scanned before the multifeed has
been saved, and then start scanning again at the next page or the beginning of the document.
NOTE
(Scan to USB only) (ADS-2400N / ADS-3000N)
If you selected JPEG as the file type, your Brother machine will save all data scanned before the multifeed
error occurred.
1 Press (All Settings).
2 Press General Setup.
3 Press a or b to display Multi-feed Detection.
4 Press Multi-feed Detection.
5 Press On (or Off).
6 Press .

General Information
39
1
Setting Lock (ADS-2800W / ADS-3600W) 1
Setting Lock lets you set a password to stop other people from accidentally changing your machine’s settings.
Make a careful note of your password. If you forget it, you must call your administrator or Brother Customer
Service to reset the passwords stored in the machine.
While Setting Lock is On, you cannot change the following settings without a password:
General Setup
Shortcut Settings
Network
Machine Info.
Initial Setup
Save as Shortcut in all Scan-to actions
Set New Default and Factory Reset in to USB
Address Book, Set New Default and Factory Reset in to E-mail Server
Set the Password 1
1 Press (All Settings).
2 Press General Setup.
3 Press Setting Lock.
4 Enter a four-digit number for the password using numbers 0-9.
Press OK.
5 Re-enter your password when the Touchscreen displays Verify:.
Press OK.
6 Press .
Change the Password 1
1 Press (All Settings).
2 Press General Setup.
3 Press Setting Lock.
4 Press Set Password.
5 Enter your existing four-digit password.
Press OK.
General Information
40
1
6 Enter a new four-digit number as the password.
Press OK.
7 Re-enter your new password when the Touchscreen displays Verify:.
Press OK.
8 Press .
Turn Setting Lock On/Off 1
If you enter the wrong password when following the instructions below, the Touchscreen displays
Wrong Password. Enter the correct password.
Turn Setting Lock On 1
1 Press (All Settings).
2 Press General Setup.
3 Press Setting Lock.
4 Press Lock OffOn.
5 Enter the registered four-digit password, and then press OK.
Turn Setting Lock Off 1
1 Press .
2 Enter the registered four-digit administrator password.
Press OK.
3 Press .

General Information
41
1
Secure Function Lock 3.0 (ADS-2800W / ADS-3600W) 1
Secure Function Lock lets you restrict Public access to the following machine operations:
Scan to PC
Scan to FTP
Scan to Network
Scan to USB
Scan to Web
Scan to Email Server
Scan to SharePoint
Scan to WSS (Web Service Scan)
Apps
This feature also prevents users from changing the default settings of the machine by limiting access to the
machine’s settings.
The administrator can set up restrictions for individual users along with a user password.
NOTE
• You can use Web Based Management or BRAdmin Professional 3 (Windows
®
only) to set Secure
Function Lock.
• Only administrators can set limitations and make changes for each user.
• (For ADS-3600W)
Use card authentication to switch to a different user and access operations, such as Scan to PC,
Scan to FTP, and Scan to Network.
General Information
42
1
Before You Use Secure Function Lock 3.0 1
You can use a web browser to configure the Secure Function Lock settings. Before configuration, do the
following:
1 Start your web browser.
2 In your browser’s address bar, type your machine’s IP address (or your print server name). For example:
http://192.168.1.2. You can use the machine’s LCD to find its IP address.
NOTE
• Find the machine’s IP address in the Network Configuration List (see the Network User’s Guide).
• If you are using a Domain Name System or enabling a NetBIOS name, you can enter another name such
as “SharedScanner” instead of the IP address.
• For example:
http://SharedScanner/
If you enable a NetBIOS name, you can use the node name.
• For example:
http://brwxxxxxxxxxxxx/
Find the NetBIOS name on the LCD, under Node Name.
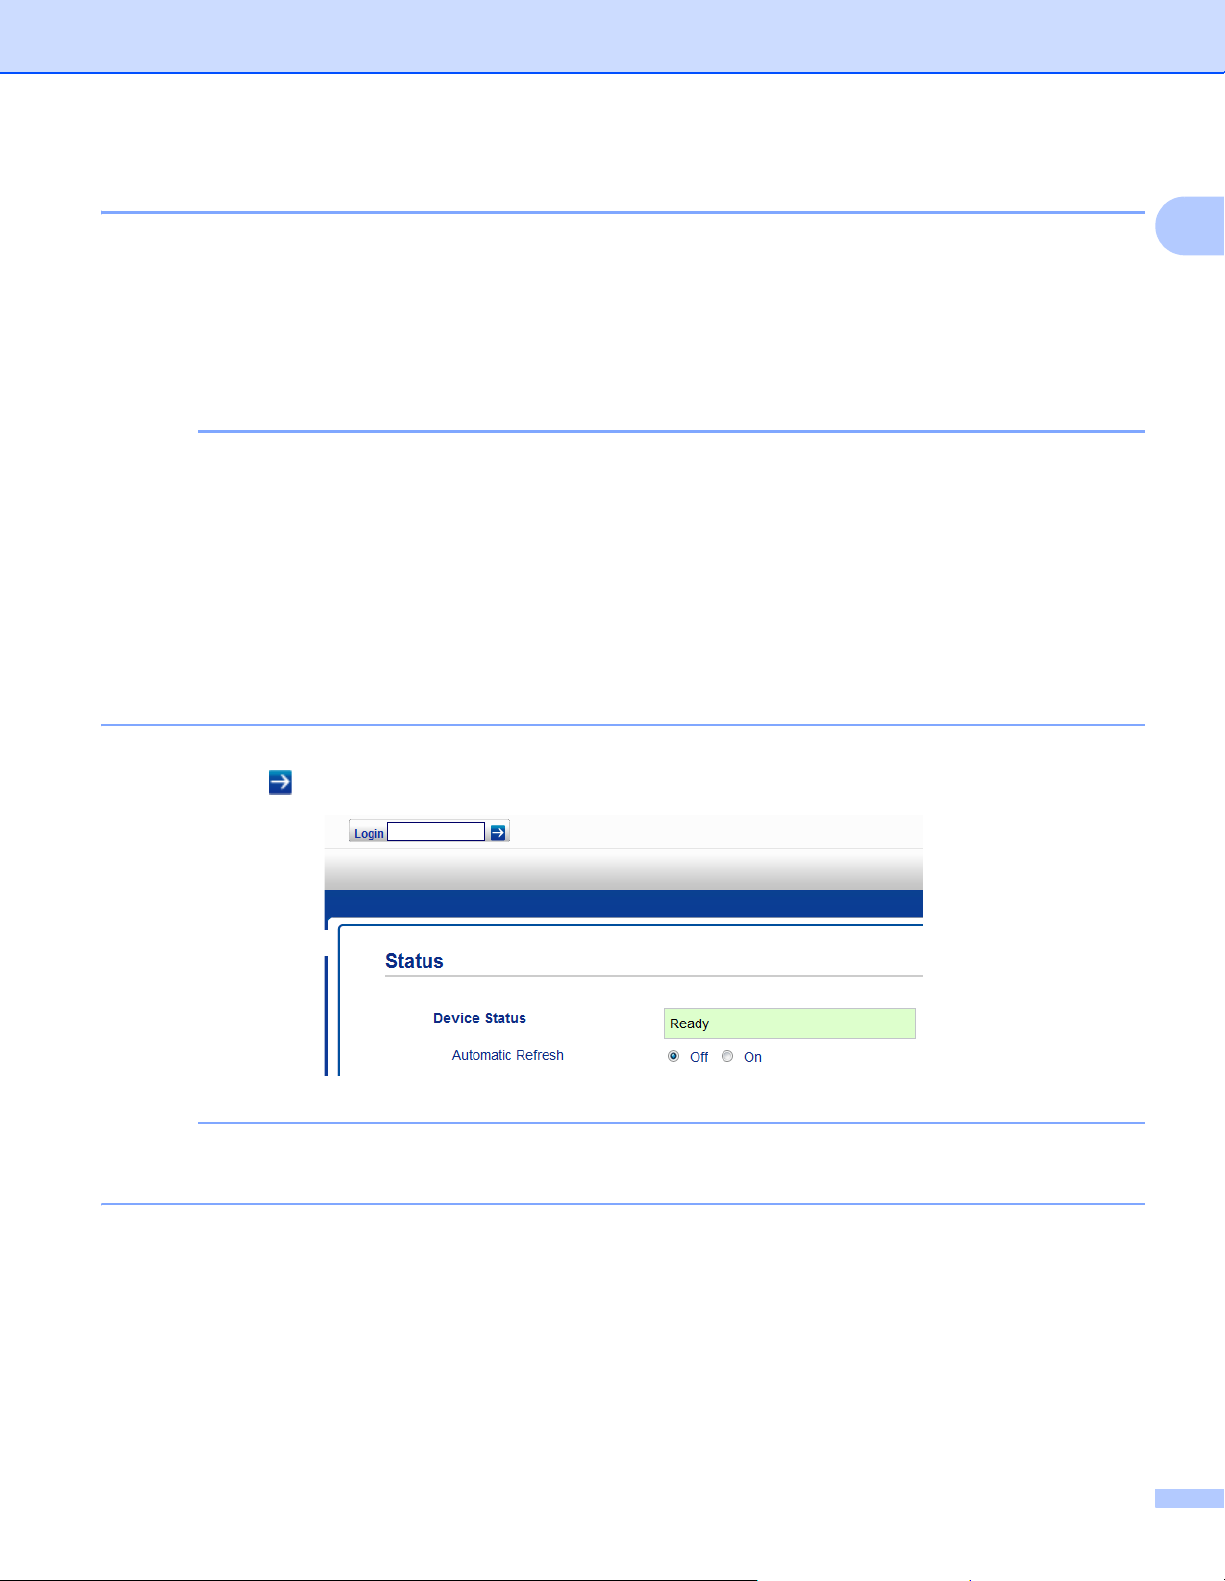
3 Type an Administrator password in the Login box. (This is a password to log on to the machine’s web
page.) Click .
NOTE
If you are using a web browser to configure the machine’s settings for the first time, set a password
(see the Network User’s Guide).
General Information
43
1
Turning Secure Function Lock On/Off 1
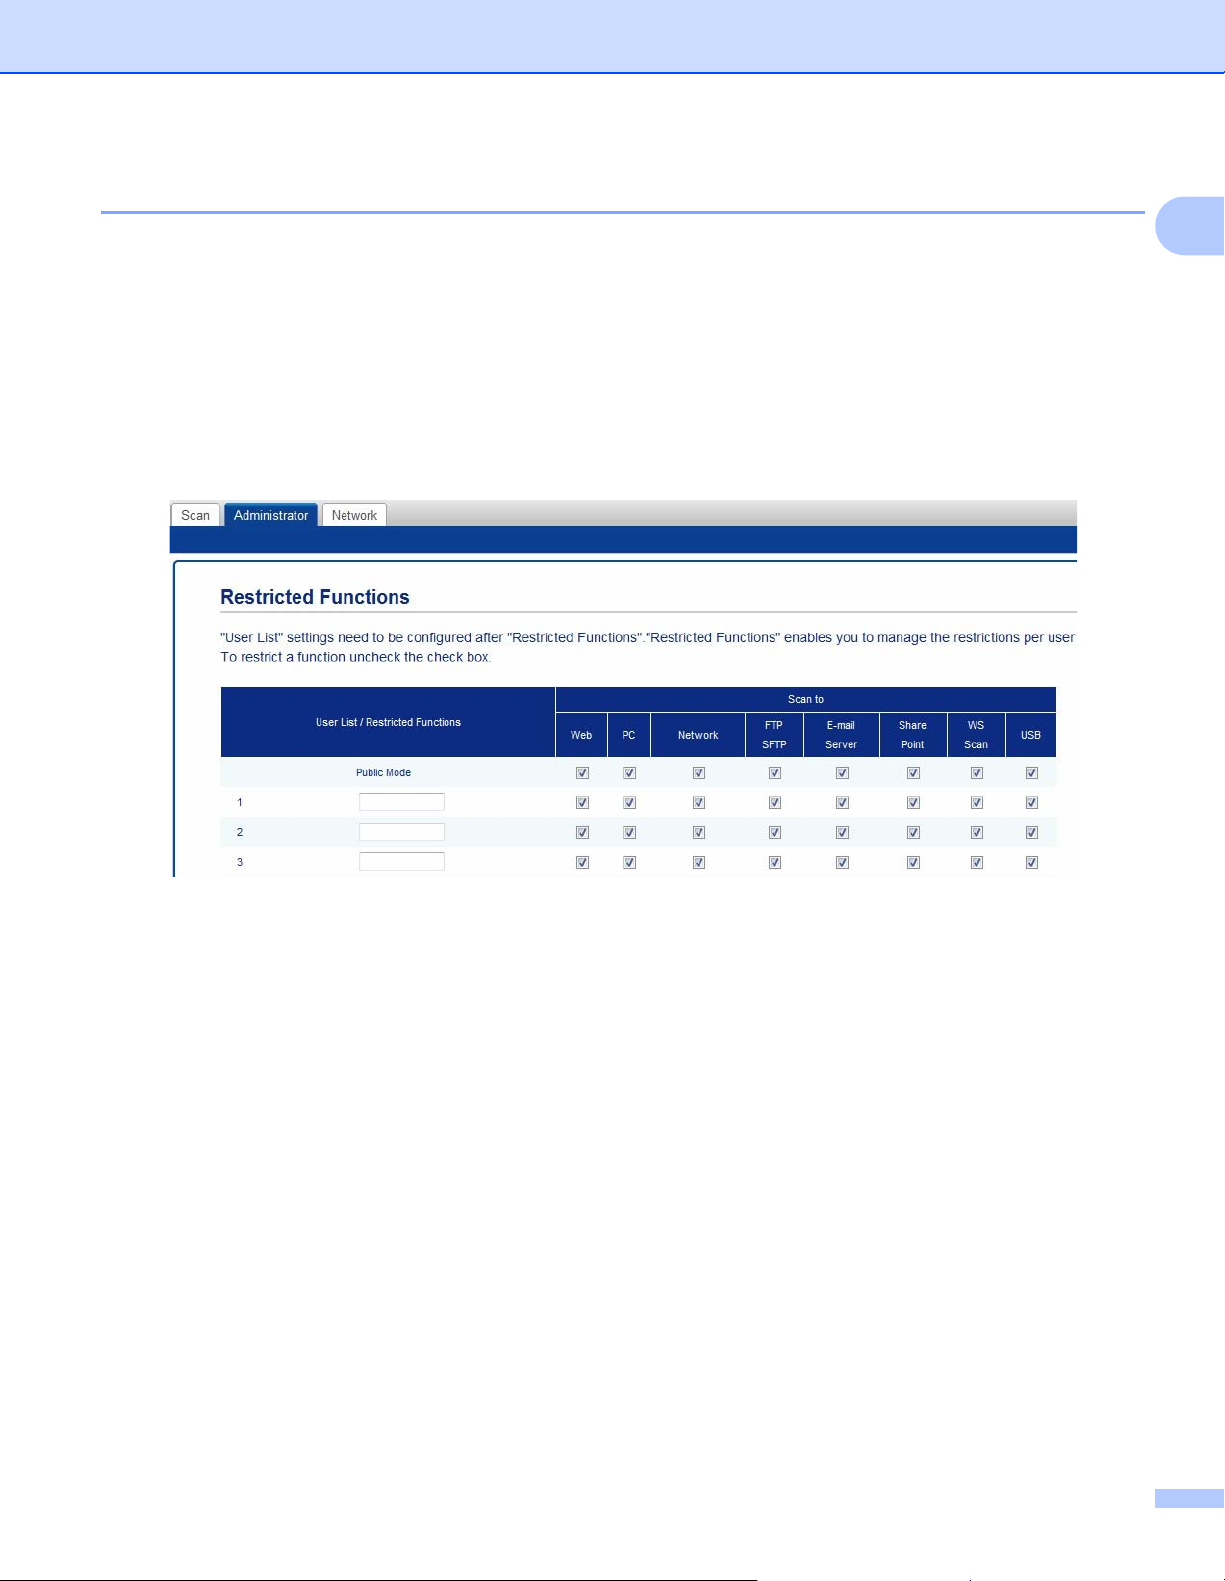
1 Click Administrator.
2 Click User Restriction Function.
3 Select Secure Function Lock or Off.
4 Click Submit.
NOTE
The Secure Function Lock icon appears at the top of the screen.
General Information
44
1
Configure Secure Function Lock 3.0 Using Web Based Management 1
Set up groups with restrictions and users with a password and card ID
1
. You can create up to 100 restricted
groups and 100 users. Configure these settings using a web browser. To set up the web page, see Before
You Use Secure Function Lock 3.0 on page 42. Then follow these steps:
1
For ADS-3600W.
1 Click Administrator.
2 Click Restricted Functions xx-xx.
3 Type an alphanumeric Group name (up to 15 characters) in the User List / Restricted Functions field.
4 In the Scan to and Apps, clear the check box to restrict access to operations.
5 Click Submit.
6 Click User List xx-xx.
7 In the User List field, type the user name (up to 20 characters).
8 In the PIN Number box, type a four-digit password.
9 (For ADS-3600W)
In the Card ID box, type the card number (up to 16 characters).
1
1
Use numbers from 0 - 9 and letters from A - F (not case-sensitive).
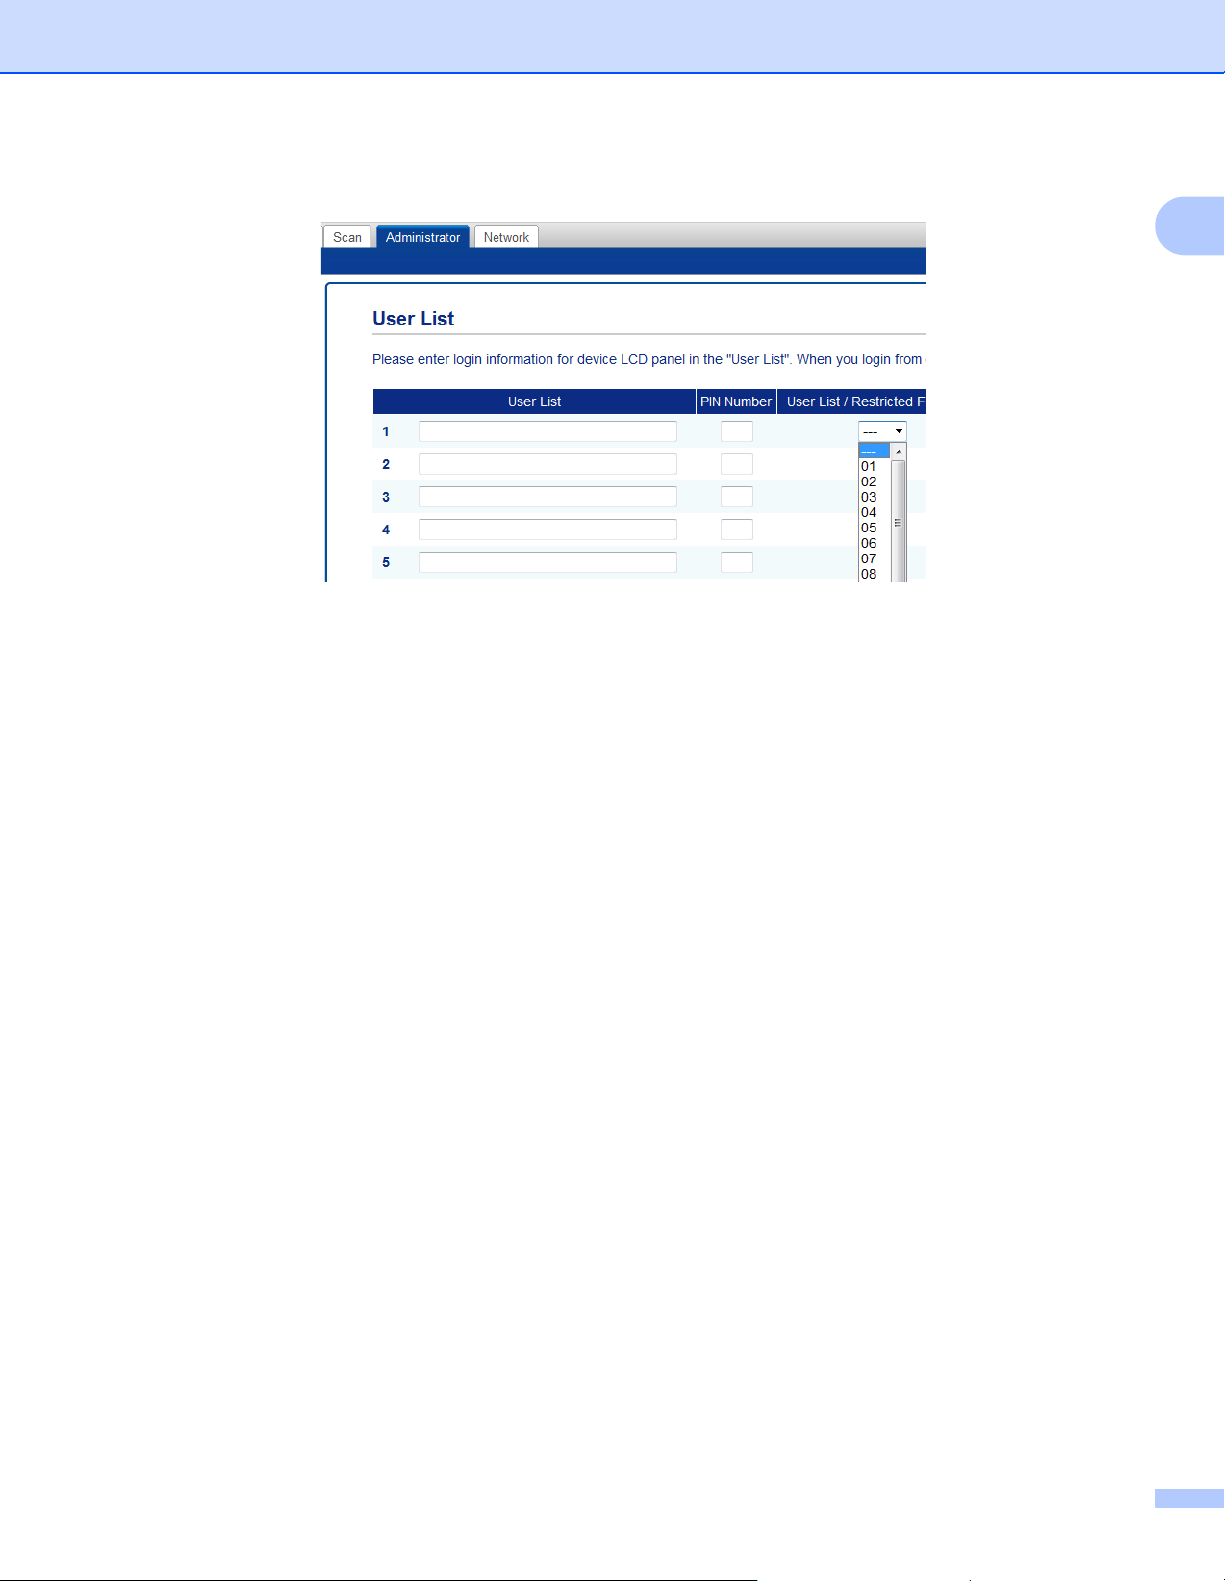
General Information
45
1
0 Select User List / Restricted Functions from the drop-down list for each user.
A Click Submit.
General Information
46
1
Setting Up Card Authentication for Users (For ADS-3600W) 1
Before you can set up card authentication for users, you must use a web browser to create a list of users with
their restricted operations.
For more information, see Configure Secure Function Lock 3.0 Using Web Based Management on page 44.
The NFC Reader may not be able to detect when the card is in a case or cover. Always remove the card from
its case or cover when you touch the card to the NFC Reader.
1 Use the Touchscreen to change to the restricted user mode. (For more information, see Changing to
Restricted User mode using the Touchscreen on page 48.)
2 Press .
3 Press Register Card.
4 Touch the card to the NFC Reader. The Touchscreen displays the card ID.
5 Press OK.
NOTE
To change the card ID, touch the new card to the NFC Reader in step 4.
Setting Up and Changing the Public Mode 1
Public mode restricts the operations that are available for all users who do not have a password.
When you set up restrictions for Public mode, you must do it through Web Based Management or BRAdmin
Professional 3 (Windows
®
only) (see the Network User’s Guide).
1 Click Administrator.
2 Click Restricted Functions xx-xx.
XXXXX

General Information
47
1
3 In the Public Mode row, clear the check box to restrict the operation in Public mode.
4 Click Submit.

General Information
48
1
Switching Users 1
You can switch between registered restricted users and Public mode when Secure Function Lock is turned on.
Changing to Restricted User mode using the Touchscreen 1
1 Press or .
(Where xxxxx is the user’s name.)
2 Press Change User.
3 Swipe up or down, or press a or b to display your user name.
4 Press your user name.
5 Enter your four-digit user password.
Press OK.
NOTE
If the current ID is restricted for the operation you want, Access Denied appears on the Touchscreen.
Changing to Restricted User mode using the NFC Reader (For ADS-3600W) 1
1 Press to return to the Home screen.
2 Touch the card to the NFC Reader.
NOTE
• Log on by touching the card to the NFC Reader even if the machine is set to Public mode or another user
is logged on.
• The NFC Reader may not be able to detect when the card is in a case or cover. Always remove the card
from its case or cover when you touch the card to the NFC Reader.
Changing to Public mode using the Touchscreen 1
1 Press .
(Where xxxxx is the user’s name.)
2 Press Go to Public.
NOTE
• After a restricted user has finished using the machine, it returns to Public mode after one minute.
• If the operation you want is restricted for all users, Access Denied appears on the Touchscreen and the
Change User screen appears. You cannot access the operation. Contact your administrator to check your
Secure Function Lock settings.
XXXXX
XXXXX

General Information
49
1
Active Directory Authentication (ADS-2800W / ADS-3600W) 1
Active Directory Authentication restricts the use of the Brother machine. If Active Directory Authentication is
enabled, the machine’s control panel will be locked. The machine’s settings cannot be changed until the user
enters the user ID and password.
Active Directory Authentication includes the following features:
Automatically obtains the user’s email address from the LDAP server and sets it in the From field when
using Scan to E-mail Server
Automatically obtains and sets the user’s home directory when using Scan to Network
Change the Active Directory Authentication setting using Web Based Management or BRAdmin Professional 3
(Windows
®
).
For more information about Active Directory Authentication, see the Network User’s Guide.
Turning Active Directory Authentication Lock On/Off 1
1 Start your web browser.
2 In your browser’s address bar, type your machine’s IP address (or your print server name). For example:
http://192.168.1.2. You can use the machine’s LCD to find its IP address.
3 Click Administrator.
4 Click User Restriction Function.
5 Select Active Directory Authentication or Off.
6 Click Submit.
NOTE
• You must configure Active Directory Server Settings to enable Active Directory Authentication.
• Control Panel Lock is enabled if Active Directory Server is correctly configured.

General Information
50
1
LDAP Authentication (ADS-2800W / ADS-3600W) 1
LDAP Authentication restricts the use of your Brother machine. The machine’s settings cannot be changed
until the user enters the user ID and password.
For more information about LDAP Authentication, see Network User’s Guide.
Turning LDAP Authentication Lock On/Off 1
1 Start your web browser.
2 In your browser’s address bar, type your machine’s IP address (or your print server name). For example:
http://192.168.1.2. You can use the machine’s LCD to find its IP address.
3 Click Administrator.
4 Click User Restriction Function.
5 Select LDAP Authentication or Off.
6 Click Submit.

51
2
2
Acceptable Documents 2
NOTE
Do not load documents that contain multiple page thicknesses, paper qualities, etc.
Standard Paper
*1
For best performance we recommend using a carrier sheet for documents that weigh: 27-39 g/m
2
.
Thick Paper
Document Specifications 2
Length 2.0 in. to 14 in. (51 mm to 356 mm)
Width 2.0 in. to 8.5 in. (51 mm to 215.9 mm)
Weight
*1
7 lb to 110 lb (27 g/m
2
to 413 g/m
2
)
Thickness 2 mil to 10 mil (0.05 mm to 0.26 mm)
To scan thinner documents, use the Carrier Sheet.
Maximum Number of Pages Up to 50 pages and less than 0.2 in. (5 mm)
Standard Paper Size A4 8.3 in. × 11.7 in. (210 mm × 297 mm)
A5 5.8 in. × 8.3 in. (148 mm × 210 mm)
A6 4.1 in. × 5.8 in. (105 mm × 148 mm)
A7 2.9 in. × 4.1 in. (74 mm × 105 mm)
A8 2.0 in. × 2.9 in. (52 mm × 74 mm)
B5 7.2 in. × 10.1 in. (182 mm × 257 mm)
B6 5.0 in. × 7.2 in. (128 mm × 182 mm)
B7 3.6 in. × 5.0 in. (91 mm × 128 mm)
B8 2.5 in. × 3.6 in. (64 mm × 91 mm)
Legal 8.5 in. × 14 in. (215.9 mm × 355.6 mm)
Mexican Legal 8.5 in. × 13.38 in. (215.9 mm × 339.9 mm)
India Legal 8.46 in. × 13.58 in. (215 mm × 345 mm)
Letter 8.5 in. × 11 in. (215.9 mm × 279.4 mm)
Length 2.0 in. to 11.7 in. (51 mm to 297 mm)
Width 2.0 in. to 8.5 in. (51 mm to 215.9 mm)
Weight 56 lb to 110 lb (210 g/m
2
to 413 g/m
2
)
Thickness 10 mil to 20 mil (0.26 mm to 0.5 mm)
Maximum Number of Pages Less than 0.2 in. (5 mm)
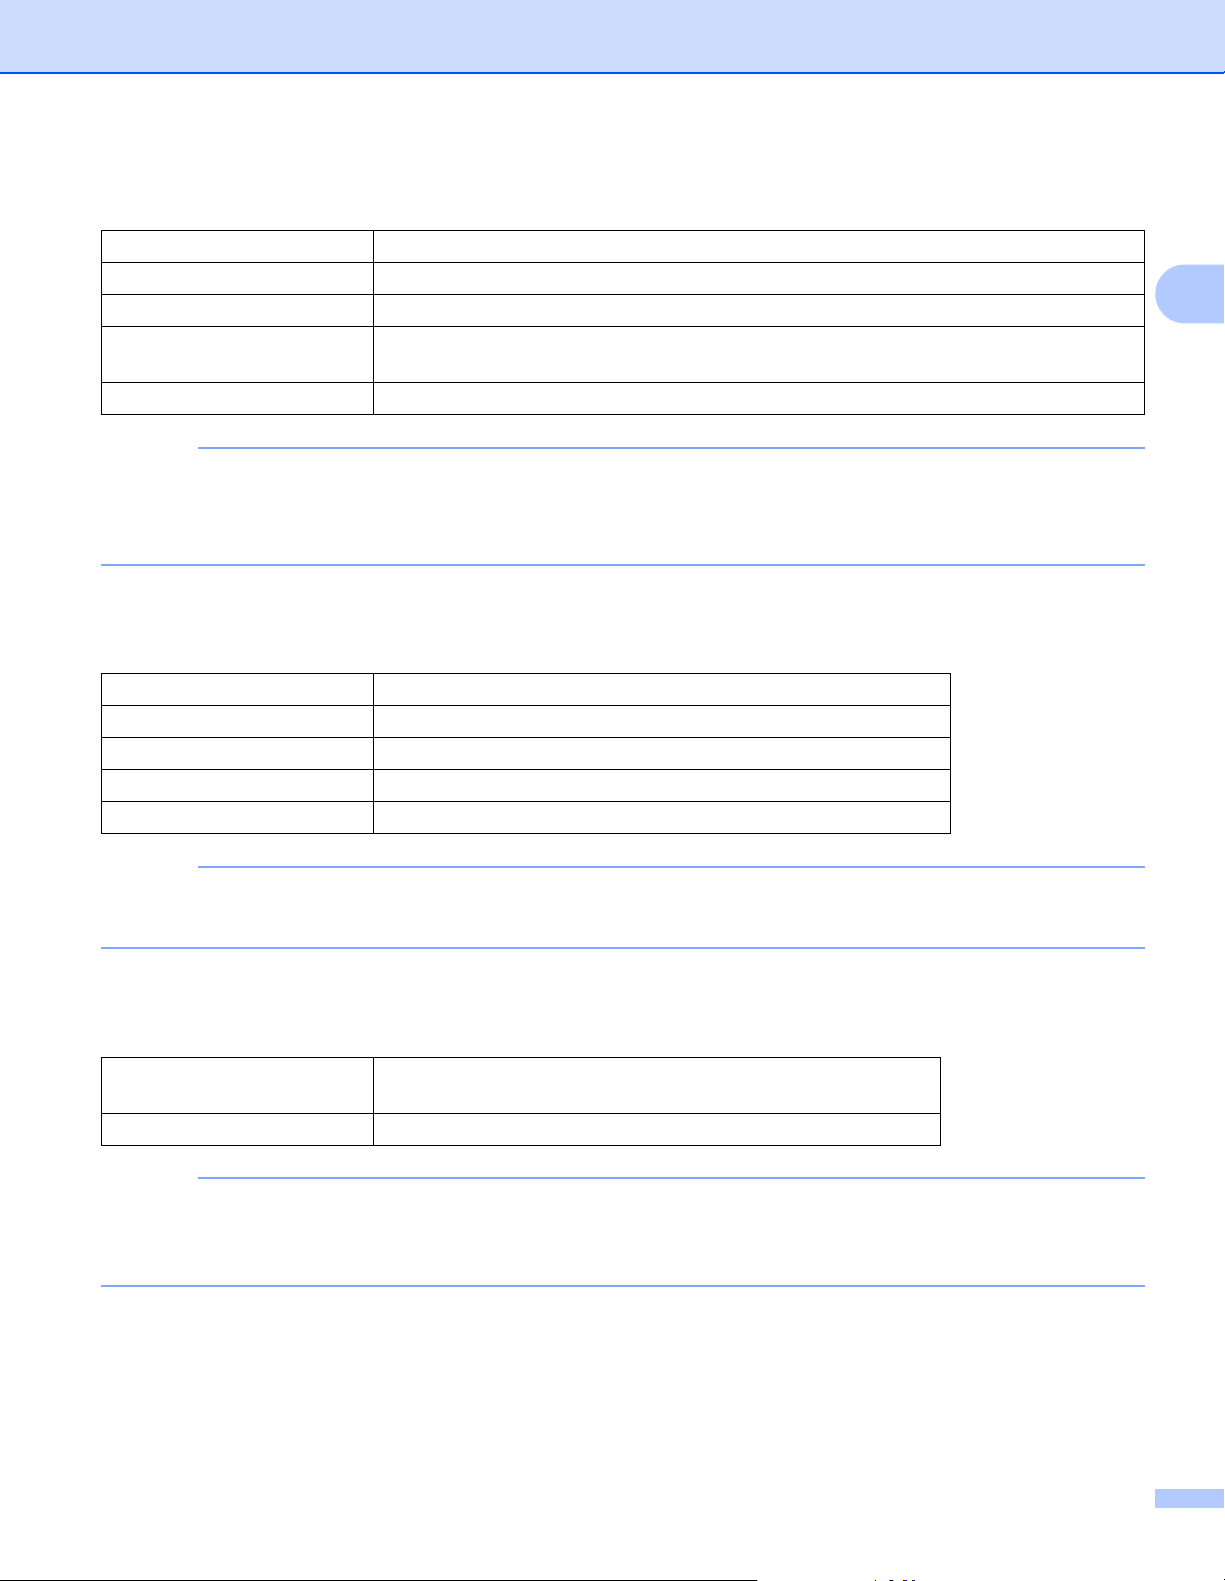
Document Specifications
52
2
Long Paper
NOTE
• To scan a document between 14 in. and 196.9 in. (355.6 mm to 5,000 mm), select Long Paper as Scan
Size or Document Size in the Settings dialog box.
• The maximum Length will change depending on the resolution and file format when scanning.
Plastic Card
NOTE
A plastic card can be scanned and saved to your computer as an image file. Select the Plastic Card Mode
check box in the Settings dialog box.
Carrier Sheet
NOTE
A Carrier Sheet can be used when saving the scanned image to your computer. The Carrier Sheet cannot
be used when scanning to a USB flash drive. Select the Carrier Sheet Mode check box in the Settings
dialog box.
Length 11.7 in. to 14.0 in. (297 mm to 355.6 mm)
Width 2.0 in. to 8.5 in. (51 mm to 215.9 mm)
Weight 11 lb to 56 lb (40 g/m
2
to 209 g/m
2
)
Thickness 2 mil to 10 mil (0.06 mm to 0.26 mm)
To scan thinner documents, use the Carrier Sheet.
Maximum Number of Pages Up to 40 pages and less than 0.16 in. (4 mm)
Size (ISO) 3.37 in. × 2.13 in. (85.6 mm × 54.0 mm)
Material Plastic (PET)
Type Plastic card such as driver’s license or store card
Thickness Up to 55 mil (1.4 mm)
Maximum Number of Cards Up to 5 cards and less than 0.2 in. (5.0 mm)
Thickness Total thickness of no more than 22.5 mil (0.6 mm)
(one 11.25 mil (0.3 mm) document plus the Carrier Sheet)
Maximum Number of Pages 1 page

Document Specifications
53
2
Unacceptable Documents 2
The following types of documents may not be scanned successfully:
Documents with a carbon sheet attached
Documents written in pencil
Documents of uneven thickness, such as envelopes
Documents with large wrinkles or curls
Documents that use tracing paper
Documents that use coated paper
Photographs (photographic paper)
Documents printed on perforated paper
Documents printed on unusually-shaped paper (not square or rectangle)
Documents with photos, notes, or stickers affixed to them
Documents that use carbonless paper
Documents that use loose-leaf paper or any paper with holes in it
Documents with paper clips or staples
Documents with wet ink
Fabrics, metallic sheets, or overhead projector sheets
Glossy or mirrored media
Documents that exceed recommended thicknesses
IMPORTANT
• Carbonless paper contains chemical substances that may harm the rollers. If paper jams occur frequently,
clean the Reverse Roller and Pick Up Roller. (See Clean the Scanner and Rollers on page 209.) The life
of the Reverse Roller and Pick Up Roller may end sooner compared to scanning wood-containing paper.
• When scanning wood containing paper, the life of the Reverse Roller and Pick Up Roller may end sooner
compared to scanning wood-free paper.
• The Reverse Roller and Pick Up Roller be damaged when a photo or a sticky note on the document
touches these parts during scanning.
• The surface of the document may be damaged when scanning glossy paper such as photographs.
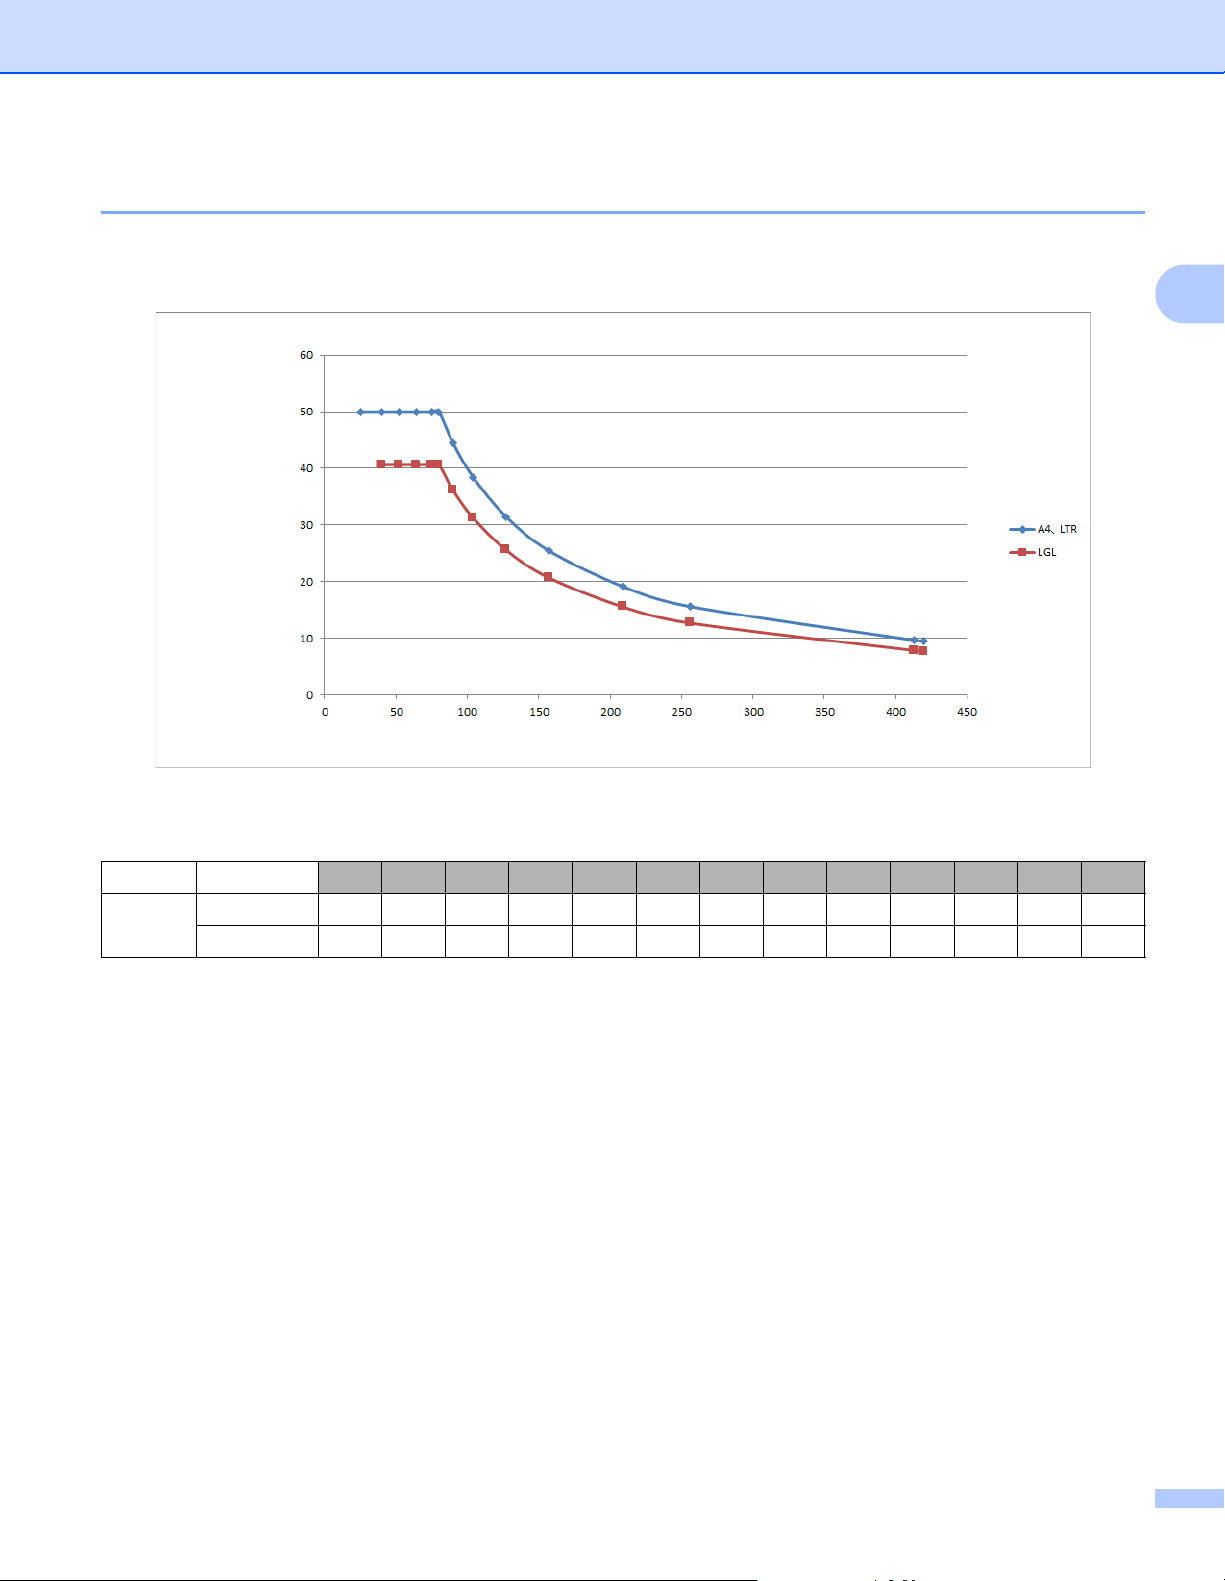
Document Specifications
54
2
Loading Capacity 2
The number of sheets that can be loaded in the Paper Guides is determined by the paper size and paper
weight. See the graph below.
Capacity (Sheets) vs Paper Type
Unit Paper Size 25 40 52 64 75 80 90 104 127 157 209 256 413
Capacity
(Sheets)
A4, LTR 50505050505044383125191610
LGL - 41 41 41 41 41 36 31 26 21 16 13 8
Paper weight (g/m
2
)
Capacity (sheets)
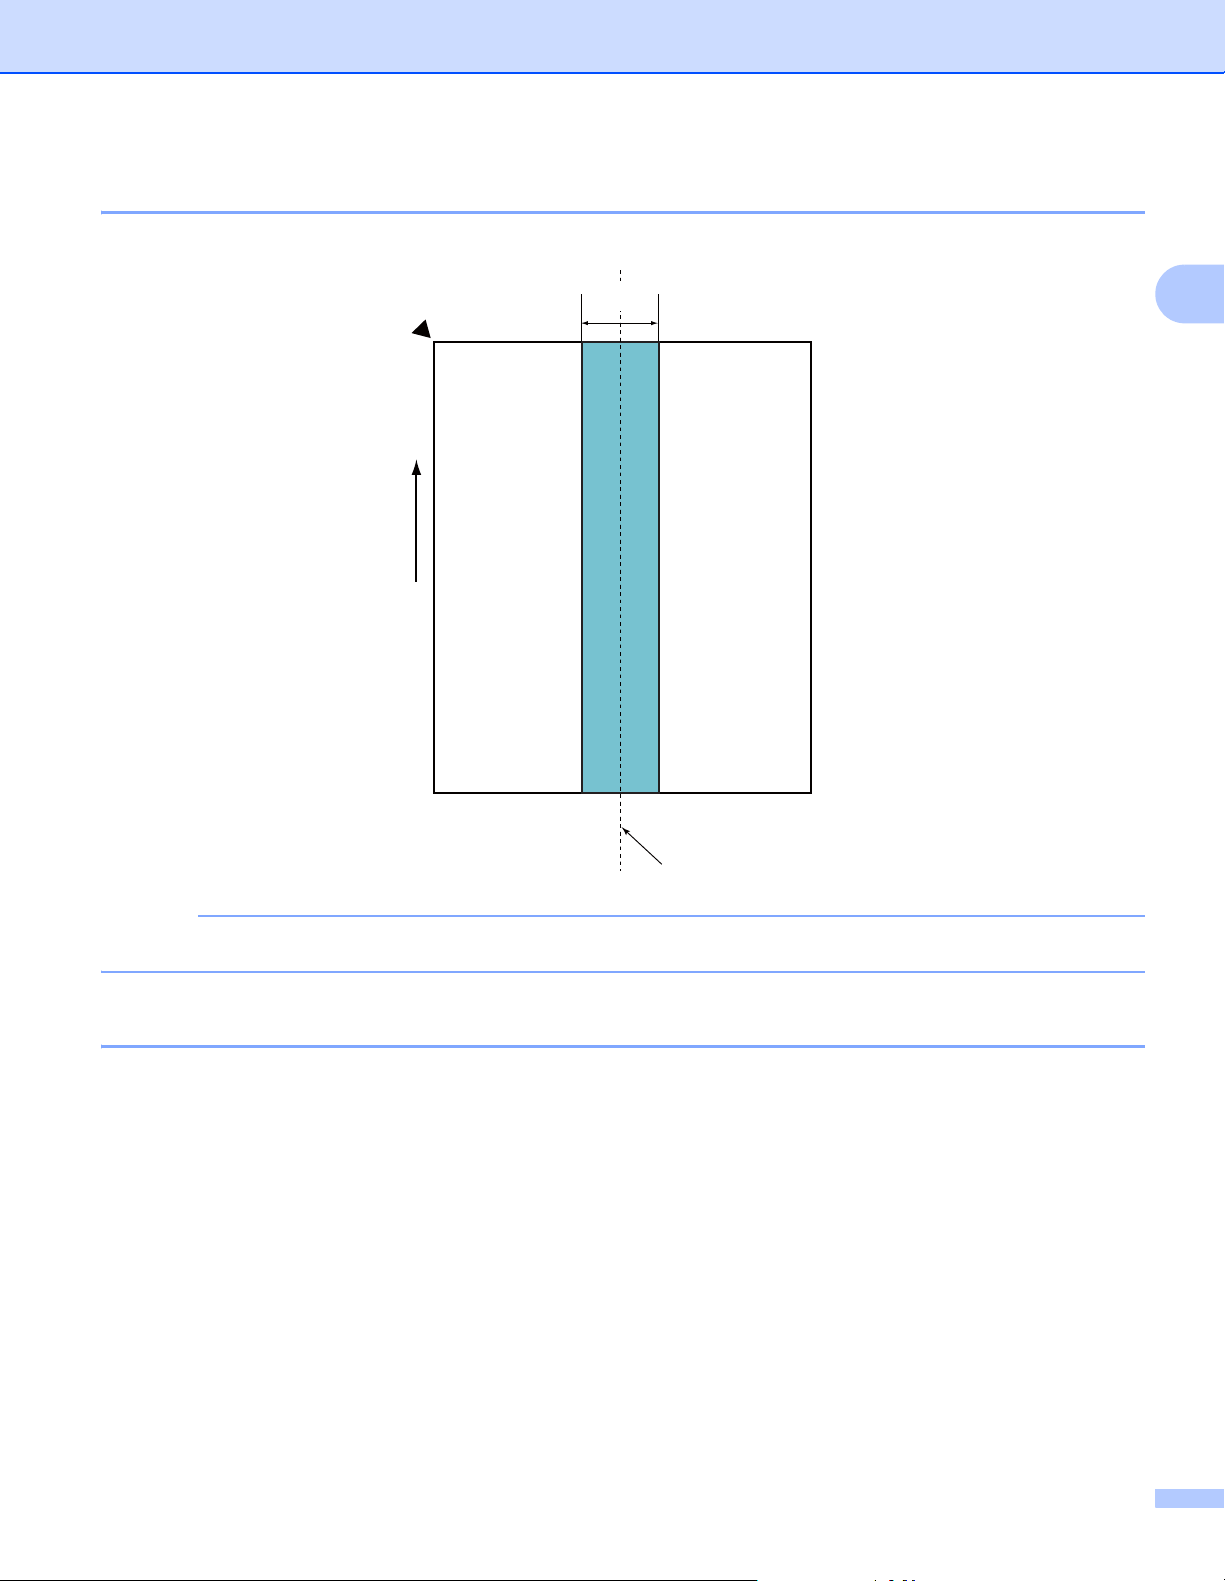
Document Specifications
55
2
Area Not to be Perforated 2
An error may occur if there are punched holes in the document area shaded in light blue in the following figure.
NOTE
The document must be centered on the Pick Up Roller.
Conditions for Multifeed Detection 2
A multifeed is an error when two or more sheets are fed through the ADF at once or when a different
document length is detected.
Multifeed detection is performed by either checking the overlapping of documents, length of the documents,
or a combination of both.
The following conditions are required for an accurate detection:
Load documents of the same paper weight in the Paper Guides.
Paper weight must be between 7 and 110 lb (27 to 413 g/m
2
).
Do not punch holes within 1.57 in. (40 mm) of the document’s center.
Do not attach other documents within 1.57 in. (40 mm) of the document’s center.
The document must be centered at the Pick Up Roller.
Scanning thick documents, such as plastic cards, may cause a false multifeed error. If this happens,
disable multifeed detection.
(Unit: mm)
Top
Reference Point
Front side
Feed
Direction
Bottom
35
Center
40

Document Specifications
56
2
Scanning a Mixed Batch 2
Check the following conditions when scanning a batch of documents with different paper weights, friction
coefficients, or sizes.
Test a few sheets first to check if the documents can be scanned.
Paper direction
Align the direction of the paper fiber with the feed direction.
Paper weight
Use the following paper weights: 11 to 110 lb (40 to 413 g/m
2
)
Friction coefficient
We recommend using the same type of paper from the same manufacturer.
Mixing paper from different manufacturers and brands affects the feeding performance as the difference
in the friction coefficient increases.
We recommend using the following friction coefficients: 0.35 to 0.60 (reference value for paper friction
coefficient)
Document position
Use paper sizes that fit the 1.54 in. (39 mm) width of the center Pick Up Roller.
Paper size
When scanning a mixed batch of different paper sizes, the documents are more likely to skew while
feeding because the paper guides do not touch every sheet. Scanned images may have missing portions
and document jams may occur.
IMPORTANT
Check the scanned images to make sure they are straight and complete.
Documents that cannot be scanned in a mixed batch
The following types of documents cannot be mixed in the same batch:
• Carbonless paper
• Bond paper
• Perforated documents
• Thermal paper
• Carbon-backed paper
• OHP film
• Tracing paper
• Synthetic paper
• Bent or damaged documents
• Thin paper (less than 40g/m
2
)

Document Specifications
57
2
Carrier Sheet Recommendations 2
Documents with a carbon sheet attached
Documents written in pencil
Documents narrower than 2.0 in. (51 mm)
Documents shorter than 2.76 in. (70 mm)
Pages thinner than 3 mil (0.08 mm)
Documents of uneven thickness, such as envelopes
Documents with large wrinkles or curls
Bent or damaged documents
Documents that use tracing paper
Documents that use coated paper
Photographs (photographic paper)
Documents printed on perforated paper
Documents printed on unusually-shaped paper (not square or rectangle)
Documents with photos, notes, or stickers affixed to them
Documents that use carbonless paper
Documents that use loose-leaf paper or any paper with holes in it
CAUTION
To avoid cutting yourself, do not slide or scrape your hand along the edge of the Carrier Sheet.
IMPORTANT
• To avoid warping, do not place the Carrier Sheet in direct sunlight or in an area subject to high
temperatures and high humidity.
• To avoid damaging the Carrier Sheet, do not bend or pull it. If the Carrier Sheet becomes damaged,
it may not be suitable for scanning, and should not be used.

Document Specifications
58
2
Notes for Using Carrier Sheets 2
To avoid document jams, do not load the Carrier Sheet upside down. See the instructions printed on the
Carrier Sheet itself for more information or see Load Documents on page 60.
To avoid document jams, do not put several small documents into the Carrier Sheet at the same time.
Insert only one document into the Carrier Sheet at a time.
Do not write on the Carrier Sheet, as the writing may be seen in scanned documents. If the Carrier Sheet
becomes dirty, wipe it with a dry cloth.
Do not leave documents in the Carrier Sheet for extended periods time; the printing on the documents may
bleedthrough onto the Carrier Sheet.
IMPORTANT
If you use any of the Unacceptable Documents and damage your Brother machine, it may not be covered
under warranty.
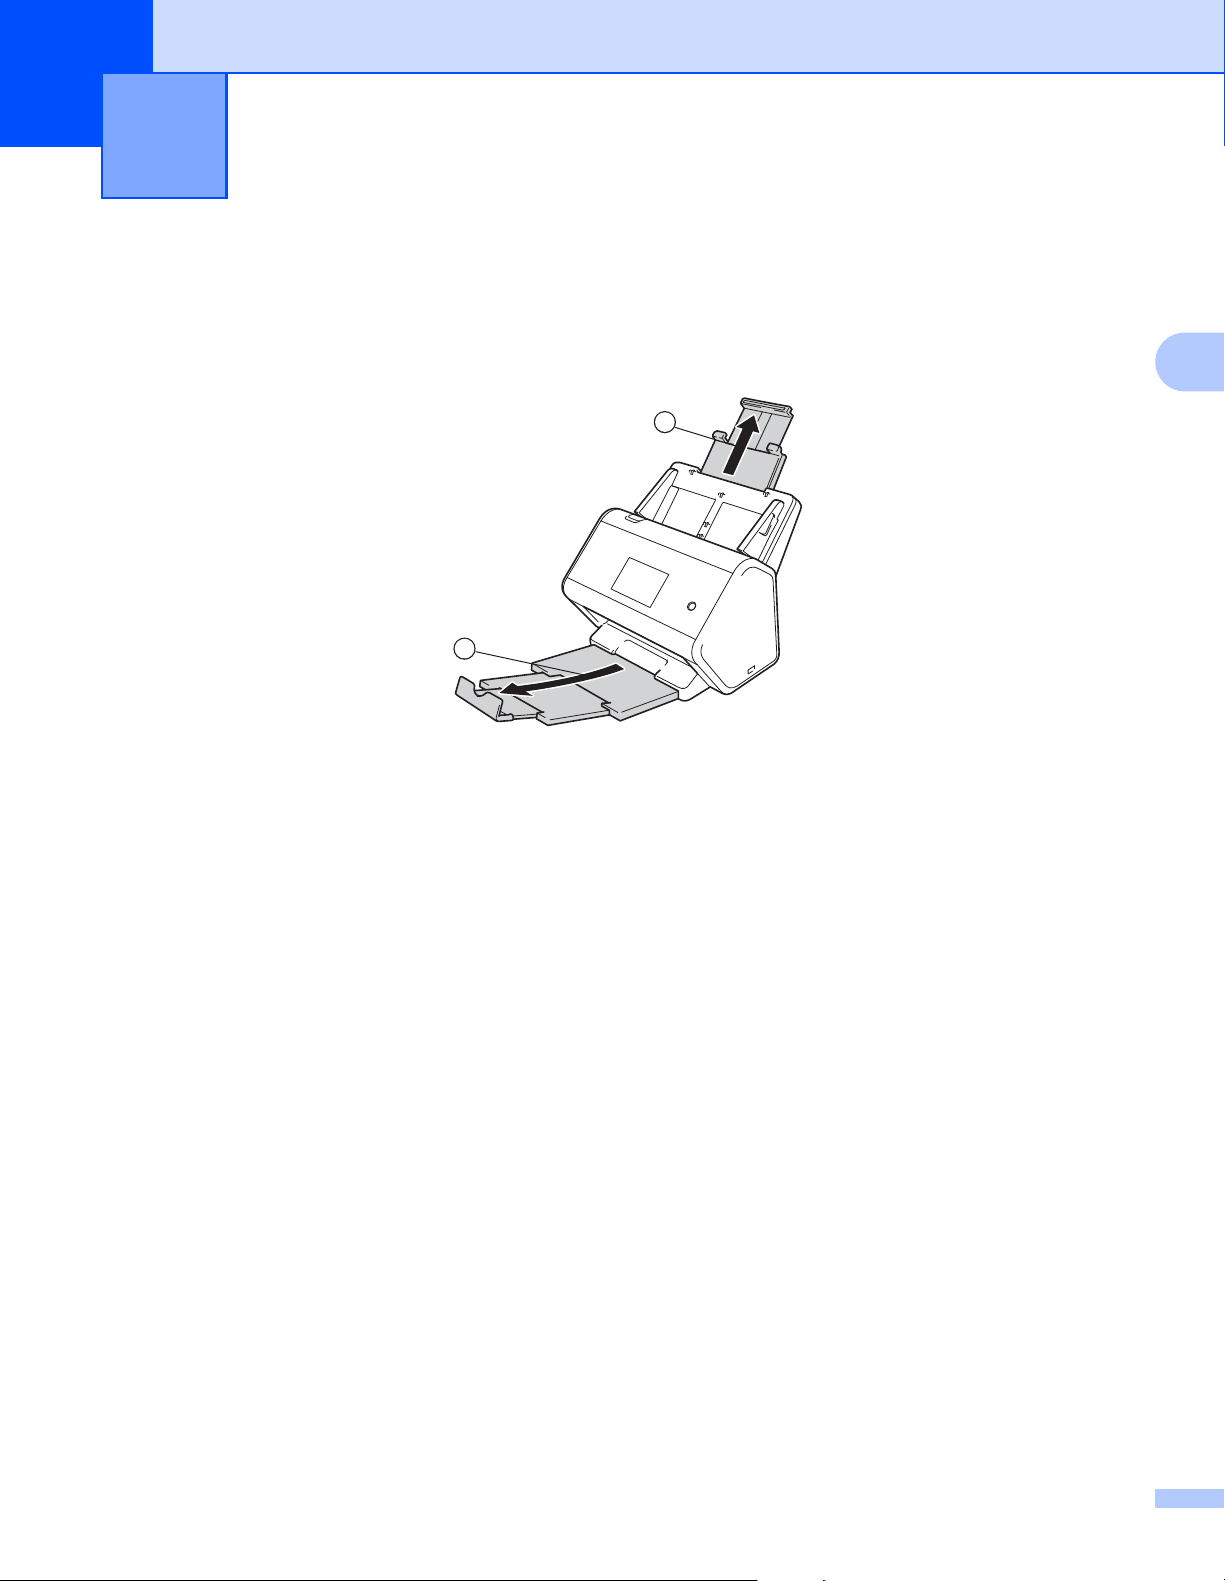
59
3
3
Set Up Your Scanner 3
Attach the Extendable ADF (Automatic Document Feeder) 1. Pull it up to support your document.
Pull out the Extendable Output Tray 2 and position it to the length of your document.
Scan Preparation 3
1
2
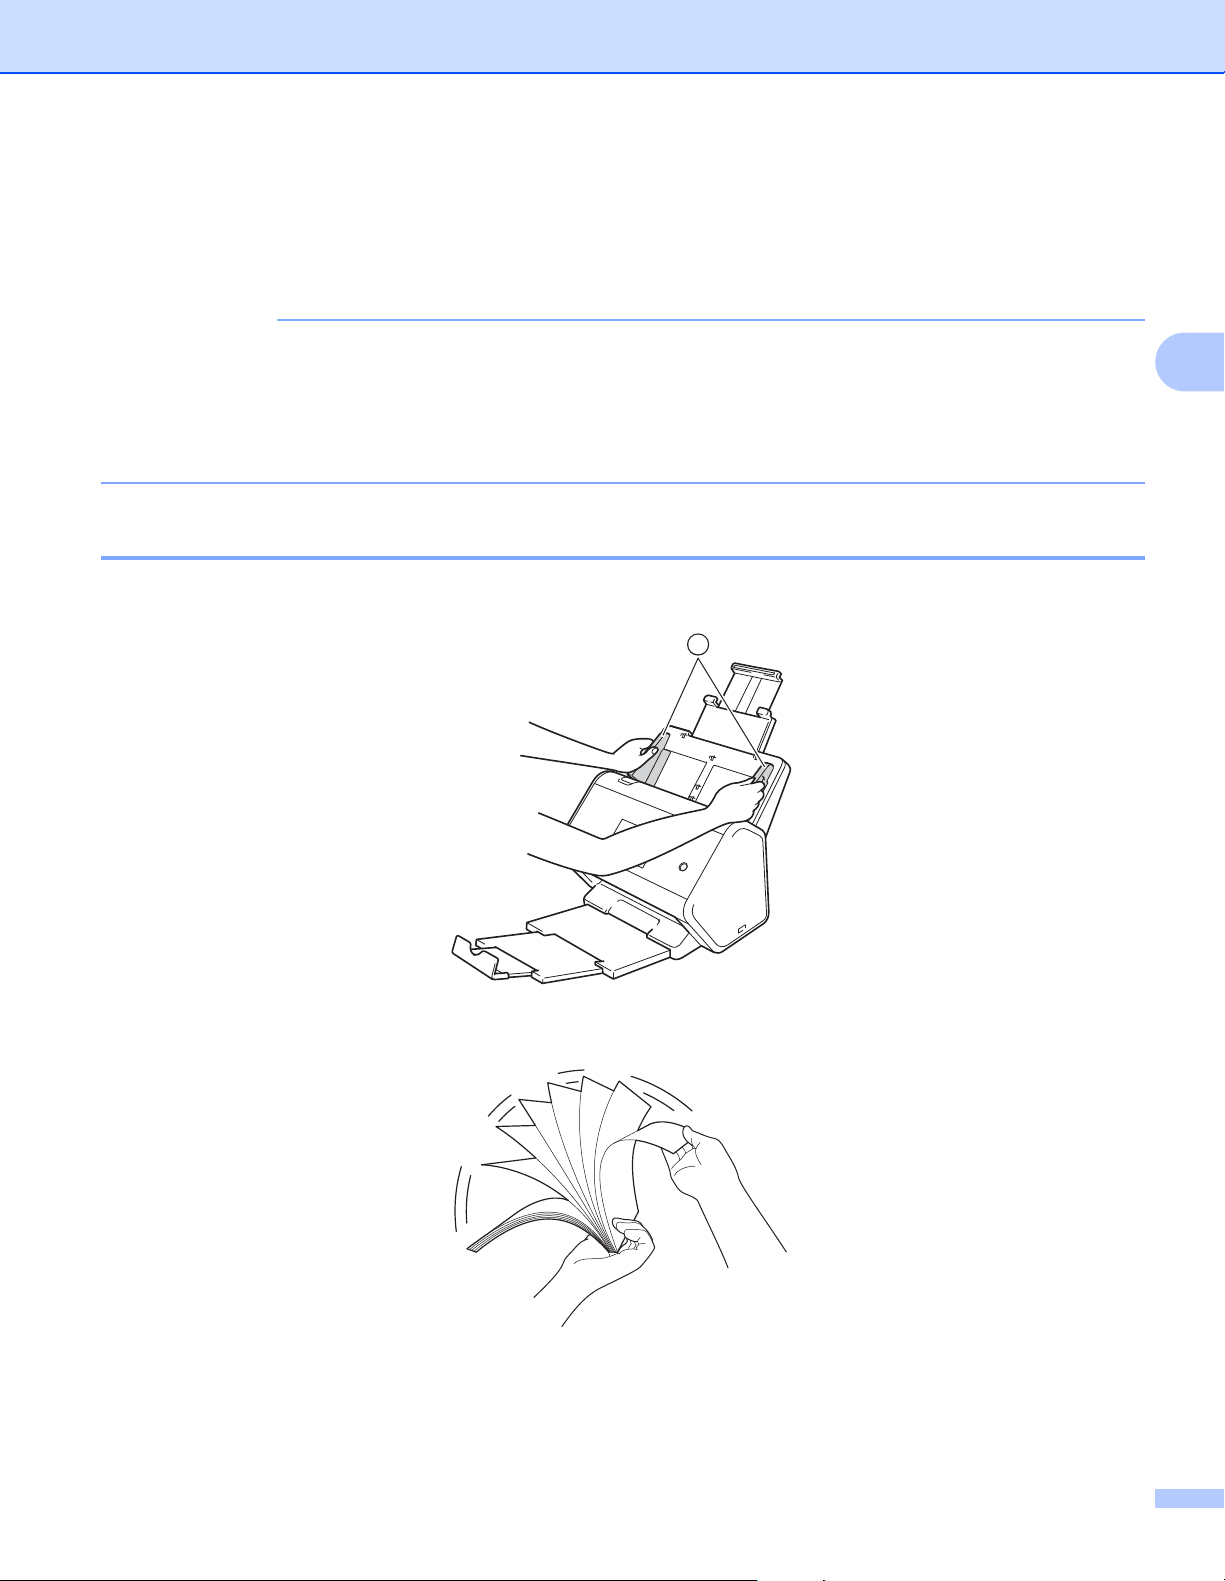
Scan Preparation
60
3
Load Documents 3
The Automatic Document Feeder (ADF) can hold up to 50 pages and feed each sheet individually.
Use20lb(80g/m
2
) paper and always fan the pages before placing them in the ADF.
IMPORTANT
• Make sure documents with ink or correction fluid are completely dry.
• DO NOT pull on the document while it is feeding.
• DO NOT use paper that is curled, wrinkled, folded, ripped, stapled, paper clipped, pasted or taped.
• DO NOT use cardboard or fabric.
Standard-size Documents 3
1 Adjust the Paper Guides 1 to fit the width of your document.
2 Fan the pages several times along both the long edge and the short edge.
1
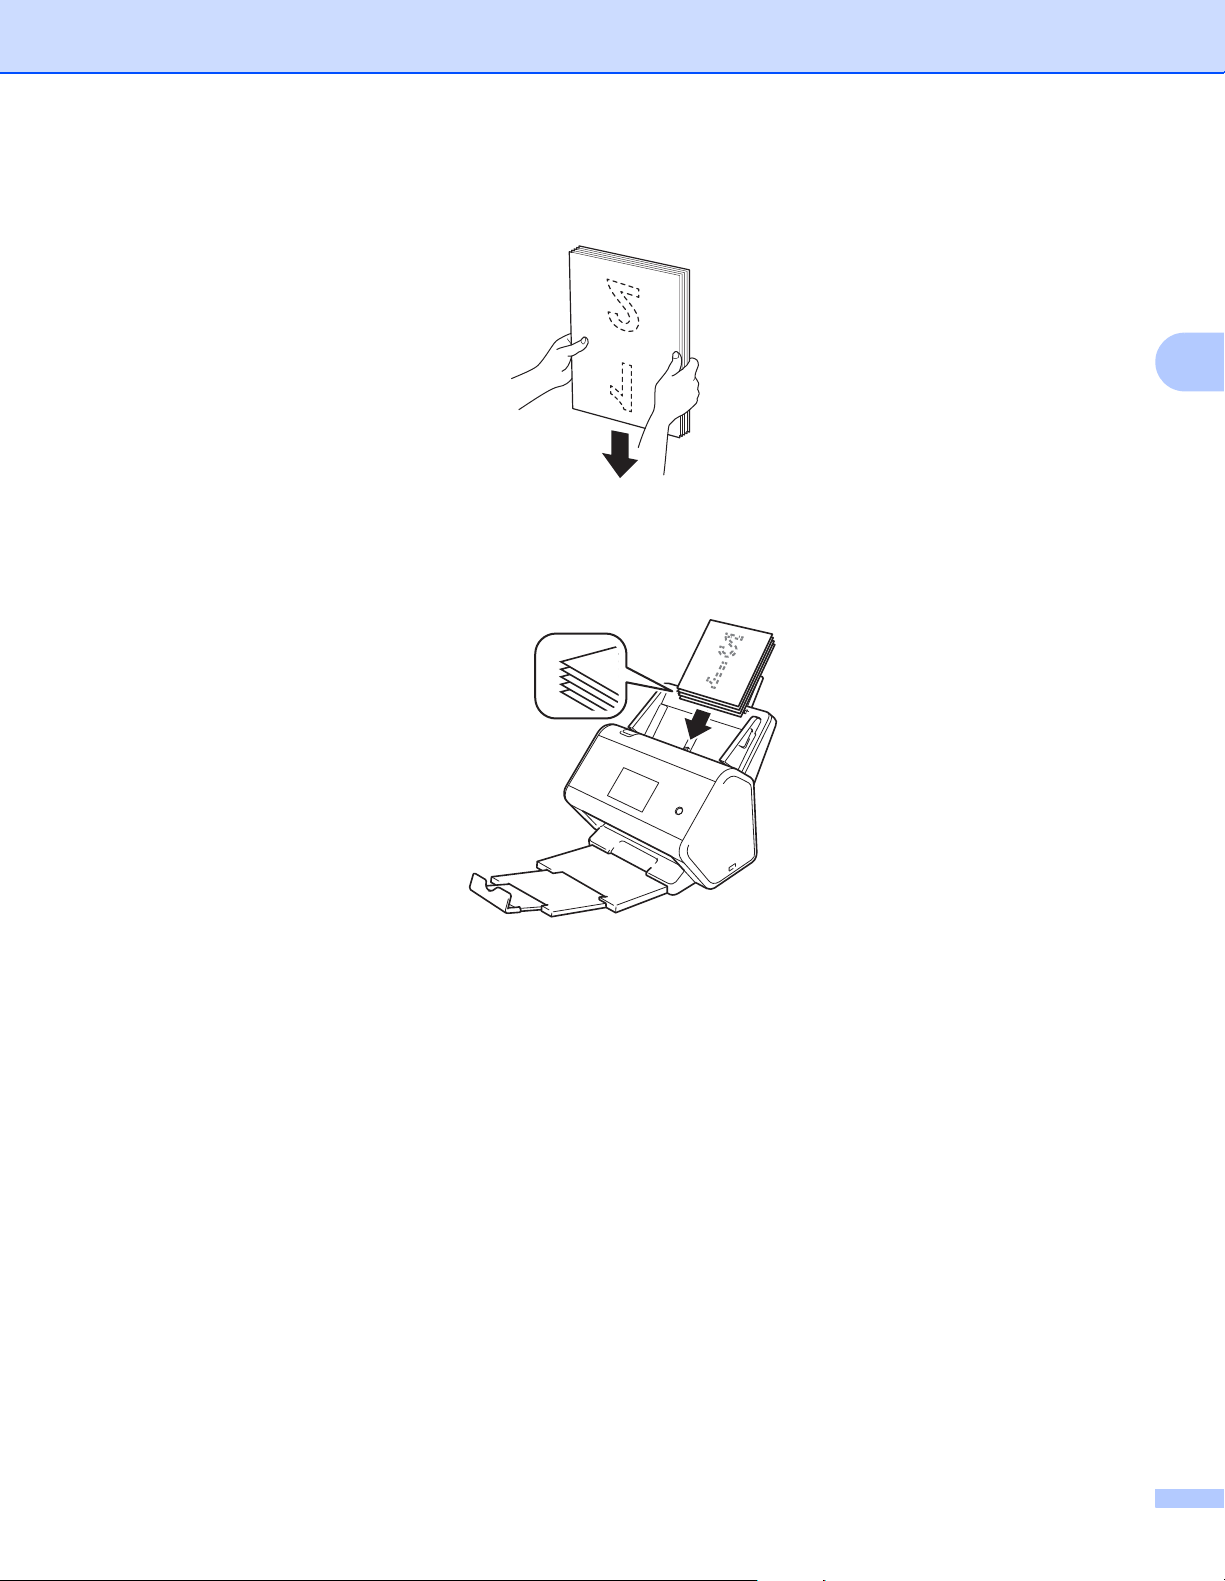
Scan Preparation
61
3
3 Align the edges of the pages.
4 Place your document, face down, top edge first in the ADF between the Guides until you feel it touch
the inside of the machine gently. Feed thin pages slowly and gently to keep the edge from folding.
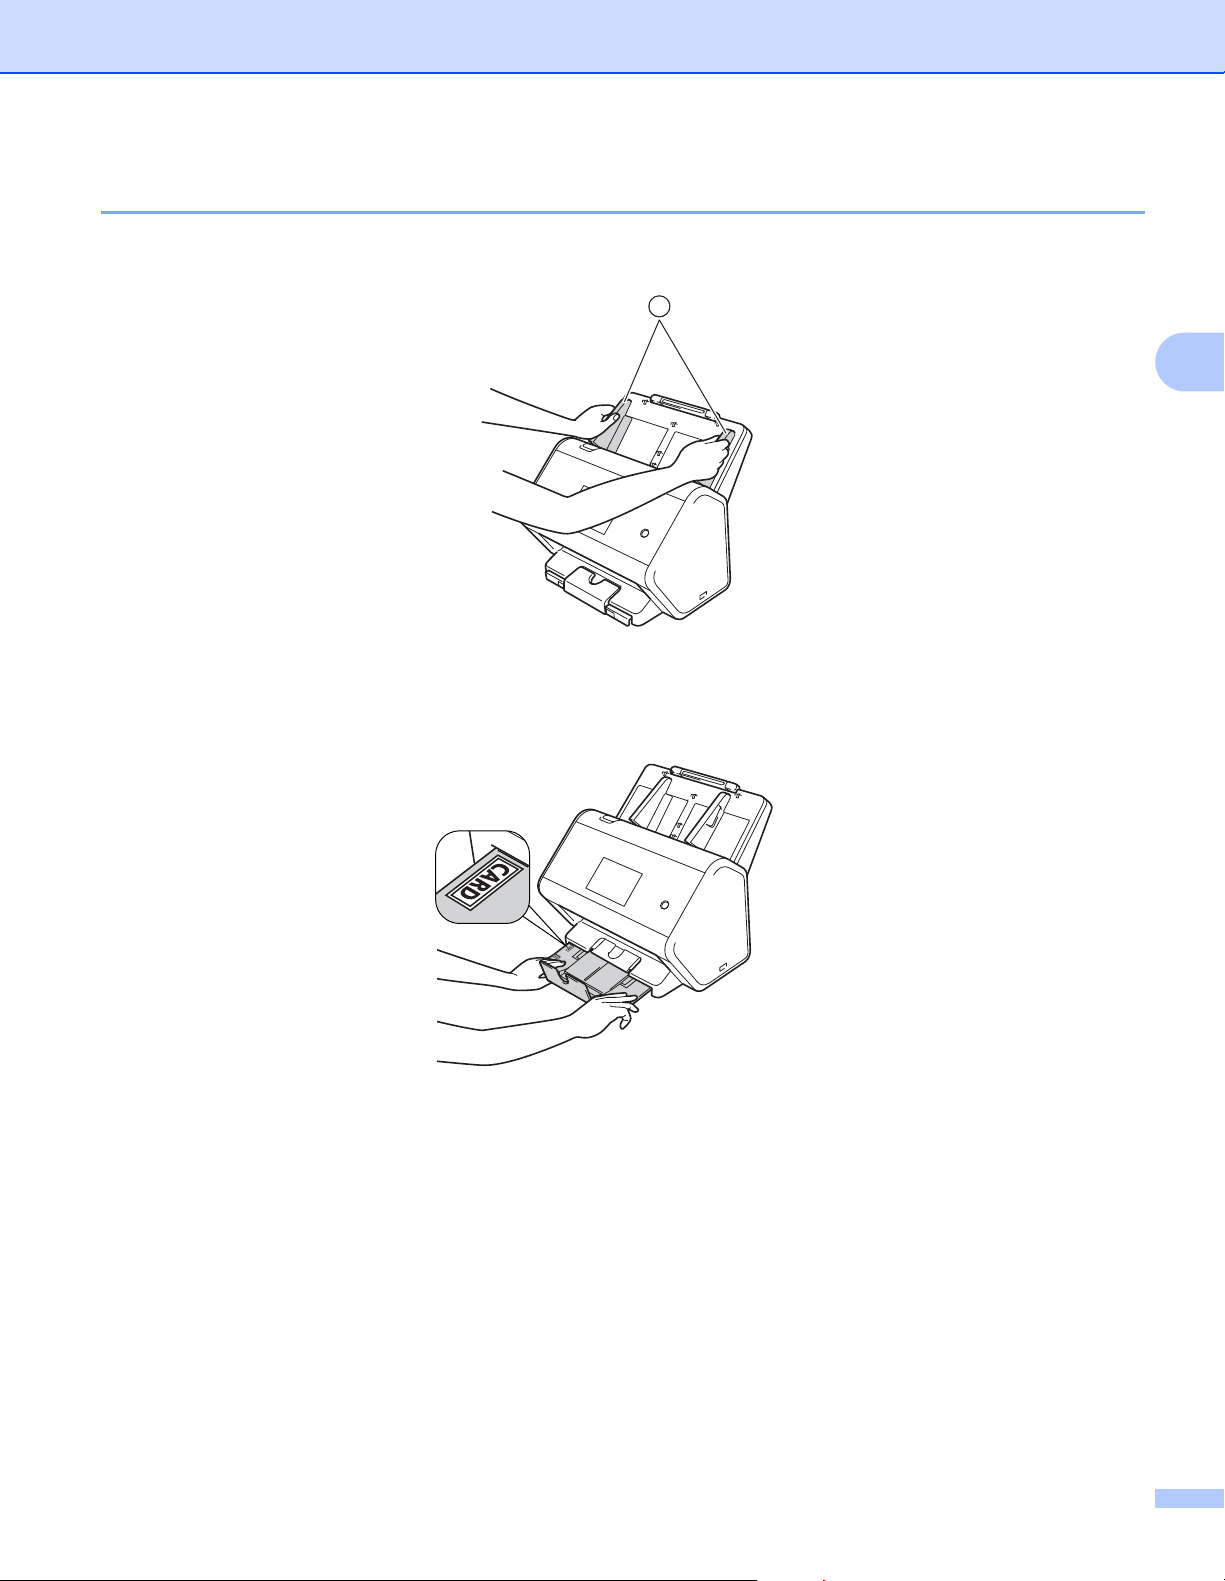
Scan Preparation
62
3
Business Cards 3
1 Adjust the Paper Guides 1 to fit the width of your document.
2 Pull the output tray out until you see the engraved card mark.
1

Scan Preparation
63
3
3 Place your card, face down and top edge first in the ADF between the Guides until you feel it touch the
inside of the machine.
NOTE
• You can load up to 25 business cards (total thickness less than 0.2 in. (5 mm)) at a time.
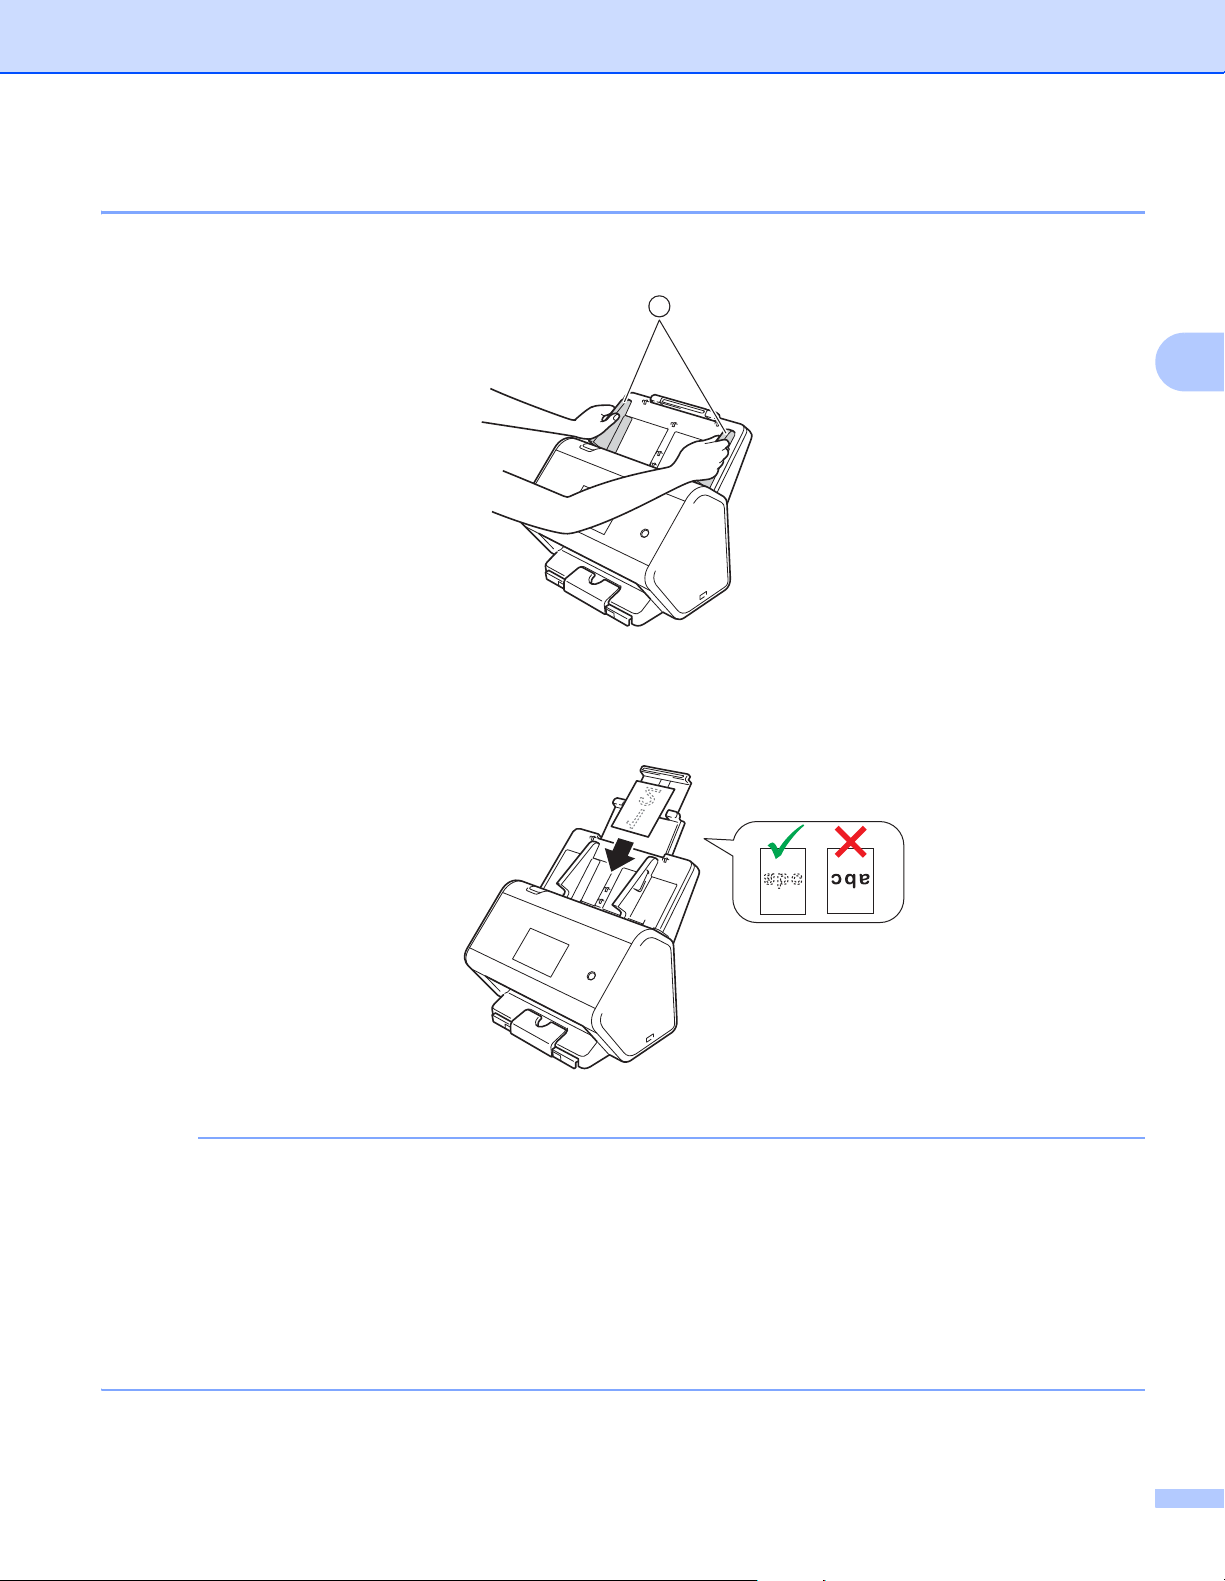
Scan Preparation
64
3
Plastic Cards 3
1 Adjust the Paper Guides 1 to fit the width of your document.
2 Place your card, face down and top edge first in the ADF between the Guides until you feel it touch the
inside of the machine.
NOTE
• You can load up to 5 plastic cards (total thickenss less than 0.2 in. (5.0 mm)) at a time.
• Certain types of plastic cards may be scratched when scanned.
• Rigid cards may not be fed properly.
• If the surface of the card is dirty with grease marks (for example, fingerprints) and such wipe the dirt off
before scanning.
• Scanning plastic cards can be falsely detected as a multifeed.
In that case, to scan documents successfully, disable multifeed detection.
1
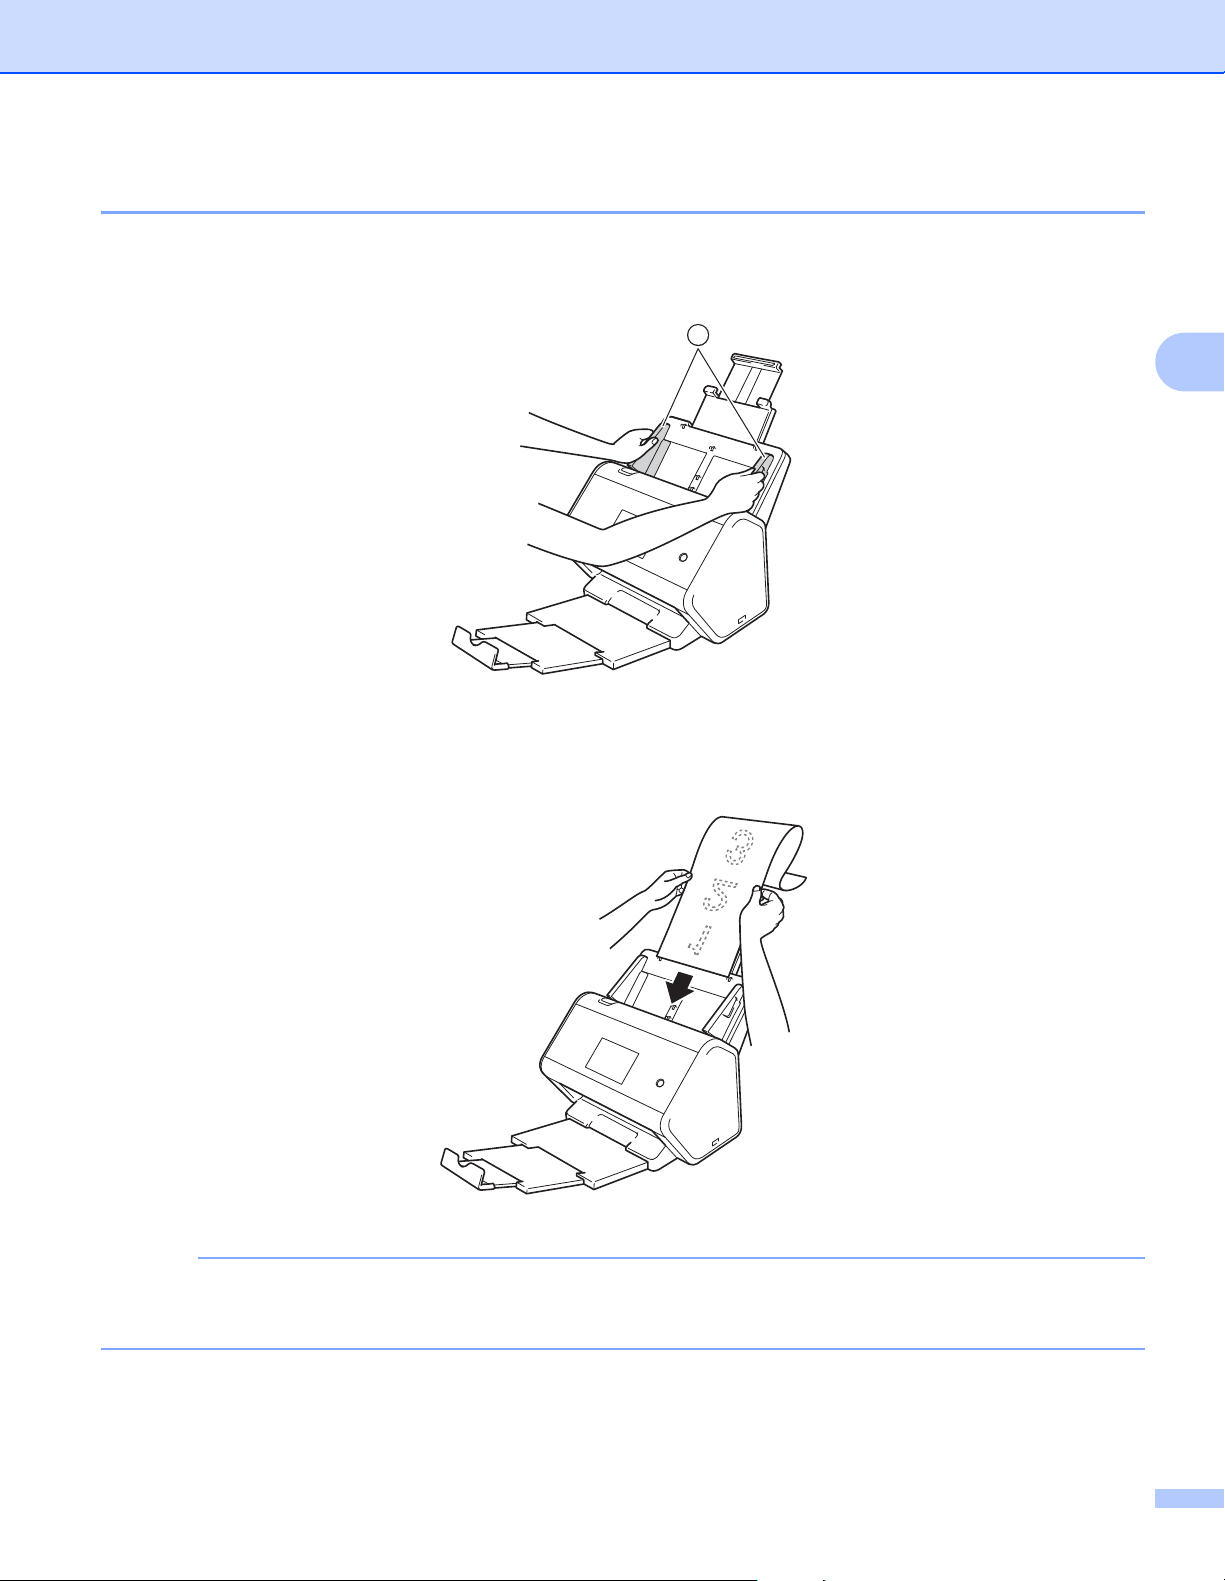
Scan Preparation
65
3
Documents Longer than Standard Size 3
Make sure documents with ink or correction fluid are completely dry.
1 Adjust the Paper Guides 1 to fit the width of your document.
2 Place your document, face down, top edge first in the ADF between the Guides until you feel it touch
the inside of the machine.
NOTE
• Load only one document at a time.
• Support the document with your hand if the document is longer than the extended ADF.
1
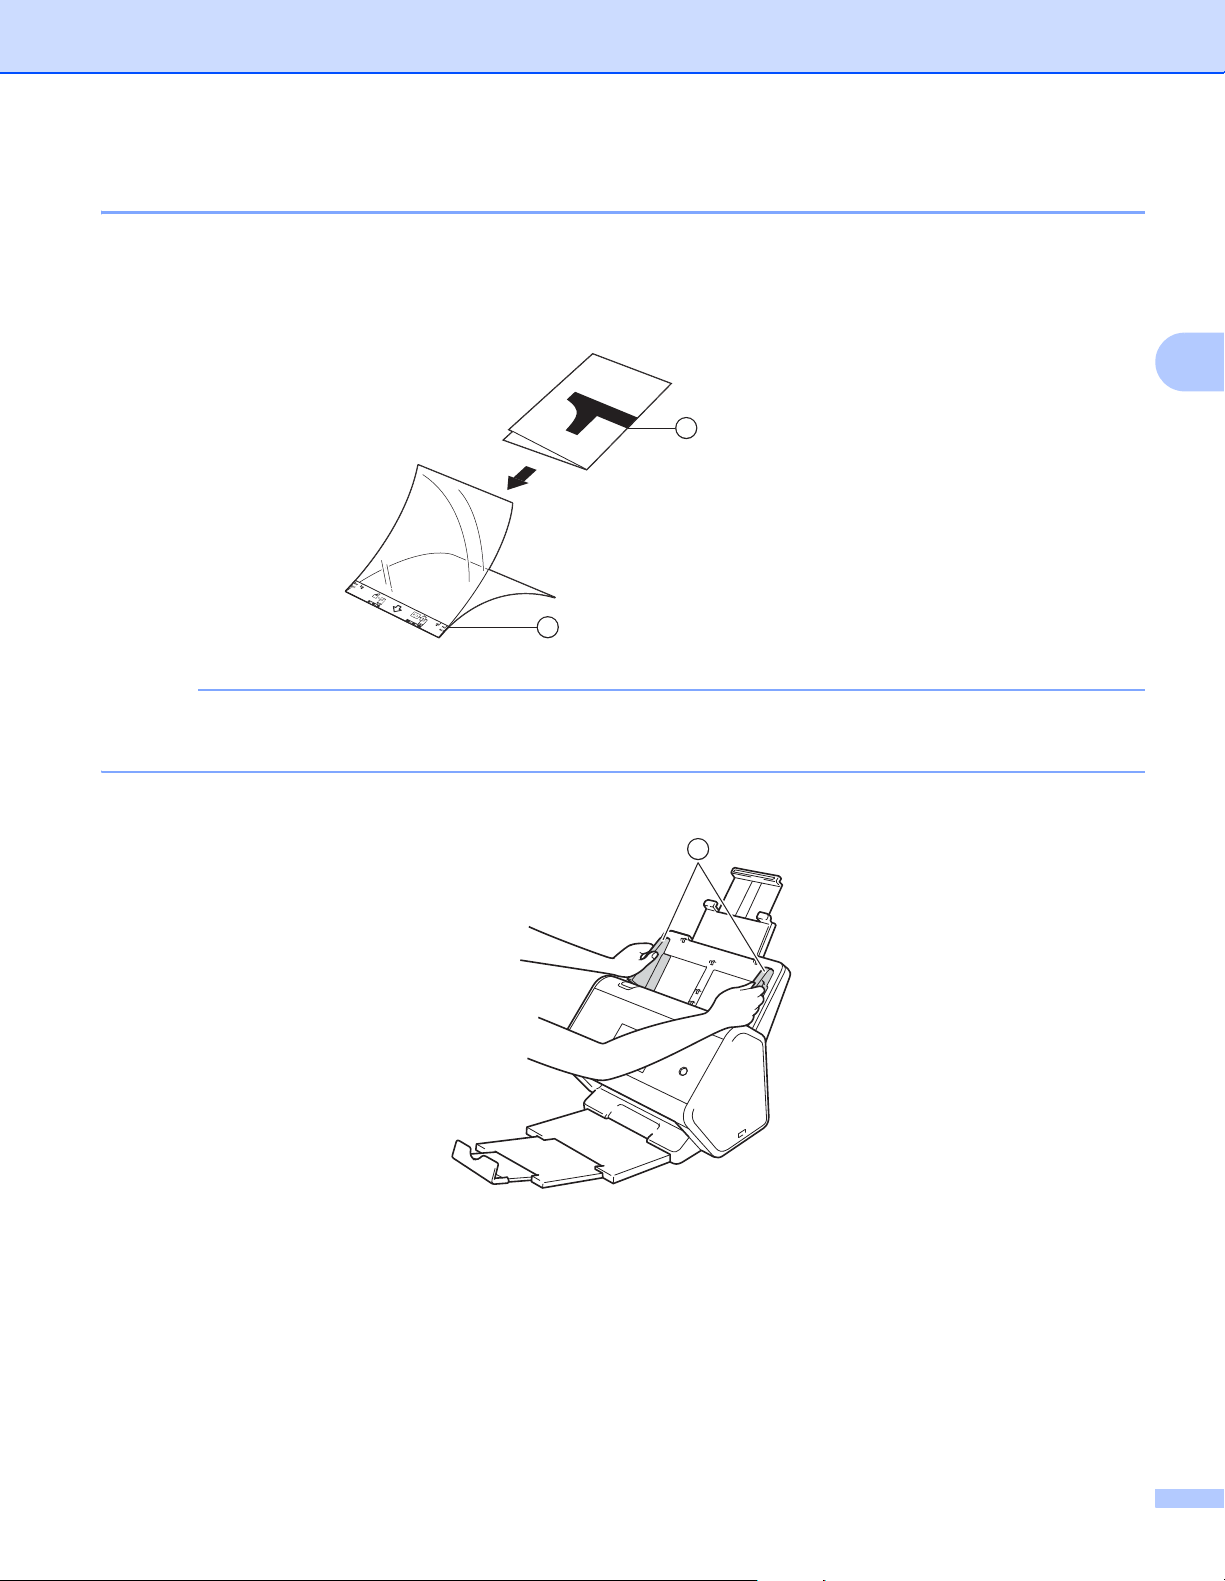
Scan Preparation
66
3
Documents Printed on Non-standard Size Paper 3
Make sure documents with ink or correction fluid are completely dry.
1 Fold your document in half and insert it into the Carrier Sheet, so the document (1) and carrier sheet
header (2) are both face up.
NOTE
Insert the document in the center of the Carrier Sheet and align the top of the document with the top of the
Carrier Sheet.
2 Adjust the Paper Guides 1 to fit the width of the Carrier Sheet.
Document is Face Up
Carrier Sheet Header is Face Up
1
2
1

Scan Preparation
67
3
3 Place the Carrier Sheet face down in the ADF between the Guides until you feel it touch the inside of
the machine.
NOTE
To reduce the white space in the center of a scanned page, be sure to position the folded edge of the
original document close to the edge of the Carrier Sheet.
Documents with Facing Pages 3
Follow the steps of Documents Printed on Non-standard Size Paper on page 66.
Receipts, Clippings, Photos, and Other Documents 3
Make sure documents with ink or correction fluid are completely dry.
1 Insert the document into the Carrier Sheet.
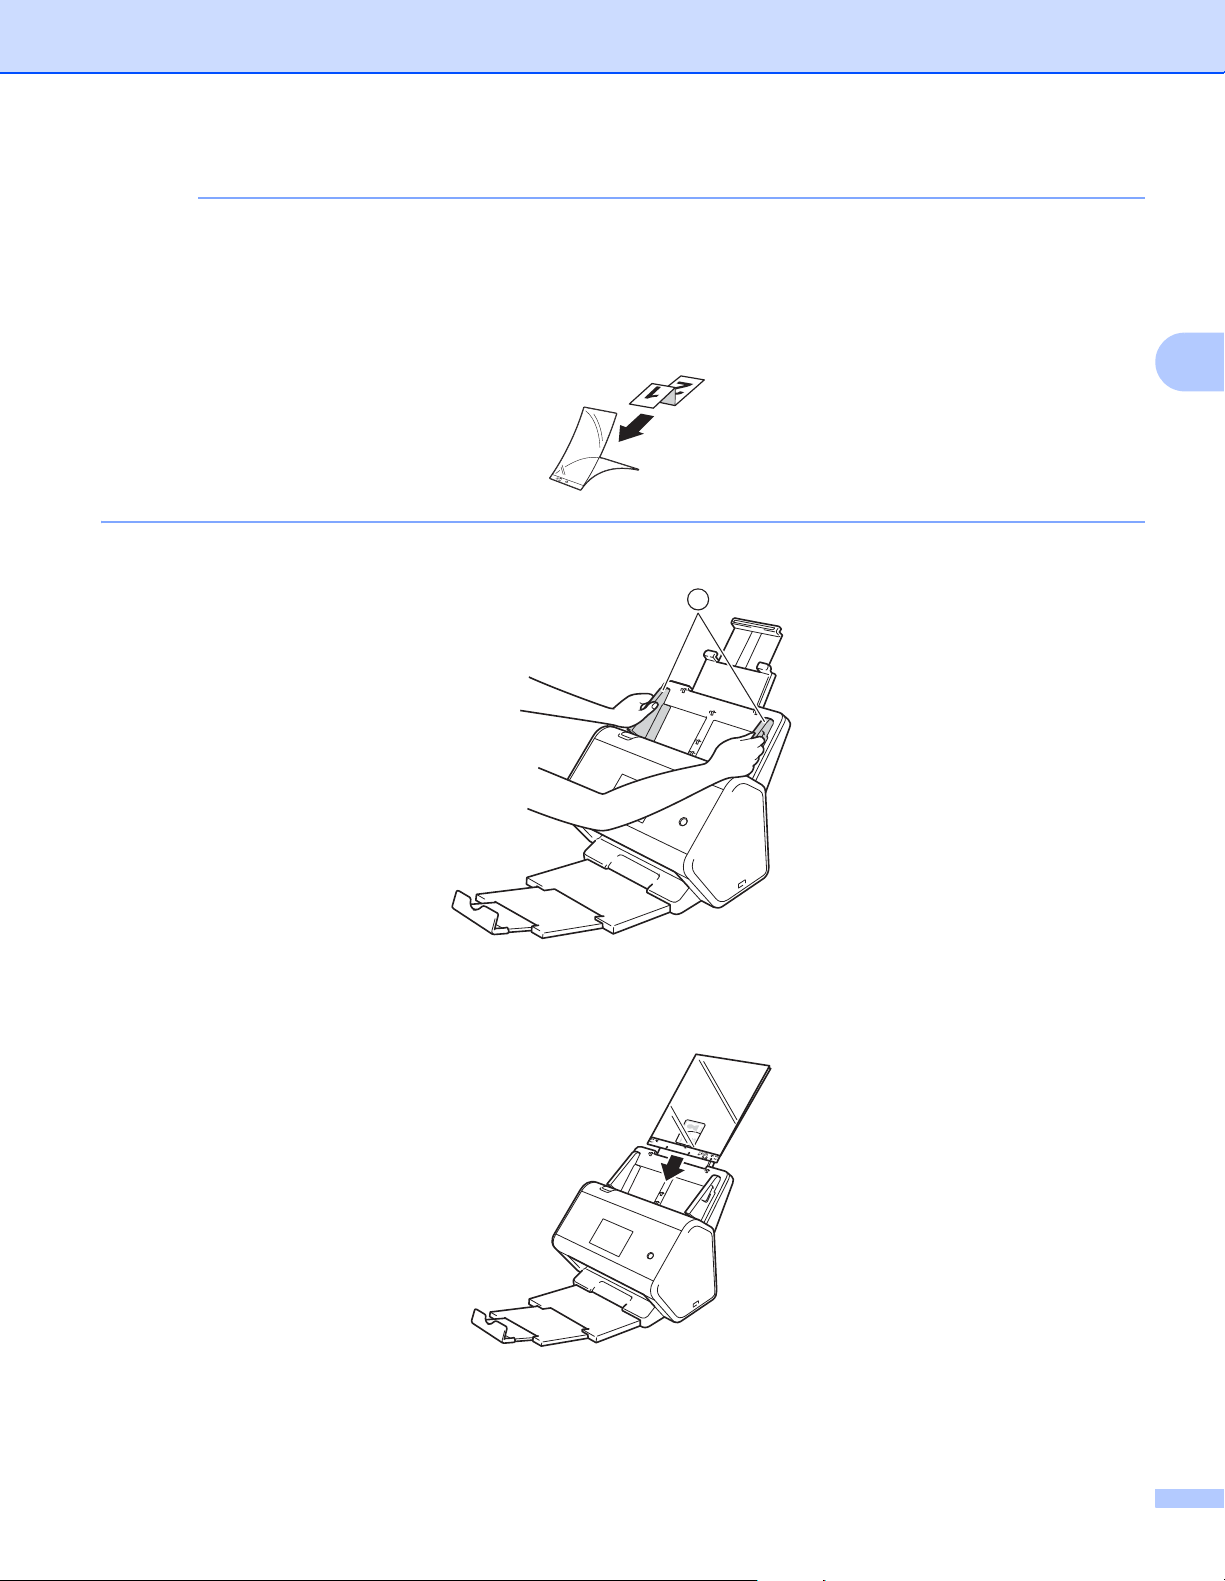
Scan Preparation
68
3
NOTE
• Insert the document in the center of the Carrier Sheet and align the top of the document with the top of the
Carrier Sheet.
• If the receipt is longer than the Carrier Sheet, fold the receipt in two places so that it overlaps when you
insert it into the Carrier Sheet.
2 Adjust the Paper Guides 1 to fit the width of the Carrier Sheet.
3 Place the Carrier Sheet in the ADF between the Guides until you feel it touch the inside of the machine.
1

69
4
4
Before Scanning 4
Before scanning, confirm the following:
Make sure you have installed the scanner driver by following the steps in the Quick Setup Guide.
If your Brother machine is connected via ethernet or USB cable, make sure that the interface cable is
physically secure.
Prepare Your Network for Scanning with
Your Computer
4
Prepare Your Network for Scanning with Your Computer
70
4
Before Network Scanning 4
Network License (Windows
®
) 4
This product includes a computer license for up to two users.
This license supports the installation of the scanner driver, including Nuance™ PaperPort™ 14SE, on up to
two computers on the network.
Configure Network Scanning for Windows
®
4
If you are using a different machine than the one that was originally registered on your computer during the
installation of scanner driver, follow the steps below:
1 Do one of the following:
Windows
®
7, Windows
®
8, Windows
®
8.1 and Windows
®
10
Click (Brother Utilities) on your desktop, and then click the drop-down list and select your
model name (if not already selected). Click Scan in the left navigation bar, and then click Scanners
and Cameras.
Windows
®
XP, Windows Vista
®
Click (Start) menu, select Control Panel click Scanners and Cameras.
2 Do one of the following:
Windows
®
XP
Right-click the Scanner Device icon and choose Properties.
The Network Scanner Properties dialog box appears.
Windows Vista
®
, Windows
®
7, Windows
®
8, Windows
®
8.1 and Windows
®
10
Click the Properties button.
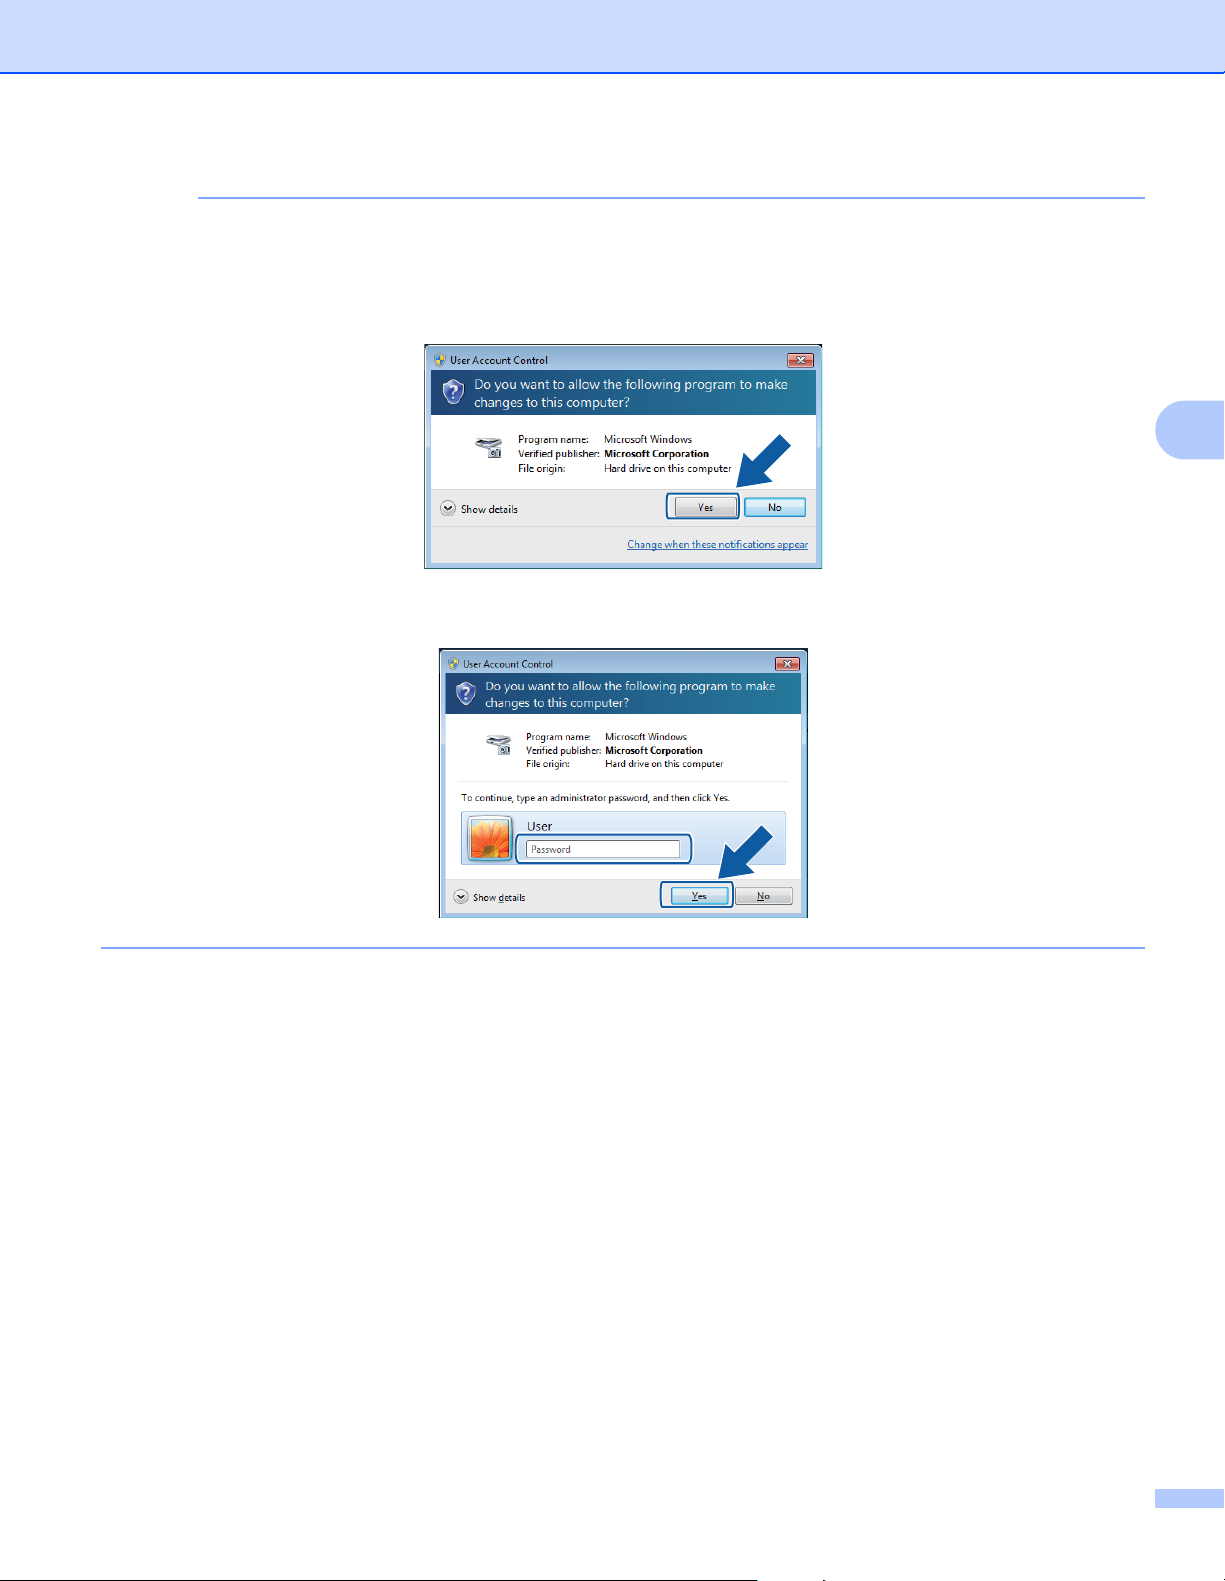
Prepare Your Network for Scanning with Your Computer
71
4
NOTE
(Windows Vista
®
, Windows
®
7, Windows
®
8, Windows
®
8.1 and Windows
®
10)
If the User Account Control screen appears, do the following:
• For users who have administrator rights: Click Continue or Yes.
• For users who do not have administrator rights: Type the administrator password and click OK or Yes.
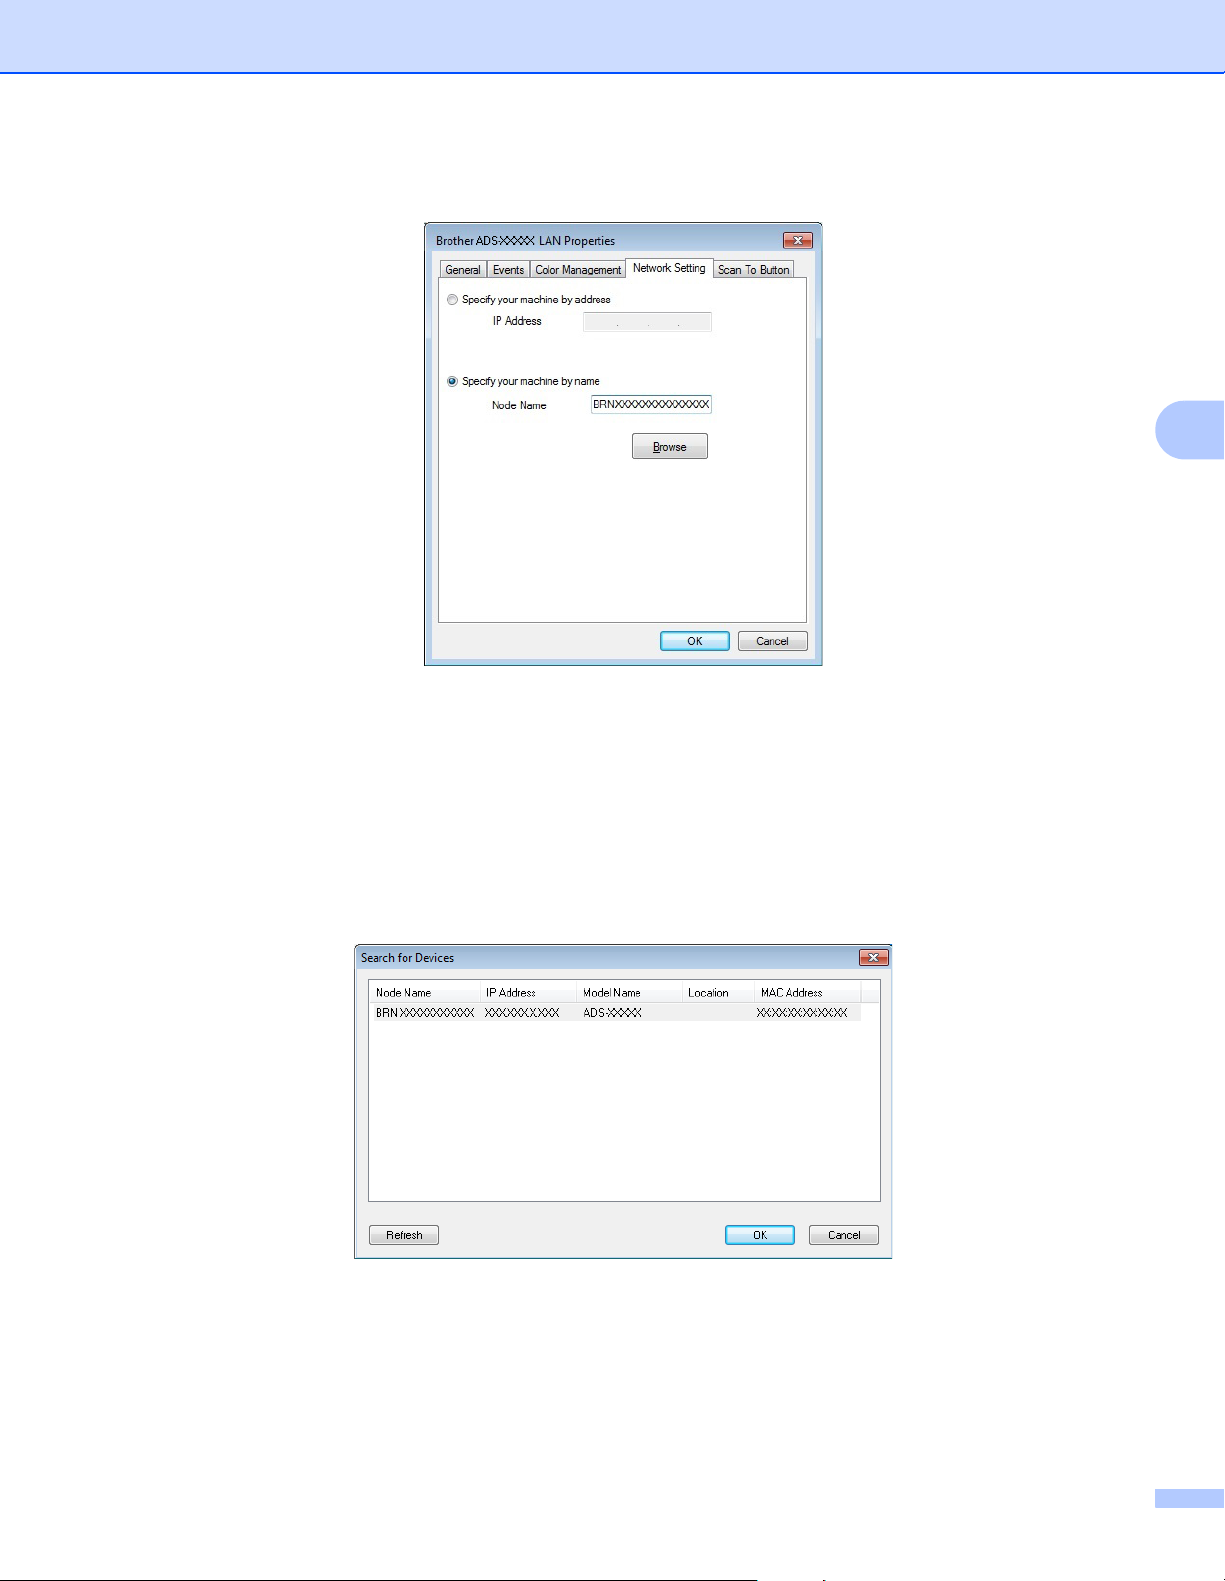
Prepare Your Network for Scanning with Your Computer
72
4
3 Click the Network Setting tab and choose the appropriate connection method.
Specify your machine by address
Type the IP address of the machine in IP Address, and then click Apply or OK.
Specify your machine by name
4
1 Type the machine node name in Node Name, or click Browse and choose the machine you want
to use.
2 Click OK.
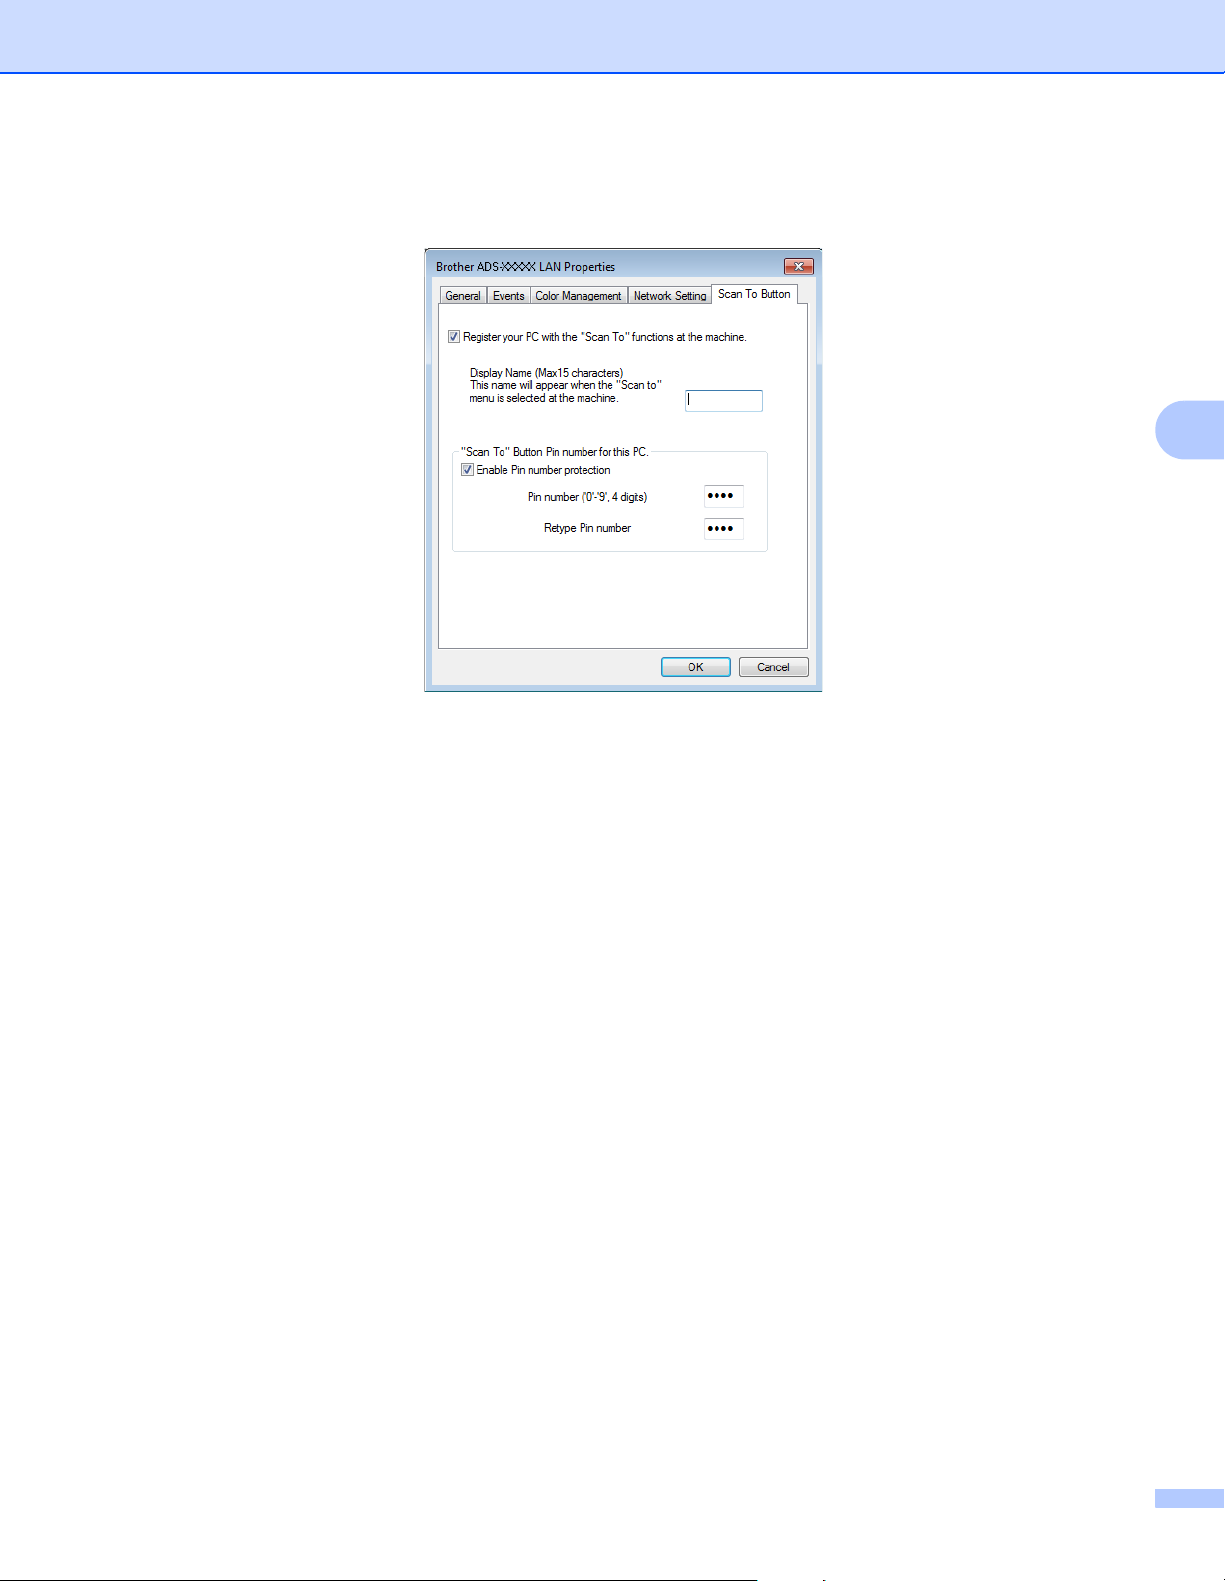
Prepare Your Network for Scanning with Your Computer
73
4
4 Click the Scan To Button tab and type your computer name in the Display Name field. The Touchscreen
displays the name you enter. The default setting is your computer name. Enter any name that you like.
5 (ADS-2800W / ADS-3600W)
To avoid receiving unwanted documents, type a four-digit PIN in the Pin number and Retype Pin
number fields.
To send scanned data to a computer protected by a PIN, the Touchscreen prompts you to enter the PIN
before the document can be scanned and sent to the computer.

Prepare Your Network for Scanning with Your Computer
74
4
Configure Network Scanning for Macintosh 4
If you followed the network installation steps in the Quick Setup Guide, your Brother machine was added to
your network automatically.
To use the machine as a network scanner, the machine must be configured with a TCP/IP address. You can
add or change the address settings from the Control Panel.
(Brother iPrint&Scan)
1 In the Finder menu bar, click Go > Applications, and then double-click the Brother iPrint&Scan icon.
2 The Brother iPrint&Scan window appears.
3 Click the Select your Machine button, and then follow the on-screen instructions to reselect your
network machine.
(TWAIN driver)
1 In the Finder menu bar, click Go > Applications > Brother, and then double-click the Device Selector
icon.
2 The Device Selector window appears.
3 Reselect your network machine, make sure Status is idle, and then click OK.

Prepare Your Network for Scanning with Your Computer
75
4
Launch the BRAdmin Utility (Windows
®
) 4
If you have installed BRAdmin Light or BRAdmin Professional 3, the BRAdmin button lets you open the
BRAdmin Light or BRAdmin Professional 3 utility.
The BRAdmin Light utility is designed for initial setup of Brother network-connected devices. It can also
search for Brother products in a TCP/IP environment, view the status, and configure basic network settings,
such as the IP address. For information about installing BRAdmin Light from the supplied installation disc,
see the Network User’s Guide.
If you require more advanced machine management, use the latest version of the BRAdmin Professional 3
utility that is available as a download from support.brother.com
1 Click the (ControlCenter4) icon in the task tray and then select Open from the menu.
The ControlCenter4 window appears.
2 Click the Device Settings tab.
3 Click BRAdmin. The BRAdmin Light or BRAdmin Professional 3 utility dialog box appears.
NOTE
If you have installed both BRAdmin Light and BRAdmin Professional, ControlCenter4 will launch BRAdmin
Professional 3.


77
6
6
Change the ControlCenter4 User Interface (Windows
®
) 6
ControlCenter4 is a software utility that lets you access your frequently-used applications. Using ControlCenter4
eliminates the need to manually launch specific applications.
ControlCenter4 also controls the settings for the (PC) button (ADS-2400N / ADS-3000N), or the to PC
button (ADS-2800W / ADS-3600W) on your Brother machine. For information about how to configure the
settings on the machine, see Change Scan to PC Settings (Windows
®
) on page 190.
ControlCenter4 has two operation modes: Home Mode and Advanced Mode. You can change the mode at
any time.
Home Mode
Lets you access your machine’s main functions.
1 Document Type option
Click to select a document type.
2 Custom Settings button
Click to configure scan settings.
3 Scan Size drop-down list
Click to select a scan size.
4 Scan button
Click to start scanning.
5 Image viewer
Displays a scanned image.
Scan Using Your Computer 6
5
6
7
8
9
1
2
4
3
10
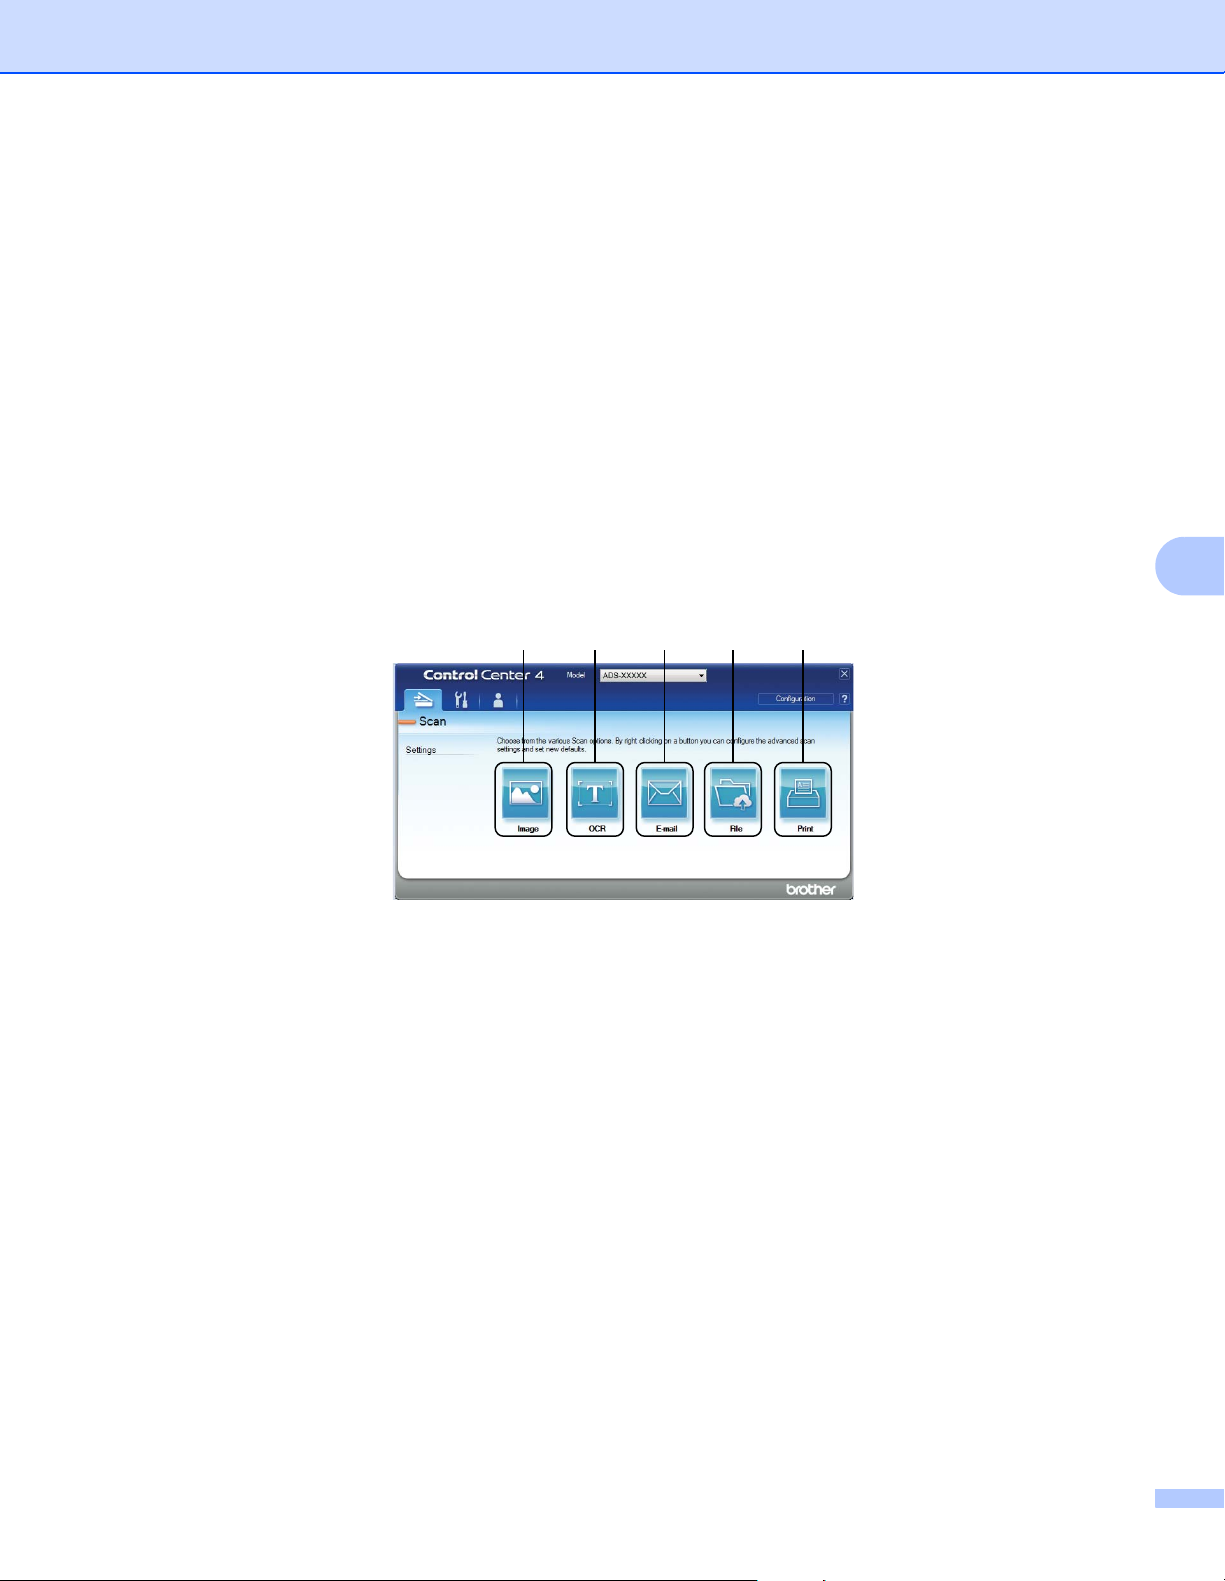
Scan Using Your Computer
78
6
6 Save button
Click to save a scanned image to a folder on your hard disk or upload it to SharePoint in one of the file
types shown in the file type list.
7 Print button
Click to print the scanned document on your printer.
8 Open with an Application button
Click to scan an image directly into your graphics application for image editing.
9 Send E-mail button
Click to scan a document to your default email application.
10 OCR button
Click to scan a document and convert it to text.
Advanced Mode
For you more control over the details of your machine’s functions, customize one-button scan actions.
1 Image button
Click to scan a document directly into any graphic viewer/editor application.
2 OCR button
Click to scan a document and convert it to text.
3 E-mail button
Click to scan a document to your default email application.
4 File button
Click to save a scanned image to a folder on your hard disk or upload it to SharePoint in one of the file
types shown in the file type list.
5 Print button
Click to print the scanned document on your printer.
1 2 3 4 5
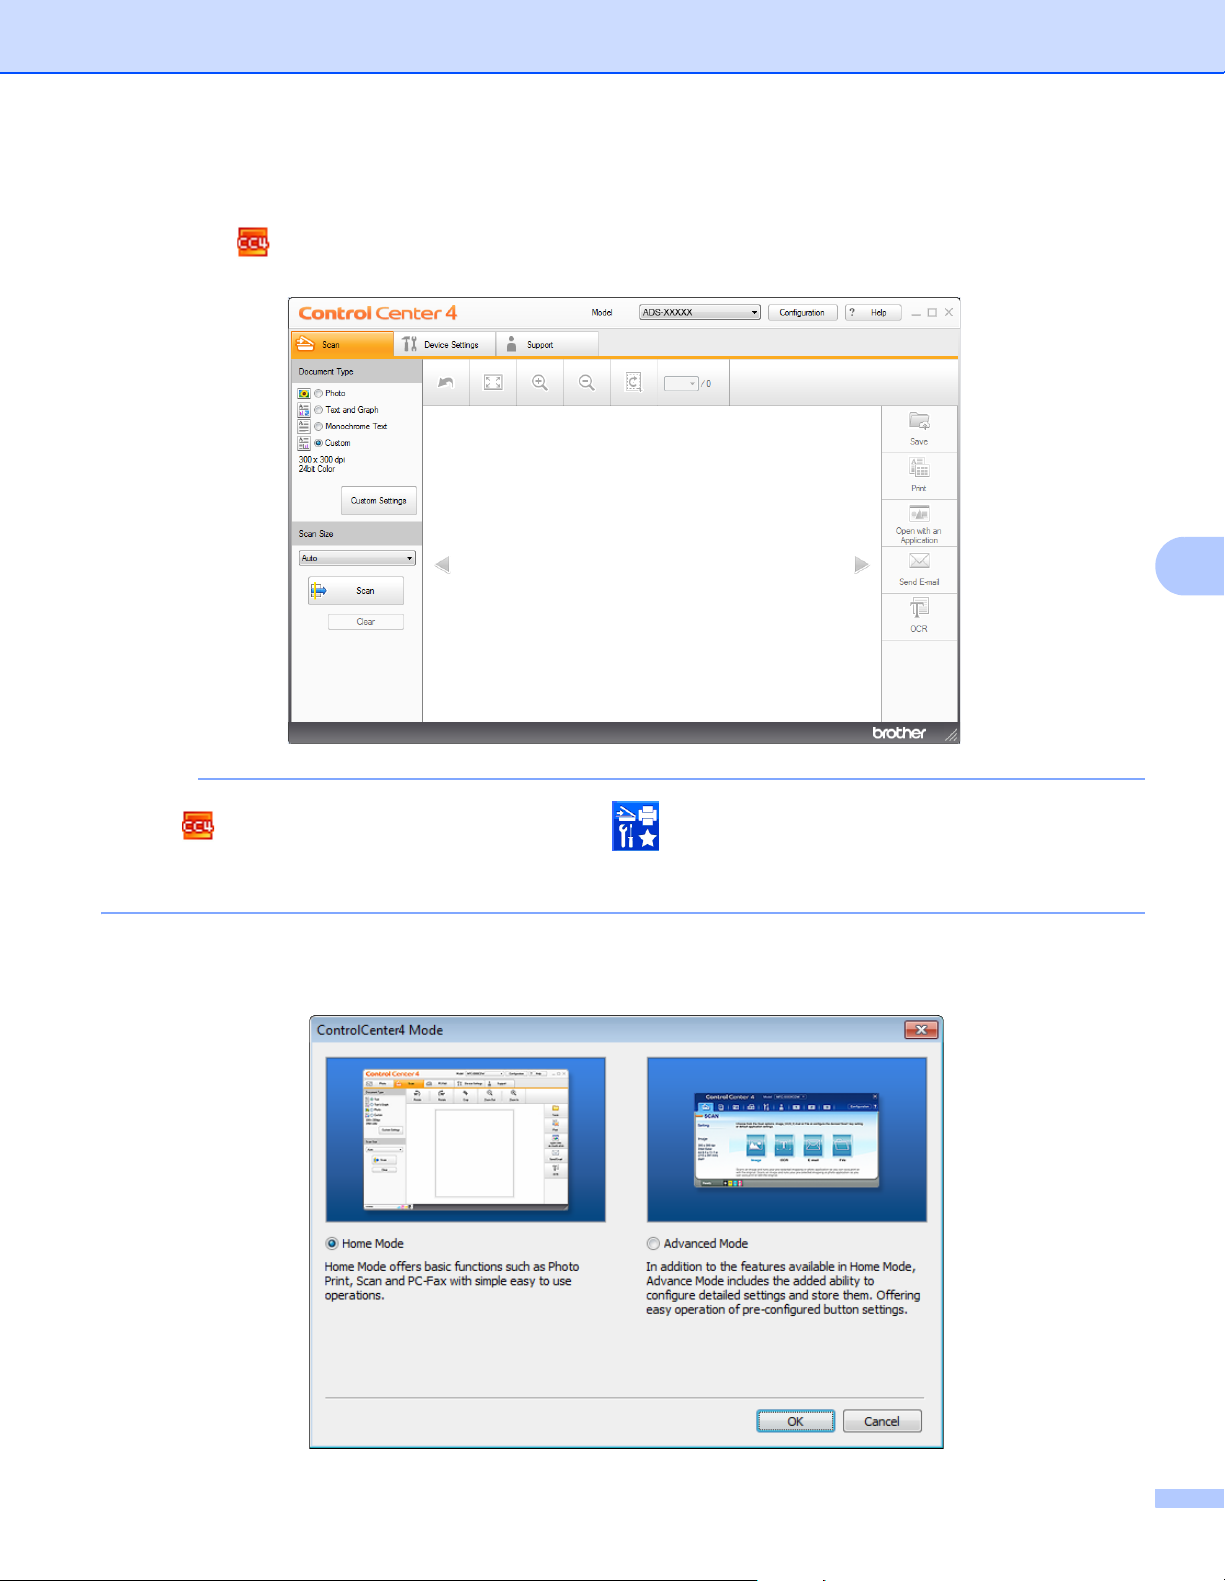
Scan Using Your Computer
79
6
To change ControlCenter4’s operation mode:
1 Click the (ControlCenter4) icon in the task tray and select Open from the menu.
The ControlCenter4 window appears.
NOTE
If the icon is not displayed in the task tray, click (Brother Utilities) on your desktop, and then click
the drop-down list and select your model name (if not already selected). Click Scan in the left navigation
bar, and then click ControlCenter4.
2 Click Configuration and select Mode Select.
3 Select Home Mode or Advanced Mode, and then click OK.
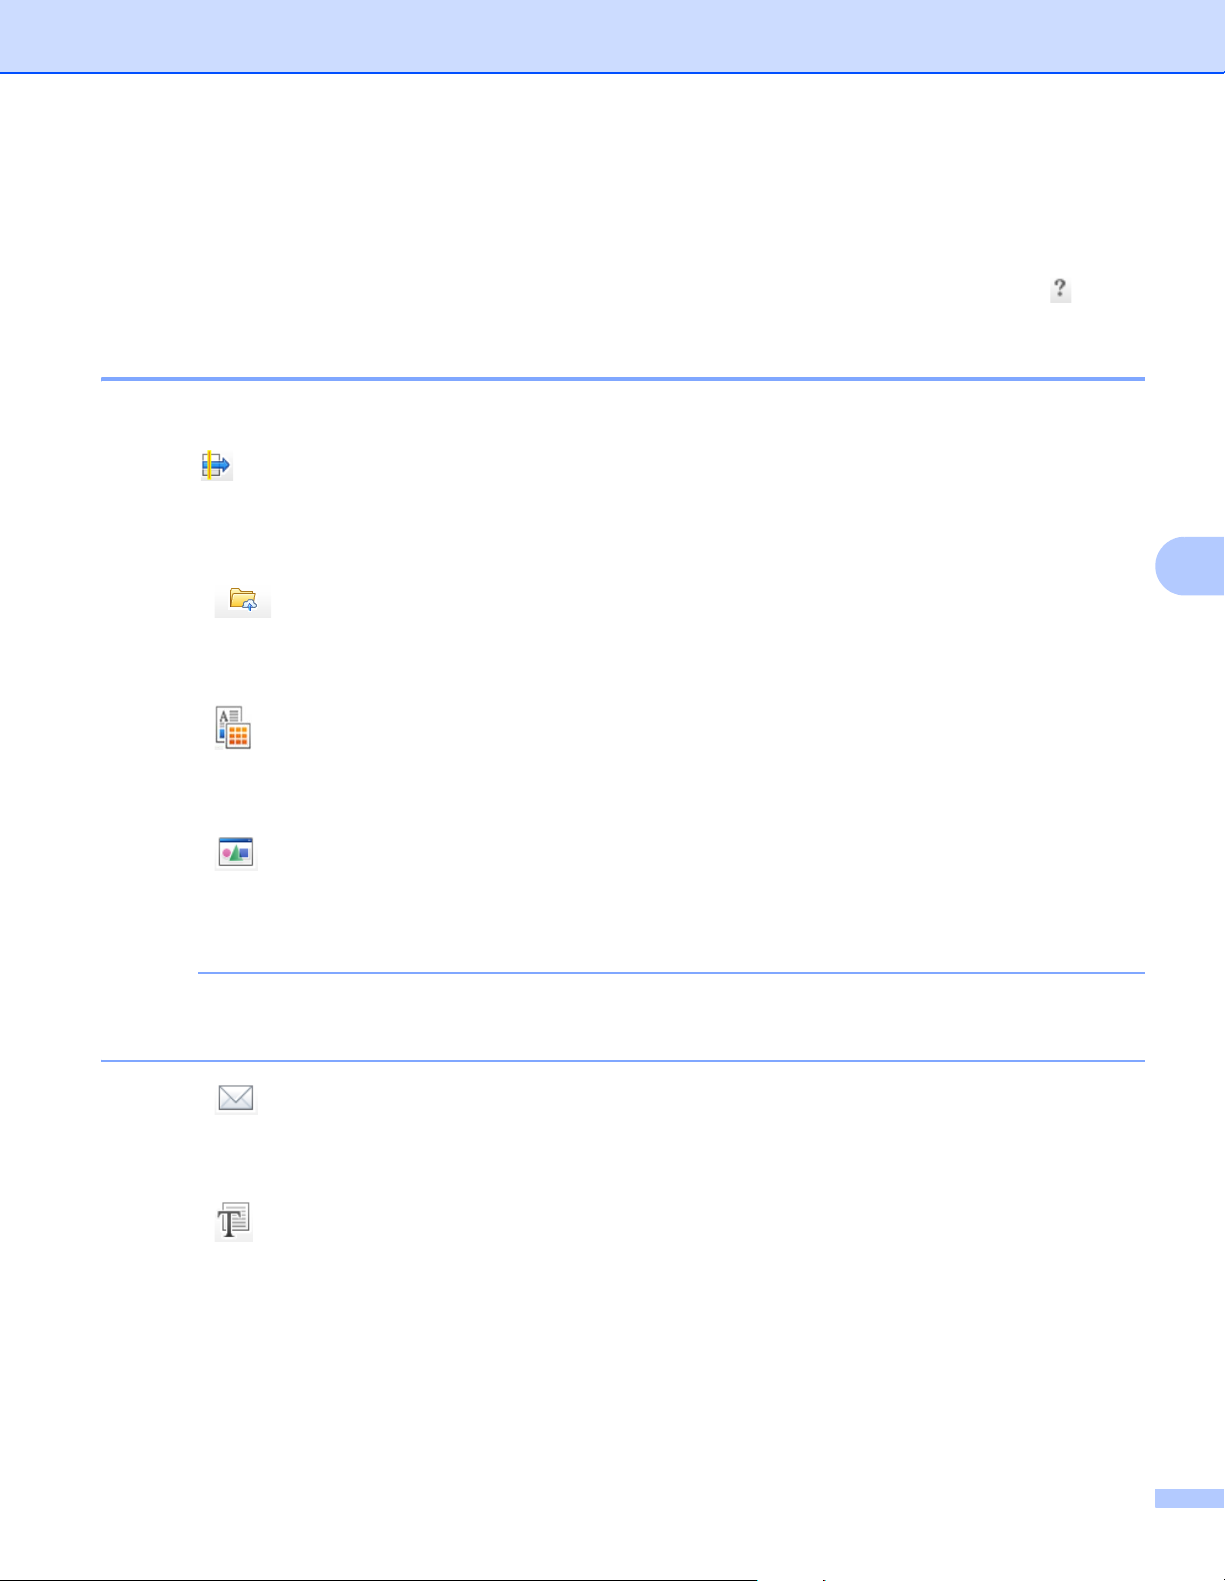
Scan Using Your Computer
80
6
Scan Using ControlCenter4 in Home Mode (Windows
®
) 6
There are five scan options: Save, Print, Open with an Application, Send E-mail, and OCR.
This section briefly introduces the Scan tab function. For more information about each function, click (Help).
Basic Scan 6
1 Select the Document Type and Scan Size for your document.
2 Click (Scan).
3 Confirm and edit (if needed) the scanned image in the image viewer.
4 Click one of the following:
For (Save)
Select your Destination Folder and other settings. Click OK.
The image is saved in your chosen folder.
For (Print)
Select your printer from the drop-down list, configure the printer settings, and then click OK.
The scanned document starts printing.
For (Open with an Application)
Select the application from the drop-down list, and then click OK.
The image appears in your chosen application.
NOTE
If you have installed the Evernote application in your computer, select Evernote from the drop-down list,
and then click OK to upload the scanned data to Evernote directly.
For (Send E-mail)
Configure the attached file settings, and then click OK.
Your default email application opens and the image is attached to a new email.
For (OCR)
Configure the OCR settings, and then click OK.
Your chosen application opens with the converted text data.
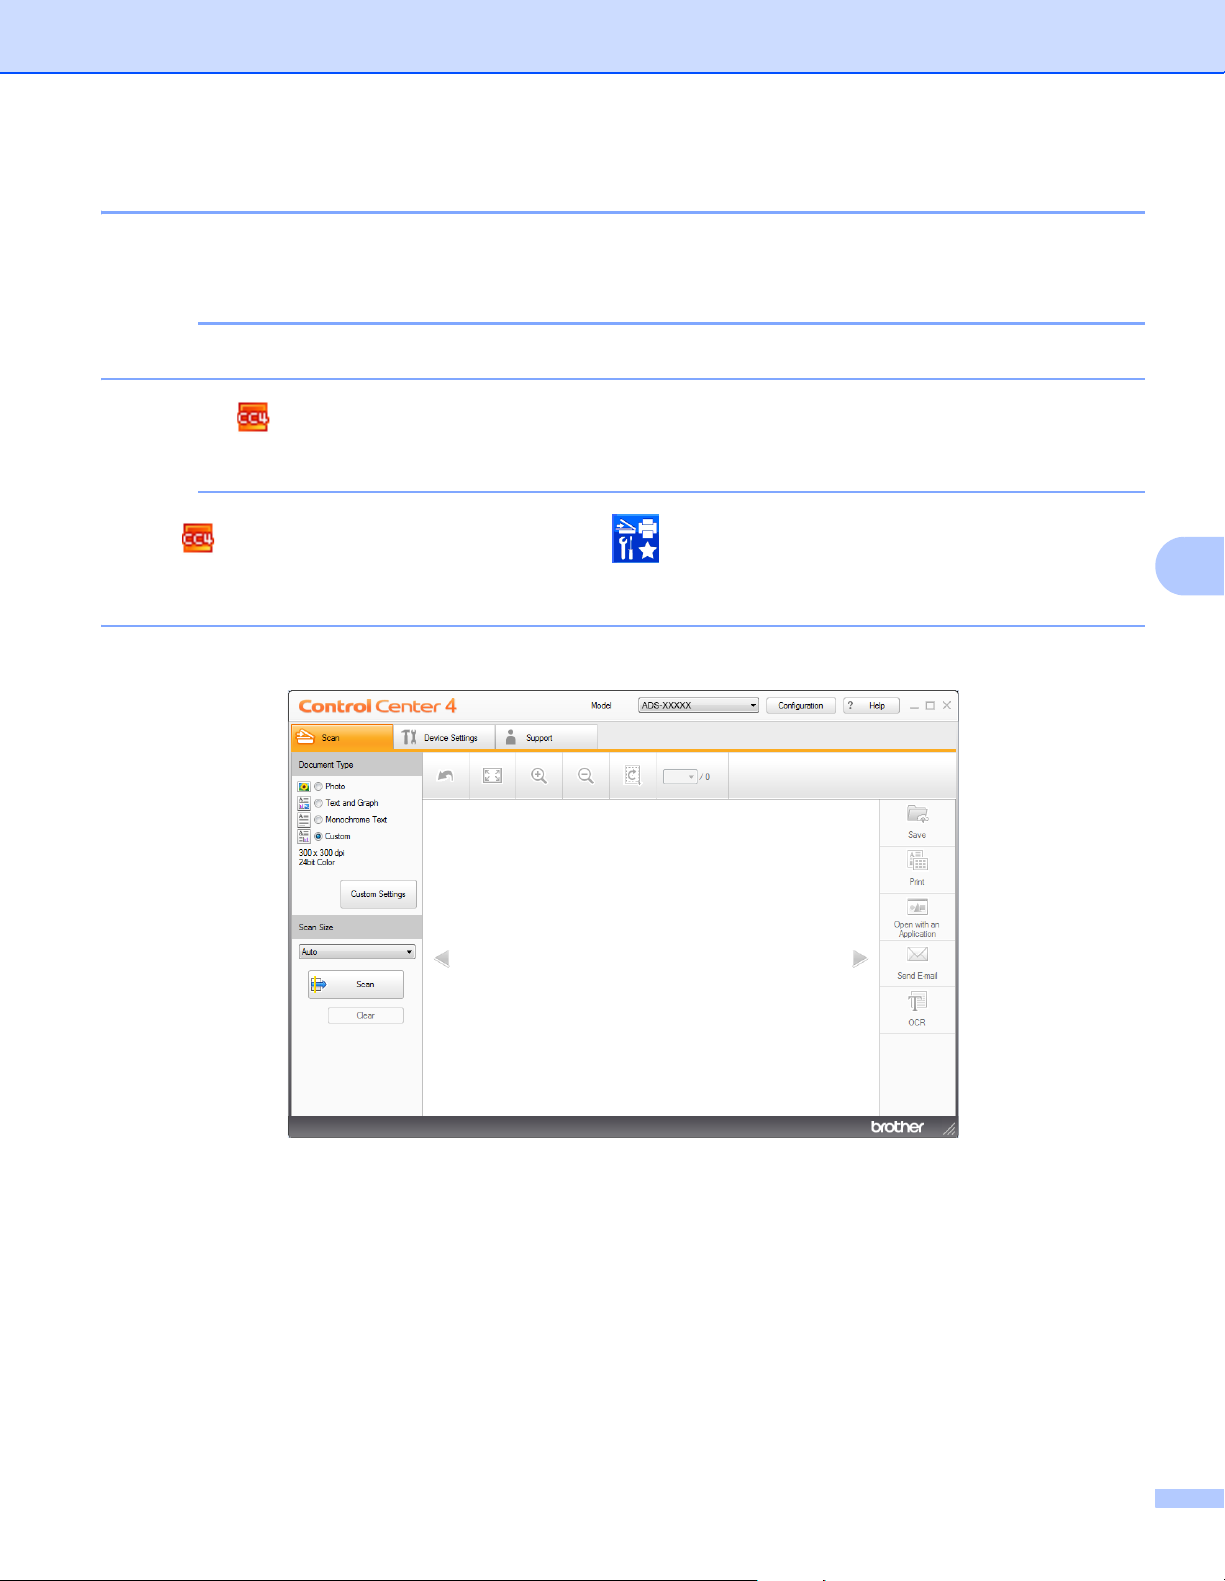
Scan Using Your Computer
81
6
Scan Documents Using the Carrier Sheet 6
1 Insert your document into the Carrier Sheet and place the Carrier Sheet in the ADF (see Receipts,
Clippings, Photos, and Other Documents on page 67).
NOTE
Load only one Carrier Sheet at a time.
2 Click the (ControlCenter4) icon in the task tray and select Open from the menu.
The ControlCenter4 window appears.
NOTE
If the icon is not displayed in the task tray, click (Brother Utilities) on your desktop, and then click
the drop-down list and select your model name (if not already selected). Click Scan in the left navigation
bar, and then click ControlCenter4.
3 Click the Scan tab.
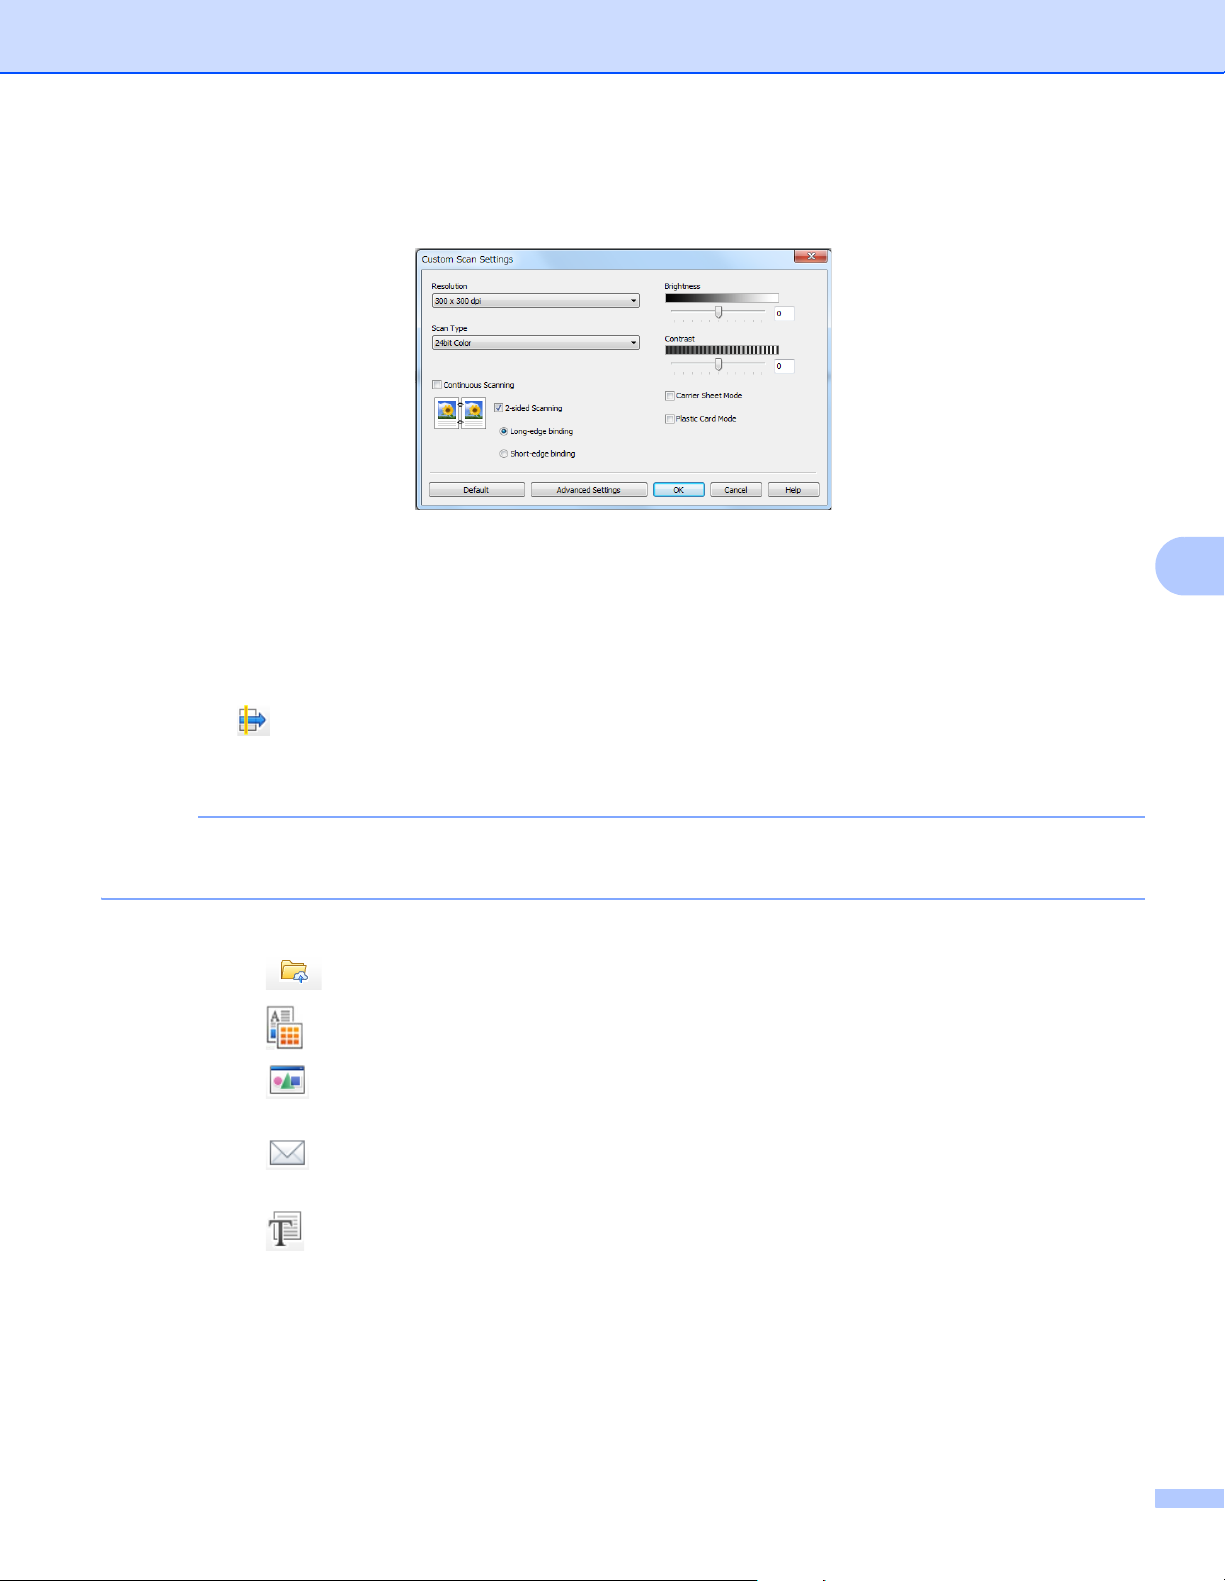
Scan Using Your Computer
82
6
4 Select Custom in the Document Type drop-down list, and then click the Custom Settings button.
The Custom Scan Settings dialog box appears.
5 Select the Carrier Sheet Mode check box.
6 Select a scan size other than Auto from the Scan Size drop-down list.
7 Configure other settings if needed (see Change Scan Settings (ControlCenter4) (Windows
®
)
on page 99).
8 Click the (Scan) button. The machine starts scanning, and then the Scanning Completed dialog
box appears and displays the number of scanned pages. The scanned image appears in the image
viewer.
NOTE
If the Scanning Completed dialog box does not appear and you want to display the number of scanned
pages, select the Display Scanning Results check box in Advanced Settings.
9 Do one of the following:
Click the (Save) button to save the scanned data. See Basic Scan on page 80.
Click the (Print) button to print the scanned data. See Basic Scan on page 80.
Click the (Open with an Application) button to open the scanned data in another application.
See Basic Scan on page 80.
Click the (Send E-mail) button to attach the scanned data to an email. See Basic Scan
on page 80.
Click the (OCR) button to scan to an editable text file. See Basic Scan on page 80.
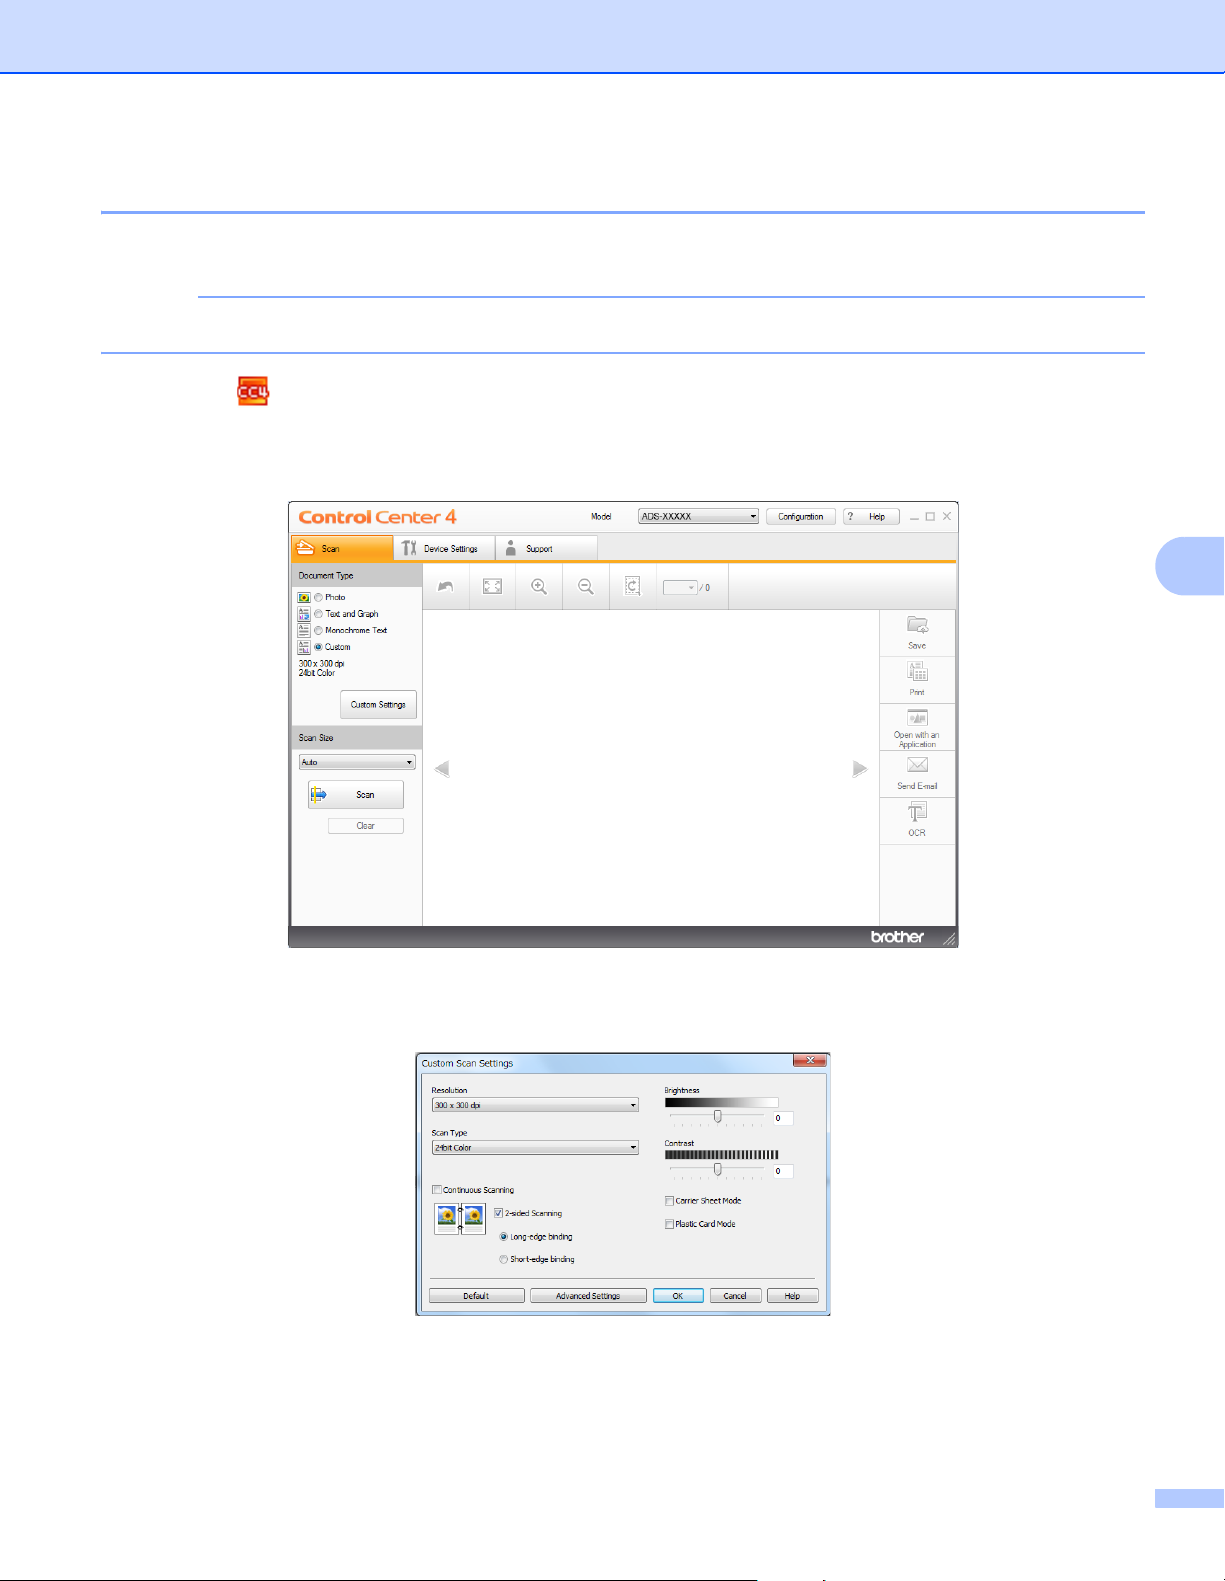
Scan Using Your Computer
83
6
Scan Plastic Cards 6
1 Load a plastic card (see Plastic Cards on page 64).
NOTE
Load up to five plastic cards at a time.
2 Click the (ControlCenter4) icon in the task tray and select Open from the menu.
The ControlCenter4 window appears.
3 Click the Scan tab.
4 Select Custom in the Document Type drop-down list, and then click the Custom Settings button.
The Custom Scan Settings dialog box appears.
5 Select the Plastic Card Mode check box.
6 Configure other settings if needed (see Change Scan Settings (ControlCenter4) (Windows
®
)
on page 99).

Scan Using Your Computer
84
6
7 Click the (Scan) button. The machine starts scanning, and then the Scanning Completed dialog
box appears. The scanned image appears in the image viewer.
NOTE
If the Scanning Completed dialog box does not appear and you want to display the number of scanned
pages, select the Display Scanning Results check box in Advanced Settings.
8 Do one of the following:
Click the (Save) button to save the scanned data. See Basic Scan on page 80.
Click the (Print) button to to print the scanned data. See Basic Scan on page 80.
Click the (Open with an Application) button to open the scanned data in another application.
See Basic Scan on page 80.
Click the (Send E-mail) button to attach the scanned data to an email. See Basic Scan
on page 80.
Click the (OCR) button to scan to an editable text file. See Basic Scan on page 80.
NOTE
Plastic Card Mode automatically uses these settings:
• Resolution: 600 x 600 dpi
• Document Size: 2 in 1 (Auto)
• 2-sided Scanning: On (Short-edge binding)
• Auto Deskew: Off
• Multifeed Detection: Off
• Auto Image Rotation: Off
Original Layout Scan Result
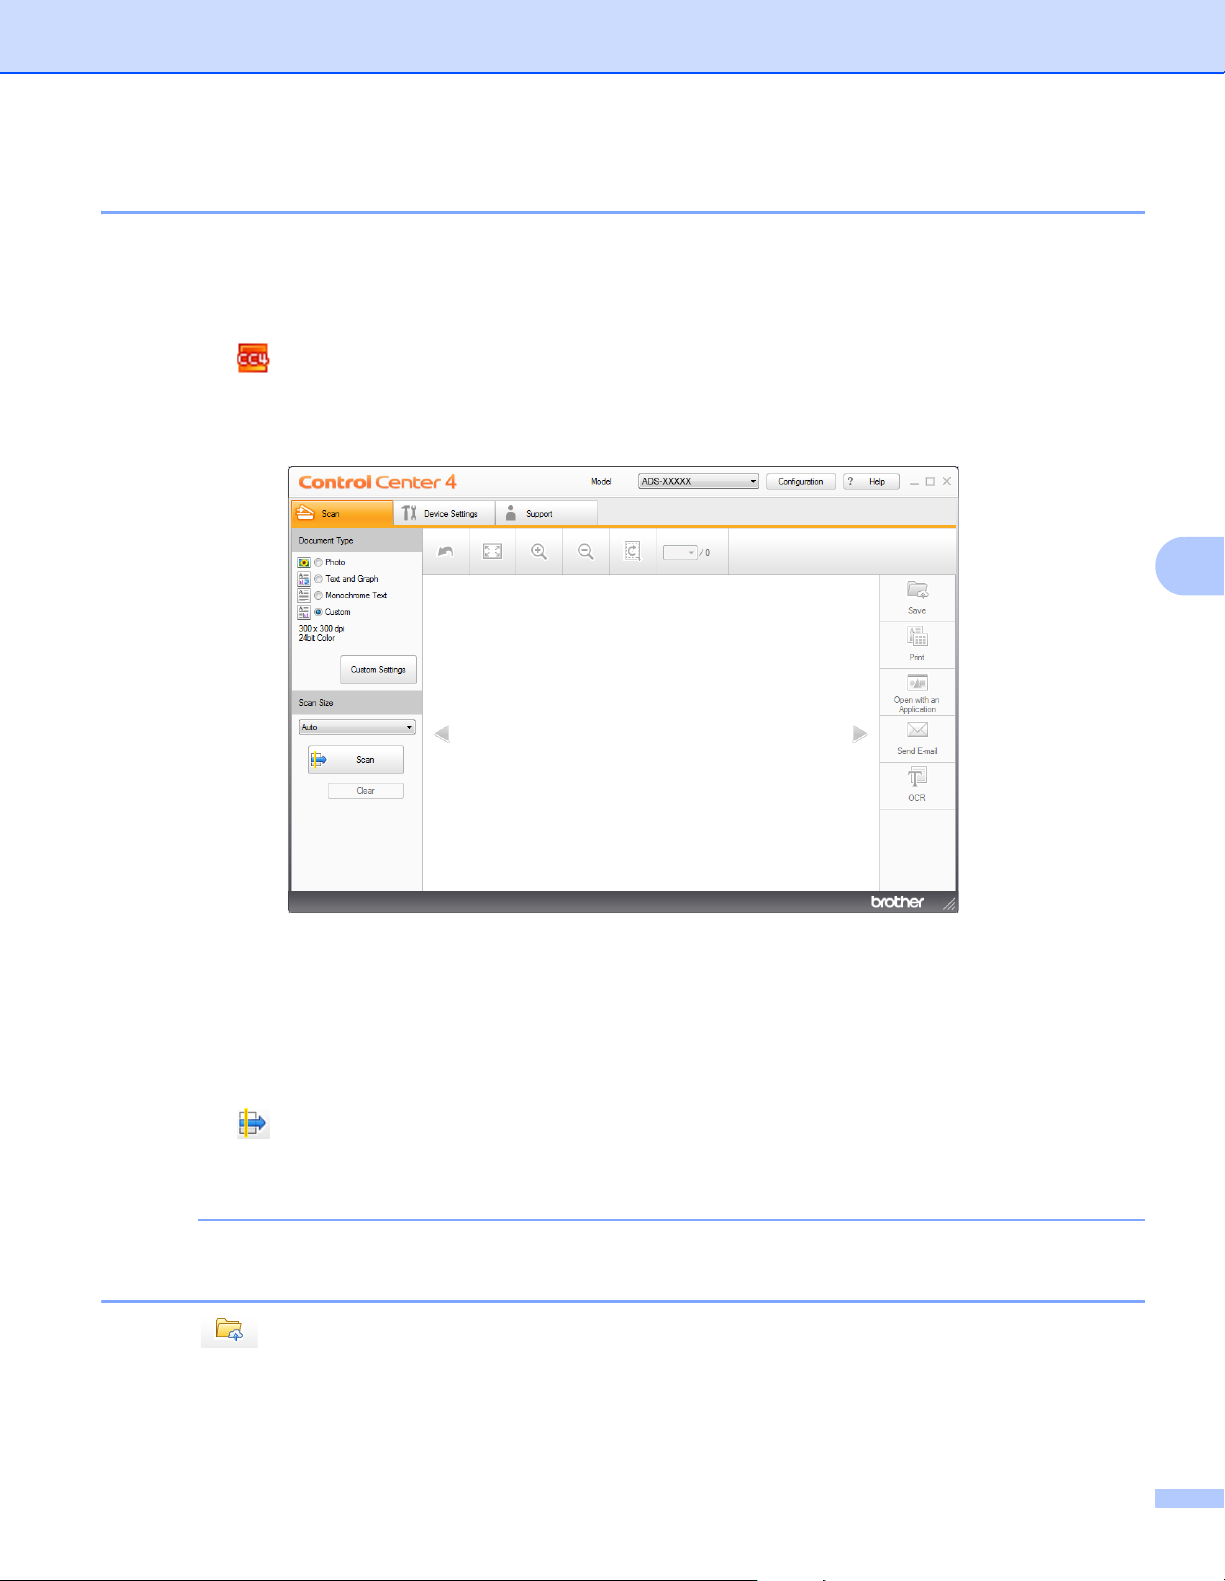
Scan Using Your Computer
85
6
Scan Documents to SharePoint 6
Scan documents and save them to a SharePoint server. Your Brother machine must be connected to a
wireless (ADS-2800W / ADS-3600W) or wired network.
1 Load your document (see Standard-size Documents on page 60).
2 Click the (ControlCenter4) icon in the task tray and select Open from the menu.
The ControlCenter4 window appears.
3 Click the Scan tab.
4 Select the document type.
5 Change the size of your document, if needed.
6 Configure other settings if needed (see Change Scan Settings (ControlCenter4) (Windows
®
)
on page 99).
7 Click the (Scan) button. The machine starts scanning, and then the Scanning Completed dialog
box appears and displays the number of scanned pages. The scanned image appears in the image
viewer.
NOTE
If the Scanning Completed dialog box does not appear and you want to display the number of scanned
pages, select the Display Scanning Results check box in Advanced Settings.
8 Click (Save). The Save dialog box appears.
9 Click the File Type drop-down list, and then select the file type.

Scan Using Your Computer
86
6
NOTE
To save the document as a password-protected PDF, select Secure PDF (*.pdf) from the File Type
drop-down list, click , and then type the password.
0 In the File Name field, type a prefix for your file name, if needed.
A In the Scan Location field, select the SharePoint radio button, and then type the server address where
you want to save your scanned documents.
B Click the Connection Test button to confirm the server connection.
The message Connected appears.
NOTE
If the security dialog box appears, type your user name and password.
C Click OK. If a message dialog box about the Internet connection appears, read the information and
click OK.
The scanned document is saved in the destination server.
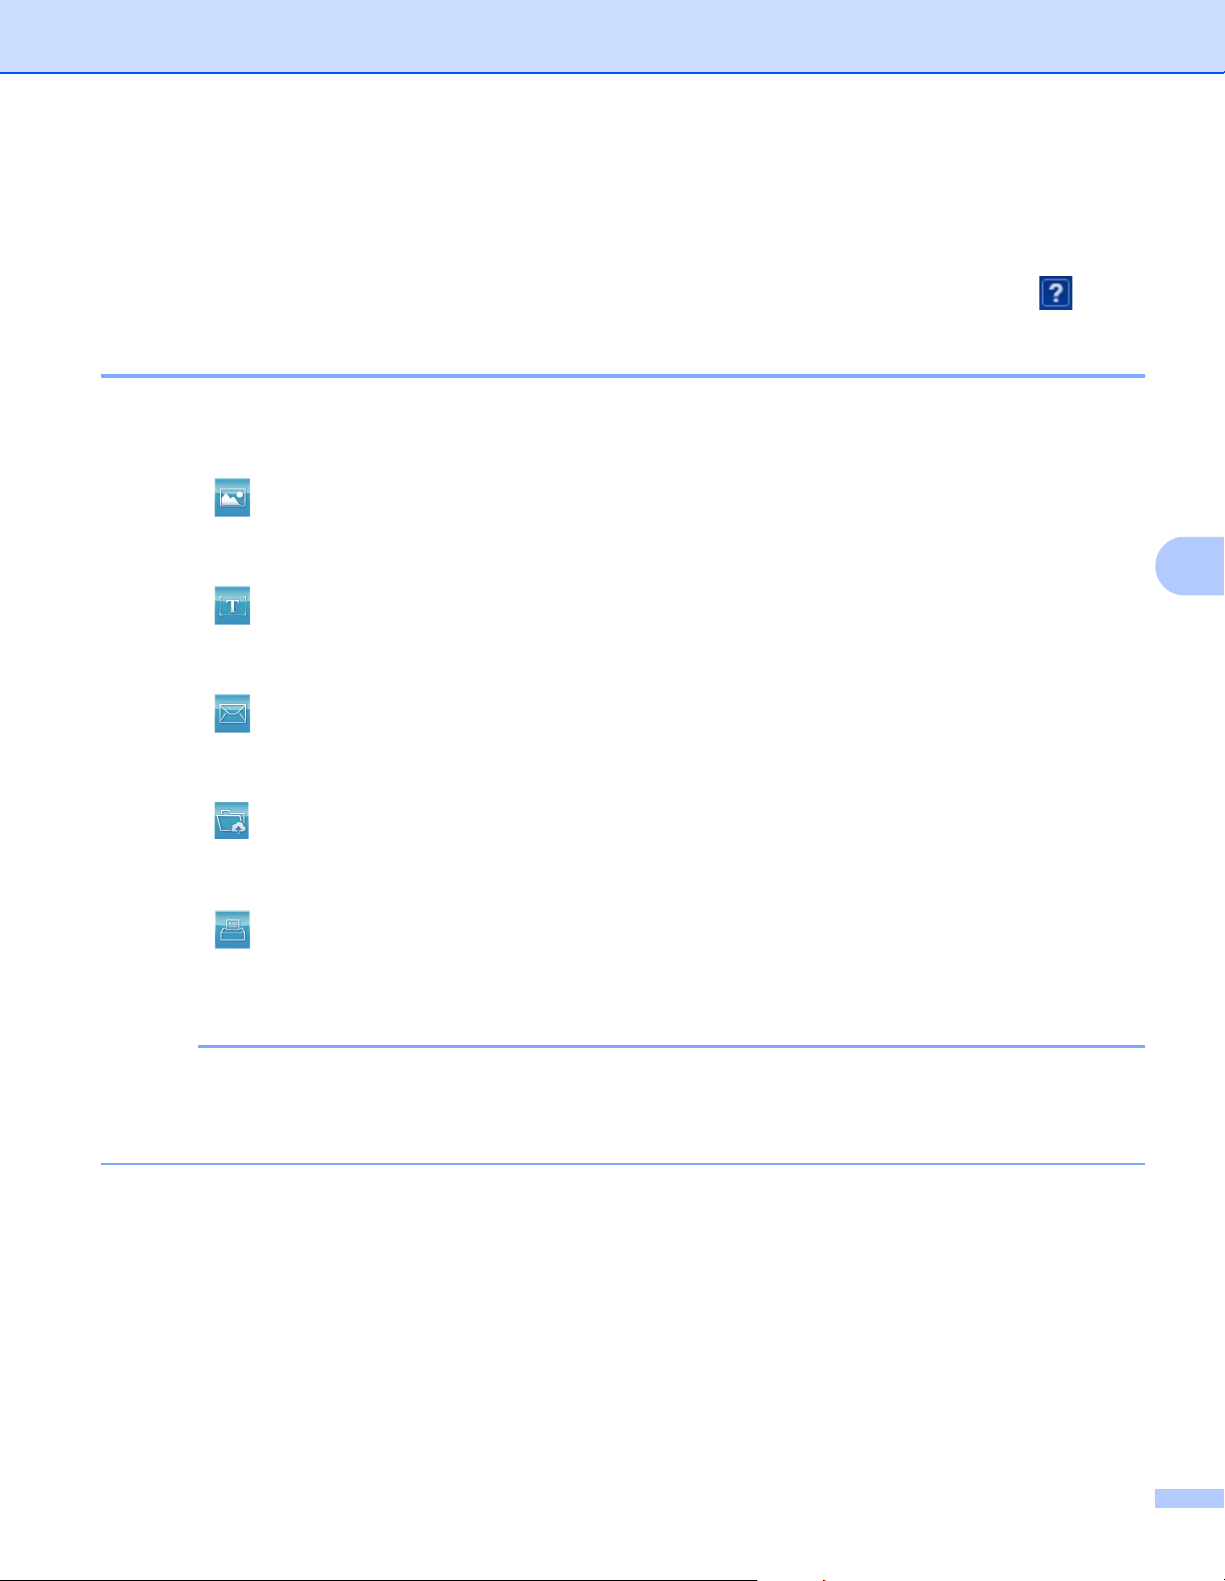
Scan Using Your Computer
87
6
Scan Using ControlCenter4 in Advanced Mode (Windows
®
) 6
There are five scan options available in Advanced Mode: Image, OCR, E-mail, File and Print.
This section briefly introduces the Scan tab function. For more information about each function, click (Help).
Basic Scan 6
1 Click the Scan tab.
2 Click one of the following:
For (Image)
Select the application from the drop-down list and click Scan.
The image appears in your chosen application.
For (OCR)
Configure the OCR settings and click Scan.
Your chosen application opens with the converted text data.
For (E-mail)
Configure the attached file settings and click Scan.
Your default email application opens and the image is attached to a new email.
For (File)
Select your Scan Location and other settings. Click Scan.
The image is saved in your chosen folder.
For (Print)
Select your printer from the drop-down list, configure the printer settings, and then click Scan.
The scanned document starts printing.
NOTE
(For Image and OCR)
If you have installed the Evernote application in your computer, select Evernote from the drop-down list,
and then click OK to upload the scanned data to Evernote directly.

Scan Using Your Computer
88
6
Scan to Image 6
The Scan to Image feature lets you scan an image directly into your graphics application for image editing.
1 Click the Scan tab.
2 Click (Image).
The Image dialog box appears.
3 Configure the scan settings, if needed.
To scan a 2-sided document, select the 2-sided Scanning check box and choose Long-edge
binding or Short-edge binding.
To change the application that you want to use, choose the appropriate application from the Target
Application drop-down list.
4 Click Scan.
Your default application will start and display the image.
NOTE
If you select Secure PDF (*.pdf) from the File Type list, the Set PDF Password dialog box appears. Enter
your password in the Password and Re-type Password boxes, and then click OK. You can also select
Secure PDF (*.pdf) for Scan to E-mail and Scan to File.
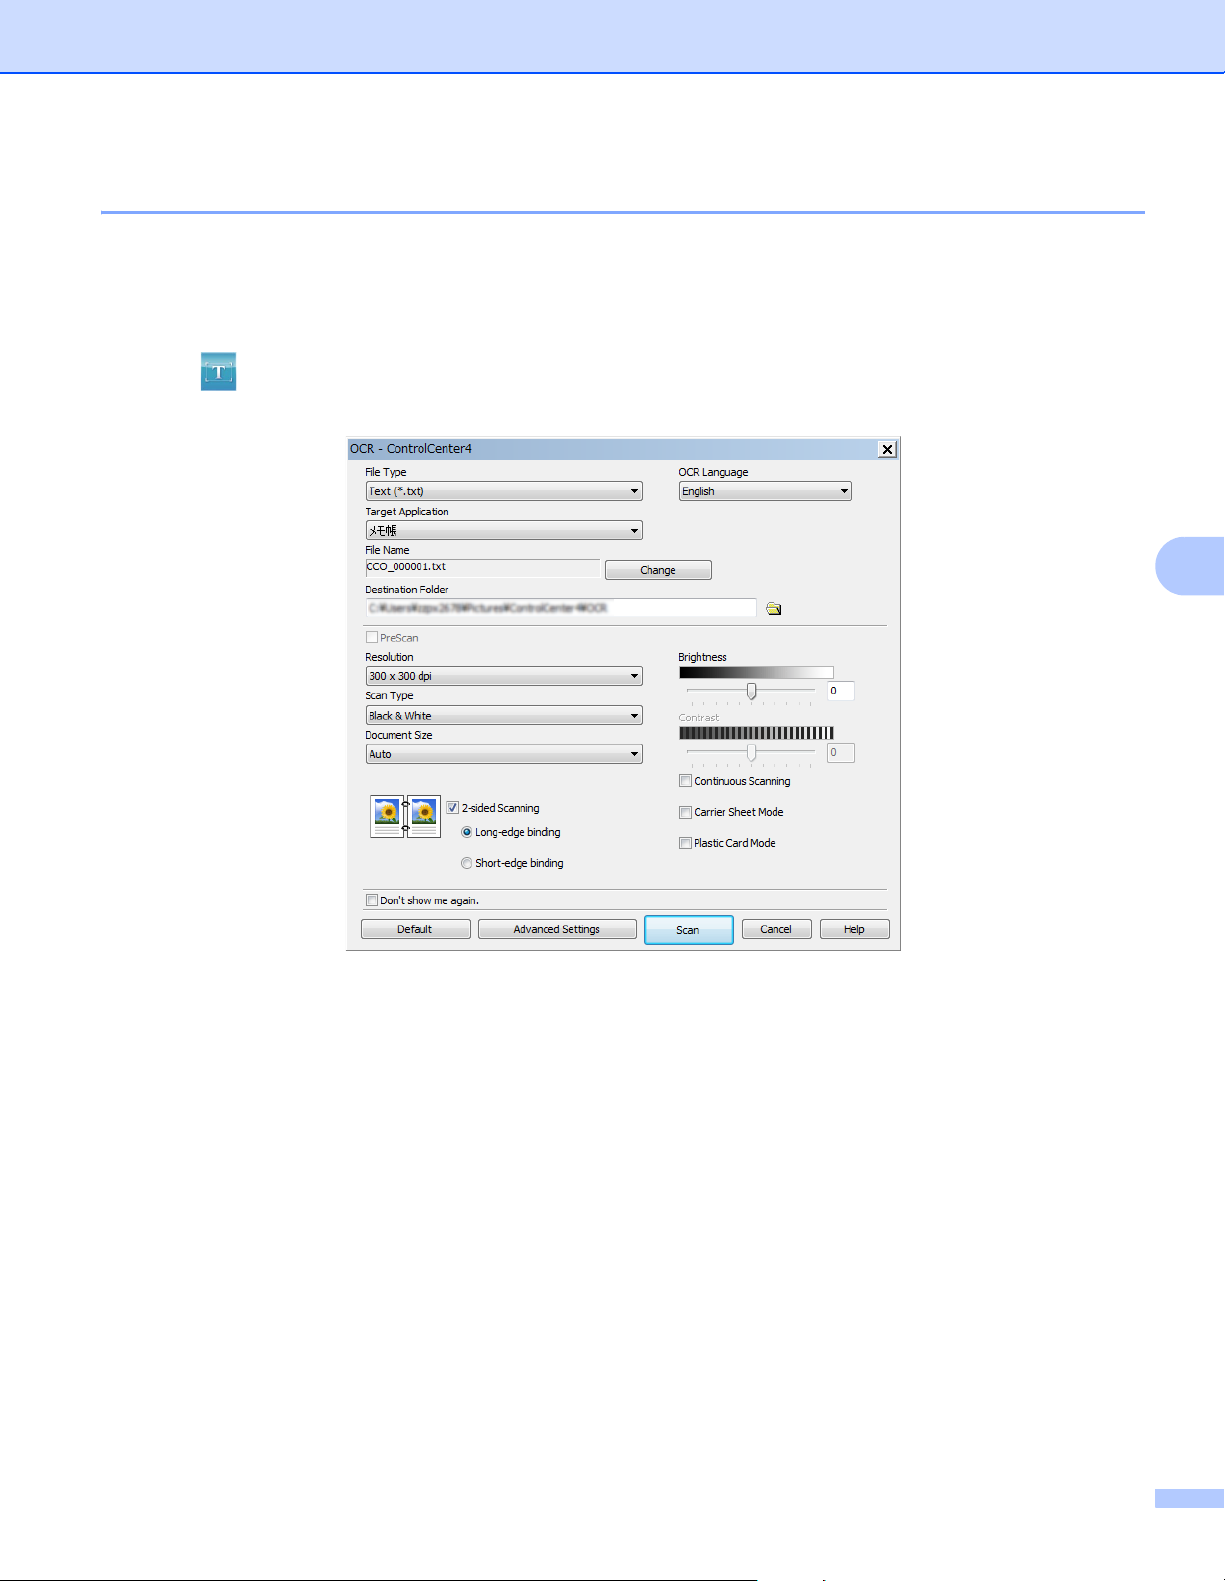
Scan Using Your Computer
89
6
Scan to OCR 6
The Scan to OCR feature lets you convert the graphic page image data into text that can be edited by any
word processing application. You can change the default word processing application.
1 Click the Scan tab.
2 Click (OCR).
The OCR dialog box appears.
3 Configure the scan settings, if needed.
To scan a 2-sided document, select the 2-sided Scanning check box and choose Long-edge
binding or Short-edge binding.
To change the word processing application that you want to use, choose the appropriate application
from the Target Application drop-down list.
4 Click Scan.
Your default word processing application will start and display the converted text data.
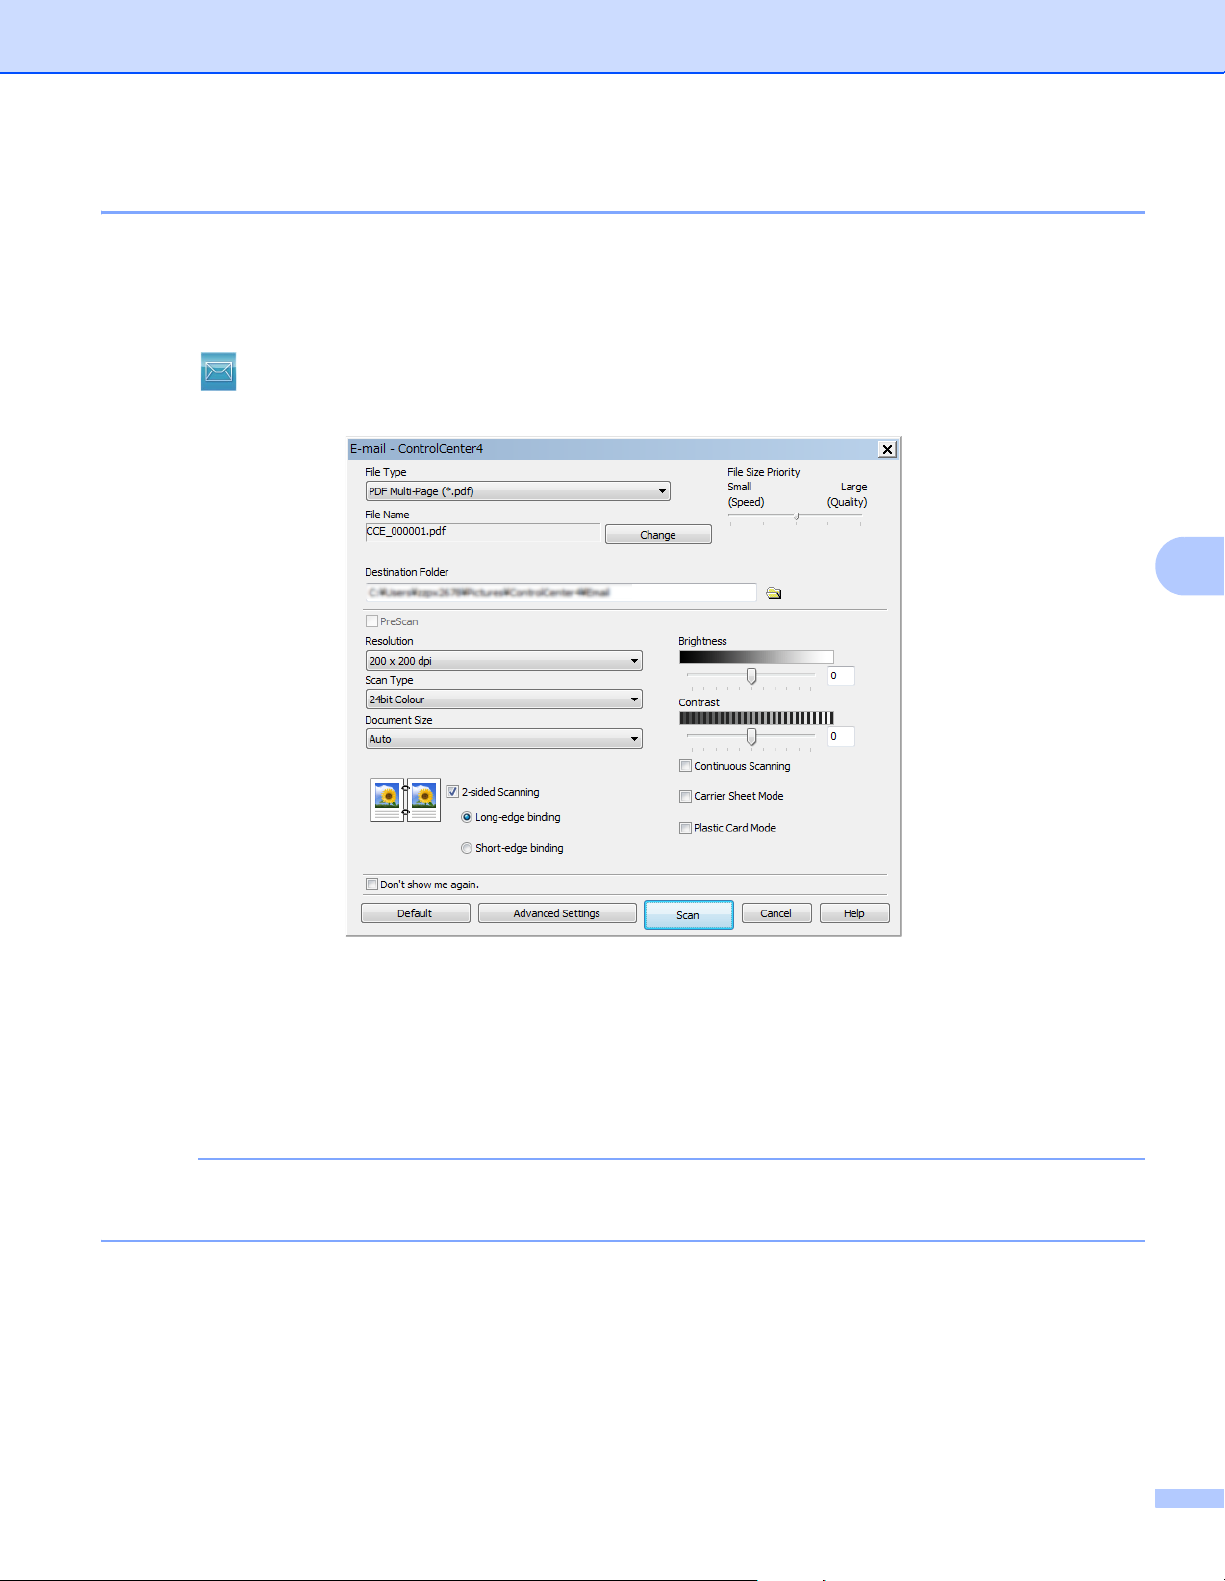
Scan Using Your Computer
90
6
Scan to E-mail 6
The Scan to E-mail feature lets you scan a document to your default email application so you can send the
scanned document as an attachment.
1 Click the Scan tab.
2 Click (E-mail).
The E-mail dialog box appears.
3 Configure the scan settings, if needed.
To scan a 2-sided document, select the 2-sided Scanning check box and choose Long-edge
binding or Short-edge binding.
4 Click Scan.
Your default email application will start and the image will be attached to a new email.
NOTE
The Scan to E-mail feature does not support Webmail services. Use the Scan to Image or Scan to File
feature to scan a document or picture, and then attach the file of the scanned data to your message.
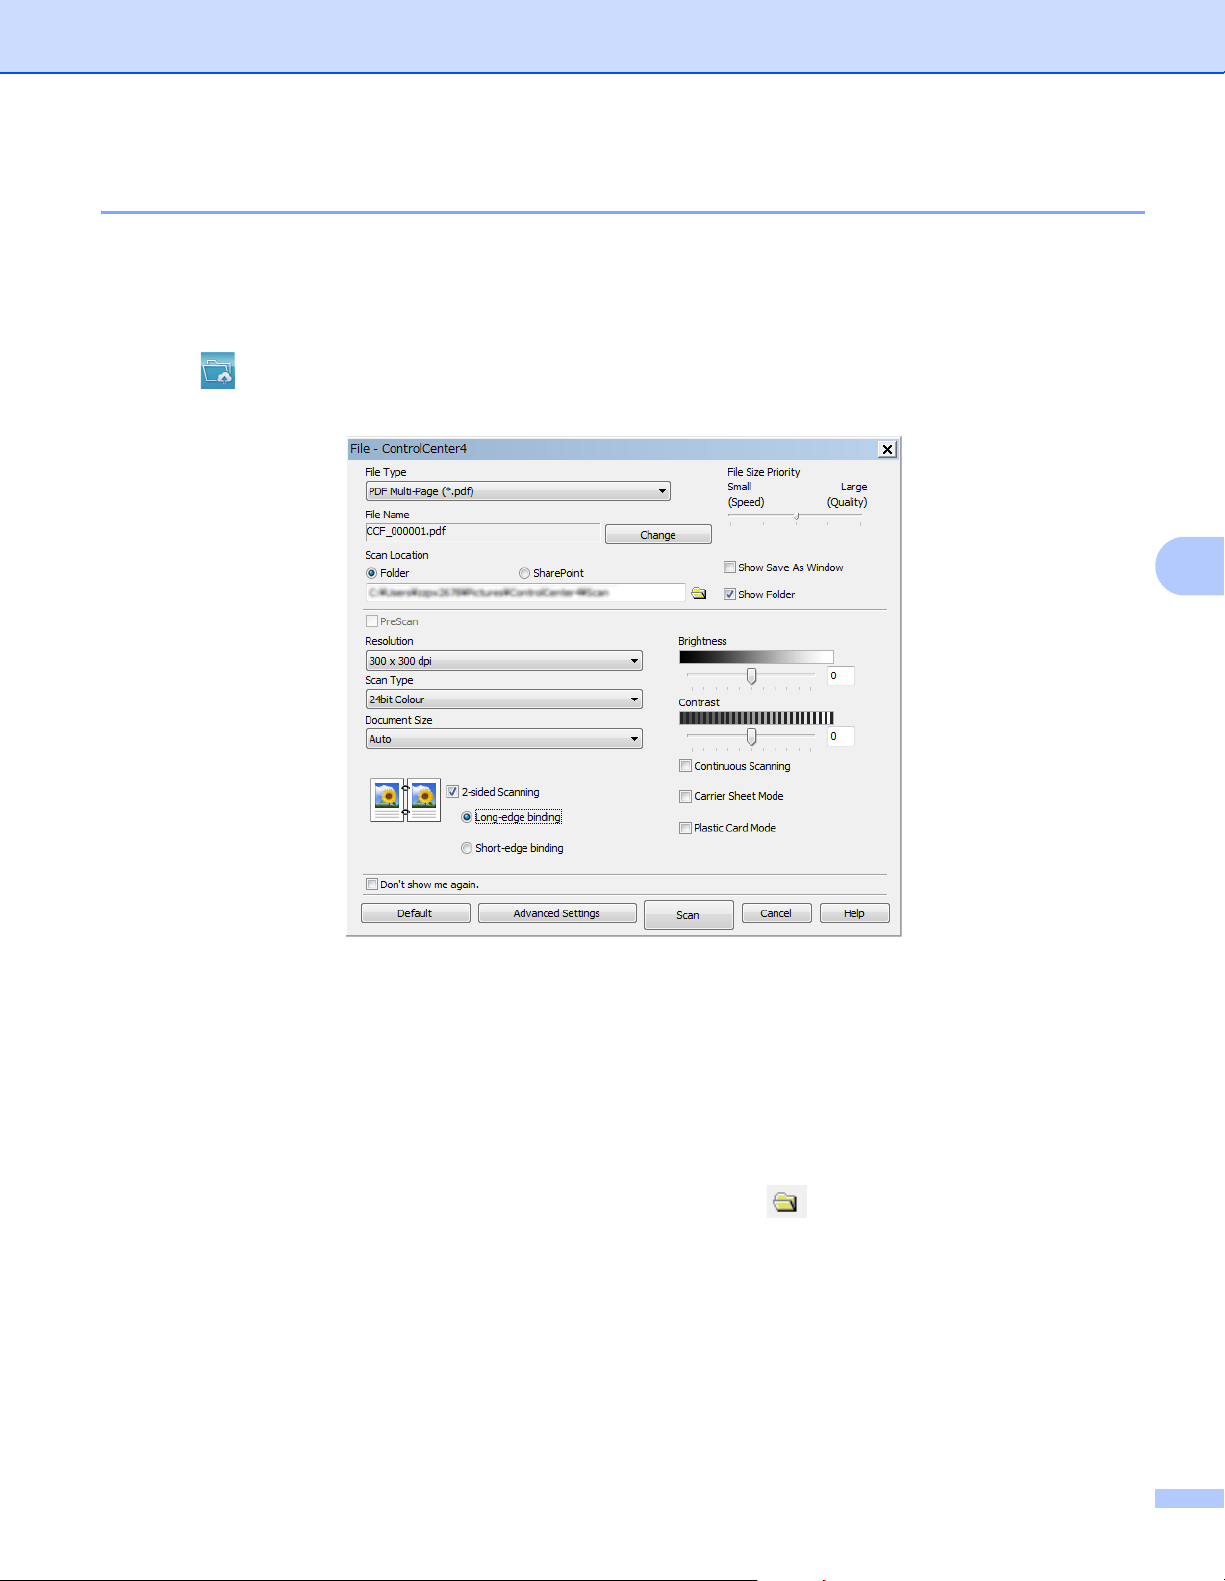
Scan Using Your Computer
91
6
Scan to File 6
The Scan to File feature lets you scan an image to a folder on your hard disk in a supported file format.
This feature allows you to easily archive your paper documents.
1 Click the Scan tab.
2 Click (File).
The File dialog box appears.
3 Configure the scan settings, if needed.
To scan a 2-sided document, select the 2-sided Scanning check box and choose Long-edge
binding or Short-edge binding.
To change the file name, enter the file name you want to use for the document (up to 100 characters)
in the File Name box. The file name will be the file name you entered plus the current date and a
sequential number.
Choose the file type for the saved image from the File Type drop-down list. You can save the file to
the default folder, or choose your preferred folder by clicking (Browse).
To show where the scanned image is saved when scanning is finished, select the Show Folder check
box. If you want to specify the destination of the scanned image every time, select the Show Save
As Window check box.
4 Click Scan.
The image will be saved in the folder you selected.
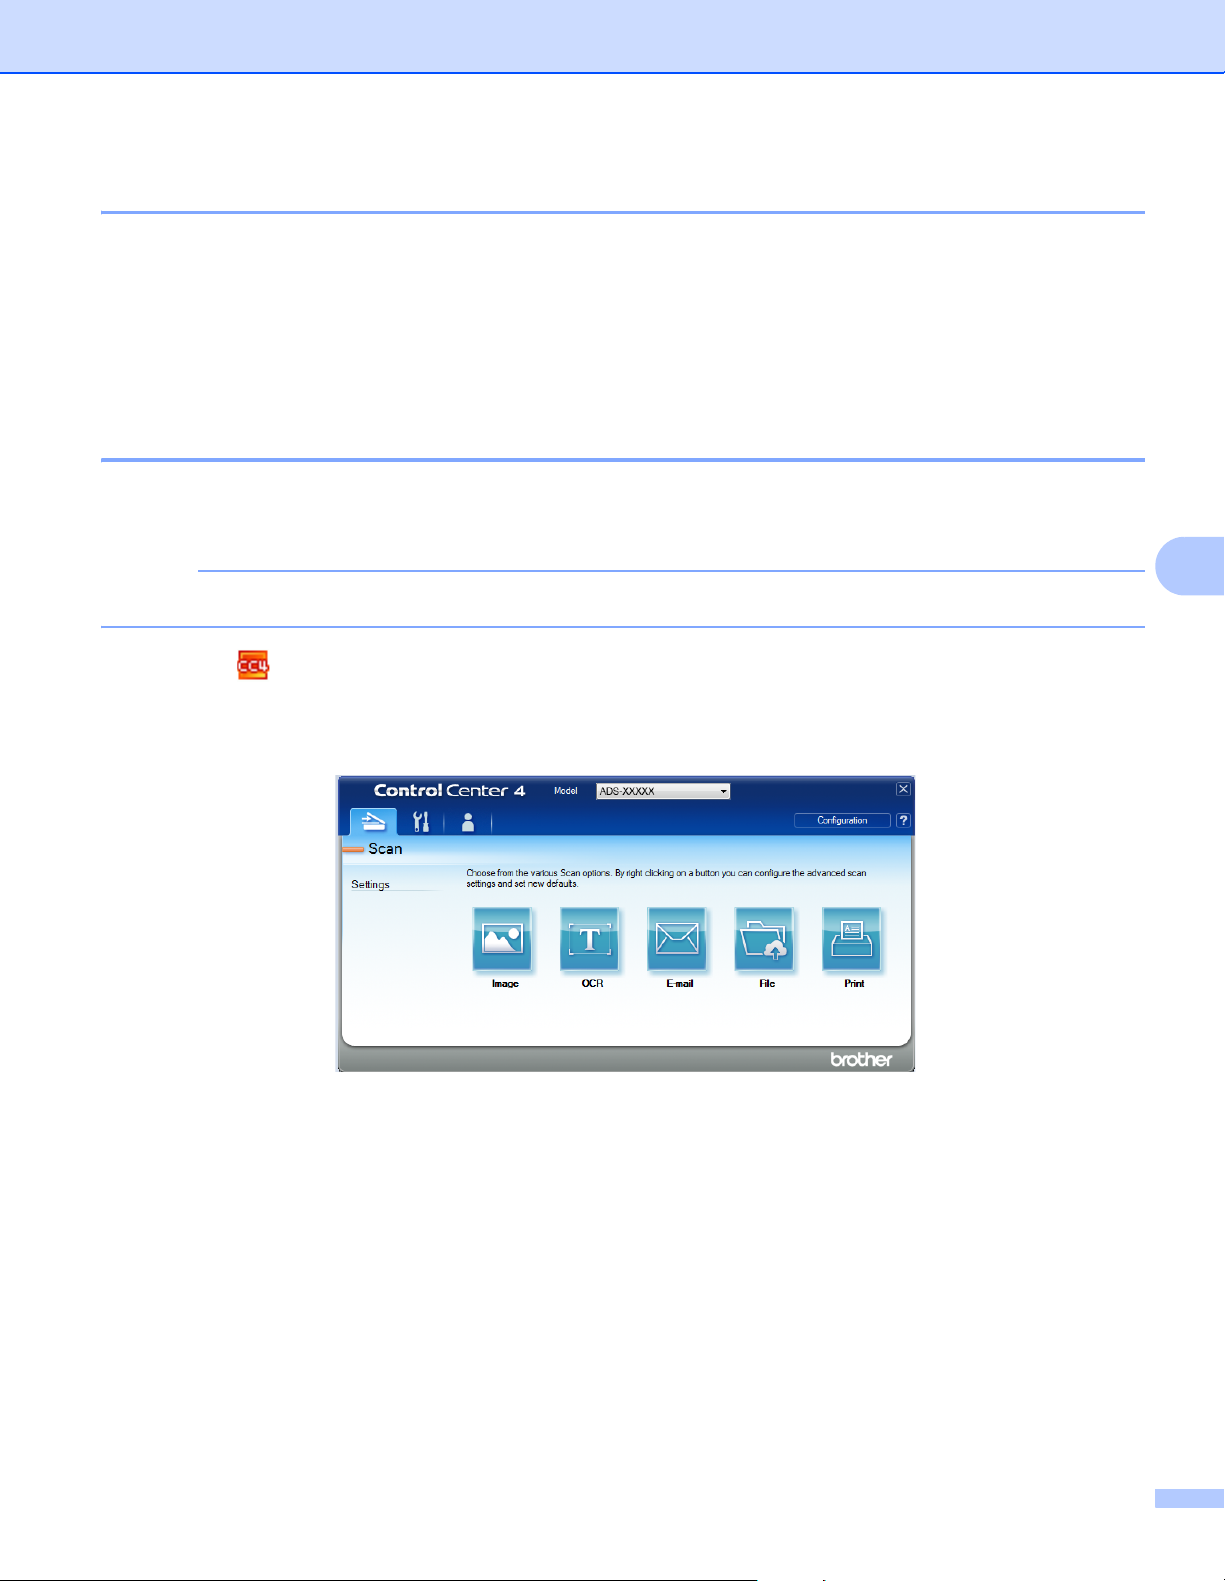
Scan Using Your Computer
92
6
Change a Scan Button’s Default Settings 6
1 Right-click the button that you want to configure and click Button settings. The settings dialog box
appears.
2 Configure the settings as needed.
3 Click OK. The new settings will be used as the default settings.
Scan Using the Carrier Sheet 6
1 Load your document into the Carrier Sheet and load the Carrier Sheet into your machine (see Receipts,
Clippings, Photos, and Other Documents on page 67).
NOTE
Load only one Carrier Sheet at a time.
2 Click the (ControlCenter4) icon in the task tray and select Open from the menu.
The ControlCenter4 window appears.
3 Select the Scan tab.
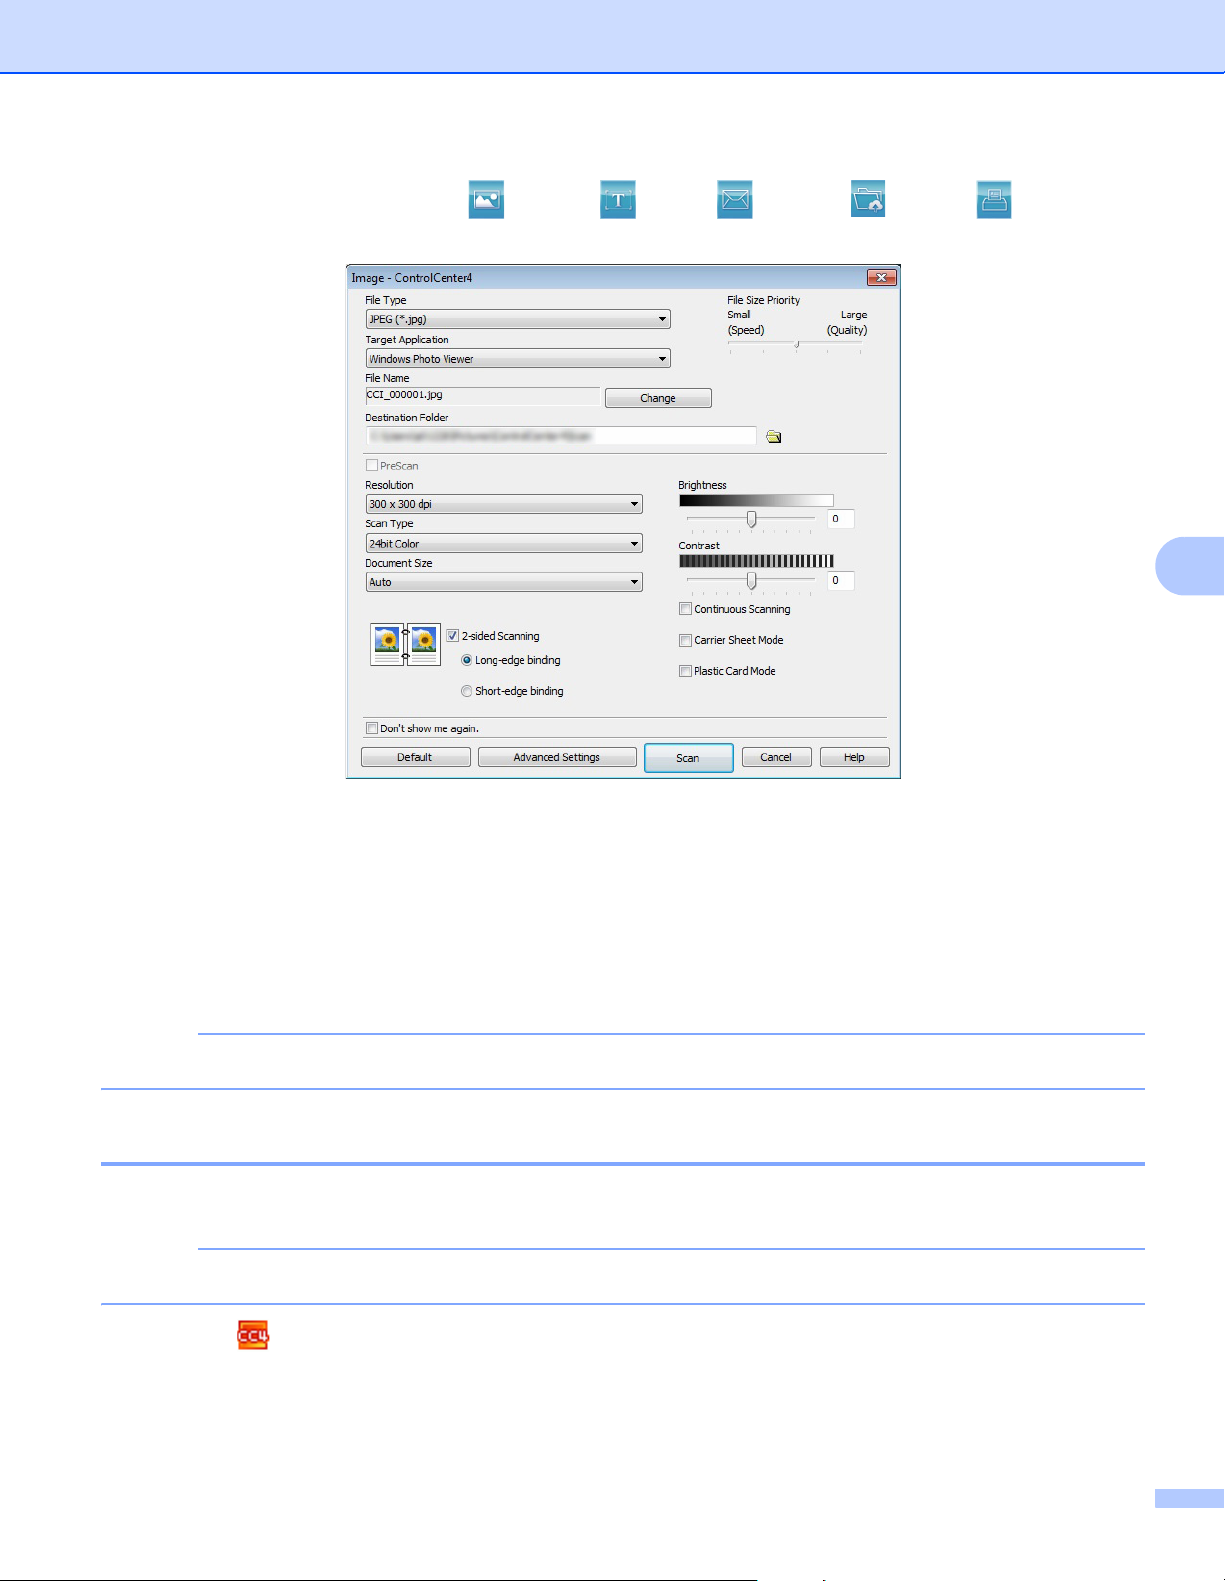
Scan Using Your Computer
93
6
4 Click the button you want to use ( (Image), (OCR), (E-mail), (File) or (Print)). The
settings dialog box appears (the example below uses Image).
5 Check the Carrier Sheet Mode check box.
6 Select a document size other than Auto from the Document Size drop-down list.
7 Change other settings if needed (see Change Scan Settings (ControlCenter4) (Windows
®
) on page 99).
8 Click the Scan button.
The machine starts scanning.
NOTE
If you do not want to see the settings dialog box again, select the Don’t show me again. check box.
Scan Plastic Cards 6
1 Load a plastic card (see Plastic Cards on page 64).
NOTE
Load up to five plastic cards at a time.
2 Click the (ControlCenter4) icon in the task tray and select Open from the menu.
The ControlCenter4 window appears.
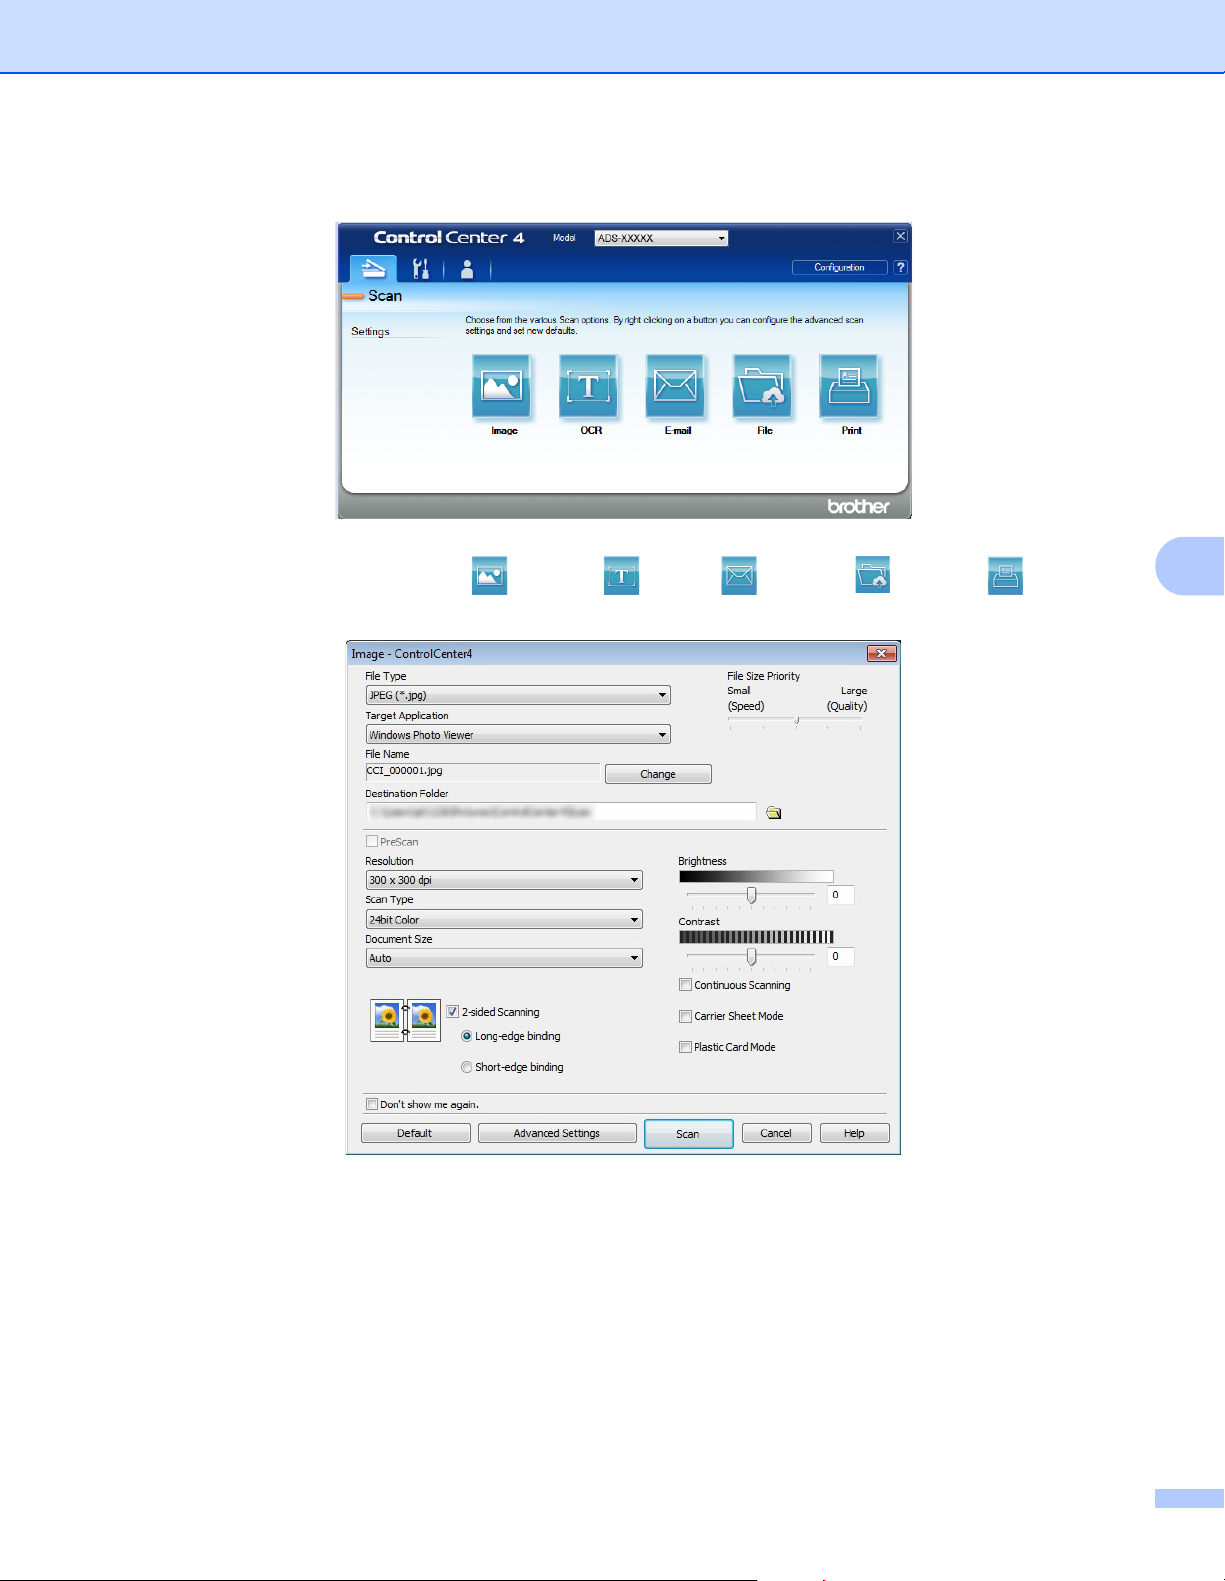
Scan Using Your Computer
94
6
3 Click the Scan tab.
4 Click the button you want to use ( (Image), (OCR), (E-mail), (File), or (Print)).
The settings dialog box appears (the example below uses Image).
5 Select the Plastic Card Mode check box.
6 Change other settings if needed (see Change Scan Settings (ControlCenter4) (Windows
®
) on page 99).
7 Click the Scan button.
The machine starts scanning.
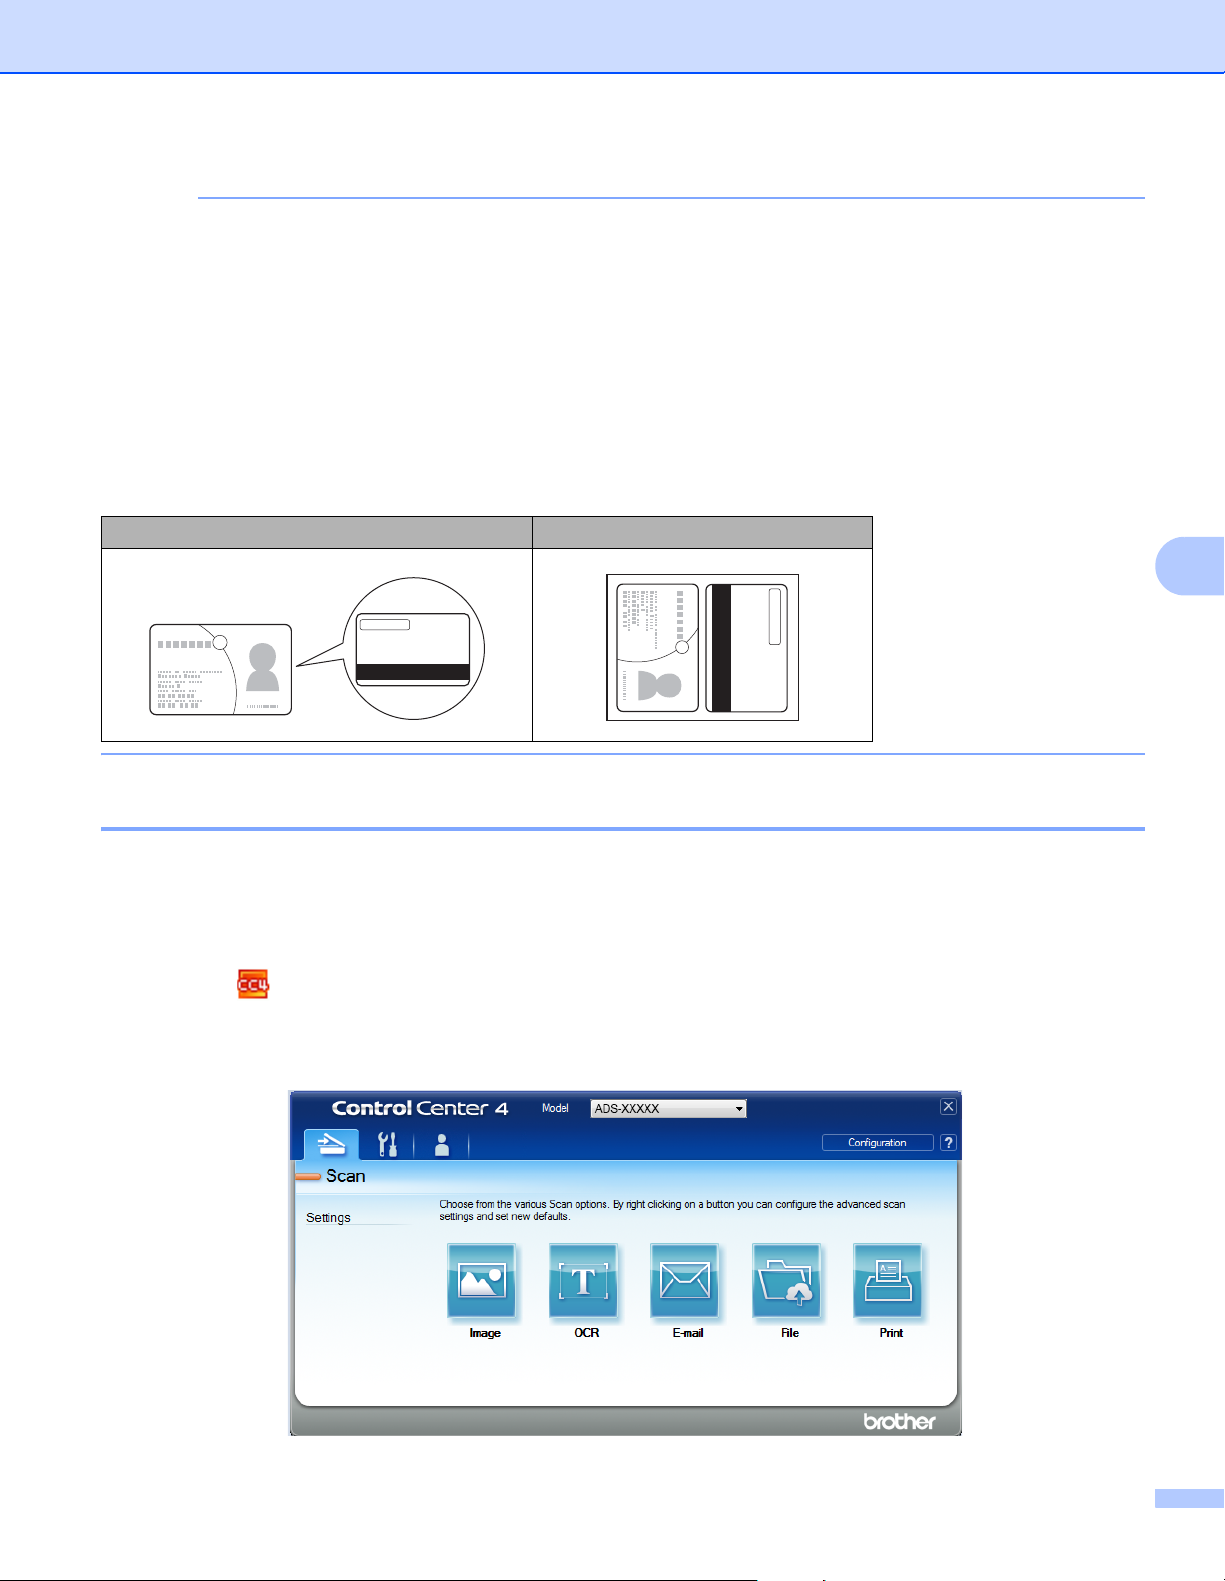
Scan Using Your Computer
95
6
NOTE
• If you do not want to see the settings dialog box again, select the Don’t show me again. check box.
• Plastic Card Mode automatically uses these settings:
• Resolution: 600 x 600 dpi
• Document Size: 2 in 1 (Auto)
• 2-sided Scanning: On (Short-edge binding)
• Auto Deskew: Off
• Auto Image Rotation: Off
• Multifeed Detection: Off
Scan Documents to SharePoint 6
Scan documents and save them to a SharePoint server. Your Brother machine must be connected to a
wireless (ADS-2800W / ADS-3600W) or wired network.
1 Load your document (see Standard-size Documents on page 60).
2 Click the (ControlCenter4) icon in the task tray and select Open from the menu.
The ControlCenter4 window appears.
3 Click the Scan tab.
Original Layout Scan Result
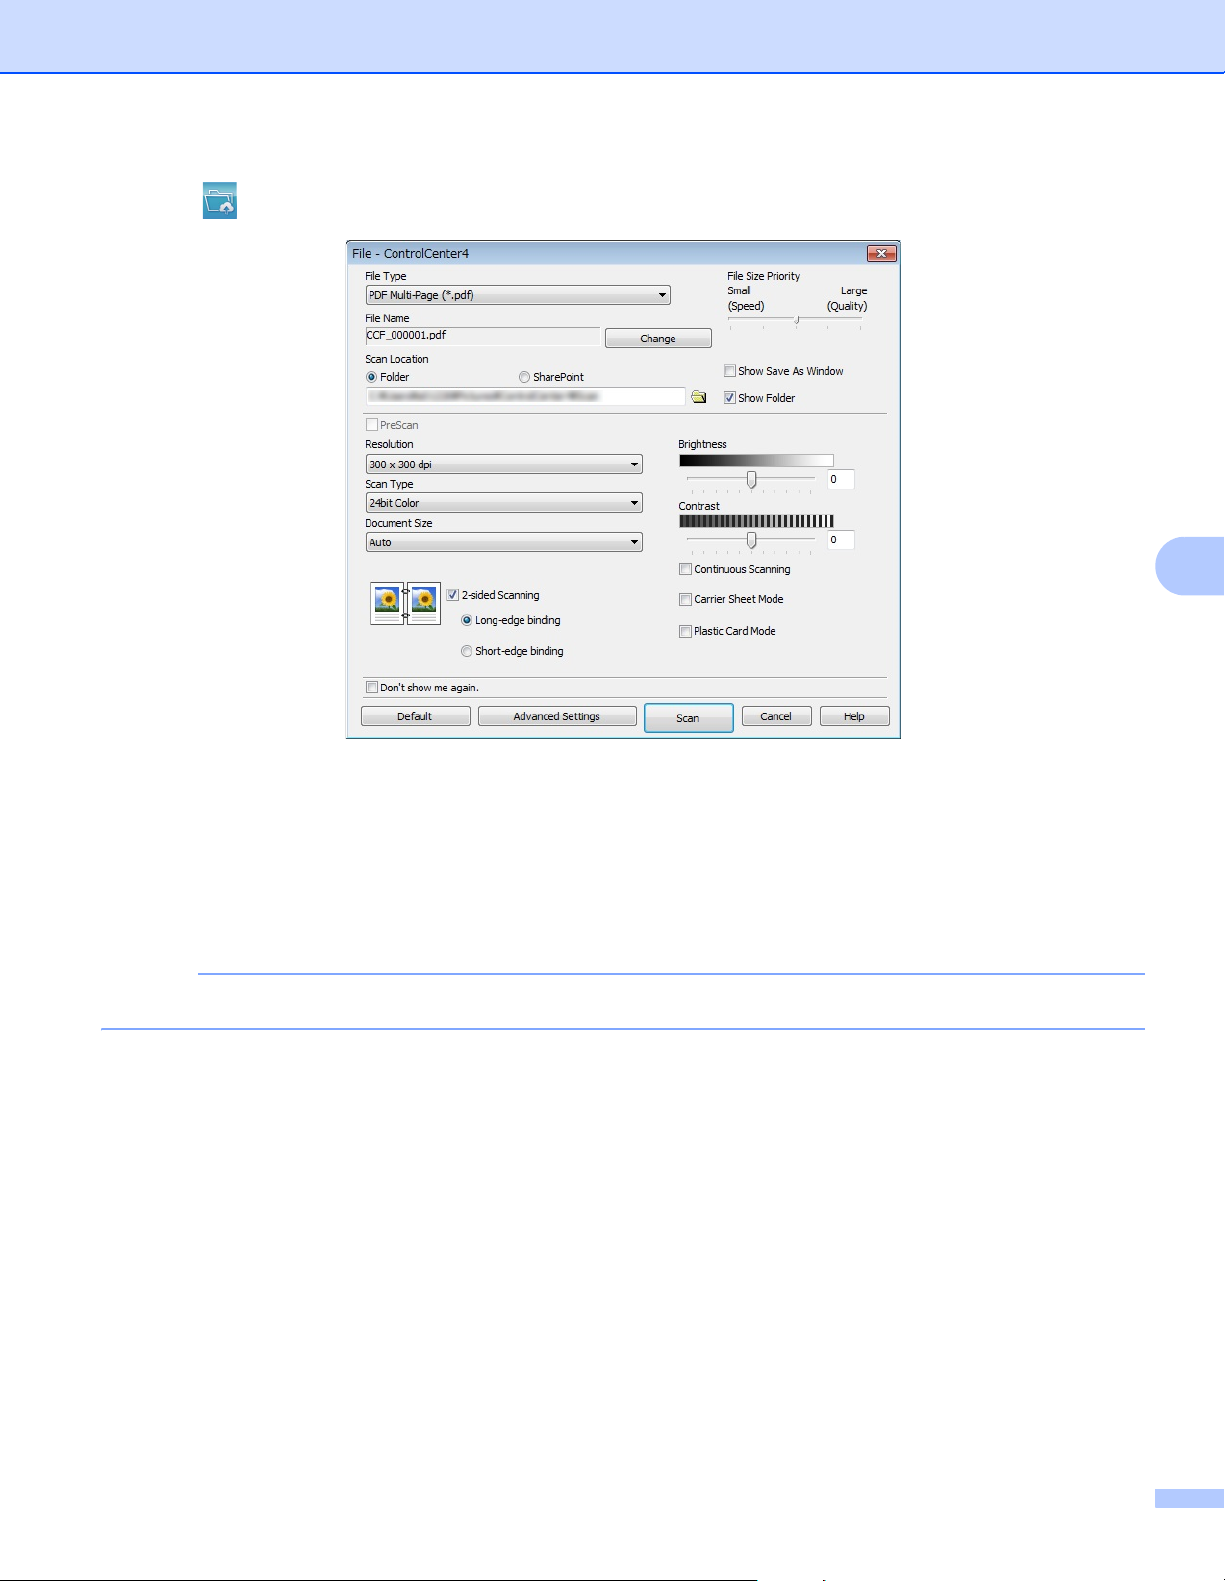
Scan Using Your Computer
96
6
4 Click (File). The settings dialog box appears.
5 In the Scan Location field, select the SharePoint radio button, and then enter the server address where
you would like to save your scanned documents.
6 Change other settings if needed (see Change Scan Settings (ControlCenter4) (Windows
®
) on page 99).
7 Click the Connection Test button to confirm the server connection.
The message Connected appears.
NOTE
If the security dialog box appears, type your user name and password.
8 Click Scan. If a message dialog box about the Internet connection appears, read the information and
click OK.
The scanned document is saved in the destination server.

Scan Using Your Computer
97
6
Create a Custom Tab (ControlCenter4 Advanced Mode)
(Windows
®
) 6
Create up to three customized tabs that include up to five customized buttons with your preferred settings.
Create a Custom Tab 6
1 Click the (ControlCenter4) icon in the task tray and select Open from the menu.
The ControlCenter4 window appears.
2 Click Configuration and then select Create custom tab. You can also create a custom tab by right-
clicking the tab area and selecting Create custom tab. A custom tab will be created.
3 To change the name of a custom tab, right-click the custom tab and select Rename custom tab. Enter
the new name. The name appears in the upper left corner of the custom tab.
NOTE
• You can also change the name of the custom tab by clicking Configuration and then clicking Rename
custom tab.
• You can make up to 3 custom tabs.
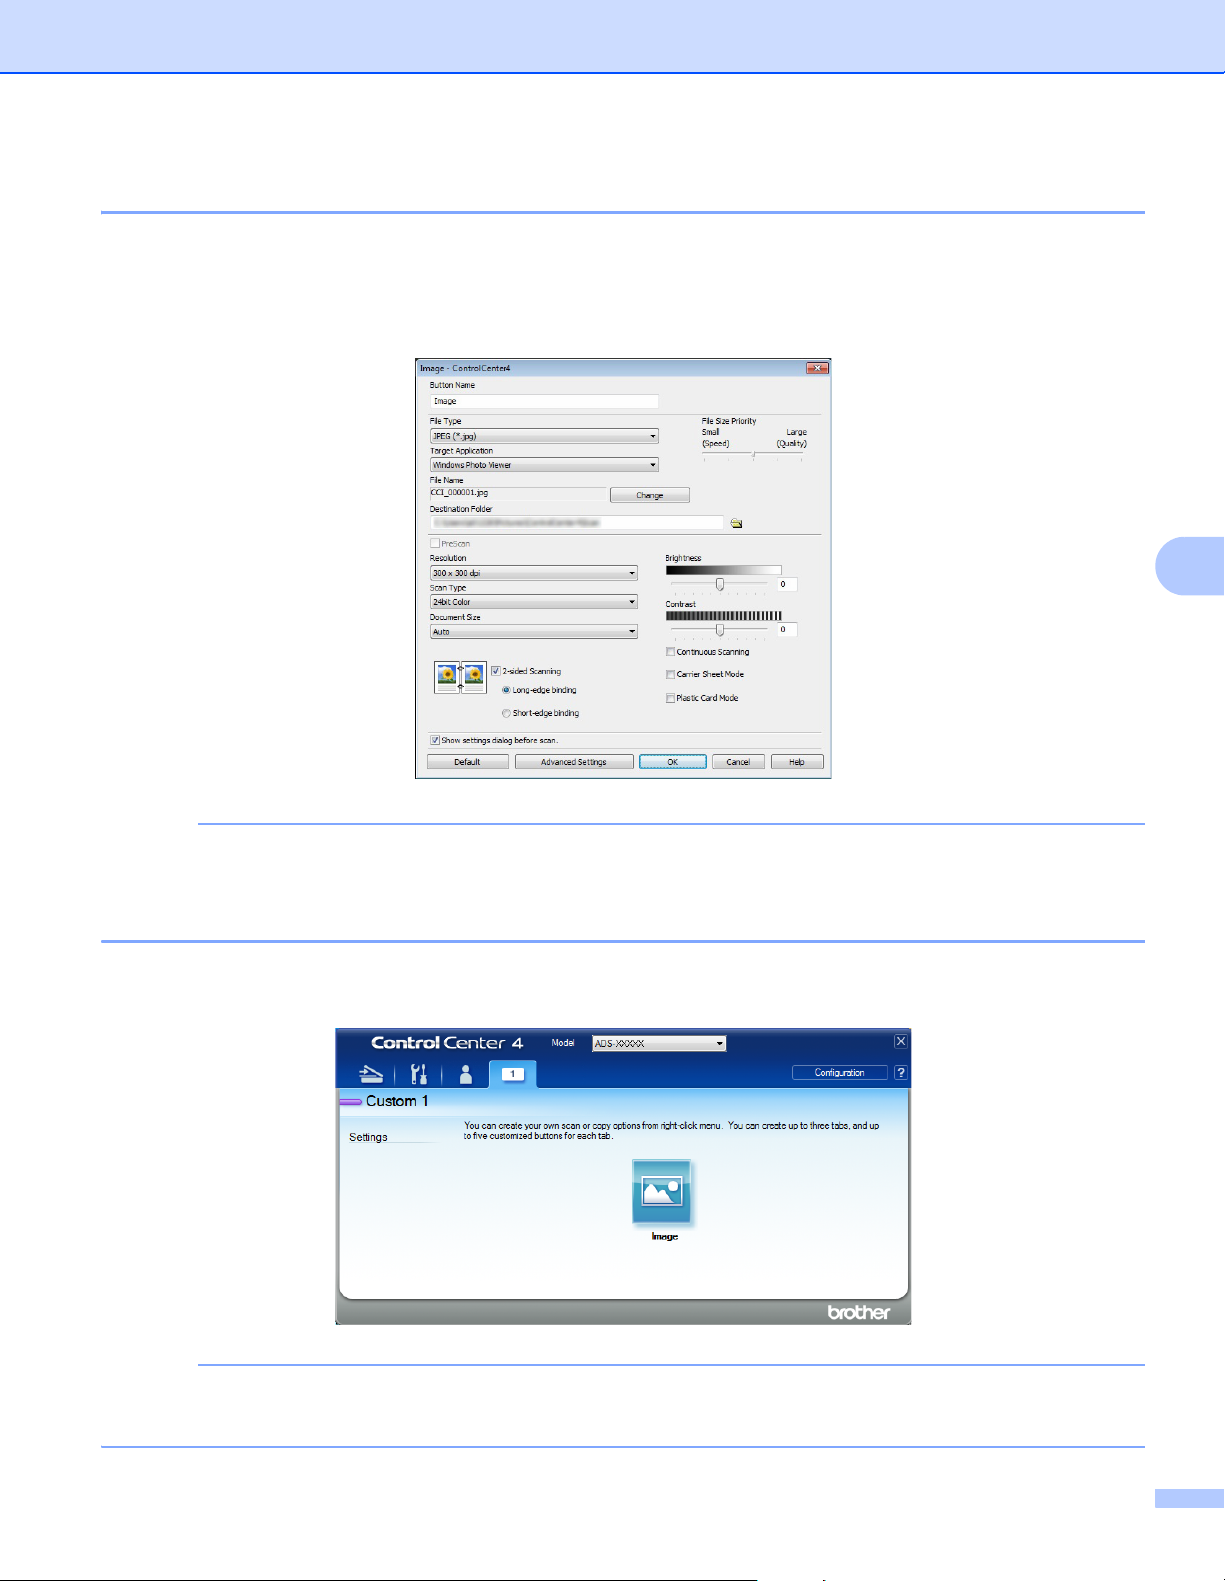
Scan Using Your Computer
98
6
Create a Custom Button in a Custom Tab 6
1 Create a Custom tab. See Create a Custom Tab on page 97.
2 Right-click the new Custom tab, and select Create custom button. Select the button you want to create
from the menu. The settings dialog box appears.
NOTE
• To copy a custom button, select Copy custom button from the menu that appears when you right-click
the Custom tab. Rename the custom button.
• You can make up to 5 custom buttons.
3 Type the button name and change the settings if needed. Click OK.
(The setting options may vary depending on the type of button you create.)
NOTE
You can change or remove the tab, button, or settings you created. Click Configuration and continue as
prompted.

Scan Using Your Computer
99
6
Change Scan Settings (ControlCenter4) (Windows
®
) 6
The following settings can be changed.
Setting Description Applicable Feature
Image OCR E-mail File Print
File Type Select the file type you want to use for the scanned data.
NOTE
• To save the document as a password-protected
PDF, select Secure PDF (*.pdf) from the File Type
drop-down list, click the (Set PDF Password)
button, and enter the password (Image, E-mail and
File only).
• Searchable PDF is a file format that includes the text
data layer over a scanned image. This layer allows
you to search the text on the image data. OCR
Language in the OCR setting must be set to match
the language you want for the searchable PDF.
• To save the document as a searchable PDF, select
Searchable PDF (*.pdf) from the File Type
drop-down list.
• To save the document as a high compression PDF,
select 300 x 300 dpi from the Resolution drop-down
list, High Compression PDF (*.pdf) from the File
Type drop-down list and True Gray or 24bit Color
from the Scan Type drop-down list.
YesYesYesYes-
Target
Application
Select the destination application including Nuance™
PaperPort™ 14SE and Evernote from the drop-down
list.
Yes Yes - - -
OCR
Language
Set to match the language of the scanned document’s
text.
-Yes---
Printer Name Select the printer you want to use to print the scanned
data.
----Yes
File Name Click the Change button for Image, OCR or E-mail.
Enter a prefix for the file name if needed. The maximum
number of characters is 100 characters.
YesYesYesYes-
Print Options Click the Print Options button to configure the printer
settings.
----Yes
Show Save
As Window
To specify the destination of the scanned image every
time you scan, select the Show Save As Window
check box.
NOTE
This feature is not available with SharePoint.
---Yes-

Scan Using Your Computer
100
6
Destination
Folder
Click the Folder icon to change the folder where you
want to save your scanned image.
YesYesYes- -
File Name To define file naming attributes, click the Change
button.
Scan
Location
Select one of the Scan Locations:
• Folder
Click the folder icon and browse to the folder where
you want to save your scanned document. Select
the Show Folder check box to automatically display
the destination folder after scanning. To specify the
destination of the scanned image every time, select
the Show Save As window check box.
• SharePoint
Write the URL address where you would like to save
your scanned document. Click Connection Test to
confirm the destination.
NOTE
You may have to log on.
---Yes-
File size
Priority
Adjust the file size by moving the slider to the right or
left.
NOTE
File size can be adjusted depending on your
selected File Type.
Yes- YesYes-
PreScan Select PreScan to preview your image and crop
unwanted portions before scanning.
YesYesYesYesYes
Resolution Select a scanning resolution from the Resolution
drop-down list. Higher resolutions take more memory
and transfer time, but produce a finer scanned image.
YesYesYesYesYes
Setting Description Applicable Feature
Image OCR E-mail File Print

Scan Using Your Computer
101
6
1
Depending upon the condition of the original document, this function may not work properly.
Scan Type Select from several color depth options for scanned
images.
Auto
Automatically selects suitable colors for your document.
1
Black & White
Use for text or line art images.
Gray (Error Diffusion)
Use for photographic images or graphics. (Error Diffusion
is a method for creating simulated grayscale images
without using true gray dots. Black dots are put in
a specific pattern to give a gray appearance.)
True Gray
Use for photographic images or graphics. This mode is
more exact due to using up to 256 shades of gray.
24bit Color
Uses up to 16.8 million colors to scan the image.
Although using 24bit Color creates an image with the
most accurate color reproduction, it requires the most
memory and has the longest transfer time.
YesYesYesYesYes
Setting Description Applicable Feature
Image OCR E-mail File Print

Scan Using Your Computer
102
6
1
Depending upon the condition of the original document, this function may not work properly.
Setting Description Applicable Feature
Image OCR E-mail File Print
Document
Size
Document size is set to Auto by default. You can scan
documents of any size without making adjustments to
Document Size.
1
For faster scan speeds, select the
exact size of your document from the Document Size
drop-down list.
NOTE
• If you select a 1 to 2 document size, the scanned
image will be divided into two documents that are
half the size of the setting. If you select 1to2(A4),
the scanned image will be divided into two A5-size
documents.
• To do 1 to 2 scanning, clear the Auto Image Rotation
check box in the Advanced Settings dialog box.
• If you select a 2 in 1 document size, two scanned
images will be combined into one document.
Yes Yes Yes Yes Yes
Brightness Adjust the setting (-50 to 50) to get the best image. The
default value of 0 represents an average and is suitable
for most images. Set the Brightness level by dragging
the slider to the right or left to lighten or darken the
image. You can also enter a value in the box to set the
level. If the scanned image is too light, set a lower
Brightness level and scan the document again. If the
image is too dark, set a higher Brightness level and scan
the document again.
Yes Yes Yes Yes Yes

Scan Using Your Computer
103
6
Setting Description Applicable Feature
Image OCR E-mail File Print
Contrast Adjust the setting (-50 to 50) to get the best image. The
default value of 0 represents an average and is suitable
for most images. Increase or decrease the contrast level
by moving the slider to the right or left. An increase
emphasizes dark and light areas of the image, while a
decrease reveals more details in gray areas. You can
also enter a value in the box to set the Contrast.
NOTE
The Contrast setting is only available when setting
Scan Type to Auto, Gray (Error Diffusion),
True Gray or 24bit Color.
Yes Yes Yes Yes Yes
Continuous
Scanning
Scan more pages than the maximum capacity of the
ADF and save them as one data file. After the first batch
of documents is scanned click Continue for additional
pages or Finish.
Yes Yes Yes Yes Yes
2-sided
Scanning
If you select this box, the machine scans both sides
of the document. When using the automatic 2-sided
(duplex) scan feature, you must select Long-edge
binding or Short-edge binding depending on the
layout of your original to make sure that the data file
created appears correctly in the scanned document.
Yes Yes Yes Yes Yes
Carrier Sheet
Mode
Scan the following document types using the Carrier
Sheet. For this mode, select any setting other than Auto
from the Document Size drop-down list.
Large-sized Documents (A3, B4 and Ledger)
Fold the document in half and insert it in the Carrier
Sheet for 2-sided (duplex) scanning, then both front
and back pages will be combined into a single page.
Select 2 in 1(A4) for an A3 document, 2 in 1(B5) for
a B4 document or 2 in 1(Letter) for a Ledger
document from the Document Size drop-down list.
Important documents (photos, contracts)
Thin paper (receipts)
Irregular-shaped paper (clippings)
NOTE
• Load only one Carrier Sheet at a time.
• Load the document in the center of the Carrier Sheet
and align the top of the document with the top of the
Carrier Sheet.
Yes Yes Yes Yes Yes

Scan Using Your Computer
104
6
Plastic Card
Mode
Scan cards, such as driver’s licenses or insurance
cards, using these automatic settings:
Resolution: 600x600dpi
Document Size: 2 in 1 (Auto)
2-sided Scanning: On (Short-edge binding)
Auto Deskew: Off
Auto Image Rotation: Off
Multifeed Detection: Off
NOTE
• To scan a plastic card with different settings,
set Plastic Card Mode to off and Resolution
to 600 dpi.
• Load up to five plastic cards at a time.
Yes Yes Yes Yes Yes
Default Restore all settings to their factory default values. Yes Yes Yes Yes Yes
Setting Description Applicable Feature
Image OCR E-mail File Print
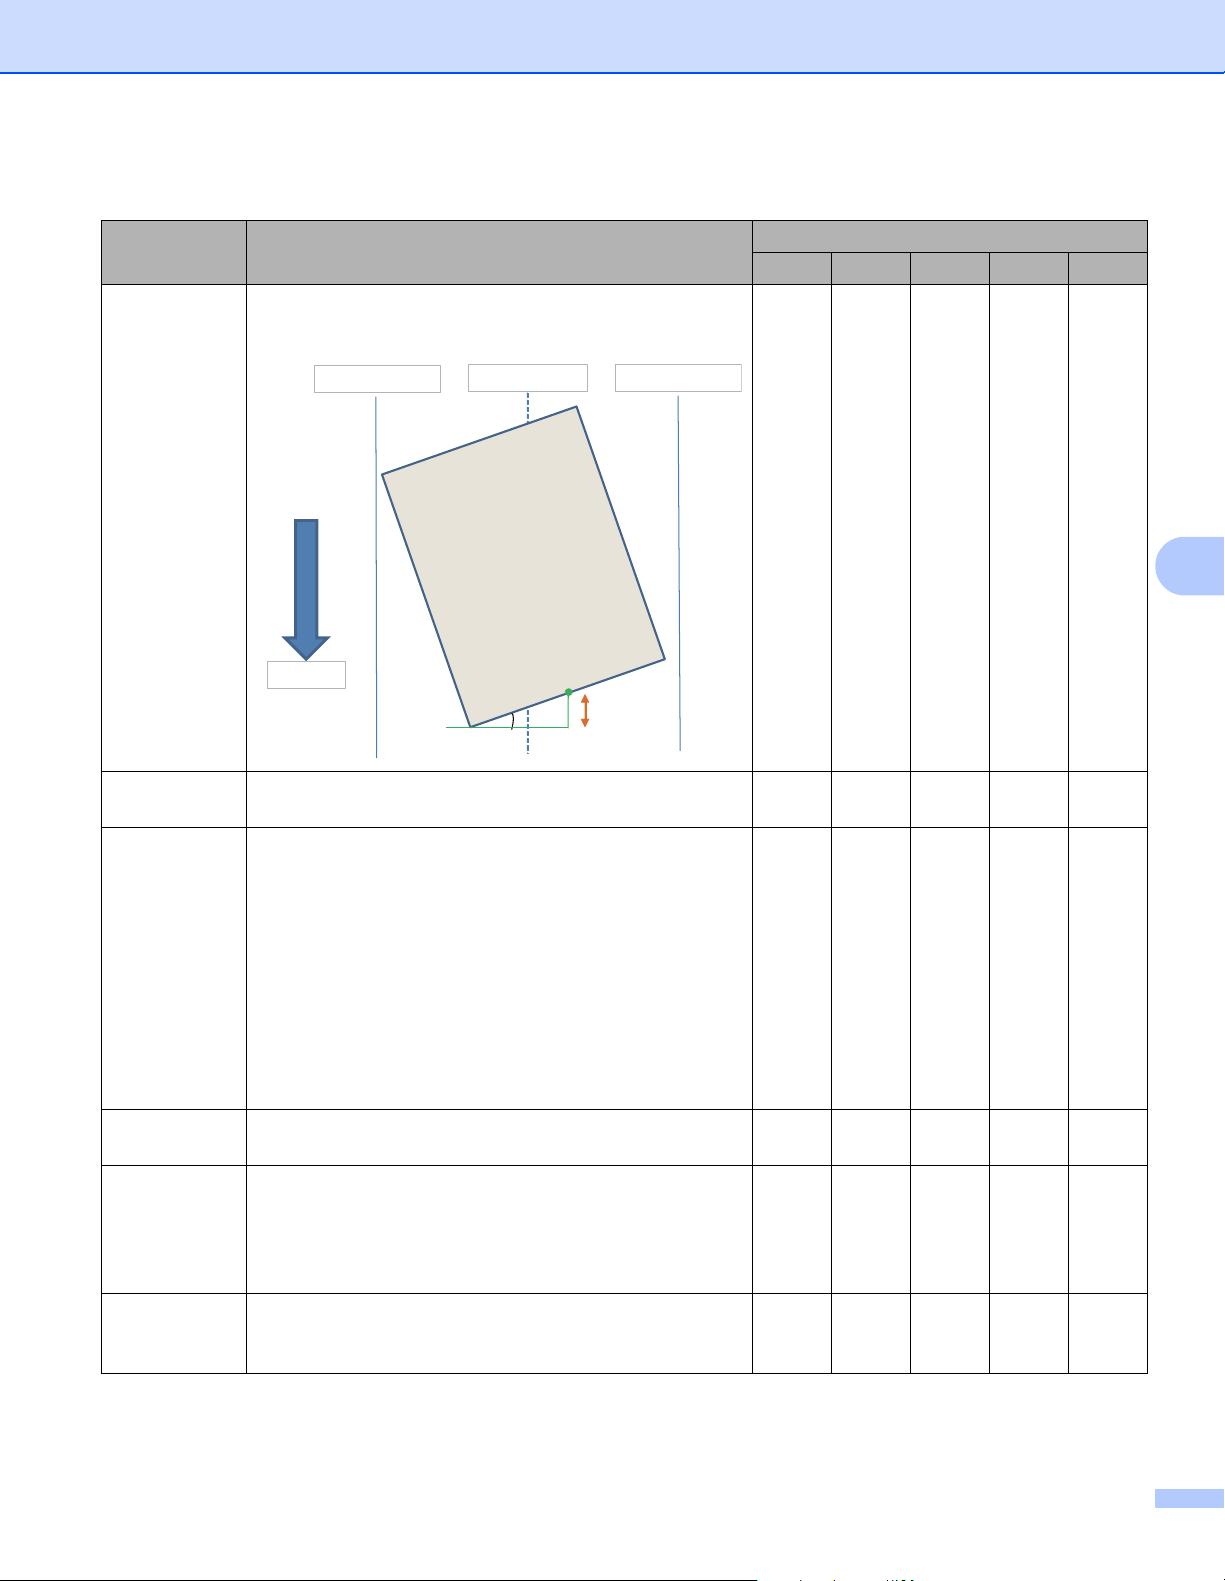
Scan Using Your Computer
105
6
You can configure more settings in the Advanced Settings dialog box. Click the Advanced Settings button.
1
Depending upon the condition of the original document, this function may not work properly.
Setting Description Applicable Feature
Image OCR E-mail File Print
Auto Deskew Corrects the skew (less than 0.36 in. (9 mm) from the
center of the document to the edge) of the scanned data.
1
Yes Yes Yes Yes Yes
Auto Image
Rotation
Changes the direction of the document based on the
text orientation.
1
Yes Yes Yes Yes Yes
Remove
Bleed-
through /
Pattern /
Remove
Background
Color
Prevents bleedthrough on a two-sided document, and
also allows you to remove the base color of documents,
such as newspapers, to make the scanned data more
recognizable.
1
The sensitivity of the Remove Bleed-through / Pattern /
Remove Background Color function can be adjusted with
the slider. Moving the slider toward “High” will make the
scanner more likely to Remove Bleed-through / Pattern /
Remove Background Color, while moving it toward “Low”
will make the scanner less likely to Remove Bleed-
through / Pattern / Remove Background Color.
Yes Yes Yes Yes Yes
Skip Blank
Page
Removes blank pages of the document from the
scanning results.
1
Yes Yes Yes Yes Yes
Multifeed
Detection
Uses a ultrasonic sensor to detect when a multifeed has
occurred. When this function detects a multifeed, confirm
that the data scanned before the multifeed has been
saved, and then start scanning again at the next page or
the beginning of the document.
Yes Yes Yes Yes Yes
Display
Scanning
Results
Shows the numbers of total pages saved and blank
pages skipped on your computer screen.
Yes Yes Yes Yes Yes
less than 9 mm
center of the
document
document
right edge of the
paper feed tray
left edge of the
paper feed tray
center of the
transport path
Scanning
direction

Scan Using Your Computer
106
6
Scan Using Brother iPrint&Scan (Mac) 6
NOTE
• Use Brother iPrint&Scan for Mac to print and scan from your computer.
• Download and install Brother iPrint&Scan from the App Store.
1 In the Finder menu bar, click Go > Applications, and then double-click the iPrint&Scan icon.
The Brother iPrint&Scan window appears.
2 If your Brother machine is not selected, click the Select your Machine button, and then follow the on-
screen instructions to select your Brother machine.
3 Click the Scan icon, and then follow the on-screen instructions to scan your documents.
Change Scan Button Settings from Brother iPrint&Scan (Mac) 6
1 In the Finder menu bar, click Go > Applications, and then double-click iPrint&Scan icon.
The Brother iPrint&Scan window appears.
2 If your Brother machine is not selected, click the Select your Machine button, and then follow the on-
screen instructions to select your Brother machine
3 Click the Machine Scan Settings button, and then follow the on-screen instructions to change the scan
settings.
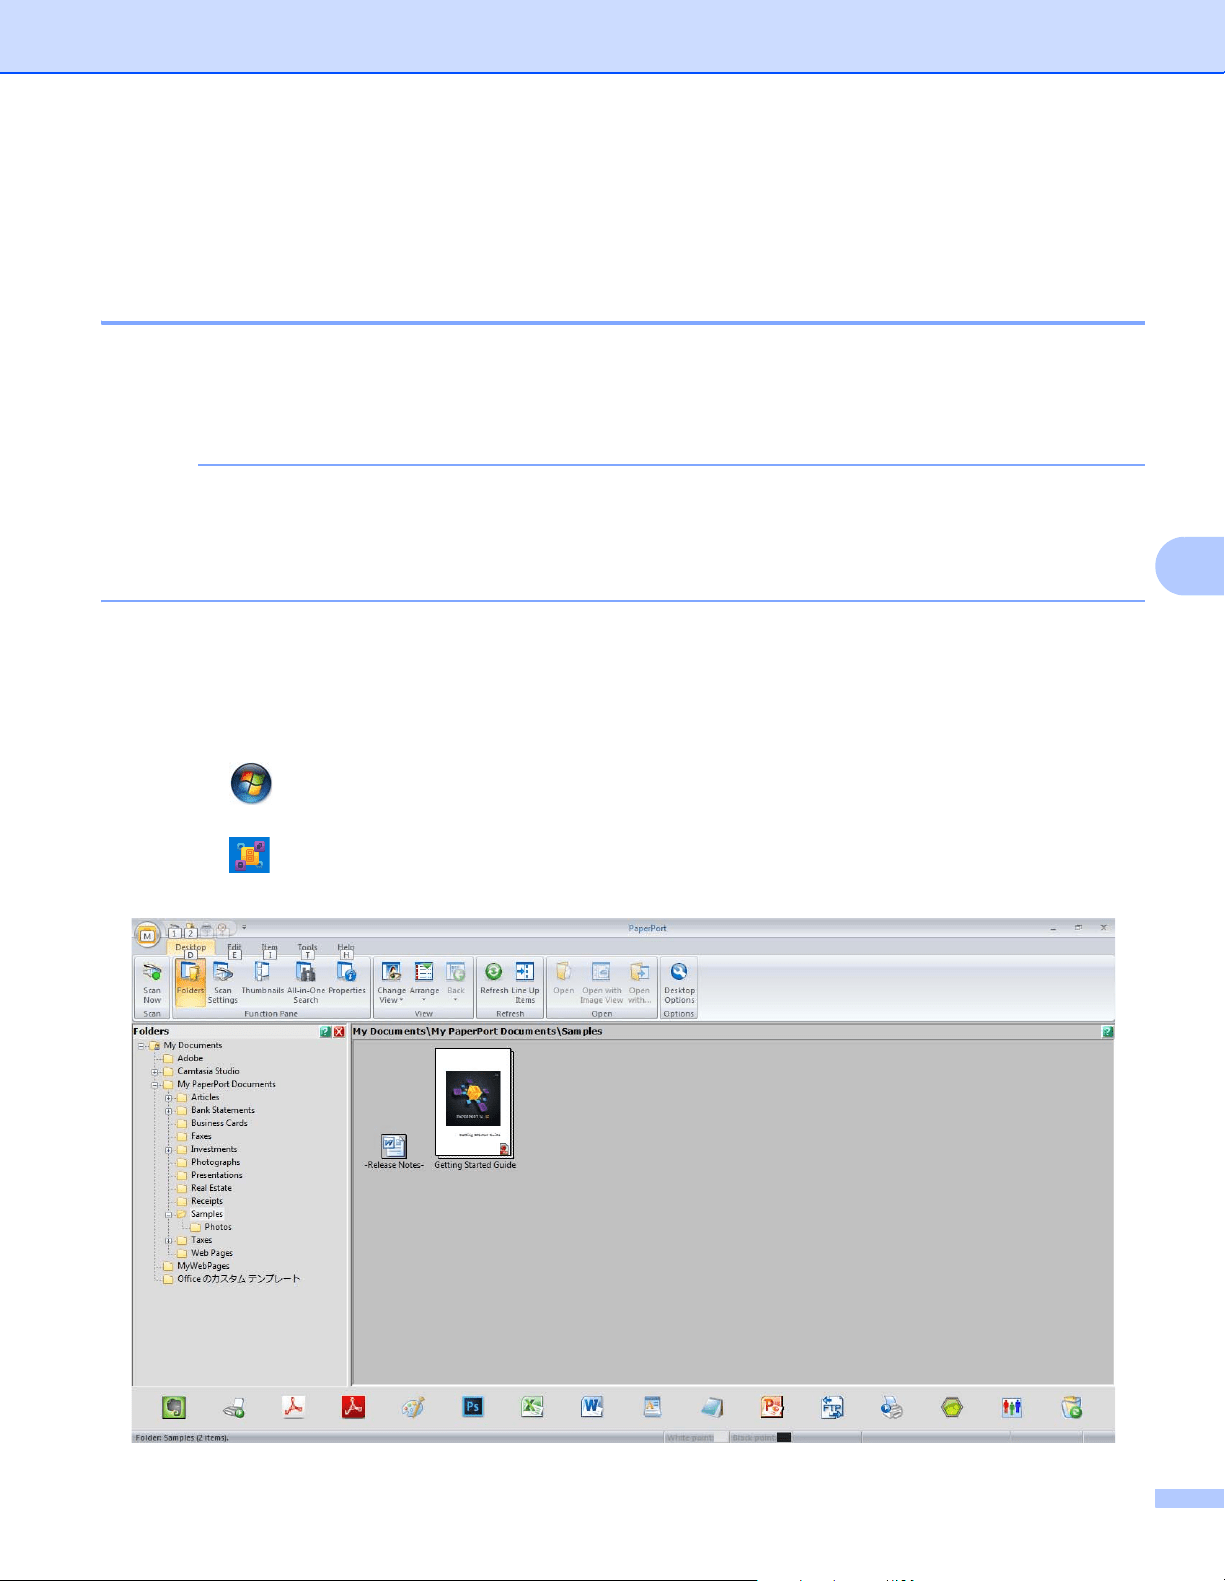
Scan Using Your Computer
107
6
Scan Using Nuance™ PaperPort™ 14SE or Other Windows
®
Applications 6
Scan Using Nuance™ PaperPort™ 14SE 6
You can use the Nuance™ PaperPort™ 14SE application, which is included in the scanner driver, for scanning.
Nuance™ PaperPort™ 14SE supports both TWAIN and WIA drivers; the TWAIN driver (recommended) is used
in the example on this page. For an example using the WIA driver, see Scan Using Windows
®
Photo Gallery
or Windows
®
Fax and Scan on page 122.
NOTE
• Nuance™ PaperPort™ 14SE supports Windows
®
XP 32 bit (SP3), Windows Vista
®
, Windows
®
7,
Windows
®
8, Windows
®
8.1 and Windows
®
10.
• For more information about the application see the Nuance™ PaperPort™ 14SE Help file. Access this
from the Nuance™ PaperPort™ 14SE Help menu.
These instructions are for Nuance™ PaperPort™ 14SE, but are similar for other Windows
®
applications.
1 Load your document.
2 Start Nuance™ PaperPort™ 14SE. Do one of the following:
Windows
®
XP, Windows Vista
®
and Windows
®
7
Click (Start) > All Programs > Nuance PaperPort 14 > PaperPort.
Windows
®
8, Windows
®
8.1 and Windows
®
10
Click (PaperPort).
The Nuance™ PaperPort™ 14SE window appears.
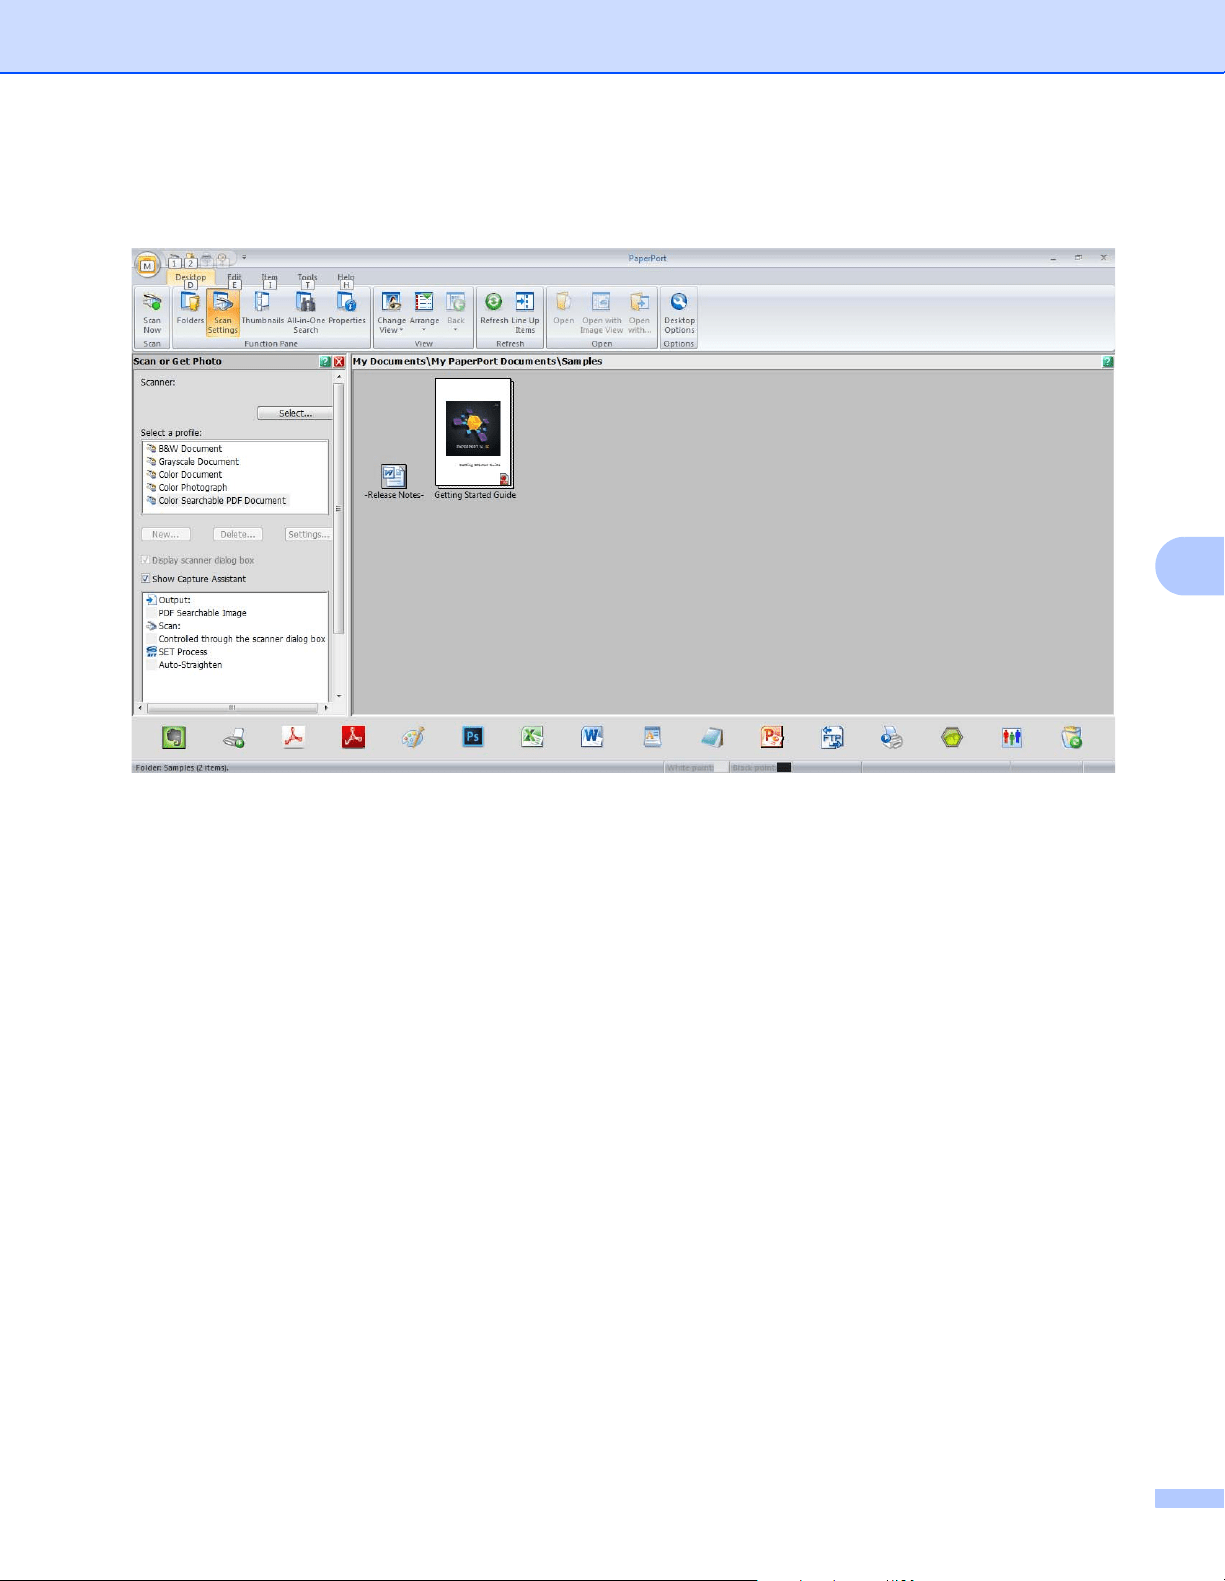
Scan Using Your Computer
108
6
3 Click Scan Settings from the Desktop tab on the ribbon.
The Scan or Get Photo panel appears on the left side of the window.
4 Click the Select button.
5 From the Available Scanners list, select TWAIN: TW-Brother ADS-XXXXX (where ADS-XXXXX is the
model name of your machine). To use the WIA driver, select the Brother driver that has “WIA” as the
prefix.
Click OK.
6 Select the Display scanner dialog box check box in the Scan or Get Photo panel.
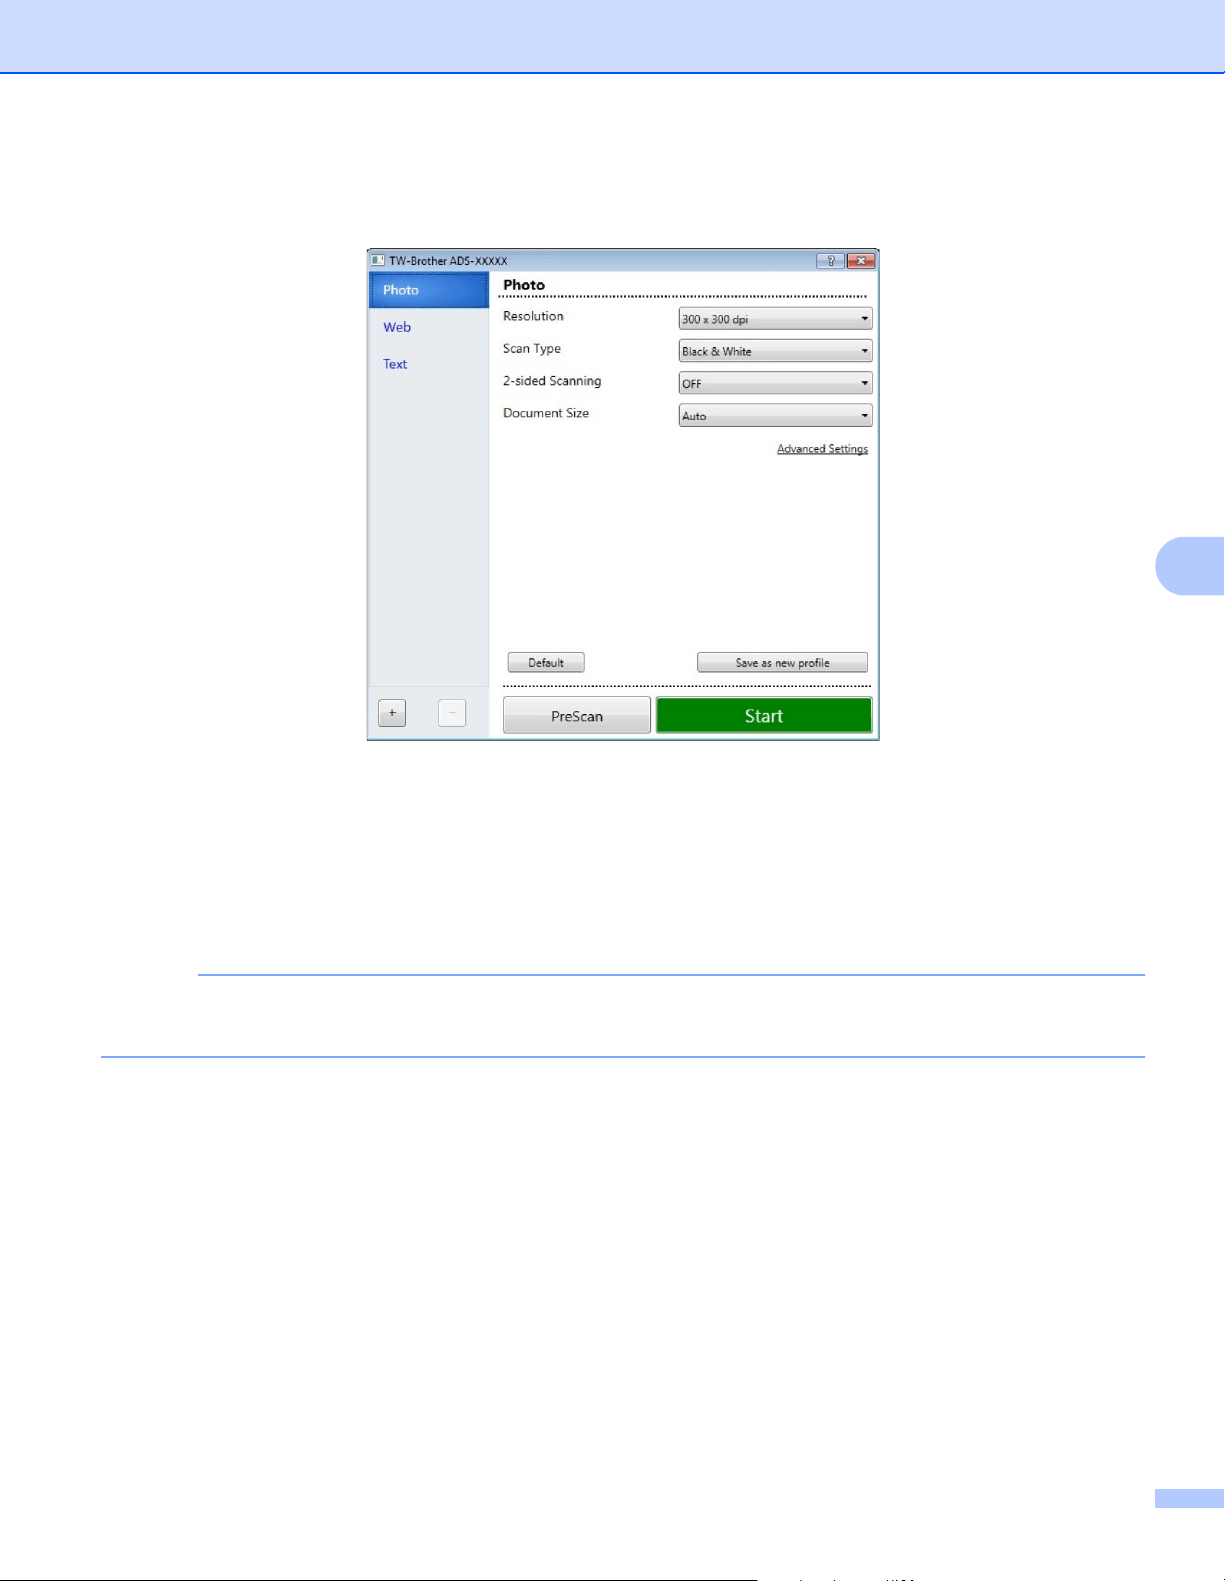
Scan Using Your Computer
109
6
7 Click the Scan button.
The scanner setup dialog box appears.
8 Adjust the settings in the scanner setup dialog box if needed (Resolution, Scan Type, 2-sided Scanning,
and Document Size).
For more information about TWAIN Driver Settings, see page 110.
For more information about WIA (Ver 1) Driver Settings, see page 122.
9 From the Document Size drop-down list, select your document size.
NOTE
After you select a document size, you can adjust the scanning area further by clicking the left mouse button
and dragging it. This is required when cropping an image for scanning.
0 Click the Start button.
The machine starts scanning.
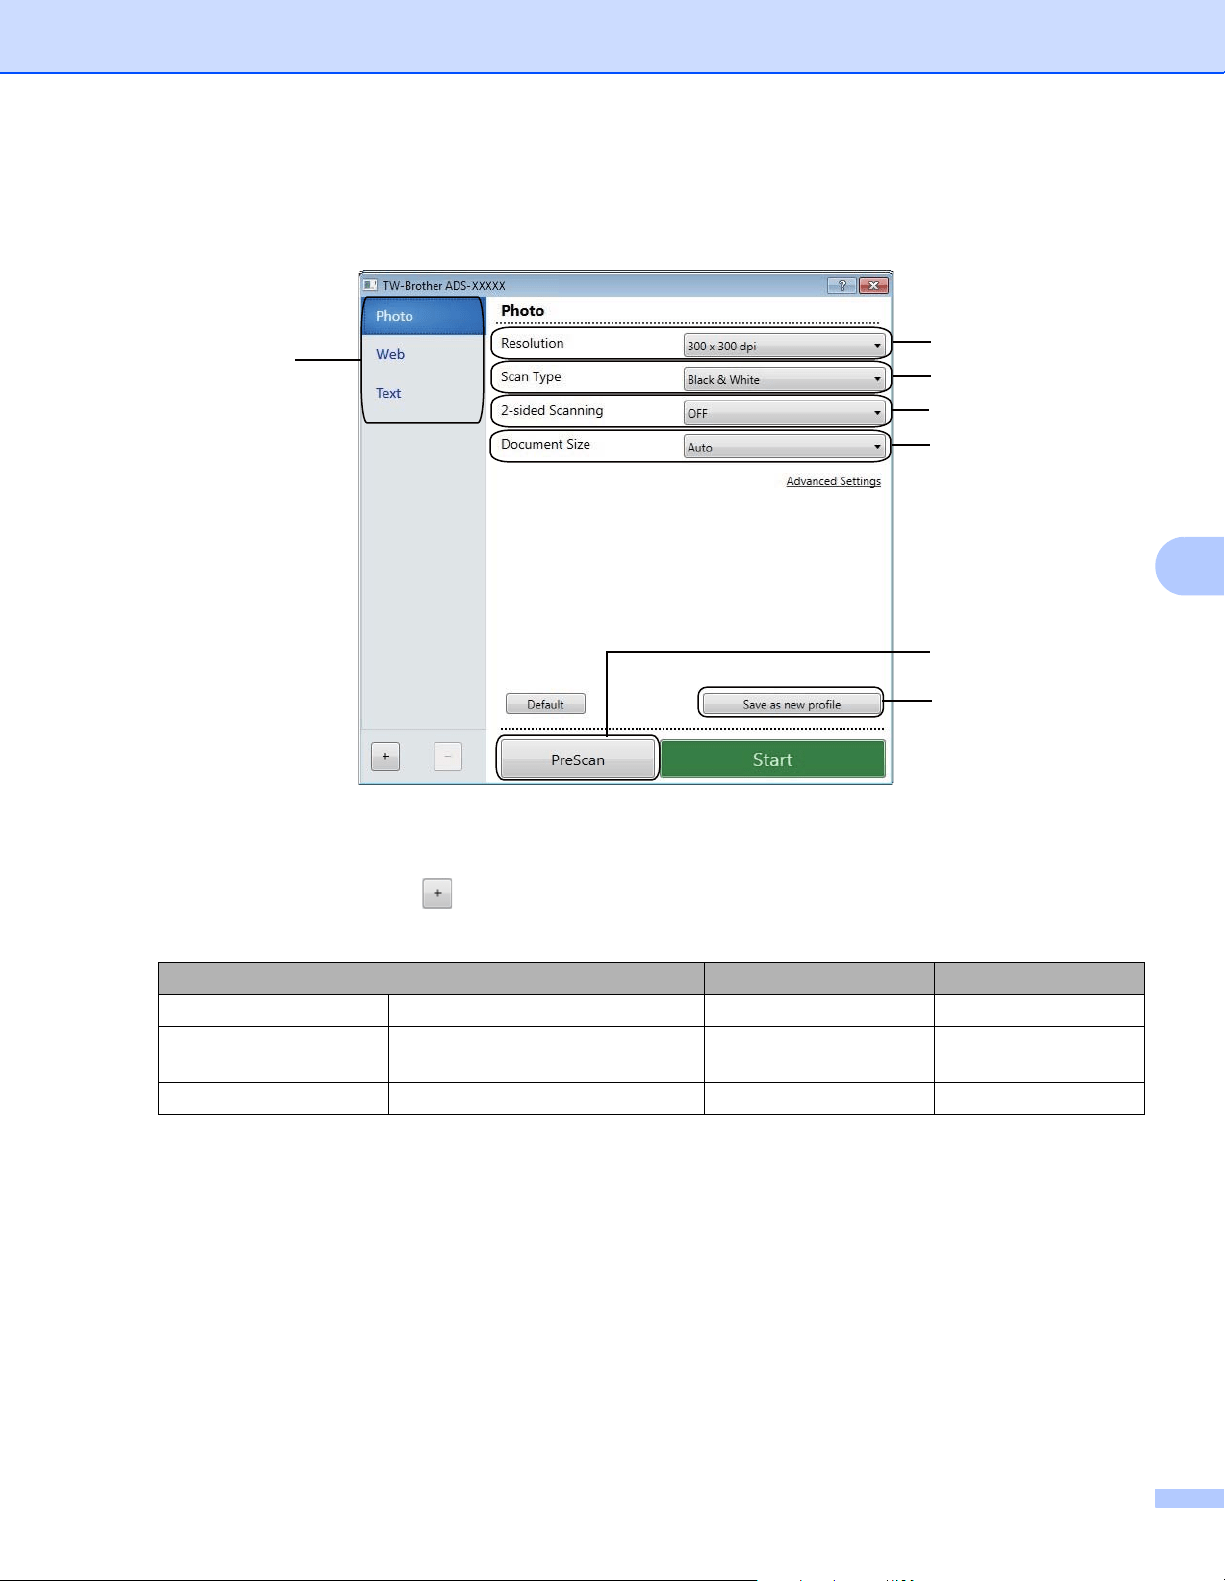
Scan Using Your Computer
110
6
TWAIN Driver Settings 6
Basic screen
1 Scan (Image Type) Profiles
Select Photo, Web, or Text.
Add new items by clicking . Although you cannot change the name of Photo, Web and Text, you
can change the name of new items.
Scan (Image Type) Resolution Scan Type
Photo Use for scanning photo images 300 x 300 dpi 24bit Color
Web Use for attaching the scanned
image to web pages
100 x 100 dpi 24bit Color
Text Use for scanning text documents 200 x 200 dpi Black & White
1
2
3
4
5
6
7

Scan Using Your Computer
111
6
2 Resolution
Select a scanning resolution from the Resolution drop-down list. Higher resolutions take more memory
and transfer time, but produce a finer scanned image.
3 Scan Type
Select one of the following:
Auto
Automatically detects whether the document uses color and generates a scanned image of it. For
documents that mix color and black and white pages, color pages will be scanned in Color mode,
while black and white pages will be scanned in Black & White mode.
Black & White
Use for text or line art images.
Gray (Error Diffusion)
Use for photographic images or graphics. (Error Diffusion is a method for creating simulated
grayscale images without using true gray dots. Black dots are put in a specific pattern to give a gray
appearance.)
True Gray
Use for photographic images or graphics. This mode is more exact due to using up to 256 shades
of gray.
24bit Color
Uses up to 16.8 million colors to scan the image. Although using 24bit Color creates an image with
the most accurate color reproduction, it requires the most memory and has the longest transfer time.
Resolution
100 x 100 dpi
150 x 150 dpi
200 x 200 dpi
300 x 300 dpi
400 x 400 dpi
600 x 600 dpi
1,200 x 1,200 dpi
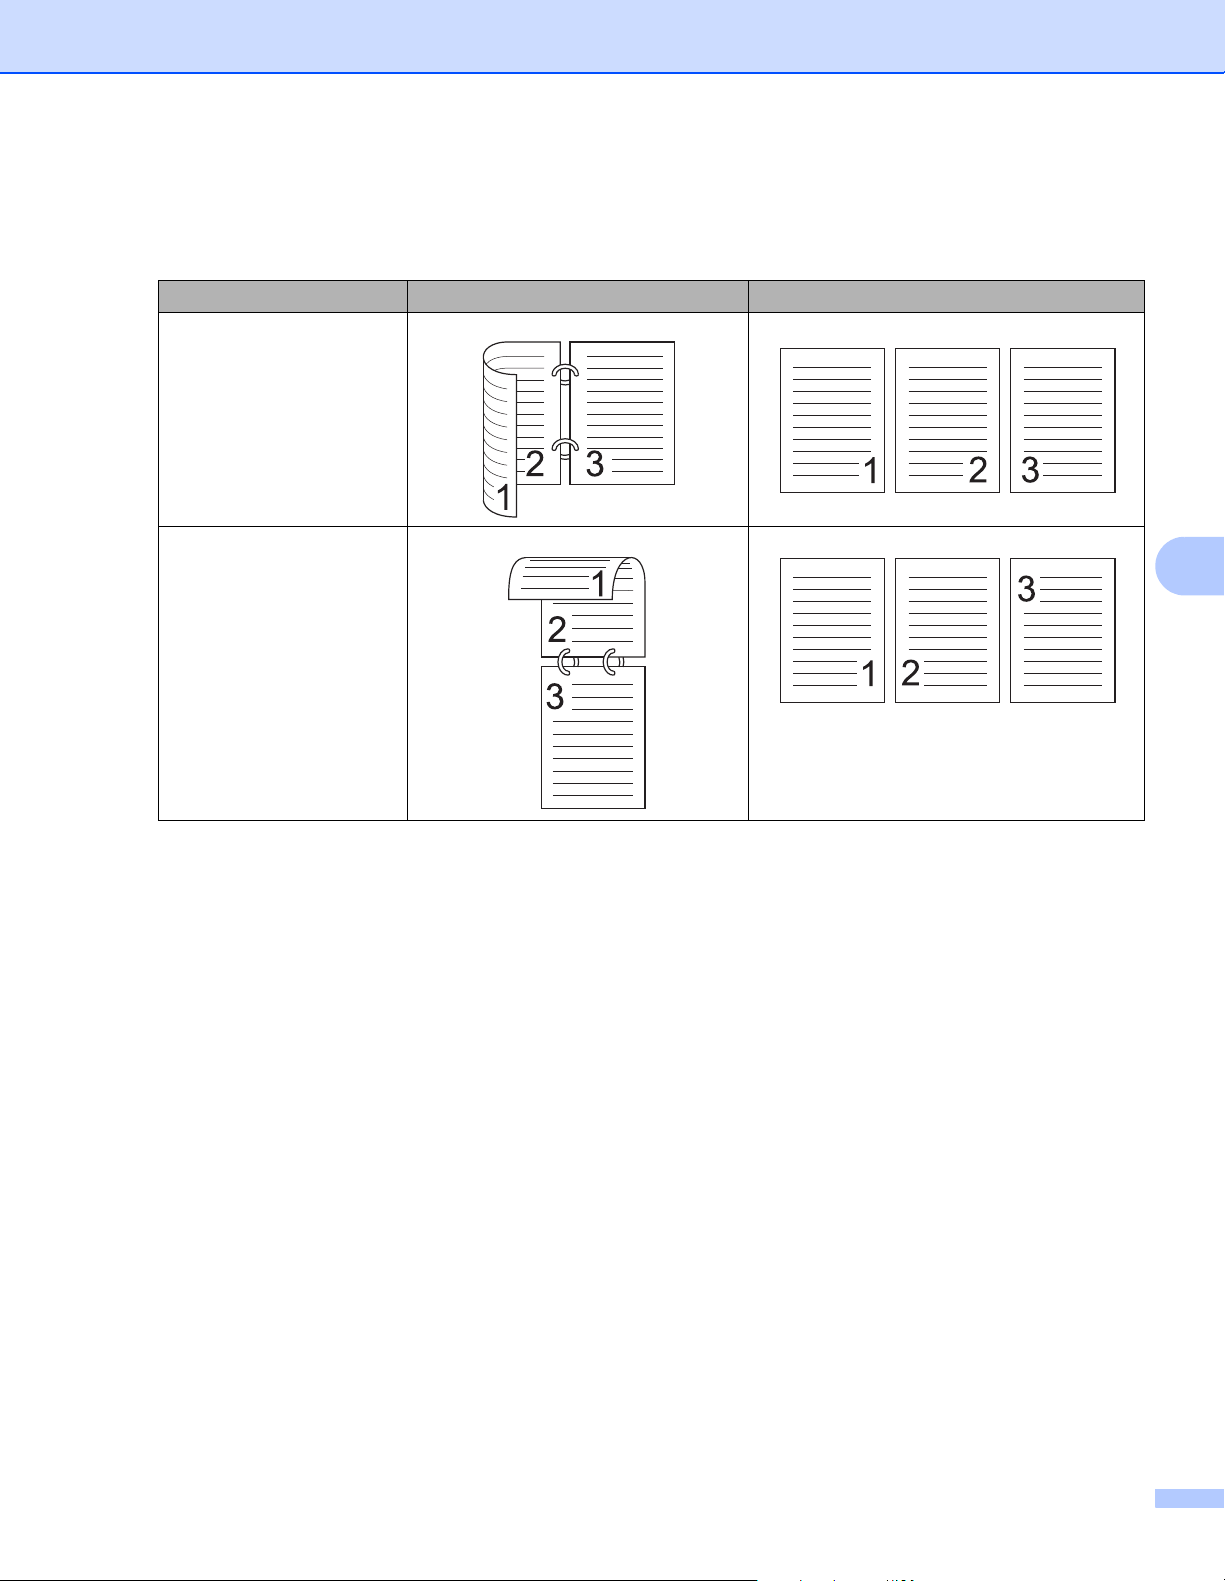
Scan Using Your Computer
112
6
4 2-sided Scanning
Select Long-edge binding or Short-edge binding depending on the layout of your original to make
sure that the data file created appears correctly in the scanned document.
5 Document Size
Document size is set to Auto by default. For faster scan speeds, select the exact size of your document
from the Document Size drop-down list. If you select Custom, the Custom Document Size dialog
box appears so you can specify the document size.
6 PreScan
Click PreScan to preview your image and crop unwanted portions before scanning.
Cropping is available in these settings:
2-sided scanning: Off
Auto Deskew: Off
Auto Image Rotation: Off
Detect End of Page: Off
Document Size: a scan size other than Auto and Long Paper
7 Save as new profile
Click Save as new profile to save your frequently-used scan settings.
The following settings will be saved as part of the profile:
Settings configured on the Basic screen
Settings configured using the Advanced Settings link
The scan boundaries as specified on the preview image
You can create up to 64 profiles.
Created profiles will be added to the Scan or Get Photo panel. To edit a profile, click Settings on the
Scan or Get Photo panel. To delete a profile, click Delete.
2-sided Scan Setting Original Layout Scan Result
Long-edge binding
Short-edge binding
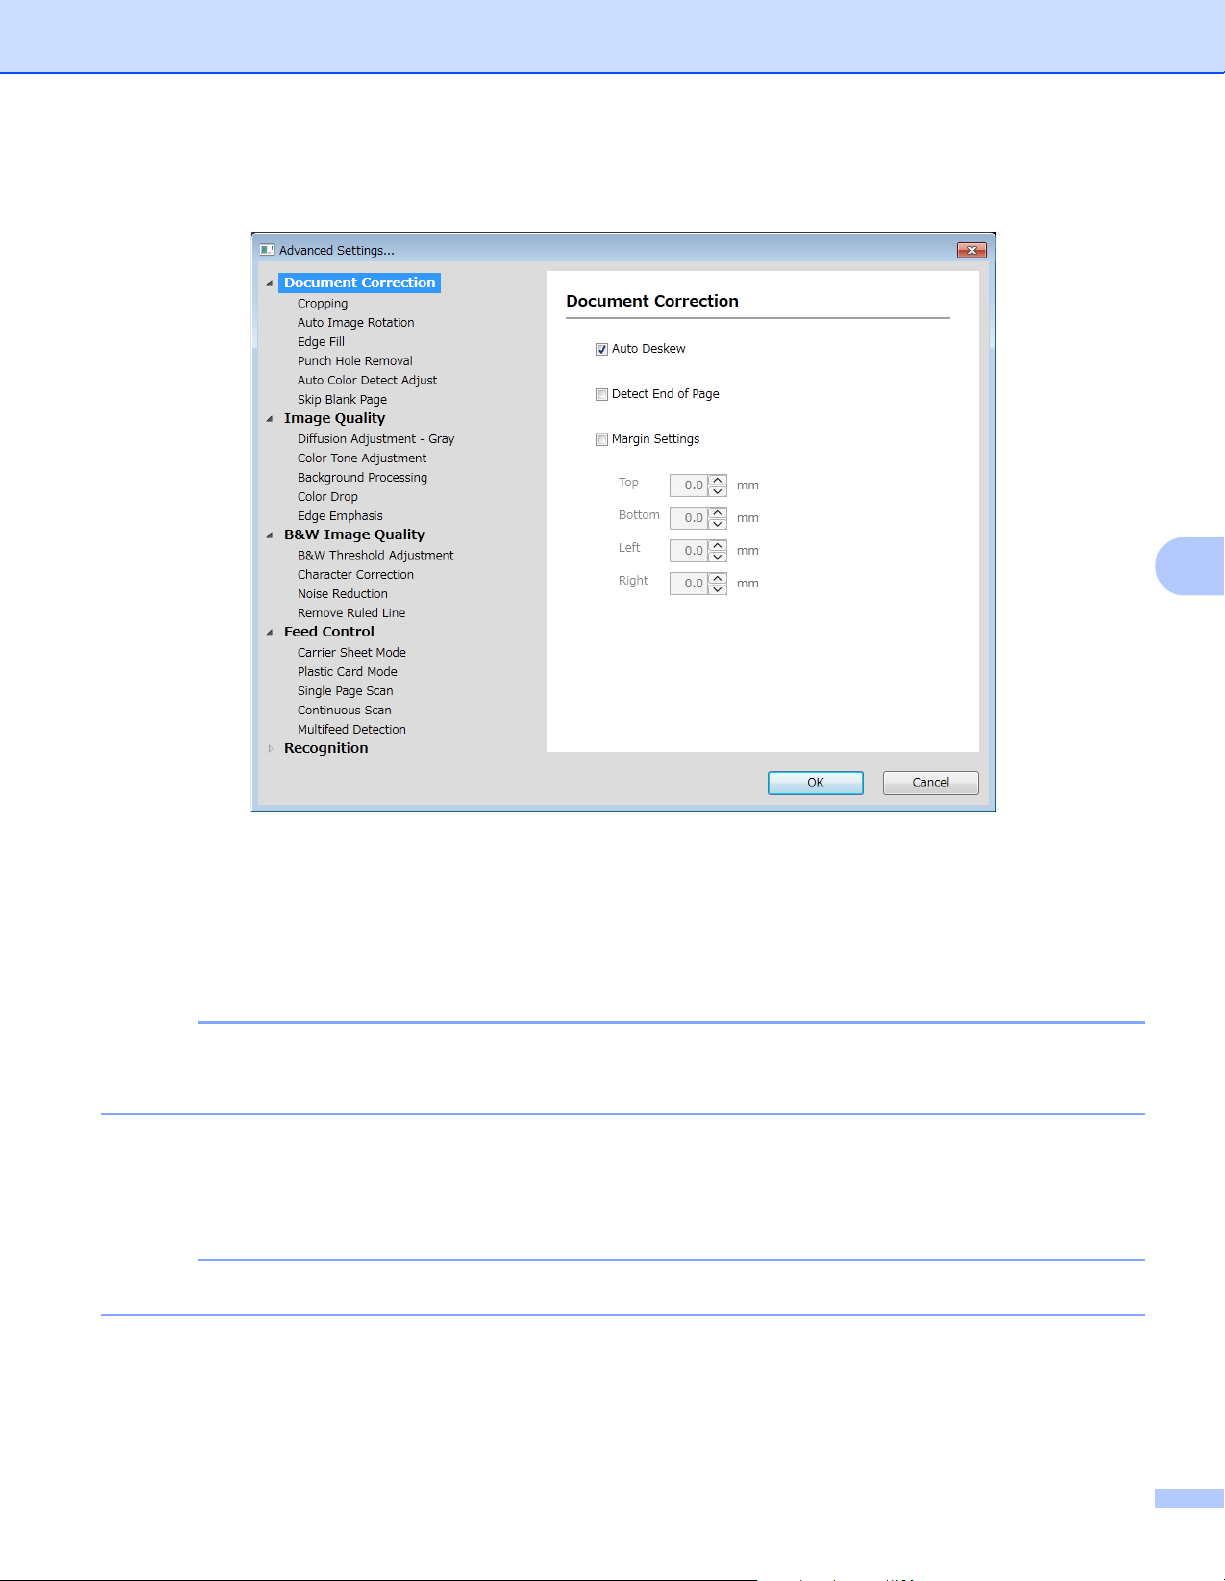
Scan Using Your Computer
113
6
Advanced Settings
Document Correction 6
1 Cropping
Auto Deskew
Corrects the skew of the scanned data.
NOTE
• If you enable Carrier Sheet Mode, you cannot enable Auto Deskew.
• This function does not apply to the Long Paper document size or the Carrier Sheet Mode.
Detect End of Page
Detects the end of page and automatically adjusts the size of a page when the length of the document is
shorter than the Document Size selected.
NOTE
If you enable Carrier Sheet Mode, you cannot enable Detect End of Page.
Margin Settings
This feature allows you to add or remove a specific margin (from -3 mm to 3 mm) at the edge of the image.

Scan Using Your Computer
114
6
2 Rotate Image
Changes the direction of the document based on the text orientation when Auto is selected.
3 Edge Fill
You can select Auto or Custom. When Custom is selected, select White or Black and set a value to add
a white or black edge around the border of your scanned image.
4 Punch Hole Removal
This feature removes the punch hole markings by filling hole marks with white or the surrounding color.
White
Fill punch holes with white.
Surrounding color
Fill punch holes with the surrounding color.
5 Auto Color Detect Adjust
When scan type Auto is selected, you can adjust the detection level of color, B&W and grayscale.
B&W/Gray - Color
Increasing the slider value makes the machine more likely to determine that a given document is a color
document. Decreasing the value makes the machine more likely to determine that a given document is a
black and white or grayscale document.
B&W - Gray
Increasing the slider value makes the machine more likely to determine that a given document is a
grayscale document. Decreasing the value makes the machine more likely to determine that a given
document is black and white.
6 Skip Blank Page
Removes blank pages of the document from the scanning results.
The sensitivity of the Skip Blank Page function can be adjusted with the slider. Moving the slider towards
High makes the machine more likely to skip pages, while moving it towards Low makes the machine less
likely to skip pages. If you enable the Show Results setting, the computer displays how many blank pages
have been skipped when the scan is complete.
If the Skip Blank Page function is triggered for all document pages, no scanned image is displayed.
Instead, the computer displays a warning message indicating that all document pages are blank.
NOTE
This function does not apply to the Long Paper document size.
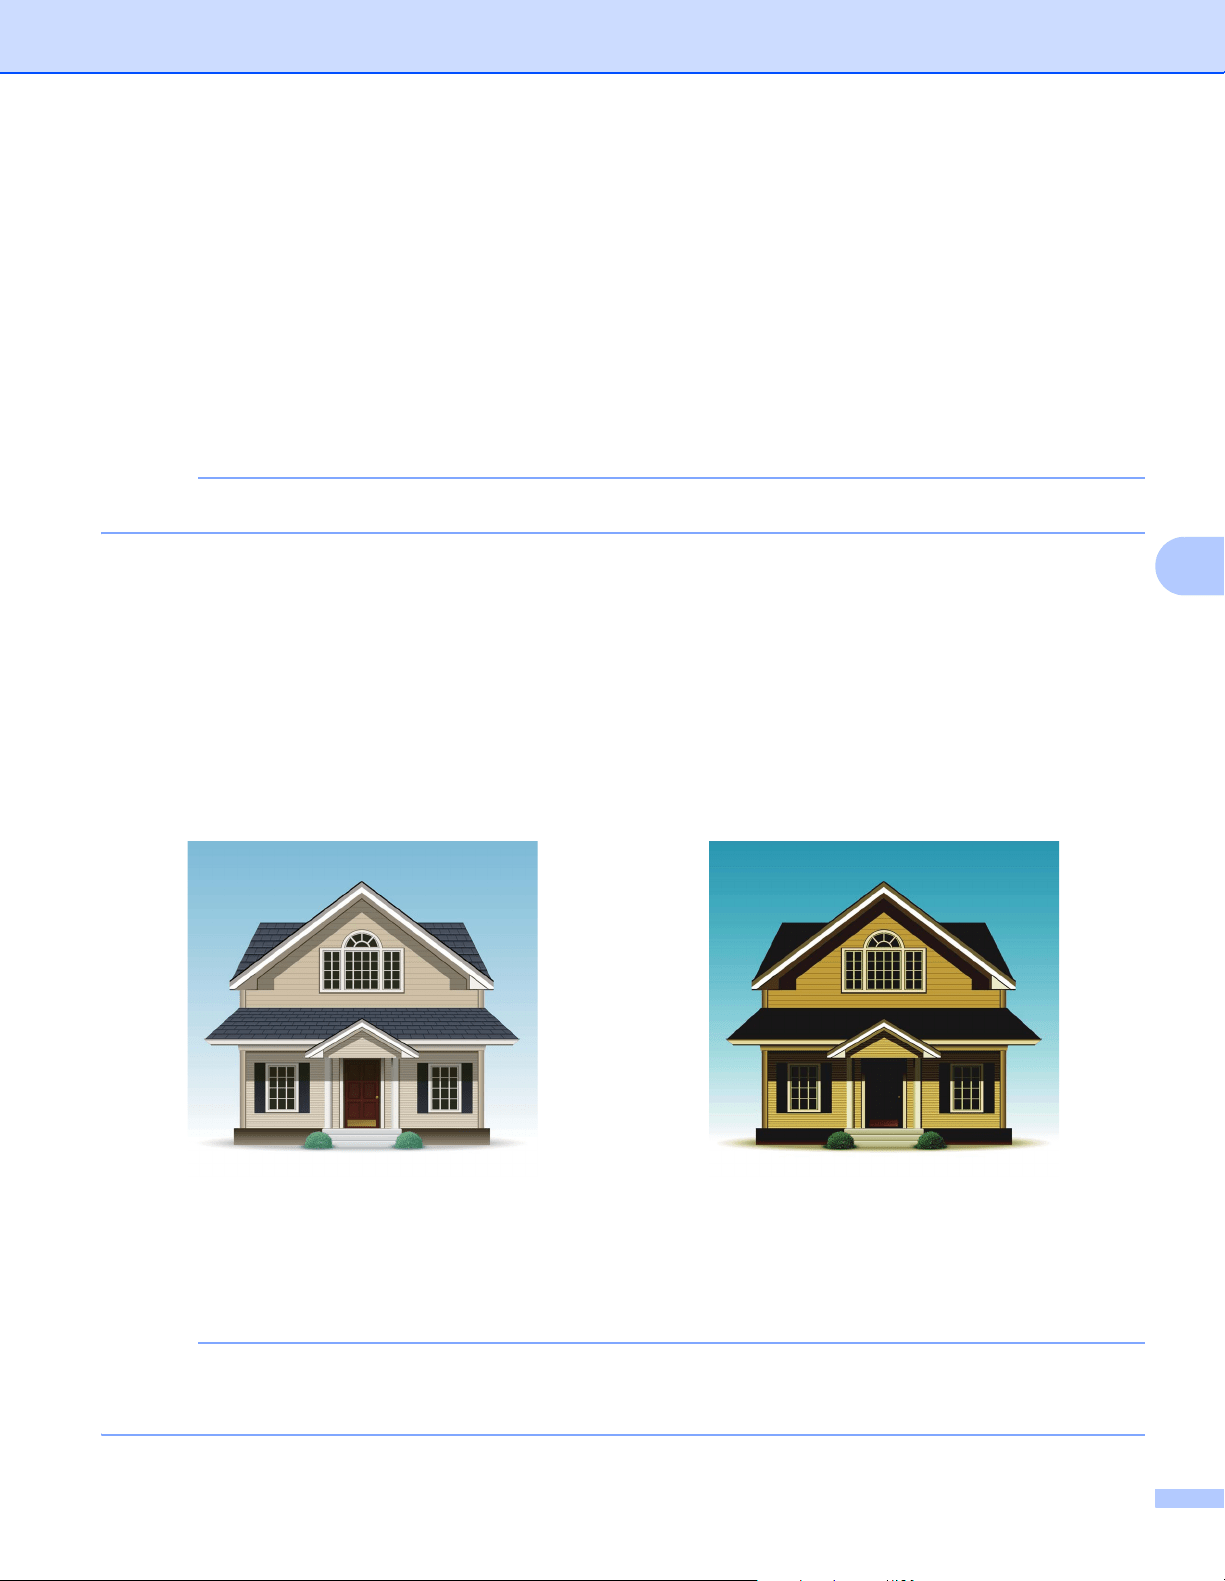
Scan Using Your Computer
115
6
Image Quality 6
1 Diffusion Adjustment-Gray
This function adjusts the brightness and contrast to create gray images.
Brightness
Larger values lighten the image.
Contrast
Larger values increase the contrast in the image. Excessively large values may result in a black and
white image.
NOTE
This function is available when the Gray (Error Diffusion) scan type is selected.
2 Color Tone Adjustment
Allows you to adjust the brightness, contrast, shadow, highlight, and gamma during gray and color
scanning.
The default setting is Custom.
Auto
Scans the document using the optimal settings based on its content.
Custom
Allows you to set the Brightness, Contrast, Shadow, Highlight and Gamma manually.
NOTE
• Shadow cannot be set to a larger value than Highlight.
• This function is available when the Auto, True Gray, or 24bit Color scan type is selected.
Original Brightness: 25
Contrast: 25
Shadow: 122
Highlight: 240
Gamma: 5.0

Scan Using Your Computer
116
6
3 Background Processing
Remove Bleed-through / Pattern
Enabling this function prevents the bleed through phenomenon on a two-sided document.
Remove Background Color
If you enable the Remove Background Color setting, the machine removes the base color of
documents such as newspapers to make the scanned data more recognizable.
Level
Adjusts the strength of the Remove Bleed-through / Pattern and Remove Background Color effects.
4 Color Drop
Removes specific colors from your scan data.
Select one of the following:
Chromatic color
Use to remove all colors except Black.
Red
Use to remove the Red color.
Green
Use to remove the Green color.
Blue
Use to remove the Blue color.
Custom
Select the color you want to remove.
5 Edge Emphasis
This feature allows you to make blurred images and document or magazine text appear more clearly for
improved readability. You can use the slider to adjust the strength of the Edge Emphasis effect.
NOTE
• This function is available when the Auto, True Gray, or 24bit Color scan type is selected.
• This function does not apply for the Long Paper document size.
B&W Image Quality 6
1 B&W Threshold Adjustment
This setting allows you to adjust the image quality when scanning in Black & White mode.
Larger values increase the amount of black in the scanned image, while smaller values increase the
amount of white.
NOTE
This function is available when the Black & White scan type is selected.

Scan Using Your Computer
117
6
2 Character Correction
Blurred Character Correction
When there is faint or broken text in the scanned image, this feature allows the machine to combine the
letters so that they are more readily detectable as text, combining not only text, but also black dots and
lines. If both Boldface Formatting and Blurred Character Correction are enabled, only the Boldface
Formatting function is performed.
NOTE
This function is available when the Black & White scan type is selected.
Boldface Formatting
This feature allows you to enlarge and thicken black areas of documents, making thin text thicker. It has
the effect of thickening not only text, but all dots and lines. If both Boldface Formatting and Blurred
Character Correction are enabled, only the Boldface Formatting function is performed.
NOTE
This function is available when the Black & White scan type is selected.
3 B&W Inversion
This feature allows you to create a black and white inverted version of the scanned image.
Normal Blurred Character Correction
Normal Boldface Formatting
abc2016
abc2016
abc2016
abc2016
abc2016
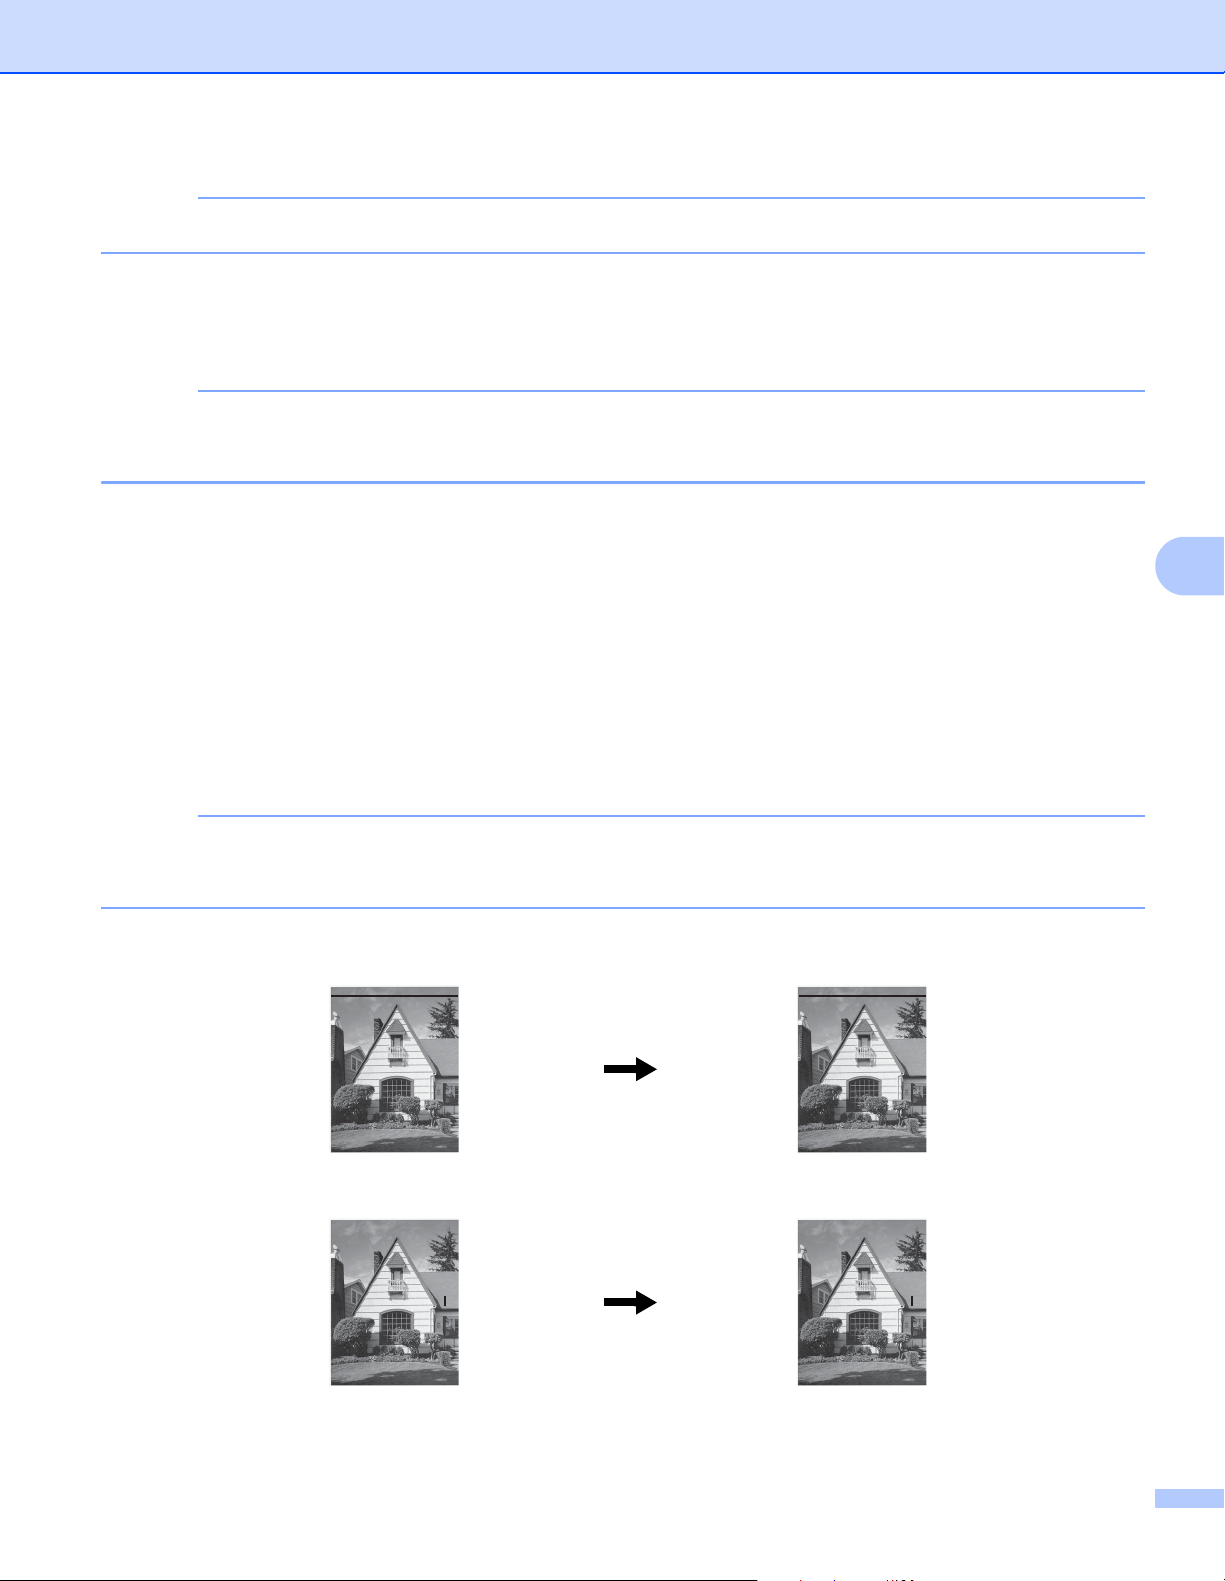
Scan Using Your Computer
118
6
NOTE
This function is available when the Black & White scan type is selected.
4 Noise Reduction
This feature allows you to remove small dots or specks called “noise”, from the background of scanned
images. Removing unwanted specks helps to reduce compressed file size.
NOTE
• This function is available when the Black & White scan type is selected.
• This function does not apply to the Long Paper document size.
5 Remove Ruled Line
This feature allows you to remove lines in the document. You can select the type of line direction to remove
(Vertical, Horizontal, Vertical and Horizontal). Angled lines are detected as lines and removed if they
are less than 9 mm from the centre of the document to the edge of the horizontal or vertical plane.
Minimum Line Length
Lines longer than or equal to the specified length are removed.
Maximum Clearance
If lines are broken, for example due to fading of the image, the lines that are broken for an interval less
than or equal to the specified broken line distance will be detected and removed.
NOTE
• This function is available when the Black & White scan type is selected.
• This function does not apply to the Long Paper document size.
When there is a horizontal line The horizontal line is not gone
When there is a vertical line shorter
than 2 cm
The vertical line is not gone
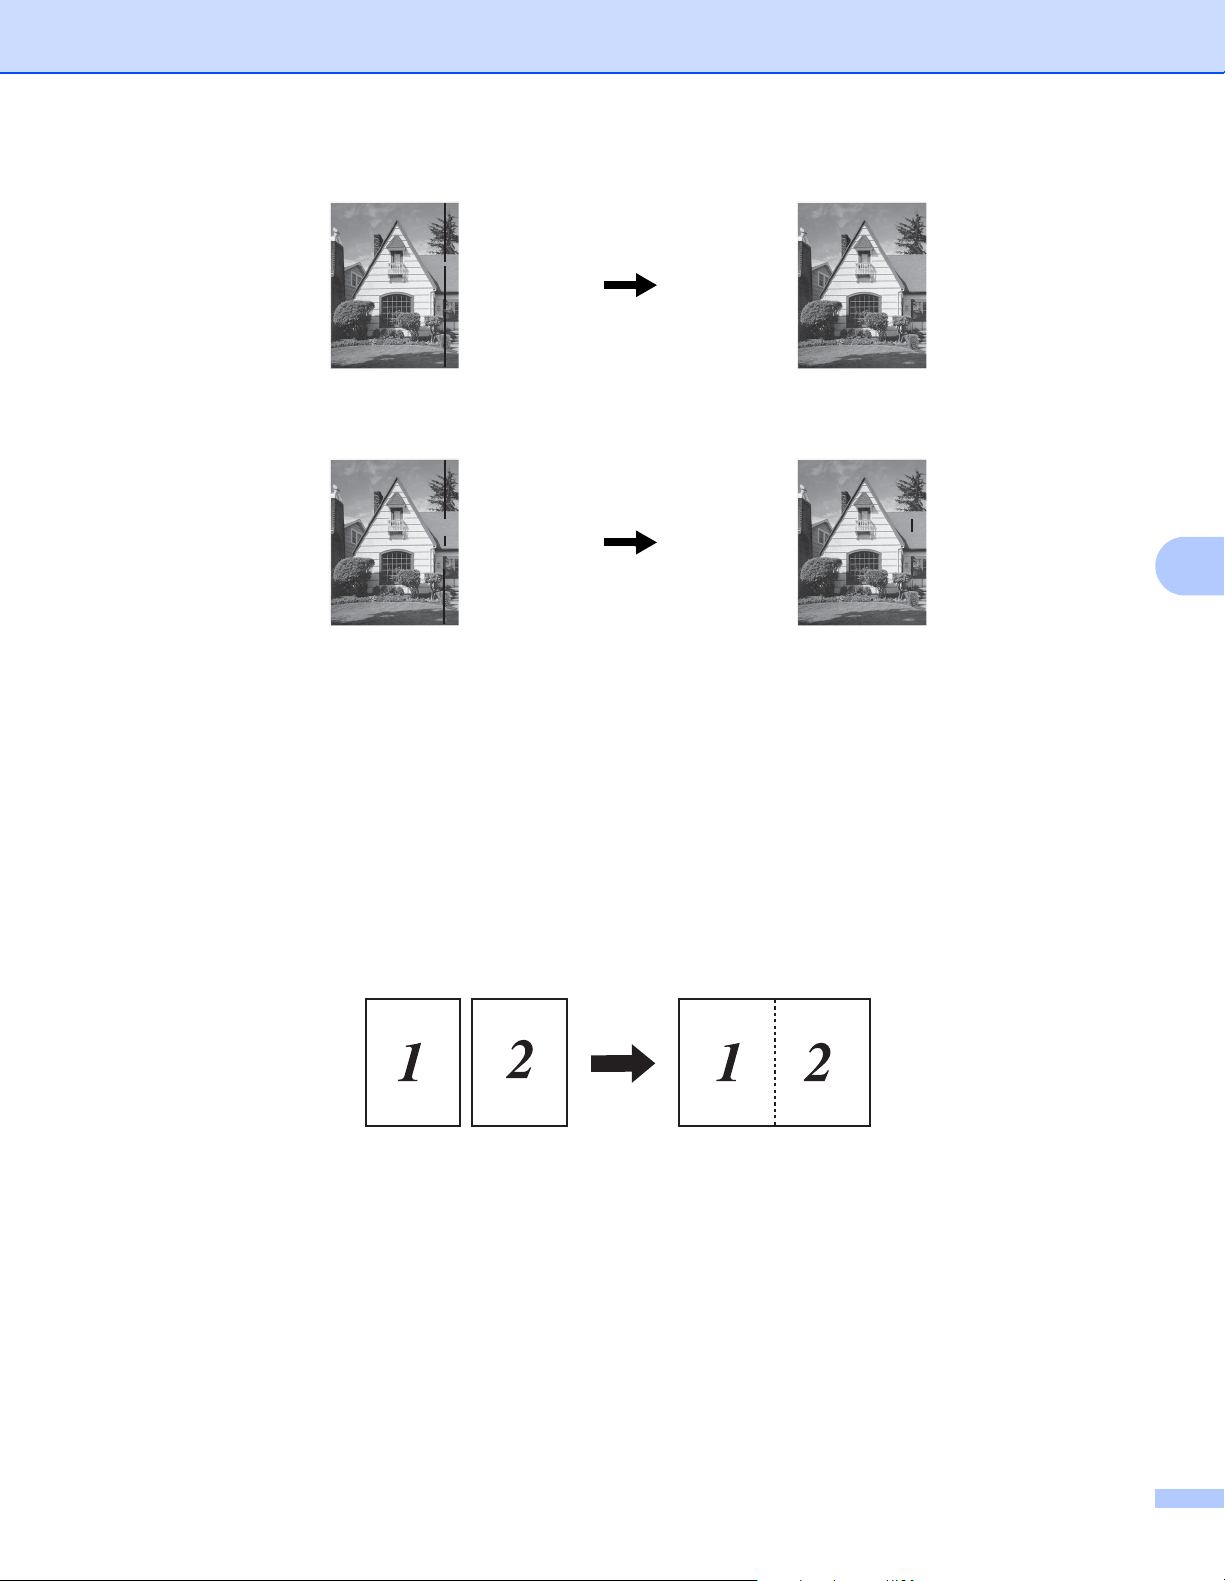
Scan Using Your Computer
119
6
Feed Control 6
1 Layout
Allows you to scan a two-page document combined into one page, or scan a one-page document divided
into two pages. Choose one of the following options:
2in1: Long edge
Combine a two-page document into a single page using landscape orientation.
When there is a break below 5 mm
between vertical lines longer than 2 cm
The vertical line is gone
When there is a 5 mm or more break
between a vertical line longer than 2 cm
and shorter than 2 cm
The vertical line shorter than 2 cm
is not gone

Scan Using Your Computer
120
6
2in1: Short edge
Combine a two-page document into a single page using portrait orientation.
1 to 2: Long edge
Divide a one-page document into two pages using portrait orientation.
1 to 2: Short edge
Divide a one-page document into two pages using landscape orientation.
2 Carrier Sheet Mode
Use the Carrier Sheet to scan the following document types:
Important documents (photos, contracts)
Thin paper (receipts)
Irregularly-shaped paper (clippings)

Scan Using Your Computer
121
6
NOTE
• For this mode, you can select any settings other than Auto and Long Paper document sizes.
• If you enable Multifeed Detection or Plastic Card Mode, you cannot enable Carrier Sheet Mode, Auto
Deskew or Detect End of Page.
3 Plastic Card Mode
Scan cards, such as driving licenses or insurance cards, using these automatic settings:
Resolution: 600 x 600 dpi
Document Size: 2 in 1 (Auto)
2-sided Scanning: On (Short-edge binding)
Auto Deskew: Off
Detect End of Page: Off
Auto Image Rotation: Off
Multifeed Detection: Off
Carrier Sheet Mode: Off
4 Single Page Scan
Single page scan feeds one page at a time from the ADF, regardless of the number of pages in the ADF.
5 Continuous Scan
This feature allows you to scan additional documents using the same settings when a scan has been
completed. It is useful when you are scanning more documents than the ADF can hold or when you are
scanning several documents at once.
6 Multifeed Detection
When your machine detects a multifeed, you must confirm that the data scanned so far has been saved,
and then start scanning again at the next page or the beginning of the document.
NOTE
• Disable this setting when scanning thick paper. Otherwise, it is more likely for the machine to detect a
multifeed.
• If you enable Carrier Sheet Mode or Plastic Card Mode, you cannot enable Multifeed Detection.
Additional Functions
Barcode Detection
The machine reads the barcode printed on the scanned image.
Specify the barcode type and detection area.
JPEG Compression
Changes the quality of the JPEG file to be saved.
NOTE
This function is available only in Disk File mode.
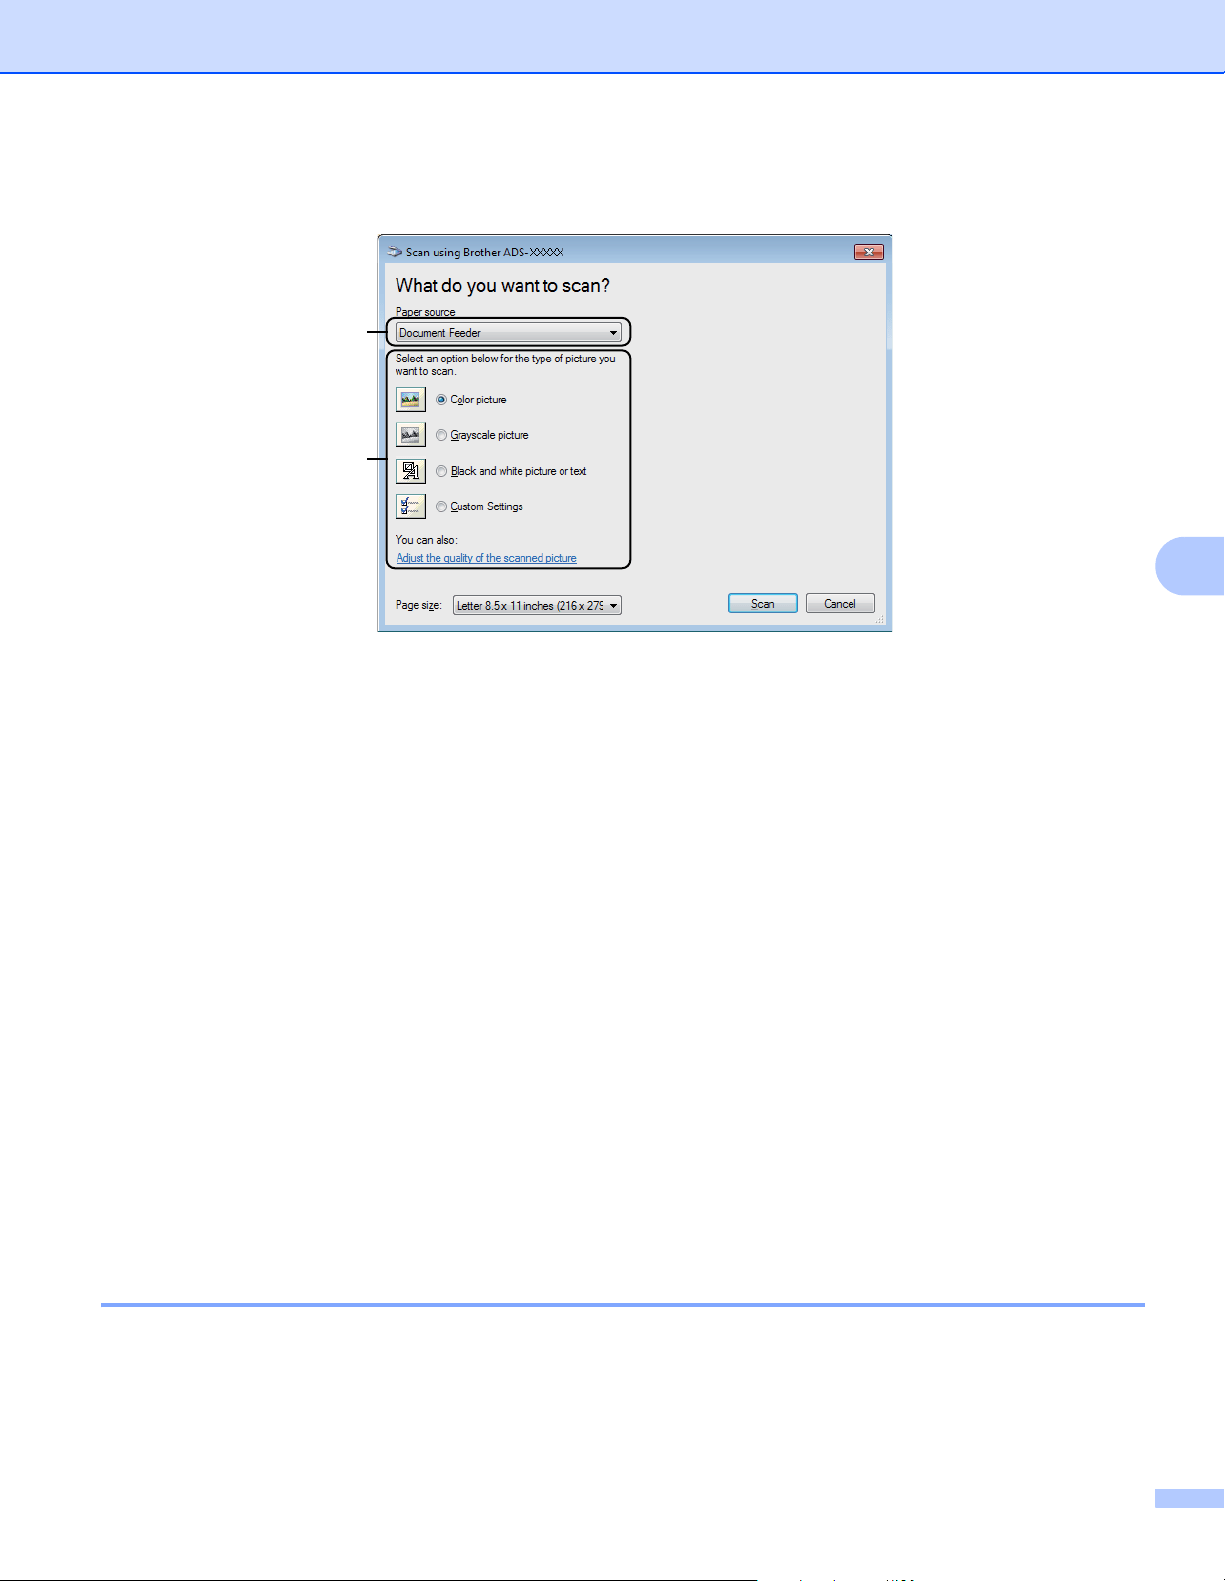
Scan Using Your Computer
122
6
WIA (Ver 1) Driver Settings 6
1 Paper source
You can select only Document Feeder.
2 Picture Type (Image Type)
Select Color picture, Grayscale picture, Black and white picture or text, or Custom Settings.
To change advanced settings, click Adjust the quality of the scanned picture.
Resolution
Select a scanning resolution from the Resolution text box. Higher resolutions take more memory and
transfer time, but produce a finer scanned image.
Brightness
Adjust the setting (-50 to 50) to get the best image. The default value of 0 represents an average and
is suitable for most images. Set the Brightness level by dragging the slider to the right or left to lighten
or darken the image. You can also enter a value in the box to set the level. If the scanned image is too
light, set a lower Brightness level and scan the document again. If the image is too dark, set a higher
Brightness level and scan the document again.
Contrast
Adjust the setting (-50 to 50) to get the best image. The default value of 0 represents an average and
is suitable for most images. Increase or decrease the contrast level by moving the slider to the right or
left. An increase emphasizes dark and light areas of the image, while a decrease reveals more details
in gray areas. You can also enter a value in the box to set the Contrast.
Scan Using Windows
®
Photo Gallery or Windows
®
Fax and Scan 6
You can use the Windows
®
Photo Gallery or Windows
®
Fax and Scan applications for scanning. These
applications use the WIA scanner driver. The steps below will guide you through the scanning operations.
You may have to download Windows
®
Photo Gallery or Windows
®
Fax and Scan.
1 Load your document.
1
2
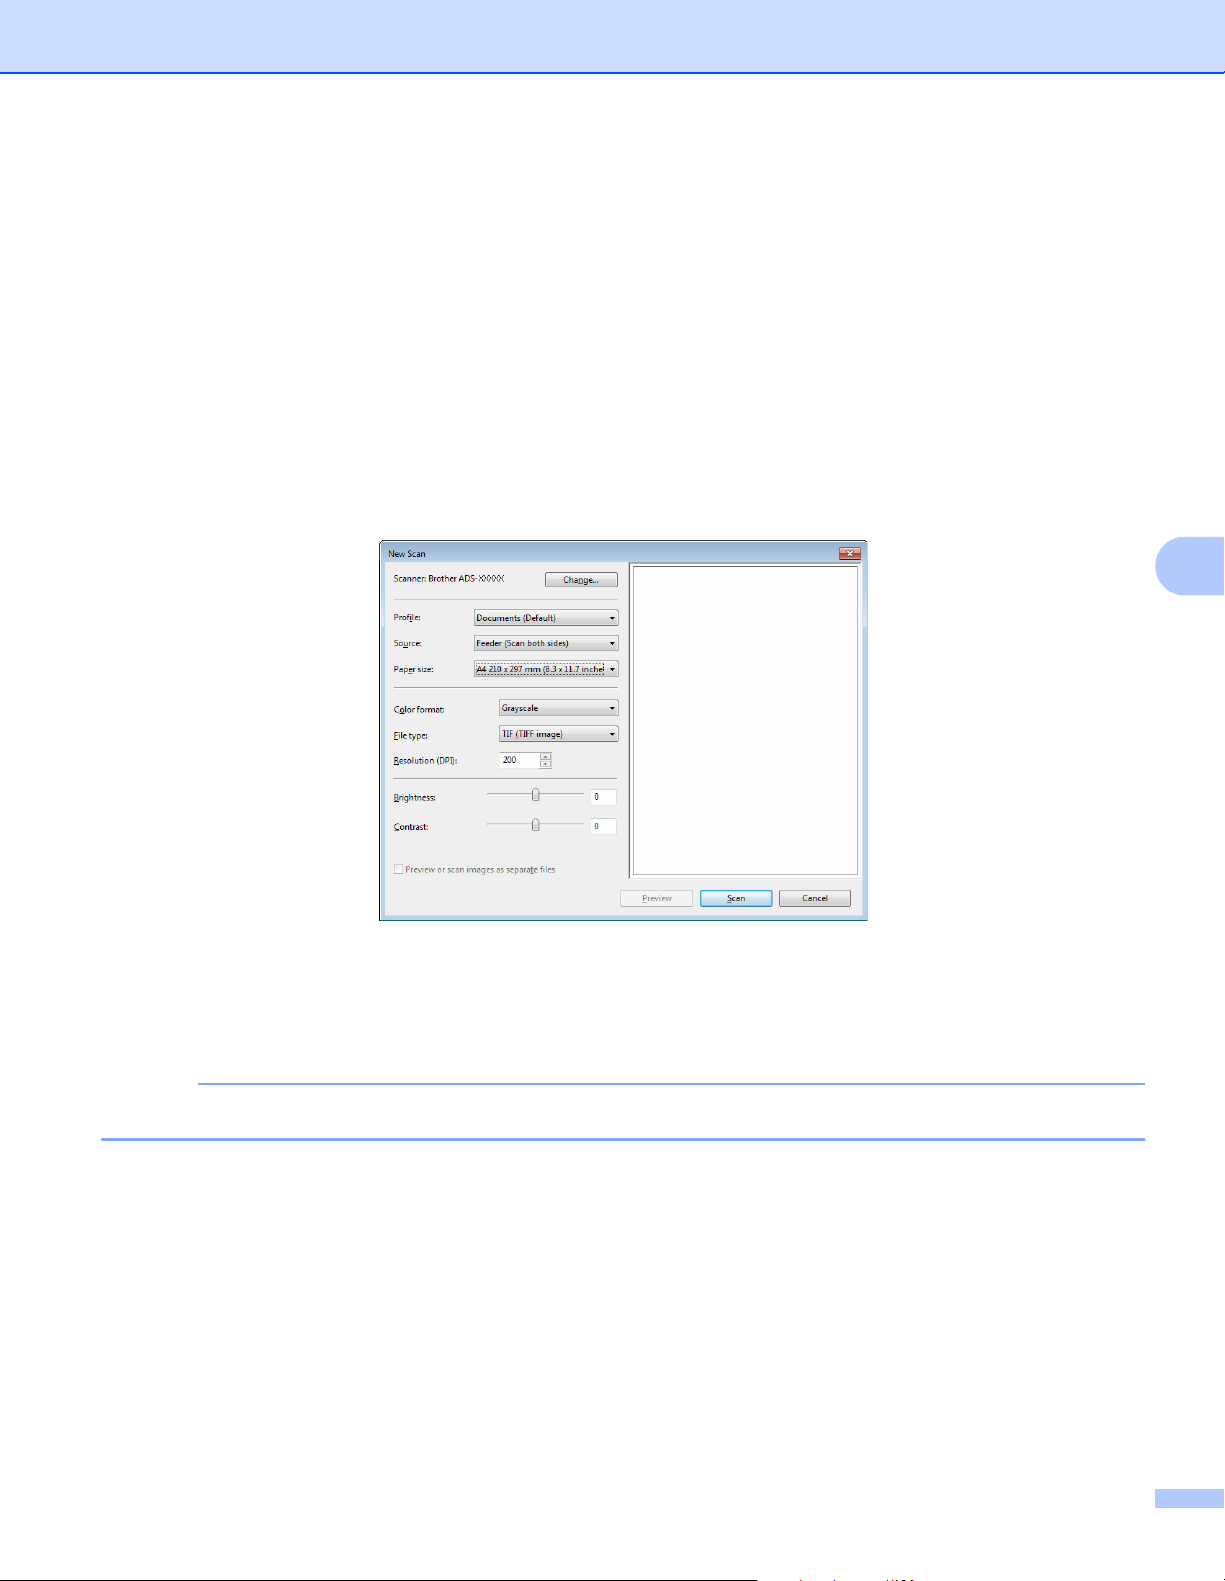
Scan Using Your Computer
123
6
2 Open your software application to scan the document. Do one of the following:
Windows
®
Photo Gallery
1 Click File > Import from Camera or Scanner.
2 Select the scanner you want to use.
3 Click the Import button.
The settings dialog box appears.
Windows
®
Fax and Scan
Click File > New > Scan.
The settings dialog box appears.
Profile
Profiles can be used to save settings, such as Page Size, Source, Format, and others.
3 Adjust the settings in the settings dialog box if needed.
NOTE
To save your settings, click the Profile drop-down arrow and select Add Profile.
4 Click the Scan button.
The machine starts scanning.
Use ABBYY FineReader 6
You can use the ABBYY FineReader application for scanning. It converts the scanned data to editable format
such as Microsoft
®
Word, Microsoft
®
Excel, Adobe
®
PDF, HTML and EPUB.
See the ABBYY FineReader Help menu for more information about using ABBYY FineReader.

Scan Using Your Computer
124
6
Scan Using TWAIN Applications (Macintosh) 6
The bundled applications cannot change TWAIN settings. However, you can use other applications such as
Presto! PageManager to configure TWAIN settings. The below instructions are for Presto! PageManager, but
are similar for other Macintosh applications.
Scan Using TWAIN Applications (for example, Presto! PageManager) 6
1 Start Presto! PageManager by double-clicking the Presto! PageManager icon on your computer screen.
NOTE
The first time you use the Brother TWAIN driver, set it as the default driver:
1 Click File > Select Source.
2 Select Brother TWAIN 2.
2 Click File > Acquire Image Data.
The scanner setup dialog box appears.
3 Adjust the settings in the scanner setup dialog box if needed.
4 From the Document Size pop-up menu, select your document size.
NOTE
After you select a document size, you can adjust the scanning area further by clicking the left mouse button
and dragging it. This is required when cropping an image for scanning.
5 Click the Start button.
The machine starts scanning.
(The Brother TWAIN screen supports languages specified in TWAIN-compliant application you use.)
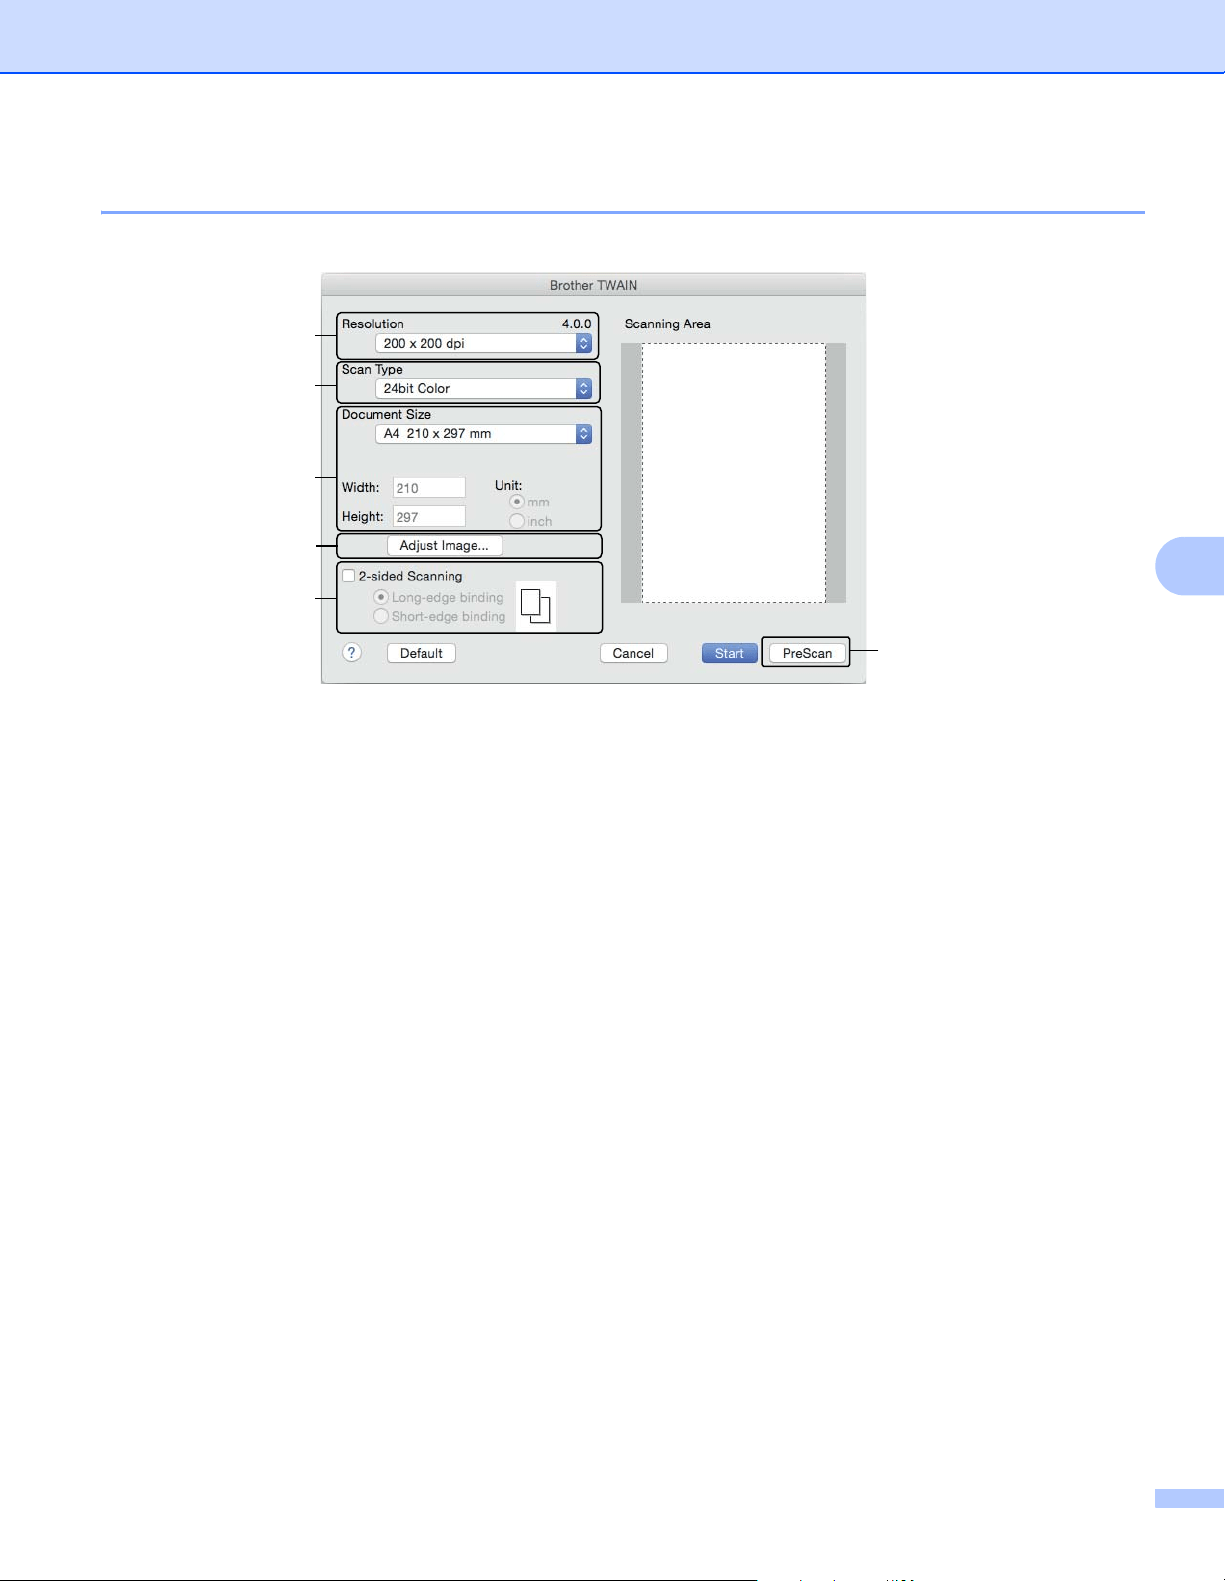
Scan Using Your Computer
125
6
TWAIN Driver Settings 6
1 Resolution
Select a scanning resolution from the Resolution pop-up menu. Higher resolutions take more memory
and transfer time, but produce a finer scanned image.
2 Scan Type
Select one of the following:
Black & White
Use for text or line art images.
Gray (Error Diffusion)
Use for photographic images or graphics. (Error Diffusion is a method for creating simulated grayscale
images without using true gray dots. Black dots are put in a specific pattern to give a gray appearance.)
True Gray
Use for photographic images or graphics. This mode is more exact due to using up to 256 shades of
gray.
24bit Color
Uses up to 16.8 million colors to scan the image. Although using 24bit Color creates an image with the
most accurate color reproduction, it requires the most memory and has the longest transfer time.
3 Document Size
Document size is set to Letter by default. If you select Custom, specify the document size.
4 Adjust Image
Click the Adjust Image button for adjusting the image.
(The Brother TWAIN screen supports languages specified in TWAIN-compliant application you use.)
1
2
5
4
3
6

Scan Using Your Computer
126
6
Brightness
Adjust the setting (-50 to 50) to get the best image. The default value of 0 represents an average and
is suitable for most images. Set the Brightness level by dragging the slider to the right or left to lighten
or darken the image. You can also enter a value in the box to set the level. If the scanned image is too
light, set a lower Brightness level and scan the document again. If the image is too dark, set a higher
Brightness level and scan the document again.
Contrast
Adjust the setting (-50 to 50) to get the best image. The default value of 0 represents an average and
is suitable for most images. Increase or decrease the contrast level by moving the slider to the right or
left. An increase emphasizes dark and light areas of the image, while a decrease reveals more details
in gray areas. You can also enter a value in the box to set the Contrast.
NOTE
The Contrast setting is only available when setting Scan Type to Gray (Error Diffusion), True Gray or
24bit Color.
Reduce Noise
You can improve and enhance the quality of your scanned images with this selection. The Reduce
Noise setting is available when using 24bit Color and scan resolutions of 300
× 300 dpi, 400 × 400 dpi
or 600
× 600 dpi.
5 2-sided Scanning
Select Long-edge binding or Short-edge binding depending on the layout of your original to make sure
that the data file created appears correctly in the scanned document.
2-sided Scan Setting Original Layout Scan Result
Long-edge binding
Short-edge binding

Scan Using Your Computer
127
6
6PreScan
Click PreScan to preview your image and crop unwanted portions before scanning.
Cropping is available when 2-sided scanning setting is Off.
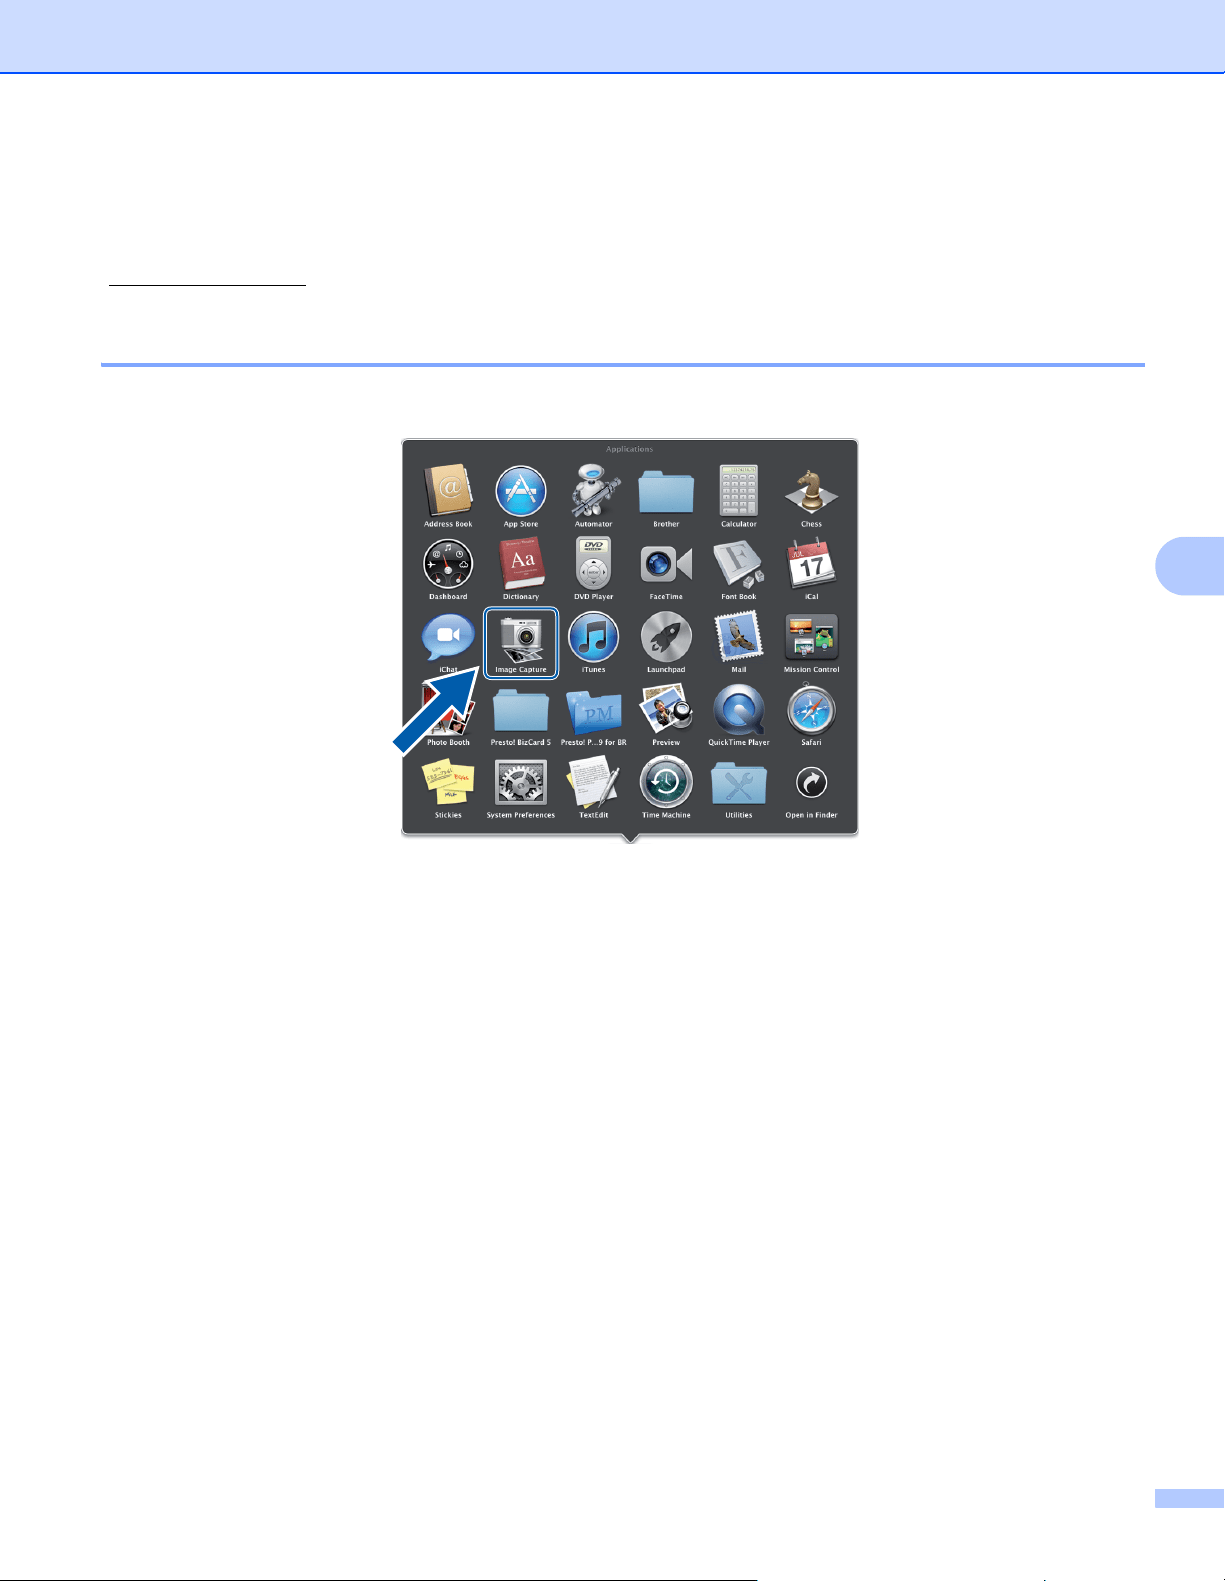
Scan Using Your Computer
128
6
Scan Using Apple Image Capture (ICA Driver) 6
You can scan a document using the ICA driver. Install the ICA driver from the Brother Solutions Center
(support.brother.com
). You can also scan directly using the Image Capture application.
Scan Using Apple Image Capture 6
1 Launch the Image Capture application.
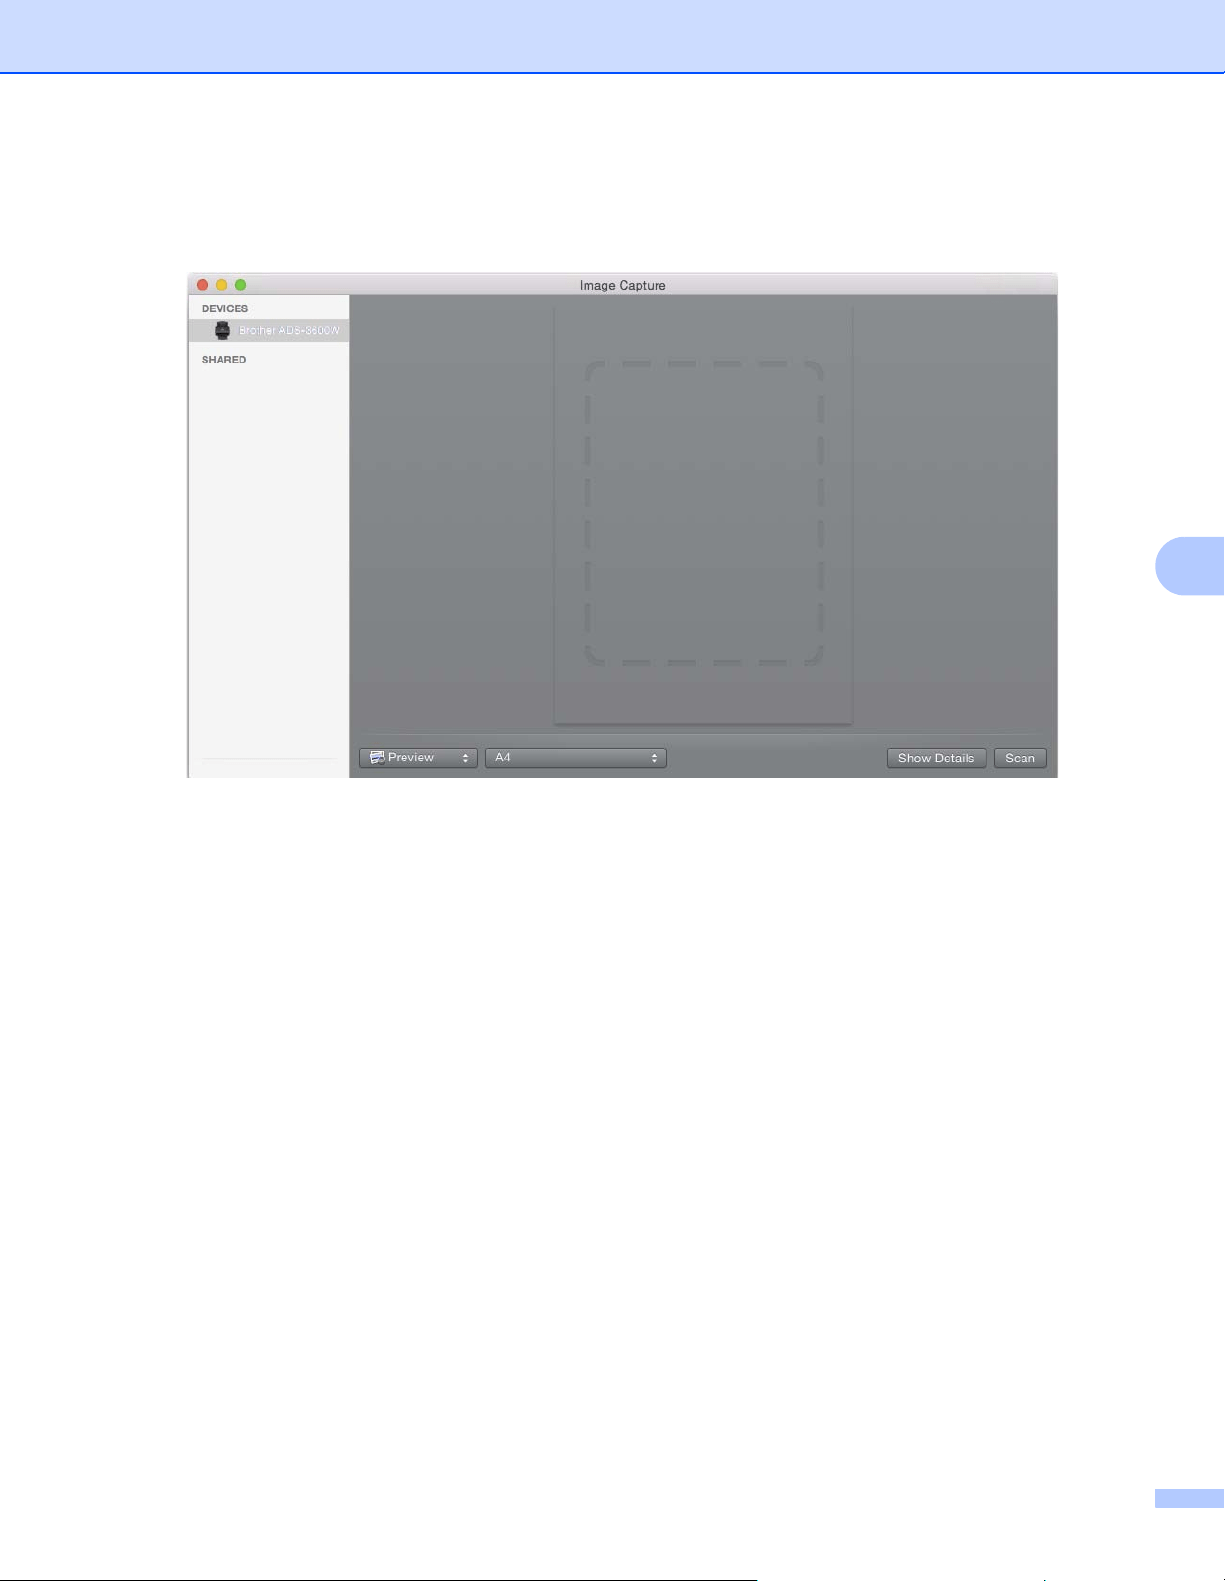
Scan Using Your Computer
129
6
2 Select the machine from the list on the left side of the window.
You will see the machine in the DEVICES area. If connected via wireless (ADS-2800W / ADS-3600W)
or Ethernet LAN, you will see it in the SHARED area.
3 Load your document.
4 Select a size of your document for scan size.
5 Select the destination folder or destination application for scan to.
6 Click the Scan button.
The machine starts scanning.

Scan Using Your Computer
130
6
ICA Driver Settings 6
Click the Show Details button to adjust the following settings, if needed. Note that the item name and
assignable value will vary depending on the machine.
1Kind
Select from Color, Black & White or Text.
2 Resolution
Select the resolution you want to scan your document at.
3ScanSize or Size
Select the paper size of the document.
4 Orientation
Select the orientation of the document.
5Duplex
Select the Duplex check box to do 2-sided (duplex) scanning.
6ScanTo
Select the destination folder or destination application.
7Name
Enter the prefix text used for the name of the scanned image.
8 Format
Select the file format of the scanned data.
ADS-XXXXX
ADS-XXXXX
1
2
3
4
5
6
7
8
9
10

Scan Using Your Computer
131
6
9 Combine into single document
Check this box to scan a document as one item and save it as one file when selecting PDF or TIFF for the
file format.
10 Image Correction
You can configure settings depending on the Kind that you have chosen.
Kind Configurable Settings
Color Brightness, Tint, Temperature, Saturation
Black & White Brightness, Contrast
Text Threshold
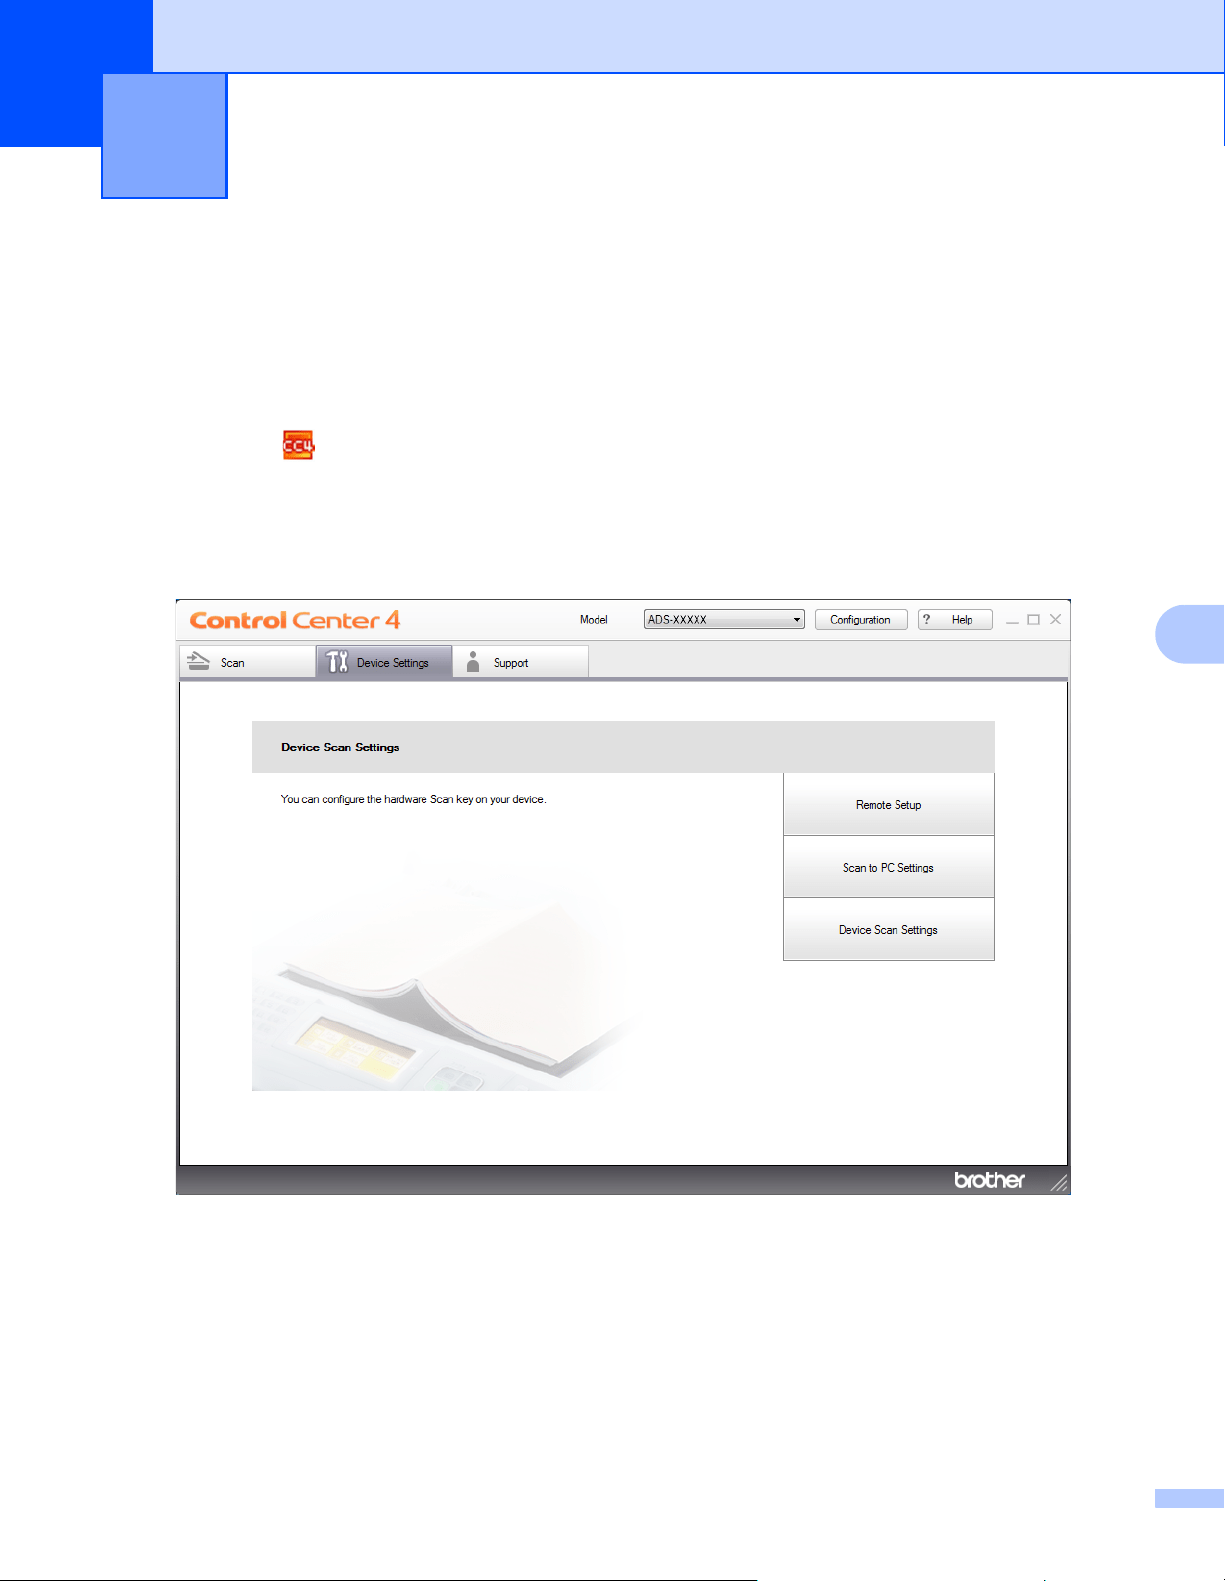
132
7
7
Save Scanned Documents on Your Computer in Home Mode 7
For ADS-2400N and ADS-3000N only
1 Start the application.
Windows
®
a Click the (ControlCenter4) icon in the task tray and then select Open from the menu.
The ControlCenter4 window appears.
b Click the Device Settings tab (the example below uses Home Mode).
c Click the Remote Setup button.
Scan Using the Control Panel 7
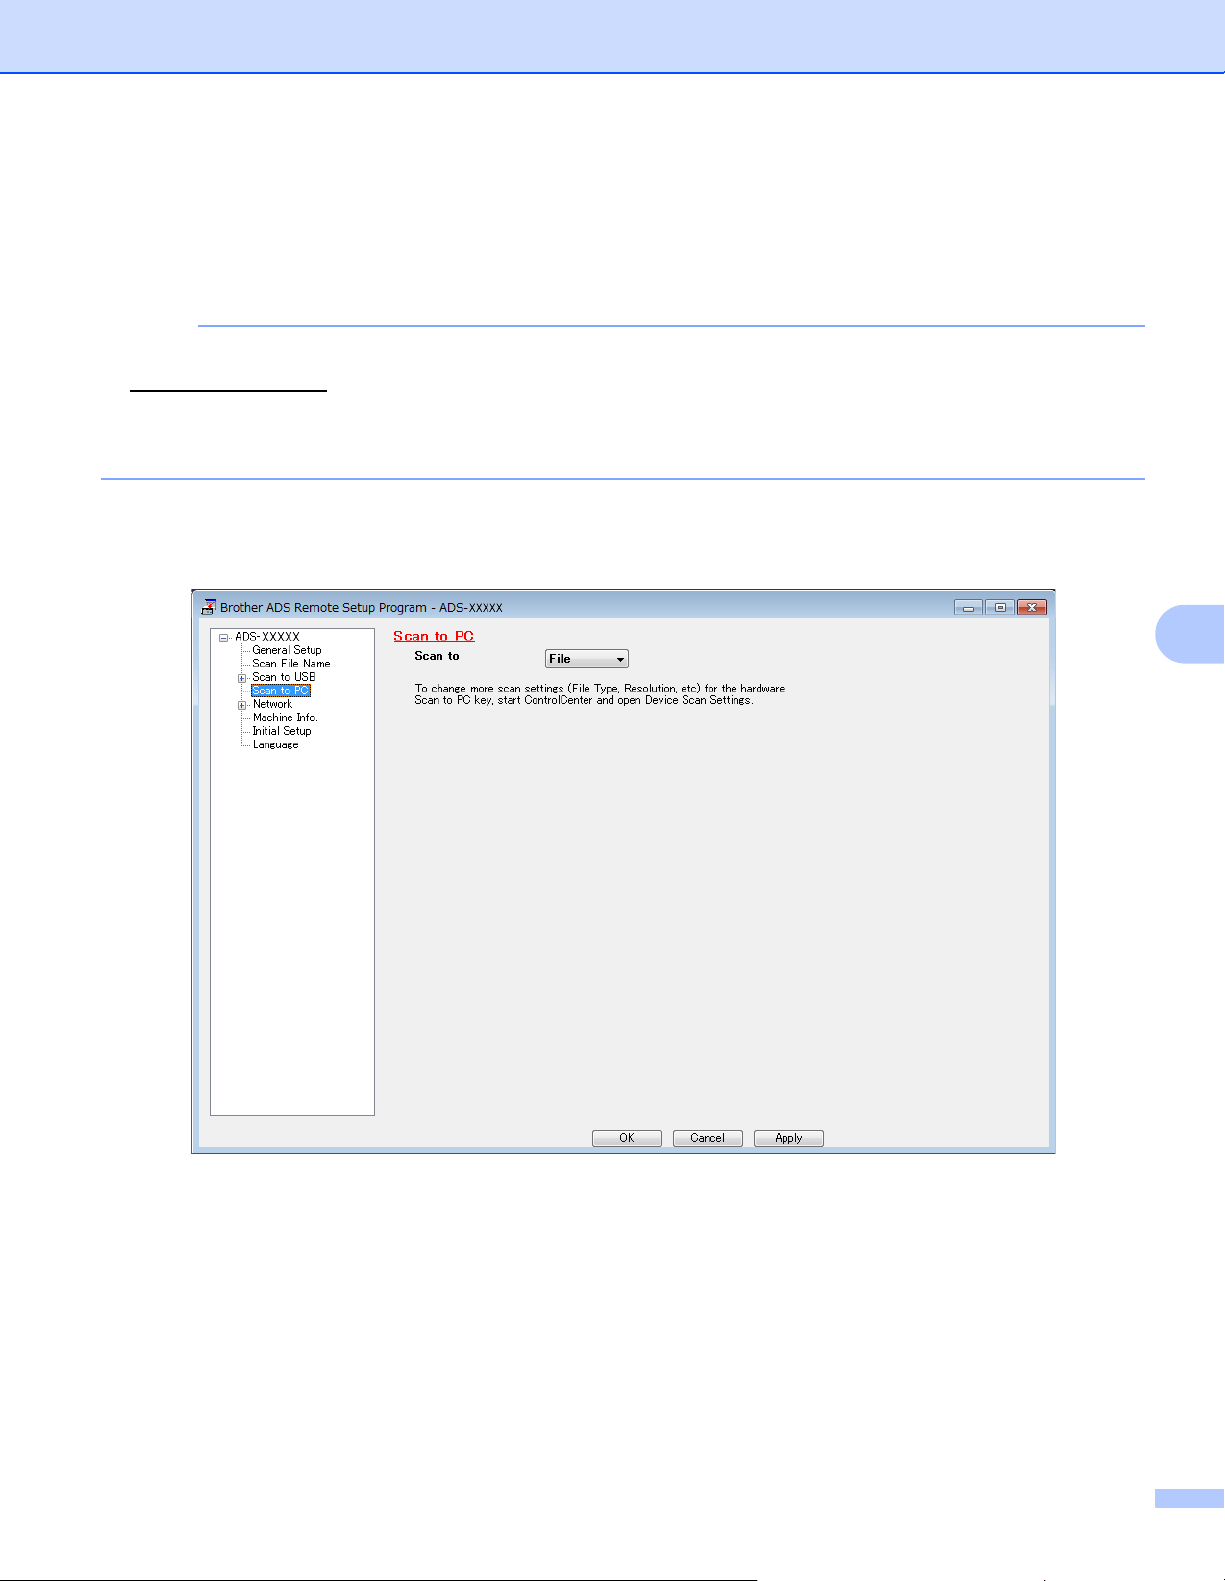
Scan Using the Control Panel
133
7
Macintosh
a In the Finder menu bar, click Go > Applications > Brother.
b Double-click the Remote Setup icon.
NOTE
• To use Remote Setup, go to your model's Downloads page on the Brother Solutions Center at
support.brother.com
and download Remote Setup from Utilities.
• Remote Setup for Mac supports USB connections only.
• Remote Setup for Mac supports macOS 10.13 or earlier.
2 Click the Remote Setup button. The Remote Setup window appears.
Windows
®
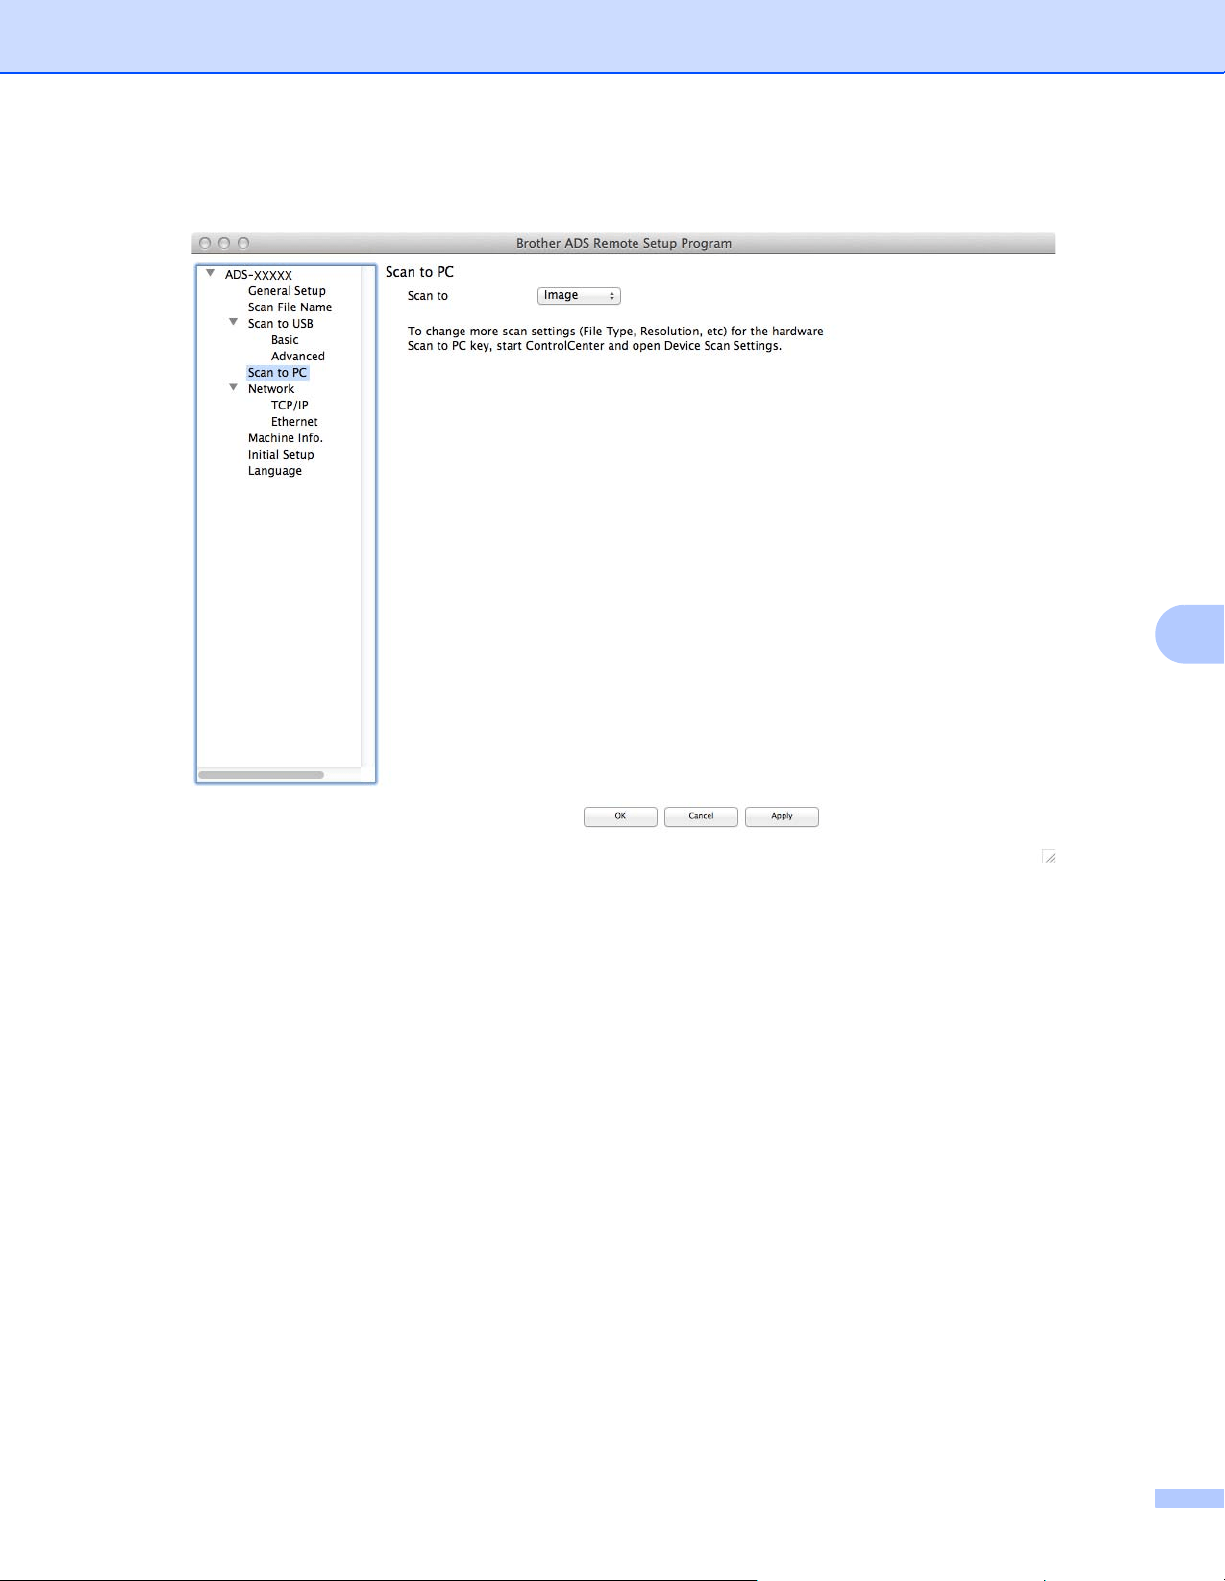
Scan Using the Control Panel
134
7
Macintosh
3 Select a Scan-to action you want to assign (Image, OCR, E-mail, or File) from the drop-down list or
pop-up menu.
4 Click OK to close the Remote Setup window.
5 Change other settings if needed (see Change Scan to PC Settings (Windows
®
) on page 190).
6 Load your document.
7 Press Scan to PC. The machine scans the document.

Scan Using the Control Panel
135
7
Save Scanned Documents on Your Computer in
Advanced Mode 7
For ADS-2400N and ADS-3000N only
1 Start the application.
Windows
®
a Click the (ControlCenter4) icon in the task tray and then select Open from the menu.
The ControlCenter4 window appears.
b Click the tab (the example below uses Advanced Mode).
c Click the Remote Setup button.
Macintosh
a In the Finder menu bar, click Go > Applications > Brother.
b Double-click the Remote Setup icon.
NOTE
• To use Remote Setup, go to your model's Downloads page on the Brother Solutions Center at
support.brother.com
and download Remote Setup from Utilities.
• Remote Setup for Mac supports USB connections only.
• Remote Setup for Mac supports macOS 10.13 or earlier.

Scan Using the Control Panel
136
7
2 The Remote Setup window appears (the example below uses Windows
®
).
3 Select a Scan-to action you want to assign (Image, OCR, E-mail, or File) from the drop-down list or
pop-up menu.
4 Click OK to close the Remote Setup window.
5 Change other settings if needed (see Change Scan to PC Settings (Windows
®
) on page 190).
6 Load your document.
7 Press Scan to PC. The machine scans the document.

Scan Using the Control Panel
137
7
For ADS-2800W and ADS-3600W only
1 Load your document.
2 Swipe left or right.
3 Press to PC.
4 Swipe left or right to display the Scan-to action you want (to OCR, to File, to Image or to E-mail).
5 Press the Scan-to action you want.
6 If multiple computers are connected to the machine, press a or b to display the destination computer you
want.
Press the destination computer.
7 Press Options.
8 Configure the following settings as needed. To configure more detailed settings, press Advanced
Settings. For more information see page 198. Press OK.
Scan Settings
2-sided Scan
Scan Type
Resolution
File Type
Document Size
Auto Deskew
Skip Blank Page
Advanced Settings
9 Press Start.
The machine starts the scanning process.
NOTE
• You can configure the Scan-to settings from your computer. See Change Scan to PC Settings (Windows
®
)
on page 190.
• To save the settings as a shortcut, press Save as Shortcut. For more information, see Adding Scan
Shortcuts on page 12.
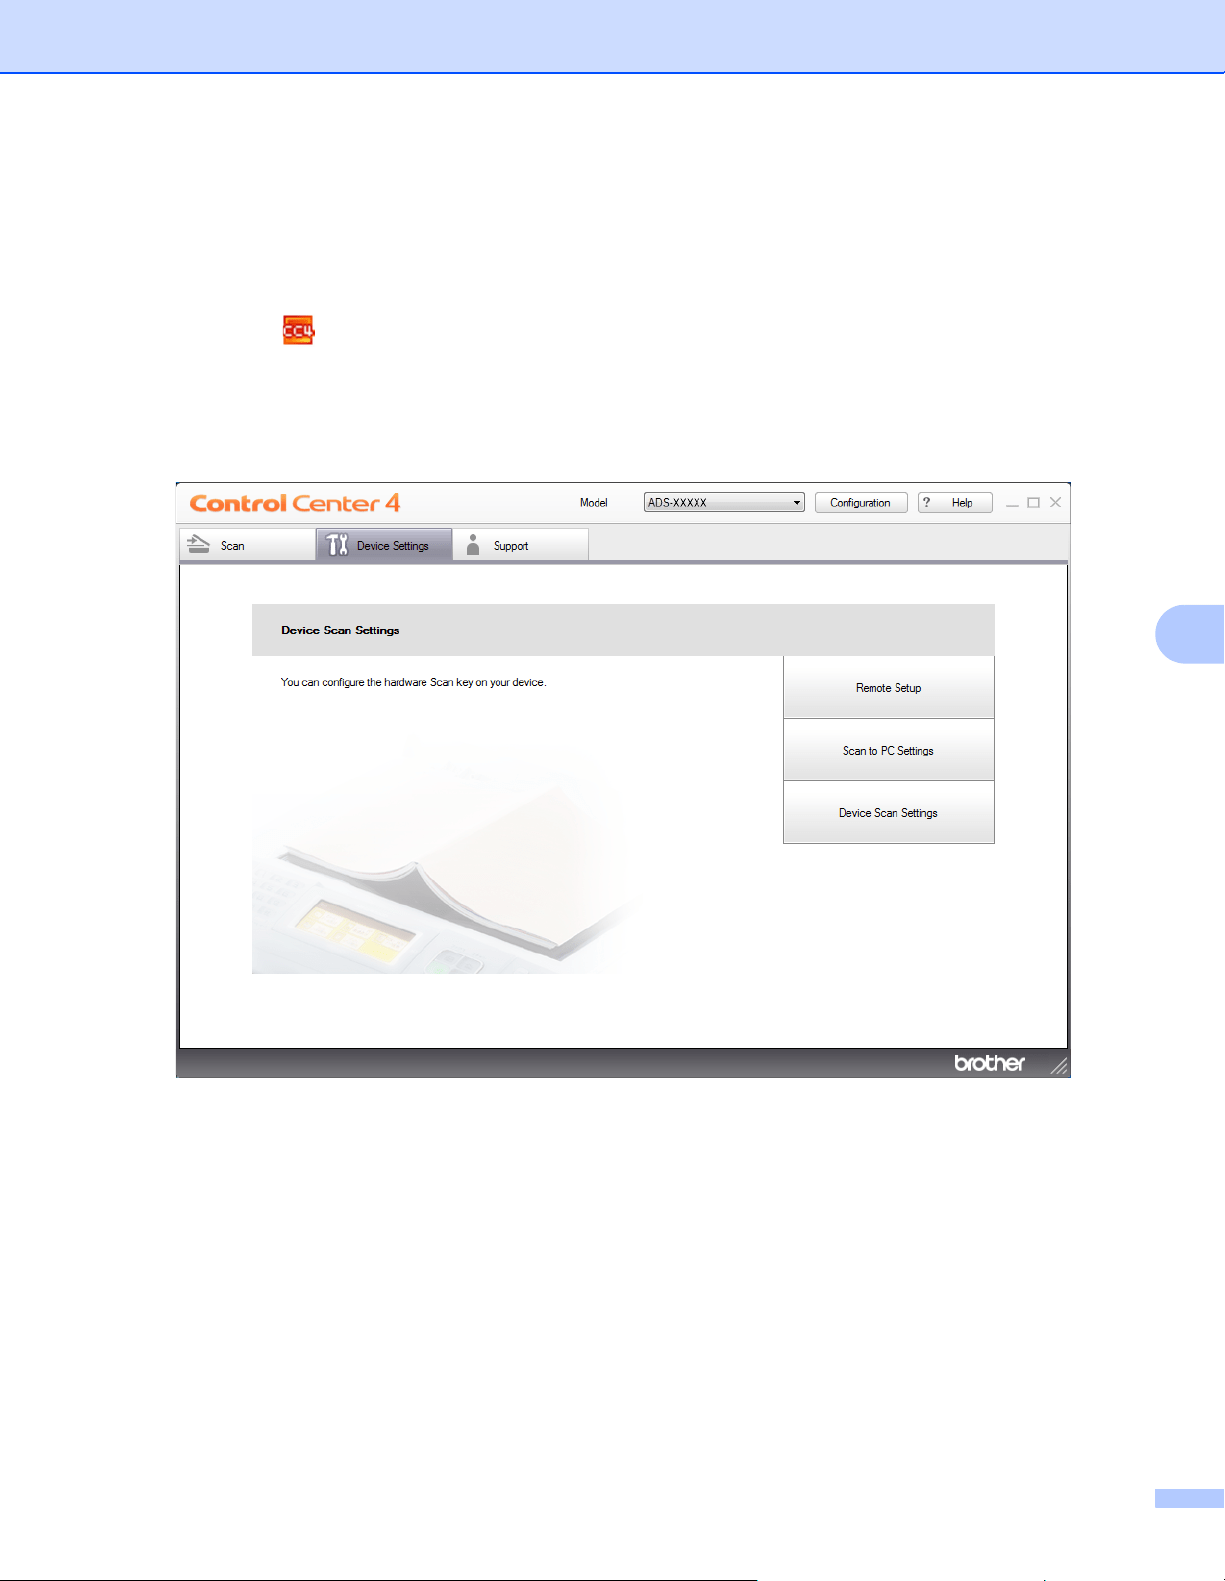
Scan Using the Control Panel
138
7
Save Scanned Documents on a USB Flash Drive 7
1 Start the application.
Windows
®
a Click the (ControlCenter4) icon in the task tray and then select Open from the menu.
The ControlCenter4 window appears.
b Click the Device Settings tab (the example below uses Home Mode).
c Click the Remote Setup button.
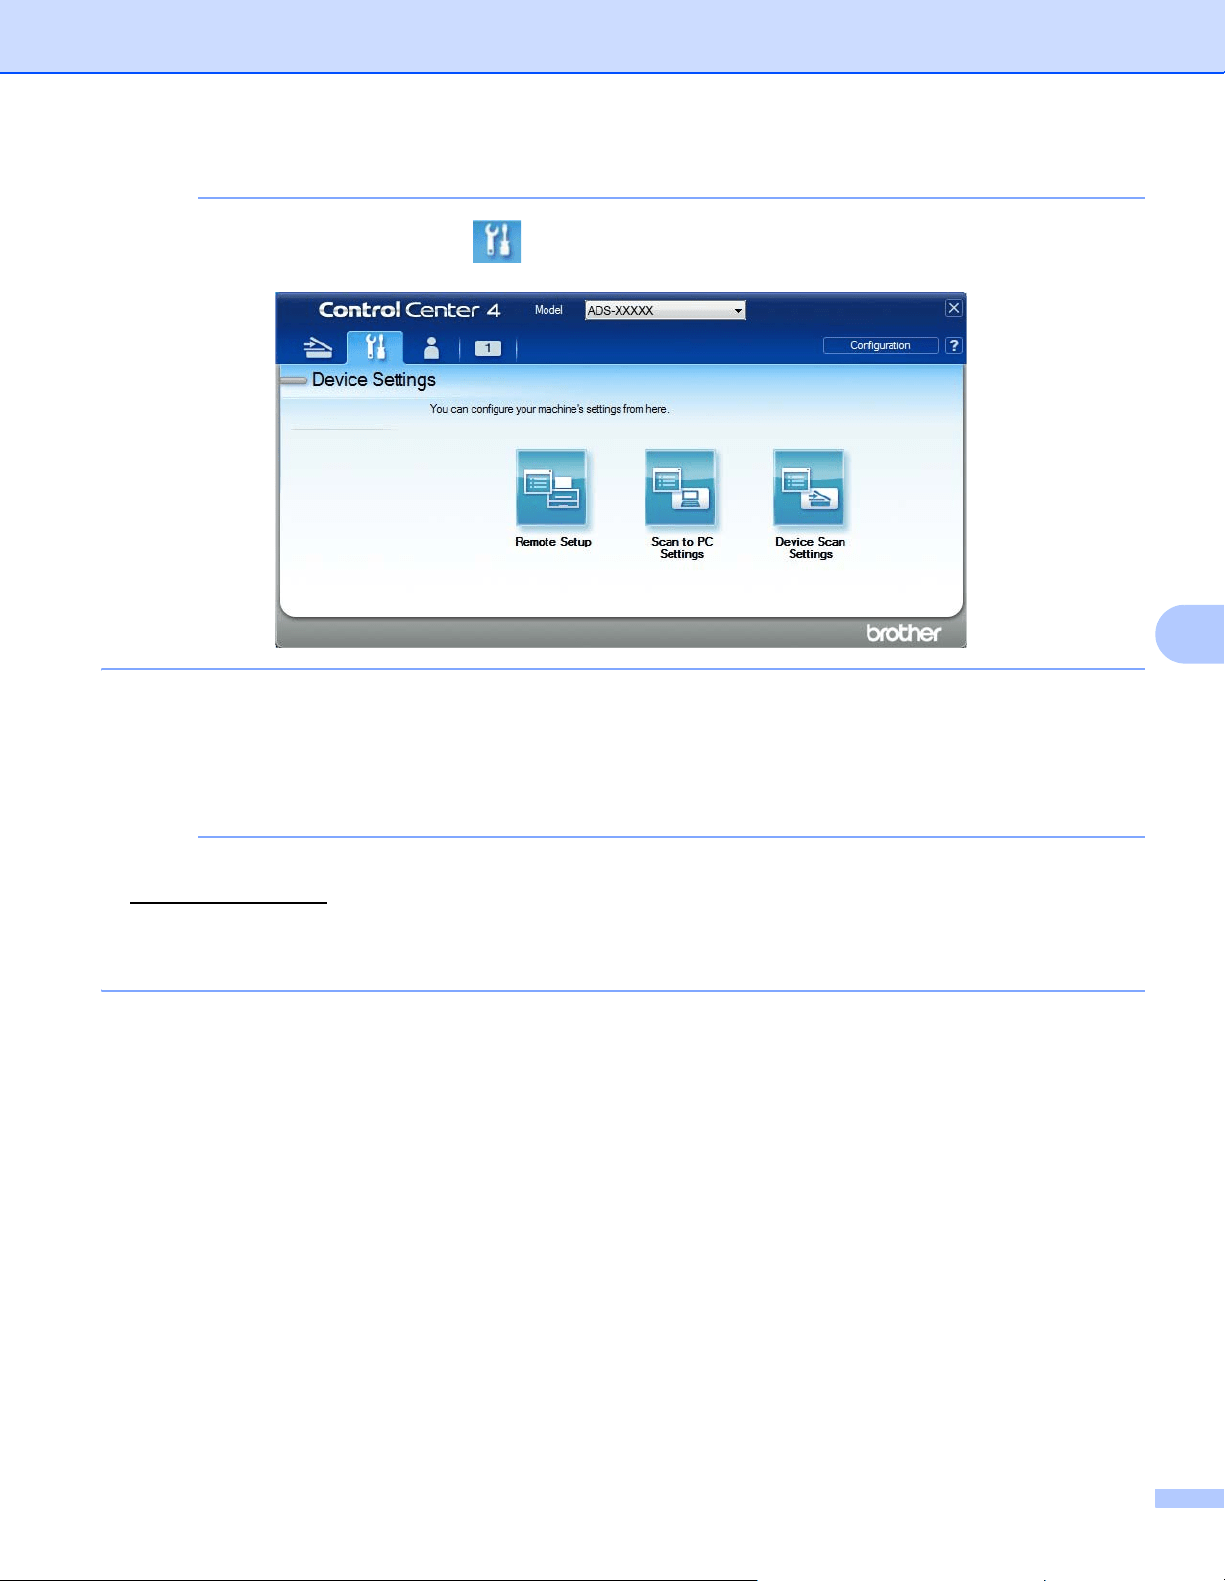
Scan Using the Control Panel
139
7
NOTE
If using Advanced Mode, click the (Settings) icon to access Device Settings.
Macintosh
a In the Finder menu bar, click Go > Applications > Brother.
b Double-click the Remote Setup icon.
NOTE
• To use Remote Setup, go to your model's Downloads page on the Brother Solutions Center at
support.brother.com
and download Remote Setup from Utilities.
• Remote Setup for Mac supports USB connections only.
• Remote Setup for Mac supports macOS 10.13 or earlier.
2 The Remote Setup window appears.
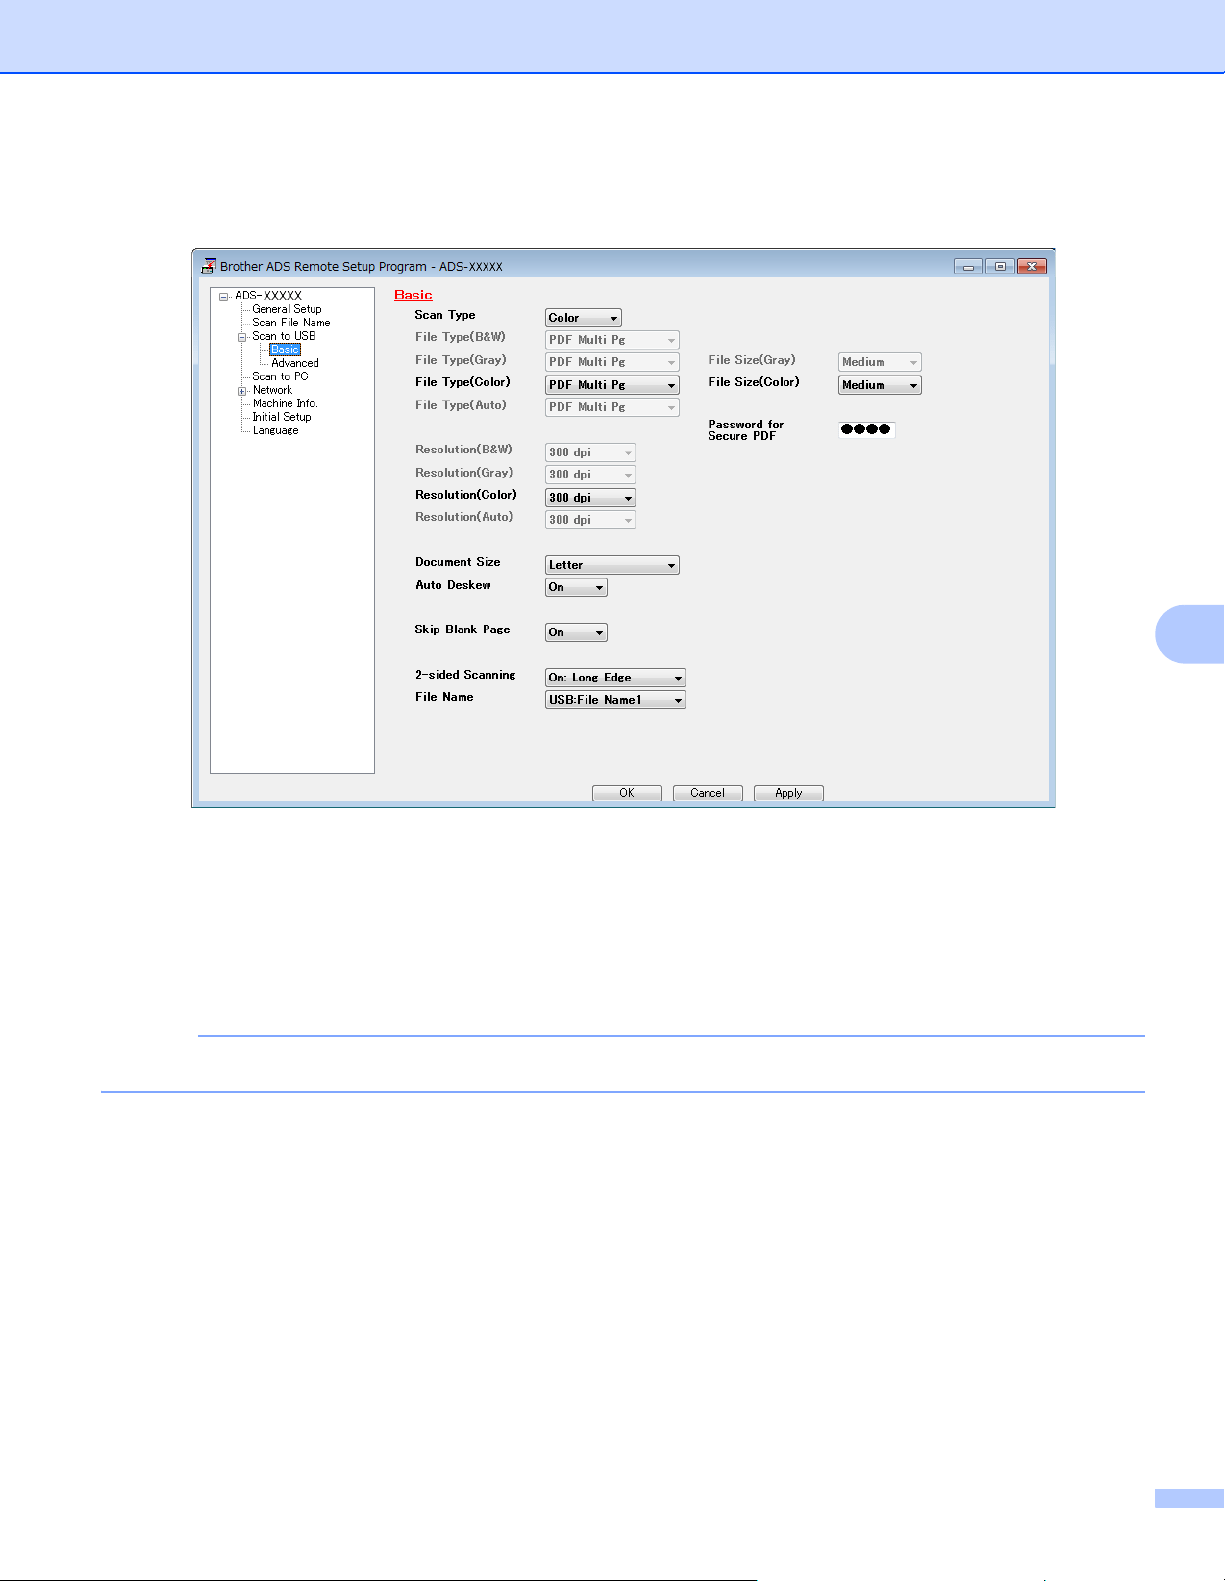
Scan Using the Control Panel
140
7
3 Select Scan to USB in the left navigation pane and then configure scan settings as needed (the example
below uses Windows
®
).
4 Click Apply and then OK.
5 Insert a USB flash drive into the machine.
6 Load your document.
7 Press Scan to USB on the control panel. The machine starts scanning.
NOTE
The file name will be the current date plus a two-digit sequential number.

Scan Using the Control Panel
141
7
For ADS-2800W and ADS-3600W only
1 Insert a USB flash drive into your machine.
2 Load your document.
3 Swipe left or right.
4 Press to USB.
5 Press Options.
6 Configure the following settings as needed. To configure more detailed settings, press Advanced
Settings. For more information see page 198. Press OK.
2-sided Scan
Scan Type
Resolution
File Type
Document Size
File Name
File Name Style
File Size
Auto Deskew
Skip Blank Page
Document Separation
Advanced Settings
NOTE
• To select Long Paper for Document Size, use the following settings:
Scan Type: Color or Black & White
• To save the settings as a new default, press Set New Default.
• To restore all settings to the factory settings, press Factory Reset.
7 Press Start.
The machine scans the data and saves it on the USB flash drive.
NOTE
To save the settings as a shortcut, press Save as Shortcut. For more information, see Adding Scan
Shortcuts on page 12.
IMPORTANT
DO NOT remove the USB flash drive while the machine is scanning to it, or you could damage the drive
or the data stored on it.

Scan Using the Control Panel
142
7
Scan Documents to an FTP Server 7
When you choose Scan to FTP, you can scan a black and white or color document directly to an FTP server
on your local network, or on the Internet.
The details required to use Scan to FTP can be entered by using Web Based Management to pre-configure
and store the details in an FTP Profile.
NOTE
• Scan to FTP is available when FTP profiles are configured by using Web Based Management.
• We recommend Microsoft
®
Internet Explorer
®
8/10/11 for Windows
®
and Safari 8.0 for Macintosh. Also
make sure that JavaScript and Cookies are always enabled in whichever browser you use. If a different
web browser is used, make sure it is compatible with HTTP 1.0 and HTTP 1.1.
Start Web Based Management 7
NOTE
For ADS-2800W and ADS-3600W only: To use Web Based Management, you must set up the machine
using the wireless network method with the installation disc (see the Quick Setup Guide).
For ADS-2400N and ADS-3000N only
1 Start the application.
Windows
®
a Click the (ControlCenter4) icon in the task tray and then select Open from the menu.
The ControlCenter4 window appears.
b Click the Device Settings tab (the example below uses Home Mode).

Scan Using the Control Panel
143
7
c Click the Scan to Net Settings button.
NOTE
If using Advanced Mode, click the (Settings) icon to access Device Settings.

Scan Using the Control Panel
144
7
Macintosh
a Confirm that your Brother machine is connected to the same network as your computer or mobile
device.
b Start your web browser.
c Type "http://machine's IP address" in your browser's address bar (where "machine's IP address" is
the machine's IP address).
For example: http://192.168.1.2
NOTE
• You can see your machine’s IP address in the Network menu on the control panel of your machine.
• If you have set a login password for Web Based Management, type your password in the Login box, then
click .
2 The Web Based Management window appears.
For ADS-2800W and ADS-3600W only
1 Start your web browser.
2 In your browser’s address bar, type your machine’s IP address (or your print server name). For example:
http://192.168.1.2. You can use the machine’s LCD to find its IP address. No password is required by
default.
3 If you have previously set a password, type it, and then press .

Scan Using the Control Panel
145
7
Configure the FTP Default Settings 7
1 Click the Scan tab.
2 Click the Scan to FTP/SFTP/Network/SharePoint menu in the left navigation bar.
3 Select the FTP option, and then click Submit.
4 Click the Scan to FTP/SFTP/Network/SharePoint Profile menu in the left navigation bar.
5 Select the profile you want to set up or change.
6 In the Profile Name field, type a name for this server profile (up to 15 alphanumeric characters). This
name appears in the Destination field when you click Scan to Network Device in the left navigation bar
(ADS-2400N / ADS-3000N) or on the machine’s Touchscreen (ADS-2800W / ADS-3600W).
7 In the Host Address field, type the Host Address (for example: ftp.example.com; up to 64 characters)
or the IP address (for example: 192.23.56.189), and type the path (up to 60 characters) to the folder on
the FTP server where you want to send your scanned data. Do not type a slash mark at the beginning
of the path.
8 In the Username field, type the user name (up to 32 characters), that has permission to write data to the
FTP server.
9 In the Password field, type the password (up to 32 characters) associated with the user name you
entered in the Username field. Type the password again in the Retype Password field.
0 In the Store Directory field, enter the destination folder where your document will be stored on the
FTP server (up to 60 characters).

Scan Using the Control Panel
146
7
A Click the File Name drop-down list, and then select a file name prefix from the three preset names
provided, or from fourteen user-defined names. The file name used for the scanned document will be the
file name prefix you select, followed by the last six digits of the scanner counter and the file extension
(for example: “Estimate_098765.pdf”).
2 Set the Color or Black and White/Gray to adjust the detection level.
C Choose the quality, file type, document size, file size, brightness, contrast and 2-sided Scan you want to
use for the scanned data. The following settings can be changed.
Setting Options Description
Quality Color 100 dpi
Color 150 dpi
Color 200 dpi
Color 300 dpi
Color 600 dpi
Color Auto
Gray 100 dpi
Gray 150 dpi
Gray 200 dpi
Gray 300 dpi
Gray 600 dpi
Gray Auto
B&W 100 dpi
B&W 150 dpi
B&W 200 dpi
B&W 300 dpi
B&W 600 dpi
B&W Auto
Auto 100 dpi
Auto 150 dpi
Auto 200 dpi
Auto 300 dpi
Auto 600 dpi
Auto
User Select
You can select a scanning quality from the Quality drop-down list.
Higher qualities take more memory and transfer time, but produce
a finer scanned image.
If you select User Select, you must select the setting from the
machine’s control panel.

Scan Using the Control Panel
147
7
File Type PDF Single-Page
PDF Multi-Page
JPEG
PDF/A Single-Page
PDF/A Multi-Page
Secure PDF
Single-Page
Secure PDF
Multi-Page
Signed PDF
Single-Page
Signed PDF
Multi-Page
High Compression
PDF Single-Page
High Compression
PDF Multi-Page
XPS
TIFF Single-Page
TIFF Multi-Page
User Select
Select the file type you want to use for the scanned data.
If you select Secure PDF, the machine will ask you to enter a 4 digit
password using numbers 0-9 before it starts scanning.
If you select Signed PDF, you must install a certificate to your
machine using Web Based Management. Select Signed PDF from
Administrator in Web Based Management. See the Network User’s
Guide.
PDF/A is a PDF file format intended for long-term archiving. This
format contains all the necessary information to be able to reproduce
the document after long-term storage.
Signed PDF helps prevent data tampering and the impersonation of
an author by including a digital certificate within the document.
You can select PDF, Secure PDF, PDF/A, Signed PDF, JPEG or
XPS when you select Color or Gray in Quality.
You can select PDF, Secure PDF, PDF/A, Signed PDF or TIFF
when you select B&W in Quality.
You can select PDF, Secure PDF or Signed PDF when you select
Auto in Quality.
If you select User Select, you must select the setting from the
machine’s control panel.
If you select High Compression PDF, you can select only
Color 300dpi or Gray 300dpi.
Document Size Auto
A4
Letter
Legal
B5
A5
B6
A6
Business Card
Long Paper
User Select
If you select Auto, scan documents of any size without making
adjustments to Document Size. For faster scan speeds, select the
exact size of your document from the Document Size drop-down list.
If you select 600 dpi for Quality, you cannot select Auto.
When Auto Deskew is set to Off, you can select A4, Letter, Legal,
B5, A5, B6, A6, Business Card or Long Paper (when Auto XXX dpi
is not selected as the Quality).
You can select Long Paper when you choose the following settings:
• Quality: other than Auto
• Auto Deskew: Off
• Skip Blank Page: Off
File Size Small
Medium
Large
User Select
You can adjust the file size for the scanned data.
If you selected Color or Gray in Quality, select a file size for the
scanned data from the drop-down list.
If you select User Select, you must select the setting from the
machine’s control panel.
Setting Options Description

Scan Using the Control Panel
148
7
2-sided Scan Off
Long edge
Short edge
When using 2-sided scanning, select Long edge or Short edge so the
layout of the data file’s pages matches your original.
Brightness -50
-40
-30
-20
-10
0
+10
+20
+30
+40
+50
Adjust the setting (-50 to 50) to get the best image. The default value of
0 represents an average and is suitable for most images. If the scanned
image is too light, set a lower Brightness level and scan the document
again.
If the image is too dark, set a higher Brightness level and scan the
document again.
Contrast -50
-40
-30
-20
-10
0
+10
+20
+30
+40
+50
Adjust the setting (-50 to 50) to get the best image. The default value of
0 represents an average and is suitable for most images.
An increase emphasizes dark and light areas of the image, while a
decrease reveals more details in gray areas.
Setting Options Description

Scan Using the Control Panel
149
7
D In the Margin Settings, enter -3 to 3 to add or remove a specific margin at the edge of the image.
E Set Auto Deskew
1
to Auto to correct the skew (less than 0.36 in. (9 mm) from the center of the
document to the edge) of the scanned data.
F Set Skip Blank Page
1
to On to remove blank pages of the document from the scanned data.
G Select -5 to 5 from the drop-down list to adjust the Skip Blank Page sensitivity.
H In Document Separation settings, select the Number of Documents or the Number of Pages to split
a scanned file.
I Select Continuous Scan to On to continue scanning.
J Set the Passive Mode option to off or on depending on your FTP server and network firewall configuration.
The default setting is On. In most cases this setting does not need to be changed.
K Change the Port Number setting used to access the FTP server. The default for this setting is port 21.
In most cases this setting does not need to be changed.
L Click Submit.
1
Depending upon the condition of the original document, this function may not work properly.
NOTE
Using the following characters: ?, /, \, ", :, <, >, | or * may cause a sending error.

Scan Using the Control Panel
150
7
Scan Using FTP Server Profiles 7
NOTE
• If you have set up the machine using the USB interface method, you must set up the machine using the
wireless (ADS-2800W / ADS-3600W) with the installation disc (see the Quick Setup Guide) to use the
Scan to FTP feature.
• Before starting Scan to FTP, you must configure the Scan to FTP profile (see Scan Documents to an FTP
Server on page 142).
For ADS-2400N and ADS-3000N only
1 Load your document.
2 Press , or to which you have assigned the Scan to FTP feature. The machine starts
scanning.
To assign the scan feature to the Network Device key, see Assign the Scan Feature to the Network
Device Key 1-3 on page 31.
For ADS-2800W and ADS-3600W only
1 Load your document.
2 Press d or c to display to FTP/SFTP.
3 Press to FTP/SFTP.
4 Press a or b to select one of the FTP server profiles listed.
Do one of the following:
If the Scan to FTP profile is complete, go to 8.
If the Scan to FTP profile is not complete, go to 5.
5 Press Options.
6 Configure the following settings as needed. To configure more detailed settings, press Advanced
Settings. For more information, see page 198.
2-sided Scan
Scan Type
Resolution
File Type
Document Size
File Name
File Name Style

Scan Using the Control Panel
151
7
File Size
Auto Deskew
Skip Blank Page
User Name
Document Separation
Advanced Settings
7 Press OK.
8 Press Start.
The Touchscreen displays Connecting. When the connection to the FTP server is successful the
machine starts the scanning process.
NOTE
To save the profile as a shortcut, press Save as Shortcut.

Scan Using the Control Panel
152
7
Scan Documents to an SFTP Server 7
When you choose Scan to SFTP, you can scan a black and white or color document directly to an SFTP server
on your local network, or on the Internet.
The details required to use Scan to SFTP can be entered by using Web Based Management to pre-configure
and store the details in an SFTP Profile.
NOTE
• Scan to SFTP is available when SFTP profiles are configured by using Web Based Management.
• We recommend Microsoft
®
Internet Explorer
®
8/10/11 for Windows
®
and Safari 8.0 for Macintosh. Also
make sure that JavaScript and Cookies are always enabled in whichever browser you use. If a different
web browser is used, make sure it is compatible with HTTP 1.0 and HTTP 1.1.
Start Web Based Management 7
NOTE
If you have set up the machine using the USB interface method, you must set up the machine using the
wireless network method with the installation disc (see the Quick Setup Guide) to use Web Based
Management.
For ADS-2400N and ADS-3000N only
1 Start the application.
Windows
®
a Click the (ControlCenter4) icon in the task tray and then select Open from the menu.
The ControlCenter4 window appears.
b Click the Device Settings tab (the example below uses Home Mode).

Scan Using the Control Panel
153
7
c Click the Scan to Net Settings button.
NOTE
If using Advanced Mode, click the (Settings) icon to access Device Settings.

Scan Using the Control Panel
154
7
Macintosh
a Confirm that your Brother machine is connected to the same network as your computer or mobile
device.
b Start your web browser.
c Type "http://machine's IP address" in your browser's address bar (where "machine's IP address" is
the machine's IP address).
For example: http://192.168.1.2
NOTE
• You can see your machine’s IP address in the Network menu on the control panel of your machine.
• If you have set a login password for Web Based Management, type your password in the Login box, then
click .
2 The Web Based Management window appears.
For ADS-2800W and ADS-3600W only
1 Start your web browser.
2 In your browser’s address bar, type your machine’s IP address (or your print server name). For example:
http://192.168.1.2. You can use the machine’s LCD to find its IP address. No password is required by
default.
3 If you have previously set a password, type it, and then press .

Scan Using the Control Panel
155
7
Configure the SFTP Default Settings 7
1 Click the Scan tab.
2 Click the Scan to FTP/SFTP/Network/SharePoint menu in the left navigation bar.
3 Select the SFTP option, and then click Submit.
4 Click the Scan to FTP/SFTP/Network/SharePoint Profile menu in the left navigation bar.
5 Select the profile you want to set up or change.
6 In the Profile Name field, type a name for this server profile (up to 15 alphanumeric characters).
This name appears in Destination in Scan to Network Device from the Scan tab (ADS-2400N /
ADS-3000N) or on the Touchscreen of the machine (ADS-2800W / ADS-3600W).
7 In the Host Address field, type the Host Address (for example: sftp.example.com; up to 64 characters)
or the IP address (for example: 192.23.56.189), and type the path (up to 60 characters) to the folder on
the SFTP server where you want to send your scanned data. Do not type a slash mark at the beginning
of the path.
8 In the Username field, type the user name (up to 32 characters), that has permission to write data to the
SFTP server.
9 In the Auth. Method field, select Password or Public Key.
0 Do one of the following:
When you select Password, type the password (up to 32 characters) associated with the user name
you typed in the Username field. Type the password again in the Retype Password field.
When you select Public Key, select the authentication type from the Client Key Pair drop-down list.

Scan Using the Control Panel
156
7
A Select the authentication type from the Server Public Key drop-down list.
B In the Store Directory field, enter the destination folder where your document will be stored on the SFTP
server (up to 60 characters).
C Click the File Name drop-down list, and then select a file name prefix from the three preset names
provided, or from fourteen user-defined names. The file name used for the scanned document will be the
file name prefix you select, followed by the last six digits of the scanner counter and the file extension
(for example: “Estimate_098765.pdf”).
D Choose the quality, file type, document size, file size, 2-sided scan, brightness and contrast you want to
use for the scanned data. The following settings can be changed:
Setting Options Description
Quality Color 100 dpi
Color 150 dpi
Color 200 dpi
Color 300 dpi
Color 600 dpi
Color Auto
Gray 100 dpi
Gray 150 dpi
Gray 200 dpi
Gray 300 dpi
Gray 600 dpi
Gray Auto
B&W 100 dpi
B&W 150 dpi
B&W 200 dpi
B&W 300 dpi
B&W 600 dpi
B&W Auto
Auto 100 dpi
Auto 150 dpi
Auto 200 dpi
Auto 300 dpi
Auto 600 dpi
Auto
User Select
You can select a scanning quality from the Quality drop-down list.
Higher qualities take more memory and transfer time, but produces
a finer scanned image.
If you select User Select, you must select the settings from the
control panel of the machine.

Scan Using the Control Panel
157
7
File Type PDF Single-Page
PDF Multi-Page
JPEG
PDF/A Single-Page
PDF/A Multi-Page
Secure PDF
Single-Page
Secure PDF
Multi-Page
Signed PDF
Single-Page
Signed PDF
Multi-Page
High Compression
PDF Single-Page
High Compression
PDF Multi-Page
XPS
TIFF Single-Page
TIFF Multi-Page
User Select
Select the file type you want to use for the scanned data.
If you select Secure PDF, the machine will ask you to enter a 4 digit
password using numbers 0-9 before it starts scanning.
If you select Signed PDF, you must install a certificate to your
machine using Web Based Management. Select Signed PDF from
Administrator in Web Based Management. See the Network User’s
Guide.
PDF/A is a PDF file format intended for long-term archiving. This
format contains all the necessary information to be able to reproduce
the document after long-term storage.
Signed PDF helps prevent data tampering and the impersonation of
an author by including a digital certificate within the document.
You can select PDF, Secure PDF, PDF/A, Signed PDF, JPEG or
XPS when you select Color or Gray in Quality.
You can select PDF, Secure PDF, PDF/A, Signed PDF or TIFF
when you select B&W in Quality.
You can select PDF, Secure PDF or Signed PDF when you select
Auto in Quality.
If you select User Select, you must select the setting from the control
panel of the machine.
If you select High Compression PDF, select only Color 300dpi or
Gray 300dpi.
Document Size Auto
A4
Letter
Legal
B5
A5
B6
A6
Business Card
Long Paper
User Select
If you select Auto, you can scan documents of any size without
making adjustments to Document Size. For faster scan speeds,
select the exact size of your document from the Document Size
drop-down list.
If you select 600 dpi for Quality, you cannot select Auto.
When Auto Deskew is set to Off, you can select A4, Letter, Legal,
B5, A5, B6, A6, Business Card or Long Paper (when Auto XXX dpi
is not selected as the Quality).
You can select Long Paper when you choose the following settings:
• Quality: other than Auto
• Auto Deskew: Off
• Skip Blank Page: Off
File Size Small
Medium
Large
User Select
You can adjust the file size for the scanned data.
If you selected Color or Gray in Quality, select a file size for the
scanned data from the drop-down list.
If you select User Select, you must select the setting from the control
panel of the machine.
Setting Options Description

Scan Using the Control Panel
158
7
2-sided Scan Off
Long edge
Short edge
To scan both sides of the document, select Long edge or Short edge
depending on the layout of your original to make sure that the data file
created appears correctly in the scanned document.
Brightness -50
-40
-30
-20
-10
0
+10
+20
+30
+40
+50
Adjust the setting (-50 to 50) to get the best image. The default value of
0 represents an average and is suitable for most images. If the scanned
image is too light, set a lower Brightness level and scan the document
again.
If the image is too dark, set a higher Brightness level and scan the
document again.
Contrast -50
-40
-30
-20
-10
0
+10
+20
+30
+40
+50
Adjust the setting (-50 to 50) to get the best image. The default value of
0 represents an average and is suitable for most images.
An increase emphasizes dark and light areas of the image, while a
decrease reveals more details in gray areas.
Setting Options Description

Scan Using the Control Panel
159
7
E Select Color or Black and White/Gray to adjust the detection level.
F In the Margin Settings, enter -3 to 3 to add or remove a specific margin at the edge of the image.
G Set Auto Deskew
1
to Auto to correct the skew (less than 0.36 in. (9 mm) from the center of the
document to the edge) of the scanned data.
H Set Skip Blank Page
1
to On to remove blank pages of the document from the scanned data.
I Select -5 to 5 from the drop-down list to adjust the Skip Blank Page sensitivity.
J In Document Separation settings, select the Number of Documents or the Number of Pages to split
a scanned file.
K Select Continuous Scan to On to continue scanning.
L Change the Port Number setting used to access the SFTP server. The default for this setting is port 21.
In most cases this setting does not need to be changed.
M Click Submit.
1
Depending upon the condition of the original document, this function may not work properly.
NOTE
Using the following characters: ?, /, \, ", :, <, >, | or * may cause a sending error.

Scan Using the Control Panel
160
7
Scan Using SFTP Server Profiles 7
NOTE
• If you have set up the machine using the USB interface method, you must set up the machine using the
wireless network method with the installation disc (see the Quick Setup Guide) to use the Scan to SFTP
feature.
• Before starting Scan to SFTP, you must configure the Scan to SFTP profile (see Scan Documents to an
SFTP Server on page 152).
For ADS-2400N and ADS-3000N only
1 Load your document.
2 Press , or to which you have assigned the Scan to SFTP feature. The machine starts
scanning.
To assign the scan feature to the Network Device key, see Assign the Scan Feature to the Network
Device Key 1-3 on page 31.
For ADS-2800W and ADS-3600W only
1 Load your document.
2 Press d or c to display to FTP/SFTP.
3 Press to FTP/SFTP.
4 Press a or b to choose one of the SFTP server profiles listed.
Do one of the following:
If the Scan to SFTP profile is complete, go to 7.
If the Scan to SFTP profile is not complete, go to 5.
5 Press Options.
6 Configure the following settings as needed. To configure more detailed settings, press Advanced
Settings. For details, see page 198. Press OK.
2-sided Scan
Scan Type
Resolution
File Type
Document Size
File Name
File Name Style

Scan Using the Control Panel
161
7
File Size
Auto Deskew
Skip Blank Page
User Name
Document Separation
Advanced Settings
7 Press Start.
The Touchscreen displays Connecting. When the connection to the SFTP server is successful the
machine starts the scanning process.
NOTE
To save the profile as a shortcut, press Save as Shortcut.

Scan Using the Control Panel
162
7
Scan Documents to a Shared Folder / Network Location
(Windows
®
) 7
When you choose Scan to Network, you can scan documents directly to a shared folder located on your local
network or the Internet.
The details required to use Scan to Network can be entered by using Web Based Management to preconfigure
and store the details in a Scan to Network profile. The Scan to Network profile stores user information and
configuration settings for use on a network, or the Internet.
NOTE
• Scan to Network is available when Scan to Network profiles are configured by using Web Based
Management.
• You must configure the SNTP protocol (network time server), or set the date, time, and time zone correctly
for authentication. For more information, see the Network User’s Guide.
• We recommend Microsoft
®
Internet Explorer
®
8/10/11. Also make sure that JavaScript and Cookies are
always enabled in whichever browser you use. If a different web browser is used, make sure it is
compatible with HTTP 1.0 and HTTP 1.1.
Start Web Based Management 7
NOTE
To use Web Based Management you must set up the machine using the wireless (ADS-2800W /
ADS-3600W) network method with the installation disc (see the Quick Setup Guide).
For ADS-2400N and ADS-3000N only
1 Start the application.
Windows
®
a Click the (ControlCenter4) icon in the task tray and then select Open from the menu.
The ControlCenter4 window appears.
b Click the Device Settings tab (the example below uses Home Mode).

Scan Using the Control Panel
163
7
c Click the Scan to Net Settings button.
NOTE
If using Advanced Mode, click the (Settings) icon to access Device Settings.

Scan Using the Control Panel
164
7
Macintosh
a Confirm that your Brother machine is connected to the same network as your computer or mobile
device.
b Start your web browser.
c Type "http://machine's IP address" in your browser's address bar (where "machine's IP address" is
the machine's IP address).
For example: http://192.168.1.2
NOTE
• You can see your machine’s IP address in the Network menu on the control panel of your machine.
• If you have set a login password for Web Based Management, type your password in the Login box, then
click .
2 The Web Based Management window appears.
For ADS-2800W and ADS-3600W only
1 Start your web browser.
2 In your browser’s address bar, type your machine’s IP address (or your print server name). For example:
http://192.168.1.2. You can use the machine’s LCD to find its IP address. No password is required by
default.
3 If you have previously set a password, type it, and then press .

Scan Using the Control Panel
165
7
Configure the Scan to Network Default Settings 7
1 Click the Scan tab.
2 Click the Scan to FTP/SFTP/Network/SharePoint, menu in the left navigation bar.
3 Select the Network option, and then click Submit.
4 Click the Scan to FTP/SFTP/Network/SharePoint Profile menu in the left navigation bar.
5 Select the profile you want to set up or change.
6 In the Profile Name field, type a name for this server profile (up to 15 alphanumeric characters).
This name appears in Destination in Scan to Network Device from the Scan tab (ADS-2400N /
ADS-3000N) or on the Touchscreen of the machine (ADS-2800W / ADS-3600W).
7 The Network Folder Path is the destination address (for example \\ComputerName\SharedFolder) (up
to 255 characters).
8 Click the File Name drop-down list, and then select a file name prefix from the three preset names
provided, or from fourteen user-defined names. The file name used for the scanned document will be the
file name prefix you select, followed by the last six digits of the scanner counter and the file extension
(for example: “Estimate_098765.pdf”).
9 In the Margin Settings, enter -3 to 3 to add or remove a specific margin at the edge of the image.

Scan Using the Control Panel
166
7
0 Choose the quality, file type, document size, file size, 2-sided scan, brightness and contrast you want to
use for the scanned data. The following settings can be changed.
Setting Options Description
Quality Color 100 dpi
Color 150 dpi
Color 200 dpi
Color 300 dpi
Color 600 dpi
Color Auto
Gray 100 dpi
Gray 150 dpi
Gray 200 dpi
Gray 300 dpi
Gray 600 dpi
Gray Auto
B&W 100 dpi
B&W 150 dpi
B&W 200 dpi
B&W 300 dpi
B&W 600 dpi
B&W Auto
Auto 100 dpi
Auto 150 dpi
Auto 200 dpi
Auto 300 dpi
Auto 600 dpi
Auto
User Select
You can select a scanning quality from the Quality drop-down list.
Higher qualities take more memory and transfer time, but produce
a finer scanned image.
If you select User Select, you must select the setting from the control
panel of the machine.

Scan Using the Control Panel
167
7
File Type PDF Single-Page
PDF Multi-Page
JPEG
PDF/A Single-Page
PDF/A Multi-Page
Secure PDF
Single-Page
Secure PDF
Multi-Page
Signed PDF
Single-Page
Signed PDF
Multi-Page
High Compression
PDF Single-Page
High Compression
PDF Multi-Page
XPS
TIFF Single-Page
TIFF Multi-Page
User Select
Select the file type you want to use for the scanned data.
If you select Secure PDF, the machine will ask you to enter a 4 digit
password using numbers 0-9 before it starts scanning.
If you select Signed PDF, you must install a certificate to your
machine using Web Based Management. Select Signed PDF from
Administrator in Web Based Management. See the Network User’s
Guide.
PDF/A is a PDF file format intended for long-term archiving. This
format contains all the necessary information to be able to reproduce
the document after long-term storage.
Signed PDF helps prevent data tampering and the impersonation of
an author by including a digital certificate within the document.
You can select PDF, Secure PDF, PDF/A, Signed PDF, JPEG or
XPS when you select Color or Gray in Quality.
You can select PDF, Secure PDF, PDF/A, Signed PDF or TIFF
when you select B&W in Quality.
You can select PDF, Secure PDF or Signed PDF when you select
Auto in Quality.
If you select User Select, you must select the setting from the control
panel of the machine.
If you select High Compression PDF, you can select only
Color 300dpi or Gray 300dpi.
Document Size Auto
A4
Letter
Legal
B5
A5
B6
A6
Business Card
Long Paper
User Select
If you select Auto, you can scan documents of any size without
making adjustments to Document Size. For faster scan speeds,
select the exact size of your document from the Document Size
drop-down list.
If you select 600 dpi for Quality, you cannot select Auto.
When Auto Deskew is set to Off, you can select A4, Letter, Legal,
B5, A5, B6, A6, Business Card or Long Paper (when Auto XXX dpi
is not selected as the Quality).
You can select Long Paper when you choose the following settings:
• Quality: other than Auto
• Auto Deskew: Off
• Skip Blank Page: Off
File Size Small
Medium
Large
User Select
You can adjust the file size for the scanned data.
If you selected Color or Gray in Quality, select the file size for the
scanned data from the drop-down list.
If you select User Select, you must select the setting from the control
panel of the machine.
Setting Options Description

Scan Using the Control Panel
168
7
2-sided Scan Off
Long edge
Short edge
To scan both sides of the document, select Long edge or Short edge
depending on the layout of your original to make sure that the data file
created appears correctly in the scanned document.
Brightness -50
-40
-30
-20
-10
0
+10
+20
+30
+40
+50
Adjust the setting (-50 to 50) to get the best image. The default value of
0 represents an average and is suitable for most images. If the scanned
image is too light, set a lower Brightness level and scan the document
again.
If the image is too dark, set a higher Brightness level and scan the
document again.
Contrast -50
-40
-30
-20
-10
0
+10
+20
+30
+40
+50
Adjust the setting (-50 to 50) to get the best image. The default value of
0 represents an average and is suitable for most images.
An increase emphasizes dark and light areas of the image, while a
decrease reveals more details in gray areas.
Setting Options Description

Scan Using the Control Panel
169
7
A Select Color or Black and White/Gray to adjust the detection level.
B Set Auto Deskew
1
to Auto to correct the skew (less than 0.36 in. (9 mm) from the center of the
document to the edge) of the scanned data.
C Set Skip Blank Page
1
to On to remove blank pages of the document from the scanned data.
D Select -5 to 5 from the drop-down list to adjust the Skip Blank Page sensitivity.
E In Document Separation settings, select the Number of Documents or the Number of Pages to split
a scanned file.
F Select Continuous Scan to On to continue scanning.
G To protect the profile, select On from Use PIN for Authentication and enter a 4-digit PIN number in
PIN Code.
H Select the authentication method. Choose Auto, Kerberos or NTLMv2. If you select Auto, the
authentication method will be detected automatically.
I Enter the Username that has been registered with the CIFS server for the machine (up to 96 characters).
J Enter the Password for access to the CIFS server (up to 32 characters).
K Click Submit.
L Select Date&Time from the General tab.
M Enter the date and time used on the CIFS server.
N Select the time zone from the drop-down list.
O Click Submit.
1
Depending upon the condition of the original document, this function may not work properly.

Scan Using the Control Panel
170
7
Scan Using Scan to Network Profiles 7
For ADS-2400N and ADS-3000N only
1 Load your document.
2 Press , or to which you have assigned the Network Scan feature.
The machine starts scanning.
For ADS-2800W and ADS-3600W only
1 Load your document.
2 Swipe left or right.
3 Press to Network.
4 Press a or b to select one of Network server profiles listed.
If the Touchscreen prompts you to enter a PIN number, enter the 4-digit PIN number for the profile on
the Touchscreen.
Press OK.
Do one of the following:
If the Scan to Network profile is complete, go to 7.
If the Scan to Network profile is not complete, go to 5.
5 Press Options.
6 Configure the following settings as needed. To configure more detailed settings, press Advanced
Settings. For more information, see page 198. Press OK.
2-sided Scan
Scan Type
Resolution
File Type
Document Size
File Name
File Name Style
File Size
Auto Deskew
Skip Blank Page
User Name
Document Separation
Advanced Settings

Scan Using the Control Panel
171
7
NOTE
• If you choose Secure PDF Single-Page or Secure PDF Multi-Page for File Type, the machine
will ask you to enter a 4 digit password using numbers 0-9 before it starts scanning.
• If you choose Signed PDF Single-Page or Signed PDF Multi-Page for File Type, you must
install and then configure a certificate to your machine using Web Based Management.
• To save the settings as a shortcut, press Save as Shortcut.
7 Press Start.
The Touchscreen displays Connecting. When the connection to the Network is successful the machine
starts the scanning process.

Scan Using the Control Panel
172
7
Scan Documents to SharePoint 7
When you choose Scan to SharePoint, you can scan a black and white or color document directly to an
SharePoint server.
Use Web Based Management to pre-configure and store the details in a SharePoint Profile.
NOTE
• Scan to SharePoint is available when Web Based Management is used to configure SharePoint profiles.
• We recommend Microsoft
®
Internet Explorer
®
8/10/11 for Windows
®
and Safari 8.0 for Macintosh. Also
make sure that JavaScript and Cookies are always enabled in whichever browser you use. If a different
web browser is used, make sure it is compatible with HTTP 1.0 and HTTP 1.1.
Start Web Based Management 7
NOTE
To use Web Based Management you must set up the machine using the wireless network method with
the installation disc (see the Quick Setup Guide).
For ADS-2400N and ADS-3000N only
1 Start the application.
Windows
®
a Click the (ControlCenter4) icon in the task tray and then select Open from the menu.
The ControlCenter4 window appears.
b Click the Device Settings tab (the example below uses Home Mode).
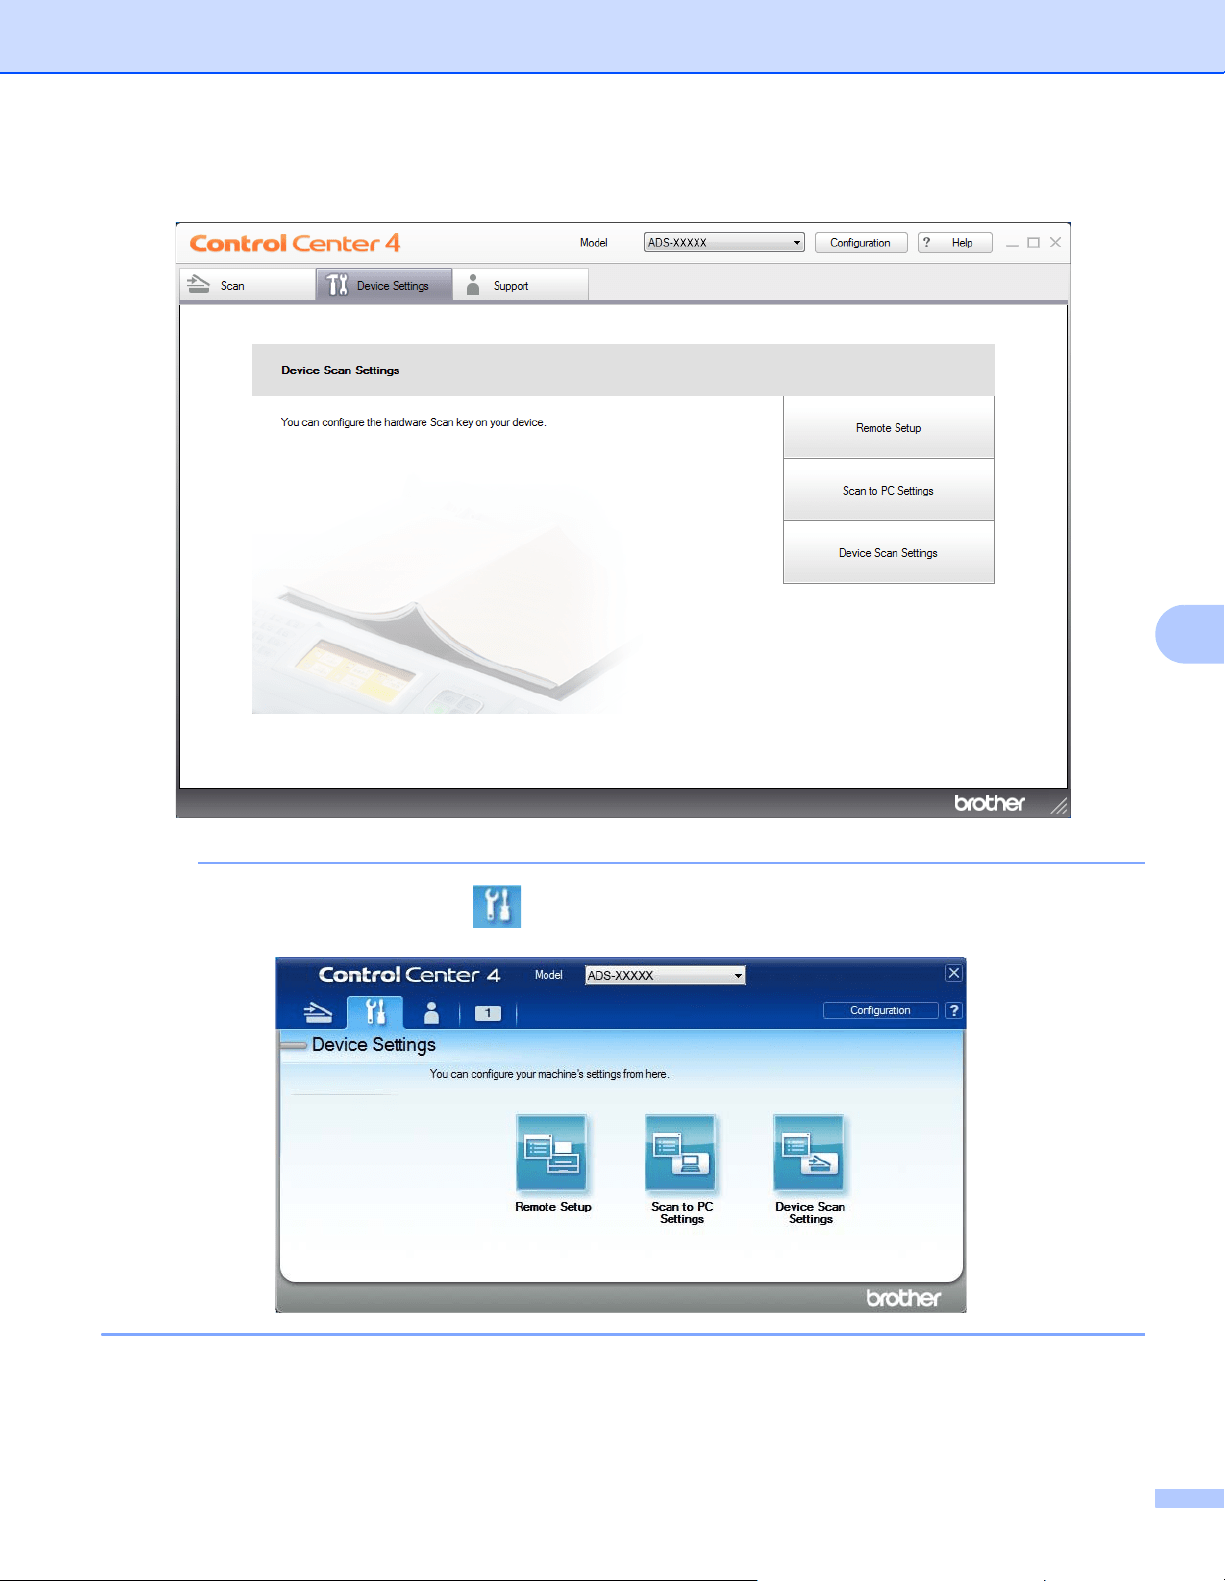
Scan Using the Control Panel
173
7
c Click the Scan to Net Settings button.
NOTE
If using Advanced Mode, click the (Settings) icon to access Device Settings.

Scan Using the Control Panel
174
7
Macintosh
a Confirm that your Brother machine is connected to the same network as your computer or mobile
device.
b Start your web browser.
c Type "http://machine's IP address" in your browser's address bar (where "machine's IP address"
is the machine's IP address).
For example: http://192.168.1.2
NOTE
• You can see your machine’s IP address in the Network menu on the control panel of your machine.
• If you have set a login password for Web Based Management, type your password in the Login box, then
click .
2 The Web Based Management window appears.
For ADS-2800W and ADS-3600W only
1 Start your web browser.
2 In your browser’s address bar, type your machine’s IP address (or your print server name). For example:
http://192.168.1.2. You can use the machine’s LCD to find its IP address. No password is required by
default.
3 If you have previously set a password, type it, and then press .
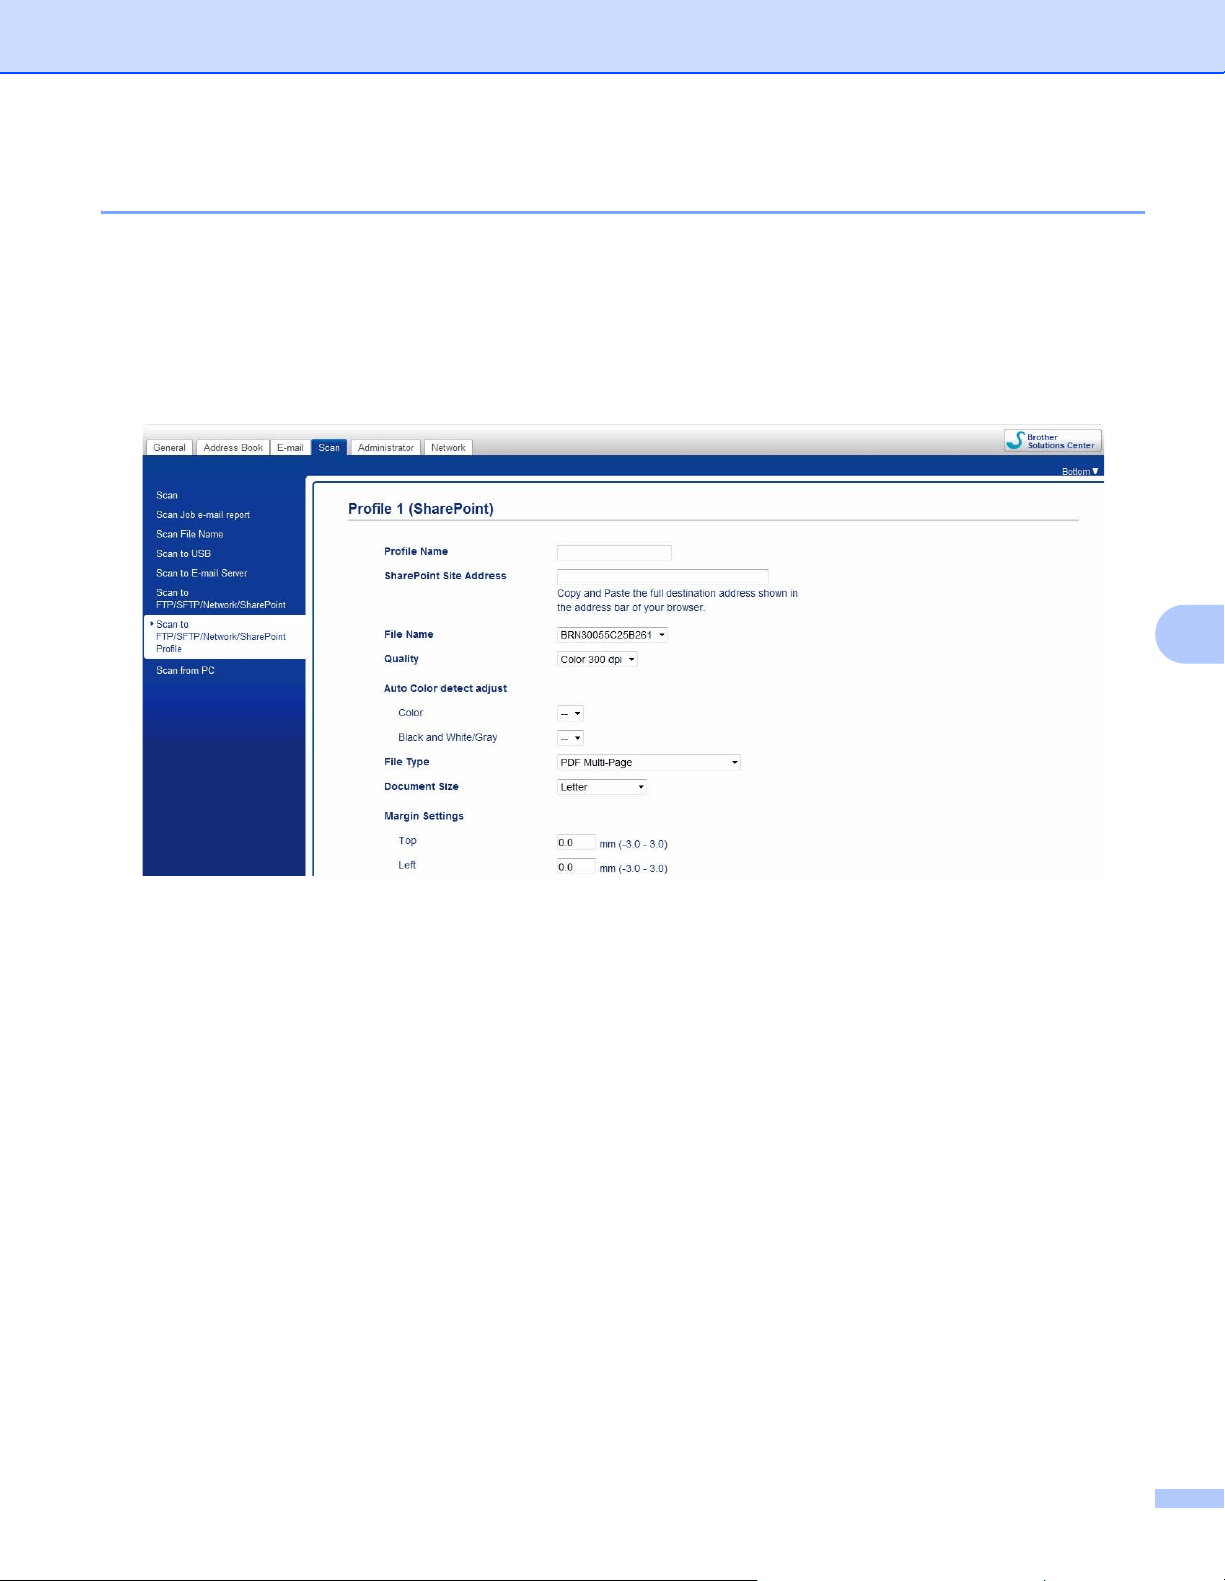
Scan Using the Control Panel
175
7
Set Up a Scan to SharePoint Profile 7
1 Click the Scan tab.
2 Click the Scan to FTP/SFTP/Network/SharePoint menu in the left navigation bar.
3 Select the SharePoint option, and then click Submit.
4 Click the Scan to FTP/SFTP/Network/SharePoint Profile menu in the left navigation bar.
5 Select the profile you want to set up or change.
6 In the Profile Name field, type a name for this server profile (up to 15 alphanumeric characters).
This name will be displayed in Destination in Scan to Network Device from the Scan tab
(ADS-2400N / ADS-3000N) or on the Touchscreen of the machine (ADS-2800W / ADS-3600W).
7 In the SharePoint Site Address field, copy and paste the full destination address. (for example:
ftp.example.com; up to 64 characters) or the IP address (for example: 192.23.56.189).
8 Click the File Name drop-down list, and then select a file name prefix from the three preset names
provided, or from fourteen user-defined names. The file name used for the scanned document will be the
file name prefix you select, followed by the last six digits of the ADF scanner counter and the file
extension (for example: “Estimate_098765.pdf”).
9 Set the Color or Black and White/Gray to adjust the detection level.

Scan Using the Control Panel
176
7
0 Choose the quality, file type, document size and 2-sided Scan you want to use for the scanned data.
The following settings can be changed.
Setting Options Description
Quality Color 100 dpi
Color 150 dpi
Color 200 dpi
Color 300 dpi
Color 600 dpi
Color Auto
Gray 100 dpi
Gray 150 dpi
Gray 200 dpi
Gray 300 dpi
Gray 600 dpi
Gray Auto
B&W 100 dpi
B&W 150 dpi
B&W 200 dpi
B&W 300 dpi
B&W 600 dpi
B&W Auto
Auto 100 dpi
Auto 150 dpi
Auto 200 dpi
Auto 300 dpi
Auto 600 dpi
Auto
User Select
Select a scanning quality from the Quality drop-down list. Higher
qualities take more memory and transfer time, but produce a finer
scanned image.
If you select User Select, you must select the setting from the control
panel of the machine.

Scan Using the Control Panel
177
7
File Type PDF Single-Page
PDF Multi-Page
JPEG
PDF/A Single-Page
PDF/A Multi-Page
Secure PDF
Single-Page
Secure PDF
Multi-Page
Signed PDF
Single-Page
Signed PDF
Multi-Page
High Compression
PDF Single-Page
High Compression
PDF Multi-Page
XPS
TIFF Single-Page
TIFF Multi-Page
User Select
Select the file type you want to use for the scanned data.
If you select Secure PDF, the machine will ask you to enter a 4 digit
password using numbers 0-9 before it starts scanning.
If you select Signed PDF, you must install a certificate to your
machine using Web Based Management. Select Signed PDF from
Administrator in Web Based Management. See the Network User’s
Guide.
PDF/A is a PDF file format intended for long-term archiving. This
format contains all the necessary information to be able to reproduce
the document after long-term storage.
Signed PDF helps prevent data tampering and the impersonation of
an author by including a digital certificate within the document.
You can select PDF, Secure PDF, PDF/A, Signed PDF, JPEG or
XPS when you select Color or Gray in Quality.
You can select PDF, Secure PDF, PDF/A, Signed PDF or TIFF
when you select B&W in Quality.
You can select PDF, Secure PDF or Signed PDF when you select
Auto in Quality.
If you select User Select, you must select the setting from the control
panel of the machine.
If you select High Compression PDF, you can select only
Color 300dpi or Gray 300dpi.
Document Size Auto
A4
Letter
Legal
B5
A5
B6
A6
Business Card
Long Paper
User Select
If you select Auto, you can scan documents of any size without
making adjustments to Document Size. For faster scan speeds, you
can select the exact size of your document from the Document Size
drop-down list.
If you select 600 dpi for Quality, you cannot select Auto.
When Auto Deskew is set to Off, you can select A4, Letter, Legal,
B5, A5, B6, A6, Business Card or Long Paper (when Auto XXX dpi
is not selected as the Quality).
You can select Long Paper when you choose the following settings:
• Quality: other than Auto
• Auto Deskew: Off
• Skip Blank Page: Off
File Size Small
Medium
Large
User Select
You can adjust the file size for the scanned data.
If you selected Color or Gray in Quality, select a file size for the
scanned data from the drop-down list.
If you select User Select, you must select the setting from the control
panel of the machine.
Setting Options Description

Scan Using the Control Panel
178
7
2-sided Scan Off
Long edge
Short edge
To scan both sides of the document, select Long edge or Short edge
depending on the layout of your original to make sure that the data file
created appears correctly in the scanned document.
Brightness -50
-40
-30
-20
-10
0
+10
+20
+30
+40
+50
Adjust the setting (-50 to 50) to get the best image. The default value of
0 represents an average and is suitable for most images. If the scanned
image is too light, set a lower brightness level and scan the document
again.
If the image is too dark, set a higher brightness level and scan the
document again.
Contrast -50
-40
-30
-20
-10
0
+10
+20
+30
+40
+50
Adjust the setting (-50 to 50) to get the best image. The default value of
0 represents an average and is suitable for most images.
An increase emphasizes dark and light areas of the image, while a
decrease reveals more details in gray areas.
Setting Options Description

Scan Using the Control Panel
179
7
A In the Margin Settings, enter -3 to 3 to add or remove a specific margin at the edge of the image.
B Set Auto Deskew
1
to Auto to correct the skew (less than 0.36 in. (9 mm) from the center of the
document to the edge) of the scanned data.
C Set Skip Blank Page
1
to On to remove blank pages of the document from the scanned data. You can
adjust the sensitivity to detect various levels of blank pages.
D Select -5 to 5 from the drop-down list to adjust the Skip Blank Page sensitivity.
E In Document Separation settings, select the Number of Documents or the Number of Pages to split
a scanned file.
F Select Continuous Scan to On to continue scanning.
G To PIN-protect this profile, in the Use PIN for Authentication field, select On.
H If you selected On for Use PIN for Authentication field, in the PIN Code field, type a four-digit PIN.
I To set your authentication method, select Auto, Kerberos, NTLMv2, or Basic from the Auth. Method
menu. If you choose Auto, the authentication method will be detected automatically.
J In the Username field, type the user name (up to 96 characters) that has permission to write data to the
folder specified in the Sharepoint Site Address field. If the user name is part of a domain, enter the user
name in one of the following styles:
user@domain
domain\user
K In the Password field, type the password (up to 32 characters) associated with the user name you
entered in the Username field. Type the password again in the Retype Password field.
L To set the Kerberos Server Address manually, in the Kerberos Server Address field, type the Kerberos
Server Address (for example: kerberos.example.com; up to 64 characters).
M Click Submit.
1
Depending upon the condition of the original document, this function may not work properly.
NOTE
Using the following characters: ?, /, \, ", :, <, >, | or * may cause a sending error.

Scan Using the Control Panel
180
7
Scan Using Web Services (Windows Vista
®
, Windows
®
7,
Windows
®
8, Windows
®
8.1 and Windows
®
10) 7
The menu that allows you to use Web Services for scanning appears in the Destination field when you click
Scan to Network Device in the left navigation bar (ADS-2400N / ADS-3000N) or on the machine’s
Touchscreen (ADS-2800W / ADS-3600W), if you have installed the driver for scanning via Web Services.
For information about installing Web Services, see Install Drivers Used for Scanning via Web Services
(Windows Vista
®
, Windows
®
7, Windows
®
8, Windows
®
8.1, Windows
®
10) in the Network User’s Guide.
• If the Touchscreen or LED indications show Out of Memory, decrease the Paper size setting or the
Resolution setting. For more information, see Configuring Settings for Scanning on page 181.
• Certain characters in the messages displayed on the Touchscreen may be replaced with spaces when the
language settings of your OS and your Brother machine are different.
For ADS-2400N and ADS-3000N only
If you are using ADS-2400N or ADS-3000N, you must assign WS Scan to a Network Device Key 1 - 3.
For more information, see Assign the Scan Feature to the Network Device Key 1-3 on page 31.
1 Load your document.
2 Press , or to which you have assigned the Web Service Scan feature.
The machine starts scanning.
For ADS-2800W and ADS-3600W only
1 Load your document.
2 Swipe left or right.
3 Press WS Scan.
4 Press the type of scan you want.
5 Press a or b to display the destination computer you want to send to.
Press the destination computer.
6 Press Start.
The machine starts scanning process.

Scan Using the Control Panel
181
7
Configuring Settings for Scanning 7
If the Touchscreen displays or the LEDs indicate Out of Memory, decrease the Paper size setting or the
Resolution setting.
1 Open the device settings for your operating system:
Windows Vista
®
(Start) > Control Panel > Hardware and Sound > Scanners and Cameras.
Windows
®
7
(Start) > Control Panel > Hardware and Sound > Devices and Printers.
Windows
®
8 and Windows
®
8.1
Move your mouse to the lower left corner of your desktop. When the menu bar appears, click Settings,
and then click Control Panel. In the Hardware and Sound group, click View devices and printers.
Windows
®
10
Right click (Start) > Control Panel > Hardware and Sound > View devices and printers.
2 Click your machine, and then click the Scan profiles button.
The Scan profiles dialog box appears.
3 Choose the scan profile you want to use. Make sure the scanner selected in Scanner is a Brother
machine that supports Web Services for scanning.
Click Set as Default.
4 Click Edit. The Edit Default Profile dialog box appears.
5 Choose the Source, Paper size, Color format, File type, Resolution, Brightness and Contrast
settings.
6 Click Save Profile. The settings will be applied when scanning using the Web Services protocol.
NOTE
If you are requested to choose a software application to scan, choose Windows
®
Fax and Scan or
Windows
®
Photo Gallery from the list.

Scan Using the Control Panel
182
7
Send Scanned Documents Directly to an Email Address
(ADS-2800W / ADS-3600W) 7
1 Load your document.
2 Swipe left or right.
3 Press to E-mail Server.
4 Select the email address you want to send to by doing one of the following:
To select an email address from the Address Book, see Select an Email Address from the Address
Book on page 183.
To enter an email address manually, see Enter an Email Address Manually on page 184.
To send scanned data to your email address, press to My E-mail. When your email address on the
LCD, press Next.
NOTE
• You can select up to 300 email addresses from the Address Book and enter up to 50 email addresses
manually. The scanned data will be sent to all of the addresses at the same time.
• If you have registered your email address with your user ID and activated Send to My E-mail feature using
Web Based Management, the to My E-mail button appears when you log on to the machine using
Secure Function Lock, Active Directory Authentication or LDAP Authentication. If this option is not
available, update your machine's firmware. Go to your model's Downloads page on the Brother Solutions
Center at support.brother.com
5 Press OK and then do one of the following:
To use the default settings, go to 8.
To change the default settings, go to 6.
6 Press Options.
7 Configure the following settings as needed. To configure more detailed settings, press Advanced
Settings. For more information, see page 198. Press OK.
2-sided Scan
Scan Type
Resolution
File Type
Document Size
File Name
File Name Style
File Size
Auto Deskew
Skip Blank Page
Document Separation
Scan Using the Control Panel
183
7
Advanced Settings
NOTE
• To save the settings as a new default, press Set New Default.
• To restore all settings to the factory settings, press Factory Reset.
8 Press Start.
The machine starts scanning and then sends the scanned document to the email address directly.
NOTE
To save the settings as a shortcut, press Save as Shortcut. For more information, see Shortcut
Settings (ADS-2800W / ADS-3600W) on page 12.
Select an Email Address from the Address Book 7
1 Press Address Book.
2 Press . The keyboard appears on the Touchscreen.
NOTE
• The LDAP protocol supports you to search for email addresses on your server. For information on how to
configure LDAP protocol, see Changing LDAP Configuration in the Network User’s Guide.
• The LDAP search result will be shown on the Touchscreen with before the local address book search
result.
3 Enter the initial characters for your search and then press OK. The machine starts searching the Address
Book, and then the search result will be shown.
4 Swipe left or right, or press a or b until you find the name you are looking for.
5 Press the name from the result.
6 Press Apply.
NOTE
• To register an email address in the Address Book, see Set Up the Address Book (ADS-2800W /
ADS-3600W) on page 185.
• You can select up to 300 email addresses from the Address Book and enter up to 50 email addresses
manually. The scanned data will be sent to all of the addresses at the same time.

Scan Using the Control Panel
184
7
Enter an Email Address Manually 7
1 Press Manual. The keyboard appears on the Touchscreen.
2 Enter an email address and then press OK.
NOTE
You can enter up to 50 email addresses manually. The scanned data will be sent to all of the addresses
at the same time.

Scan Using the Control Panel
185
7
Set Up the Address Book (ADS-2800W / ADS-3600W) 7
The Address Book feature lets you select an email address to send the scanned data directly. You can
configure the Address Book from the control panel of the machine.
NOTE
You can also configure the Address Book with Remote Setup or Web Based Management.
Register an Email Address 7
You can register up to 300 email addresses and enter a name for each address.
1 Swipe left or right, or press d or c to display Scan 2.
2 Press to E-mail Server.
3 Press Address Book.
4 Press Edit.
5 Press Add New Address.
6 Press Name.
7 Enter a name and then press OK.
8 Press Address.
9 Enter an email address and then press OK.
0 Press OK.
Change an Email Address 7
1 Swipe left or right, or press d or c to display Scan 2.
2 Press to E-mail Server.
3 Press Address Book.
4 Press Edit.
5 Press Change.
6 Press a or b until you find the email address you want to change.
7 Press the email address. If the email address is used in one or more shortcuts, the Touchscreen displays
that the address in the shortcut(s) will also change.

Scan Using the Control Panel
186
7
8 Do one of the following:
To change the name, go to step 9.
To change the email address, go to step A.
9 Press Name. The keyboard appears on the Touchscreen.
0 Enter a new name and then press OK.
A Press Address. The keyboard appears on the Touchscreen.
B Enter a new email address and then press OK.
C Press OK.
NOTE
The Touchscreen displays a list of shortcuts using the email address you changed. The shortcut settings
will automatically change.
Delete an Email Address 7
1 Swipe left or right, or press d or c to display Scan 2.
2 Press to E-mail Server.
3 Press Address Book.
4 Press Edit.
5 Press Delete.
6 Press a or b until you find the email address you want to delete.
7 Press the email address.
Press OK.
NOTE
You cannot delete an email address used in a shortcut. Delete the shortcut first (see Deleting Shortcuts
on page 17).

Scan Using the Control Panel
187
7
Set Up a Group 7
You can register up to 20 groups. Each group can have up to 299 email addresses.
NOTE
Before setting up a group, you must register more than one email address.
1 Swipe left or right, or press d or c to display Scan 2.
2 Press to E-mail Server.
3 Press Address Book.
4 Press Edit.
5 Press Setup Groups.
6 Press Name.
7 Enter a group name and then press OK.
8 Press Add/Delete.
9 Press a or b until you find the email address you want to add to the group.
0 Press the email address and then OK.
A Press OK.
Change a Group 7
You can rename a group, add an email address to the group and delete an email address from the group.
1 Swipe left or right, or press d or c to display Scan 2.
2 Press to E-mail Server.
3 Press Address Book.
4 Press Edit.
5 Press Change.
6 Press a or b until you find the group you want to change.
7 Press the group name.
8 Do one of the following:
To rename the group, go to step 9.
To add an email address to the group, go to step A.
To delete an email address from the group, go to step A.

Scan Using the Control Panel
188
7
9 Press Name. The keyboard appears on the Touchscreen.
0 Enter a new group name. Press OK.
A Press Add/Delete.
B Press a or b until you find the email address you want to add or delete.
C Press the email address.
D Press OK.
Delete a Group 7
1 Swipe left or right, or press d or c to display Scan 2.
2 Press to E-mail Server.
3 Press Address Book.
4 Press Edit.
5 Press Delete.
6 Press a or b until you find the group name you want to delete.
7 Press the group name, and then OK.

Scan Using the Control Panel
189
7
Upload Scanned Documents to the Web
(ADS-2800W / ADS-3600W) 7
Scan to Web lets you scan a document and upload it directly to Web Services. See the Web Connect Guide.
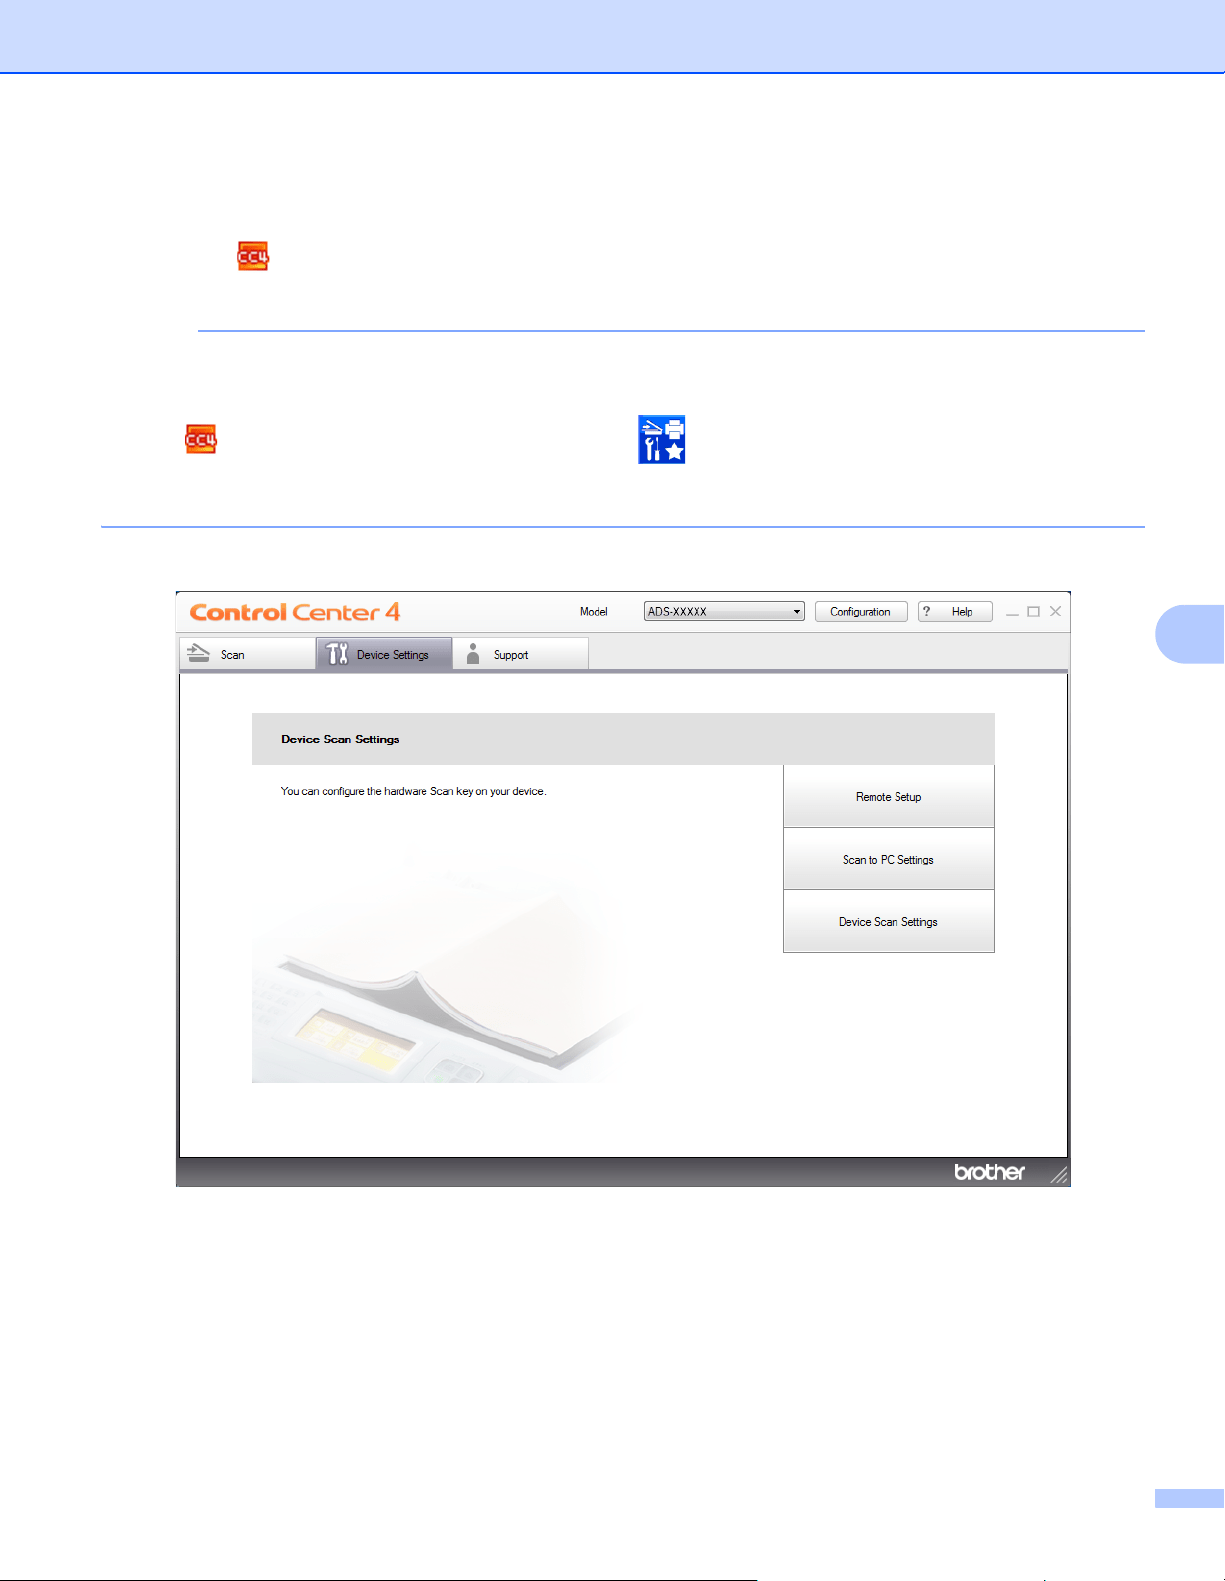
Scan Using the Control Panel
190
7
Change Scan to PC Settings (Windows
®
) 7
1 Click the (ControlCenter4) icon in the task tray and then select Open from the menu.
The ControlCenter4 window appears.
NOTE
• The screens in this guide are from Windows
®
7. Screens on your computer may vary depending on your
operating system.
• If the icon does not appear in the task tray, click (Brother Utilities) on your desktop, and then
click the drop-down list and select your model name (if not already selected). Click Scan in the left
navigation bar, and then click ControlCenter4.
2 Click the Device Settings tab (the example below uses Home Mode).
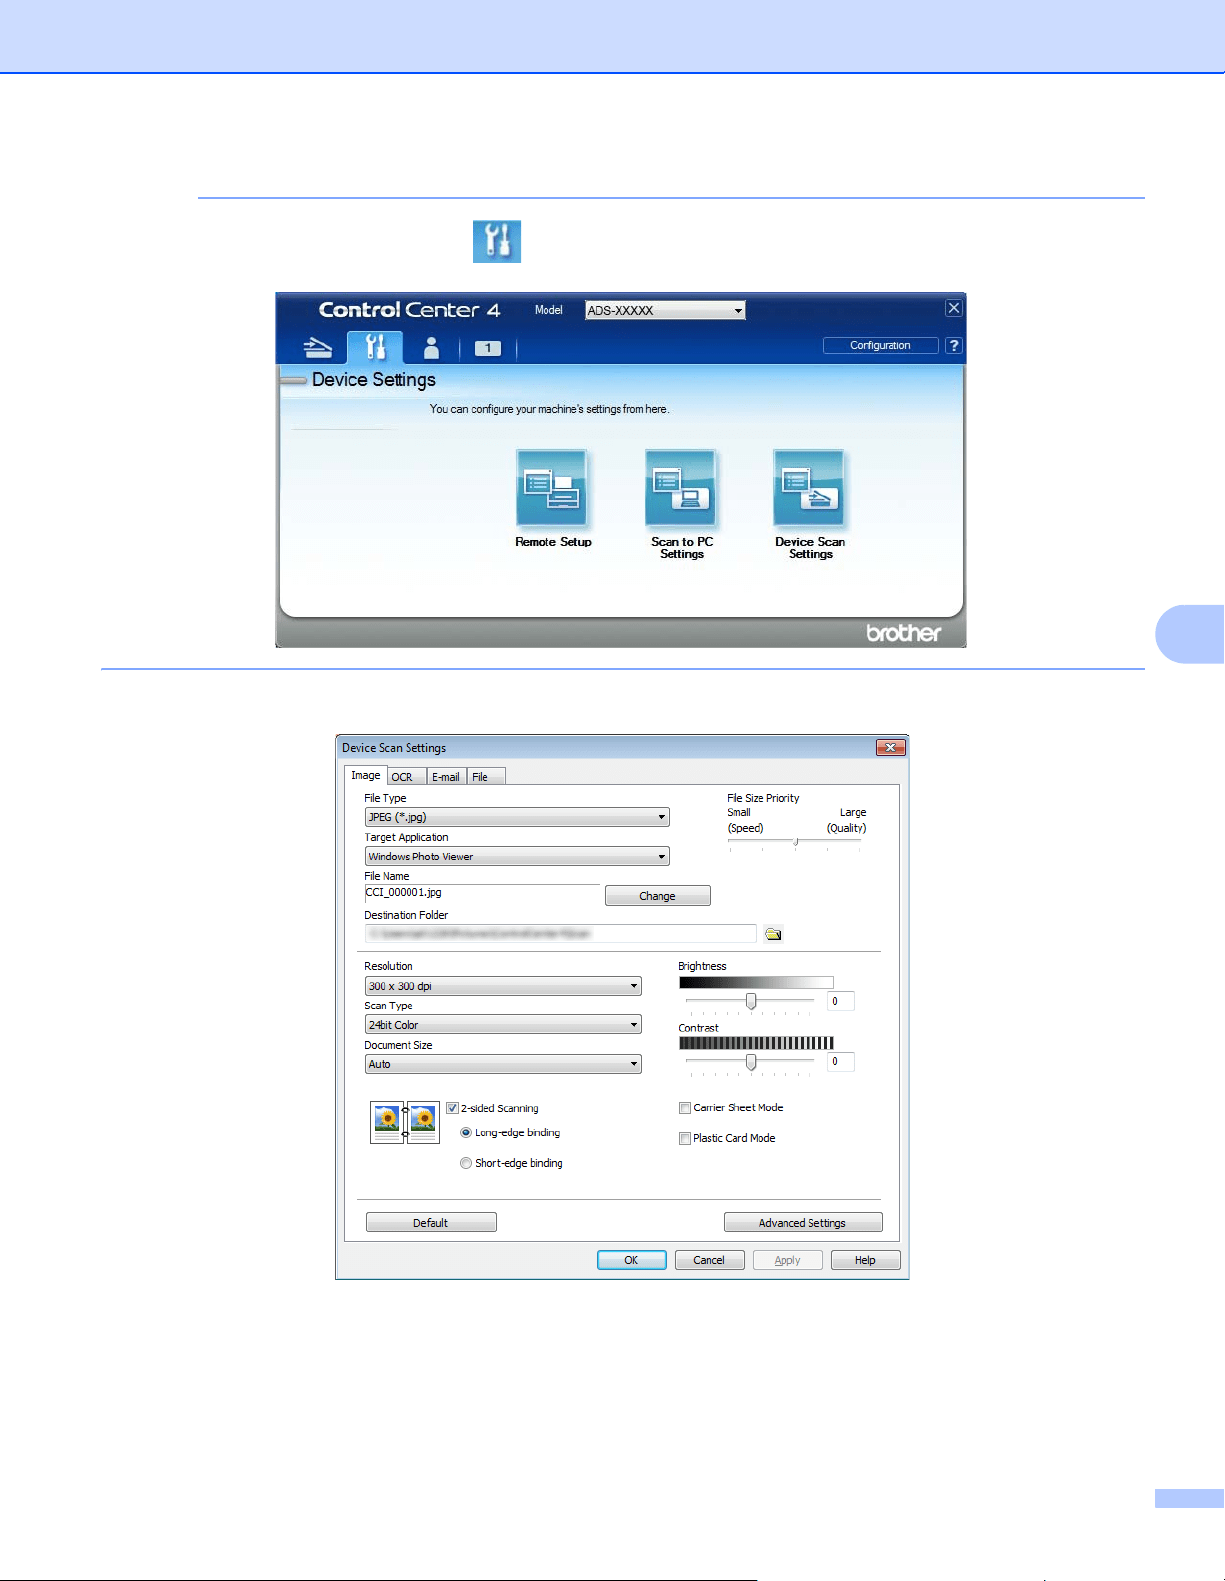
Scan Using the Control Panel
191
7
NOTE
If using Advanced Mode, click the (Settings) icon to access Device Settings.
3 Click the Device Scan Settings button. The Device Scan Settings dialog box appears.
4 Click the tab for the Scan-to action you want to change (Image, OCR, E-mail, or File).
5 Change the settings.
The following settings can be changed.
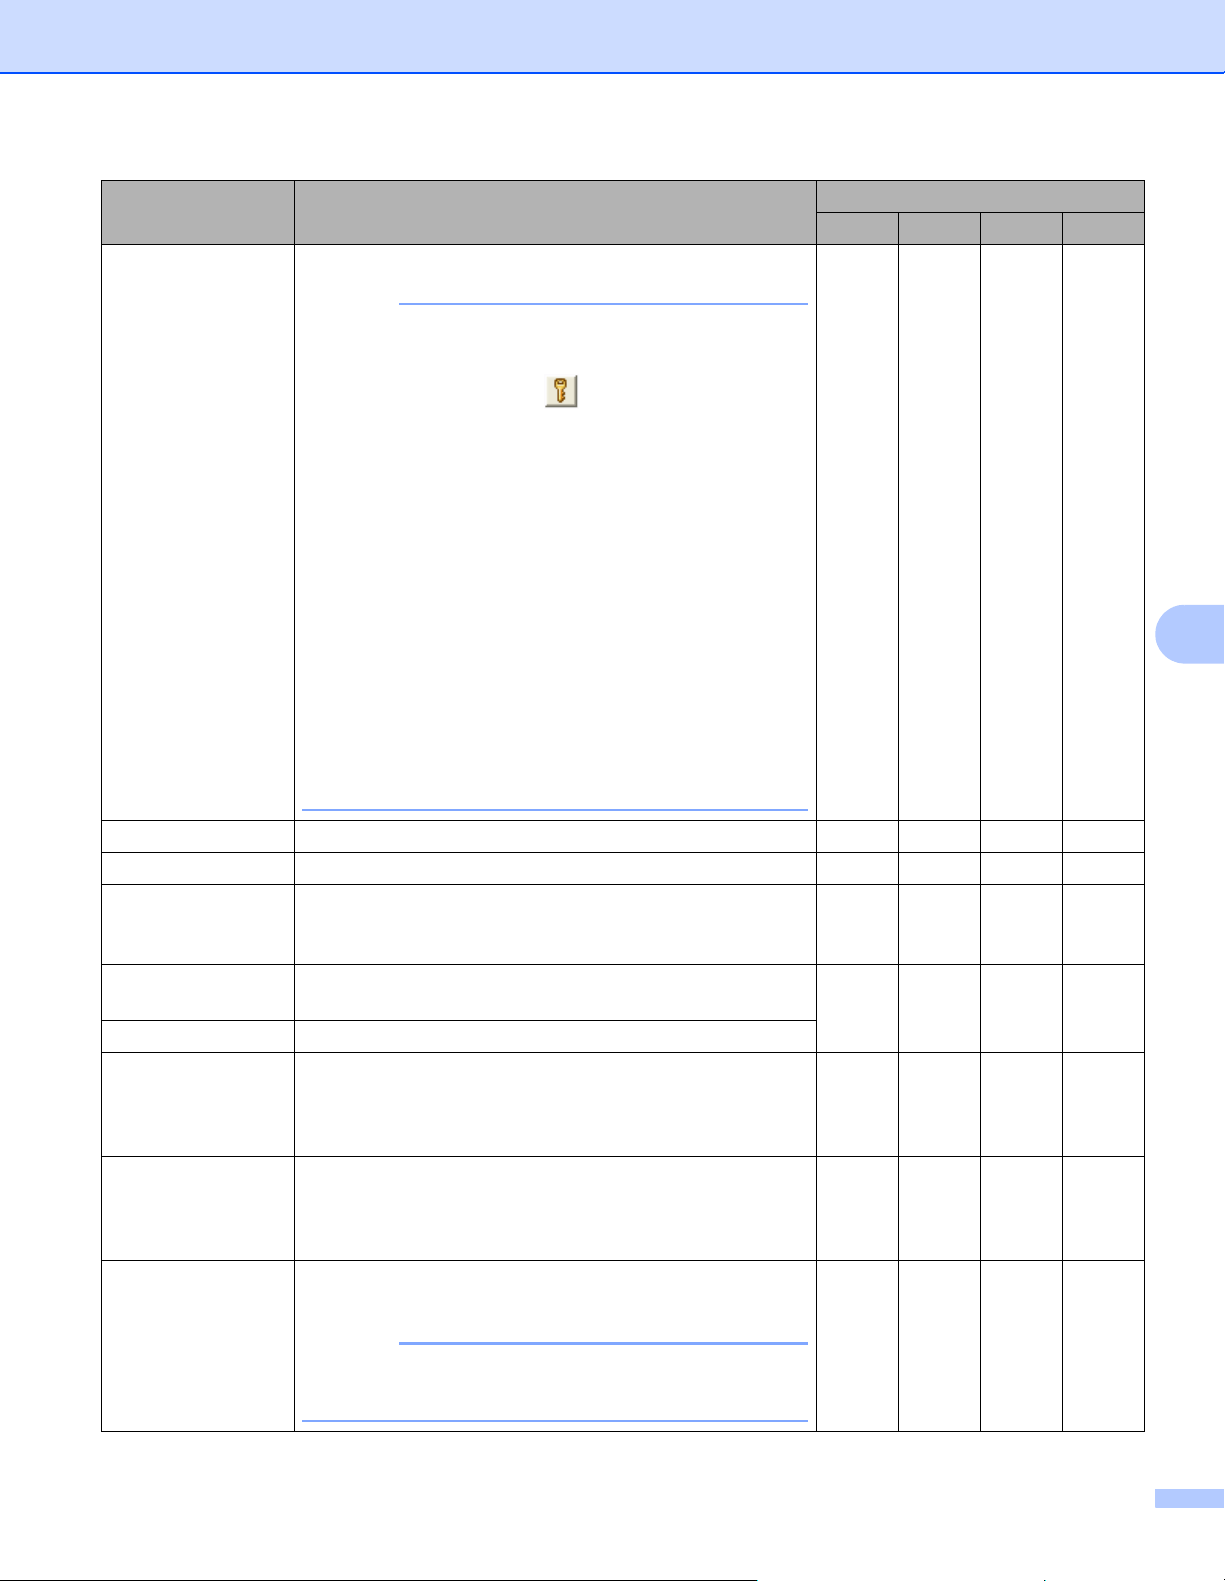
Scan Using the Control Panel
192
7
Setting Description Applicable Feature
Image OCR E-mail File
File Type Select the file type you want to use for the scanned data.
NOTE
• To save the document as a password-protected PDF,
select Secure PDF (*.pdf) from the File Type
drop-down list, click the (Set PDF Password)
button, and enter the password.
• Searchable PDF is a file format that includes the text
data layer over a scanned image. This layer allows you
to search the text on the image data. OCR Language
in the OCR setting must be set to match the language
in the searchable PDF.
• To save the document as a searchable PDF, select
Searchable PDF (*.pdf) from the File Type
drop-down list.
• Several file types such as TIFF, TIFF Multi-Page, PDF,
Secure PDF and JPEG support file size compression.
Select Uncompressed or Compressed to adjust the
file size for TIFF or TIFF Multi-Page. For PDF, Secure
PDF and JPEG, use the slider to adjust the file size
(not available for Scan to OCR).
Yes Yes Yes Yes
Target Application Select the destination application from the drop-down list. Yes Yes - -
OCR Language Set to match the language of the scanned document’s text. - Yes - -
File Name Click the Change button for Image, OCR or E-mail to
change the file naming attributes, such as Prefix,
Add Date & Time, and so on.
Yes Yes Yes Yes
Destination File
Path
Click the Folder icon to change the folder where you want
to save your scanned image.
Yes Yes Yes -
File Name To define file naming attributes, click the Change button.
Destination Folder Click the folder icon and browse to the folder where you
would like to save your scanned document. Select the
Show Folder check box to automatically display the
destination folder after scanning.
Yes Yes Yes No
Scan Location Select Folder and browse to the folder you would like to
save your scanned document to. Select the SharePoint
and Connection Test to verify your site you would like to
save your scanned document to.
---Yes
File Size Priority Adjust the File Size Priority by moving the slider to the
right or left.
NOTE
File Size Priority can be adjusted depending on your
selected File Type.
Yes - Yes Yes

Scan Using the Control Panel
193
7
Resolution Select a scanning resolution from the Resolution
drop
-down list. Higher resolutions take more memory and
transfer time, but produce a finer scanned image.
Yes Yes Yes Yes
Scan Type Select from a range of scan color depth.
Black & White
Use for text or line art images.
Gray (Error Diffusion)
Use for photographic images or graphics. (Error Diffusion
is a method for creating simulated grayscale images
without using true gray dots. Black dots are put in a
specific pattern to give a gray appearance.)
True Gray
Use for photographic images or graphics. This mode is
more exact due to using up to 256 shades of gray.
24bit Color
Uses up to 16.8 million colors to scan the image. Although
using 24bit Color creates an image with the most
accurate color reproduction, it requires the most memory
and has the longest transfer time.
Auto
Uses suitable colors for your document automatically.
Yes Yes Yes Yes
Document Size Document size is set to Auto by default. You can scan
documents of any size without making adjustments
to Document Size. For faster scan speeds, select the
exact size of your document from the Document Size
drop-down list.
NOTE
• If you select a 1 to 2 document size, the scanned
image will be divided into two documents that are half
the size of the setting. If you select 1to2(A4),
the scanned image will be divided into two A5-size
documents.
• To do 1 to 2 scanning, clear the Auto Image Rotation
check box in the Advanced Settings dialog box.
• If you select a 2 in 1 document size, two scanned
images will be combined into one document.
Yes Yes Yes Yes
Setting Description Applicable Feature
Image OCR E-mail File

Scan Using the Control Panel
194
7
Brightness Adjust the setting (-50 to 50) to get the best image. The
default value of 0 represents an average and is suitable
for most images. Set the Brightness level by dragging the
slider to the right or left to lighten or darken the image. You
can also enter a value in the box to set the level. If the
scanned image is too light, set a lower Brightness level
and scan the document again. If the image is too dark, set
a higher Brightness level and scan the document again.
Yes Yes Yes Yes
Contrast Adjust the setting (-50 to 50) to get the best image. The
default value of 0 represents an average and is suitable
for most images. Increase or decrease the contrast level
by moving the slider to the right or left. An increase
emphasizes dark and light areas of the image, while a
decrease reveals more details in gray areas. You can also
enter a value in the box to set the Contrast.
NOTE
The Contrast setting is only available when setting
Scan Type to Auto, Gray (Error Diffusion),
True Gray or 24bit Color.
Yes Yes Yes Yes
Default Restore all settings to their factory default values. Yes Yes Yes Yes
Carrier Sheet
Mode
Scan the following documents using the Carrier Sheet.
For this mode, select any setting other than Auto from the
Document Size drop-down list.
Large-sized Documents (A3, B4 and Ledger)
Fold the document in half and insert it in the Carrier
Sheet for 2-sided (duplex) scanning, then both front
and back pages will be combined into a single page.
Select 2in1(A4) for an A3 document, 2in1(B5) for a
B4 document or 2 in 1(Letter) for a Ledger document
from the Document Size drop-down list.
Important documents (photos, contracts)
Thin paper (receipts)
Irregularly-shaped paper (clippings)
NOTE
• Load only one Carrier Sheet at a time.
• Insert the document in the center of the Carrier Sheet
and align the top of the document with the top of the
Carrier Sheet.
Yes Yes Yes Yes
Setting Description Applicable Feature
Image OCR E-mail File
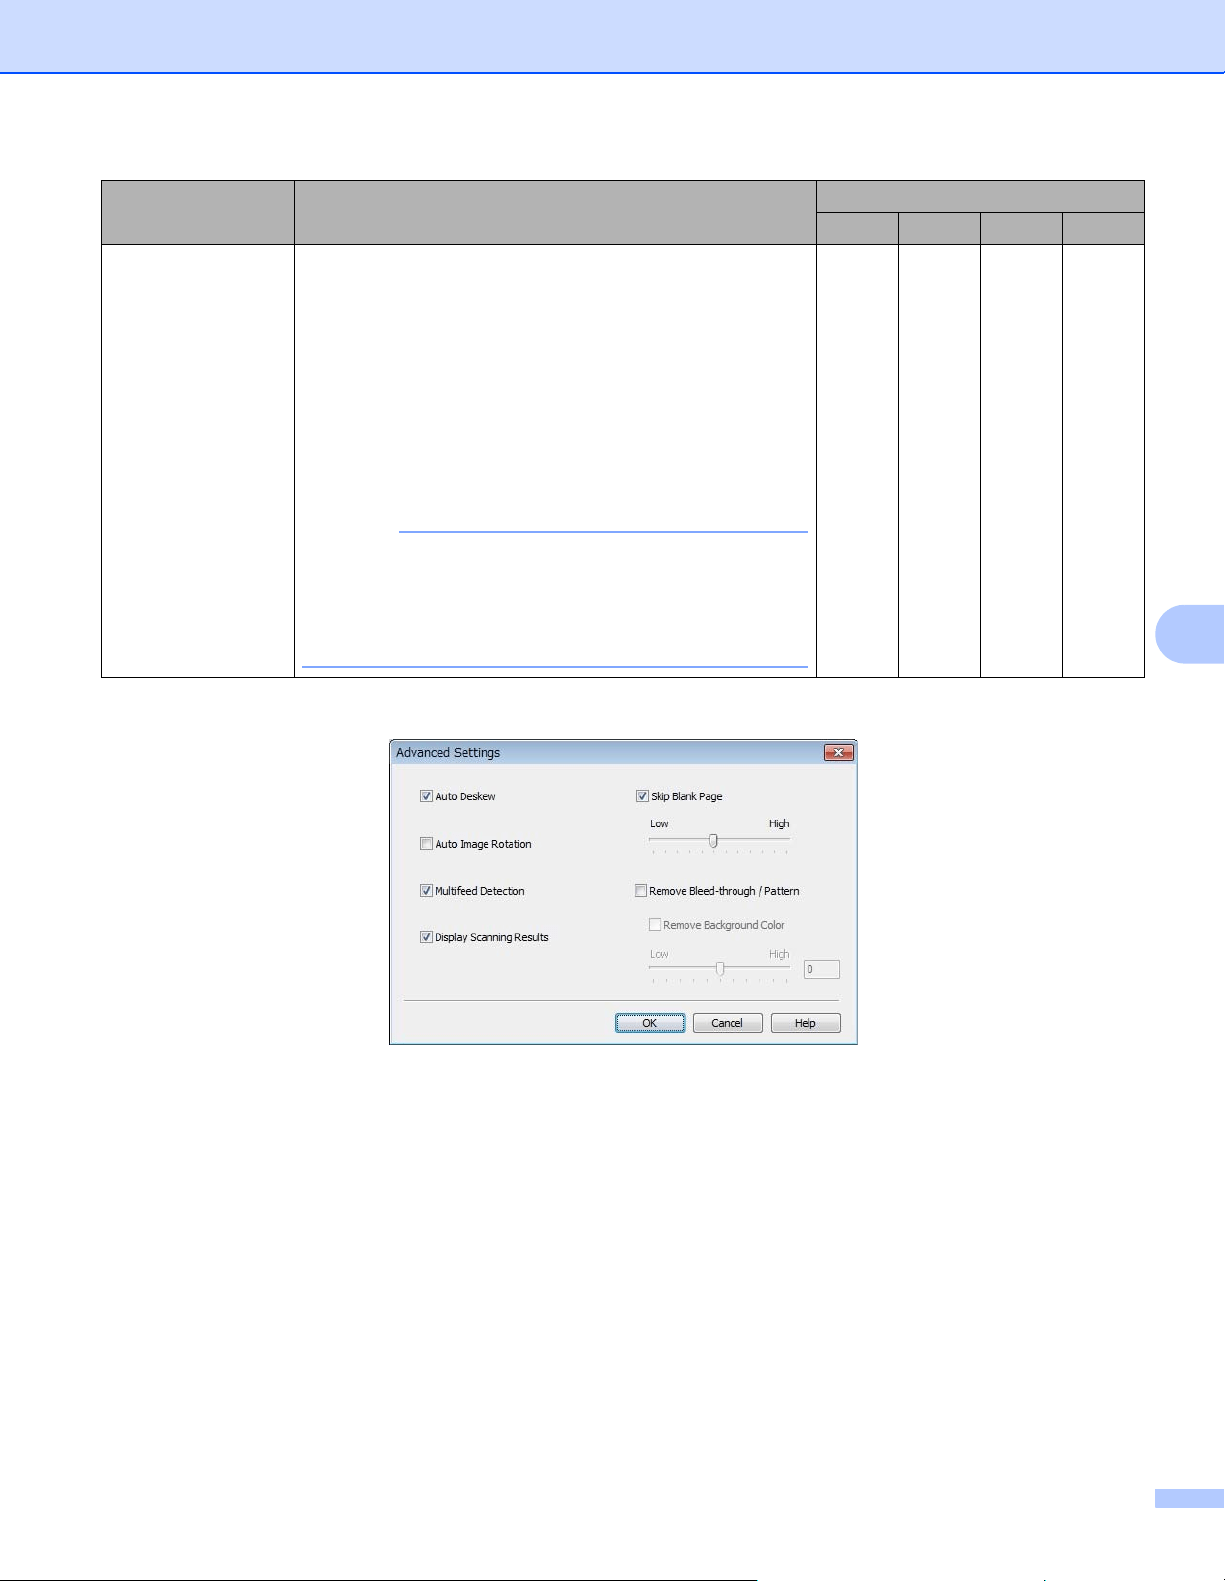
Scan Using the Control Panel
195
7
6 Click the Advanced Settings button. The Advanced Settings dialog box appears.
Plastic Card Mode Scan cards, such as driver’s licenses or insurance cards,
using these automatic settings:
Resolution: 600 x 600 dpi
Document Size: 2 in 1 (Auto)
2-sided Scanning: On (Short-edge binding)
Auto Deskew: Off
Multifeed Detection: Off
Auto Image Rotation: Off
NOTE
• To scan a plastic card with different settings, set
Plastic Card Mode off, Resolution to 600 dpi, and
Multifeed Detection to Off.
• Load up to five plastic cards at a time.
Yes Yes Yes Yes
Setting Description Applicable Feature
Image OCR E-mail File
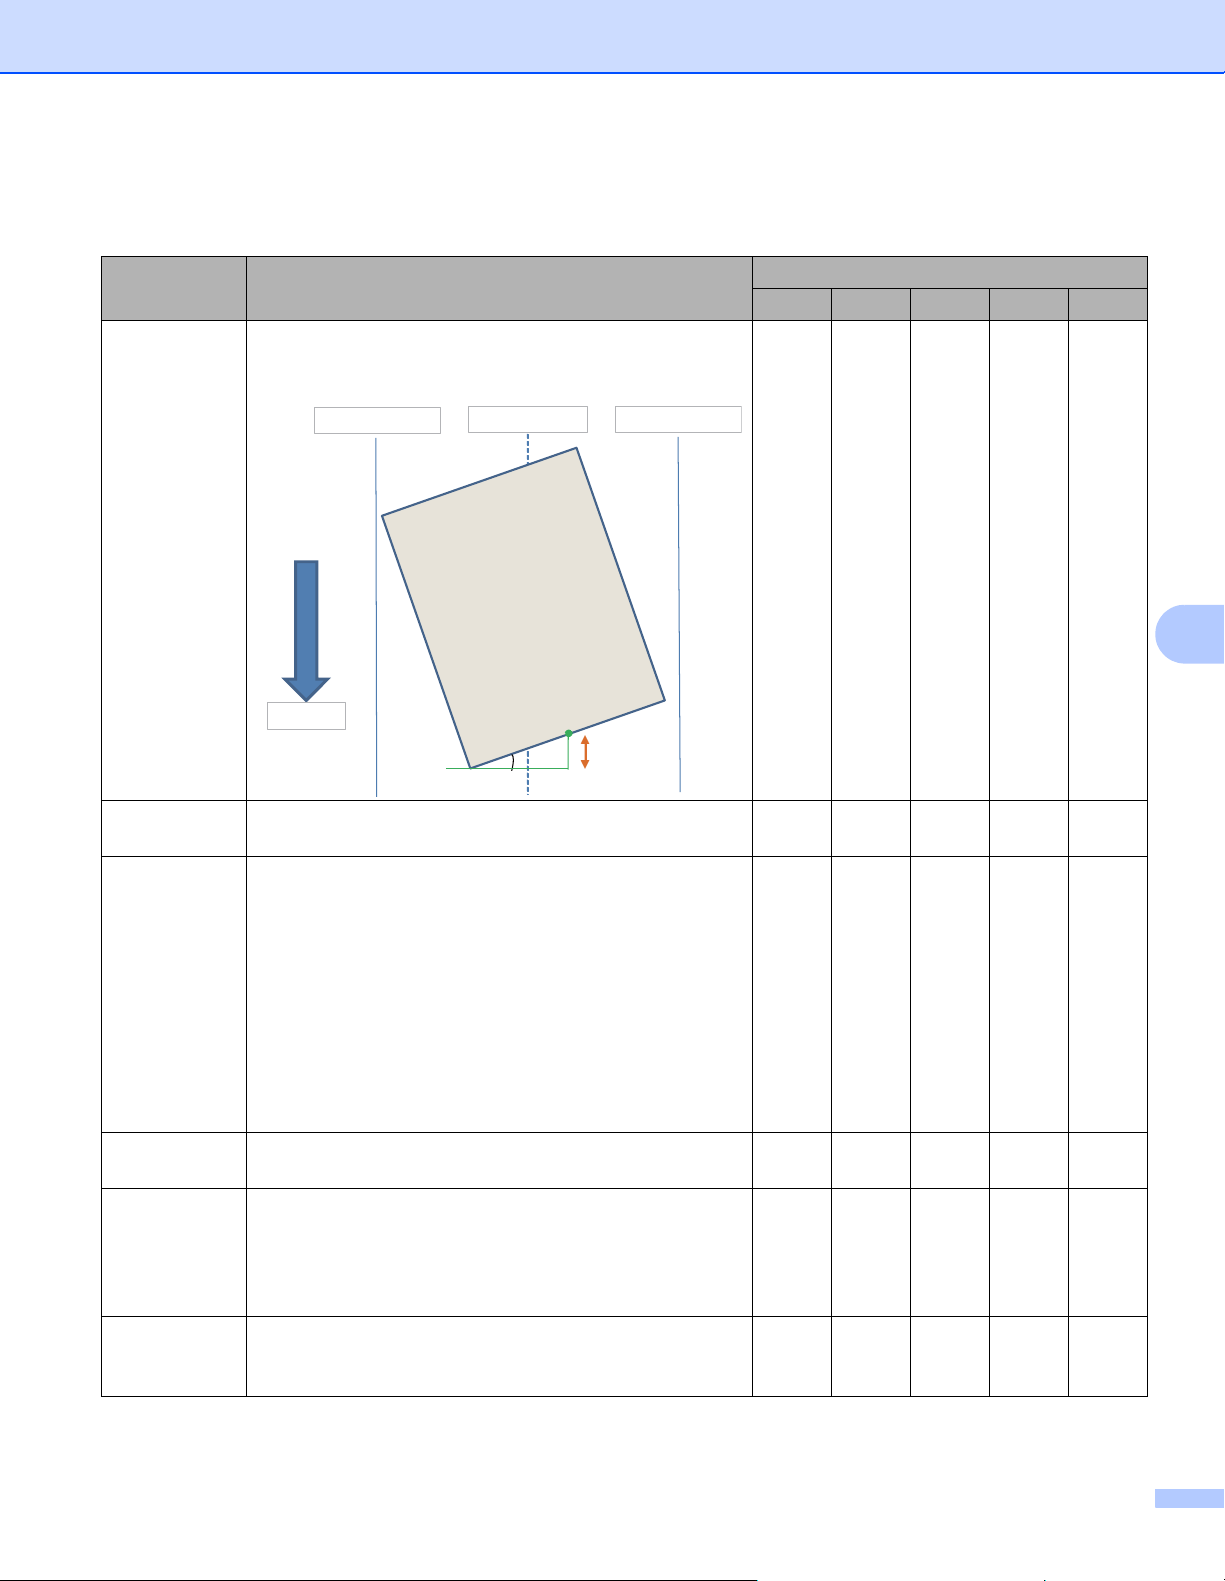
Scan Using the Control Panel
196
7
7 Change the settings.
The following settings can be changed.
1
Depending upon the condition of the original document, this function may not work properly.
Setting Description Applicable Feature
Image OCR E-mail File Print
Auto Deskew Corrects the skew (less than 0.36 in. (9 mm) from the
center of the document to the edge) of the scanned
data.
1
Yes Yes Yes Yes Yes
Auto Image
Rotation
Changes the direction of the document based on the
text orientation.
1
Yes Yes Yes Yes Yes
Remove
Bleed-
through /
Pattern/
Remove
Background
Color
Prevents bleedthrough on a two-sided document, and
also allows you to remove the base color of documents,
such as newspapers, to make the scanned data more
recognizable.
1
The sensitivity of the Remove Bleed-through / Pattern /
Remove Background Color function can be adjusted with
the sliders. Moving the slider toward “High” will make the
scanner more likely to Remove Bleed-through / Pattern /
Remove Background Color, while moving it toward “Low”
will make the scanner less likely to Remove Bleed-
through / Pattern / Remove Background Color.
Yes Yes Yes Yes Yes
Skip Blank
Page
Removes blank pages of the document from the
scanning results.
1
Yes Yes Yes Yes Yes
Multifeed
Detection
Uses a ultrasonic sensor to detect when a multifeed has
occurred. When this function detects a multifeed,
confirm that the data scanned before the multifeed has
been saved, and then start scanning again at the next
page or the beginning of the document.
Yes Yes Yes Yes Yes
Display
Scanning
Results
Shows the numbers of total pages saved and blank
pages skipped on your computer screen.
Yes Yes Yes Yes Yes
less than 9 mm
center of the
document
document
right edge of the
paper feed tray
left edge of the
paper feed tray
center of the
transport path
Scanning
direction

Scan Using the Control Panel
197
7
8 Click OK to close the Advanced Settings dialog box.
9 Click OK to close the Device Scan Settings dialog box.

Scan Using the Control Panel
198
7
Scan Options Using the Touchscreen (ADS-2800W / ADS-3600W)
7
Skip Blank Page Function 7
Set Skip Blank Page to On to remove blank pages of the document from the scanning results.
The sensitivity of the Skip Blank Page function can be adjusted with the slider. Moving the slider toward “High”
will make the scanner more likely to skip pages, while moving it toward “Low” will make the scanner less likely
to skip pages.
1 Swipe left or right to display the Scan-to action you want (to PC, to Network, to FTP/SFTP,
to E-mail Server, to SharePoint, to USB).
2 Press Options.
3 Press Skip Blank Page.
4 Press On (or Off).
Adjust the Scanning Position 7
You can adjust the position at which documents are scanned if the output position of images shifts or if
images are squeezed together or stretched out vertically.
1 Swipe left or right to display the scan-to action you want (to Network, to FTP/SFTP, to E-mail Server,
to SharePoint, to USB).
2 Press Options.
3 Press Advanced Settings.
4 Press Margin Settings.
5 Select -3 to 3.
6 Press OK.
Split a Scanned File and Save 7
When multiple documents have been scanned, you can split up and save documents separately by using this
function. You can also set the number of pages to split a document by.
1 Swipe left or right to display the scan functions (to Network, to FTP/SFTP, to Email Server,
to SharePoint, or to USB).
2 Press Options.
3 Press Document Separation.
4 Press Document Separation again.
5 Press Number of Documents or Number of Pages.
Scan Using the Control Panel
199
7
6 Press Number of Documents or Number of Pages again.
7 Enter the number of documents or pages to split.
8 Press OK.
Scan a Specific Area 7
Cropping allows you to scan a portion of the document.
1 Press (All Settings).
2 Press Initial Setup.
3 Press Scan offset correction.
4 Select Front Page Offset or Back Page Offset.
5 Adjust the area and press OK.
6 Press .
Automatically Detect Whether a Document Uses Color 7
This feature automatically detects whether the document uses color and generates a scanned image of it.
For documents that mix color and black and white pages, color pages will be scanned in Color mode, while
black and white pages will be scanned in Black & White mode.
1 Swipe left or right to display the Scan-to action you want (to PC, to Network, to FTP/SFTP,
to E-mail Server, to SharePoint, to USB).
2 Select the Scan-to action you want.
3 Press Options.
4 Press Scan Type.
5 Select Auto.
Auto Color Detect Adjust 7
When the scan type is set to Auto, you can adjust the detection level of color, B&W and grayscale.
1 Swipe left or right to display the Scan-to action you want (to Network, to FTP/SFTP, to E-mail Server,
to SharePoint, to USB).
2 Select the Scan-to action you want.
3 Press Options.
4 Press Advanced Settings.
5 Press Auto Color Detect Adjust.
6 Adjust the color detection level.
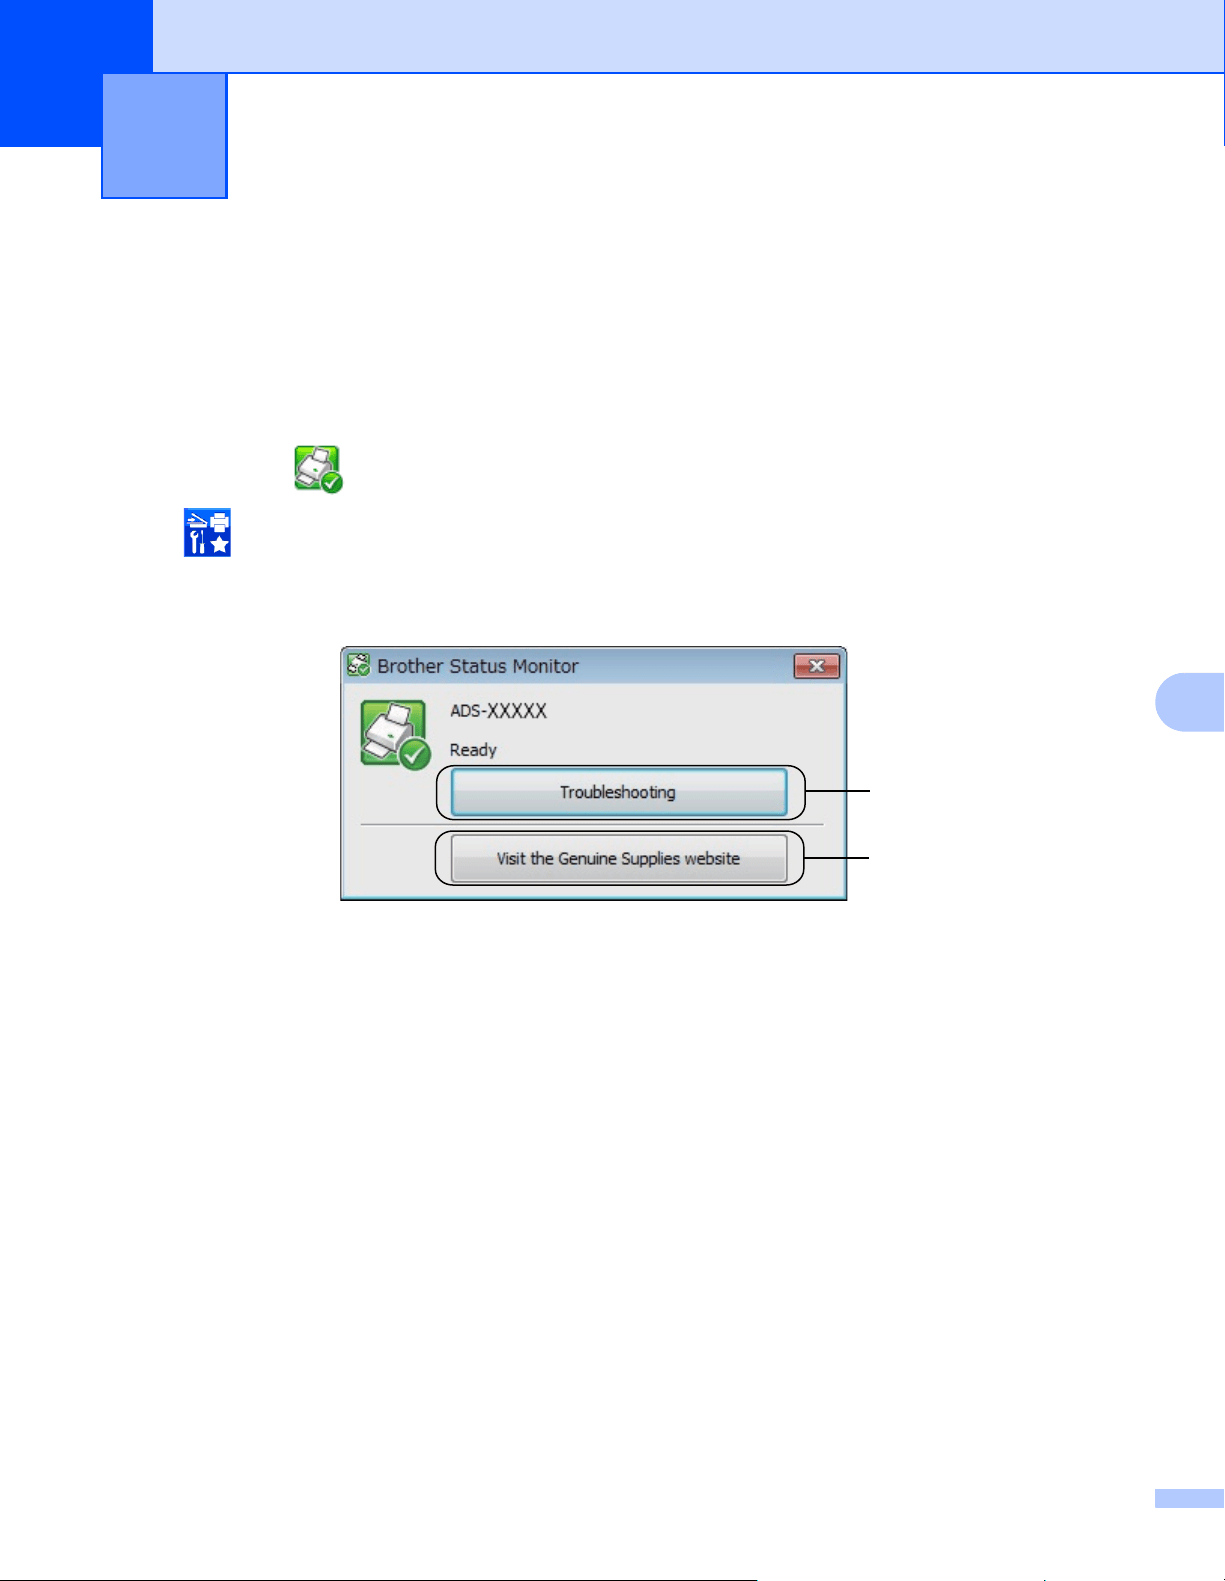
200
8
8
Monitor the Machine’s Status from Your Computer
(Windows
®
) 8
The Status Monitor utility is a configurable software tool for monitoring the status of one or more devices,
allowing you to get immediate notification of error messages.
Do one of the following:
Double-click the (Status Monitor) icon in the task tray.
Click (Brother Utilities) on your desktop, and then click the drop-down list and select your model
name (if not already selected). Click Tools in the left navigation bar, and then click Status Monitor.
The Brother Status Monitor screen appears.
1 Troubleshooting
Click to access the Status Monitor troubleshooting website.
2 Visit the Genuine Supplies website
Click to access the Brother genuine supplies website.
Managing the Machine from Your
Computer
8
1
2
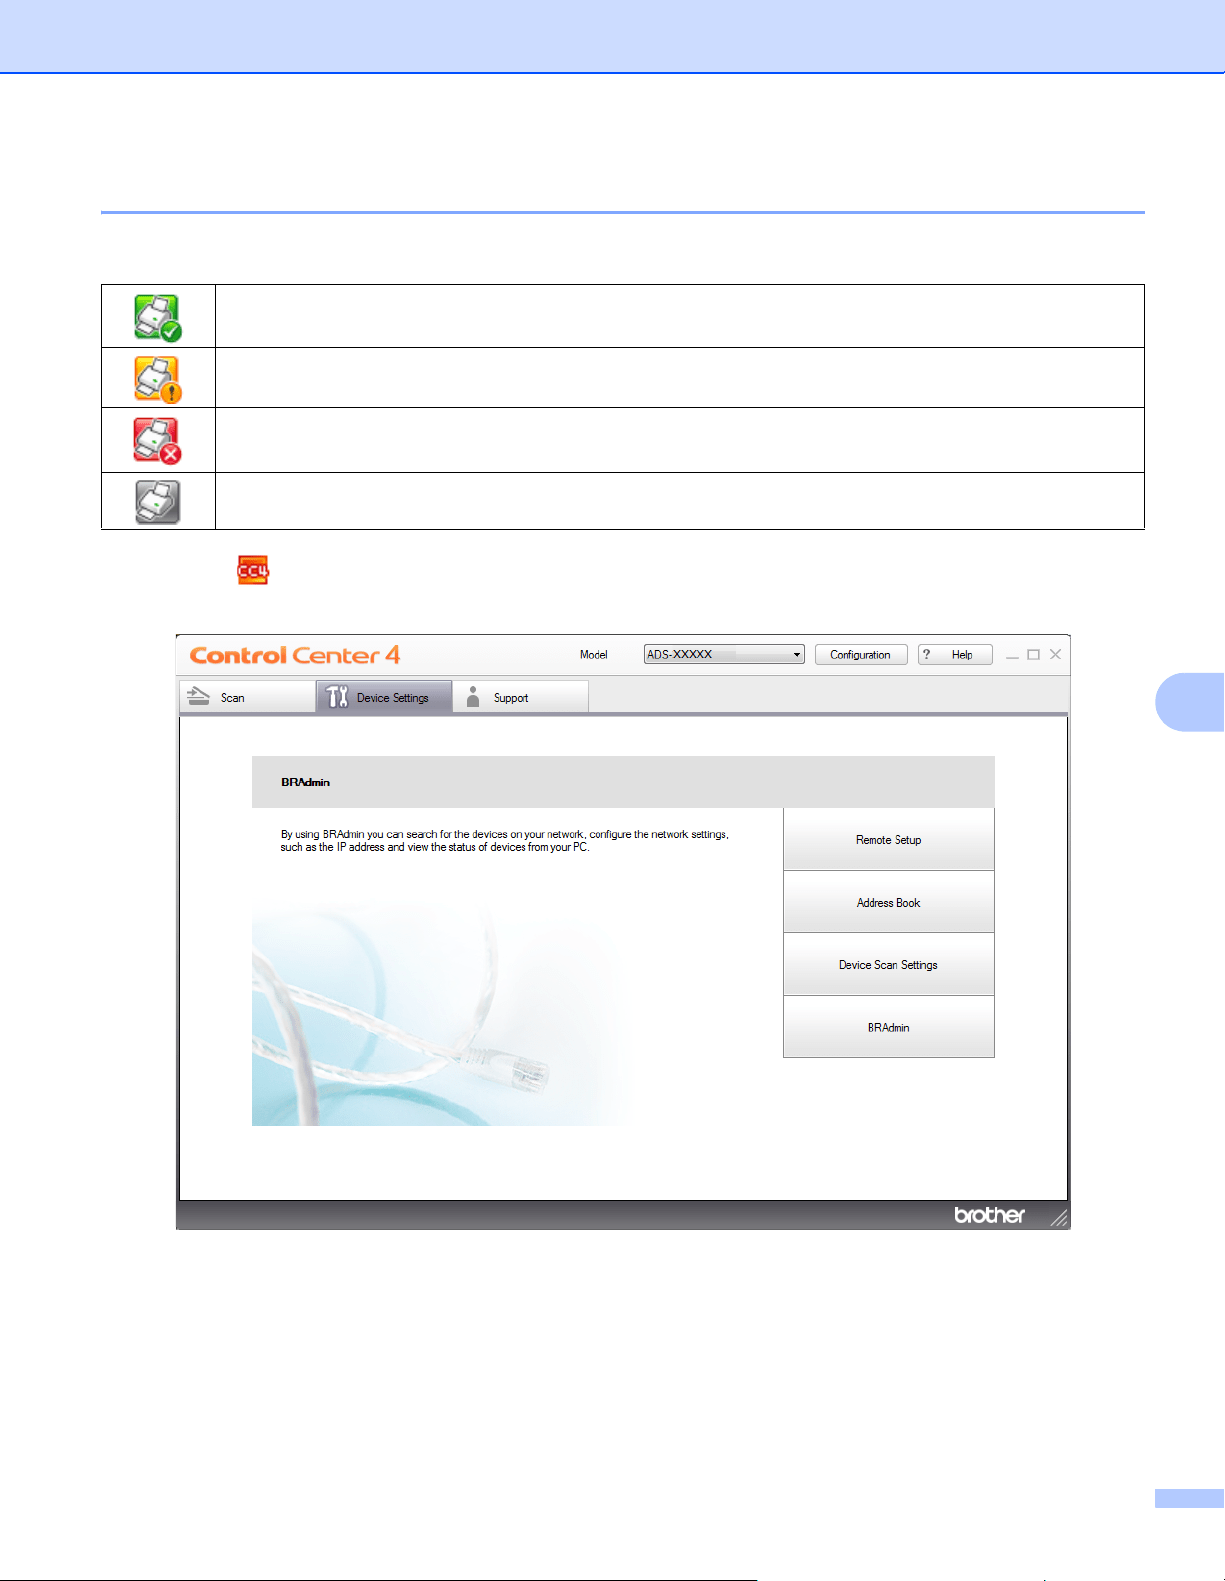
Managing the Machine from Your Computer
201
8
Status Monitor Indicators 8
The Brother Status Monitor icon changes color based on your machine’s status.
1 Click the (ControlCenter4) icon in the task tray.
The ControlCenter4 window appears.
A green icon indicates that your scanner is in a normal stand-by state.
A yellow icon indicates a warning.
A red icon indicates an error has occurred.
A gray icon indicates that your scanner is offline.
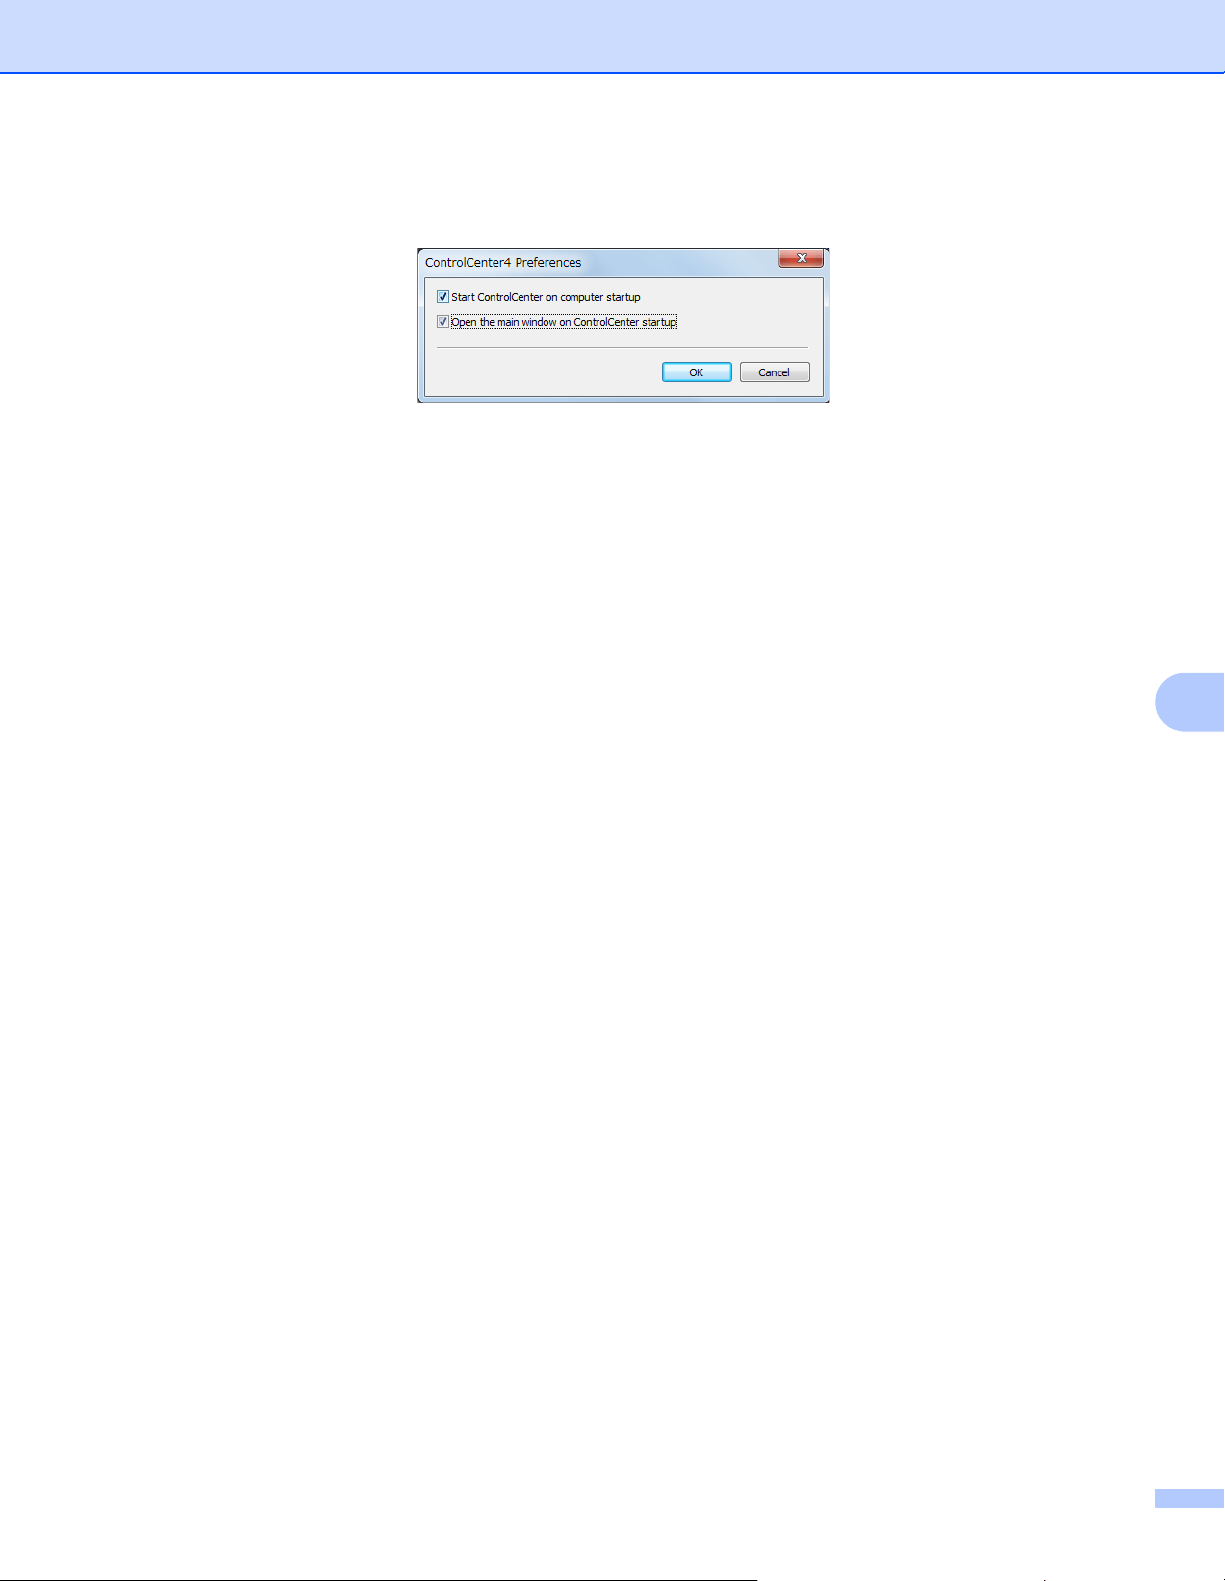
Managing the Machine from Your Computer
202
8
2 Click Configuration, and then select Preferences.
The ControlCenter4 Preferences window appears.
3 Select (or clear) the Start ControlCenter on computer startup check box.
4 Click OK.
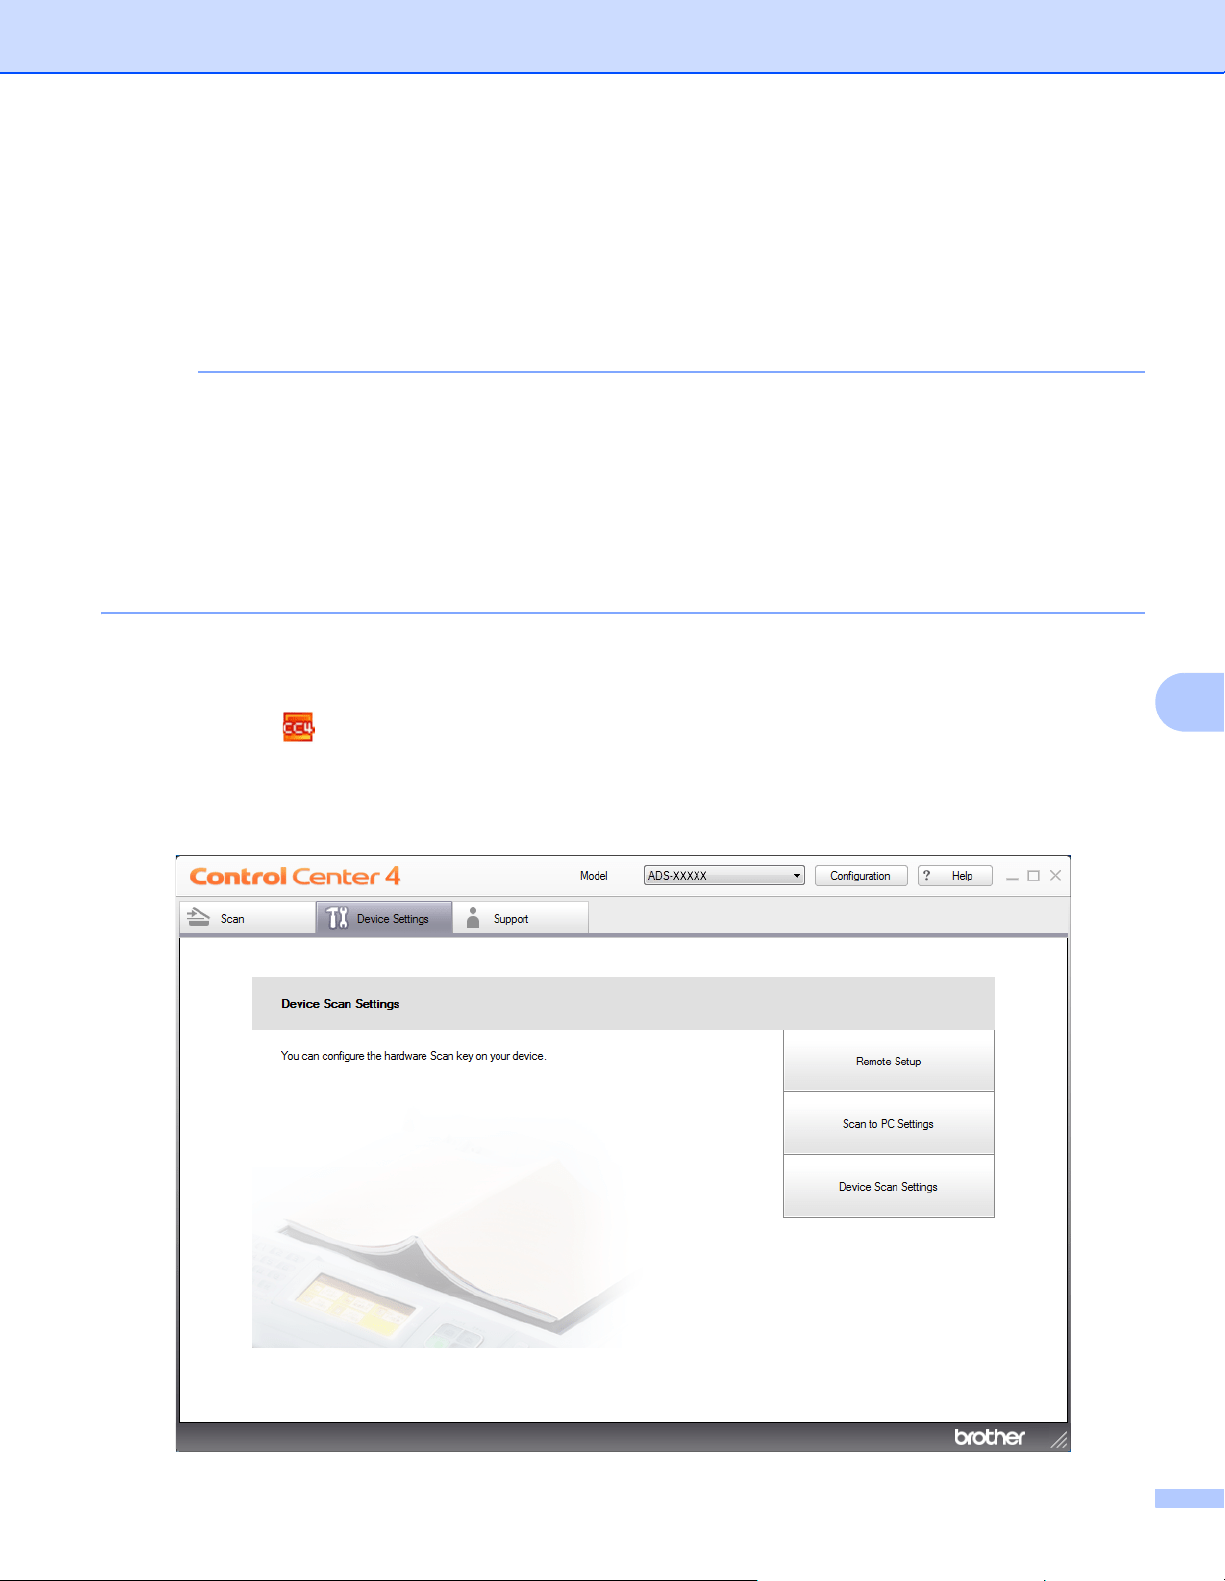
Managing the Machine from Your Computer
203
8
Set Up the Brother Machine from Your Computer 8
The Remote Setup application lets you configure many machine settings from your computer. When you start
the Remote Setup application, the settings on your Brother machine are downloaded automatically to your
computer and displayed on the screen. If you change the settings on your computer, you can upload them
directly to the machine.
NOTE
If an error dialog box appears, Remote Setup will not start. Correct the error and then try to start
Remote Setup again.
Windows
®
Users only:
• If your computer is protected by a firewall, and is unable to use Remote Setup, you may have to
configure the firewall settings to allow communication through port numbers 137 and 161.
• If you are using Windows
®
Firewall and you installed the scanner driver from the installation disc,
the necessary Firewall settings have already been made.
1 Start the application.
Windows
®
a Click the (ControlCenter4) icon in the task tray and then select Open from the menu.
The ControlCenter4 window appears.
b Click the Device Settings tab (the example below uses Home Mode).
c Click the Remote Setup button.
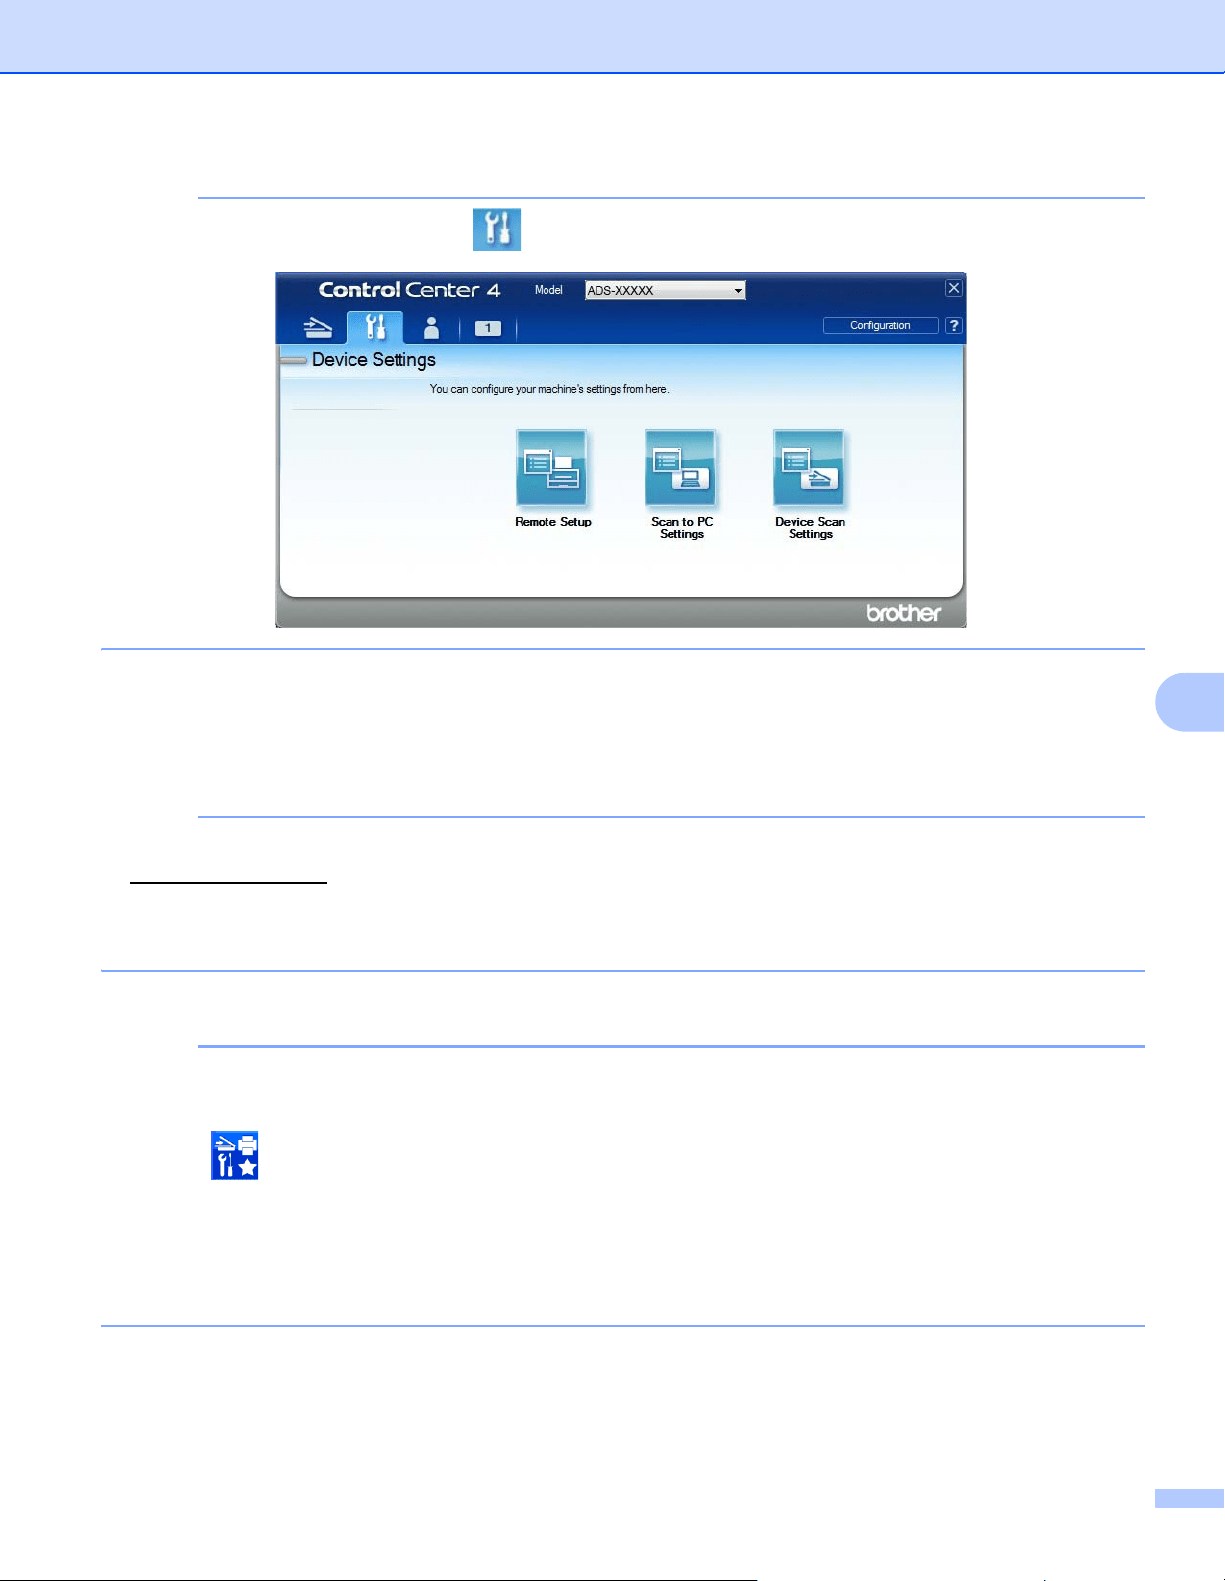
Managing the Machine from Your Computer
204
8
NOTE
If using Advanced Mode, click the (Settings) icon to access Device Settings.
Macintosh
1 In the Finder menu bar, click Go > Applications > Brother.
2 Double-click the Remote Setup icon.
NOTE
• To use Remote Setup, go to your model's Downloads page on the Brother Solutions Center at
support.brother.com
and download Remote Setup from Utilities.
• Remote Setup for Mac supports USB connections only.
• Remote Setup for Mac supports macOS 10.13 or earlier.
2 The Remote Setup window appears.
NOTE
You can also start Remote Setup by following the instructions below:
• Windows
®
Click (Brother Utilities) on your desktop, and then click the drop-down list and select your model
name (if not already selected). Click Tools in the left navigation bar, and then click Remote Setup.
•Macintosh
In the Finder menu bar, click Go > Applications > Brother, and then double-click the Remote Setup
icon.
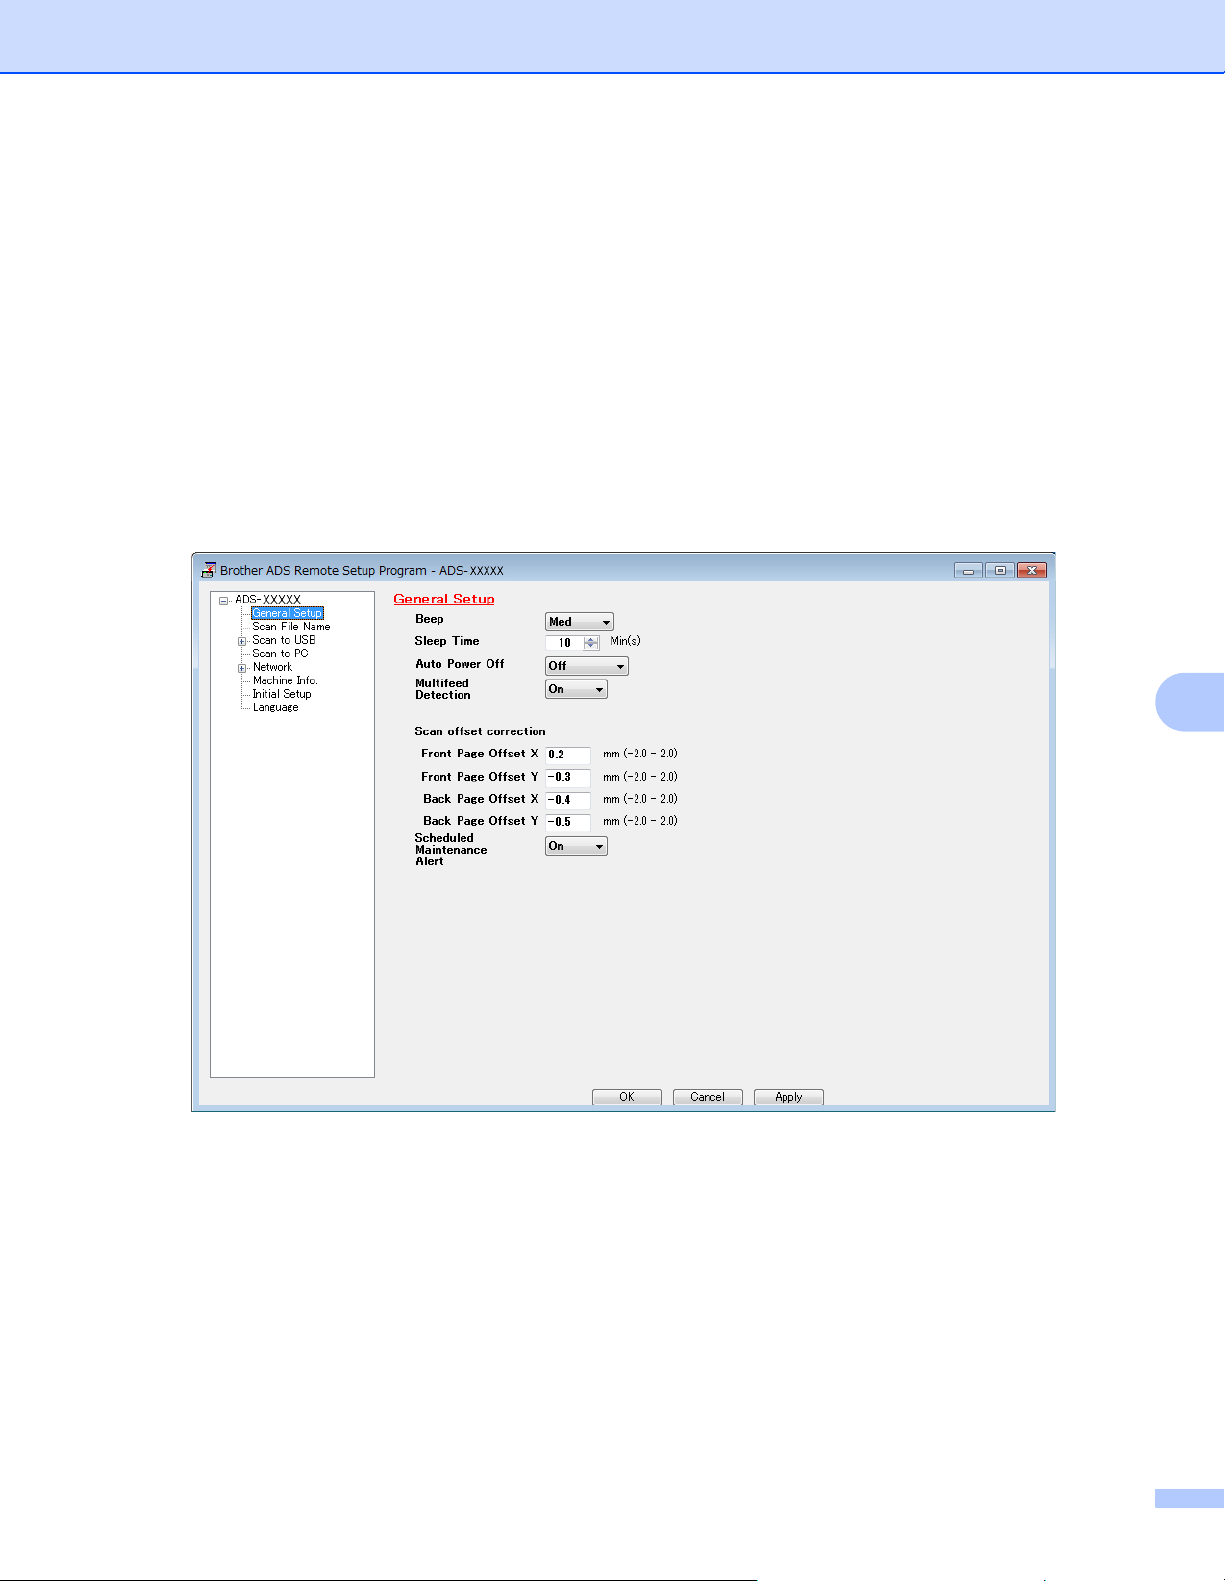
Managing the Machine from Your Computer
205
8
3 Select a menu in the left navigation pane and configure the settings as needed (the example below uses
General Setup in Windows
®
).
OK
Click to start uploading data to the machine and exit the Remote Setup application. If an error
message appears, re-enter the correct data, and then click OK.
Cancel
Click to exit the Remote Setup application without uploading data to the machine.
Apply
Click to upload data to the machine without exiting the Remote Setup application.
ADS-2400N and ADS-3000N screen
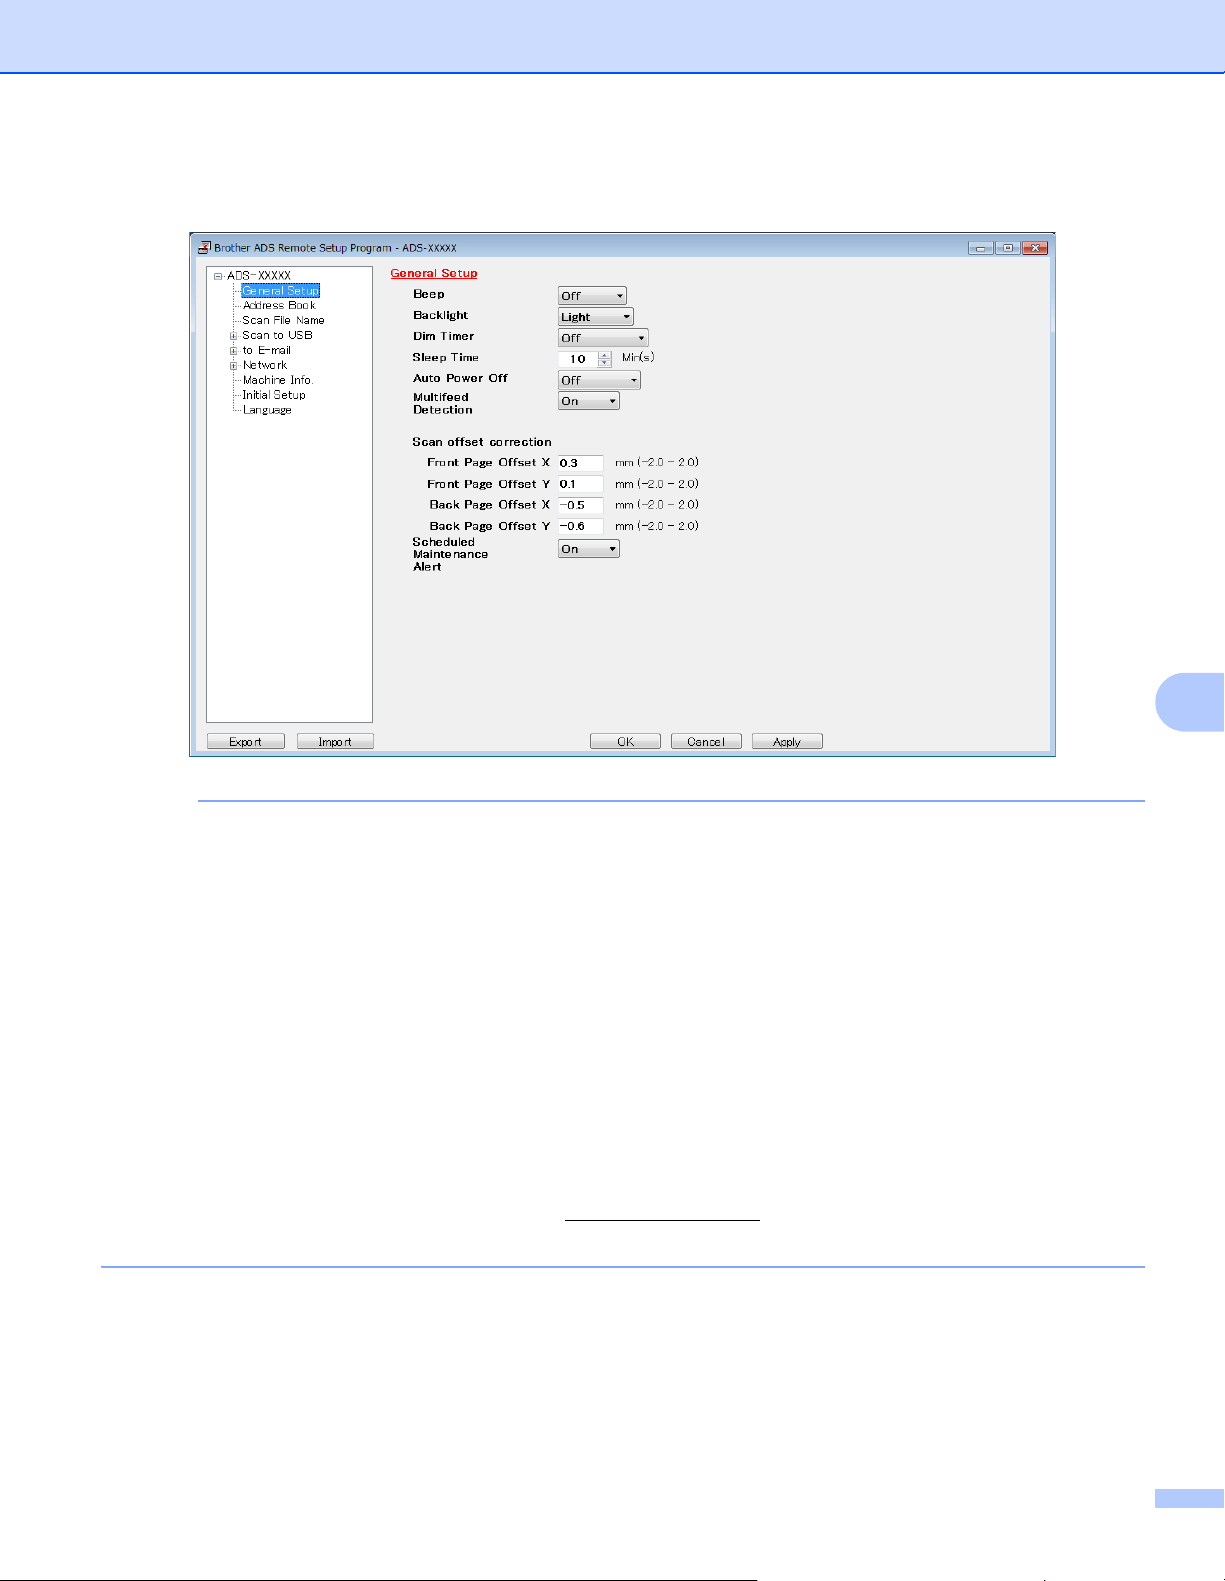
Managing the Machine from Your Computer
206
8
ADS-2800W and ADS-3600W screen
NOTE
Click the Export button to save all settings for your machine.
For Windows
®
Users only:
• If your computer is protected by a firewall, and is unable to use Remote Setup, you may have to
configure the firewall settings to allow communication through port numbers 137 and 161.
• If you are using Windows
®
Firewall and you installed the scanner driver from the installation disc,
the necessary Firewall settings have already been made.
For Macintosh Users only:
• If you change the machine that was registered to your computer during installation of the Full Driver &
Software Package (see the Quick Setup Guide), or if the network environment has changed, you must
specify the new machine. Open the Device Selector and select the new machine. (See Configure
Network Scanning for Macintosh on page 74.)
• If you require more advanced machine management, use the latest version of BRAdmin Professional 3
utility that is available as a download from support.brother.com
. See the BRAdmin Professional 3 Help
menu for more information about using BRAdmin Professional 3.
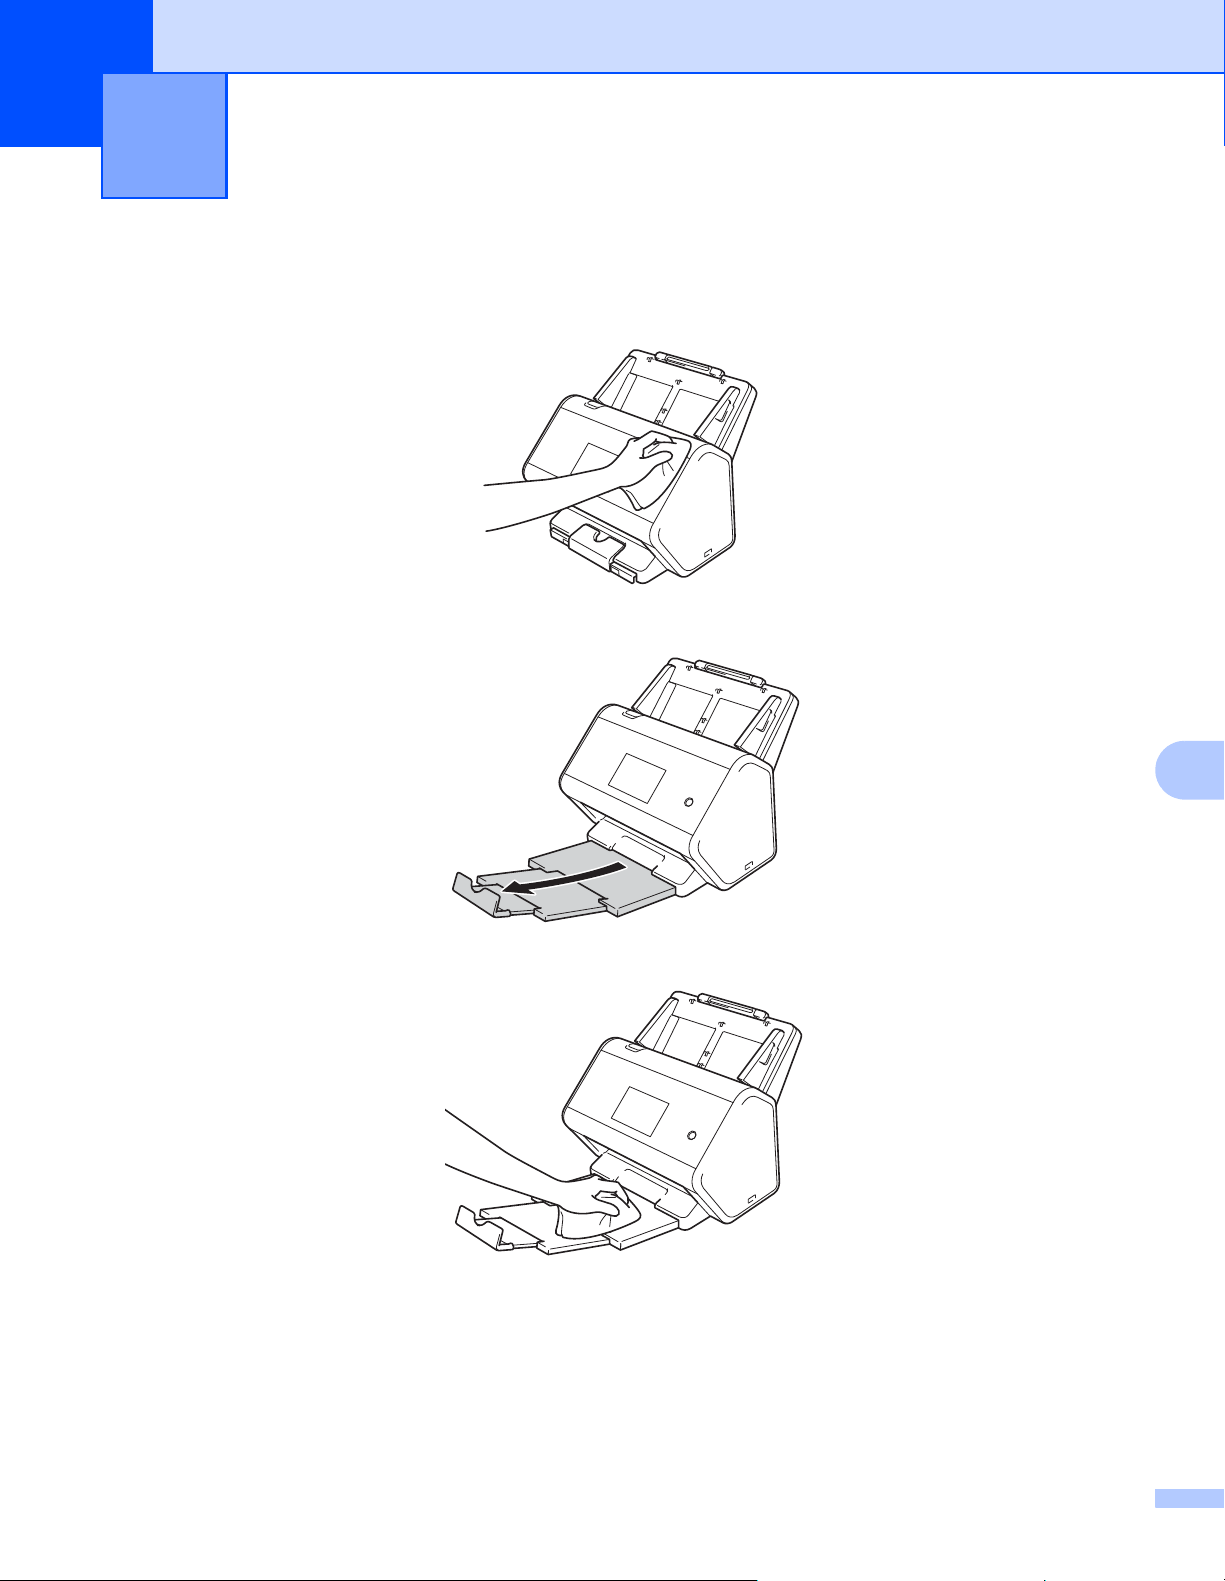
207
9
9
Clean the Outside of the Machine 9
1 Wipe the Control Panel with a dry, soft, lint-free cloth to remove dust.
2 Unfold the Output Tray and Document stopper.
3 Wipe the inside of the Output Tray with a dry, soft, lint-free cloth to remove dust.
Routine Maintenance 9
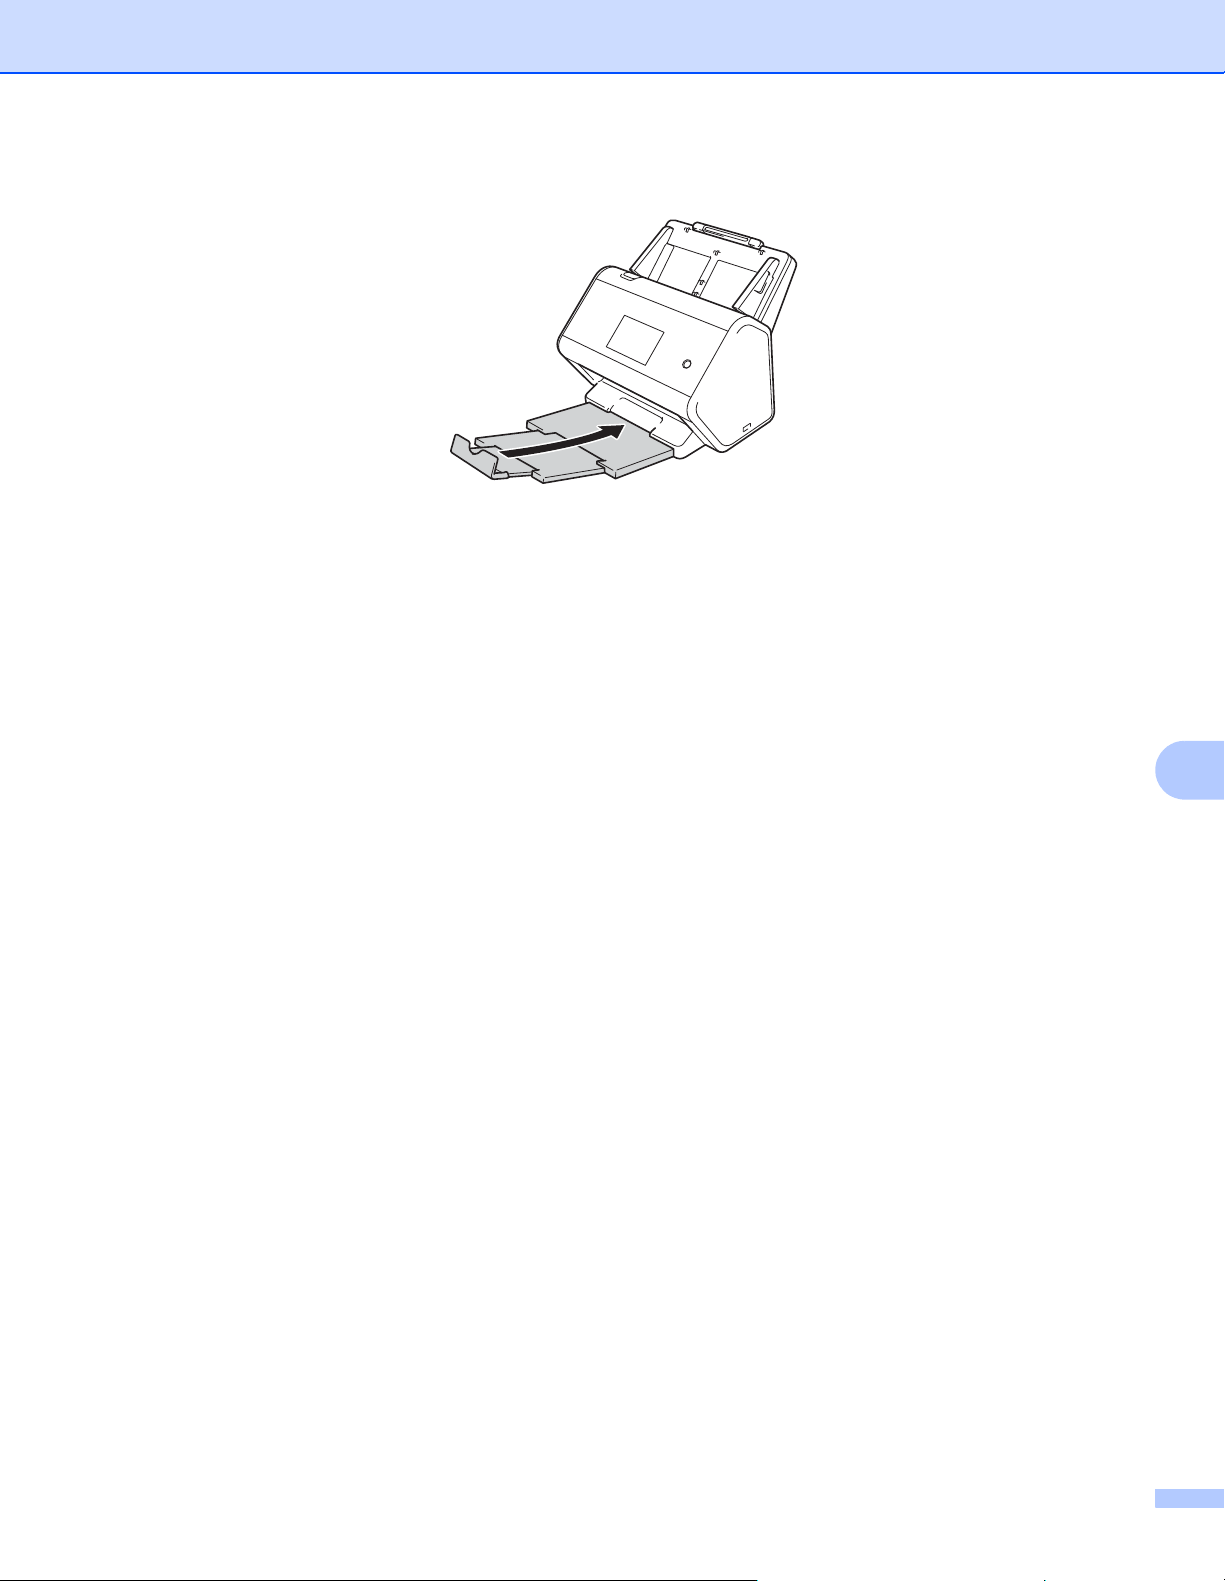
Routine Maintenance
208
9
4 Firmly push the Output Tray into the machine.
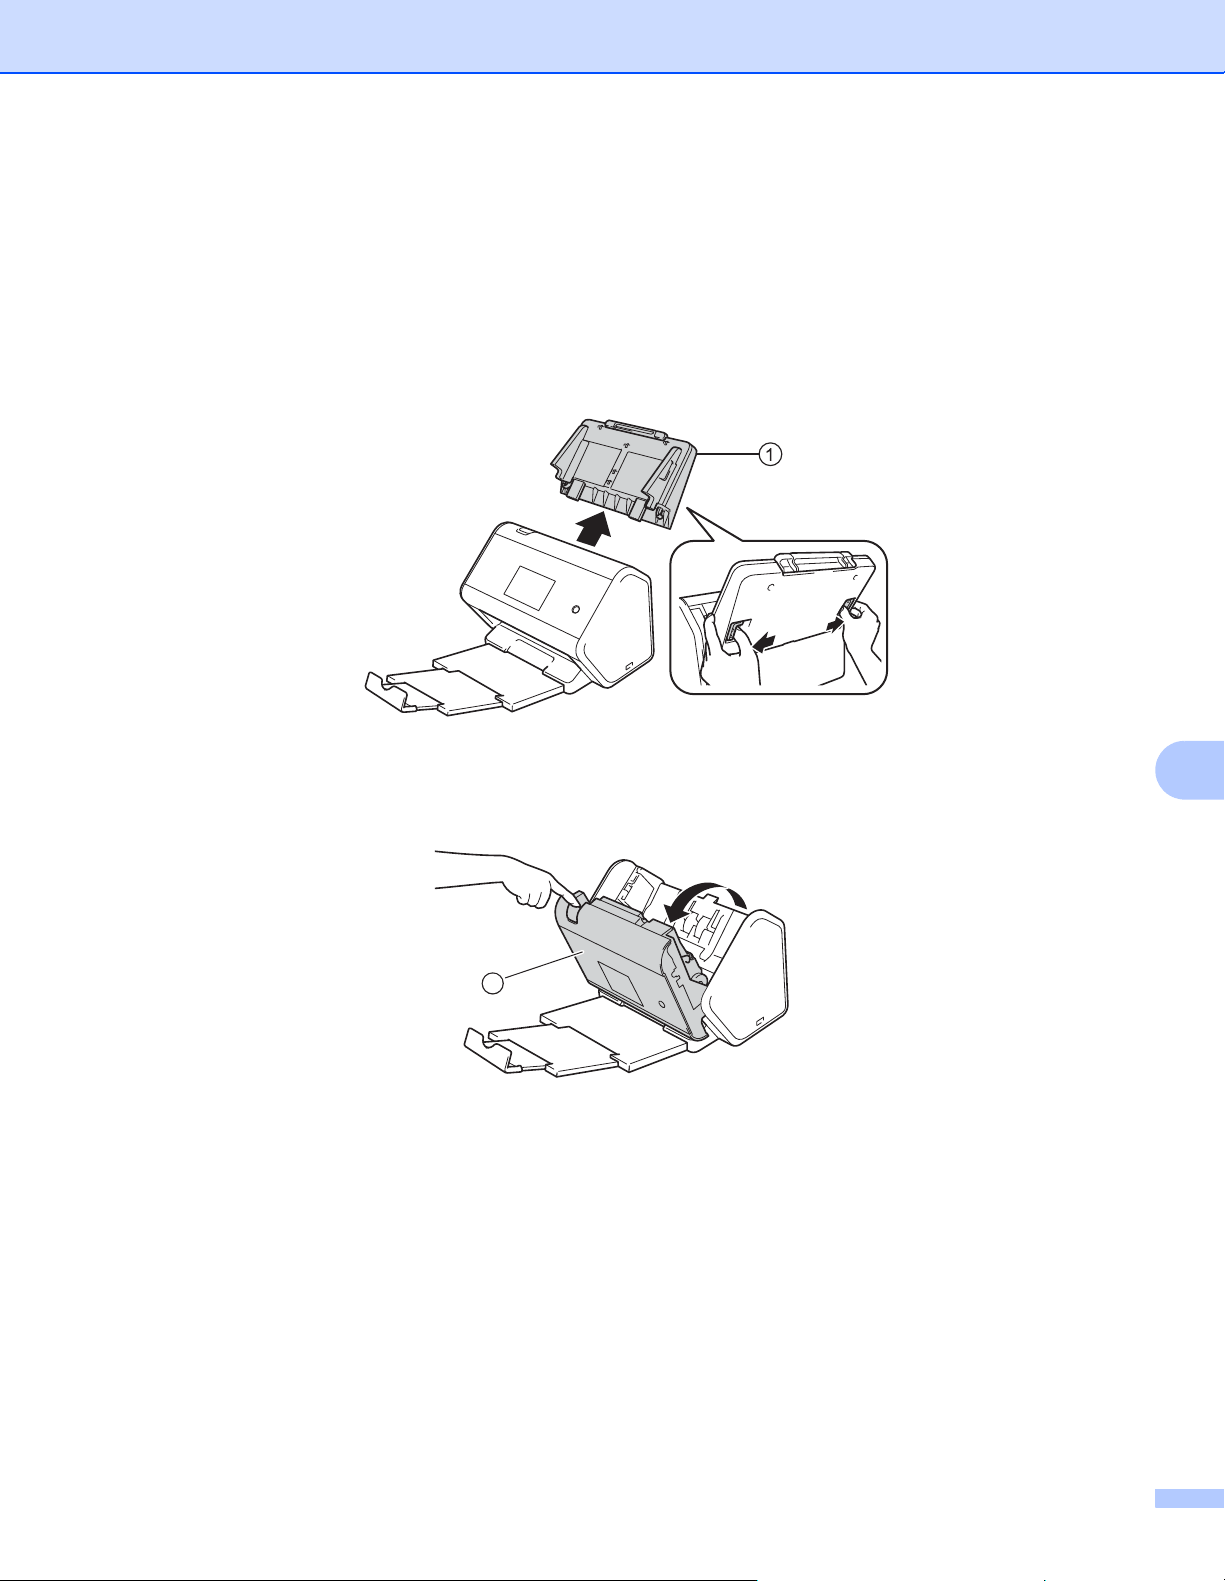
Routine Maintenance
209
9
Clean the Scanner and Rollers 9
A spot of dirt or correction fluid on the glass strip may cause poor quality scans. Clean the inside of the
scanner if a vertical line appears in the scanned data or if areas are missing in the scanned data.
1 Unplug the machine from the AC power outlet.
2 Remove the Extendable ADF 1 while releasing the levers on the back side.
3 Open the Front Cover 1.
1
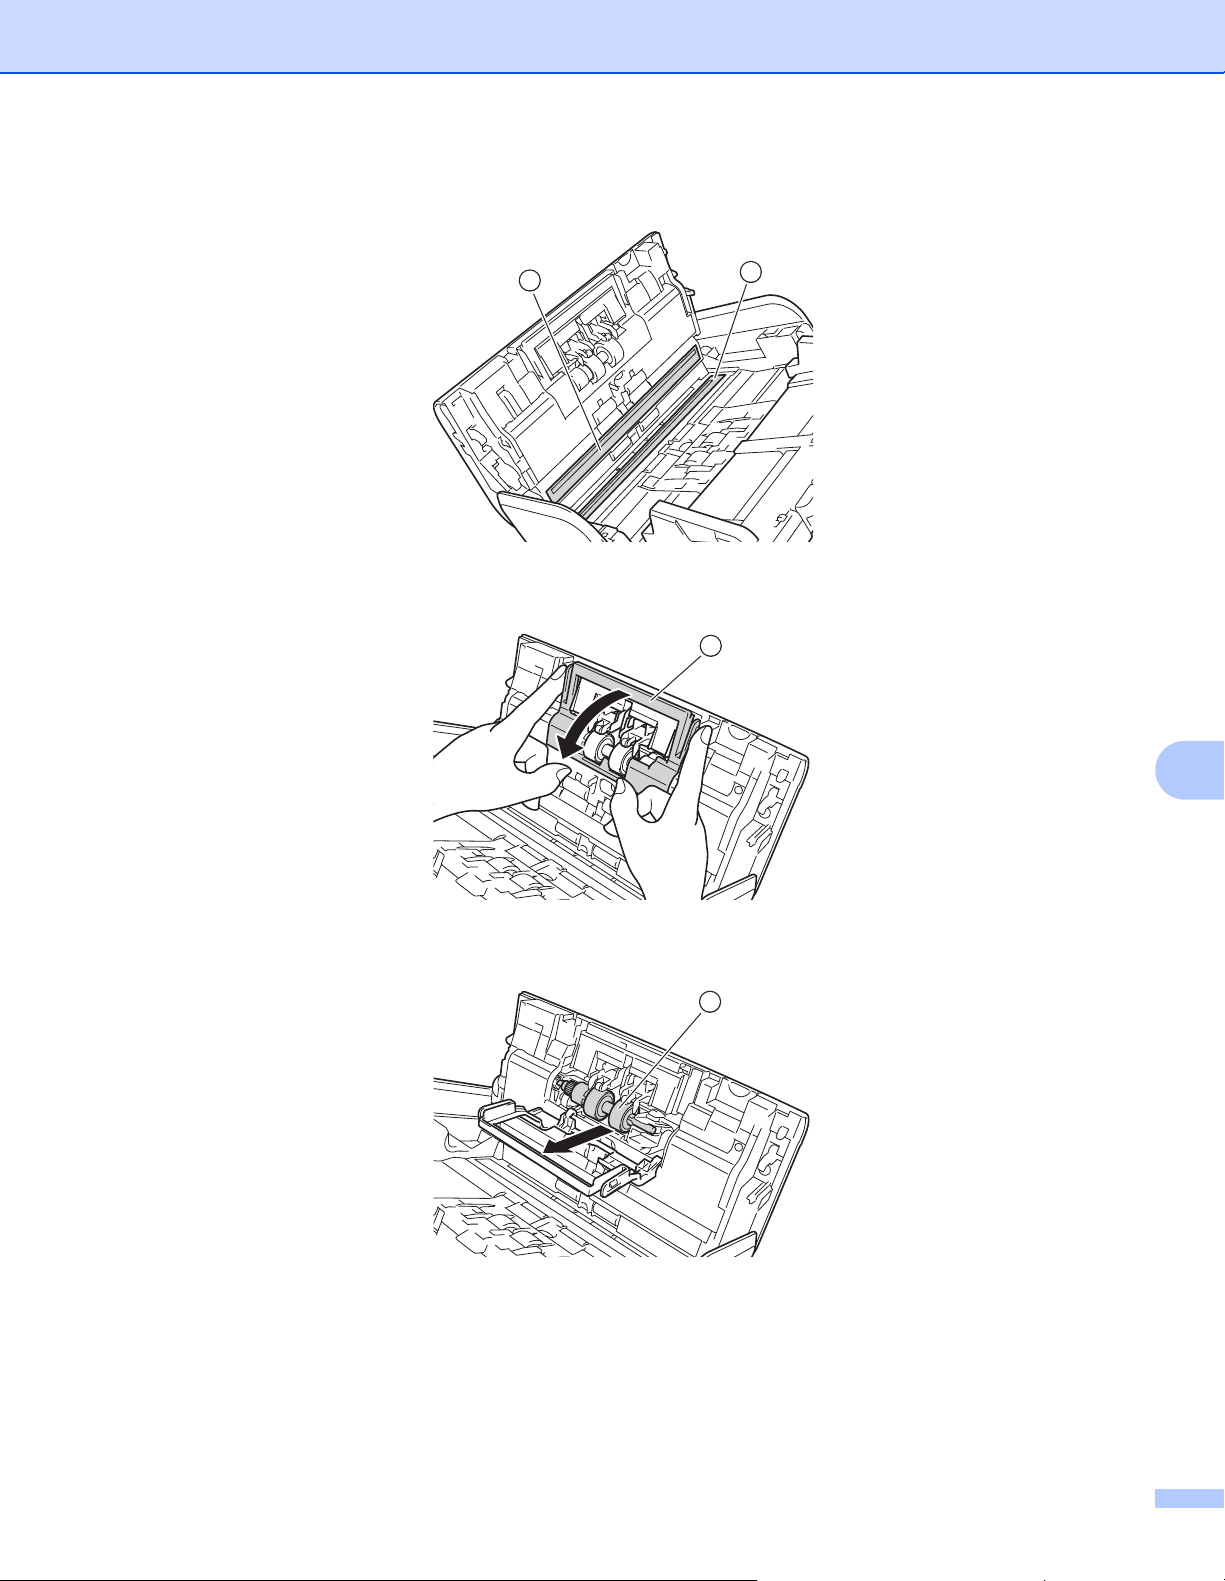
Routine Maintenance
210
9
4 From the back of the machine, in the ADF unit, clean the glass strips 12 with a soft lint-free cloth.
5 Pinch both sides of the Reverse Roller Cover 1 and pull the Cover down.
6 To remove the Reverse Roller, grab its shaft and pull it toward you and out to the right.
7 Clean the Reverse Roller with a soft, lint-free cloth slightly moistened with water.
1
2
1
1
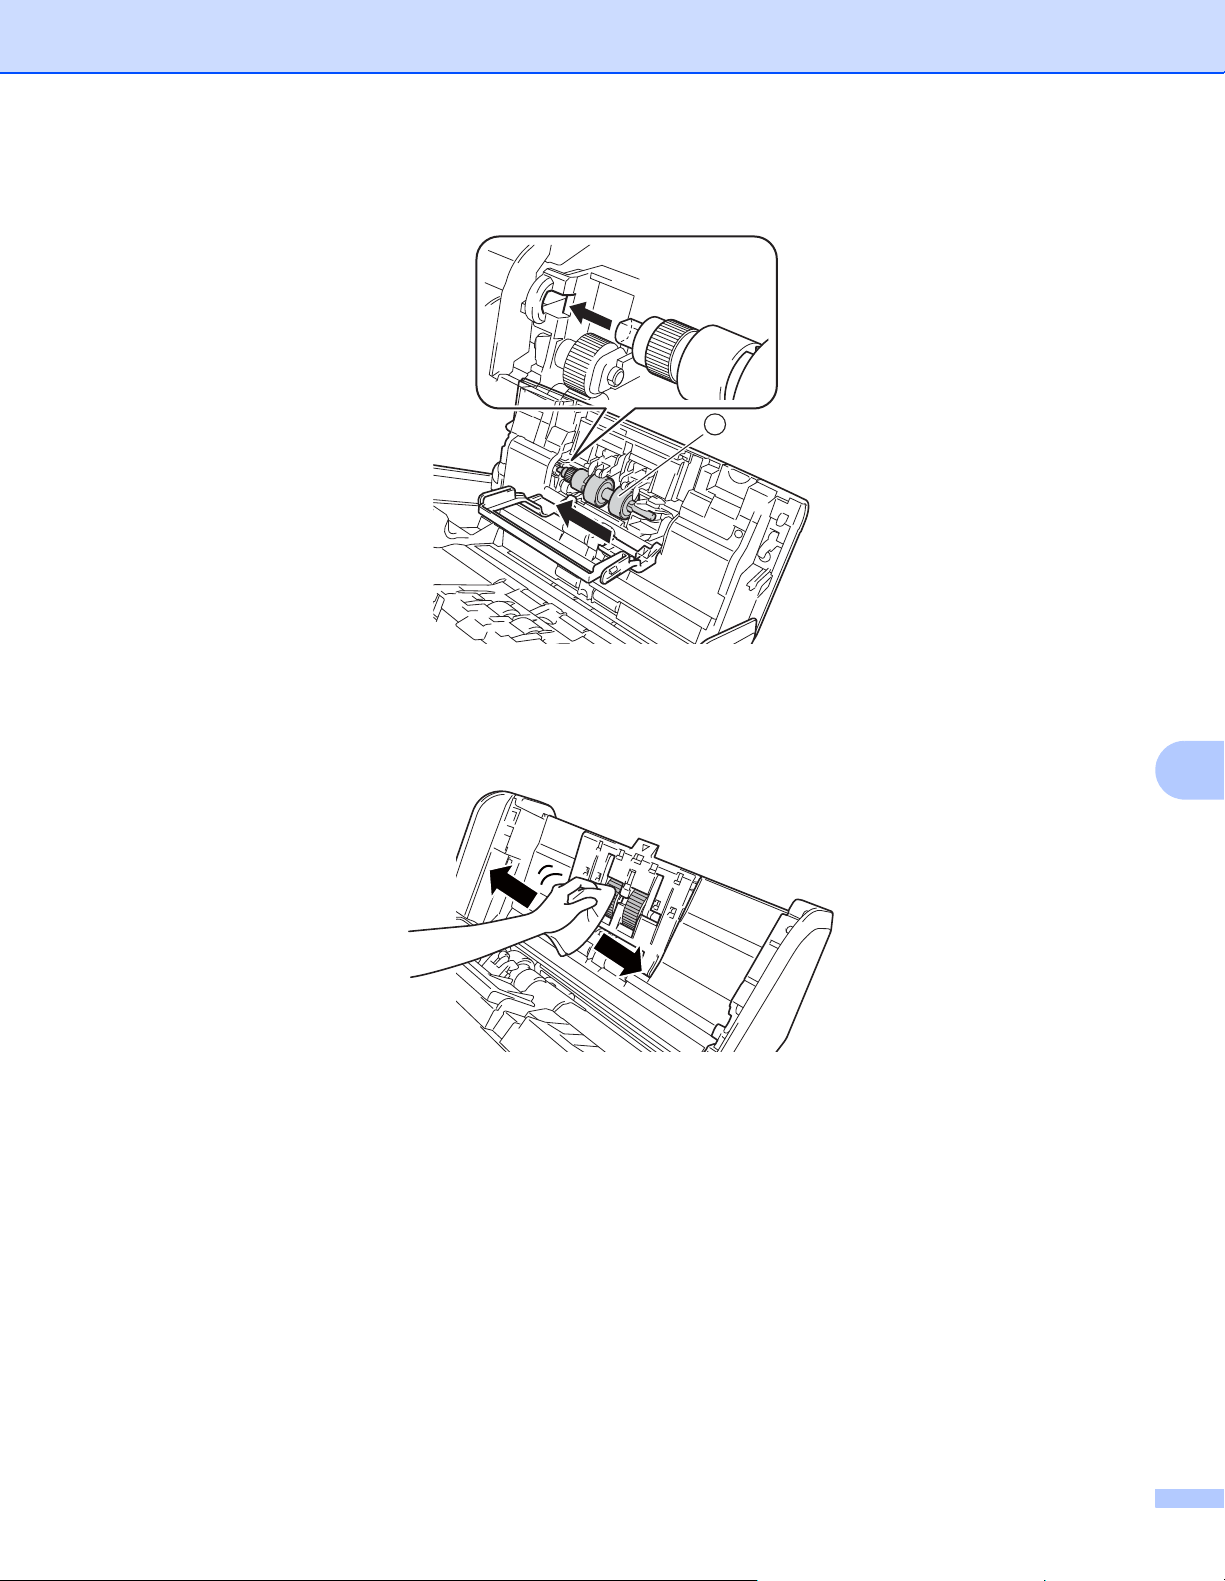
Routine Maintenance
211
9
8 Slide the Reverse Roller 1 into the opening on left and place it back into the machine.
9 Close the Reverse Roller Cover.
0 Clean the Pick Up Roller from side to side with a soft, lint-free cloth slightly moistened with water.
A Close the Front Cover and attach the Extendable ADF.
1

Routine Maintenance
212
9
NOTE
For ADS-2800W and ADS-3600W only
• When Scheduled Maintenance alert appears on the machine’s LCD, you must clean the machine
promptly. If you do not, document jams and paper feed problems may occur.
Clean the glass strips with a lint-free cloth. When finished, run your fingertip over the glass to see if you
feel anything on it. If you feel dirt or debris, clean the glass again, concentrating on that area. You may
have to repeat the cleaning process three or four times. Remove the roller and clean it. To test, scan a
document after each cleaning attempt. This Scheduled Maintenance alert occurs every 5,000
pages.
• After cleaning the machine, in order to clear the Scheduled Maintenance alert, the machine must
be reset.
For more information, see Reset the Machine (ADS-2800W / ADS-3600W) on page 248.
When there is a spot of dirt or
correction fluid on the glass
strip the scanned sample
shows a vertical line.
After the glass strip is cleaned
the vertical line is gone.
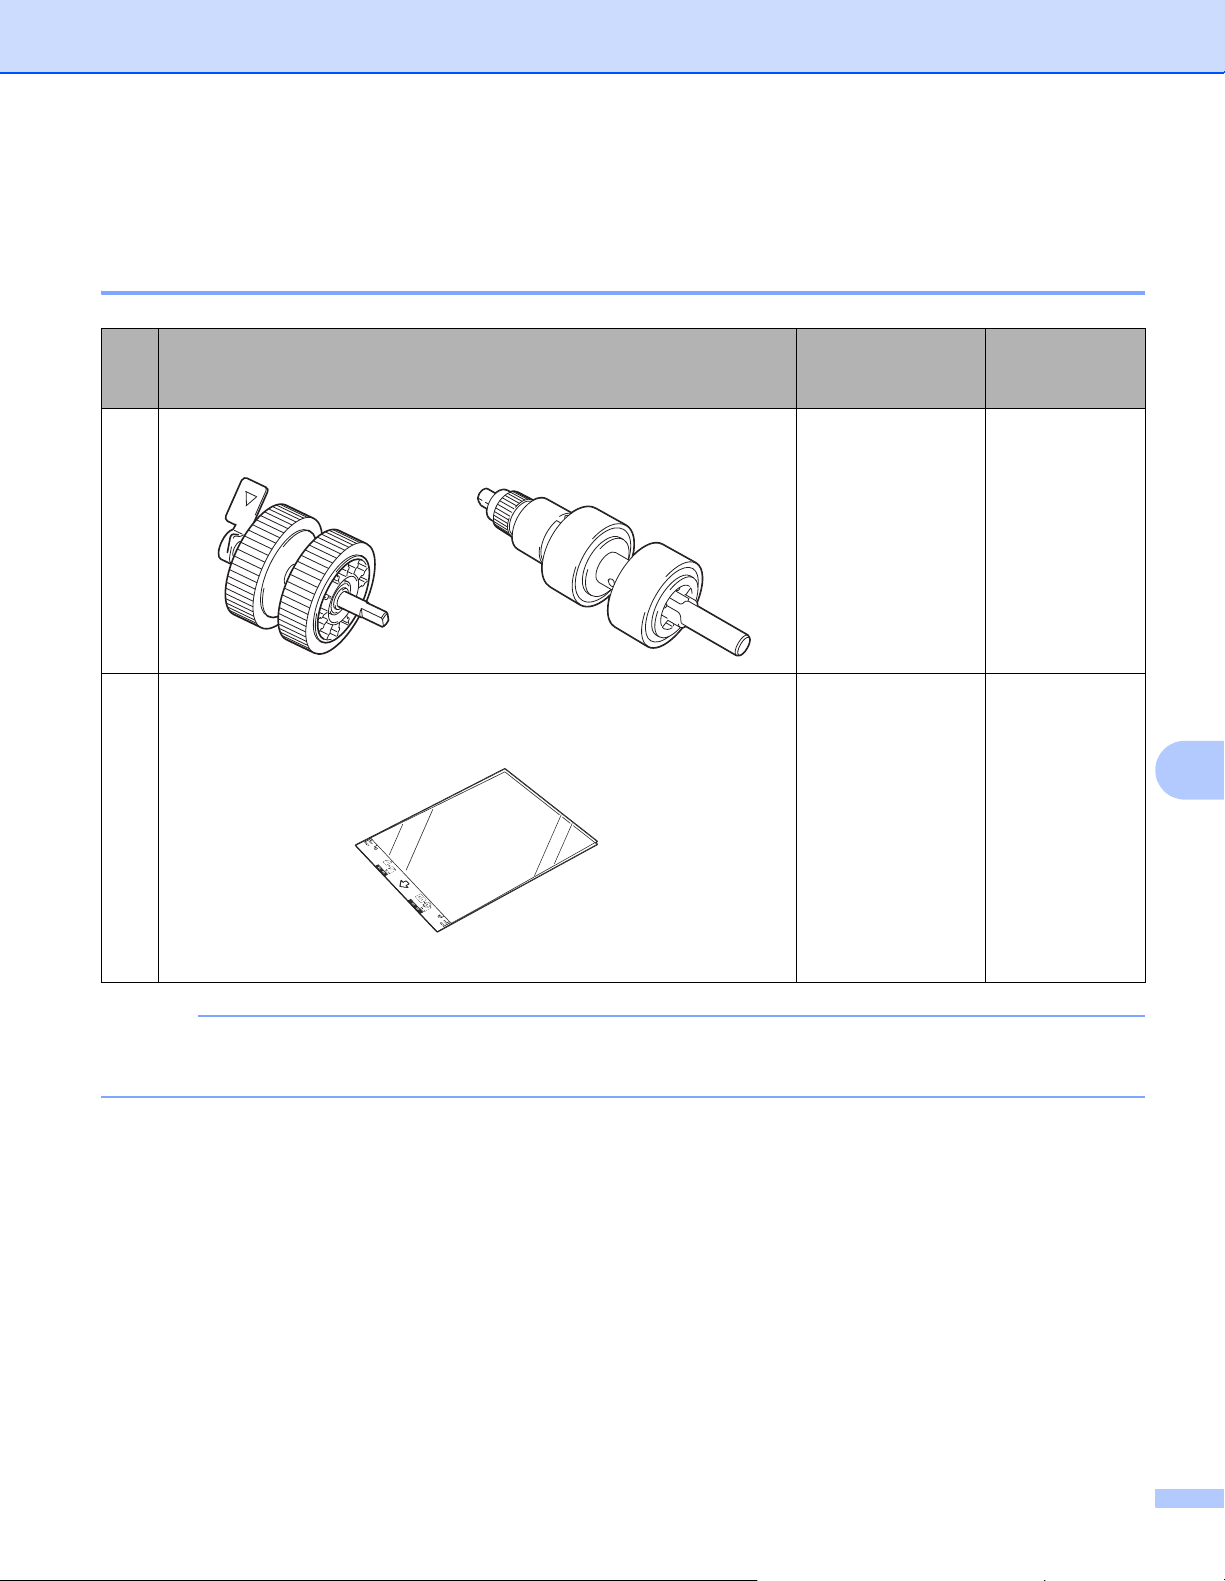
Routine Maintenance
213
9
Replace Supplies 9
Part Names, Numbers, and Life Cycles 9
NOTE
The Standard Replacement Cycle may vary depending on the usage environment, type of documents,
and how often documents are scanned.
No. Part Name Part No. Standard
Replacement
Cycle
1 Roller kit
PRK-A2001 200,000 sheets
2 Carrier Sheet
CS-A3001 500 times

Routine Maintenance
214
9
These parts are available at most Brother retailers. If you cannot find the part you need and you have a Visa,
MasterCard, Discover, or American Express credit card, you can order parts directly from Brother. Visit us
online for a complete selection of the Brother parts and supplies that are available for purchase.
NOTE
In Canada, only Visa and MasterCard are accepted.
In USA: 1-877-552-MALL (1-877-552-6255)
1-800-947-1445 (fax)
www.brothermall.com
In Canada:
www.brother.ca

Routine Maintenance
215
9
Check Supplies Replacement Cycle (ADS-2400N / ADS-3000N) 9
1 Start the application.
Windows
®
a Click the (ControlCenter4) icon in the task tray and select Open from the menu.
The ControlCenter4 window appears.
b Click the Device Settings tab (the example below uses Home Mode).
c Click the Remote Setup button.

Routine Maintenance
216
9
NOTE
If using Advanced Mode, click the (Settings) icon to access Device Settings.
Macintosh
a In the Finder menu bar, click Go > Applications > Brother.
b Double-click the Remote Setup icon.
NOTE
• To use Remote Setup, go to your model's Downloads page on the Brother Solutions Center at
support.brother.com
and download Remote Setup from Utilities.
• Remote Setup for Mac supports USB connections only.
• Remote Setup for Mac supports macOS 10.13 or earlier.
2 The Remote Setup window appears.

Routine Maintenance
217
9
3 Select Machine Info. in the left navigation pane. The window displays the Pick up Roller Count and
Reverse Roller Count (the example below uses Windows
®
).
1 Start your web browser.
2 In your browser’s address bar, type your machine’s IP address (or your print server name). For example:
http://192.168.1.2. You can use the machine’s LCD to find its IP address.
3 Click General.
4 Click Maintenance Information.
5 Click OK.

Routine Maintenance
218
9
Check Supplies Replacement Cycle (ADS-2800W / ADS-3600W) 9
1 Press (All Settings).
2 Press Machine Info.
3 Press Usage Counter. The Touchscreen displays Reverse Roller Count and
Pick up roller Count.
NOTE
If the Touchscreen indications warn you to replace the Reverse Roller and/or the Pick Up Roller, order the
necessary parts and then replace the used parts with new ones.
Replace the Pick Up Roller 9
Your machine is equipped with a scan counter that automatically counts how many times the machine has
scanned. After approximately 200,000 scans, you may have to replace the Pick-Up Roller.
1 Remove the Extendable ADF while releasing the levers on the back side.
2 Open the Front Cover 1.
1

Routine Maintenance
219
9
3 From the front of the machine, firmly pull open the tab of the Pick Up Roller Cover.
4 Pull down the green lever 1 toward you and slide the Pick Up Roller out to the left and toward you.
NOTE
Be careful not to break the green hook. If it does not pull down easily, gently use a little more force.
1
2
3
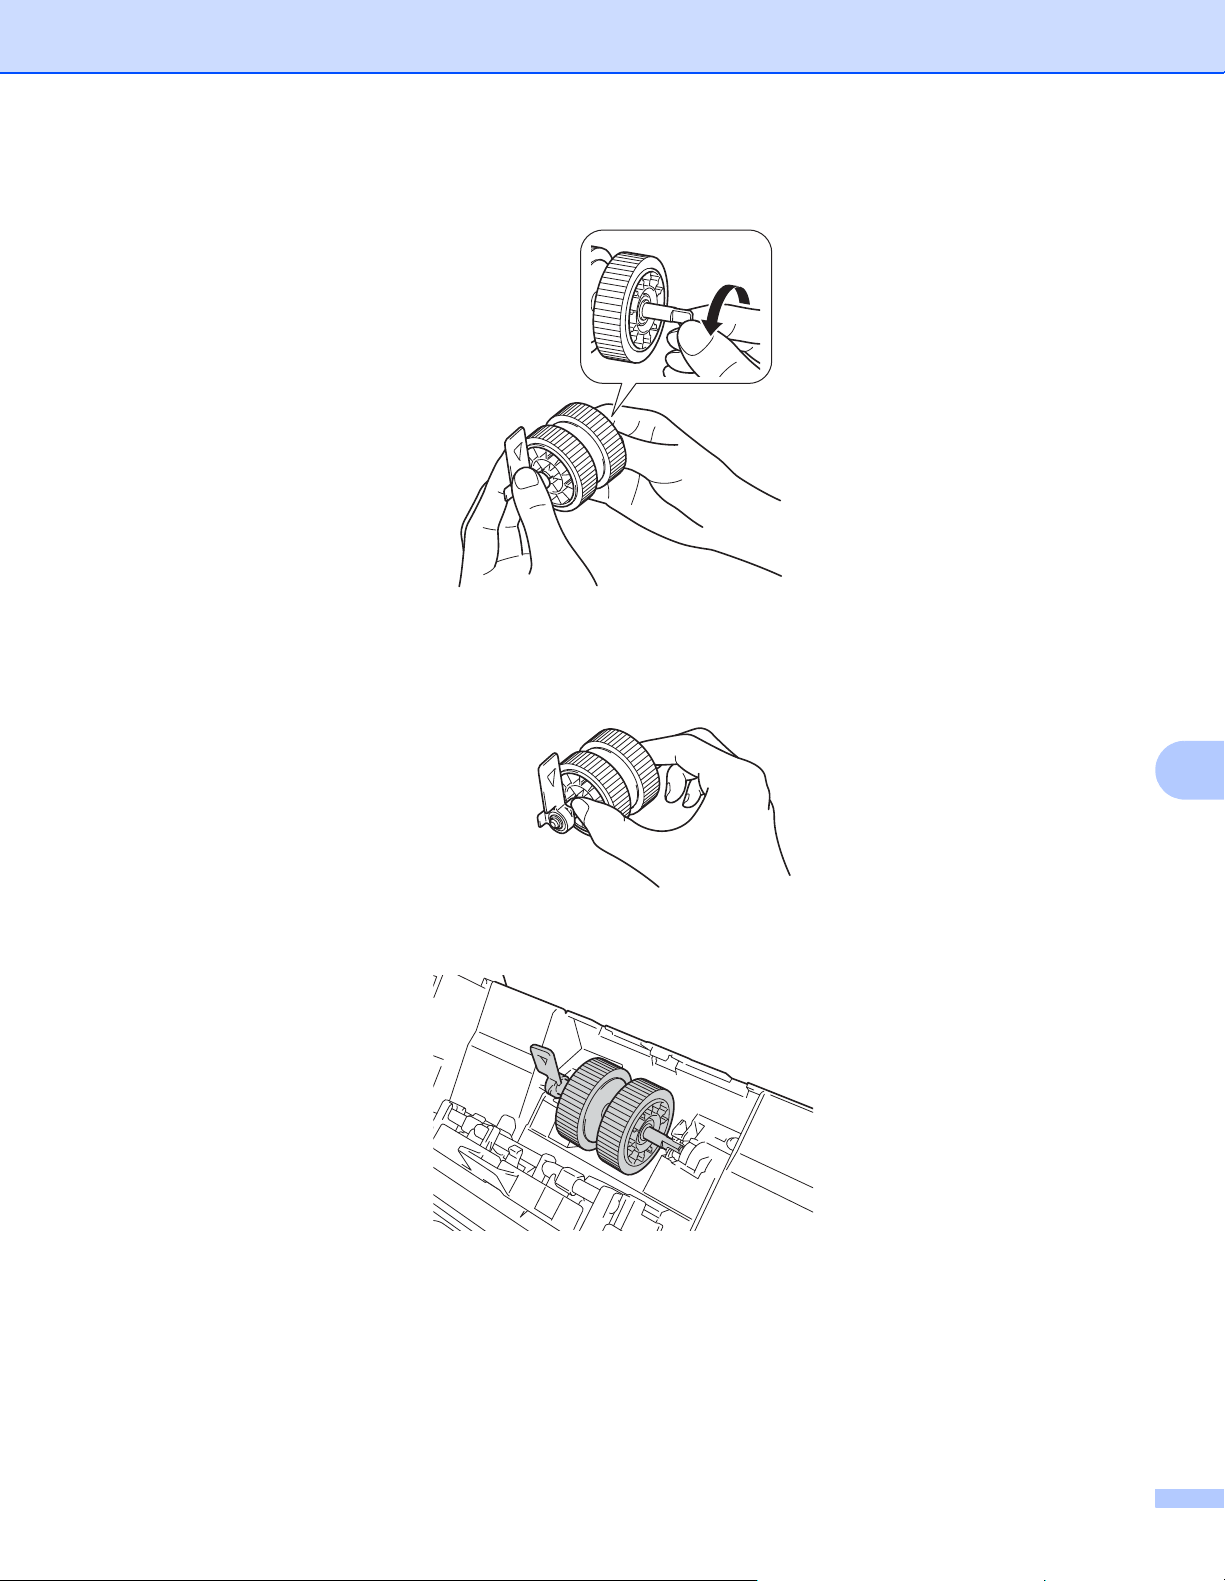
Routine Maintenance
220
9
5 Take the new pick-up roller and rotate the centre pin towards you.
6 While holding the new pick-up roller as shown in the illustration, make sure the green lever remains
upright.
7 Insert the new pick-up roller into the machine as shown in the illustration.
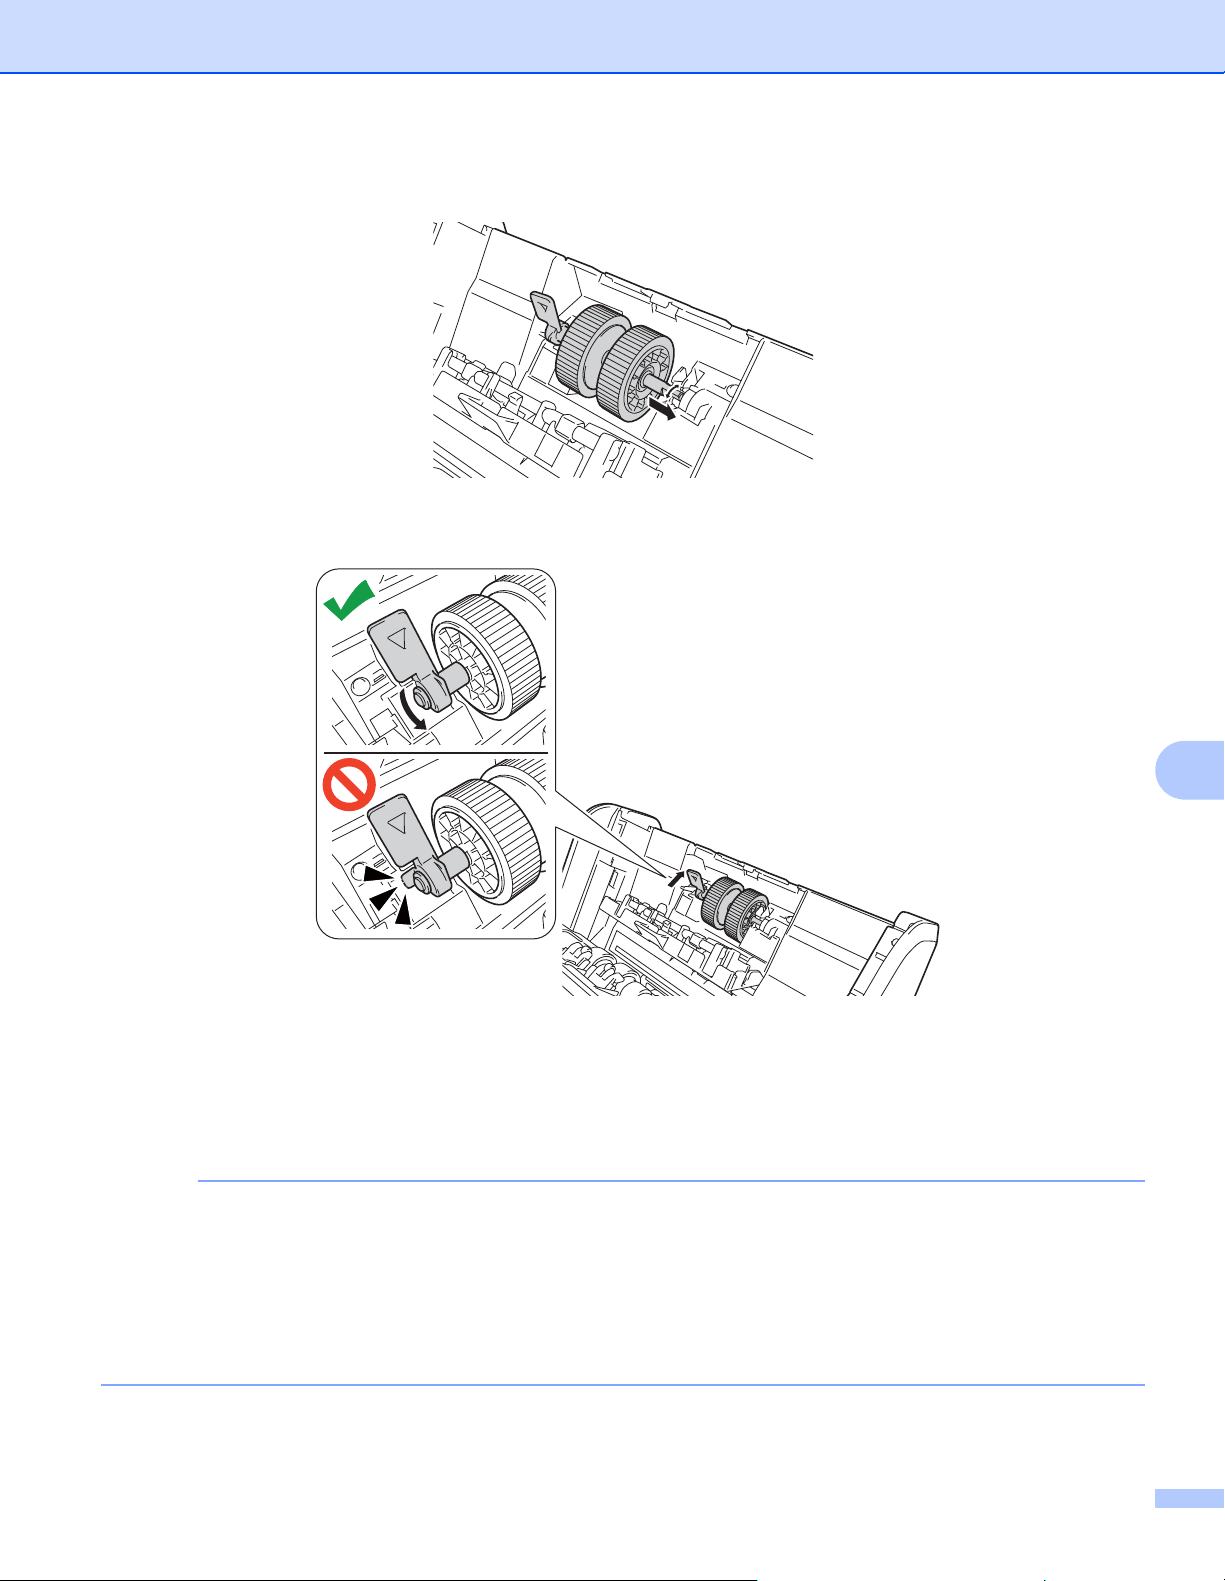
Routine Maintenance
221
9
8 Rotate the lever back and forth to find a spot where you can slide the pick-up roller into the slot.
9 Rotate the green lever until the pick-up roller locks into place.
0 Close the Pick Up Roller Cover.
A Close the Front Cover and attach the Extendable ADF.
B Reset the Pick Up Roller’s Counter (see Reset the Usage Counters on page 224).
NOTE
Confirm the following:
• The Roller Count value is 0.
• The Touchscreen or LED indications do not display a replace Pick Up Roller message.
• Pull the green lever open firmly and quickly in step
4.
• Gently rotate the slotted green lever in step
4. Be careful not to force it.
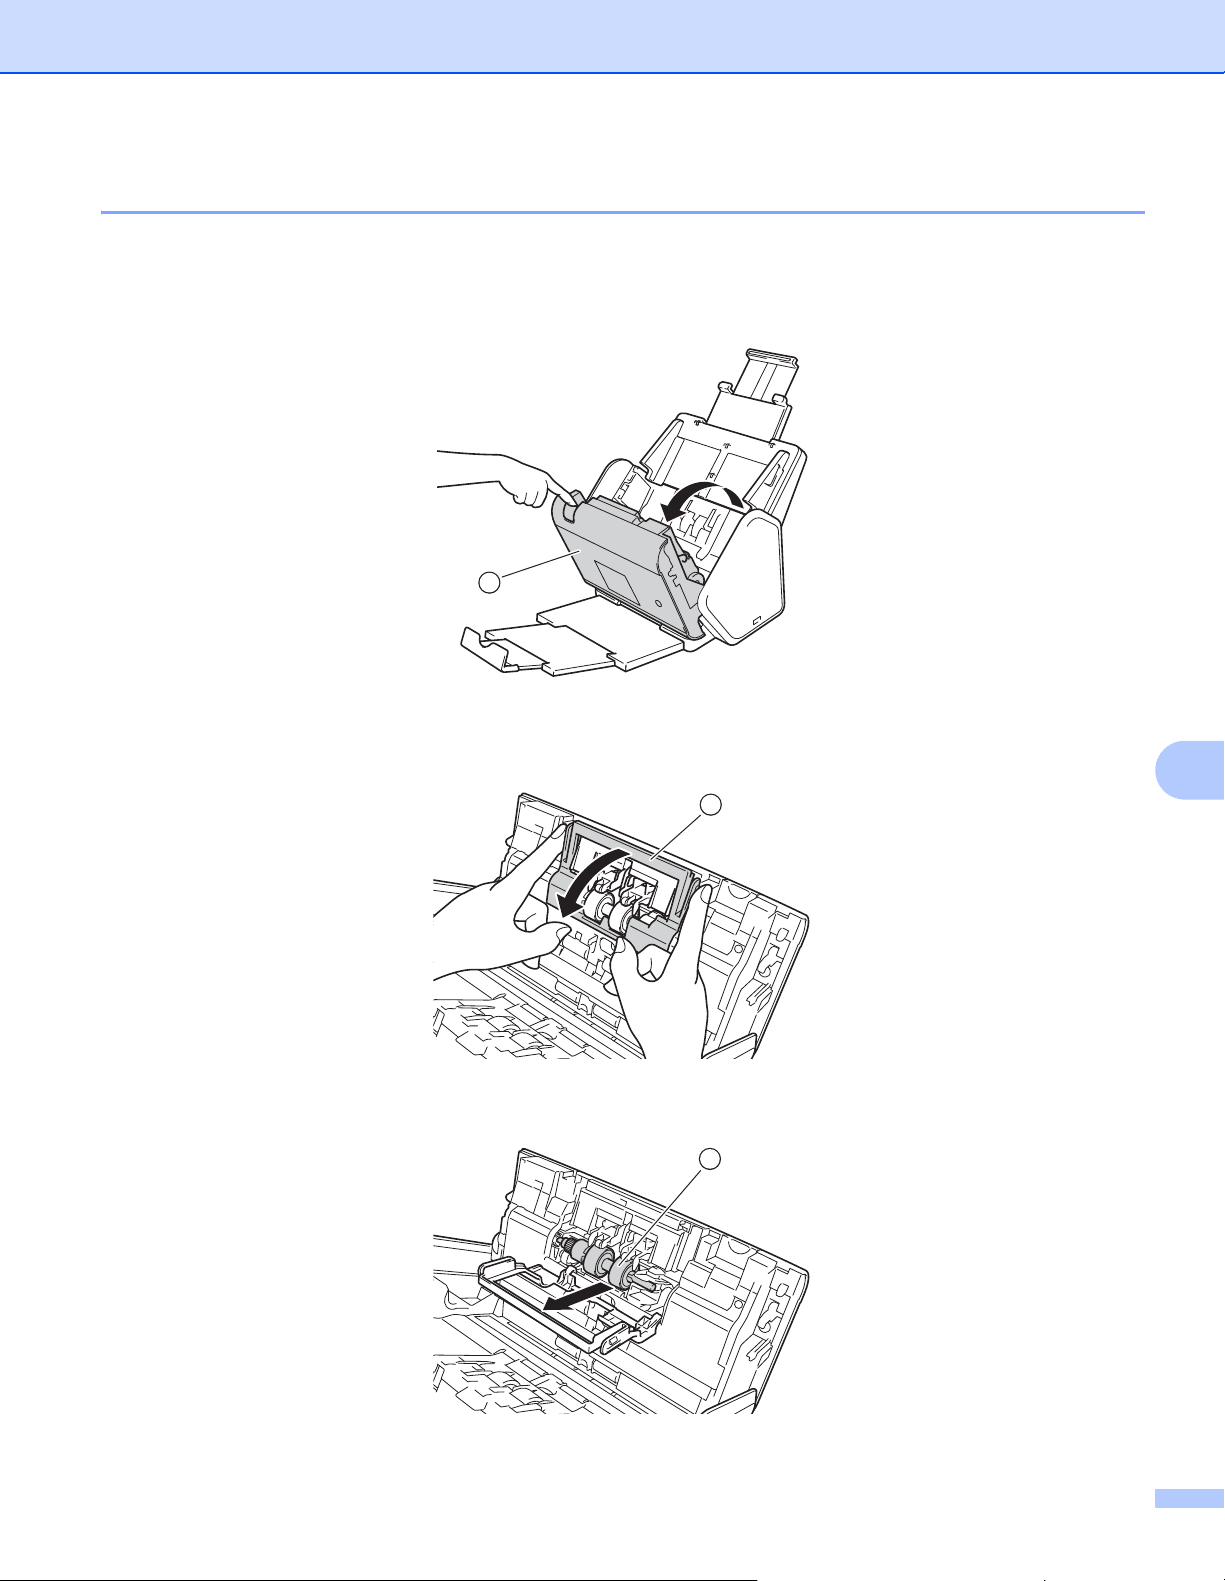
Routine Maintenance
222
9
Replace the Reverse Roller 9
Your machine is equipped with a scan counter that automatically counts how many times the machine has
scanned. After approximately 200,000 scans, you may have to replace the Reverse Roller.
1 Open the Front Cover 1.
2 From the back of the machine, pinch the both sides of the Reverse Roller Cover 1 and pull the Cover
down.
3 To remove the Reverse Roller, grab its shaft and pull it toward you and out to the right 1.
1
1
1
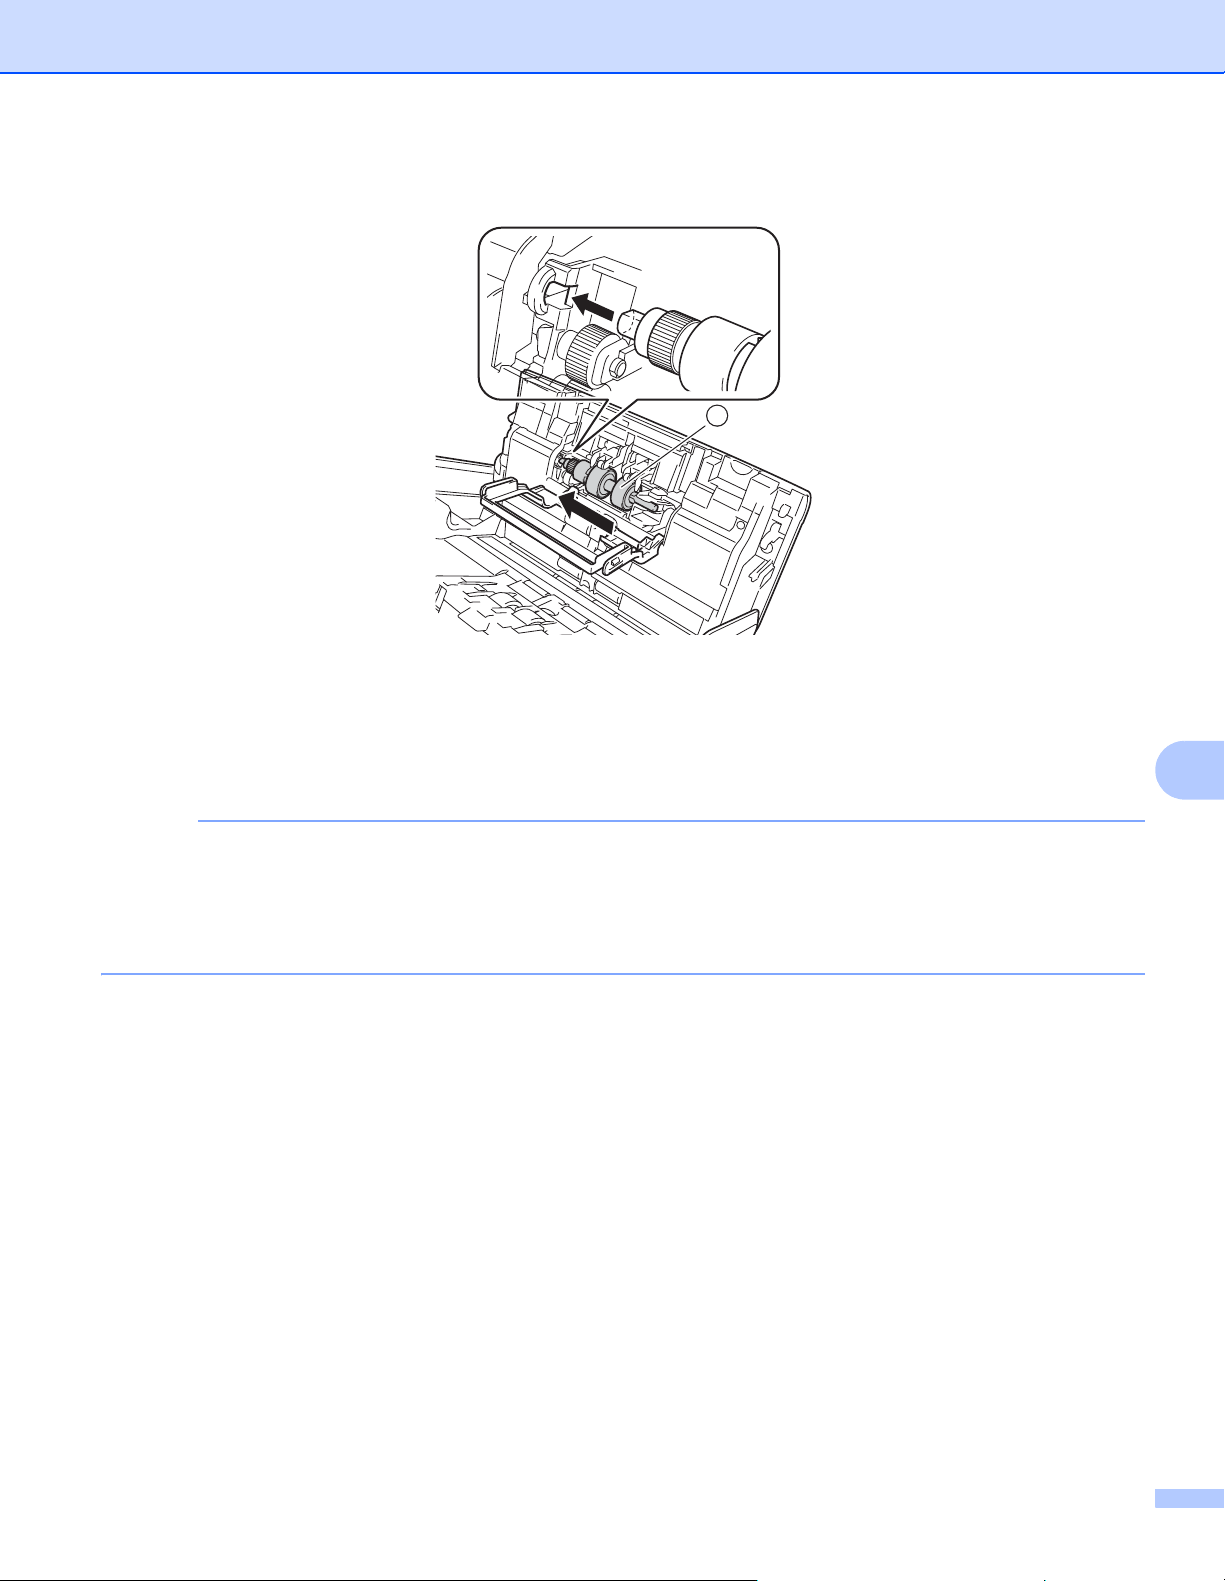
Routine Maintenance
223
9
4 Slide the new Reverse Roller 1 into the opening on the left and place it into the machine.
5 Close the Reverse Roller Cover.
6 Close the Front Cover.
7 Reset the Reverse Roller Counter (see Reset the Usage Counters on page 224).
NOTE
Confirm the following:
• The Reverse Roller Count value is 0 (see Check Supplies Replacement Cycle (ADS-2400N /
ADS-3000N) on page 215).
• The Touchscreen or LED indications do not display either a Replace Roller or Replace Parts message.
1

Routine Maintenance
224
9
Reset the Usage Counters 9
1 Start the application.
Windows
®
a Click the (ControlCenter4) icon in the task tray and select Open from the menu.
The ControlCenter4 window appears.
b Click the Device Settings tab (the example below uses Home Mode).
c Click the Remote Setup button.

Routine Maintenance
225
9
NOTE
If using Advanced Mode, click the (Settings) icon to access Device Settings.
Macintosh
a In the Finder menu bar, click Go > Applications > Brother.
b Double-click the Remote Setup icon.
NOTE
• To use Remote Setup, go to your model's Downloads page on the Brother Solutions Center at
support.brother.com
and download Remote Setup from Utilities.
• Remote Setup for Mac supports USB connections only.
• Remote Setup for Mac supports macOS 10.13 or earlier.
2 The Remote Setup window appears.
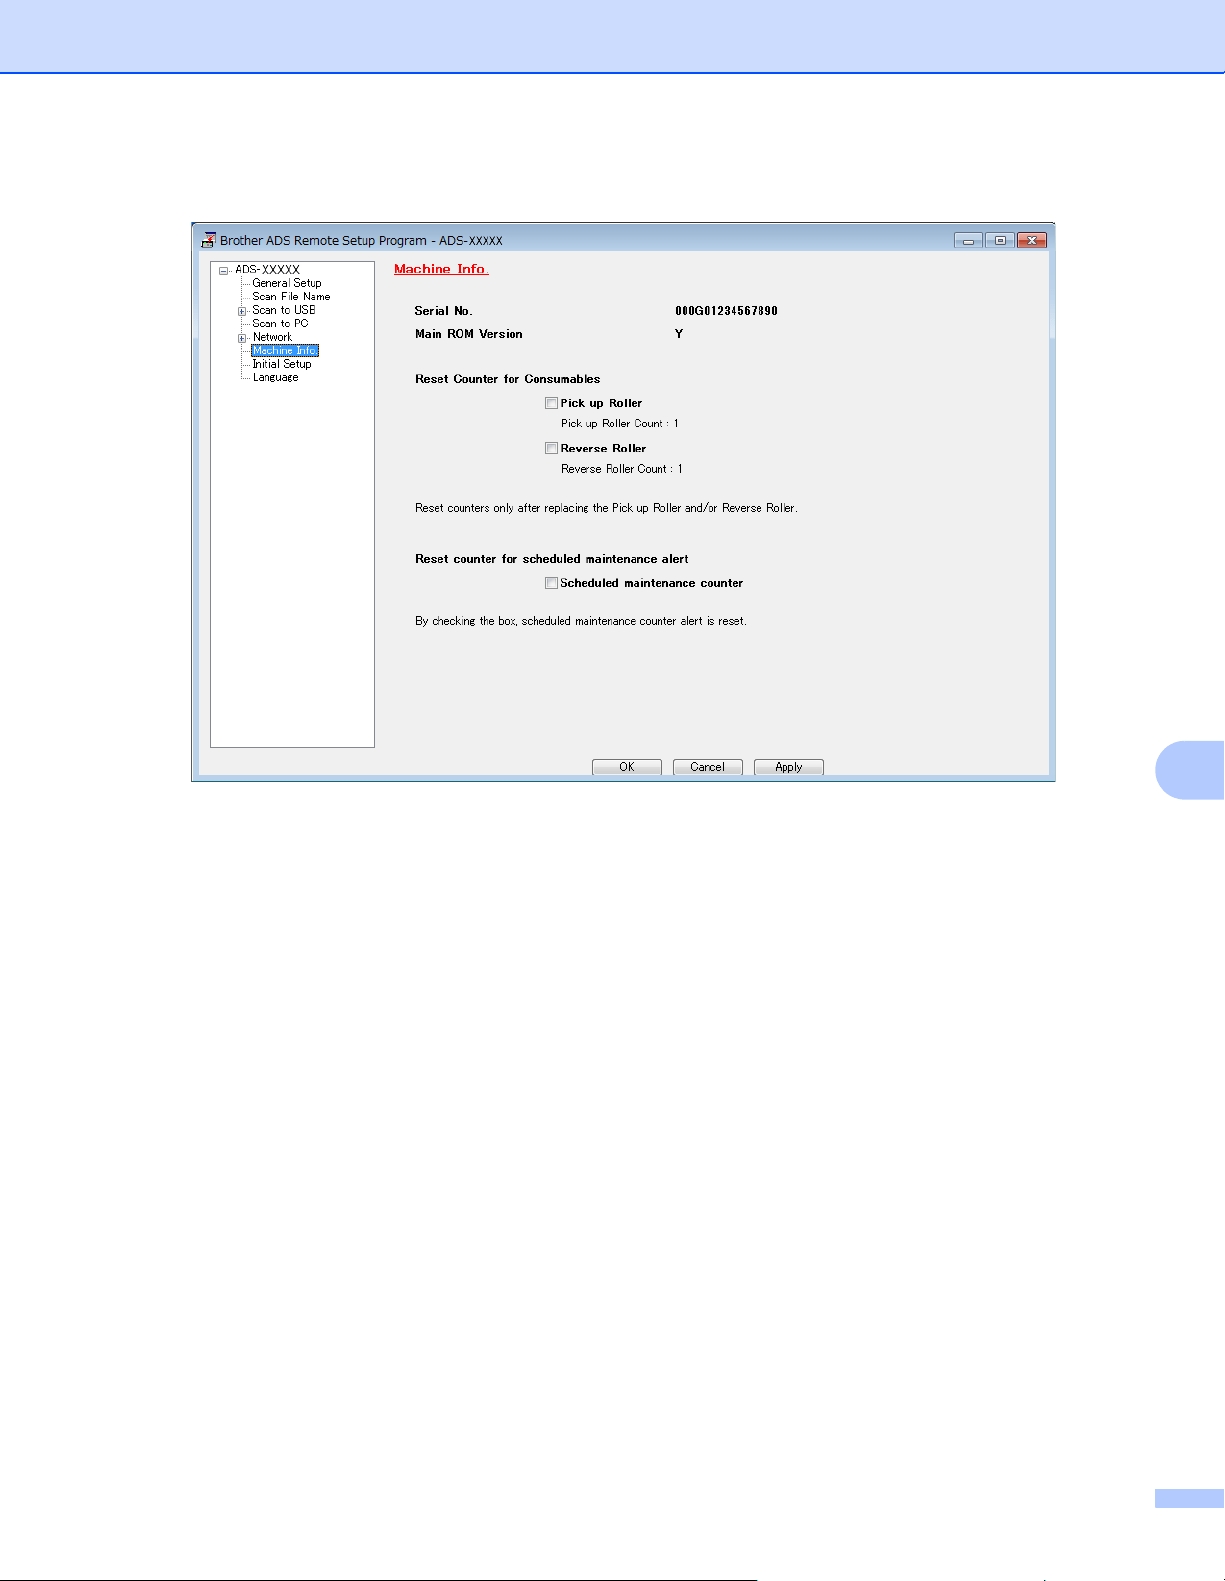
Routine Maintenance
226
9
3 Select Machine Info. in the left navigation pane and select the Scheduled maintenance counter option.
To reset the Reverse Roller Counter, select the Reverse Roller check box.
To reset the Pick Up Roller Counter, select the Pick up Roller check box.
4 Click Apply.
5 Click OK.

Routine Maintenance
227
9
Reset the Usage Counters (ADS-2800W / ADS-3600W) 9
1 Press (All Settings).
2 Press Machine Info.
3 Press Usage Counter.
4 Do one of the following:
To reset the Reverse Roller Counter, press Reverse roller Count.
To reset the Pick Up Roller Counter, press Pick up roller Count.
5 When the Touchscreen displays a confirmation message, press Yes.
6 Press .
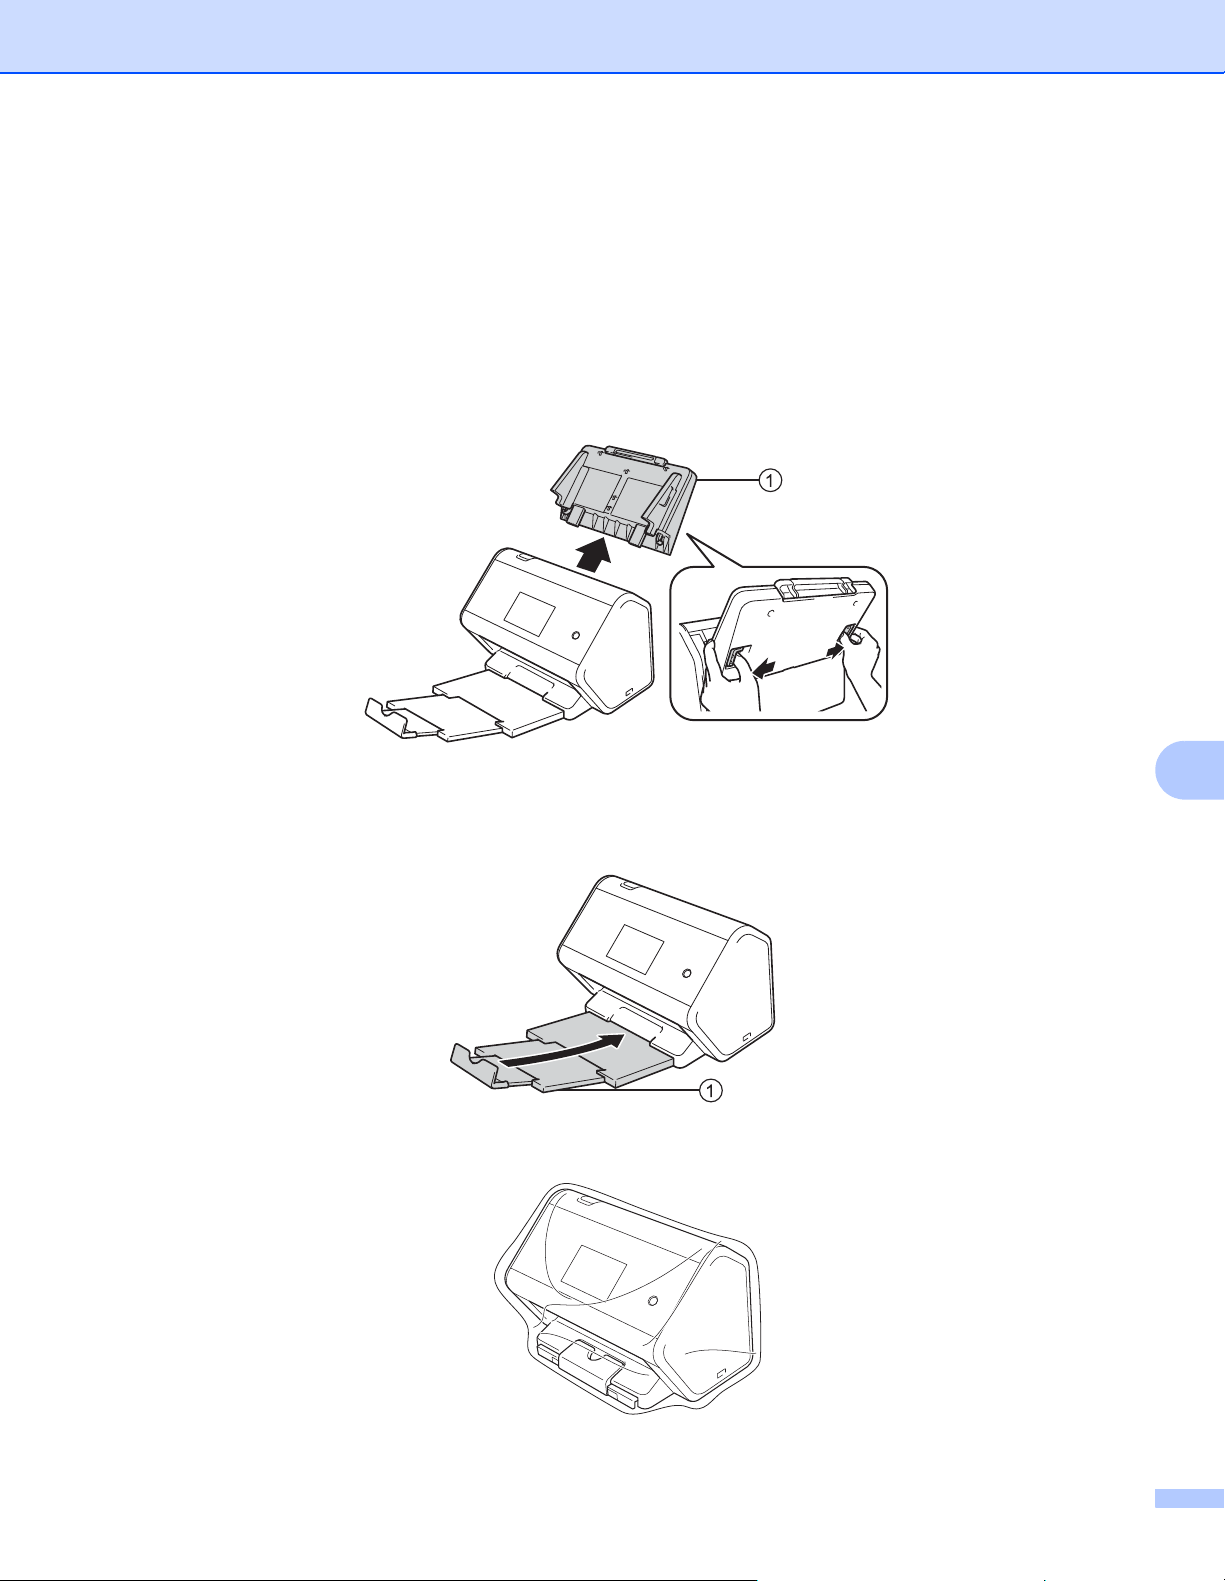
Routine Maintenance
228
9
Packing and Shipping the Machine 9
When you transport the machine, use the packing materials that came with your machine. If you do not pack
the machine correctly, any damage that may occur in transit may not be covered by your warranty.
The machine should be adequately insured with the carrier.
1 Firmly collapse the Extendable ADF.
2 Remove the Extendable ADF 1 while releasing the levers on the back side.
3 Firmly push the Output Tray 1 into the machine.
4 Wrap the machine in the original bag.
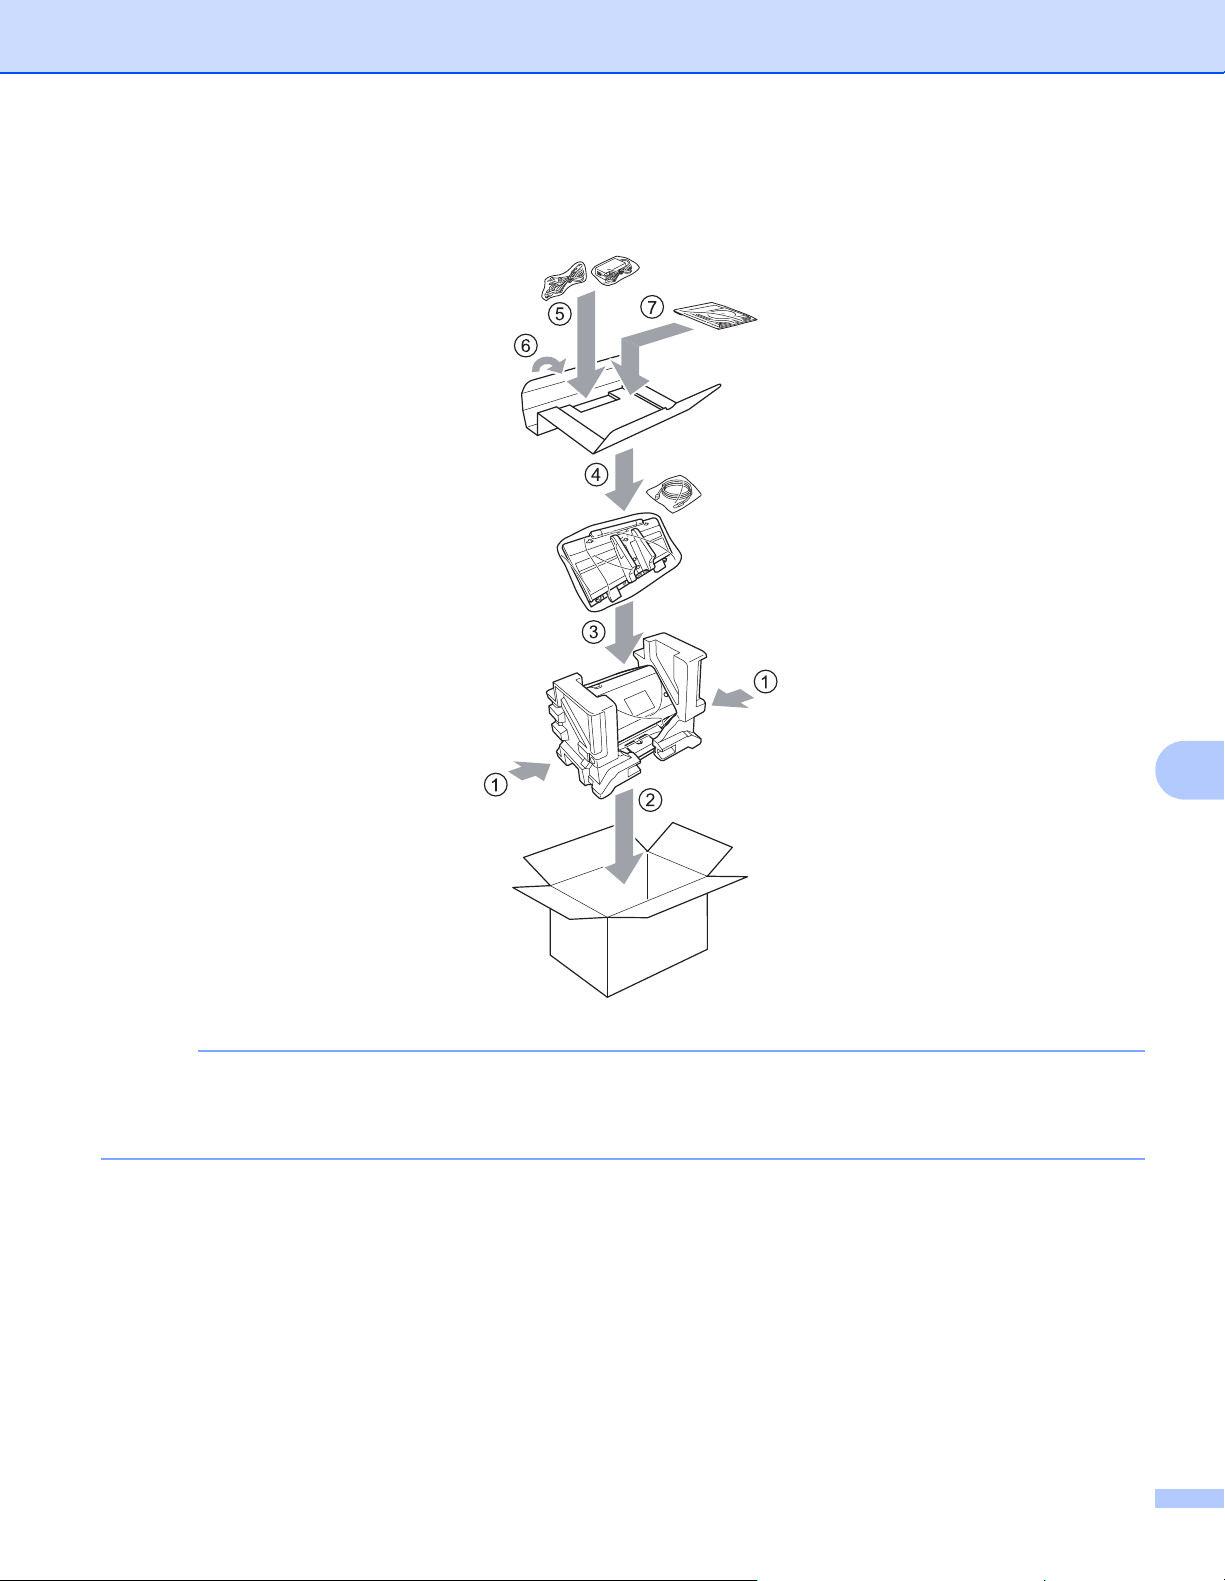
Routine Maintenance
229
9
5 Pack the machine and the printed materials in the original carton with the original packing material as
shown below.
NOTE
If you are returning your machine to Brother as part of the Exchange Service, pack only the machine. Keep
all separate parts (power cord, Carrier Sheet and USB cable) and printed materials to use with your
“Exchange” machine.
6 Close the carton and tape it shut.

230
10
10
Overview 10
This chapter explains how to resolve problems you may encounter when using your Brother machine.
When referred to another User’s Guide for your machine, go to your model’s Manuals page on the Brother
Solutions Center at support.brother.com
to download the other manuals.
Identifying Your Problem 10
First, check the following: 10
The AC power cord is connected properly and the machine is turned on.
All of the protective parts have been removed.
The Front Cover, Reverse Roller Cover and Pick Up Roller Cover are completely closed.
The interface cable is securely connected to the machine and the computer.
The correct driver for the machine has been installed.
The computer is connected to the correct port on the machine.
Error and Maintenance Messages 10
(For ADS-2800W / ADS-3600W)
As with any sophisticated office product, errors may occur and supplies must be replaced. If this happens,
your machine identifies the error or required routine maintenance and displays the appropriate message.
The most common error and maintenance messages are shown in the table.
You can correct most errors and clear routine maintenance messages yourself. If you need more help,
the Brother Solutions Center offers the latest FAQs and troubleshooting tips.
Visit support.brother.com
NOTE
(For ADS-2400N and ADS-3000N)
See also LED Indications (ADS-2400N / ADS-3000N) on page 255.
Troubleshooting 10
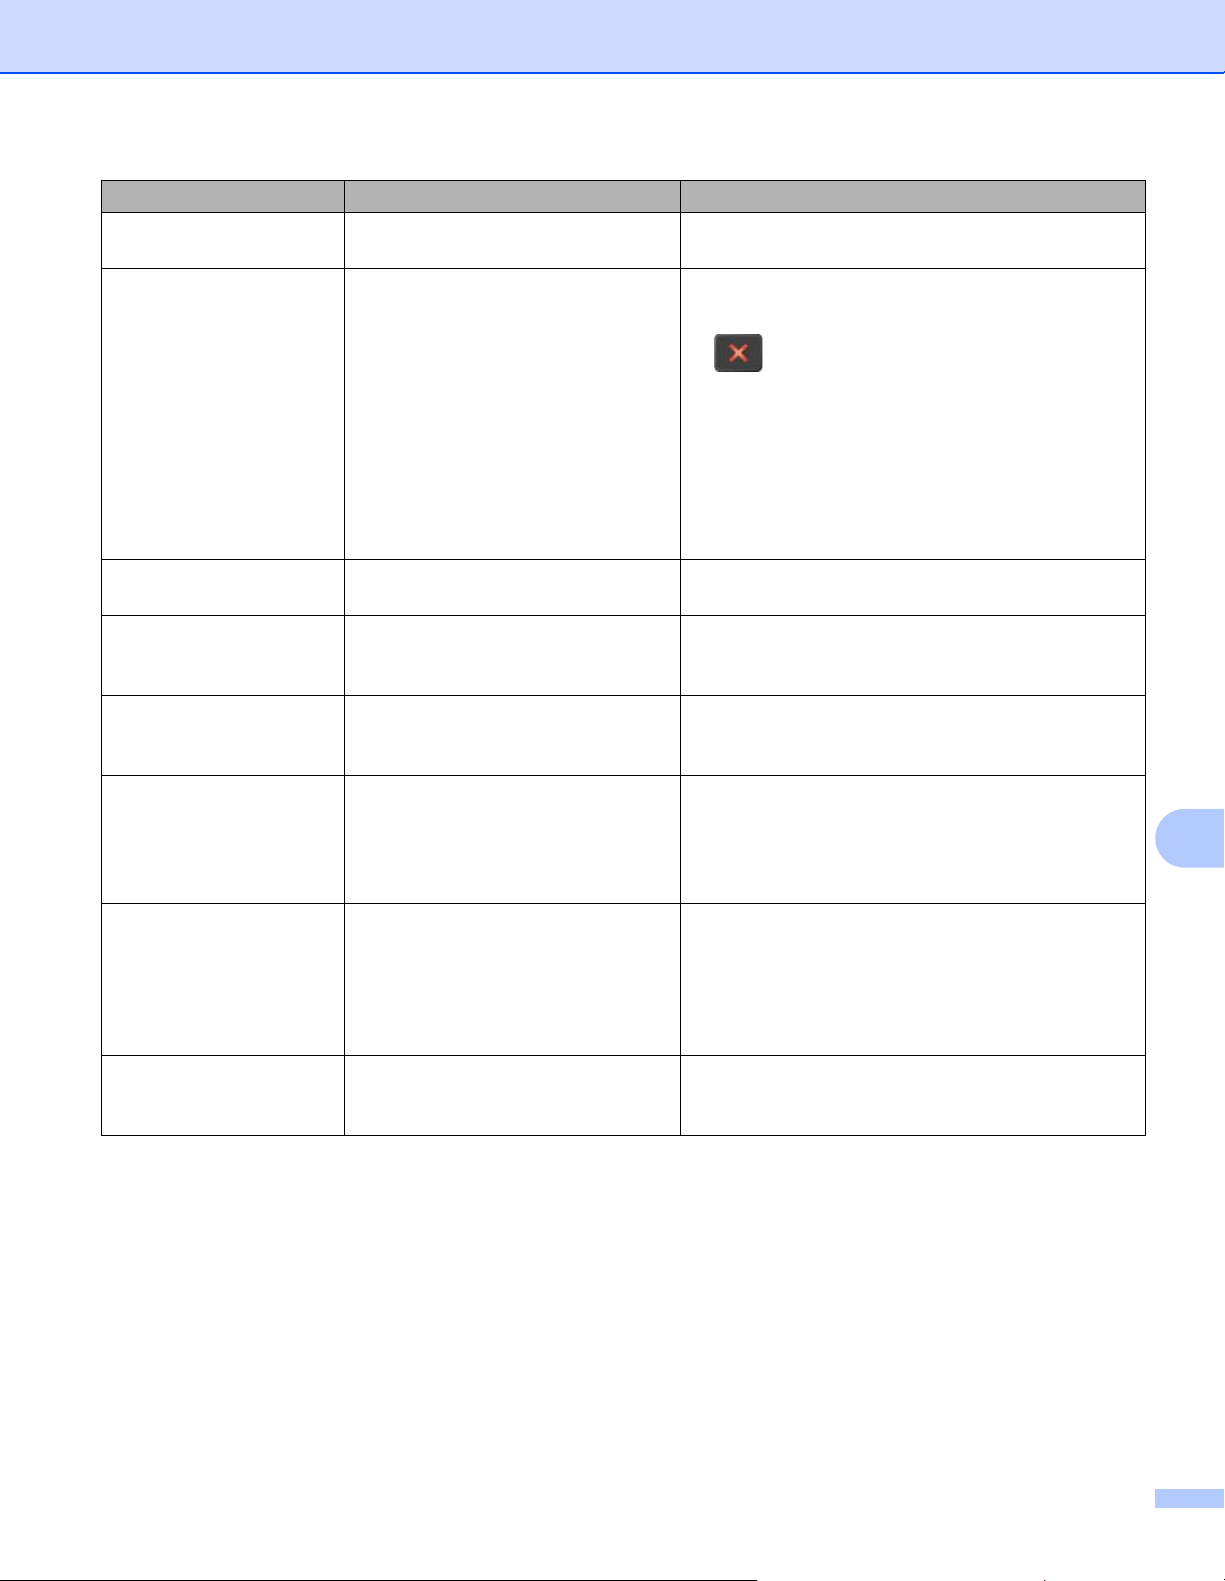
Troubleshooting
231
10
Error message Cause Action
Check Connection The machine is not connected to
your computer.
Connect the machine to your computer, and then try
again.
Out of Memory The machine’s memory is full. To clear the error, do one of the following:
Press any button (ADS-2400N / ADS-3000N) or
(ADS-2800W / ADS-3600W).
Turn the machine off and then on by unplugging
the machine from the AC power outlet and then
plugging the machine in again.
To prevent the error, do one of the following:
Reduce the number of your documents.
Set resolution setting or file size smaller.
This machine is not
connected to your PC
The machine is not connected to
your computer.
Connect the machine to your computer, and then try
again.
Replace Pick up
roller
The Pick Up Roller has been used
over 200,000 times.
Replace the Pick Up Roller with a new one. Scanning
errors may occur if you do not replace the part. See
Replace the Pick Up Roller on page 218.
Replace Reverse
Roller
The Reverse Roller has been used
over 200,000 times.
Replace the Reverse Roller with a new one.
Scanning errors may occur if you do not replace the
part. See Replace the Reverse Roller on page 222.
Replace pick up and
reverse roller
Both the Reverse Roller and the
Pick Up Roller have been used over
200,000 times.
Replace the Reverse Roller and the Pick Up Roller
with new ones. Scanning errors may occur if you
do not replace the parts. See Replace the Pick Up
Roller on page 218 and Replace the Reverse Roller
on page 222.
Unable to Scan XX
(XX is an error code.)
A machine error has occurred. Turn the machine off and then on, and then try to
scan again. If the error is not cleared after turning
the machine off and then on, make a note of the
error message and report it to your Brother dealer or
Brother Customer Service (see For Customer
Service on page ii).
Scan error due to
length, reduce
length
Documents that exceed the
maximum length was scanned.
Decrease the scanner resolution because the
maximum length that can be scanned varies
depending on the resolution.
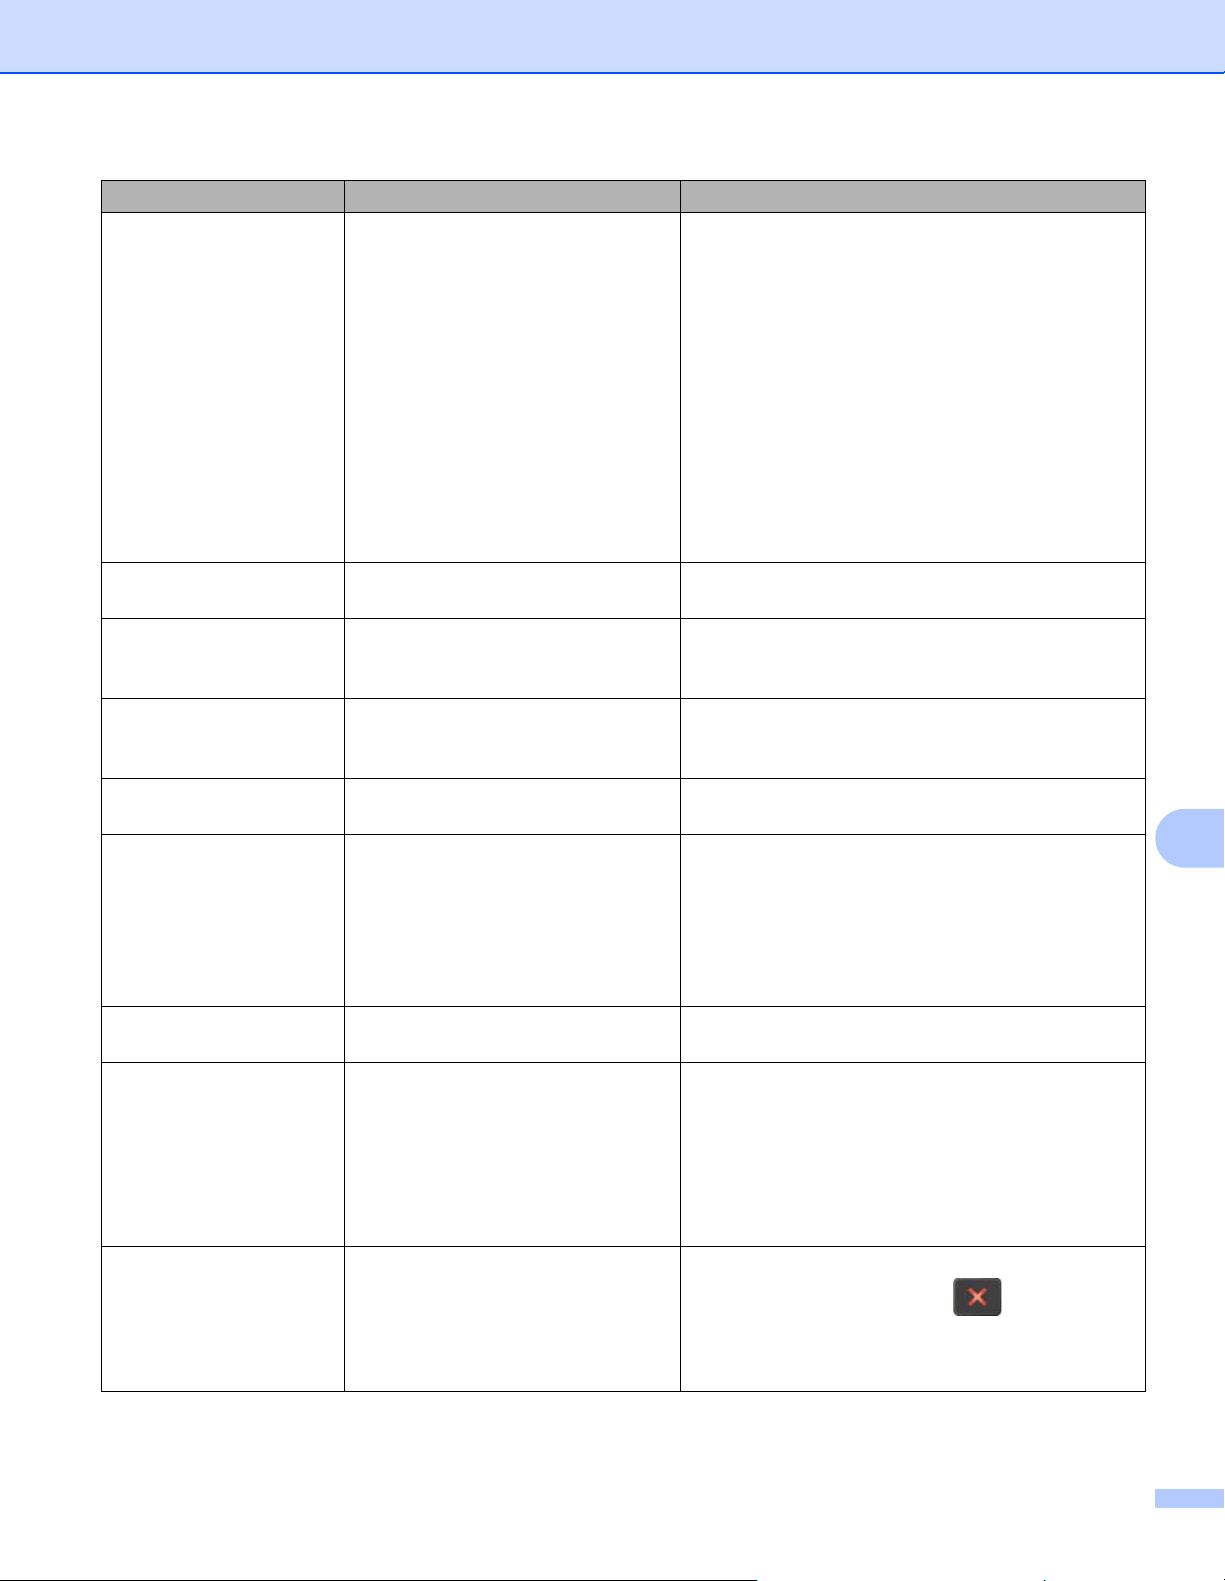
Troubleshooting
232
10
Document Jam/
Too long
The Paper Guides are not set to
the correct document size.
The settings are not suitable for
your document.
Paper dust has accumulated on
the surface of the Pick Up Roller
or Reverse Roller.
Clear the document jam (see Document Jam
on page 234) and then do the following:
Adjust the Paper Guides to fit the width of the
document. When Scan Size is set to Auto and
you are scanning a document that contains
multiple page sizes, insert narrow pages straight
and as close to the center of the machine as
possible. If the document does not feed straight,
use Continuous Scanning.
Confirm the settings. See Important in Document
Jam on page 234.
Clean the Pick Up Roller and Reverse Roller.
See Clean the Scanner and Rollers on page 209.
Multifeed detection Multiple pages were fed at the same
time.
Clear the Multifeed. See Document Jam
on page 234.
Unusable Device An unusable device is inserted in the
USB port.
Disconnect the device. Turn the machine off and then
on by unplugging the machine from the AC power
outlet and then plugging the machine in again.
Unusable USB Device An unsupported USB device is
inserted in the USB port.
Remove the unsupported USB device, such as a
mouse or mobile device that does not support USB
flash drive mode, from the USB port.
USB Hub
Not Supported
A hub or USB flash drive with a hub
is inserted in the USB port.
Remove the unsupported device, such as a USB hub
or USB flash drive with a hub, from the USB port.
Insufficient USB
Storage
The inserted USB flash drive is full. Press any button (ADS-2400N / ADS-3000N) or
Close (ADS-2800W / ADS-3600W) and then do one
of the following:
Delete unused files or folders from the USB flash
drive and then try again.
Use a USB flash drive that has available space.
USB Access Error The USB flash drive was removed
while it was being accessed.
Press any button (ADS-2400N / ADS-3000N) or
Close (ADS-2800W / ADS-3600W).
USB Write-protected The inserted USB flash drive is
write-protected.
Remove the write-protected USB flash drive, press
any button (ADS-2400N / ADS-3000N) or
Close (ADS-2800W / ADS-3600W), and then do
one of the following:
Turn off the USB flash drive’s write-protection
and then try again.
Use a USB flash drive that is not write-protected.
Too Many Files on
USB
Your machine cannot save to a USB
flash drive if it contains too many
files.
Remove the USB flash drive, press any button
(ADS-2400N / ADS-3000N) or (ADS-2800W /
ADS-3600W). Delete unused files or folders from
the root folder of the USB flash drive and then try
again.
Error message Cause Action
Troubleshooting
233
10
File Name Cannot
Be Used
The maximum sequential number 99
sequential number for the file name
has been reached.
Press any button (see File Name Cannot Be Used
(Scan to USB) on page 259) (ADS-2400N /
ADS
-3000N) or (ADS-2800W / ADS-3600W)
and then do one of the following:
Delete unused files from the USB flash drive and
then try again.
Change the file name. See Save Scanned
Documents on a USB Flash Drive on page 138.
No Profile set No Scan to FTP/SFTP profile or
Scan to Network profile is registered.
Configure the Scan to FTP/SFTP profile or the Scan
to Network profile before using Scan to FTP or Scan
to Network. See Scan Documents to an FTP Server
on page 142, Scan Documents to an SFTP Server
on page 152 or Scan Documents to a Shared
Folder / Network Location (Windows
®
)
on page 162.
No Certificate The certificate does not exist, or is
corrupted.
Configure the settings under Signed PDF in the
Administrator tab in Web Based Management.
See Scan Documents to an FTP Server
on page 142 or Scan Documents to a Shared
Folder / Network Location (Windows
®
)
on page 162.
Address Book Full The Address Book is full. Delete unnecessary email addresses, and then try
again.
Registration Failed (Email Address)
The email address is too long.
You can enter an email address that contains up
to 64 characters.
(Shortcut)
The maxium number of email
addresses in a shortcut has been
reached.
Delete unnecessary email addresses, and then try
again.
Shortcuts Full The maximum number of shortcuts
has been reached.
Delete unnecessary shortcuts, and then try again.
Cannot Delete The email address is registered in a
shortcut.
You cannot delete an email address used in a
shortcut. Delete the shortcut first, and then try again.
Access Denied Secure Function Lock is On. Call your administrator to check your Secure
Function Lock settings.
See Secure Function Lock 3.0 (ADS-2800W /
ADS-3600W) on page 41.
Scheduled
Maintenance alert
Periodic maintenance is required.
(Every 5,000 pages)
Clean the Pick Up Roller and Reverse Roller and
clear the counter.
See Clean the Scanner and Rollers on page 209.
Error message Cause Action
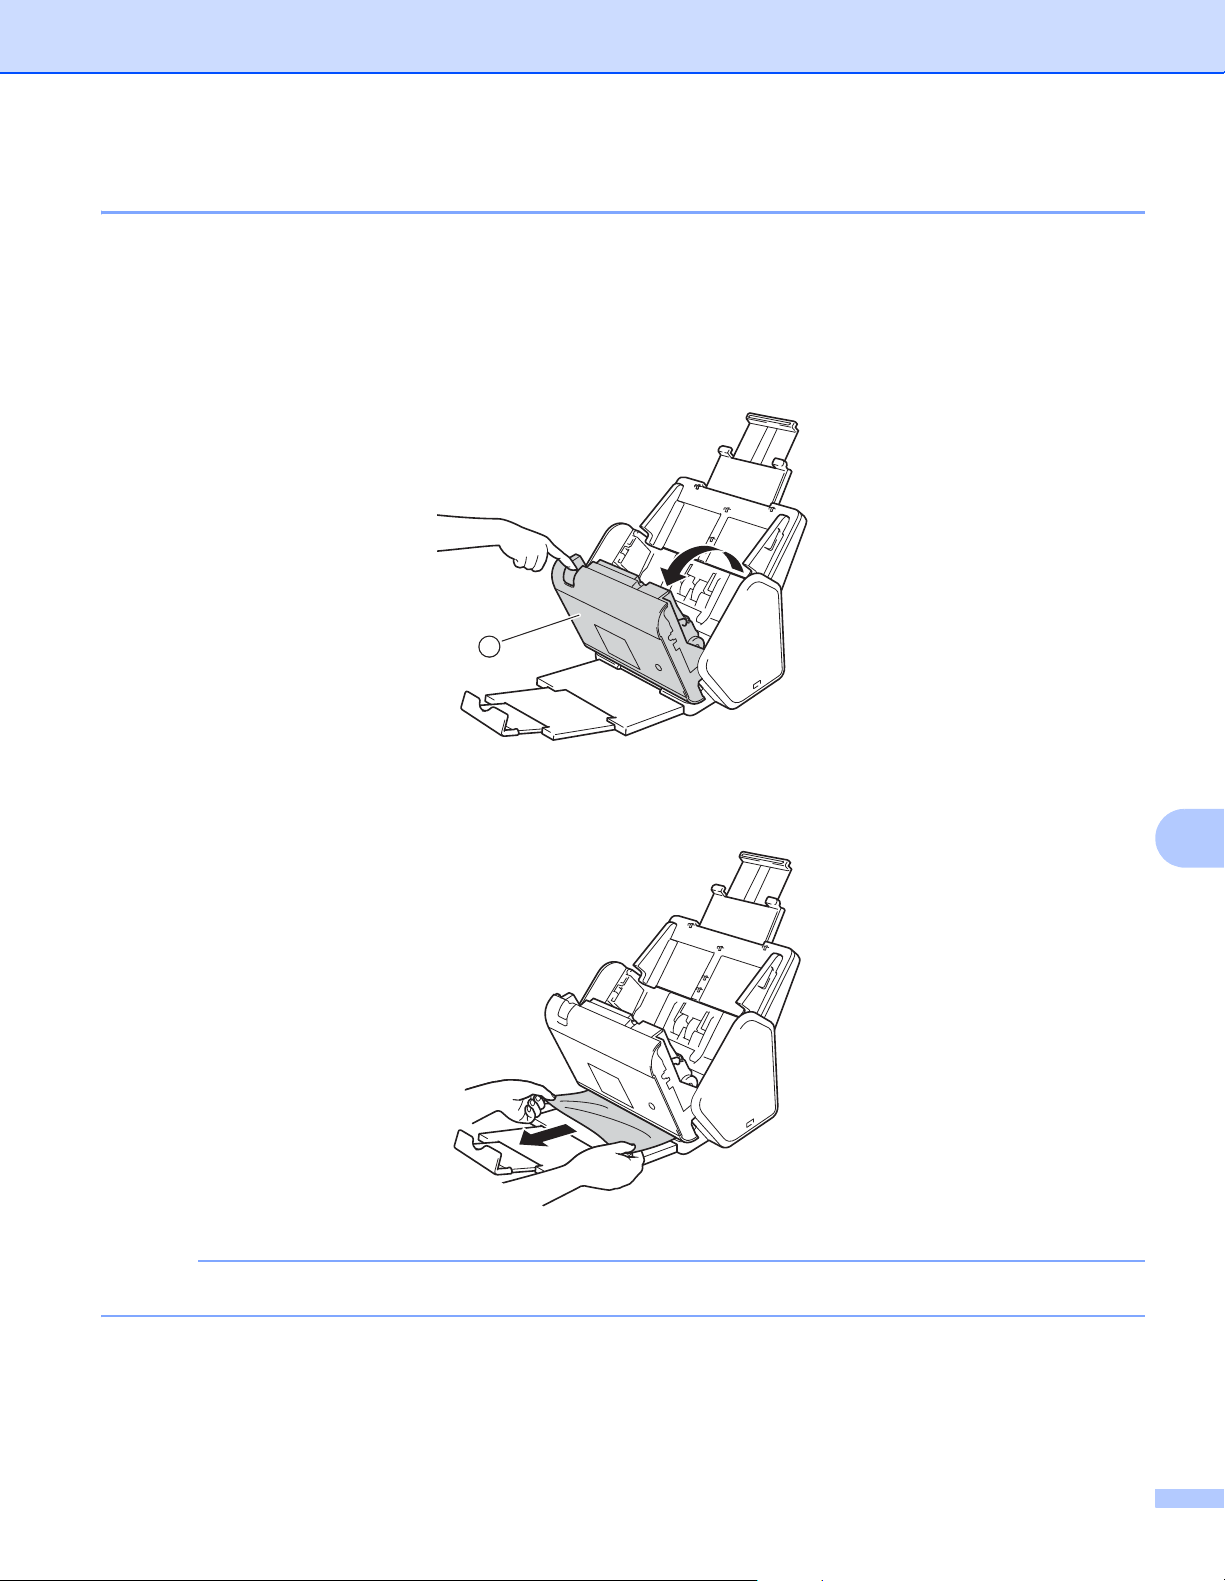
Troubleshooting
234
10
Document Jam 10
Documents can jam in the ADF unit if they are not inserted or fed correctly, if they are too long, or if multiple
pages were fed at the same time (multifeed). Follow the steps below to clear a document jam.
1 Take out any paper from the ADF that is not jammed.
2 Open the Front Cover by pressing the Cover Release Lever a.
3 Pull the jammed document out of the machine.
NOTE
Check for ripped paper inside the machine. Remove any paper scraps you find inside the machine.
4 Close the Front Cover.
1

Troubleshooting
235
10
5 Press any button (ADS-2400N / ADS-3000N) or (ADS-2800W / ADS-3600W).
NOTE
When clearing the multifeed, confirm that the data scanned before the multifeed was detected has been
saved, and then start scanning again at the next page or the beginning of the document.
IMPORTANT
To avoid damage to the jammed document, DO NOT pull the document out before opening the Front Cover.
Take out any paper from the ADF before closing the Front Cover.
To avoid future document jams, do the following:
• Close the Front Cover properly by pushing it gently in the center.
• Configure the settings for your document correctly.
• Clean the Reverse Roller and Pick Up Roller. To clean the Reverse Roller, see Replace the Reverse
Roller on page 222 for instructions on how to pull the Reverse Roller out from the machine. Clean the
rubber side of the Reverse Roller with a soft lint-free cloth moistened with water, and then put the
Reverse Roller back into the machine. To clean the Pick Up Roller, see Clean the Scanner and Rollers
on page 209.
• Stagger the pages and then load your document. See Load Documents on page 60.
• Make sure your document is acceptable for the machine. See Acceptable Documents on page 51.
• Load your document properly. See Load Documents on page 60.
• Load no more than 50 pages at a time.
• To avoid a long paper jam, you must select Long Paper for Scan Size or Document Size.
When you scan from your PC
•See Change Scan Settings (ControlCenter4) (Windows
®
) on page 99
•See Change Scan Button Settings from Brother iPrint&Scan (Mac) on page 106
When you scan from the machine (ADS-2800W / ADS-3600W)
Confirm the following settings on the Touchscreen:
(Scan to USB/FTP/Network/email Server)
• Scan Type: Color or Black & White
• Skip Blank Page: Off

Troubleshooting
236
10
Operational and Software Difficulties 10
IMPORTANT
For technical help, you must contact Brother customer support.
If you think there is a problem with your machine, check the chart below and follow the troubleshooting tips.
You can correct most problems yourself. If you need additional help, the Brother Solutions Center offers the
latest FAQs and troubleshooting tips, visit support.brother.com
Using non-Brother supplies may affect the scan quality, hardware performance, and machine reliability.
Scanning Difficulties 10
Difficulty Cause Suggestions
TWAIN or WIA errors
appear when starting
to scan. (Windows
®
)
TWAIN or WIA driver has not been
chosen as the primary source in your
scanning application.
Make sure the Brother TWAIN or WIA driver is
chosen as the primary source in your scanning
application. For example, in Nuance™
PaperPort™ 14SE, click Scan Settings and then
Select to select the Brother TWAIN/WIA driver.
TWAIN errors appear
when starting to scan.
(Macintosh)
The TWAIN driver has not been chosen
as the primary source in your scanning
application.
Make sure the Brother TWAIN driver is chosen
as the primary source in your application.
You can also scan documents using the
ICA Scanner Driver.
OCR does not work. The scanner resolution is too low. Increase the scanner resolution.
Vertical lines are seen
in the scanned image.
Paper dust has accumulated on the
surface of the glass strips.
Clean the glass strips inside the machine. See
Clean the Scanner and Rollers on page 209.
The scanned image is
missing.
The Paper Guides are not adjusted
to fit the width of the document.
The Auto Deskew feature was set
to On when the document was
scanned.
The settings are not suitable for your
document. For example, a Legal
Letter/A4 size document was fed
when Executive/A5 Letter was
selected as document size.
Adjust the Paper Guides to fit the width of the
document. When Scan Size is set to Auto and
you are scanning a document that contains
multiple page sizes, insert narrow pages straight
and as close to the center of the machine as
possible. If the document does not stay straight
while feeding, use Continuous Scanning.
Set Auto Deskew to Off.
Make sure the document size settings are
suitable for your document.
Configure the margin settings and adjust the
scanning position. For more information, see
Adjust the Scanning Position on page 198.

Troubleshooting
237
10
The scanned image is
skewed.
The Paper Guides are not adjusted
to fit the width of the document.
The Auto Deskew feature was set to
Off when the document was
scanned.
The Long Paper setting is selected.
Adjust the Paper Guides to fit the width of the
document. When Scan Size is set to Auto and
you are scanning a document that contains
multiple page sizes, insert narrow pages straight
and as close to the center of the machine as
possible. If the document does not stay straight
while feeding, use Continuous Scanning.
Set Auto Deskew to On.
Select a setting other than Long Paper.
Scanning is too slow. The resolution is not suitable for your
document.
Decrease the scanner resolution.
Set scan size to a setting other than Auto.
The document was not
fed.
Paper dust has accumulated on the
surface of the Pick Up Roller or
Reverse Roller.
Too many documents are loaded in
the ADF at a time.
There are foreign objects in the ADF.
Your document is too thin or too
thick.
Remote Setup is in process.
Paper ejection has paused.
The Reverse Roller Cover is not
properly closed.
Clean the Reverse Roller and Pick Up Roller.
To clean the Reverse Roller, see Replace the
Reverse Roller on page 222 for how to pull the
Reverse Roller out of the machine, clean the
rubber side of the Reverse Roller with a soft
lint-free cloth moistened with water, and then
attach the Reverse Roller in the machine.
To clean the Pick Up Roller, see Clean the
Scanner and Rollers on page 209.
Make sure the maximum number of pages is
suitable for your document. See Acceptable
Documents on page 51.
Remove any foreign objects or ripped paper
from the ADF.
Make sure your document is acceptable for
the machine. See Acceptable Documents
on page 51.
Cancel Remote Setup.
Remove any paper from the ADF.
Securely close the Reverse Roller Cover.
The document is
jammed.
Paper dust has accumulated on the
surface of the Pick Up Roller or
Reverse Roller.
There are foreign objects in the ADF.
Your document is not acceptable for
the machine.
Clean the Reverse Roller and Pick Up Roller.
To clean the Reverse Roller, see Replace the
Reverse Roller on page 222 for how to pull the
Reverse Roller out of the machine, clean the
rubber side of the Reverse Roller with a soft
lint-free cloth moistened with water, and then
attach the Reverse Roller in the machine.
To clean the Pick Up Roller, see Clean the
Scanner and Rollers on page 209.
Remove any foreign objects or ripped paper
from the ADF.
Make sure your document is acceptable for
the machine. See Acceptable Documents
on page 51.
Difficulty Cause Suggestions

Troubleshooting
238
10
The order of the output
document pages will
change.
The Output Tray has been positioned
so that it does not match the size of the
document.
Carefully position the Output Tray so that it
matches the size of the document.
The scan quality is
poor.
Paper dust has accumulated on the
surface of the Pick Up Roller or
Reverse Roller.
Paper dust has accumulated on the
surface of the glass strips inside the
machine.
The resolution is too low.
Clean the Reverse Roller and Pick Up Roller.
To clean the Reverse Roller, see Replace the
Reverse Roller on page 222 for how to pull the
Reverse Roller out of the machine, clean the
rubber side of the Reverse Roller with a soft
lint-free cloth moistened with water, and then
attach the Reverse Roller in the machine.
To clean the Pick Up Roller, see Clean the
Scanner and Rollers on page 209.
Clean the glass strips inside the machine. See
Clean the Scanner and Rollers on page 209.
Increase the scanner resolution.
The machine pauses
for about 3 seconds
between each page
when scanning.
The machine has entered Motor Save
mode. If you scan continuously, the
internal temperature of the machine
may increase, causing the machine
to enter Motor Save mode.
NOTE
The length of the pause may vary
depending on the scanning
conditions.
This is normal and you may continue to scan. If you
scan continuously, the internal temperature of the
machine may increase, causing the machine to
enter Motor Save mode.
Bleedthrough is seen
in the scanned data.
The settings are not appropriate for the
type of document being scanned.
Select the Remove Bleed-through / Pattern /
Remove Background Color check box.
Colors in the scanned
data are dark.
The settings are not appropriate for the
type of document being scanned.
Do one of the following:
Select the Remove Bleed-through / Pattern /
Remove Background Color check box and then
scan from your computer.
Change Brightness higher and then scan from
your computer.
Change Contrast higher and then scan from
your computer.
Change Scan Type to Gray or Color and then
scan from your computer.
A page that is not a
blank page is skipped.
The document is too light.
Skip Blank Page is set to On.
Set Skip Blank Page to Off.
Alternatively, adjust the Skip Blank Page sensitivity
so that it is lower.
Difficulty Cause Suggestions
Troubleshooting
239
10
Software Difficulties 10
Cannot scan a long
document.
Long Paper is not selected for the
document size.
Select Long Paper for the document size. If you
cannot select Long Paper, when scanning from the
machine’s Control Panel, set Skip Blank Page to
Off and set Scan Type to an option other than Auto.
Then, you can select Long Paper for the document
size.
A multifeed occurs. The document is not loaded properly. Load your document properly (see Standard-size
Documents on page 60), and then try again.
Cannot scan. Secure Function Lock is on. Call your administrator to check your Secure
Function Lock settings.
See Secure Function Lock 3.0 (ADS-2800W /
ADS-3600W) on page 41.
Cannot scan a thick
card successfully.
Card materials and environment are not
suitable.
Load your card sideways. Scan using the following
settings:
Plastic card mode: Off
Resolution: 600 dpi
Document Size: Auto
Multifeed detection: Off
The edge of your
document does not
scan correctly, or the
scan is stretched when
scanning a thick
document.
A thick document hit the output tray. Scan your document without using the output tray.
Auto Start Scan does
not start.
(ADS-2800W/
ADS-3600W)
The settings for Auto Start Scan (the
9th Shortcut tab) are incorrect.
Confirm the settings for Auto Start Scan (the 9th
Shortcut tab).
See Auto Start Scan on page 9.
Difficulty Cause Suggestions
Cannot install
software.
— (Windows
®
users only)
Run the scanner driver on the installation disc. This
program will repair and reinstall the software.
Cannot find how to
start ControlCenter4
(Windows
®
).
—
If the icon is not displayed in the task tray,
click (Brother Utilities) on your desktop, and
then click the drop-down list and select your model
name (if not already selected). Click Scan in the left
navigation bar, and then click ControlCenter4.
Difficulty Cause Suggestions

Troubleshooting
240
10
Cannot find how to
configure the settings
to scan from the
Control Panel of the
machine.
(ADS-2400N /
ADS-3000N)
— Use Remote Setup. See Set Up the Brother
Machine from Your Computer on page 203.
Cannot save the
settings in Remote
Setup or Web Based
Management.
The machine is processing.
The machine is being configured
from the machine’s Control Panel.
Wait until the machine finishes processing and
then try again.
Stop configuring the machine from the Control
Panel.
Cannot start Remote
Setup.
The machine is turned off.
The machine is not connected to
your computer.
An error is occurring.
The machine is scanning.
The machine is being configured
from the machine’s Control Panel.
Turn on the machine, and then try again.
Connect the machine to your computer, and
then try again.
Clear all errors, and then try again.
Wait until scanning has finished and try again.
Stop configuring the machine from the Control
Panel.
Difficulty Cause Suggestions

Troubleshooting
241
10
Network Difficulties 10
Difficulty Suggestions
Cannot scan over the network. Make sure that your machine is powered on and is online and in Ready Mode.
Check the current network settings.
See Troubleshooting in the Network User’s Guide.
The network scanning feature does
not work.
(Windows
®
users)
Configure the third-party Security/Firewall Software to allow Network scanning.
To add port 54925 for Network scanning, enter the information below:
In Name: Enter any description, for example Brother NetScan.
In Port number: Enter 54925.
In Protocol: UDP is selected.
Refer to the instruction manual that came with your third-party Security/Firewall
Software or contact the software manufacturer.
(Macintosh users)
• Brother iPrint&Scan
In the Finder menu bar, click Go > Applications, and then double-click the
Brother iPrint&Scan icon. The Brother iPrint&Scan window appears. Click the
Select your Machine button, and then follow the on-screen instructions to
reselect your network machine.
• TWAIN driver
In the Finder menu bar, click Go > Applications > Brother > TWAIN Driver
Utility, and then double-click the Device Selector icon. The Device Selector
window appears. Reselect your network machine, make sure Status is idle,
and then click OK.
The Brother software cannot be
installed.
(Windows
®
users)
If the Security Software warning appears on the computer screen during the
installation, change the Security Software settings to permit the Brother
product setup program or other program to run.
(Macintosh users)
If you are using a firewall function of anti-spyware or antivirus security software,
temporarily disable it, and then install the Brother software.
Cannot connect to wireless network.
(ADS-2800W / ADS-3600W)
Check the wireless network settings.
See Troubleshooting in the Network User’s Guide.
Reset the network settings. See Reset the Machine (ADS-2400N / ADS-3000N) on page 247.
See Reset the Machine (ADS-2800W / ADS-3600W) on page 248.
Troubleshooting
242
10
Other Difficulties 10
How to check the machine’s IP
address. (ADS-2400N / ADS-3000N)
(ADS-2400N / ADS-3000N)
1. Start the ControlCenter application.
2. Click the Device Settings tab.
3. Click the Scan to Net Settings button. The Web Based Management
window appears.
4. Select Network tab.
5. Click Wired.
Cannot recognize the NFC card. Set NFC to On.
Difficulty Cause Suggestions
The machine is in
Sleep Time (power
save mode).
(ADS-2800W /
ADS-3600W)
The machine is idle and the amount of
time specified by the Sleep Time setting
has elapsed.
Do one of the following:
Press .
Press .
Scan using your computer.
Open the Top Cover.
Load your document.
Touch the screen.
Touch IC Card to the NFC reader.
The machine is not
turned on.
The maschine was plugged in within
60 seconds after pulling out the plug.
Turn off the machine, wait 60 seconds, and then
turn on the scanner.
The machine is in
Offline Mode.
The machine is not connected to the
computer.
Connect the machine to the computer and turn on
the machine.
Difficulty Suggestions
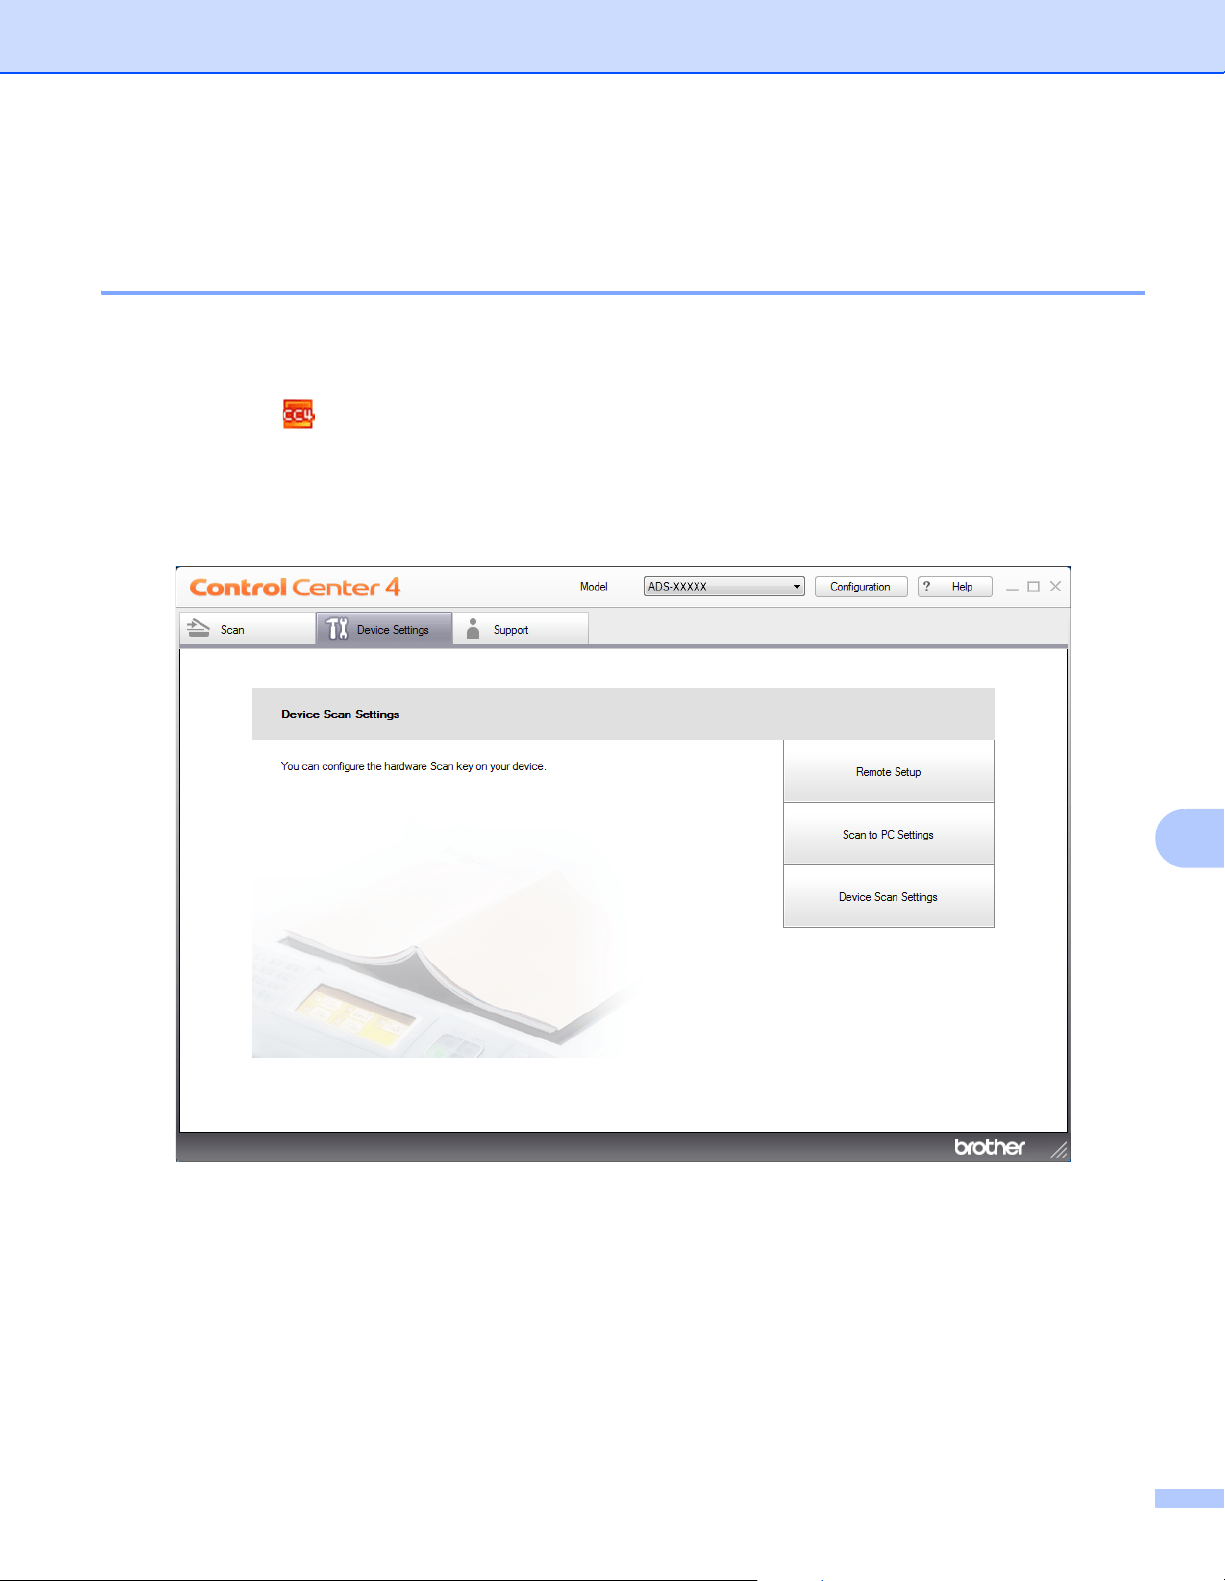
Troubleshooting
243
10
Machine Information 10
Check the Serial Number (ADS-2400N / ADS-3000N) 10
1 Start the application.
Windows
®
a Click the (ControlCenter4) icon in the task tray and select Open from the menu.
The ControlCenter4 window appears.
b Click the Device Settings tab (the example below uses Home Mode).
c Click the Remote Setup button.
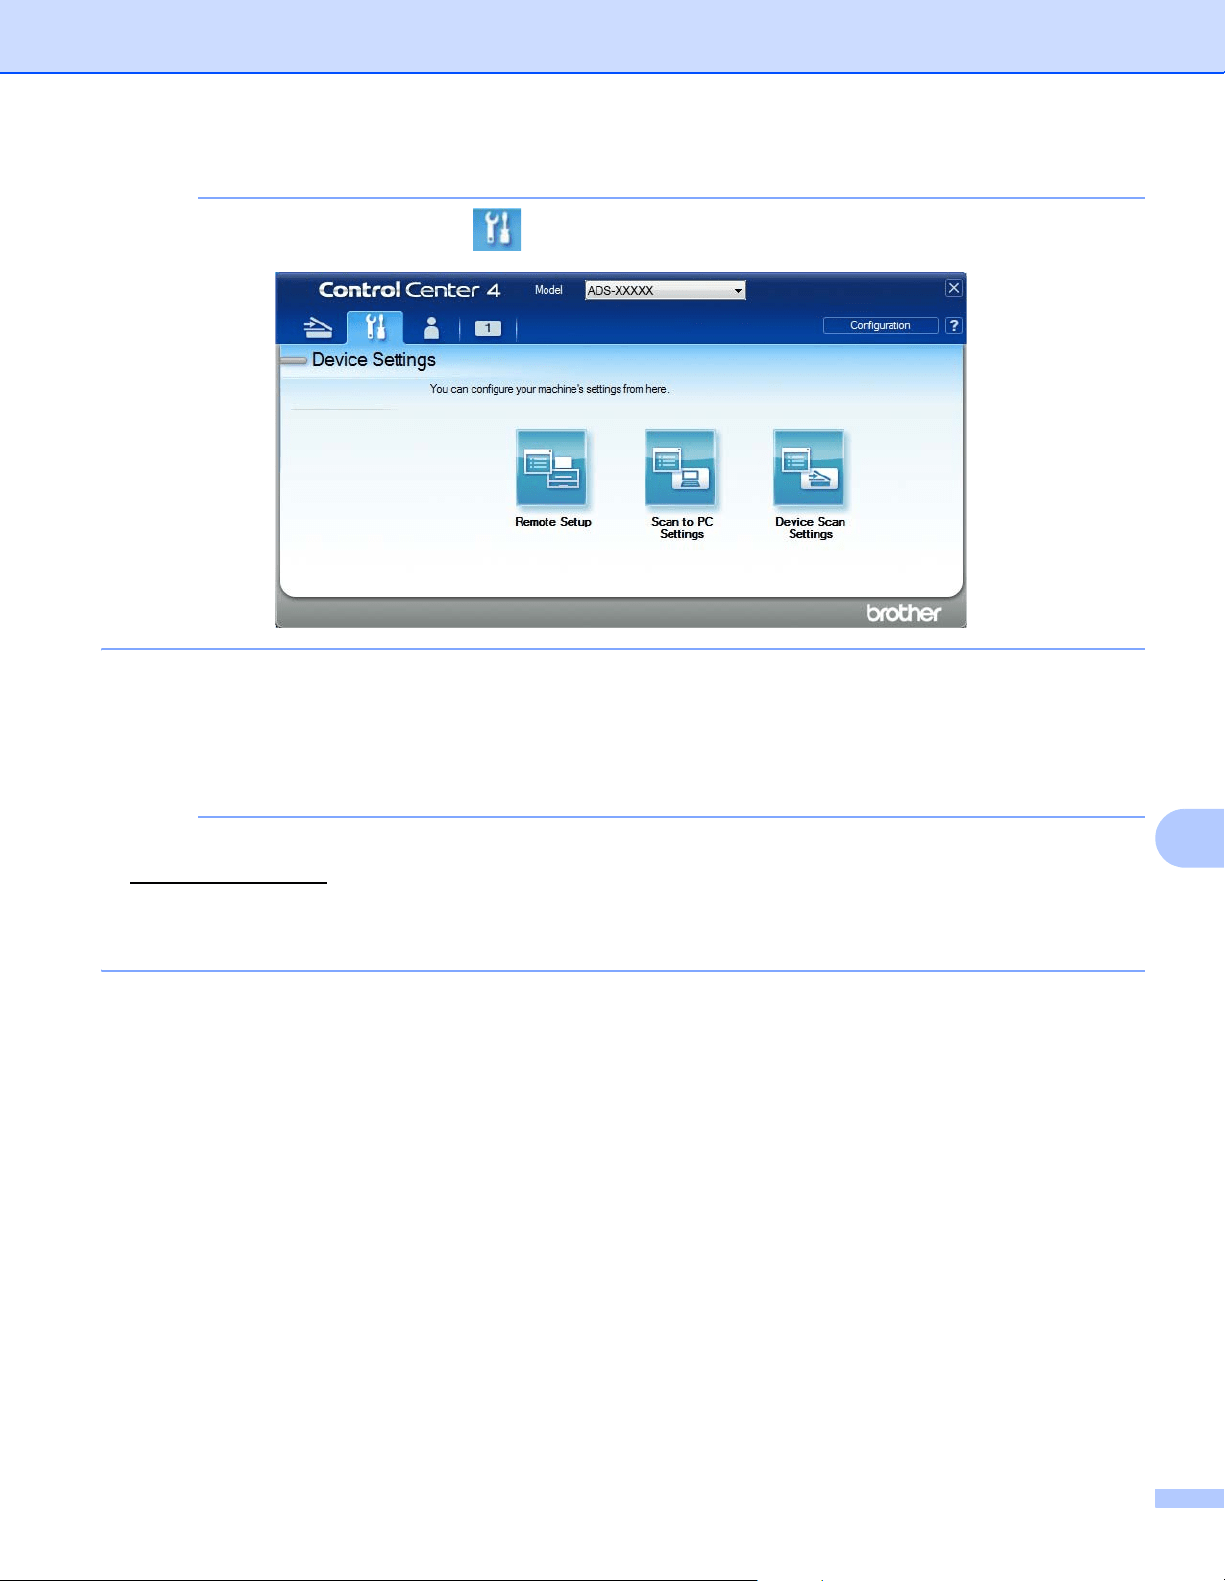
Troubleshooting
244
10
NOTE
If using Advanced Mode, click the (Settings) icon to access Device Settings.
Macintosh
a In the Finder menu bar, click Go > Applications > Brother.
b Double-click the Remote Setup icon.
NOTE
• To use Remote Setup, go to your model's Downloads page on the Brother Solutions Center at
support.brother.com
and download Remote Setup from Utilities.
• Remote Setup for Mac supports USB connections only.
• Remote Setup for Mac supports macOS 10.13 or earlier.
2 The Remote Setup window appears.
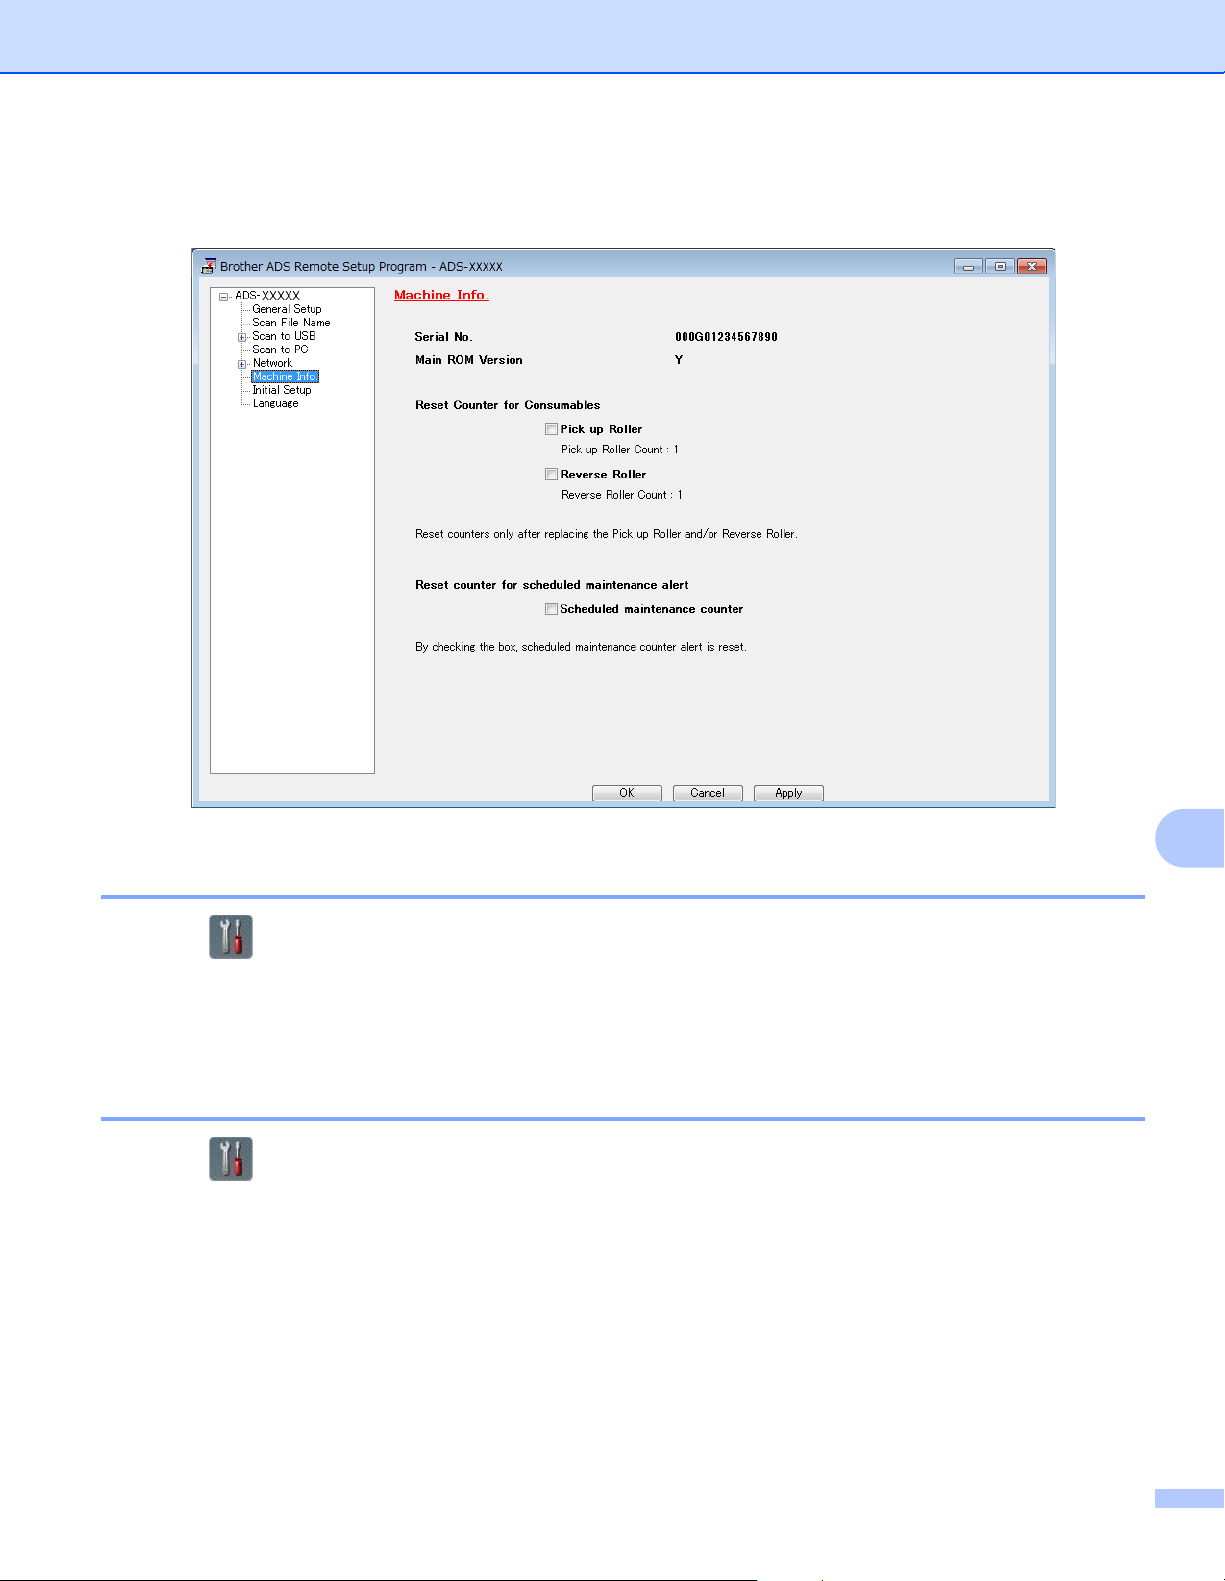
Troubleshooting
245
10
3 Select Machine Info. in the left navigation pane. The window displays the Serial No. (the example
below uses Windows
®
).
Check the Serial Number (ADS-2800W / ADS-3600W) 10
1 Press (All Settings).
2 Press Machine Info.
3 Press Serial No. The Touchscreen displays the machine’s serial number.
WLAN Enable/Disable (ADS-2800W / ADS-3600W) 10
1 Press (All Settings).
2 Press Network.
3 Press WLAN.
4 Press a or b to display WLAN Enable.
5 Press WLAN Enable.
6 Press On (or Off).
Troubleshooting
246
10
LAN Enable/Disable 10
ADS-2800W/ADS-3600W
1 Press .
2 Press Network.
3 Press Wired LAN.
4 Press a or b to display Wired Enable.
5 Press Wired Enable.
6 Press On (or Off).
ADS-2400N/ADS-3000N
1 Open the front cover.
2 Press and hold and for about five seconds until the machine beeps.
To disable LAN: press and hold and for about five seconds until the machine beeps.
USB Enable/Disable 10
ADS-2800W/ADS-3600W
1 Press .
2 Press Initial Setup.
3 Press USB/PC Port.
4 Press On (or Off).
5 Press OK for two seconds to reboot the machine.
ADS-2400N/ADS-3000N
1 Open the front cover.
2 Press and hold and for about five seconds until the machine beeps.
To disable USB: press and hold and for about five seconds until the machine beeps.
3 The machine reboots.
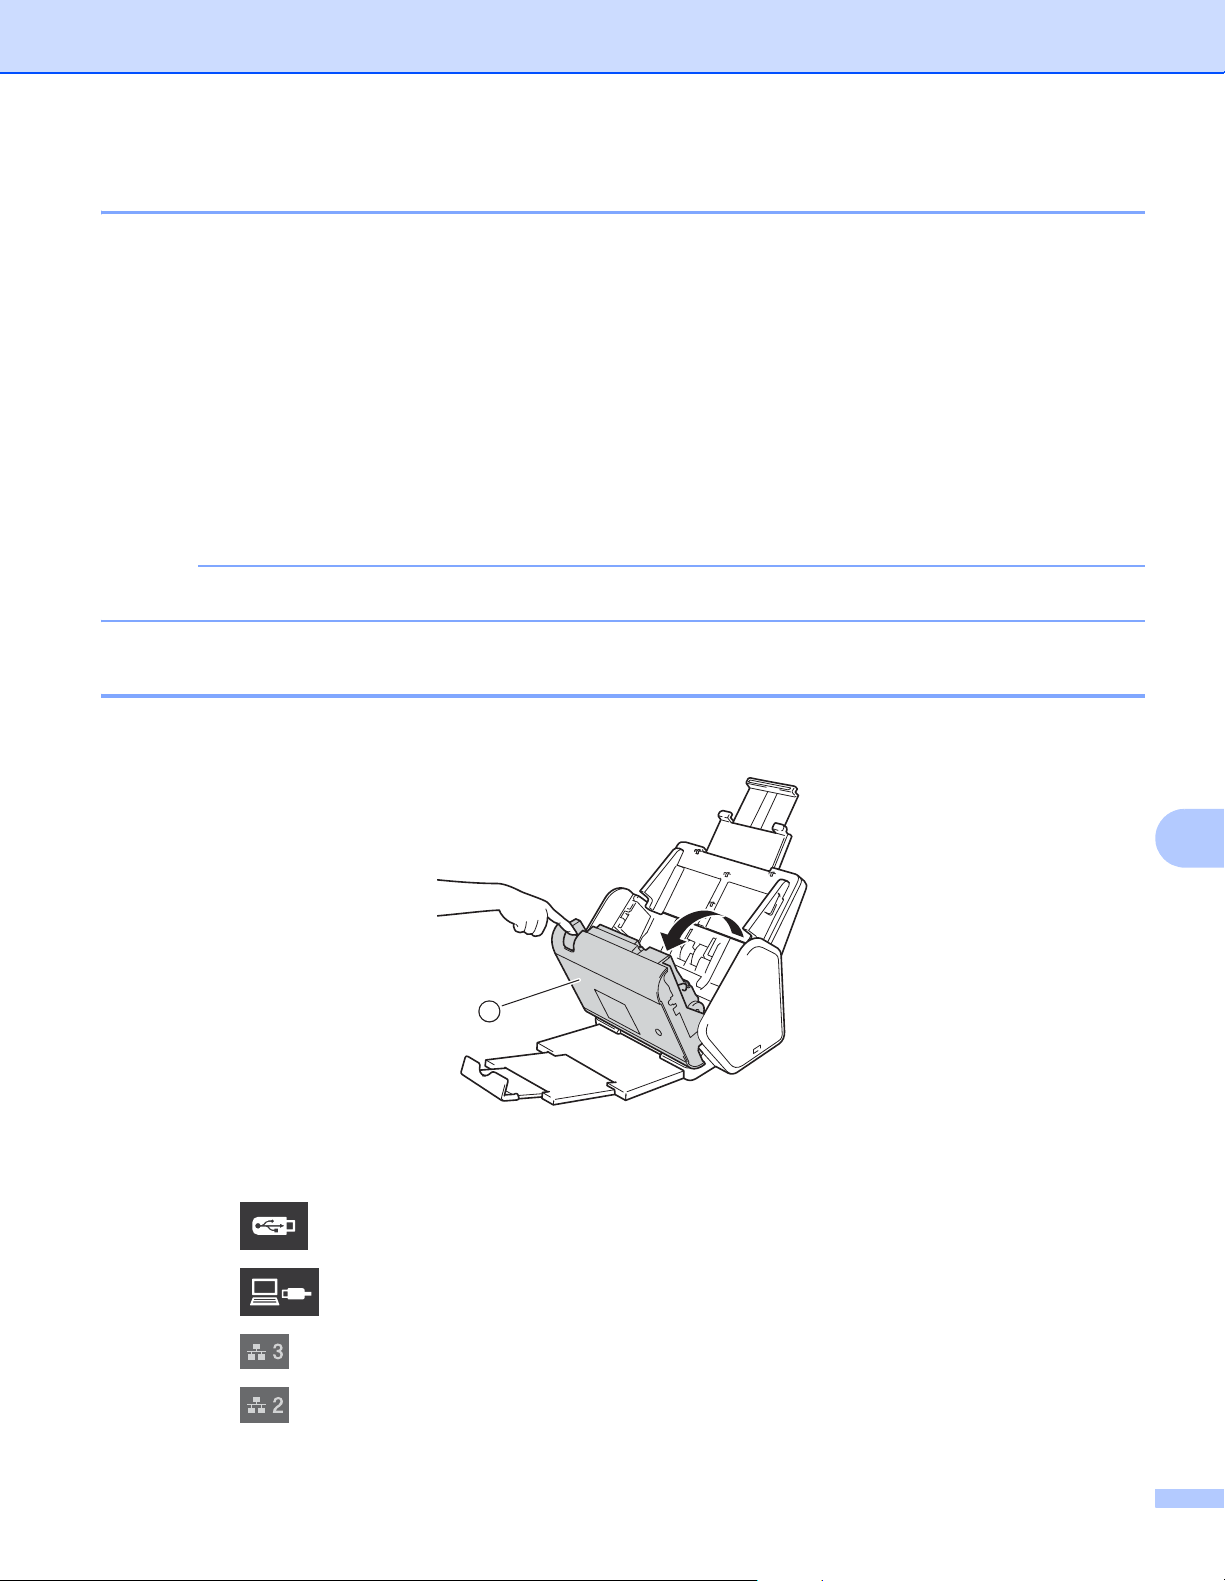
Troubleshooting
247
10
Reset Functions 10
The following reset functions are available:
Network
You can restore the network settings, such as the password and IP address information, to the factory
settings.
Address Book (ADS-2800W / ADS-3600W)
You can reset the Address Book.
All Settings
You can restore all settings to the factory settings.
We recommend performing this procedure before transferring or disposing of the machine.
NOTE
Unplug the interface cable before you choose Network or All Settings.
Reset the Machine (ADS-2400N / ADS-3000N) 10
1 Open the Front Cover 1.
2 Do one of the following:
Press for about five seconds until the machine beeps to reset the network.
Press for about five seconds until the machine beeps to reset IPsec.
Press for about five seconds until the machine beeps to reset the Periodic Cleaning Counter.
Press for about five seconds until the machine beeps to reset the Pick Up Roller Counter.
1

Troubleshooting
248
10
Press for about five seconds until the machine beeps to reset the Reverse Roller Counter.
Press for about five seconds until the machine beeps to reset the Pick Up Roller Counter
and Reverse Roller Counter.
Reset the Machine (ADS-2800W / ADS-3600W) 10
1 Press (All Settings).
2 Press a or b to display Initial Setup.
3 Press Initial Setup and then Reset.
4 Press the type of reset you want.
5 Press OK for two seconds to restart the machine.
249
A
A
General A
NOTE
This chapter provides a summary of the machine’s specifications. For additional specifications, visit
support.brother.com
for details.
1
Measured diagonally.
2
Measured when the machine is connected to your computer.
3
When using 2-sided (duplex) scanning.
4
USB port, wired LAN port and NFC (only for applicable model) are activated.
USB port is connected.
5
Measured when the machine's USB, wired LAN connection are activated and USB Flash Drive is connected.
6
Measured when the machine's USB, wired LAN and NFC (only for applicable model) connection are activated and USB Flash Drive is connected.
Specifications A
Model
ADS-2400N
5
ADS-3000N
5
ADS-2800N
5
ADS-3600N
6
Memory Capacity Standard 256 MB 512 MB
Power Source USA 100 - 120 V AC 50/60 Hz
Latin
American
Countries
220 - 240 V AC 50/60 Hz
Touchscreen LCD (Liquid Crystal Display) - Touchscreen 3.7 in. (93.4 mm)
TFT Color LCD
1
Approx. Power Consumption
2
Scanning
3
27 W 30 W 27 W 30 W
Ready
4
2.5 W 3.6 W 3.3 W 4.4 W
Sleep 1.3 W 2.2 W 1.4 W 2.3 W
Power Down 0.12 W

Specifications
250
A
Model ADS-2400N ADS-3000N ADS-2800W ADS-3600W
Dimensions
Approx. Weights 9.8 lb (4.45 kg) (ADS-2400N /
ADS-3000N)
10 lb (4.55 kg) (ADS-2800W /
ADS-3600W)
Temperature Operating 41 to 95 °F (5 to 35 °C)
Storage 32 to 104 °F (0 to 40 °C)
12.0 in
(306 mm)
9.8 in
(250 mm)
10.2 in
(258 mm)
12.0 in
(306 mm)
7.2 in
(182 mm)
7.8 in
(199 mm)
14.0 in
(356 mm)
13.9 in
(352 mm)
12.3 in
(313 mm)
26.2 in
(665 mm)
Specifications
251
A
Scanner A
1
For the latest driver updates for the OS X you are using, visit support.brother.com
Direct Scan Feature (Scan to USB) A
1
USB Mass Storage standard up to 64 GB
Supported Formats: FAT12/FAT16/FAT32/exFAT.
Humidity Operating 20 to 80%
Storage 10 to 90%
ADF (automatic document feeder) Up to 50 pages (Paper: 20 lb (80 g/m
2
) Legal size, or less than
0.2 in. (5 mm))
Document
Size
Multiple Paper Width 2.0 to 8.5 in. (51 to 215.9 mm)
Length 2.0 to 14.0 in. (51 to 355.6 mm)
Single Paper Width 2.0 to 8.5 in. (51 to 215.9 mm)
Length 2.0 to 196.9 in. (51 to 5,000 mm)
Color/Black Yes / Yes
TWAIN Compliant Windows
®
Windows
®
XP 32 bit (SP3) / Windows Vista
®
/ Windows Server
®
2003
R2 32 bit (SP2) / Windows Server
®
2008 / Windows Server
®
2008 R2 /
Windows Server
®
2012 / Windows Server
®
2012 R2 / Windows
®
7 /
Windows
®
8 / Windows
®
8.1 / Windows
®
10
Macintosh
OS X 10.8.5, 10.9.x, 10.10.x, 10.11.x
1
WIA Compliant Windows
®
Windows
®
XP 32 bit (SP3) / Windows Vista
®
/ Windows
®
7 / Windows
®
8 /
Windows
®
8.1 / Windows
®
10
ICA Compliant Macintosh
OS X 10.8.5, 10.9.x, 10.10.x, 10.11.x
1
ISIS™ Compliant Windows
®
Windows Vista
®
/ Windows
®
7 / Windows
®
8 / Windows
®
8.1 / Windows
®
10
Color Depth Input 30 bit color Processing
Output 24 bit color Processing
Resolution Interpolated Up to 1,200 × 1,200 dpi
Optical Up to 600 × 600 dpi
Scanning Width Up to 8.5 in. (215 mm)
Grayscale 256 levels
Max. Speed For detailed specifications, visit www.brother.com
Compatible Media USB flash drive 1
1
Interface Interface USB 2.0 Hi Speed
Model ADS-2400N ADS-3000N ADS-2800W ADS-3600W
Specifications
252
A
Interfaces A
1
Your machine has a Hi-Speed USB 2.0 interface. The machine can also be connected to a computer that has a USB 1.0/1.1 interface.
2
Your machine has a USB 3.0 SuperSpeed interface. The machine can also be connected to a computer that has a USB 2.0/USB 1.1/USB 1.0
interface.
3
Third party USB ports are not supported.
4
See Network on page 252.
See Supported Protocols and Security Features in the Network User’s Guide.
Network A
NOTE
For more information about the Network specifications, see the Network User’s Guide.
1
If you require more advanced scanner management, use the latest Brother BRAdmin Professional utility version that is available as a download
from support.brother.com
USB (ADS-2400N / ADS-2800W)
Hi-Speed USB 2.0
1, 3
Use a USB 2.0 cable (Type A/B) that is no more than 6 feet (2.0 meters) long.
(ADS-3000N / ADS-3600W)
USB 3.0 SuperSpeed Port
1, 2
LAN
4
Use an Ethernet UTP cable category 6 or higher.
Wireless LAN
(ADS-2800W /
ADS-3600W)
IEEE 802.11b/g/n (Infrastructure/Ad-hoc Mode)
IEEE 802.11g/n (WiFi Direct)
LAN You can connect your machine to a network for Network Scanning and Remote Setup.
Also included is Brother BRAdmin Light
1
Network Management software.
Wireless Network
Security (ADS-2800W /
ADS-3600W)
WEP 64/128 bit, WPA-PSK (TKIP/AES), WPA2-PSK (AES), Enterprise WPA/WPA-PSK
(AES), EAP, EAP RAST, PEAP, EAP TTLS, EAP TLS
Setup Support Utility
(ADS-2800W /
ADS-3600W)
WPS
WLAN Assistant
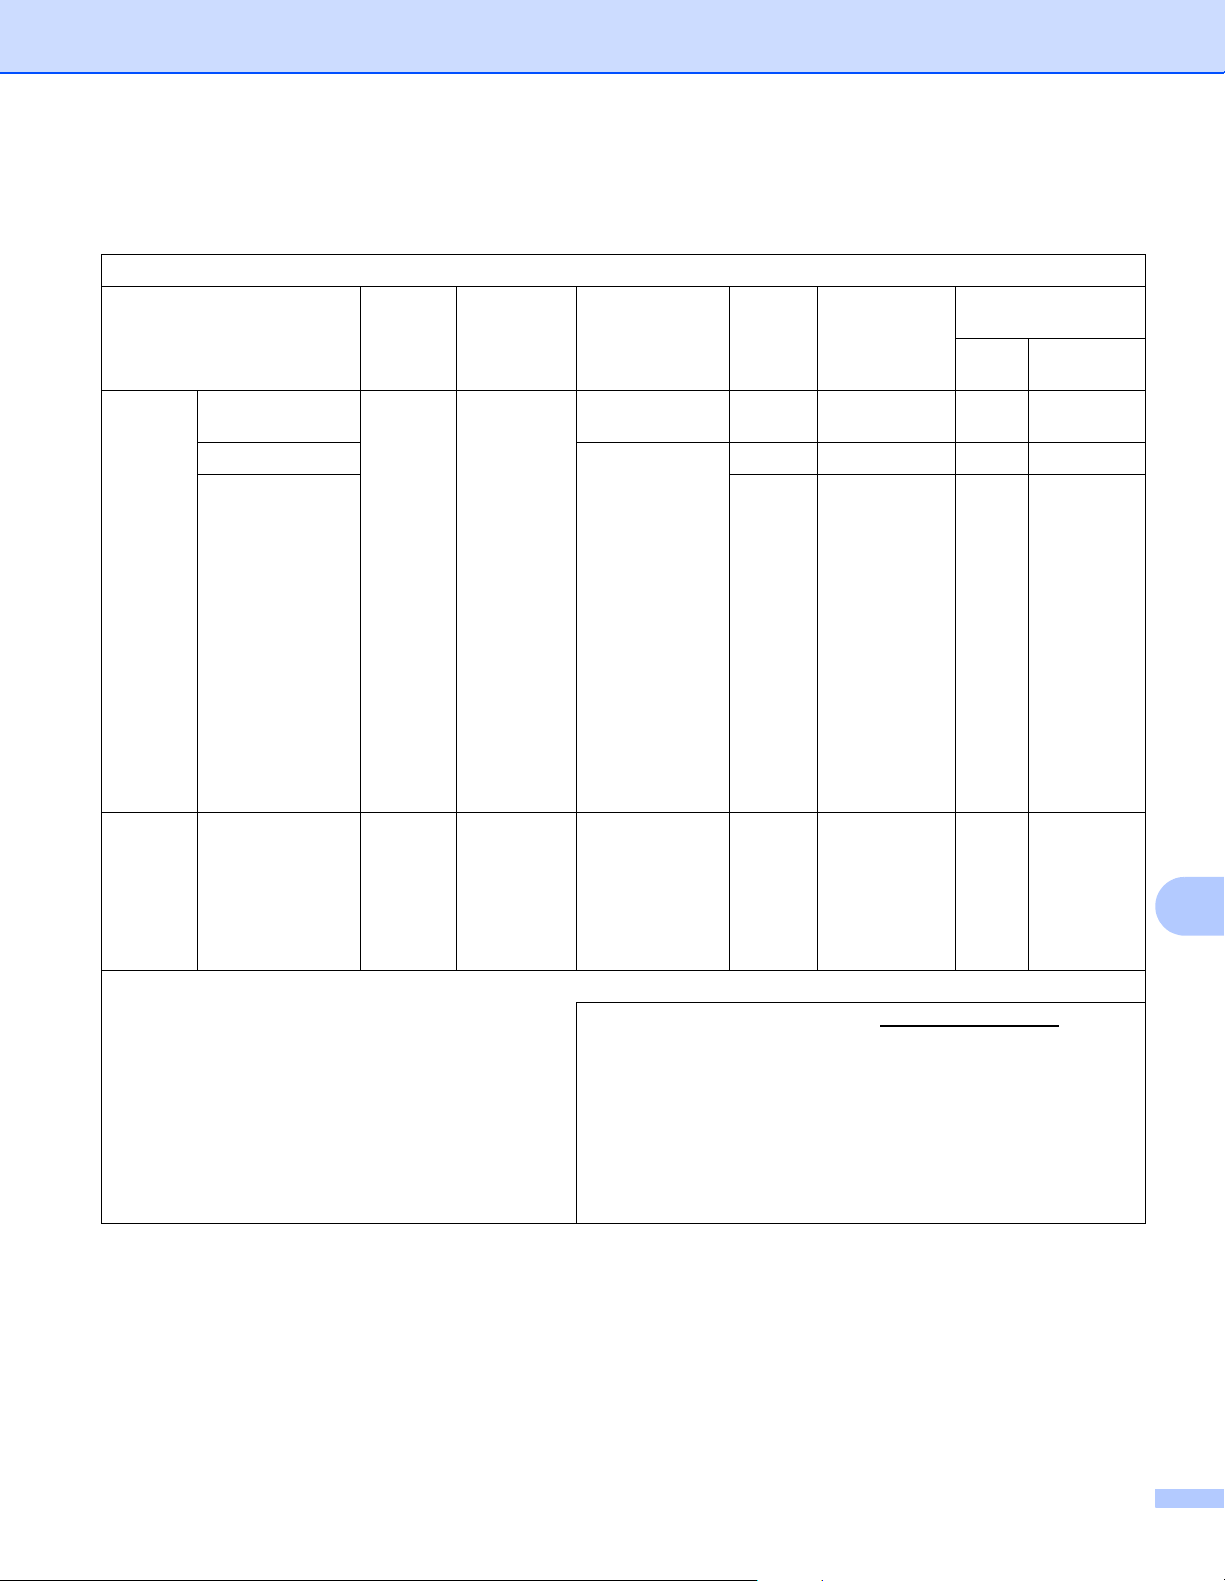
Specifications
253
A
Computer Requirements A
SUPPORTED OPERATING SYSTEMS AND SOFTWARE FUNCTIONS
Computer Platform &
Operating System Version
Supported
Computer
Software
Functions
Computer
Interface
Processor
Minimum Speed
Minimum
RAM
Recommended
RAM
Hard Disk Space to
install
For
Drivers
For
Applications
Windows
®
Operating
System
Windows
®
XP
32 bit (SP3)
1
Scanning USB
10/100/
1000Base-TX
(Ethernet)
Wireless
4
802.11b/g/n
Intel
®
Pentium
®
II
or equivalent
128 MB 256 MB 150 MB 1.0 GB
Windows Vista
®
1
Intel
®
Pentium
®
4
or equivalent
64 bit (Intel
®
64 or
AMD64)
supported CPU
512 MB 1 GB 500 MB 1.0 GB
Windows
Server
®
2003 R2
32 bit (SP2)
2, 3
Windows
Server
®
2008
2
Windows
Server
®
2008 R2
2
Windows
Server
®
2012
2
Windows
Server
®
2012 R2
2
Windows
®
7
1
Windows
®
8
1
Windows
®
8.1
1
Windows
®
10
1
1GB
(32 bit)
2GB
(64 bit)
1GB (32bit)
2GB (64bit)
650 MB 1.0 GB
Macintosh
Operating
System
OS X 10.8.5
OS X 10.9.x
OS X 10.10.x
OS X 10.11.x
Scanning USB
5
10/100/
1000Base-TX
(Ethernet)
Wireless
4
802.11b/g/n
Intel
®
Processor 2 GB 2 GB 80 MB 1.0 GB
Conditions:
1
Nuance™ PaperPort™ 14SE supports Windows
®
XP 32 bit
(SP3), Windows Vista
®
, Windows
®
7, Windows
®
8,
Windows
®
8.1 and Windows
®
10.
2
• The Desktop Experience Pack is needed.
• This operating system does not support the supplied
applications.
3
Server OS supports Scanner Driver Only.
4
ADS-2800W and ADS-3600W.
5
Third-party USB ports are not supported.
For the latest driver updates, visit support.brother.com.
All trademarks, brand and product names are the property of
their respective companies.
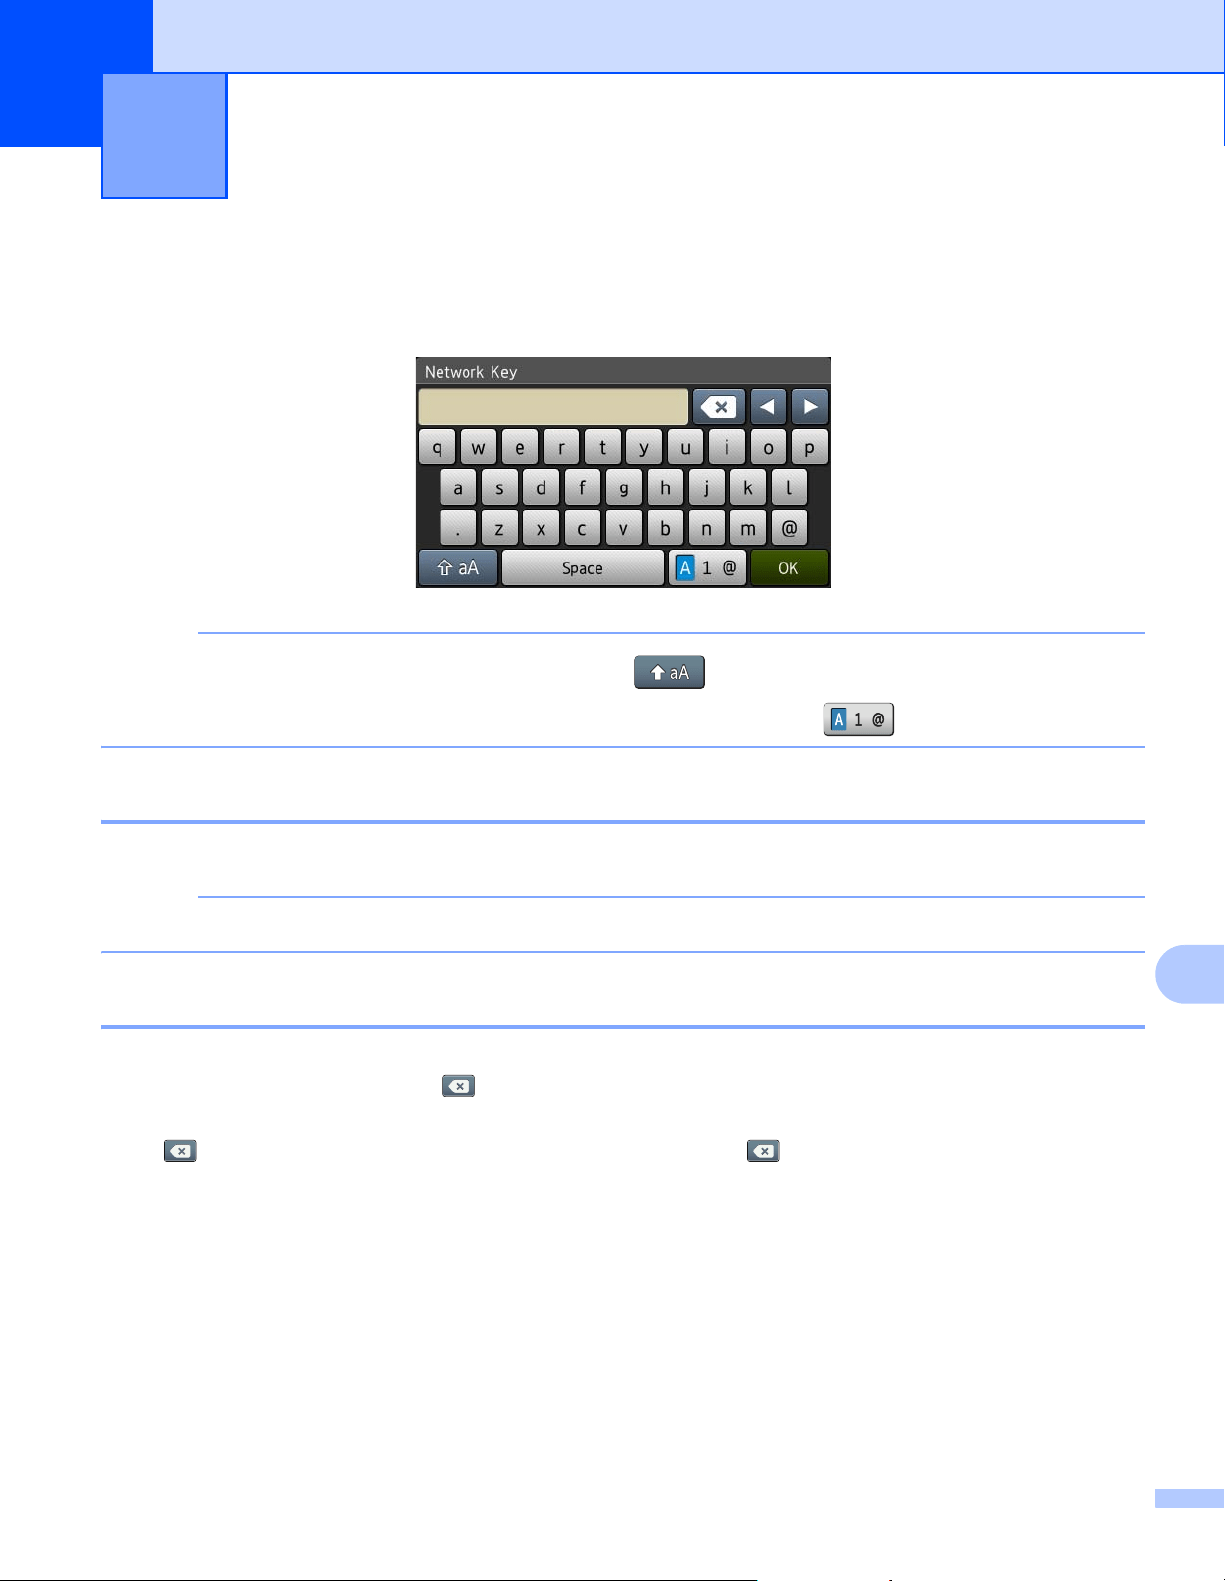
254
B
B
Entering Text (ADS-2800W / ADS-3600W) B
When you must enter text into a machine a keyboard appears on the Touchscreen.
NOTE
• To change between lowercase or uppercase, press .
• To toggle between the keyboards (letters, numbers, or symbols), press .
Inserting Spaces B
To enter a space, press Space. Or, press c to move the cursor.
NOTE
The characters that are available may differ depending on your country.
Making Corrections B
If you entered an incorrect character and want to change it, press d to move the cursor to highlight the
incorrect character, and then press . Enter the correct character. You can also insert letters by moving the
cursor and entering a character.
Press for each character you want to erase, or press and hold to erase all the characters.
Appendix B
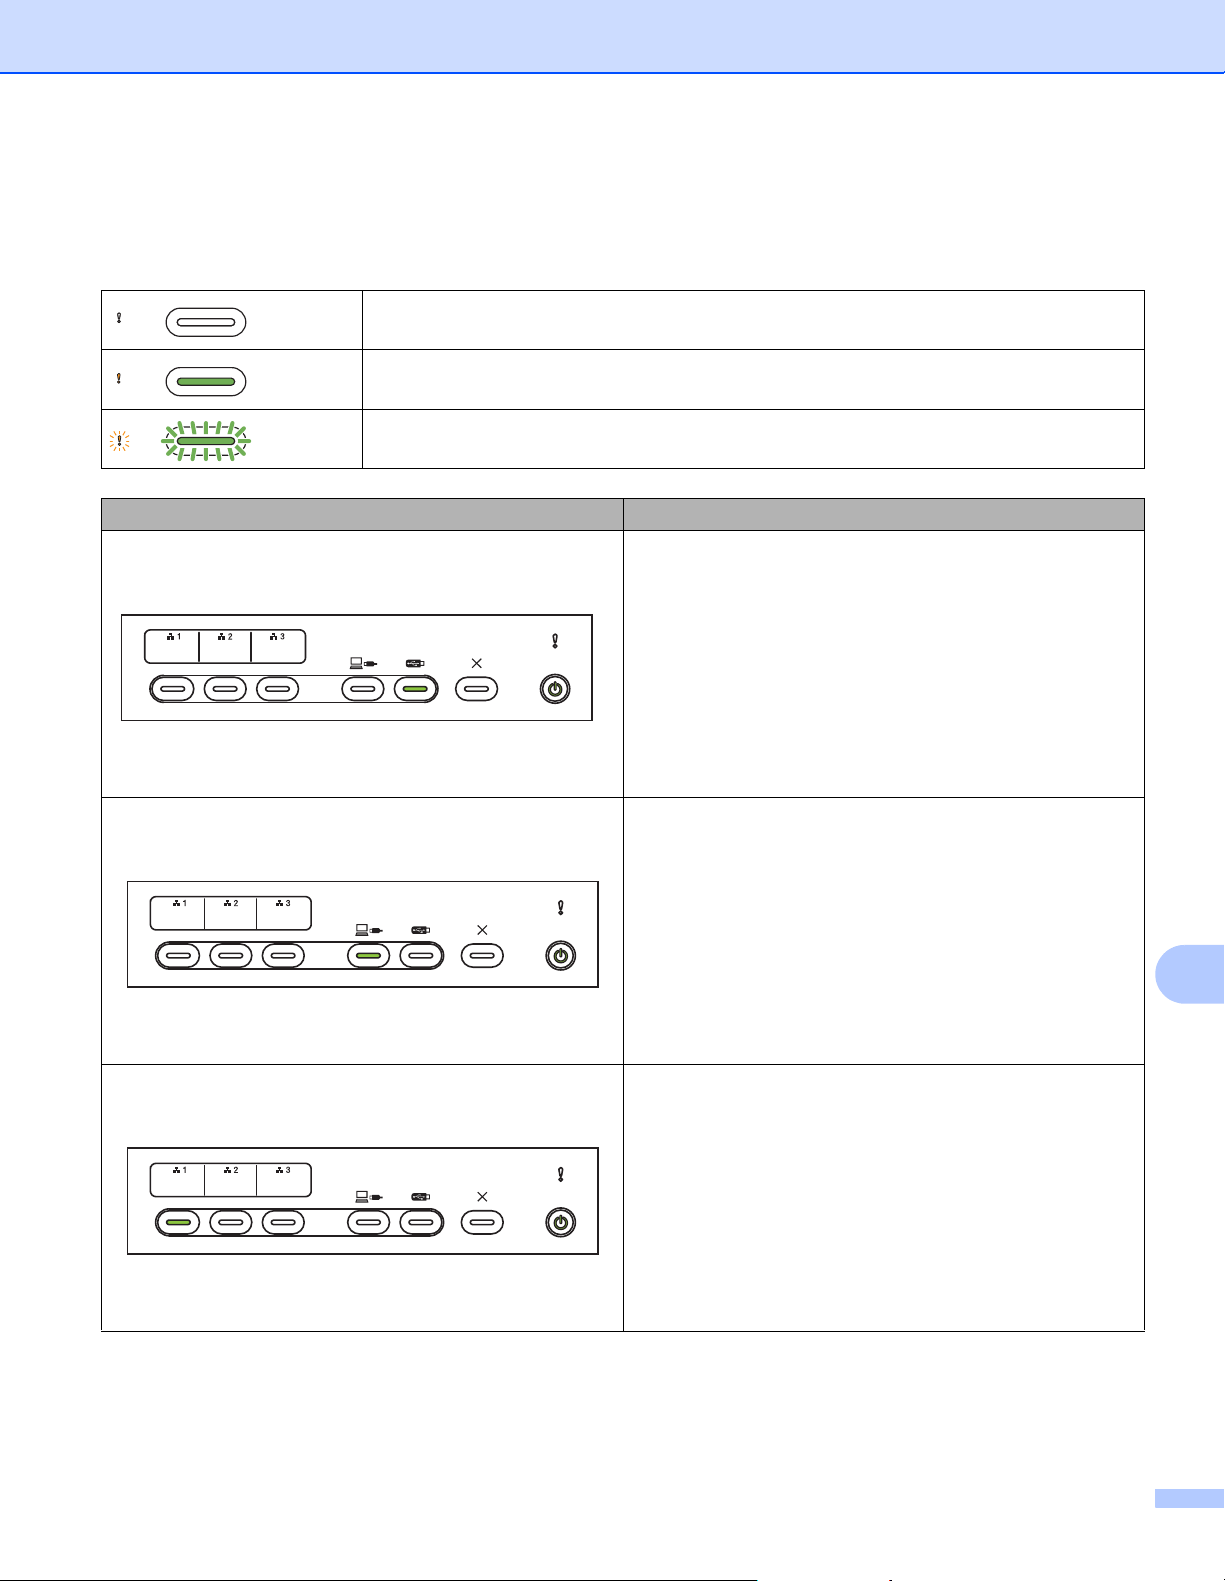
Appendix
255
B
LED Indications (ADS-2400N / ADS-3000N) B
The LED indications on the control panel are explained in the table below.
or
The LED is off.
or
The LED is on.
or
The LED is blinking.
LEDs Machine Status
Ready (USB connected)
The machine is connected to a USB device and ready to
scan.
Ready (Computer connected)
The machine is connected to your computer and ready to
scan.
Ready (Net Device 1)
The machine is ready to scan to Network Device 1.
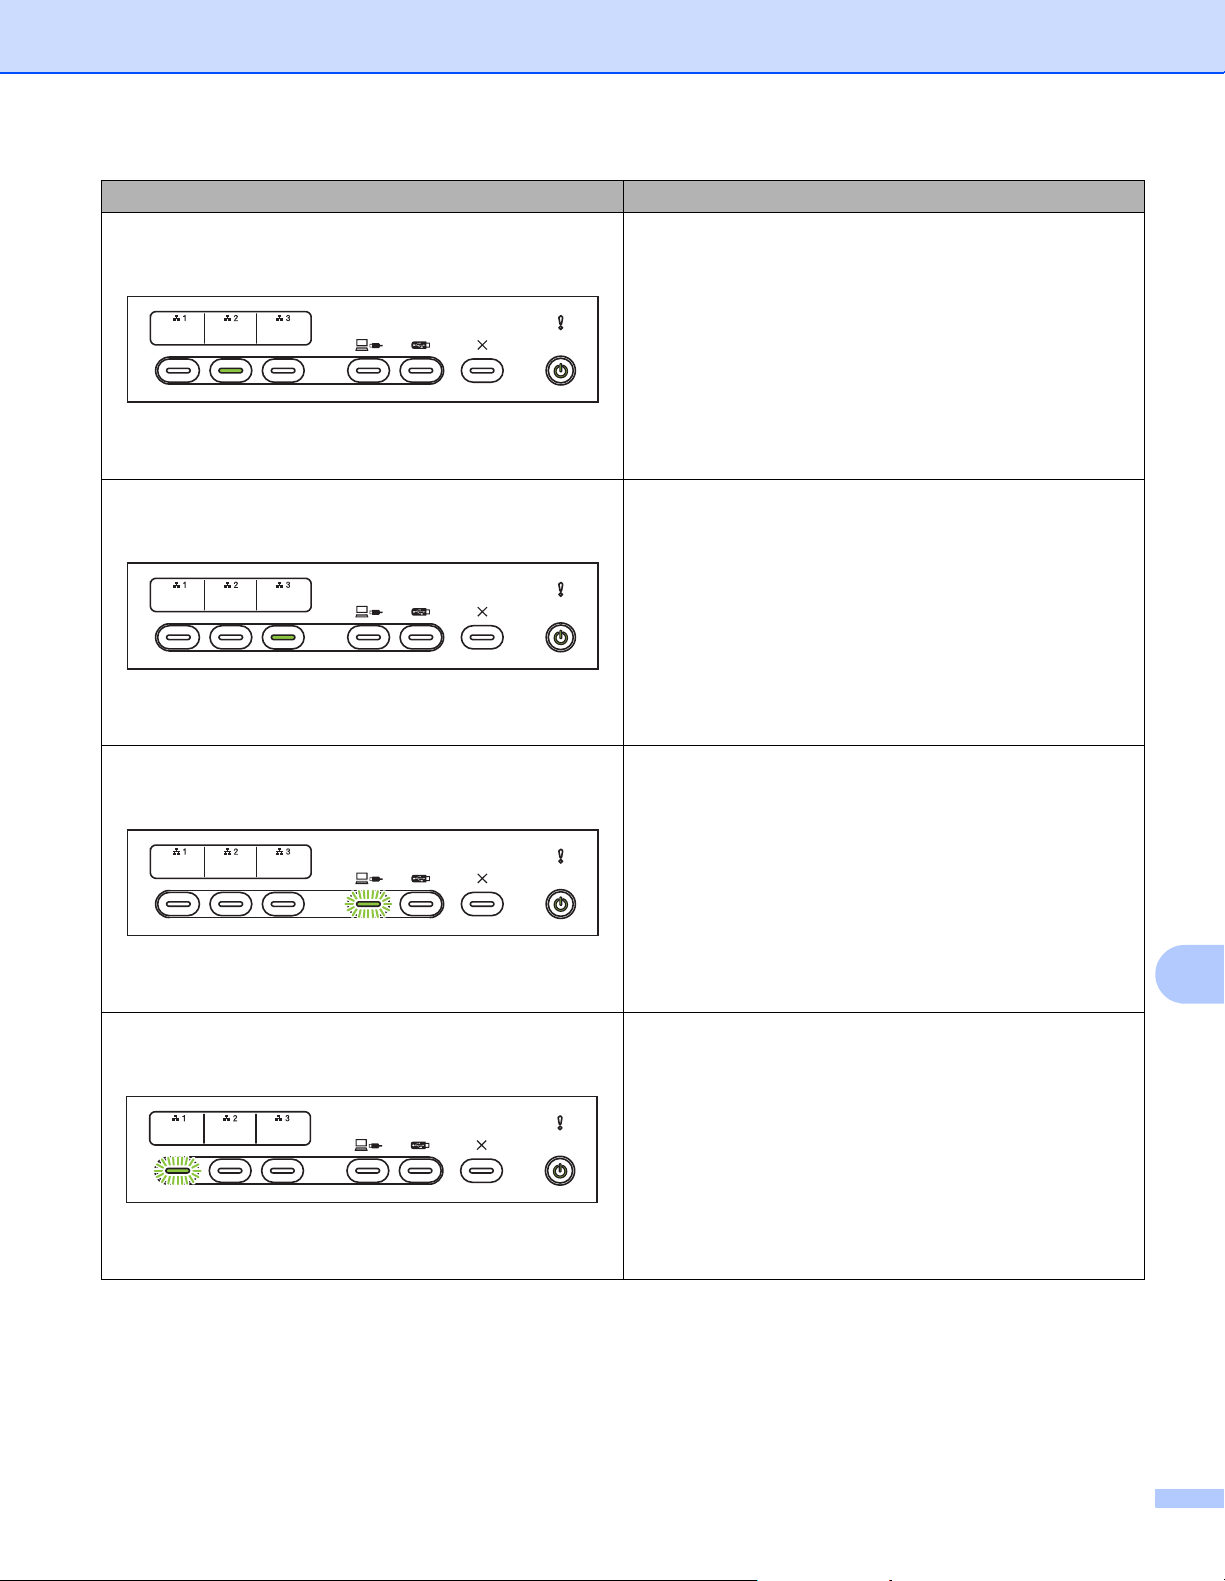
Appendix
256
B
Ready (Net Device 2)
The machine is ready to scan to Network Device 2.
Ready (Net Device 3)
The machine is ready to scan to Network Device 3.
Connecting (Scan to PC)
The machine is connecting to the Scan to PC destination.
Connecting (Scan to Net Device 1)
The machine is connecting to Network Device 1 for
scanning.
LEDs Machine Status

Appendix
257
B
Connecting (Scan to Net Device 2)
The machine is connecting to Network Device 2 for
scanning.
Connecting (Scan to Net Device 3)
The machine is connecting to Network Device 3 for
scanning.
Scanning (Scan from PC)
The machine is scanning from a computer.
Sending (Scan to Net Device 1)
The machine is scanning to Network Device 1.
LEDs Machine Status
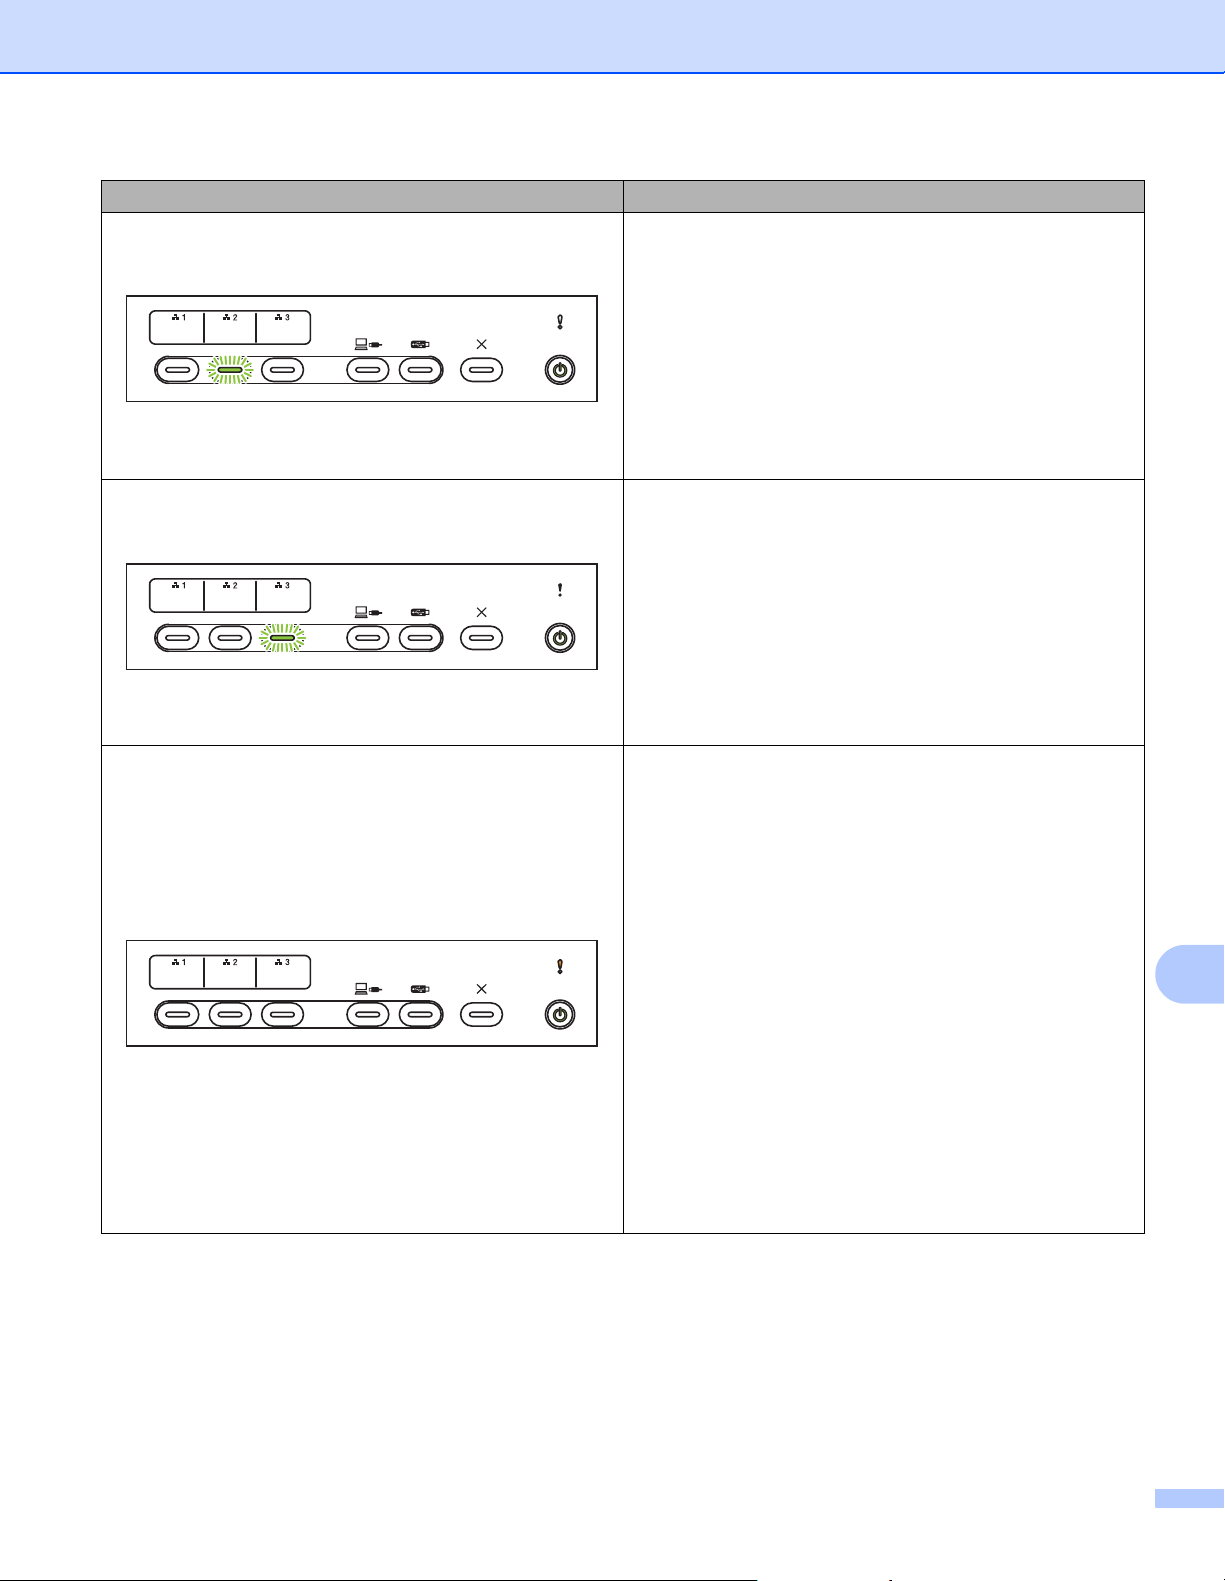
Appendix
258
B
Sending (Scan to Net Device 2)
The machine is scanning to Network Device 2.
Sending (Scan to Net Device 3)
The machine is scanning to Network Device 3.
All Pages Were Skipped
All scanned pages were skipped as blank pages. Press
any button, and then do the following:
Place your document, face down, top edge first, in the
ADF.
Set Blank Page Skip to Off by doing one of the
following:
•See Change Scan Settings (ControlCenter4)
(Windows
®
) on page 99.
•See Scan Using Brother iPrint&Scan (Mac)
on page 106.
•See Change Scan to PC Settings (Windows
®
)
on page 190.
•See Scan Options Using the Touchscreen
(ADS-2800W / ADS-3600W) on page 198.
LEDs Machine Status
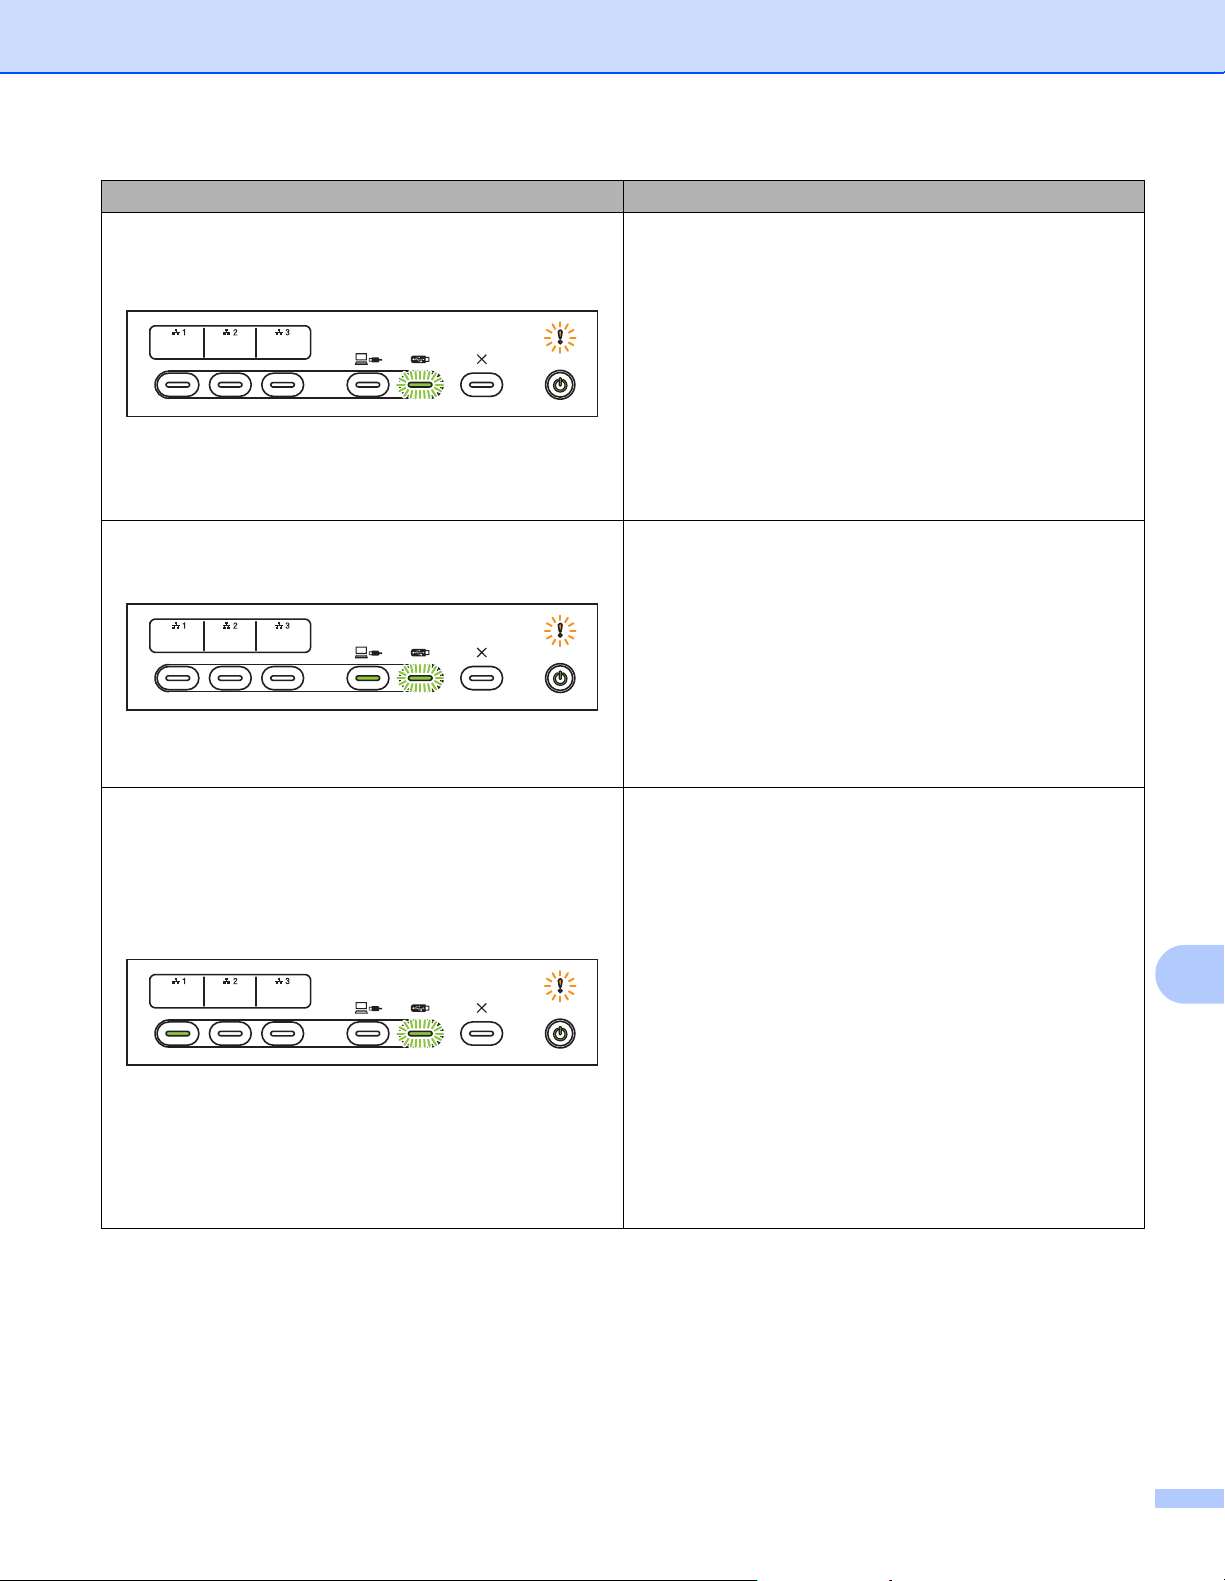
Appendix
259
B
Out of Memory (Scan to USB)
The machine’s memory is full and the machine cannot
scan the entire document.
To clear the error, do one of the following:
Press any button.
Unplug the machine from the AC power outlet, and
then plug the machine in again.
To prevent the error, do one of the following:
Place fewer pages in the ADF.
Set a smaller resolution or file size.
Too Many Files on USB (Scan to USB)
Your machine cannot save to a USB flash drive if it
contains too many files. Remove the USB flash drive,
press any key, and then do one of the following:
Delete unused files or folders from the root folder of the
USB flash drive, and then try again.
Use a USB flash drive that contains fewer than
999 files.
File Name Cannot Be Used (Scan to USB)
The maximum sequential number for the file name has
been reached. Press any button, and then do one of the
following:
Delete unused files from the USB flash drive, and then
try again.
Change the file name by doing one of the following:
•See Change Scan Settings (ControlCenter4)
(Windows
®
) on page 99.
•See Scan Using Brother iPrint&Scan (Mac)
on page 106.
•See Change Scan to PC Settings (Windows
®
)
on page 190.
•See Save Scanned Documents on a USB Flash
Drive on page 138.
LEDs Machine Status
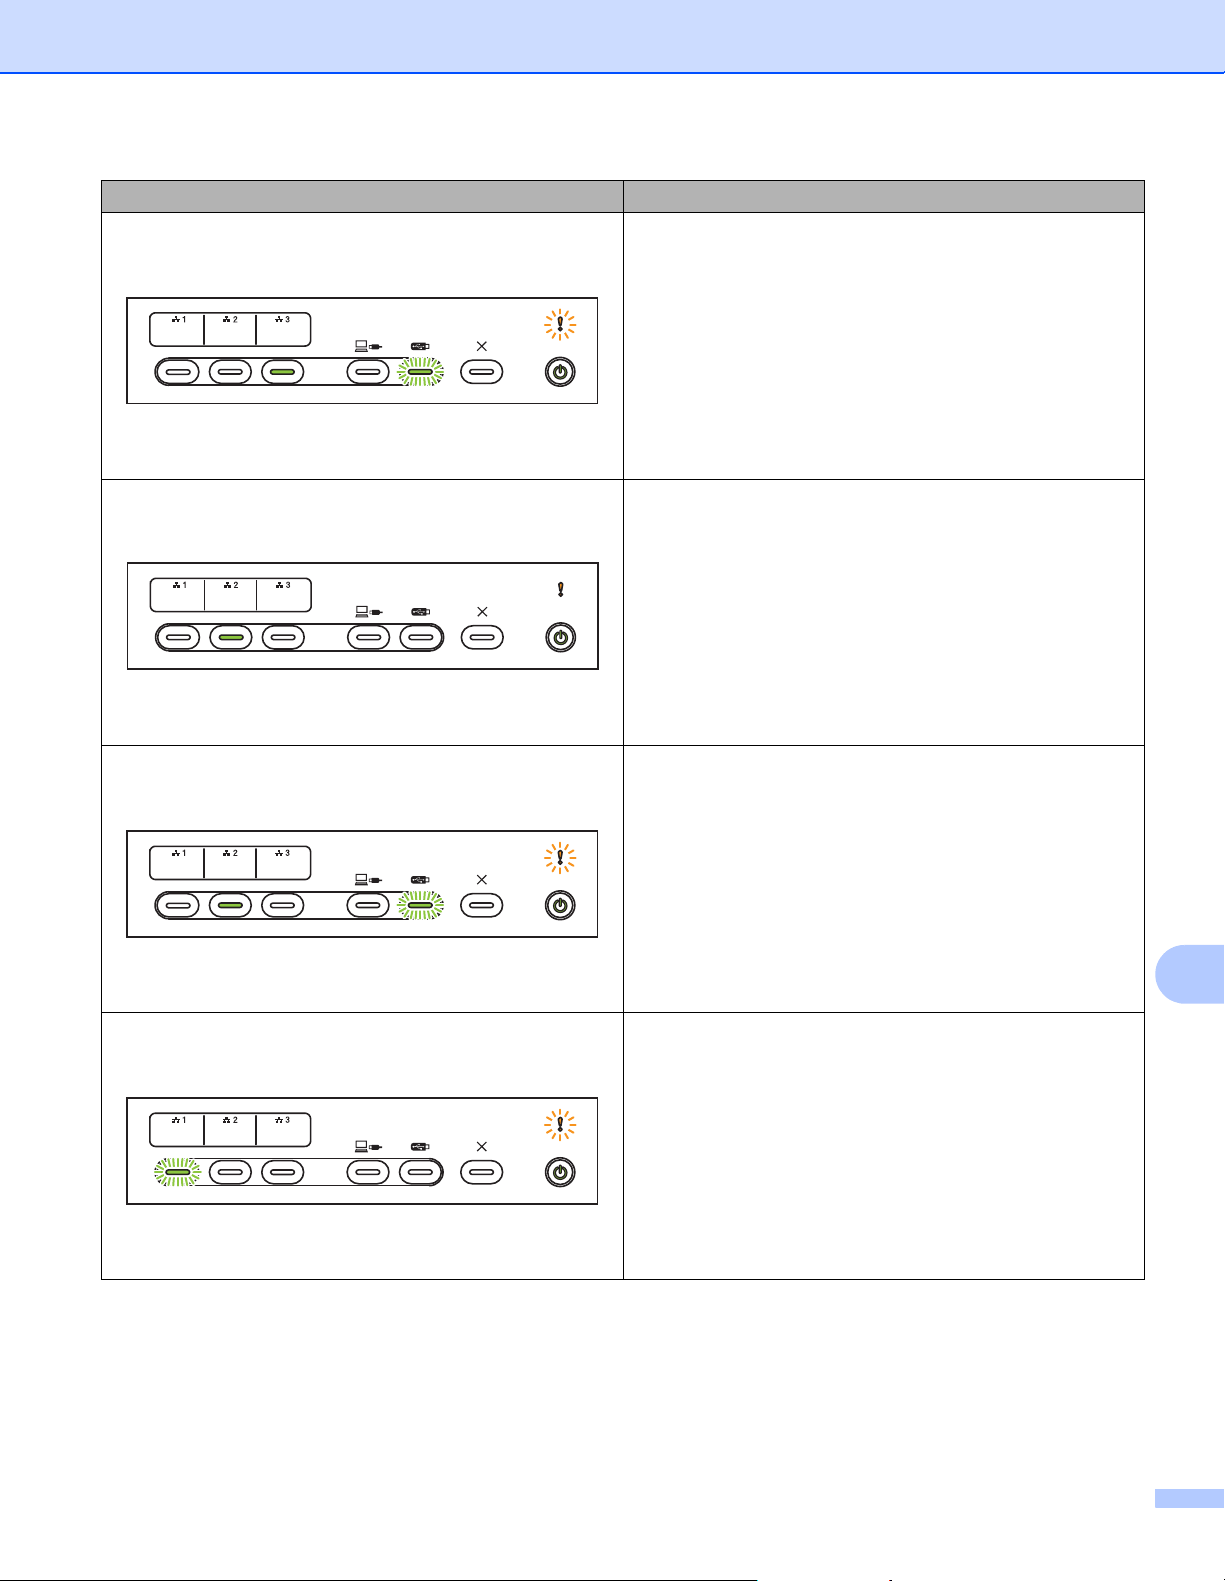
Appendix
260
B
Write Protect
The media is write protected. To clear the error, press the
Stop key.
Scheduled Maintenance Alert
Scheduled maintanance alert counter is up to max. Please
clean the rollers in the machine and reset the counter.
Access Error
The media has been removed. To clear the error, press
the Stop key.
Authenticate Error (Scan to FTP)
The FTP user name and password you entered are
incorrect or not configured correctly.
Confirm that the user name and password are configured
or entered correctly, and then try again.
LEDs Machine Status
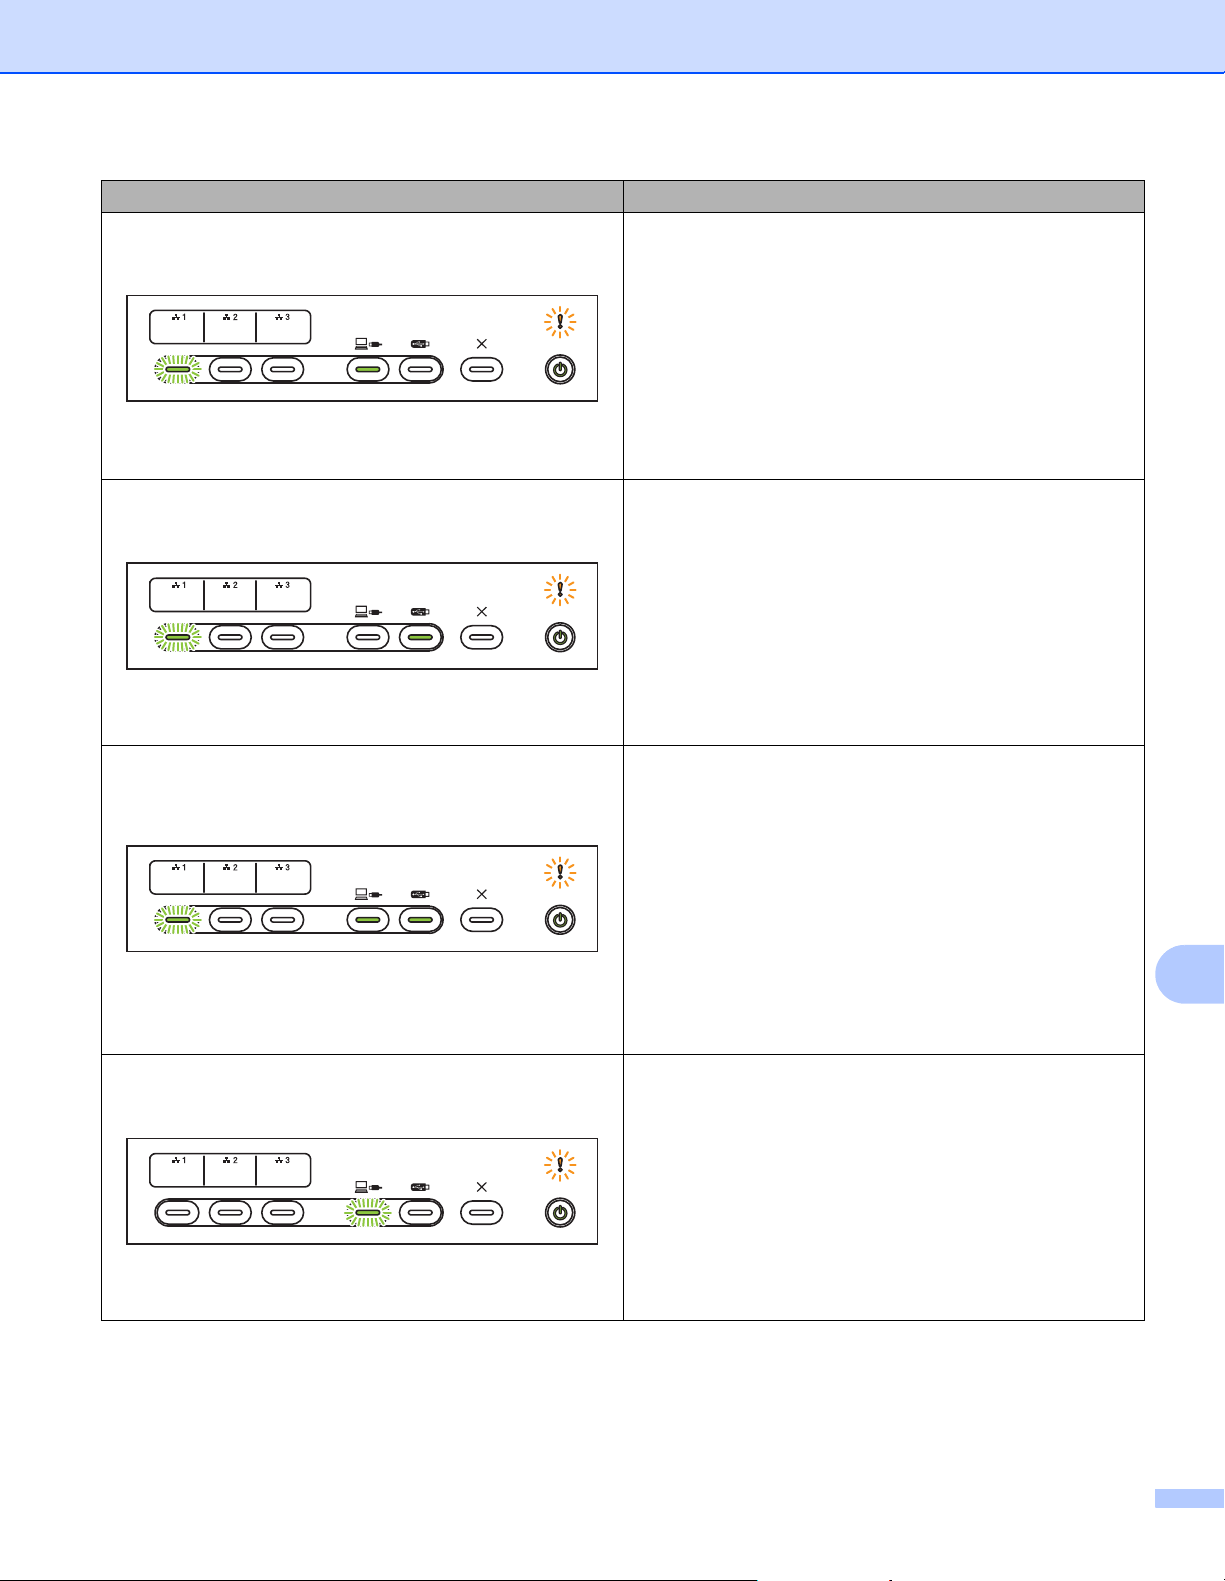
Appendix
261
B
Server Time Out (Scan to FTP)
Check the following, and then try again:
The network settings are correct.
Your wireless access point/router is turned on.
The remote FTP server is turned on.
The name (or IP address) of the FTP remote server is
correct.
Sending Error (Scan to FTP)
Check the following, and then try again:
You have writing permission for the destination folder.
The hard disk containing the destination folder is not
full. (For example, if the hard disk is full, free some disk
space, and then try again.)
Out of Memory (Scan to FTP)
The machine’s memory is full and the machine cannot
scan the entire document. To clear the error, do one of the
following:
Press any button.
Unplug the machine from the AC power outlet, and
then plug the machine in again.
To prevent the error, do one of the following:
Place fewer pages in the ADF.
Set a smaller resolution or file size.
Out of Memory (Scan to PC)
Check the following, and then try again:
You have writing permission for the destination folder.
The hard disk containing the destination folder is not
full. (For example, if the hard disk is full, free some disk
space and then try again.)
LEDs Machine Status
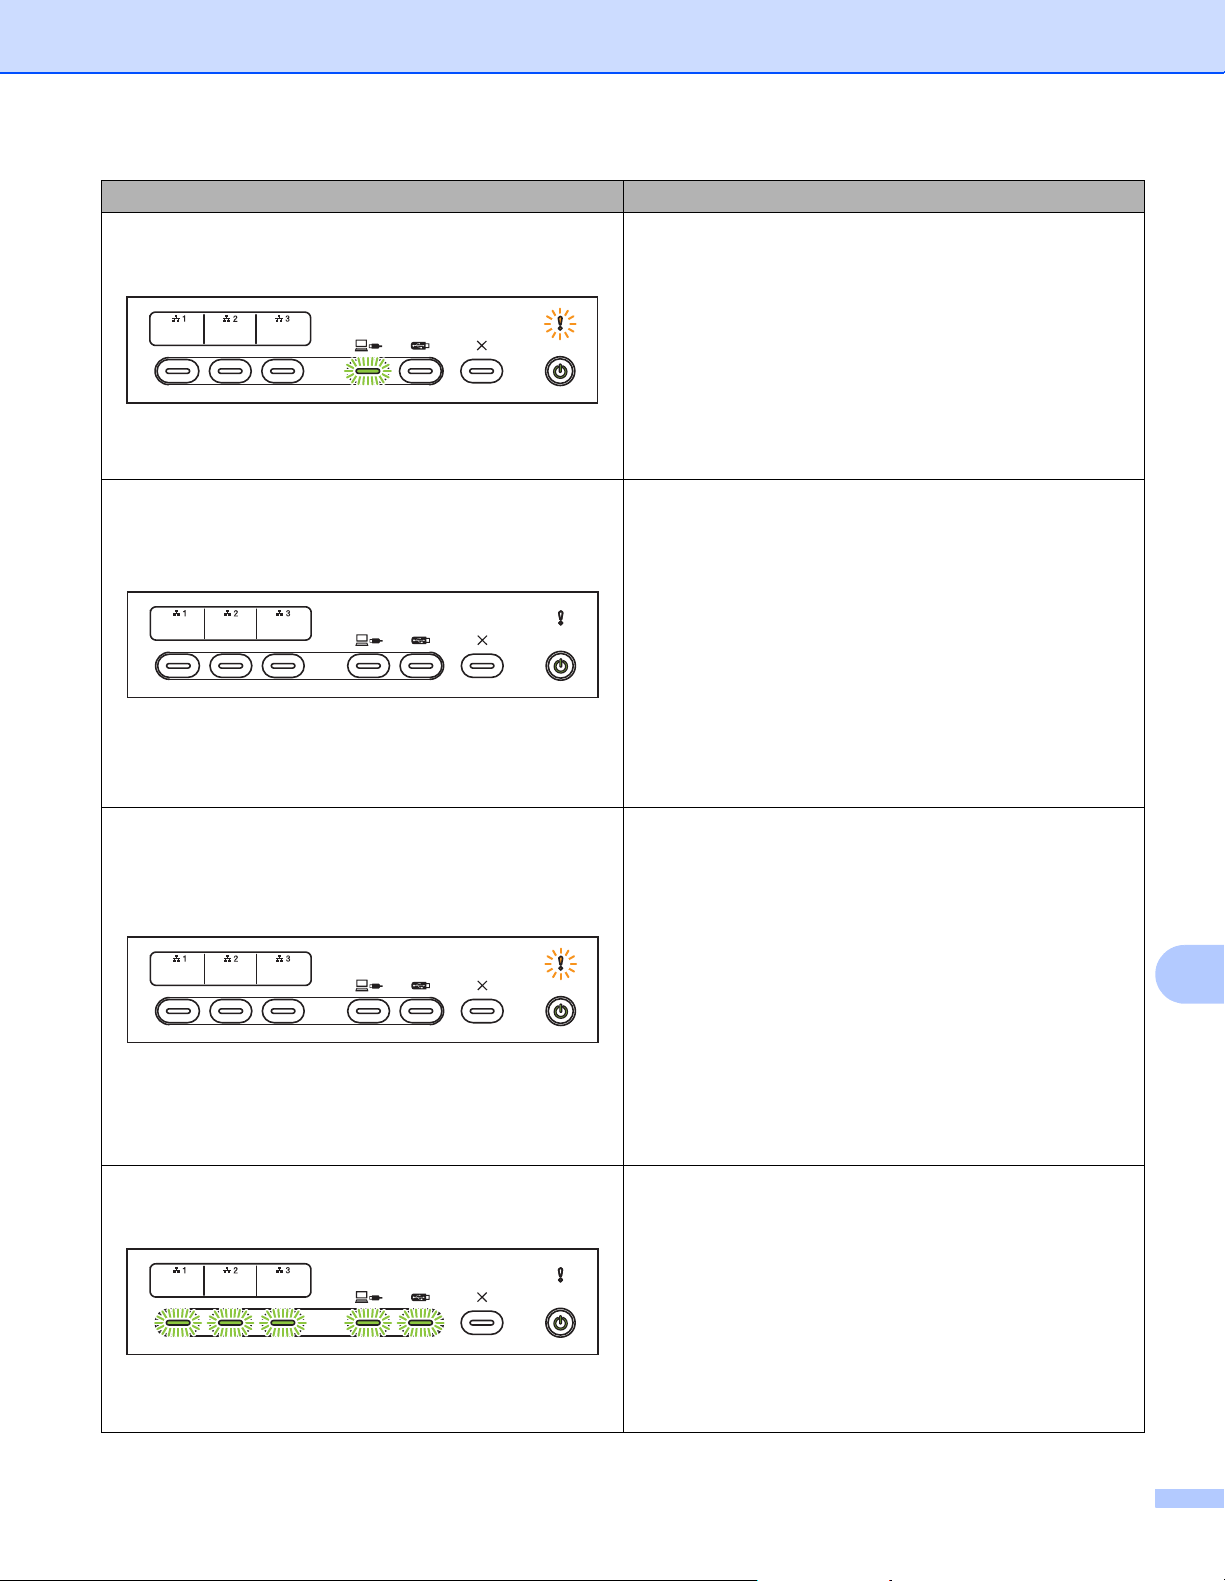
Appendix
262
B
Out of Memory (WS Scan)
Check the following, and then try again:
You have writing permission for the destination folder.
The hard disk containing the destination folder is not
full. (For example, if the hard disk is full, free some disk
space and then try again.)
Sleep Time
The machine is in Sleep Time. The machine acts as
though it is turned off.
Do one of the following to wake up the machine:
Press the Power key.
Open the ADF.
Load your document.
Touch the screen.
Touch IC Card to the NFC reader (ADS-3600W only).
The machine will enter Ready Mode.
Document Jam
Clear the document jam (see Document Jam
on page 234), and then do the following:
If scanning a long document, select Long Paper (Auto)
from the Scan Size or Document Size drop-down list.
To change the settings, do one of the following:
See Change Scan Settings (ControlCenter4)
(Windows
®
) on page 99.
See Scan Using Brother iPrint&Scan (Mac)
on page 106.
See Change Scan to PC Settings (Windows
®
)
on page 190.
Ejecting Paper
If the machine stopped while ejecting the document, press
the Stop button to continue ejecting the pages.
LEDs Machine Status
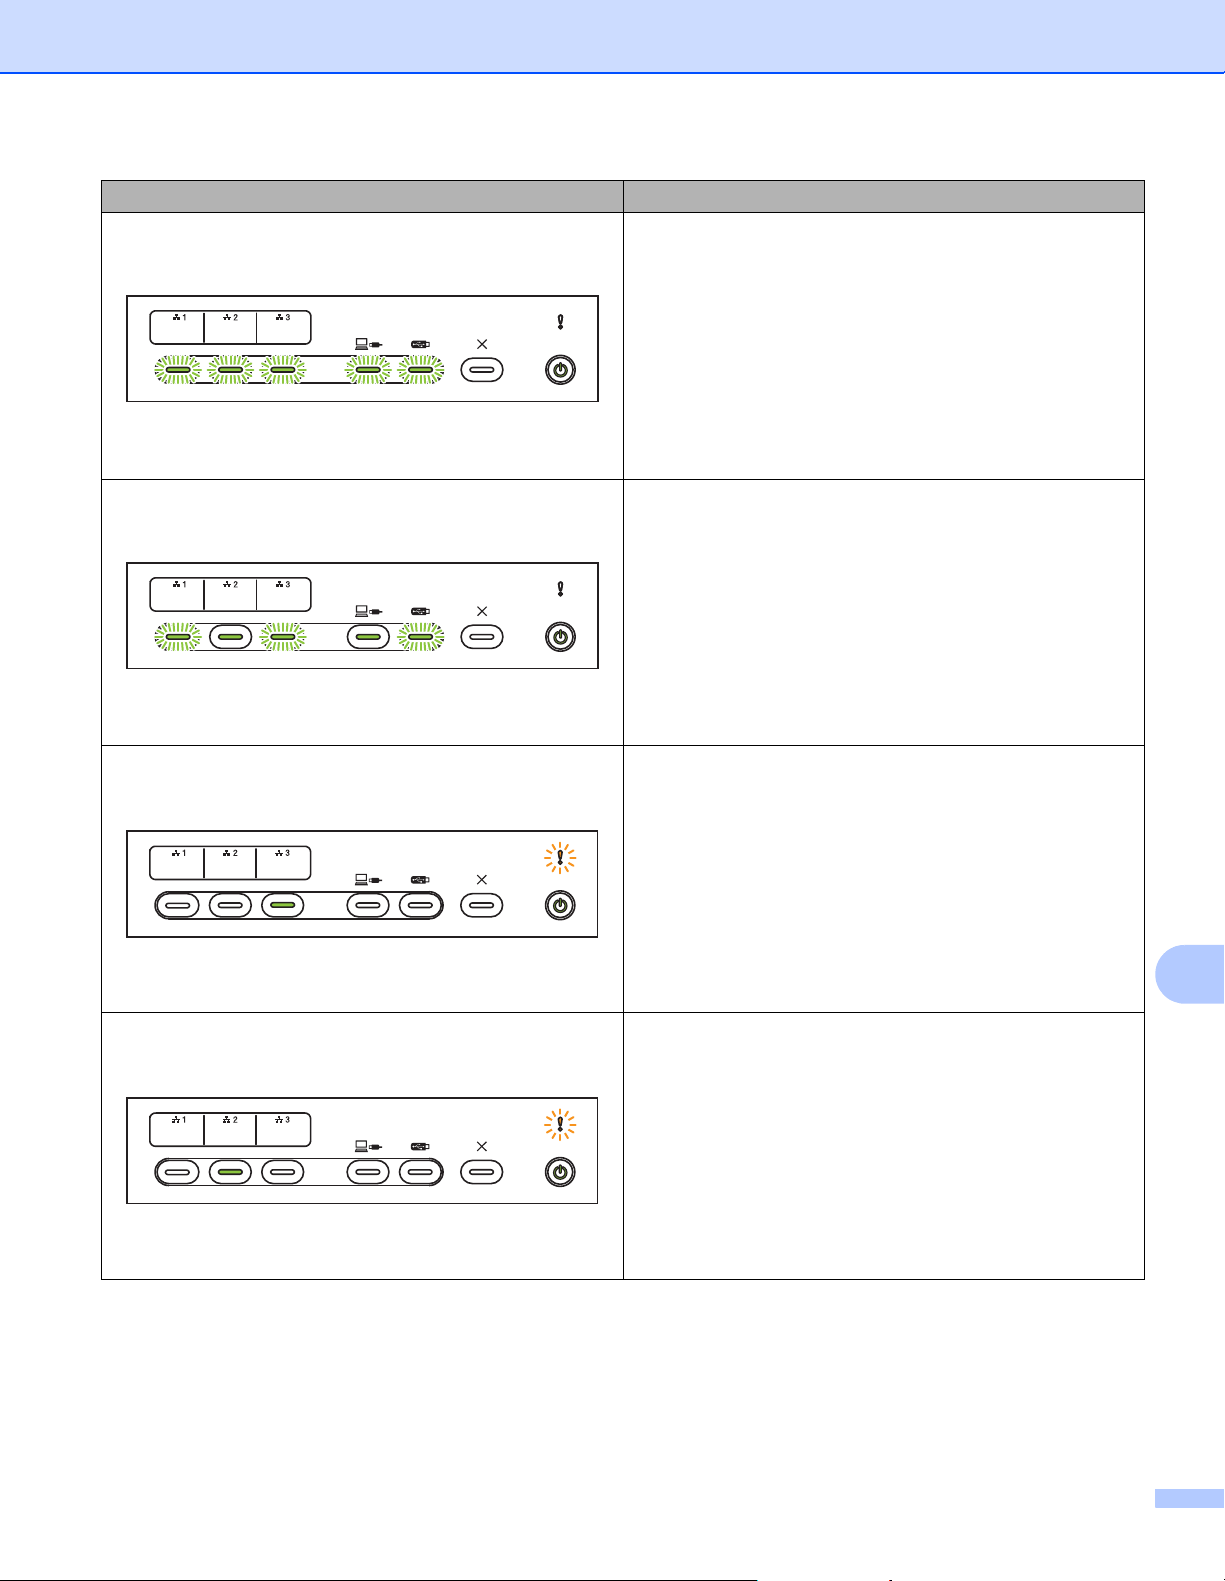
Appendix
263
B
Stopped Ejecting
The machine has stopped ejecting the document or plastic
cards. To continue ejecting, press the Stop button.
Remote Setup
Remote Setup is in process. To cancel Remote Setup,
click the Stop button in the Remote Setup window on your
computer.
Scan Exceeded a Specific Area
The machine has scanned a document that is more than
5 m using the Long Paper setting. To clear the error, press
the Stop key.
Multifeed Detection Error
A multifeed has occurred. To clear the error, press the
Stop key.
LEDs Machine Status
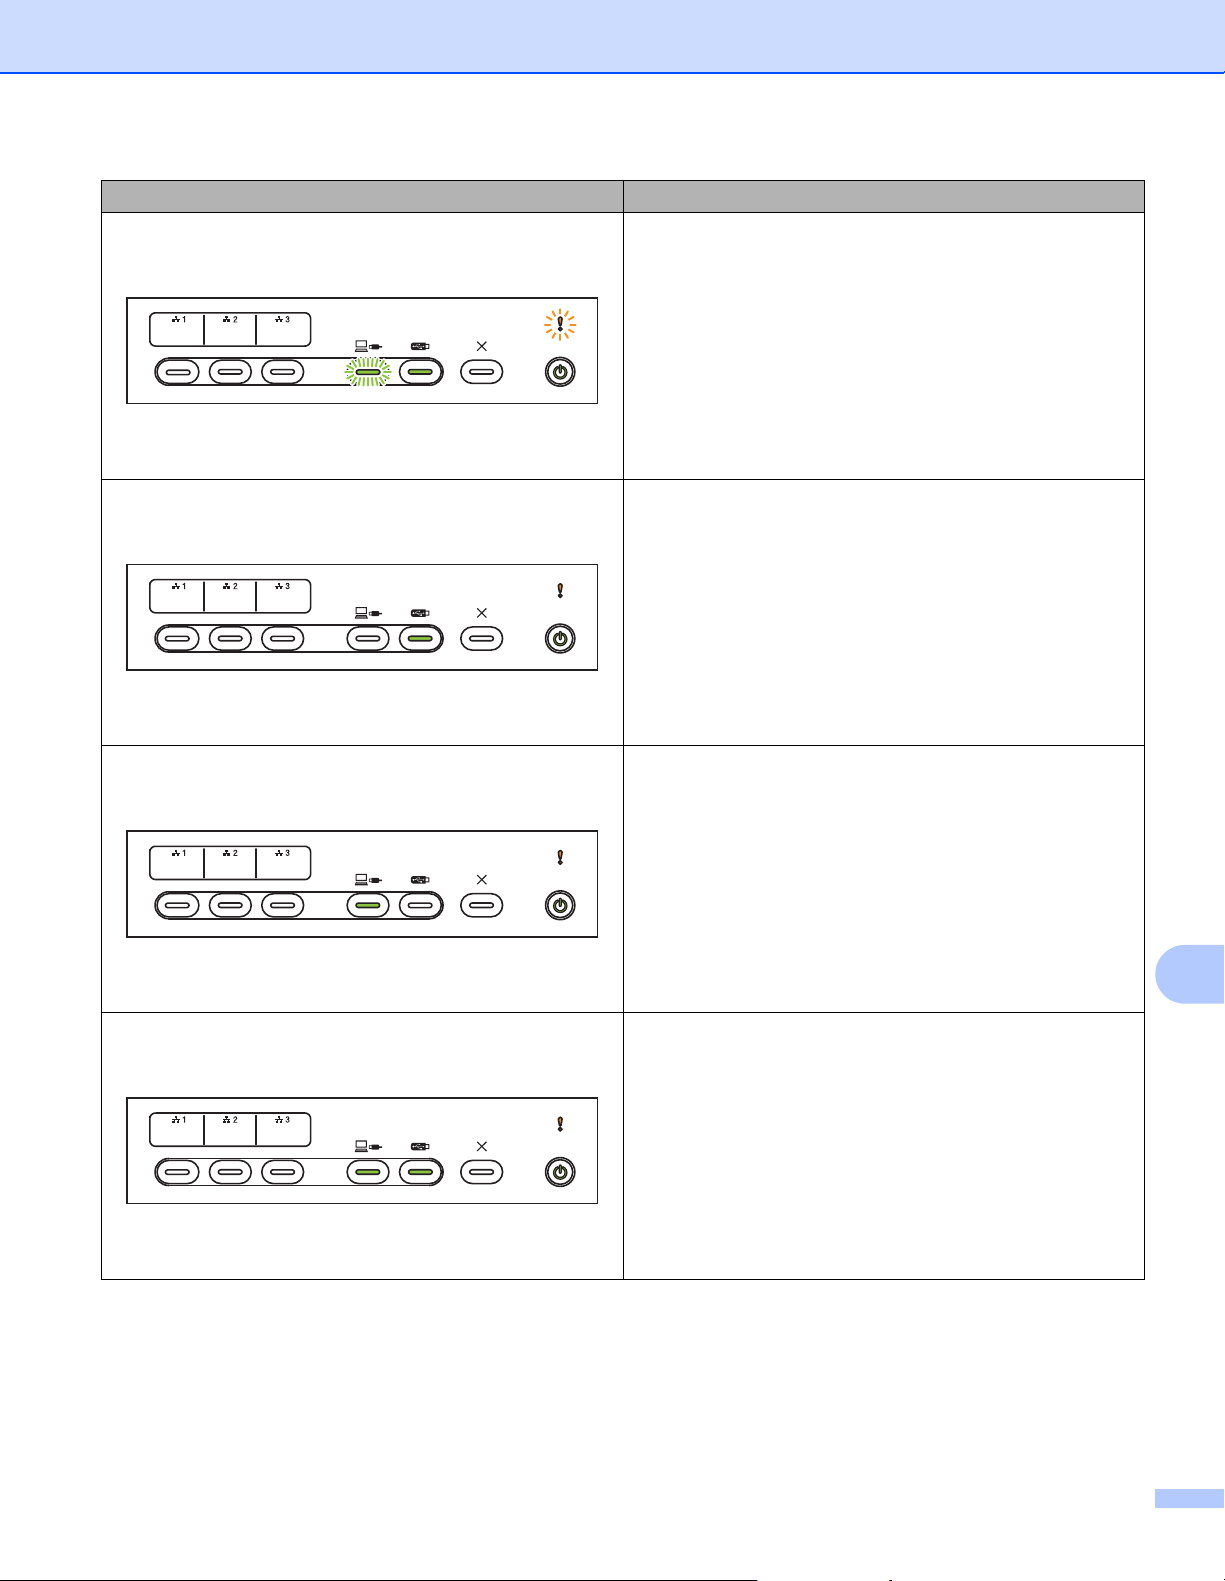
Appendix
264
B
Front Cover open
The Front Cover is open.
Pick Up Roller Alert
The maximum Pick Up Roller Counter has been exceeded.
To clear the error, do the following:
Reset the Pick Up Roller Counter.
Reverse Roller Alert
The Reverse Roller has been used over 200,000 times.
To clear the error, do the following:
Reset the Reverse Roller Counter.
Pick Up Roller & Reverse Roller Alert
The Pick Up Roller and Reverse Roller have been used
over the limit. To clear the error, do one of the following:
Reset the Pick Up Roller Counter.
Reset the Reverse Roller Counter.
LEDs Machine Status
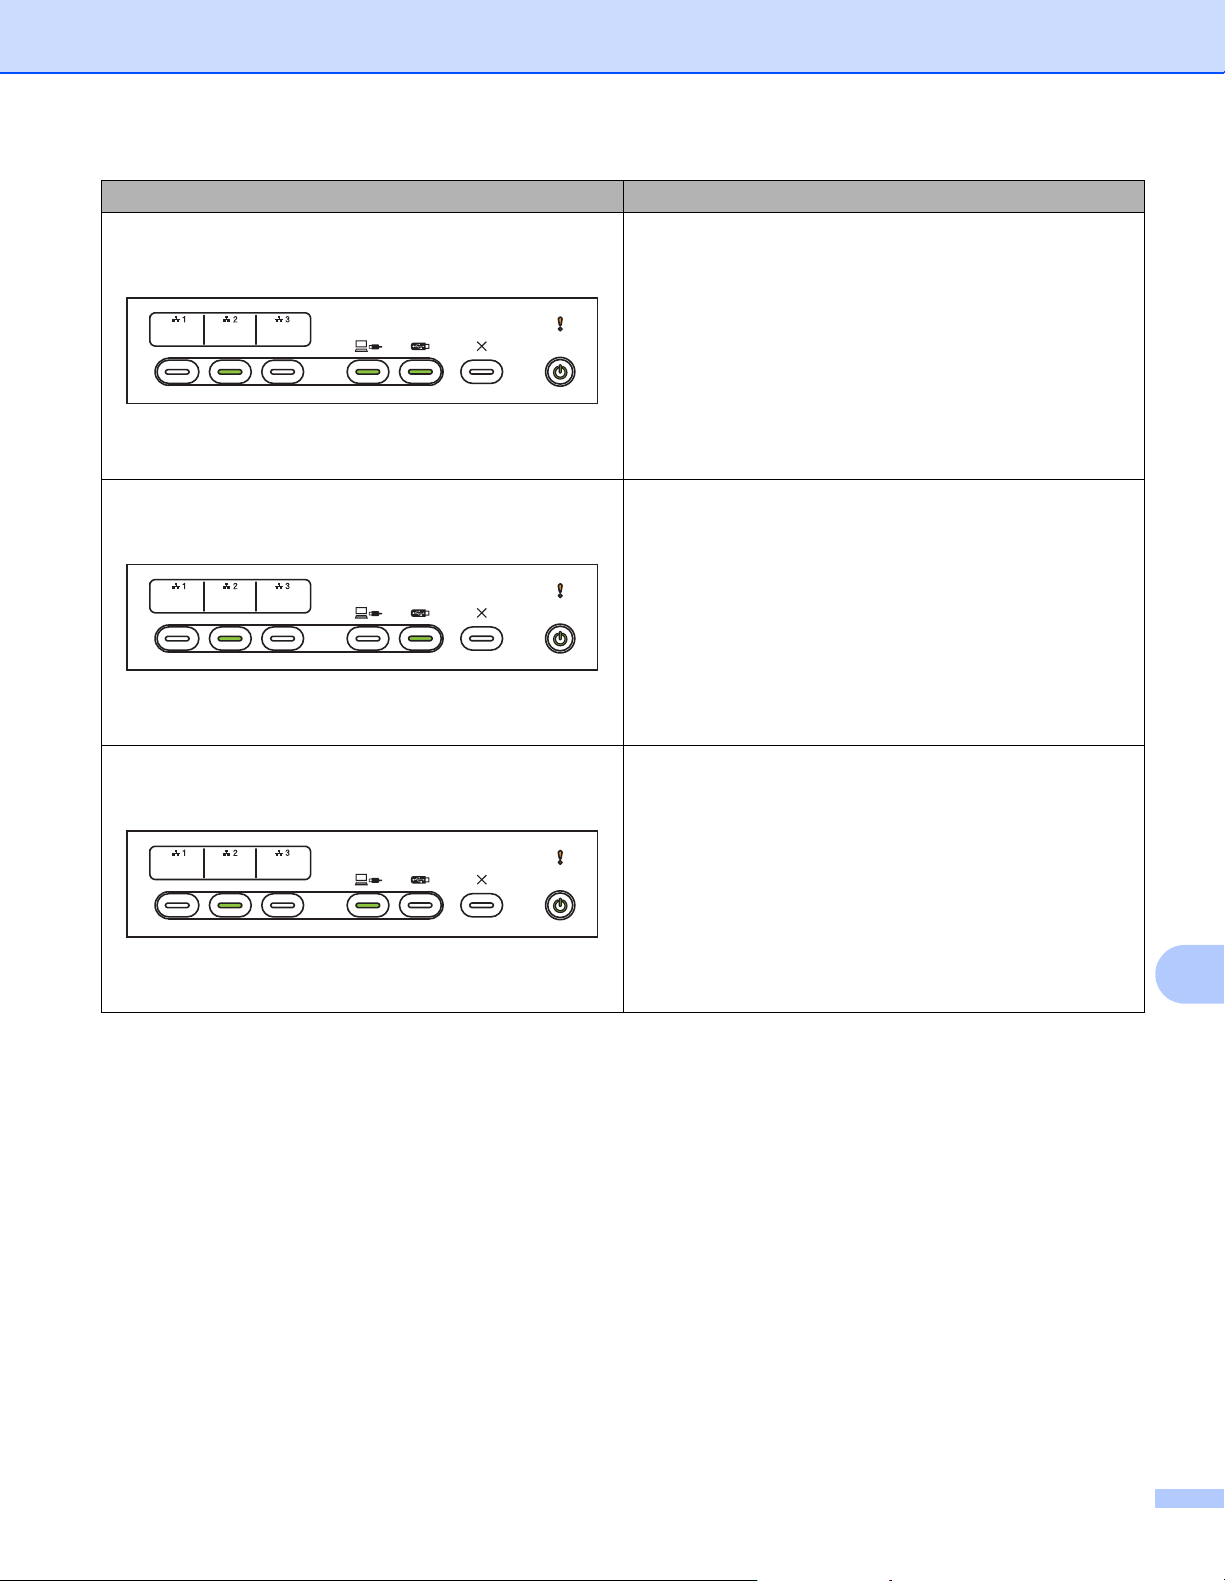
Appendix
265
B
Pick Up Roller & Reverse Roller alert & Scheduled
Maintenance Alert
The Pick Up Roller and Reverse Roller have been used
over the limit and Periodic Cleaning Counter exceeds the
limit. To prevent the error, do one of the following:
Reset the Pick Up Roller Counter.
Reset the Reverse Roller Counter.
Reset the Periodic Cleaning Counter.
Pick Up Roller & Scheduled Maintenance Alert
The Pick Up Roller has been used over the limit and
Periodic Cleaning Counter exceeds the limit. To prevent
the error, do one of the following:
Reset the Pick Up Roller Counter.
Reset the Periodic Cleaning Counter.
Reverse Roller alert & Scheduled Maintenance Alert
The Reverse Roller has been used over 200,000 times
and Periodic Cleaning Counter has exceeded the limit.
Reset the Reverse Roller Counter.
Reset the Periodic Cleaning Counter.
LEDs Machine Status
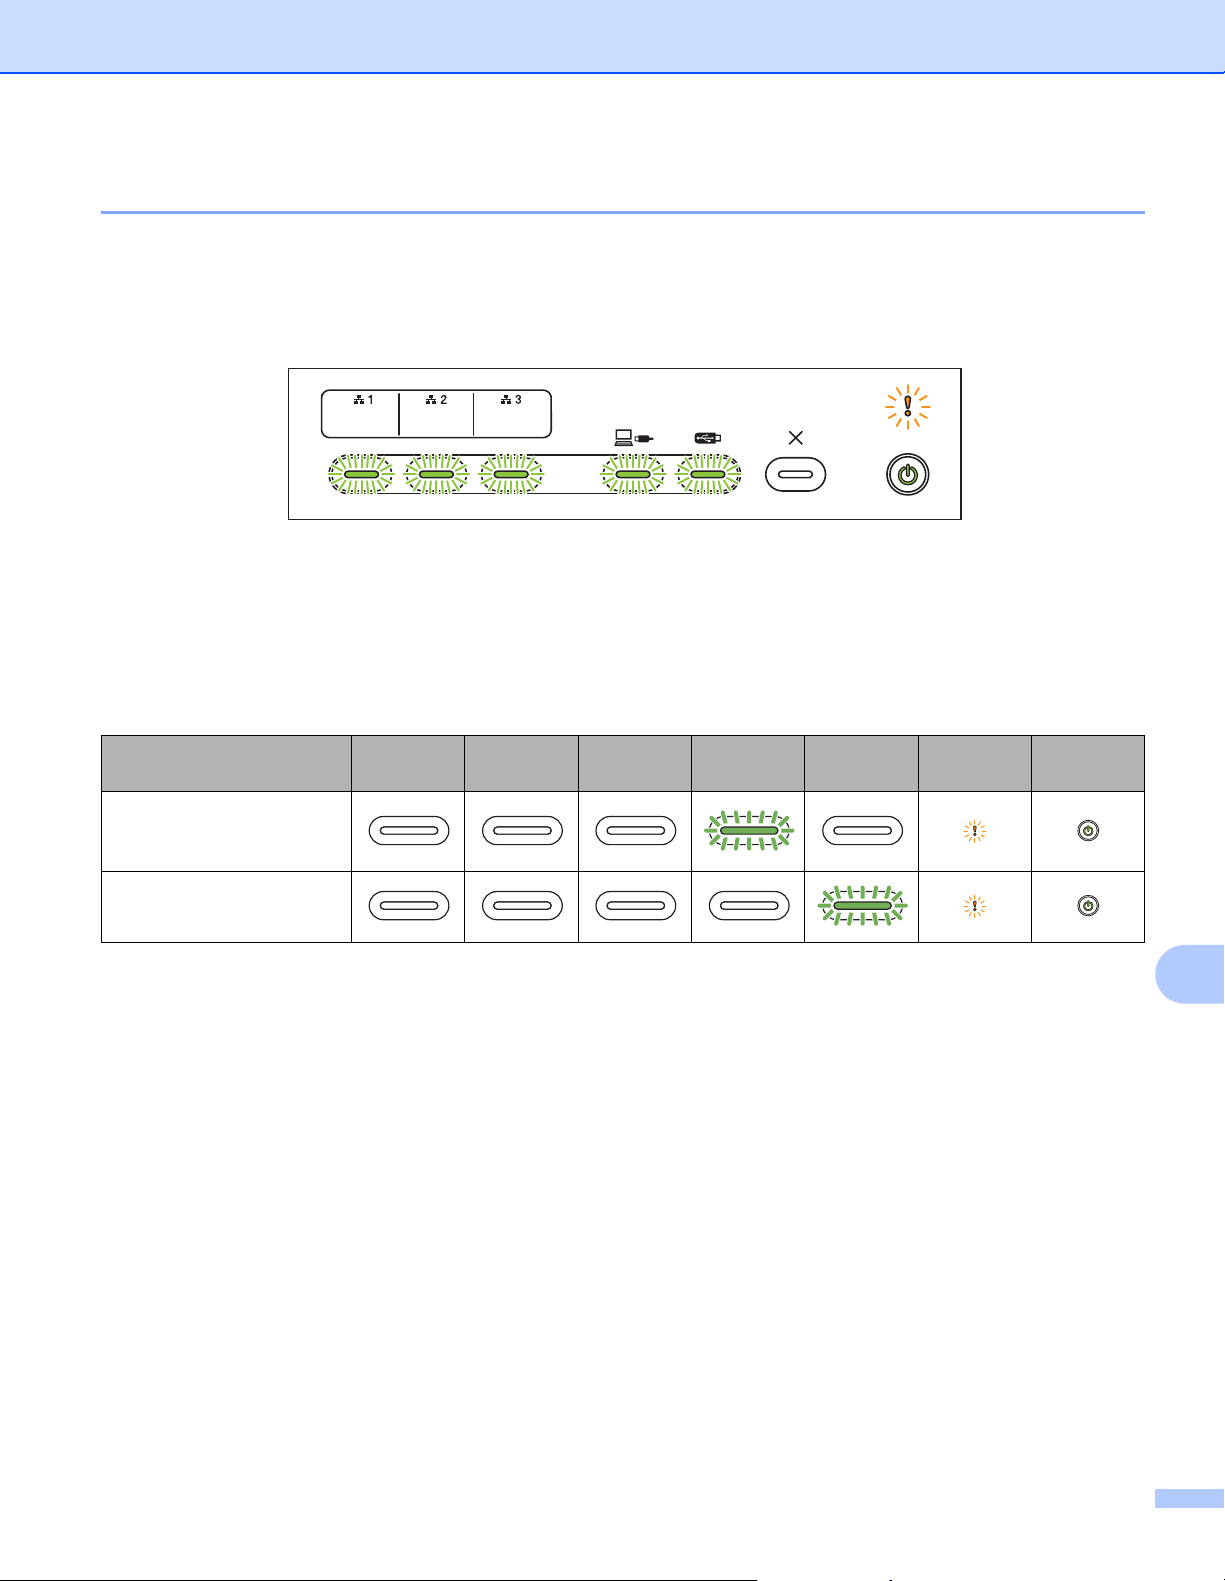
Appendix
266
B
Service Call Indications B
If there is an error that you cannot clear yourself, the machine will indicate the need for a service call by
lighting up all the LEDs as shown below.
If you see the service call indication shown above, turn the machine off and then on, and then try to scan
again.
If the error is not cleared after turning the machine off and on, press Stop. The LEDs will light up as shown in
the table below to identify the error.
Make a note of the error code and report it to your Brother dealer or Brother customer service (see For
Customer Service on page ii).
Error Code Network
Device 1
Network
Device 2
Network
Device 3
Scan to
PC
Scan to
USB
Error
Indicator
Power
Indicator
A7: Not a ROM of
matching color Parameter
to CIS Maker
A9: Detected a special
scanning error
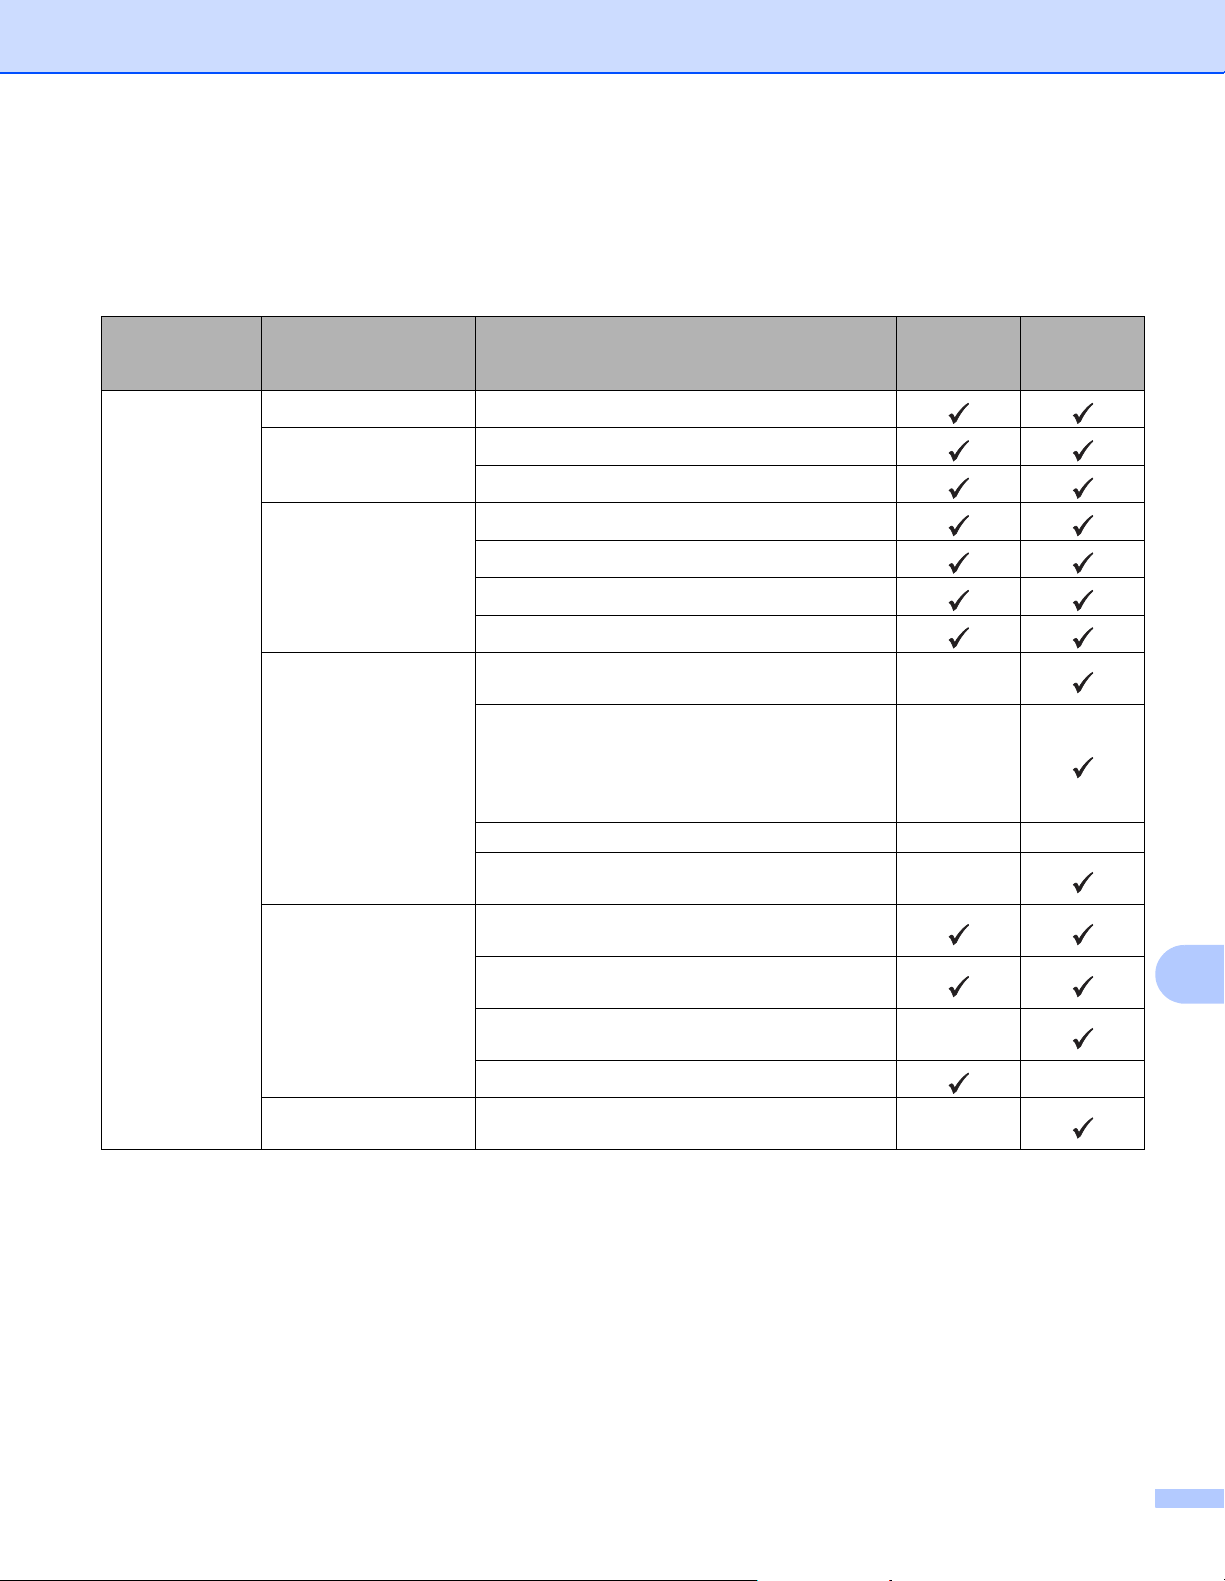
Appendix
267
B
Scan Settings B
If the machine is connected to a computer, see the table below for available settings when scanning from the
computer.
Category Setting Option
Configurable
Settings in
TWAIN
Configurable
Settings in
CC4
Basic Settings
2-sided Scan Off / Long Edge / Short Edge
Scan Type
Auto / Black and White / True Gray / 24bit Color
Gray (Error Diffusion)
Resolution
100 dpi / 150 dpi
200 dpi / 300 dpi / 600 dpi
400 dpi
1200 dpi
File Type
PDF Single-Page/PDF Multi-Page/JPEG/TIFF
Single-Page/TIFF Multi-Page
-
PDF/A Single-Page / PDF/A Multi-Page /
Secure PDF Single-Page / Secure PDF Multi-Page /
High Compression PDF Single-Page /
High Compression PDF Multi-Page / Searchable
PDF Single-Page / Searchable PDF Multi-Page
-
Signed PDF Single-Page / Signed PDF Multi-Page - -
Windows Bitmap (.bmp) / Portable Network
Graphics (.png) / XPS
-
Document Size
Auto / A4 / Letter / Legal / JIS B5 / A5 / JIS B6 / A6 /
Business Card / Long Paper (Auto)
Executive / Index Card / Photo / Photo L / Photo 2L /
Post Card 1 / Post Card 2 (Double) / Folio
1 to 2(A3) / 1 to 2(Ledger) / 1 to 2(B4) / 1 to 2(A4) /
2 in 1(A4) / 2 in 1(Letter) / 2 in 1(A5) / 2 in 1(B5)
-
Custom
-
File Size (Compression
rate adjustment)
--
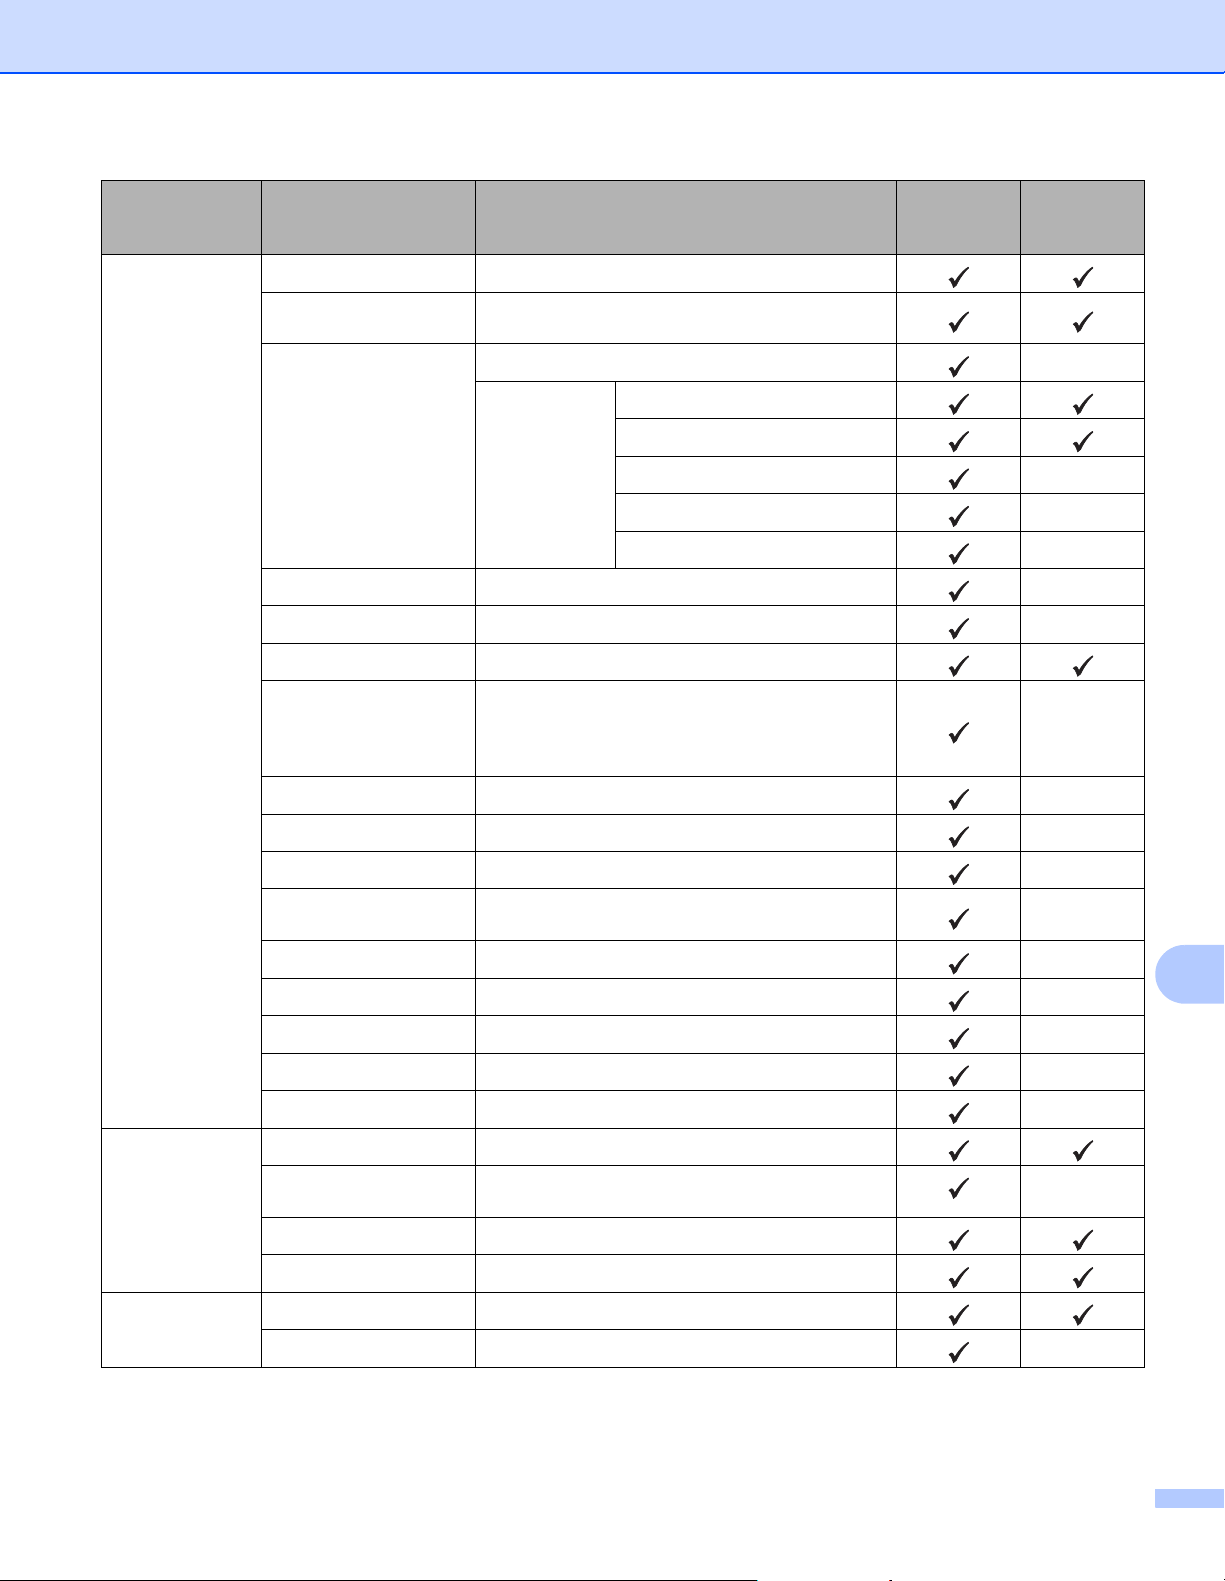
Appendix
268
B
Image Processing
Auto Deskew On / Off
Remove Background
Color
Bleedthrough / Remove Background Color
Color Tone Adjustment
Auto
-
Custom
Brightness
Contrast
Shadow
-
Highlight
-
Gamma
-
Grayscale Adjustment Brightness / Contrast
-
Auto Color Detect Adjust Auto Color Detect Adjust
-
Skip Blank Page Skip Blank Page
Margin Setting for
Cropping
Top: -0.12~0.12 in. (-3.0~3.0 mm)
Left: -0.12~0.12 in. (-3.0~3.0 mm)
Right: -0.12~0.12 in. (-3.0~3.0 mm)
Bottom: -0.12~0.12 in. (-3.0~3.0 mm)
-
Punch Hole Removal Paint color White / Background color
-
Edge Emphasis On (Low, Middle, High) / Off
-
Boldface Formatting On (Low, Middle, High) / Off
-
Blurred Character
Correction
On / Off
-
B&W Inversion
On / Off
-
Noise Reduction On (Low, Middle, High) / Off
-
Remove Ruled Line Vertical / Horizontal / Vertical and Horizontal
-
Edge Fill White / Black
-
Color Drop Chromatic Color / Red / Green / Blue / Custom
-
Special Mode
Multifeed Detection On / Off
Layout
None / 2in1: Long Edge / 2in1: Short Edge /
1to2: Long Edge / 1to2: Short Edge
-
Carrier Sheet Mode On / Off
Plastic Card Mode On / Off
Detail Settings
Continuous Scan On / Off
Single Page Scan On / Off
-
Category Setting Option
Configurable
Settings in
TWAIN
Configurable
Settings in
CC4
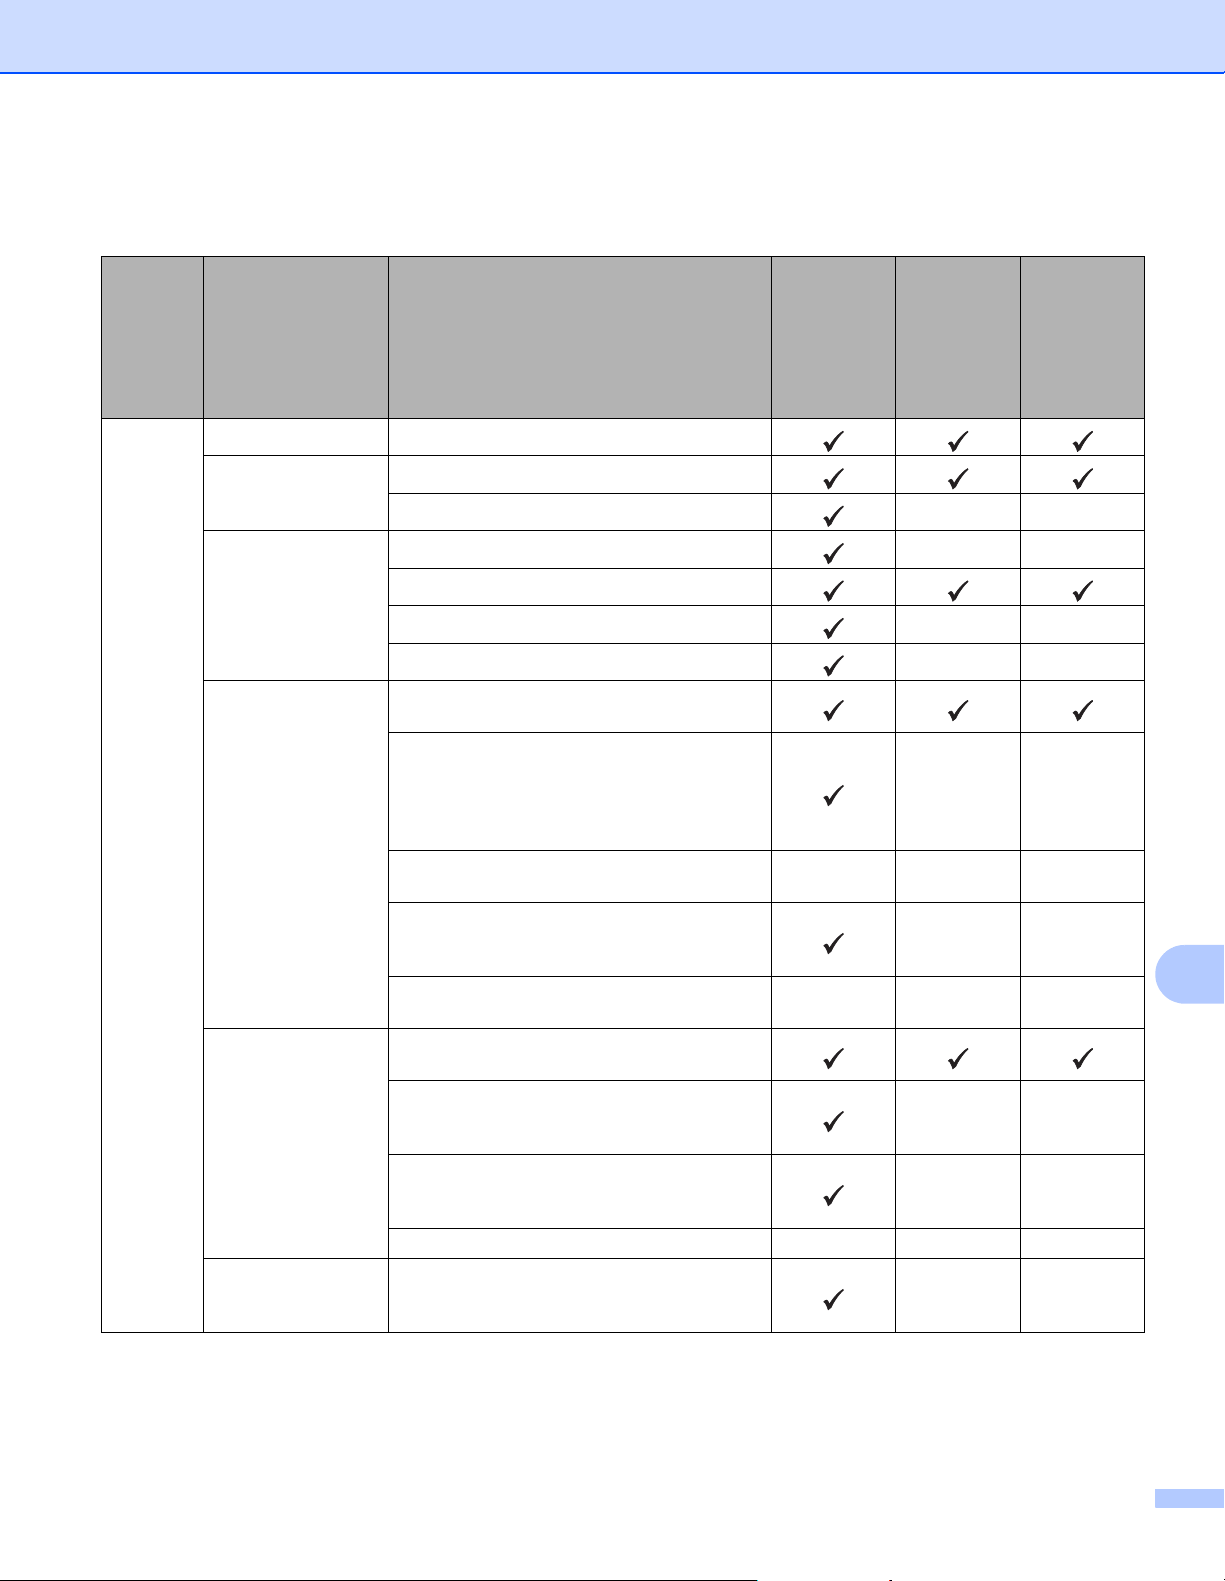
Appendix
269
B
If the machine is connected to a computer, see the table below for available settings when scanning from the
control panel.
Category Setting Option
Configurable
settings from
CC4
(ADS-2400N /
ADS-3000N /
ADS-2800W /
ADS-3600W)
Configurable
settings in
Control Panel
(ADS-2800W /
ADS-3600W)
Saving
settings to
ashortcut
(ADS-2800W /
ADS-3600W)
Basic
Settings
2-sided Scan Off / Long Edge / Short Edge
Scan Type
Auto / Black and White / True Gray / 24bit Color
Gray (Error Diffusion)
--
Resolution
100 dpi
--
150 dpi / 200 dpi / 300 dpi / 600 dpi
400 dpi
--
1200 dpi
--
File Type
PDF Single-Page / PDF Multi-Page / JPEG /
TIFF Single-Page / TIFF Multi-Page
PDF/A Single-Page / PDF/A Multi-Page /
Secure PDF Single-Page / High Compression
PDF Single-Page / High Compression PDF
Multi-Page / Searchable PDF Single-Page /
Searchable PDF Multi-Page
--
Signed PDF Single-Page / Signed PDF
Multi-Page
---
Windows Bitmap (.bmp) / Portable Network
Graphics (.png) / Microsoft Office Word (*.docx) /
Microsoft Office PowerPoint (*.pptx) / XPS
--
Secure PDF Multi-Page / Signed PDF
Single-Page
---
Document Size
Auto / A4 / Letter / Legal / JIS B5 / A5 / JIS B6 /
A6 / Business Card / Long Paper (Auto)
A3 / Ledger / JIS B4 / Executive / Index Card /
Photo / Photo L / Photo 2L / Post Card 1 /
Post Card 2 (Double) / Folio
--
1 to 2(A3) / 1 to 2(Ledger) / 1 to 2(B4) /
1 to 2(A4) / 2 in 1(A4) / 2 in 1(Letter) /
2in1(A5)/ 2in1(B5)
--
Custom ---
File Size
(Compression rate
adjustment)
-
--
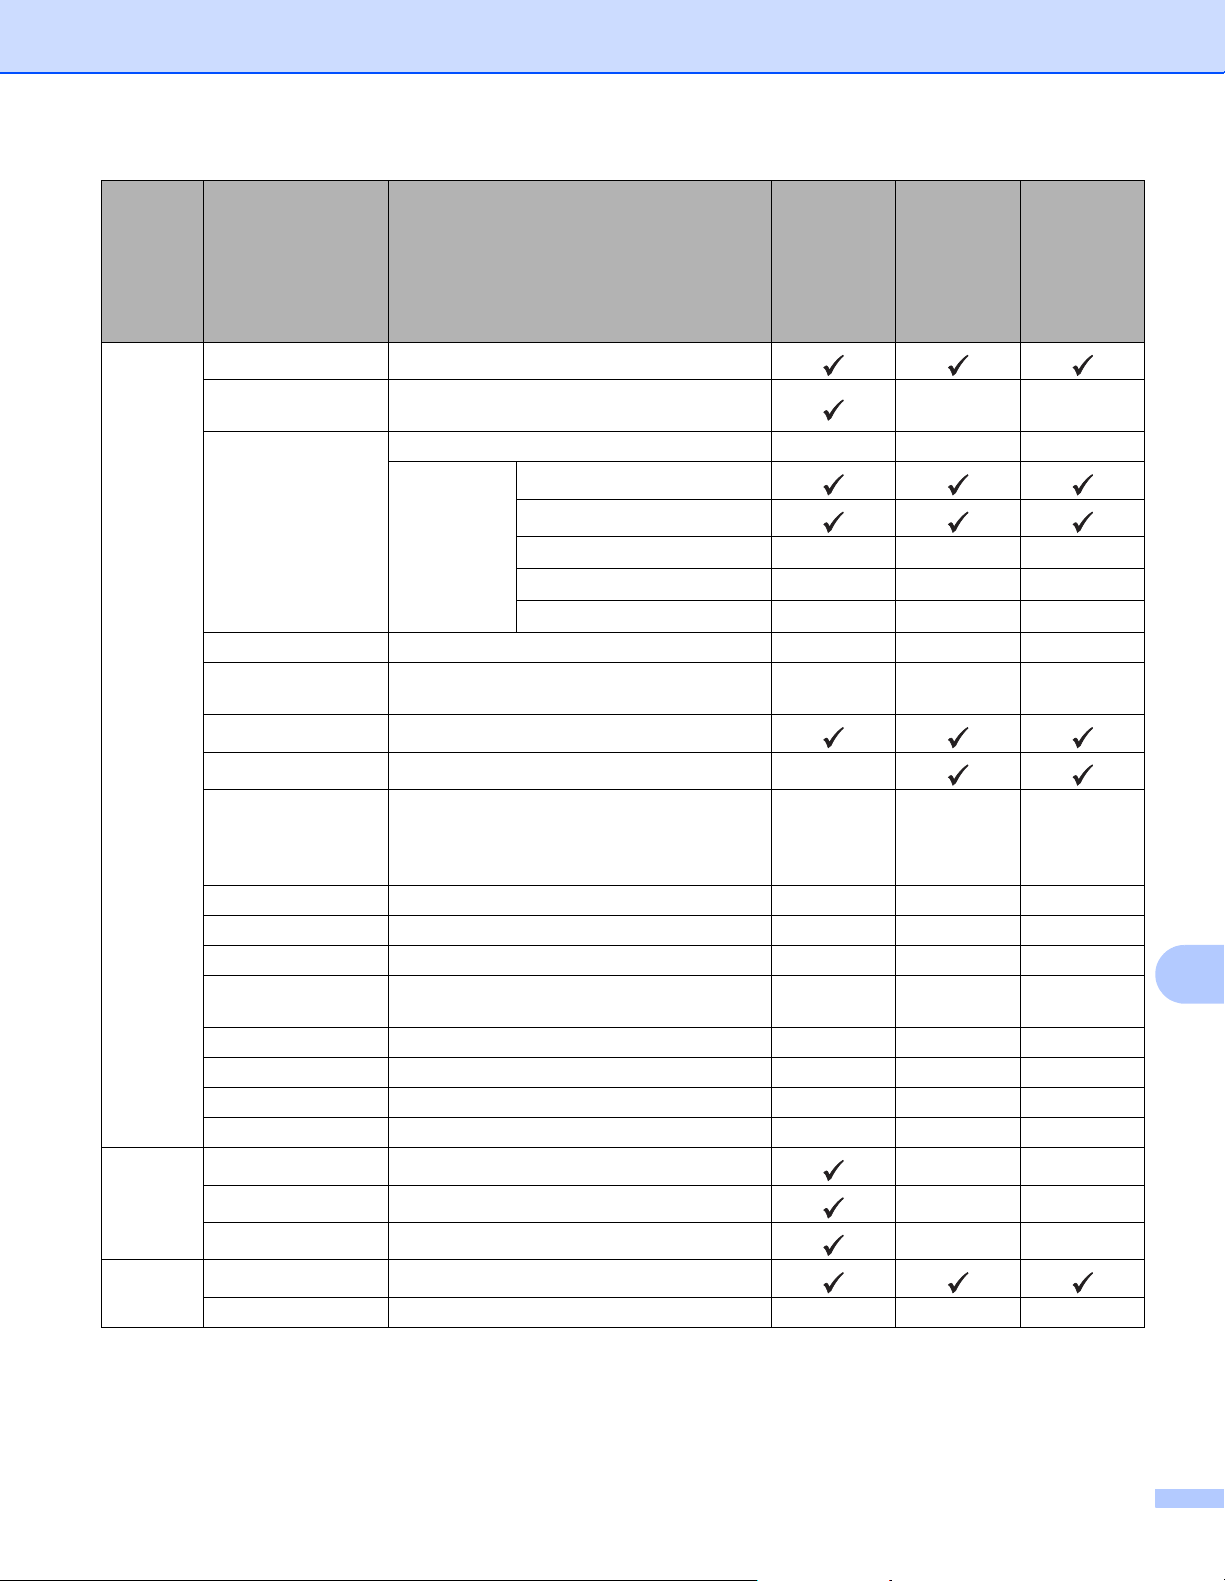
Appendix
270
B
Image
Processing
Auto Deskew On / Off
Remove Background
Color
Bleedthrough / Remove Background Color
--
Color Tone
Adjustment
Auto ---
Custom
Brightness
Contrast
Shadow
-
--
Highlight
-
--
Gamma
-
--
Grayscale Adjustment Brightness / Contrast - - -
Auto Color Detect
Adjust
Auto Color Detect Adjust - - -
Skip Blank Page Skip Blank Page
Document Separation Off / Number of Documents / Number of Pages -
Margin Setting for
Cropping
Top: -0.12~0.12 in. (-3.0~3.0 mm)
Left: -0.12~0.12 in. (-3.0~3.0 mm)
Right: -0.12~0.12 in. (-3.0~3.0 mm)
Bottom: -0.12~0.12 in. (-3.0~3.0 mm)
---
Punch Hole Remobval Paint color White / Background color - - -
Edge Enhancement - - - -
Boldface Formatting - - - -
Blurred Character
Correction
On / Off - - -
Noise Reduction - - - -
Remove Ruled Line Vertical / Horizontal / Vertical and Horizontal - - -
Edge Fill White / Black - - -
Color Drop Chromatic Color / Red / Green / Blue / Custom - - -
Special
Mode
Multifeed Detection On / Off
--
Carrier Sheet Mode On / Off
--
Plastic Card Mode On / Off
--
Detail
Settings
Continuous Scan On / Off
Detect End of Page On / Off - - -
Category Setting Option
Configurable
settings from
CC4
(ADS-2400N /
ADS-3000N /
ADS-2800W /
ADS-3600W)
Configurable
settings in
Control Panel
(ADS-2800W /
ADS-3600W)
Saving
settings to
ashortcut
(ADS-2800W /
ADS-3600W)

Appendix
271
B
If the machine is not connected to a computer, see the table below for available settings when scanning from
the control panel.
Category Setting Option
Configurable
settings in
Control Panel
(ADS-2800W /
ADS-3600W)
Saving
settings to
ashortcut
(ADS-2800W /
ADS-3600W)
Basic
Settings
2-sided Scan Off / Long Edge / Short Edge
Scan Type
Auto / Black and White / True Gray / 24bit Color
Gray (Error Diffusion) - -
Resolution
100 dpi - -
150 dpi / 200 dpi / 300 dpi / 600 dpi
400 dpi - -
1200 dpi - -
Auto
File Type
PDF Single-Page / PDF Multi-Page / JPEG /
TIFF Single-Page / TIFF Multi-Page
PDF/A Single-Page / PDF/A Multi-Page / Secure PDF
Single-Page / Secure PDF Multi-Page / High Compression
PDF Single-Page / High Compression PDF Multi-Page /
Searchable PDF Single-Page / Searchable PDF
Multi-Page
Signed PDF Single-Page / Signed PDF Multi-Page
Windows Bitmap (.bmp) / Portable Network Graphics
(.png) / XPS
--
Document Size
Auto / A4 / Letter / Legal / JIS B5 / A5 / JIS B6 / A6 /
Business Card /Long Paper (Auto)
A3 / Ledger / JIS B4 / Executive / Index Card / Photo /
Photo L / Photo 2L / Post Card 1 / Post Card 2 (Double) /
Folio
--
1 to 2(A3) / 1 to 2(Ledger) / 1 to 2(B4) / 1 to 2(A4) /
2 in 1(A4) / 2 in 1(Letter) / 2 in 1(A5) / 2 in 1(B5)
--
Custom - -
File Size (Compression
Rate Adjustment)
-
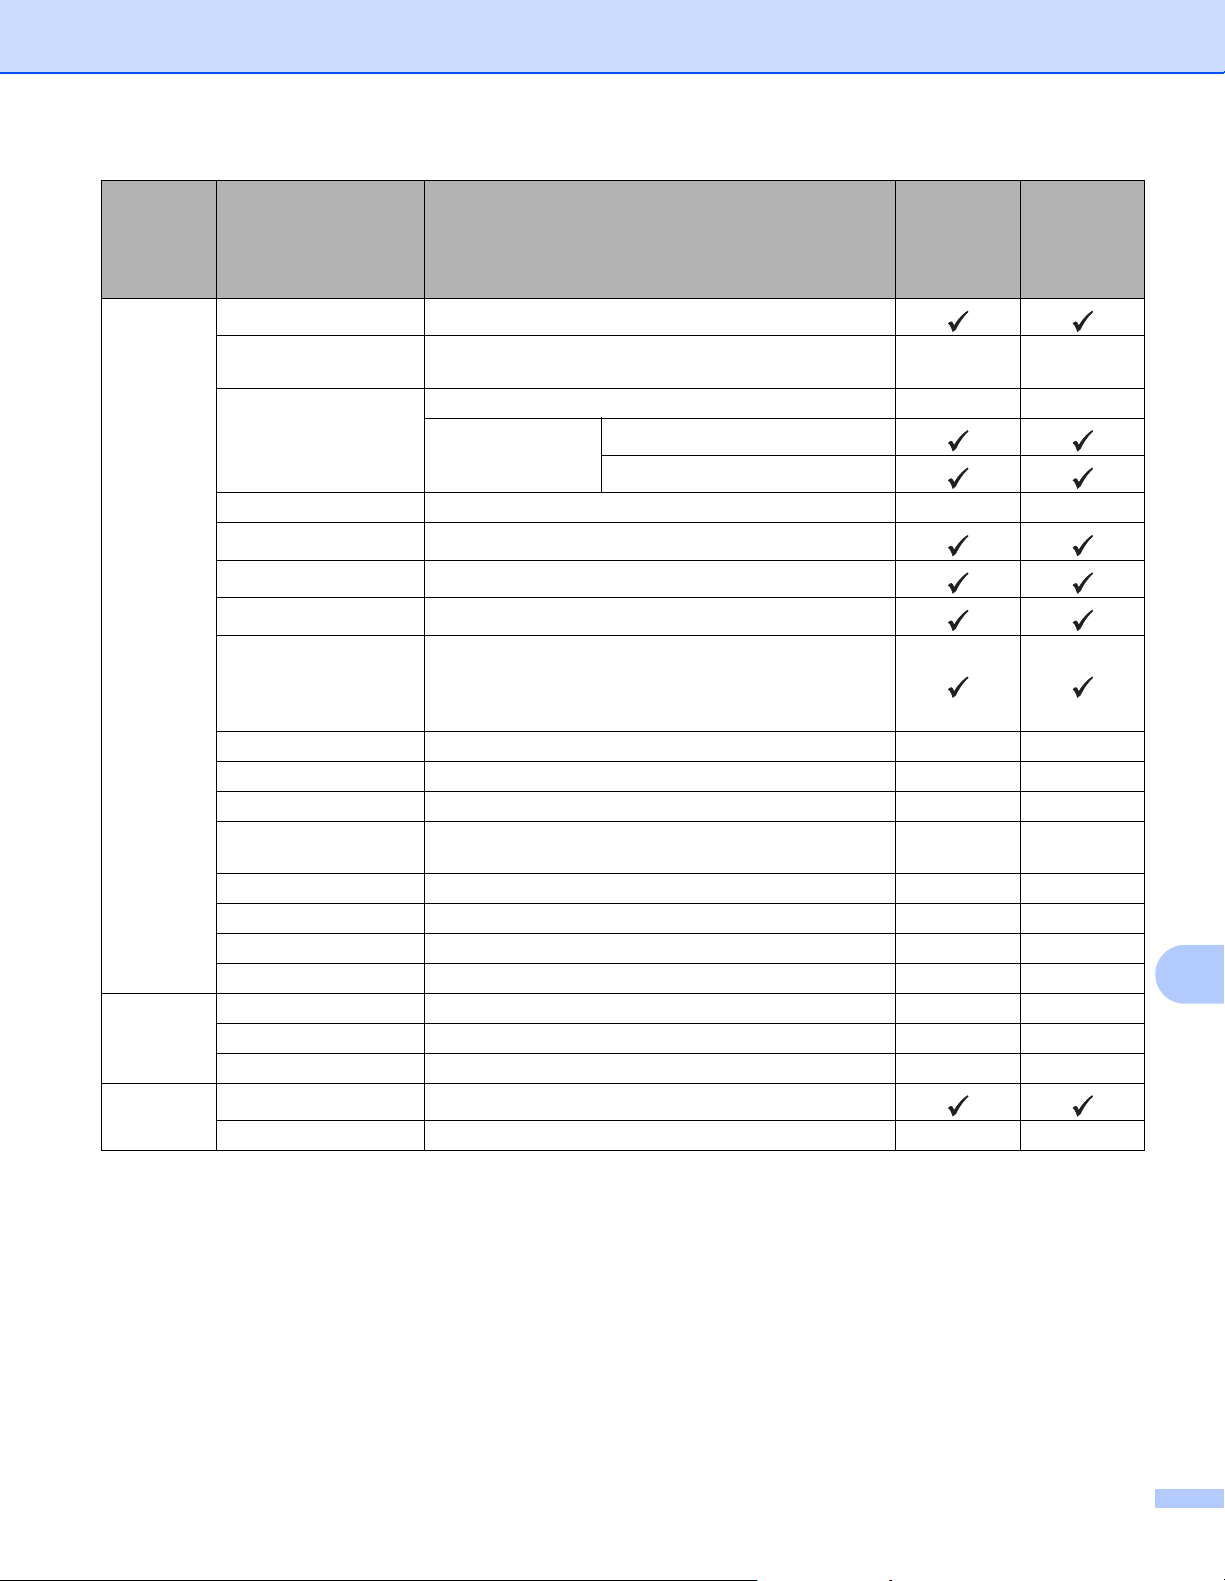
Appendix
272
B
Image
Processing
Auto Deskew On / Off
Remove Background
Color
Bleedthrough / Remove Background Color - -
Color Tone Adjustment
Auto - -
Custom
Brightness
Contrast
Grayscale Adjustment Brightness / Contrast - -
Auto Color Detect Adjust Auto Color Detect Adjust
Skip Blank Page Skip Blank Page
Document Separation Off / Number of Documents / Number of Pages
Margin Setting for
Cropping
Top: -0.12~0.12 in. (-3.0~3.0 mm)
Left: -0.12~0.12 in. (-3.0~3.0 mm)
Right: -0.12~0.12 in. (-3.0~3.0 mm)
Bottom: -0.12~0.12 in. (-3.0~3.0 mm)
Punch Hole Removal Paint color White / Background color - -
Edge Enhancement - - -
Boldface Formatting - - -
Blurred Character
Correction
On / Off - -
Noise Reduction - - -
Remove Ruled Line Vertical / Horizontal / Vertical and Horizontal - -
Edge Fill White / Black - -
Color Drop Chromatic Color / Red / Green / Blue / Custom - -
Special
Mode
Multifeed Detection On / Off - -
Carrier Sheet Mode On / Off - -
Plastic Card Mode On / Off - -
Detail
Settings
Continuous Scan On / Off
Detect End of Page On / Off - -
Category Setting Option
Configurable
settings in
Control Panel
(ADS-2800W /
ADS-3600W)
Saving
settings to
ashortcut
(ADS-2800W /
ADS-3600W)

273
C
C
A
ABBYY FineReader Pro .......................................... 123
B
Brother
Apps ....................................................................... 15
Brother iPrint & Scan ........................................... 106
Brother Numbers ....................................................... i
Customer Service .....................................................ii
FAQs (Frequently Asked Questions) ........................ i
Product Support ........................................................ii
Solutions Center ....................................................... i
C
ControlCenter4
Windows
®
...................................................... 77, 190
D
Device Selector ................................................. 74, 206
Drivers
Macintosh
ICA .................................................................... 128
TWAIN .............................................................. 124
Windows
®
TWAIN .............................................................. 107
WIA ................................................................... 107
L
LCD (Liquid Crystal Display)
Brightness .............................................................. 34
Dim Timer .............................................................. 34
M
Memory Storage ........................................................ 35
N
Nuance PaperPort 14SE (Windows) ....................... 107
P
Power Failure ............................................................ 35
R
Remote Setup ......................................................... 203
S
Scan
Macintosh
ABBYY FineReader .......................................... 124
ICA Compliant ................................................... 128
TWAIN Compliant ............................................. 124
Windows
®
Nuance PaperPort 14SE ................................... 107
TWAIN Compliant ............................................. 107
WIA Compliant .................................................. 107
Sleep Time ................................................................ 36
Status Monitor
Windows
®
............................................................ 200
T
Text, entering .......................................................... 254
Troubleshooting ...................................................... 230
V
Volume, Setting
Beeper .................................................................... 35
W
Web Connect ..............................................................iii
Index
www.brotherearth.com
Visit us on the World Wide Web
www.brother.com
These machines are approved for use in the country of purchase only. Local Brother companies or their dealers will support only
machines purchased in their own countries.
Brother International Corporation
200 Crossing Boulevard
P.O. Box 6911
Bridgewater, NJ 08807-0911 USA
Brother International Corporation (Canada) Ltd.
1 rue Hôtel de Ville,
Dollard-des-Ormeaux, QC, Canada H9B 3H6