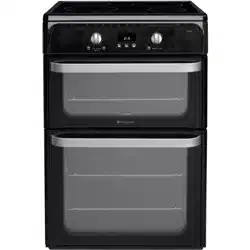
Hotpoint Ultima HUI612 K Electric Cooker
Product's Documents
Below are documents related to this product, you can read online or download:
- User Manual - (English) Read Online | Download pdf
User manual Electric Cooker

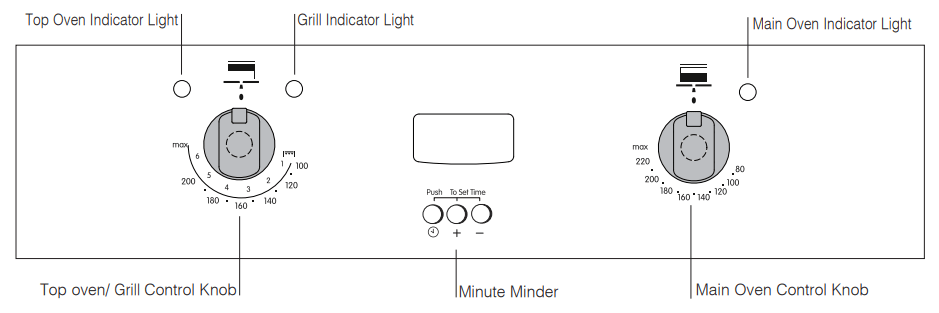
Operating controls when the grill is in use
In common with all cookers having controls sited above the grill compartment, care must be taken when setting the controls, due to the hot air expelled from the grill compartment.
Note: After use, it is advisable to check that all cooker controls have been switched Off.
Cooling fan
A gentle flow of air will be blown below the control panel when the grill is in use.When the oven/s are in use the cooling fan will operate after a short period of time and may run on, after all controls are switched off.
Oven light
The oven light will illuminate when the main oven thermostat is operated.
The light will remain on during the cook period.
Hob Hot Neon
A short time (approx. 30 seconds) after the hob heating areas have been turned on, the Hob Hot neon will illuminate.
This light will remain illuminated until all the hob controls have been turned off and all hob heating areas have cooled.
Only the Main Oven can be controlled by the automatic timer.
NEVER operate the grill when the oven is set to cook automatically because the oven cavity can become warm and this may cause bacterial growth in food.
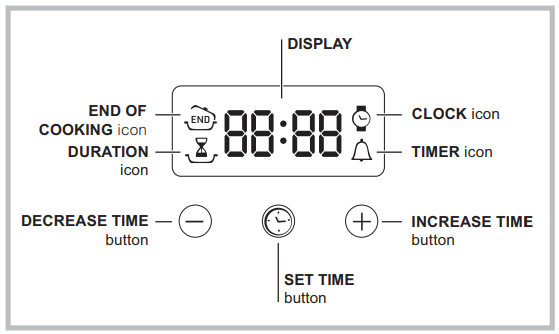
The clock may be set when the oven is switched off or when it is switched on, provided that the end time of a cooking cycle has not been programmed previously. After the appliance has been connected to the mains, or after a blackout, the  icon and the four numerical digits on the DISPLAY will begin to flash.
 button several times until the icon and the four digits on the display begin to flash. button again to finalise the setting.
This function does not interrupt cooking and does not affect the oven; it is simply used to activate the buzzer when the set amount of time has elapsed.
button several times until the  icon and the three digits on the display begin to flash. button again to finalise the setting.
The display will then show the time as it counts down. When this period of time has elapsed the buzzer will be activated.
A cooking mode must be selected before programming can take place.
Programming the cooking duration
button several times until the  icon and the three digits on the DISPLAY begin to flash. button again to finalise the setting.
Setting the end time for a cooking mode
A cooking duration must be set before the cooking end time can be scheduled.
button until the  icon and the four digits on the DISPLAY begin to flash. button again to finalise the setting.
Programming has been set when the and buttons are illuminated. The DISPLAY shows the cooking end time and the cooking duration alternately.
Cancelling a programme
To cancel a programme:
• press the button until the icon corresponding to the setting you wish to cancel and the digits on the display are flashing. Press the “-” button until the digits 00:00 appear on the display.
• Press and hold the “+” and “-” buttons; this will cancel all the settings selected previously, including timer settings.
Hob Control Panel
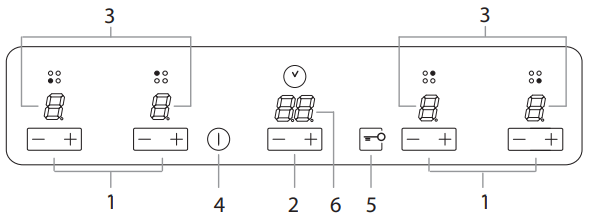
The control panel described in this manual is only a representative example: it may not exactly match the panelon your appliance.
When using the touch control pannel panel:
For detailed information on the control panel functions refer to “Start-up and use” section.
This product complies with the requirements of the latest European Directive on the limitation of power consumption of the standby mode. If no operations are carried out for a period of 2 minutes, after the residual heat indicator lights turn off and the fan stops (if present), the appliance automatically switches to the .off mode.. The appliance resumes the operating mode once the ON/OFF button is pressed.
Before connecting the appliance to the power supply, make sure that:
• The appliance is earthed and the plug is compliant with the law.
• The socket can withstand the maximum power of the appliance, which is indicated on the data plate located on the appliance itself.
• The voltage falls within the range of values indicated on the data plate.
• The socket is compatible with the plug of the appliance. If the socket is incompatible with the plug, ask an authorised technician to replace it. Do not use extension cords or multiple sockets.
Once the appliance has been installed, the power supply cable and the electrical socket must be easily accessible.
The cable must not be bent or compressed.
The cable must be checked regularly and replaced by authorised technicians only.
The manufacturer declines any liability should these safety measures not be observed.
Do not remove or replace the power supply cable for any reason. Its removal or replacement will void the warranty and the CE marking. INDESIT does not assume liability for accidents or damage arising from replacement/removal of the original power supply cable. Replacement can only be accepted when carried out by personnel authorised by INDESIT and using an original spare part.
The glue applied on the gaskets leaves traces of grease on the glass. Before using the appliance, we recommend you remove these with a special non-abrasive cleaning product. During the first few hours of use there may be a smell of rubber which will disappear very quickly.
A few seconds after the hob is connected to the electricity supply, a buzzer will sound. The hob may now be switched on.
Types of noise during normal hob operation:
• Buzz: due to the vibration of the metallic parts that make up the induction element and the pot; it is generated by the electromagnetic field required for heating and increases as the power of the induction element increases.
• Soft whistle: heard when the pot placed on the heating zone is empty; the noise disappears once food or water is placed into the pot.
• Crackle: produced by the vibration of materials on the bottom of the pot due to the flow of parasitic currents caused by electromagnetic fields (induction); can be more or less intense depending on the material making up the bottom of the pot, and decreases as the pot dimensions increase.
• Loud whistle: heard when two induction elements of the same group function simultaneously at maximum power and/or when the booster function is set on the larger element while the other is auto-adjusted. Noise is reduced by decreasing the power level of the auto-adjusted induction element; pot bottom layers made of different kinds of materials are among the main causes of this noise.
• Fan noise: a fan is necessary to ensure the hob functions correctly and to safeguard the electronic unit from possible overheating. The fan functions at maximum power when the large induction element is at maximum power or when the booster function is on; in all other cases, it works at average power depending on the temperature detected. Furthermore, the fan may continue to work even after switching the hob off, if the temperature detected is high.
The types of noise listed above are due to induction technology and are not necessarily operational faults.
If the (-) or (+)button is pressed for an extended period of time, the display scrolls quickly though the power levels and timer minutes.
When power is initially applied to the Cooktop, the touch control conducts a calibration process for the touch keys, which requires a low level of ambient light in the area of the touch keys.
If during this calibration process excessive ambient lighting is detected the User Interface displays „FL” (Infrared Ambient Light Error) and the control calibration process is suspended. In order to rectify the process any lighting that could effect the calibration process should be switched off (e.g. halogen cooker hood lighting). The error will disappear when satisfactory ambient lighting is detected and the touch control calibration procedure will now complete satisfactorily.
After connecting the hob to the electricity mains, the touch pannel might be automatically locked. To unclock the pannel press and hold the Control Panel Loock button  .
.
To switch the hob on, press and hold the  button for approximately one second.
The cooktop is switched On when a beep sound is emmited and all the cooking zones displays show the digit point.
When the cooktop is OFF, after 5 sec the control  . switches off the KEYLOCK LED to reduce the power consumption.
As soon as we touch a key, the KEYLOCK LED goes ON and we can continue to use the cooktop, unlocking the keyboard.
Switching off the cooktop is signalled by 3 beep sound.
The booster function for some of the cooking zones may be used to shorten heating-up times.
It may be activated by pressing the (+) POWER button over level 9. This function boosts the power to 1600 W or 2000 W, depending on the size of the relevant cooking zone. The activation of of the booster is signalled by a beep sound, and the letter ‘P’ appearing on the display corresponding to the selected cooking zone
The booster works for max 10 minutes. After these 10 minutes a beep sounds and the cooking zone will return to level “9”
With the heater at Booster level, if the [+] key is Touched an error beep sounds and the cookset doesn’t change. With the heater at Booster level, if the [-] key is Touched a beep sounds and the cookset is reduced to 9.
To switch off a cooking zone touch(-)and (+)
POWER selection buttons simultaneously.
A beep sounds and the corresponding display shows “0”.
All the cooking zones can be programmed for a cooking time duration between 1 and 99 min.
The user can select only one heater at a time.
Pressing and holding the (+) and (-) keys increases the speed of time selection.
If the time is not selected before 10 seconds, the timer is switched off.
If the selected time is “00” after 10 seconds the timer is switched off.
Starting Timer countdown.
The countdown starts 10 seconds after the last operation over the INCREASE (+)/ REDUCE(-) TIME buttons. If any power is selected, a beep sounds and the timer display stops blinking. The same happens to the led heater.
The last minute will be displayed in seconds.
When the timer is in countdown the user can change the time at any time by touching the INCREASE / REDUCE TIME buttons. Then the countdown stops and the timer changes to time selection status waiting a time selection.
End of Timer countdown.
When the time set on the timer has elapsed the timed heater is switched off, the timer display and the timed heater led starts blinking and a timer alarm beep sounds for one minute. The timer alarm can be cancelled by the user at any time, even during the first minute of the alarm . When the timer is in alarm status, by pressing any key of the touch control the timer is switched off.
To cancel the operation of the timer, select the time value of “00”pressing the(+) and(-) TIME buttons at the same time.
When all the cooking zones are not powered, and one of them is temporized at zero power level, the key-lock function is activated after 1 minute.
When the hob is switched on, it is possible to lock the oven controls in order to avoid accidental changes being made to the settings (by children, during cleaning, etc.).
Press the  button to lock the control panel: -the icon will illuminate and an audible beep sound will be emmited. To use any of the controls (e.g. to stop cooking), you must switch off this function. Press the button for a few moments, the icon will stop illuminating and the lock function will be removed.
All the keys on the cooking zone selection wil be locked
if :the cooktop is off,,
if the Control Panel Lock is activated or
if an error on a cooktop occurs..
Press the button  to switch off the appliance - do not rely solely on the pan sensor.
If the control panel lock has been activated, the controls will continue to be locked even after the hob is switched on again. In order to switch the hob on again, you must first remove the lock function.
The Working of the Heating Zones
Heating only occurs within the marked circular cooking zones. The zones heat up and cool down quicker, providing greater controllability for sensitive foods. Each heating zone is equipped with a thermal limiter which is a safety cut-out which prevents the ceramic glass from overheating. After several minutes at full power without a pan on the heating zone the thermal limiter will switch the heating elements off and on automatically to avoid any damage to the ceramic glass.
Choice of saucepan’s
It is essential that the saucepan’s you use on the ceramic hob are suitable.
ALWAYS USE:
NEVER USE:
Do Not
In order to keep your ceramic hob in good condition, follow these simple guidelines:
Do not stare at halogen heating units.
Do not cook directly on the hob surface without a cooking utensil, as this will result in damage to the surface of the hob.
Do not use the hob as a worktop surface as damage may occur to the smooth surface of the hob.
Do not drag or slide utensils on the hob surface, as this will cause scratches in the surface of the hob.
Do not allow a cooking utensil to come into contact with the hob surround.
Do not place anything between the base of the utensil and the ceramic hob, e.g. do not use asbestos mats, aluminium or wok stand.
Do not leave any utensils, food or combustible items on the hob when it is not in use.
Do not place aluminium or plastic foil, or plastic containers on the hob.
Do not leave the hotplates or cooking areas switched On unless they are being used.
Do not leave heating zones uncovered when they are switched On. We recommend not to place large preserving pans or fish kettles across two heating areas.
Do not leave utensils partly covering the heated areas. Always ensure that they are placed centrally over the heated areas and have the same diameter as the heating area used.
Do
Always ensure that the bottom of the pan is both clean and dry. Dirt or moisture between the pan and the hob can cause pitting of the surface of the glass.
We do not recommend the use of utensils with a base diameter greater than 25cm (l0ins).
Pressure cookers or other large pans should be used on the front cooking areas.
Always ensure that saucepan handles are positioned safely.
Always take extra care when cooking foods with a high sugar content eg. jam, as spillage will cause damage to the surface of the glass.
Always clean spills immediately (see Care and Cleaning).
IMPORTANT As with any cooking appliance there could be some fire risk attached to the heating of oil, particularly for deep fat frying, cooking utensils containing oil must not be left unattended (e.g. to answer the telephone) on or in close proximity to the patterned cooking areas.
Safety requirements for deep fat frying
In the unfortunate event of a chip pan fire:
TURN OFF THE MAIN SWITCH AND ENSURE THE COOKER IS COLD BEFORE CLEANING.
BEFORE SWITCHING ON AGAIN, ENSURE THAT ALL CONTROLS ARE IN THE OFF POSITION.
NEVER USE BIOLOGICAL WASHING POWDER, HARSH ABRASIVES, SCOURING PADS, AEROSOL CLEANERS OR OVEN CHEMICAL CLEANERS OF ANY KIND, UNLESS SPECIFIED BELOW.
Never use steam cleaners or pressure cleaners on the appliance.
Clean the glass part of the oven door using a sponge and a non-abrasive cleaning product, then dry thoroughly with a soft cloth. Do not use rough abrasive material or sharp metal scrapers as these could scratch the surface and cause the glass to crack.
The accessories can be washed like averyday crockery (even in your dishwasher).
Cleaning materials to avoid:
ALWAYS SWITCH OFF AT THE MAINS SWITCH BEFORE CLEANING.
Ceramic hotplates:
Clean your Ceramic hob top regularly and avoid repeated burning of encrusted contamination.
Your choice of cleaner will depend on the degree of soiling involved (see below).
Detergent residues must always be completely removed with a clean wet cloth, (even if the instructions for use suggest otherwise), as they can have an etching effect when reheated. Then wipe dry.
To maintain hob in good condition, we would recommend regular use of the ‚Easy Do Powder Cleanser’.
Sprinkle Powder Cleanser on a clean damp cloth or paper towel and rub vigorously for 3 to 4 minutes. Remove all residue with a clean damp cloth or paper towel.Then use conditioner to protect the hob.
For more stubborn marks, mix a small amount of the powder cleanser with ‚Jif Lemon Juice’ (from a bottle) and carefully spread over the affected area. Cover with a damp paper towel and leave for a minimum of 15 minutes.Rub vigorously. Remove excess with a clean damp cloth or paper towel before the conditioner dries. Polish with a clean cloth or paper towel. Easy Do products are available from many electrical retailers, our Parts Department (see Key Contacts, back page) and our Spares Distributors. Homecare ‚Hob Brite’ is available from leading Supermarkets.
Oven shelf supports
The shelf supports are removable and dishwasher safe.
To remove hold the support at the front and pull away from the oven side, this can then be cleaned in a sink or a dishwasher.
When removed it allows access to the oven side, which can be cleaned with warm soapy water.
To refit the support, insert the longer leg into the rear fixing hole and push in the front leg.
Decorative trims
It is advisable to clean the decorative trims regularly to prevent any build up of soiling which may detract from the appearance of the cooker.The recommended method of cleaning is to wipe over the trims with a soft cloth wrung out in warm water or mild non-abrasive cleaner. (If in doubt try the cleaner on a small area of trim which is not noticeable in normal use).Then, after wiping with a cloth wrung out in clear water, dry with a soft clean cloth.
Never use scouring pads or abrasive cleaners/powders which may scratch the surface.
Take care during cleaning not to damage or distort the door seals.Do not lift the door seal from the oven chassis, if necessary remove the seal by carefully unhooking the corner clips.
Take care that the rating label edges are not lifted during cleaning, and furthermore that the lettering is not blurred or removed.
Control
Panel:
Wipe with a damp cloth and polish with a dry cloth.
Stainless trims:
Regularly wipe with a clean, damp cloth and polish with a clean dry cloth.
Grill Door:
Wipe over the grill door decorative outer panel; with a cloth wrung out in warm soapy water, then after wiping with a cloth wrung out in clear water, dry with a soft clean cloth.
Do not use scouring pads or abrasive powder which may scratch the surface.
Ensure that the glass panel (where fitted) is not subjected to any sharp mechanical blows.
Grill:
Remove the grill pan and the wire grid food support, it is best to wash these items immediately after each use to prevent stains from being burnt on when used again. Wipe out the Grill compartment, use a fine steel wool soap pad to remove stubborn stains from the compartment.
Main oven:
1. Glass Door - open the oven door fully.The glass panel may now be cleaned. Stubborn stains can be removed by using a fine steel wool soap pad.Do not use scouring pads, or abrasive powder, which will scratch the glass. Ensure that the glass panel is not subjected to any sharp mechanical blows. For slight soiling the inner glass panel may be cleaned, while still warm. For removing stubborn stains see “Care and Cleaning” chapter.
2. Remove the rod shelves and meat pan. Use a fine steel wool soap pad to remove stubborn stains from the rod shelves,meat pan and the floor of the oven. Refer to the instructions in “Care and Cleaning” chapter, for cleaning the shelf supports. Do not use aerosol cleaners on this oven as they could adversely affect the fan motor unit, and cannot be wiped off the fan blade.
Replacement oven lamp:
WARNING: To avoid electric shocks - please ensure that the electricity supply to the appliance is switched off and the appliance is fully cold, before removing the lamp lens.
Open the oven door and remove the rod shelves. Using a suitable cloth to protect the fingers grip the light glass dome, unscrew anti-clockwise and lift. Reach into the aperture and unscrew the lamp anti-clockwise. Fit replacement lamp (25W 300°C rated SES), refit dome.
Wall-mounted splash panel:
A wall-mounted splash panel is available as an optional extra from our Parts Department (see Key Contacts, back page).
Care must be taken that rating label edges are not lifted during cleaning and furthermore that the lettering is not blurred or removed. For details of your nearest Service Centre please see the separate service leaflet. If you have any queries regarding service or spares, our Parts and Service Division will be pleased to advise.
See Key Contacts, back page, for details.
SIDE OPENING DOORS
Cleaning the door glass is the same as the drop down doors,except take care to support the weight of the inner glass when removing and refitting.
DROP DOWN DOORS
Remove the door inner glass as follows.
1. Open the door fully and unscrew the two screws securing the glass panel so that the securing brackets can be turned.There is no need to remove the screws completely.
2. Turn the brackets so that the glass can be removed and cleaned at the sink (Fig. 1.)
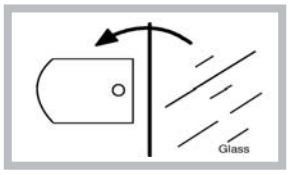
3. The inside of the outer door glass can now be cleaned while still fitted to the cooker.
NEVER OPERATE THE COOKER WITHOUT THE INNER DOOR GLASS IN POSITION.
Refit the door inner glass as follows.
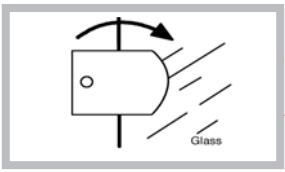
1.Turn the two securing brackets back to their original position to retain the glass and tighten the screws. (Fig. 2.)
STAY CLEAN’Oven interior pannels
Refer to the instructions below for cleaning the ‚Stay clean’ panels.
How „STAY CLEAN” works:
The surfaces of the ‚Stay clean’ oven liners are treated on the mottled face with a special vitreous enamel which absorbs cooking soils. At temperatures of 220°C (425°F) or above, the special surface enables these soils to be slowly destroyed. The higher the temperature the more effective it is. In most cases normal cooking operations at this temperature will permit this cleaning operation to proceed during cooking. However if higher cooking temperatures are not used regularly it may be necessary in order to prevent heavy soiling, to run the oven without a meat pan at maximum setting for a couple of hours.
Main Oven Liners - side and rear panels.
Main Oven Liners - side and rear panels.
It should not normally be necessary to clean the ‚Stay clean’ panels in water. If the user feels it is desirable to do so, wash them in warm soapy water, followed by rinsing in clean water. Do not use enzyme/biological washing powder, harsh abrasives or oven chemical cleaners of any kind.
| Problem | Check |
Grilling Uneven cooking front to back | Ensure that the grill pan is positioned centrally below the grill element. |
| Fat splattering | Ensure that the grill is not set to too high a setting. |
Baking (General) Uneven rising of cake | Ensure that the oven shelves are level by using a spirit level on the rod shelf and adjusting the wheels/feet. The oven should be checked both left to right and front to back. |
| Sinking of cakes | Sinking of cakes The following may cause cakes to sink:
|
| Over/Under cooking Fast/Slow cooking | Refer to the cooking times and temperatures given in the oven temperature charts, however, it may be necessary to increase or decrease temperatures by 10°C to suit personal taste. Do not use utensils greater than 56mm (2¼ins) in height. |
| Uneven cooking of cakes | 1. Too large baking sheet used. (See ‚Cookery Notes’, for correct sizes). 2. Over loading of oven and always ensure even air gaps around baking tins. 3. Placed into pre-heated oven. (See oven temperature charts) |
| Top Oven Baking: Uneven cooking front to back | Ensure the cooking utensil is positioned centrally under the grill element. |
| Uneven rising of cakes | Ensure that the shelf is level (see above) and that the food is positioned centrally in the oven. |
| Overcooking | Remember to reduce cooking temperatures by 10°C from standard recipes when using the top oven. |
| Food is taking too long to cook | Ensure that the cooking utensil used in the top oven is not larger than 300x225mm (12ins x 9ins). Only cook one item at a time to avoid overloading the oven. |
Before contacting your nearest Service Centre/Installer, check the problem guide below; there may be nothing wrong with your cooker.
| Problem | |
| Slight odour or small amount of smoke when grill / oven used for first time | This is normal and should cease after a short period. |
| Nothing works | If you find that the timer display is blank, then it is likely that there is no electricity supply to your oven. Check: (i) That the main cooker wall is switched on (ii) Other appliances, to see if you have had a power cut (iii) The main circuit breaker for the property |
| Grill / Top Oven do not work. Main oven works | (a) Grilling with the door closed - Always grill with the door fully open (b) Grilling for an excessively long period at maximum setting - see Grilling guide. Switch off appliance and allow to cool for approx 30 mins. Switch the cooker back on and check that the Grill / Top oven (as applicable) is now operating. |
| Oven temperatures too high or low | Check temperature and shelf positions are as recommended in the Oven Temperature Charts. It may be necessary to increase or decrease the recommended temperature slightly to suit your taste. |
| Oven lamp does not work | The oven lamp is not covered by the guarantee. The part is easily changed (see the section on oven lamp replacement). A new lamp may be obtained from our Parts department, see Key Contacts, back page. |
| Grill does not work | Ensure that the top oven control is turned fully off. |
| Grill keeps turning on and off | When the Grill control is operating at less than its maximum setting, the Grill will cycle on and off, this is normal and not a fault. |
| Draught from beneath control panel | A gentle flow of air will be blown from beneath the control panel when the appliance is used. If the appliance is still warm, this cooling fan may run on, or restart itself when all controls have been turned off. The fan will stop once the appliance has been cooled.This is normal and not a fault. |
| Condensation on the wall at the rear of the cooker | Steam and / or condensation may appear from the vent at the rear of the appliance when using an oven particularly for foods with a high water content e.g. frozen chips, roast chicken etc.This is normal, and any excess should be wiped off. |
| Steam / Condensation in the oven after use | Steam is a by - product of cooking any food with a high water contact. To help minimise always: a) Try to avoid leaving food in the oven to cool after being cooked. b) Use a covered container, wherever possible. |
Contact the Service Office
If something is still wrong with your appliance after you have been through the ‚Something Wrong’ list:
When you contact us we will want to know the following:
Reference file: Hotpoint Ultima HUI612 K Electric Cooker
Additionally, the document applies to other Hotpoint models: HUI 612 K, HUI 612 P

