User Manual Smart TV
Welcome
The new standard in Smart TVs
Welcome to TV like you’ve most likely never seen before—a home screen that you can personalize with your favorite devices and streaming channels. Choose from hundreds of thousands of streaming movies and TV episodes, plus music, sports, kids, family, international and much more. You should never run out of things to watch.
Note: A paid subscription or other payments may be required for some channels. Channel availability is subject to change and varies by country. Not all content is available in countries or regions where Roku products are sold.
Get the most out of your new TV
Follow these simple steps to get the most out of your new TV.
- Connect to the Internet
- It’s simple, it’s easy, and it will unlock a world of entertainment. All you need is a network connection. There are hundreds of free streaming channels, subscriptions services like Netflix and Spotify, convenient ways to rent or buy a favorite film or show with Google Play and Cineplex and more.
- Pick your favorite streaming channels
- Find the entertainment you love. From the latest blockbuster movies to your favorite TV shows, with tons of live sports, a broad selection of music streaming channels, popular programming in a dozen international languages, 24x7 live news and so much more, your new Roku TV has your sweet spot. A paid subscription or other payments may be required for some channels.
- Personalize your home screen
- Put your favorite broadcast TV, streaming channels, gaming console and other devices front-and-center on the home screen. No more flipping through inputs or wading through complicated menus. You can even personalize the names of each input and move tiles around so your most-often used devices and streaming channels are only a click away.
- Search for your favorite movie, TV show, actor, or director
- Once you’re connected to the internet, you can easily search across top streaming channels by movie or TV show title, actor or director—all from one place. Search results are organized by price so you can always see the best priced option. A paid subscription or other payments may be required for some channels.
- Send your personal media to the big screen
- Send personal photos, videos, and music from your compatible smartphone or tablet to the TV screen in just a few taps. Plus, with Netflix and YouTube apps and any applicable subscription, send movies, shows, sport highlights, and more directly to your TV.
- Note: The Roku app for Microsoft Windows devices does not cast videos.
- Follow movies coming soon
- Use My Feed to choose from and follow a list of upcoming movies, and then watch for alerts each time one of your followed movies becomes available or changes price.
- Note: My Feed is not available in the Roku App for Windows devices in the United States or Canada.
- Take charge with a smartphone or tablet
- Control your TV with the included remote or from your compatible smartphone or tablet with the free mobile app for iOS, Android, and Windows devices. Browse channels, view My Feed, and even search with voice via the free mobile app.
- Note: Voice search and My Feed are not available in the Roku app for Windows devices.
- Mirror your compatible smartphone or tablet on your TV. Share videos, photos, web pages, and more from compatible devices.
- Use your compatible smartphone or tablet to connect your Roku TV to the types of networks found in hotels and college dorms, where you may have to agree to terms, enter codes, or provide identifying information.
- Note: Using your Roku TV on a restricted public network requires wireless availability and use of your network-connected smartphone, tablet, or computer to authenticate access to your account. Your TV must already be linked to your Roku account and activated. Also, you must use your Roku TV remote control, because the Remote feature of the Roku mobile app does not work on restricted public networks. Streaming content might be limited due to your geographic location or because of restrictions imposed by the wireless network host.
Connections and setup
Before initial setup
Protect against power surges
- Connect all components before you plug any power cords into the wall outlet or power strip.
- NEVER plug your TCL Roku TV into an outlet that is controlled by a wall switch.
- Turn off the TV before you connect or disconnect any cables.
- Make sure all antennas and cables are properly grounded. Refer to the Important Safety Instructions.
Safety information
- Prevent TV from overheating by placing in an area with good ventilation.
- Do not block ventilation holes on the TV. Position the TV so air can circulate freely on all sides.
- Do not stack objects on the TV.
- If you place the TV on a stand, make sure you allow adequate ventilation.
- If you connect an audio receiver or amplifier to the TV, place it on the top shelf so the heated air will not overheat the TV.
Avoid audio interference
- Position cables properly; insert each cable firmly into the designated jack.
- Route all cables down one side of the back of the TV instead of straight down the middle.
- If your antenna uses 300-ohm twin lead cables, do not coil the cables.
- Keep twin lead cables away from audio/video cables.
Avoid direct light
Do not place the TV where sunlight or room lighting is directed toward the screen. Use soft or indirect lighting.
Set up your new TV
Open the box and remove the TV and other items. Be careful, the TV is heavy!
What’s in the box

To mount on a wall
If you are mounting your TCL Roku TV to the wall, do not attach the TV base stand or TV stand column.
To mount your TV to the wall, purchase one of the following VESA wall mounts:
- 55" model VESA 200 x 200, M6 x 16mm screws
The VESA number is the horizontal and vertical measurement of the mounting holes. For example, 100 x 200 indicates that the mounting holes are spaced 100mm horizontally and 200mm vertically.
Follow the directions supplied with the wall mount to mount the TV to the wall.
Caution: Your wall mount must be able to bear a minimum of five times the TVs net weight to avoid damage.
Note: The wall mount bracket and the screws are not included.
To use the stand
Your TCL Roku TV comes without the stands attached so that you can choose to use the stands or mount your TV to a wall using a wall mount (sold separately). If you want to mount your TV to the wall, don’t attach the stand legs.
A – Place the TV face down on a soft, cushioned surface on a table. The bag the TV was packed in makes a good cushion. Position the TV so that the stand, when attached, will hang over the edge of the table.
B – Align the stands with the screw holes located on the TV stand column:
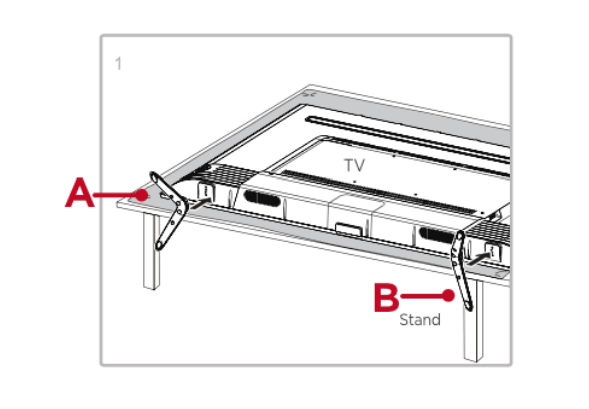
C – Secure stands to the TV with the four (4) screws.
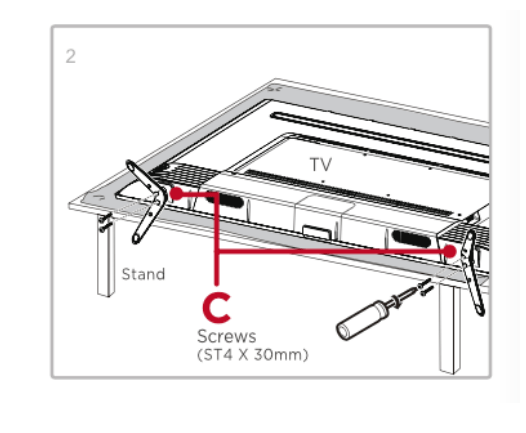
Note: Store the stand and stand screws in a safe place in case you decide to use the stand in the future.
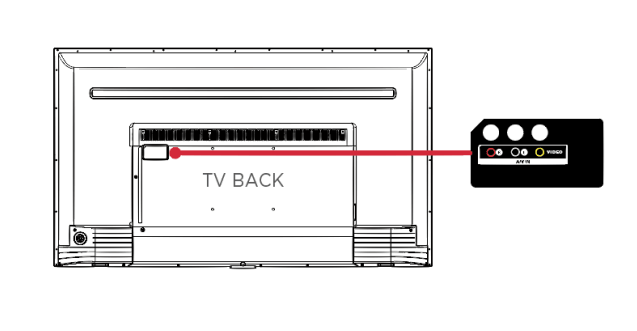
Connect your TCL Roku TV
This section explains how to connect your devices to your TV.
Connecting an antenna, cable, or satellite box
If you are using an antenna, CATV cable without a set-top box, or a cable or satellite box that has only an antenna output, connect a 75-ohm coaxial cable (not provided) from the device to the ANT/CABLE input on the TV.
Tip: If you are using an antenna with a 300 ohm twin-lead cable, you need to use a 300- 75 ohm adapter (not provided) to adapt the cable to a connection that is compatible with the TV’s antenna input.
Tip: If you receive your TV stations through a set top box from a cable or satellite TV provider, connect it to the TV using the best connection method available. From most to least desirable:
- HDMI® input – Digital HD and SD video
- AV input – analog SD video
- Antenna input – analog SD video using NTSC

Connecting a component with a composite AV video cable
If the best connection available on your component is AV or composite video output, connect it to the TV using a composite AV cable (not provided). Composite AV cables typically have three RCA-type plugs on each end, color coded as follows:
- Yellow: Video
- Red: Audio, right channel
- White or black: Audio, left channel
Connect each plug to the corresponding connector on the component and on the TV.
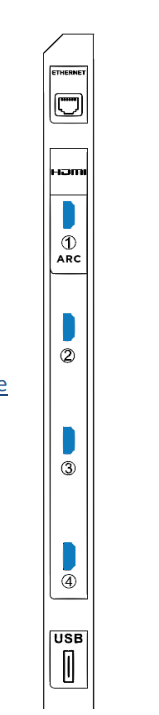
Connecting a component with an HDMI® cable
If possible, connect your devices using HDMI® cables (not provided). They help to provide the best video quality and also carry audio signals, so that only one cable is needed. For better picture quality, we recommend that you use cables designated as High Speed (Category 2) HDMI® cables.
Tip: You might need to configure the component to send its signal through its HDMI® connector.
The connector labeled HDMI IN (ARC) has the additional ability to use the audio return channel to send digital audio to a receiver or sound bar, as explained in “Select models also have an audio line out connection that is not affected by TV volume or mute settings and does not disable the TV speakers. Use this connection when you want to use your amplifier or sound bar to control the TV volume. To turn off the TV’s built-in speakers, in the Home screen menu, navigate to Settings > Audio > TV speakers and change the setting
Connecting an AV receiver or digital sound bar” on page 8.
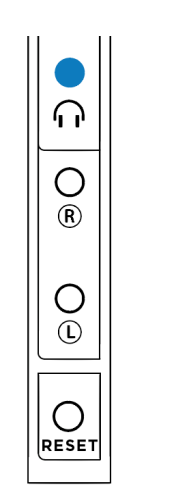
Connecting headphones or analog sound bar
You can connect headphones or an analog sound bar (not provided) to the TV’s headphone jack.
- Tip: Inserting a plug in the headphone jack disables the sound from the TV’s built-in speakers.
- Warning: Loud noise can damage your hearing. When using headphones, use the lowest volume setting on your headphones that still lets you hear the sound.
Select models also have an audio line out connection that is not affected by TV volume or mute settings and does not disable the TV speakers. Use this connection when you want to use your amplifier or sound bar to control the TV volume. To turn off the TV’s built-in speakers, in the Home screen menu, navigate to Settings > Audio > TV speakers and change the setting.
Connecting an AV receiver or digital sound bar
You can enjoy Dolby Digital multichannel sound from your TV if you connect a digital amplifier or sound bar (not provided) in either of two ways:
- Digital optical audio out (S/PDIF) – Connect a TOSLINK optical cable (not provided) from the TV to the Optical input on your receiver or sound bar.
- HDMI® ARC – Connect an HDMI® cable (not provided) from the HDMI (ARC) connector to the HDMI® input on your receiver or sound bar. This connection uses the Audio Return Channel (ARC) feature of the HDMI® specification to output sound from the TV to a compatible device. To use this feature, you must configure the TV to enable HDMI® ARC, as explained in “Enabling HDMI® ARC” on page 68.
Preparing for Internet connectivity
If you want to connect your TV to the Internet to watch streaming content, you can choose either a wireless or a wired connection.
- Wireless connection – To use a wireless connection, make sure you know the name (SSID) and password you use to connect to your wireless modem/router or wireless access point.
- Wired connection – To use a wired connection, plug your Ethernet cable into the RJ-45 jack on the back of the TV. The wired connection supports both 10 and 100 Base-T Ethernet
For wireless operation, the TV connects through a built-in wireless LAN adapter. The TV does not support the use of a USB network adapter.
Note: We recommend that your wireless connection support the IEEE 802.11ac specification for the best experience.
AC power
Plug your TV into a power outlet. You can tell that the TV has power because the status light on the front of the TV lights up.
“Status light” on page 28 explains how the status indicator shows what is happening with the TV.
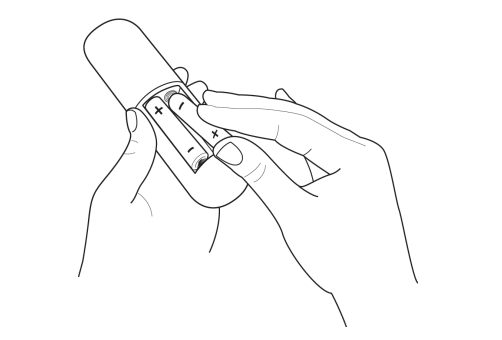
Remote control batteries
Open the back of your Roku TV remote control and insert the included batteries, observing the proper orientation as indicated in the battery compartment. Reattach the back cover.
“Roku TV Remote ” on page 30 explains how to use the remote control in each of the TV’s operating modes.
Guided Setup
With the preliminaries out of the way, it’s time to turn on your TCL• Roku TV. As the TV starts for the first time, it leads you through Guided Setup, which configures the TV before you start to use it.
During Guided Setup, you’ll:
- Answer a few questions
- Provide network connection information
- Get a software update
- Link your TV to your Roku account.
- Connect devices such as a DVD player, game console, or cable box.
Note: Guided Setup only runs the first time you turn on your TV. If you need to run Guided Setup again, you’ll have to perform a factory reset, as explained in “Factory reset everything” on page 70.
Starting Guided Setup
To start Guided Setup, press the POWER button on the remote control to turn on your TV.
When you first turn on your TV, it will take a few seconds to get itself ready. You’ll notice the following things happening:
- The status light blinks every time the TV is busy doing something; in this case it’s powering up and getting ready for you.
- The power-on screen appears and the status light blinks slowly for a few more seconds. The power-on screen displays the TCL• Roku TV logo while the TV starts up.
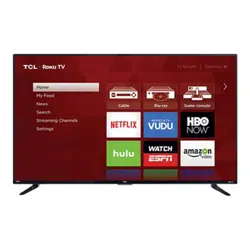
- After a few seconds, Guided Setup starts:
- Press the UP or DOWN button on the remote control to highlight your preferred language.
Setting up your TV
With the first Guided Setup screen on your TV, follow these steps to set it up:
- After selecting a language, press OK or the RIGHT arrow on the remote control to go to the next screen:
- Press OK to select Set up for home use. Home mode is the right choice for enjoying your TV at home. It provides energy saving options as well as access to all features of the TV.
- Note: Store mode configures the TV for retail display and is not recommended for any other use. In store mode, some features of the TV are missing or limited. To switch from one mode to the other, you have to perform a factory reset as explained in “Factory reset everything” on page 70, and then repeat Guided Setup.
- After you select Set up for home use, the TV prompts you to select the way you want to connect to the Internet.
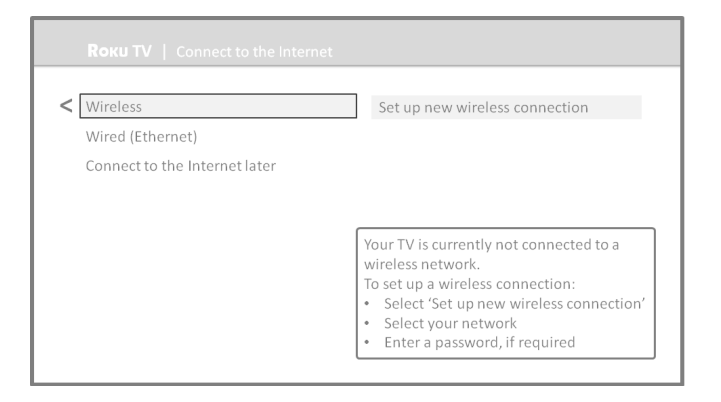
- Make a selection:
- Wireless connection – Highlight Set up new wireless connection and press OK. The TV prompts you through wireless setup. Go to Step 4 for help with the process.
- Wired connection – Highlight Connect to wired network and press OK. The TV immediately attempts to connect to your wired network, your local network, and then the Internet. Go to Step 8 to continue with Guided Setup.
- Connect to the Internet later – If you’re unable to connect to the Internet, that’s OK. You can skip this step and use the TV to watch broadcasts, play games, and watch DVDs. If you want to connect later, it’s easy. We’ll show you how in “Benefits of connecting” on page 21.
- Note: If you decide not to connect, Guided Setup skips ahead to setting up the devices that you’ve connected to your TV. See “Non-connected TCL
- Roku TV Home screen” on page 20 to get started using your non-connected TV. Note: Some networks, such as those often found in dorm rooms, hotels, and other public places, may require you to read and agree to terms, enter a code, or provide identifying information before letting you connect to the Internet. If the Roku TV detects that you are connecting to such a network, it prompts you through the connection process using your compatible smartphone or tablet to provide the needed information. For more information, see “Using your TV in a hotel or dorm room” on page 36.
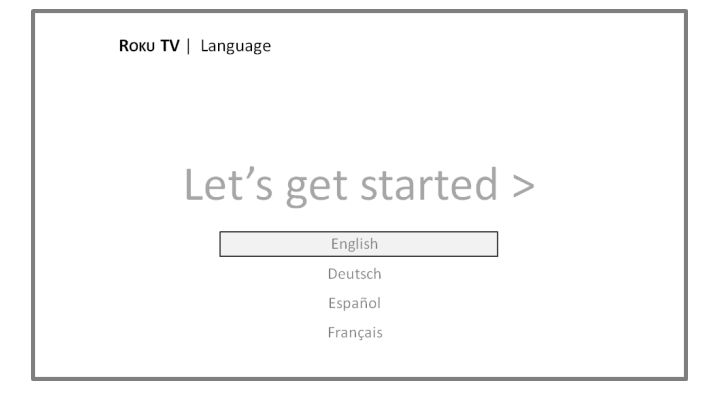
- After you select Set up new wireless connection, the TV scans for the wireless networks within range and displays them in order, with the strongest signals first. In addition to your own wireless signal, the TV might pick up signals from your neighbors.
- Press the UP or DOWN arrows to highlight the name of your wireless network, and then press OK to select it.
- Other options:
- Scan again / Scan again to see all networks – This option depends on the number of wireless networks within range.
- Scan again appears if the list already shows all available wireless networks within range. If you don’t see your wireless network name in the list, you might need to adjust the location of your wireless router or the TV, turn on your router, or make other changes. When everything is ready, select Scan again to see if your network name now appears in the list.
- Scan again to see all networks appears if there are more wireless networks than the strongest ones it initially listed. If you don’t see your wireless network name in the list, this option displays the complete list. If you still don’t see your network name, you might have your router configured to provide wireless service as a “private network.”
- Note: Highlighting either of these options displays an informational panel with the unique media access control (MAC) address of your Roku TV. You will need the MAC address if your wireless router is configured to use MAC address filtering.
- Private network – If your wireless network name is hidden, it won’t appear in the list. Select Private network to display an on-screen keyboard, and use it to enter your network name. Unless you changed the factory-set network name, you can find the name (also called SSID) on a label on the router.
- If you select a wireless network that is password-protected, an on-screen keyboard appears. Use the keyboard to enter the network password.
- Tip: Wireless networks that are password-protected display a “padlock” icon adjacent to the name. This icon enables you to know that you are going to be prompted to enter a password after you select that network
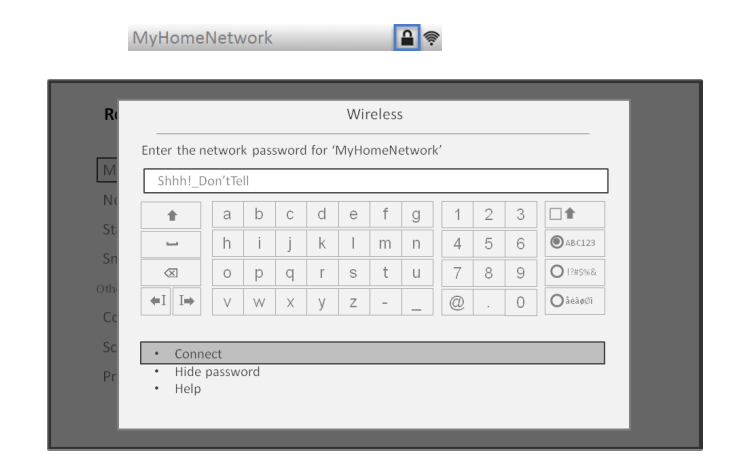
- After you submit your wireless network password, the TV displays progress messages as it connects to your wireless network, your local network, and the Internet.
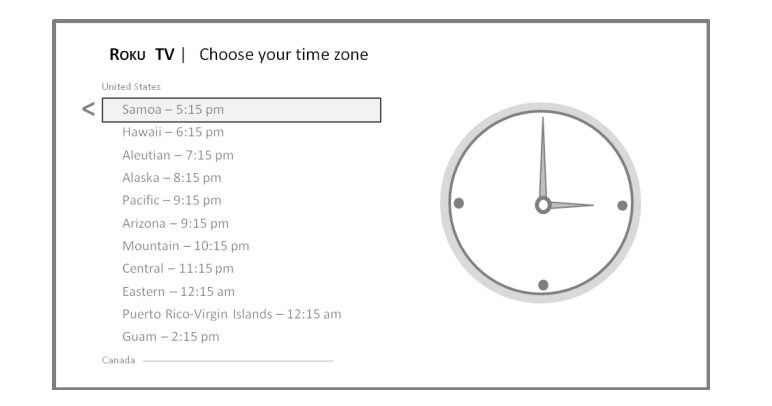
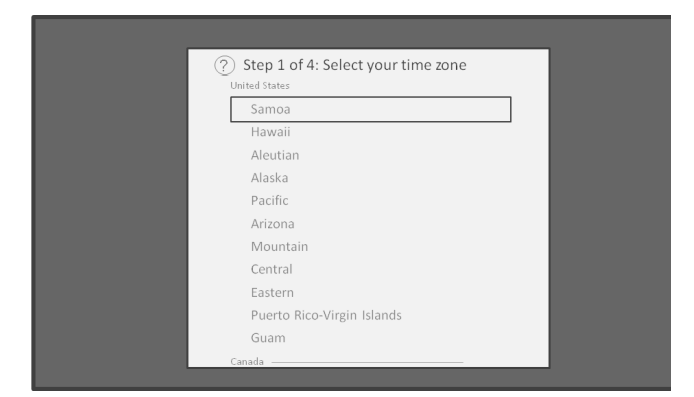
- Your TV needs to know the local time zone so that it can correctly display time information about the program you are currently watching. If the TV is unable to automatically determine the local time zone, it prompts you to choose your time zone from a list. Use the UP and DOWN arrows to highlight your time zone, and then press OK.
- As soon as the TV is able to connect to the Internet, it downloads and installs its first software update, and then restarts.
- Tip: Your TV automatically checks for updates periodically. These updates provide new features and improve your overall experience with the TV. After an update, you might notice that some options have moved, and that there are new options or features. This User Guide describes version 7.0. To determine your current Roku TV software version, go to Settings > System > About after you complete Guided Setup.
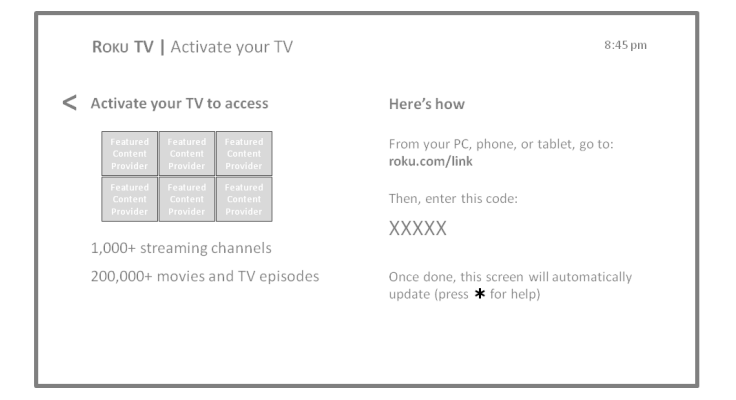
- After the TV restarts, it displays the Activation screen:
- Note: A paid subscription or other payments may be required for some channels. Channel availability is subject to change and varies by country. Not all content is available in countries or regions where Roku products are sold.
- Using a compatible computer, tablet, or smartphone with an Internet connection, go to the web address displayed on the screen and enter the code that appears on your screen.
- After you log in or create your Roku account, the link page suggests that you select some streaming channels. After you confirm your selections, the TV gets an acknowledgement, and then adds your preexisting and newlyselected streaming channels to your Roku TV. This process is automatic and takes a few moments—a little longer if you already have a lot of streaming channels to add.
- Tip: Streaming channels from all Roku devices associated with your account are synchronized periodically, so all of your Roku devices have the same streaming channels (subject to compatibility with the device).
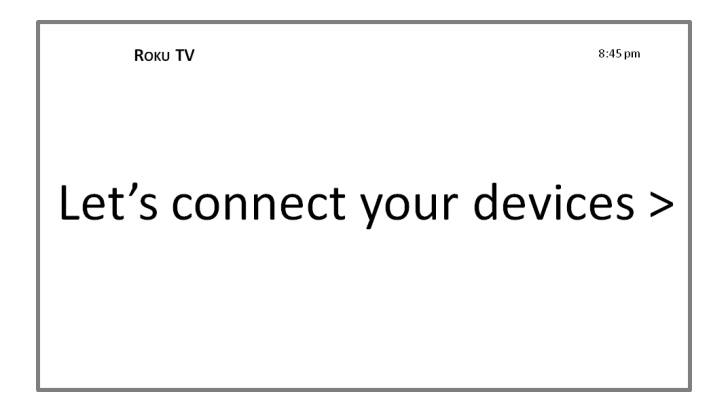
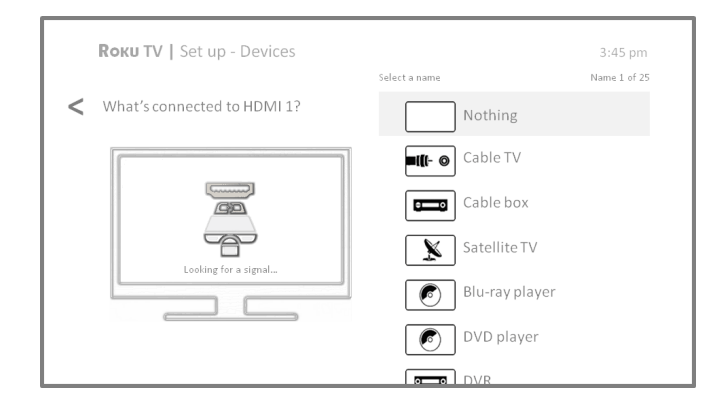
- After it adds your selected streaming channels, the TV helps you set up the devices that you’re connecting to it, such as a cable box, Blu-ray player, or game console:
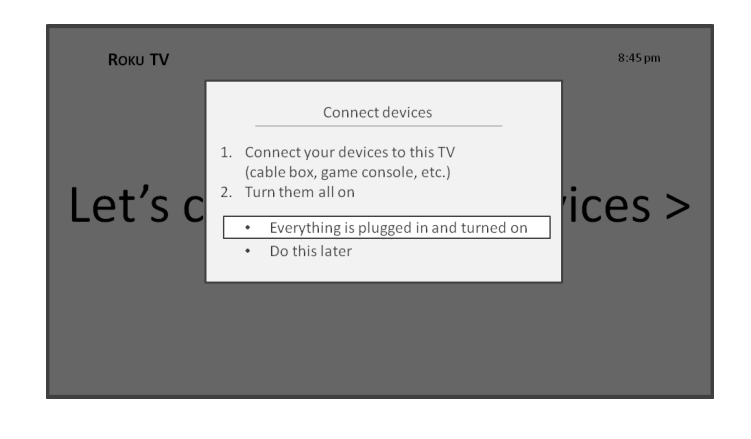
- Press the OK or RIGHT arrow to proceed:
- Connect all the devices you plan to use with your TV, turn them all on, and then select Everything is plugged in and turned on. The TV now takes you step by step through each of its inputs and asks what kind of device you have connected. On each input that has a connected and active device, you can see its picture and hear its sound.
- Press the UP or DOWN arrows to highlight the label you want to associate with the input, and then press OK to move on to the next input.
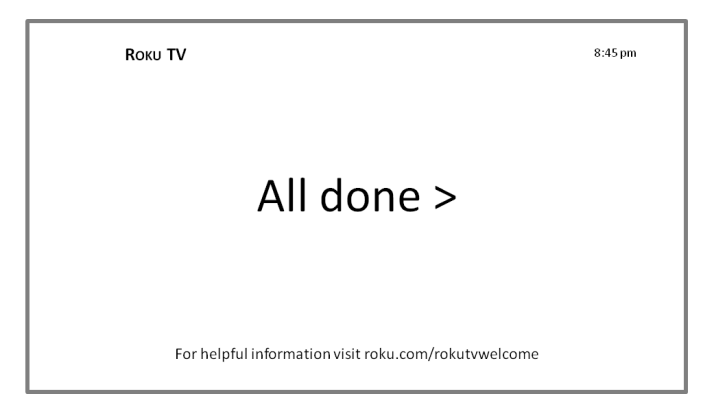
- You’re done with Guided Setup.
- Note: : Some Roku TVs, depending on where you live and other factors, show you an introductory video filled with some great hints and tips. If you’re not interested in viewing this video, press
 on the remote control to exit to the Roku TV Home screen.
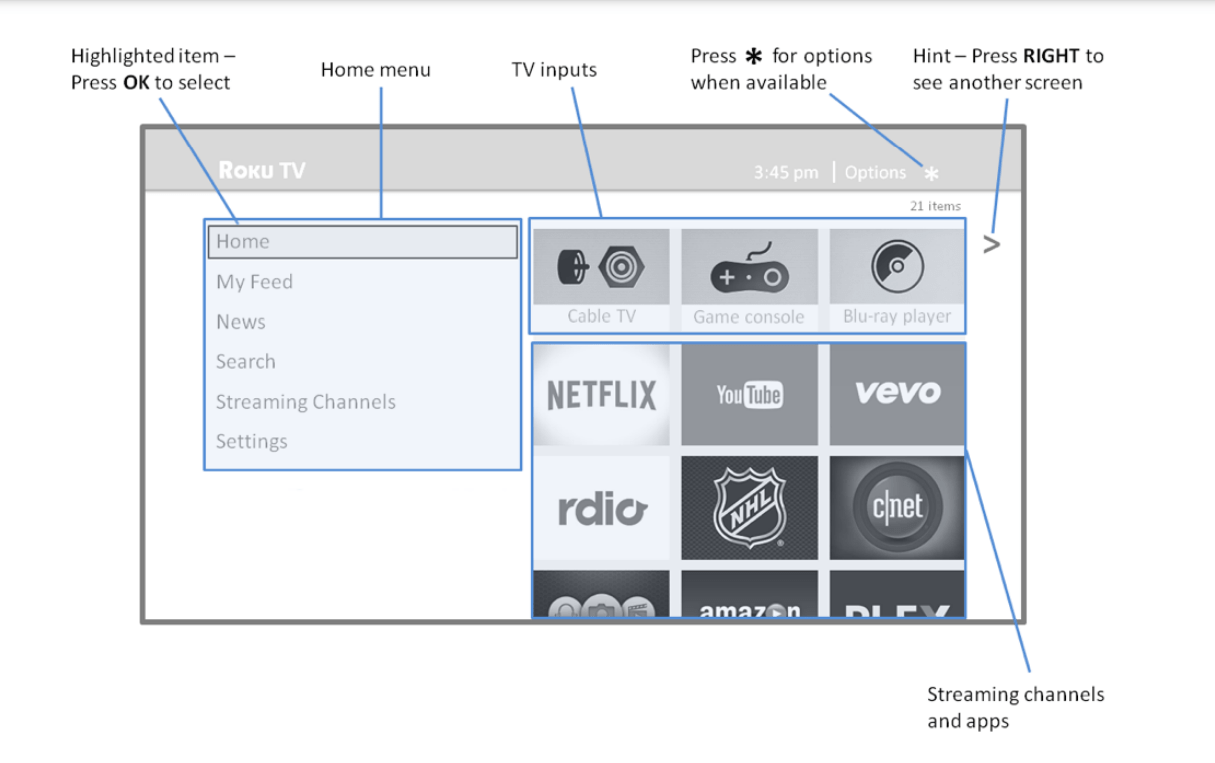
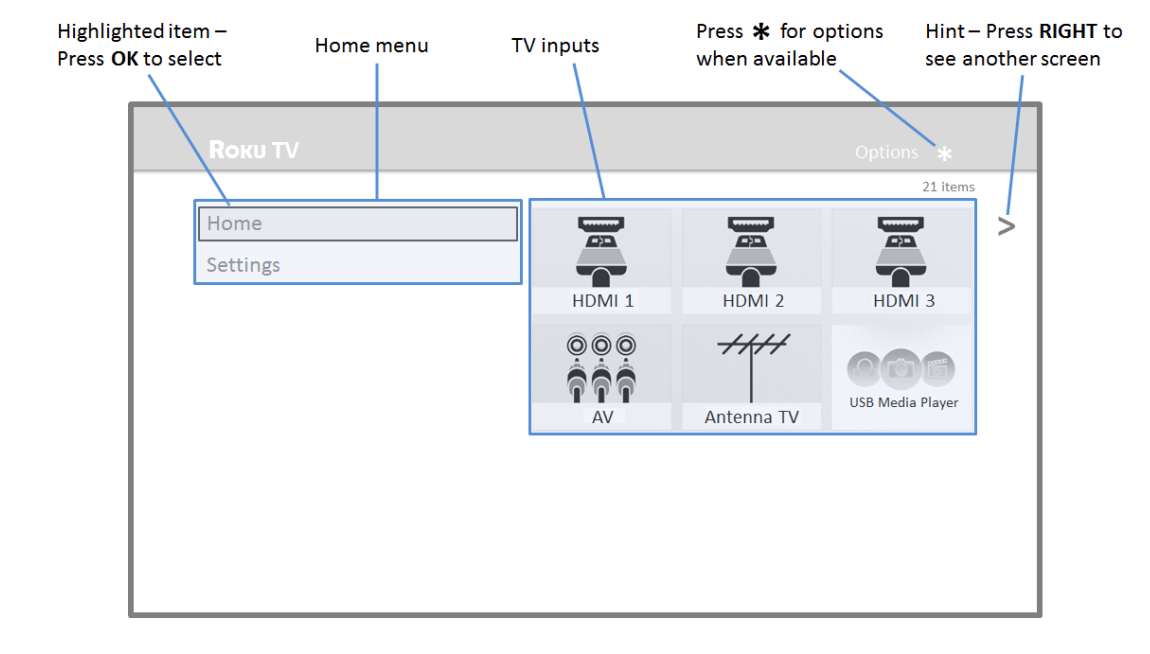
- When you finish Guided Setup, and whenever you press on the remote control, the Home screen greets you.
- From here, you can explore everything your TV has to offer. Press the arrow buttons to move around, and press OK to select a highlighted item. We’ve designed the TV to encourage you to explore, and you can probably figure out most of the capabilities and settings on your own. If you have any questions or difficulties, you can find answers and solutions in this guide.
- If you find yourself a long way from the Home screen, you can always get back right away by pressing one button:
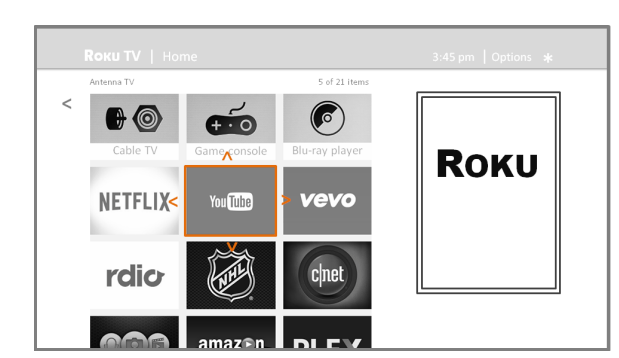
Connected TCL• Roku TV Home screen
Here is a typical Home screen from a Roku TV that’s connected to the Internet and linked to a Roku account.
Personalize your Home screen
You can do a lot to personalize your Home screen and make it just right for you and your family:
- Add streaming channels by using the Streaming Channels menu option to browse the Roku Channel Store.
- Remove a tile by highlighting it and pressing *. Then highlight Remove input or Remove channel and press OK.
- Reposition a tile by highlighting it and pressing *. Then highlight Move input or Move channel and press OK. Use the arrow buttons to move the tile, and then press OK to lock it in its new location.
- Rename a TV input tile by highlighting it and pressing *. Then highlight Rename input and press OK. Highlight a new name in the list, and then press OK to assign that name to the tile.
- Change the screen theme by going to Settings > Themes to find and pick one to suit your mood.
- Hide News (US models only) as explained in “Blocking News” on page
Non-connected TCL• Roku TV Home screen
Here is a typical Home screen from a Roku TV that is not connected to the Internet.
Personalize your Home screen
You can do a lot to personalize your Home screen and make it just right for you and your family:
- Remove a tile by highlighting it and pressing *. Then highlight Remove input and press OK.
- Reposition a tile by highlighting it and pressing *. Then highlight Move input and press OK. Use the arrow buttons to move the tile, and then press OK to lock it in its new location. • Rename a tile by highlighting it and pressing *. Then highlight Rename input and press OK. Highlight a new name in the list, and then press OK to assign that name to the tile.
- Add streaming channels by browsing the Roku Channel Store (after connecting the TV to the Internet to add the Streaming Channels option to the menu).
Benefits of connecting
Connecting brings out your TCL• Roku TV’s full potential!
Make any night a movie night
Thousands of movies to choose from, across all major streaming movie channels like Netflix, Cineplex Store, Crackle, and more* . You’ll never run out of something new to watch.
Get in the groove
Stream endless hours of music from free and subscription-based channels like Spotify and VEVO. With almost instant access to thousands of music artists, your favorite beats are just as close as your remote
Explore your passions
In addition to popular streaming channels like YouTube, NHL, Sky News and Cineplex Store, your Roku TV also offers hundreds of streaming channels to fuel your passions—including fitness, cooking, religion, outdoors, International programming and much more.
Enjoy FREE trials of popular channels
Your TCL• Roku TV comes loaded with special offers, including free trials from popular streaming channels Netflix, Spotify, DailyBurn Fitness, and many more. But remember that you must cancel before the free trial ends to avoid subscription fees.
What is streaming?
Streaming is viewing or listening to video or audio content that is sent over the Internet, or located on a network-connected media server or on a USB device plugged into the TV’s USB port.
* A paid subscription or other payments may be required for some channels. Channel availability is subject to change and varies by country. Not all content is available in countries or regions where Roku products are sold.
With streaming, you can buy or rent most programs on demand, when it’s convenient for you. When streaming, you can play, pause, rewind, and fast forward whatever you are watching. You can also replay the last few seconds again, or turn on closed captions.
- Tip: Some content cannot be paused or skipped. For example, if you are viewing live programming or a program that is supported by ads, you generally are not allowed to skip the ads.
Your Roku TV lets you choose from thousands of streaming channels that offer a huge selection of entertainment:
- Thousands of movies and TV episodes
- Unlimited music, live and on-demand
- Tons of live and on-demand sports
- Commercial-free kids programming
- International programming in 22 languages
- 24x7 news and in-depth news commentary
Many streaming channels are free. Some streaming channels, like Cineplex and Amazon Instant Video, let you purchase or rent the latest movie releases or popular TV series. Some channels such as Netflix or Spotify charge a monthly subscription fee and others are free if you subscribe to a companion service through your cable or satellite provider. For example, HBO subscribers with participating broadcast TV provider accounts can add the HBO Go channel and watch it for free.
If you have an existing subscription to a service like Netflix or Spotify, you can just sign in with your existing user name and password.
To play streaming content that is available on the Internet, you add streaming channels to your Home screen. To add a streaming channel to your Home screen, use the Streaming Channels option on the Home screen menu to go to the Roku Channel Store, and then select the streaming channel you want to add. The streaming channel is then added to your Home screen, and you can watch it at any time.
For more information on using the Roku Channel Store feature, see “Using the Roku Channel Store” on page 49.
Note: A paid subscription or other payments may be required for some channels. Channel availability is subject to change and varies by country. Not all content is available in countries or regions where Roku products are sold.
But what if I didn’t connect my TCL• Roku TV?
What if you went through Guided Setup and chose Connect to the Internet later? No worries. Your TCL• Roku TV makes it easy to connect whenever you want. As you move around the Home screen, you’ll see several places where you can start the connection process. For example:
- Now and then you’ll see a message appear on the panel to the right of the Home screen offering a Connect Now option. Simply highlight and select the Connect Now option to get started.
- Use the Connect and activate now option in the Settings menu. From the Home screen menu, select Settings, then Network, and then Connect and activate now.
- If you want to start over from the beginning, use the Settings menu to do a Factory reset, and then go through Guided Setup again. This time, choose your home network when prompted.
Regardless of how you connect, the process is the same. If you need details, see “Setting up your TV” on page 12.
Setting up Antenna TV
Despite all of the entertainment possibilities of your Roku TV, you may also want to watch broadcast TV. You can watch broadcast TV in much the same way you watch other entertainment choices. You select a tile—the Antenna TV tile—from the Home screen.
The first time you select the Antenna TV tile, you have to set up the TV tuner. Setting up the TV tuner scans for active channels and adds them to your broadcast TV channel list.
Why do I have to set up the TV tuner?
You might be asking, “Why is this step necessary?” Good question.
Not everyone needs to use the TV tuner. For example, you might have a set top box provided by a cable or satellite company that receives all of your channels. Most of these set top boxes use an HDMI® connection.
More and more people are watching only streaming TV and do not have a TV antenna or cable/satellite service. If you don’t need the TV tuner, you can bypass setting it up and instead remove it from the Home screen as explained in “Remove unwanted tiles” on page 53.
When you set up Antenna TV, the TV scans the signals on its antenna input for channels with a good signal, and adds those to the channel list, skipping dead channels and channels with a very weak signal.
The TV will, however, let you add two analog channels, even if they have no signal. You might need to add these channels if you have an older set top box, VCR, or game console that can only output a signal on analog channel 3 or 4. These are the only channels that can be added regardless of whether they have a good signal. Typically, you’ll only need one of these channels, but both are provided to make setup simpler. You can hide the one you don’t want as explained in “Edit broadcast TV channel lineup” on page 52.
How do I set up the TV tuner?
Setting up the TV tuner is easy—your TV does most of the work. You just have to answer a couple of questions.
- Make sure your antenna (sold separately) or TV cable is connected to the TV’s ANT/CABLE input.
- On the Home screen, select the Antenna TV tile.
- Read the simple on-screen instructions and select Start finding channels.
- If prompted, select your time zone. You’ll only need to do this if the TV can’t figure out your time zone from your Internet connection.
- When prompted, select whether to add analog channels 3 and 4 (to enable you to connect older set top boxes, VCRs, or game consoles).
- Wait while your TV scans for broadcast (antenna TV) stations…
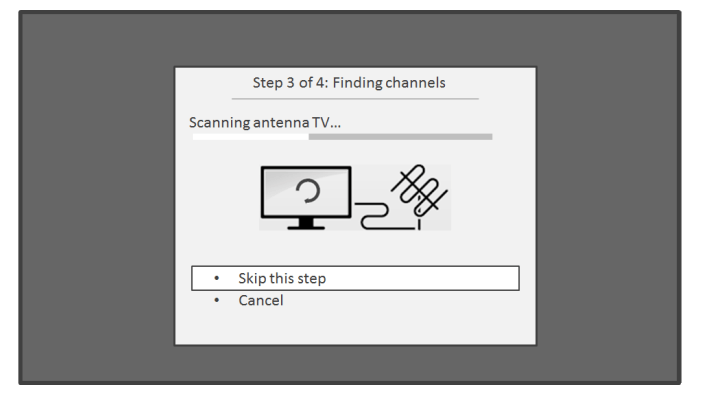
- … and then cable TV channels.
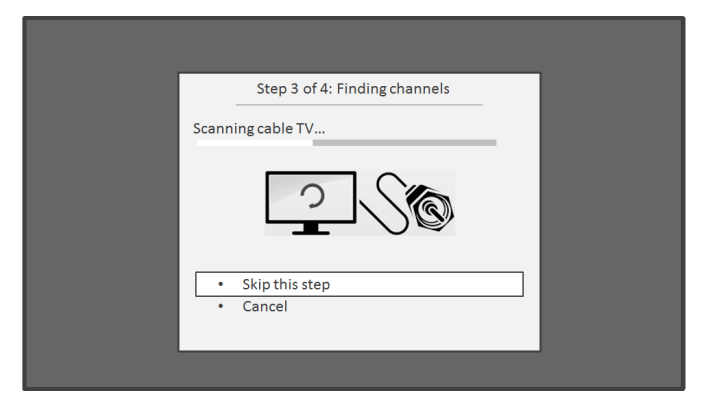
- Tip: Cable TV channels are channels from a cable TV provider that you can receive by connecting their cable directly to your TV (unscrambled NTSC, ATSC, and QAM channels, if you’re the kind of person who is interested in the details). In many cases, your cable provider probably requires you to use their set-top box and connect it to a different input, and then use the set-top box to tune your cable stations. In that case, you can skip scanning for cable channels.
- When the channel scans finish, the TV shows the number of channels it added.
- Scanning for channels can take several minutes.

- Tip: Repeat the channel scan from time to time to make sure you are receiving all of the latest channels. Broadcasters add and remove channels, move channels to different parts of the spectrum, and change the power levels of their channels periodically.
- Note: You’ll have to repeat the channel scan if you remove the Antenna TV tile from the Home screen or perform a factory reset. To repeat the channel scan at any time, go to Settings > TV inputs > Antenna TV > Scan again for channels > Start finding channels. Your antenna reception and picture quality depend on the position of your antenna and on your location relative to the antennas of broadcasters in your area
- Now, you’re ready to watch broadcast TV! While you’re watching, try the following:
- Press the UP and DOWN arrows to change channels.
- Press the LEFT arrow to display the channel list and then use the UP and DOWN arrows to select a channel to watch. Or press REWIND or FAST FORWARD to jump through the channel list a page at a time.
- Press OK to display information about the current program.
- Press
 to switch to the previously tuned channel.
- Press * to see options for picture and sound settings.
- Note: If is not available on your remote control, you can use on the Roku App or the Jump Back button on a universal remote. For more information, see “Other devices” on page 74.
- “Roku TV Remote ” on page 30 has more information on using the remote control buttons while watching TV.
Using your TCL• Roku TV
This section provides information on using the day-to-day features of your TCL• Roku TV.
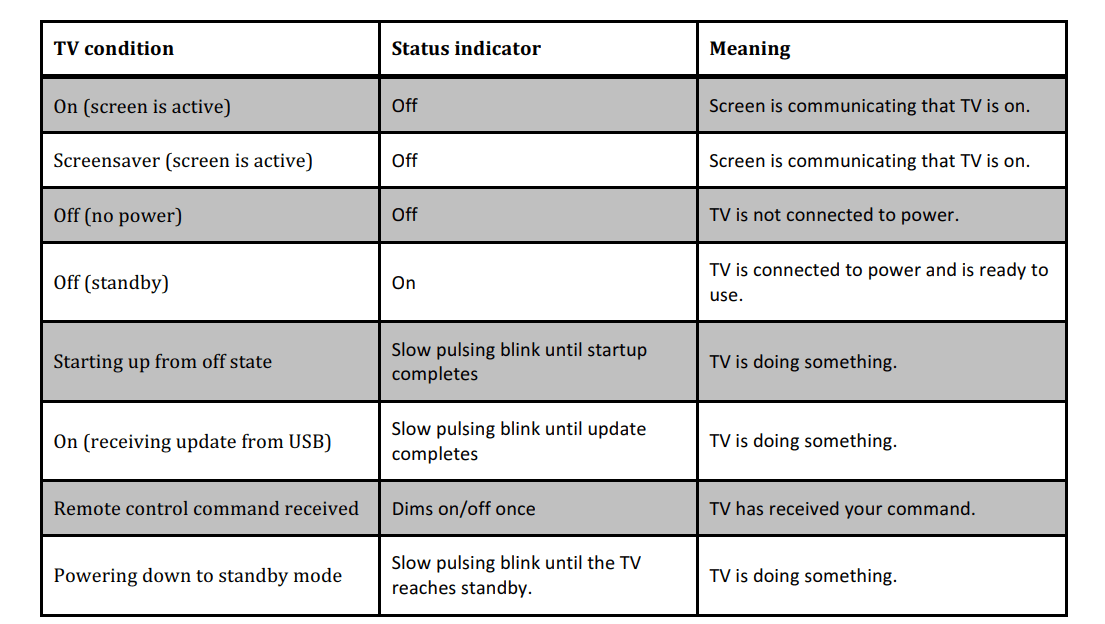
Status light
Your TV has a single status light on the front panel. It goes on and off and blinks in different ways depending on the status of the TV, as shown in the following table:
Panel buttons
The controls on the TV enable you to perform simple functions, but are not a substitute for the remote control. The joystick-type control on the back of your TV near the lower right side provides the following functions:
- Press in to toggle between power ON and Standby.
- Press up or down to increase/decrease the volume.
- Press left or right to switch inputs.

Standby mode energy savings
When you turn off your TV, it may remain in a higher power mode for a few minutes, after which it goes into a very low power standby mode. If you turn on the TV again before it has entered the very low power mode, it turns on immediately. After the TV goes into the lower power standby mode, it takes a bit longer to start up.
Roku TV Remote control
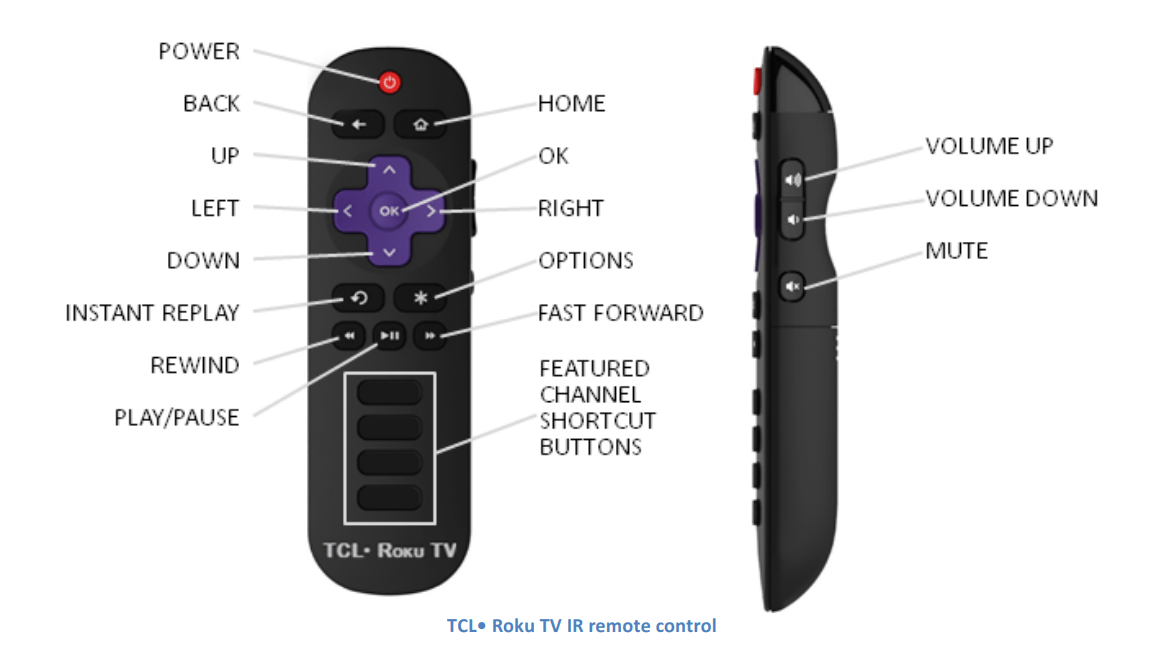
Getting around
You’ve already done a bit of navigating with the remote control when you completed the Guided Setup and when you set up Antenna TV. This section explains how to use the remote control for everyday TV use.
 POWER
POWER
- If the TV is in Standby mode, turns power on.
- If the TV is on, puts TV in Standby mode.
 BACK
BACK
- The action depends on what you are doing with the TV:
- Menu: Goes back to previous menu/screen.
- Home screen tile: Moves highlight back to the Home menu option.
- Watching Antenna TV or a TV input: Returns to the screen from which the input was selected.
- Playing streaming content: Stops playing stream and returns to the previous menu or screen.
- Browsing streaming content: Goes to the previous level in the content tree.
 HOME
HOME
- Immediately returns to the Home screen menu.
 UP
UP
- Moves the highlight up one item. Changes channel up while watching TV.
 DOWN
DOWN
- Moves the highlight down one item. Changes channel down while watching TV.
 LEFT
LEFT
- Moves the highlight left, if possible (if a < hint appears).
- When watching TV, displays your channel list.
- When playing most streaming videos, skips backward in the video.
 RIGHT
RIGHT
- Moves the highlight to the right, if possible (if a > hint appears).
- When watching TV with the channel list displayed, dismisses the channel list.
- When playing most streaming videos, skips forward in the video.
 OK
OK
- Selects the highlighted option.
- When watching TV, this button displays information for the current TV program.
 INSTANT REPLAY
- When playing streaming video that supports this feature, jumps back a few seconds with each press and resumes playing. In some channels, if Closed captioning is set to Instant Replay, captions are displayed during the duration of the jump back period only.
- When watching broadcast TV, jumps to previous channel.
- When using an on-screen keyboard, backspaces in the text you are entering.
 OPTIONS
- Displays an Options menu, but only when the Options * hint in the upper right corner of the screen is not dimmed. The menu you see varies depending on what you are doing with the TV.
- Also, in most cases, pressing * while video is playing displays an Options menu over part of the screen where you can adjust various picture and sound settings.
 REWIND
- When playing streaming video that supports this feature:
- First press rewinds at 1x speed.
- Second press rewinds at 2x speed.
- Third press rewinds at 3x speed.
- Subsequent presses cycle through 1x, 2x, and 3x rewind speed.
- When playing streaming audio, jumps to the previous track/selection.
- When any menu, tile, or channel in the channel list is highlighted, jumps up one page. When using a virtual keyboard, jumps to the character at the top of the current column.
 PLAY/ PAUSE
- When playing streaming content, alternately pauses and plays the content.
 FAST FORWARD
- When playing streaming video that supports this feature:
- First press fast forwards at 1x speed.
- Second press fast forwards at 2x speed.
- Third press fast forwards at 3x speed.
- Subsequent presses cycle through 1x, 2x, and 3x fast forward speed.
- When playing streaming audio, jumps to the next track/selection.
- When any menu, tile, or channel in the channel list is highlighted, jumps down one page.
- When using a virtual keyboard, jumps to the character at the bottom of the current column.
 VOLUME UP
- Turns volume up one setting with each press. Press and hold to turn volume up rapidly. A volume indicator shows the volume level while you are adjusting the volume and for a few seconds afterward.
- Note: If the TV is muted, pressing VOLUME UP unmutes the sound.
 VOLUME DOWN
- Turns volume down one setting with each press. Press and hold to turn volume down rapidly. A volume indicator shows the volume level while you are adjusting the volume and for a few seconds afterward.
- Note: If the TV is muted, pressing VOUME DOWN does not unmute the sound.
 MUTE
MUTE
- Mutes and unmutes the TV sound. A volume indicator shows the current volume level and a mute icon when you press MUTE and for a few seconds afterward. If Closed captioning is set to When Mute, captions are displayed while the TV is muted.
 FEATURED CHANNEL SHORTCUT
- Dedicated buttons show the logo of a featured streaming content provider. Pressing a button turns the TV on (if the TV is not already on), and if the TV is operating in connected to the Internet, performs one of the following actions:
- Displays the streaming channel’s main page if you have already added the channel to your Home screen.
- Displays the streaming channel’s sign-up page if you have not already added the channel so that you can agree to any terms and fees for the service.
Watching broadcast TV channels
To watch broadcast TV, select the Antenna TV tile in the Home screen. Your TV remembers the last channel you watched and starts with that channel playing.
Tip: You also can use the buttons on the TV panel to select Antenna TV, as explained in "Panel buttons” on page 29.
Changing channels
To change channels, you can do any of the following:
- Press the UP arrow to change to the next higher channel.
- Press the DOWN arrow to change to the next lower channel.
- Press the LEFT arrow to display the channel list, and then press the UP and DOWN arrows to move the highlight through the list one channel at a time. Or press REWIND and FAST FORWARD to move the highlight through the list one page at a time. When you’ve highlighted the channel you want to watch, press OK. (If you decide you don’t want to change channels, press the RIGHT arrow or BACK button).
- Press to jump to the previous channel. Press again to return to the channel you were watching before you pressed
Note: If is not available on your remote control, you can use on the Roku App or the Jump Back button on a universal remote. For more information, see “Other devices” on page 74.
Viewing program information
To view information about the current program, press OK. The TV displays a banner at the bottom of the screen with as much information as is available in the program data stream, as shown in the following example.
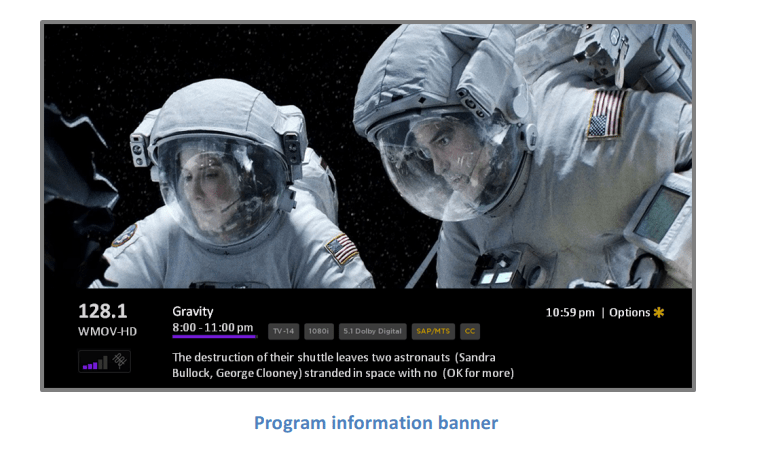
Program information, subject to availability within the broadcast information, includes:
- Channel number
- Channel call sign
- Signal strength
- Program title
- Start time, end time, and graph of program length showing current position
- Content rating
- Video resolution (480i, 480p, 720p, 1080i, 1080p, 4K [on UHD TVs only])
- Audio quality (Mono Dolby Digital, Stereo Dolby Digital, 5.1 Dolby Digital, Dolby Digital+)
- Audio features (SAP)
- Closed captioning (CC)
- Current time
- Program description. If the entire description does not fit, press OK to expand the size of the banner and see the entire description.
Adjusting settings
Press * to display the Options menu. Press the UP and DOWN arrows to highlight an option, and then press the LEFT and RIGHT arrows to change the setting. “Adjusting TCL• Roku TV settings” on page 39 explains each of the settings in detail.
Switching TV inputs
Switch to a TV input to access the device connected to that input, for example, a Blu-ray player. Switching inputs is as simple as highlighting the input’s tile in the Home screen, and pressing OK. The video signal on the input, if any, appears on the screen.
Tip: You also can use the buttons on the TV panel to select a TV input, as explained in "Panel buttons” on page 29. “Customizing your ” on page 51 explains how to rename and remove inputs.
Auto-detecting devices
Your TV automatically detects when you connect a new device to an HDMI® input and turn on its power. The input is automatically added to the Home screen if it isn’t already present.
Adjusting audio/video settings
While watching video content on any input, press * to display the Options menu. Press the UP and DOWN arrows to highlight an option, and then press the LEFT and RIGHT arrows to change the setting. “Adjusting TCL• Roku TV settings” on page 39 explains each of the settings in detail.
Playing content from USB storage devices
Your TV has a USB port that can be used to play personal music, video, and photo files from a personal USB flash drive or hard disk. If your TV is connected to the Internet, your Home screen has the Roku Media Player tile. If your TV has not been connected to the Internet, the Home screen has the USB Media Player tile.
To use this feature, first make sure your media files are compatible with the Roku/USB Media Player. As of the publication date of this guide, the following media file formats are supported* :
There are many variants of each of these media formats. Some variants may not play at all or may have issues or inconsistencies during playback.
- Video – (H.264/262/265HEVC) in MKV, MP4, and MOV files; VP9 in MKV files
- Music – AAC (5.1), MP3, WMA, WAV (PCM), AIFF, FLAC, AC3, and DTS*
- Photo – JPG, PNG (up to 16k x 16k pixels), GIF (up to 16k x 16k pixels)
To see the latest list of supported formats, view Help in the Media Player.
The Roku/USB Media Player displays supported file types* only, and hides file types it knows it cannot play.
Playing content from local network media servers
If you have connected your TV to a network, it can play personal video, music, and photo files from a media server on your local network. Media servers include personal computers running media server software such as Plex or Windows Media Player, network file storage systems that have built-in media server software, and other devices that implement the specifications of the Digital Living Network Alliance.
Some servers do not fully implement the DLNA specification but are UPNP (Universal Plug and Play) compatible. The Roku Media Player will connect to them as well. Some media servers can convert files into Roku compatible formats. DRM-protected content is not supported.
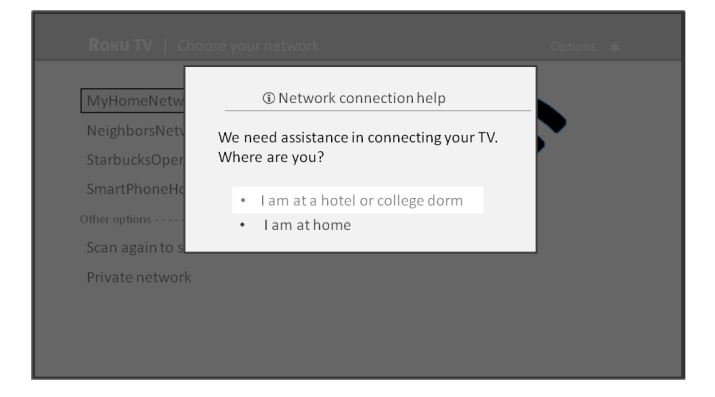
Using your TV in a hotel or dorm room
Hotels, school dorms, conference facilities, and similar locations with public wireless Internet access often require you to interact with a web page to authenticate your access. These restricted public networks are commonly known as captive portal networks. When you select a network of this type, the TV automatically detects that additional information is needed and prompts you through using another wireless device to supply the requested information.
Tips:
- Using your Roku TV on a hotel or dorm room network requires wireless availability and use of your network-connected smartphone, tablet, or computer to authenticate access to your account.
- Be sure to bring your Roku TV remote control, because the Remote feature of the Roku mobile app may not work when connected to a hotel or dorm room network.
- Content might be limited or unavailable if you try to connect outside your home country due to geo-filtering.
* DTS audio, whether in music or video files, is supported only by pass-through, meaning that the TV cannot directly output the sound of a DTS file, but can pass it through to a DTS-compatible receiver that is connected to the HDMI ARC or S/PDIF connector on the TV.
To connect your TV to the restricted network:
- Either during Guided Setup or after using the Settings > Network menu to set up a new connection, the TV automatically detects that you are connecting to a restricted network and displays the following prompt:
- Tip: Your TV can connect to a restricted network only if Device connect is enabled in Settings > System > Advanced system settings. (Device connect is enabled by default, but if you have disabled it, the TV cannot complete the connection.)
- Note: Device connect is not present if the TV is in non-connected mode.
- If you selected the correct network, highlight I am at a hotel or college dorm, and then press OK. The TV prompts you to use your smartphone, tablet, or laptop to complete the connection.
- Use a phone, tablet, or wireless-enabled computer to detect wireless networks. In most cases, you can simply open the device’s Wi-Fi Settings or Network Settings screen to start scanning.
- Note: The phone, tablet, or computer must be on the same wireless network to which you are connecting the TV.
- Connect to the network named on your TV screen. The actual network name varies.
- Note: The previous step connects your smartphone, tablet, or computer directly to the TV. No connection charges apply and the connection does not impact your device’s data plan.
- The wireless connection process prompts you for a password. Enter the password as shown on the TV screen. The actual password varies.
- Start the web browser on your smartphone, tablet, or computer. When you attempt to open any web page, the restricted connection will prompt you for whatever information it needs. In most cases, you must agree to terms and conditions, provide identifying information, or enter a password, PIN, or room number to proceed. The information requested depends on the organization that controls the wireless connection.
- After you enter the requested information, the TV automatically proceeds to complete its connection and resumes normal operation.
- If the TV prompts you to link to your Roku account, use your smartphone, tablet, or computer to complete the pairing operation and activate your Roku TV.
Adjusting TCL• Roku TV settings
You can adjust most picture and sound settings while you are watching a program by pressing * to display the Options menu. If you don’t find what you need, there are additional picture and sound settings in the Settings menu.
In most cases, the changes you make apply only to the input you are using. Antenna TV, each separate HDMI® input, and the AV input have their own settings that the TV remembers when you return to that input. The TV also remembers the settings you specify while viewing streaming content.
Settings menu
Use the Settings menu to adjust overall TV settings. Press to go to the Home screen, and then navigate to Settings > TV picture settings.
You can adjust the following overall TV picture settings from the Settings screen:
- TV brightness – If the lighting level in your TV room changes, use this setting to help provide a better viewing experience; set to darker for a darker room, and brighter for a brighter room. Choose among Normal and four other settings to make the overall picture brighter or darker. So that you don’t have to make this type of change for each TV input one at a time, this setting increases or decreases the TV’s general brightness across all TV inputs. This setting is identical to the TV brightness setting you can access in the Options menu while watching a program.
- Settings per input – This section of options lists each TV input. Select an input to switch to that input. Then press * to display the Options menu, where you can adjust the input’s settings while watching a live picture and listening to the sound from that input.
- Tip: You don’t have to go to the Settings menu first—you can display an input’s Options menu and adjust its settings whenever you are watching the input by pressing * .
Options menu
The Options menu for each TV input provides settings for controlling the appearance of the picture and the quality of the audio.
To view the Options menu, press * whenever you are watching a TV input or streaming a video. The Options menu is a panel that appears over the left side of the screen:

To adjust the settings on the Options menu, press the UP or DOWN arrow to highlight a setting, and then press the LEFT or RIGHT arrow to change the setting. You’ll notice the changes you make right away in picture appearance or audio quality.
Tip: When you highlight a setting, the header text explains the effect of its current value. When you begin to adjust a setting, the other options are hidden so you can see more of the screen. Even though the other settings are hidden, you can move the highlight up or down to adjust the other settings.
Options menu settings
- TV brightness – Affects the overall brightness of the picture. This setting applies across the entire TV; that is, to all TV inputs and is identical to the TV brightness setting under Settings > TV picture settings.
- Picture mode – Provides picture presets for various viewing preferences. This setting applies to the currently-selected input only.
- Picture size – Adjusts the aspect ratio of the picture, enabling you to view a picture in its original format, or zoom or stretch it to fill the screen. The Auto setting has been found to produce the best picture in most cases.
- Audio effect – Adjusts the sound quality output from the TV speakers. This setting applies across the entire TV; that is, to all TV inputs. It does not affect the sound quality for headphones, HDMI (ARC), or SPDIF (TOSLINK) connectors.
- Sleep timer – Sets a timer that turns off the TV after the specific amount of time. This setting remains in effect even if you stop watching the current input.
- Closed captioning – Controls when you see captions. This setting is only offered for Antenna TV, the AV input, and streaming videos. Any set value remains in effect across only these inputs.
- Antenna TV – Turn captions on or off, or set them to appear only when the TV sound is muted.
- AV input – Turn captions on or off, or set them to appear only when the TV sound is muted.
- Streaming video channel – Turn captions on or off, set them to appear only when the TV sound is muted, or only during instant replay (for streaming content that supports instant replay).
- Note: If the Instant Replay button is not available on your remote control, you can use on the Roku App or the Jump Back button on a universal remote. For more information, see “Other devices” on page 74. Additional captioning options are provided in the Captions screen in Settings.
- Captioning track – Selects which caption track to display when Closed Captioning is on. This setting remains in effect on all inputs that provide captions.
- SAP – Selects whether to play a secondary audio program or multichannel television sound, and which choice to play. This setting applies only to Antenna TV on digital channels.
- Tip: To dismiss the Options menu, just wait a few seconds without pressing any buttons. Or press * again to dismiss the menu immediately.
Advanced picture settings
The Advanced picture settings menu for each TV input provides settings for fine tuning the appearance of the picture. All of the settings in this menu apply only to the currently-selected input.
To use the Advanced picture settings menu, first press * to display the Options menu. Then select Advanced picture settings.

To adjust the settings on the Advanced picture settings menu, press the UP or DOWN arrow to highlight a setting, and then press the LEFT or RIGHT arrow to change the setting. You’ll notice the changes you make right away in picture appearance.
Tip: When you highlight a setting, the header text explains the effect of its current value. When you begin to adjust a setting, the other options are hidden so you can see more of the screen. Even though the other settings are hidden, you can move the highlight up or down to adjust the other settings. As soon as you press the UP or DOWN arrow, the other settings become visible again.
Advanced picture settings menu options
- Picture mode – Provides picture presets for various viewing preferences. This setting duplicates the one on the Options menu. When you change the Picture mode, other picture settings adjust accordingly. For example, setting the Picture mode to Vivid sets Brightness, Contrast, Sharpness, and other values to produce a very vibrant picture. Setting Picture mode to Movie changes these same settings to produce a picture suitable for enjoying movies in a darkened room. If you make changes to the individual picture settings—for example, Contrast, or Sharpness—these settings are saved for the current input and the current picture mode. In this way, the HDMI 1 input’s Movie picture mode can be customized and different than the HDMI 2 input’s Movie picture mode and Antenna TV’s Movie picture mode. Use Reset picture settings, described below, to return the input’s current picture mode to its original values.
- Dynamic Contrast – Automatically adjusts the backlight level to achieve the optimum contrast and prevent excessive differences between light and dark areas of the screen. The Backlight option is disabled when Dynamic Contrast is enabled.
- Backlight - Adjusts the overall light intensity of the screen.
- Brightness – Adjusts the dark level of the black areas of the picture. • Contrast – Adjusts the white level of the light areas of the picture.
- Sharpness – Adjusts the sharpness of the edges of objects in the picture.
- Color – Adjusts the intensity of colors in the picture. A setting of 0 removes all color and displays a black and white picture.
- Tint – Adjusts the color balance from green to red to obtain accurate colors in the picture.
- Color temperature – Adjusts the overall colors in the picture from Normal to slightly more bluish (Cool) to slightly more reddish (Warm).
- Game mode – Controls whether Game mode is on or off. When On, the TV performs less image processing and has less input lag. When Off, the TV may perform more image processing and has more input lag, which is less desirable for action games. Available only for HDMI® and AV inputs.
- Reset picture settings – Returns all picture settings for the input’s currently-selected Picture mode to their original values.
Tip: To dismiss the Advanced picture settings menu, just wait a few seconds without pressing any buttons. Or press * again to dismiss the menu immediately
Changing privacy settings
By default, when connected to the Internet and activated with your Roku account, the TV uses an advertising identifier to track your usage behavior. You can change the privacy settings on your TV in two ways: resetting the advertising identifier and limiting ad tracking.
Note: Privacy settings are not present on TVs operating in non-connected mode. Non-connected TVs do not display advertisements.
Resetting the advertising identifier
Resetting the advertising identifier has the effect of clearing your prior usage history and starting over. From that point forward, your new usage patterns affect the advertisements you see on your TV.
To reset the advertising identifier:
- From the Home screen menu, navigate to Settings > System > Privacy.
- Highlight Reset advertising identifier. Press * to view more information about this option. When you finishing reading the information, press OK to close the More Information window.
- Press OK to reset the advertising identifier, and then press OK again to dismiss the verification message.
Limiting ad tracking
You can limit Roku’s tracking of your usage behavior by limiting ad tracking. When you do, your TV will display ads that are not personalized based on your TV’s advertising identifier.
To limit ad tracking:
- From the Home screen menu, navigate to Settings > System > Privacy.
- Highlight Limit ad tracking. Press * to view more information about this option. When you finish reading the information, press OK to close the More Information window.
- Press OK to select the Limit ad tracking option.
Note: If you perform a factory reset and then reconnect your TV, ad tracking is restored until you repeat these steps.
My Feed
Use My Feed to find out when you can watch movies coming soon, and to get updates on movies, TV shows, and actors that you are following.
Movies Coming Soon
My Feed gives you updates on your list of movies that are coming soon to theaters. With My Feed, you’ll know when your favorite movie is ready to stream, the channels it is on, and how much it will cost.
Select the movies you want to follow by going to My Feed > Movies Coming Soon. You’ll then see a list of newly released movies that are not yet available for streaming. Select a movie, and then select Follow this movie on Roku. When you return to the main My Feed screen, you’ll see banners for each of your newly-followed movies along with banners for movies and TV shows you’re already following.
Movies, TV shows, and people
In addition to following movies coming soon, you can follow any movie, TV show, or actor. To do this, use the Search feature to find the movie, TV show, or name that you want to follow, and then select Follow this movie/TV show/person on Roku. For more information, see “Searching for something to watch” on page 46.
Note: The TV takes a bit of time to update your newly-followed shows. Until it finds at least one channel offering the movie, the content banner in My Feed shows Check back later for updates.
My Feed alerts you any time a movie or TV show you are following becomes available on another channel and whenever its price changes. A number in parentheses next to My Feed in the Home menu means that My Feed has updated information that you haven’t viewed yet. For example, you if three of your followed shows have updates, you’ll see My Feed (3).
Note: When a movie or TV show you are following becomes available, the streaming channel offering the movie might require that you subscribe or pay a fee to view it.
Tip: My Feed is available only if your TV is connected to the Internet.
Searching for something to watch
Searching for movies and shows across multiple streaming channels is one of the unique features of your TCL• Roku TV. Within a single search operation, you can search by:
- Movie name
- TV show name
- Actor or director name
- Streaming channel name
- Game name
Tip: Roku Search is available only if your TV is connected to the Internet.
Note: Roku Search doesn’t search across all streaming channels, but searches across lots of popular streaming channels. The actual channels it searches vary by locale, but include popular providers such as Netflix and several others, with more being added all the time.
You can check which streaming channels are included in Roku Search by going to the Search screen, clearing all previous searches to reveal the search instructions, and then watching the channel tiles cycle at the bottom of the screen.
To search, select Search on the Home screen menu. The Search screen has a keyboard grid and initially displays instructions—a set of icons representing search categories and a list of participating provider tiles.
Tip: If you don’t see the instructions, navigate to the end of the list of recent searches and select Clear recent search selections.
How do I search?
To search, use the arrow buttons to navigate the on-screen keyboard, entering a few characters of the search term. With each additional character you enter, you narrow down the search and the search results become more relevant.
Tip: Use the free Roku mobile app on your compatible smartphone or tablet to make searching even faster. Not only can you use your device’s keypad to type, you can search simply by touching the voice search icon and saying the name of the movie, TV show, actor or director, channel, or game.
An icon next to each search result shows the category of the result (movie, TV show, actor).
- Press the RIGHT arrow to move the highlight into the list of search results.
- Press the UP and DOWN arrows to scroll through the list of search results to highlight the item you want to view.
I found a show, now what?
Now that you’ve highlighted the show, movie, actor, game, or streaming channel you were looking for, press the RIGHT arrow.
If your search result was an actor, director, or other item that does not represent a single item of content, you’ll see another list to narrow down your search. Continue highlighting results and pressing the RIGHT arrow until you find a single, viewable content item.
- An HD logo means that the content is available in high-definition.
- The checked circle adjacent to the title means you have already added the streaming channel.
If your search result was a game or a streaming channel, you’ll see detailed information, images, and available actions, such as a list of streaming channels and the cost of getting the item or channel.
Note: Some channels may require a subscription.
Following on Roku
Rather than watch the show you found in Search, you can add it to My Feed and wait until it’s available on a particular streaming channel or available at a better price. From the search results screen, select Follow on Roku. Then go to My Feed periodically to check for updates to each of your followed movies, TV shows, or people. For more information, see “My Feed” on page 45.
Recent Searches
The next time you use Roku Search, the Search screen displays a list of recent search selections in place of the search instructions.
Using the recent search selections list makes it easy to quickly get to a previously found item, for example, to find another movie with the same actor, or another TV show in the same series.
Using the Roku Channel Store
The Streaming Channels menu option takes you to the Roku Channel store, where you can add new streaming channels to your TV.
Tips:
- The Streaming Channels menu option is available only if your TV is connected to the Internet.
- You also can search for streaming channels by using the Search option, as explained in “Searching for ” on page 46.
To make it easier to find what you want, the streaming channels in the Roku Channel Store are categorized by topic. Press the UP and DOWN arrows to highlight the category you want, and then press the RIGHT arrow to move the highlight into the grid of streaming channel tiles.
When you find a streaming channel you want to add or learn more about, highlight it and press OK to display more details.
- If the streaming channel you are adding is free, you can select Go to channel to start watching it immediately.
- If there is a one-time or recurring fee associated with using the streaming channel, you must agree to the terms and conditions, accept the fee, and—if you created one when you activated your Roku TV, enter your Roku PIN code to authorize the charges.
- If you already have a subscription to the streaming channel—for example, you already subscribe to Netflix or you receive HBO through your cable TV provider—you must complete a different, simple authorization step to add the streaming channel.
You only have to complete the authorization or activation step one time, when you initially add the streaming channel. After that, you simply select the streaming channel tile from your Home screen to start watching. (Channel and content availability is subject to change. Charges may apply to your selection.)
Tip: New streaming channels are added continuously, so be sure to check back every now and then.
Note: If you don’t remember your PIN, or if want to change whether you need to use a PIN to make purchases on your Roku account, see “Changing your Roku Channel Store PIN preference” on page 71.
Customizing your TV
There are several things you can do to personalize your TV.
Rearrange tiles
Whenever you add a TV input tile, it’s added at the top of your Home screen. Whenever you add a new streaming channel from the Roku Channel Store, it’s added at the bottom of your Home screen.
You can easily rearrange the order of the tiles on the Home screen to suit your viewing preferences. For example, you might want Antenna TV to be the first tile in your Home screen. But if you mostly watch one streaming channel, you might want its tile to be the first one on your Home screen.
Rearranging tiles is easy:
- From the Home screen, highlight one of the tiles you want to move.
- Press * to display a list of options for the type of tile you selected.
- Select Move input or Move channel. The list of options disappears and the highlighted tile shows arrows indicating how it can be moved
- Use the arrow buttons to move the highlighted tile to its new position. As you move the tile, it pushes other tiles out of its way.
- Press OK to lock the tile into its new position.
- Repeat these steps to move other tiles until you have arranged your Home screen to your liking.
Edit broadcast TV channel lineup
When you set up the TV tuner as described in “Setting up Antenna TV” on page 24, the TV adds all the channels with good signals that it could detect in your area. It’s likely that you now have more channels than you want in your channel list.
To edit the channel lineup, from the Home screen, navigate to Settings > TV inputs > Antenna TV > Edit channel lineup. You’ll see a screen listing all of your channels. Adjacent to the list of channels is a miniature TV screen playing the highlighted channel’s picture and sound.
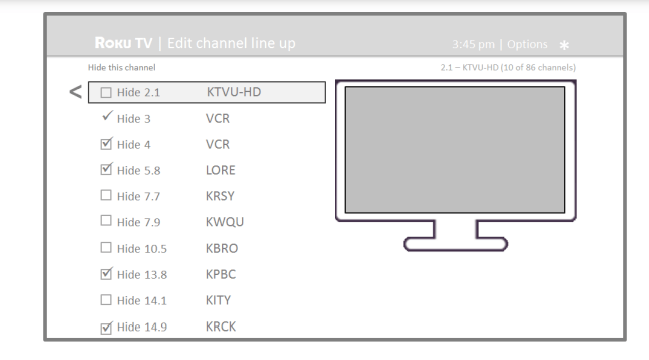
Highlight each channel you want to hide, and then press OK to hide the channel.
Tip: If you need to see or hear the highlighted channel, wait a couple of seconds for the TV to start playing the channel’s picture and sound. Also note that if you’ve enabled parental controls and the program on the current channel is blocked, you won’t see a picture or hear sound while editing the channel lineup.
Rename inputs
Rather than trying to remember that your Blu-ray player is connected to HDMI 1 and your game console is connected to HDMI 3, you can rename the TV inputs to match the connected component.
Note: Renaming an input also changes the icon associated with it.
To rename an input, you can either:
- Highlight the input tile in the Home screen, and then press * to display a list of options. From the list of options, select Rename input. Then select a new name and icon.
or
- From the Home screen, navigate to Settings > TV inputs. On the TV inputs screen, select the input you want to rename, select Rename, and then choose a new name and icon from the provided list.
Press to return to the Home screen. The new name and icon are now in effect.
Remove unwanted tiles
It’s easy to remove unused TV inputs and unwanted channel or app tiles. For example, if you never use the HDMI 3 input, or if you don’t like the weather app you added from the Roku Channel Store, you can remove them from your Home screen.
Note: You also can remove the Antenna TV tile if you never use the TV tuner. But be aware that removing the Antenna TV tile also deletes the broadcast TV channel list. You’ll have to set up the TV tuner again next time you want to view broadcast TV. Instructions for setting up the TV tuner can be found in “Setting up Antenna TV” on page 24.
- To remove any tile, highlight the input tile in the Home screen, and then press * to display a list of options. From the list of options, select Remove input. In the screen that follows, confirm you want to remove the input.
- Alternatively, to remove a TV input tile from the Home screen, navigate to Settings > TV inputs. On the TV inputs screen, select the input you want to remove, and then select Remove > Confirm. Then press to return to the Home screen.
Change themes
Another way to customize your TV is to change its theme. The theme establishes the look and feel of the TV through colors, designs, and fonts.
Tip: Themes are available only when your TV is connected to the Internet. Some themes require payment.
To change the theme, in the Home screen menu navigate to Settings > Themes. In the Themes screen, choose from the following options:
- My themes – Highlight a theme, and then press OK to switch to that theme.
- Custom settings – Turn Featured themes on or off. When Featured themes is on, the TV automatically switches to featured themes—like certain holiday-inspired themes —for a limited time whenever Roku makes them available, and then switches back to your selected theme when the featured theme expires. When off, the TV always uses your selected theme.
Change sound effects volume
Sound effects are the noises the TV makes to let you know it received your command. You can change the volume of sound effects or turn them off.
To adjust the sound effects volume, in the Home screen menu, navigate to Settings > Audio > Menu volume. Navigate to the right and then change the setting to High, Medium, Low, or Off.
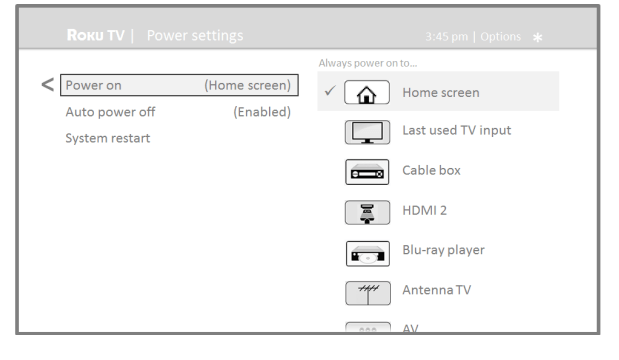
Configure power settings
Power settings let you set up your TV so that it turns on to the location you choose. Power settings also help your TV save energy by automatically turning it off under certain conditions.
Power on settings
Power on settings tell the TV what to do when you turn on the power. To configure the power on settings, from the Home screen menu, navigate to Settings > System > Power > Power on. Highlight the power on location from the list, and then press OK to select it.
Auto power off settings
To help you save energy, your TV can automatically turn itself off after a period of inactivity or a period during which no signal has been detected. It is factory-configured to do both of these things, but you can change these settings if needed.
To configure automatic power off, from the Home screen menu navigate to Settings > System > Power > Auto power savings. In the Power settings screen, highlight the following options and press OK to turn them on or off:
- Reduce power after 15 minutes – If no video or audio activity and no user interaction occur for 15 minutes, the TV automatically turns off the screen and sound.
- Turn off after 4 hours – If no video or audio activity and no user interaction occur for 4 hours, the TV goes into standby mode.
Configure parental controls
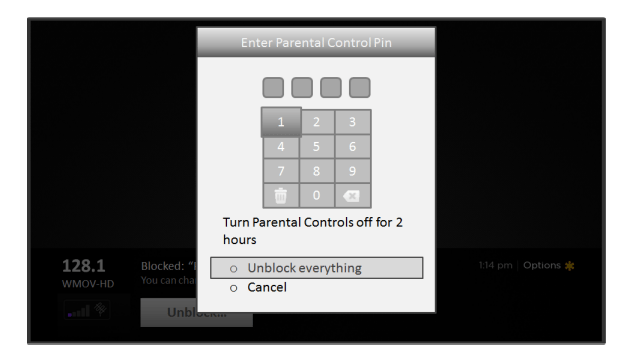
Parental controls enable you to control whether the members of your household can view certain kinds of broadcast TV programs. When a program or feature is blocked, you can unblock it by entering a parental control PIN that only you know.
Note: The parental control feature can be used to hide News options that are available on the Home screen menu of TVs manufactured for the United States. However, the parental controls feature does not block other streaming content nor content from inputs other than the TV tuner.
Creating a parental control PIN
The first time you access the Parental controls screen, you must create a new parental control PIN. Thereafter, whenever you want to change parental control settings, unblock programming that has been blocked, change the PIN, or disable parental controls, you must enter your parental control PIN.
Tip: Your parental control PIN has nothing to do with your Roku PIN. You can make them the same if you want—this is entirely your choice.
To create a new parental control PIN, from the Home screen menu navigate to Settings > Parental controls. The screen displays a numeric keypad. Use the arrow buttons and the OK button to enter a four digit code. Then repeat the process to enter the same PIN again, just to make sure you correctly entered the PIN you want to use.
Important: If you forget your parental control PIN, the only way to recover is to perform a factory reset operation, as explained in “Factory reset everything” on page 70. Be sure to write it down in a safe place just in case
Blocking News (US TV models only)
One of the parental control options is to completely hide the entertainment options that are available directly on the Home screen menu of TVs manufactured for sale in the United States. (The News option is not available on TVs manufactured for sale in Canada).
To hide Home screen entertainment options:
- From the Home screen menu, navigate to Settings > Parental controls, and then enter your parental control PIN.
- In the Parental controls screen, highlight Home screen and then select or clear either of these options:
- Hide “News” – Removes the News option from the Home screen menu.
- Tip: To use either of these options after you’ve hidden them, you must return to this screen and remove the check mark from the corresponding Hide command.
Blocking Broadcast TV shows
For broadcast TV, parental controls use information embedded in the broadcast signal to determine whether to allow a program to be displayed. Parents can configure parental controls to block broadcast TV programs that meet or exceed a specific rating, so they cannot be viewed or heard unless the correct parental control PIN is entered.
Note: Rating standards differ by country.
Enabling parental control of TV shows
The first step in blocking TV shows is to enable parental control of TV shows.
This setting is provided separately to make it easier for you to turn parental control of TV shows on and off without disturbing their settings. For example, your kids are going to summer camp for two weeks, and while they are gone, you don’t want to have to deal with unblocking shows that you want to watch by entering your parental control PIN. All you need to do is clear Enable parental controls, and all TV shows are unblocked. When the kids return, select Enable parental controls again, and all of your parental control settings are restored in a single operation.
To enable parental control of TV shows:
- In the Home screen menu, navigate to Settings > Parental controls, and then enter your parental control PIN.
- In the Parental controls screen, navigate to TV tuner > Parental control of TV shows.
- Make sure the check box next to Enable parental controls is checked. If not, highlight it and press OK.
Blocking based on US TV ratings
Most broadcast US TV shows—other than movies—contain rating data that enables parental controls to block shows that parents don’t want others to view. The ratings are divided into two groups that function independently:
- Youth group – TV-Y, TV-Y7
- Main group – TV-G, TV-PG, TV-14, TV-MA
Within each of these groups, the ratings interact such that if you block a particular level of content, the TV also blocks all content with a higher rating. Conversely, if you unblock a particular level of content, the TV also unblocks all content with a lower rating. For example, if you block TV-PG programs, the TV also blocks TV-14 and TV-MA programs. If you subsequently unblock TV-14 programs, TV-PG programs are also unblocked, but TV-MA programs remain blocked.
Similarly, within the main group, content types can be individually blocked. For example, you can block just coarse language in shows with a TV-PG rating. If you do, then the TV also blocks shows with coarse language in the higher ratings (TV-14 and TV-MA). Subsequently unblocking coarse language in TV-14 ratings does not unblock coarse language in TV-MA programs, but it does unblock coarse language in TVPG programs.
To block TV shows based on US television ratings:
- From the Home screen menu, navigate to Settings > Parental controls, and then enter your parental control PIN.
- In the Parental controls screen, navigate to TV tuner > TV ratings. Choose among the following settings:
- Entire ratings – Highlight the rating you want to block, and then navigate to the right and select the first option that blocks the entire rating level (and all higher rating levels).
- Individual content types – Highlight the rating that contains the content type you want to block, and then select the content types you want to block from among those listed. Remember that blocking a content type in one rating blocks the equivalent content type in all higher rating levels.
Blocking based on US movie ratings
Most movies in the US are rated by the Motion Picture Association of America, or MPAA, so the ratings are known as MPAA ratings. TV broadcast signals carry movie rating data that enables parental controls to block shows that parents don’t want others to see. The ratings are:
- G – General audiences
- PG – Parental guidance suggested
- PG-13 – Parents strongly cautioned for children age 13 or younger
- R – Restricted
- NC-17 – Not for age 17 or younger
Unlike US TV ratings, there are no individual content types within the ratings. But like TV ratings, blocking movies with a particular rating also blocks movies with a higher rating, and unblocking movies with a particular rating also unblocks movies with a lower rating.
Tip: Blocking movies with an NC-17 rating also blocks programs with the now-obsolete X rating, which can still occur in the program data of older movies.
To block movies based on MPAA ratings:
- From the Home screen menu, navigate to Settings > Parental controls, and then enter your parental control PIN.
- In the Parental controls screen, navigate to TV Tuner > Movie ratings.
- Select the rating level you want to block. You need only select one rating level, and all higher levels are automatically blocked.
Blocking based on Other ratings
Your TV can block programs having ratings that had not been defined when the TV was manufactured. It does this by detecting a new Rating Region Table in a program and then downloading the new table and displaying its rating in the Parental controls.
When the TV downloads a new Rating Region Table, it adds a new option to the list of rating types: Other ratings. If you see this option in the Parental controls screen, you have tuned to a station that has implemented a new rating table. Once the new rating table has been downloaded to the TV, it remains in the TV until it is factory reset, and you can configure blocking based on the new ratings.
New Region Rating Tables can have independent rating levels, or rating levels that interact in the same ways as the built-in US TV and MPAA Movie ratings.
Tip: If your TV downloads a new Region Rating Table, you’ll have to experiment with its settings to understand how to use it.
Blocking based on Canadian English ratings
Canadian-English language and third-language programs that are broadcast in Canada are rated by the Action Group on Violence on Television, or AGVOT. TV broadcast signals carry rating data that enables parental controls to block shows that parents don’t want others to view based on content containing violence, language, sex, or nudity. The ratings are:
- C – Children under 8 years
- C8 – Children 8 years and older
- G – Generally suitable for all age groups
- PG – Parental guidance suggested for viewers under 14 years
- 14+ – Generally not suitable for viewers under 14 years
- 18+ – Generally not suitable for viewers under 18 years
Blocking content with a particular rating also blocks content with a higher rating, and unblocking content with a particular rating also unblocks movies with a lower rating.
To block programs based on AGVOT ratings:
- From the Home screen menu, navigate to Settings > Parental controls, and then enter your parental control PIN.
- In the Parental controls screen, navigate to TV tuner > Canadian English ratings.
- Select the rating level you want to block. You need only select one rating level, and all higher levels are automatically blocked.
Blocking unrated programs
Some broadcast TV shows and movies are assigned a rating of “Unrated”. Whether or not such programs contain content that is objectionable to you cannot be determined. However, you can choose to block such programs.
To block all unrated broadcasts:
- From the Home screen menu, navigate to Settings > Parental controls, and then enter your parental control PIN.
- In the Parental controls screen, navigate to TV tuner > Block all unrated programs.
- Highlight Unrated programs and press OK. When blocking is enabled, the adjacent padlock icon changes from unlocked to locked.
Tip: Blocking programs that have been assigned a rating of “Unrated” does not block programs that have no rating assigned to them (for example a broadcast of a local town council meeting). Programs that do not have an assigned rating display Rating NA (for “not applicable, meaning a rating is not needed). Programs that have no assigned rating are considered “safe”; therefore, there is no need to block them.
What happens when a TV show is blocked?
After you’ve set up parental controls, TV shows and movies can be blocked:
- When you change channels and the new channel is playing a program whose rating exceeds your settings.
- When a new show comes on the channel you are watching and its rating exceeds your settings.
When a program is blocked by parental control settings, the TV displays a blocked message:
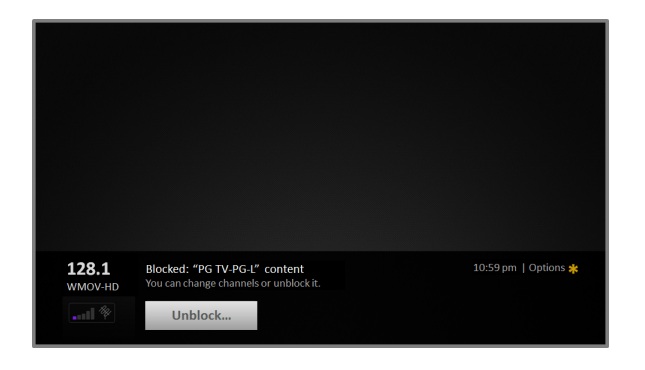
Whenever this blocked message appears, both the video and audio of the show are blocked, as well as program data that would normally appear in the area at the bottom of the screen.
To watch the blocked program, you need to know the PIN code defined when you enabled parental controls, as explained in “Creating a parental control PIN” on page 55.
- Press OK to select Unblock and display a PIN pad.
- Use the arrow buttons to enter your parental control PIN code, and then press OK to select Unblock everything.
After unblocking shows that have been blocked, all blocking is disabled for two hours or until you turn off the TV.
Changing the parental control PIN
To change your parental control PIN:
- From the Home screen menu, navigate to Settings > Parental controls, and then enter your parental control PIN.
- In the Parental controls screen, highlight Change PIN.
- Move the highlight into the adjacent keypad, and then use the arrow buttons and the OK button to enter a four digit code. Then repeat the process to enter the same PIN again, just to make sure you correctly entered the PIN you want to use.
Resetting parental controls
So now your kids have grown up and gone away to college, and you no longer want to deal with blocked programs.
To erase all parental control settings:
- From the Home screen menu, navigate to Settings > Parental controls, and then enter your parental control PIN.
- In the Parental controls screen, highlight Reset parental controls.
- Follow the instructions on the screen to confirm that you want to erase all parental control settings.
Tip: Resetting parental controls also erases your parental control PIN.
More settings
This section describes the features and settings of the TV that were not covered in the other parts of this guide.
Changing network settings
If needed, you can change your network settings at any time. For example, if you change the name of your wireless network (its SSID) or its password, you will need to change your TV’s settings so that it can continue to connect. Also, if you decided not to connect to the Internet in “Guided Setup” on page 11, you can use Network settings to connect at a later time.
To change network settings, from the Home screen menu, navigate to Settings > Network, and then press the RIGHT arrow. At this point, you can choose the following options:
- Update connection – Select your existing network connection type (Wireless or Wired), and then press OK to start the update process. The TV uses your current network information to reconfirm the wireless or wired network connection, the local network connection, and the Internet connection.
- Set up new connection – Select a different network connection types (Wireless or Wired), and then select the option to set up a new connection. Follow the on-screen instructions to complete the network connection. For help with setting up a new connection, see “Setting up your TV” on page 12.
Note: Some networks, such as those found in dorm rooms, hotels, and other public places, may require you to read and agree to terms, enter a code, or provide identifying information before letting you connect to the Internet. If the TV detects that you are connecting to such a network, it prompts you through the connection process using your smartphone or tablet to provide the needed information. For more information, see "Using your TV in a hotel or dorm room” on page 36.
Changing caption settings
You can change many different settings that affect the appearance of captions.
To change caption settings, from the Home screen menu, navigate to Settings > Captions, and then press the RIGHT arrow. At this point, you can choose the following options:
Captions mode – Choose Off, On, Instant replay, or When mute.
- If you choose On, the TV displays captions whenever they are available in the program information. This setting applies to Antenna TV, the AV input, and streaming channels.
- If you choose Instant Replay, the TV displays captions only during a replay operation; that is, after pressing to jump back a few seconds in streaming video. This setting applies only to streaming channels when the program being streamed supports instant replay.
- If you choose When mute, the TV displays captions only when the sound is muted. This setting applies to Antenna TV, the AV input, and streaming channels.
Note: If is not available on your remote control, you can use on the Roku App or the Jump Back button on a universal remote. For more information, see “Other devices” on page 74.
This setting reflects the Closed captioning settings in the Options menu for certain TV inputs, as explained in “Options menu settings” on page 40. Note that, once enabled, the captions mode remains set for all applicable inputs until you turn it off.
Tip: Some streaming channels require you to enable captions through a setting within their channel even though you have turned on captions everywhere else.
- Text style – Choose from a list of fonts. As you move the highlight to each font, you can see a sample of the result in an adjacent panel.
- Text edge effect – Choose from a list of edge effect styles, such as raised, depressed, and various shadows. As you move the highlight to each effect, you can see a sample of the result in an adjacent panel.
- Text size – Choose from a list of sizes. As you move the highlight to each size, you can see a sample of the result in an adjacent panel.
- Text color - Choose from a list of colors for the text. As you move the highlight to each color, you can see a sample of the result in an adjacent panel.
- Text opacity - Choose from a list of opacity settings for the text. This setting determines how much the area behind the text shows through the text. A value of 100% blocks all of the content behind the text. As you move the highlight to each setting, you can see a sample of the result in an adjacent panel.
- Background color - Choose from a list of colors for the background area behind the text. As you move the highlight to each color, you can see a sample of the result in an adjacent panel. Note that you won’t see any change unless you set the Background opacity to a value other than Off.
- Background opacity - Choose from a list of opacity settings for the background of the caption. This setting determines how much the area behind the caption background shows through the background. A value of 100% blocks all of the content behind the background. As you move the highlight to each setting, you can see a sample of the result in an adjacent panel.
- Window color - Choose from a list of colors for the window rectangle surrounding the entire caption. As you move the highlight to each color, you can see a sample of the result in an adjacent panel. Note that you won’t see any change unless you set the Window opacity to a value other than Default or Off.
- Window opacity - Choose from a list of opacity settings for the window rectangle surrounding the entire caption. This setting determines how much the area behind the caption window shows through the window. A value of 100% blocks all of the content behind the window. As you move the highlight to each setting, you can see a sample of the result in an adjacent panel.
Changing time settings
You can change time settings to suit your preferences. You can find the following settings by navigating from the Home screen menu to Settings > System > Time:
- Sleep timer – Set a time delay after which the TV will automatically shut off. This setting reflects the setting you can make in the Options menu from any TV input, as explained in “Options menu settings” on page 40. Note that the sleep timer setting is not input specific.
- Time zone – Select whether to set the time zone automatically or manually, and if set manually, select your current time zone. Typically, a TV connected to the Internet can discover its own time zone automatically, and a TV that is not connected to the Internet must be set manually. Initially, this setting is made when you set up the TV tuner, as explained in “Setting up Antenna TV” on page 24. Correct time zone information is needed to correctly display program data.
- Clock format – Select whether to display time in a 12-hour or 24-hour format, or to turn off time display. This setting is available only on TVs that are connected to the Internet. Non-connected TVs do not display the time.
Scanning for broadcast TV channels again
There will be times when you need to create a new channel list. For example, you:
- Change cable providers
- Reorient your TV antenna
- Move to a different city with different channels
Whenever you need to update your TV channel list, you can repeat the channel scan.
Tip: Repeat the channel scan from time to time to make sure you are receiving all of the latest channels. Broadcasters add and remove channels, move channels to different parts of the spectrum, and change the power levels of their channels periodically.
To repeat the channel scan, from the Home screen menu, navigate to Settings > TV inputs > Antenna TV > Scan again for channels. Then select Start finding channels to begin the channel scan process. The screens and options that appear during this process are identical to those described in “How do I set up the TV tuner?” on page 24.
Setting the HDMI mode
You can independently configure each HDMI input to match the capabilities of the connected device. From the Home screen menu, navigate to Settings > TV inputs, and then select an enabled HDMI input. Next, select HDMI mode and then select one of the following settings:
- Auto – Let the TV determine the best setting. Use this option unless your HDMI device does not correctly communicate its HDMI version compatibility.
- HDMI 1.4 – Configure the input for compatibility with HDMI version 1.4, which supports a maximum refresh rate of 30 Hz at full UHD resolution. Most HDMI devices will work correctly with the TV in this mode.
- HDMI 2.0 – Configure the input for compatibility with HDMI version 2.0, which supports a maximum refresh rate of 60 Hz at full UHD resolution. Many older HDMI devices will not work correctly if the TV’s HDMI input is configured for this mode.
Using the TV in a home theater
Your TV has several features that make it an ideal TV for a home theater. But you might not notice them because they remain in the background until you decide to use them.
Turning off the speakers
When you use your TV with a sound bar or an external amplifier and speakers, you’ll probably want to turn off the internal TV speakers.
To turn off the TV’s built-in speakers, in the Home screen menu, navigate to Settings > Audio > TV speakers and change the setting.
Tip: The TV’s internal speakers can be enabled and disabled automatically as needed by system audio control, as described in “Enabling system audio control” on page 68. The internal speakers are also turned off when you use the headphone jack.
Changing the audio mode
The TV has two audio modes, accessed by navigating in the Home screen menu to Settings >Audio > Audio mode:
- Stereo – Use this setting for internal speakers, headphones, and external stereo amplifiers connected through HDMI® ARC, SPDIF optical, or headphone jack.
- Auto – Use this setting to automatically detect the best audio setting based on the audio stream in the content you are watching. If you have connected the TV to an external Dolby Digital or Dolby Digital Plus compatible amplifier, receiver, or sound bar through HDMI® ARC or SPDIF optical, the TV automatically selects the appropriate surround sound capabilities of the device based on the characteristics of the current program.
Setting up a digital audio connection
You can connect the TV to an external amplifier, receiver, or sound bar by using either of these two connections:
- HDMI ARC – The HDMI® Audio Return Channel enables the TV to output digital audio on one of its HDMI® connectors. The connected amplifier can also function simultaneously as an input source to the TV, if needed. To use the ARC capability, you must connect an HDMI® cable from your amplifier’s HDMI® ARC connector to the HDMI ARC connector on the TV. You also must:
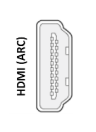
- Be sure your HDMI® cable is certified by HDMI® .
- Enable HDMI ARC under Settings > System > Control other devices (CEC), as explained in “Enabling HDMI® ARC” on page 68.
- SPDIF optical – The TV has an SPDIF optical connector that outputs a digital audio signal. To use the optical output, connect a TOSLINK optical cable from the amplifier to the Optical or SPDIF connector on the TV.

- Note: Dolby Digital Plus format is not available through the SPDIF optical output. This format is only available through the HDMI® ARC connection.
After making the required HDMI® ARC or SPDIF optical connection, go to Settings > Audio > S/PDIF and ARC option and select the audio format to use.
Note: In most cases, Auto detect is the best option. Other settings can result in no sound when the content you are viewing does not contain the audio stream type you selected.
Controlling other devices through CEC
Consumer Electronics Control (CEC) enables your TV and other CEC-compatible home entertainment components to control one another in various ways. First, the CEC-compatible devices must “discover” one another and report their capabilities. After this, one device can control another according to the features you enable. For example, playing a disc on a Blu-ray player could switch the TV to the Blu-ray player’s input. Or, powering off the TV could also power off the Blu-ray player and the home theater receiver.
Discovering connected CEC devices
To discover CEC devices:
- Make sure that your CEC-compatible components are connected to the TV with a suitable highspeed HDMI® cable that supports HDMI® ARC and CEC control.
- Turn on each component and make sure all components are CEC enabled. Tip: Some manufacturers have their own branded names for CEC functionality, so you might need to read the product documentation to correctly identify the CEC features of the device.
- On the TV’s Home screen menu, navigate to Settings > System > Control other devices (CEC) and then select Search for CEC devices. Press OK to repeat the discovery process, if necessary.
When finished, the TV displays a list of CEC devices that are connected to each HDMI® input, as well as any devices that had previously been connected. The TV remembers the names of multiple CEC devices even when they are no longer connected. If the list is longer than the allowed space, press Þ to see a complete list in a scrollable window.
Enabling HDMI® ARC
HDMI® ARC is the audio return channel that is available on one of the TV’s HDMI® ports. The audio return channel enables you to send a Dolby Digital audio signal back to a home theater receiver that is also sending an audio and video signal into the TV. Using HDMI® ARC reduces the number of cables needed and optionally lets you control the volume and mute state of the receiver by enabling system audio control.
HDMI® ARC is disabled by default. To enable HDMI® ARC, in the Home screen menu, navigate to Settings > System > Control other devices (CEC), and then highlight HDMI ARC. Press OK to enable or disable the feature.
Note: Enabling HDMI ARC also enables System audio control. After enabling HDMI ARC, you can disable System audio control if you prefer.
Enabling system audio control
System audio control enables the TV remote control to change the volume and mute state of an amplifier or sound bar connected through HDMI® , and to display the external device’s volume and mute status in the TV’s on-screen display.
The TV automatically turns off its internal speakers and sends volume and mute control signals to an external amplifier when all of the following are true:
- System audio control is enabled on the TV.
- The TV is connected to a CEC-compatible amplifier, it is powered on, and CEC discoverability is enabled.
- The CEC-compatible amplifier’s HDMI® ARC connector is connected to the TV’s HDMI ARC connector with a suitable HDMI® cable.
When the CEC-compatible amplifier is off, the TV automatically turns on its speakers (unless you have turned them off as described in “Turning off the speakers” on page 66) and resumes local control of volume and mute state.
To enable or disable system audio control, in the Home screen menu, navigate to Settings > System > Control other devices (CEC) and highlight System audio control. Press OK to enable or disable the feature.
Enabling 1-touch play
1-touch play enables a component to control which TV input is active. For example, pressing Play on your Blu-ray player switches the TV to the Blu-ray input.
1-touch play is disabled by default. To enable 1-touch play, in the Home screen menu, navigate to Settings > System > Control other devices (CEC) and highlight 1-touch play. Press OK to enable or disable the feature.
Enabling system standby
The system standby feature causes other components to power off when you power off your TV. Depending on the CEC System Standby implementation, it also might enable connected components to power off your TV when you power off the component.
System standby is disabled by default. To enable system standby, in the Home screen menu, navigate to Settings > System > Control other devices (CEC) and highlight System standby. Press OK to enable or disable the feature.
Restarting the TV
You can restart the TV when necessary. Restarting has the same effect as unplugging the TV power and then plugging it in again.
To restart the TV, navigate to Settings > System > Power, and then select System restart. Highlight Restart, and then press OK to confirm restart.
While the TV restarts, the screen goes dark for a few seconds, and then displays the startup screen for a few more seconds. When the restart operation completes, the TV displays the activity you selected in “Power on settings” on page 54.
Resetting the TV
You can choose to reset only the TV picture and audio settings to their original values, or perform a full factory reset to return the TV to the state it was in when you first unpacked and turned it on.
Reset audio/video settings
To reset only the TV picture and audio settings to their original values, navigate to Settings > System > Advanced system settings > Factory reset, and then highlight Reset TV audio/video settings. Read the information on the screen to make sure you understand what the reset operation does.
To proceed with the reset operation, press PLAY/PAUSE three times in a row.
Changing your Roku Channel Store PIN preference
When you created your Roku account, you were given the opportunity to create a PIN code and to specify when it must be used. If you created a Channel Store PIN and want to change it, or you don’t remember your PIN, or if you didn’t create a Channel Store +PIN and want to add one, you can easily make these changes.
- On a computer, tablet, or smartphone, use your web browser to go to https://my.roku.com.
- Enter your email address and password to sign in. After signing in, the My Account page appears.
- Under PIN Preference, click Update to open the Choose Your PIN Preferences page.
- Skip this step if you just want to change your PIN. Otherwise, choose the option your prefer from among those listed:
- Require a PIN to make purchases or to add any item from the Channel Store.
- Require a PIN to make purchases.
- Do not require a PIN to make purchases.
- If you choose either of the first two options, enter your PIN twice in the appropriate boxes.
- Click Save Changes to save your changes and return to the My Account page. Note that your current setting is described under PIN Preference.
Battery Caution and Disposal Information
- For best results, use alkaline batteries.
- Install only new batteries of the same type in your product.
- Failure to insert batteries in the correct polarity, as indicated in the battery compartment, may shorten the life of the batteries or cause batteries to leak.
- Do not mix old and new batteries.
- Do not use Rechargeable (Nickel Cadmium) or (Nickel Metal Hydride) batteries.
- Do not mix Alkaline, Standard (Carbon-Zinc) or Rechargeable (Nickel Cadmium) or (Nickel Metal Hydride) batteries.
- Do not dispose of batteries in fire.
- Recycle or dispose of batteries as per state and local guidelines.
Electronics Recycling Information For Consumers
TCL strives to provide a high level of service to our customers and in the communities we serve, and recommends that consumers always look for a recycling or reuse alternative to throwing away televisions and other electronics. We encourage customers to recycle end-of-life electronic devices using one of the many convenient methods available today. In many states TCL has programs in place to enable consumers to drop-off and recycle televisions free of charge. For information on electronics recycling in all 50 states, including drop-off locations, please visit the “Electronics Recycling” area of the TCL USA website at www.tclusa.com.
Care and Cleaning
- Caution: Turn off your TV before cleaning.
- Clean the TV as needed using a soft lint-free cloth. Be sure to occasionally dust the ventilation slots in the cabinet to help assure adequate ventilation.
- IMPORTANT: Never use strong cleaning agents, such as ammonia-based cleaners, or abrasive powder. These types of cleaners will damage the TV. The TV’s screen may be cleaned with a soft, lint-free cloth as well. Take care not to scratch or mar the screen. If necessary, you may use a cloth dampened with warm water. While cleaning, do not spray liquid directly on the screen, or allow liquid to run down the screen and inside the TV. Also, never place drinks or vases with water on top of the TV. This could increase the risk of fire, shock hazard or damage to the TV.
Television Specifications