Refer to your TV’s Quick Start Guide or other provided documentation to for modelspecific information about attaching the base or a wall mount and making connections to AC power and to your other audio/video devices. The following information applies to all TCL Roku TV models.
Connecting an antenna, cable, or satellite box
If you are using an antenna, CATV cable without a set-top box, or a cable or satellite box that has only an antenna output, connect a 75-ohm coaxial cable (not provided) from the device to the ANT/CABLE input on the TV.
Tip: If you are using an antenna with a 300 ohm twin-lead cable, you need to use a 300-to-75 ohm adapter (not provided) to adapt the twin-lead cable to a connection that is compatible with the TV’s antenna input
Tip: If you receive your TV stations through a set top box from a cable or satellite TV provider, connect it to the TV using the best connection method available. From most to least desirable:
HDMI® input – Digital HD and SD video
AV input – analog SD video
Antenna input – analog SD video using NTSC
AC power
Plug your TV into a power outlet. You can tell that the TV has power because the status indicator lights up when the TV is off.
The topic Status indicator explains how the status indicator shows what is happening with the TV.
Roku remote batteries
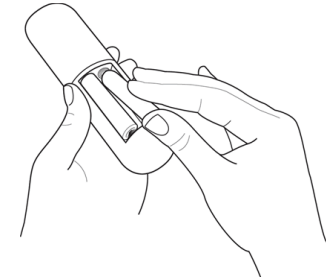
Open the back of your Roku remote and insert the included batteries, observing the proper orientation as indicated in the battery compartment. Reattach the back cover.
TCL Roku TV remote
Use the following information to identify the buttons on your Roku remote.
Note: Certain remote buttons and features vary by model. Your remote might not have all buttons or features listed.
If your remote has a microphone button just below the purple pad, then you have a Roku Voice Remote.
If your remote has a headphone jack on its left edge, then you have a Roku Enhanced Voice Remote.
The Roku voice remotes have additional capabilities as described in the following table.
BUTTON
FUNCTION
DESCRIPTION
POWER
Turns TV on and off
BACK
Menu: Goes back to previous menu/screen.
Home screen tile: Moves highlight back to the Home screen option.
Watching live TV or a TV input: Returns to Home screen.
Playing streaming content: Stops playing stream and returns to the previous menu or screen.
Browsing streaming content: Goes to the previous level in the content tree.
HOME
Immediately returns to the Home screen.
PAD
LEFT/RIGHT/UP/DOWN moves the highlight in the corresponding direction.
OK selects the highlighted option.
While watching TV:
UP/DOWN changes channel.
LEFT displays the Smart Guide (connected mode) or channel list (non-connected mode).
LEFT/RIGHT only on TVs operating in nonconnected mode, while in the channel list switches between All Channels and FAVORITE CHANNELs.
OK while in the channel list selects the highlighted channel.
While watching live TV: displays the program information banner.
VOICE SEARCH and VOICE COMMANDS
Only in the United States on select models with Roku voice remotes. Hold and say the name of a movie, TV show, actor, or director to search across many streaming and Antenna TV channels. Say a command to start streaming, change a channel, and more.
GAME MODE
Select models. Displays a banner showing the current Game mode or Not available at this time. Subsequent presses toggle Game mode. When On, the TV performs less image processing and has less input lag, producing a better experience with action games. Available only for HDMI and AV inputs.
INSTANT REPLAY
Select models. Streaming programs that support this feature and Antenna TV channels: if Live TV Pause is enabled, jumps back a few seconds with each press and resumes playing.
Broadcast TV: If Live TV Pause is disabled, jumps to previous channel.
When using an on-screen keyboard: Backspaces in the text you are entering.
Smart Guide: Returns to the current day and time.
SLEEP
Select models. Displays a banner showing the remaining sleep time, if any, or Sleep timer is off. Subsequent presses cycle among the preset sleep time intervals.
Once set, the sleep timer remains in effect regardless of what you are watching.
MEDIA PLAYBACK CONTROLS
Rewind, pause, play, and fast forward streaming content and Antenna TV channels (if Live TV Pause is enabled).
Press REWIND or FAST FORWARD one, two, or three times to control the speed of the operation.
REWIND and FAST FORWARD also jump backward and forward one page at a time when viewing long lists, such as when you are browsing Antenna TV shows in the channel list or Smart Guide (U.S. only).
OPTIONS
Displays additional options when available. On-screen hints let you know when this button is active.
PRESET CHANNEL SHORTCUT
Dedicated buttons show the logo of a preset streaming content provider. Dedicated content providers vary by model and region. Pressing a button:
Displays the streaming channel’s main page if you have already added the channel to your Home screen.
Displays the streaming channel’s sign-up page if you have not already added the channel.
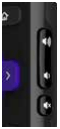
VOLUME/MUTE
Located on the right edge of the remote.
Increases/decreases volume and mutes the TV sound.
Note: If the TV is muted, pressing VOLUME UP unmutes. Pressing VOLUME DOWN does not unmute the sound.
Guided Setup
Home screen
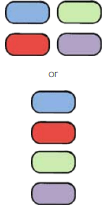
The following illustrations show typical Home screens, which vary depending on location, connected mode, selected theme, number of TV inputs enabled, and streaming channels and apps added.
Note: A paid subscription or other payments may be required for some channel content. Channel availability is subject to change and varies by country. Not all content is available in countries or regions where Roku® products are sold.
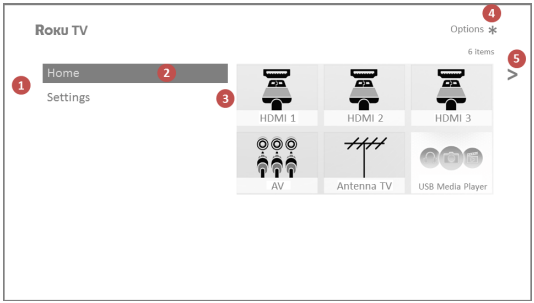
Typical connected Home screen, United States
Home screen menu—shows options available to you when you are on the Home screen.
Highlighted option—press OK on the remote to select.
TV input tiles—select an input to watch the connected device.
Streaming channel and app tiles—select a tile to go to the indicated streaming channel or application.
Options hint—press on the remote for options when this symbol is present.
Next screen hint—press the RIGHT arrow on the remote to see the next screen.
Typical connected Home screen, Canada
Home screen menu—shows options available to you when you are on the Home screen.
Highlighted option—press OK on the remote to select.
TV input tiles—select an input to watch the connected device.
Streaming channel and app tiles—select a tile to go to the indicated streaming channel or application.
Options hint—press on the remote for options when this symbol is present.
Next screen hint—press the RIGHT arrow on the remote to see the next screen.
Typical non-connected Home screen
Home screen menu—shows options available to you when you are on the Home screen.
Highlighted option—press OK on the remote to select.
TV input tiles—select an input to watch the connected device.
Options hint—press on the remote for options when this symbol is present.
Next screen hint—press the RIGHT arrow on the remote to see the next screen.
Personalize your Home screen
There are many things you can do to personalize your Home screen and make it just right for you and your family:
Only in connected mode: Add streaming channels by using the Streaming Channels menu option to browse the Roku Channel Store.
Only in connected mode: Change the screen theme by going to Settings > Themes to find and pick one to suit your mood.
Only in connected mode on U.S. models: Hide Movie Store, TV Store, or News as explained in Configure parental controls.
Remove a tile by highlighting it and pressing . Then highlight Remove input or Remove channel and press OK.
Move a tile by highlighting it and pressing . Then highlight Move input or Move channel and press OK. Use the arrows to move the tile, and then press OK to lock it in its new location.
Rename a TV input tile by highlighting it and pressing . Then highlight Rename input and press OK. Highlight a new name in the list, and then press OK to assign that name to the tile.
Rather than using the predefined names and icons, you can set a custom name and icon. To do so, scroll up or down to highlight Set custom name & icon, and then press OK. Follow the instructions on the screen to enter a name and select an icon for the input.
Note: If you have renamed the inputs, you cannot use voice commands to switch inputs. Voice commands can only switch among inputs that have their original names, such as “AV,” and “HDMI 1.”
Setting up Antenna TV
In addition to the other entertainment possibilities of your TCL Roku TV, you may also want to watch broadcast channels from an antenna or cable TV service connected to the ANT input. On your TCL Roku TV, you watch broadcast TV in much the same way you watch other entertainment choices. You select a tile—in this case, the Antenna TV tile—from the Home screen.
The first time you select the Antenna TV tile, you have to set up the TV tuner. Setting up the TV tuner scans for active channels and adds them to your Antenna TV channel list.
How do I set up the TV tuner?
1. Make sure your antenna (not provided) or TV cable is connected to the TV’s ANT/CABLE input.
2. On the Home screen, select the Antenna TV tile.
3. Read the simple on-screen instructions, and then select Start finding channels.
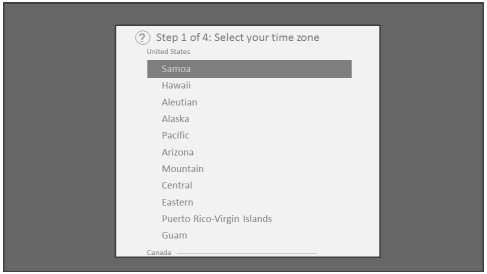
4. If prompted, select your time zone. You’ll only need to do this if the TV can’t figure out your time zone from your Internet connection.
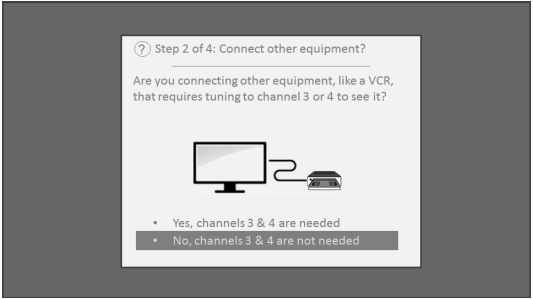
5. When prompted, select whether to add analog channels 3 and 4. These channels enable you to connect older set top boxes, VCRs, or game consoles.
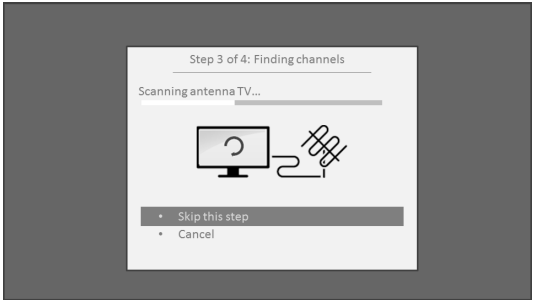
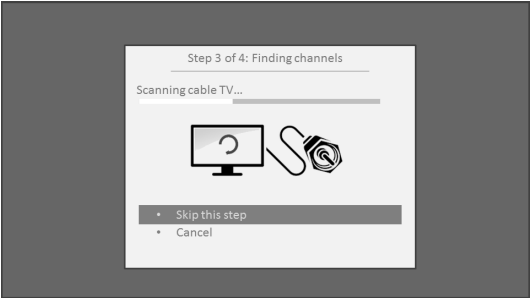
6. Wait while your TV scans for Antenna TV stations…
… and then cable TV channels.
Scanning for channels can take several minutes.
Tip: If you use a set-top box to receive cable TV channels (and don’t have your cable connected directly to the TV’s ANT input), you can save time by skipping the cable TV portion of the channel scan.
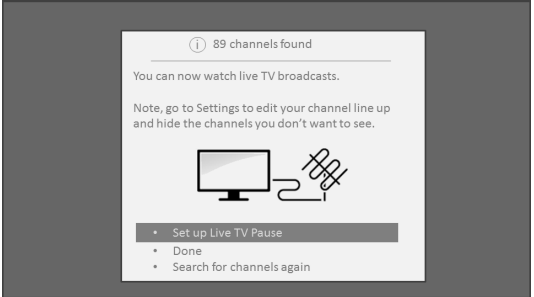
7. When the channel scans finish, the TV shows the number of channels it added.
8. Only in connected mode, you have the option of setting up Live TV Pause. The topic Pausing Live TV explains how to set up and use this feature. If you don’t want to set up Live TV Pause, or if this option is not available to you, select Done to start watching Live TV.
Tip: Repeat the channel scan from time to time to make sure you are receiving all of the latest channels. Broadcasters add and remove channels, move channels to different parts of the spectrum, and change the power levels of their channels periodically. Your antenna reception and picture quality depend on the position of your antenna and on your location relative to the antennas of broadcasters in your area.
Note: You’ll have to repeat the channel scan if you remove and re-add the Antenna TV tile from the Home screen or perform a factory reset. To repeat the channel scan, go to Settings > TV inputs > Antenna TV > Scan again for channels > Start finding channels.
Now, you’re ready to watch Antenna TV! While you’re watching, try the following tips:
Press the UP and DOWN arrows to change channels.
Press the LEFT arrow to display the channel list (non-connected mode) or Smart Guide (connected mode), and then use the UP and DOWN arrows to select a channel to watch. Or press REWIND or FAST FORWARD to jump through the channel list or Smart Guide a page at a time.
Press OK to display information about the current program.
Press to see options for picture and sound settings.
Only on models that have a Roku voice remote, hold down or , and then say the name of a movie, TV show, actor, or director. The TV displays the result and the streaming channels that offer the requested content. Only in the United States, the results also include shows on Antenna TV channels.
Using your TV
Status indicator
Your TV has a single status indicator. It goes on and off and blinks in different ways depending on the status of the TV, as shown in the following table:
TV CONDITION
STATUS INDICATOR
MEANING
On (screen is active)
Off
Screen is communicating that TV is on.
Screensaver (screen is active)
Off
Screen is communicating that TV is on.
Off (no power)
Off
TV is not connected to power.
Off (standby)
On
TV is connected to power and is ready to use.
Starting up from off state
Slow pulsing blink until startup completes
TV is doing something.
On (receiving update from USB)
Slow pulsing blink until update completes
TV is doing something.
Remote command received
Dims on/off once
TV has received your command.
Network connection lost
Two short blinks, pause, repeat
TV was connected and paired with a Roku account and now has no network connection.
Powering down to standby mode
Slow pulsing blink until the TV reaches standby.
TV is doing something
Standby mode energy savings
When you turn off your TV, it remains in a higher power mode for a few minutes, after which it goes into a very low power standby mode. If you turn on the TV again before it has entered the very low power mode, it turns on immediately. After the TV goes into the lower power standby mode, it takes a few seconds longer to start up.
Only in connected mode on TVs that do not have an Energy Star® rating, you can optionally enable Fast TV start. When this option is enabled, your TV starts up almost immediately regardless of how long it has been turned off, but uses somewhat more power in standby mode. For more information, see Fast TV start.
Disable Smart TV experience
If you decide you want to disable Smart TV experience, follow these steps:
1. From the Home screen, go to Settings > Privacy > Smart TV experience.
2. Navigate to the right to highlight Use info from TV inputs.
3. Press OK on the remote to clear the check box.
Disable Auto Notifications
If you want to keep the Smart TV experience enabled, but you do not want to see notifications while you are watching shows, you can disable notifications. To do so, follow these steps:
1. From the Home screen, go to Settings > Privacy > Smart TV experience.
2. Navigate to the right to highlight Use info from TV inputs.
3. Press DOWN on the remote to highlight Enable auto notifications.
4. Press OK on the remote to clear the check box.
Note: These settings do not affect recommendations for More Ways to Watch that you see in the Smart Guide when watching Antenna TV channels. Those recommendations come from the Smart Guide and do not rely on ACR technology.
Watching Antenna TV channels
Select the Antenna TV tile in the Home screen. Your TV remembers the last channel you watched and starts with that channel playing.
Changing channels
To change channels, you can do any of the following:
Press the UP arrow to change to the next higher channel.
Press the DOWN arrow to change to the next lower channel.
Press the LEFT arrow to display the channel list (in non-connected mode) or Smart Guide (in connected mode), and then press the arrow keys to select the channel or show you want to watch. Press REWIND and FAST FORWARD to move through the list one page at a time. When you’ve highlighted the channel or show you want to watch, press OK. (If you decide you don’t want to change channels, press the BACK button).
Only if Live TV Pause is not enabled, press to jump to the previous channel. Press again to return to the channel you were watching before you pressed .
Note: If the button is not available on your remote, you can use this feature in the Roku mobile app. For more information, see Getting and using the Roku mobile app
Pausing Live TV
Live TV Pause gives your TCL Roku TV the ability to pause, play, fast forward, and rewind digital Antenna TV. You can pause Antenna TV for up to 90 minutes.
Requirements
To use this feature, you need to:
1. Connect your TV to the Internet. If you didn’t connect during Guided Setup, see What if I didn’t connect my TV?.
2. Provide your own dedicated USB drive with the following minimum specifications.
• 16 GB
• 15 Mbps read/write speed
• USB 2.0 compliant
A USB flash drive (thumb drive) meeting the minimum requirements is highly recommended. Note that using a larger drive does not extend the 90 minute pause time.
Important: After warning you and giving you a chance to cancel Live TV Pause setup, all existing content on your USB drive is erased when you enable this feature.
3. Connect your USB drive to the TV’s USB port.
Important: Some TV models have more than one USB port. You can connect your Live TV Pause USB drive to any port, but make sure that nothing is connected to other USB ports while enabling Live TV Pause. Reconnect other USB devices after you have finished enabling Live TV Pause.
4. Enable Live TV Pause, as explained in the following topic.
Enabling Live TV Pause
You can start setting up Live TV Pause in any of the following ways:
• Go to Settings > TV inputs > Antenna TV > Live TV Pause, and then select Enable.
• After completing a channel scan, select Set up Live TV Pause from the available options.
• Press Play/Pause on the Roku remote while watching a digital Antenna TV channel.
• Highlight the Antenna TV tile on the Home screen, press on the remote, and then select Enable Live TV Pause.
After starting setup of Live TV Pause in any of these ways, the TV prompts you through the steps needed to enable this feature. Setup takes only a few moments.
Note: Use of a USB hub is not supported.
Playing content from local network media servers
Only in connected mode, your TV can play personal video, music, and photo files from a media server on your local network. Media servers include personal computers running media server software such as Plex or Windows Media Player, network file storage systems that have built-in media server software, and other devices that implement the specifications of the Digital Living Network Alliance.
Some servers do not fully implement the DLNA specification but are UPNP (Universal Plug and Play) compatible. The Roku Media Player will connect to them as well.
Using your TV in a hotel or dorm room
Hotels, school dorms, conference facilities, and similar locations with public wireless Internet access often require you to interact with a web page to authenticate your access. These types or networks are called restricted public networks . When you select a network of this type, the TV automatically detects that additional information is needed and prompts you through using another wireless device to supply the requested information.
About using your TV on a restricted public network
Here are some points to keep in mind when using your TV on a restricted public network:
• Using your TCL Roku TV on a hotel or dorm room network requires wireless availability and a network-connected smartphone, tablet, or computer to authenticate access to your wireless access point.
• You will need your TCL Roku TV remote.
• Some content might be limited or unavailable if you try to connect outside your home country due to geo-filtering.
Getting your TCL Roku TV on line on a restricted public network
1. Either during Guided Setup or after using the Settings > Network menu to set up a new connection, the TV automatically detects that you are connecting to a restricted network and displays the following prompt:
Tip: Your TV can connect to a restricted network only if Enable ‘Device connect’ is selected in Settings > System > Advanced system settings. (Device connect is enabled by default, but if you have disabled it, the TV cannot complete the connection.)
Note: Device connect is not present if the TV is in non-connected mode.
2. After selecting the correct network, highlight I am at a hotel or college dorm, and then press OK. The TV prompts you to use your smartphone, tablet, or laptop to complete the connection.
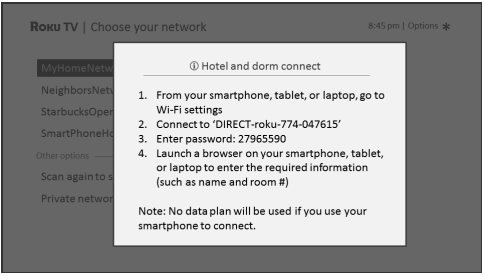
3. Use a phone, tablet, or wireless-enabled computer to detect wireless networks. In most cases, you can simply open the device’s Wi-Fi Settings or Network Settings screen to start scanning.
Note: The phone, tablet, or computer must be on the same wireless network to which you are connecting the TV
4. Connect to the network named on your TV screen. The actual network name varies.
Note: The previous step connects your smartphone, tablet, or computer directly to the TV. No connection charges apply and the connection does not impact your device’s data plan.
5. The wireless connection process prompts you for a password. Enter the password as shown on the TV screen. The actual password varies.
6. Start the web browser on your smartphone, tablet, or computer. When you attempt to open any web page, the restricted connection will prompt you for whatever information it needs. In most cases, you must agree to terms and conditions, provide identifying information, or enter a password, PIN, or room number to proceed. The information requested depends on the organization that controls the wireless connection.
7. After you enter the requested information, the TV automatically proceeds to complete its connection and resumes normal operation.
8. If the TV prompts you to link to your Roku account, use your smartphone, tablet, or computer to complete the pairing operation and activate your TCL Roku TV.
Roku voice remotes (select models only)
Only on TVs with the Roku voice remotes: The following topics explain how to get the most out of your TV when it includes a Roku Voice Remote or Roku Enhanced Voice Remote.
Re-pairing your Roku voice remote
The Roku voice remotes operate with wireless radio-frequency signals and must be paired with your TV. You initially paired the remote when you set up your TV during Guided Setup. But if your remote loses its pairing with the TV for some reason, you can easily re-pair it using either of the following methods:
1. Remove the battery cover from the back of the remote.
2. Press and hold down the pairing button for 3 seconds or longer, until the adjacent LED lights up.
3. Do one of the following:
• Turn on the TV using the power button on the TV side or back panel. Pairing occurs as the TV starts up.
• Use the Roku mobile app or a different remote to navigate to Settings > Remote > Pair remote.
Tip: If the remote fails to pair with the TV, try installing new batteries. Also, it’s helpful to hold the remote within two to three feet of the TV to ensure successful pairing.
Checking the Roku voice remote battery level
You can check the condition of the batteries in your Roku voice remote at any time by navigating to Settings > Remote > Battery level. The resulting screen displays not only the battery level, but also other information that can be useful when you need technical support with your remote.
Tip: When you first turn on the TV, a battery level indicator appears in the upper right corner of the screen for a few seconds.
Finding your Roku Enhanced Voice Remote
Only on TVs with the Roku Enhanced Voice Remote, when your remote has found its way down into the sofa cushions or your dog has hidden it in the corner, you can use the Find Remote feature to find out where it’s hiding. This feature has a limited range, and is designed to find your Enhanced Voice Remote somewhere in the same room as the TV.
Select Find Remote on the Settings > Remote menu to see brief instructions on how to activate the Find Remote feature. Note, however, that selecting this option doesn’t actually activate the feature. Here are the complete instructions:
Activate Find Remote
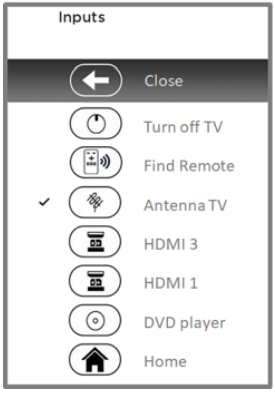
• If your TV has a joystick-style control, press to the Left or Right to open the Inputs menu, and then press Right to scroll down to Find Remote.
• If your TV has a column of labeled panel buttons, press the INPUT button to open the Inputs menu, and then press the INPUT button again until you highlight Find Remote.
A moment or two after highlighting Find Remote, the Roku Enhanced Voice Remote starts playing your selected Find Remote sound to let you know where it is hiding. The sound automatically stops after a minute, or after you find the remote and press any button.
Changing and previewing the Enhanced Voice Remote finder sound
Only on TVs with the Roku Enhanced Voice Remote, you can customize the sound your remote makes when you use the Find Remote feature. To customize the sound, navigate to Settings > Remote > Change remote finder sound. Select the sound you want to use from the available settings.
To preview the sound you have chosen, select Preview remote finder sound, and then hold down OK on the remote to play the sound. When you release the OK button, the sound will stop.
Adjusting TV settings
You can adjust most picture and sound settings while you are watching a program by pressing to open the Options menu. There are some additional picture and sound settings in the Settings menu.
In most cases, the changes you make apply only to the input you are using. Antenna TV, the separate HDMI® inputs, and the AV input each have their own settings that the TV remembers when you return to that input. The TV also separately remembers the settings you specify while viewing streaming content.
Settings menu
Use the Settings menu to adjust overall TV settings. Press to go to the Home screen, and then navigate to Settings > TV picture settings.
You can adjust the following overall TV picture settings from the Settings screen:
• TV brightness – Provide a better viewing experience in darker or brighter rooms. Increases or decreases the TV’s general brightness across all TV inputs.
Note: This setting is identical to the TV brightness setting you can access in the Options menu while watching a program.
• HDR notification – On select models only: Controls whether the TV displays a notification in the upper right corner of the screen for a few seconds when HDR or Dolby Vision content begins to play.
On – The TV displays a notification when HDR or Dolby Vision content begins to play.
Off – The TV does not display a notification when HDR or Dolby Vision content begins to play.
Note: This setting does not affect the HDR or Dolby Vision notification that always appears in the program information banner. Press OK while watching a show to open the program information banner.
• Settings per input – Lists each TV input. Select an input, and then press to display the Options menu where you can adjust the input’s settings while watching a live picture and listening to the sound from that input.
Tip: You don’t have to go to the Settings menu first—you can display an input’s Options menu and adjust its settings whenever you are watching the input by pressing .
Options menu
The Options menu for each TV input provides many settings for controlling the appearance of the picture and the quality of the audio. To view the Options menu, press whenever you are watching a TV input or streaming a video (except when you are viewing the program information banner). The Options menu is a panel that appears over the left side of the screen:
Typical Options menu
To adjust the settings on the Options menu, press the UP or DOWN arrow to highlight a setting, and then press the LEFT or RIGHT arrow to change the setting. You’ll see the changes you make right away in picture appearance or audio quality.
Tip: When you highlight a setting, the header text explains the effect of its current value. When you begin to adjust a setting, the other options are hidden so you can see more of the screen. Even though the other settings are hidden, you can move the highlight up or down to adjust the other settings. As soon as you press the UP or DOWN arrow, the other settings become visible again.
Options menu settings
TV brightness – Affects the overall brightness of the picture. This setting applies across the entire TV; that is, to all TV inputs and is identical to the TV brightness setting under Settings > TV picture settings.
Picture mode – Provides picture presets for various viewing preferences. This setting applies to the currently-selected input only.
Picture size – Adjusts the aspect ratio of the picture, enabling you to view a picture in its original format, or zoom or stretch it to fill the screen. The Auto setting has been found to produce the best picture in most cases.
Audio effect – Adjusts the sound quality output from the TV speakers. This setting applies across the entire TV; that is, to all TV inputs. It does not affect the sound quality for headphones, HDMI (ARC), or SPDIF (TOSLINK) connectors.
Sleep timer – Sets a timer that turns off the TV after the specific amount of time.
This setting remains in effect even if you stop watching the current input.
Closed captioning – Controls when you see captions. This setting is only offered for Antenna TV, the AV input, and streaming videos. Any set value remains in effect across only these inputs.
Antenna TV – Set captions to off, always on, on only when the TV sound is muted, or on only during instant replay (when Live TV Pause has been enabled).
AV input – Set captions to off, always on, or on only when the TV sound is muted.
Streaming video channel – For streaming content that provides closed captions, set captions to off, always on, on only when the TV sound is muted, or on only during instant replay (for streaming content that supports instant replay). Note that some streaming channels have other methods for turning captions on and off. In these cases, the Closed captioning option does not appear on the Options menu.
Note: If the button is not available on your remote, you can use this feature in the Roku mobile app. For more information, see Getting and using the Roku mobile app
Captioning track – Only in Canada: Selects which caption track to display when Closed Captioning is on. This setting remains in effect on all inputs that provide captions.
Note: Only in the United States, the Captioning track setting is located under Accessibility.
SAP – Selects whether to play a secondary audio program or multichannel television sound, and which choice to play. This setting applies only to Antenna TV on digital channels.
Advanced audio settings – Only on select models: Shows the Advanced audio settings menu.
Advanced picture settings – Shows the Advanced picture settings menu.
Tip: To dismiss the Options menu, just wait a few seconds without pressing any buttons. Or press again to dismiss the menu immediately
Using the Roku Channel Store
Only in connected mode, the Streaming Channels menu option takes you to the Roku Channel store, where you can add new subscription based and free streaming channels to your TV.
Tip: You also can search for streaming channels by using the Search option, as explained in Searching for something to watch.
To make it easier to find what you want, the streaming channels in the Roku Channel Store are categorized by topic. Press the UP and DOWN arrows to highlight the category you want, and then press the RIGHT arrow to move the highlight into the grid of streaming channel tiles.
When you find a streaming channel you want to add or learn more about, highlight it and press OK to display more details.
• If the streaming channel you are adding is free, you can select Go to channel to start watching it immediately.
• If there is a one-time or recurring fee associated with using the streaming channel, you must agree to the terms and conditions, accept the fee, and—if you created one when you activated your TCL Roku TV, enter your Roku PIN code to authorize the charges.
• If you already have a subscription to the streaming channel—for example, you already subscribe to Netflix or you receive HBO through your cable TV provider—you must complete a different, simple authorization step to add the streaming channel.
You need only complete the authorization or activation step one time, when you initially add the streaming channel. After that, you simply select the streaming channel tile from your Home screen to start watching. (Channel and content availability is subject to change. Charges may apply to your selection.)
Tip: New streaming channels are added continuously to the Roku Channel Store, so be sure to check back every now and then for new options.
Note: If you don’t remember your PIN, or if want to change whether you need to use a PIN to make purchases on your Roku account, see Changing your Roku Channel Store PIN preference.
Customizing your TV
There are several things you can do to personalize your TV.
Add TV inputs
As you use your TV, you might find that you need to add a TV input tile that you did not add during Guided Setup. To add a TV input:
1. From the Home screen menu, navigate to Settings > TV inputs. Notice that the list of inputs is divided into two sections: Inputs being used and Inputs not used.
2. Press the UP or DOWN arrows to highlight an input in the Inputs not used section of the list.
3. Press the RIGHT arrow to move the highlight to Set up input.
4. Press OK to add the input.
5. Press to return to the Home screen. Notice that the input has been added to the top of the Home screen. If you want to move the input tile to a different position in the grid, see Rearrange tiles.
Add streaming channels
You can add streaming channels by searching in the Roku Channel Store. New streaming channels are added to the bottom of the Home screen. If you want to move the channel tile to a different position in the grid, see Rearrange tiles.
Change themes
Only in connected mode, another way to customize your TV is to change its theme. The theme establishes the look and feel of the TV through colors, designs, and fonts. Some themes require payment.
To change the theme, in the Home screen menu navigate to Settings > Themes. In the Themes screen, choose from the following options:
• My themes – Highlight a theme, and then press OK to switch to that theme.
• Get more themes – Highlight this option at the bottom of the My Themes list, and then press OK to shop for new themes.
• Custom settings – Turn Featured themes on or off. When Featured themes is on, the TV automatically switches to featured themes—like certain holiday-inspired themes —for a limited time whenever Roku makes them available, and then switches back to your selected theme when the featured theme expires. When off, the TV uses your selected theme.


 just below the purple pad, then you have a Roku Voice Remote.


 on the remote for options when this symbol is present.

 to see options for picture and sound settings.
 or
or  , and then say the name of a movie, TV show, actor, or director. The TV displays the result and the streaming channels that offer the requested content. Only in the United States, the results also include shows on Antenna TV channels.
 to jump to the previous channel. Press again to return to the channel you were watching before you pressed
  on the remote, and then select Enable Live TV Pause.
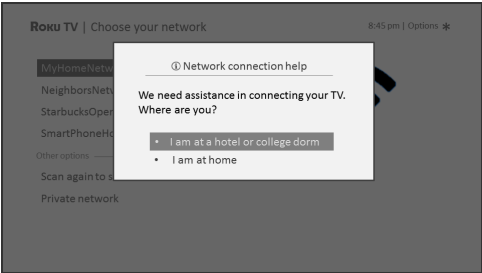
 to open the Options menu. There are some additional picture and sound settings in the Settings menu.
 to go to the Home screen, and then navigate to Settings > TV picture settings.
 button is not available on your remote, you can use this feature in the Roku mobile app. For more information, see Getting and using the Roku mobile app
 to return to the Home screen. Notice that the input has been added to the top of the Home screen. If you want to move the input tile to a different position in the grid, see Rearrange tiles.