User manual Coffee Machine
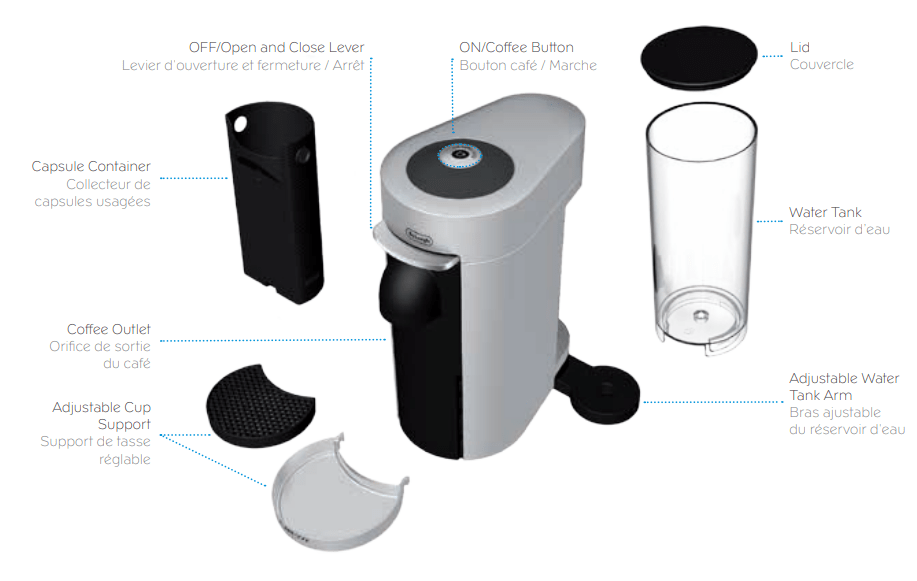
OVERVIEW
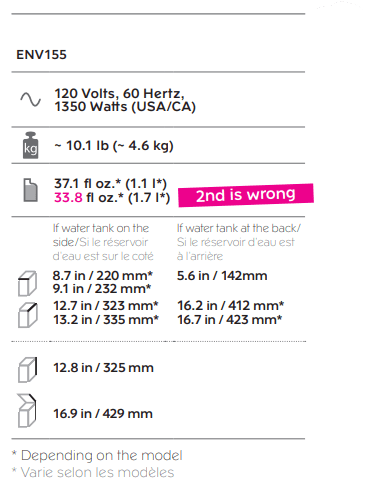
SPECIFICATIONS
PACKAGING CONTENT


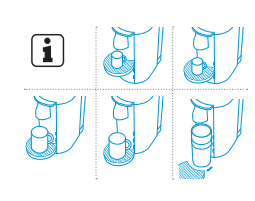
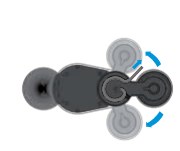
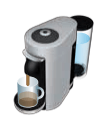
MACHINE HANDLING
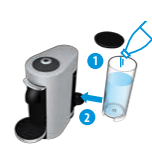
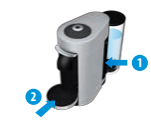
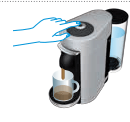
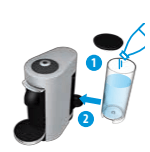
WATER TANK
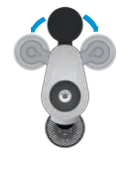
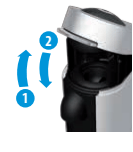
1. The water tank arm can be rotated and positioned at the back, to the left or to the right hand side of the machine
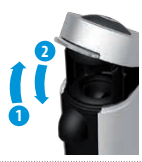
2. Remove the water tank by tilting it slightly backwards, then gently pulling it up. Put the water tank in position by placing it vertically onto its arm, until there is a ‘click’ sound.
WARNING: Be careful when removing the water tank since the machine may tilt during the movement.
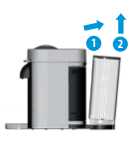
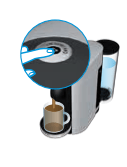
CAPSULE CONTAINER

1. Remove the water tank, then remove the capsule container by sliding it sideways
2. Place the capsule container in the back of the machine by sliding it sideways into position. It is held in place by a magnet. Place the water tank back
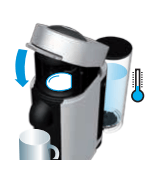
CUP SUPPORT
1. The cup support has 4 positions and can be temporarily removed to accommodate various cup sizes.
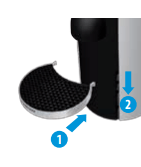
2. To place the cup support, slide cup support straight into the holes and gently push down until the hooks are well in place.To remove it, gently lift straight up and then pull the cup support out
CAUTION: Be careful when removing the cup support since it may contain warm liquid. Make sure the cup support is properly placed before putting the cup
POWER CABLE
1. The power cable can be adjusted under the machine. Insert the remaining cable in the guide on the left or on the right side socket, depending on the position chosen for the water tank. Ensure machine is in the upright position
FIRST USE OR AFTER A LONG PERIOD OF NON-USE
CAUTION: First read the important safeguards to avoid risks of fatal electrical shock and fire
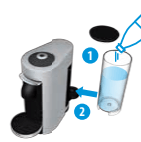
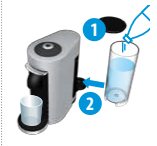
1. Rinse and clean the water tank and lid before filling it with only fresh potable water. Place the water tank in place
2. Ensure the capsule container and the cup support are in place. For your safety, operate the machine only with cup support and capsule container in position.
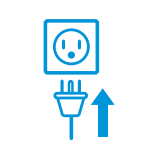
3. Plug the machine into the outlet

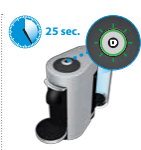
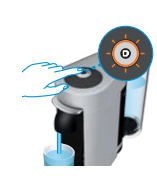
4. Turn the machine “ON” by pushing the button. GREEN light will blink while the machine is heating up
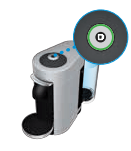
5. Steady GREEN lights will indicate the machine is ready
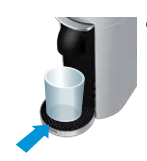
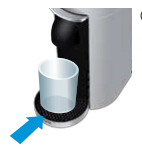
6. Place a container of at least 12.5 fl oz./0.4 l under the coffee outlet.
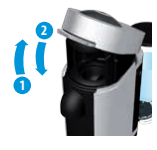
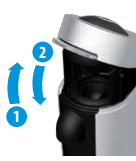
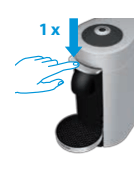
7. Open the machine head by pressing the lever up to eject the capsule and then push the lever down to close it
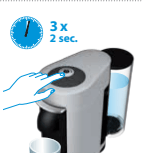
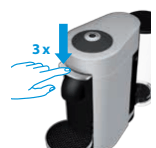
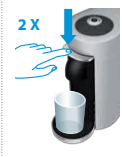
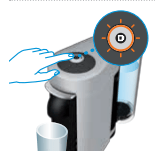
8. Push the button 3 times in 2 seconds to start cleaning and let the cleaning procedure complete automatically. ORANGE lights will blink during the operation. It will take less than 2 minutes before a flow comes out. The procedure consists of 3 cycles of pumping water in, internal cleaning and water flowing from the outlet to complete

9. This procedure may take up to 5 minutes. The procedure can be stopped at any time by pushing the button. The button will go to steady GREEN. To restart the cleaning process, follow the instructions starting at point 8. To brew a coffee, insert a capsule, push the lever down to close the machine and push the button.
COFFEE PREPARATION
CAUTION: Be careful not to injure yourself on sharp points or trap your fingers when reaching inside the machine.
1. Fill the water tank with fresh potable water
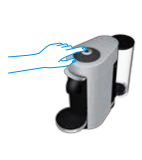
2. Turn the machine “ON” by pushing the button.
3. GREEN lights will blink while the machine is heating up.
4. Steady GREEN light indicates the machine is ready.

5. Place a cup of sufficient capacity under the coffee outlet. For Alto coffee, please remove the cup support. Risk of scalding may occur due to overflowing
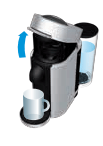
6. Open the machine head by pushing the lever up. The machine head will open automatically, with an electrical mechanism.
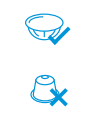
NOTE: This machine operates with Nespresso Vertuo capsules. Nespresso Original capsules cannot be used in this machine.
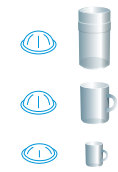
NOTE: The factory settings and recommended cup sizes are:
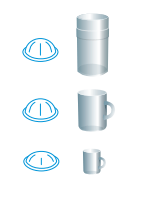
- Alto: 14 fl oz./ 414 ml
- Coffee: 7.77 fl oz./ 230 ml
- Espresso: 1.35 fl oz./ 40 ml
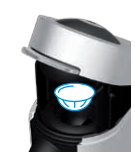
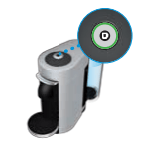
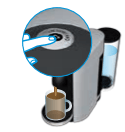
7. Insert a capsule with the dome shape facing downward
NOTE: To avoid damaging the machine, use only fresh, unused capsules. Ensure previous capsule has been ejected before inserting a fresh one.
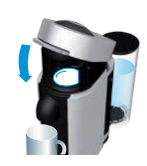
8. Push the lever down to close the machine head

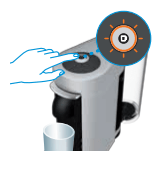
9. Push the button to start the brewing process . Green light will rotate slowly during the barcode reading and pre-wetting phase.
NOTE: You can do this even when the machine is still heating up. The coffee will then flow automatically when the machine is ready. The machine will automatically recognize the inserted capsule and select the coffee preparation parameters and cup length defined by Nespresso coffee experts to extract the coffee blend at its best.
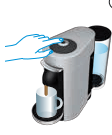
10. During the coffee preparation phase coffee will start to flow. GREEN light will rotate quickly during brewing. Steady GREEN light indicates that coffee brewing is ready.
11. To stop the coffee flow early, push the button. Steady GREEN light indicates that coffee brewing is ready.
12. To manually top off your coffee, push the button and push again to stop when desired volume is reached.
13. For a cold brew coffee, ensure you have ice cold water in the water tank or add water and ice into the water tank. Place the dedicated cold brew coffee capsule of your choice in the machine and push the button. Due to a slower infusion process, the beverage will take longer to prepare than hot coffee to ensure all aromas are extracted according to the process defined by our coffee experts
CAUTION: Use only fresh drinking water for coffee preparations, including when making ice cubes. Rinse the machine on a regular basis.
NOTE: The coffee will be ambient when it is brewed and should be stirred when the extraction is finished. For an iced coffee experience, add ice into your coffee.
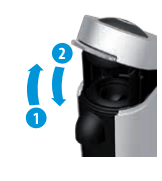
14. To eject the capsule, open the machine head by pushing the lever up. The machine head will open automatically with an electrical mechanism.
ENERGY SAVING CONCEPT
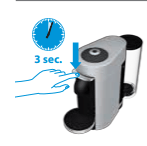
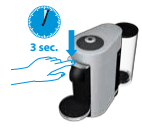
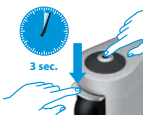
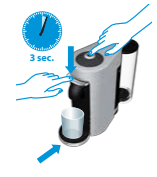
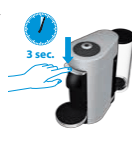
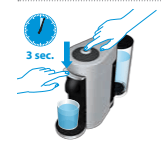
- The machine can be turned 'OFF' at any time, by closing the machine head and then pushing the lever down for 3 seconds. Automatic”OFF” Mode: The machine will turn off automatically after 9 minutes of non-use.
NOTE: The machine head should be in closed position when the machine is turned off.
PROGRAMMING THE WATER VOLUME
1. The programming is specific to each capsule size, Espresso, Coffee or Alto. Cup sizes can be reprogrammed from 0.3 fl oz./10 ml to 17 fl oz./500 ml
2. Open the machine head by pressing the lever up; Insert the capsule blend you want to program; Close the head by pushing the lever down.
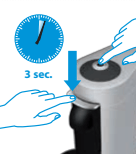
3. Push and hold the button until desired volume is reached
4. Water volume level is now stored for the capsule size used for the programming
NOTE: Once a customer-specific volume is programmed by the user, every time that capsule size is inserted in the machine, the preparation will stop at the user-programmed cup size. It is possible to restore cup size volumes, refer to "Reset to factory settings" section
SPECIAL FUNCTIONS
CLEANING
NOTE: The machine has a predefined cleaning procedure that can be launched at user discretion.
CAUTION: Do not use any strong or abrasive cleaning agent or solvent cleaner. Do not put in a dishwasher. Never immerse the appliance or part of it in water. Clean the coffee outlet regularly with a damp cloth. Please use only clean tools for cleaning the machine.
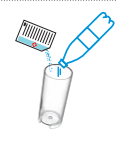
1. Rinse and clean the water tank and lid before filling it with fresh potable water. Place the water tank in place.
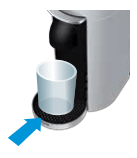
2. Rinse the cup support. Place a container of at least 13.5 fl oz./0.4 l under the coffee outlet
3. Open the machine head by pushing the lever up and let the used capsule be ejected, then close the machine. Empty and rinse the capsule container.
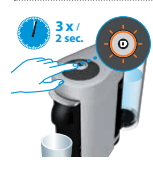
4. Push the button 3 times in 2 seconds to start the cleaning cycle. ORANGE light will blink during the cycle. It will take less than 2 minutes before a flow comes out. The cleaning procedure will run automatically for 5 minutes. The procedure consists of 3 cycles of pumping water in, internal cleaning and water flowing from the outlet to complete.
5. The procedure can be stopped at any time by pushing the button.The button will go to steady GREEN light when ready for brewing. To restart the cleaning process, follow the instructions starting at point 4. To brew a coffee, insert a capsule, push the lever down to close the machine and push the button
RESET TO FACTORY SETTINGS
NOTE: Choose special function by pressing the lever down: 1 time for "Descaling". 2 times for "Emptying the system". 3 times for "Reset to factory settings"
1. Turn the machine "OFF" by pushing the lever down for 3 seconds
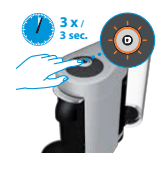
2. To enter Factory settings mode, push the button and the lever down at the same time for 3 seconds. ORANGE steady light indicates entry into the Special Functions menu.
3. Choose function by pressing the lever down: - 3 times for "Reset to factory settings"
NOTE: Choose function within 2 minutes or else the machine will go back to Ready mode. ORANGE light will blink 3 times every 2 seconds, indicating the “Factory reset” function.
4. Push the button to confirm. ORANGE light will blink 3 times in 3 seconds to confirm reset is done and then go to steady GREEN. The machine is now ready to use.
NOTE: It is possible at any time to exit the Special Functions menu by pushing the button and pressing the lever down at the same time for 3 seconds. GREEN steady light indicates the machine is ready.
EMPTYING THE SYSTEM
BEFORE A PERIOD OF NON-USE, FOR FROST PROTECTION OR BEFORE A REPAIR

1. Empty the water tank and put it in place.
2. Open the machine head and let the used capsule be ejected. Close the machine. Empty the capsule container.

3. Turn the machine "OFF" by pushing the lever down for 3 seconds
4. Place a container under the coffee outlet. To enter "Emptying the system" mode push the button and the lever down at the same time for 3 seconds. ORANGE steady light indicates entry into the Special functions menu.
5. Choose function by pressing the lever down - 2 times for “Emptying the system”
NOTE: Choose function within 2 minutes or else the machine will go back to Ready mode. ORANGE light will blink 2 times every 2 seconds, indicating the “Emptying the system” function
6. Push the button. The ORANGE lights will blink during the entire procedure. The machine turns “OFF” automatically when machine is empty.

CAUTION: Caution should be exercised as the machine evacuates remaining liquids using heat. Small quantities of steam may emit from the machine.
NOTE: It is possible at any time to exit the Special Functions menu by pushing the button and pressing the lever down at the same time for 3 seconds. GREEN steady light indicates the machine is ready
DESCALING
ASSISTANCE VIDEOS ARE AVAILABLE ON WWW.NESPRESSO.COM - VISIT “MACHINES” SECTION/
NOTE: Duration: Approximately 20 minutes.
CAUTION: Read the important safeguards on the descaling package. The descaling solution can be harmful. Avoid contact with eyes, skin and surfaces. Never use any product other than the Nespresso descaling kit available through the Nespresso Club to avoid damage to your machine. For any additional questions you may have regarding descaling, please contact your Nespresso Club
1. Turn the machine "ON" by pushing the button.
2. Open the machine head by pushing the lever up and let the used capsule be ejected. Close the machine by pushing the lever down.
3. Turn the machine “OFF” by pushing the lever down for 3 seconds.

4. Empty the cup support and the used capsule container
5. Fill the water tank with 1 unit of Nespresso descaling liquid and add minimum 17 fl oz. / 0.5 l of water
6. To enter Descaling mode, push the button and the lever down at the same time for 3 seconds. ORANGE steady light indicates entry into the Special Functions menu.
7. Choose function by pressing the lever down: - 1 time for “Descaling”
NOTE: Choose function within 2 minutes or else the machine will go back to Ready mode. ORANGE light will blink 1 time every 2 seconds, indicating the “Descaling” function.
8. Place a recipient (minimum volume: 20 fl oz./0.6 l) under the coffee outlet
9. To start descaling, push the button. The machine will stop automatically when complete. ORANGE light will blink during the entire descaling process.

10. Empty, clean and rinse the water tank and cup support thoroughly.
11. Fill the water tank with fresh potable water and put it back in place on the machine
12. When ready, push the button to rinse the machine. Machine will stop automatically when complete. ORANGE light blinking once every 2 seconds confirms the descaling process is completed. The procedure can be stopped at any time by pushing the button.
13. To exit descaling mode, press the button and the lever down at the same time for 3 seconds.
14. GREEN steady light when ready.
15. Descaling is completed. Allow the machine to dry for 10 minutes before using it.
16. The machine is now ready for use
NOTE: This machine is equipped with a descaling alert: GREEN and RED steady light. Machine can only be operated to make coffee a few more times once the alert appears before descaling becomes mandatory. If the machine is completely scaled, the descaling program may not function and the machine will stop and blink. Pause the program in this case for several minutes, allowing the descaling agent to penetrate the scale build-up, then push the button again to restart the descaling.
TROUBLESHOOTING
1. No light on the button.
- The machine has turned “OFF” automatically; push the button to turn the machine “ON”.
- Check the plug, voltage, and fuse.
2. No coffee.
- Check that the light on the button is GREEN.
- Check that the water tank is filled and is well positioned.
- Check that a fresh capsule is inserted in correct position, that the machine head is closed and push the button to start.
- Descale if necessary.
- Open the machine head and let the capsule be ejected. Then perform a cleaning as per cleaning section.
3. Coffee is not hot enough.
- Preheat cup with hot water from the tap.
- Descale if necessary.
4. Unusual coffee flow.
- Check that the water tank is well positioned.
- Open the machine head and let the capsule be ejected. Then perform a cleaning as per cleaning section.
- Descale if necessary.
5. Water leakage.
- Check that the water tank is well positioned.
- Empty and clean the capsule container.
- If problem persists, call the Nespresso Club.
6. Capsule is not ejecting correctly.
- Open the machine head. Remove the power cord from the grid. Clean the metallic clamps with precaution. Be careful of the sharp edges in the machine head.

- If problem persists, call the Nespresso Club.
7. Coffee leakage.
- Open the machine head and let the capsule be ejected. Then perform a cleaning.
- Empty and clean the cup support.
- Descale if necessary.
- If problem persists, call the Nespresso Club.
8. Machine turns to “OFF” mode.
- To save energy the machine will turn off after 9 minutes of non-use.
- See paragraph on “Energy Saving Concept”.
9. Coffee grounds in the cup.
- Start the cleaning procedure. See paragraph on “Cleaning”
GREEN LIGHT
 10. The machine does not start and has GREEN steady lights.
- Check the machine head is properly closed.
- If you want to brew an Alto, Coffee or Espresso, check that a fresh capsule is inserted in correct position, that the machine head is properly closed and push the button to start.
 11. GREEN light blinking continuously and machine not running.
- The machine is heating up and it will take maximum one minute to be ready.
 12. GREEN light turning while machine is running.
- This indicates the machine is working properly.
RED LIGHT
 13. Half GREEN and Half RED steady light.
- Descaling needed: Machine can be operated when alert appears only a few times after this alert before descaling becomes necessary.
- See paragraph on “Descaling”
 14. RED light blinking continuously and the machine head stops moving.
- Remove any obstacle, empty the capsule container if necessary, and then open or close the machine head depending on position.
 15. The machine does not start and RED light blinking 2 times and goes back to Steady GREEN.
- Fill the water tank and push button to start.
- Open the machine head to eject capsule.
- Check that a fresh capsule is inserted in correct position, that the machine head is closed and push the button to start.
 16. The machine does not start and RED light blinking 3 times every 2 seconds and goes back to Steady RED.
- Press the lever up and wait until the machine head stops, release any obstacle if applicable, empty the capsule container if necessary, and then press the lever down to close the machine head.
 17. RED steady light and the machine is NOT running.
- Turn the machine OFF, unplug the power cord, wait for 15 minutes for the machine to cool down.
- Plug the power cord and turn the machine ON by pressing the lever down. Machine is heating up and will go to steady GREEN when ready.
- If problem persists, call the Nespresso Club
 18. RED light fading out.
- Machine is cooling down and will go to steady green when ready
 19. RED light flashing twice and goes back to ORANGE blinking.
- Special function running; open the machine head and let the capsule be ejected. Then restart the function by pressing the button.
- If in the "Emptying the system" mode, remove the water tank
 20. RED light flashing twice and goes back to steady ORANGE.
- Special Functions menu: Choose desired special function by pressing lever down.
ORANGE LIGHT
 21. ORANGE light blinking continuously.
- Special function is running.
- Refer to applicable section; Descaling/ Cleaning/ Emptying the system/ Reset to factory settings
 22. Flashing ORANGE lights.
- Special function is in selection mode. Refer to applicable paragraph; Descaling/ Cleaning/ Emptying the system/ Reset to factory settings.