Documents: Go to download!
User Manual
- User Manual - (English)
- Siemens WT47Y7W0AU 9kg iQ800 Heat Pump Dryer Specifications Sheet - (English)
- The main points in brief
- Getting to know your appliance
- Programmes and buttons
- Operating the appliance
- Cleaning
- Faults and what to do about them
Table of contents
user manual
The main points in brief

Getting to know your appliance
Dryer
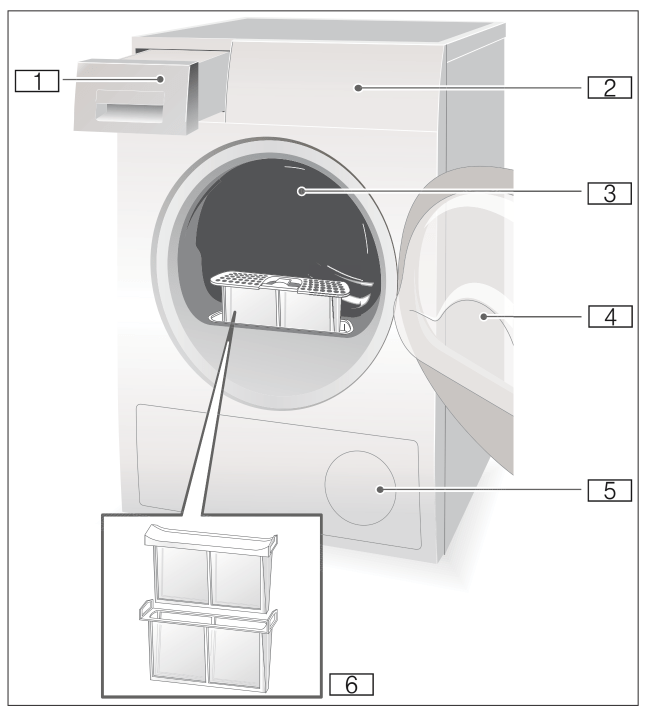
- Condensate container
- Control and display panel
- Drum interior light (depending on the model)
- Dryer door
- Air inlet
- Fluff filter
Control panel
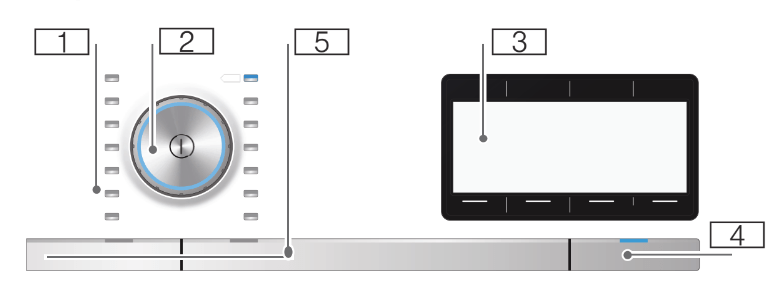
- Programmes → Page 26.
- Programme selector and On/Off button.
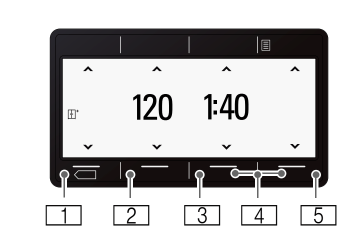
- Display panel with buttons → Page 23.
- Start button for starting, interrupting or cancelling the programme.
- Buttons → Page 27. en Getting to know your appliance
Display panel

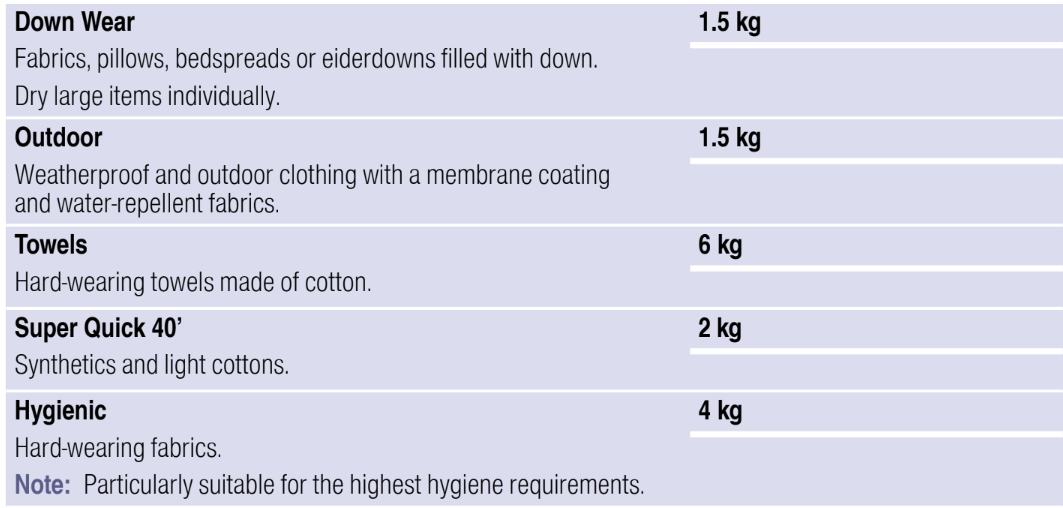
Programmes and buttons
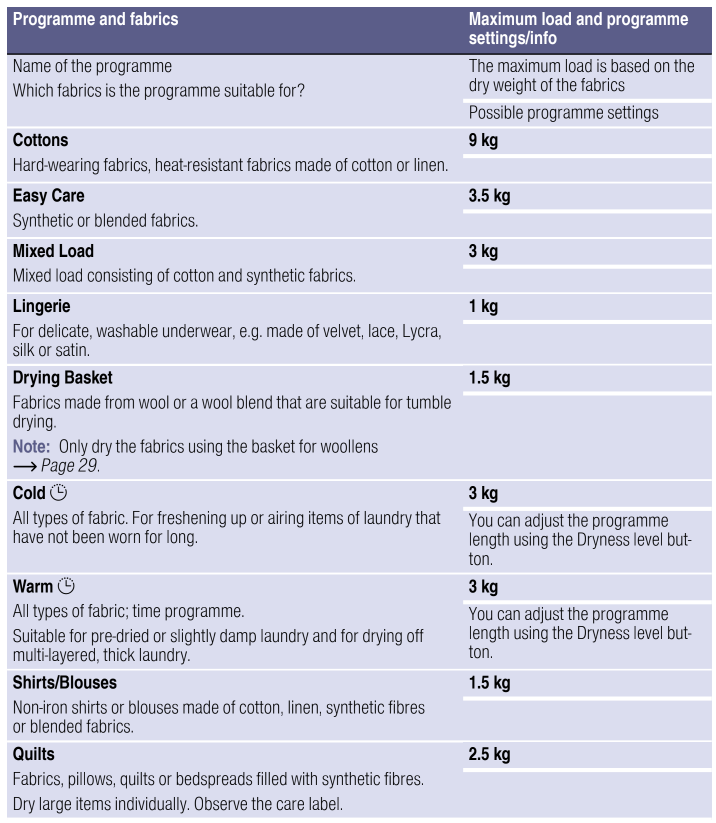
Programmes
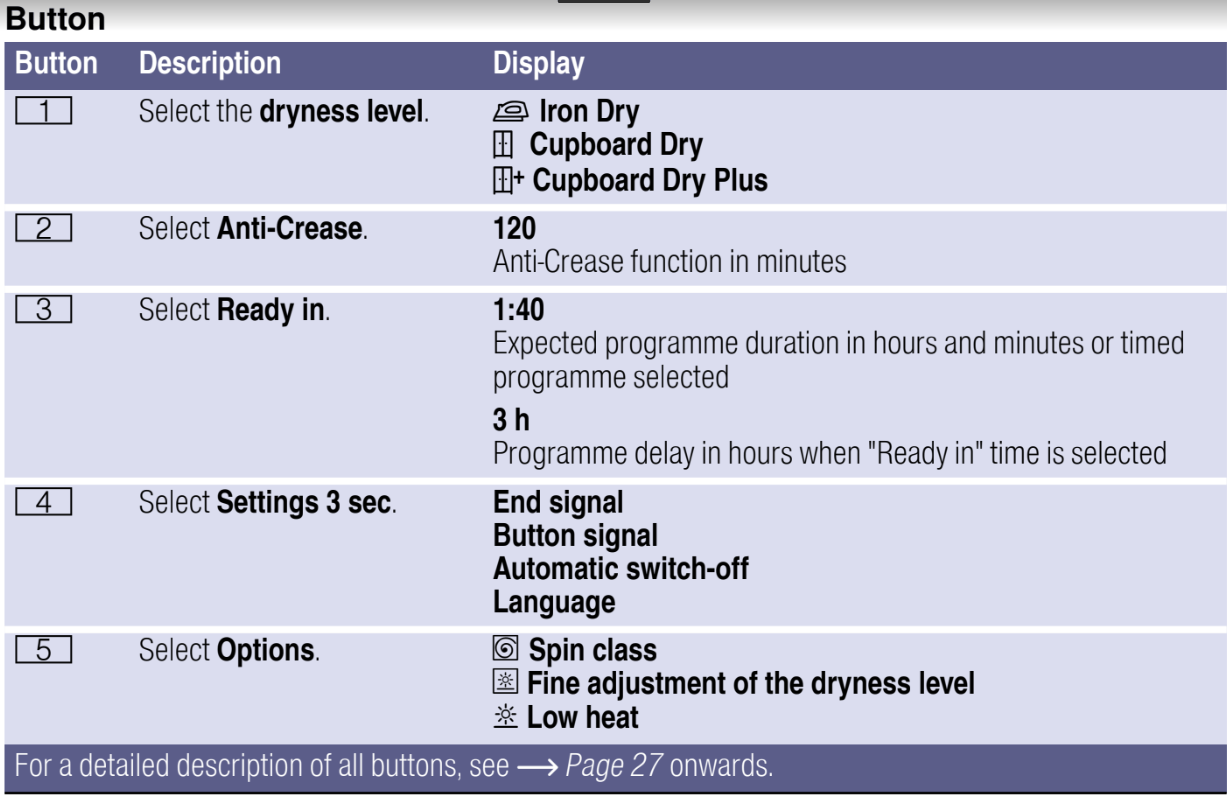
Buttons
| Buttons | Explanations and notes |
| Drying Target: | Select the dryness level (e.g. Cupboard Dry) or the drying time (20 mins up to 3 hrs 30 mins, depending on the model and programme). If you have selected a dryness level, this is stored for all programmes, except for Cot-tons, even after the dryer has been switched off. |
 Cupboard dry plus Cupboard dry plus | For multi-layered, thick laundry which is difficult to dry. |
 Cupboard dry Cupboard dry | Normal, single-layered laundry. |
 Iron dry Iron dry | Normal, single-layered laundry, which should still be damp after drying and is suita-ble for ironing or hanging up. |
| Less Ironing | The drum moves the laundry at regular intervals for 60 to 120 minutes after drying, in any programme, to prevent creasing. |
| Finish in | The programme will end in between 1 h and 24 h. Set the "Ready in" time in incre-ments of one hour to delay the start of the programme. The required number of hours after the programme ends is displayed on the display panel. |
 Childproof lock Childproof lock | You can activate or deactivate the childproof lock by pressing and holding the "Ready in" button for five seconds. |
 Options Options | Select the button and the menu will be displayed in the display panel. |
 Spin class Spin class | For the spin class, set the spin speed at which the laundry has been spun in the washing machine. This permits the expected drying time to be indicated more pre-cisely. Speeds of between 600 and 1800 rpm can be selected. Default setting: 1000 rpm |
 Fine adjustment Fine adjustmentof the dryness level | If the laundry is too damp after drying, you can finely adjust the dryness levels e.g. Cupboard Dry. The dryness level can be increased in three stages, from +1 to +3. If you have adjusted the dryness level, the setting for all programmes with a selecta-ble dryness level is retained even after the dryer is switched off. |
 Low heat Low heat | Reduced temperature for delicate fabrics, e.g. polyacrylic or elastane, may increase the drying time. |
| Memory 1/2 | You can save individual programme settings under Memory 1 and 2. Select the required programme settings and press the Memory 1 or Memory 2 button for 3 seconds until the display panel shows that Memory programme 1 or 2 is saved. Your selected programme settings are retained even after the dryer is switched off. |
| Basic Settings 3 sec. | Press both buttons at the same time and hold them for 3 seconds. The menu will be displayed in the display panel. |
| End signal, button signal | Select the button signal volume: off - quiet - normal - loud - very loud. Default setting: loud |
| Automatic switch-off | Automatically switching off the dryer after 15, 30 or 60 minutes, or never automati-cally switching off. Default setting: 15 minutes |
| Language | Select the desired language in the display panel. |
Start/Pause  | Starts or pauses the programme. |
Operating the appliance
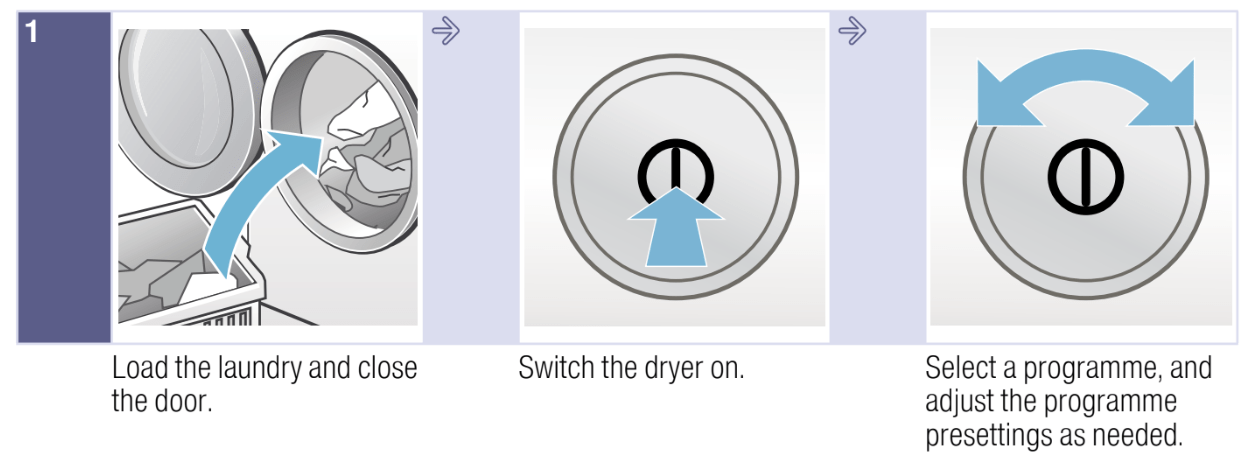
Loading laundry and switching on the dryer

1. Place the laundry in the drum.
2. Press the  buttnon to switch the dryer on.
3. Close the dryer door.
The basket for woollens
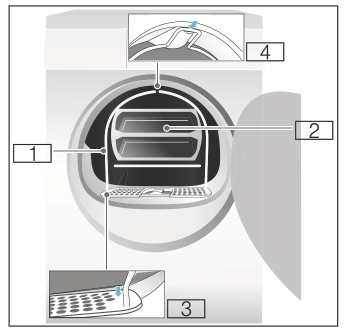
1.Basket for woollens
2.Insert for the basket for woollens
3.Recesses for mounting the basket for woollens
4.Notch for the basket for woollens
Drying with the basket for woollens
1. Insert the feet of the basket for woollens into the holes on the fluff filter.
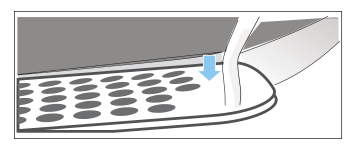
2. Lean the basket for woollens against the upper notch.

The basket for woollens should now be firmly inserted in the drum.
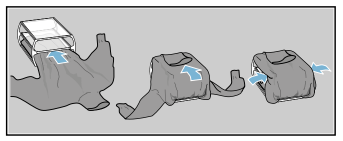
3. Place the required fabric in the insert of the basket for woollens
Application examples:
a) Trousers or skirt
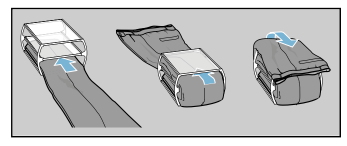
b) Pullover
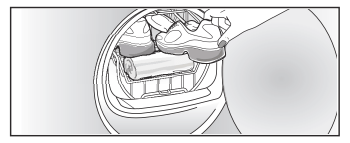
c) Sports shoes
Place sports shoes in the basket for woollens without the insert.
Pull out the tongues of the shoes and remove the insoles or heel cushions.
Roll up a towel and place it under the sports shoes to create an inclined surface. Place the shoes so that the heels are on the towel.
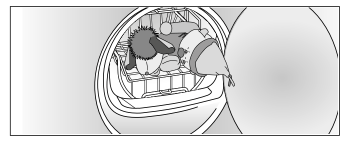
d)Soft toys
Dry soft toys in the basket for woollens without the insert.
Only place as many soft toys in the basket for woollens as is possible without any falling out.
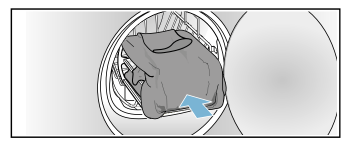
4.Place the insert or the sports shoes in the basket for woollens.
Caution!
Risk of material damage to the fabrics.
Place the fabrics in the insert of the basket for woollens so that they do not come into contact with the drum.
5. Use the programme selector to select the programme for the basket for woollens or a time programme.
6. Set the drying time.
Thin woollen pullover:
Approx. 1:20 hrs
Thick woollen pullover:
Approx. 1:30 hrs - 3:00 hrs
Skirt: Approx. 1:00 hr - 1:30 hrs
Trousers: Approx. 1:00 hrs - 1:30 hrs
Gloves: Approx. 30 min
Sports shoes: Approx. 1:30 hrs/ with airing max. 2:00 hrs
7.Start the programme.
8.Remove the fabrics and switch off the dryer.
Setting a programme
1. Select the required programme; detailed information on the programmes can be found from→ Page 26 onwards.
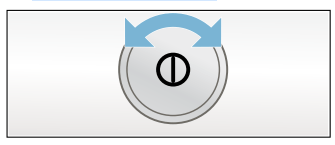
2.Use the programme selector to set the required programme. The default programme settings for the selected programme appear in the display panel.
3.If required, adjust the default programme settings. You can find detailed information on this from→Page 26 onwards.
Starting the programme
Press the Start button.
Programme sequence
The programme status is indicated in the display field.
Changing the programme or adding laundry
You can remove or add laundry and change or alter the programme at any time during drying.
- To pause the programme, open the dryer door or press the Start button.
- Add or remove laundry.
- Select another programme or an additional function, if required.
- Close the dryer door.
- Press the Start button.
Cancelling the programme
The programme can be interrupted at any time; to pause, open the dryer door or press the Start button.
Programme end
FERTIG. WAESCHE ENTNEHMEN. appears in the display panel.
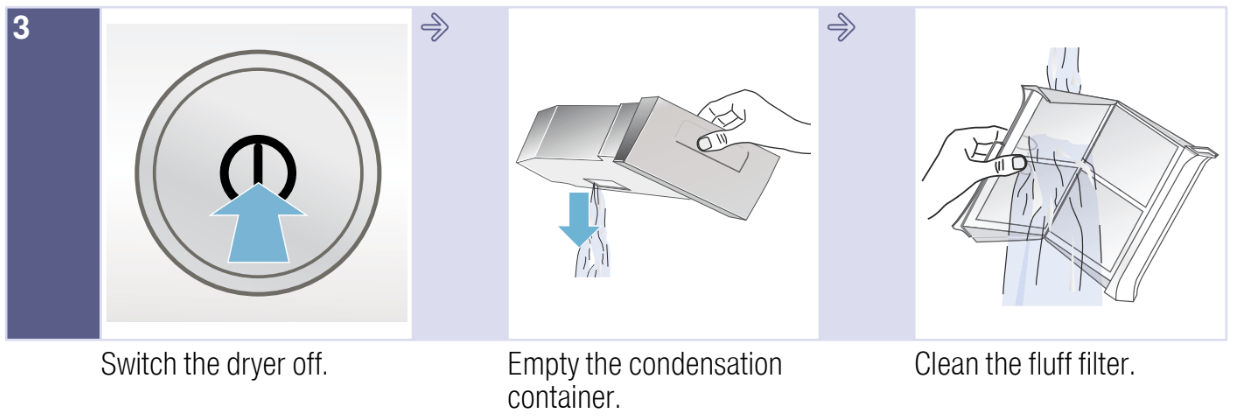
Removing laundry and switching off the dryer
1.Remove the laundry.
2. Press the  button to switch the dryer off.

Clean the fluff filter
Clean the fluff filter after each drying cycle:
1.Open the dryer door and remove all fluff from the door.
2.Pull out the two-part fluff filter.
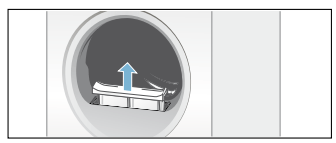
3.Remove the fluff from the recess in the fluff filter.
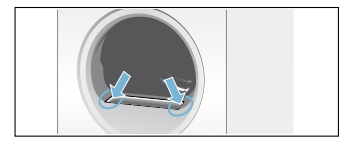
4.Pull apart the two-part fluff filter.
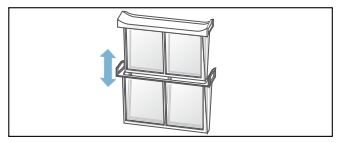
5.Open both filters and remove all the fluff.
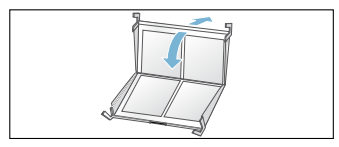
6.Rinse away the fluff under warm, running water.
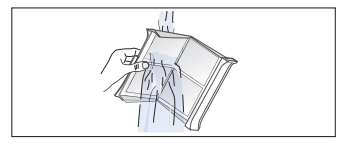
7.Dry the fluff filter, close it and reinsert the two-part fluff filter.
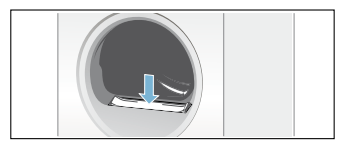
Emptying the condensate container
1. Pull out the condensate container horizontally.
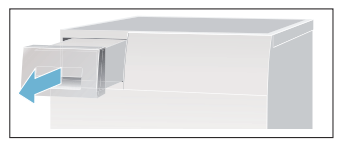
2. Pour out the condensation water.
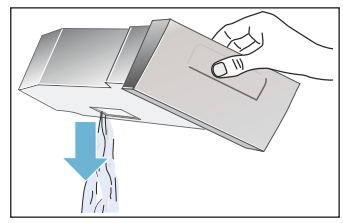
3. Push in the condensate container until you feel it lock back into place in the dryer.
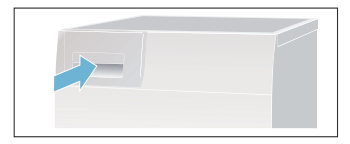
Cleaning
Cleaning the dryer and the control panel
Warning
Risk of death!
There is a risk of electric shock as the dryer is operated with electricity.
Disconnect the dryer from the mains before cleaning.
Clean the dryer using only water and a soft, damp cloth.
Remove all detergent residue, spray residue or other residues immediately.Do not use cleaning agents or agents for pre-treating laundry (e.g. prewash sprays, stain removers). Do not use high-pressure cleaners or steam jet cleaners to clean your appliance.
Cleaning the moisture sensor
Note: The dryer is equipped with a stainless-steel moisture sensor. The moisture sensor measures how damp the laundry is.
After long periods of usage the moisture sensor may become covered by a fine layer of limescale or residues of detergents and care products. Such residues must be removed regularly as the sensor function and in consequence the drying result may be impaired.
Open the door and clean the moisture sensor with a coarse sponge.
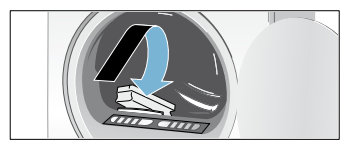
Caution!
Moisture sensor may be damaged.
Do not clean moisture sensors with abrasives and steel wool.
Cleaning the filter in the condensate container
1.Pull out the condensate container horizontally.
2.Pour out the condensation water.
3.Remove the filter.
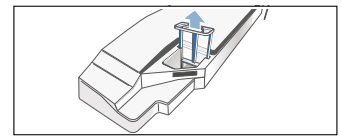
4.Clean the filter under warm, running water or in the dishwasher.
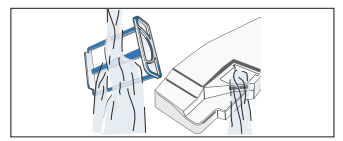
5.Push in the filter until you feel it lock into place.
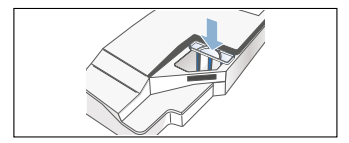
6. Push in the condensate container until you feel it lock into place.
Faults and what to do about them
Faults | Cause/remedy |
| Please empty the con-densate container on the display panel and the drying cycle is inter rupted. |
|
| Please clean the fluff filters on the display panel. | Clean the fluff filter and press the Start button → Page 32. |
| Heat exchanger is being rinsed on the dis- play panel. | Not a fault. The heat exchanger is cleaned automatically. Do not pull out the condensate container while this is displayed. |
| Dryer does not start. |
|
| Creasing. |
|
| Water is leaking out. | Not a fault; the dryer may be positioned on an incline. Level the dryer. |
| Change in the pro- gramme duration dis- played during drying. | Not a fault. The moisture sensors detect the remaining moisture in the load and adjust the programme length (except timed programmes). |
| Laundry is not dried cor- rectly or is still too damp. |
|
| Drying time too long? |
|
| Display panel goes off and Start button flashes. | Not a fault. Energy saving mode is active → Page 12. |
| Residual water in the condensate container despite the dryer being connected to the con- densation drain*. | Not a fault. If the condensation drain is installed, residual water remains in the condensate container due to the dryer's self-cleaning function. |
| Humidity in the room increases. | Not a fault. Make sure the room is sufficiently ventilated. |
| Power cut. | The drying programme is interrupted. Remove the laundry and spread it out, or restart the programme. |
| Unusual noises when drying. | Not a fault. Noises are produced by the automatic cleaning of the heat exchanger → Page 34. |
| The dryer feels cold despite drying. | Not a fault. The dryer can dry efficiently at low temperatures using a heat pump. |
See other models: WT47W580AU SN26M282AU WM14U940GB WU14Q420GB WM12N201GB
