
MX-T50
FULL MANUAL
Imagine the possibilities
Thank you for purchasing this Samsung product.
To receive more complete service, please register
your product at www.samsung.com/register
ENG - ii
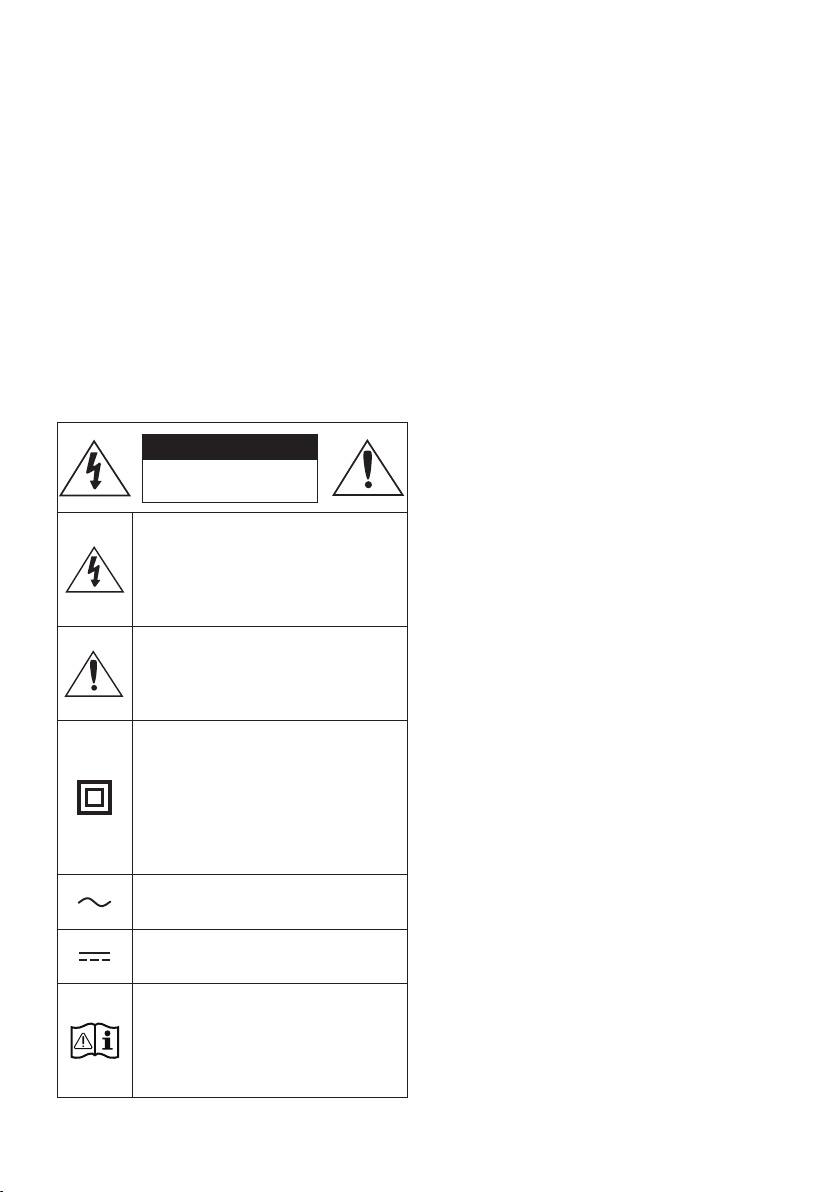
SAFETY INFORMATION
SAFETY WARNINGS
TO REDUCE THE RISK OF ELECTRIC SHOCK, DO
NOT REMOVE THE COVER (OR BACK).
NO USER-SERVICEABLE PARTS ARE INSIDE.
REFER SERVICING TO QUALIFIED SERVICE
PERSONNEL.
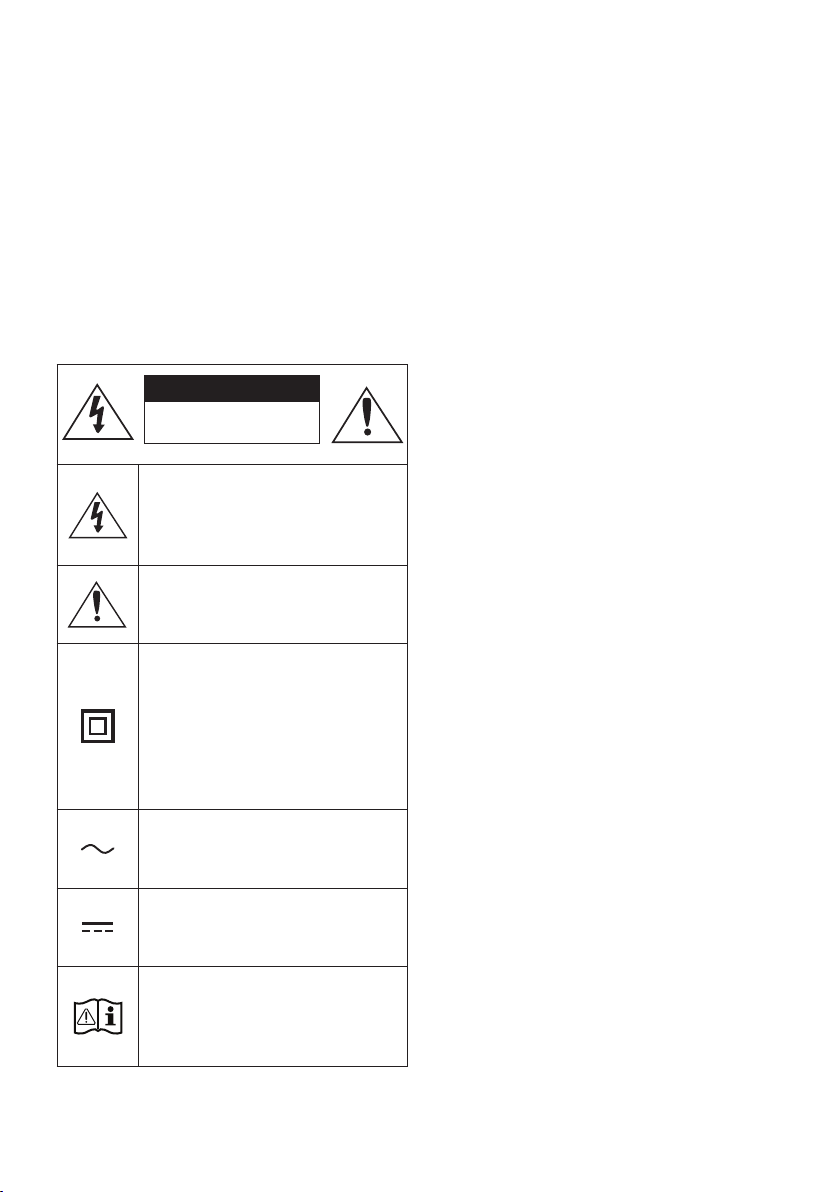
Refer to the table below for an explanation of
symbols which may be on your Samsung product.
CAUTION
RISK OF ELECTRIC SHOCK.
DO NOT OPEN.
This symbol indicates that high voltage
is present inside. It is dangerous to
make any kind of contact with any
internal part of this product.
This symbol indicates that this product
has included important literature
concerning operation and maintenance.
Class II product : This symbol indicates
that it does not require a safety
connection to electrical earth (ground).
If this symbol is not present on a
product with a power cord, the product
MUST have a reliable connection to
protective earth (ground).
AC voltage : This symbol indicates that
the rated voltage marked with the
symbol is AC voltage.
DC voltage : This symbol indicates that
the rated voltage marked with the
symbol is DC voltage.
Caution, Consult instructions for use :
This symbol instructs the user to
consult the user manual for further
safety related information.
WARNING
not expose this appliance to rain or moisture.
CAUTION
TO PREVENT ELECTRIC SHOCK, MATCH WIDE
BLADE OF PLUG TO WIDE SLOT, FULLY
INSERT.
This apparatus shall always be connected to a
AC outlet with a protective grounding
connection.
To disconnect the apparatus from the mains,
the plug must be pulled out from the mains
socket, therefore the mains plug shall be
readily operable.
Do not expose this apparatus to dripping or
liquids, such as vases on the apparatus.
To turn this apparatus off completely, you
must pull the power plug out of the wall
socket. Consequently, the power plug must
be easily and readily accessible at all times.
ENG - iii
PRECAUTIONS
1. Ensure that the AC power supply in your
house complies with the power
sticker located on the rear of your product.
Install your product horizontally, on a
suitable base (furniture), with enough space
around it for ventilation (7~10 cm). Make sure
the ventilation slots are not covered. Do not
equipment which may become hot. This unit
is designed for continuous use. To fully turn
off the unit, disconnect the AC plug from the
wall outlet. Unplug the unit if you intend to
leave it unused for a long period of time.
2. During thunderstorms, disconnect the AC
plug from the wall outlet. Voltage peaks due
to lightning could damage the unit.
3. Do not expose the unit to direct sunlight or
other heat sources. This could lead to
overheating and cause the unit to
malfunction.
4. Protect the product from moisture (i.e.
equipment creating strong magnetic or
the AC wall socket if the unit malfunctions.
Your product is not intended for industrial
use. It is for personal use only. Condensation
may occur if your product has been stored in
cold temperatures. If transporting the unit
during the winter, wait approximately
2 hours until the unit has reached room
temperature before using.
5. The battery used with this product contains
chemicals that are harmful to the
environment. Do not dispose of the battery
in the general household trash. Do not
expose the battery to excess heat, direct
disassemble, or overheat the battery.
Danger of explosion if the battery is replaced
incorrectly. Replace only with the same or
equivalent type.
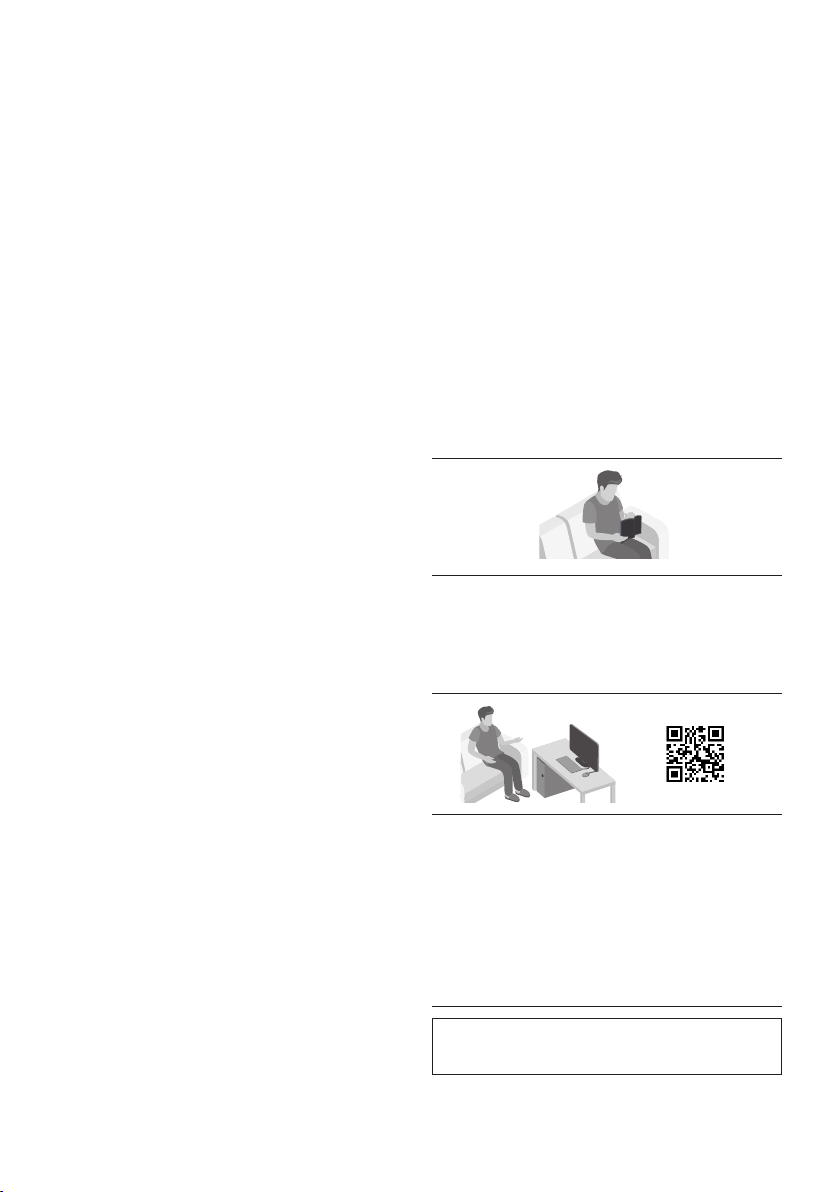
ABOUT THIS MANUAL
The user manual has two parts: this simple paper
USER MANUAL and a detailed FULL MANUAL you
can download.
USER MANUAL
See this manual for safety instructions,
product installation, components,
FULL MANUAL
You can access the FULL MANUAL on
Samsung’s on-line customer support centre by
scanning the QR code. To see the manual on
your PC or mobile device, download the
manual in document format from Samsung’s
website. (http://www.samsung.com/support)
without prior notice.

ENG - iv
CONTENTS
01 Checking the Components 2
Inserting Batteries before using the Remote Control
(AAA batteries X 2) ------------------------- 2
02 Product Overview 3
Top Panel of the Party Audio ------------------------- 3
Rear Panel of the Party Audio ------------------------- 4
03 Connecting the Party Audio 6
Connecting Electrical Power
-------------------------
6
How to use Audio Group
-------------------------
7
04 Connecting an External Device 12
Connecting using an Analogue Audio (AUX) Cable
-------------------------
12
Connecting a mobile device via Bluetooth
-------------------------
13
05 Connecting a USB Storage Device 16
Software Update
-------------------------
17
06 Using the Remote Control 18
How to Use the Remote Control
-------------------------
18
How to use Sound Mode
-------------------------
20
How to use the DJ Effect
-------------------------
20

ENG - v
07 Using the Samsung Giga Party Audio app 21
Install Samsung Giga Party Audio App
-------------------------
21
Launching the Samsung Giga Party Audio App
-------------------------
21
08 Troubleshooting 22
09 Licence 23
10 Open Source Licence Notice 23
11 Important Notes About Service 23
12 SpecicationsandGuide 24
-------------------------
24

ENG - 2
01 CHECKING THE COMPONENTS
Party Audio Main Unit Remote Control / Batteries Power Cord
For more information about the power supply and power consumption, refer to the label attached
to the product. (Label: Rear of the Party Audio Main Unit)
To purchase additional components or optional cables, contact a Samsung Service Centre or
Samsung Customer Care.
When moving the product, do not drag or pull the product from the ground. Lift the product when
moving the product.
Inserting Batteries before using the Remote Control
(AAA batteries X 2)
Slide the battery cover in the direction of the arrow
until it is completely removed. Insert 2 AAA
batteries (1.5V) oriented so that their polarity is
correct. Slide the battery cover back into position.
ENG - 3
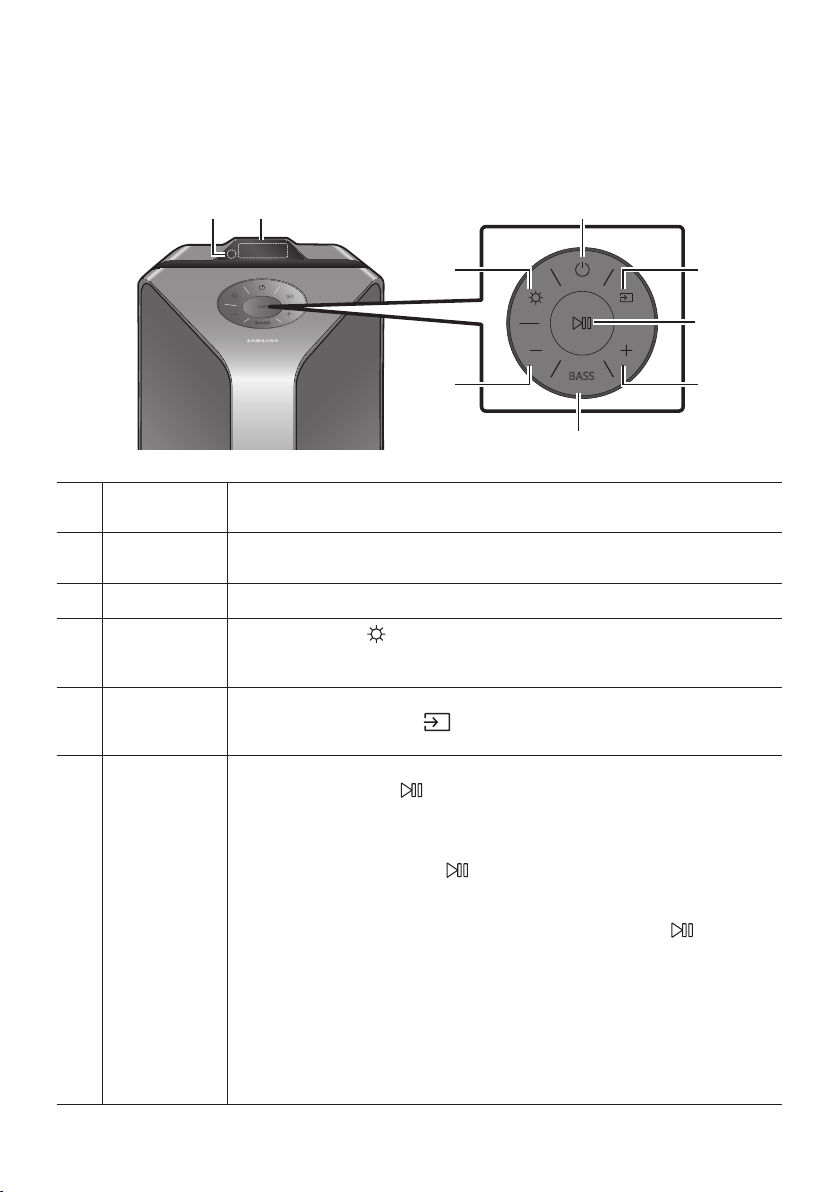
02 PRODUCT OVERVIEW
Top Panel of the Party Audio
BASS
Remote
Sensor
When operating the Party Audio system, please aim the front of the remote control at
the remote sensor.
Display
Window
Displays operating messages or current status of the Party Audio system.
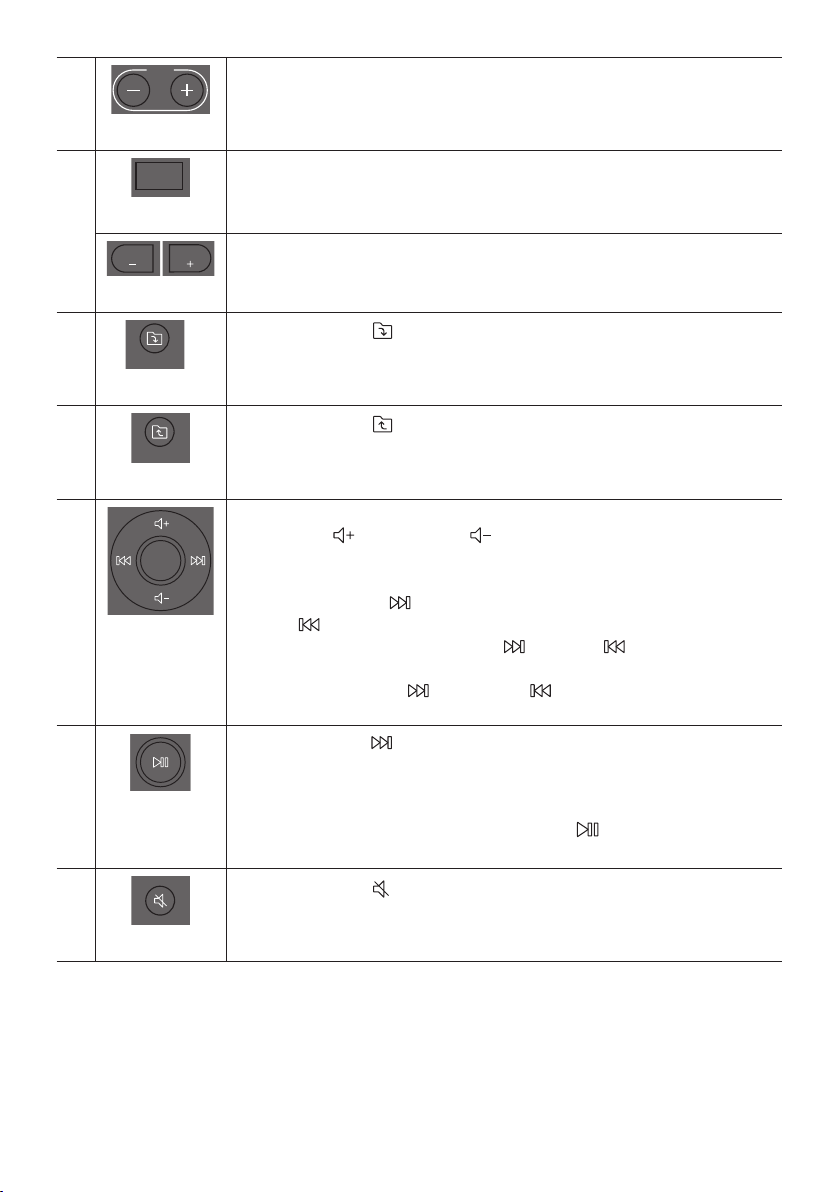
Power Turns the Party Audio on and off.
Light
Press the
(Light) button to turn the Lighting Mode on.
Press the button repeatedly to cycle through the available lighting modes:
AMBIENT, PARTY, DANCE, THUNDERBOLT, STAR or OFF.
Source
Press to select a source connected to the Party Audio.
Press and hold the (Source)
button for more than 5 seconds
to enter the “BT
PAIRING” mode.
Play/Pause
Play/Pause
Press the
Demo play
Press and hold the
button for more than 5 seconds to start the Demo play while
the system is turned on. “DEMO” appears on the display and it plays demo music for
To cancel Demo Play, press and hold the
button for more than 5 seconds during
Demo Play.
– If you input any commands while in demo play, 60 seconds timer is refreshed.
– All the buttons on the remote control and rear panel are disabled while in demo
play. If you want to use the remote control, cancel the demo play.
– Demo play is cancelled when you change the source or power off the system.
ENG - 4
Volume down
Press the (Volume down) button to lower the volume.
Press and hold the (Volume down) button to quickly lower the volume.
Volume up
Press the (Volume up) button to raise the volume.
Press and hold the (Volume up) button to quickly raise the volume.
BASS
Press the BASS button to use the powerful bass sound.
Press it again to return to the normal sound.
Press and hold the BASS button for more than 5 seconds to turn on or off the
BLUETOOTH POWER function.
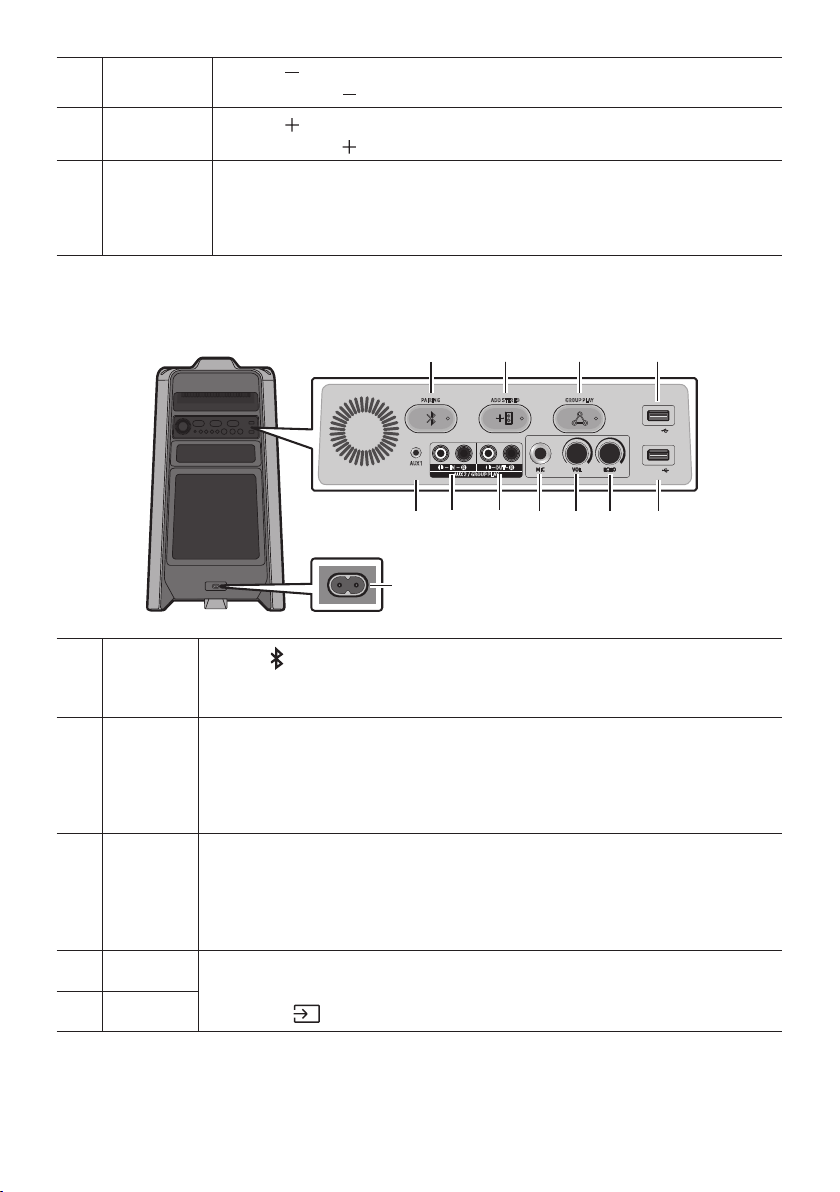
Rear Panel of the Party Audio
ADD STEREO GROUP PLAYPAIRING
AUX 1
AUX 2 / GROUP PLAY
IN
OUT
L
R
L
R
USB1
(5V 2.1A)
USB2
(5V 0.5A)
ECHOVOLMIC
OUT
Bluetooth
PAIRING
Press the PAIRING button to enter the “BT PAIRING” mode.
You can connect the Party Audio to a new Bluetooth device in this mode by selecting the
Party Audio from the Bluetooth device's search list.
ADD
STEREO
Press the ADD STEREO button to connect to another Party Audio wirelessly.
Press the ADD STEREO button again before connecting another Party Audio to exit Stereo
Group mode. When the connection is made, you can enjoy stereo sound.
Press and hold the ADD STEREO button for more than 5 seconds to disconnect the Stereo
Group mode.
GROUP
PLAY
Press the GROUP PLAY button to connect up to ten Party Audio systems wirelessly.
Press the GROUP PLAY button again before connecting other Party Audio to exit wireless
Group Play. When the connection is made, you can use multiple Party Audio systems at
the same time using Group Play mode. Press and hold the GROUP PLAY button for more
than 5 seconds to disconnect the wireless Group Play mode.
USB1
Connect a USB device to the USB1 or USB2 ports on the main unit.
If you connect your cell phone to the USB1 port, you can charge it.
Press the (Source) button to select USB1 or USB2.
USB2

ENG - 5
ECHO
You can give an echo effect to the sound from a connected microphone (MIC) by adjusting
the ECHO knob.
If you turn clockwise, the echo effect goes up, and if you turn counter-clockwise, the echo
effect goes down.
VOL
Use the VOL knob to adjust the volume of a connected microphone (MIC).
If you turn clockwise, the volume goes up, and if you turn counter-clockwise, the volume
goes down.
MIC Connect your microphone to the MIC jack.
GROUP
PLAY OUT
Terminals
Use an Audio Cable (not supplied) to connect GROUP PLAY (OUT) terminals on the main
unit to Audio In on an external analogue output device.
Be sure to match connector colours.
If the external analogue output device has only one Audio In jack, connect either left or
right.
AUX2/
GROUP
PLAY IN
Terminals
Use an Audio Cable (not supplied) to connect AUX2 (IN) terminals on the main unit to
Audio Out on an external analogue output device.
Be sure to match connector colours.
If the external analogue output device has only one Audio Out jack, connect either left
or right.
Press the (Source) button to select AUX2.
If the product is in AUX2 mode with no playback and no command input for more than
20 minutes, the system will turn off.
If the product is in AUX2 mode with playback for more than 8 hours and no command
input, the system will turn off.
AUX1
Use an Audio (AUX) Cable (not supplied) to connect AUX1 jack on the main unit to Audio
Out on an external device.
If the product is in AUX1 mode with no playback and no command input for more than
20 minutes, the system will turn off.
If the product is in AUX1 mode with playback for more than 8 hours and no command
input, the system will turn off.
Power
Connect the power cord to the Power jack and connect the other end of the power cord to
a wall socket to supply electrical power to the Party Audio.

ENG - 6
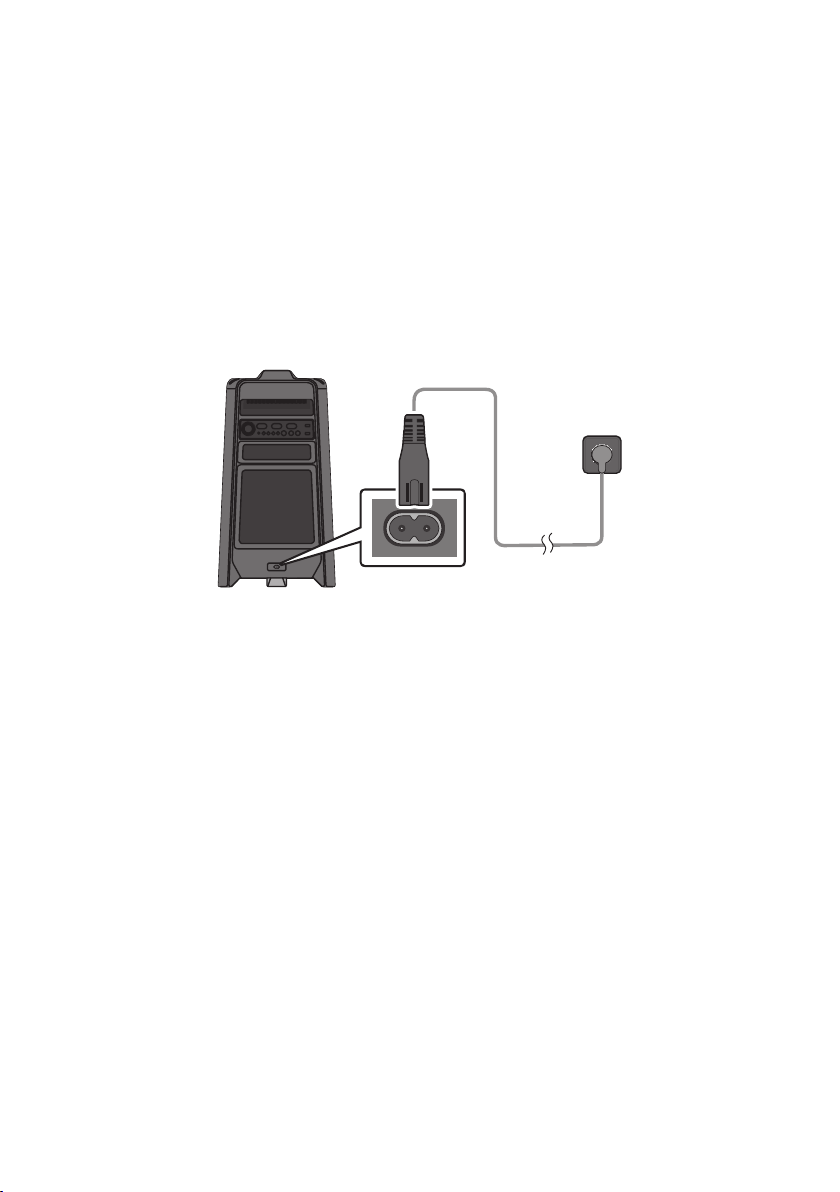
03 CONNECTING THE PARTY AUDIO
Connecting Electrical Power
Use the power cord to connect the Party Audio to an electrical outlet in the following order:
Connect the power cord to the Party Audio and then to a wall socket.
See the illustrations below.
For more information about the required electrical power and power consumption, refer to the
label attached to the product. (Label: Rear of the Party Audio)
Connecting
Electrical Power
Rear of Party Audio

ENG - 7
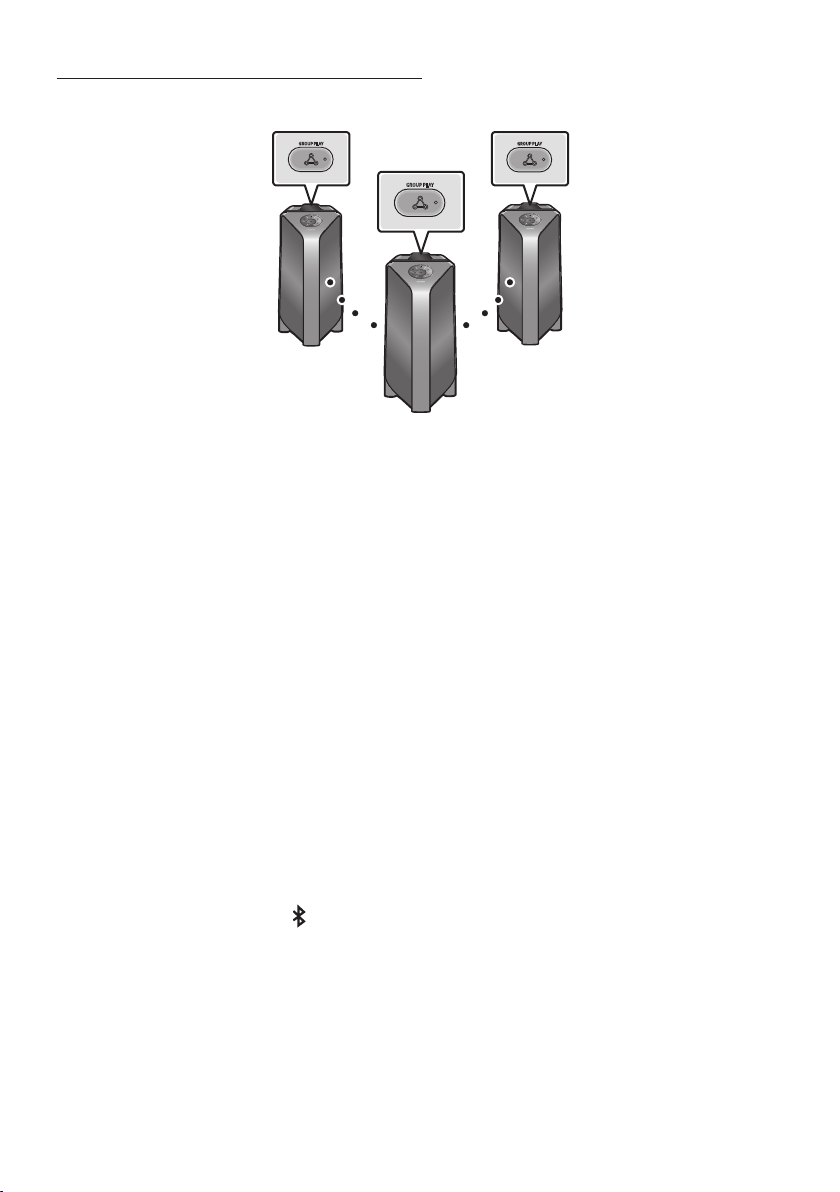
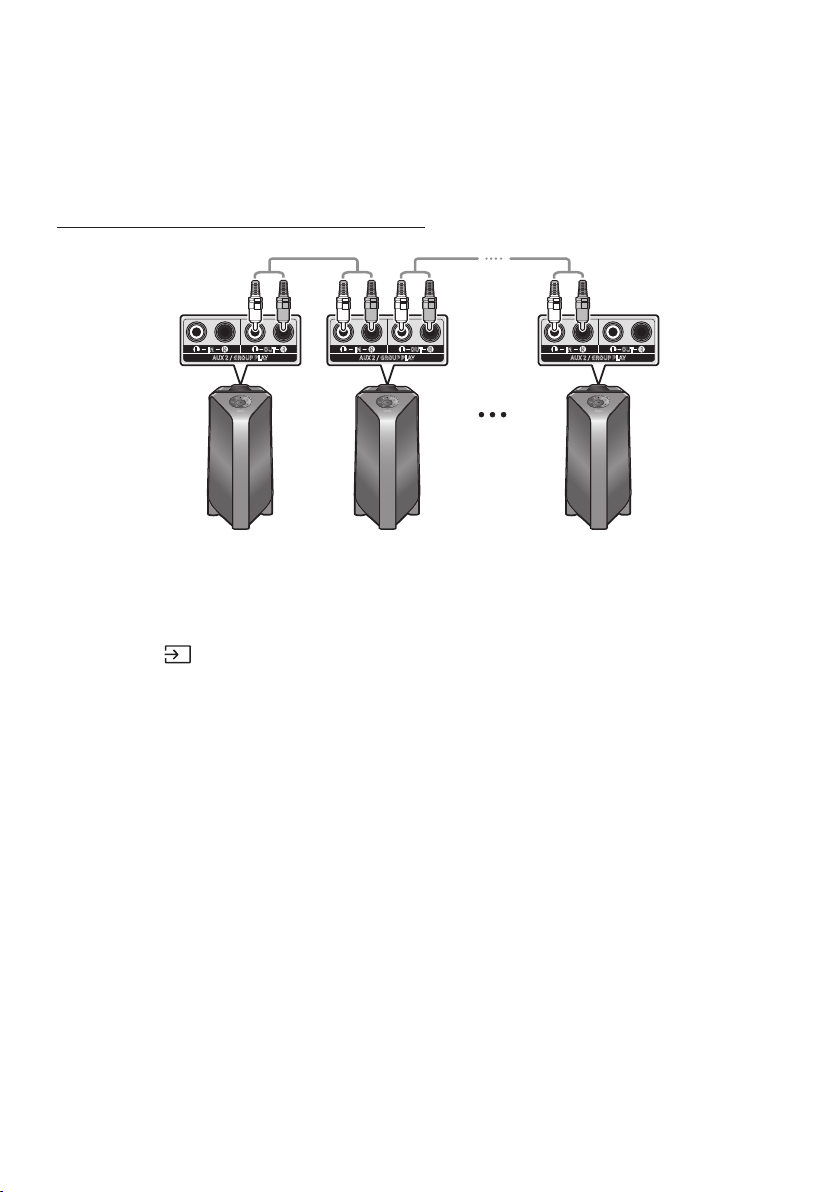
How to use Audio Group
You can connect multiple audio systems in a group to create a party environment and produce higher
sound output. Set one Party Audio as the host and any music played on it will be shared among any
other Party Audio systems in the Audio group.
Connecting the wired Group Play mode
AUX 2 / GROUP PLAY
IN
OUT
L
R
L
R
AUX 2 / GROUP PLAY
IN
OUT
L
R
L
R
AUX 2 / GROUP PLAY
IN
OUT
L
R
L
R
1st
Party Audio Host
2nd
Party Audio
Last
Party Audio
Continue the
connection until
the last Party
Audio
Set up Group Play by connecting all the systems using audio cables (not supplied). Use the AUX or
(Source) button to change the source to AUX2 for every Party Audio system except the 1st (or host)
Party Audio system.
NOTES
The 1st Party Audio Host can play music from any source.
Depending on the length or characteristics of the cable, there may be a difference in operating
distance.
ENG - 8
Connecting the wireless Group Play mode
You can connect up to ten Party Audio systems with the wireless Group Play function.
GROUP PLAY
GROUP PLAY
GROUP PLAY
Host
Slave 1
Slave 2
1. Press the GROUP PLAY button on the Host Party Audio system. The “HOST” message appears on
the display of the host Party Audio and the LED blinks on the GROUP PLAY button.
2. Press the GROUP PLAY button on the 2nd Party Audio system (Slave 1). The “GROUP PLAY
CONNECTED” message appears on the display and the GROUP PLAY button on both systems
stops blinking.
3. Press the GROUP PLAY button on the 3rd Party Audio system (Slave 2). The “GROUP PLAY
CONNECTED” message appears on the display and the GROUP PLAY button on the system stops
blinking.
4. If you want to add more Party Audio systems, repeat step 3.
5. Play music on the Host Party Audio. Sound outputs from all the connected systems.
NOTES
The wireless Group Play connection is available for any Party Audio system.
Environmental conditions or other factors with connected devices may have effect on playback
quality.
If the red LED is on the GROUP PLAY button, an error has occurred in the wireless Group Play
connection. Try step 1 to step 5 again.
The ADD STEREO button and PAIRING button on the slave Party Audio systems are not available
while in wireless Group Play mode.
The ADD STEREO button on the host Party Audio system is not available while in wireless Group
Play mode.
When adding a slave unit, if you press and hold GROUP PLAY on the slave, before the “GROUP PLAY
CONNECTED” message appears, it will become the Host unit instead.

ENG - 9
All slave units must be connected one by one. For example, after Host is connected, press GROUP
PLAY button on slave 1 to connect, and after slave 1 is connected, you should connect slave 2 and
slave 3 one by one sequentially.
While using Group Play, currently connected Bluetooth devices are disconnected and Bluetooth
connection is disabled.
Bluetooth devices can search and connect with the host Party Audio only.
When in Group Play mode, the slaves cannot connect to a Bluetooth device.
If you power off and then power on the Party Audio or select any source other than BT on a slave
unit, in Group Play mode, the Group Play mode is disconnected.
This product does not support aptX audio stream with Wireless Group Play mode.
Disconnecting the wireless Group Play mode
1. Press and hold the GROUP PLAY button over 5 seconds (Host or Slaves) after Group Play is
connected or press the GROUP PLAY button (Host or Slaves) before Group Play is connected.
“OFF-GROUP PLAY” appears on the display and the LED above the GROUP PLAY button is off.
2. If you select any source other than BT on the slave units or turn off the host Party Audio, the Group
Play mode is disconnected.
If the disconnection is made from the host Party Audio, Group Play is disconnected.
LED Indications
LED STATE Description
Green
Blink Waiting for a wireless Group Play connection.
Solid The wireless Group Play connection was successful.
Red Solid There is an error with the wireless Group Play connection.
NOTE
In wireless connection, Playback quality can be unstable depending on Bluetooth environment.
For better play, please keep the device in wired Group Play mode.

ENG - 10
Using the Stereo Group mode
You can enjoy stereo sound by connecting two Party Audio systems.
ADD STEREO
ADD STEREO
Left Party Audio
(Master)
Right Party Audio
(Slave)
1. Press the ADD STEREO button on the left Party Audio system. The “ADD STEREO” message
appears on the display and the LED blinks on the ADD STEREO button.
2. Press the ADD STEREO button on the right Party Audio system. The “ADD STEREO” message
appears on the display and the LED blinks on the ADD STEREO button.
3. When the connection is made, The “BT PAIRING” message appears on the master Party Audio
system and “STEREO MODE” appears on the slave Party Audio system.
The master Party Audio system outputs left channel sound and the slave Party Audio system
outputs right channel sound. If you want to change the sound channels of Party Audio systems,
press the ADD STEREO button on the current master Party Audio system.
4. Play music on the Party Audio. Sound outputs from both Party Audio systems.
NOTES
To use the Stereo Group mode, both Party Audio systems must be the same model.
Environmental conditions or other factors with connected devices may have effect on playback
quality.
If the red LED is on the ADD STEREO, an error has occured in the Stereo Group connection. Try step
1 and step 4 again.
All the buttons except ADD STEREO button and Power on the slave Party Audio systems are
disabled while in Stereo Group mode.
The GROUP PLAY button on the host Party Audio system is not available while in Stereo Group
mode.

ENG - 11
While in Stereo Group mode, currently connected Bluetooth devices are disconnected and
Bluetooth connection is disabled.
If you select any source other than BT or power cycle the master Party Audio, the Stereo Group
mode is disconnected.
This product does not support aptX audio stream with Wireless Group Play mode.
If you try to connect a Bluetooth device while Stereo Group is connecting, the Stereo Group mode
may fail.
Disconnecting the Stereo Group mode
1. Press and hold the ADD STEREO button over 5 seconds (Master or Slave) after Stereo Group is
connected or press the ADD STEREO button (Master or Slave) before Stereo Group is connected.
“OFF-ADD STEREO” appears on the display and the LED above the ADD STEREO button is off.
2. If you select any source other than BT on the slave units or the master Party Audio is turned off
and then back on, the Stereo Group mode is disconnected.
If one of the Party Audio is disconnected from Stereo Group mode, another Party Audio is
automatically disconnected.
LED Indications
LED STATE Description
Green
Blink Waiting for a Stereo Group connection.
Solid The Stereo Group connection is successful.
Red Solid There is an error with the Stereo Group connection.
ENG - 12
04 CONNECTING AN EXTERNAL DEVICE
Connect to an external device via a wired or wireless network to play the external device’s sound
through the Party Audio.
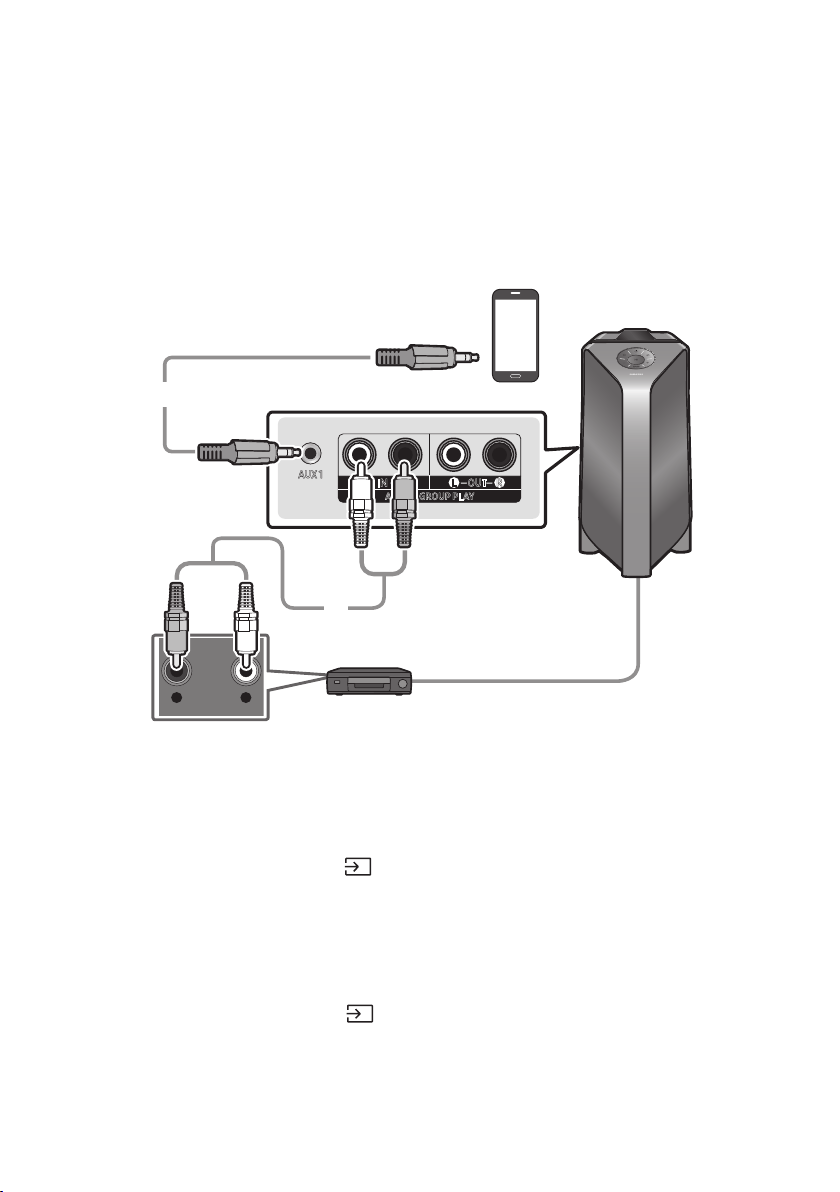
Connecting using an Analogue Audio (AUX) Cable
- AUDIO -
R L
AUX 1
AUX 2 / GROUP PLAY
IN
OUT
L
R
L
R
Mobile device / MP3 / PMP
BD / DVD player / Set-top box / Game console
3.5 mm stereo cable
(not supplied)
Audio (AUX) Cable (not supplied)
Rear of the Party Audio
3.5 mm stereo Cable (AUX1)
1. Connect AUX1 jack on the main unit to the AUDIO OUT jack of the Source Device using an
3.5 mm stereo cable .
2. Select “AUX1” mode by pressing the (Source) button on the top panel or on the remote control.
You can also select a source using AUX button on the remote control.
Audio Cable (AUX2)
1. Connect AUX2 (IN) terminals on the main unit to the AUDIO OUT terminals of the Source Device
using an audio cable .
2. Select “AUX2” mode by pressing the (Source) button on the top panel or on the remote
control.
You can also select a source using AUX button on the remote control.
ENG - 13
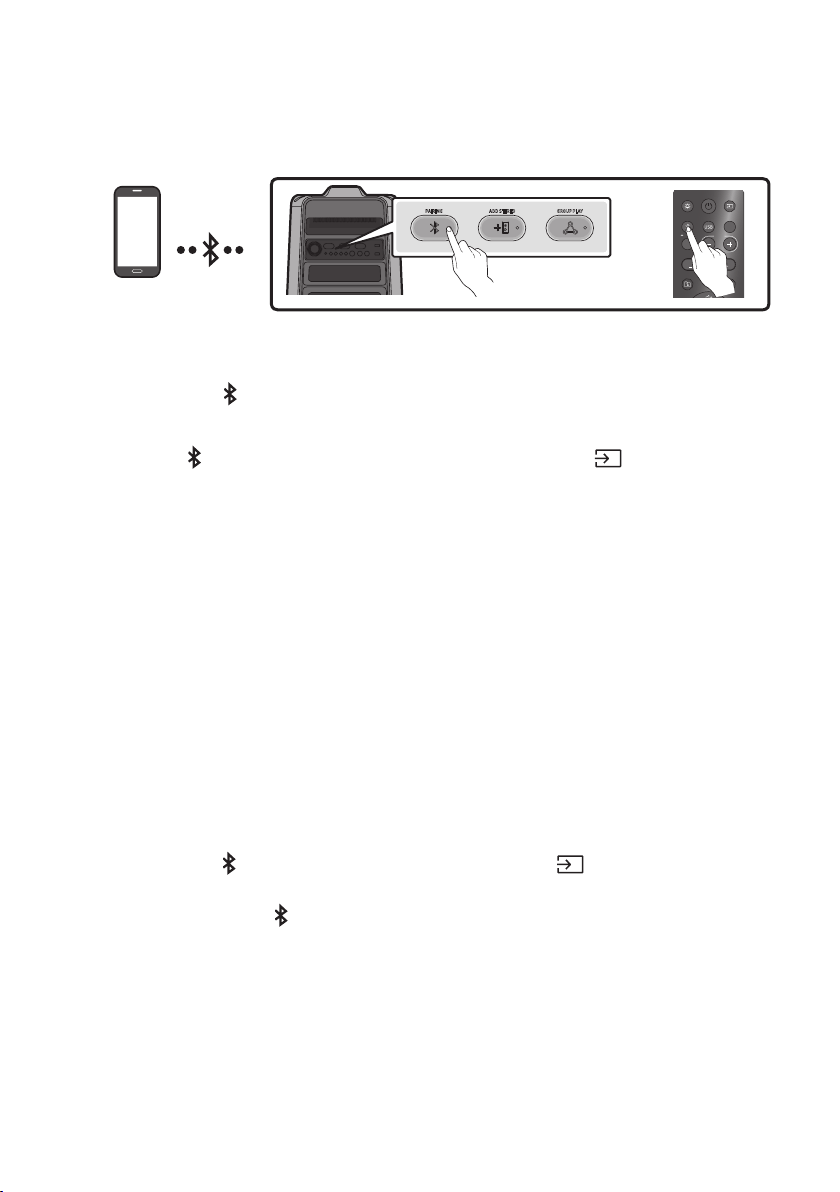
Connecting a mobile device via Bluetooth
When a mobile device is connected using Bluetooth, you can hear stereo sound without the hassle of
cabling.
Bluetooth device
ADD STEREO GROUP PLAYPAIRING
LIGHT
PAIRING
TEMPO
USB
AUX
EFFECT
DOWN
UP
EFFECT
DJ
SOUND
MODE
OR
The initial connection
1. Press and hold the PAIRING button on the remote control for more than 5 seconds to enter the
“BT PAIRING” mode.
(OR)
Press the PAIRING button on the rear panel or press and hold the (Source)
button on
the top panel
for more than 5 seconds to enter the “BT PAIRING” mode.
2. On your device, select “[AV] Samsung Party T50” from the list that appears.
When the Party Audio is connected to the Bluetooth device, [Bluetooth Device NameBT”
appears in the front display.
3.
If the device fails to connect
If a previously connected Party Audio listing (e.g. “[AV] Samsung Party T50”) appears in the list,
delete it.
Then repeat steps 1 and 2.
What is the difference between BT READY and BT PAIRING?
BT READY : In this mode, you can search for previously connected TVs or connect a previously
connected mobile device to the Party Audio.
BT PAIRING : In this mode, you can connect a new device to the Party Audio.
(Press and hold the PAIRING button on the remote control or the
(Source) button on top of
the Party Audio for more than 5 seconds to enter the “BT PAIRING” mode.)
– You can also press the PAIRING button on the rear of the Party Audio to enter the “BT
PAIRING” mode.

ENG - 14
Bluetooth Multi connection
Party Audio supports up-to two simultaneous Bluetooth device connections. Party Audio can play
music through one of the connected Bluetooth devices without disconnecting the second device.
Bluetooth device 1 Bluetooth device 2
1.
(See page 13)
2. Music can be played on only one of the two connected devices, and when the music is played on
the other device, the music on the playing device is paused.
NOTES
If you want to connect Party Audio to a third device, you can disconnect Party Audio from one of the
two currently connected devices and then connect Party Audio to the third device.
With the Party Audio and two devices currently connected, when pairing to a new Bluetooth device,
the devices currently connected maybe disconnected.
You can connect to two Bluetooth devices at the same time.
If asked for a PIN code when connecting a Bluetooth device, enter <0000>.
Environmental conditions or other factors with connected devices may have effect on playback
quality.
The Party Audio automatically turns off after 20 minutes with no command input in the ready state.
The Party Audio may not perform Bluetooth search or connection correctly under the following
circumstances:
–
– If several Bluetooth devices are simultaneously paired with the Party Audio.
– If the Bluetooth device is turned off, not in place, or malfunctions.
Electronic devices may cause radio interference. Devices that generate electromagnetic waves
must be kept away from the Party Audio main unit - e.g., microwaves, wireless LAN devices, etc.
When the Party Audio is connected to your TV by Bluetooth connection, the video on the TV and
audio from the Party Audio may not be synchronised because the distance between the Party
Audio and the TV is too far. It is recommended to move the Party Audio closer to your TV within
1 meter.

ENG - 15
When the speaker is in the Bluetooth Multi connection mode, you will need to connect the other
Bluetooth device and speaker within a few minutes (Approx. 1 minute). Otherwise Bluetooth Multi
connection mode will be cancelled.
Bluetooth Multi connection may not be supported depending on the connected device’s
Removable/detachable Bluetooth devices (Ex:Dongle etc..) ,windows phone, laptops, TV, etc. do not
support Bluetooth Multi connection.
After Bluetooth Multi connection pairing, there may be a slight delay before music starts playing
depending on the Bluetooth devices.
device, it may take a few minutes to connect other Bluetooth devices. If you turn the Party Audio off
and back on, you can connect other Bluetooth devices without waiting.
LED Indications
LED STATE Description
Blue
Fast Blink BT PAIRING mode
Blink BT READY mode
Solid A Bluetooth device is connected.
Using Bluetooth Power On
When the Party Audio is turned off, you can connect your smart device via a Bluetooth connection to
turn it on.
1. Press and hold the BASS button on the remote control or on the top panel to set the Bluetooth
Power On function on. “ON-BLUETOOTH POWER” appears on the display.
2. When the Party Audio is off, connect your smart device via Bluetooth. (For information on
Bluetooth connections, refer to your smart device’s manual.)
3. When the connection is complete, the Party Audio turns itself on automatically in Bluetooth mode.
Select the desired music to play from your smart device.
NOTE
Press and hold the BASS button for more than 5 seconds on the remote control or on the top panel to
turn the Bluetooth Power On function on or off.
Each time you press the BASS button, the Party Audio displays :
ON-BLUETOOTHPOWER→OFF-BLUETOOTHPOWER
ENG - 16
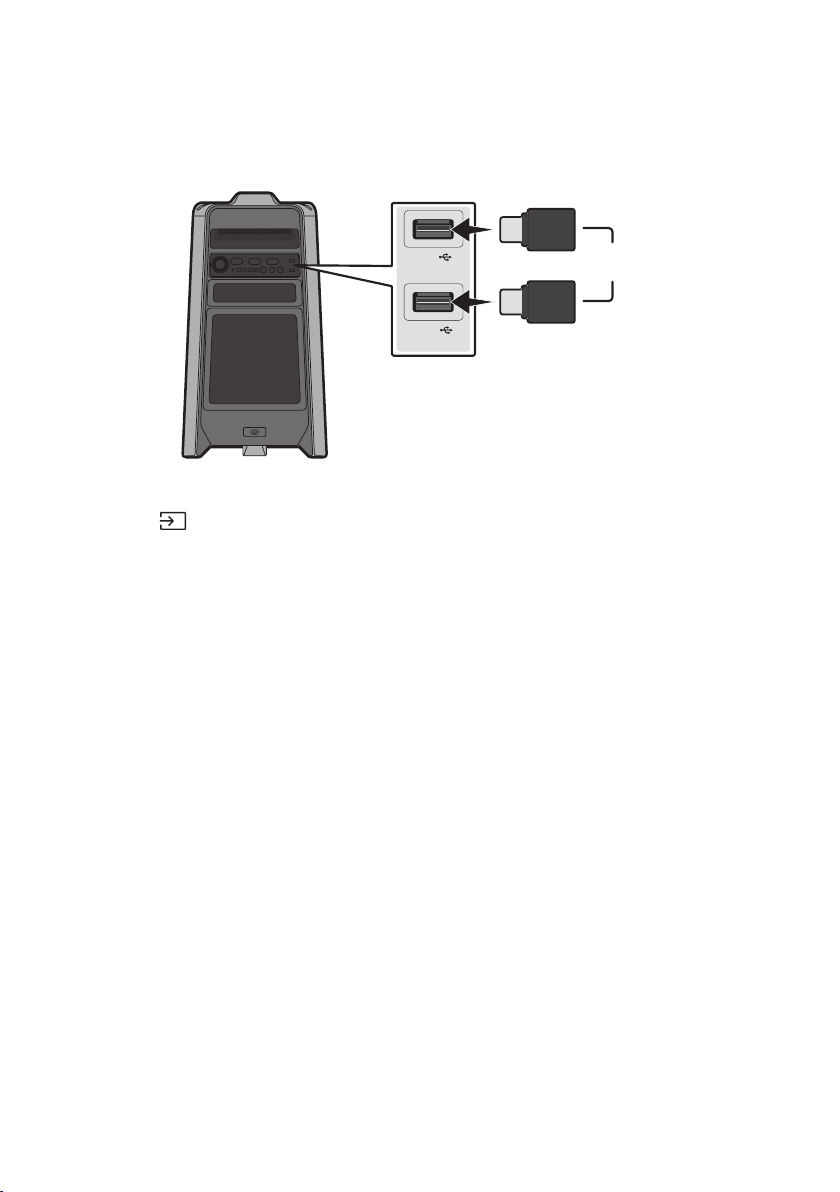
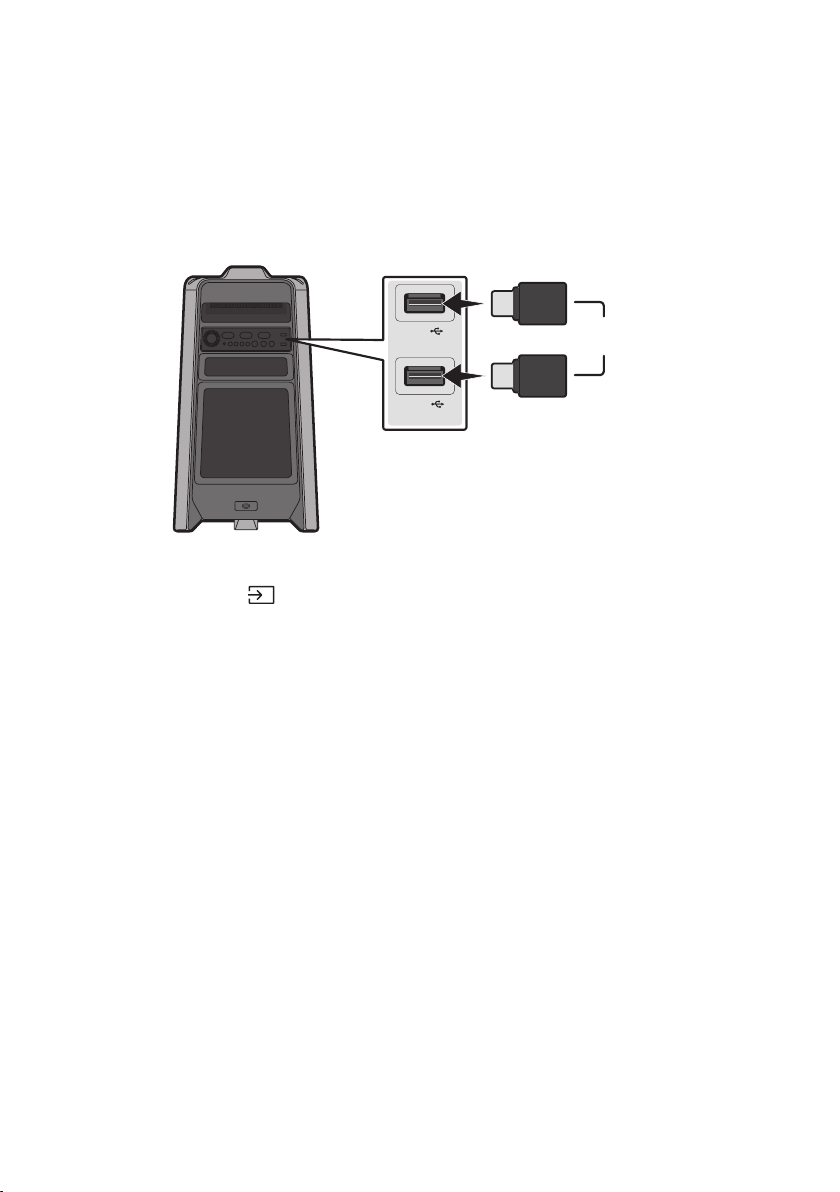
05 CONNECTING A USB STORAGE DEVICE
USB1
(5V 2.1A)
USB2
(5V 0.5A)
OR
USB storage device
(not supplied)
Rear of the Party Audio
1. Connect a USB storage device to the USB1 or USB2 jacks on your Party Audio.
2. Press the (Source) button on the top panel or on the remote control, and then select “USB1” or
“USB2”.
You can also select a source using USB button on the remote control.
3. “USB1” or “USB2” appears in the display screen.
4.
The Party Audio automatically turns off (Auto Power Down) if USB device is not connected,
playback stopped, or there is no input for more than 20 minutes.
NOTES
system.
This product does not support HDD storage or storage on mobile devices.
A maximum of 256 folders can be read per USB storage device.

ENG - 17
Supported Audio Formats
File Extension Audio Codec Sampling Rate Bit Rate
*.mp3
MPEG 1 Layer3 32 kHz ~ 48 kHz 32 kbps ~ 320 kbps
MPEG 2 Layer3 16 kHz ~ 24 kHz 8 kbps ~ 160 kbps
MPEG 2.5 Layer3 8 kHz ~ 12 kHz 8 kbps ~ 160 kbps
*.wma WMA7/8/9 8 kHz ~ 48 kHz 32 kbps ~ 320 kbps
*.aac
AAC 8 kHz ~ 96 kHz < 1728 kbps
A AC- LC 8 kHz ~ 96 kHz < 1728 kbps
HE-AAC 8 kHz ~ 96 kHz < 1728 kbps
*.wav
PCM/LPCM/
IMA_ADPCM
8 kHz ~ 192 kHz < 5 Mbps
- 8 kHz ~ 192 kHz < 5 Mbps
NOTES
This product does not support WMA Professional codec.
The above table shows supported sampling rates and bit rates. Files in formats that are not
supported will not play.
Software Update
SamsungmayofferupdatesforthePartyAudio’ssystemrmwareinthefuture.
update stored on it to the USB1 or USB2 port on your Party Audio. For more information about how to
Then, enter or select the model number of your Party Audio, select the Software & Apps option, and
then Downloads. Note that the option names can vary.
ENG - 18
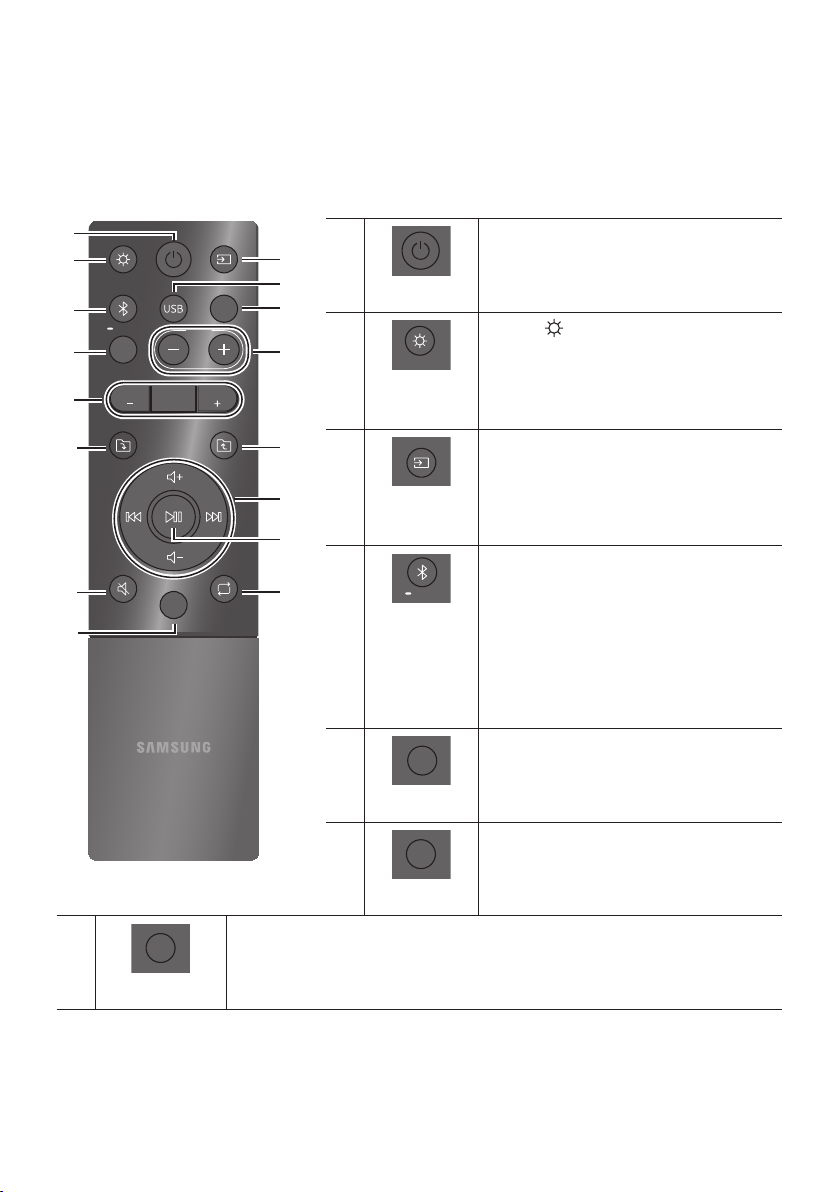
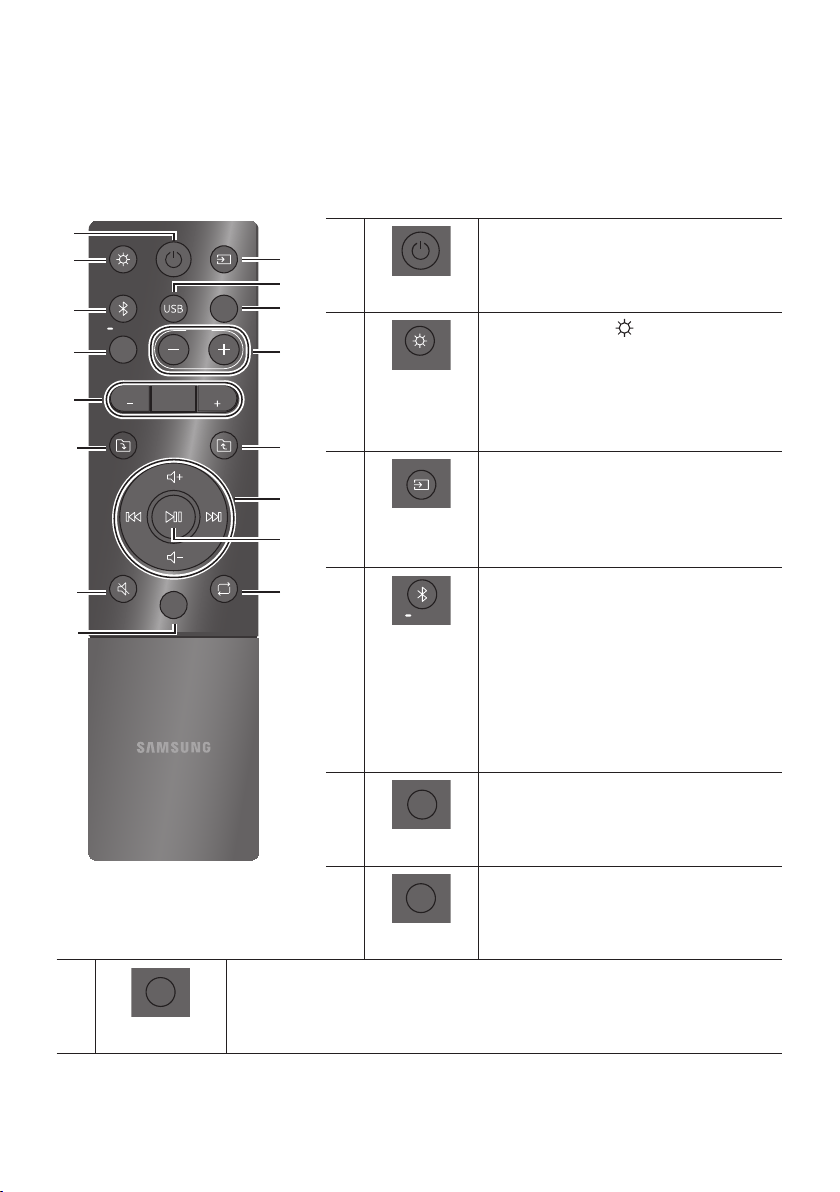
06 USING THE REMOTE CONTROL
How to Use the Remote Control
LIGHT
PAIRING
TEMPO
USB
AUX
EFFECT
DOWN
UP
BASS
EFFECT
DJ
SOUND
MODE
Power
DOWN
UP
BASS
EFFECT
EFFECT
DJ
LIGHT
PAIRING
TEMPO
USB
AUX
SOUND
MODE
Turn the Party Audio on and off.
LIGHT
DOWN
UP
BASS
EFFECT
EFFECT
DJ
LIGHT
PAIRING
TEMPO
USB
AUX
SOUND
MODE
Press the (LIGHT) button to turn the
Lighting Mode on.
Press the button repeatedly to cycle through
the available light modes: AMBIENT, PARTY,
DANCE, THUNDERBOLT, STAR or OFF.
Source
DOWN
UP
BASS
EFFECT
EFFECT
DJ
LIGHT
PAIRING
TEMPO
USB
AUX
SOUND
MODE
Press to select a source connected to the Party
Audio.
Press the button repeatedly to cycle through
the available sources: BT, USB1, USB2, AUX1 or
AUX2 .
Bluetooth
PAIRING
DOWN
UP
BASS
EFFECT
EFFECT
DJ
LIGHT
PAIRING
TEMPO
USB
AUX
SOUND
MODE
Press to select a source connected directly to
"BT" mode.
Press and hold the button for more than
5 seconds to enter the "BT PAIRING" mode.
You can connect the Party Audio to a new
Bluetooth device in this mode by selecting the
Party Audio from the Bluetooth device's
search list.
USB
DOWN
UP
BASS
EFFECT
EFFECT
DJ
LIGHT
PAIRING
TEMPO
USB
AUX
SOUND
MODE
Press to select the USB1 or USB2 sources
connected to the Party Audio.
AUX
DOWN
UP
BASS
EFFECT
EFFECT
DJ
LIGHT
PAIRING
TEMPO
USB
AUX
SOUND
MODE
Press to select the AUX1 or AUX2 sources
connected to the Party Audio.
SOUND MODE
DOWN
UP
BASS
EFFECT
EFFECT
DJ
LIGHT
PAIRING
TEMPO
USB
AUX
SOUND
MODE
Press the button repeatedly to cycle through the available sound effects: PARTY,
STANDARD, HIPHOP, EDM, ROCK, LATIN, HOUSE or REGGAE.
ENG - 19
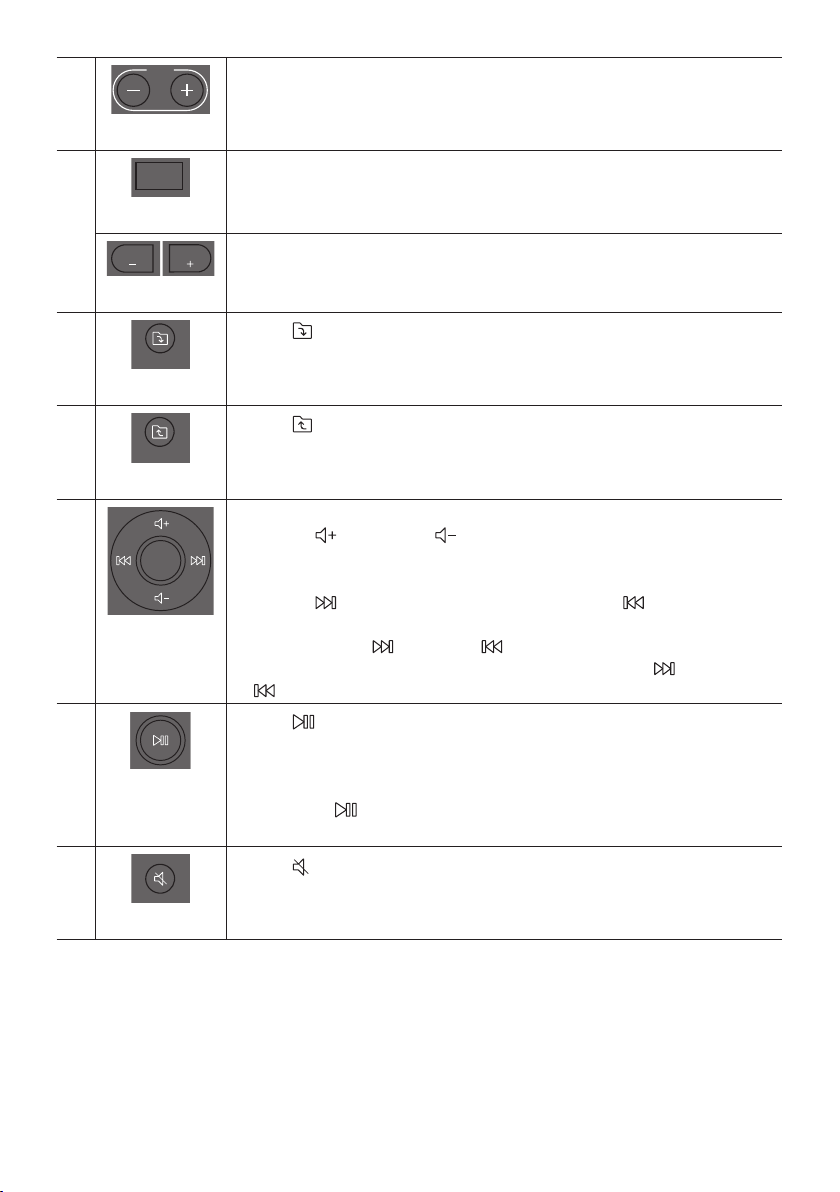
TEMPO +, -
DOWN
UP
BASS
EFFECT
EFFECT
DJ
LIGHT
PAIRING
TEMPO
USB
AUX
SOUND
MODE
Press the TEMPO + or TEMPO - buttons to change the tempo of the music up or down.
This function only works in the USB1 and USB2 mode.
DJ
DOWN
UP
BASS
EFFECT
EFFECT
DJ
LIGHT
PAIRING
TEMPO
USB
AUX
SOUND
MODE
This function lets you turn on the DJ effect function.
Press the button repeatedly to cycle through the available DJ sound effects:
NOISE, FILTER, CRUSH, CHORUS, WAHWAH or OFF.
EFFECT +, -
DOWN
UP
BASS
EFFECT
EFFECT
DJ
LIGHT
PAIRING
TEMPO
USB
AUX
SOUND
MODE
DOWN
UP
BASS
EFFECT
EFFECT
DJ
LIGHT
PAIRING
TEMPO
USB
AUX
SOUND
MODE
Press the EFFECT + or EFFECT - buttons to change the level of the each DJ sound effect
up or down.
Folder DOWN
DOWN
UP
BASS
EFFECT
EFFECT
DJ
LIGHT
PAIRING
TEMPO
USB
AUX
SOUND
MODE
Press the (DOWN) button to move to the next folder in the USB device.
Folder UP
DOWN
UP
BASS
EFFECT
EFFECT
DJ
LIGHT
PAIRING
TEMPO
USB
AUX
SOUND
MODE
Press the (UP) button to move to the previous folder in the USB device.
Volume up,
Volume down /
Skip
Volume up, Volume down
Press the (Volume up) or (Volume down) to adjust the volume level up or
down.
Music Skip
Press the button to select the
Press and hold the button or the button for more than 3 seconds in USB play
mode to search forward or search backward. Press and hold the button or the
button for more than 3 seconds again to get back to normal play.
Play / Pause
Press the
Auto Power Down Function
To turn off Auto Power Down function while the unit is in AUX1, AUX2 mode, press
and hold the button for more than 5 seconds. ON-AUTO POWER DOWN /
OFF-AUTO POWER DOWN appears on the display.
Mute
DOWN
UP
BASS
EFFECT
EFFECT
DJ
LIGHT
PAIRING
TEMPO
USB
AUX
SOUND
MODE
Press the (Mute) button to mute the sound.
Press it again to unmute the sound.
ENG - 20
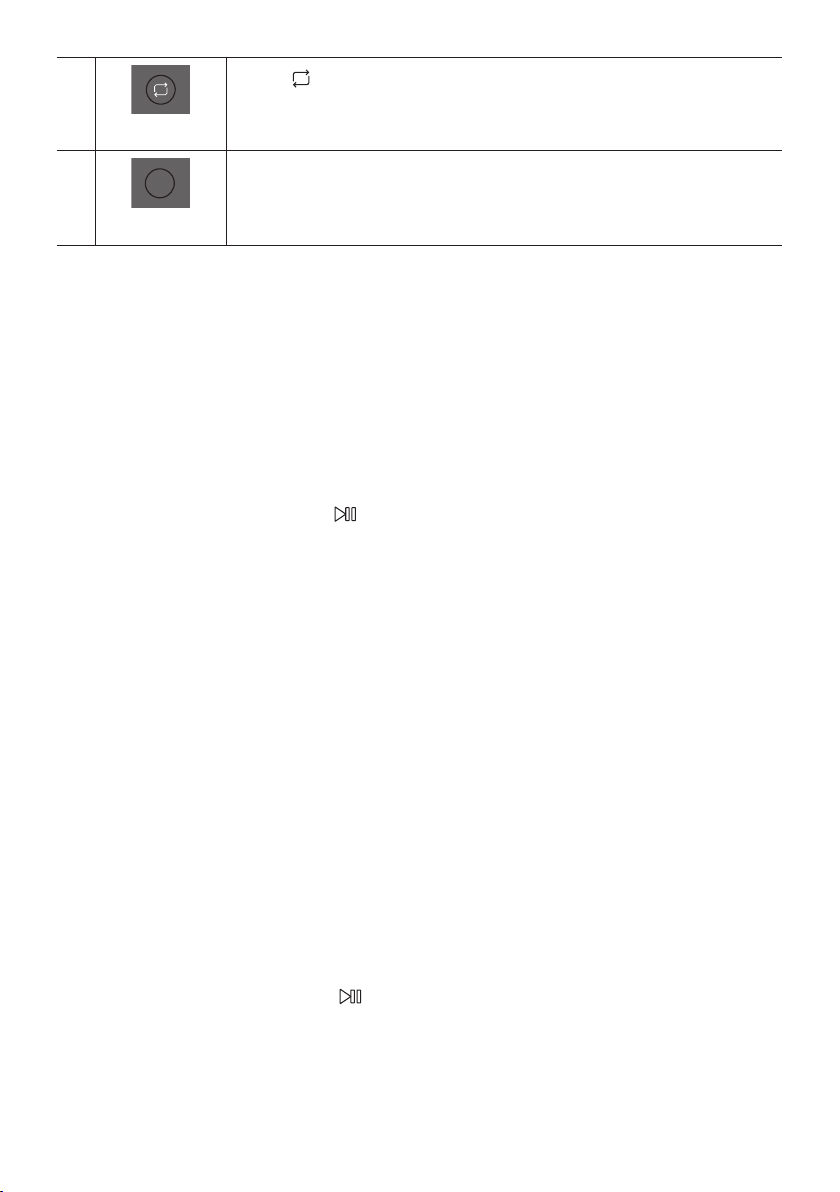
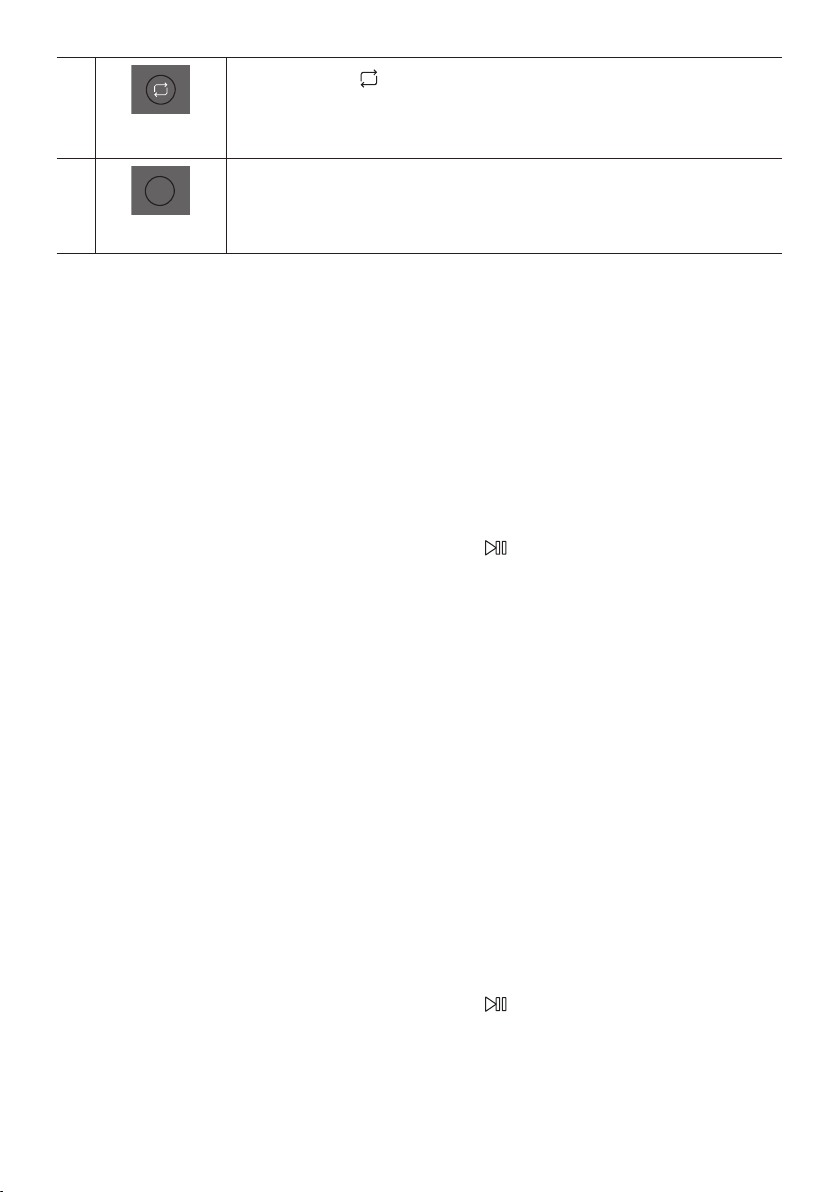
Repeat
DOWN
UP
BASS
EFFECT
EFFECT
DJ
LIGHT
PAIRING
TEMPO
USB
AUX
SOUND
MODE
Press the (Repeat) button to use the Repeat function in “USB1”and “USB2” mode.
Press the button repeatedly to cycle through the available repeat functions:
ONE, FOLDER, ALL, RANDOM or OFF.
BASS
DOWN
UP
BASS
EFFECT
EFFECT
DJ
LIGHT
PAIRING
TEMPO
USB
AUX
SOUND
MODE
Press the BASS button to use the powerful bass sound.
Press it again to return to the normal sound.
Press and hold the BASS button for more than 5 seconds to turn on or off the
BLUETOOTH POWER function.
How to use Sound Mode
1. Press the SOUND MODE button on the Remote control.
2. Each time you press the SOUND MODE button, the Party Audio cycles through the available sound
effects: PARTY, STANDARD, HIPHOP, EDM, ROCK, LATIN, HOUSE or REGGAE.
NOTES
Default sound mode is PARTY.
When turned off, press and hold the button on product or remote control for more than 5 seconds
to turn on in the default Sound Mode setting.
How to use the DJ Effect
The DJ Effect function lets you add DJ sound effects to your music. The level of each effect is
adjustable.
1. Press the DJ button on the Remote control.
2. Each time you press the DJ button, the Party Audio cycles through the available DJ Effects:
NOISE
FILTER : Creates an effect similar to the sound of only treble or bass.
CRUSH: Creates an effect that makes the original sound sharper.
CHORUS : Creates an effect similar to a singing chorus.
WAHWAH : Creates a ‘Wah~ Wah~’ effect.
DJ EFFECT OFF : Turns off the DJ Effect.
3. Press the EFFECT + or EFFECT - buttons to raise or lower the level of each of the DJ sound effects
from -15 to +15.
NOTE
When turned off, press and hold the button on product or remote control for more than
5 seconds to turn on in the default DJ Effect setting.

ENG - 21
07 USING THE SAMSUNG GIGA PARTY
AUDIO APP
Install Samsung Giga Party Audio App
To control this product with your Smart Device and the Samsung Giga Party Audio app, download the
Samsung Giga Party Audio App from the Google Play Store or Apple App Store, and install it on your
Smart Device.
NOTES
The Samsung Giga Party Audio app is compatible with Android mobile phone devices running
Android OS 6.0 or later.
The Samsung Giga Party Audio app is compatible with Apple mobile devices running iOS 10.0 or
later.
Market search : Samsung Giga Party Audio
Launching the Samsung Giga Party Audio App
To launch and use the Samsung Giga Party Audio app, touch the Giga Party Audio icon on your smart
device, and then follow the directions on the screen.
Giga Party Audio
ENG - 22
08 TROUBLESHOOTING
Before seeking assistance, check the following.
The unit will not turn on.
Is the power cord plugged into the outlet?
; Connect the power plug to the outlet.
A function does not work when the button is
pressed.
Is there static electricity in the air?
; Disconnect the power plug and connect it
again.
Sound dropouts occur in BT mode.
; See the Bluetooth connection sections on
page 13.
Sound is not produced.
Is the Mute function on?
; Press the (Mute) button to cancel the
mute function.
Is the volume set to minimum?
; Adjust the Volume.
The remote control does not work.
Are the batteries drained?
; Replace them with new batteries.
Is the distance between the remote control
and Party Audio main unit too far?
; Move the remote control closer to the
Party Audio main unit.
Stereo Group connection is not working.
Is the system in wireless Group Play mode?
; Disconnect the wireless Group Play mode
and try Stereo Group connection again.
It cannot make a Bluetooth connection.
Is the system connected to another system in
wireless Group Play mode or Stereo Group
mode?
; Try Bluetooth connection again after
disconnecting the wireless Group Play or
Stereo Group connection.
Are the two Bluetooth devices already
connected?
; Try Bluetooth connection again after
disconnecting other Bluetooth connections.
The PAIRING button is not working.
Is the system in wireless Group Play mode or
Stereo Group mode?
; Try again after disconnecting the wireless
Group Play or Stereo Group connection.
I want to switch the host system to the other
in wireless Group Play or Stereo Group
connection.
; Disconnect Group Play mode, press the
and after it displays “HOST” message,
connect the others one by one.
;
You can not change others as host.
I want to play AUX1 or AUX2 more than 8 hours
without control input.
; Press and hold the button for more than
5 seconds in AUX1 or AUX2 mode to disable
Auto Power Down Function. Change from
ON-AUTO POWER DOWN to OFF-AUTO
POWER DOWN.
ENG - 23
I can’t connect a slave to Group play.
; After 1 hour, the host will block any
additional slaves from being added.
Press the GROUP PLAY button on host,
after it display “HOST” message, the slave
can be reconnected.
It cannot make a “Wireless/Wired Group/Add
Stereo/Bluetooth” connection.
Is the distance between systems too far?
; It is recommended to make a “Wireless/
Wired Group/Add Stereo/Bluetooth” pairing
within 1 meter from the system.
; The recommended operating distance
between Party Audio systems is closer than
10 meters.
09 LICENCE
The Bluetooth® word mark and logos are
registered trademarks owned by the Bluetooth
SIG, Inc. and any use of such marks by Samsung
Electronics Co., Ltd. is under license. Other
trademarks and trade names are those of their
respective owners.
Qualcomm aptX is a product of Qualcomm
Technologies, Inc. and/or its subsidiaries.
Qualcomm is a trademark of Qualcomm
Incorporated, registered in the United States
and other countries. aptX is a trademark of
Qualcomm Technologies International, Ltd.,
registered in the United States and other
countries.
10 OPEN SOURCE
LICENCE NOTICE
To send inquiries and requests regarding open
sources, contact Samsung via Email
(oss.request@samsung.com).
11 IMPORTANT
NOTES ABOUT
SERVICE
Figures and illustrations in this User Manual are
provided for reference only and may differ from
actual product appearance.

ENG - 24
12 SPECIFICATIONS AND GUIDE
Specications
Model Name MX-T50
USB1/USB2
Weight 11.6 kg
Dimensions (W x H x D) 351.0 x 651.0 x 323.0 mm
Operating Temperature Range +5°C to +35°C
Operating Humidity Range 10 % ~ 75 %
AMPLIFIER
Rated Output power
Tweeter 65W x 2, 8 ohm
Woofer 185W x 2, 3 ohm
NOTES
Weight and dimensions are approximate.
FRA - ii
INFORMATIONS RELATIVES À LA SÉCURITÉ
AVERTISSEMENTS
POUR ÉVITER LES RISQUES DE CHOC
ÉLECTRIQUE, NE DÉMONTEZ PAS LE CAPOT.
L’APPAREIL NE CONTIENT PAS DE PIÈCES
RÉPARABLES PAR L’UTILISATEUR ; S’ADRESSER
À UN SERVICE APRÈS-VENTE QUALIFIÉ.
Reportez-vous au tableau ci-dessous pour une
ATTENTION
RISQUE DE CHOC
ÉLECTRIQUE. NE PAS
OUVRIR
Ce symbole indique que ce produit est
alimenté par haute tension. Il est
située à l'intérieur de ce produit.
Ce symbole indique qu'une
documentation importante relative au
fonctionnement et à l'entretien est
fournie avec le produit.
qu'aucun branchement de sécurité à la
terre (prise de terre) n'est requis.
Si ce symbole n'est pas présent sur un
produit avec un cordon d'alimentation,
le produit DOIT avoir une connexion de
tension nominale indiquée par le
symbole est une tension CA.
tension nominale indiquée par le
symbole est une tension CC.
qu'il doit consulter le manuel
d'utilisation pour en savoir plus sur les
informations relatives à la sécurité.
AVERTISSEMENT
choc électrique, n’exposez pas cet appareil à
la pluie ou à l’ humidité.
ATTENTION
POUR PRÉVENIR LES CHOCS ÉLECTRIQUES,
BRANCHEZ LA FICHE AU FOND, EN
PRENANT SOIN D’INSÉRER LA TIGE LARGE
DANS LA FENTE LARGE.
Cet appareil doit toujours être branché à une
prise terre.
Pour déconnecter l’appareil du circuit
principal, la prise doit être débranchée de la
prise principale ; il est de ce fait nécessaire
Évitez toute projection d’eau sur l’appareil.
Ne posez jamais d’objet contenant un liquide
devez retirer le cordon d’alimentation de la
prise murale. Par conséquent, le cordon
d’alimentation doit être facilement accessible
à tout moment.
FRA - iii
PRÉCAUTIONS
1. Assurez-vous que l'alimentation CA de votre
d'alimentation indiqués sur l'étiquette
produit. Posez votre produit à plat sur un
meuble stable en veillant à laisser un espace
d’assurer une ventilation correcte de celui-ci.
de ventilation. Ne posez pas l’ensemble sur
susceptible de chauffer. Cet ensemble est
conçu pour une utilisation en continu. Pour
2.
l’appareil de la prise murale. Les surtensions
3. N’exposez pas l’ensemble aux rayons directs
du soleil ou à toute autre source de chaleur.
Ceci pourrait entraîner une surchauffe et un
dysfonctionnement de l’appareil.
4.
vases) et d’une chaleur excessive (comme
une cheminée) ou de tout équipement
ou électriques. Débranchez le câble
d’alimentation en cas de dysfonctionnement.
industriel. Ce produit ne peut être utilisé qu’à
peut se former si le produit ou un disque a
été stocké à basse température.
Si vous devez transporter l’ensemble
pendant l’hiver, attendez environ 2 heures
que l’appareil ait atteint la température de la
5. Les piles utilisées dans ce produit peuvent
pour l’environnement. Ne jetez pas les piles
dans votre poubelle habituelle. Ne vous
débarrassez pas des piles en les faisant
brûler. Ne court-circuitez pas, ne
désassemblez pas ni ne faites pas
surchauffer les batteries. Le remplacement
incorrect de la batterie entraîne un risque
d’explosion. Ne la remplacez que par une
batterie du même type.
À PROPOS DE CE
MANUEL
Le manuel d’utilisateur est composé de deux
MANUEL D’UTILISATEUR
Consultez ce manuel pour en savoir plus sur les
MANUEL COMPLET
Vous pouvez accéder au MANUEL COMPLET
consulter le manuel sur votre PC ou appareil

FRA - iv
SOMMAIRE
01 Vericationdescomposants 2
Insertion des piles avant d’utiliser la Télécommande (2 piles AAA) ------------------------- 2
02 Présentationduproduit 3
Panneau supérieur de Party Audio ------------------------- 3
------------------------- 4
03 ConnexiondePartyAudio 6
Branchement de l’alimentation électrique
-------------------------
6
Comment utiliser l’Audio Groupe
-------------------------
7
04 Connexiond’unappareilexterne 12
-------------------------
12
Connexion d’un appareil mobile via Bluetooth
-------------------------
13
05 Connexiond'unpériphériquedestockageUSB 16
-------------------------
17
06 Utilisationdelatélécommande 18
Comment utiliser la télécommande Alimentation
-------------------------
18
Comment utiliser le Mode Son
-------------------------
20
Comment utiliser l'effet DJ
-------------------------
20

FRA - v
07 Utilisationdel'applicationSamsungGigaParty
Audio 21
-------------------------
21
-------------------------
21
08 Dépannage 22
09 Licence 23
10 AvisdeLicenceLibre 23
11 RemarqueImportanteàProposduService 23
12 SpécicationsetGuide 24
-------------------------
24

FRA - 2
01 VERIFICATION DES COMPOSANTS
UnitéprincipalePartyAudio Télécommande/Piles Câbled’alimentation
Pour plus d’informations sur l’alimentation et la consommation électrique, reportez-vous à
Pour acheter des composants supplémentaires ou des câbles facultatifs, contactez un centre de
le déplacer.
Insertiondespilesavantd’utiliserlaTélécommande(2pilesAAA)
respectant la polarité. Replacer le couvercle du
compartiment à piles .
FRA - 3
02 PRÉSENTATION DU PRODUIT
PanneausupérieurdePartyAudio
BASS
Capteurde
télécommande
vers le capteur de la télécommande.
Fenêtrede
visualisatio
Power Active et désactive la fonction Party Audio.
Lumière
Appuyer sur la touche
(Lumière)pour activer le mode d'éclairage. Appuyez plusieurs
fois sur la touche pour passer naviguer entre les modes d’éclairage disponibles : AMBIENT,
PARTY, DANCE, THUNDERBOLT, STAR ou OFF.
Source
Appuyer pour sélectionner une source connectée à Party Audio.
Maintenez appuyée la touche
(Source)
dans le mode « BTPAIRING ».
Lecture/Pause
Lecture/Pause
Appuyer sur la touche
pause.
Lecturedeladémo
Maintenez appuyée la touche
DEMO
l’écran et lance la musique de démonstration pendant 60 secondes.
Pour annuler la Lecture de la démo, maintenez appuyée la touche pendant
– Si vous saisissez des commandes pendant la Lecture de la démo, le minuteur
de 60 secondes est réinitialisé.
–
désactivées pendant la Lecture de la démo. Pour utiliser la télécommande,
annulez la lecture de la démo.
–

FRA - 4
Volumebas
Appuyer sur le bouton (Volumebas)
Appuyer sur le bouton (Volumebas)
Volumefort
Appuyez sur la touche (Volumefort)
Appuyer et maintenir enfoncé le bouton (Volumefort)
rapidement le volume sonore.
BASS
Appuyez sur le bouton BASS pour utiliser la puissance des basses.
Appuyez de nouveau sur cette touche pour revenir au son normal.
Maintenez appuyée la touche BASS
désactiver la fonction BLUETOOTHPOWER.
PanneauarrièredePartyAudio
ADD STEREO GROUP PLAYPAIRING
AUX 1
AUX 2 / GROUP PLAY
IN
OUT
L
R
L
R
USB1
(5V 2.1A)
USB2
(5V 0.5A)
ECHOVOLMIC
OUT
Bluetooth
PAIRING
Appuyer sur la touche PAIRINGBTPAIRING
est possible de connecter le Party Audio à un nouveau périphérique Bluetooth en
sélectionnant le Party Audio dans la liste de recherche du périphérique Bluetooth.
ADD
STEREO
Appuyer sur le bouton ADD STEREO
Appuyer de nouveau sur le bouton ADD STEREO pour quitter le mode Groupe Stereo
avant qu'un autre Party Audio ne soit connecté. Une fois la connexion réalisée, vous
ADD STEREO pendant plus
GROUP
PLAY
Appuyer sur le bouton GROUPPLAY
Appuyer de nouveau sur le bouton GROUPPLAY
Group Play. Maintenez appuyée la touche GROUPPLAY
USB1
Connecter un périphérique USB aux ports USB1 ou USB2 de l'unité principale.
En connectant votre téléphone portable au port USB1
Appuyer sur la touche
(Source)pour sélectionner USB1 ou USB2.
USB2

ECHO
Vous pouvez donner un effet d'écho au son d'un microphone connecté (MIC) en ajustant la
touche ECHO.
VOL
Utiliser le bouton VOL(MIC).
MIC Connecter votre micro à la prise jack MIC.
Terminaux
deGROUP
PLAY OUT
Utiliser un câble audio (non fourni) pour connecter les bornes GROUPPLAY(OUT)de
Veiller à faire correspondre les couleurs des connecteurs.
Terminaux
deAUX2/
GROUP
PLAY IN
Utiliser un câble audio (non fourni) pour connecter les bornesAUX2(IN)de l'unité
Veiller à faire correspondre les couleurs des connecteurs.
Appuyer sur la touche (Source) pour sélectionner AUX2.
Si le produit est en mode AUX2 sans lecture et sans entrée de commande pendant
Si le produit est en mode AUX2 avec plus de 8 heures de lecture et sans entrée de
AUX1
AUX1 de l'unité
principale à la sortie audio d'un appareil externe.
Si le produit est en mode AUX1 sans lecture et sans entrée de commande pendant
Si le produit est en mode AUX1 avec plus de 8 heures de lecture et sans entrée de
Power
Connecter le cordon d'alimentation à la prise Power et brancher l'autre extrémité du
cordon d'alimentation à une prise murale pour alimenter le Party Audio en électricité.
FRA - 6
03 CONNEXION DE PARTY AUDIO
Branchementdel’alimentationélectrique
Brancher le cordon d’alimentation sur le Party Audio, puis sur une prise murale.
Voir les illustrations ci-dessous.
Branchementde
l’alimentationélectrique
ArrièredePartyAudio
FRA - 7
Commentutiliserl’AudioGroupe
ConnexiondumodeGroupPlayaveccâble
AUX 2 / GROUP PLAY
IN
OUT
L
R
L
R
AUX 2 / GROUP PLAY
IN
OUT
L
R
L
R
AUX 2 / GROUP PLAY
IN
OUT
L
R
L
R
Hôtedu1er
PartyAudio
2ePartyAudio DernierPartyAudio
Poursuivrela
connexion
jusqu’audernier
PartyAudio
touche AUX ou
(Source)AUX2
REMARQUES
détection.

FRA - 8
ConnexiondumodeGroupPlaysansle
GROUP PLAY
GROUP PLAY
GROUP PLAY
Hôte
Esclave1
Esclave2
1. Appuyer sur le bouton GROUPPLAYHOST
GROUPPLAY.
2. Appuyer sur la touche GROUPPLAY
GROUPPLAYCONNECTEDGROUPPLAY
3. Appuyer sur la touche GROUPPLAY
GROUPPLAYCONNECTEDGROUPPLAY
4.
5.
REMARQUES
Les conditions ambiantes ou d'autres facteurs liés aux périphériques connectés peuvent avoir un
effet sur la qualité de lecture.
GROUPPLAY, une erreur s’est produite dans la connexion
Les boutons ADD STEREO et PAIRING
La touche ADD STEREO
Lors de l'ajout d'une unité esclave, maintenez appuyé GROUPPLAYsur l’esclave avant que le
GROUPPLAYCONNECTED

FRA - 9
connecté, appuyez sur la touche GROUPPLAY
ait été connecté, vous devriez connecter l'esclave 2 et l'esclave 3 séquentiellement.
Lors de l’utilisation de Group Play, les périphériques Bluetooth connectés actuellement sont
déconnectés et la connexion Bluetooth est désactivée.
En mode Group Play, les esclaves ne peuvent pas se connecter à un dispositif Bluetooth.
BT sur une unité
esclave en mode Group Play, le mode Group Play est déconnecté.
DéconnexiondumodeGroupPlaysansl.
1. Appuyer sur la touche GROUPPLAY
GROUPPLAY
esclaves) avant le mode Group Play connecté.
OFF-GROUPPLAYGROUPPLAY est
éteinte.
2. Si vous sélectionnez une source autre que BT
le mode Group Play est déconnecté.
IndicationsparLED
LED ÉTAT Description
Vert
On
On
REMARQUE
Bluetooth.

FRA - 10
UtilisationdumodeGroupeStereo
ADD STEREO
ADD STEREO
PartyAudiogauche
(Maître)
PartyAudiodroit
(Esclave)
1. Appuyer sur le bouton ADD STEREOADD
STEREOADD STEREO.
2. Appuyer sur le bouton ADD STEREOADD STEREO »
ADD STEREO.
3. BTPAIRING
maître et « STEREO MODE
sur le bouton ADD STEREO
4.
REMARQUES
Les conditions ambiantes ou d'autres facteurs liés aux périphériques connectés peuvent avoir un
effet sur la qualité de lecture.
ADD STEREO, une erreur s’est produite dans la connexion du
Groupe Stereo. Répéter l’étape 1 et l’étape 4.
Toutes les touches sauf la touche ADD STEREO et Power
Le bouton GROUPPLAY
Stereo.

FRA - 11
déconnectés et la connexion Bluetooth est désactivée.
Si vous sélectionnez une source autre que BT ou mettez sous tension le Party Audio maître, le mode
DéconnexiondumodeGroupeStereo
1. Maintenir le bouton ADD STEREO
ADD STEREO (maître ou esclave) avant la
connexion au Groupe Stereo.
OFF-ADD STEREOADD STEREO est
éteinte.
2. Si vous sélectionnez une source autre que BT sur les unités esclaves ou que le Party Audio maître
Si l’un des Party Audio est déconnecté du mode Groupe Stereo, un autre Party Audio est
automatiquement déconnecté.
IndicationsparLED
LED ÉTAT Description
Vert
En attente d’une connexion Groupe Stereo.
On
On

FRA - 12
04 CONNEXION D’UN APPAREIL EXTERNE
Connexionàl’aided’uncâbleaudioanalogique(AUX)
- AUDIO -
R L
AUX 1
AUX 2 / GROUP PLAY
IN
OUT
L
R
L
R
Appareilmobile/MP3/PMP
BD/LecteurDVD/Set-topbox/Consoledejeu
Câblestéréo3,5mm
(nonfourni)
Câbleaudio(AUX)(nonfourni)
ArrièreduPartyAudio
Câblestéréo3,5mm(AUX1)
1. Connecter la prise AUX1 de l’unité principale à la prise AUDIO OUT du périphérique source à l’aide
2. AUX1 (Source) du panneau supérieur ou de
la télécommande.
AUX de la télécommande.
Câbleaudio(AUX2)
1. Connecter les bornes AUX2(IN) de l’unité principale aux bornes AUDIO OUT du périphérique
source à l’aide d’un câble audio.
2. AUX2 (Source) du panneau supérieur ou
de la télécommande.
AUX de la télécommande.

FRA - 13
Connexiond’unappareilmobileviaBluetooth
Lorsqu'un appareil mobile est connecté à l'aide du Bluetooth, il est possible d'entendre un son stéréo
PériphériqueBluetooth
ADD STEREO GROUP PLAYPAIRING
LIGHT
PAIRING
TEMPO
USB
AUX
EFFECT
DOWN
UP
EFFECT
DJ
SOUND
MODE
OU
Laconnexioninitiale
1. Maintenez appuyée la touche PAIRING
BTPAIRING ».
(OU)
Appuyez sur la touche PAIRING
(Source)BT
PAIRING ».
2. [AV]SamsungPartyT50
Lorsque le Party Audio est connecté au périphérique Bluetooth, [Nomdupériphérique
BluetoothBT
3.
Sil'appareilneparvientpasàseconnecter
[AV]SamsungPartyT50
apparaît dans la liste, supprimez-la.
Répéter ensuite les étapes 1 et 2.
QuelleestladifférenceentreBTREADYetBTPAIRING?
BTREADY
connecter un appareil mobile précédemment connecté à Party Audio.
BTPAIRING
enfoncée la touche PAIRING de la télécommande ou la touche
(Source)en haut de l'Audio
BTPAIRING
– PAIRING
BTPAIRING

FRA - 14
ConnexionmultipleBluetooth
peut jouer de la musique via l'un des appareils Bluetooth connectés sans déconnecter le second
appareil.
AppareilBluetooth1 AppareilBluetooth2
1.
13)
2. La musique ne peut être jouée que sur l'un des deux appareils connectés, et lorsque la musique est
jouée sur l'autre appareil, la musique sur l'appareil de lecture est mise en pause.
REMARQUES
appareil.
Bluetooth, les appareils connectés peuvent être déconnectés.
Vous pouvez vous connecter à deux appareils Bluetooth en même temps.
Si un code PIN vous est demandé lors de la connexion d'un appareil Bluetooth, entrer <0000>.
Les conditions ambiantes ou d'autres facteurs liés aux périphériques connectés peuvent avoir un
effet sur la qualité de lecture.
Le Party Audio s'éteint automatiquement au bout de 20 minutes sans qu'aucune commande n'ait
été saisie à l'état prêt.
Il se peut que l'Audio Partie n'effectue pas correctement la recherche ou la connexion Bluetooth
– S'il y a un fort champ électrique autour du Party Audio.
– Si plusieurs appareils Bluetooth sont appairés simultanément avec l'audio Party Audio.
– Si le périphérique Bluetooth est éteint, n'est pas en place ou fonctionne mal.
Lorsque l'Audio Party est connecté à votre téléviseur par connexion Bluetooth, la vidéo du
téléviseur et l'audio de l'Audio Party peuvent ne pas être synchronisées car la distance entre l'Audio

Lorsque le haut-parleur est en mode de Connexion multiple Bluetooth, vous devez connecter l'autre
périphérique Bluetooth et le haut-parleur en quelques minutes (environ 1 minute). Dans le cas
contraire, le mode de Connexion multiple Bluetooth sera annulé.
portables, les téléviseurs, etc., ne supportent pas la connexion Bluetooth Multi.
musique ne commence à être lue selon les périphériques Bluetooth.
Bluetooth, la connexion d'autres périphériques Bluetooth peut prendre quelques minutes. Si vous
IndicationsparLED
LED ÉTAT Description
Bleu
Mode BT PAIRING
Mode BT READY
On Un périphérique Bluetooth est connecté.
UtilisationdelaMisesoustensionBluetooth(BluetoothPowerOn)
produit via une connexion Bluetooth pour l'allumer.
1. Appuyer et maintenir enfoncée la touche BASS de la télécommande ou du panneau supérieur pour
ON-BLUETOOTHPOWER
à l'écran.
2.
Bluetooth. (Pour plus d'informations sur les connexions Bluetooth, reportez-vous au manuel de
3. Une fois la connexion établie, l'Audio Party s'allume automatiquement en mode Bluetooth.
REMARQUE
Maintenez appuyée la touche BASS
supérieur pour activer et désactiver mise sous tension Bluetooth.
Qaudn vous appuyez sur la touche BASS
ON-BLUETOOTHPOWER→OFF-BLUETOOTHPOWER
FRA - 16
05 CONNEXIOND'UNPÉRIPHÉRIQUEDE
STOCKAGEUSB
USB1
(5V 2.1A)
USB2
(5V 0.5A)
OU
PériphériquedestockageUSB
(nonfourni)
ArrièreduPartyAudio
1.
2. Appuyer sur la touche
(Source) du panneau supérieur ou de la télécommande, puis
USB1USB2
USB de la
télécommande.
3. USB1USB2
4.
Audio.
Le Party Audio s’éteint automatiquement (Mise hors tension automatique) si le périphérique
USB n'est pas connecté, si la lecture est arrêtée ou s’il n’y a pas de saisie pendant plus de
REMARQUES

FRA - 17
Formatsaudioprisencharge
Codecaudio Codecaudio
Fréquence
d'échantillonnage
Débitbinaire
*.mp3
MPEG 1 Layer3 32 kHz ~ 48 kHz 32 kbps ~ 320 kbps
MPEG 2 Layer3 16 kHz ~ 24 kHz 8 kbps ~ 160 kbps
8 kHz ~ 12 kHz 8 kbps ~ 160 kbps
8 kHz ~ 48 kHz 32 kbps ~ 320 kbps
*.aac
AAC 8 kHz ~ 96 kHz < 1728 kbps
A AC- LC 8 kHz ~ 96 kHz < 1728 kbps
HE-AAC 8 kHz ~ 96 kHz < 1728 kbps
IMA_ADPCM
8 kHz ~ 192 kHz
- 8 kHz ~ 192 kHz
REMARQUES
Ce produit ne supporte pas le codec WMA Professional.
Miseàjourdulogiciel
SamsungpeutoffrirdesmisesàjourpourlermwaredusystèmedePartyAudioàl'avenir.
USB1 ou USB2 de votre
FRA - 18
06 UTILISATION DE LA TÉLÉCOMMANDE
CommentutiliserlatélécommandeAlimentation
LIGHT
PAIRING
TEMPO
USB
AUX
EFFECT
DOWN
UP
BASS
EFFECT
DJ
SOUND
MODE
Power
DOWN
UP
BASS
EFFECT
EFFECT
DJ
LIGHT
PAIRING
TEMPO
USB
AUX
SOUND
MODE
Active et désactive le Party Audio.
LIGHT
DOWN
UP
BASS
EFFECT
EFFECT
DJ
LIGHT
PAIRING
TEMPO
USB
AUX
SOUND
MODE
Appuyez sur le bouton
(LIGHT) pour activer le
mode d'éclairage.
A chaque pression sur la touche, le mode
d'éclairage souhaité est sélectionné en choisissant
AMBIENT, PARTY, DANCE, THUNDERBOLT,
STAR ou OFF.
Source
DOWN
UP
BASS
EFFECT
EFFECT
DJ
LIGHT
PAIRING
TEMPO
USB
AUX
SOUND
MODE
Appuyer sur pour sélectionner une source
connectée au Party Audio.
Chaque fois que vous appuyez sur la touche pour
sélectionner une source souhaitée en choisissant
BT, USB1, USB2, AUX1 ou AUX2
Bluetooth
PAIRING
DOWN
UP
BASS
EFFECT
EFFECT
DJ
LIGHT
PAIRING
TEMPO
USB
AUX
SOUND
MODE
Appuyer sur pour sélectionner une source
BT
Maintenez appuyée la touche pendant plus de
BT
PAIRING ».
Il est possible de connecter le Party Audio à un
nouveau périphérique Bluetooth dans ce mode
en sélectionnant le Party Audio dans la liste de
recherche du périphérique Bluetooth.
USB
DOWN
UP
BASS
EFFECT
EFFECT
DJ
LIGHT
PAIRING
TEMPO
USB
AUX
SOUND
MODE
Appuyer pour sélectionner les sources USB1
ou USB2 connectées au Party Audio.
AUX
DOWN
UP
BASS
EFFECT
EFFECT
DJ
LIGHT
PAIRING
TEMPO
USB
AUX
SOUND
MODE
Appuyer sur pour sélectionner les sources
AUX1 ou AUX2 connectées au Party Audio.
SOUND MODE
DOWN
UP
BASS
EFFECT
EFFECT
DJ
LIGHT
PAIRING
TEMPO
USB
AUX
SOUND
MODE
A chaque pression sur la touche, on sélectionne l'effet sonore souhaité parmi PARTY,
STANDARD, HIPHOP, EDM, ROCK, LATIN, HOUSE ou REGGAE.
FRA - 19
TEMPO+,-
DOWN
UP
BASS
EFFECT
EFFECT
DJ
LIGHT
PAIRING
TEMPO
USB
AUX
SOUND
MODE
Appuyer sur les boutons TEMPO + ou TEMPO -
vers le haut ou le bas.
La fonction est uniquement disponible dans les modes USB1 et USB2.
DJ
DOWN
UP
BASS
EFFECT
EFFECT
DJ
LIGHT
PAIRING
TEMPO
USB
AUX
SOUND
MODE
Cette fonction permet d'activer la fonction d'effet DJ.
A chaque pression sur la touche, on sélectionne l'effet sonore DJ désiré en choisissant
NOISE, FILTER , CRUSH, CHORUS, WAHWAH ou OFF.
EFFECT+,-
DOWN
UP
BASS
EFFECT
EFFECT
DJ
LIGHT
PAIRING
TEMPO
USB
AUX
SOUND
MODE
DOWN
UP
BASS
EFFECT
EFFECT
DJ
LIGHT
PAIRING
TEMPO
USB
AUX
SOUND
MODE
Appuyer sur les boutons EFFECT + ou EFFECT -
sonore DJ vers le haut ou le bas.
DossierDOWN
DOWN
UP
BASS
EFFECT
EFFECT
DJ
LIGHT
PAIRING
TEMPO
USB
AUX
SOUND
MODE
Appuyer sur le bouton
(DOWN)pour passer au dossier suivant du périphérique USB.
DossierUP
DOWN
UP
BASS
EFFECT
EFFECT
DJ
LIGHT
PAIRING
TEMPO
USB
AUX
SOUND
MODE
Appuyer sur le bouton
(UP)pour passer au dossier précédent du périphérique USB.
Volumehaut,
Volumebas/
Passer
Volumehaut,Volumebas
Appuyer sur
(Volumehaut) ou
(Volumebas)
volume haut ou bas.
Passerlamusique
Appuyer sur la touche
touche
Appuyer et maintenir enfoncée la touche ou la touche pendant plus de
3 secondes en mode lecture USB pour avancer ou reculer dans la recherche. Appuyer
de nouveau sur la touche ou sur la touche pendant plus de
3 secondes pour revenir à la Appuyer de nouveau sur cette touche pour rétablir le son.
Lecture/Pause
Appuyer sur la touche
FonctiondeMisehorstensionautomatique(AutoPowerDown)
Pour désactiver la fonction Mise hors tension automatique pendant que l’unité est
en mode AUX1, AUX2, maintenez appuyée la touche
ON-AUTOPOWERDOWNOFFON-AUTOPOWERDOWN.
Muet
DOWN
UP
BASS
EFFECT
EFFECT
DJ
LIGHT
PAIRING
TEMPO
USB
AUX
SOUND
MODE
Appuyer sur le bouton
(Muet) pour couper le son.
Appuyer de nouveau sur cette touche pour rétablir le son.
FRA - 20
Répéter
DOWN
UP
BASS
EFFECT
EFFECT
DJ
LIGHT
PAIRING
TEMPO
USB
AUX
SOUND
MODE
Appuyer sur la touche
(Répéter)pour utiliser la fonction Repeat en mode «USB1» et
«USB2».
A chaque pression sur la touche, il est possible de sélectionner la fonction de répétition désirée
en choisissant ONE, FOLDER, ALL, RANDOM ou OFF.
BASS
DOWN
UP
BASS
EFFECT
EFFECT
DJ
LIGHT
PAIRING
TEMPO
USB
AUX
SOUND
MODE
Appuyer sur le bouton BASS pour utiliser le son de basse puissant.
Appuyer de nouveau sur cette touche pour revenir au son normal.
Maintenez appuyée la touche BASS
désactiver la fonction BLUETOOTHPOWER.
CommentutiliserleModeSon
particulier.
1. Appuyer sur le bouton SOUND MODE de la télécommande.
2. A chaque pression sur la touche SOUND MODE pour sélectionner l'effet sonore désiré en
choisissant PARTY, STANDARD, HIPHOP, EDM, ROCK, LATIN, HOUSE ou REGGAE.
REMARQUES
La valeur par défaut du mode sonore est PARTY.
Quand l’appareil est éteint, maintenez appuyée la touche sur le produit ou la télécommande
Commentutiliserl'effetDJ
1. Appuyer sur la touche DJ de la télécommande.
2. DJ
NOISE
FILTER
CRUSH
CHORUS Crée un effet similaire à un chœur chantant.
WAHWAH
DJ EFFECT OFF
3. Appuyez sur les touches EFFECT + ou EFFECT -
REMARQUE
Quand l’appareil est éteint, maintenez appuyée la touche sur le produit ou la télécommande

FRA - 21
07 UTILISATIONDEL'APPLICATION
SAMSUNGGIGAPARTYAUDIO
Installerl'applicationaudioSamsungGigaParty
l'installer sur votre Smart Device.
REMARQUES
fonctionnant sous Android OS 6.0 ou ultérieur.
fonctionnant sous iOS 10.0 ou supérieur.
Recherchedemarché:SamsungGigaPartyAudio
Lancementdel'applicationaudioSamsungGigaParty
GigaPartyAudio
FRA - 22
08 DÉPANNAGE
L'appareilnes'allumepas.
Lecordond'alimentationest-ilbranchédansla
prise?
;
de courant.
Unefonctionnefonctionnepaslorsquevous
appuyezsurlatouche.
Ya-t-ildel'électricitéstatiquedansl'air?
;
rebrancher.
LespertesdesonseproduisentenmodeBT.
; Voir les sections Connexion Bluetooth à la
13.
Lesonn'estpasproduit.
LafonctionMuetest-elleactivée?
; Appuyer sur la touche (Muet)pour
annuler la fonction mute.
Levolumeest-ilrégléauminimum?
;
Latélécommandenefonctionnepas.
Lespilessontdéchargées?
; Remplacer les piles par des piles neuves.
Ladistanceentrelatélécommandeetl'unité
principalePartyAudioest-elletropgrande?
; Rapprocher la télécommande de l'unité
principale Party Audio.
LaconnexiondugroupeStereonefonctionne
pas.
Lesystèmeest-ilenmodeGroupPlaysansl?
;
et réessayer la connexion de Groupe Stereo.
Impossibled’établirdeconnexionBluetooth.
Lesystèmeest-ilconnectéàunautresystème
enmodesanslGroupPlayouenmode
GroupeStereo?
; Essayer à nouveau la connexion Bluetooth
LesdeuxappareilsBluetoothsont-ilsdéjà
connectés?
; Essayer à nouveau la connexion Bluetooth
Bluetooth.
Lebouton PAIRINGnefonctionnepas.
Lesystèmeest-ilenmodeGroupPlaysansl
ouenmodeGroupeStereo?
;
Groupe Stereo.
Jeveuxtransférerlesystèmehôteàl'autre
systèmedansuneconnexionsansldeGroup
PlayoudeGroupeStereo.
; Déconnecter le mode Group Play, appuyer
sur le haut-parleur que vous souhaitez
HOST », puis connecter les
autres un par un.
;
Il est impossible de passer les autres
JeveuxlireAUX1ouAUX2plusde8heures
sanssaisiedecommande.
; Maintenez appuyée la touche pendant
AUX1 ou AUX2
pour désactiver la fonction Mise hors
tension automatique. Passer de ON-AUTO
POWERDOWN à OFF-AUTOPOWER
DOWN.

FRA - 23
Jen’arrivepasàconnecterunesclaveau
GroupPlay.
;
esclave supplémentaire. Appuyer ensuite
sur le bouton GROUPPLAY
HOST
l’esclave peut être reconnecté.
Impossibled'établiruneconnexion«Sansl/
Groupecâblé/Groupecâblé/Stéréo/Bluetooth».
Ladistanceentrelessystèmesest-elletrop
grande?
;
; Il est recommandé que la distance de
09 LICENCE
Electronics Co., Ltd. is under license. Other
trademarks and trade names are those of their
Qualcomm is a trademark of Qualcomm
United States and other countries.
10 AVIS DE LICENCE
LIBRE
Pour toute requête et demande concernant les
11 REMARQUE
IMPORTANTE À
PROPOS DU
SERVICE
d’utilisation sont fournies à titre de référence
uniquement et peuvent différer de l’apparence du
produit réel.

FRA - 24
12 SPÉCIFICATIONSETGUIDE
Spécications
Poids
Dimensions (L x H x P)
AMPLIFICATEUR
Puissance de sortie nominale
Woofer
REMARQUES
Le poids et les dimensions sont approximatifs.
POR - ii
INFORMAÇÕES DE SEGURANÇA
COMPONENTES
INCLUÍDOSAVISOS DE
SEGURANÇA
PARA REDUZIR O RISCO DE CHOQUES
ELÉCTRICOS, NÃO RETIRE A TAMPA POSTERIOR.
O INTERIOR NÃO CONTÉM PEÇAS PASSÍVEIS DE
REPARAÇÃO PELO UTILIZADOR.
A MANUTENÇÃO DEVE SER EFECTUADA POR
PESSOAL TÉCNICO QUALIFICADO.
Consulte a tabela abaixo para uma explicação dos
símbolos que poderão estar no seu produto Samsung.
CUIDADO
RISCO DE CHOQUE
ELÉCTRICO.NÃO ABRIR.
Este símbolo indica a presença de alta
tensão no interior do produto.
É perigoso estabelecer qualquer tipo de
contacto com as peças existentes no
interior do produto.
Este símbolo indica a existência de
documentação importante relativa ao
funcionamento e manutenção deste
produto (fornecida com o mesmo).
Produto de classe II: Este símbolo indica
que não é necessária uma ligação
eléctrica de segurança à terra.
Se este símbolo não se encontrar num
produto DEVERÁ possuir uma ligação
de proteção segura à terra.
Tensão CA: Este símbolo indica que a
tensão nominal é CA.
Tensão CC: Este símbolo indica que a
tensão nominal é CC.
Cuidado, consulte as instruções de
utilização: Este símbolo aconselha o
utilizador a consultar o manual do
utilizador quanto a informações de
segurança.
AVISO
Para reduzir o risco de fogo ou de choque
elétrico, não exponha este aparelho à chuva
ou à humidade.
CUIDADO
PARA EVITAR CHOQUES ELÉCTRICOS, INSIRA
TOTALMENTE A PARTE LARGA DA FICHA NA
RANHURA LARGA.
Este aparelho deve ser sempre ligado a uma
tomada com ligação à terra.
Para desligar o aparelho da corrente, tem de
Não exponha o aparelho a gotas ou salpicos.
Não coloque objectos com líquidos, tais como
vasos, em cima do aparelho.
Para desligar completamente o aparelho, tem
de desligar o cabo de alimentação da tomada
de parede. Por este motivo, o cabo de
alimentação tem de estar sempre facilmente
acessível.

POR - iii
PRECAUÇÕES
1.
sua casa está em conformidade com os
requisitos de energia indicados no
parte traseira do seu produto. Instale o
produto na horizontal, sobre uma base
para permitir a ventilação 7~10 cm.
ventilação não estão tapados. Não coloque a
tipo de equipamento que possa aquecer.
Esta unidade foi concebida para uma
utilização contínua. Para desligar
CA da tomada de parede. Desligue a unidade
quando não tencionar utilizá-la durante
muito tempo.
2.
corrente da rede eléctrica. Os picos de
tensão durante uma trovoada podem
3. Não exponha a unidade à luz solar directa
nem a outras fontes de calor. A unidade
4. Proteja o produto da humidade (por exemplo,
vasos) e de calor (por exemplo, uma lareira)
ou de equipamento que crie campos
magnéticos ou eléctricos fortes. Desligue o
cabo de alimentação da tomada eléctrica se
a unidade não funcionar correctamente.
O produto não se destina a utilização
industrial. Utilize este produto apenas para
produto ou o disco tiverem sido arm zenados
em temperaturas baixas. Se transportar a
unidade no Inverno, aguarde
aproximadamente 2 horas para que a
de utilizar.
5. As pilhas utilizadas neste produto contêm
químicos nocivos para o ambiente. Não deite
as pilhas no lixo doméstico. Não elimine as
pilhas através de fogo. Não provoque curto-
circuito, não desmonte nem sobreaqueça as
pilhas. Pode provocar uma explosão, se
substituir as pilhas incorrectamente.
Substitua-as apenas pelo mesmo tipo de
pilhas ou por um tipo equivalente.
SOBRE ESTE MANUAL
O manual de utilizador contém duas partes: este
MANUAL DO UTILIZADOR em papel simples e um
MANUAL COMPLETO detalhado que pode
transferir.
MANUAL DO UTILIZADOR
Consulte este manual para obter instruções de
segurança, informações sobre a instalação do
produto, sobre os componentes e sobre as
MANUAL COMPLETO
Pode analisar o código QR para aceder ao
MANUAL COMPLETO no centro de assistência
ao cliente online da Samsung. Para poder
visualizar o manual no seu computador ou
formato de documento a partir do website da
Samsung. (http://www.samsung.com/support)
alteração sem aviso prévio.

POR - iv
CONTEÚDOS
01 Vericaroscomponentes 2
Inserção de Pilhas antes de usar o Controlo Remoto (pilhas AAA X 2) ------------------------- 2
02 Resumodoproduto 3
Painel Superior do Party Audio ------------------------- 3
Painel Traseiro do Party Audio ------------------------- 4
03 ConectaroPartyAudio 6
Conectar a Energia Elétrica
-------------------------
6
Como usar o Grupo de Áudio
-------------------------
7
04 Conexãodeumdispositivoexterno 12
Conectar usando um Cabo de Áudio Analógico (AUX)
-------------------------
12
Conectar um dispositivo móvel via Bluetooth
-------------------------
13
05
ConectarumdispositivodearmazenamentoUSB
16
Atualização de software
-------------------------
17
06 Usarocontroloremoto 18
Como usar o controlo remoto
-------------------------
18
Como usar o Modo de Som
-------------------------
20
Como usar o Efeito DJ
-------------------------
20

POR - v
07 UsaraappSamsungGigaPartyAudio 21
Instale a APP Samsung Giga Party Audio
-------------------------
21
Lançamento da App Samsung Giga Party Audio
-------------------------
21
08 Resoluçãodeproblemas 22
09 Licenças 23
10 AvisodeLicençadeOpenSource 23
11 NotaImportantesobreoServiço 23
12 Especicaçõeseguia 24
-------------------------
24
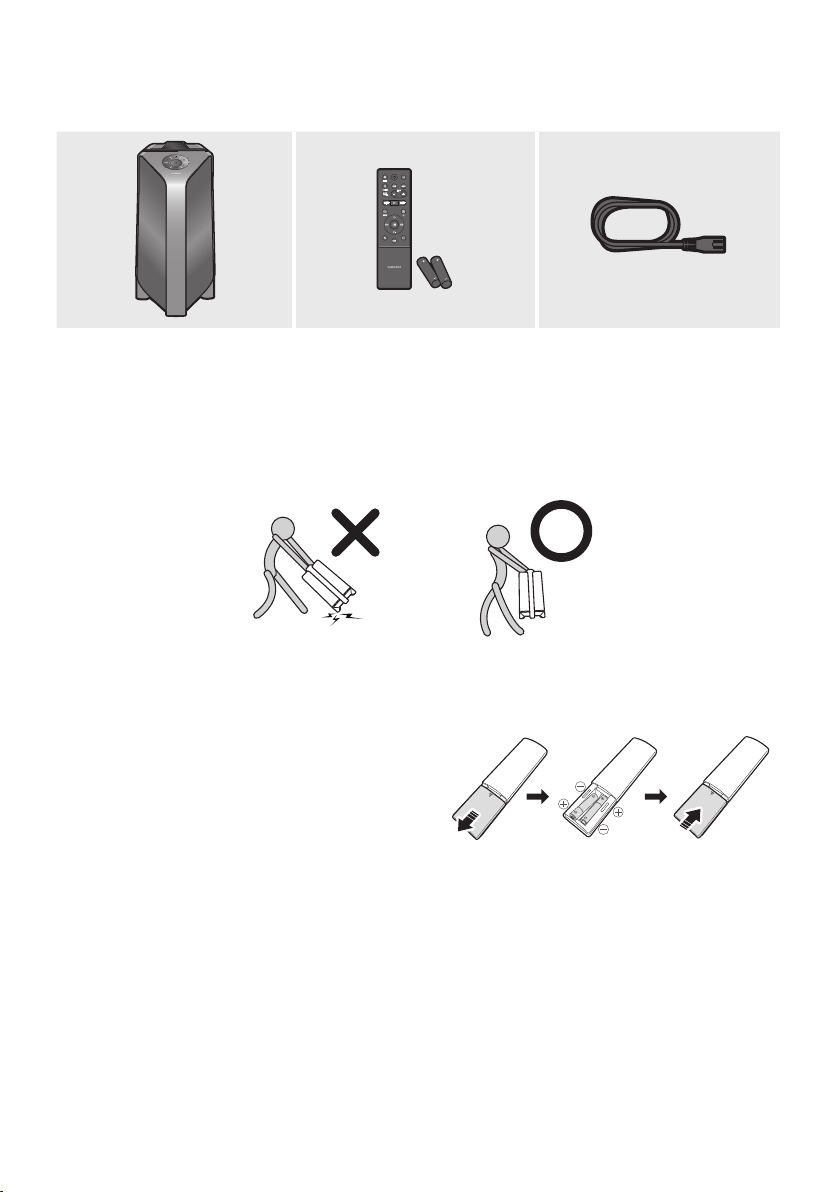
POR - 2
01 VERIFICAR OS COMPONENTES
UnidadePrincipaldoPartyAudio ControloRemoto/Pilhas CabodeAlimentação
Para obter mais informações sobre a fonte de alimentação e o consumo de energia, consulte a
etiqueta anexada ao produto. (Etiqueta: Parte traseira da Unidade Principal do Party Audio)
Para adquirir componentes adicionais ou cabos opcionais, entre em contacto com o Centro de
Serviço da Samsung ou com o Apoio ao Cliente da Samsung.
Ao mover o produto, não arraste ou puxe o produto a partir do chão. Levante o produto ao movê-lo.
InserçãodePilhasantesdeusaroControloRemoto(pilhasAAAX2)
Deslize a tampa do compartimento das pilhas na
removida. Insira 2 pilhas AAA (1,5V) orientadas com
a polaridade correta. Deslize novamente a tampa
do compartimento das pilhas de modo a fechá-lo.

POR - 3
02 RESUMO DO PRODUTO
PainelSuperiordoPartyAudio
BASS
Sensor
Remoto
Ao manusear o sistema Party Audio, aponte a frente do controlo remoto para o sensor
remoto.
Janelade
Exibição
Exibe mensagens de funcionamento ou o estado atual do sistema Party Audio.
Energia Liga e desliga o Party Audio.
Luz
Pressione o botão
(Luz) para ativar o Modo de Iluminação. Pressione o botão
repetidamente para alternar entre os modos de iluminação disponíveis: AMBIENT, PARTY ,
DANCE , THUNDERBOLT , STAR ou OFF .
Fonte
Pressione para selecionar uma fonte conectada ao Party Audio.
Pressione e mantenha pressionado o botão (Fonte) por mais de 5 segundos para
entrar no modo “BT PAIRING”.
Reproduzir/
Pausa
Reproduzir/Pausa
Pressione o botão
ReproduçãodeDemonstração
Pressione e mantenha pressionado o botão por mais de 5 segundos para iniciar
a Reprodução de Demonstração enquanto o sistema estiver ligado. “DEMO” surgirá
Para cancelar a Reprodução de Demonstração, pressione e mantenha pressionado o
botão por mais de 5 segundos durante a Reprodução de Demonstração.
– Se você digitar algum comando enquanto estiver na reprodução de
demonstração, o temporizador de 60 segundos será atualizado.
– Todos os botões no controle remoto e no painel traseiro são desativados
durante a reprodução de demonstração. Se quiser usar o controlo remoto,
cancele o Reprodução de Demonstração.
– O Reprodução de Demonstração será cancelada quando mudar a fonte ou
desligar o sistema.
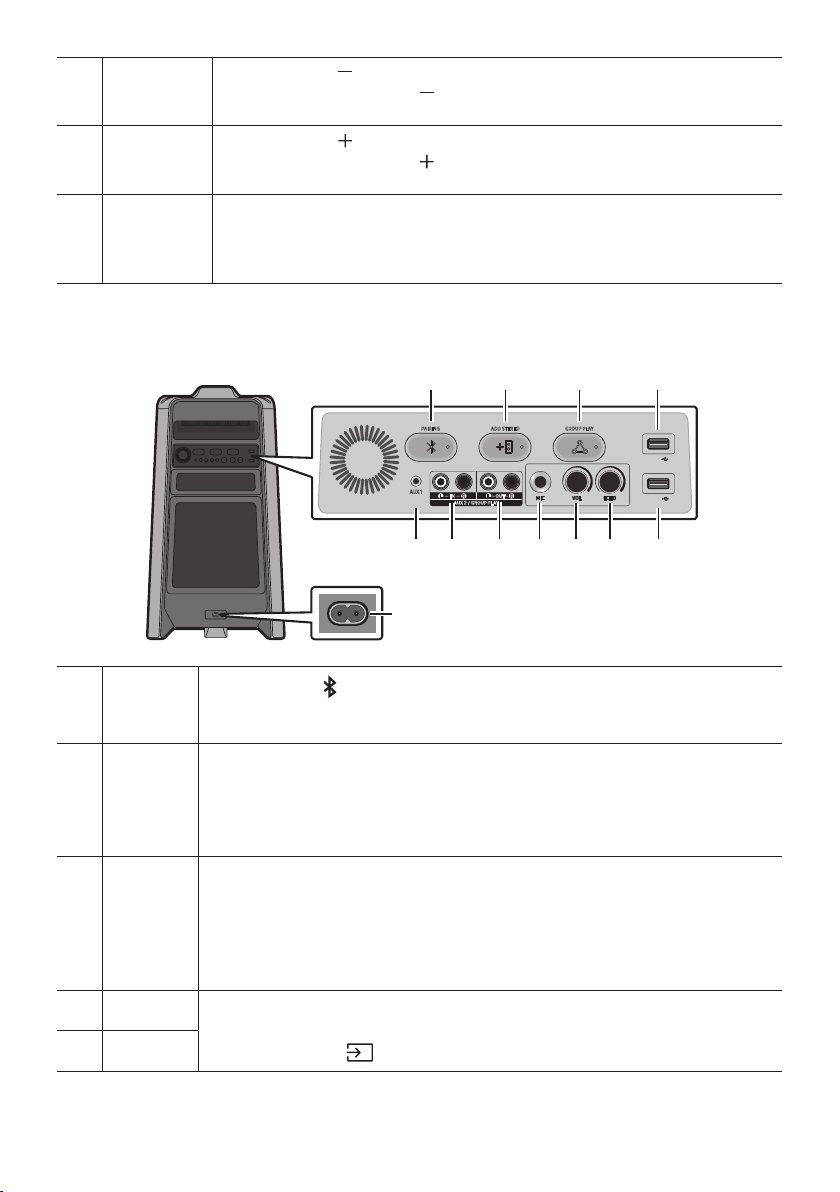
POR - 4
Diminuir
volume
Pressione o botão (Diminuirvolume) para baixar o nível do volume.
Mantenha pressionado o botão (Diminuirvolume) para diminuir rapidamente o nível
do volume.
Aumentar
volume
Pressione o botão (Aumentarvolume) para aumentar o volume.
Mantenha pressionado o botão (Aumentarvolume) para aumentar rapidamente o
nível do volume.
BASS
Pressione o botão BASS para usar o poderoso som grave.
Pressione novamente para retornar ao som normal.
Pressione e mantenha pressionado o botão BASS por mais de 5 segundos para ligar ou
desligar a função BLUETOOTH POWER.
PainelTraseirodoPartyAudio
ADD STEREO GROUP PLAYPAIRING
AUX 1
AUX 2 / GROUP PLAY
IN
OUT
L
R
L
R
USB1
(5V 2.1A)
USB2
(5V 0.5A)
ECHOVOLMIC
OUT
Bluetooth
PAIRING
Pressione o botão PAIRING para entrar no modo “BT PAIRING”. Poderá conectar o Party
Audio a um novo dispositivo Bluetooth neste modo, selecionando o Party Audio da lista de
pesquisa de dispositivos Bluetooth.
ADD
STEREO
Pressione o botão ADD STEREO
Pressione novamente o botão ADD STEREO para sair do modo Grupo Stereo antes que
outro Party Audio seja conectado. Quando a conexão for estabelecida, você pode curtir o
som estéreo. Pressione e mantenha pressionado o botão ADD STEREO por mais de
GROUP
PLAY
Pressione o botão GROUP PLAY
Pressione novamente o botão GROUP PLAY
que outro Party Audio seja conectado. Quando a conexão for estabelecida, poderá usar os
vários sistemas Party Audio ao mesmo tempo, usando o modo Group Play. Pressione e
mantenha pressionado o botão GROUP PLAY por mais de 5 segundos para desconectar o
USB1
Conecte um dispositivo USB às portas USB1 ou USB2 da unidade principal.
Se conectar o seu telefone à porta USB1, poderá carregá-lo.
Pressione o botão (Fonte) para selecionar USB1 ou USB2.
USB2
POR - 5
ECHO
Você pode dar um efeito de eco ao som de um microfone conectado (MIC) ao ajustar o
botão ECHO.
Se rodar no sentido dos ponteiros do relógio, o efeito eco aumentará, se rodar no sentido
oposto, o efeito eco diminuirá.
VOL
Use o botão VOL da unidade principal para ajustar o volume do microfone (MIC).
Se rodar no sentido dos ponteiros do relógio, o volume aumentará, se rodar no sentido
oposto, o volume diminuirá.
MIC Conecte o seu microfone ao terminal MIC.
Terminais
GROUP PLAY
OUT
Use um Cabo de Áudio (não fornecido) para conectar os terminais GROUPPLAY(OUT) da
unidade principal à entrada de áudio de um dispositivo externo de saída analógica.
Se o dispositivo externo de saída analógica tiver apenas um terminal de entrada de
áudio, conecte à esquerda ou à direita.
Terminais
AUX2/GROUP
PLAY IN
Use um Cabo de Áudio (não fornecido) para conectar os terminais AUX2(IN)da unidade
principal à saída de áudio de um dispositivo externo de saída analógica.
Se o dispositivo externo de saída analógica tiver apenas um terminal de Saída de
Áudio, conecte à esquerda ou à direita.
Pressione o botão (Fonte)para selecionar AUX2.
O sistema será desligado se o produto estiver no modo AUX2 sem reprodução e sem
entrada de comando por mais de 20 minutos.
O sistema será desligado se o produto estiver no modo AUX2 com reprodução por
mais de oito horas e sem entrada de comando.
AUX1
Use um Cabo de Áudio (AUX) (não fornecido) para conectar o terminal AUX1 da unidade
principal à saída de áudio de um dispositivo externo.
O sistema será desligado se o produto estiver no modo AUX1 sem reprodução e sem
entrada de comando por mais de 20 minutos.
O sistema será desligado se o produto estiver no modo AUX1 com reprodução por
mais de oito horas e sem entrada de comando.
Energia
Conecte o cabo de alimentação no terminal Energia e conecte a outra extremidade a uma
tomada de parede para fornecer energia elétrica ao Party Audio.

POR - 6
03 CONECTAR O PARTY AUDIO
ConectaraEnergiaElétrica
Use o cabo de alimentação para conectar o Party Audio a uma tomada na seguinte ordem: Conecte o cabo
de alimentação ao Party Audio e, de seguida, a uma tomada na parede.
Veja as ilustrações abaixo.
Para obter mais informações sobre a energia elétrica necessária e o consumo de energia, consulte a
etiqueta anexada ao produto. (Etiqueta: Parte traseira do Party Audio)
ConectaraEnergia
Elétrica
PartetraseiradoParty
Audio

POR - 7
ComousaroGrupodeÁudio
Poderá conectar vários sistemas de áudio num um grupo para criar um ambiente de festa e produzir
compartilhada com qualquer outro sistema Party Audio no grupo de áudio.
ConectarnomodoGroupPlaycomo
AUX 2 / GROUP PLAY
IN
OUT
L
R
L
R
AUX 2 / GROUP PLAY
IN
OUT
L
R
L
R
AUX 2 / GROUP PLAY
IN
OUT
L
R
L
R
1ºPartyAudio
Hospedeiro
2ºPartyAudio ÚltimoPartyAudio
Continuea
conexãoatéao
últimoParty
Audio
o botão AUX ou
(Fonte) para mudar a fonte para AUX2 para todo sistema Party Audio com exceção
do primeiro (ou host) sistema Party Audio.
NOTAS
Dependendo do comprimento ou das características do cabo, poderá haver uma diferença na
distância operacional.
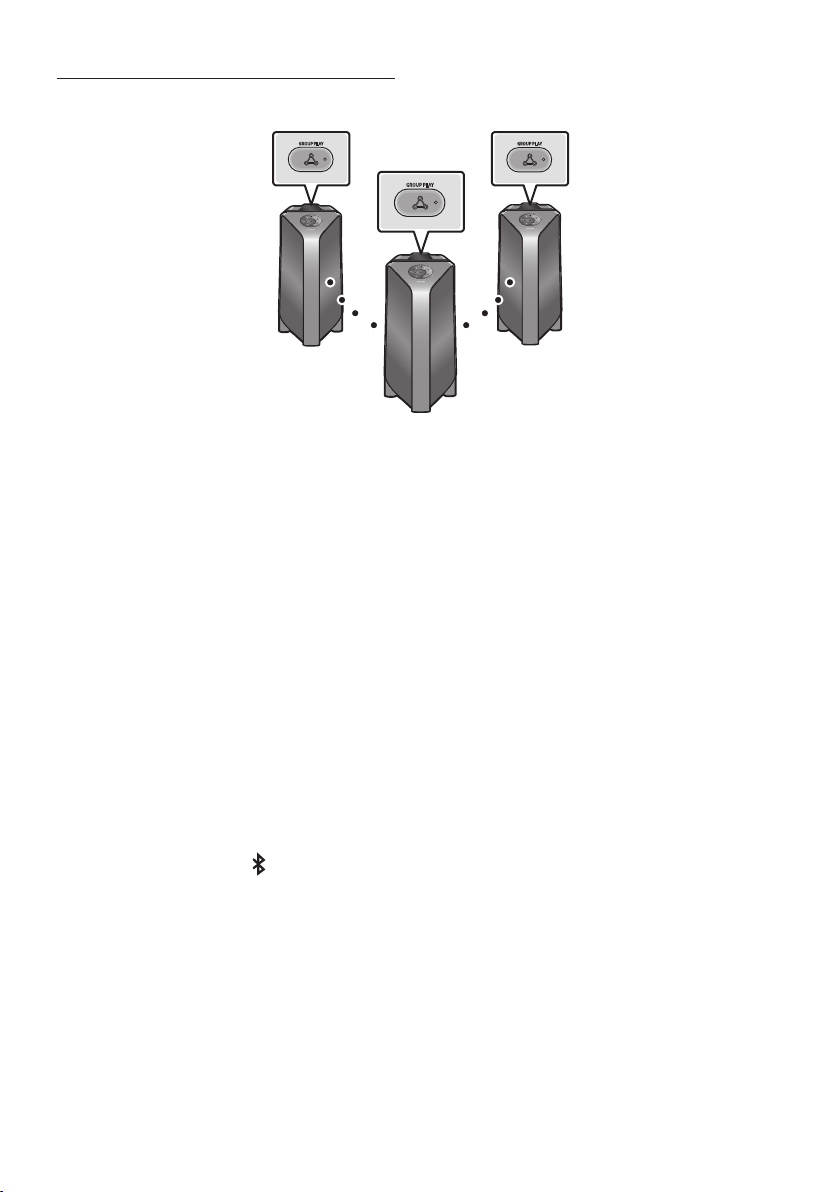
POR - 8
ConectarnomodoGroupPlaysemos
GROUP PLAY
GROUP PLAY
GROUP PLAY
Hospedeiro
Escravo1
Escravo2
1. Pressione o botão GROUP PLAY no sistema Party Audio Hospedeiro. A mensagem “HOST” surgirá
no visor Party Audio hospedeiro e o LED piscará no botão GROUP PLAY.
2. Pressione o botão GROUP PLAY no 2º sistema Party Audio (Escravo 1). A mensagem “GROUP PLAY
CONNECTED” surgirá no visor e o botão GROUP PLAY em ambos os sistemas parará de piscar.
3. Pressione o botão GROUP PLAY no 3º sistema Party Audio (Escravo 2). A mensagem “GROUP PLAY
CONNECTED” surgirá no visor e o botão GROUP PLAY em ambos os sistemas parará de piscar.
4. Se desejar adicionar mais sistemas Party Audio, repita o passo 3.
5.
NOTAS
Condições ambientais ou outros fatores com dispositivos conectados podem afetar a qualidade da
reprodução.
Se o LED vermelho estiver ativado no botão GROUP PLAY, um erro terá ocorrido na conexão sem
O botão ADD STEREO e PAIRING nos sistemas escravos do Party Audio não estão disponíveis no
O botão ADD STEREO no sistema Party Audio host não estará disponível enquanto estiver no modo
Ao adicionar uma unidade subordinada, se você pressionar e manter pressionado GROUP PLAY na
subordinada, antes de aparecer a mensagem “GROUP PLAY CONNECTED”, ela se tornará a unidade
host em vez disso.

POR - 9
Todas as unidades subordinadas devem ser conectadas uma a uma. Por exemplo, após a host ser
conectada, pressione o botão GROUP PLAY na subordinada 1 para conectar e, depois que a
subordinada 1 estiver conectada, você deverá conectar as subordinadas 2 e 3 uma a uma em
sequência.
Ao usar a Group Play, os dispositivos Bluetooth conectados no momento são desconectados e a
conexão Bluetooth é desativada.
Os dispositivos Bluetooth podem buscar e se conectar apenas à Party Audio host apenas.
No caso do modo Group Play, as subordinadas não podem se conectar a um dispositivo Bluetooth.
Se você desligar e depois ligar o Party Audio ou selecionar qualquer fonte que não seja BT em uma
unidade subordinada, no modo Group Play, o modo Group Play é desconectado.
DesconectaromodoGroupPlaysemos
1. Mantenha pressionado o botão GROUP PLAY durante mais de 5 segundos (Hospedeiro ou
Escravos) depois que o Group Play estiver conectado ou pressione o botão GROUP PLAY
(Hospedeiro ou Escravos) antes de conectar o Group Play.
“OFF-GROUP PLAY” surgirá no visor e o LED acima do botão GROUP PLAY
2. Se você selecionar qualquer fonte diferente de BT nas unidades subordinadas ou desligar Party
Audio host, o modo Group Play é desconectado.
Se a desconexão for feita em Party Audio host, Group Play é desconectada.
IndicaçõesLED
LED ESTADO Descrição
Verde
Piscar
Em
Vermelho Em
NOTA
Bluetooth.
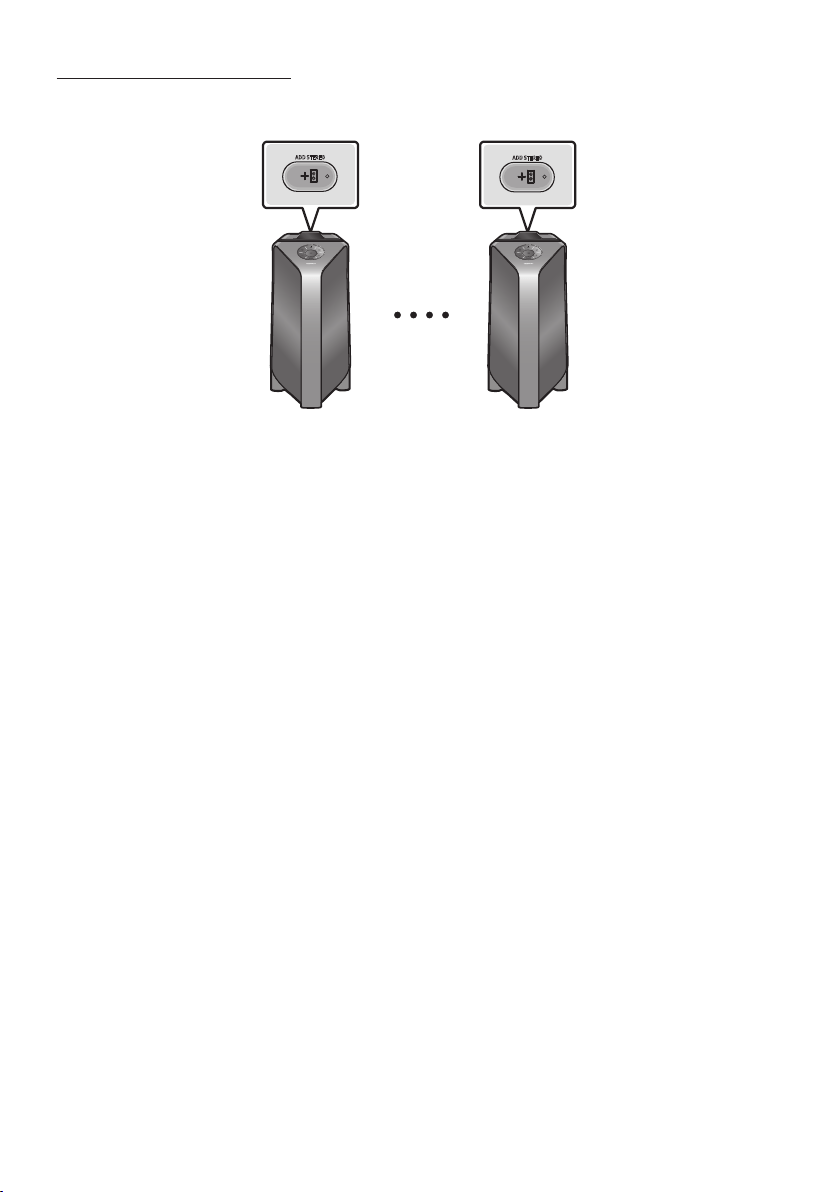
POR - 10
UsodomodoGrupoStereo
Poderá desfrutar do som estéreo conectando dois sistemas Party Audio.
ADD STEREO
ADD STEREO
PartyAudio
Esquerdo(Mestre)
PartyAudioDireito
(Escravo)
1. Pressione o botão ADD STEREO no sistema Party Audio esquerdo. A mensagem “ADD STEREO”
surgirá no visor e o LED piscará no botão ADD STEREO.
2. Pressione o botão ADD STEREO no sistema Party Audio direito. A mensagem “ADD STEREO”
surgirá no visor e o LED piscará no botão ADD STEREO.
3. Quando a conexão estiver estabelecida, a mensagem “BT PAIRING” surgirá no sistema Party Audio
Master/Mestre o “STEREO MODE” surgirá no sistema no sistema Party Audio Escravo.
O sistema Party Audio Mestre emitirá som do canal esquerdo e o sistema Party Audio Escravo
emitirá som do canal direito. Se desejar alterar os canais de som dos sistemas Party Audio,
pressione o botão ADD STEREO no atual sistema Party Audio Mestre.
4.
NOTAS
Para usar o modo Grupo Stereo, os dois sistemas Party Audio devem ser do mesmo modelo.
Condições ambientais ou outros fatores com dispositivos conectados podem afetar a qualidade da
reprodução.
Se o LED vermelho estiver ligado botão ADD STEREO, ocorreu um erro na conexão do Grupo Stereo.
Tente novamente os passos 1 e 4.
Todos os botões, exceto o botão ADD STEREO e Energia nos sistemas Party Audio subordinados,
são desativados enquanto estão no modo Grupo Stereo.
O botão GROUP PLAY no sistema Party Audio hospedeiro não está disponível enquanto estiver no
modo Grupo Stereo.

POR - 11
Enquanto estiverem no modo Grupo Stereo, os dispositivos Bluetooth conectados no momento são
desconectados e a conexão Bluetooth é desativada.
Se você selecionar qualquer fonte diferente de BT ou realizar o ciclo de energia do Party Audio
mestre, o modo Grupo Stereo é desconectado.
Se tentar conectar um dispositivo Bluetooth enquanto o Grupo Stereo estiver se conectando, o
modo Grupo Stereo poderá falhar.
DesligaromodoGrupoStereo
1. Pressione e mantenha pressionado o botão ADD STEREO durante mais de 5 segundos (Mestre ou
Escravo) após o Grupo Stereo estiver conectado ou pressione o botão ADD STEREO (Mestre ou
Escravo) antes de conectar o Grupo Stereo.
“OFF-ADD STEREO” surgirá no visor e o LED acima do botão ADD STEREO
2. Se você selecionar qualquer fonte diferente de BT nas unidades subordinadas ou se o Party Audio
mestre for desativado e depois ativado, o modo Grupo Stereo é desconectado.
Se um dos Party Audio for desconectado do modo Grupo Stereo, outro Party Audio será
desconectado automaticamente.
IndicaçõesLED
LED ESTADO Descrição
Verde
Piscar A aguardar uma conexão do Grupo Stereo.
Ligado A conexão Grupo Stereo ocorre de forma bem-sucedida.
Vermelho Ligado Há um erro na conexão Grupo Stereo.

POR - 12
04 CONEXÃODEUMDISPOSITIVOEXTERNO
dispositivo externo no do Party Audio.
ConectarusandoumCabodeÁudioAnalógico(AUX)
- AUDIO -
R L
AUX 1
AUX 2 / GROUP PLAY
IN
OUT
L
R
L
R
Dispositivomóvel/MP3/PMP
LeitorBD/DVD/Descodicador/ConsoladeJogos
Caboestéreode3,5mm
(nãofornecido)
CabodeÁudio(AUX)(nãofornecido)
PartetraseiradoPartyAudio
Caboestéreode3,5mm(AUX1)
1. Conecte o terminal AUX1 da unidade principal à tomada AUDIO OUT do Dispositivo de Origem
usando um cabo estéreo de 3,5 mm.
2. Selecione o modo “AUX1” pressionando o botão
(Fonte)no painel superior ou no controlo
remoto.
Também poderá selecionar uma fonte usando o botão AUX no controlo remoto.
CabodeÁudio(AUX2)
1. Conecte os terminais AUX2(IN) Da unidade principal aos terminais AUDIO OUT do dispositivo de
origem usando um cabo de áudio.
2. Selecione o modo “AUX2” pressionando o botão
(Fonte) no painel superior ou no controlo
remoto.
Também poderá selecionar uma fonte usando o botão AUX no controlo remoto.
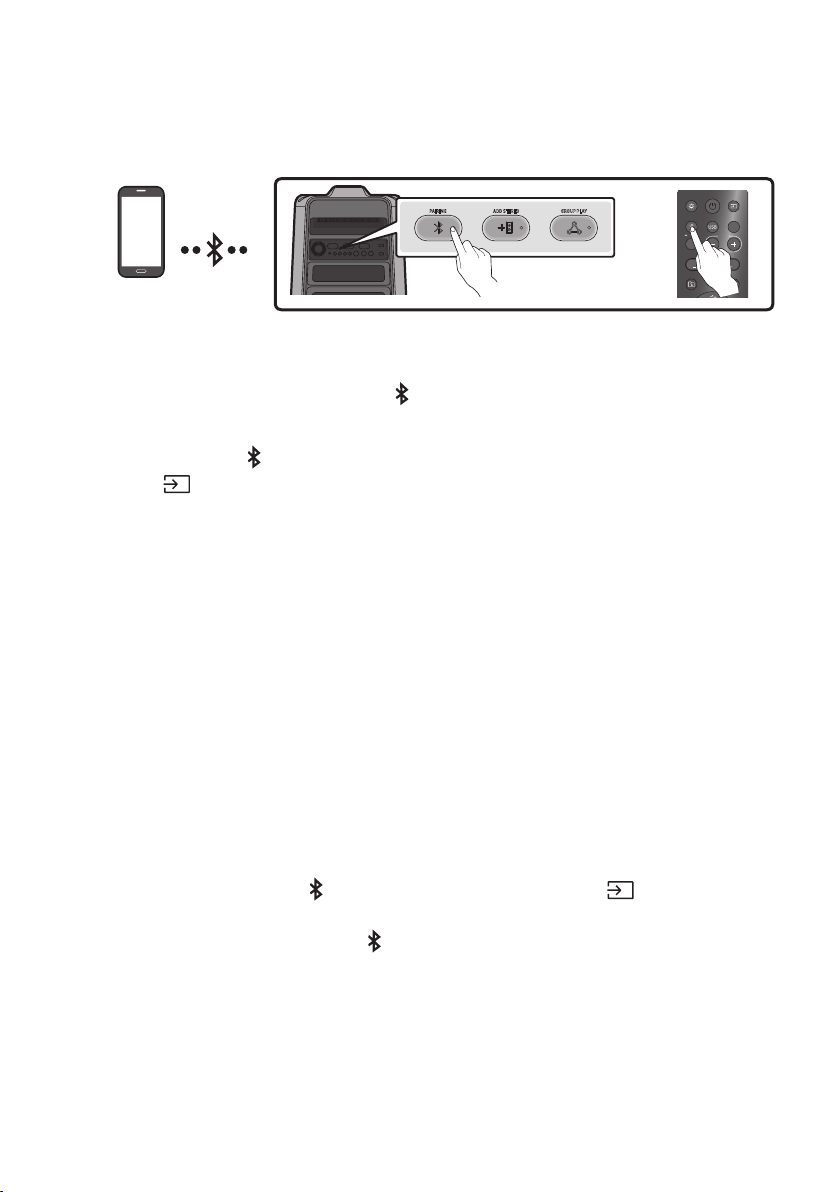
POR - 13
ConectarumdispositivomóvelviaBluetooth
Quando um dispositivo móvel é conectado usando Bluetooth, ouvir um som estéreo sem a necessidade
de cablagens.
DispositivoBluetooth
ADD STEREO GROUP PLAYPAIRING
LIGHT
PAIRING
TEMPO
USB
AUX
EFFECT
DOWN
UP
EFFECT
DJ
SOUND
MODE
OU
Aconexãoinicial
1. Pressione e mantenha pressionado o botão PAIRING
para entrar no modo “BT PAIRING”.
(OU)
Pressione o botão PAIRING no painel traseiro ou pressione e mantenha pressionado o
botão
(Fonte) no painel superior por mais de 5 segundos para entrar no modo “BT
PAIRING”.
2. No seu dispositivo, selecione “[AV]SamsungPartyT50” que surge na lista.
Quando o Party Audio está conectado ao dispositivo Bluetooth, [Nomedodispositivo
BluetoothBT” surge no visor frontal.
3.
Seodispositivofalharnaconexão
Se uma lista do Party Audio conectado anteriormente (por exemplo, “[AV]SamsungPartyT50”)
aparecer na lista, exclua-a.
Repita os passos 1 e 2.
QualéadiferençaentreBTREADYeBTPAIRING?
BT READY : Neste modo, Poderá procurar TVs conectadas anteriormente ou conectar um
dispositivo móvel conectado anteriormente ao Party Audio.
BT PAIRING : Neste modo, poderá conectar um novo dispositivo ao Party Audio.
(Mantenha pressionado o botão PAIRING no controlo remoto ou o botão (Fonte)na parte
superior do Party Audio durante mais de 5 segundos para entrar no modo “BT PAIRING”.
– Também poderá pressionar o botão PAIRING na parte traseira do Party Audio para entrar no
modo “BT PAIRING”.

POR - 14
MúltiplasConexõesBluetooth
O Party Audio suporta até duas conexões simultâneas com dispositivos Bluetooth. O Party Audio pode
dispositivo.
Dispositivo
Bluetooth1
Dispositivo
Bluetooth2
1. Conecte o Party Audio ao primeiro dispositivo e ao segundo dispositivo, respetivamente, pela
primeira vez. (Veja a página 13)
2.
NOTAS
Se pretender conectar Party Audio a um terceiro dispositivo, poderá desligar o Party Audio de um
dos dois dispositivos atualmente conectados e depois conectar o Party Audio ao terceiro
dispositivo.
Com o Party Audio e dois dispositivos atualmente conectados, ao emparelhar um novo dispositivo
Bluetooth, os dispositivos atualmente conectados poderão ser desconectados.
Poderá conectar-se a dois dispositivos Bluetooth ao mesmo tempo.
Se for solicitado um código PIN ao conectar um dispositivo Bluetooth, digite <0000>.
Condições ambientais ou outros fatores com dispositivos conectados podem afetar a qualidade da
reprodução.
O Party Audio desliga automaticamente após 20 minutos sem nenhuma entrada de comando no
estado pronto.
O Party Audio poderá não executar a pesquisa ou conexão Bluetooth corretamente nas seguintes
circunstâncias:
– Se houver um forte campo elétrico ao redor do Party Audio.
– Se vários dispositivos Bluetooth estiverem emparelhados simultaneamente com o Party Audio.
– Se o dispositivo Bluetooth estiver desligado, não estiver no lugar ou com defeito.
Dispositivos eletrónicos podem causar interferências de rádio. Os dispositivos que geram ondas
eletromagnéticas devem ser mantidos afastados da unidade principal do Party Audio - por
Quando o Party Audio está conectado à sua TV por Bluetooth, o vídeo na TV e o áudio do Party
Audio podem não estar sincronizados porque a distância entre o Party Audio e a TV é muito longe.
Recomenda-se aproximar o Party Audio à sua TV, no alcance de 1 metro.

POR - 15
outro dispositivo Bluetooth e o alto-falante após alguns minutos (Apróx. 1 minuto). Caso contrário, o
dispositivo conectado.
Dispositivos Bluetooth removíveis/desconectáveis (por exemplo: Dongle, Windows Phone, laptops,
Se você se afastar muito do alcance do Party Audio sem primeiro desconectar o dispositivo
Bluetooth, poderá levar alguns minutos para conectar outros dispositivos Bluetooth. Se você
desligar e ligar o Party Audio, poderá conectar outros dispositivos Bluetooth sem esperar.
IndicaçõesLED
LED ESTADO Descrição
Azul
Piscar
Rapidamente
Modo BT PAIRING
Piscar Modo BT READY
Ligado Um dispositivo Bluetooth está conectado.
UsarLigarViaBluetooth(BluetoothPowerOn)
Quando o Party Audio está desligado, poderá conectar o seu dispositivo inteligente ao produto através
de uma conexão Bluetooth para ligá-lo.
1. Mantenha pressionado o botão BASS no controlo remoto ou no painel superior para ativar a
função Ligar Via Bluetooth . “ON-BLUETOOTH POWER” surge no visor.
2. Quando o Party Audio estiver desligado, conecte o seu dispositivo inteligente ao produto via
Bluetooth. (Para obter informações sobre conexões Bluetooth, consulte o manual do seu
dispositivo inteligente.)
3. Quando a conexão estiver concluída, o Party Audio será ativado automaticamente no modo
Bluetooth.
NOTA
Pressione e mantenha pressionado o botão BASS por mais de 5 segundos no controle remoto ou no
painel superior para ativar ou desativar a função Ligar Via Bluetooth.
Cada vez que o botão BASS é pressionado, o Party Audio mostra:
ON-BLUETOOTHPOWER→“OFF-BLUETOOTHPOWER”
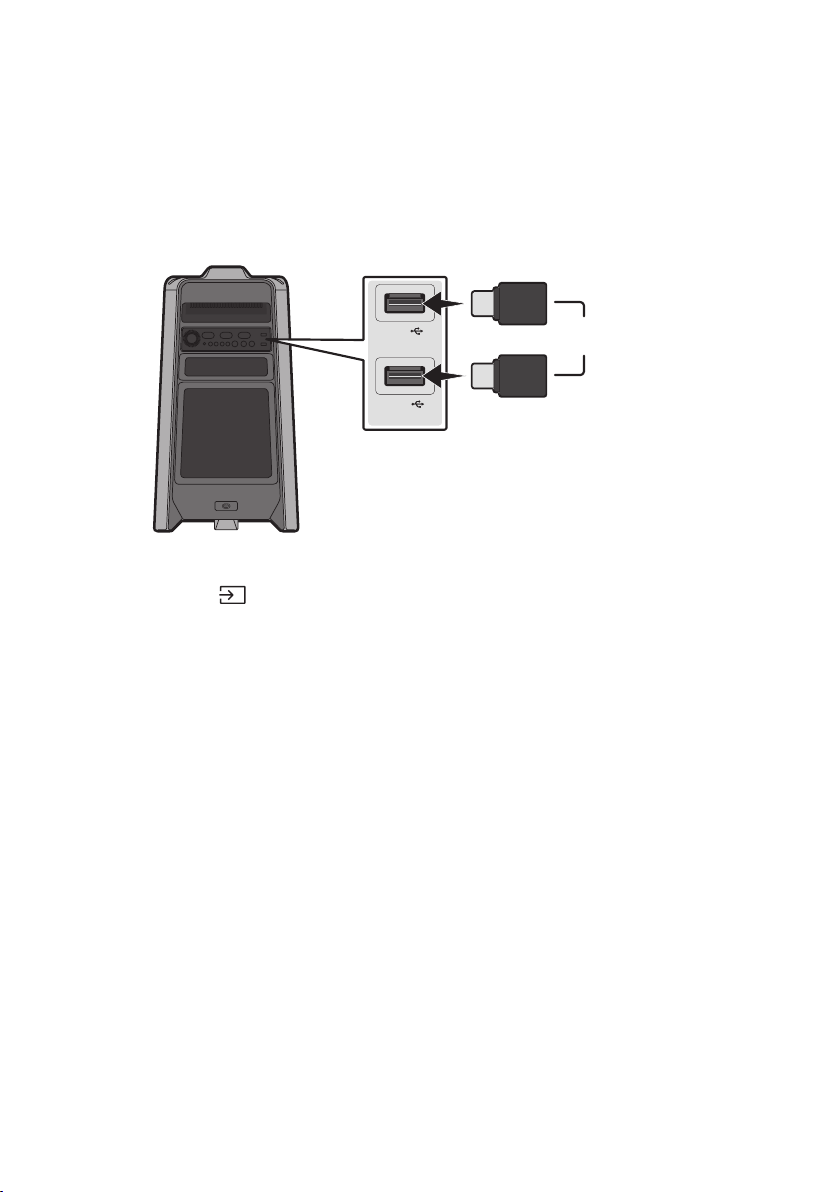
POR - 16
05 CONECTAR UM DISPOSITIVO DE
ARMAZENAMENTO USB
Party Audio.
USB1
(5V 2.1A)
USB2
(5V 0.5A)
OU
DispositivodearmazenamentoUSB
(nãofornecido)
PartetraseiradoPartyAudio
1. Conecte um dispositivo de armazenamento USB às tomadas USB1 ou USB2 do seu Party Audio.
2. Pressione o botão
(Fonte)no painel superior ou no controlo remoto e selecione “USB1” ou
“USB2”.
Também poderá selecionar uma fonte usando o botão USB no controlo remoto.
3. “USB1” ou “USB2” surgirá no visor.
4.
O Party Audio desliga automaticamente (Desligamento automático) se o dispositivo USB não
estiver conectado, em caso de reprodução interrompida ou se não houver entrada por mais de
20 minutos.
NOTAS
Este produto suporta apenas dispositivos de armazenamento USB formatados no sistema de
Este produto não suporta armazenamentos HDD nem dispositivos móveis.
É possível ler no máximo 256 pastas por dispositivo de armazenamento USB.

POR - 17
FormatosdeÁudioSuportados
Extensãodos
Ficheiros
CodecdeÁudio
Taxade
Amostragem
TaxadeBits
*.mp3
MPEG 1 Layer3 32 kHz ~ 48 kHz 32 kbps ~ 320 kbps
MPEG 2 Layer3 16 kHz ~ 24 kHz 8 kbps ~ 160 kbps
MPEG 2.5 Layer3 8 kHz ~ 12 kHz 8 kbps ~ 160 kbps
*.wma WMA7/8/9 8 kHz ~ 48 kHz 32 kbps ~ 320 kbps
*.aac
AAC 8 kHz ~ 96 kHz < 1728 kbps
A AC- LC 8 kHz ~ 96 kHz < 1728 kbps
HE-AAC 8 kHz ~ 96 kHz < 1728 kbps
*.wav
PCM/LPCM/
IMA_ADPCM
8 kHz ~ 192 kHz < 5 Mbps
- 8 kHz ~ 192 kHz < 5 Mbps
NOTAS
Este produto não suporta o codec WMA Professional.
A tabela acima mostra as taxas de amostragem e as taxas de bits suportadas. Ficheiros em
formatos não suportados não serão reproduzidos.
Atualizaçãodesoftware
OSamsungpodeofereceratualizaçõesparaormwaredosistemaPartyAudionofuturo.
USB1 ou USB2 do Party Audio. Para obter mais
Aplicações e, de seguida, Downloads. Observe que os nomes das opções podem variar.
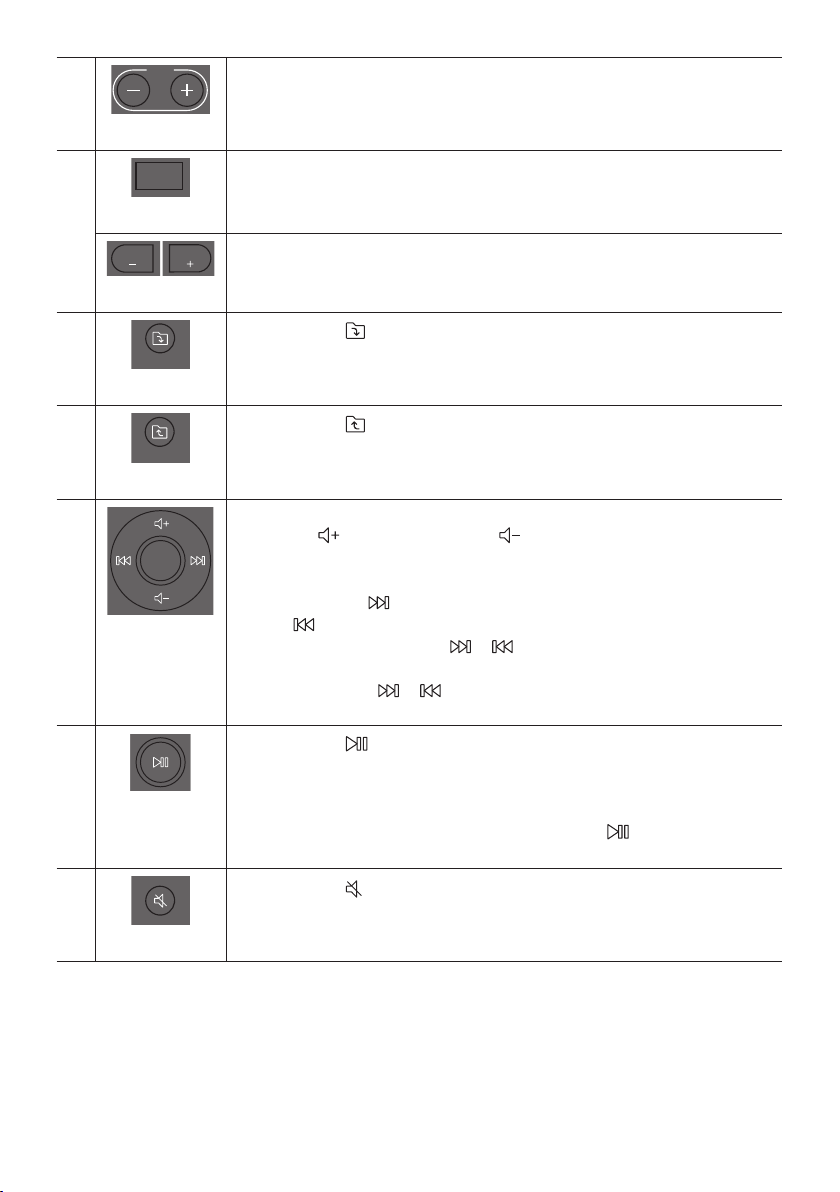
POR - 19
TEMPO+,-
DOWN
UP
BASS
EFFECT
EFFECT
DJ
LIGHT
PAIRING
TEMPO
USB
AUX
SOUND
MODE
Pressione os botões TEMPO + ou TEMPO -
cima ou para baixo.
Esta função funciona apenas no modo USB1 e USB2.
DJ
DOWN
UP
BASS
EFFECT
EFFECT
DJ
LIGHT
PAIRING
TEMPO
USB
AUX
SOUND
MODE
Esta função permite ativar a função de efeito DJ.
Cada vez que pressionar o botão para selecionar o efeito sonoro DJ desejado, escolha
NOISE, FILTER, CRUSH, CHORUS, WAHWAH ou OFF.
EFFECT+,-
DOWN
UP
BASS
EFFECT
EFFECT
DJ
LIGHT
PAIRING
TEMPO
USB
AUX
SOUND
MODE
DOWN
UP
BASS
EFFECT
EFFECT
DJ
LIGHT
PAIRING
TEMPO
USB
AUX
SOUND
MODE
Pressione os botões EFFECT + ou EFFECT - para alterar o nível de cada efeito sonoro DJ
para cima ou para baixo.
PastaDOWN
DOWN
UP
BASS
EFFECT
EFFECT
DJ
LIGHT
PAIRING
TEMPO
USB
AUX
SOUND
MODE
Pressione o botão
(DOWN)para ir para a próxima pasta no dispositivo USB.
PastaUP
DOWN
UP
BASS
EFFECT
EFFECT
DJ
LIGHT
PAIRING
TEMPO
USB
AUX
SOUND
MODE
Pressione o botão
(UP) para ir para a pasta anterior no dispositivo USB.
Aumentarovolume,
Diminuirovolume/
Saltar
Aumentarovolume,Diminuirovolume
Pressione
(Aumentarovolume)ou
(Diminuirovolume)para ajustar o nível
do volume para cima ou para baixo.
SaltarMúsica
Pressione o botão
botão
Mantenha pressionado o botão ou durante mais de 3 segundos no modo de
reprodução USB para procurar para frente ou para trás. Mantenha pressionado
novamente o botão ou durante mais de 3 segundos para voltar à reprodução
normal.
Reproduzir/
Pausa
Pressione o botão
DesligamentoAutomático(AutoPowerDown)
Para desligar a função Desligamento automático enquanto a unidade está no modo
AUX1, AUX2, pressione e mantenha pressionado o botão por mais de
ON-AUTO POWER DOWN /OFF-AUTO POWER DOWN surgirá no visor.
Silêncio
DOWN
UP
BASS
EFFECT
EFFECT
DJ
LIGHT
PAIRING
TEMPO
USB
AUX
SOUND
MODE
Pressione o botão
(Silêncio) para silenciar o som.
Pressione novamente para ativar o som.

POR - 20
Repetir
DOWN
UP
BASS
EFFECT
EFFECT
DJ
LIGHT
PAIRING
TEMPO
USB
AUX
SOUND
MODE
Pressione o botão
(Repetir)para usar a função Repetir no modo “USB1” e “USB2”.
Sempre pressionar o botão para selecionar a função de repetição desejada, escolha entre
ONE, FOLDER , ALL, RANDOM ou OFF.
BASS
DOWN
UP
BASS
EFFECT
EFFECT
DJ
LIGHT
PAIRING
TEMPO
USB
AUX
SOUND
MODE
Pressione o botão BASS para usar o poderoso som grave.
Pressione novamente para retornar ao som normal.
Pressione e mantenha pressionado o botão BASS por mais de 5 segundos para ligar ou
desligar a função BLUETOOTH POWER.
ComousaroMododeSom
1. Pressione o botão SOUND MODE no controlo remoto.
2. 2. Sempre que pressionar o botão SOUND MODE poderá selecionar o efeito sonoro desejado,
escolha entre PARTY, STANDARD, HIPHOP, EDM, ROCK, LATIN, HOUSE ou REGGAE.
NOTAS
O valor padrão do modo de som é PARTY.
Quando desligado, pressione e mantenha pressionado o botão no produto ou no controle
ComousaroEfeitoDJ
A função Efeito DJ permite ativar o efeito sonoro Efeito DJ. O nível de cada efeito é ajustável.
1. Pressione o botão DJ no Controlo remoto.
2. Cada vez que você pressiona o botão DJ, o Party Audio realiza o ciclo pelos Efeitos DJ disponíveis:
NOISE
FILTER: Cria um efeito semelhante ao som de apenas agudos ou graves.
CRUSH: Cria um efeito que torna o som original mais nítido.
CHORUS: Cria um efeito semelhante a um coro de canto.
WAHWAH: Cria um efeito ‘Wah ~ Wah ~’.
DJ EFFECT OFF: Desativa o efeito DJ.
3. Pressione os botões EFFECT + ou EFFECT - para aumentar ou diminuir o nível de cada um dos
efeitos sonoros de DJ de -15 a +15.
NOTA
Quando desligado, pressione e mantenha pressionado o botão no produto ou no controle
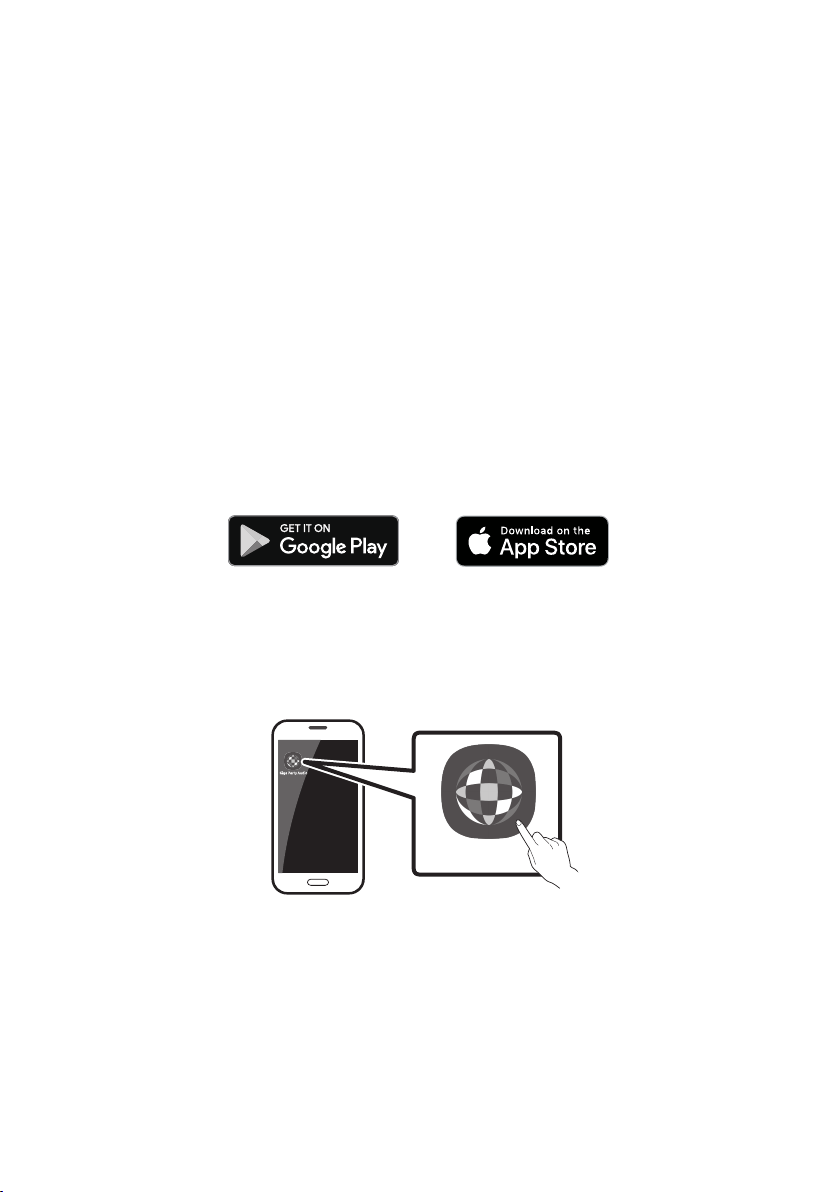
POR - 21
07 USAR A APP SAMSUNG GIGA PARTY
AUDIO
InstaleaAPPSamsungGigaPartyAudio
Para controlar este produto com seu Dispositivo Inteligente e a App Samsung Giga Party Audio, faça o
download da aplicação Samsung Giga Party Audio do Google Play Store ou da Apple App Store e
instale-a no seu dispositivo inteligente.
NOTAS
A App Samsung Giga Party Audio é compatível com dispositivos Android que executem o Android
OS 6.0 ou posterior.
A App Samsung Giga Party Audio é compatível com dispositivos móveis Apple que executam o iOS
10.0 ou posterior.
Pesquisademercado:SamsungGigaPartyAudio
LançamentodaAppSamsungGigaPartyAudio
Para iniciar e usar a App Samsung Giga Party Audio, toque no ícone Giga Party Audio no seu dispositivo
inteligente e siga as instruções no ecrã.
GigaPartyAudio
POR - 22
08 RESOLUÇÃO DE PROBLEMAS
Aunidadenãoliga.
Ocabodealimentaçãoestáconectadoà
tomada?
;
Umafunçãonãofuncionaquandoobotãoé
pressionado.
Existeeletricidadeestáticanoar?
;
novamente.
QuedasdesomocorremnomodoBT.
; Consulte as seções sobre conexões
Bluetooth na página 13.
Osomnãoéproduzido.
AfunçãoSilêncioestáativada?
; Pressione o botão (Silêncio)para
cancelar a função Silêncio.
Ovolumeestádenidonomínimo?
; Ajuste o volume.
Ocontroloremotonãofunciona.
Aspilhasestãogastas?
; Substitua por pilhas novas.
Adistânciaentreocontroloremotoea
unidadeprincipaldoPartyAudioédemasiado
longe?
; Mova o controlo remoto para mais perto da
unidade principal do Party Audio.
AconexãodoGrupoStereonãoestáa
funcionar.
OsistemaestánomodoGroupPlaysemos?
;
tente a conexão em Grupo Stereo
novamente.
NãoestabeleceumaconexãoBluetooth.
Osistemaestáconectadoaoutrosistemano
modoGroupPlaysemosounomodoGrupo
Stereo?
; Tente a conexão Bluetooth novamente
depois de desconectar a conexão do Group
OsdoisdispositivosBluetoothjáestão
conectados?
; Tente a conexão Bluetooth novamente
depois de desconectar as outras conexões
Bluetooth.
Obotão PAIRINGnãoestáafuncionar.
OsistemaestánomodoGroupPlaysemos
ounomodoGrupoStereo?
; Tente novamente depois de desconectar a
Grupo Stereo.
Queromudarosistemahospedeiroparaoutro
naconexãoGroupPlaysemosounaconexão
GrupoStereo.
; Para desconectar o modo Group Play,
pressione primeiro o Alto-falante que
deseja que hospede em primeiro lugar e
depois que exibir a mensagem “HOST”,
conecte os outros um por um.
;
Não pode alterar os outros como hospedeiro.
QueroreproduzirnoAUX1ouAUX2durante
maisde8horassementrada.
; Pressione e mantenha pressionado o botão
por mais de 5 segundos no modo AUX1
ou AUX2 para desativar a função
Desligamento automático. Mude de
ON-AUTO POWER DOWN para OFF-AUTO
POWER DOWN.
POR - 23
Nãoconsigoconectarumaunidadeescravaao
GroupPlay.
; Após uma hora, a host impedirá que outras
subordinadas sejam adicionadas. Pressione
o botão GROUP PLAY no hospedeiro e após
este exibir a mensagem “HOST”, a unidade
escrava poderá ser reconectada.
Nãoépossívelfazerumaconexão“GrupoSem
Fios/ComFios/AdicionarEstéreo/Bluetooth”.
Adistânciaentreossistemasémuitolonga?
; Recomenda-se fazer um emparelhamento
“Grupo Sem Fios/Com Fios/Adicionar
Estéreo/Bluetooth” a menos de 1 metro do
sistema.
; Recomenda-se que a distância operacional
entre os sistemas Party Audio seja inferior
a 10 metros.
09 LICENÇAS
The Bluetooth® word mark and logos are
registered trademarks owned by the Bluetooth
SIG, Inc. and any use of such marks by Samsung
Electronics Co., Ltd. is under license. Other
trademarks and trade names are those of their
respective owners.
Qualcomm aptX is a product of Qualcomm
Technologies, Inc. and/or its subsidiaries.
Qualcomm is a trademark of Qualcomm
Incorporated, registered in the United States and
other countries. aptX is a trademark of Qualcomm
Technologies International, Ltd., registered in the
United States and other countries.
10 AVISO DE
LICENÇA DE
OPEN SOURCE
Para enviar pedidos e perguntas sobre software
open source, contacte a Samsung por e-mail
(oss.request@samsung.com).
11 NOTA
IMPORTANTE
SOBRE O
SERVIÇO
As imagens e ilustrações neste Manual do
Utilizador são fornecidas apenas para referência,
podendo ser diferentes do produto real.

POR - 24
12 ESPECIFICAÇÕES E GUIA
Especicações
Nome do modelo MX-T50
USB1/USB2
Peso 11,6 kg
Dimensões (L x A x P) 351,0 x 651,0 x 323,0 mm
Limites da temperatura de funcionamento +5°C a +35°C
Limites de humidade de funcionamento 10 % ~ 75 %
AMPLIFICADOR
Potência nominal de saída
Tweeter 65W x 2, 8 ohm
Woofer 185W x 2, 3 ohm
NOTAS
Peso e dimensões são aproximados.
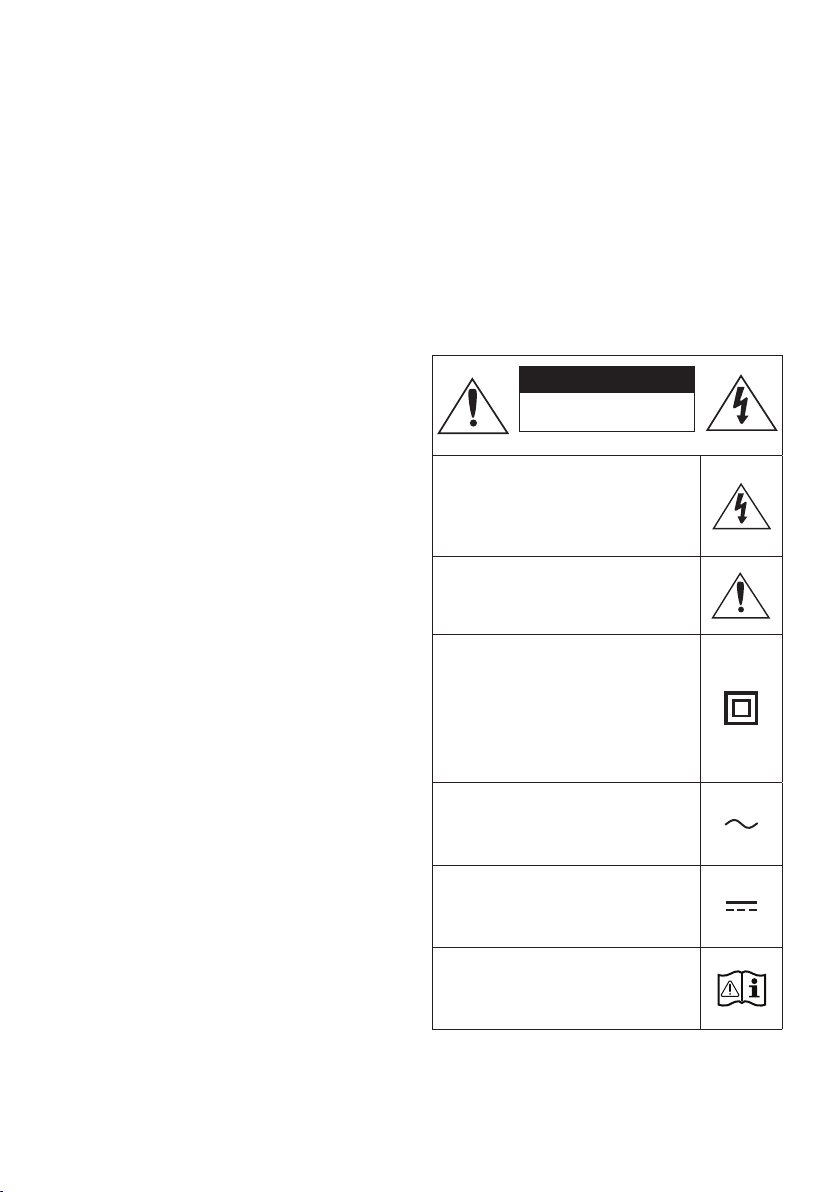
ii - ARA
.Samsung
.
II
•
•
•
•
•
•

iii - ARA
1
107
2
3
4
5
.QRSamsung
Samsung
)

iv - ARA
2 01
2 ------------------------- )AAA
3 02
3 -------------------------
4 -------------------------
6 03
6
-------------------------
7
-------------------------
12 04
12
-------------------------
)AUX
13
-------------------------
16 USB 05
17
-------------------------
18
06
18
-------------------------
20
-------------------------
20
-------------------------

v - ARA
21 07
21
-------------------------
21
-------------------------
22 08
23 09
23 10
23 11
24 12
24
-------------------------
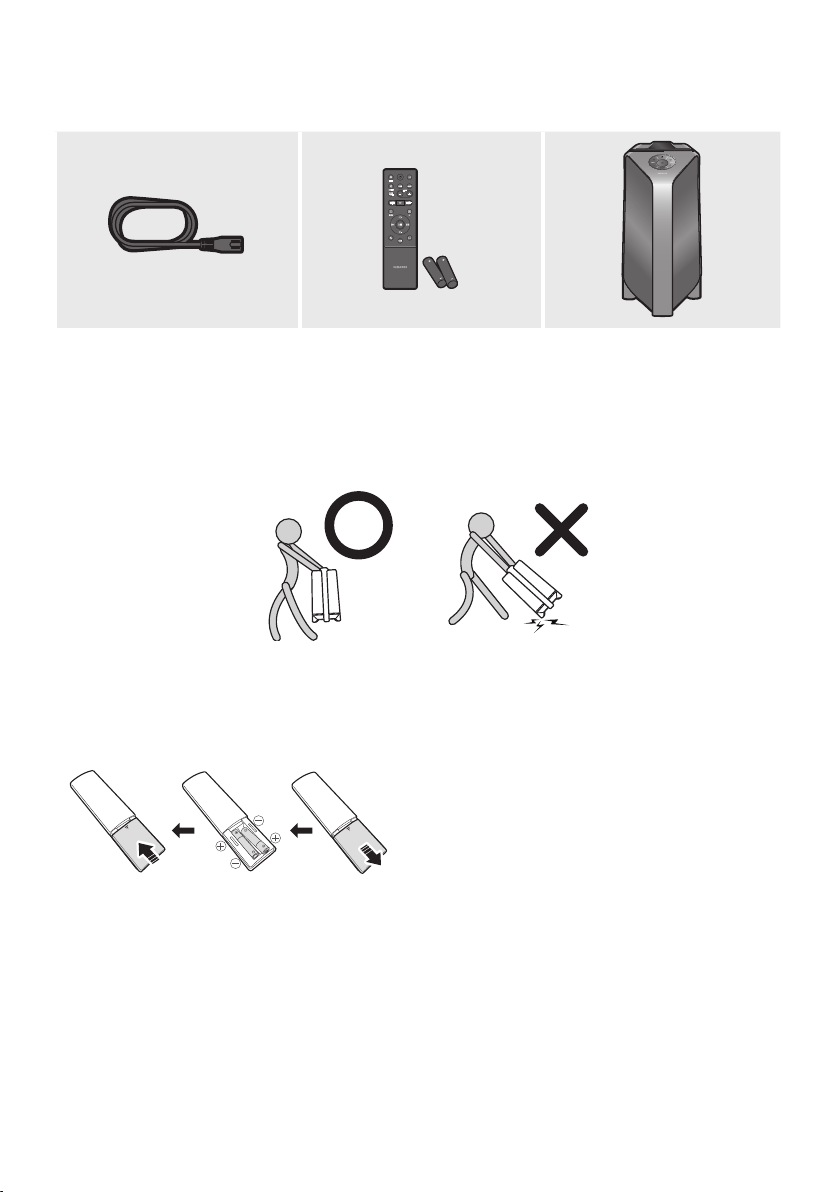
2 - ARA
01
•
)
• .SamsungSamsung
•
)
AAA )1.5

3 - ARA
02
BASS
.
.
.OFF,,,,
.
.”
5
•
•
5
60
5
– 60
–
–

4 - ARA
5
.
ADD STEREO GROUP PLAYPAIRING
AUX 1
AUX 2 / GROUP PLAY
IN
OUT
L
R
L
R
USB1
(5V 2.1A)
USB2
(5V 0.5A)
ECHOVOLMIC
OUT
.”
.
5
5
USB1
USB2USB1USB
USB1
• .USB2USB1
USB2

5 - ARA
)
.
.)
.
•
•
•
•
• .
•
20
• 8
•
20
• 8
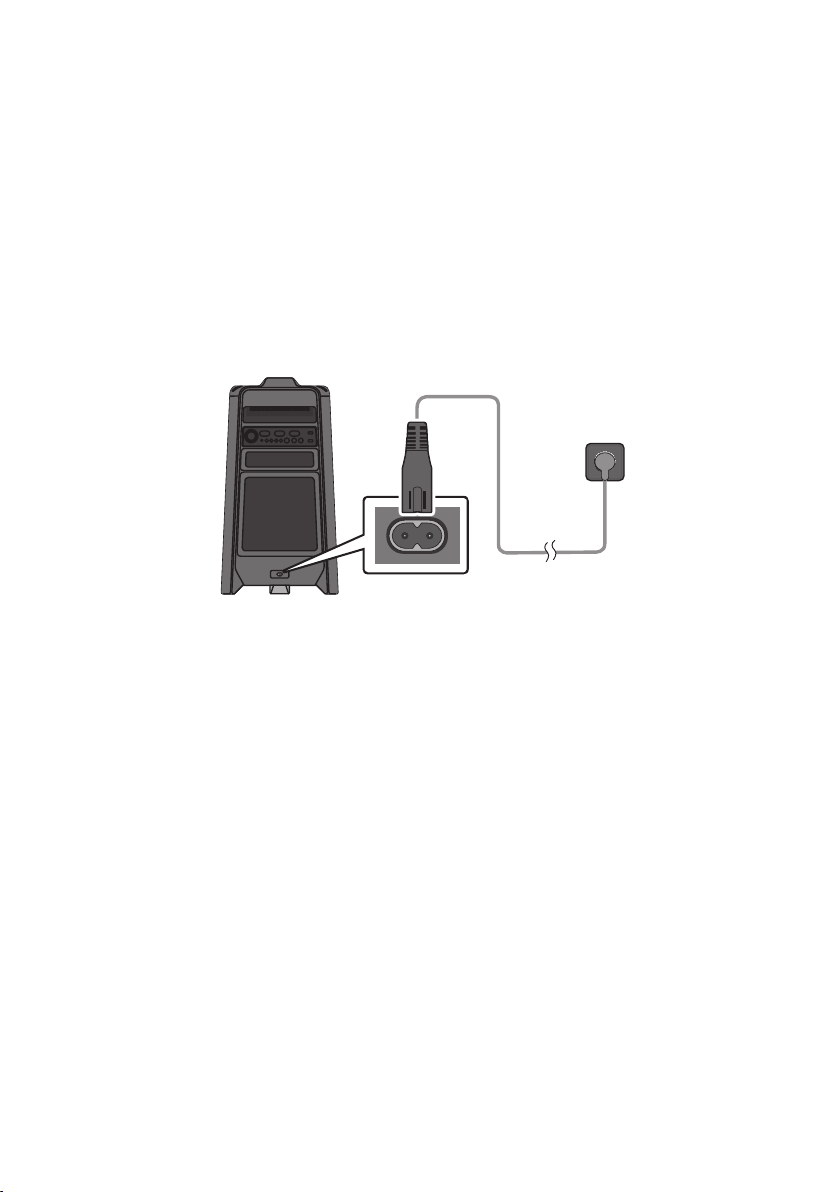
6 - ARA
03
•
)
Party
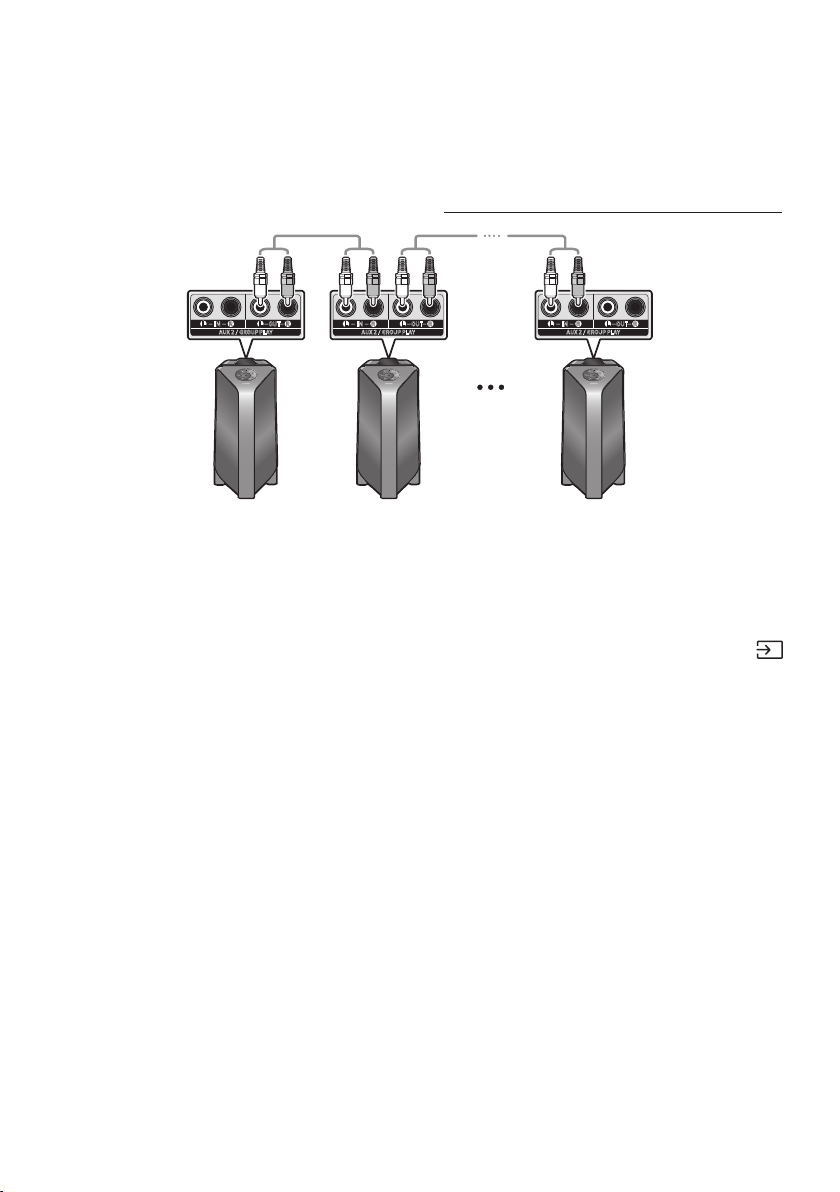
7 - ARA
AUX 2 / GROUP PLAY
IN
OUT
L
R
L
R
AUX 2 / GROUP PLAY
IN
OUT
L
R
L
R
AUX 2 / GROUP PLAY
IN
OUT
L
R
L
R
•
•
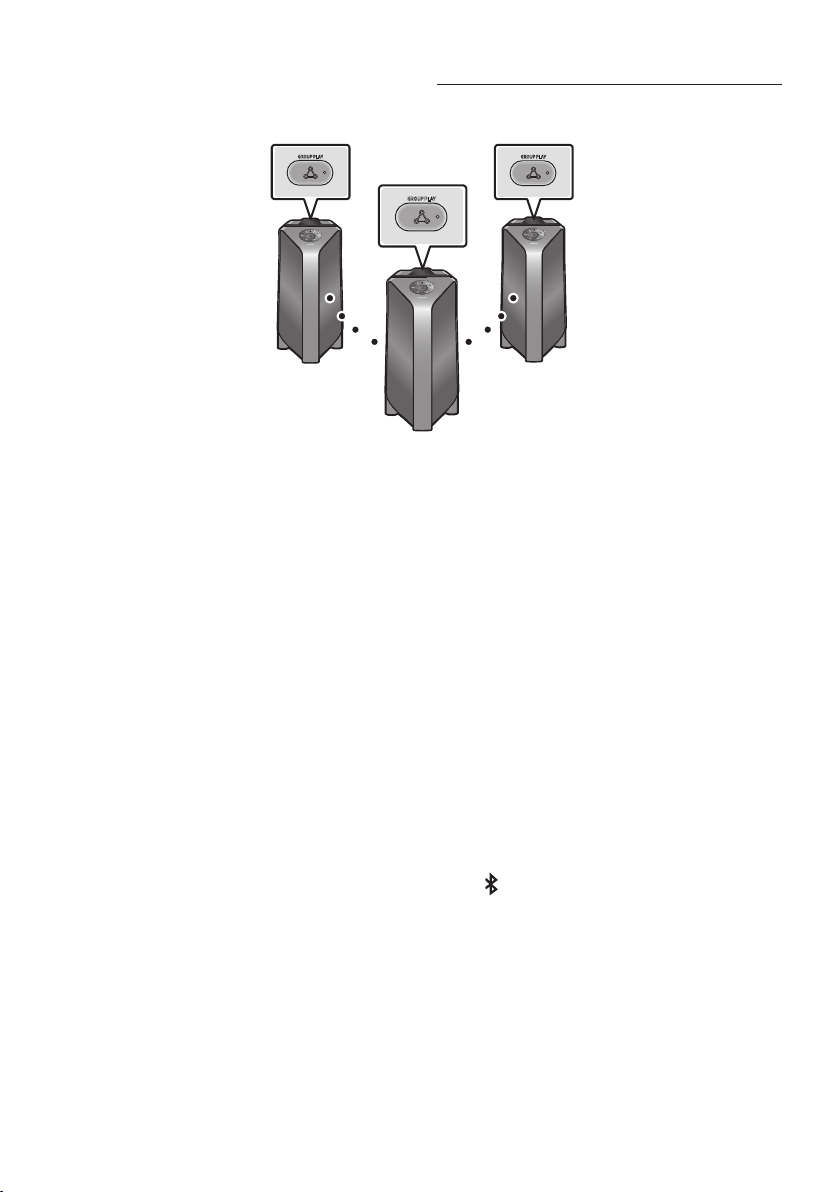
8 - ARA
GROUP PLAY
GROUP PLAY
GROUP PLAY
1
2
1 HOST
.
21
32
4.3
5
• .
•
•
51
•
.
•
.
•

9 - ARA
•
11
32
•
•
•
• BT
.
•
aptX
1
5
.
• .
2BT
•
•
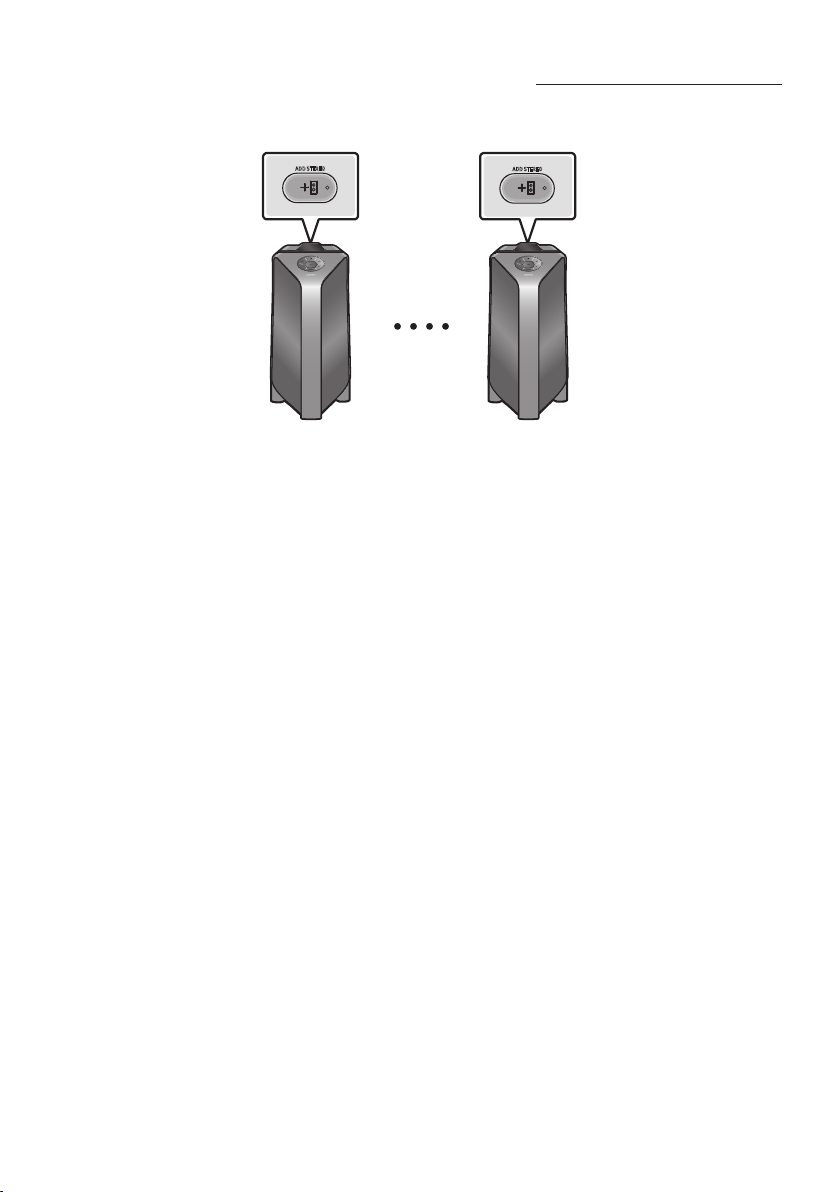
10 - ARA
.
ADD STEREO
ADD STEREO
1
.
2
.
3
•
4.
•
•
•
41
•
.
• .

11 - ARA
•
• BT
•
aptX
•
.
1
5
.
• .
2
BT
•
.
.
.
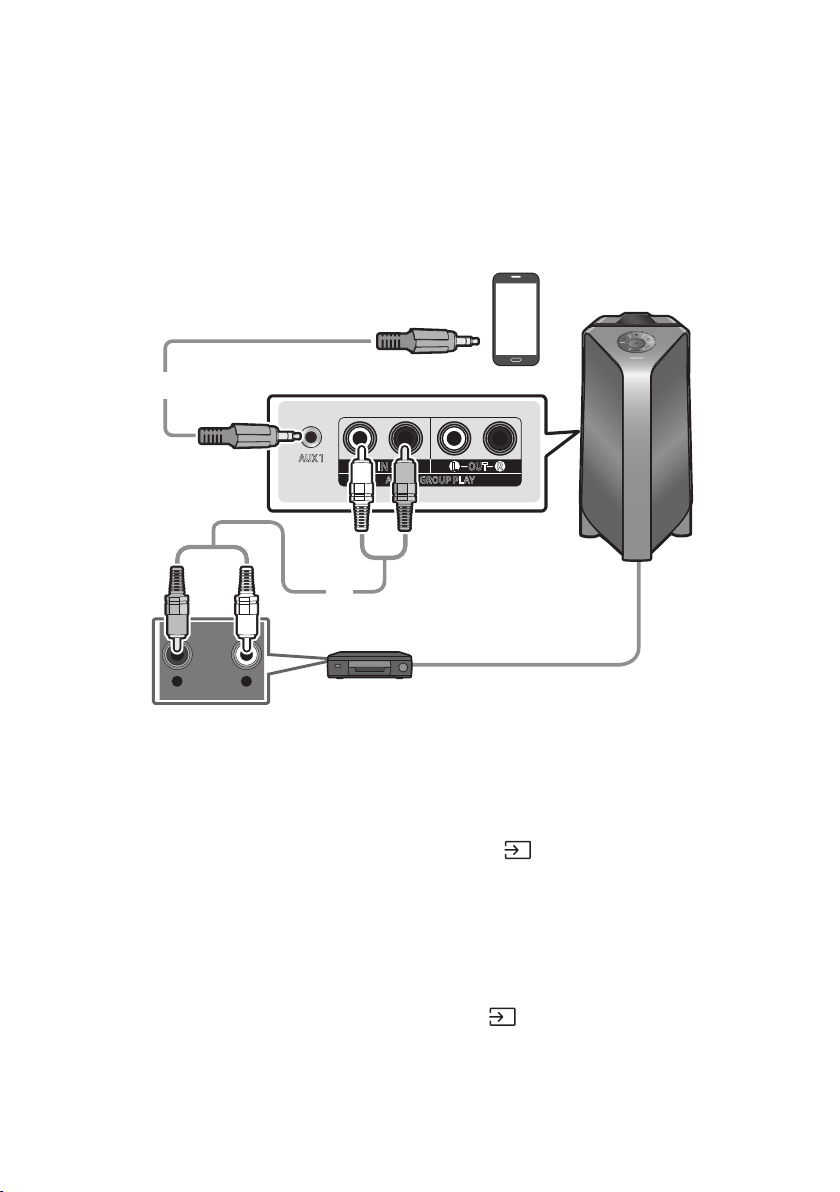
12 - ARA
04
.
)
- AUDIO -
R L
AUX 1
AUX 2 / GROUP PLAY
IN
OUT
L
R
L
R
DVD
3.5
)3.5
1
3.5
2
•
)
1
2
•
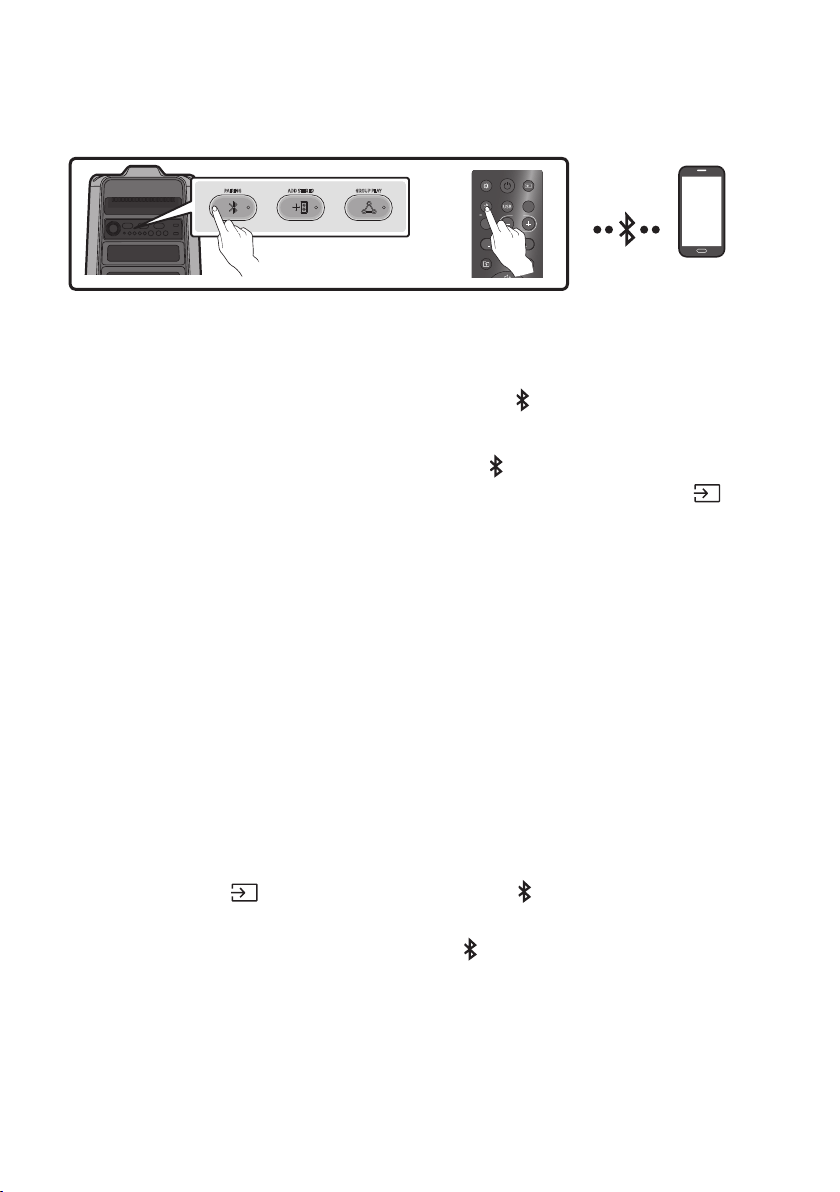
13 - ARA
ADD STEREO GROUP PLAYPAIRING
LIGHT
PAIRING
TEMPO
USB
AUX
EFFECT
DOWN
UP
EFFECT
DJ
SOUND
MODE
1
5
.”“
. ”
5
2]
•
BT
3.
•
• .21
•
.
• .
)."
5
–
.”“
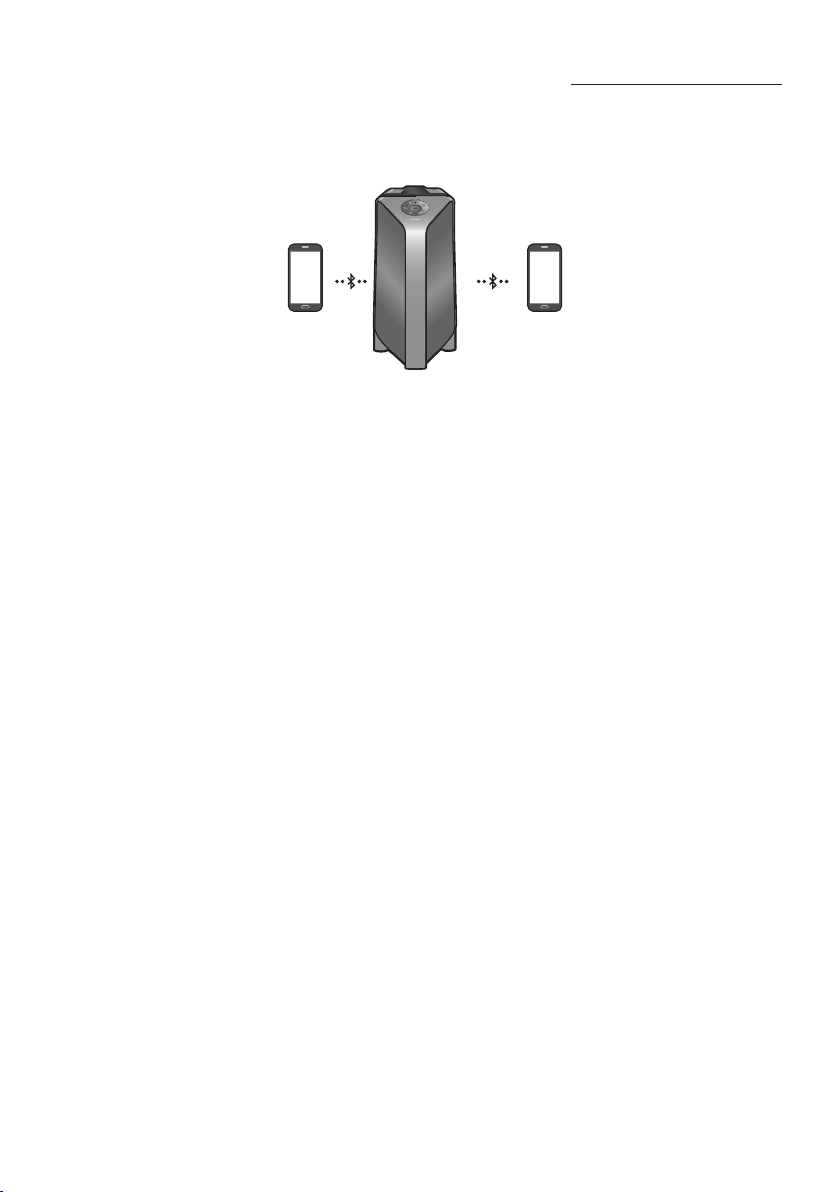
14 - ARA
1
2
1)13
2
•
•
•
• .>0000PIN
•
• 20
•
– .
– .
–
•
.
•

15 - ARA
•
1
•
•
•
•
BT PAIRING
BT READY
1
2
3
•
•
5
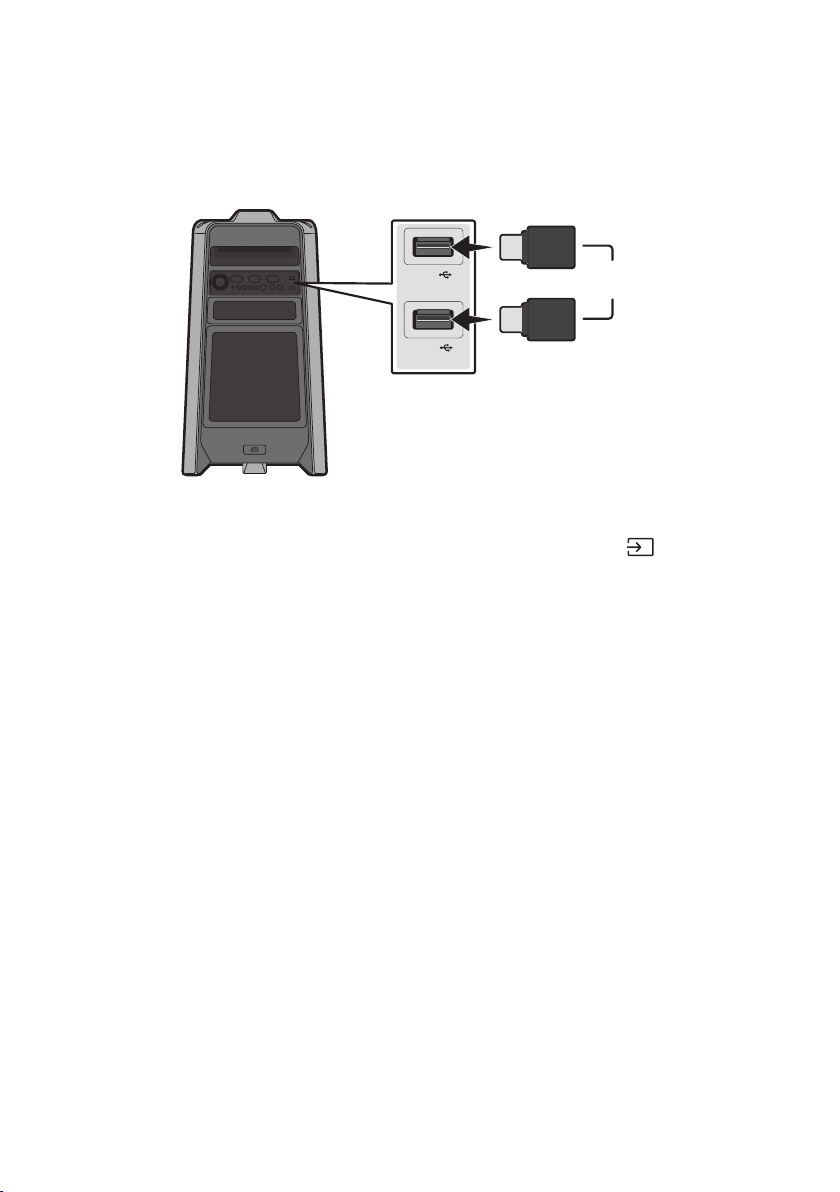
16 - ARA
05USB
.USB
USB1
(5V 2.1A)
USB2
(5V 0.5A)
USB
1.USB2USB1USB
2USB1
.”USB2“
•
USB
3USB2USB1
4.USB
• USB
20
• .FAT32FATUSB
• HDD
• .USB
999
• .USB
256

17 - ARA
mp3.*
483232032
24161608
1281608
.*48832032
.*
AAC9681728 <
AAC-LC9681728 <
HE-AAC9681728 <
.*
IMA_ADPCM
19285 <
*-19285 <
• .WMA
•
• ADTSAAC
USB
USB2USB1
.
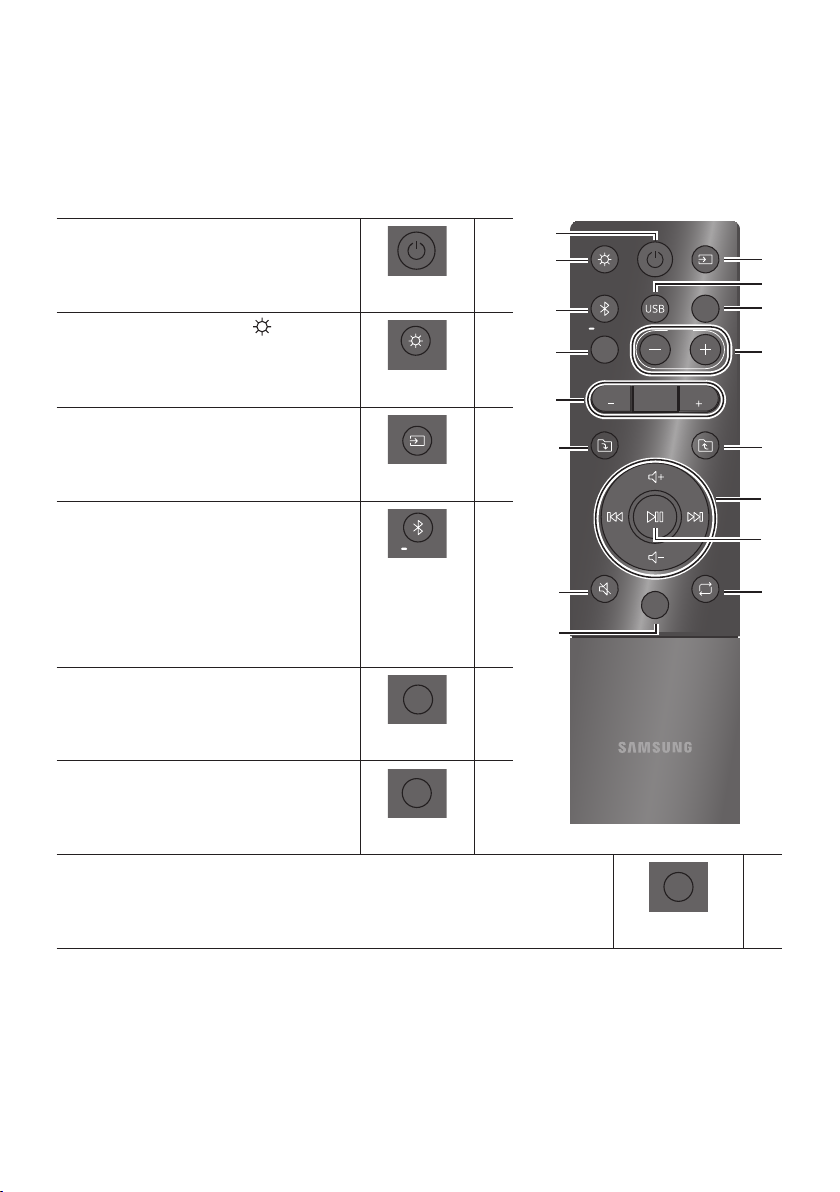
18 - ARA
06
LIGHT
PAIRING
TEMPO
USB
AUX
EFFECT
DOWN
UP
BASS
EFFECT
DJ
SOUND
MODE
DOWN
UP
BASS
EFFECT
EFFECT
DJ
LIGHT
PAIRING
TEMPO
USB
AUX
SOUND
MODE
)
,,,
.OFF,
DOWN
UP
BASS
EFFECT
EFFECT
DJ
LIGHT
PAIRING
TEMPO
USB
AUX
SOUND
MODE
.
.,,,BT
DOWN
UP
BASS
EFFECT
EFFECT
DJ
LIGHT
PAIRING
TEMPO
USB
AUX
SOUND
MODE
BT
5
DOWN
UP
BASS
EFFECT
EFFECT
DJ
LIGHT
PAIRING
TEMPO
USB
AUX
SOUND
MODE
USB2USB1
.
USB
DOWN
UP
BASS
EFFECT
EFFECT
DJ
LIGHT
PAIRING
TEMPO
USB
AUX
SOUND
MODE
.
DOWN
UP
BASS
EFFECT
EFFECT
DJ
LIGHT
PAIRING
TEMPO
USB
AUX
SOUND
MODE
DOWN
UP
BASS
EFFECT
EFFECT
DJ
LIGHT
PAIRING
TEMPO
USB
AUX
SOUND
MODE
,,,,
.,,
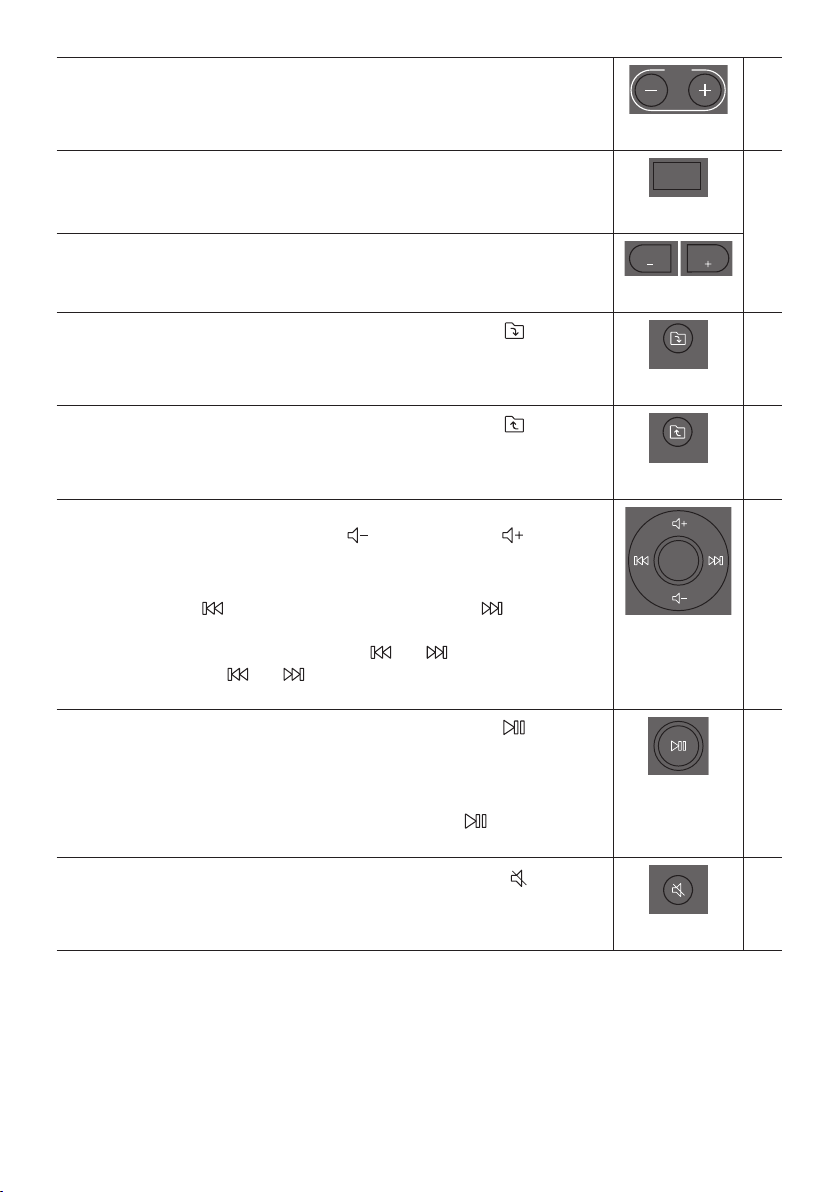
19 - ARA
DOWN
UP
BASS
EFFECT
EFFECT
DJ
LIGHT
PAIRING
TEMPO
USB
AUX
SOUND
MODE
-
• .USB2USB1
DJ
DOWN
UP
BASS
EFFECT
EFFECT
DJ
LIGHT
PAIRING
TEMPO
USB
AUX
SOUND
MODE
DJ
.OFF,,,
DOWN
UP
BASS
EFFECT
EFFECT
DJ
LIGHT
PAIRING
TEMPO
USB
AUX
SOUND
MODE
DOWN
UP
BASS
EFFECT
EFFECT
DJ
LIGHT
PAIRING
TEMPO
USB
AUX
SOUND
MODE
DJ -
DOWN
DOWN
UP
BASS
EFFECT
EFFECT
DJ
LIGHT
PAIRING
TEMPO
USB
AUX
SOUND
MODE
.USB)DOWN
UP
DOWN
UP
BASS
EFFECT
EFFECT
DJ
LIGHT
PAIRING
TEMPO
USB
AUX
SOUND
MODE
.USB)UP
•
•
USB
3
3
•
5
DOWN
UP
BASS
EFFECT
EFFECT
DJ
LIGHT
PAIRING
TEMPO
USB
AUX
SOUND
MODE
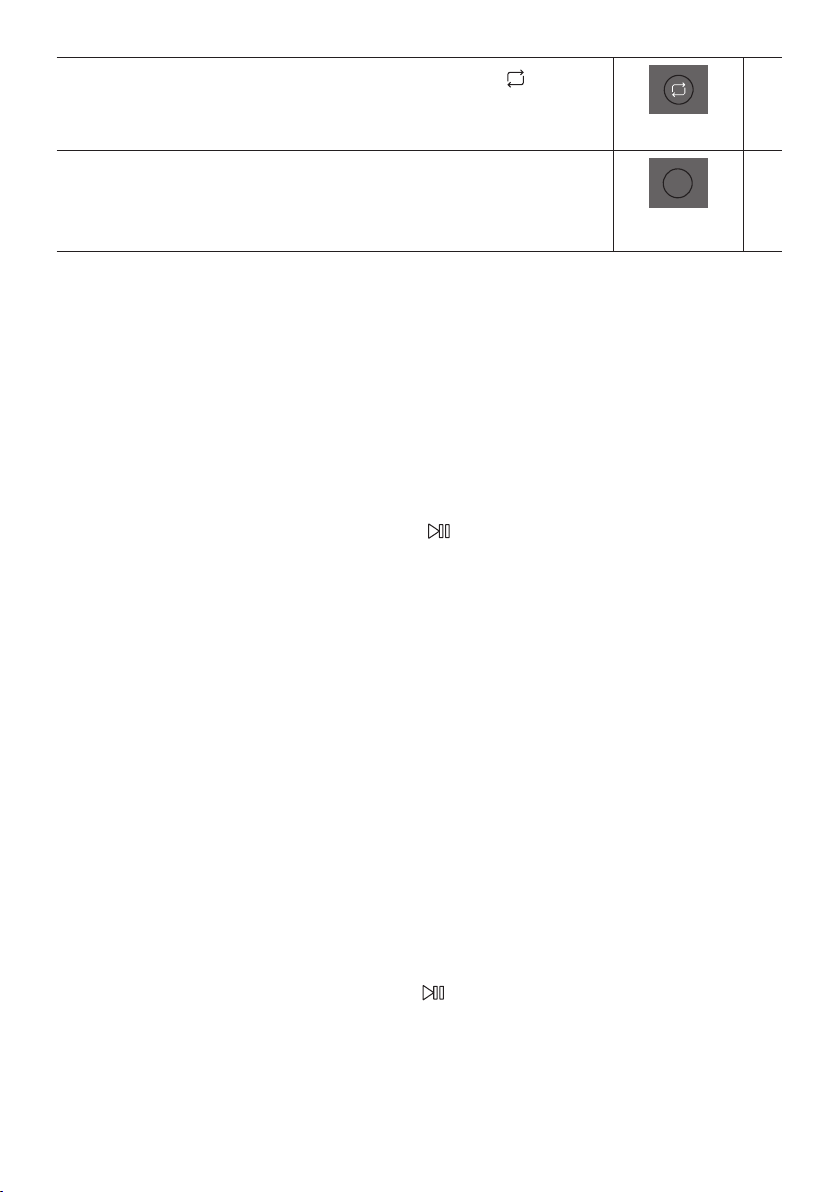
20 - ARA
DOWN
UP
BASS
EFFECT
EFFECT
DJ
LIGHT
PAIRING
TEMPO
USB
AUX
SOUND
MODE
.”USB2 USB1
.OFF,,,ONE
DOWN
UP
BASS
EFFECT
EFFECT
DJ
LIGHT
PAIRING
TEMPO
USB
AUX
SOUND
MODE
5
.
1
2
.,,,,,,
• .
•
5
1
DJ
2DJ
•
•
•
•
•
•
3.+15-15 -
•
5
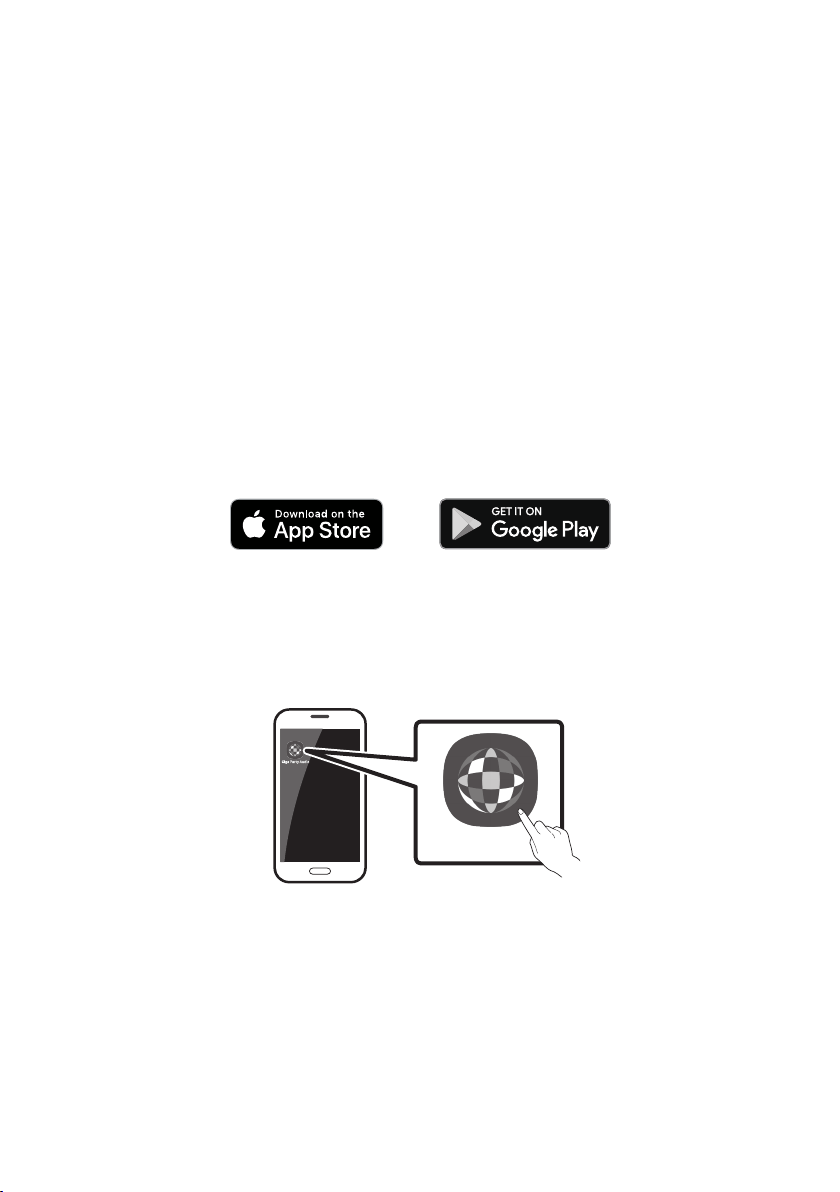
21 - ARA
07
•
6.0
•
10.0iOS
22 - ARA
08
:
:
.BT
:
.13
:
:
:
:
.
:
:
.
:
:
.
:
HOST“
: .
8
:
5
.
23 - ARA
:
HOST
:
:
10
09
10
Samsung
.)
11

24 - ARA
12
MX-T50
11.6
323.0651.0351.0
+35+5
7510 %
8265
32185
•
•

© 2019 Samsung Electronics Co., Ltd. All rights reserved.
Contact SAMSUNG WORLD WIDE
If you have any questions or comments relating to Samsung products, please contact the SAMSUNG customer
care Centre.
Area Contact Centre Web Site
`
Middle East
EGYPT
08000-7267864
16580
www.samsung.com/eg/
support
IRAN
021-8255
www.samsung.com/iran/
support
ISRAEL
*6963
www.samsung.com/il/
support/
SAUDI
ARABIA
(+966) 8002474357
(800 24/7 HELP)
www.samsung.com/sa_en/
support (English)
www.samsung.com/sa/
support (Arabic)
PAKISTAN
0800-Samsung (72678)
www.samsung.com/pk/
support
U.A.E
800-SAMSUNG
(800 - 726 7864)
www.samsung.com/ae/
support (English)
www.samsung.com/ae_ar/
support (Arabic)
OMAN 800-SAM CS (800-72627)
KUWAIT 183-CALL (183-2255)
BAHRAIN 8000-GSAM (8000-4726)
QATAR 800-CALL (800-2255)
TURKEY 444 77 11
www.samsung.com/tr/
support
JORDAN
0800-22273
06 5777444
www.samsung.com/levant/
supportLEBANON 1299
IRAQ 80010080
ALGERIA
3004
www.samsung.com/n_africa/
support
TUNISIA
80 100 012
MOROCCO 080 100 22 55
Area Contact Centre Web Site
`
Africa
SOUTH AFRICA 0860 SAMSUNG (726 7864)
www.samsung.com/za/
support
NAMIBIA 08197267864
www.samsung.com/africa_en/
support
ZAMBIA 3434
MAURITIUS +230 460 3830
REUNION 0262 50 88 80
www.samsung.com/africa_fr/
support
MOZAMBIQUE 847267864
www.samsung.com/africa_pt/
support
NIGERIA 0800-726-7864
www.samsung.com/
africa_en/support
GHANA 0800-100-077
COTE D’IVOIRE 8000-00-77
www.samsung.com/africa_fr/
support
SENEGAL 800-00-0077
CAMEROON 67095-0077
KENYA 0800 545 545
www.samsung.com/africa_en/
support
UGANDA 0800 300 300
TANZANIA 0800 780 089
RWANDA 9999
www.samsung.com/africa_fr/
support
DRC 499999
SUDAN 1969
www.samsung.com/eg/
support