User manual Tumble Dryer
Energy-saving tips
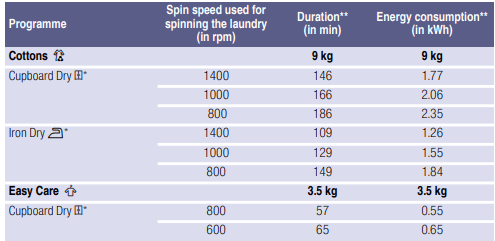
Spin the laundry before drying. The drier the laundry, the shorter the programme will be, in turn reducing energy consumption.
Load the appliance with the maximum loads permitted for the programmes.
Note: If the maximum load is exceeded, this extends the programme duration and increases energy consumption.
- Operate the appliance in a ventilated room and make sure that the air inlet on the appliance is unobstructed so that air exchange can take place unhindered.
- Regularly remove the fluff from the appliance. If there is fluff in the appliance, this extends the programme duration and increases energy consumption.
- If you do not perform any actions on the appliance for an extended period before the programme starts or once the programme has ended, the appliance will automatically switch to Energy saving mode. The display and indicator lights will go out after a few minutes and Start/Pause
 will flash. To end Energy saving mode, all you need to do is perform an action on the appliance, such as opening and closing the door.
- If you do not perform any actions on the appliance for an extended period when it is in Energy saving mode, the appliance will automatically switch itself off.
Installing and connecting the appliance
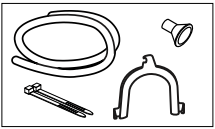
Included with the appliance:
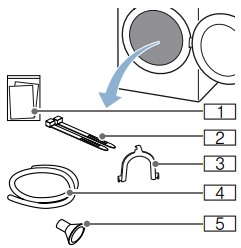
 Accompanying documents (e.g. installation and operating instructions)
 Fastening parts
 U-piece for fixing the drain hose in place
 Drain hose
 Connection adapter
- Remove any packaging and protective covers completely from the appliance.
- Open the door.
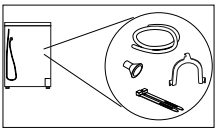
- Remove all the accessories from the drum.
You can now install and connect the appliance.
Installing the appliance
Do not position the appliance behind a door, as this may obstruct the appliance door or prevent it from opening completely.
Once an appliance has reached the end of its life, pull the mains plug from the socket before severing the mains cable, and then destroy the lock on the appliance door.
Install the appliance as follows:
1. Place the appliance on a clean, even, solid surface.
2. Check that the appliance is level using a spirit level.
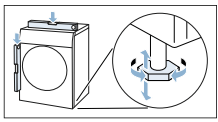
3. If necessary, turn the appliance feet to make sure it is level.
You can now connect the appliance.
Notes
- All appliance feet must stand firmly on the ground.
- If appliances are not installed correctly, this may result in noises, vibrations, uneven drum operation and/or to residual water leaking out of the appliance.
Connecting the appliance
If the appliance is not installed properly, this may lead to a dangerous situation. Ensure the following:
- The mains voltage on your power socket must match the rated voltage specified on the appliance (identification plate). The connected loads and the required fuse protection are specified on the identification plate.
- The appliance must not be supplied through an external switching device, such as a timer, or connected to a circuit that is regularly switched on and off by a utility.
- The mains plug and the protective contact socket must match and the earthing system must be correctly installed.
- The installation must have an adequate cross section.
- The mains plug must be freely accessible at all times. If this is not possible, in order to comply with the relevant safety regulations, a switch (all pole disconnection) must be built into the permanent installation in accordance with electrical installation regulations.
- If using a residual current circuit breaker, only use one that bears the following mark:
 . The presence of this mark is the only way to be sure that it fulfils all the applicable regulations.
Connect the appliance as follows:
1. Connecting the drain hose. -> Page 32
2. Plug the appliance's mains plug into the designated socket.
3. Check that the mains plug is in securely. Your appliance is now ready to use.
Appliance settings
Childproof lock
Activating the childproof lock prevents the settings from being accidentally changed on the control panel.
Activating/deactivating the childproof lock:
- Press and hold Child Lock
 push 3 sec. for 3 seconds.
Note: The childproof lock will remain active, even once the appliance has been switched off. If you wish to change settings on the control panel when you turn on the appliance, you will need to deactivate the childproof lock.
Activating setting mode
In order to apply the settings described below, you will first need to activate setting mode. The options on the programme selector that will allow you to do this are as follows:
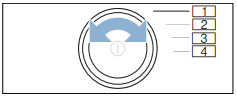
- Activate setting mode
- Activate setting mode and adjust audible notification signal volume
- Adjust the audible button signal volume
- Automatic switch-off function
1. Switch on the appliance.
2. Turn the programme selector to position 1.
3. Press Drying Level  and, at the same time, turn the programme selector to position 2.
4. Release Drying Level . Setting mode is now activated.
Changing the audible signal volume
You can adjust the volume of audible notification signals (that indicate that a programme has ended, for example) and audible button signals by turning the rotary selector to the following positions:
- 2: Audible notification signal volume
- 3: Audible button signal volume
1. Activate setting mode.
2. Turn the programme selector to the required position.
3. Use the Finished in  + or – button to set the volume you require (0 = off; 4 = very loud).
Switching the automatic switch-off function on/off
If the appliance is not used for an extended period, it may automatically switch itself off until a programme starts or when a programme has ended in order to save energy.It can be switched back on again at any time by pressing  .
.
You can switch the appliance's automatic switch-off function on or off as follows:
1. Activate setting mode.
2. Turn the programme selector to position 4.
3. Use the Finished in + or – button to switch the appliance's automatic switch-off function on or off.
Exiting setting mode
Once you have applied all the settings, press to switch off the appliance.
The settings you have selected will be saved and will take effect the next time the washing machine is switched on.
Quick reference guide
Note: The appliance must be correctly installed and connected. -> Page 12


Remove the fluff.
Familiarising yourself with your appliance
Appliance overview
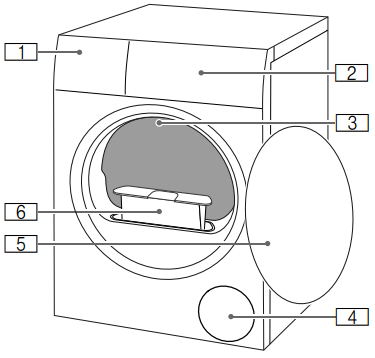
Condensation container
Control panel
Drum interior lighting (depending on the model)
Air inlet
Door
 Fluff filter
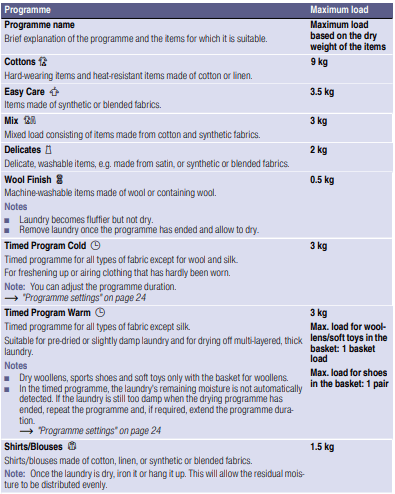
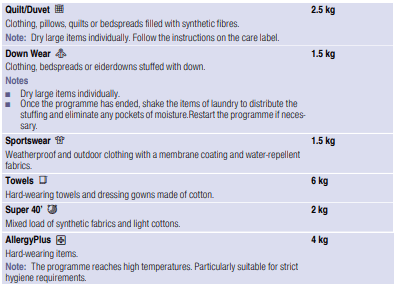
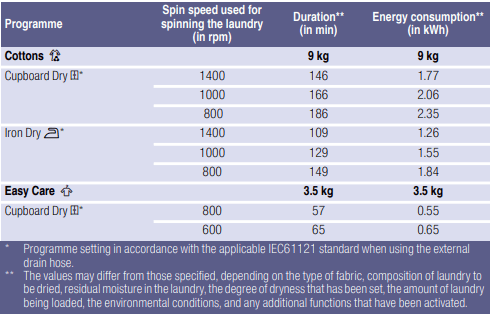
Overview of programmes
Laundry
Preparing the laundry
Leaving objects in the pockets of your clothing can cause damage to the drum and laundry when the appliance is in operation. Remove all objects (e.g. metal items) from clothing pockets.
Prepare the laundry as follows:
- Tie cloth belts, apron strings, etc. together or use a laundry bag.
- Close zips, hooks, eyelets and buttons. Button up large items of laundry, such as covers.
- Always dry very small items of laundry, e.g. babies' socks, together with large items such as towels.
- Use timed programmes for single items.
- Knitted items, such as T-shirts and jerseys, often shrink slightly the first time they are tumble-dried. Use a gentle programme.
- Do not overdry easy-care laundry. This leads to increased creasing of your laundry.
- Some detergents and care products, e.g. starch or softeners, contain particles that may accumulate on the moisture sensor. This may impair the sensor's performance and, in turn, the drying result.
Notes
– When washing laundry to be tumble-dried, use the correct amount of detergent and care products as specified in the manufacturer's instructions.
– Clean the moisture sensor regularly ~ Page 36.
Sorting laundry
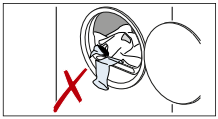
Note: Load the laundry item by item into the appliance. For more effective drying, do not stuff an entire bundle of laundry into the dryer at once.
Laundry that is unsuitable for tumbledrying may damage the appliance and the laundry when it is dried. Before you dry it, sort the laundry according to the information given on the care label:
 Suitable for tumble drying
 Dry at normal temperature
 Dry at low temperature
 Do not tumble-dry
When sorting the laundry to be dried, take the following points into account:
- To achieve an even drying result, only dry laundry of the same type of fabric and texture together. If you dry thin, thick and multilayered fabrics together, they will dry to differing degrees.
- Use the fabric descriptions given for the individual drying programmes to help you choose the most appropriate programme. -> "Overview of programmes" on page 22
Operating the appliance
Loading laundry and switching on the appliance
Note: The appliance must be correctly installed and connected. -> Page 12
1. Prepare and sort the laundry.
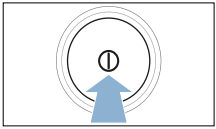
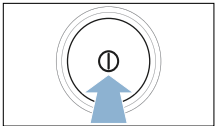
2. Press  to switch on the appliance
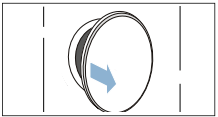
3. Open the door. Check that the drum has been completely emptied. Empty it if necessary.
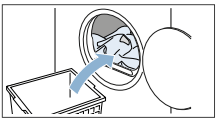
4. Load the laundry unfolded into the drum.
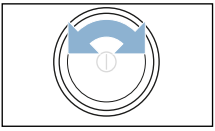
5. Close the appliance door.

Make sure that laundry is not trapped in the door.
Note: The appliance's drum is lit up after the door is opened and closed and once the programme has started. The drum's interior light goes out on its own.
Programme progress
The programme status will be indicated on the display.
Note: When a programme is selected, the expected drying time for the maximum permitted load is displayed. The moisture sensor measures the residual moisture in the laundry as it is being dried. The programme duration and the remaining time indicated on the display are automatically adjusted as the programme progresses, depending on how damp the laundry is (exception: Timed programmes).
Changing the programme or adding more laundry
You can remove or add laundry and change or adjust the programme at any time during drying.
1. Open the door or press Start/ Pause  to pause the programme.
2. Add or remove laundry.
3. If required, select a different programme or a different programme setting. -> "Overview of programmes" on page 22 -> "Programme settings" on page 24
4. Close the door.
5. Press Start/Pause .
Note: The programme duration is updated on the display, depending on the load and on the residual moisture in the laundry. The values displayed may change when the programme or load is changed.
Cancelling the programme
The programme can be cancelled at any time by opening the door or pressing Start/Pause A.
Programme end
 will appear on the display.
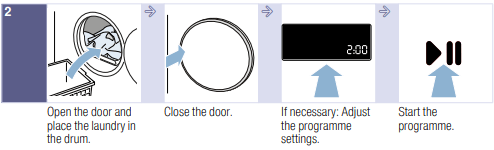
Removing laundry and switching off the appliance
Removing laundry and switching off the appliance
2. Press  to switch off the appliance.

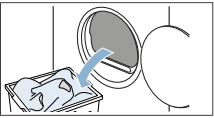
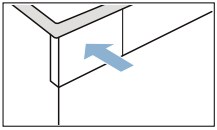
Emptying the condensation container
Condensation will form in the appliance as it dries the laundry.
If there is no drain hose connected to the appliance, the condensation water from the appliance will run into the condensation container. In this case, you will need to empty the condensation container each time the dryer finishes drying the laundry, and also if it becomes full before drying is complete.
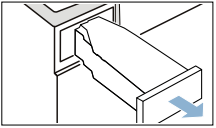
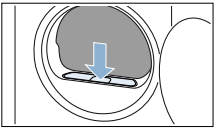
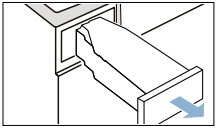
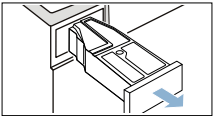
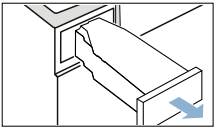
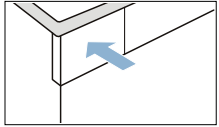
1. Pull out the condensation container horizontally
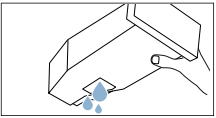
2. Pour out the condensation water.
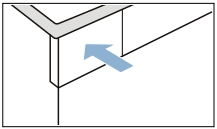
3. Push the condensation container back into the appliance until you feel it lock into place.
Note: The filter in the condensation container filters the condensation water, which is used during the appliance's automatic cleaning cycle. The filter is cleaned by emptying out the condensation water. You should still check the filter regularly for any buildup, and remove this if necessary. -> "Cleaning the filter in the condensation container" on page 37
Removing the fluff
Note: During drying, fluff and hair from the laundry is trapped by the fluff filter. If the fluff filter is clogged or dirty, this reduces the flow of air, preventing the appliance from achieving optimal drying results. Dirty fluff filters increase the power consumption and increase the required drying time.
Clean the fluff filter after each drying cycle:
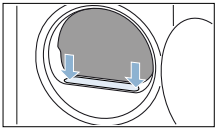
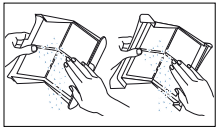
1. Open the door and remove all fluff from it.
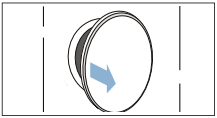
2. Pull out the two-part fluff filter.
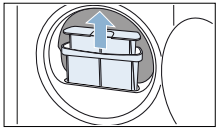
3. Remove the fluff from the fluff filter recess. Ensure that no fluff falls into the open shaft.
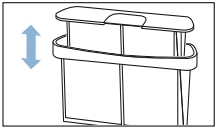
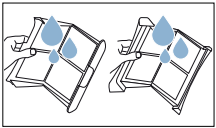
4. Pull the two-part fluff filter apart.
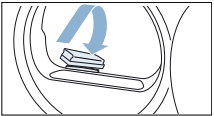
5. Open the two parts of the filter.
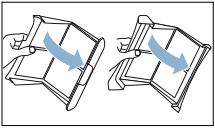
6. Remove all fluff from both parts of the filter.
7. Rinse off fluff under warm, running water
8. Dry the two parts of the fluff filter, snap them shut and reinsert the filter.
Draining the condensation water
Condensation will form in the appliance as it dries the laundry.
You must ensure that the drain hose is connected when you operate the appliance.
f there is no drain hose connected to the appliance, the condensation water from the appliance will run into the condensation container. In this case, you will need to empty the condensation container each time the dryer finishes drying the laundry, and also if it becomes full before drying is complete.
Connect the drain hose as follows:
1. Remove any accessories from the drum.
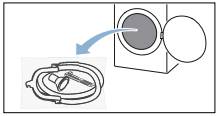
2. Remove all items from the bag.
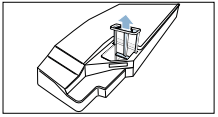
3. Detach the condensation hose from the socket.
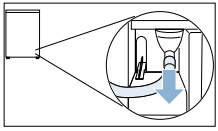
Note: The appliance comes delivered with the condensation hose already fitted to the socket.
4. Place the condensation hose in the "parked" position.
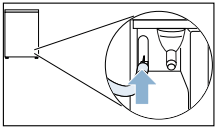
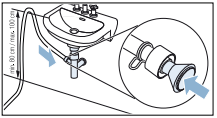
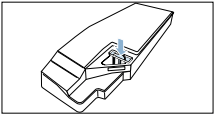
5. Take the drain hose from the accessories and attach it to the free socket, pushing it up to the stop.
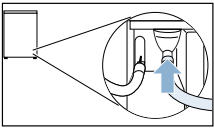
6. Secure the other side of the drain hose using the remaining accessories, depending on the connection situation.
Washbasin:
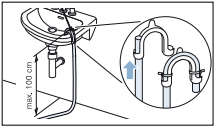
Siphon:
The connection point must be secured using a hose clamp (12- 22 mm clamping range, available from specialist retailers).
When connecting to a siphon, make sure that the drain hose is routed at a height of at least 80 cm, but no more than 100 cm.
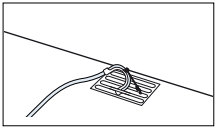
Floor drain:
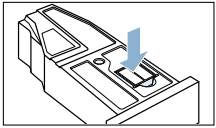
7. Pull out the condensation container horizontally and empty it.
8. Turn the condensation container 180° onto its underside and remove the stopper that is fitted.
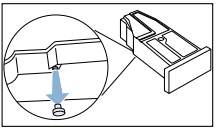
9. Turn the condensation container 180° again and insert the stopper into the recess in the top of the condensation container.
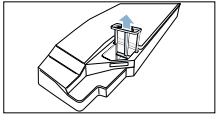
10.Pull the filter out of its snap-in lock.
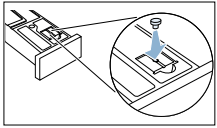
11.Place the filter into the recess on the condensation container.
12.Slide in the condensation container until it clicks into place.
The condensation water is now discharged via the drain hose into the waste-water system or into a washbasin.
Note: If you want to drain the condensation water back into the condensation container, reverse these steps.
Cleaning and maintenance
Cleaning the appliance
The appliance is powered by electricity. There is a risk of electric shock if you come into contact with live components. Therefore please note:
- Switch off the appliance. Disconnect the appliance from the power supply (pull out the plug).
- Never take hold of the mains plug with wet hands.
- When removing the mains plug from the socket, always take hold of the plug itself and never the mains cable, otherwise this may damage the mains cable.
- Do not make any technical modifications to the appliance or its features.
- Repairs and any other work on the appliance must only be conducted by our customer service or by an electrician. The same applies for replacing the mains cable (when necessary).
- Spare mains cables can be ordered from our customer service.
Cleaning the moisture sensor
Note: The moisture sensor measures the amount of moisture in the laundry. After long periods of usage, the moisture sensor may become covered by a fine layer of limescale or detergent and care product residue. These deposits must be removed regularly, otherwise the drying results may not be optimal.
1. Open the door.
2. Clean the moisture sensor with a rough sponge.
Cleaning the filter in the condensation container
Note: The filter in the condensation container cleans the condensation water, which is used during the appliance's automatic cleaning cycle.
1. Pull out the condensation container horizontally.
2. Pour out the condensation water.
3. Remove the filter.
4. Clean the filter under warm, running water or in the dishwasher.
5. Push the filter in until you feel it lock into place.
6. Push the condensation container in until you feel it lock into place.
Note: If you cannot rectify the fault yourself by turning the appliance off and then on again, please contact our after-sales service. -> Page 44
Help with the appliance
The appliance will not start.
- Check the mains plug and the fuses.
Creasing
- Load exceeded or incorrect programme selected for a type of fabric. All the required information can be found in the programme table. -> Page 22
- Remove laundry from the drum as soon as the drying programme has finished. Creasing occurs when clothing is left in the drum.
Water is leaking out.
- The appliance may be positioned at an angle. Level the appliance. -> Page 13
Programme duration displayed changes as drying progresses.
- Not a fault. The moisture sensor measures the residual moisture in the laundry and adjusts the programme duration (with the exception of timed programmes).
Laundry is not dried properly or is still too damp.
- After the programme has ended, warm laundry feels damper than it actually is. Spread out the laundry and let it cool down.
- Adjust the drying time or increase the degree of dryness. This will extend the drying time but the temperature will remain the same.
- Select a timed programme to add extra drying time for laundry that is still damp.
- Select a timed programme for a small load.
- Do not exceed the maximum load for a programme. -> Page 22
- Clean the moisture sensor in the drum. The sensor may become covered in a fine layer of limescale or detergent and care product residue, which then impairs its performance. -> Page 36
- Drying has been interrupted as a result of a power cut, because the condensation container is full or because the maximum drying time has been exceeded.
- Note: See also the laundry tips. -> Page 26
The programme will not start
Make sure that:
- The door is closed.
- Child lock
 push 3 sec has been deactivated
- You have pressed Start/Pause

Note: If the programme has been delayed by setting Finished in  , the programme will start later.
Drying taking too long.
- The appliance may have fluff in it. This will increase the drying time. Remove the fluff. -> Page 31
- If the air inlet on the appliance is blocked or not fully open, the drying time may increase. Make sure that the air inlet remains unobstructed.
- If the ambient temperature is lower than 15°C or higher than 30°C, this may increase the drying time.
- Inadequate air circulation in the room may increase the drying time. Make sure the room is adequately ventilated.
Humidity in the room is increasing
- Make sure the room is sufficiently ventilated.
Drying programme is stopped.
- If the drying programme is stopped due to a power failure, restart the programme or remove the laundry and spread it out.
Unusual noises when drying.
- Automatic cleaning of the heat exchanger produces noises. This does not indicate that there is a malfunction on the appliance.
The appliance feels cold despite drying.
- Not a fault. The appliance can dry effectively at low temperatures using a heat pump.
Residual water in the condensation container despite the appliance being connected to the drain hose*.
- If the optional drain hose is installed, residual water remains in the condensation container due to the appliance's self-cleaning function.
* Depending on how the appliance is equipped or the available accessory
Note: If you cannot rectify the fault yourself by turning the appliance off and then on again, please contact our after-sales service. -> Page 44
Transporting the appliance
- The appliance is very heavy. Lifting it may result in injury. Do not lift the appliance on your own. Risk of injury!
- The appliance has sharp edges on which you could cut your hands. Do not take hold of the appliance by its sharp edges. Wear protective gloves to lift it.
Prepare the appliance for transportation as follows:
1. Pull out the condensation container horizontally and empty it.
2. Push the condensation container back into the appliance until you feel it lock into place.
3. Switch on the appliance.
4. Set any programme.
5. Press Start/Pause .
6. Wait for 5 minutes. The condensation water will be drained.
7. Empty the condensation container again.
8. If installed, remove the drain hose from the washbasin, siphon or floor drain. -> Page 32 Caution! Secure the drain hose to the appliance to prevent it from slipping out. Do not kink the drain hose.
9. Switch off the appliance.
10.Disconnect the appliance's mains plug from the power supply. The appliance is now ready to be transported.
Consumption values
Consumption values table