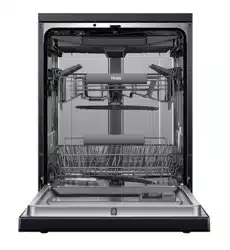
Haier HDW15G3X Freestanding Dishwasher
Product's Documents
Below are documents related to this product, you can read online or download:
- Owner's manual - (English) Read Online | Download pdf

User manual Dishwasher
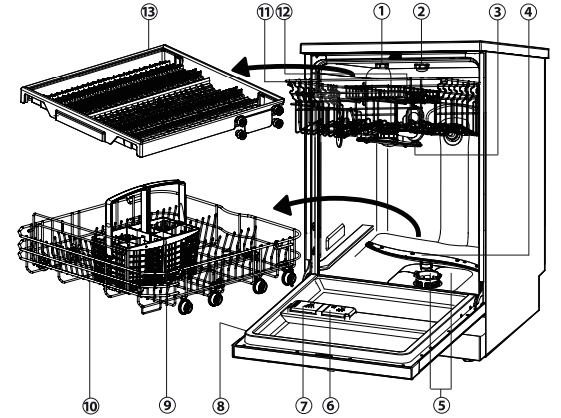
Accessories
Check the accessories and literature in accordance with this list:
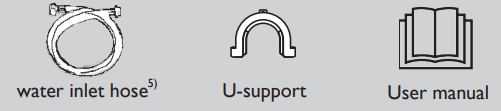
1), 2) Applicable to models HDW14G2, HDW15G2P and HDW15G3.
3) Applicable to models HDW13G1 and HDW14G2.
4) Applicable to models HDW15G2P and HDW15G3.
5) Applicable to models HDW13G1, HDW14G2 and HDW15G2P.
HDW13G1/HDW14G2/HDW15G2P :
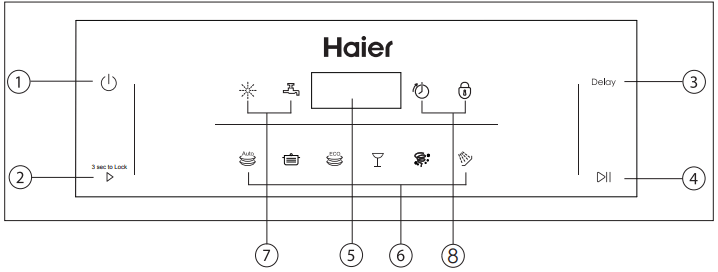
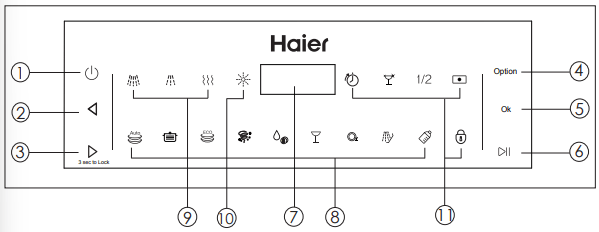
1. ON / OFF button 
2. PROGRAMME SELECT button 
3. START DELAY button 
4. START / PAUSE button 
5. Time & Info Display
6. Programme Indicators
7. Deficit Indicators
Rinse aid indicator 
Water tap indicator 
8. Option Indication
Delay start indicator 
Child Lock indicator 
HDW15G3 :

During any selection the display shows by flashing related information like
After start of an operation it displays without flashing:


While running it may vary due to local conditions and daily working load.

If the indicator lights up: Rinse aid is empty! This indicator is off while the programme operates.

If the indicator lights up: The appliance does not fill with water.
Check section:“TROUBLESHOOTING”

If the indicator lights up: the Dishwasher is washing.

If the indicator lights up: the Dishwasher is rinse washing.

If the indicator lights up: the Dishwasher is drying.

You can delay the start of a programme in 1 hour steps up to 24 hours. Check the according paragraph under “Daily use”.

To active or cancel Child lock, press and hold  until the Child lock indicator comes on

This option reduces spots on glassware and dinnerware. The option adds an extra intermediate rinse.

Use this option if you have only a few items to wash.
This will save water, energy and time. If you use powder detergent use a little less detergent than for a full load.

Activate this option only when you use the combi detergent tablets. This option decreases the flow of rinse aid and salt. Related indication. The programme duration can increase.
On some models :
Remove all packaging materials, keep them out of childrens reach and dispose them in an environmentally friendly manner.There could be water residue inside the appliance due to quality checks in the factory. Perform the following steps:
1. Install the appliance.
Refer to section INSTALLATION.
2. Only for use of Multitabs:Adjust the rinse aid setting.
Refer to section DIFFERENT SETTINGS FOR RINSE AID.
3. Fill the rinse aid dispenser.
Refer to section HOWTO FILL THE RINSE AID DISPENSER.
4. Open the water tap.
5. Start any wash programme (apart from 20 minutes programme) with detergent but no load to remove possible manufacturing residues.
An accoustic signal informs about the end of a programme.This signal can be switched off.
Refer to section HOWTO ADJUST SETTINGS and select the  -setting:
 the signal is switched off.
 the signal is switched on.
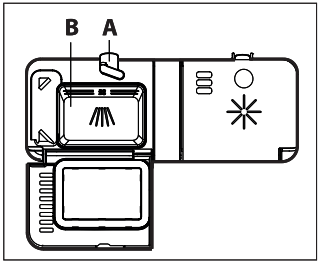
Rinse aid is added during the last rinsing phase to dry the dishes without streaks and stains.
Detergent (e.g. powder, tabs, ...)
Factory default setting:  . No settings are necessary.
The rinse aid is added from the rinse aid dispenser only.
Detergent with multifunction (e.g. Multitabs)
The rinse aid setting should be adjust to  . Please use the setting instructions in section HOWTO ADJUST SETTINGS and select the
  -setting.
The rinse aid is added from the rinse aid dispenser in addition to the multitabs rinse aid.
Setting  cuts off the rinse aid dosage and the rinse aid indication. The higher the value for
  the higher the dosage.
Usually the recommended setting performs well. In case of streaks, stains, shimmer etc.;refer to section TROUBLESHOOTING.
 CAUTION!
Only use rinse aid for dishwashers.
Other product can cause damage to the appliance!
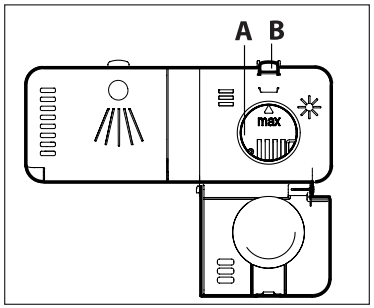
To adjust the Rinse Aid level
1. The appliance is switched off.
2. Press and hold “  and
and  ”about 3 seconds until (for HDW15G3,
Press and hold “ and Option”): The display shows the current Rinse Aid setting (the default is  ).
). 
3. Press (for HDW15G3, Press OK) to change the Rinse Aid setting in steps between  (minimum dispense) and
  (maximum dispense).
To exit the Rinse Aid menu,press and hold 1 second .
and hold and about 3 seconds until (for HDW15G3 , Press and hold “ and Option”): The display shows the current Rinse Aid setting. (for HDW15G3, press Option) to scroll to the buzzer menu. (buzzer off) or
  (buzzer on). (for HDW15G3, press OK) to toggle between (buzzer off) or (buzzer on)..
This feature disables all the buttons on the dishwasher. If any other buttons are pressed while Child lock is activated, the the Child lock indicator will flash for a few seconds.
 that Child lock has been activated. Child lock has been cancelled.
Please note that not all sales models comes with identical features and options. So pictures of that chapter are sometimes different to your dishwasher model. Explanations try only to point out basic model variants.
 to activate the appliance. If the rinse aid indicator is on, fill the rinse aid dispenser and reset the rinse aid indicator; refer to section HOW TO RESET THE RINSE AID IDNICATOR.
 to start the programme.
How to Reset Rinse Aid Indicator
The appliance is switched on.
The rinse aid indicator is on:
1. Always completely fill the rinse aid before starting the next wash cycle.
2. Press and hold the START/PAUSE button until the indicators light up. The programme starts.
Load the Baskets
 With delicate glasses and porcelain make sure they are labelled dishwasher-proof.
Do not put in the appliance items made of wood, horn, aluminium, pewter and copper.
Do not put in the appliance items that can absorb water (sponges, household cloths).
If jingling noises are heard during a programme run:Check that the dishes and glassware have a firm position.
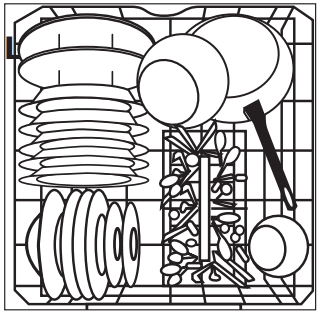
Place heavily soiled items (like pots and pans or dinner plates) in the bottom basket. The more powerful spray jet provides a better dishwashing result.
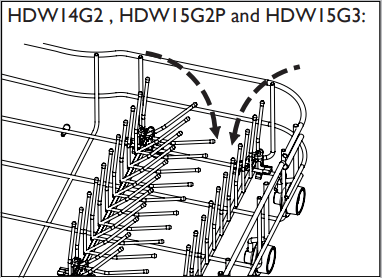
The lower basket has folding spikes. Fold down these spikes to improve arrangement of pots, pans and bowls.
Cutlery Basket
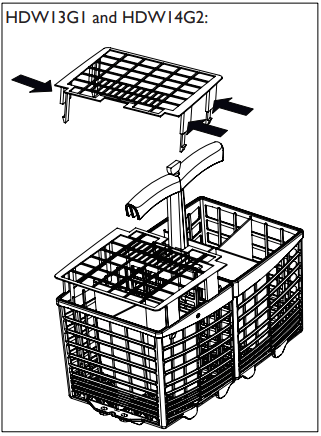
CAUTION!
 Put sharp and pointed items with the blade pointing downward to keep them out of harms way
Upper Basket and utensil tray
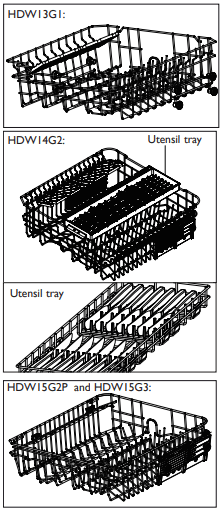
Place small items on the foldable cup holder.
CAUTION!
Place sharp and pointed items with the blade pointing downward into the knife rack,to keep them out of harms way.
Please use only a dedicated dishwasher detergent and follow the related instructions and dosage on its package.
Multitabs
These combi detergent tablets could include too different agents for water softening,rinse aid and other functions.The softener and rinse aid setting must be adjusted acc. to section BEFORE FIRST USE.
Usually the default setting performs well. If there are streaks, stains, shim- mer etc.;refer to sectionTROUBLESHOOTING and BEFORE FIRST USE.
Detergent tablets do not fully dissolve with short programmes.That may cause bad washing results and detergent residues.
If detergent without multifunction should be used again:
1. Close the door.
2. Open the water tap.
3. Press the ON/OFF button  .
.
4. Press sequentially the PROGRAMME SELECT button  until the required programme indicator lights up. Additionally the display flashes the programme run-time.
5. If desired select a start time for a delay start. Refer to section START A PROGRAMME WITH DELAY.
6. Press the START/PAUSE button  to activate the programme or the delay start.
The programme starts. The display acts now as countdown of the remaining run-time.
The appliance remembers the last programme you used.The next time the appliance will switch on, the appliance pre-selects the programme last used.
Interrupt a Running Programme
To interrupt a programme run:
. In the display  is flashing. and/or
Press the START/PAUSE button and/or close the door to continue the programme from the point of interruption. Longer breaks may cause bad cleaning results.
Activate / Deactivate options
On some models, the combination of all options is possible with all programmes. You can set one option or combine all options.
1. Switch on the appliance.
2. Select a programme. The display shows the duration of the programme.
3. Press the option button. The display switches off. The first indicator of the options flashes.
4. Press the option button again and again until the indicator of the required option flashes.
5. Confirm with the OK button. OFF ( or ON) flashes in the display.
6. Press the option button to select ON (or OFF).
7. Confirm with the OK button. The option is activated (deactivated).
8. Repeat step 3 to 7 to activate more options.
9. Press the button to start the programme.
There are three filter ( A1, A2, B) to be checked and cleaned.

1. Turn the filter A anticlockwise and remove it.
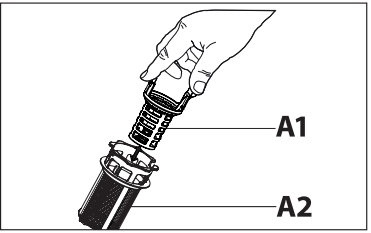
2. To disassemble the filter A press the latches and unplug A1 from A2.
3. Remove the filter B.
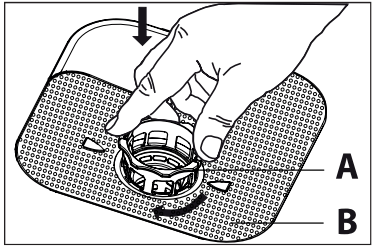
4. Clean the filters with water.
5. Put the filter B to its initial posi tion.
6. Assemble the filter A and put it into position in filter B.Turn it clockwise until it locks.
 An incorrect assembly or position of the filters will cause bad washing results and possibly serious damage to the appliance.
If any filter is removed make sure that no solid object of any size is left beyond these filters!
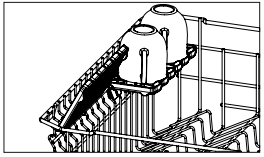
Spray arms should be regularly inspected for dirt. If needed the spray arms could be removed.
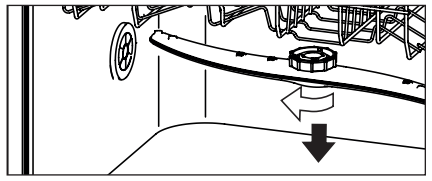
Upper spray arm
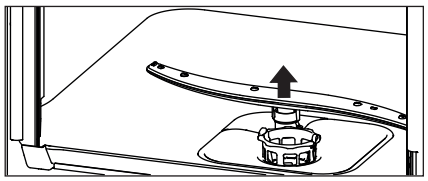
Lower spray arm
CAUTION!
Never clean the appliance with a steam cleaner.
Never use bleach or other chlorinated detergents.
Many occuring problems could be solved by yourself without specific expertise. In case of a problem please check all shown possibilities and follow below instructions before you contact an after sales service
CAUTION!
The appliance does not start or it stops during operation
Problem | Possible cause | Possible solution |
| The programme does not start. | Appliance door is open. | Close the appliance door. |
| Delay start is set. | Refer to displayed time. | |
| Mains plug is not connected in the mains socket. | Connect the mains plug. | |
| Fuse in the house circuit is damaged. | Replace the fuse. | |
Rinse Aid Indicator  is lighted. is lighted. | Rinse aid dispenser is empty. | Refill Rinse aid till full. |
| Refill of rinse aid was not confirmed. | Press and hold the START/ PAUSE button for 1 sec after each refill. |
Error codes on the display
Problem | Possible cause | Possible solution |
Acoustic alarm, display shows ALARMCODE  The appliance does not fill with water The appliance does not fill with water | Water tap is closed. | • Open the water tap. Note: Whenever „Error 10“ is solved switch off the appliance and restart the programm. |
| Water inlet hose has a kink or a bend. | Make sure that the position of the hose is correct. | |
| In case of aqua-stop system: water protection is triggered; the marker (C) is red. | The hose must be replaced. | |
| Filter in the water inlet hose is clogged. | Clean the filter at the inlet hose connections at tap and the rear of the appliance. | |
| Water inlet is clogged. | Check water flow from tap. | |
| Water pressure is too low. | Contact your local water authority. | |
Acoustic alarm, display shows ALARMCODE  The appliance does not drain sufficiently. The appliance does not drain sufficiently. | Filters are clogged | • Scoop out as much water as possible. • Clean filters. • Continue programme by pressing the START/PAUSE button. |
| the drainage is blocked | • Scoop out as much water as possible. • Make sure that drain water- connection and piping is correct and not blocked. • Continue programme by pressing the START/PAUSE button. • If the fault persists, contact customer care. | |
| Acoustic alarm, display shows ALARMCODE Leak:The drain pump runs permanently! | Anti-flood device is on: • There are water leakages in the appliance. • The water inlet valve is open and blocked. • The drainage is blocked. | 1. Close the water tap. 2. Disconnect appliance from power supply. 3. Contact Service. |
All other Alarmcodes:
1. Note Alarmcode
2. Contact Service ;refer to CUSTOMER SERVICE
Washing Results are not satisfactory
Problem | Possible cause | Possible solution |
| The dishes are not clean. | Filters are clogged. | Clean the filters. |
| Filters are not correctly assembled and installed. | Make sure that the filters are correctly assembled and installed. | |
| Spray arms are clogged. | Remove remaining food remnants with a thin pointed object. | |
| Programme was not applicable for the type of load and food remnants. | Make sure that the programme is applicable for the type of load and food remnants. | |
| Incorrect position of the items in the baskets. Water could not wash all items. | Make sure that the position of the items in the baskets is correct and that the water can easily wash all items. | |
| Spray arms could not turn freely | Make sure that the position of the items in the baskets is correct and does not cause the blockage of the spray arms. | |
| No detergent or insufficient quality of detergent in the detergent dispenser. | Make sure that you add the correct quantity detergent in the dispenser before you start a programme. | |
| The wash cycle was interrupted by a long break. | Do not open the door or cut power supply during the wash cycle. | |
| Whitish streaks, stains or bluish layers on glasses and dishes. | Released quantity of rinse aid is too much. | Decrease the released quan- tity of rinse aid. Refer to section DIFFERENT SETTINGS FOR RINSE AID. |
| Quantity of detergent was too much. | Make sure that you add the correct quantity of detergentin the dispenser before you start a programme. | |
| Combi detergent tablets used with a short programme might not fully dissolve. | Select a longer programme when using combi detergent tablets. | |
| Dry water drop stains on glasses and dishes. | Rinse aid dosage is too low.. | Increase the released quantity of rinse aid. Refer to section DIFFERENT SETTINGS FOR RINSE AID. |
| Quality of rinse aid or Multitab. | Cleaning product too old; change the product. | |
| The dishes are wet. | • Programme had no drying phase. • Programme had a low temperature drying phase. | Open the door slightly and leave it ajar (about 100 mm) to help the drying process. |
| The dishes are wet and matt. | Rinse aid dispenser is empty. | Refill rinse aid into dispenser and reset the rinse aid indicator. |
| Quality of rinse aid or Multitab. | Cleaning product too old; change the product. |
Reference file: Haier HDW15G3X Freestanding Dishwasher
Additionally, the document applies to other Haier models: HDW13G1, HDW14G2, HDW15G2P, HDW15G3