Loading ...
Loading ...
Loading ...
24
INSTALLATION INSTRUCTIONS
BUILT-IN ELECTRIC
RECESSED WALL OVENS
IMPORTANT – Read and save these instructions.
Save for local electrical inspector’s use.
24
INSTALLATION INSTRUCTIONS
BUILT-IN ELECTRIC
RECESSED WALL OVENS
IMPORTANT – Read and save these instructions.
Save for local electrical inspector’s use.
INSTALLATION INSTRUCTIONS
BUILT-IN ELECTRIC
RECESSED WALL OVENS
IMPORTANT – Read and save these instructions.
Save for local electrical inspector’s use.
24
BACKGUARD INSTALLATION INSTRUCTIONS
Electric Ranges
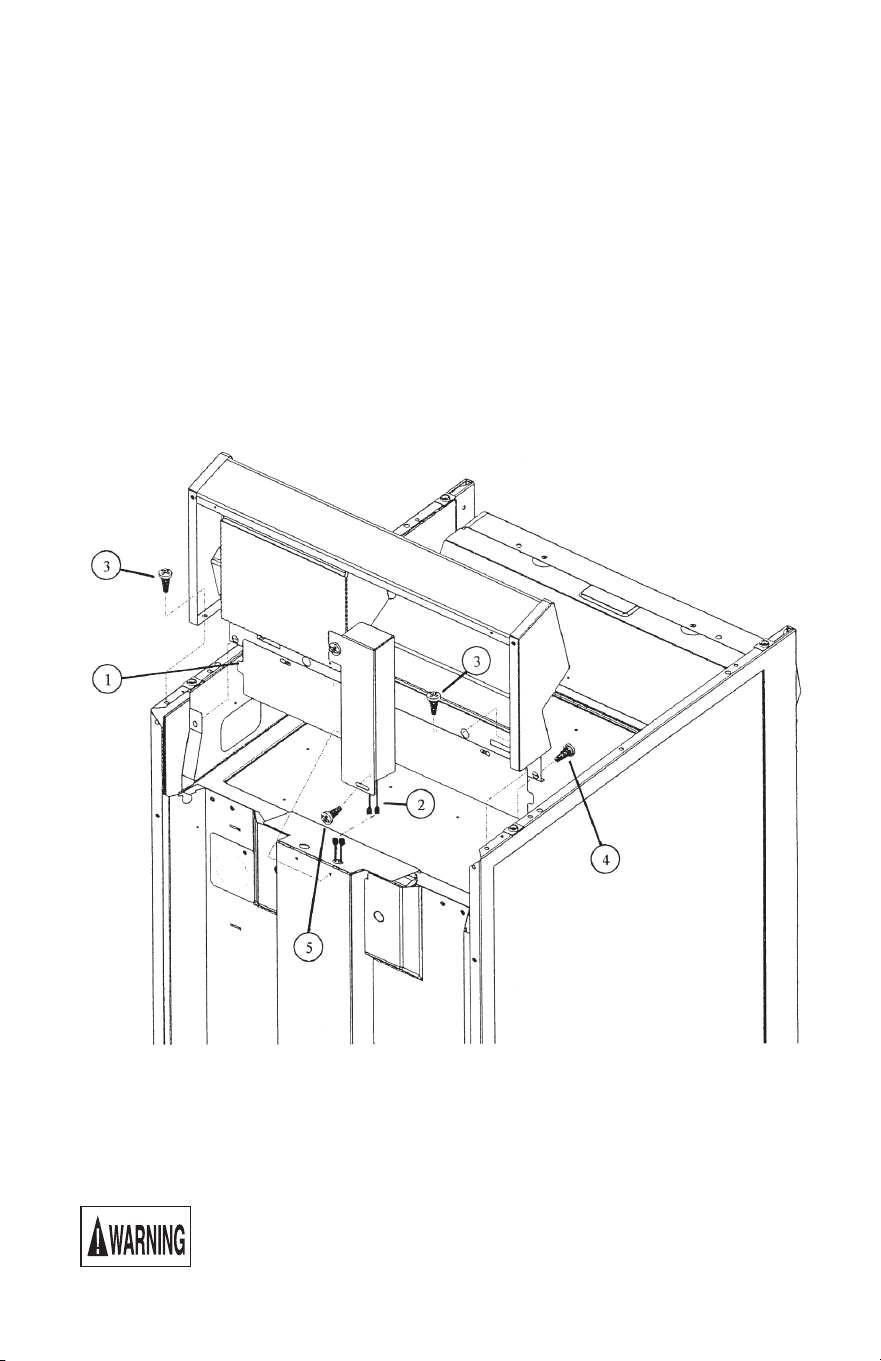
1. Move the main top forward. (Lift up and pull forward slightly.)
2. Place the backguard on top of end panels at the rear of range. Make certain the tabs of
the burner box cover rest on the outside of the burner box anges. (See No. 1.)
3. If backguard is equipped with electrical features, connect the corresponding black and
white wires then tuck them into the connection channel. (See No. 2.)
4. Insert machine screws through lower inside ange of end caps and end panels. Secure
with hex nuts provided. (See No. 3.)
5. Insert machine screws through elongated holes at bottom of backguard and side anges
of burner box. Secure with hex nuts provided. (See No. 4.)
6. Attach wire connection channel to the main back wire cover. Use the sheet metal screw
provided. (See No. 5.)
Power Connections to Appliances
Have the range installed by a qualied service technician or an authorized servicer.
Installation must conform with the National Electric Code ANSI/NFPA NO. 70-latest
edition and local electrical code requirements.
Be sure electric power is OFF at the fuse (breaker) box until the unit is
installed and ready to operate. See appliance rating plate for maximum
K.W. and amperage rating.
9
Loading ...
Loading ...
Loading ...