1
ENGLISH
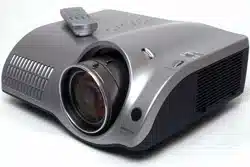
Projector
PJ-TX200
User’s Manual – Operating Guide
Thank you for purchasing this projector.
► Before using this product, please read the "User's Manual
- Safety Guide" and related manuals to ensure the proper use of this product.
After reading them, store them in a safe place for future reference.
WARNING
• The information in this manual is subject to change without notice.
• The manufacturer assumes no responsibility for any errors that may appear in
this manual.
• The reproduction, transfer or copy of all or any part of this document is not
permitted without express written consent.
NOTE
Trademark acknowledgment
• VGA and XGA are registered trademarks of International Business Machines
Corporation.
• Mac is registered trademarks of
Apple Computer, Inc.
• VESA and SVGA are trademarks of Video Electronics Standard Association.
• Windows is a registered trademark of Microsoft Corporation.
• HDMI, the HDMI logo and High-Definition Multimedia Interface are trademarks
or registered trademarks of HDMI Licensing LLC.
All other trademarks are the properties of their respective owners.
2
Content
Content
Before use ................................................................................ 4
Projector features ......................................................................................... 4
About this manual .........................................................................................4
About contents of package ........................................................................... 5
Part names ................................................................................................... 6
Projector ....................................................................................................... 6
Controls buttons ........................................................................................... 7
Ports ............................................................................................................. 7
Remote control ............................................................................................. 8
Preparations ............................................................................ 9
Fastening the lens cover ..............................................................................9
Arrangement ...............................................................................................10
Adjusting the projector’s elevation .............................................................. 12
Connecting your devices ............................................................................ 13
With a VCR/DVD player ............................................................................. 13
For HDMI signal source ............................................................................. 14
For DVI signal source ................................................................................. 14
For a SCART RGB input ............................................................................ 14
With a computer ......................................................................................... 15
Example of computer signal ....................................................................... 16
Connecting a power supply ........................................................................ 17
Loading batteries into the remote control ................................................... 18
Using the remote control ............................................................................19
Using the remote control button lights ........................................................ 19
Projection ............................................................................... 20
Turning the power on .................................................................................. 20
Selecting an input signal ............................................................................ 21
Automatically adjusting the picture ............................................................. 21
Adjusting the display position ..................................................................... 22
Adjusting the zoom ..................................................................................... 22
Adjusting the focus ..................................................................................... 22
Turning the power off .................................................................................. 23
Basic operation ...................................................................... 24
ASPECT ..................................................................................................... 24
IRIS ............................................................................................................ 25
MODE .........................................................................................................26
BLACK ........................................................................................................27
BRIGHTNESS, CONTRAST, COLOR ........................................................ 27
MY MEMORY ............................................................................................. 28
EASY MENU ........................................................................... 30
EASY MENU operation ..............................................................................30
3
ENGLISH
Content
(EASY MENU) ......................................................................... 30
EASY MENU functions ............................................................................... 31
ASPECT ..................................................................................................... 31
MODE, BLACK ........................................................................................... 32
BRIGHTNESS, CONTRAST, COLOR, TINT, SHARPNESS, MIRROR ..... 33
RESET, LANGUAGE, Go To Advance Menu ............................................. 34
Advanced Menu ..................................................................... 35
Advanced Menu operation ......................................................................... 35
PICTURE menu ..........................................................................................37
BRIGHTNESS, CONTRAST, GAMMA ....................................................... 37
COLOR TEMP ............................................................................................ 39
COLOR, TINT, SHARPNESS ..................................................................... 40
IRIS, BLACK, MY MEMORY ...................................................................... 41
IMAGE menu .............................................................................................. 43
ASPECT, OVER SCAN .............................................................................. 43
V POSITION, H POSITION, H PHASE, H SIZE, AUTO ADJUST .............. 44
INPUT menu ...............................................................................................45
PROGRESSIVE, COLOR SPACE ............................................................. 45
COMPONENT, VIDEO FORMAT, HDMI, FRAME LOCK ........................... 46
S-ASPECT, INFORMATION ....................................................................... 47
SETUP menu ............................................................................................. 48
KEYSTONE, WHISPER, MIRROR ............................................................ 48
SCREEN menu .......................................................................................... 49
LANGUAGE, MENU POSITION, OSD BRIGHT. ........................................ 49
START UP, MyScreen ................................................................................ 50
MyScreen Lock, MESSAGE ....................................................................... 51
DIGITAL SHUTTER .................................................................................... 52
OPTION menu ............................................................................................53
AUTO OFF, LAMP TIME, FILTER TIME ..................................................... 53
SERVICE (FAN SPEED, GHOST, STRIPE) ............................................... 54
SERVICE (FILTER MESSAGE, FACTORY RESET) ................................. 55
Maintenance .......................................................................... 56
Lamp .......................................................................................................... 56
Air filter .......................................................................................................58
Inside of the projector ................................................................................. 60
Lens ............................................................................................................60
Cabinet and remote control ........................................................................ 60
Troubleshooting ..................................................................... 61
Related message ....................................................................................... 61
Regarding the indicator lamps ....................................................................62
Phenomena that may be easily mistaken as machine defects ................... 64
Warranty and after-service ................................................... 67
Specifications ........................................................................ 67
Dimension diagram .................................................................................... 68
Glossary ................................................................................. 69
4
Before use
Before use
Projector features
This projector is used to project computer and NTSC/PAL/SECAM video signals
onto a screen. It requires only a small amount of space for installation and
projects a large image from even a short distance.
The following features will turn any room into a High Definition Theater.
● Super Focus ED (Extra-low dispersion) lenses are used for the highest possible
image quality.
● 720P wide LCD panels are used for faithful reproduction of high definition
images.
●
Motorized iris control provides film-like images with a darker black.
● The 1.6x zoom lens and optical lens shift feature allow for flexibility of installation
and viewing position.
About this manual
Various symbols are used throughout this manual. The meanings of these
symbols are described below.
WARNING
This symbol indicates information that, if ignored, could possibly
result in personal injury or even death due to incorrect handling.
CAUTION
This symbol indicates information that, if ignored, could possibly
result in personal injury or physical damage due to incorrect
handling.
To ensure proper use, please take special notice of information
provided following this symbol.
NO
TE
See the pages noted after this symbol for more information about
the current topic.
5
ENGLISH
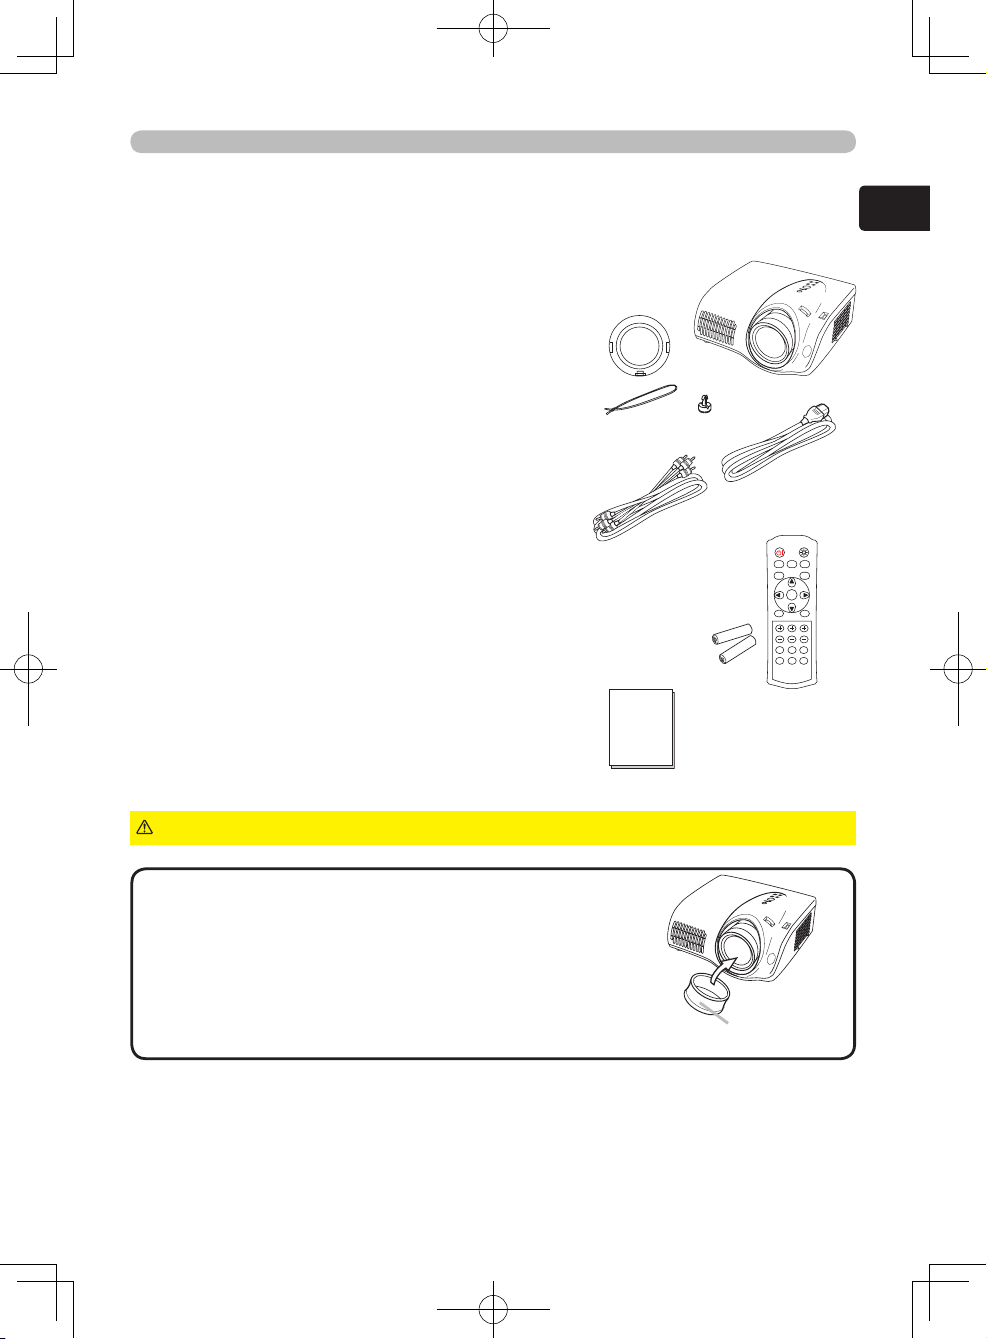
About contents of package
Your projector should come with the items shown below. Check to make sure that
all the items are included. Contact your dealer immediately if anything is missing.
Before use
(1) Projector ..................................................................................
(2) Lens cover, rivet and strap ....................................
(3) Power cord
...................................................................................
(4) Component video cable
.......................................
(5) SCART adapter (PJ-TX200E only)
(6) Remote control and 2 AAA batteries .......................................
(7) User’s manuals ....................................................
► Do not place the projector on an unstable surface.WARNING
• Keep the original packing materials for future
reshipment.
Be sure to use the original packing material when moving
the projector. Use special caution for the lens.
Use the original cushion for the lens.
NOTE
POWER LIGHT
BLACK
ASPECT
MENU
BRIGHT CONTRAST COLOR
IRIS
MODE
MEMORY
ENTER
RESET
HDMI
PC
AUTO
COMPO
S-VIDEO
VIDEO
Cushion for
the lens
6
Before use
Part names
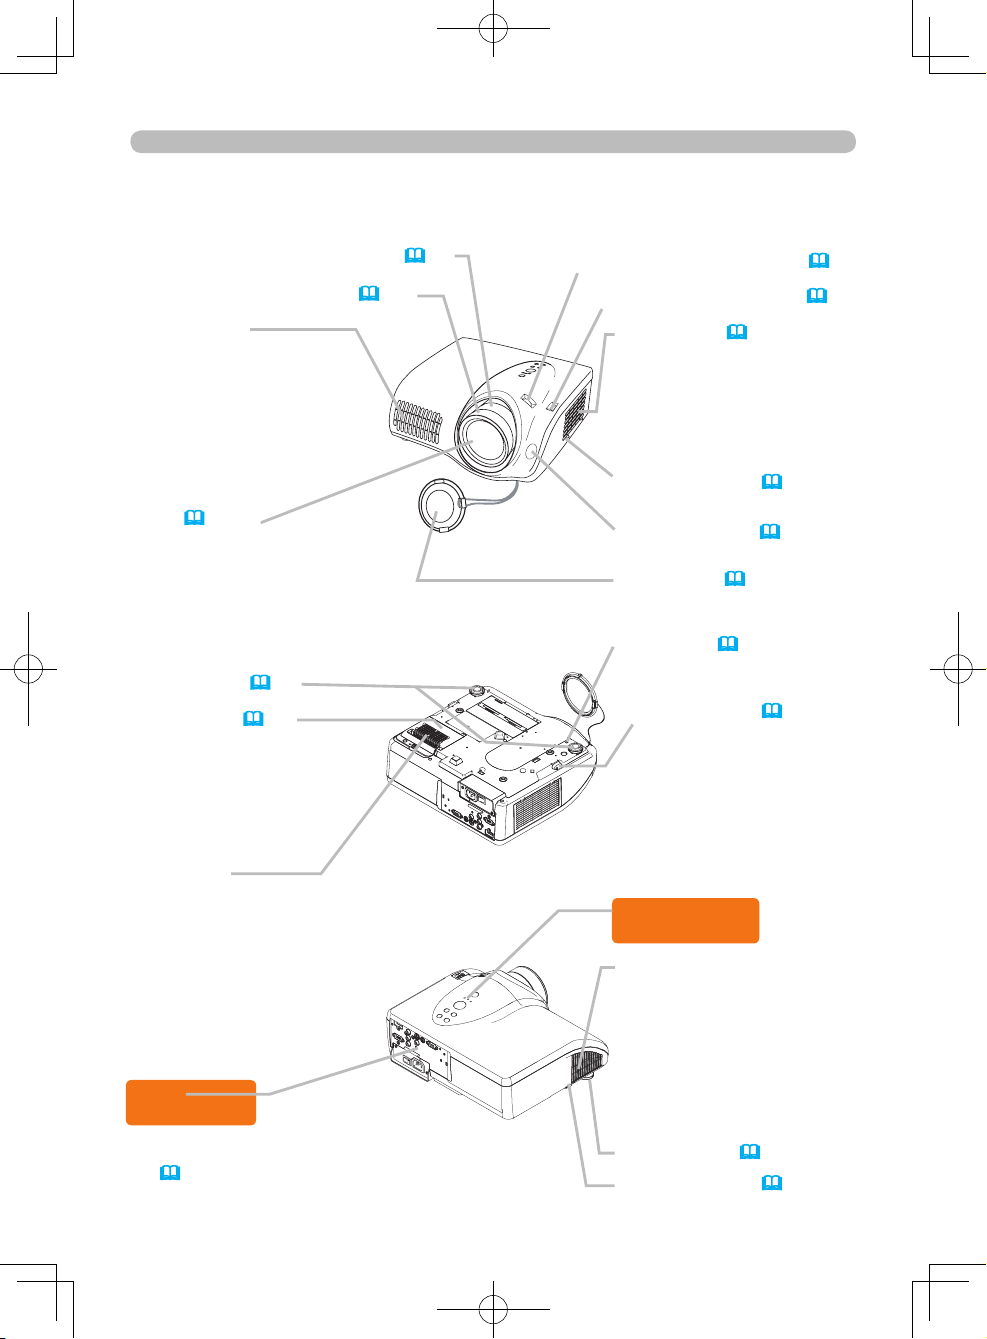
Projector
Exhaust vent
► Do not block or cover the
projector's vents.
►
To avoid being burnt,
please do not touch areas
near the vents while the
projector is in use or
immediately after use.
Lens (
9, 61)
A bright light for projecting is
emitted from the lens.
►
Please do not look into the
lens while the projector is
in use.
Elevator feet (
12)
Lamp cover (
57)
Covers the lamp.
►
The lamp has a finite
product life. Preparation
of a new lamp and
early replacement are
recommended.
Intake vent
►
Do not place anything that
may be sucked into or stick
to the vents underneath
the projector
.
Zoom ring (
22)
Focus ring (
22)
(Front right view)
Filter cover (
58)
Covers the air filter and intake
vent.
►
Maintain the air filter to
ensure proper ventilation.
Control buttons
See next page.
Exhaust vent
►
Do not block or cover the
projector's vents.
►
To avoid being burnt,
please do not touch areas
near the vents while the
projector is in use or
immediately after use.
Ports
See next page.
►
Please see the
“Connecting your devices”
(
13) section for more
information.
Horizontal lens shift dials (
22)
Vertical lens shift dials (
22)
Elevator button (
12)
Remote sensor (
19)
Lens cover (
9)
Strap hole (
9)
Elevator button (
12)
Elevator foot (
12)
Elevator button (
12)
(Bottom view)
(Rear left view)
7
ENGLISH
Before use
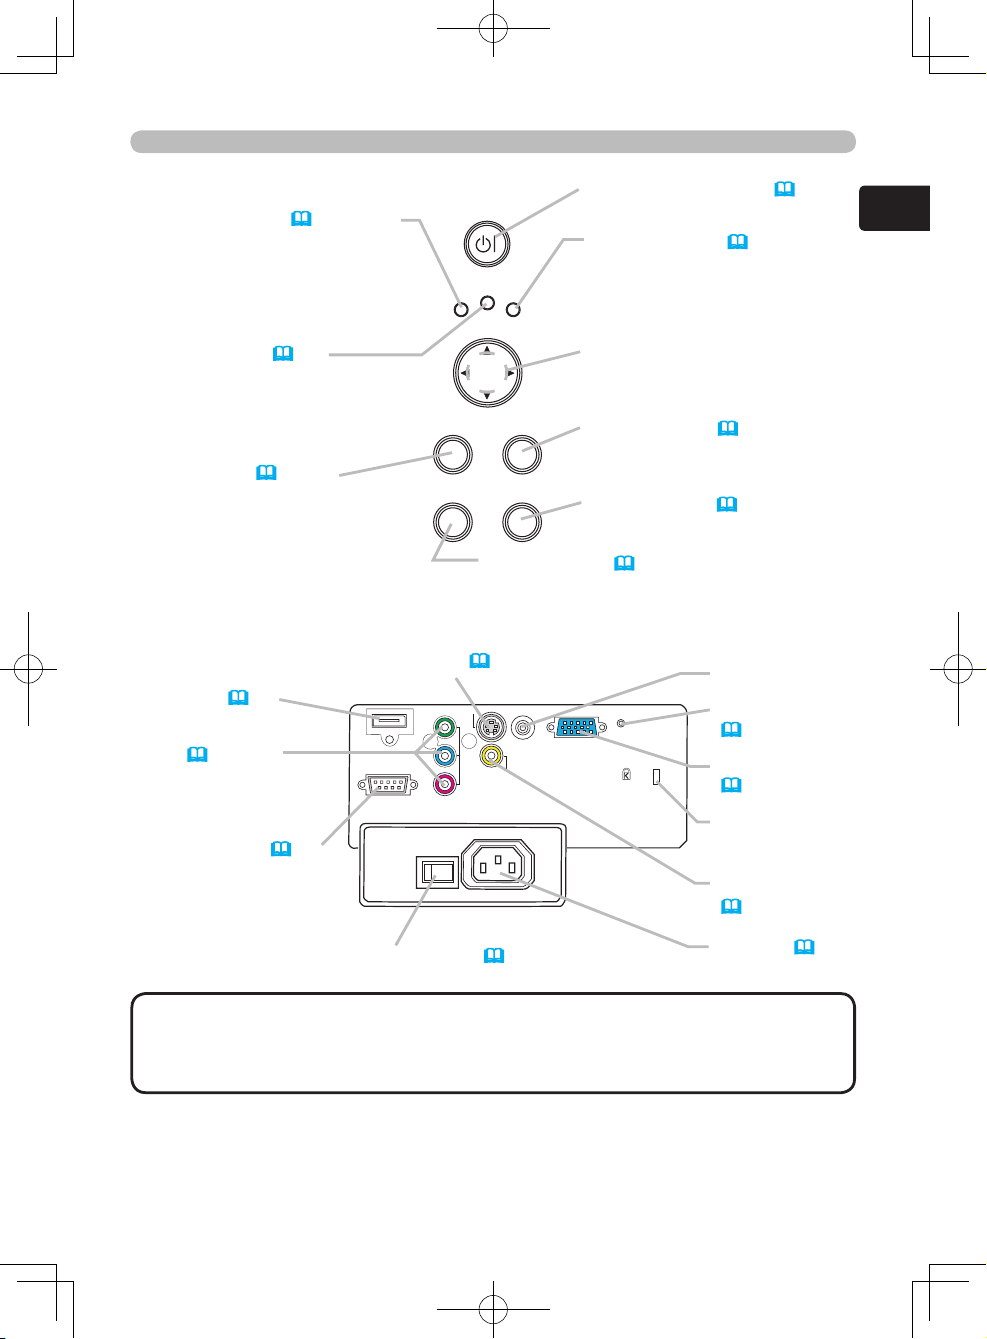
Control buttons
POWER indicator (20, 23, 62)
This indicator blinks while the
projector is cooling down or
warming up
►
Note that a lit or blinking red
indicator denotes a problem.
TEMP
indicator (
62)
► Note that a lit or blinking red
indicator indicates a problem.
MENU button (
30, 35)
Used to begin or end a menu
operation.
ST
ANDBY/ON button (
20, 23)
Used to turn the power on and off.
LAMP indicator (
62)
► Note that a lit or blinking red
indicator indicates a problem.
Cursor buttons ▲,▼,◄,►
Used to make adjustments and
operate menus.
ENTER button (
30, 35)
Used to proceed to the next stage
in a menu operation.
RESET button (
31, 36)
Used to cancel an adjustment.
INPUT button (
21)
Used to select an input signal. Pressing this
button toggles between input ports.
HDMI port (
14)
Ports
COMPONENT VIDEO
ports (
13, 14)
This is a set of input
ports composed of
Y, C
B/
P
B and CR/PR ports.
CONTROL port (
15)
S-VIDEO port (
13)
Power switch (
20, 23)
TRIGGER port
Restart switch
(
23, 64)
COMPUTER port
(
15)
Kensington lock
slot
VIDEO port
(
13, 14)
AC inlet (
17)
• Use only an HDMI cable marked with the HDMI logo for HDMI
connections.
• The TRIGGER port (12V/25mA) is used to connect to a screen that can be
controlled via a trigger signal from display equipment.
NOTE
POWER
MENU
ENTER
LAMP
TEMP
STANDBY/ON
INPUT
RESET
Y
C
B
/P
B
C
R
/P
R
COMPONENT VIDEO
S-VIDEO
VIDEO
COMPUTER
CONTROL
HDMI
TRIGGER
AC IN
I O
8
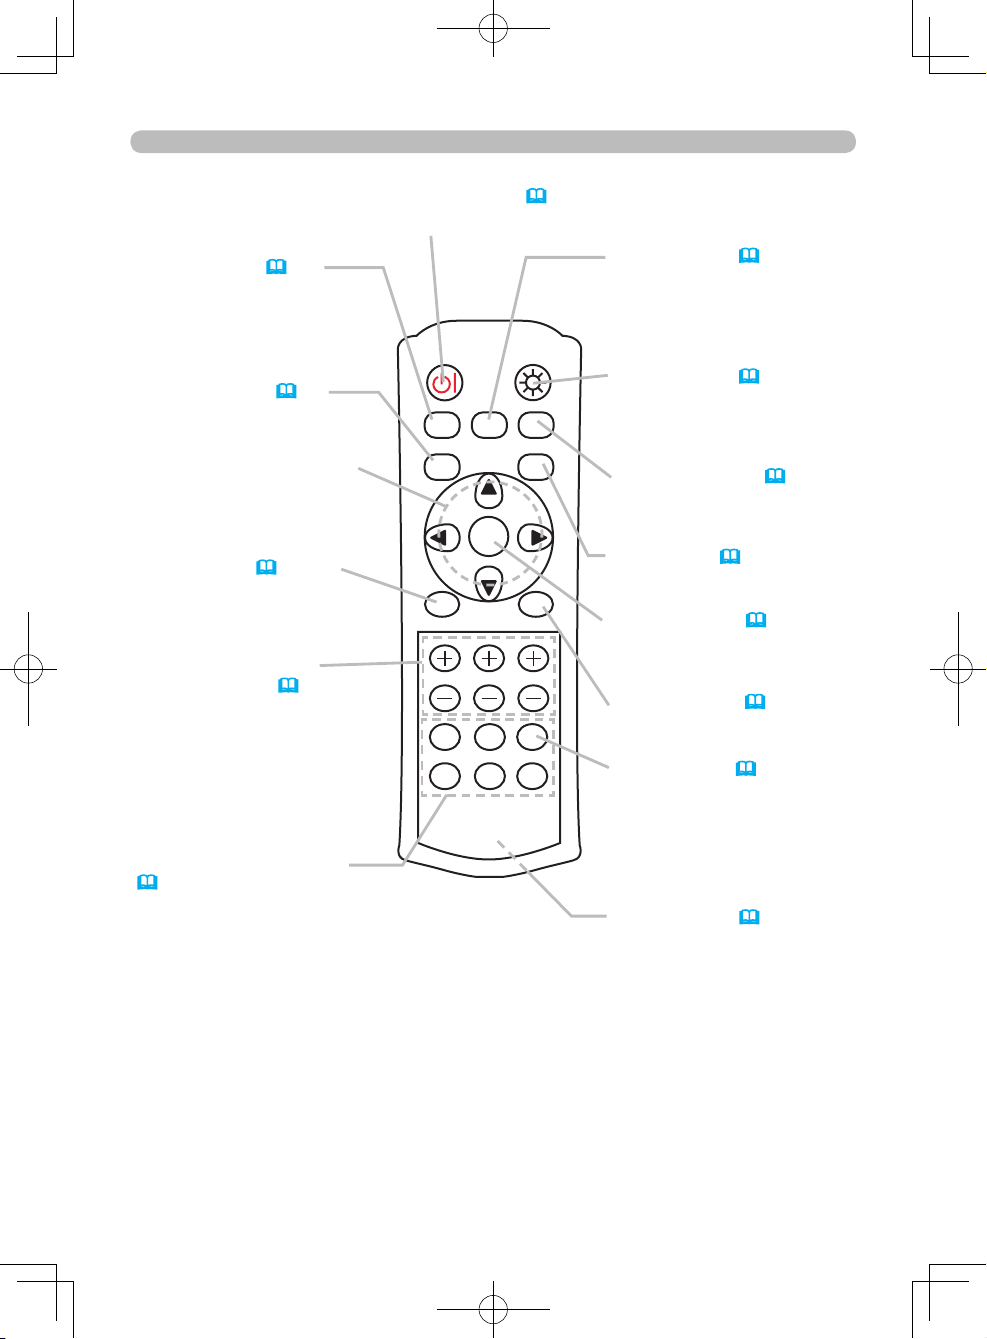
POWER button (20, 23)
Used to turn the power on and off.
Before use
Remote control
BLACK button (27)
Used to select a BLACK
mode. Each mode adjusts the
black setting to suit dif
ferent
conditions.
ASPECT button (
24)
Used to select an aspect ratio.
Cursor buttons ▲,▼,◄,►
Used to make adjustments
and operate menus.
MENU button (
30, 35)
Used to begin or end a menu
operation.
CONTRAST
, BRIGHT,
COLOR buttons (
27)
Used to adjust the contrast,
brightness and color tone.
PC, HDMI, COMPO,
S-VIDEO, VIDEO buttons
(
21)
Used to select an input port.
PC button
COMPUTER port
HDMI button
HDMI port
COMPO button
COMPONENT
VIDEO ports
S-VIDEO button
S-VIDEO port
VIDEO button
VIDEO port
MODE button (
26)
Used to select a mode. Each
mode is a combination of
settings for gamma, color
temperature and iris.
LIGHT button (
19)
Used to make the buttons on
the remote control light up for
a short time.
MEMOR
Y button (
28)
Used to save and load user
adjustment settings.
IRIS button (
25)
Used to adjust the iris.
ENTER button (
30, 35)
Used to proceed to the next
stage in a menu operation.
RESET button (
31, 36)
Used to cancel an adjustment.
Battery cover (
18)
The battery cover is on the
back of the remote control.
AUT
O button (
21)
Used to enable the automatic
adjustment function.
POWER LIGHT
BLACK
ASPECT
MENU
BRIGHT CONTRAST COLOR
IRIS
MODE
MEMORY
ENTER
RESET
HDMI
PC
AUTO
COMPO
S-VIDEO
VIDEO

9
ENGLISH
1.
Fix the strap to the lens
cover strap ring.
2.
Put the strap into the
groove on the rivet.
3.
Press the rivet into the
strap hole.
4.
Put the lens cover on
the lens of the projector.
Preparations
Preparations
Fastening the lens cover
Fasten the lens cover to the projector using the included strap to prevent it from
becoming lost.
► Do not fasten the lens cover during or immediately after use.
Handling while the projector is hot could cause burn and/or projector malfunction.
WARNING
► When the projector is not in use, be sure to close the lens
cover to prevent the lens surface being scratched.
CAUTION
Strap
Lens cover strap ring
Strap hole
Rivet
(1) (2)
10
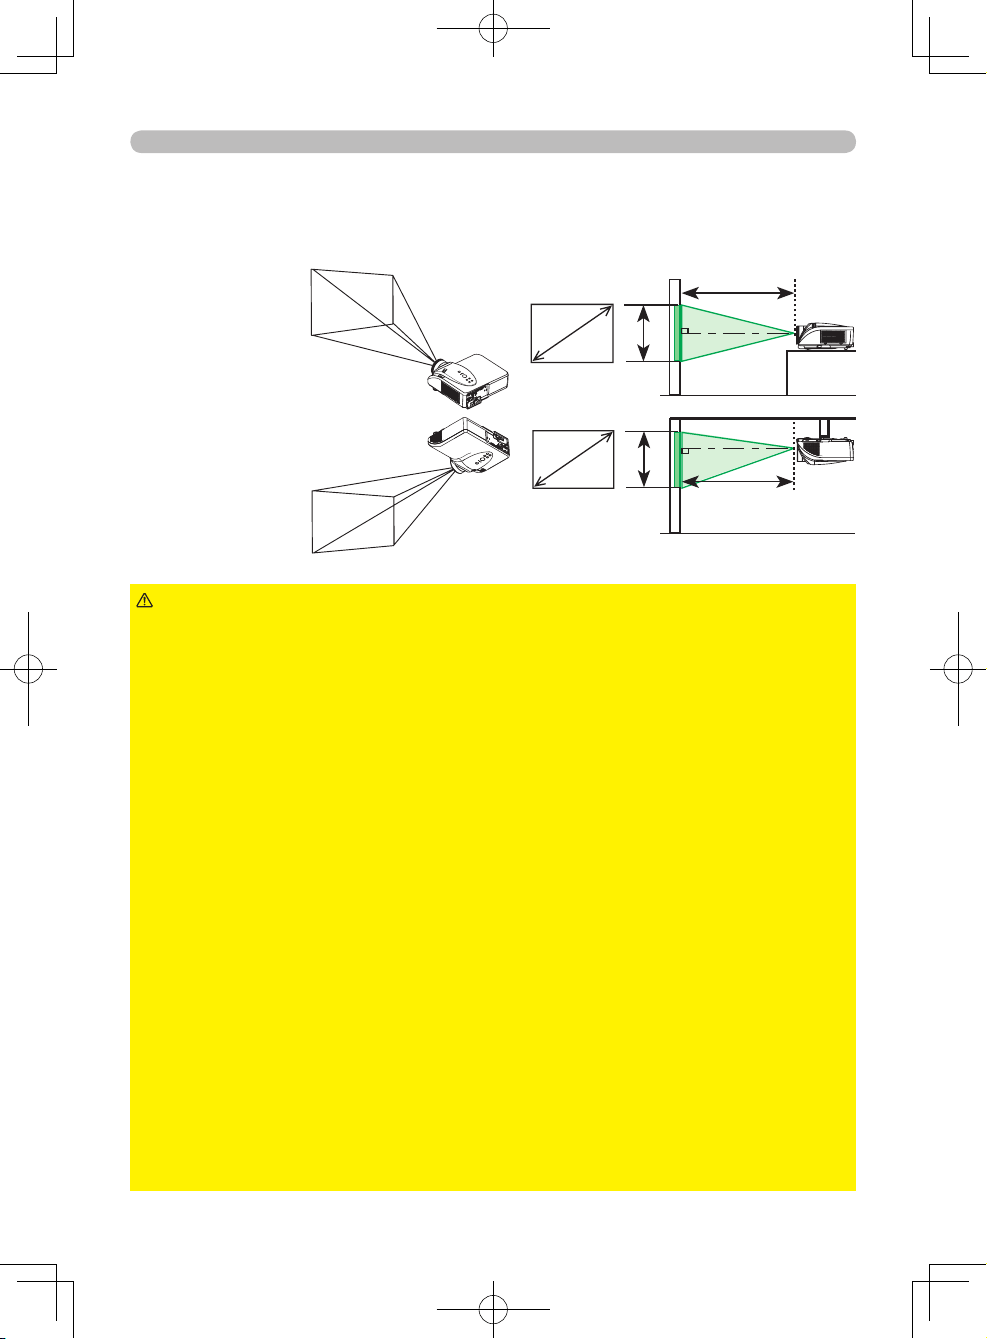
Preparations
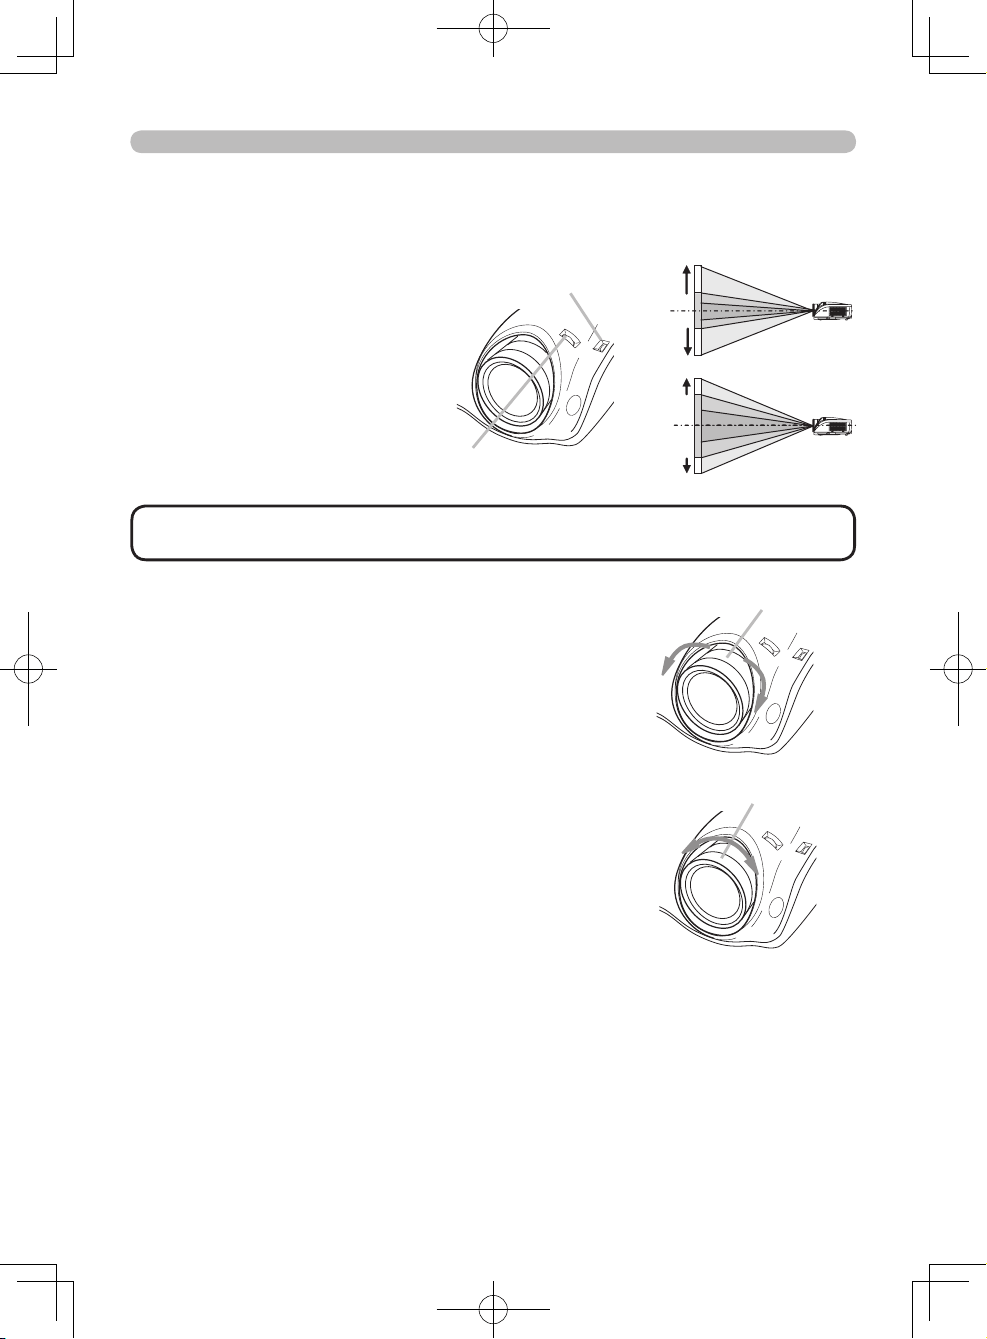
Arrangement
On a horizontal
surface
Arrange the projector according to the manner in which you will use the projector
and the environment the projector will be used in.
Suspended from
the ceiling
► Place the projector in a stable, horizontal position. If the
projector falls or is knocked over it could result in injury and/or damage to the
projector. Using a damaged projector could result in fire and/or electric shock.
• Do not place the projector on an unstable, slant or vibratory surface such as a
wobbly or inclined stand.
• Do not stand the projector on its side, front or rear faces.
• Contact your dealer before ceiling installations and similar.
► Place the projector in a cool place, with adequate ventilation. The high
operating temperature of the projector could cause burns, fire and/or projector
malfunction if not properly placed.
• Do not block or cover the projector's vents.
• Maintain a space of at least 30 cm between the sides of the projector and other
objects such as walls.
• Do not place the projector on metallic objects or objects susceptible to heat.
• Do not place the projector on carpets, cushions or bedding.
• Do not place the projector in direct sunlight or near heat sources, such as
heaters.
• Do not place anything on or near the projectors lens or vents. Do not place
anything on top of the projector.
• The projector also has intake vents on the bottom. Do not place anything that
may be sucked into or stick to the vents underneath the projector.
► Do not place the projector any place where it may get wet. Placing the
projector in a humid place or inserting liquid in the projector could cause fire, an
electric shock and/or malfunction to the projector.
• Do not place the projector in a bathroom or outdoors.
• Do not place anything containing liquid near the projector.
WARNING
(a)
(c)
(b)
(a)
(c)
(b)
11
ENGLISH
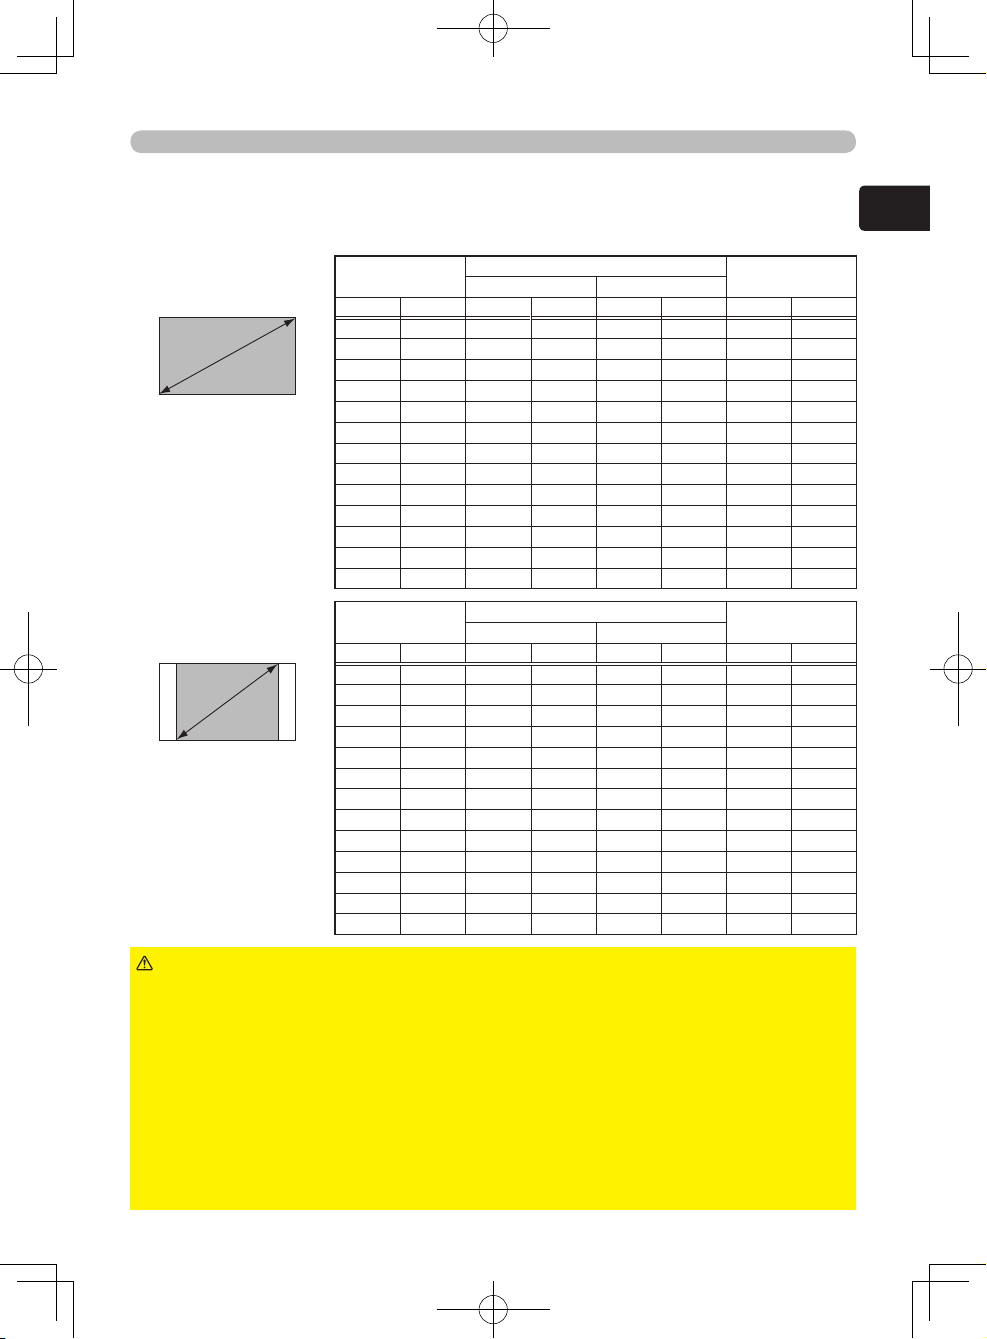
Preparations
Refer to the illustrations and tables below to determine the screen size and
projection distance.
The values shown in the table are calculated (±10%) for a full size screen at 1280x720.
For 16:9 screens
For 4:3 screens
(a)
Screen size
(b) Projection distance
(c)
Screen height
min. max.
inch (m) m (inch) m (inch) cm (inch)
30 (0.8) 0.8 (32) 1.3 (52) 37 (15)
40 (1.0) 1.1 (43) 1.8 (70) 50 (20)
50 (1.3) 1.4 (54) 2.3 (89) 62 (25)
60 (1.5) 1.7 (66) 2.7 (107) 75 (29)
70 (1.8) 2.0 (77) 3.2 (125) 87 (34)
80 (2.0) 2.2 (89) 3.6 (143) 100 (39)
90 (2.3) 2.5 (100) 4.1 (161) 1
12 (44)
100 (2.5) 2.8 (1
11) 4.6 (179) 125 (49)
120 (3.0) 3.4 (134) 5.5 (215) 149 (59)
150 (3.8) 4.3 (168) 6.9 (270) 187 (74)
200 (5.1) 5.7 (224) 9.2 (360) 249 (98)
250 (6.4) 7.1 (281) 1
1.5 (451) 311 (122)
300 (7.6) 8.6 (337) 13.8 (541) 374 (147)
(a)
Screen size
(b) Projection distance
(c)
Screen height
min. max.
inch (m) m (inch) m (inch) cm (inch)
30 (0.8) 1.0 (39) 1.6 (65) 46 (18)
40 (1.0) 1.4 (53) 2.2 (87) 61 (24)
50 (1.3) 1.7 (67) 2.8 (109) 76 (30)
60 (1.5) 2.1 (81) 3.3 (131) 91 (36)
70 (1.8) 2.4 (95) 3.9 (153) 107 (42)
80 (2.0) 2.8 (109) 4.5 (175) 122 (48)
90 (2.3) 3.1 (122) 5.0 (198) 137 (54)
100 (2.5) 3.5 (136) 5.6 (220) 152 (60)
120 (3.0) 4.2 (164) 6.7 (264) 183 (72)
150 (3.8) 5.2 (206) 8.4 (330) 229 (90)
200 (5.1) 7.0 (275) 1
1.2 (441) 305 (120)
250 (6.4) 8.7 (344) 14.0 (552) 381 (150)
300 (7.6) 10.5 (413) 16.8 (663) 457 (180)
► Avoid smoky, humid and dusty places (e.g. near a humidifier,
a smoking area, a kitchen etc.) Placing the projector in such a place could cause
fire, electric shock and/or projector malfunction.
► Adjust the position of the projector so that light does not shine directly on the
projector's remote sensor.
►
The manufacturer strongly recommends avoiding any magnetic contact that is
not shielded or protected on or near the projector itself. (e.g. Magnetic Security
Devices, or other projector accessories that contain magnetic material that has not
been provided by the manufacture etc.) Magnetic objects may cause interruption
of the projector's internal mechanisms which may interfere with cooling fan speed
or cause the fans to stop, and may cause the projector to shut down completely.
CAUTION
(a)
(a)
12
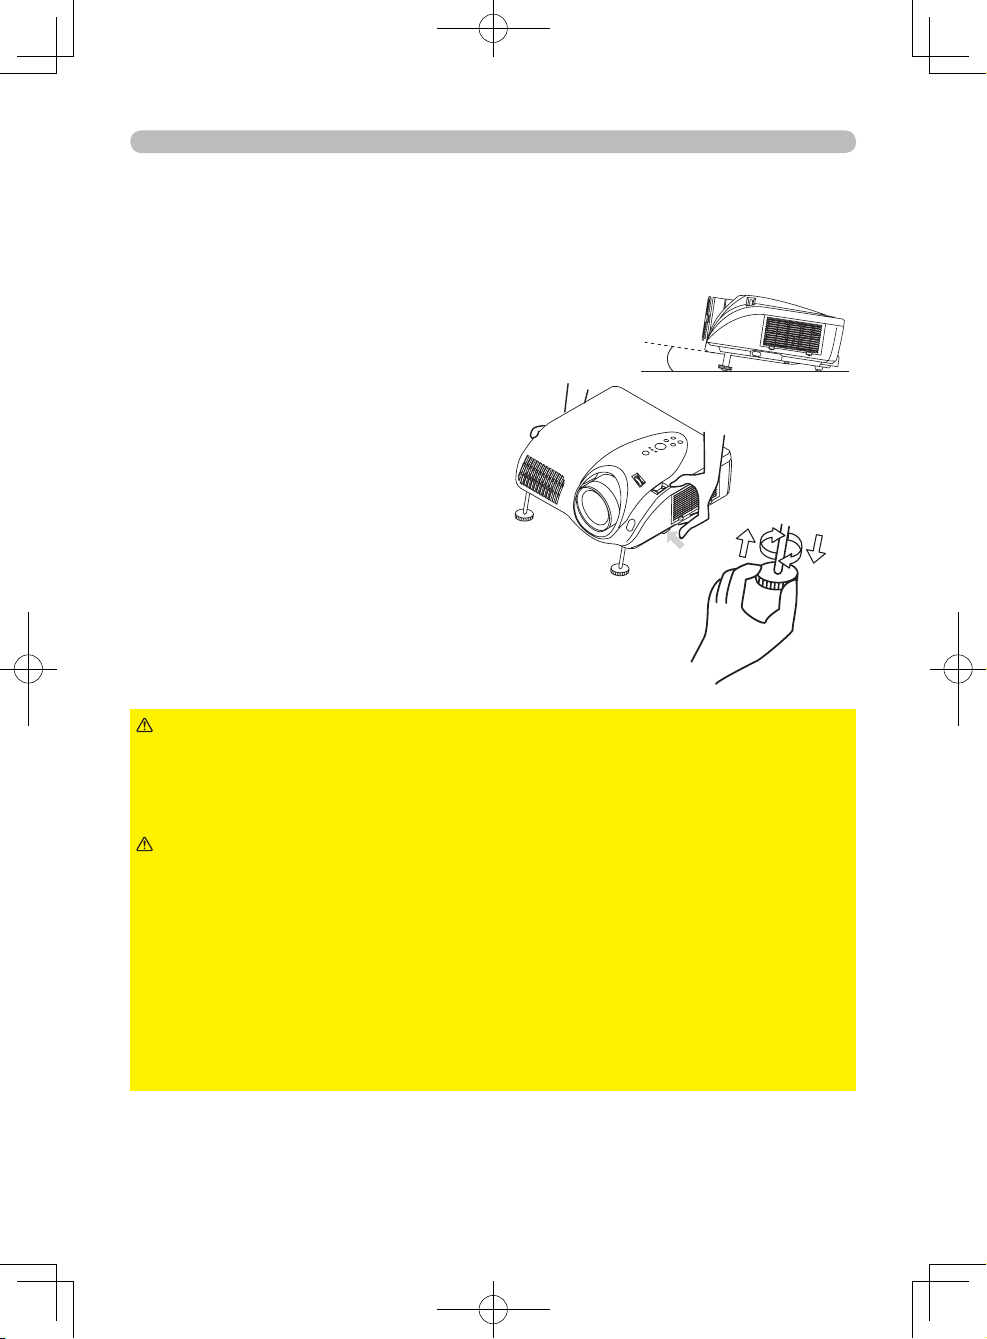
Preparations
Adjusting the projector’s elevation
The elevator feet can be used to make adjustments if the surface on which the
projector is set is uneven or if the projection angle needs to be otherwise adjusted.
The adjustment range of the elevator feet is 0 to 7 degrees.
1.
Press and hold in the elevator
buttons while holding the projector.
There are elevator buttons and feet
on the both sides of the projector.
2.
Raise or lower the projector to the
desired height and release the
elevator buttons. When the elevator
buttons are released, the elevator
feet will lock into position.
3.
If necessary, the elevator feet can
be manually twisted to make more
precise adjustments.
► Do not adjust the elevation of the projector during or
immediately after use. Handling while the projector is hot could cause burn
and/or projector malfunction. Before adjusting the elevation, make sure that the
power switch is off, that the power cord is unplugged, and that the projector is
adequately cool.
WARNING
► Using the elevator buttons without holding the projector could
cause the projector to fall, overturn, or strike your fingers and possibly cause
projector malfunction. To prevent damaging the projector and injuring yourself,
always hold the projector whenever using the elevator buttons to adjust the
elevator feet.
► Do not tilt the projector to the right or left. Also be sure not to raise the
front or rear of the projector more than 7 degrees. Raising the projector more
than 7 degrees could cause projector malfunction or shorten the lifetime of
consumables.
► Other than raising the projector using the elevator feet, place the projector
horizontally.
CAUTION
7°
13
ENGLISH
Y
C
B
/P
B
C
R
/P
R
COMPONENT VID
EO
S-VIDEO
VIDEO
COMPUTER
CONTROL
HDMI
TRIGGER
Y
C
B
/P
B
C
R
/P
R
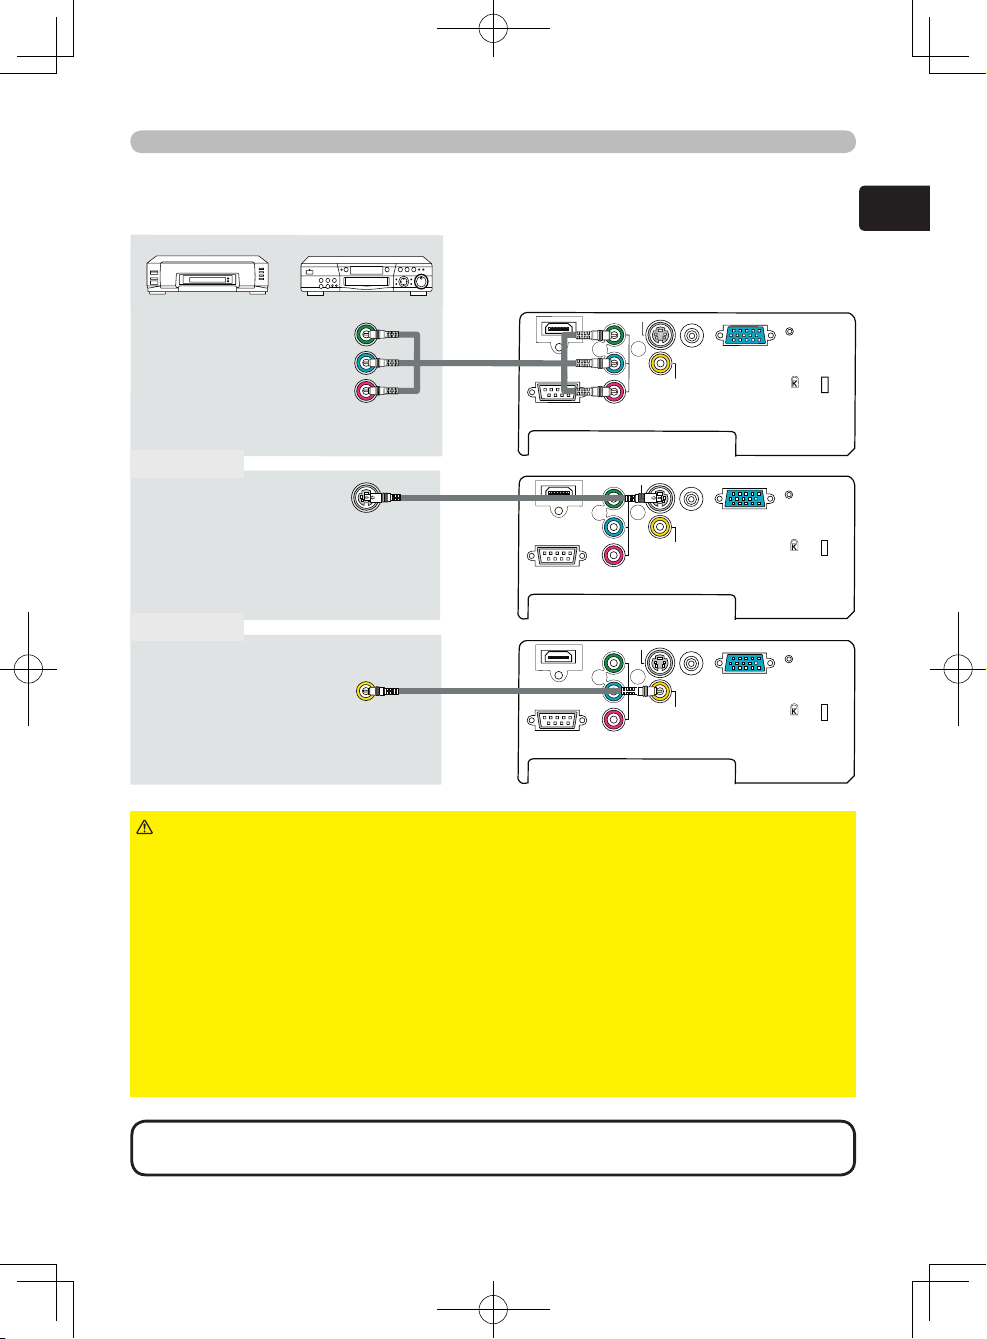
Component
video Out
Component
cable
Y
C
B
/P
B
C
R
/P
R
COMPONENT VIDEO
S-VIDEO
VIDEO
COMPUTER
CONTROL
HDMI
TRIGGER
S-video Out
S-video
cable
Y
C
B
/P
B
C
R
/P
R
COMPONENT VIDEO
S-VIDEO
VIDEO
COMPUTER
CONTROL
HDMI
TRIGGER
Video Out
Video
cable
Preparations
Connecting your devices
With a VCR/DVD player
► Turn off all devices prior to connecting them to the projector.
Attempting to connect a live device to the projector may generate extremely loud
noises or other abnormalities that may result in malfunction and/or damage to
the device and/or projector.
► Use the accessory cables or a designated cable type to make connections.
Some cables have to be used with a core. A cable that is too long may cause
picture degradation. Please consult with your dealer for more information. For
cables that have a core only at one end, connect the end with the core to the
projector.
► Make sure that devices are connected to the correct port. An incorrect
connection may result in malfunction and/or damage to the device and/or
projector.
CAUTION
• Be sure to tighten the screws on connectors to secure.
• Automatic adjustment may not function correctly with some input signals.
NOTE
14
Y
C
B
/P
B
C
R
/P
R
COMPONENT VIDEO
S-VIDEO
VIDEO
COMPUTER
CONTROL
HDMI
TRIGGER
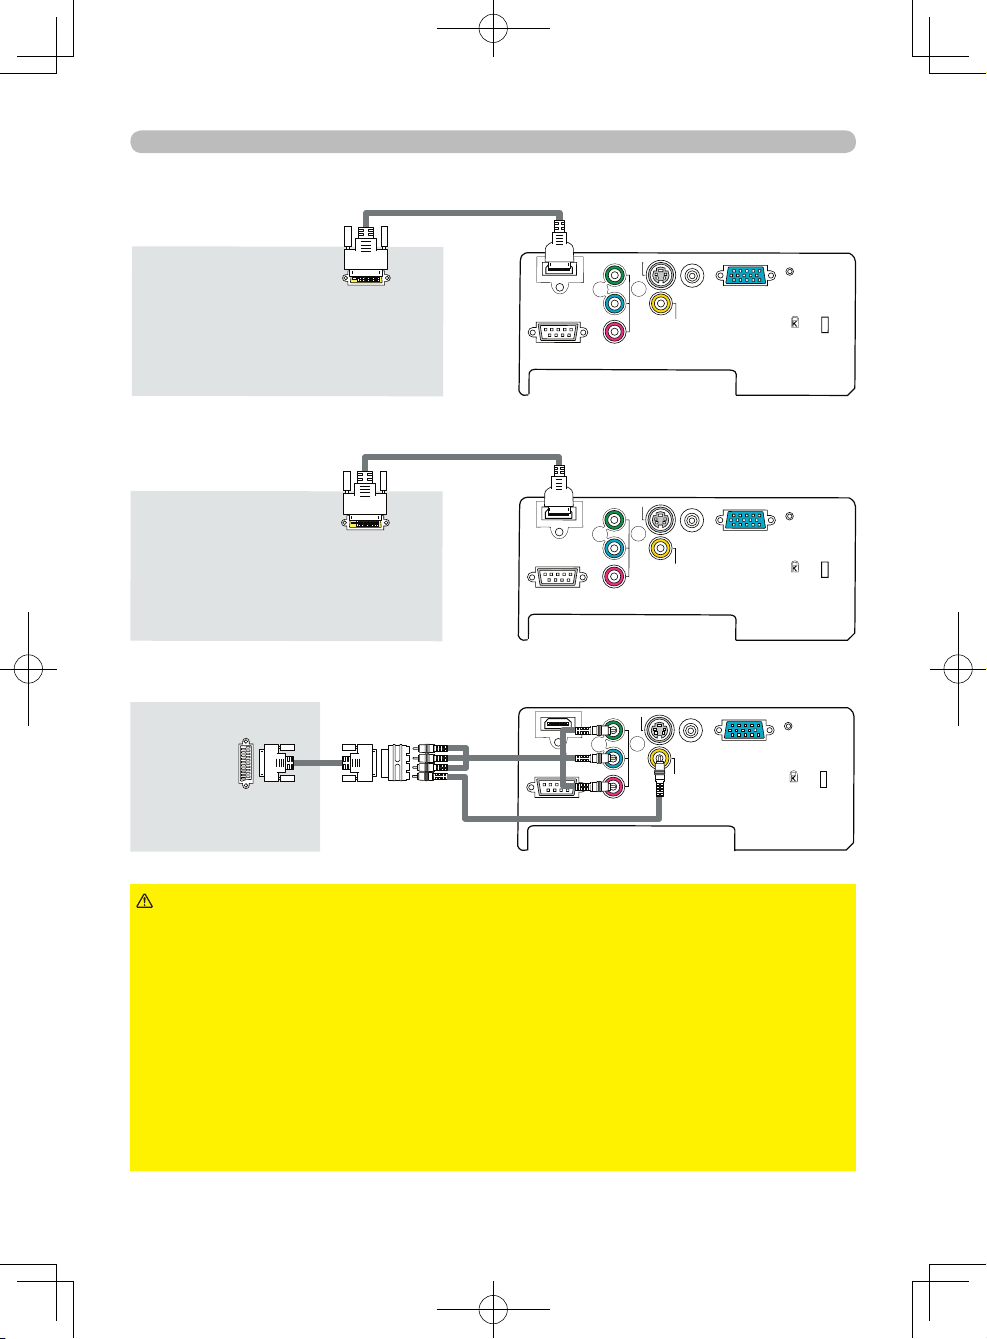
DVI-HDMI cable
DVI Out
Y
C
B
/P
B
C
R
/P
R
COMPONENT VID
EO
S-VIDEO
VIDEO
COMPUTER
CONTROL
HDMI
TRIGGER
HDMI cable
HDMI Out
Preparations
For an HDMI signal source
► Turn off all devices prior to connecting them to the projector.
Attempting to connect a live device to the projector may generate extremely loud
noises or other abnormalities that may result in malfunction and/or damage to
the device and/or projector.
► Use the accessory cables or a designated cable type to make connections.
Some cables have to be used with a core. A cable that is too long may cause
picture degradation. Please consult with your dealer for more information. For
cables that have a core only at one end, connect the end with the core to the
projector.
► Make sure that devices are connected to the correct port. An incorrect
connection may result in malfunction and/or damage to the device and/or
projector.
CAUTION
For a DVI signal source
For an SCART RGB input
Y
C
B
/P
B
C
R
/P
R
COMPONENT VIDEO
S-VIDEO
VIDEO
COMPUTER
CONTROL
HDMI
TRIGGER
SCART
Out
SCART
cable
Adapter
Component
cable
V
ideo
cable
15
ENGLISH
Y
C
B
/P
B
C
R
/P
R
COMPONENT VIDEO
S-VIDEO
VIDEO
COMPUTER
CONTROL
HDMI
TRIGGER
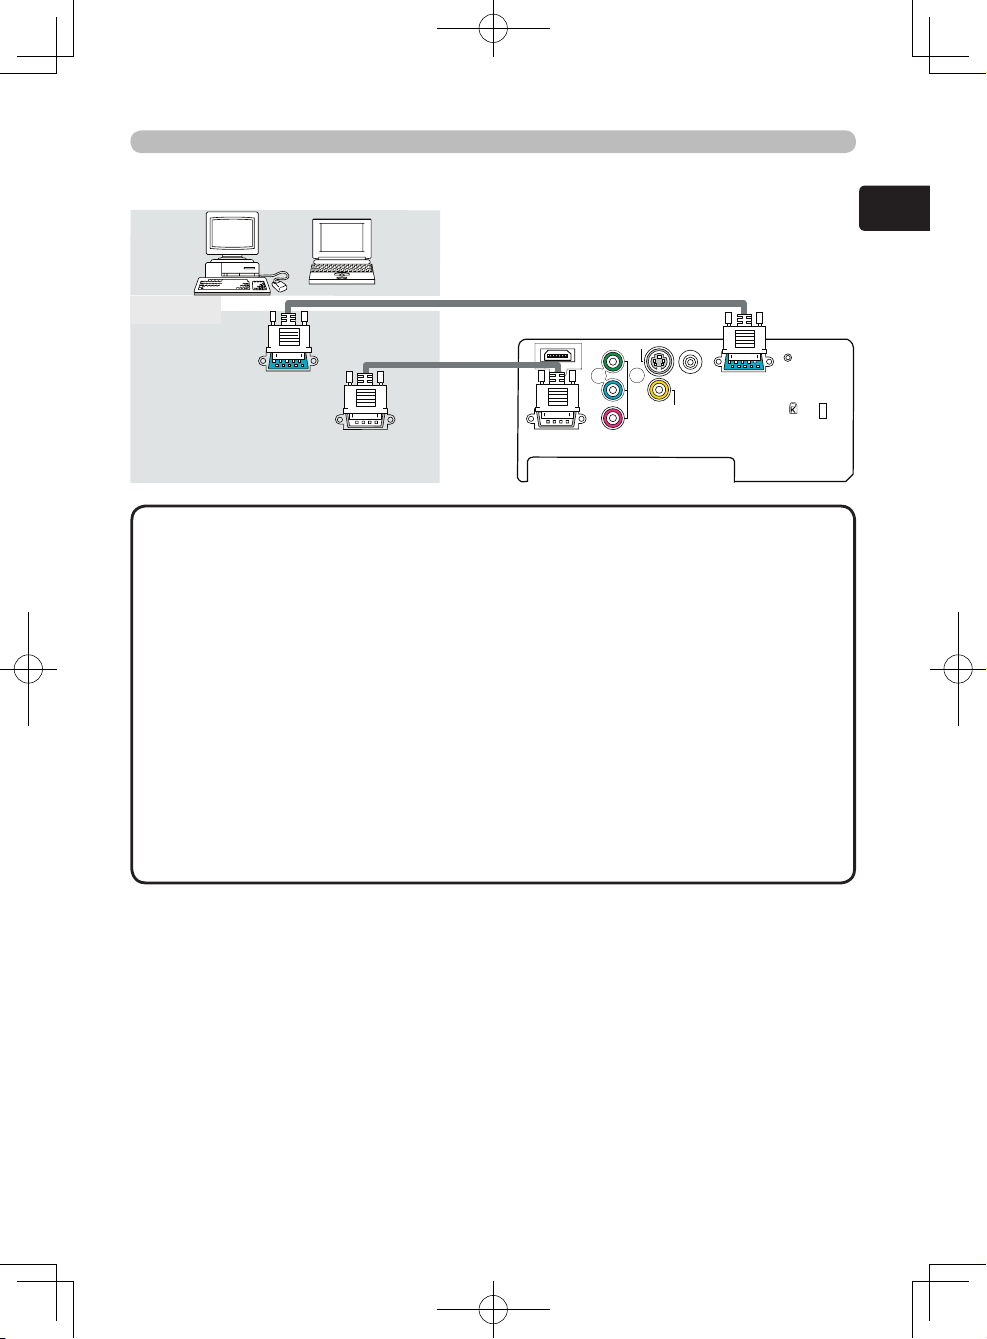
RGB Out
RGB cable
RS-232C
RS-232C
cable
Preparations
With a computer
• Be sure to tighten the screws on connectors to secure.
• Use only an HDMI cable marked with the HDMI logo for HDMI connections.
• Use a DVI-HDMI cable or adapter when connecting to a DVI output device. In
some cases however, a DVI input to the HDMI port may not work properly.
• Whenever attempting to connect a laptop computer to the projector, be sure
to activate the laptop’s external RGB output (set the laptop to CRT display or to
simultaneous LCD and CRT display). For more information please refer to the
instruction manual of the laptop computer.
• Be sure to check jack type, signal level, timing and resolution before
connecting this projector to a computer.
• Some computers may have multiple screen display modes. Some of these
modes cannot used with this projector.
• The image may not be displayed correctly when the input signal is a
composite sync or a sync on G signal.
• For some computer signals the optional Mac adapter is necessary.
• Automatic adjustment may not function correctly with some input signals.
NOTE
(optional
use)
16
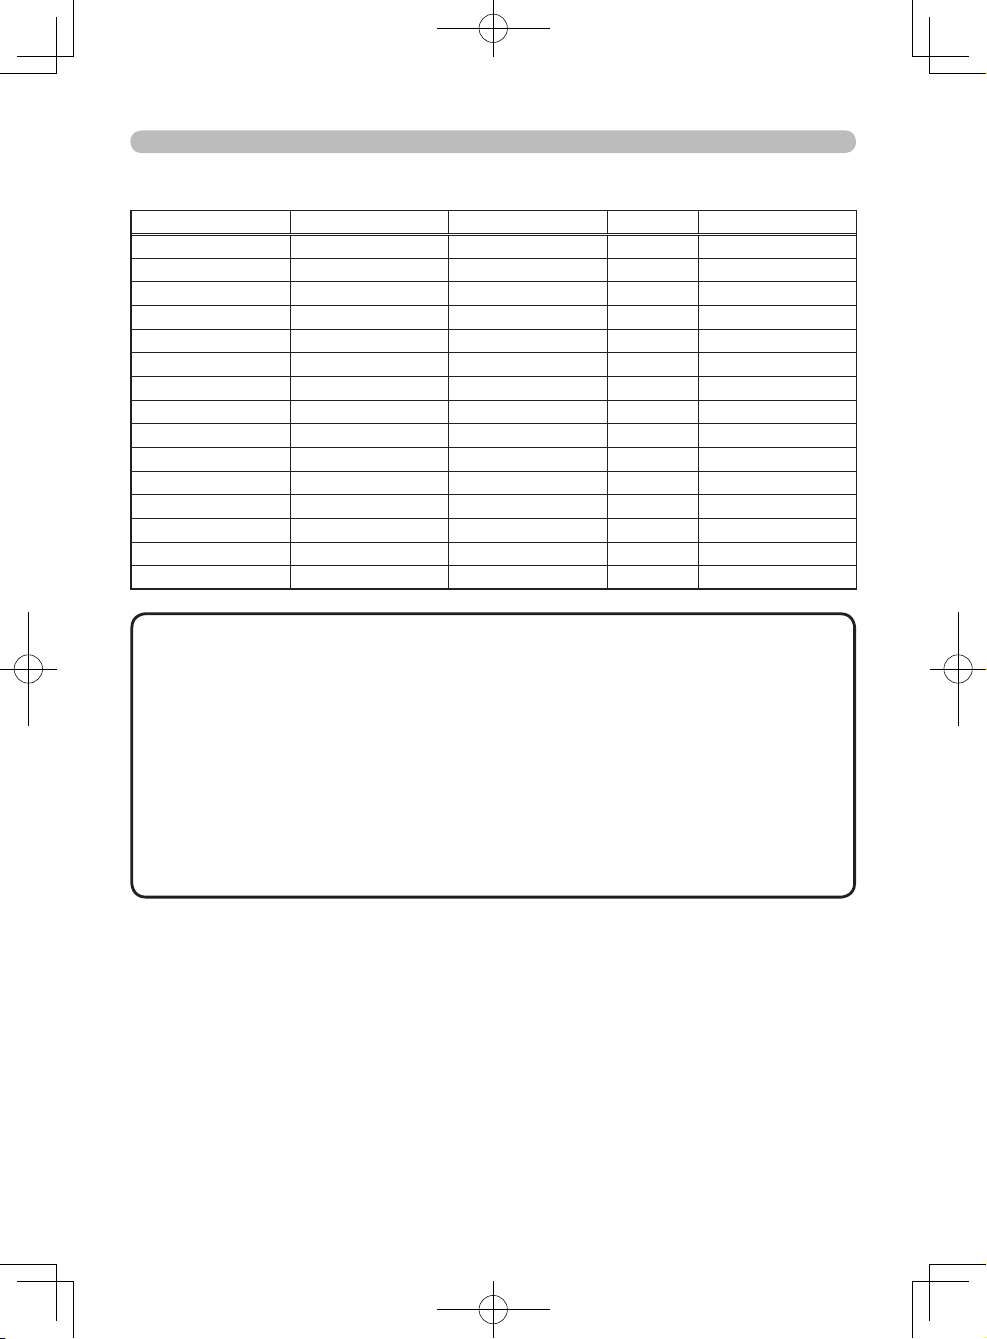
Preparations
Computer signal examples
Resolution (HxV) H. frequency (kHz) V. frequency (Hz) Rating Signal mode
720 x 400 37.9 85.0 VESA TEXT
640 x 480 31.5 59.9 VESA VGA
(60Hz)
640 x 480 37.9 72.8 VESA VGA
(72Hz)
640 x 480 37.5 75.0 VESA VGA
(75Hz)
640 x 480 43.3 85.0 VESA VGA
(85Hz)
800 x 600 35.2 56.3 VESA SVGA
(56Hz)
800 x 600 37.9 60.3 VESA SVGA
(60Hz)
800 x 600 48.1 72.2 VESA SVGA
(72Hz)
800 x 600 46.9 75.0 VESA SVGA
(75Hz)
800 x 600 53.7 85.1 VESA SVGA
(85Hz)
1024 x 768 48.4 60.0 VESA XGA
(60Hz)
1024 x 768 56.5 70.1 VESA XGA
(70Hz)
1024 x 768 60.0 75.0 VESA XGA
(75Hz)
1280 x 720 44.7 60.0 VESA -
1280 x 1024 64.0 60.0 VESA SXGA
(60Hz)
• Full-size display may not be possible with some input signals. Refer
to the resolutions above.
• Although the projector can display signals with resolution up to SXGA
(1280x1024), signals will be converted to the projector’s panel resolution
before being displayed. The best display performance is achieved when the
resolutions of the input signal and projector panel are identical.
• For some input types when the screen resolution is changed on a computer,
the automatic adjustment function may take a long time or may not complete. If
this happens, you may not be able to see the “Yes/No” check box to confirm the
resolution change in Windows. The screen resolution will then be reset to the
previous resolution. It is recommended to use a CRT or LCD monitor to change
the resolution if this occurs.
NOTE
About Plug-and-Play capability
Plug-and-Play is a system composed of a computer
, its operating system and
peripheral equipment (i.e. display devices). This projector is VESA DDC 2B
compatible. Plug-and-Play can be used by connecting this projector to a computer
that is VESA
DDC (display data channel) compatible.
• Take advantage of this feature by connecting an RGB cable to the COMPUTER
port (DDC 2B compatible). Plug-and-Play may not work properly if any other type
of connection is attempted.
• This projector behaves as a standard Plug-and-Play monitor and uses the
standard monitor drivers provided with your operating system.
17
ENGLISH
Preparations
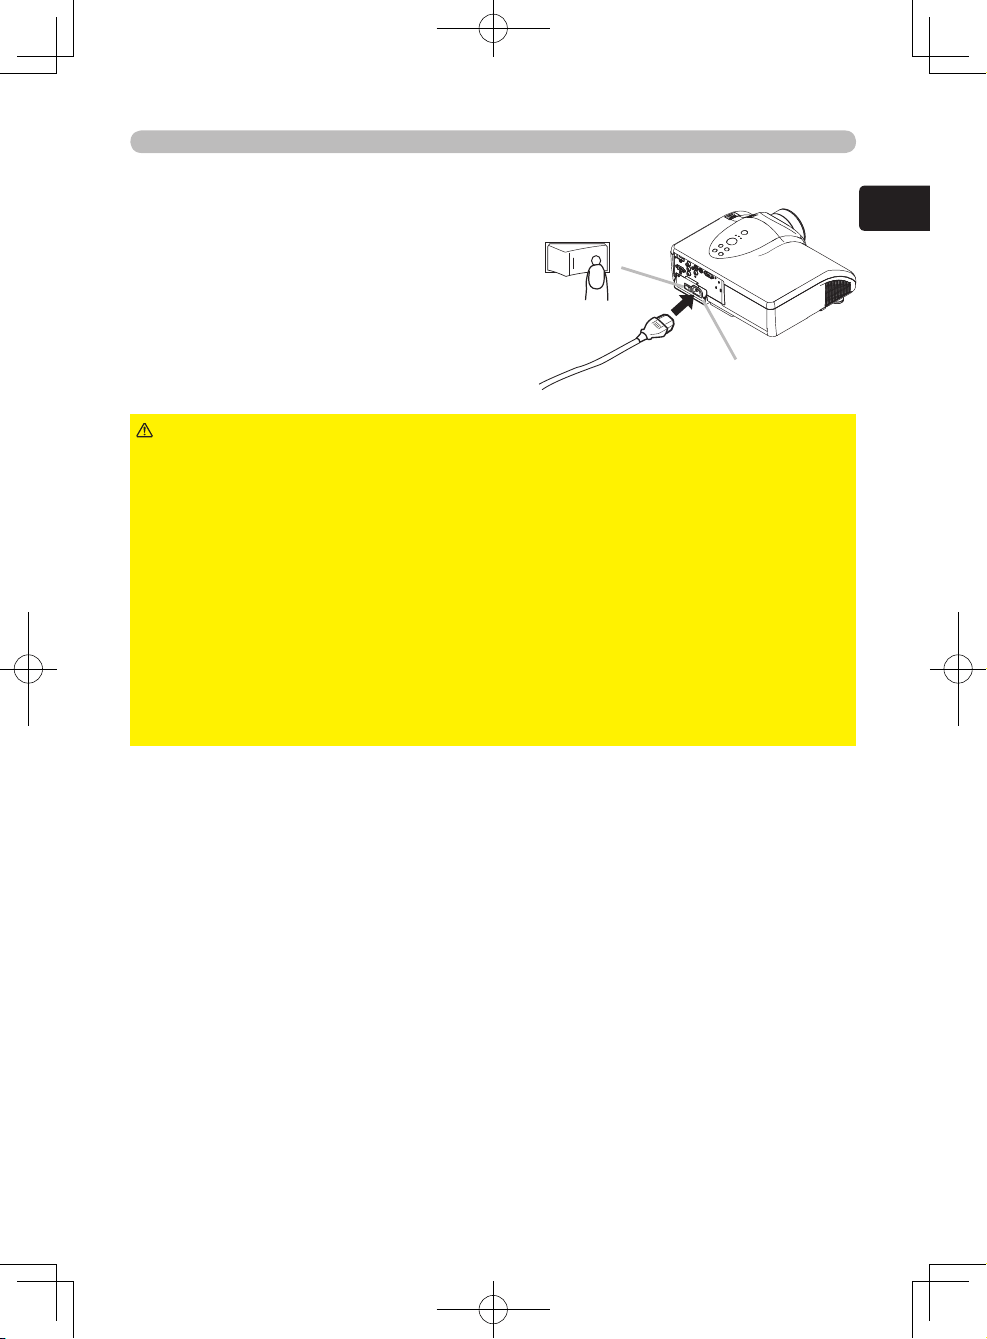
Connecting the power supply
Before connecting the power, make
sure that the power switch is in the OFF
position (the side marked “O”).
1.
Connect the power cord connector
to the projector’s AC inlet.
2.
Plug the power cord's plug firmly
into a power outlet.
► Use extra caution when connecting the power cord as
incorrect or faulty connections may result in fire and/or electrical shock.
• Use only the power cord that came with the projector. If it becomes damaged,
contact your dealer for a new one.
• Only plug the power cord into an outlet rated for use with the power cord's
specified voltage range.
• Never modify the power cord. Never attempt to defeat the ground connection of
the three-pronged plug.
• The power outlet should be close to the projector and easily accessible.
• Do not touch the power cord with wet hands.
• Check that the power cord connector is clean (no dust) before using. Use a
soft, dry cloth to clean the power cord.
• Insert the power plug into the power outlet firmly. Avoid using loose, unsound
outlets and contact failures.
WARNING
Power switch
Power cord
connector
AC inlet
18
Preparations
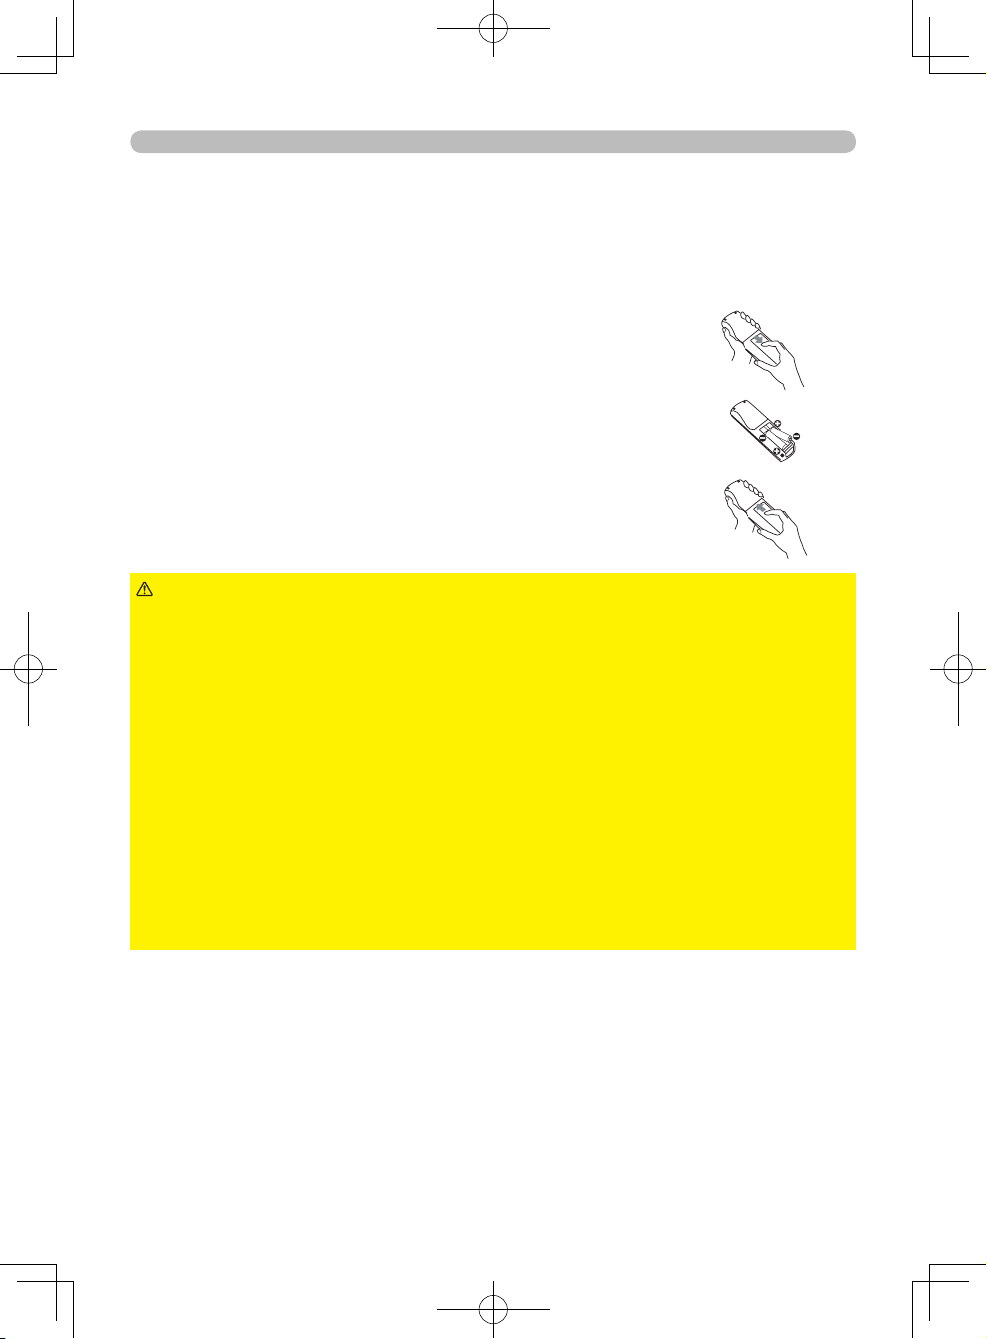
Loading batteries into the remote control
Please load the batteries before using the remote control. If the remote control
starts to malfunction, replace the batteries. If you will not use the remote control
for an extended period, remove the batteries from the remote control and store
them in a safe place.
1.
Remove the battery cover. Slide the battery cover back
in the direction of the arrow and remove.
2.
Take old batteries out and/or put new batteries in.
When putting batteries in, insert the two AAA batteries
according to their plus and minus terminals as indicated
on the remote control.
3.
Close the battery cover. Replace the battery cover in the
direction of the arrow and snap it back into place.
► Always handle batteries with care and use them only as
directed. Batteries may explode if mishandled. Mishandling may also result in
cracking or leakage, which could in turn result in fire, injury and/or pollution of
the surrounding environment.
• Do not recharge, short circuit, solder, disassemble or dispose of batteries in fire
or water.
• Be sure to use only the batteries specified. Do not use different types of
batteries together. Do not mix new and old batteries.
• Make sure the plus and minus terminals are correctly aligned when loading
batteries.
• Keep batteries away from children and pets.
• Keep batteries in a dark, cool and dry place.
• Do not drop, hit or otherwise jar the battery in anyway.
• If you notice battery leakage, clean out the liquid and then replace the battery. If
any of the liquid gets on your body or clothes, immediately rinse well with water.
• Obey local laws on battery disposal.
WARNING
19
ENGLISH
30°
30°
Preparations
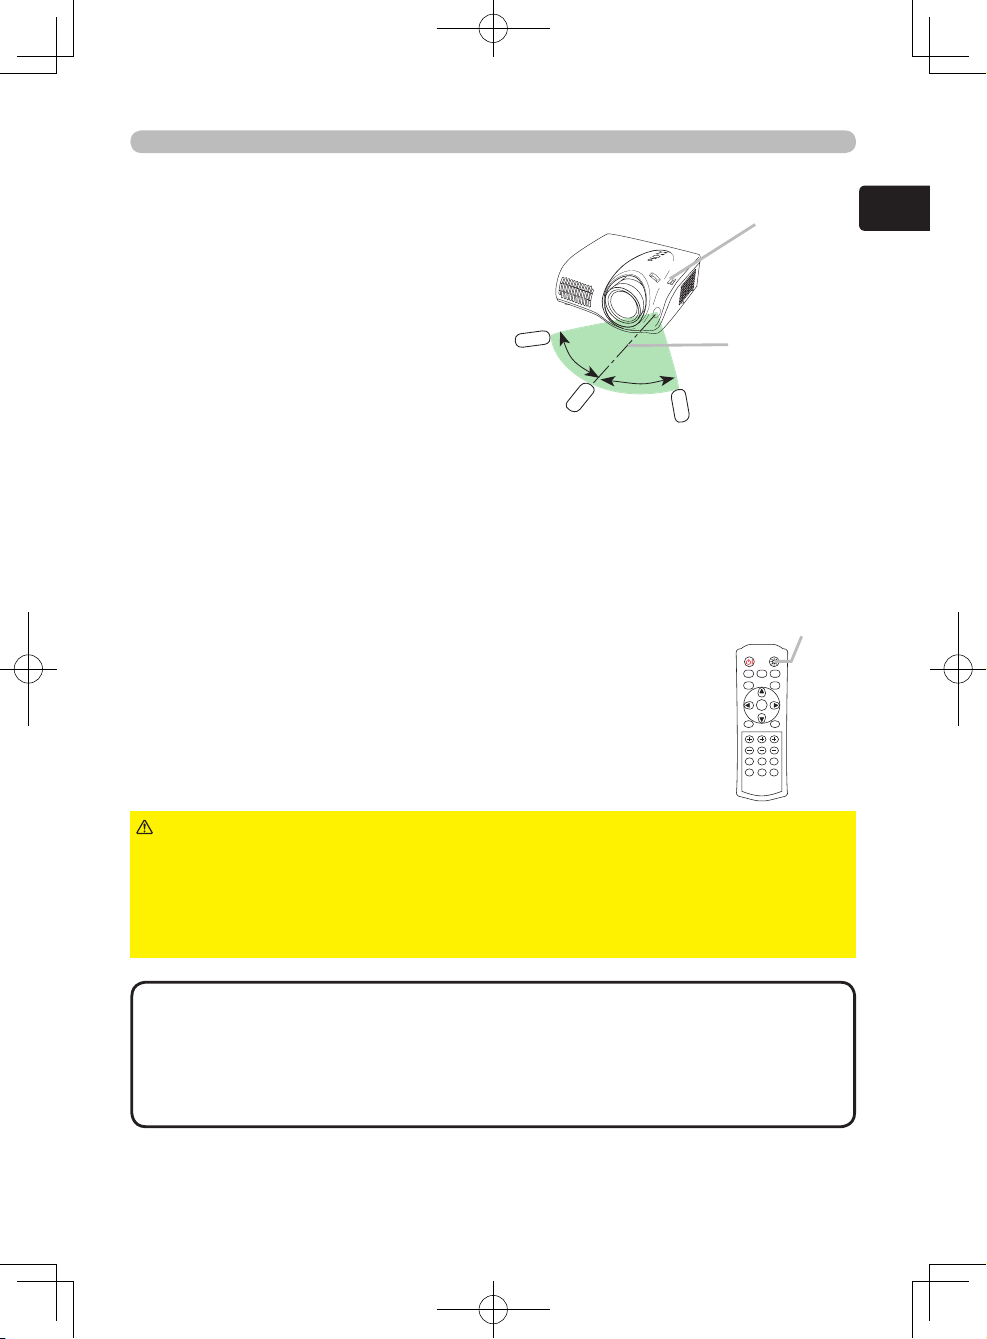
Using the remote control
The remote control works with the
projector’s remote sensor.
The range of the remote sensor is
60-degrees (30-degrees to the left and
right of the remote sensor) within 3
meters.
The remote signal may also be able
to be reflected of
f the screen etc. If it
is difficult to send the remote signal
to the sensor directly, try to reflect the
signal.
The remote control uses infrared light to send signals to the projector (Class1
LED), so be sure to use the remote control in an area free from obstacles that
could block the remote control’
s signal to the projector.
Using the remote control button lights
When using the remote control in the dark, the buttons of the
remote control can light up.
1.
Pressing the LIGHT button turns the remote control
button lights on. The lights will automatically turn off after
a short time.
► Be careful when handling the remote control. Incorrect
handling could cause damage and/or malfunction.
• Do not drop, hit or otherwise jar the remote control in anyway.
• Do not get the remote control wet or place it on wet objects.
• If you will not use the remote control for an extended period, remove the
batteries from the remote control and store them in a safe place.
CAUTION
• If the remote control starts to malfunction, replace the batteries.
• The remote control may not function correctly if strong light (such as direct
sunlight) or light from an extremely close range (such as from an inverter
fluorescent lamp) shines on the projector’s remote sensor. Adjust the position
of the projector so that light does not shine directly on the projector's remote
sensor.
NOTE
Remote control
sensor
Approximately
3m
LIGHT
button
POWER LIGHT
BLACK
ASPECT
MENU
BRIGHT CONTRAST COLOR
IRIS
MODE
MEMORY
ENTER
RESET
HDMI
PC
AUTO
COMPO
S-VIDEO
VIDEO
20
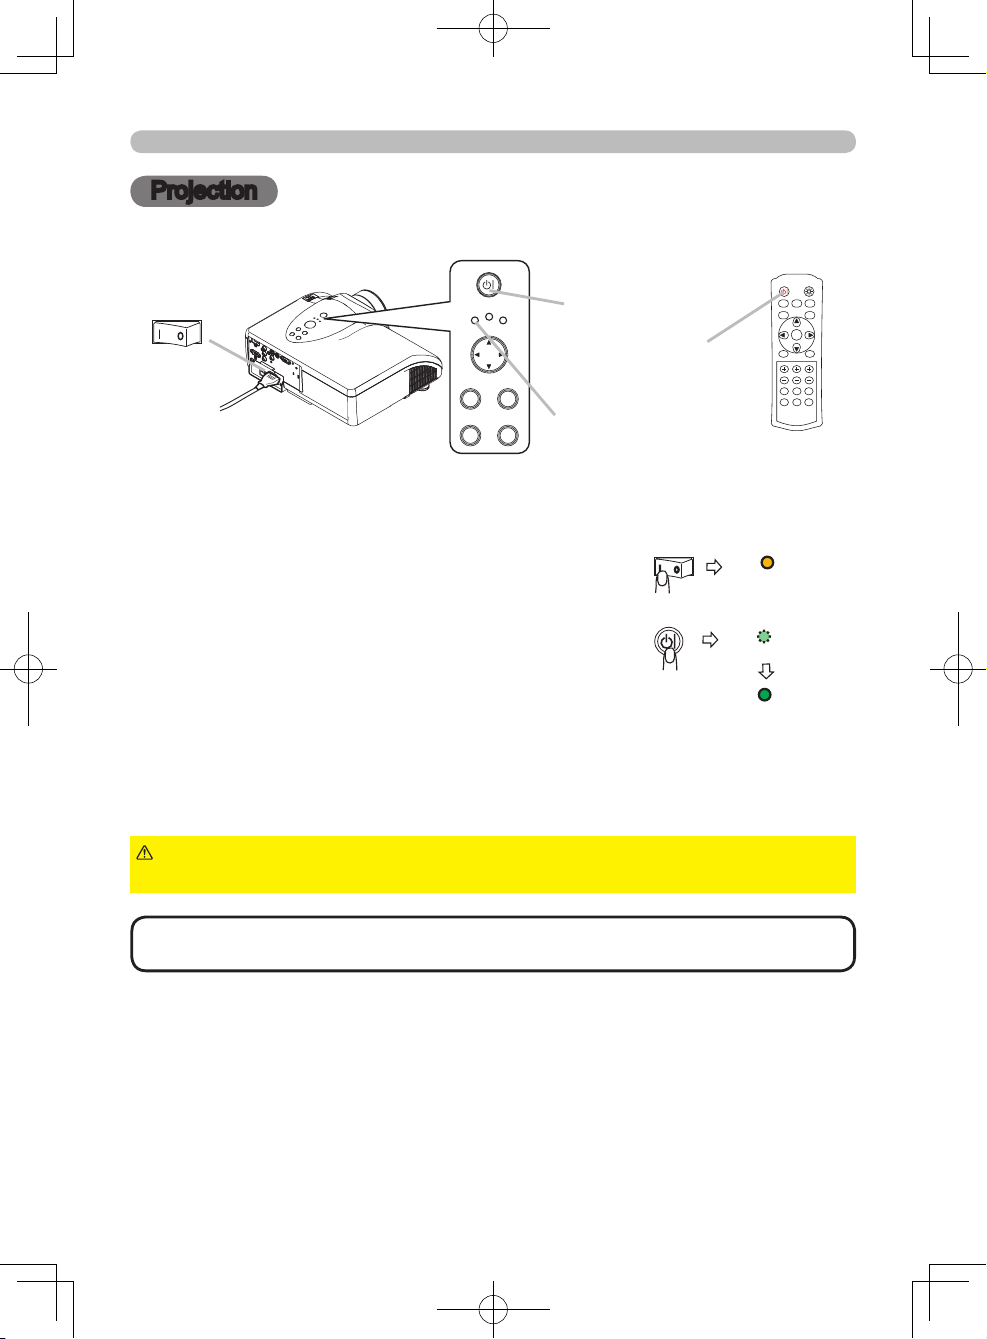
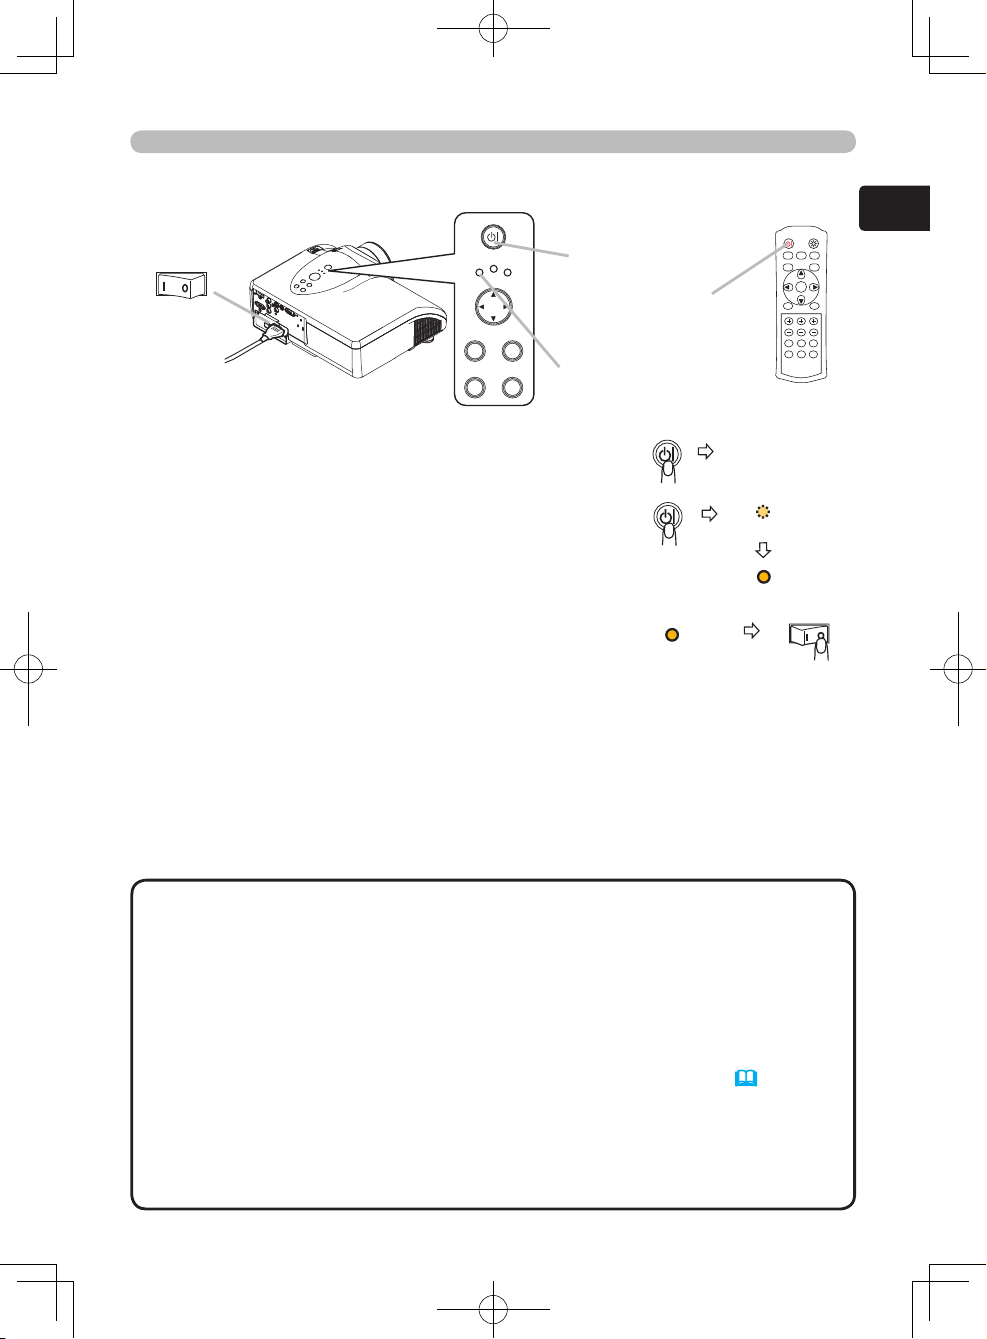
1.
Make sure that the power cord is firmly and correctly connected to both the
projector and power outlet.
2.
Open the lens cover, and set the power switch to
the ON position.
The power indicator will light a steady orange. Then
wait several seconds because buttons may not
function for the first several seconds the projector
is turned on.
3.
Press the STANDBY/ON button on the projector or
the POWER button on the remote control.
The projector lamp will light up and the POWER
indicator will begin blinking in green. When the
power is completely on, the indicator will stop
blinking and light a steady green.
Projection
Projection
Turning the power on
► When the power is on, a strong light is emitted. Do not look
into the projector lens or openings.
WARNING
• Turn the power on in the correct order. Turn on the projector before
the connected devices.
NOTE
STANDBY/ON button
POWER button
POWER indicator
POWER LIGHT
BLACK
ASPECT
MENU
BRIGHT CONTRAST COLOR
IRIS
MODE
MEMORY
ENTER
RESET
HDMI
PC
AUTO
COMPO
S-VIDEO
VIDEO
POWER
MENU
ENTER
LAMP
TEMP
STANDBY/ON
INPUT
RESET
POWER
( Steady orange)
POWER
(Blinking in green)
POWER
(Steady green)

21
ENGLISH
POWER LIGHT
BLACK
ASPECT
MENU
BRIGHT CONTRAST COLOR
IRIS
MODE
MEMORY
ENTER
RESET
HDMI
PC
AUTO
COMPO
S-VIDEO
VIDEO
1.
To switch between input ports, press the
INPUT button on the projector. Each time
the button is pressed, the projector will
switch between input ports as follows.
COMPONENT VIDEO S-VIDEO
HDMI COMPUTER VIDEO
Projection
Selecting an input signal
1.
To select a specific input port directly, press the
PC, HDMI, COMPO, S-VIDEO or VIDEO button
on the remote control according to which port you
want to select.
PC button COMPUTER port
HDMI button HDMI port
COMPO button COMPONENT VIDEO ports
S-VIDEO button S-VIDEO port
VIDEO button VIDEO port
1.
Press the AUTO button on the remote control to
automatically set or select the following contents.
Automatically adjusting the picture
For a signal from the COMPUTER port
The vertical position, horizontal position, horizontal
phase, horizontal size and aspect ratio are
automatically set.
Make sure that the application
window is set to its maximum size before attempting to use this feature. A dark
picture may be incorrectly adjusted. Use a bright picture when adjusting.
For a signal from the HDMI port
The aspect ratio is automatically set.
For a signal from the COMPONENT VIDEO ports
The vertical position, horizontal position and aspect ratio are automatically set.
The horizontal phase is also automatically set except for 525i (480i), 625i (576i)
and SCAR
T RGB signals.
For a signal from the S-VIDEO or VIDEO port
The video format best suited for the respective input signal will be automatically
selected.
This function is available only when the VIDEO FORMAT item in the
INPUT menu (46) is set to AUTO.
The vertical position, horizontal position and aspect ratio are also automatically
set.
• The automatic adjustment operation takes approximately 10 seconds.
Automatic adjustment may not function correctly with some input signals.
NOTE
POWER LIGHT
BLACK
ASPECT
MENU
BRIGHT CONTRAST COLOR
IRIS
MODE
MEMORY
ENTER
RESET
HDMI
PC
AUTO
COMPO
S-VIDEO
VIDEO
POWER LIGHT
BLACK
ASPECT
MENU
BRIGHT CONTRAST COLOR
IRIS
MODE
MEMORY
ENTER
RESET
HDMI
PC
AUTO
COMPO
S-VIDEO
VIDEO
POWER LIGHT
BLACK
ASPECT
MENU
BRIGHT CONTRAST COLOR
IRIS
MODE
MEMORY
ENTER
RESET
HDMI
PC
AUTO
COMPO
S-VIDEO
VIDEO
POWER
MENU
ENTER
LAMP
TEMP
STANDBY/ON
INPUT
RESET
22
1.
Use the vertical lens shift dial
to shift the picture upward or
downward.
2.
Use the horizontal lens shift
dial to shift the picture left or
right.
Projection
Adjusting the display position
The lens of this projector can be shifted horizontally and vertically to adjust the
display position using the lens shift dials.
• The best picture quality is generally achieved when the lens shift is
set to the center. Each lens shift dial clicks into place when set to the center.
NOTE
1.
Hold the knob of the zoom ring while turning the
zoom ring.
Adjusting the zoom
Use the zoom ring on the projector to adjust the
magnification of the picture.
1.
Hold the knob of the focus ring while turning the
focus ring.
Adjusting the focus
Use the focus ring on the projector to focus the
picture.
Vertical
lens shift dial
Horizontal
lens shift dial
Zoom ring
Magnify
Reduce
Focus ring
3/4
3/4
1/4
1/4
23
ENGLISH
Magnify
1.
Press the STANDBY/ON button on the projector or
the POWER button on the remote control.
The message "Power off?" will appear on the screen
for approximately 5 seconds.
Projection
Turning the power off
2.
Press the STANDBY/ON button on the projector
or the POWER button on the remote control again
when the “Power off?” message appears.
The projector lamp will go off, and the POWER
indicator will begin blinking in orange.
Then the POWER indicator will stop blinking and
light steady orange when the lamp is finished
cooling down.
3.
Make sure that the power indicator is lit a steady orange, and set the power
switch to the OFF position.
The POWER indicator will go off.
Do not set the power switch to the OFF position while the POWER indicator
is green or blinking.
4.
Close the lens cover. For safety purposes, disconnect the power cord if the
projector is not to be used for prolonged periods of time.
• Turn the power off in right order. Turn off the connected devices first
and the projector last.
• Except for emergencies, whenever you turn the projector off be sure to follow
the procedure explained in “Turning off the power”, and do not disconnect the
power cord until the procedure is complete. Neglect can cause damage to the
electrode and/or prevent the lamp from lighting.
• This projector is controlled by an internal microprocessor. Under certain
exceptional circumstances, the projector may not operate correctly even when
turning off the power. If this occurs, please push the restart switch (7, 64)
using a pin or similar object. Make sure that the power indicator is lit a steady
orange, and set the power switch to the OFF position. Only use the restart
switch in exceptional circumstances.
• If there is a power failure, or the restart switch is used, allow the projector to
cool down for at least 10 minutes before turning on again.
NOTE
(Blinking in orange)
(
Steady orange)
POWER
POWER off ?
POWER
(Steady orange)
POWER
STANDBY/ON button
POWER button
POWER indicator
POWER LIGHT
BLACK
ASPECT
MENU
BRIGHT CONTRAST COLOR
IRIS
MODE
MEMORY
ENTER
RESET
HDMI
PC
AUTO
COMPO
S-VIDEO
VIDEO
POWER
MENU
ENTER
LAMP
TEMP
STANDBY/ON
INPUT
RESET
24
Basic operation
Basic operation
The following functions are basic and useful. They can also be easily accessed
using the remote control.
Some functions display dialogs to aid you. Although the dialogs automatically
close after several seconds, the dialogs can be deactivated using the MESSAGE
function in the SCREEN menu (49).
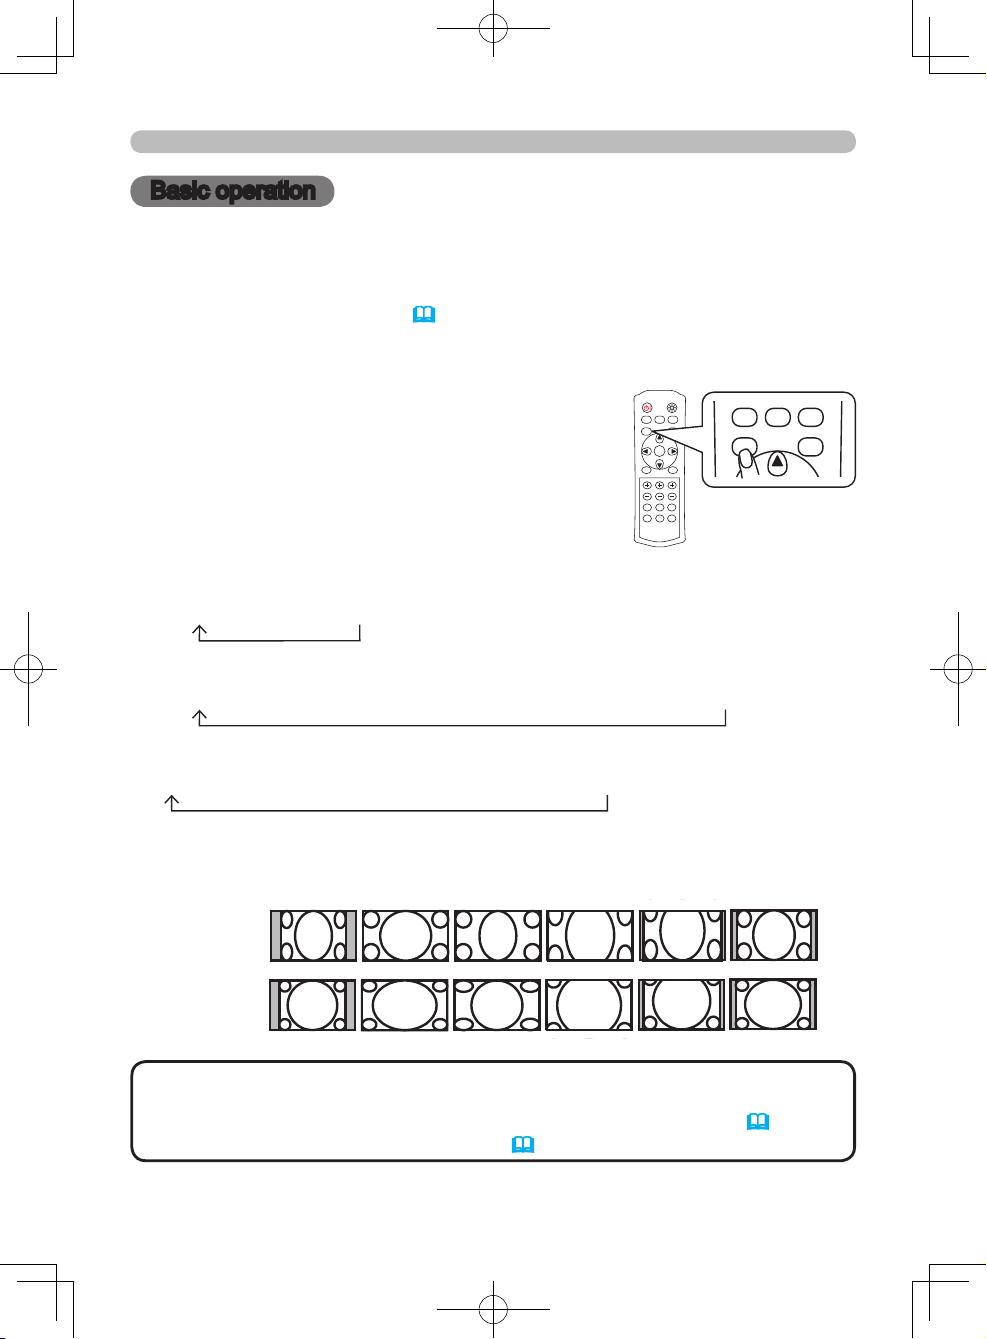
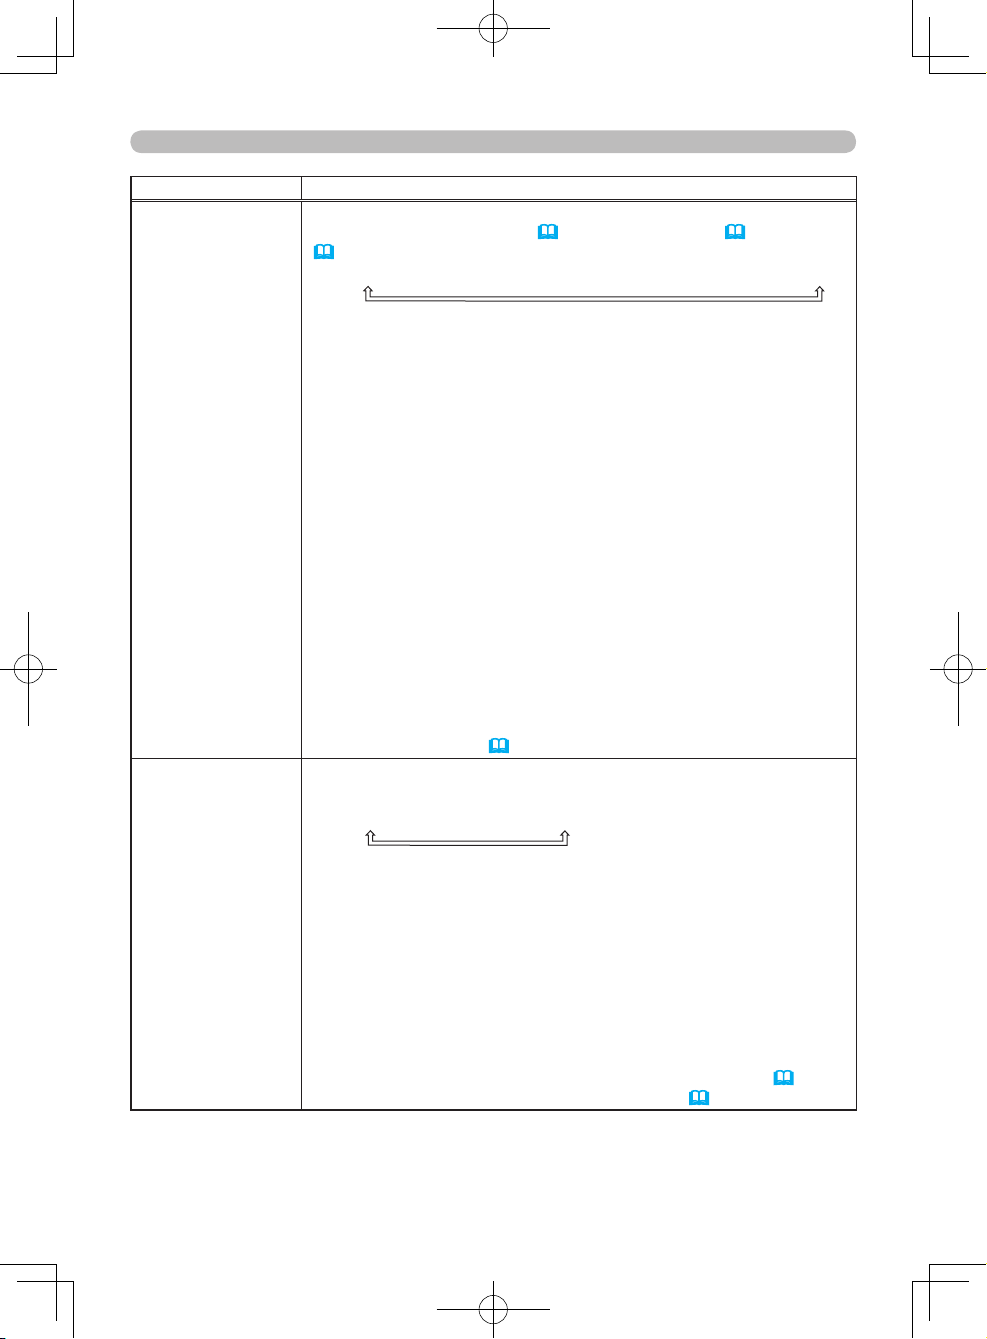
1.
Press the ASPECT button.
Each time the button is pressed the mode will
change and a dialog indicating the selected mode
will be displayed.
ASPECT
ASPECT refers to the aspect ratio modes. The
following aspect ratio modes are available. Select a
mode corresponding to the input signal to be used.
For a computer (RGB) signal
NORMAL
4:3 16:9
For an HDMI signal
NORMAL
4:3 16:9 WIDE MOVIE1 MOVIE2 14:9
For a video, s-video or component video signal
4:3 16:9 WIDE MOVIE1 MOVIE2 → 14:9
For no signal or an unrecognized signal
16:9 (fixed)
• The NORMAL mode uses the signal’s original aspect ratio.
• Performing an automatic adjustment initializes the aspect ratio setting.
• The ASPECT function can also be accessed via the EASY MENU (31) or
the IMAGE menu in the Advanced Menu (43).
NOTE
4:3
NORMAL
4:3 16:9 WIDE MOVIE1 MOVIE2 14:9
16:9
NORMAL
Example for
a 16:9 signal
Example for
a 4:3 signal
POWER LIGHT
BLACK
ASPECT
MENU
BRIGHT CONTRAST COLOR
IRIS
MODE
MEMORY
ENTER
RESET
HDMI
PC
AUTO
COMPO
S-VIDEO
VIDEO
POWER LIGHT
BLACK
ASPECT
MENU
BRIGHT CONTRAST COLOR
IRIS
MODE
MEMORY
ENTER
RESET
HDMI
PC
AUTO
COMPO
S-VIDEO
VIDEO

25
ENGLISH
1.
Press the IRIS button.
The projector will display a dialog to aid you in
adjusting the iris.
Basic operation
IRIS
2.
Use the ▲/▼ cursor buttons to adjust the iris.
3.
To close the dialog and end the operation press the IRIS button again. The
dialog will automatically close after several seconds without user input.
• Pressing the RESET button while the dialog is displayed resets the
adjustment.
• The IRIS function can also be accessed via the PICTURE menu in the
Advanced Menu (41).
NOTE
The iris can be adjusted to suit the brightness of the
surroundings and other conditions.
+10
IRIS
Bright
▲
↕
▼
Dark
POWER LIGHT
BLACK
ASPECT
MENU
BRIGHT CONTRAST COLOR
IRIS
MODE
MEMORY
ENTER
RESET
HDMI
PC
AUTO
COMPO
S-VIDEO
VIDEO
POWER LIGHT
BLACK
ASPECT
MENU
BRIGHT CONTRAST COLOR
IRIS
MODE
MEMORY
ENTER
RESET
HDMI
PC
AUTO
COMPO
S-VIDEO
VIDEO
26
Basic operation
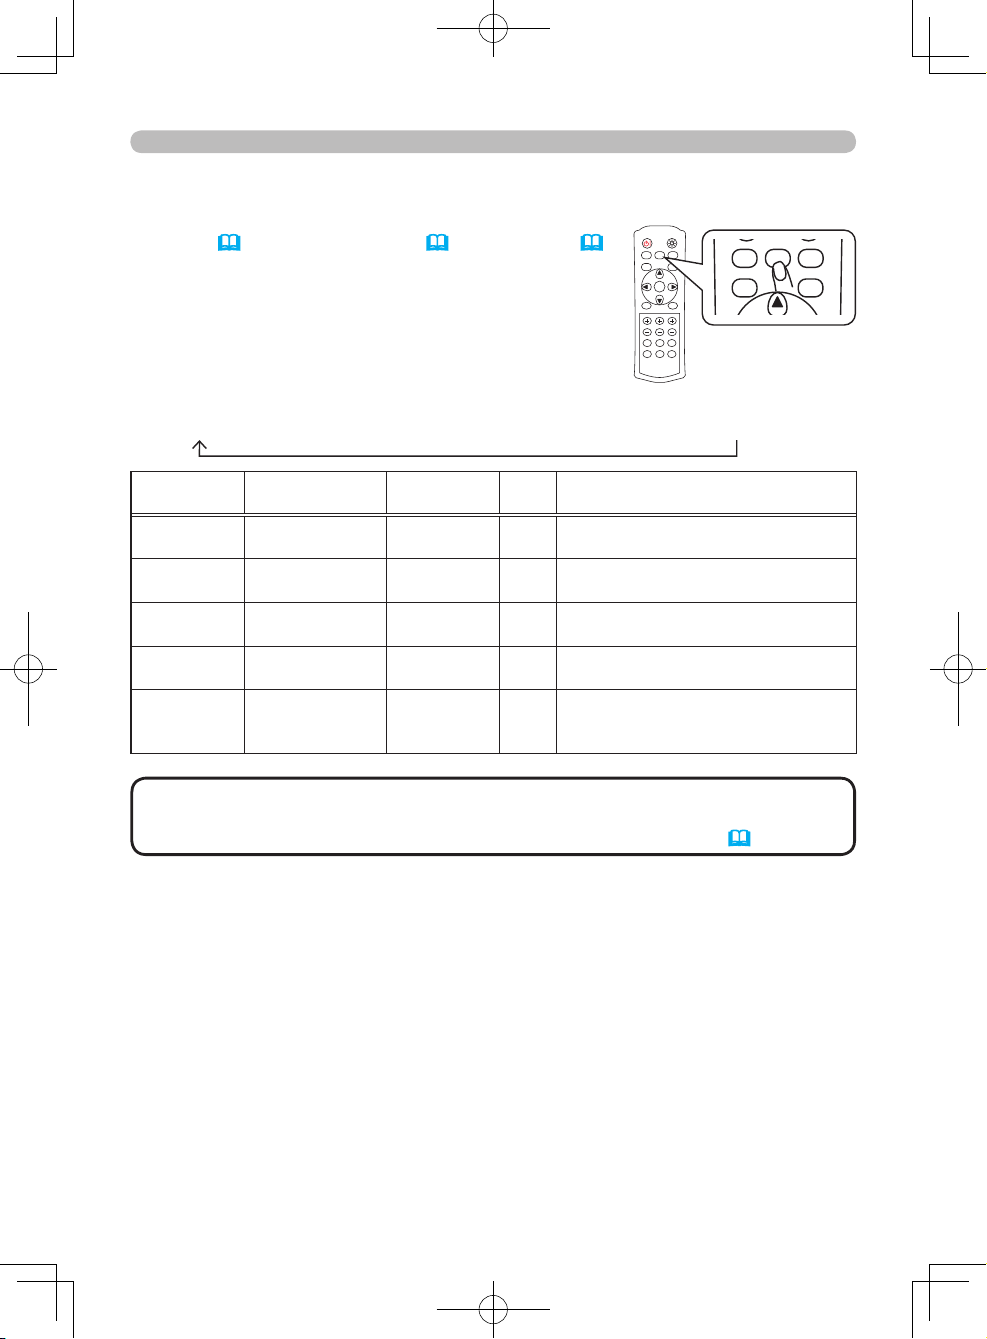
1.
Press the MODE button.
Each time the button is pressed the mode will
change and a dialog indicating the selected mode
will be displayed.
MODE
MODE refers to modes that are a combination of the
GAMMA (37), COLOR TEMP (39), and IRIS (
41) settings as shown in the table below. Select a
mode corresponding to the input signal to be used.
NORMAL CINEMA LOW CINEMA HIGH MUSIC SPORTS
• When the combination of the settings does not correspond with any
pre-set modes, the dialog will display the mode as “CUSTOM”.
• The MODE function can also be accessed via the EASY MENU (32).
NOTE
MODE GAMMA
COLOR
TEMP
IRIS Recommended source
NORMAL ST
ANDARD 7500K 7
For a wide range of sources at
standard picture quality
.
CINEMA
LOW
LOW 6500K 5
Suitable for appreciating movies
with film-like video.
CINEMA
HIGH
HIGH 6500K 5
Suitable for appreciating movies
with sharp, realistic video.
MUSIC HIGH 7500K 7
Suitable for live concerts, music
videos.
SPOR
TS Hi-CONTRAST 9300K 10
Suitable for video that emphasizes
a feeling of contrast: high defi
nition
broadcasts, sports broadcasts.
POWER LIGHT
BLACK
ASPECT
MENU
BRIGHT CONTRAST COLOR
IRIS
MODE
MEMORY
ENTER
RESET
HDMI
PC
AUTO
COMPO
S-VIDEO
VIDEO
POWER LIGHT
BLACK
ASPECT
MENU
BRIGHT CONTRAST COLOR
IRIS
MODE
MEMORY
ENTER
RESET
HDMI
PC
AUTO
COMPO
S-VIDEO
VIDEO
27
ENGLISH
Basic operation
1.
Press the BLACK button.
Each time the button is pressed the mode will
change and a dialog indicating the selected mode
will be displayed.
BLACK
BLACK refers to the auto iris control modes as shown in
the table below. The auto iris is automatically controlled
to adjust the black level according to the mode selected.
TURN OFF AUTO1 AUTO2
BLACK Mode characteristics
TURN OFF The auto iris is always open.
AUT
O1 The auto iris displays a better black for dark images.
AUT
O2 The auto iris displays the best black for dark images.
•
The screen may flicker when the AUTO1 or AUTO2 modes are selected.
• The BLACK function can also be accessed via the EASY MENU (32) or the
PICTURE menu in the Advanced Menu (41).
NOTE
1.
On the remote control press either the or
buttons under the item you want to adjust.
The projector will then display a dialog to aid you
in adjusting the item.
BRIGHTNESS, CONTRAST, COLOR
The brightness, contrast and color can be easily
adjusted to suit your preferences.
2.
Use the and cursor buttons to adjust the
item.
• Pressing the RESET button while the dialog is displayed resets the
adjustment.
• The BRIGHTNESS, CONTRAST and COLOR functions can also be accessed
via the EASY MENU (33) or the PICTURE menu in the Advanced Menu
(37, 40).
• The COLOR function can only be used for video, s-video, component video or
HDMI signals.
NOTE
Bright
↕
Dark
Strong
↕
W
eak
Strong
↕
Weak
+0
BRIGHTNESS
+0
CONTRAST
+0
COLOR
POWER LIGHT
BLACK
ASPECT
MENU
BRIGHT CONTRAST COLOR
IRIS
MODE
MEMORY
ENTER
RESET
HDMI
PC
AUTO
COMPO
S-VIDEO
VIDEO
POWER LIGHT
BLACK
ASPECT
MENU
BRIGHT CONTRAST COLOR
IRIS
MODE
MEMORY
ENTER
RESET
HDMI
PC
AUTO
COMPO
S-VIDEO
VIDEO
POWER LIGHT
BLACK
ASPECT
MENU
BRIGHT CONTRAST COLOR
IRIS
MODE
MEMORY
ENTER
RESET
HDMI
PC
AUTO
COMPO
S-VIDEO
VIDEO
POWER LIGHT
BLACK
ASPECT
MENU
BRIGHT CONTRAST COLOR
IRIS
MODE
MEMORY
ENTER
RESET
HDMI
PC
AUTO
COMPO
S-VIDEO
VIDEO

28
Basic operation
MY MEMORY
This projector provides 4 memories to save user adjustment settings. The
brightness, contrast, color, tint, sharpness and iris adjustment settings, and
selected modes for gamma, color temperature, black, whisper and digital shutter
can be saved to each memory.
You can name and save a maximum of 4 sets of adjustment settings, and the
saved adjustment settings can be named and reloaded later.
To load saved adjustment settings
Note that if the MESSAGE function (
51) is inactive, step 1 in the following
procedure is skipped. The projector will not display any dialog, and will load saved
adjustment settings as soon as the MEMORY button is pressed. Please see step 2.
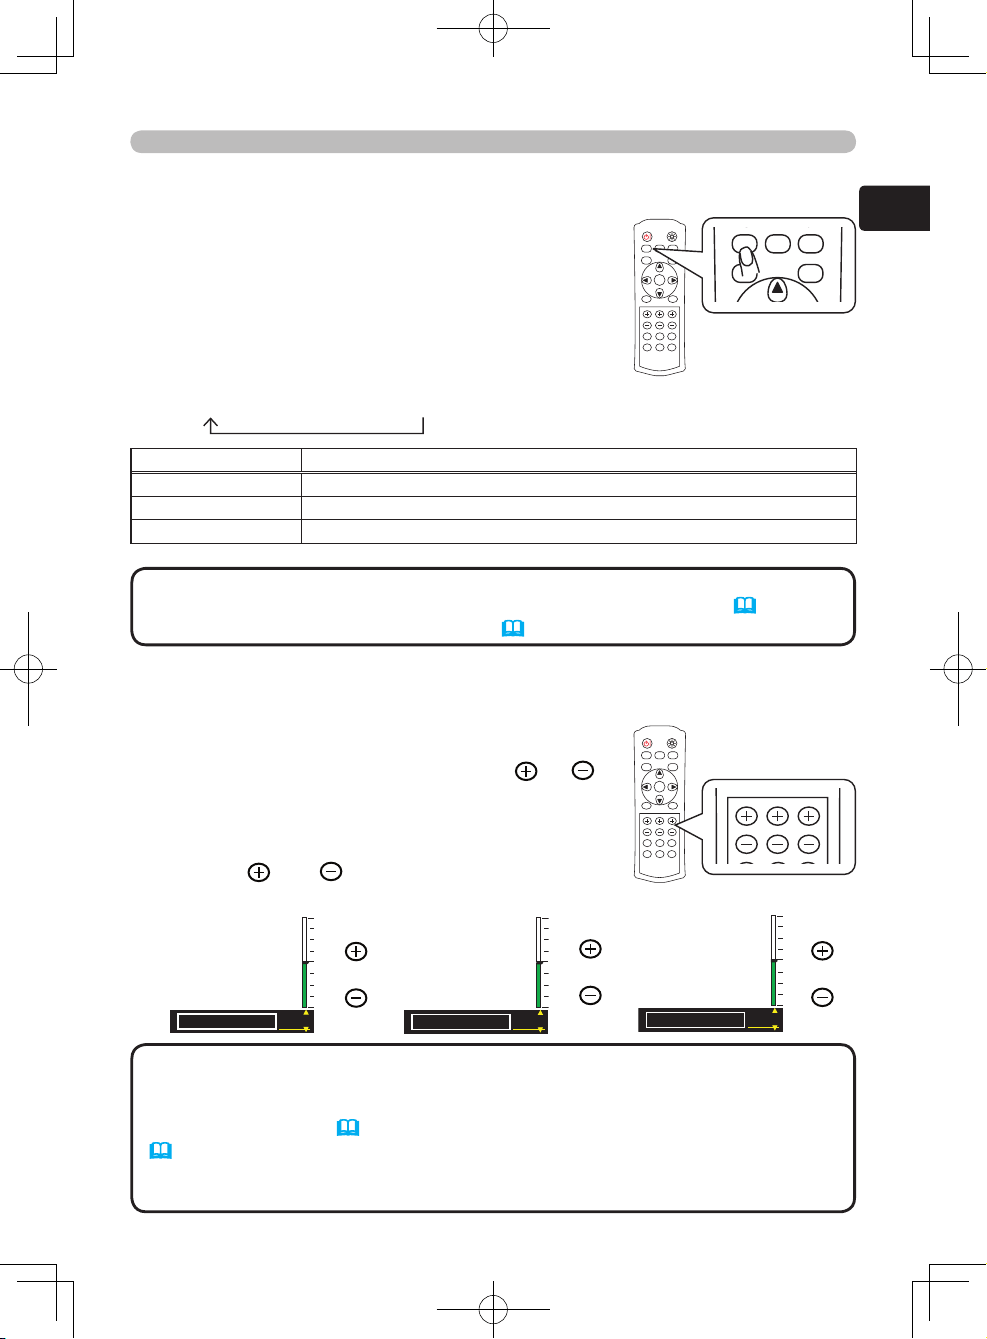
1.
Press the MEMORY button once.
The projector will display a dialog to indicate the current adjustment settings.
When the current adjustment settings are from one of the saved memories a
dialog shows which memory is being used.
When the current settings are not saved to memory the following dialog is
displayed.
2.
To load saved adjustment settings press the MEMORY button.
Each time you press the button, one of the saved adjustments is loaded, in
the following order. Memories in which no data is saved are skipped.
1. CUSTOM-1 2. CUSTOM-2 3. CUSTOM-3 4. CUSTOM-4
When there are no saved adjustment settings the following dialog is displayed.
• Adjustment settings cannot be loaded when there are no saved
adjustment settings.
• The numbers to the left of each memory cannot be changed but the name to
the right can be changed.
• The MY MEMORY function can also be accessed via the PICTURE menu in
the Advanced Menu (41).
NOTE
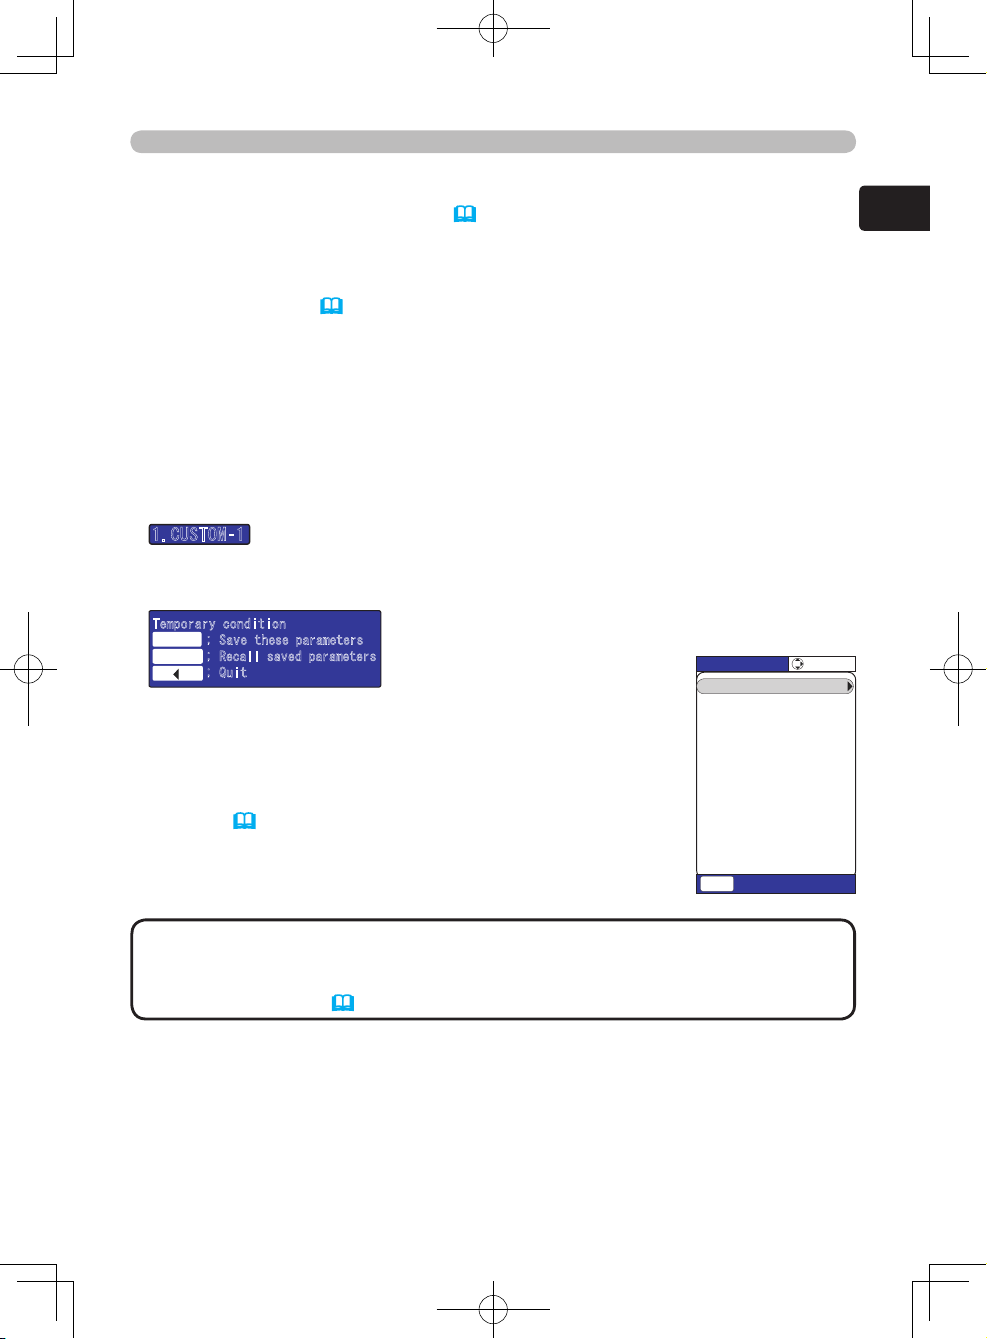
1.CUSTOM‑1
Temporary condition
ENTER ; Save these parameters
MEMORY ; Recall saved parameters
; Quit
ENTER
MEMORY
No saved data
29
ENGLISH
Basic operation
To save adjustment settings
Note that if the MESSAGE function (
51) is inactive, the following procedure
cannot be performed and the projector will load saved adjustment settings as
soon as the MEMORY button is pressed.
When the MESSAGE function is inactive please use the MY MEMORY function in
the PICTURE menu (42) to save adjustment settings.
When the MESSAGE function is active, the MY MEMORY menu can be displayed
using the following procedure. The MY MEMORY menu displayed is the same as
in the PICTURE menu. You cannot only save adjustment settings but also change
and rename previously saved adjustment settings via this menu.
1.
When the current adjustment settings are from one of the saved memories a
dialog shows which memory is being used.
When the current settings are not saved to memory the following dialog is
displayed.
2.
Press the ENTER button while the dialog is displayed to
open the MY MEMORY menu and save to the currently
selected memory.
• The numbers to the left of each memory cannot be changed but the
name to the right can be changed.
• The MY MEMORY function can also be accessed via the PICTURE menu in
the Advanced Menu (42).
NOTE
Press the MEMORY button once.
The projector will display a dialog to indicate the current adjustment settings.
3.
Please refer to the MY MEMORY item under PICTURE
menu (42) for more information on using the MY
MEMORY menu.
1.CUSTOM‑1
Temporary condition
ENTER ; Save these parameters
MEMORY ; Recall saved parameters
; Quit
ENTER
MEMORY
MY MEMORY
SHARPNESS +3
BRIGHTNESS +0
CONTRAST +0
COLOR +0
TINT +0
COLOR TEMP 6500K
GAMMA STANDARD
IRIS 10
BLACK TURN OFF
DIGITAL SHUTTER
TURN OFF
WHISPER NORMAL
:SELECT
NAME CUSTOM‑1
:QUIT
MENU
SAVE
30
EASY MENU
EASY MENU
This projector has various functions intended to improve picture quality. The EASY
MENU provides quick and easy access to the most useful of these functions.
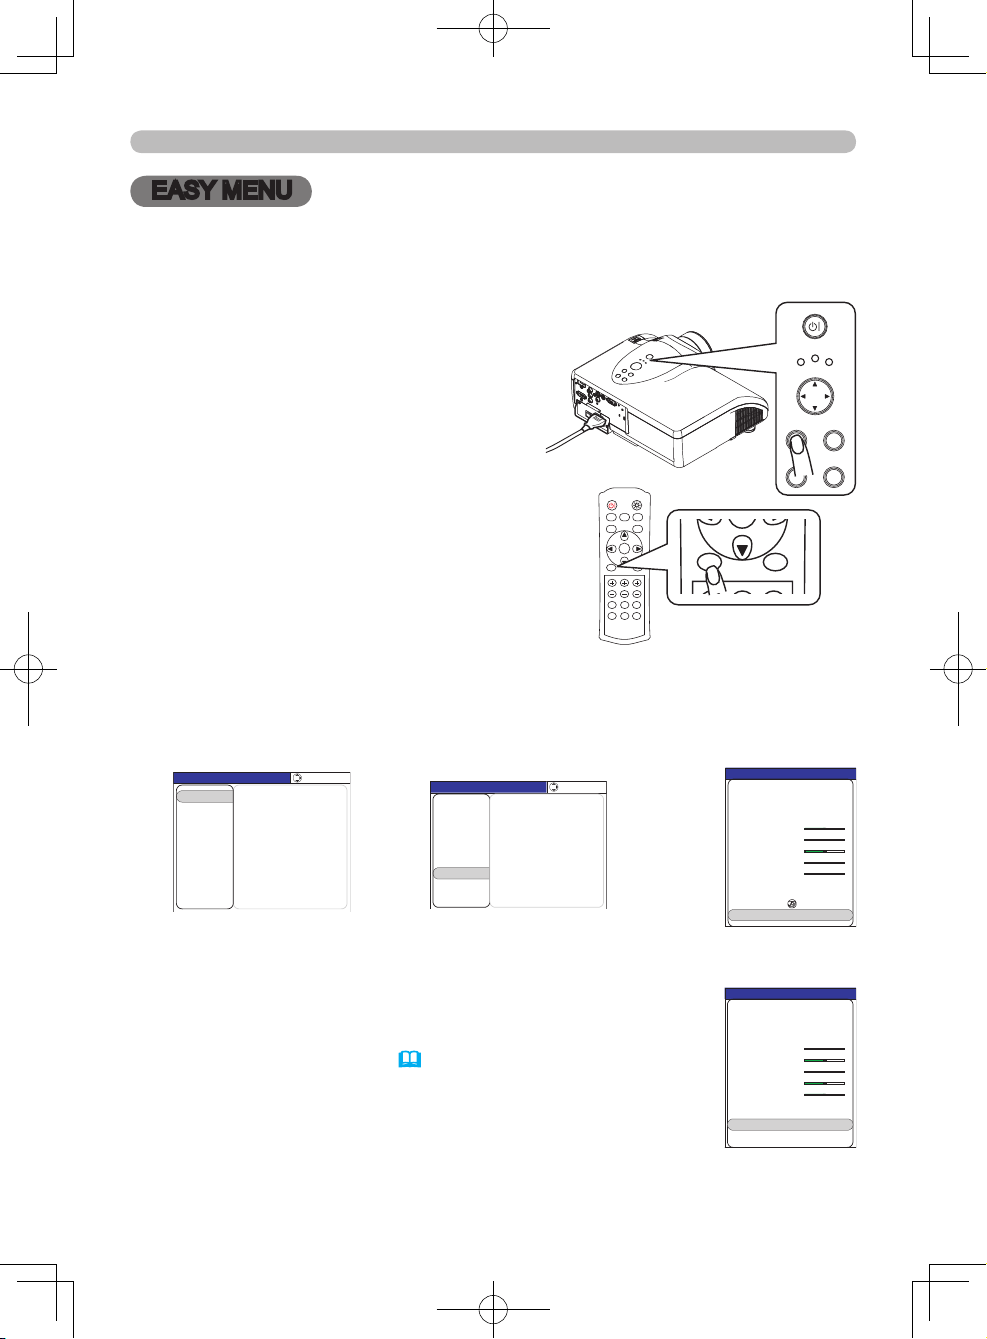
1.
To display a menu when no menu is
currently displayed
Press the MENU button and a menu will be
displayed. Alternatively, pressing one of the
▲/▼/◄/► cursor buttons will also display a
menu.
The tall menu is the EASY MENU. The
wide menu is the Advanced Menu.
EASY MENU operation
Follow the procedure below to use the EASY MENU.
2.
To switch from the Advanced Menu to the EASY MENU
(1)
If the yellow highlight bar is in the right column of the Advanced Menu, press
the ◄ cursor button to move the yellow highlight bar to the left column.
(2) Move the yellow highlight bar onto the “EASY MENU” item using the ▲/▼
cursor buttons, then press the ► cursor button or the ENTER button.
The EASY MENU item is always the bottom item in the left column of the
Advanced Menu. Even if the menu is displayed in another language, choosing the
bottom item in the left column will switch to the EASY
MENU.
3.
To change the display language
The display language can be changed using the LANGUAGE
item in the EASY MENU (34).
Even if the menu is displayed in another language, the
LANGUAGE item will always be the 2nd item from the
bottom in the EASY MENU.
4.
To select an item
Move the yellow highlight bar onto the item you want to select using the ▼/▲
cursor buttons.
►/
ENTER
▲/▼
MENU [COMPONENT]
IMAGE
SETUP
PICTURE
INPUT
OPTION
EASY MENU
SCREEN
SHARPNESS +0
BRIGHTNESS +0
CONTRAST +0
COLOR +0
TINT +0
COLOR TENP 6500K
GAMMA STANDARD
IRIS 10
MY MEMORY CUSTOM‑1
:SELECT
BLACK TURN OFF
MENU [COMPUTER]
IMAGE
SETUP
PICTURE
INPUT
OPTION
EASY MENU
SCREEN
:SELECT
Go To Easy Menu...
E ASY M E NU
CONTRAST
ASPECT 4:3
BLACK TURN OFF
BRIGHTNESS
MODE NORMAL
COLOR
+0
+0
+0
TINT
+0
SHARPNESS
+3
RESET
LANGUAGE ENGLISH
MIRROR NORMAL
Go To Advance Menu...
E A SY M E NU
CONTRAST
ASPECT 4:3
BLACK TURN OFF
BRIGHTNESS
MODE NORMAL
COLOR
+0
+0
+0
TINT
+0
SHARPNESS
+3
RESET
Go To Advance Menu...
MIRROR NORMAL
LANGUAGE ENGLISH
POWER
MENU
ENTER
LAMP
TEMP
STANDBY/ON
INPUT
RESET
POWER LIGHT
BLACK
ASPECT
MENU
BRIGHT CONTRAST COLOR
IRIS
MODE
MEMORY
ENTER
RESET
HDMI
PC
AUTO
COMPO
S-VIDEO
VIDEO
POWER LIGHT
BLACK
ASPECT
MENU
BRIGHT CONTRAST COLOR
IRIS
MODE
MEMORY
ENTER
RESET
HDMI
PC
AUTO
COMPO
S-VIDEO
VIDEO
31
ENGLISH
EASY MENU
5.
To operate the selected item
Use the ◄/► cursor buttons to operate the item. For details please see the
following descriptions.
6.
To reset the operation
Press the RESET button while the item is selected.
(Does not reset the LANGUAGE item.)
7.
To close the menu
Press the MENU button to close the menu. The menu will automatically close
after several seconds without user input.
EASY MENU functions
The following functions are accessible via the EASY MENU. After selecting
an item according to the procedure described in the preceding “EASY MENU
operation” section, refer to the following table for details on operating the selected
item.
Item Description
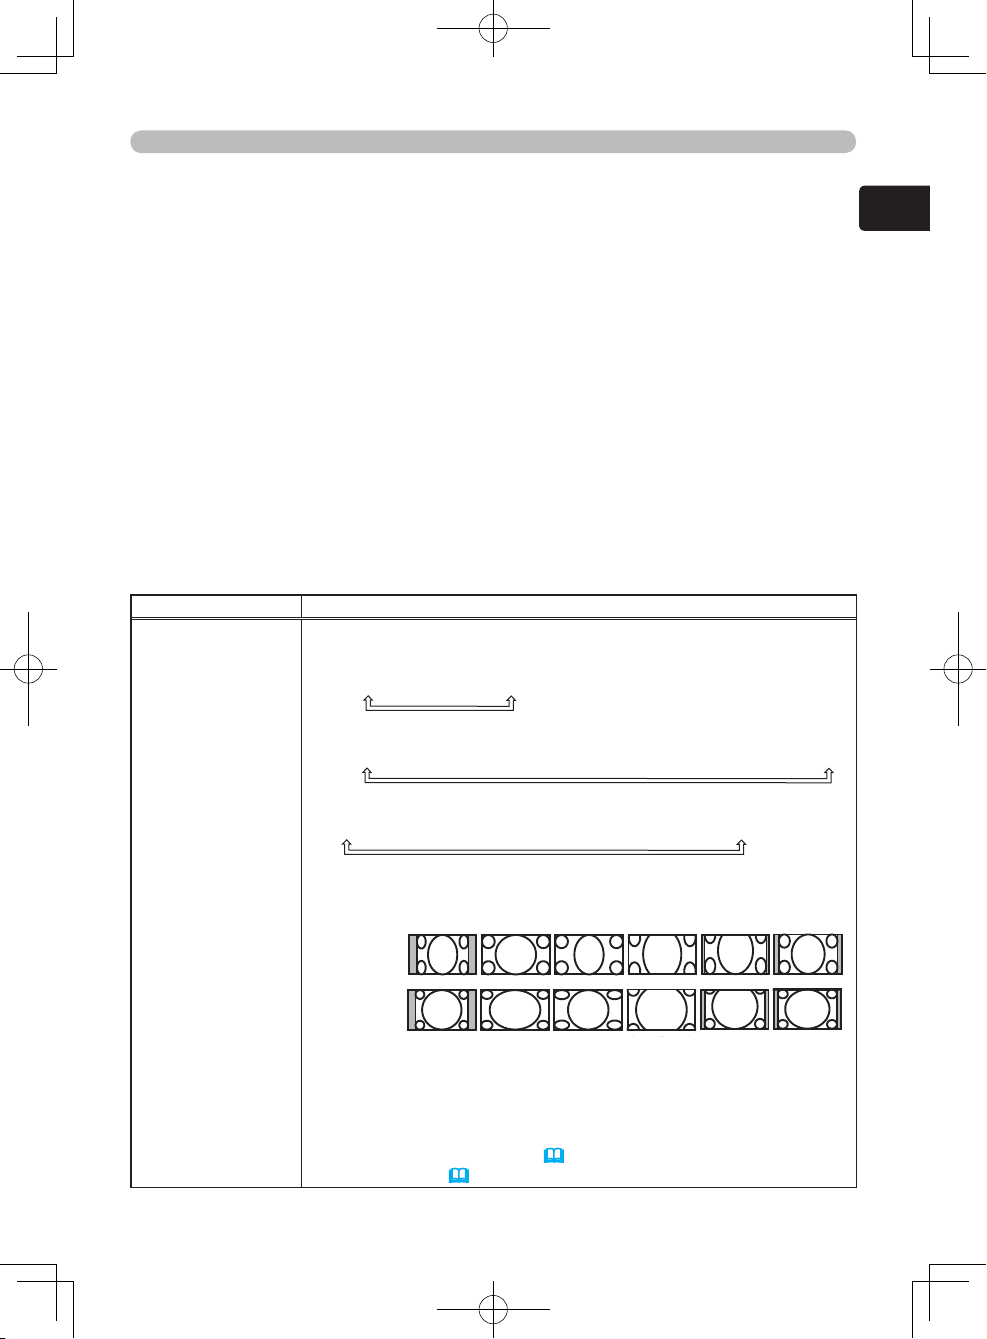
ASPECT
Using the ◄/► cursor buttons changes the aspect ratio.
For a computer (RGB) signal
NORMAL
4:3
16:9
For an HDMI signal
NORMAL
4:3
16:9
WIDE
MOVIE1
MOVIE2
14:9
For a video, s-video or component video signal
4:3
16:9
WIDE
MOVIE1
MOVIE2
14:9
For no signal or an unrecognized signal
16:9 (fixed)
- NOTE -
• The NORMAL mode uses the signal’s original aspect ratio.
• Performing an automatic adjustment initializes the aspect ratio
setting.
• The ASPECT function can also be accessed using the ASPECT
button on the remote control (
24) or via the IMAGE menu in the
Advanced Menu (
43).
(Continued on next page)
4:3
NORMAL
4:3 16:9 WIDE MOVIE1 MOVIE2 14:9
16:9
NORMAL
Example for
a 16:9 signal
Example for
a 4:3 signal
32
EASY MENU
Item Description
MODE
Using the ◄/► cursor buttons changes the mode which is a
combination of the GAMMA
(
37), COLOR TEMP (39) and IRIS
(
41) settings as explained below.
NORMAL
CINEMA
LOW
CINEMA HIGH
MUSIC
SPORTS
NORMAL
GAMMA
= STANDARD, COLOR TEMP = 7500K, IRIS = 7
Suitable for a wide range of sources at standard picture quality.
CINEMA LOW
GAMMA
= LOW, COLOR TEMP = 6500K, IRIS = 5
Suitable for appreciating movies with fi
lm-like video
CINEMA HIGH
GAMMA
= HIGH, COLOR TEMP = 6500K, IRIS =5
Suitable for appreciating movies with sharp, realistic video.
MUSIC
GAMMA
= HIGH, COLOR TEMP = 7500K, IRIS = 7
Suitable for live concerts, music videos
SPORTS
GAMMA
= Hi-CONTRAST, COLOR TEMP = 9300K, IRIS = 10
Suitable for video that emphasizes a feeling of contrast: high
definition broadcasts, sports broadcasts
- NOTE -
•
When the combination of the settings does not correspond with any
pre-set modes, the dialog will be display the mode as “CUSTOM”.
• The MODE function can also be accessed using the MODE button
on the remote control (
26).
BLACK
Us
ing the ◄/► cursor buttons changes the auto iris control mode as
follows.
TURN OFF
AUTO1
AUTO2
TURN OFF
The auto iris is always open.
AUTO1
The auto iris displays a better black for dark images.
AUTO2
The auto iris displays the best black for dark images.
- NOTE -
• The screen may flicker when the AUTO1 or AUTO2 modes are
selected.
• The BLACK function can also be accessed using the BLACK
button and the ▼/▲ cursor buttons on the remote control (
27) or
via the PICTURE menu in the Advanced Menu (
32).
(Continued on next page)
33
ENGLISH
EASY MENU
Item Description
BRIGHTNESS
Using the ◄/► cursor buttons adjusts the picture.
Darker
Brighter
- NOTE -
• The BRIGHTNESS function can also be accessed using the
BRIGHT
buttons on the remote control (
27) or via the PICTURE
menu in the Advanced Menu (
37).
CONTRAST
Using the ◄/► cursor buttons adjusts the picture.
W
eaker
Stronger
- NOTE -
• The CONTRAST function can also be accessed using the
CONTRAST
buttons on the remote control (
27) or via the
PICTURE menu in the Advanced Menu (
37).
COLOR
Using the ◄/► cursor buttons adjusts the picture.
W
eaker
Stronger
- NOTE -
• The COLOR function can only be used for video, s-video,
component video or HDMI signals.
• The COLOR function can also be accessed using the COLOR
buttons on the remote control (
27) or via the PICTURE menu in
the Advanced Menu (
40).
TINT
Using the ◄/► cursor buttons adjusts the picture.
Reddish
Greenish
- NOTE -
• The TINT function can only be used for video, s-video, component
video or HDMI signals.
• The TINT function can also be accessed via the PICTURE menu in
the
Advanced Menu (
40).
SHARPNESS
Using the ◄/► cursor buttons adjusts the picture.
W
eaker
Stronger
- NOTE -
•
The SHARPNESS function can also be accessed via the PICTURE
menu in the Advanced Menu (
40).
MIRROR
Using the ◄/► cursor buttons changes the mirror mode.
NORMAL
H:INVERT
V
:INVERT
H&V:INVERT
- NOTE -
• The MIRROR function can also be accessed via the SETUP menu
in the
Advanced Menu (
48).
(Continued on next page)
34
EASY MENU
Item Description
RESET
Using this function resets all items in the EASY
MENU except the
LANGUAGE item.
Pressing the ► cursor button displays a confi
rmation dialog.
To reset press the ▼ cursor button.
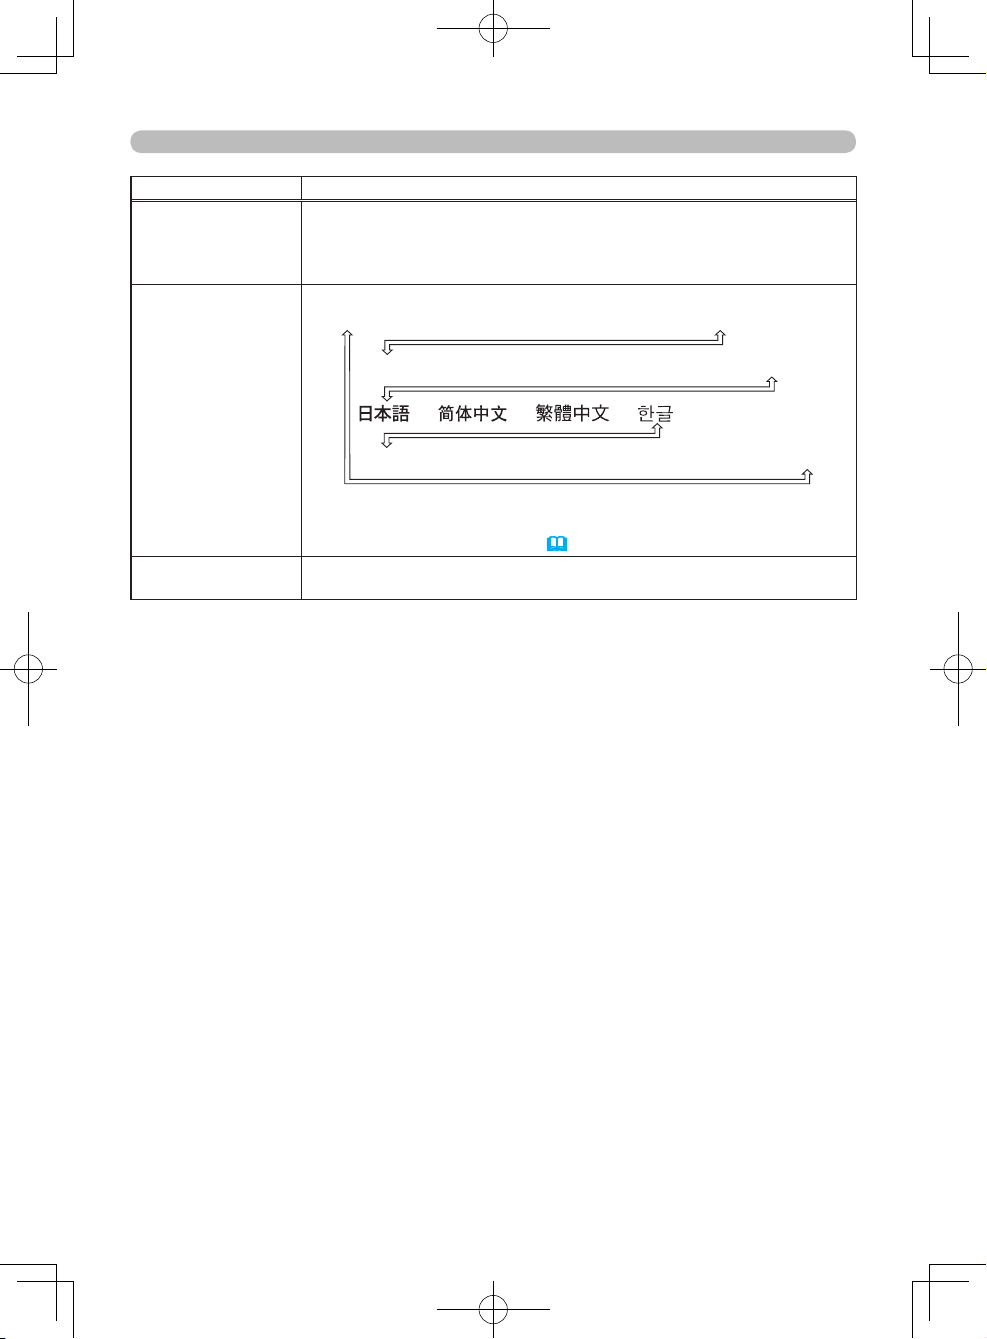
LANGUAGE
Using the ◄/► cursor buttons changes the display language.
ENGLISH
FRANÇAIS
DEUTSCH
ESP
AÑOL
ITALIANO
NORSK
NEDERLANDS
PORTUGUÊS
SVENSKA
Р
УССКИЙ
SUOMI
POLSKI
TÜRKÇE
- NOTE -
• The LANGUAGE function can also be accessed via the SCREEN
menu in the
Advanced Menu (
49).
Go To Advance
Menu
Pressing the ► cursor button switches to the
Advanced Menu.
35
ENGLISH
Advanced Menu
Advanced Menu
The Advanced Menu provides access to advanced features, grouped into 6 sub-
menus (PICTURE, IMAGE, INPUT, SETUP, SCREEN and OPTION) for more
precise picture control.
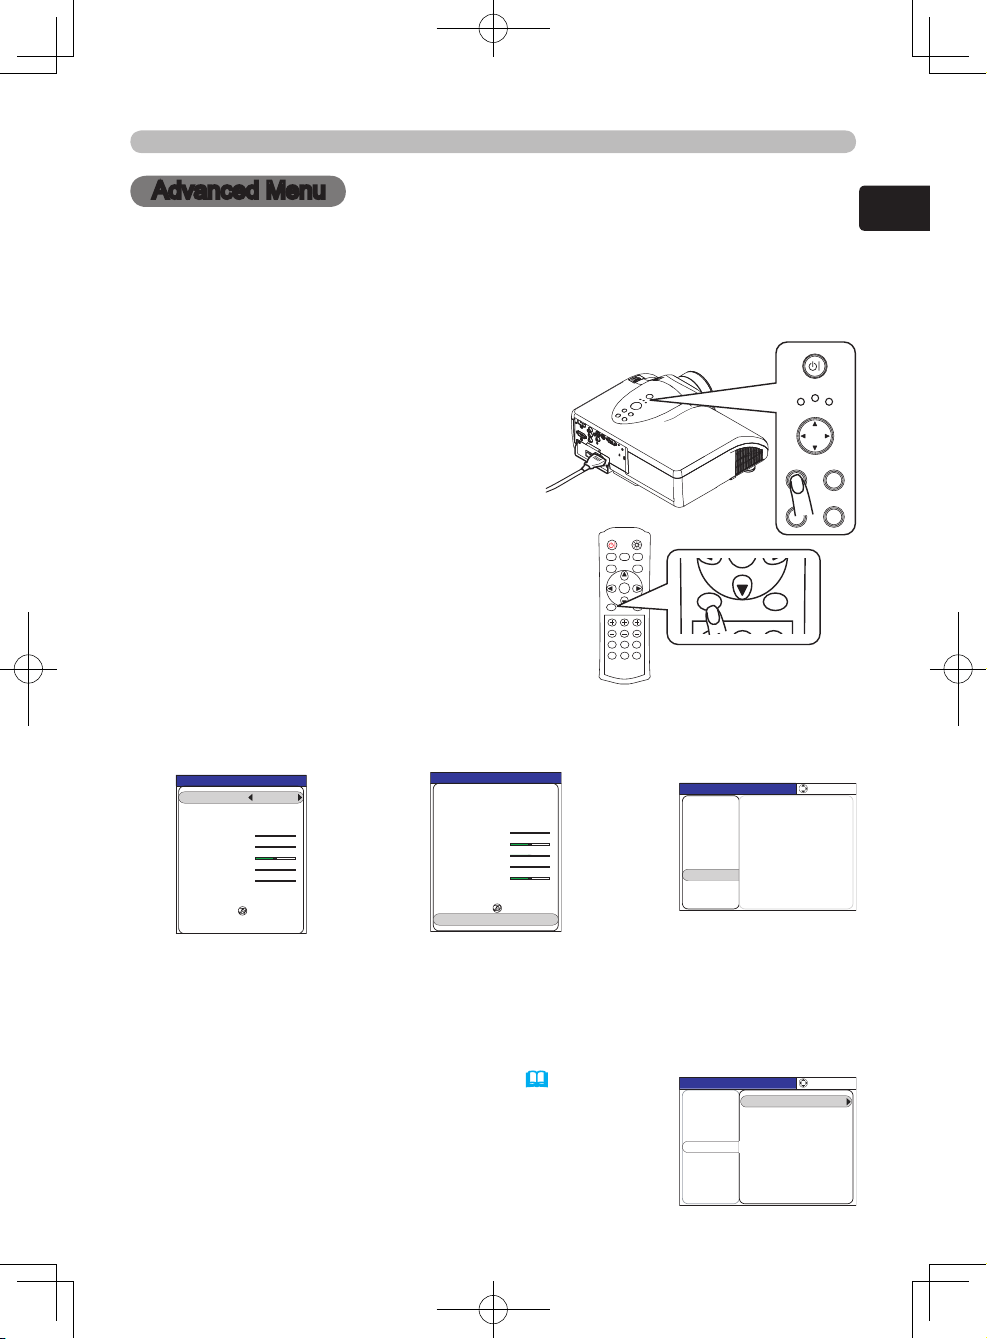
1.
To display a menu when no menu is
currently displayed
Press the MENU button and a menu will
be displayed. Alternatively, pressing one
of the ▲/▼/◄/► cursor buttons will also
display a menu.
The tall menu is the EASY MENU. The
wide menu is the Advanced Menu.
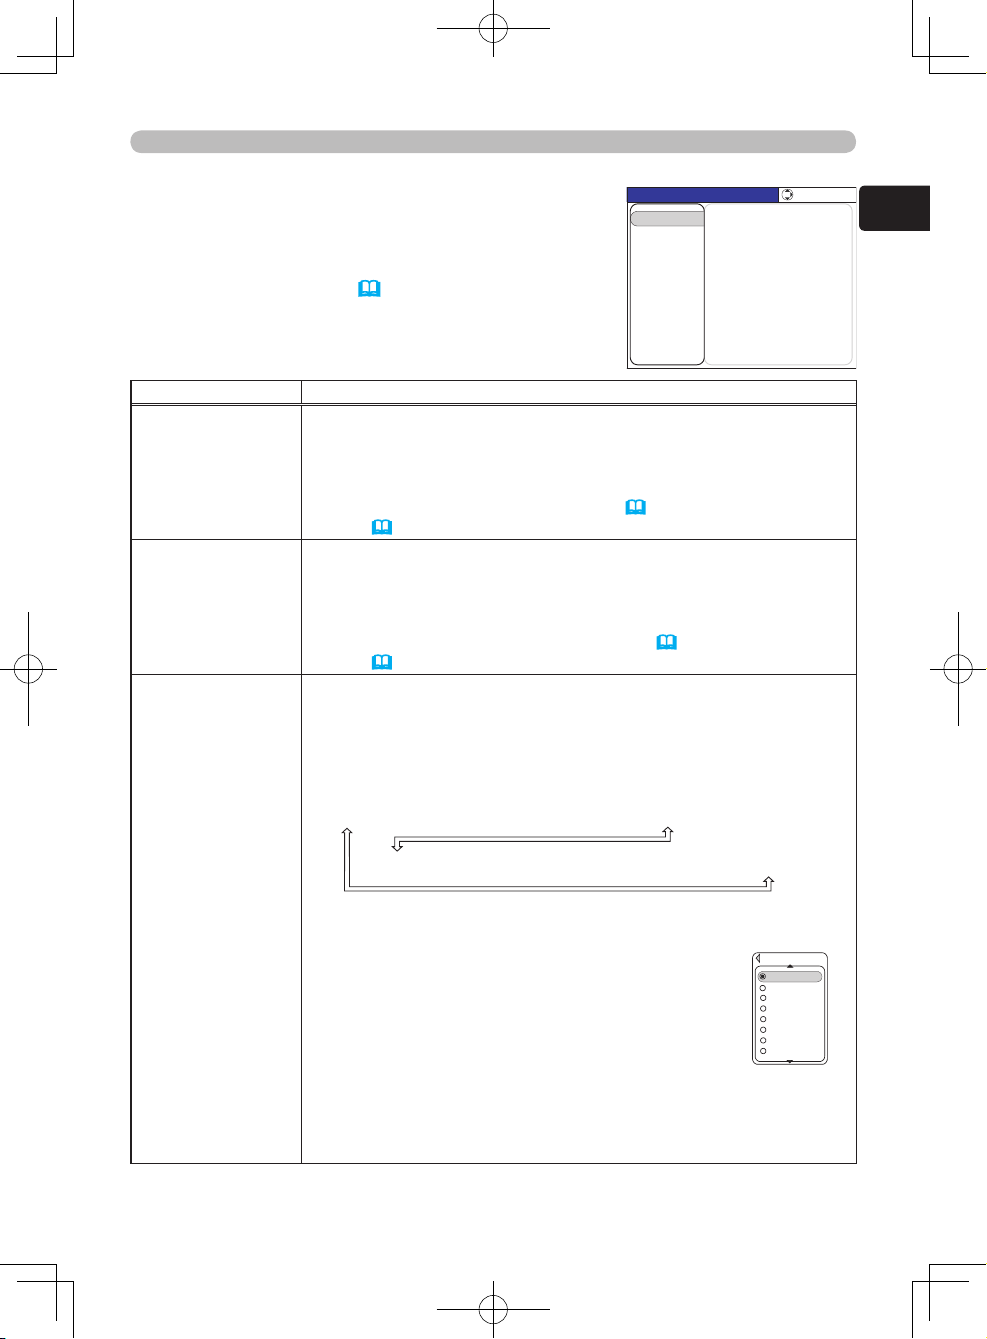
Advanced Menu operation
Follow the procedure below to use the Advanced Menu.
2.
To switch from the EASY MENU to the Advanced Menu
Move the yellow highlight bar onto the “Go To Advanced Menu…” item using the
▲/▼ cursor buttons, then press the ► cursor button or the ENTER button.
The “Go To Advance Menu…” item is always the bottom item in the EASY MENU.
Even if the menu is displayed in another language, choosing the bottom item in
the left column will switch to the Advanced Menu.
3.
To change the display language
The display language can be changed using the LANGUAGE item on the
SCREEN menu in the Advanced Menu (49).
Even if the menu is displayed in another language,
the SCREEN menu will always be the 5th item from
the top in the left column of the Advanced Menu and
the LANGUAGE item will always be the top item in the
SCREEN menu.
►/
ENTER
▲/▼
E ASY M E NU
CONTRAST
ASPECT 4:3
BLACK TURN OFF
BRIGHTNESS
MODE NORMAL
COLOR
+0
+0
+0
TINT
+0
SHARPNESS
+3
RESET
LANGUAGE ENGLISH
Go To Advance Menu...
MIRROR NORMAL
E ASY M E NU
CONTRAST
ASPECT 4:3
BLACK TURN OFF
BRIGHTNESS
MODE NORMAL
COLOR
+0
+0
+0
TINT
+0
SHARPNESS
+3
RESET
LANGUAGE ENGLISH
MIRROR NORMAL
Go To Advance Menu...
MENU [COMPUTER]
IMAGE
SETUP
PICTURE
INPUT
OPTION
EASY MENU
SCREEN
:SELECT
Go To Easy Menu...
MENU [COMPUTER]
IMAGE
SETUP
PICTURE
INPUT
OPTION
EASY MENU
SCREEN
LANGUAGE ENGLISH
MENU POSITION
START UP ORIGINAL
OSD BRIGHT. 5
:SELECT
MyScreen
MyScreen Lock TURN OFF
MESSAGE TURN ON
DIGITAL SHUTTER TURN ON
PICTURE SHIFT
POWER
MENU
ENTER
LAMP
TEMP
STANDBY/ON
INPUT
RESET
POWER LIGHT
BLACK
ASPECT
MENU
BRIGHT CONTRAST COLOR
IRIS
MODE
MEMORY
ENTER
RESET
HDMI
PC
AUTO
COMPO
S-VIDEO
VIDEO
POWER LIGHT
BLACK
ASPECT
MENU
BRIGHT CONTRAST COLOR
IRIS
MODE
MEMORY
ENTER
RESET
HDMI
PC
AUTO
COMPO
S-VIDEO
VIDEO
36
Advanced Menu
4.
To select a menu
(1) If the yellow highlight bar is in the right column of the Advanced Menu,
press the ◄ cursor button to move the yellow highlight bar to the left
column.
(2) Move the yellow highlight bar onto the title of the menu you want to select
using the ▼/▲ cursor buttons. The menu items will be shown in the right
column of the Advanced Menu.
Then press the ► cursor button or ENTER button.
5.
To reset the menu settings
All the settings of the selected menu can be initialized at the same time,
except settings where the current setting is always considered the default
setting. (MY MEMORY, LANGUAGE, MyScreen Lock, LAMP TIME, FILTER
TIME etc.)
(1) Press the RESET button while yellow highlight bar is on the title of the
menu and a confirmation dialog will be displayed.
(2) To reset press the ▲ cursor button.
6.
To select an item
Move the yellow highlight bar onto the item you want to select using the ▼
/▲ cursor buttons. Then press the cursor ► button or ENTER button, and a
dialog or sub-menu will appear.
7.
To operate the selected item
Use the ▲/▼/◄/► cursor buttons according to the dialog or sub-menu. For
more details please see the following descriptions of each item.
8.
To reset the operation
Press the RESET button while the dialog or sub-menu is displayed.
(Except for MY MEMORY, AUTO ADJUST, INFORMATION, LANGUAGE,
MyScreen Lock, LAMP TIME, FILTER TIME and SERVICE.)
9.
To close the menu
Press the MENU button to close the menu. The menu will automatically close
after several seconds without user input.
37
ENGLISH
Advanced Menu (PICTURE menu)
PICTURE menu
The following functions are accessible via the
PICTURE menu. After selecting an item according to
the procedure described in the preceding “Advanced
Menu operation” section (35), refer to the following
table for details on operating the selected item.
Item Description
BRIGHTNESS
Using the ▲/▼ cursor buttons adjusts the picture.
Brighter
Darker
- NOTE -
• The BRIGHTNESS function can also be accessed using the
BRIGHT
buttons on the remote control (
27) or via the EASY
MENU (
33).
CONTRAST
Using the ▲/▼ cursor buttons adjusts the picture.
Stronger
W
eaker
- NOTE -
• The CONTRAST function can also be accessed using the
CONTRAST
buttons on the remote control (
27) or via the EASY
MENU (
33).
GAMMA
This projector provides 4 pre-set modes and 4 custom gamma
modes.
T
o select a mode
Using the ▲/▼ cursor buttons in the GAMMA menu changes the
gamma mode. The mode that the yellow highlight bar is on is the
currently selected mode.
ST
ANDARD
LOW
HIGH
Hi-CONTRAST
CUST
OM-1
CUST
OM-2
CUSTOM-3
CUSTOM-4
STANDARD
Suitable for a wide range of sources.
LOW
This mode emphasizes the reproducibility of lower
tones.
HIGH
This mode emphasizes the reality of the image.
Hi-CONTRAST
This mode emphasizes the contrast of the image.
CUSTOM-1, CUSTOM-2, CUSTOM-3, CUSTOM-4
These modes can be customized based on one of the pre-set
modes.
(Continued on next page)
MENU [COMPONENT]
IMAGE
SETUP
PICTURE
INPUT
OPTION
EASY MENU
SCREEN
SHARPNESS +0
BRIGHTNESS +0
CONTRAST +0
COLOR +0
TINT +0
COLOR TENP 6500K
GAMMA STANDARD
IRIS 10
MY MEMORY CUSTOM‑1
:SELECT
BLACK TURN OFF
STANDARD
L
OW
H
IGH
Hi‑CONTRAST
GAMMA
CUSTOM‑1
CUSTOM‑2
CUSTOM‑3
CUSTOM‑4
38
Advanced Menu (PICTURE menu)
Item Description
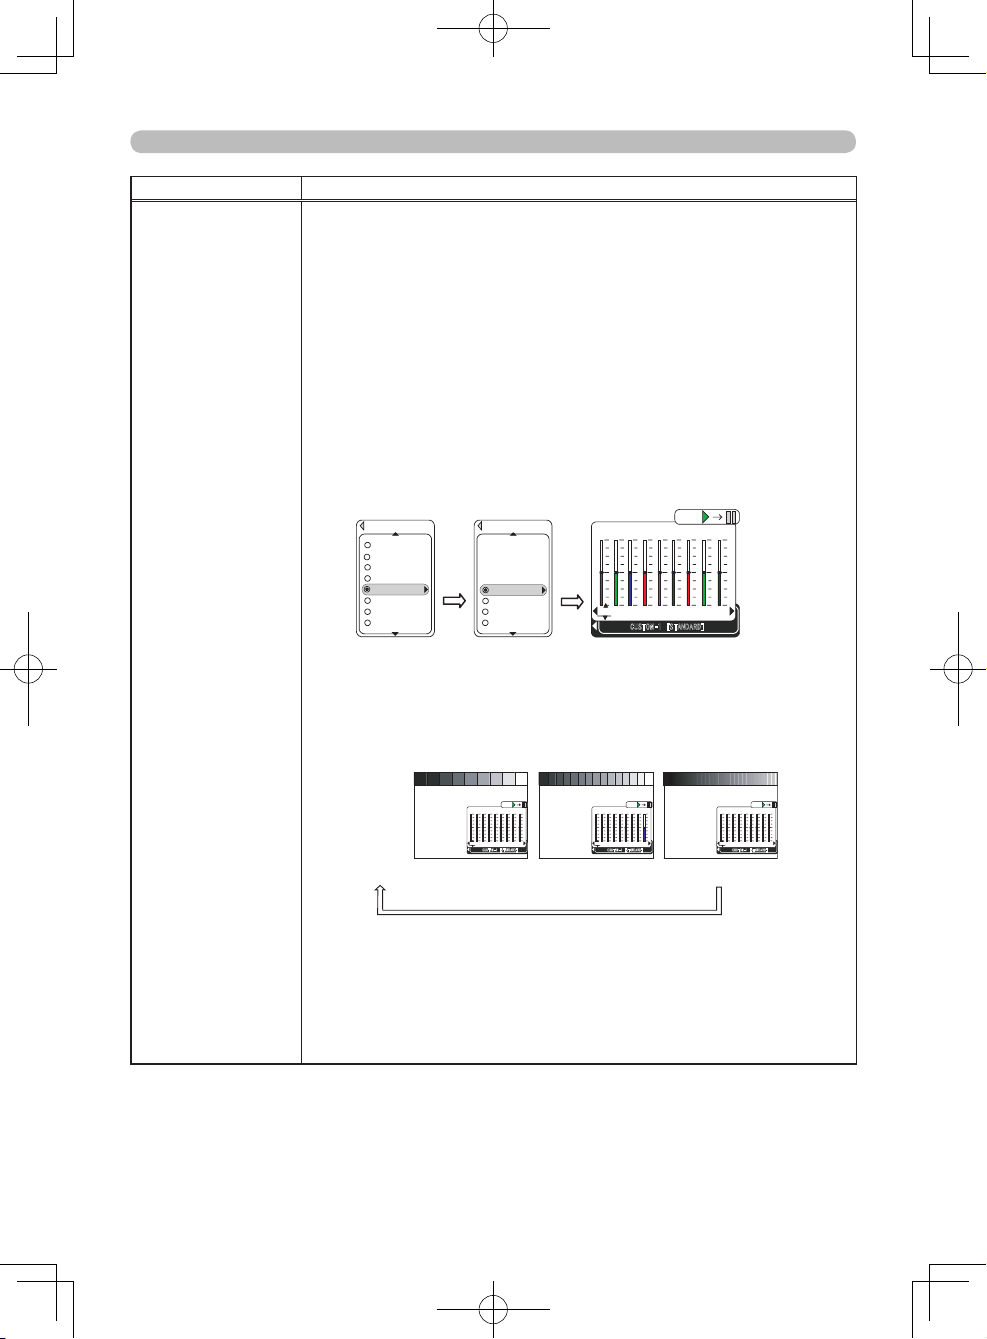
Continuation of
"GAMMA"
T
o adjust a CUSTOM mode
(1) Select one of the CUSTOM modes to adjust using the ▲/▼
cursor buttons. Then press the ► cursor button to display the
CUSTOM dialog.
(2) Select the base mode to be adjusted using the ▲/▼ cursor
buttons.
Note that changing the base mode and pressing the ► cursor
button in the CUST
OM dialog will erase the current settings
of the selected mode. If you want to keep the settings, please
press the ◄ cursor button to return to the preceding menu, and
select a dif
ferent CUSTOM mode.
Then press the ► cursor button to display a dialog with 9
adjustment bars. Each bar corresponds to the tone of each of 9
gamma steps.
The names of selected mode and the base mode
are shown at the bottom of the dialog.
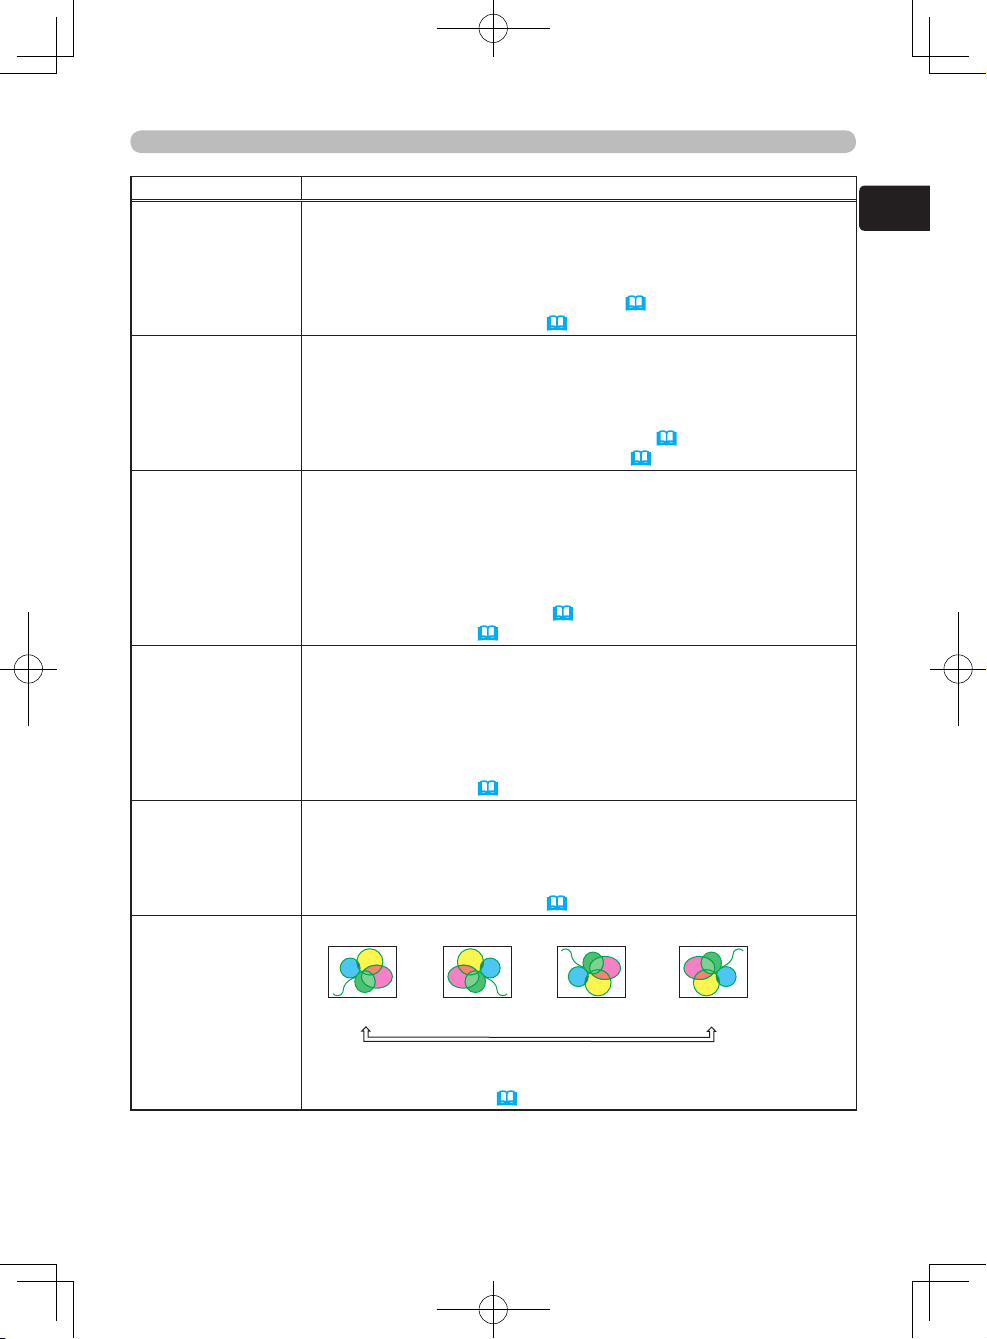
(3)
Pressing the ENTER button while the dialog is displayed displays
a test pattern to aid in adjusting.
This projector has 3 types of test pattern. Each time you press
the ENTER button, the test pattern is changed.
Each part of the 9 step gray scale is linked to the corresponding
adjustment bar in the dialog.
(no display)
9 step
15 step
Ramp
gray scale gray scale
(4)
Select the adjustment bar for the step to adjust using the ◄/►
cursor buttons.
Note that pressing the cursor ◄ button while the number 1
adjustment bar is selected closes the dialog and returns to the
GAMMA
menu.
(5) Adjust the tone of the selected step using the ▲/▼ cursor
buttons.
(Continued on next page)
LOW
HIGH
Hi‑CONTRAST
GAMM A
CUSTOM‑2
CUSTOM‑3
CUSTOM‑4
CUSTOM‑1
STANDARD
► ►
MIDDLE
CUSTOM
LOW
+0
+0 +0 +0 +0 +0 +0
CUSTOM‑1 [STANDARD]
ENTER:
+0
+0
1 2 3 4 5 6 7 8 9
the reference
CUSTOM‑1
Select
LOW
HIGH
Hi‑CONTRAST
STANDARD
MIDDLE
CUSTOM
LOW
+0
+0 +0 +0 +0 +0 +0
CUSTOM‑1 [STANDARD]
ENTER:
+0
+0
1 2 3 4 5 6 7 8 9
MIDDLE
CUSTOM
LOW
+0
+0 +0 +0 +0 +0 +0
CUSTOM‑1 [STANDARD]
ENTER:
+0
+0
1 2 3 4 5 6 7 8 9
MIDDLE
CUSTOM
LOW
+0
+0 +0 +0 +0 +0 +0
CUSTOM‑1 [STANDARD]
ENTER:
+0
+0
1 2 3 4 5 6 7 8 9
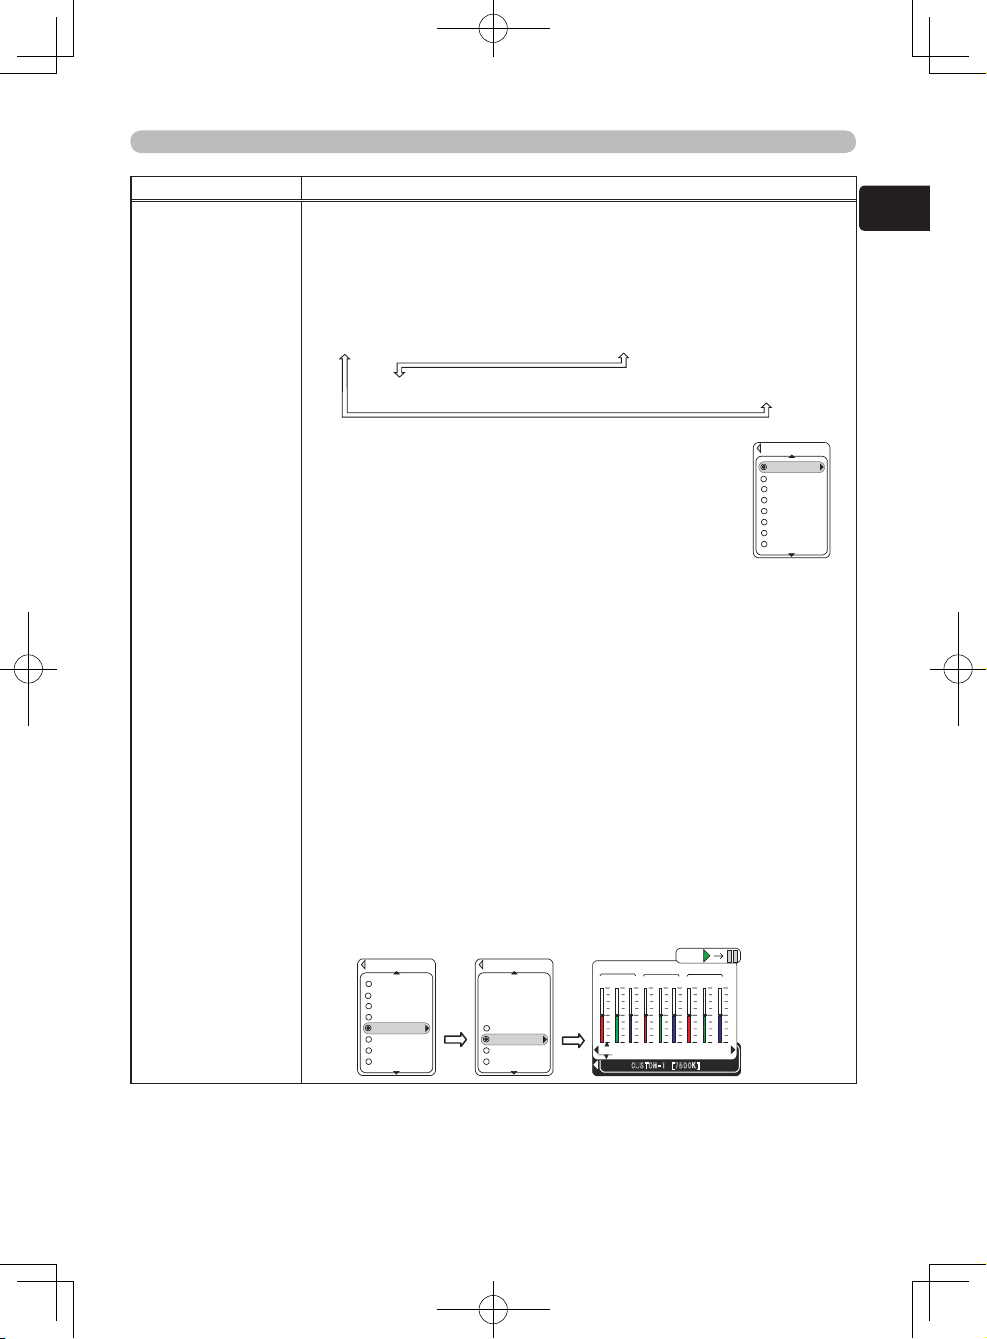
39
ENGLISH
Advanced Menu (PICTURE menu)
Item Description
COLOR TEMP
This projector provides 4 pre-set modes and 4 custom color
temperature modes.
T
o select a mode
Using the ▲/▼ cursor buttons in the COLOR TEMP menu changes
the color temperature mode. The mode that the yellow highlight bar
is on is the currently selected mode.
6500K ↔ 7500K ↔ 9300K ↔ Hi-BRIGHT
CUST
OM-1 ↔ CUSTOM-2 ↔ CUSTOM-3 ↔ CUSTOM-4
6500K, 7500K, 9300K
These modes set the same color temperature as
the mode name.
Hi-BRIGHT
The mode is prepared thinking much of the
brightness of the image with the maximum gains of
all colors.
CUSTOM-1, CUSTOM-2, CUSTOM-3, CUSTOM-4
These modes can be customized based on one of the pre-set
modes.
T
o adjust a CUSTOM mode
(1) Select one of the CUSTOM modes to adjust using the ▲/▼
cursor buttons. Then press the ► cursor button to display the
CUSTOM dialog.
Note that pressing the ▲/▼/► cursor buttons or the ENTER
button in the CUST
OM dialog will erase the current settings of
the selected mode. If you want to keep the settings, please press
the ◄ cursor button to return to the preceding menu, and select
a dif
ferent CUSTOM mode.
(2) Select the base mode to be adjusted using the ▲/▼ cursor
buttons. Then press the ► cursor button to display a dialog with
3 sets of 3 adjustment bars. Each set corresponds to a step of
the color temperature, and every set has 3 adjustment bars for
red, green and blue.
The names of selected mode and the base
mode are shown at the bottom of the dialog.
(Continued on next page)
6500K
7500K
9300K
Hi‑BRIGHT
COLOR TEMP
CUSTOM‑1
CUSTOM‑2
CUSTOM‑3
CUSTOM‑4
7500K
9300K
Hi‑BRIGHT
COLOR TEMP
CUSTOM‑2
CUSTOM‑3
CUSTOM‑4
CUSTOM‑1
6500K
►
the reference
CUSTOM‑1
6500K
9300K
Hi‑BRIGHT
7500K
Select
►
MIDDLE
CUSTOM
HIGH
LOW
R G B R
OFFSET
+0
+0
+0
+0
+0
+0
+0
CUSTOM‑1 [7500K]
ENTER:
+0
+0
R G B
L
OW
R G B
MID
R
G B
H
IGH
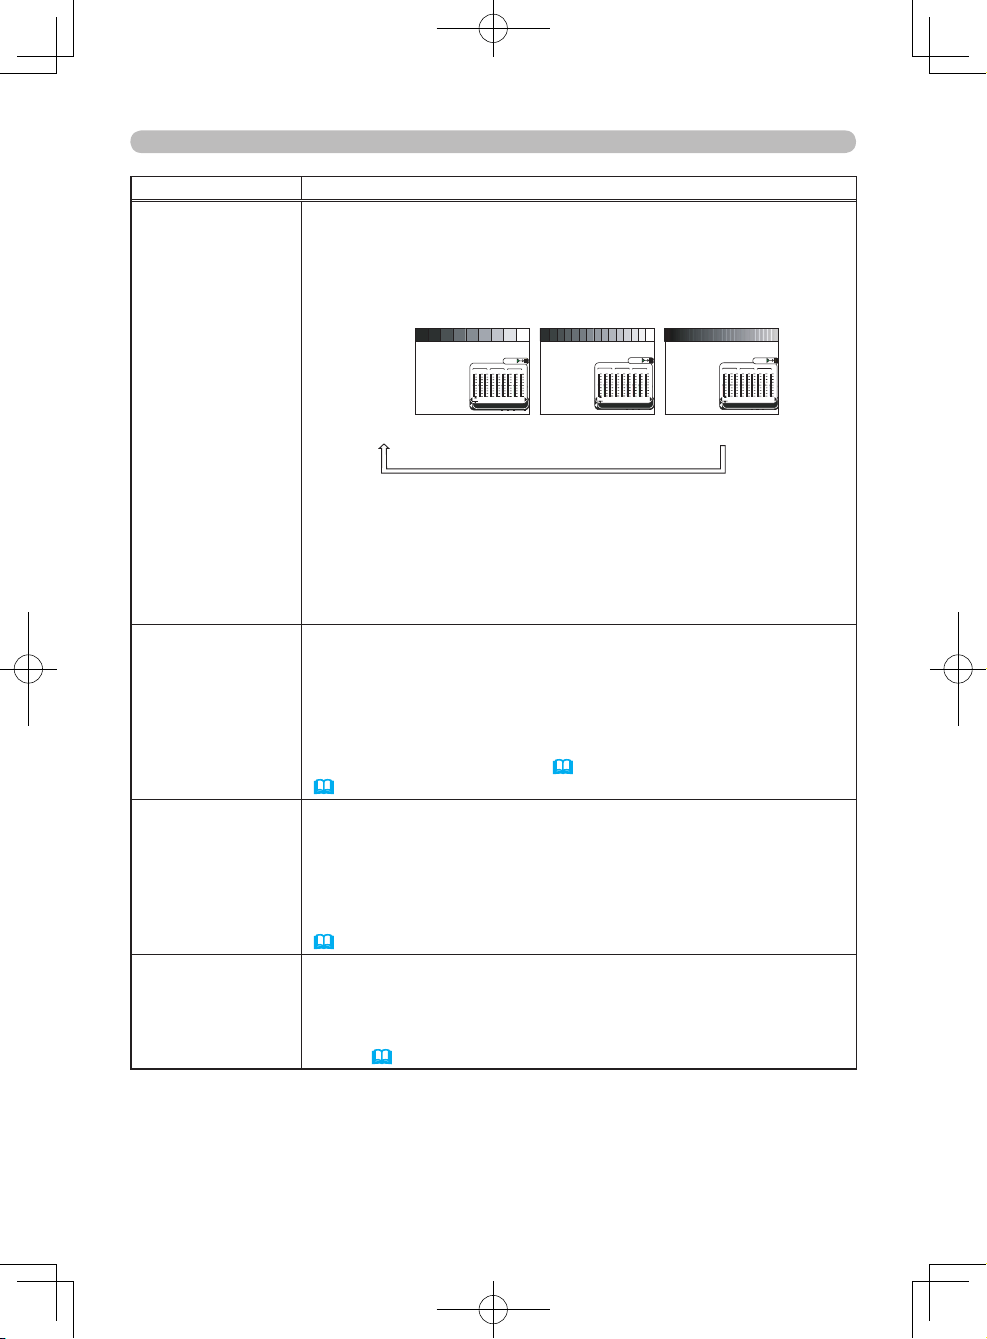
40
Advanced Menu (PICTURE menu)
Item Description
Continuation of
"COLOR
TEMP"
(3) Pressing the ENTER button while the dialog is displayed displays
a test pattern to aid in adjusting.
This projector has 3 types of test pattern. Each time you press
the ENTER button, the test pattern is changed.
Each part of the 9 step gray scale is linked to the corresponding
adjustment bar in the dialog.
(no display)
9 step
15 step
Ramp
gray scale gray scale
(4)
Select the adjustment bar for the color element to adjust using
the ◄/► cursor buttons.
Note that pressing the cursor ◄ button while the adjustment bar
of
the LOW step’s R is selected closes the dialog and turns it into
the COLOR TEMP menu.
(5) Adjust the tone of the selected step using the ▲/▼ cursor
buttons.
COLOR
Using the ▲/▼ cursor buttons adjusts the picture.
Stronger
W
eaker
- NOTE -
• The COLOR function can only be used for video, s-video,
component video or HDMI signals.
• The COLOR function can also be accessed using the COLOR
buttons on the remote control (
27) or via the EASY MENU
(
33).
TINT
Using the ▲/▼ cursor buttons adjusts the picture.
Greenish
Reddish
- NOTE -
• The TINT function can only be used for video, s-video, component
video or HDMI signals.
• The TINT function can also be accessed via the EASY MENU
(
33).
SHARPNESS
Using the ▲/▼ cursor buttons adjusts the picture.
Stronger
W
eaker
- NOTE -
• The SHARPNESS function can also be accessed via the EASY
MENU (
33).
(Continued on next page)
MIDDLE
CUSTOM
HIGH
LOW
R
G
B
R
OFFSET
+0
+0
+0
+0
+0
+0
+0
CUSTOM ‑1 [75 00K]
ENTER:
+0
+0
R G B
LOW
R
G B
MID
R G B
HIGH
MIDDLE
CUSTOM
HIGH
LOW
R
G
B
R
OFFSET
+0
+0
+0
+0
+0
+0
+0
CUSTOM‑1 [7500K]
ENTER:
+0
+0
R G B
LOW
R
G B
MID
R G B
HIGH
MIDDLE
CUSTOM
HIGH
LOW
R
G
B
R
OFFSET
+0
+0
+0
+0
+0
+0
+0
CUSTOM‑1 [7500K]
ENTER:
+0
+0
R G B
LOW
R
G B
MID
R
G B
HIGH
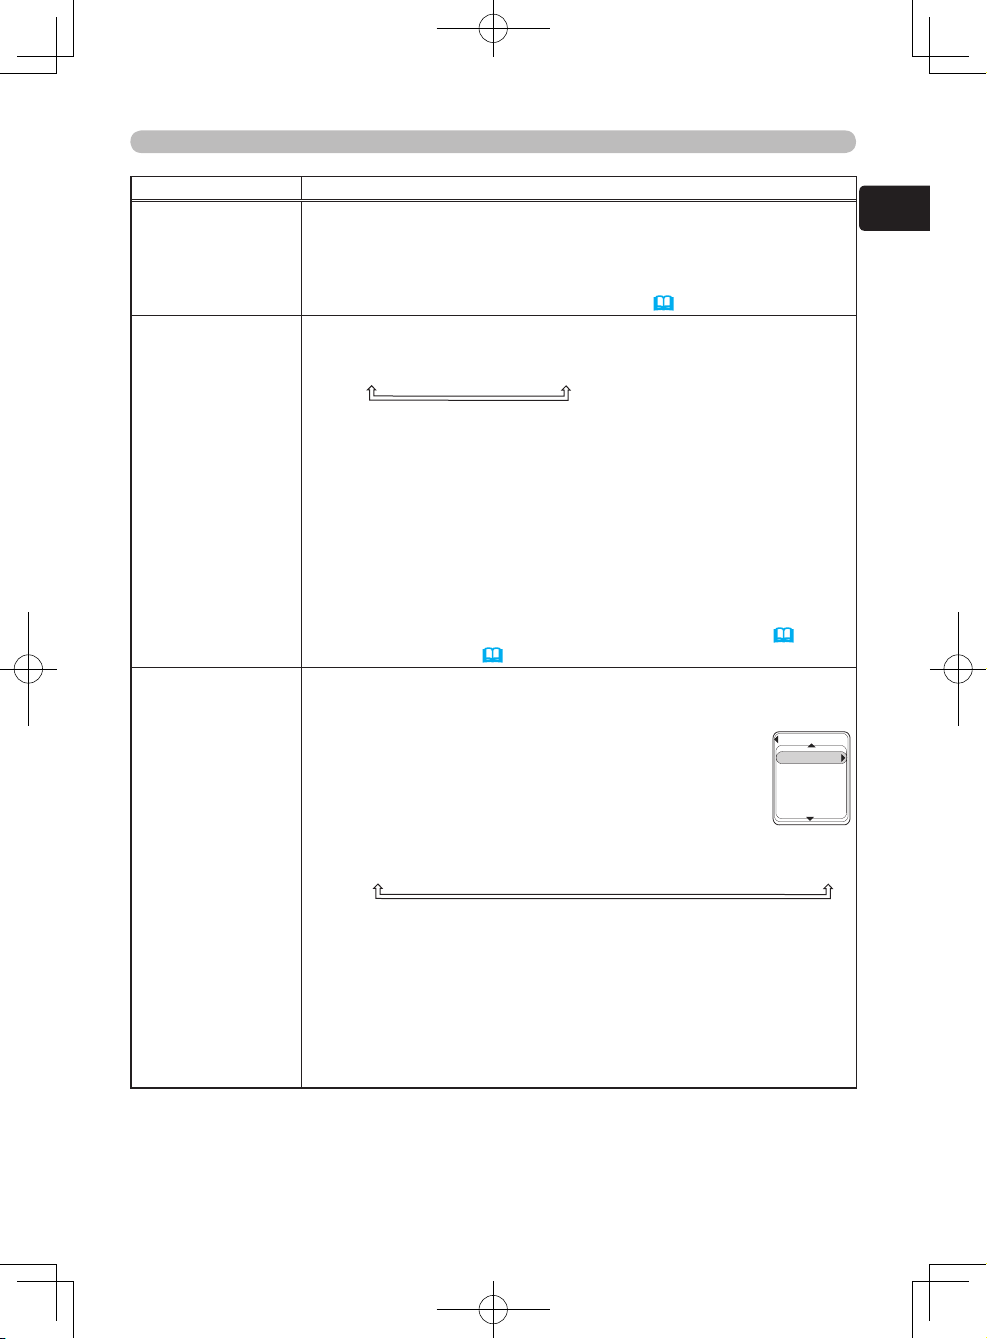
41
ENGLISH
Advanced Menu (PICTURE menu)
Item Description
IRIS
Using the ▲/▼ cursor buttons adjusts the picture.
Bright
Dark
- NOTE -
• The IRIS function can also be accessed using the IRIS button and
▲/▼ cursor buttons on the remote control (
25).
BLACK
Us
ing the ▲/▼ cursor buttons changes the auto iris control mode as
follows.
TURN OFF
AUTO1
AUTO2
TURN OFF
The auto iris is always open.
AUTO1
The auto iris displays a better black for dark images.
AUTO2
The auto iris displays the best black for dark images.
- NOTE -
• The screen may flicker when the AUTO1 or AUTO2 modes are
selected. If this occurs, select
TURN OFF.
• The BLACK function can also be accessed using the BLACK
button and the ▲/▼ cursor buttons on the remote control (
27) or
via the EASY MENU (
32).
MY MEMORY
This projector provides 4 memories to save user adjustment settings.
The brightness, contrast, color, tint, sharpness and iris adjustment
settings, and selected modes for gamma, color temperature, black,
whisper and digital shutter can be saved to each memory
.
To load saved adjustment settings
Using the ▲/▼ cursor buttons in the MY MEMORY menu
changes the memory to be adjusted, memories in which
no data is saved are skipped.
The mode that the yellow
highlight bar is on is the currently selected mode.
1. CUSTOM-1
2. CUSTOM-2
3. CUSTOM-3
4. CUSTOM-4
SAVE
- NOTE -
• The numbers to the left of each memory cannot be changed but
the name to the right can be changed.
• The SAVE item is not a memory but an item to display the MY
MEMOR
Y menu and save to the currently selected memory. Please
refer to the following description about save.
• When a signal other than the signal used when the adjustment
settings were registered is input, the saved adjustment settings may
not display the signal image correctly
.
(Continued on next page)
MY MEMORY
1.CUSTOM‑1
2.CUSTOM‑2
3.CUSTOM‑3
4.CUSTOM‑4
SAVE
MY MEMORY
menu (small)
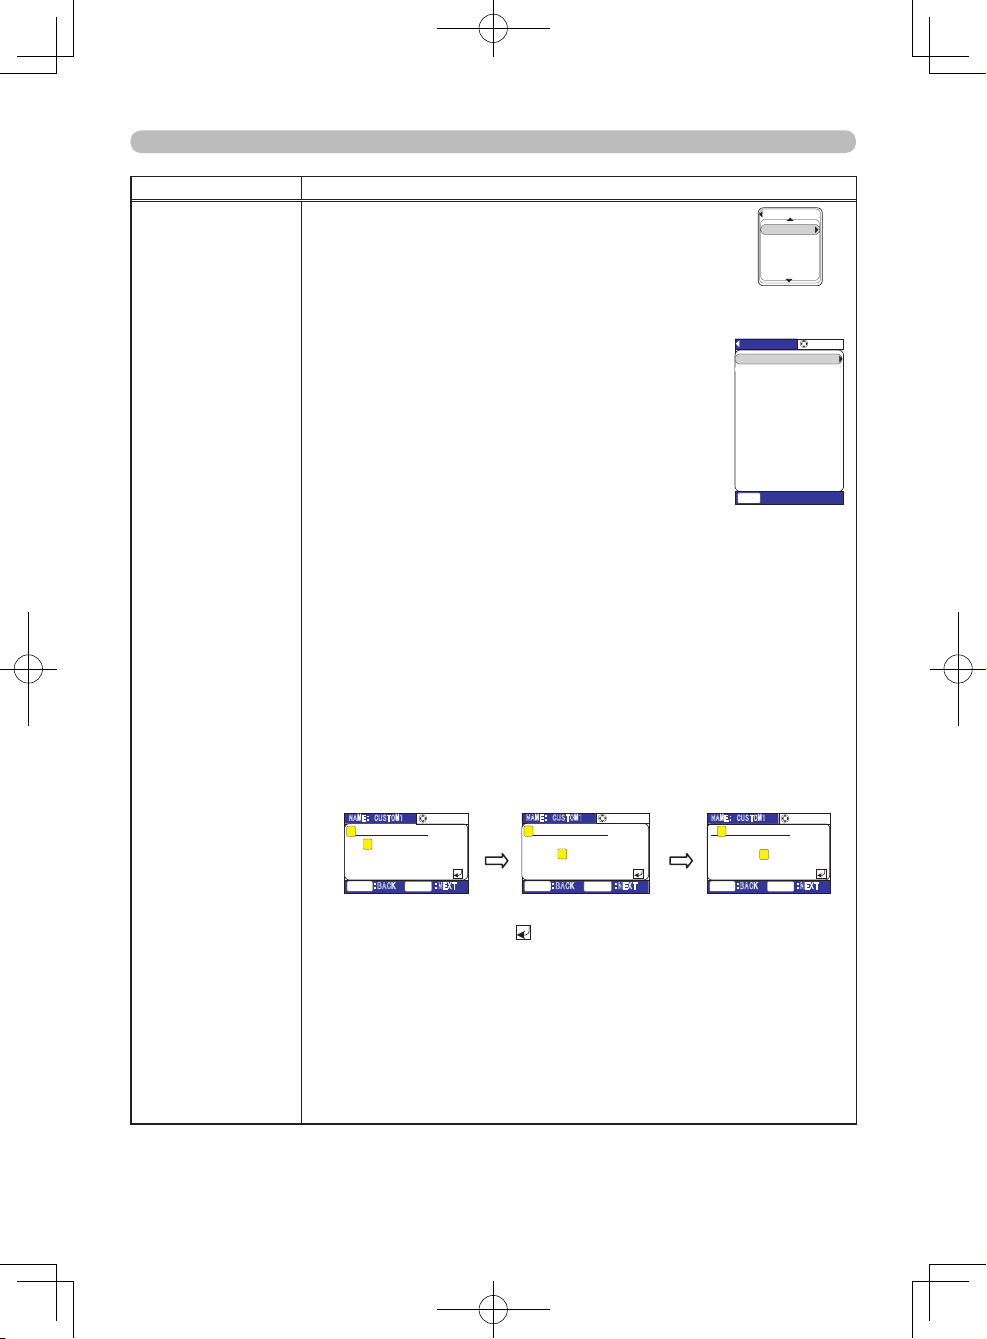
42
Advanced Menu (PICTURE menu)
Item Description
Continuation of "MY
MEMORY"
To save adjustment settings
(1) Load a base memory using the ▲/▼ cursor
buttons in the MY
MEMORY menu (small).
When you want to use the current adjustment,
do not load any other memories.
Then press the ► cursor button to display the
MY
MEMORY menu (large).
(2) The MY MEMORY menu (large) shows the
name of the current memory and the adjustment
settings to be saved.
Check the adjustment settings, and go to step
(5) to save if no adjustments are necessary
.
(3) If you want to adjust some of the items, please
select an item to adjust using the ▲/▼ cursor
buttons.
Then press the ► cursor button to display the
menu or dialog for adjusting the item.
Make adjustments according to the description of each item.
After making adjustments, press the ◄ cursor button to return to
the MY
MEMORY menu (large).
(4) If you want to change the name of the memory, select the NAME
item using the ▲/▼ cursor buttons. Then press the ► cursor
button to display the NAME dialog.
The current name is displayed on the 1st line in the menu.
The
letter in the name that the cursor is on can be changed using the
▲/▼/◄/► cursor buttons to move the cursor in the lower part of
the menu.
Press the ENTER button to move the cursor onto the next letter
in the name, and press the RESET
button to move the cursor
onto the previous letter in the name.
Press the ENTER button while the cursor is on the last letter of
the name to select the mark. Press the ENTER button again
to return to the MY
MEMORY menu (large).
(5)
Select the SAVE item in the MY MEMORY
(large)
menu using the
▲/▼
cursor buttons. Then press the ► cursor button to display
the SAVE dialog.
Confirm that the memory you want to save the adjustment
settings to is selected. Use the ▲/▼ cursor buttons to change
the selected memory
.
Press the ENTER button to save the current adjustment settings
to the selected memory
.
MY MEMORY
1.CUSTOM‑1
2.CUSTOM‑2
3.CUSTOM‑3
4.CUSTOM‑4
SAVE
↓
MY MEMORY
SHARPNESS +3
BRIGHTNESS +0
CONTRAST +0
COLOR +0
TINT +0
COLOR TEMP 6500K
GAMMA STANDARD
IRIS 10
WHISPER NORMAL
:SELECT
NAME CUSTOM‑1
:QUIT
MENU
BLACK TURN OFF
DIGITAL SHUTTER
TURN OFF
SAVE
NAME: CUSTOM1
A B C D E F G H I J K L M N
O P Q R S T U V W X Y Z
0 1 2 3 4 5 6 7 8 9
:SELECT
C U S T O M 1������
:BACK :NEXT
RESET
ENTER
C
C
‑ � . # ! ? &
▲/▼
/◄/►
NAME: CUSTOM1
A B C D E F G H I J K L M N
O P Q R S T U V W X Y Z
0 1 2 3 4 5 6 7 8 9
:SELECT
C U S T O M 1������
:BACK :NEXT
RESET
ENTER
C
S
‑ � . # ! ? &
ENTER
A B C D E F G H I J K L M N
O P Q R S T U V W X Y Z
0 1 2 3 4 5 6 7 8 9
S U S T O M 1������
‑ � . # ! ? &
NAME: CUSTOM1 :SELECT
:BACK :NEXT
RESET
ENTER
U
U
MY MEMORY
menu (small)
MY MEMORY
menu (large)
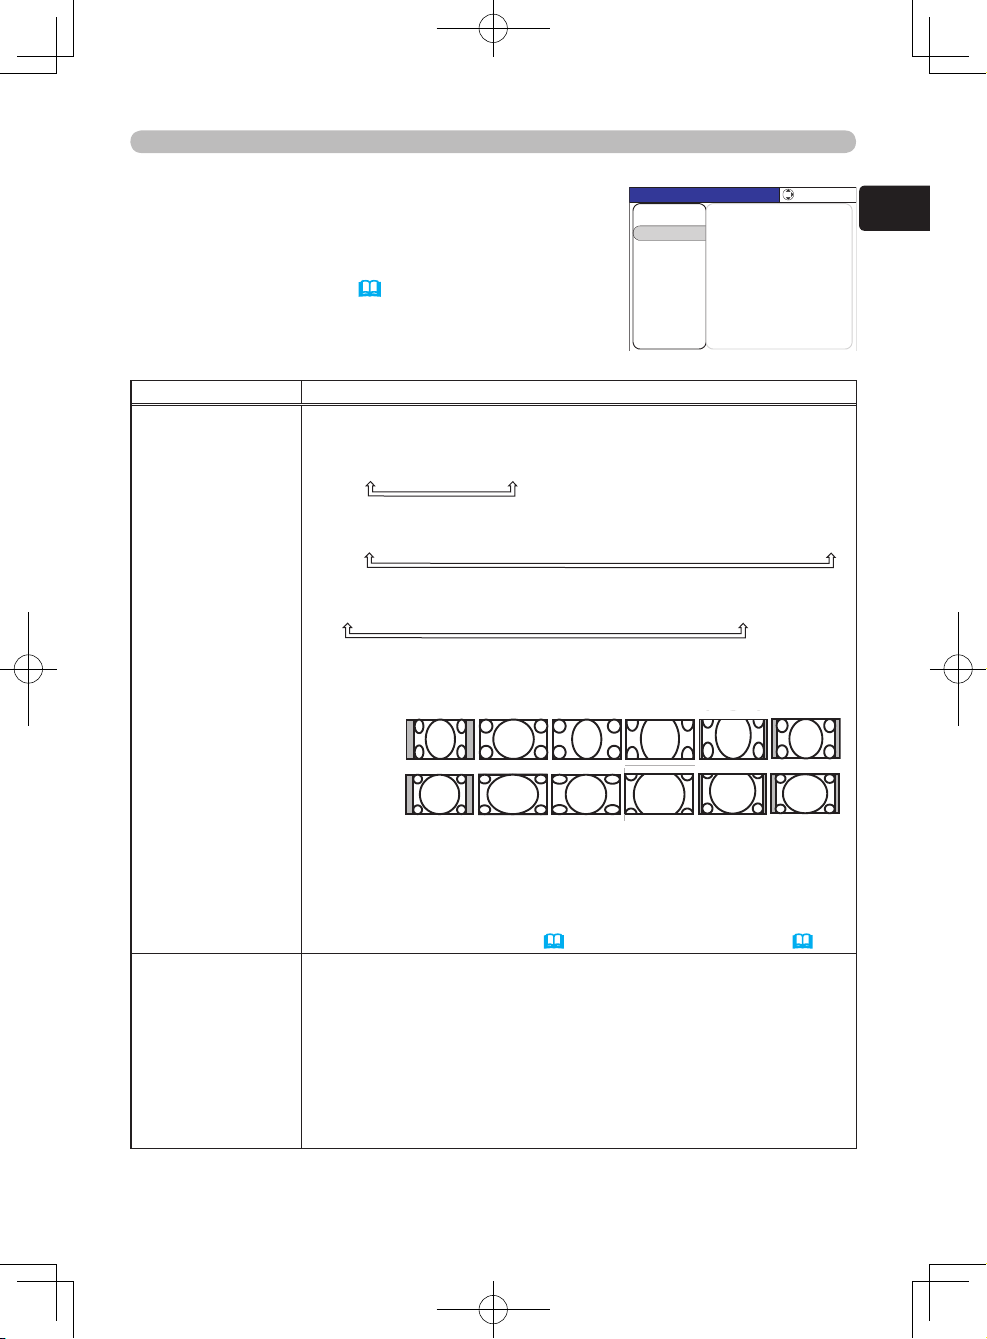
43
ENGLISH
Advanced Menu (IMAGE menu)
IMAGE menu
The following functions are accessible via the
IMAGE menu. After selecting an item according to
the procedure described in the preceding "Advanced
Menu operation" section (35), refer to the following
table for details on operating the selected item.
Item Description
ASPECT
Using the ▲/▼ cursors buttons changes the aspect ratio.
For a computer (RGB) signal
NORMAL
4:3
16:9
For an HDMI signal
NORMAL
4:3
16:9
WIDE
MOVIE1
MOVIE2
14:9
For a video, s-video or component video signal
4:3
16:9
WIDE
MOVIE1
MOVIE2
14:9
For no signal or an unrecognized signal
16:9 (fixed)
- NOTE -
• The NORMAL mode uses the signal’s original aspect ratio.
• Performing an automatic adjustment initializes the aspect ratio
setting.
• The ASPECT function can also be accessed using the ASPECT
button on the remote control (
24) or via the EASY MENU (31).
OVER SCAN
Using the ▲/▼ cursor buttons adjusts the over-scan ratio.
Large (Reduces the picture)
Small (Magnifies the picture)
- NOTE -
• The OVER SCAN function can only be used for video, s-video or
component video signals.
• When this adjustment is too large, certain degradation may appear
on the border of the picture. If this occurs, readjust.
• The numbers displayed in the dialog and the IMAGE menu, are
just for your reference, and might not be the exact display ratio.
(Continued on next page)
MENU [COMPUTER]
SETUP
PICTURE
INPUT
OPTION
EASY MENU
SCREEN
:SELECT
ASPECT 4:3
OVER SCAN 5
V POSITION 25
H POSITION 142
H PHASE 16
H SIZE 1344
AUTO ADJUST
IMAGE
4:3
NORMAL
4:3 16:9 WIDE MOVIE1 MOVIE2 14:9
16:9
NORMAL
Example for
a 16:9 signal
Example for
a 4:3 signal
44
Item Description
V POSITION
Using the ▲/▼ cursor buttons adjusts the vertical position of the picture.
Up
Down
- NOTE -
•
The V POSITION cannot be adjusted for signals from the HDMI port.
H POSITION
Using the ▲/▼ cursor buttons adjusts the horizontal position of the picture.
Left
Right
- NOTE -
•
The H POSITION cannot be adjusted for signals from the HDMI port.
H PHASE
Using the ▲/▼ cursor buttons adjusts the horizontal phase to
eliminate fl
icker.
Right
Left
- NOTE -
• The H PHASE can be adjusted only for computer (RGB) signals
excluding SCAR
T RGB signals, or component video signals
excluding 525i (480i) and 625i (576i) signals.
H SIZE
Using the ▲/▼ cursor buttons adjusts the horizontal size of the picture.
Large
Small
- NOTE -
• The H SIZE can be adjusted only for computer (RGB) signals
excluding SCAR
T RGB signals.
• When this adjustment is excessive, the picture may not be
displayed correctly
. If this occurs, please reset the adjustment by
pressing the RESET button while using this item.
AUTO ADJUST
This function is performed as soon as the ► cursor button is
pressed to select this item.
For a signal from the COMPUTER port
The vertical position, the horizontal position, the horizontal phase,
horizontal size and the aspect ratio are automatically adjusted.
Make sure that the application window is set to its maximum
size before attempting to use this feature.
A dark picture may be
incorrectly adjusted. Use a bright picture when adjusting.
For a signal from the HDMI port
The aspect ratio is automatically adjusted.
For a signal from the COMPONENT VIDEO ports
The vertical position, horizontal position and aspect ratio are
automatically adjusted. The horizontal phase is also automatically
adjusted except for 525i (480i), 625i (576i) and SCART RGB signals.
For a signal from the S-VIDEO or VIDEO port
The video format best suited for the respective input signal is
automatically selected.
This function is available only when the
VIDEO FORMAT item in the INPUT menu (
46) is set to AUTO.
The vertical position, horizontal position and aspect ratio are
automatically adjusted.
- NOTE -
•
The automatic adjustment operation takes approximately 10 seconds.
Automatic adjustment may not function correctly with some input signals.
Advanced Menu (IMAGE menu)
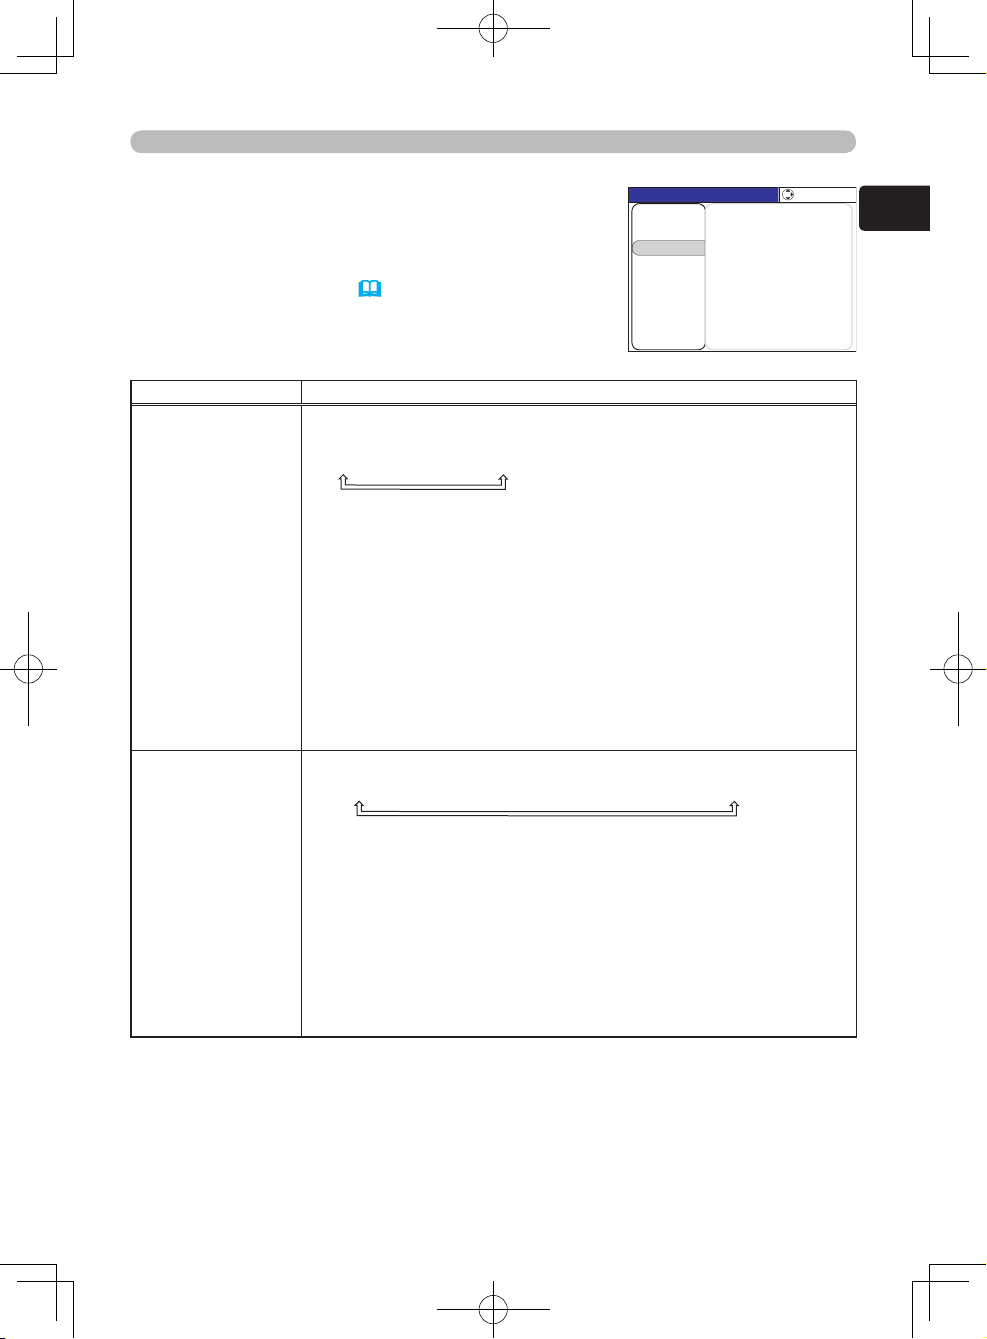
45
ENGLISH
Advanced Menu (INPUT menu)
INPUT menu
The following functions are accessible via the INPUT
menu. After selecting an item according to the
procedure described in the preceding "Advanced
Menu operation" section (35), refer to the following
table for details on operating the selected item.
Item Description
PROGRESSIVE
Using the ▲/▼ cursor buttons in the PROGRESSIVE menu
changes the interpolation mode of an interlaced signal.
TV
FILM
TURN OFF
TV
This mode makes the screen image crisper
.
FILM
This mode makes the screen image crisper
, and this mode can
also be adapted to the 3-2 Pull-Down system.
- NOTE -
• The PROGRESSIVE function can only be used for interlaced
video, s-video, or component video 525i (480i) or 625i (576i) 1
125i
(1080i) signals.
• The TV and FILM modes may cause certain picture defects (ex.,
jagged lines). If this occurs, select
TURN OFF, although the screen
image may lose its crispness.
COLOR SP
ACE
Using the ▲/▼ cursor buttons changes the color space mode.
AUT
O
RGB
SMPTE240
REC709
REC601
AUTO
Automatically selects an optimum mode.
RGB, SMPTE240, REC709, REC601
The selected color space is used.
- NOTE -
• The COLOR SPACE function can only be used for signals from
the COMPUTER, HDMI or COMPONENT
VIDEO ports excluding
component video 525i (480i) or 625i (576i), or SCART RGB signals.
• The AUTO mode may not work well for some signals. In this
situation select a suitable mode other than
AUTO.
(Continued on next page)
MENU [COMPUTER]
SETUP
PICTURE
OPTION
EASY MENU
SCREEN
:SELECT
PROGRESSIVE FILM
COLOR SPACE AUTO
COMPONENT COMPONENT
VIDEO FORMAT AUTO
HDMI NORMAL
FRAME LOCK TURN OFF
S‑ASPECT TURN OFF
IMAGE
INPUT
INFORMATION
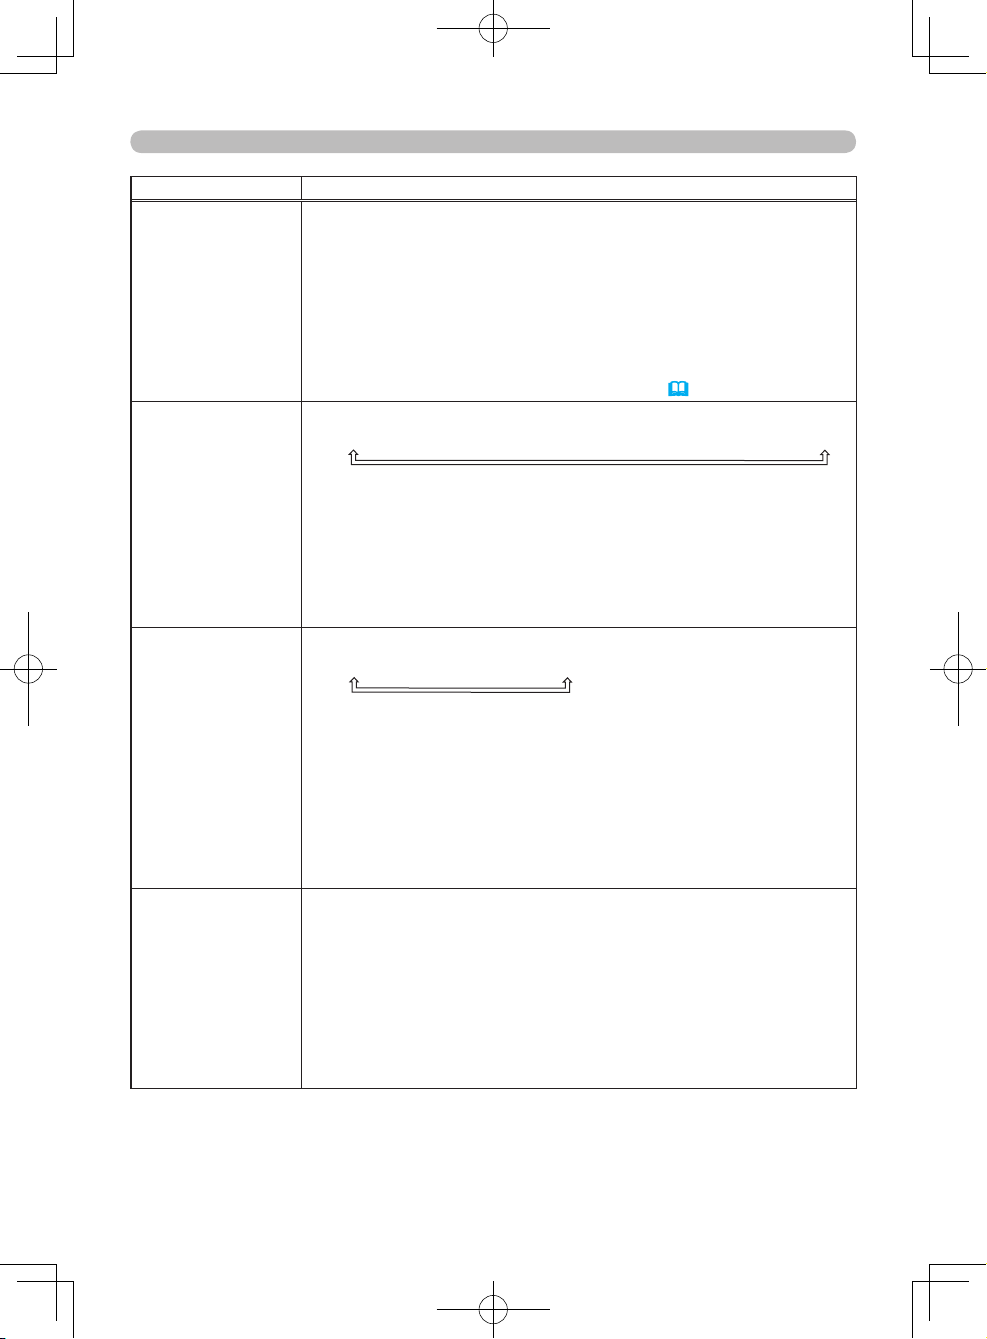
46
Advanced Menu (INPUT menu)
Item Description
COMPONENT
Using the ▲/▼ cursor buttons changes the COMPONENT
port
mode.
COMPONENT
SCART RGB
COMPONENT
The COMPONENT
port works with a component video signal
input.
SCART RGB
The COMPONENT
port works with an SCART RGB signal input.
Please refer to “Connecting your devices” (
14).
VIDEO FORMAT
Using the ▲/▼ cursor buttons changes the video format mode.
AUTO
NTSC
P
AL
SECAM
NTSC4.43
M-PAL
N-PAL
AUTO
Automatically selects an optimum mode.
NTSC, PAL, SECAM, NTSC4.43, M-PAL, N-PAL
The selected video format is used.
- NOTE -
• The AUTO mode may not work well for some signals. In this
situation select a suitable mode other than
AUTO.
HDMI
Using the ▲/▼ cursor buttons changes the HDMI signal mode.
AUT
O
NORMAL
ENHANCED
AUTO
Automatically selects an optimum mode.
NORMAL
Suitable for DVD signals (16-235).
ENHANCED
Suitable for VGA
signals (0-255).
- NOTE -
• If the contrast of the screen image is too strong or too weak, try to
find a more suitable mode.
FRAME LOCK
Using the ▲/▼ cursor buttons turns the frame lock function on and
of
f.
TURN ON
TURN OFF
When
TURN ON is selected, videos are displayed more smoothly.
- NOTE -
• The FRAME LOCK function can only be used for computer (RGB)
signals with a vertical frequency of 50 to 60 Hz.
• When FRAME LOCK is enabled there may be some picture
degradation. If this occurs, select
TURN OFF.
(Continued on next page)
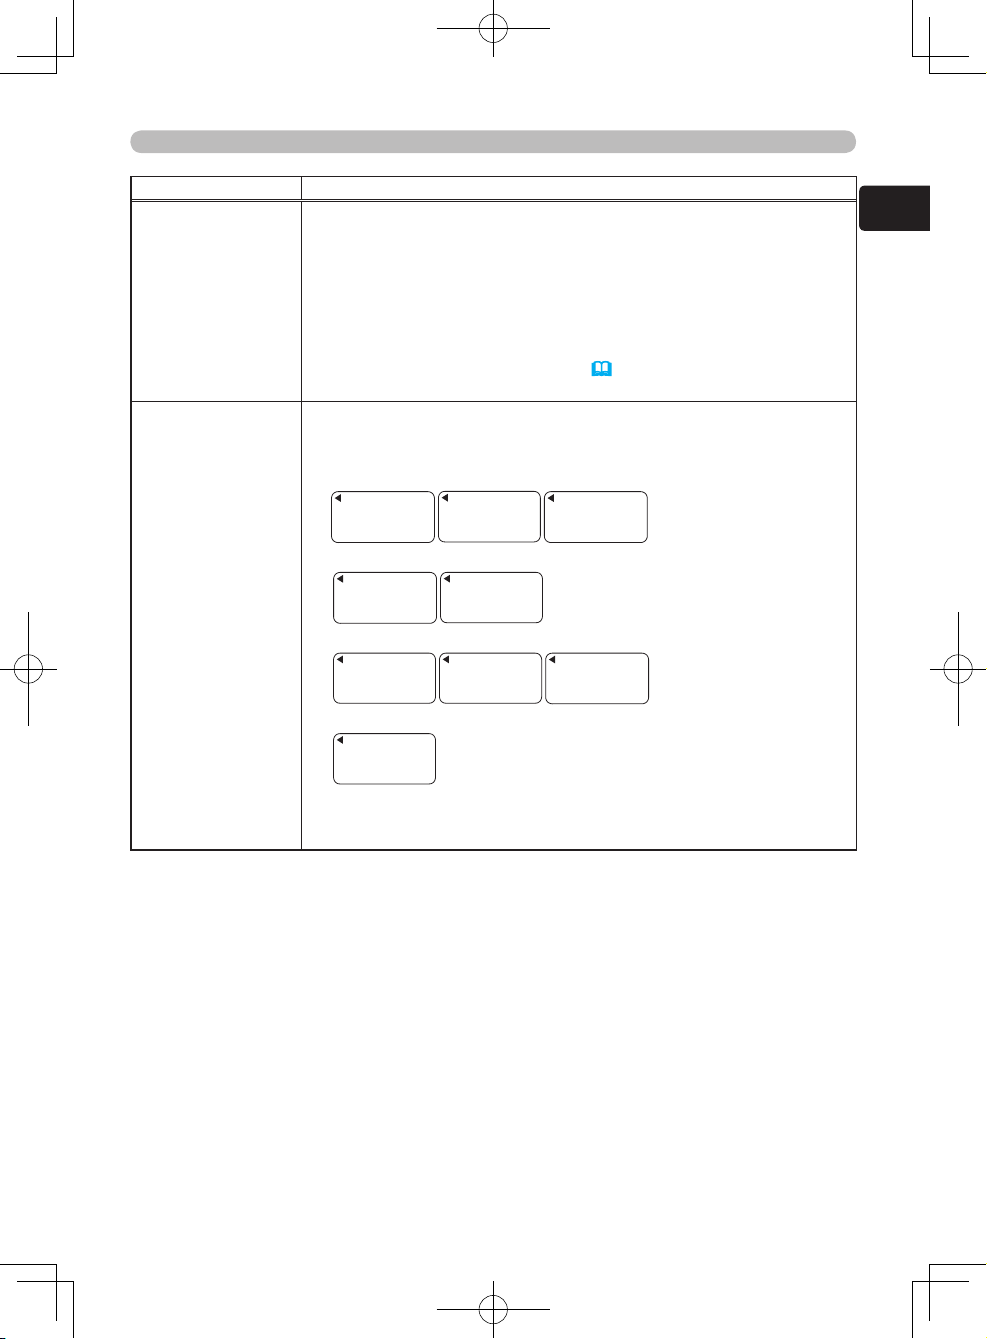
47
ENGLISH
Advanced Menu (INPUT menu)
Item Description
S-ASPECT
Using the ▲/▼ cursor buttons turns the S-ASPECT
function on and
off.
TURN ON
TURN OFF
When the S-ASPECT
function is enabled S2-video signals can be
detected and an optimum aspect ratio automatically selected.
- NOTE -
• When the ASPECT button on the remote control is used or the
ASPECT
item in the IMAGE menu (
43) is used, this item is
automatically disabled.
INFORMA
TION
This function is performed as soon as the ► cursor button is
pressed to select this item. It displays the INFORMA
TION dialog
that shows the currently selected signal input.
Example for computer (RGB) signals
Example for an HDMI signal
Example for a video, s-video and component video signal
Example for a SCART RGB signal
- NOTE -
• The INFORMATION function cannot be used when there is no
signal.
COMPUTER
1024x768 @85
INPUT‑INFORMATION
COMPUTER
1024x768 @60
INPUT‑INFORMATION
FRAME LOCK
COMPUTER
1080i @60
INPUT‑INFORMATION
HDMI
INPUT‑INFORMATION
1
920x1080i @60
HDMI
1920x1080i @60
INPUT‑INFORMATION
F
RAME LOCK
VIDEO
NTSC
INPUT‑INFORMATION
A
UTO
S‑VIDEO
PAL
INPUT‑INFORMATION
AUTO
COMPONENT
1080i @60
I
NPUT‑INFORMATION
COMPONENT
576i @50
INPUT‑INFORMATION
S
CART RGB
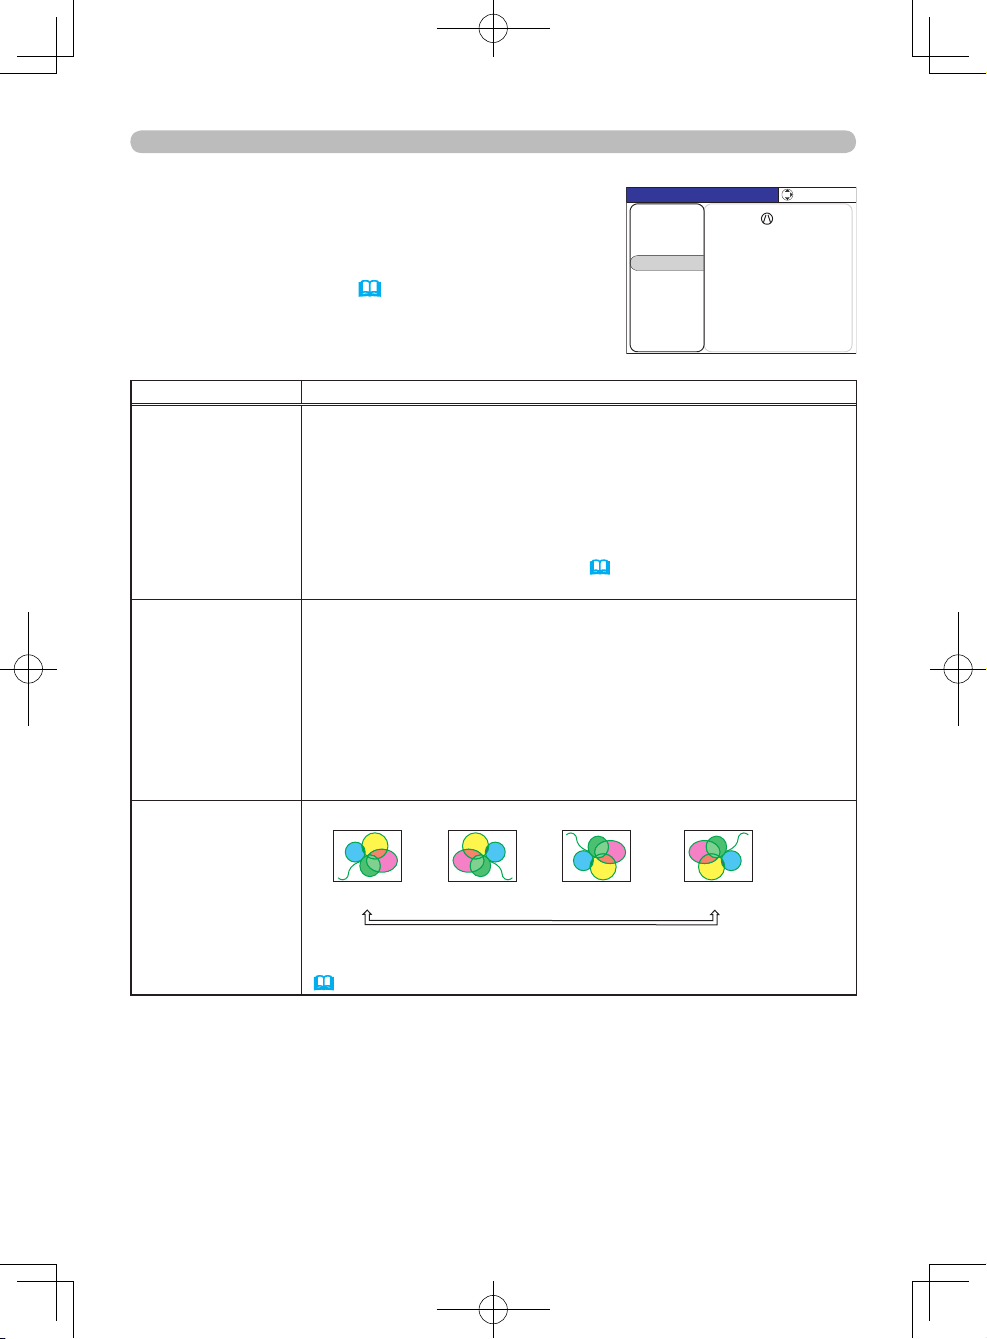
48
Advanced Menu (SETUP menu)
SETUP menu
The following functions are accessible via the
SETUP menu. After selecting an item according to
the procedure described in the preceding "Advanced
Menu operation" section (35), refer to the following
table for details on operating the selected item.
Item Description
KEYSTONE
Using the ▲/▼ cursor buttons adjusts the vertical keystone. Please
make adjustments while checking the picture.
Reduce top of the image
Reduce bottom of the image
- NOTE -
• The adjustable correction range will vary among different inputs.
This function may not work well for some types of input.
• This function may not work well if the projector screen is angled
up or down and the MIRROR item (
Below) in the SETUP sub-
menu is set to V:INVERT or H&V:INVERT.
WHISPER
Using the ▲/▼ cursor buttons turns the WHISPER function on and
of
f.
NORMAL
WHISPER
When WHISPER is selected, acoustic noise and screen brightness
are reduced. It may take several minutes for the change in
brightness to occur
.
- NOTE -
• The WHISPER function cannot be used for several minutes after
the projector lamp fi
rst lights up.
MIRROR
Using the ▲/▼ cursor buttons changes the mirror mode.
NORMAL
H:INVERT
V
:INVERT
H&V:INVERT
- NOTE -
• The MIRROR function can also be accessed via the EASY MENU
(
33).
MENU [COMPUTER]
IMAGE
SETUP
PICTURE
INPUT
OPTION
EASY MENU
SCREEN
:SELECT
KEYSTONE +0
WHISPER NORMAL
MIRROR NORMAL

49
ENGLISH
Advanced Menu (SCREEN menu)
SCREEN menu
The following functions are accessible via the
SCREEN menu. After selecting an item according to
the procedure described in the preceding "Advanced
Menu operation" section (35), refer to the following
table for details on operating the selected item.
Item Description
LANGUAGE
Using the ▲/▼ cursor buttons changes the display language.
ENGLISH
FRANÇAIS
DEUTSCH
ESP
AÑOL
ITALIANO
NORSK
NEDERLANDS
PORTUGUÊS
SVENSKA
Р
УССКИЙ
SUOMI
POLSKI
TÜRKÇE
- NOTE -
• The LANGUAGE function can also be accessed via the EASY
MENU (
34).
MENU POSITION
Using the ▲/▼/◄/► cursor buttons adjusts the menu position.
Please make adjustments while checking the picture.
- NOTE -
• Pressing the MENU button closes the dialog and returns to the
SCREEN menu. Not operating the menu for about 50 seconds
closes merely the dialog.
OSD BRIGHT
.
Using the ▲/▼ cursor buttons adjusts the brightness of the OSD.
(OSD = On-Screen Display and refers to menus and dialogs.)
Bright
Dark
(Continued on next page)
MENU [COMPUTER]
IMAGE
SETUP
PICTURE
INPUT
OPTION
EASY MENU
SCREEN
:SELECT
LANGUAGE ENGLISH
MENU POSITION
START UP ORIGINAL
OSD BRIGHT. 5
MyScreen
MyScreen Lock TURN OFF
MESSAGE TURN ON
DIGITAL SHUTTER TURN ON
PICTURE SHIFT
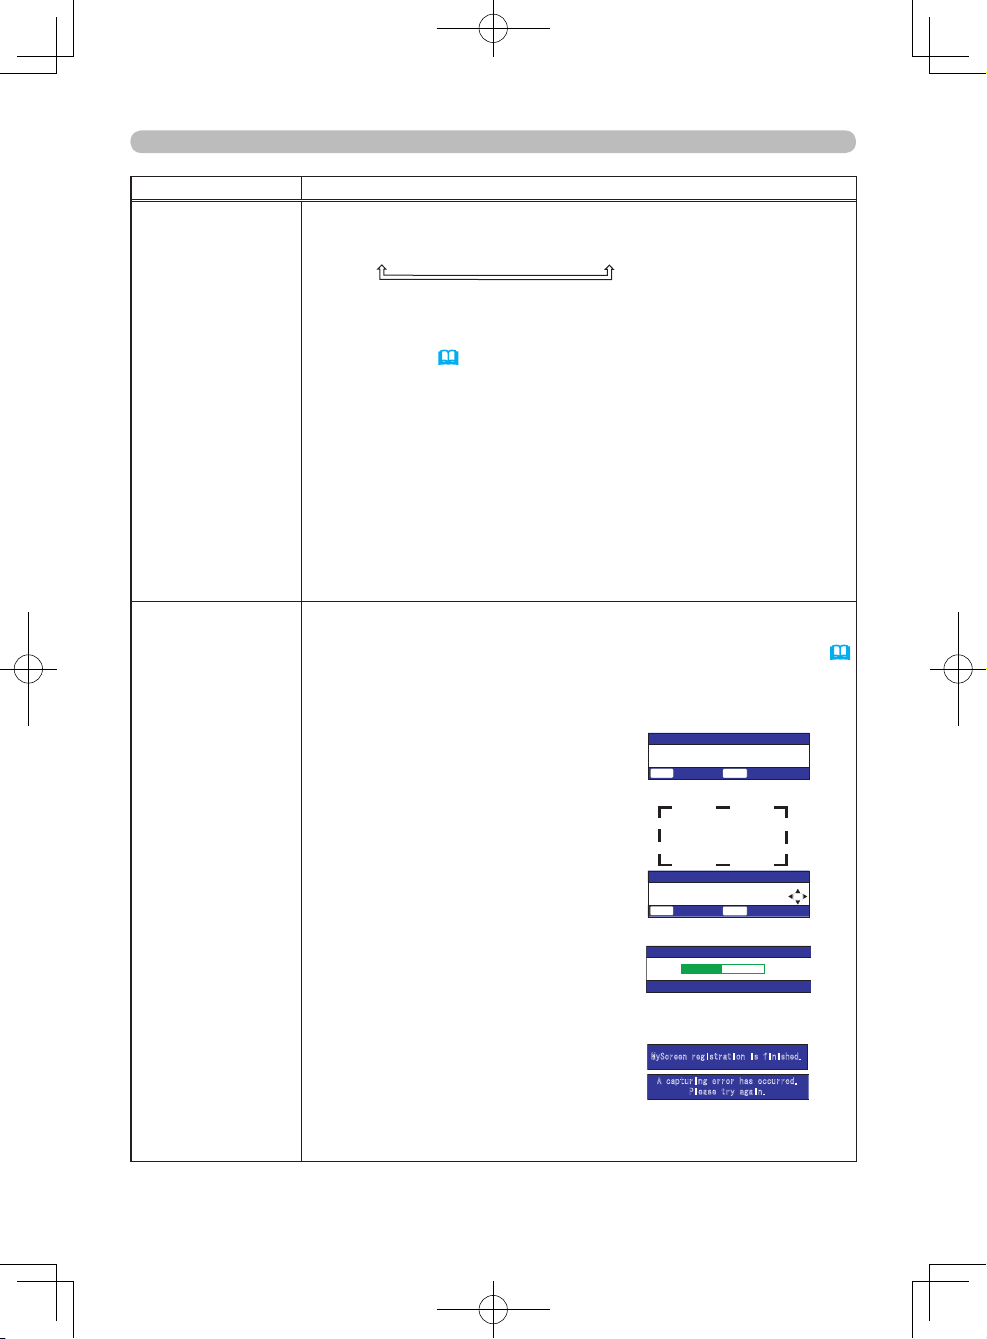
50
Advanced Menu (SCREEN menu)
Item Description
START UP
Using the ▲/▼ cursor buttons changes the start up image that is
displayed when no signal or an unsuitable signal is detected.
MyScreen
ORIGINAL
TURN OFF
MyScreen
MyScreen is a feature which allows you to save a screenshot to
use in place of the default screen. Please refer to the description
of MyScreen (
Below) for information on saving a screen using
the MyScreen function. Until a screenshot is registered a plain
blue screen is displayed as the MyScreen image.
ORIGINAL
When ORIGINAL
is selected a factory pre-set start up screen is
displayed.
TURN OFF
When
TURN OFF is selected a plain black screen is displayed.
- NOTE -
• To prevent burn-in (burned in afterimage) the MyScreen and
ORIGINAL
screens will switch to a plain black screen after several
minutes.
MyScreen
This projector has a MyScreen function which allows the user to
save a portion of an image to be used as the ST
ART UP image by
following the procedure below. See the description of START UP (
above) for information on selecting a START UP image.
First, input the signal and display the image you wish to save. Then,
in the SCREEN menu select the MyScreen item and press the
ENTER button or the ► cursor button.
(1)
The “Do you start capturing this
picture?” dialog will be displayed.
Press the ENTER button and the
dialog will change and a frame to
select the portion of the image to
save will appear
..
(2) Use the ▲/▼/◄/► cursor buttons
to move the frame and select the
portion of the image you wish to
save, then press the ENTER button.
The projector will then begin saving
the image (may take several
minutes).
(3)
When the operation ends, a dialog will appear informing you of
the result.
Registration successful screen: ...
Error screen: ................................
- NOTE -
• The KEYSTONE cannot be adjusted while using the MyScreen
function.
(Continued on next page)
MyScreen
Do you start capturing this picture?
:NO :YES
RESET
ENTER
↓
MyScreen
Move the capture area
as you want.
:RETURN :NEXT
RESET
ENTER
↓
MyScreen
45%
△
▼
MyScreen registration is finished.
A capturing error has occurred.
Please try again.
51
ENGLISH
Advanced Menu (SCREEN menu)
Item Description
MyScreen Lock
Using the ▲/▼ cursor buttons turns the MyScreen Lock function on
and of
f.
TURN ON
TURN OFF
When
TURN ON is selected the MyScreen function is locked. Use
this feature to protect the current MyScreen image.
MESSAGE
Using the ▲/▼ cursor buttons turns the MESSAGE function on and
of
f.
TURN ON
TURN OFF
When
TURN ON is selected, the following messages will be
displayed. When you want to hide messages, select TURN OFF.
The adjustment dialog that is displayed when the BRIGHTNESS,
CONTRAST or COLOR is adjusted using the BRIGHTNESS,
CONTRAST or COLOR buttons on the remote control
The dialogue that is displayed when the BLACK mode is changed
using the BLACK button on the remote control
The dialogue that is displayed when the MODE is changed using
the MODE button on the remote control
The “AUTO IN PROGRESS” message displayed during automatic
adjustment
The “NO INPUT IS DETECTED” message displayed when no
input is detected
The “SYNC IS OUT OF RANGE” message displayed when an
improper input is detected
The “Detecting…” message displayed when the projector is
detecting an input signal
The dialogue that is displayed when the input signal has been
changed
The dialogue that is displayed when the aspect ratio has been
changed
(Continued on next page)
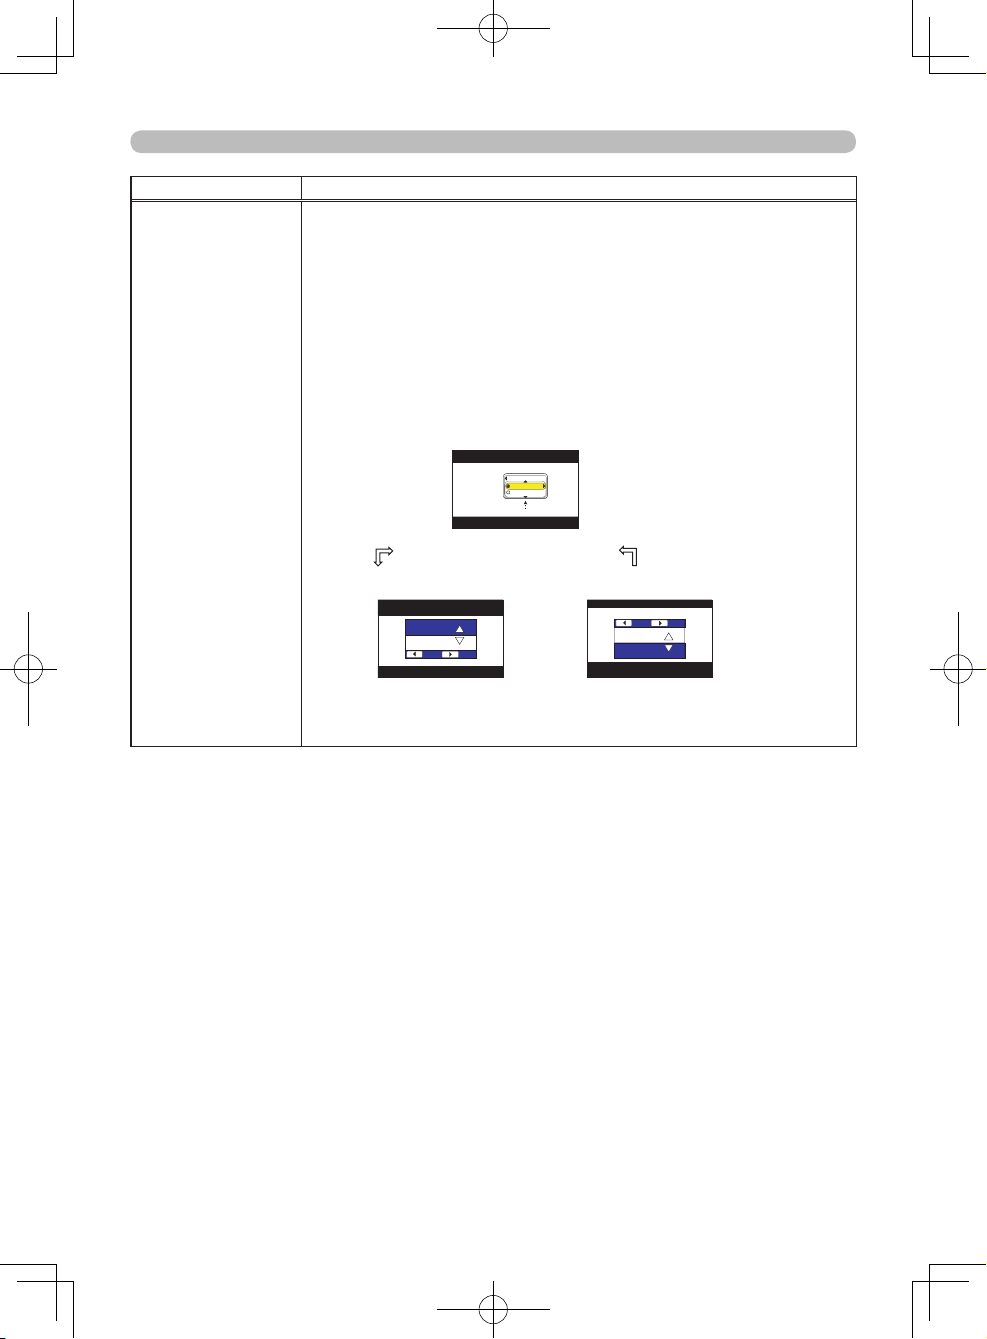
52
DIGITAL SHUTTER
TURN ON
TURN OFF
↓ ↓
→ DIGITAL SHUTTER menu ←
(
one way)
D
ialog for the top bar ↔ Dialog for the bottom bar
Digit al Sh utter
:BACK :NEXT
Digit al Sh utter
:BACK :NEXT
Advanced Menu (SCREEN menu)
Item Description
DIGITAL SHUTTER
Using the ▲/▼ cursor buttons turns the DIGITAL SHUTTER function
on and off.
TURN ON
TURN OFF
When
TURN ON is selected, the black bars displayed mask the top
and bottom of the screen, like a shutter. Use this function when you
want to mask the top and bottom of the screen.
Follow the procedure below to move the bars up and down.
T
o move the black bars up and down
(1) Select TURN ON in the DIGITAL SHUTTER menu, then press
the ► cursor button. The DIGITAL SHUTTER dialog will appear.
(2) Using the ◄/► cursor buttons switches between the dialogs
DIGIT
AL SHUTTER menu (one way)
Dialog for the top bar
Dialog for the bottom bar
(3)
Using the ▲/▼ cursor buttons in the dialogs moves the
corresponding bar up or down. Note that the total height of the
bars is limited.
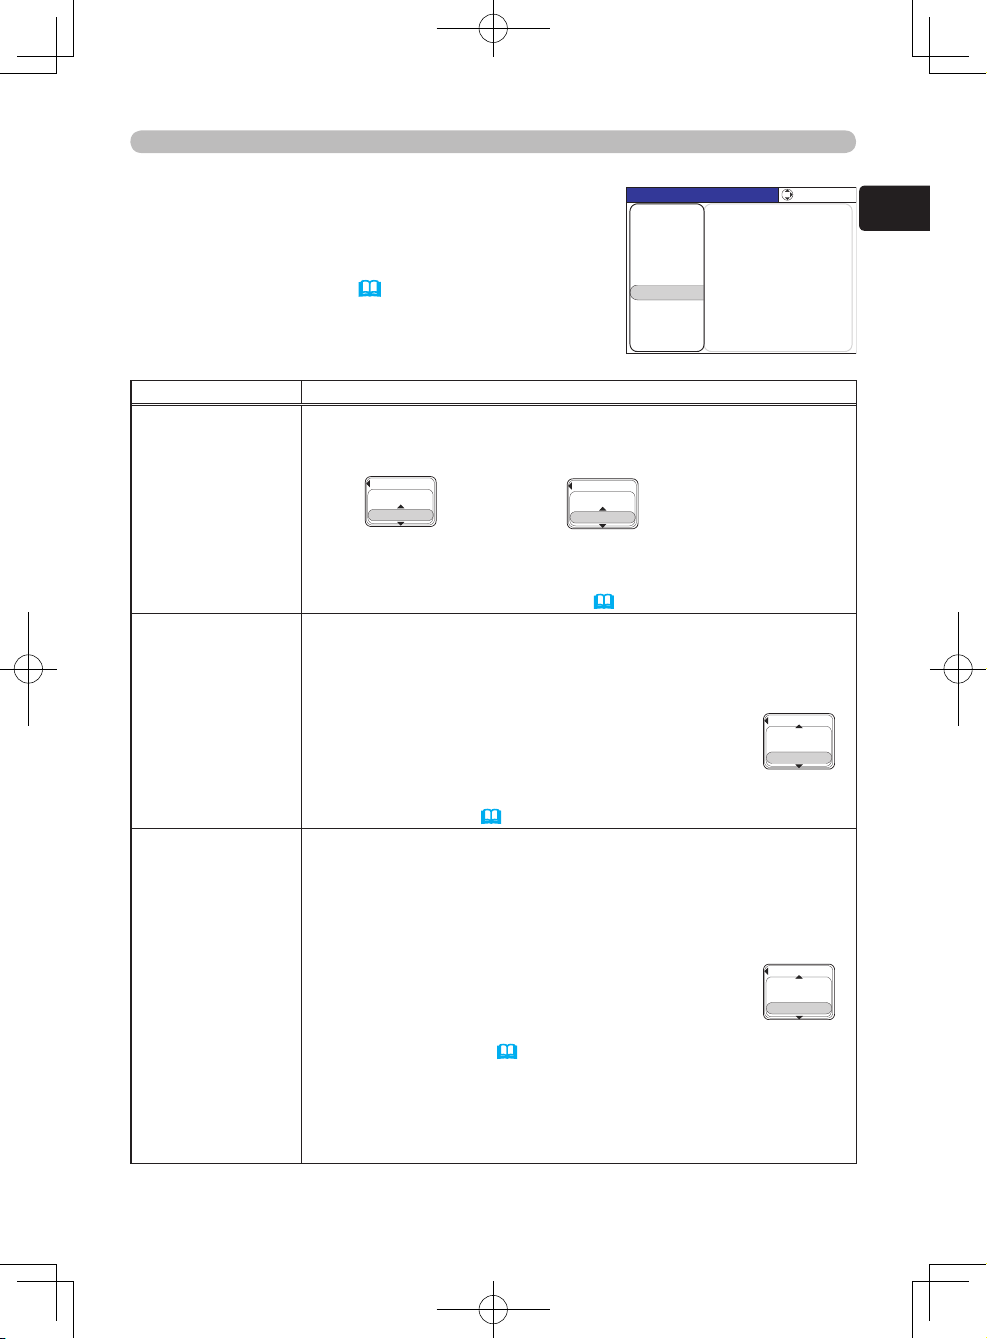
53
ENGLISH
Advanced Menu (OPTION menu)
OPTION menu
The following functions are accessible via the
OPTION menu. After selecting an item according to
the procedure described in the preceding "Advanced
Menu operation" section (35), refer to the following
table for details on operating the selected item.
Item Description
AUTO OFF
Using the ▲/▼ cursor buttons adjusts the amount of time after
which the projector of
f is automatically turned off.
Long (max. 99 min.)
Short (min. 0 min.)
If no signal or an unsuitable signal is detected for the time set on
t
his menu, the projector lamp will turn off and the power indicator will
blink orange.
Please see “T
urning the power off” (
23) to complete the process.
LAMP TIME
LAMP TIME is displayed in the OPTION menu as a reference value
of the usage time of the lamp. The time displayed is the total time
the lamp has been used since the LAMP TIME was last reset.
Only reset the LAMP TIME item when you have replaced the lamp
so that the LAMP TIME remains accurate.
Pressing the ▲ cursor button in the LAMP TIME menu
resets the LAMP
TIME.
RESET
CANCEL
- NOTE -
• Please see “Lamp” (
57) for information on lamp replacement.
FILTER TIME
FILTER TIME is displayed in the OPTION menu as a reference
value of the usage time of the air filter. The time displayed is the
total time the filter has been used since the FILTER TIME was last
reset.
Only reset the FIL
TER TIME item when you have cleaned or
replaced the air filter so that the FILTER TIME remains accurate.
Pressing the ▲ cursor button in the FILTER TIME menu
resets the FIL
TER TIME.
RESET
CANCEL
- NOTE -
• Please see “Air filter” (
58) for information on cleaning and
replacing the air filter.
• The FILTER MESSAGE that prompts you to clean the air filter
“REMINDER…” is displayed based on the FIL
TER TIME value.
Please reset the FILTER TIME when the filter is cleaned or changed
so that the message displays correctly.
(Continued on next page)
MENU [COMPUTER]
IMAGE
SETUP
PICTURE
INPUT
OPTION
EASY MENU
SCREEN
:SELECT
AUTO OFF 0 min
LAMP TIME 0 h
SERVICE
FILTER TIME 0 h
AUTO OFF
ENABLE
10 min
AUTO OFF
DISABLE
0 min
LAMP TIME
0h
RESET
CANCEL
FILTER TIME
0h
RESET
CANCEL
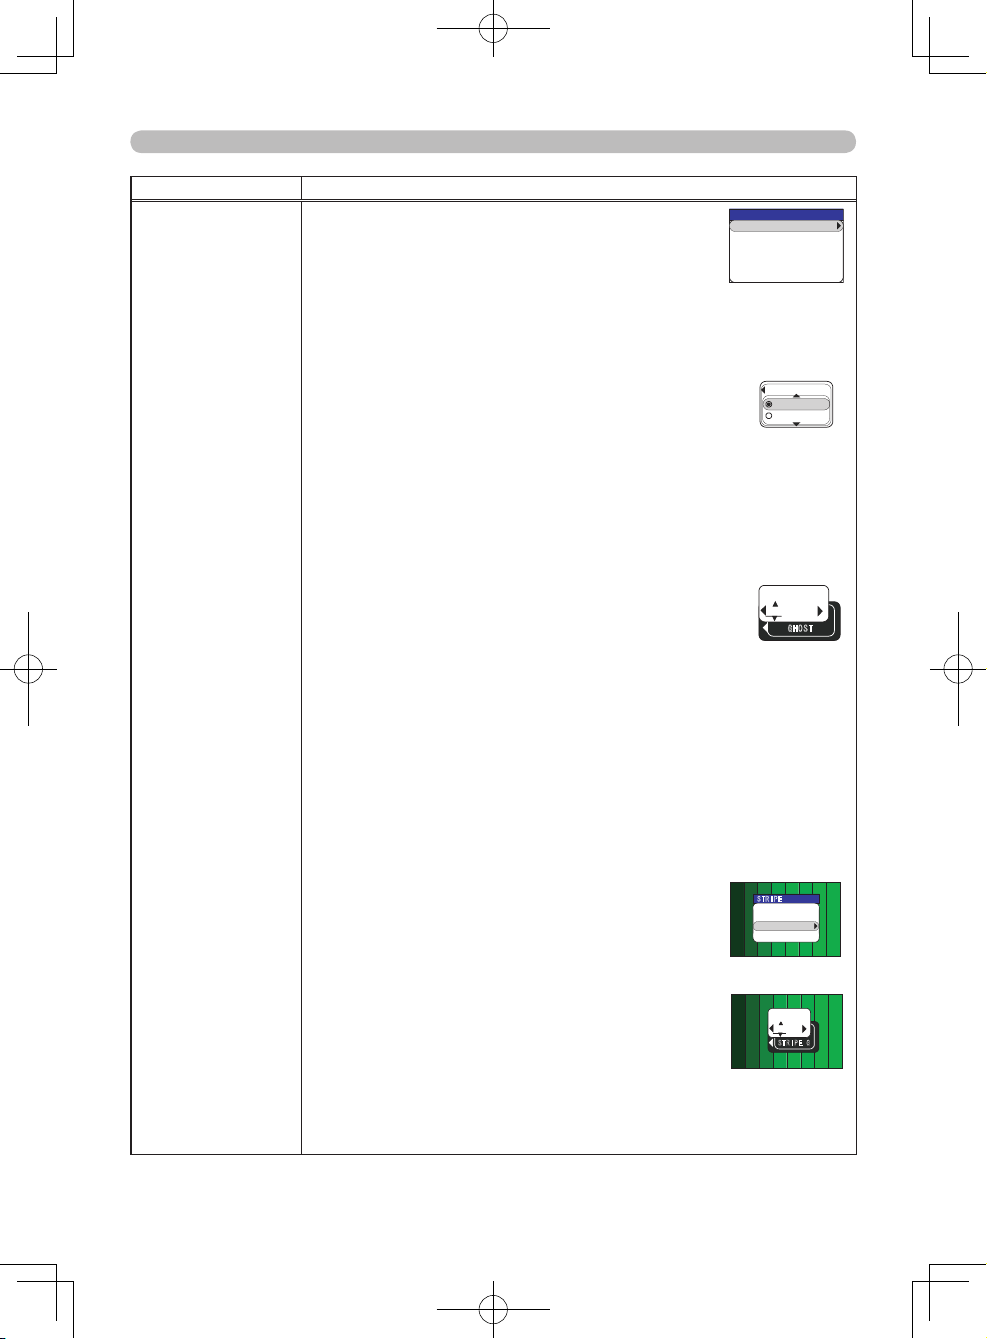
54
Advanced Menu (OPTION menu)
Item Description
SERVICE
The projector has some additional functions as
follows.
Select an item using the ▲/▼ cursor buttons in the
SER
VICE menu, and press the cursor ► button.
Then a dialog or sub-menu will appear
.
FAN SPEED
GHOST
STRIPE
F
ACTORY RESET
FIL
TER MESSAGE
FAN SPEED
Using the ▲/▼ cursor buttons changes the rotation
speed of the built-in cooling fans.
HIGH
NORMAL
The HIGH mode is for use at high elevations.
- NOTE -
• HIGH mode may shorten the lifetime of the lamp. Except for use at
high elevations, please use the NORMAL
mode.
• Note that the projector is noisier when HIGH is selected.
GHOST
If a ghost image appears, the following adjustment
may resolve it.
(1)
Select a color element using the ◄/► cursor buttons in the
GHOST menu.
R (Red)
G (Green)
B (Blue)
(2)
Adjust the selected color using ▲/▼ cursor buttons to remove
the ghost image.
STRIPE
V
ertical stripes may appear on the screen with some signals. This is
not a hardware failure but a phenomenon common to LCD panels.
The following procedure may improve the stripes, although it may
not correct them completely
.
Make adjustments while referring to the test
pattern displayed in the background of the menu or
dialog.
(1)
Select a color element using the ▲/▼ cursor
buttons in the STRIPE menu.
R (Red)
G (Green)
B (Blue)
(2)
Press the ► cursor button and a dialog will
appear
.
(3) Select H or L using the ◄/► cursor buttons.
L (Dark side)
H (Bright side)
(4)
Adjust the tone of selected color using the ▼/▲ cursor buttons to
improve the stripes.
Be sure to make adjustments for every color element.
(Continued on next page)
SERVICE
FANSPEED NORMAL
GHOST
STRIPE
FILTER MESSAGE 100h
FACTORY RESET
FANSPEED
HIGH
NORMAL
+0 +0 +0
GHOST
R G B
STRIPE
B:
Low High
+0 +0
R:
+0 +0
G:
+0 +0
↓
+0
+0
STRIPE G
L
H
STRIPE
B:
Low High
+0 +0
R:
+0 +0
G:
+0 +0
↓
+0
+0
STRIPE G
L
H
STRIPE
B:
Low High
+0 +0
R:
+0 +0
G:
+0 +0
↓
+0
+0
STRIPE G
L
H
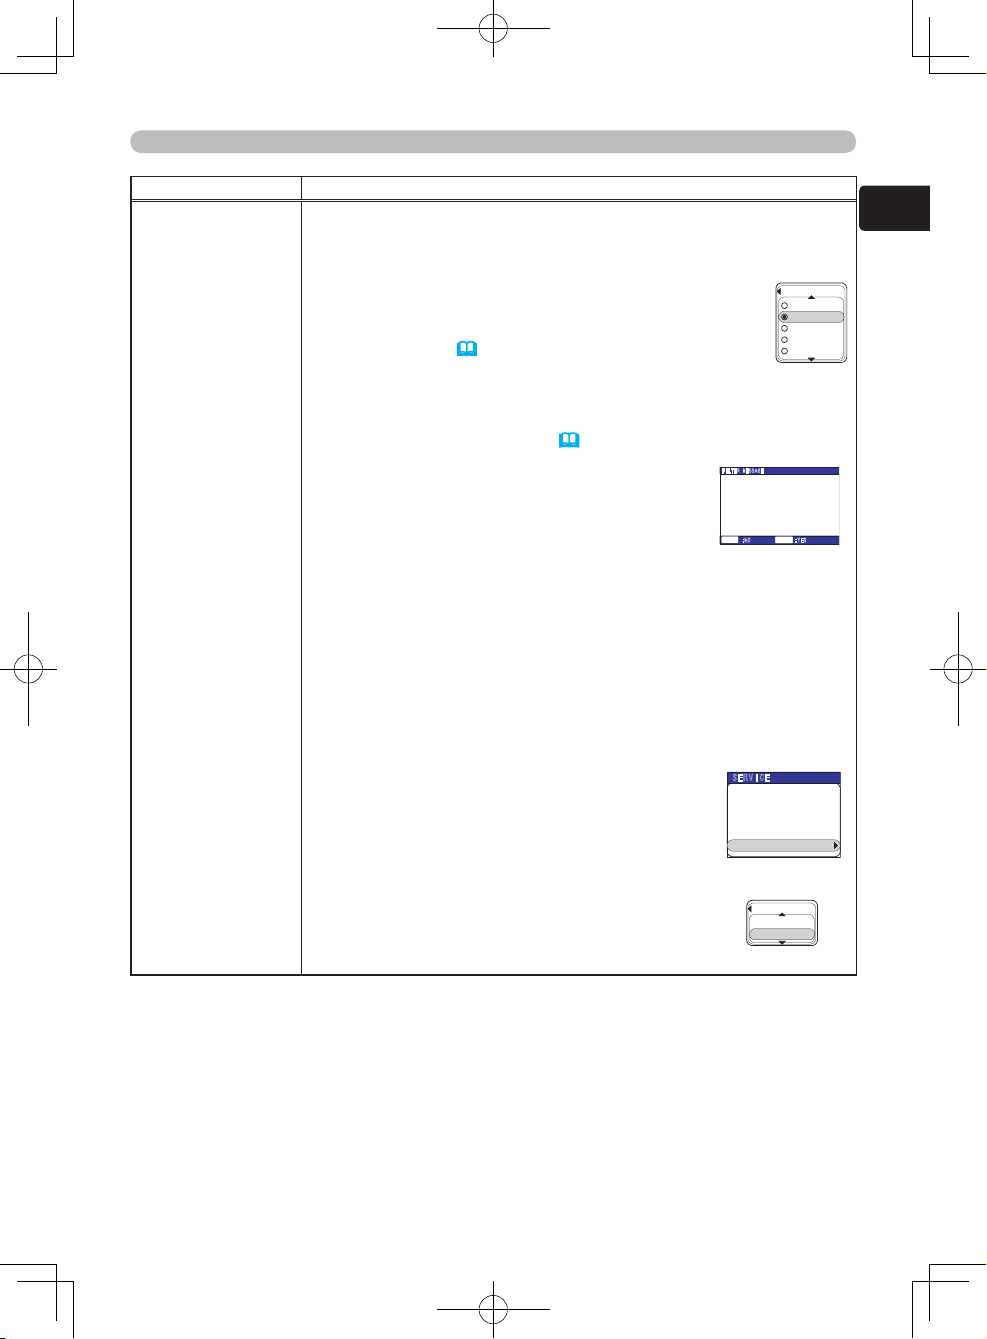
55
ENGLISH
Advanced Menu (OPTION menu)
Item Description
Continuation of
“SER
VICE”
(Continuation of “STRIPE”.)
- NOTE -
• KEYSTONE cannot be adjusted while using the STRIPE .function.
FIL
TER MESSAGE
Using the ▲/▼ cursor buttons changes the amount of
time til the projector will display the fi
lter message
(“REMINDER…”) (
61) that prompts you to clean the air
filter.
50h
100h
200h
300h
TURN OFF
When 50h, 100h, 200h or 300h is selected, the fi
lter message will
appear after the FILTER TIME (
53) has reached the selected
time.
Choosing
TURN OFF in the FILTER MESSAGE
menu displays a confi
rmation dialog. Note that the
filter message will not appear when
TURN OFF is
selected.
Pressing the ENTER button selects
TURN OFF.
If you want to change the selection, press the RESET button while
the dialog is displayed to return to the FILTER MESSAGE menu.
- NOTE -
• Check and clean the air filter periodically, even if no message is
displayed. If the air fi
lter becomes blocked by dust or other debris,
the internal temperature will rise, which could cause projector
malfunction, or reduce the lifetime of the projector
.
• Please be careful of the operating environment of the projector
and the condition of the air fi
lter, especially when the 200h, 300h or
TURN OFF options are selected.
F
ACTORY RESET
This projector has a FACTORY RESET function to
re-initialize all user settings simultaneously
. Except
where the current setting is always considered the
default setting (LANGUAGE, MyScreen Lock,
LAMP
TIME, FILTER TIME etc.)
Pressing the ▲ cursor button in the FACTORY
RESET
menu performs a FACTORY RESET.
RESET
CANCEL
FILTER MESSAGE
100h
50h
200h
300h
TURN OFF
ARE YOU SURE YOU WISH TO DISABLE WARNING?
FAILURE TO CLEARN THE FILTER MAY RESULT IN
DAMAGE TO THE PROJECTOR
SEE MANUAL FURTHER INFO
FILTER M ES SA GE
:NO :YES
RESET
ENTER
S ERV IC E
FANSPEED NORMAL
AUTO ADJUST ENABLE
GHOST
STRIPE
FILTER MESSAGE 100h
FACTORY RESET EXECUTE
↓
FACTORY RESET
RESET
CANCEL
S ERV IC E
FANSPEED NORMAL
AUTO ADJUST ENABLE
GHOST
STRIPE
FILTER MESSAGE 100h
FACTORY RESET EXECUTE
↓
FACTORY RESET
RESET
CANCEL
S ERV IC E
FANSPEED NORMAL
AUTO ADJUST ENABLE
GHOST
STRIPE
FILTER MESSAGE 100h
FACTORY RESET EXECUTE
↓
FACTORY RESET
RESET
CANCEL
56
WARNING
HIGH VOLTAGE
HIGH TEMPERATURE
HIGH PRESSURE
►The projector uses a high-pressure mercury glass lamp. The lamp can break
with a loud bang, or burn out, if jolted or scratched, handled while hot, or worn
over time. Note that each lamp has a different lifetime, and some may burst or
burn out soon after you start using them. In addition, when the bulb bursts, it is
possible for shards of glass to fly into the lamp housing, and for gas containing
mercury to escape from the projector’s vent holes.
►About disposal of a lamp • This product contains a mercury lamp; do not put
it in a trash. Dispose of it in accordance with environmental laws.
For lamp recycling, go to www
.lamprecycle.org. (in the US)
For product disposal, contact your local government agency or www.eiae.org (in
the US) or www.epsc.ca (in Canada).
For more information, call your dealer.
• If the lamp should break (it will make a loud bang when it does),
unplug the power cord from the outlet, and make sure to request a
replacement lamp from your local dealer. Note that shards of glass could
damage the projector’s internals, or cause injury during handling, so
please do not try to clean the projector or replace the lamp yourself.
• If the lamp should break (it will make a loud bang when it does),
ventilate the room well, and make sure not to breathe the gas that
comes out of the projector vents, or get it in your eyes or mouth.
• Before replacing the lamp, turn the projector off and unplug the power
cord, then wait at least 45 minutes for the lamp to cool sufficiently.
Handling the lamp while hot can cause burns, as well as damaging the
lamp.
• Never unscrew except the appointed (marked by an arrow) screws.
•
Do not open the lamp cover while the projector is suspended from
above. This is dangerous, since if the lamp’s bulb has broken, the
shards will fall out when the cover is opened. In addition, working in
high places is dangerous, so ask your local dealer to have the lamp
replaced even if the bulb is not broken.
• Do not use the projector with the lamp cover removed. At the lamp
replacing, make sure that the screws are screwed in firmly. Loose
screws could result in damage or injury.
• Use only the lamp of the specified type.
•
If the lamp breaks soon after the first time it is used, it is possible that
there are electrical problems elsewhere besides the lamp. If this happens,
contact your local dealer or a service representative.
•
Handle with care: jolting or scratching could cause the lamp bulb to burst
during use.
•
Using the lamp for long periods of time, could cause it dark, not to light up
or to burst. When the pictures appear dark, or when the color tone is poor,
please replace the lamp as soon as possible. Do not use old (used) lamps;
this is a cause of breakage.
Maintenance
Maintenance
Lamp
Disconnect
the plug
from the
power
outlet
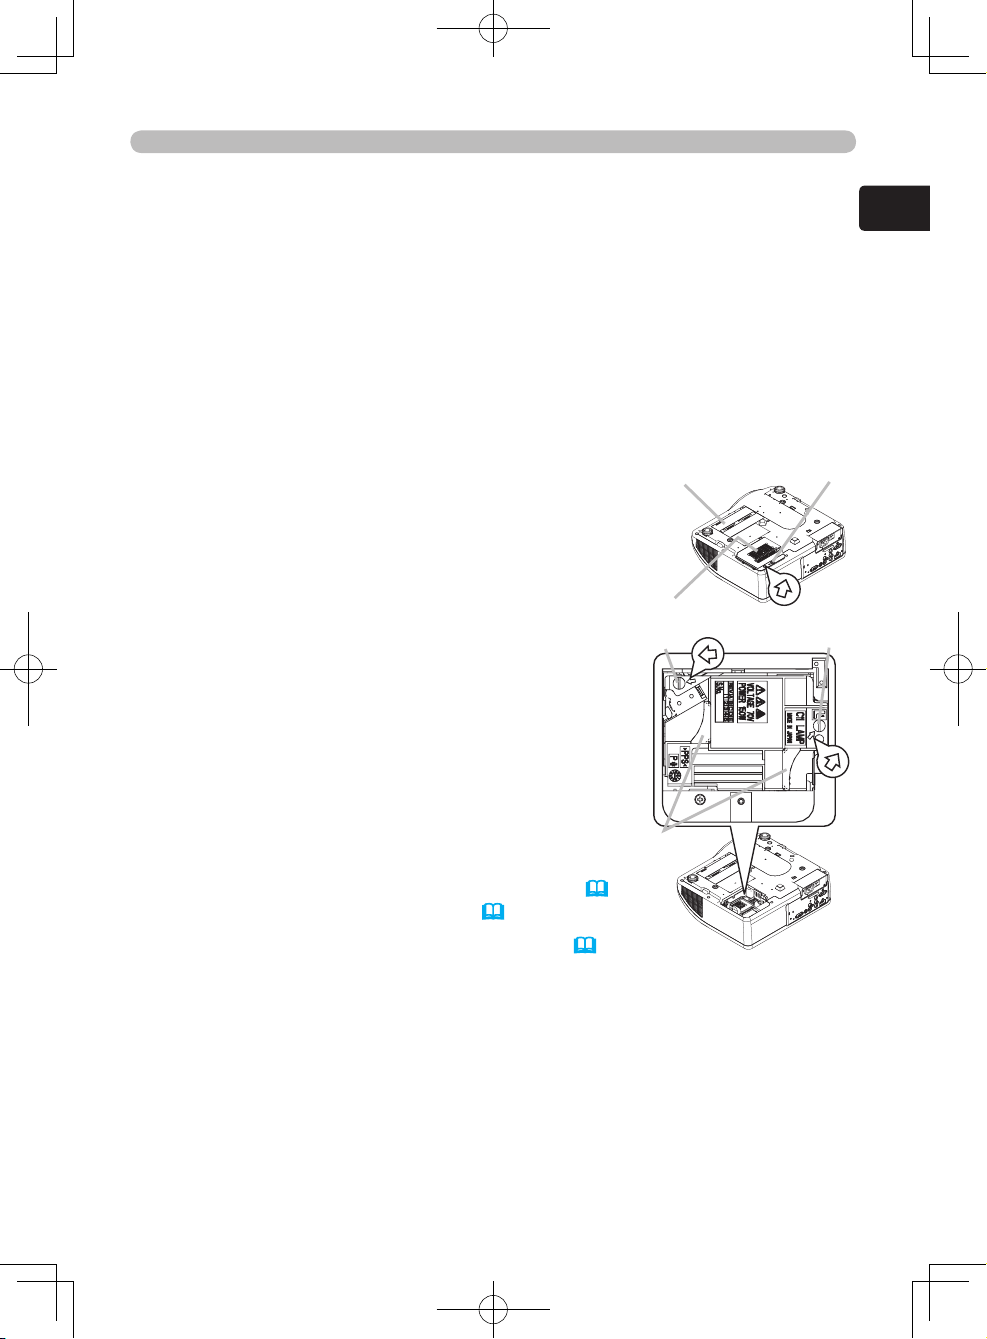
57
ENGLISH
Maintenance
A lamp has a finite product life. Using the lamp for long periods of the time could
cause the picture to become darker or the color tone to become poor. Note that
each lamp has a different lifetime, and some may burst or burn out soon after you
start using them.
Preparation of a new lamp and early replacement are recommended. To purchase
a new lamp, contact your dealer and tell the lamp type number = DT00665.
1.
Turn the projector off, and unplug the power cord. Allow the projector to cool
for at least 45 minutes.
2.
Prepare a new lamp. If the projector is mounted on the ceiling, or if the lamp
has broken, ask the dealer to replace the lamp.
3.
After making sure that the projector has
adequately cooled, slowly turn the projector over
so that the bottom is facing up.
4.
Loosen the lamp cover screw (marked by the
arrow), then slide and lift the lamp cover.
5.
Loosen the 2 lamp screws (marked by the arrow),
and slowly lift the lamp by the handles.
Be careful when handling the lamp. Breaking the
lamp could cause injury and the release of gas
containing mercury.
6.
Insert the new lamp, and retighten the screws that
were loosened in the previous step to lock it in
place.
7.
Slide the lamp cover into place, and retighten the
lamp cover screw loosened in step 4.
8.
Please reposition and reconnect the projector (
12-17). Then turn the projector on (20).
9.
Reset the LAMP TIME in the OPTION menu (53).
(1) Press the MENU button to display a menu. If you are using the Advanced
Menu skip the next step (2).
(2) To switch from the EASY MENU to the Advanced Menu, select the “Go To
the Advanced Menu …” item in the EASY MENU using the ▲/▼ cursor
buttons, then press the ► cursor button. The Advanced Menu will appear.
(3) Select the “OPTION” item in the left column of the Advanced Menu using
the ▲/▼ cursor buttons then press the ► cursor button.
Replacing the lamp by yourself
Bottom
of the projector
Screw
Lamp cover
Screw
Screw
Handles
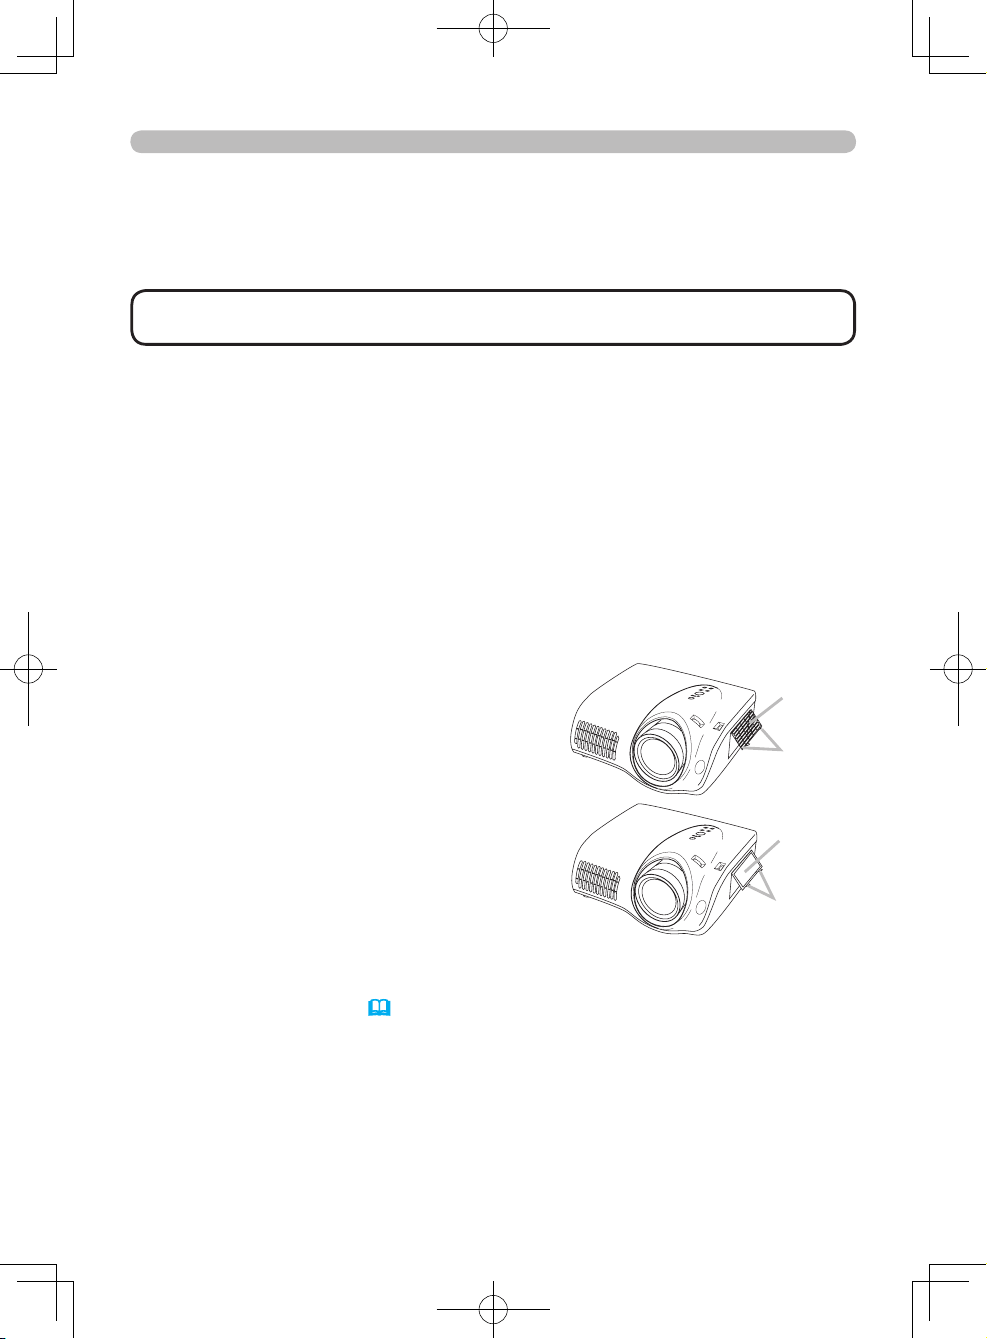
58
Maintenance
(4) Select the “LAMP TIME” item in the right column of the Advanced Menu
using the ▲/▼ cursor buttons, then press the ► cursor button and the
LAMP TIME menu will appear.
(5) Pressing the ▲ cursor button in the menu resets the LAMP TIME.
• Only reset the LAMP TIME item when you have replaced the lamp so
that the LAMP TIME remains accurate.
NOTE
Air filter
If the air filter becomes clogged by dust or the like, internal temperatures will
rise and could cause fire, burn and/or projector malfunction. When the indicators
or a message prompts you to clean the air filter, make sure to clean it as soon
as possible. Check and clean the air filter periodically, even if no message is
displayed.
Please replace the air filter when it is damaged or too dirty to be cleaned.
Preparation of a new air filter is recommended. To purchase a new air filter,
contact your dealer and tell the air filter type number = NJ22632.
Replace the air filter when the lamp is replaced. An air filter of the specified type
will be included with replacement lamps for this projector.
1.
Turn the projector off, and unplug the power
cord. Allow the projector to sufficiently cool
down.
2.
After making sure that the projector has
cooled adequately, remove the filter cover
and air filter. Hold the knobs while lifting.
3.
Use a vacuum cleaner to clean the air filter
vent, the air filter and filter cover.
Please replace the air filter when it is
damaged or too dirty to be cleaned.
4.
Set the cleaned or new air filter into place, and press the point between the 2
knobs.
5.
Turn the projector on (20).
Filter
cover
Knobs
Knobs
Air filter
59
ENGLISH
Maintenance
6.
Reset the FILTER TIME in the OPTION menu (53).
(1) Press the MENU button to display a menu.
If you are using the Advanced Menu skip the next step (2).
(2) To switch from the EASY MENU to the Advanced Menu, select the “Go To
the Advanced Menu …” item in the EASY MENU using the ▲/▼ cursor
buttons, then press the ► cursor button. The Advanced Menu will appear.
(3) Select the “OPTION” item in the left column of the Advanced Menu using
the ▲/▼ cursor buttons then press the ► cursor button.
(4) Select the “FILTER TIME” item in the right column of the Advanced Menu
using the ▲/▼ cursor buttons, then press the ► cursor button and the
FILTER TIME menu will appear.
(5) Pressing the ▲ cursor button in the menu resets the FILTER TIME.
► Do not maintain the projector during or immediately after use.
Handling while the projector is hot could cause burn and/or projector malfunction.
Before maintaining, make sure that the power switch is off, that the power cord is
unplugged, and that the projector is adequately cool.
► Use only the specified air filter type. Do not use the projector with the air
filter or the filter cover removed. Doing so could cause fire and/or projector
malfunction.
► The air filter should be cleaned periodically. If the air filter becomes blocked
by dust or other debris, the internal temperature will rise, which could cause
burns, fire and/or projector malfunction, or reduce the lifetime of the projector.
WARNING
• Please replace the air filter when it is damaged or too dirty to be
cleaned, and also when the lamp is replaced.
• Only reset the FILTER TIME item when you have cleaned or replaced the air
filter so that the FILTER TIME remains accurate (53).
• The projector may display the message “CHECK THE AIR FLOW” or
automatically turn the power off in order to prevent the internal heat level from
rising.
NOTE

60
Maintenance
Inside of the projector
In order to ensure the safety of your projector, please have it cleaned and
inspected by your dealer about once a year.
1.
Turn the projector off, and unplug the power cord. Allow the projector to
sufficiently cool down.
2.
After making sure that the projector has adequately cooled, lightly wipe the
lens with a commercially available lens-cleaning wipe. Do not touch the lens
directly with your hand.
Lens
In order to ensure the safety of your projector, please have it cleaned and
inspected by your dealer about once a year.
If the lens is flawed, dirty or fogged, it could cause deterioration of display quality.
Take special care of the lens and handle it carefully.
1.
Turn the projector off, and unplug the power cord. Allow the projector to
sufficiently cool down.
2.
After making sure that the projector has adequately cooled, lightly wipe with
gauze or a soft cloth. If the projector is extremely dirty, dip a soft cloth in
water or a neutral cleaner diluted in water, wring well, and wipe the projector
lightly. Then, wipe lightly with a soft, dry cloth.
Cabinet and Remote control
Incorrect care could cause discoloration, peeling, etc.
► Do not maintain the projector during or immediately after use.
Handling while the projector is hot could cause burn and/or projector malfunction.
Before maintaining, make sure that the power switch is off, that the power cord is
unplugged, and that the projector is adequately cool.
► Never try to maintain the inside of the projector yourself. Doing is so
dangerous.
► Do not get the projector wet or insert liquids into the projector. It could result
in fire, electric shock, and/or projector malfunction.
● Do not place anything containing liquid near the projector.
● Do not use aerosols or sprays on the projector.
WARNING
► Properly maintain the projector according to the following.
Incorrect care could cause injury, and/or discoloration, peeling, etc.
• Do not use cleaners or chemicals other than those specified in this manual.
• Do not polish or wipe the projector with hard objects.
CAUTION
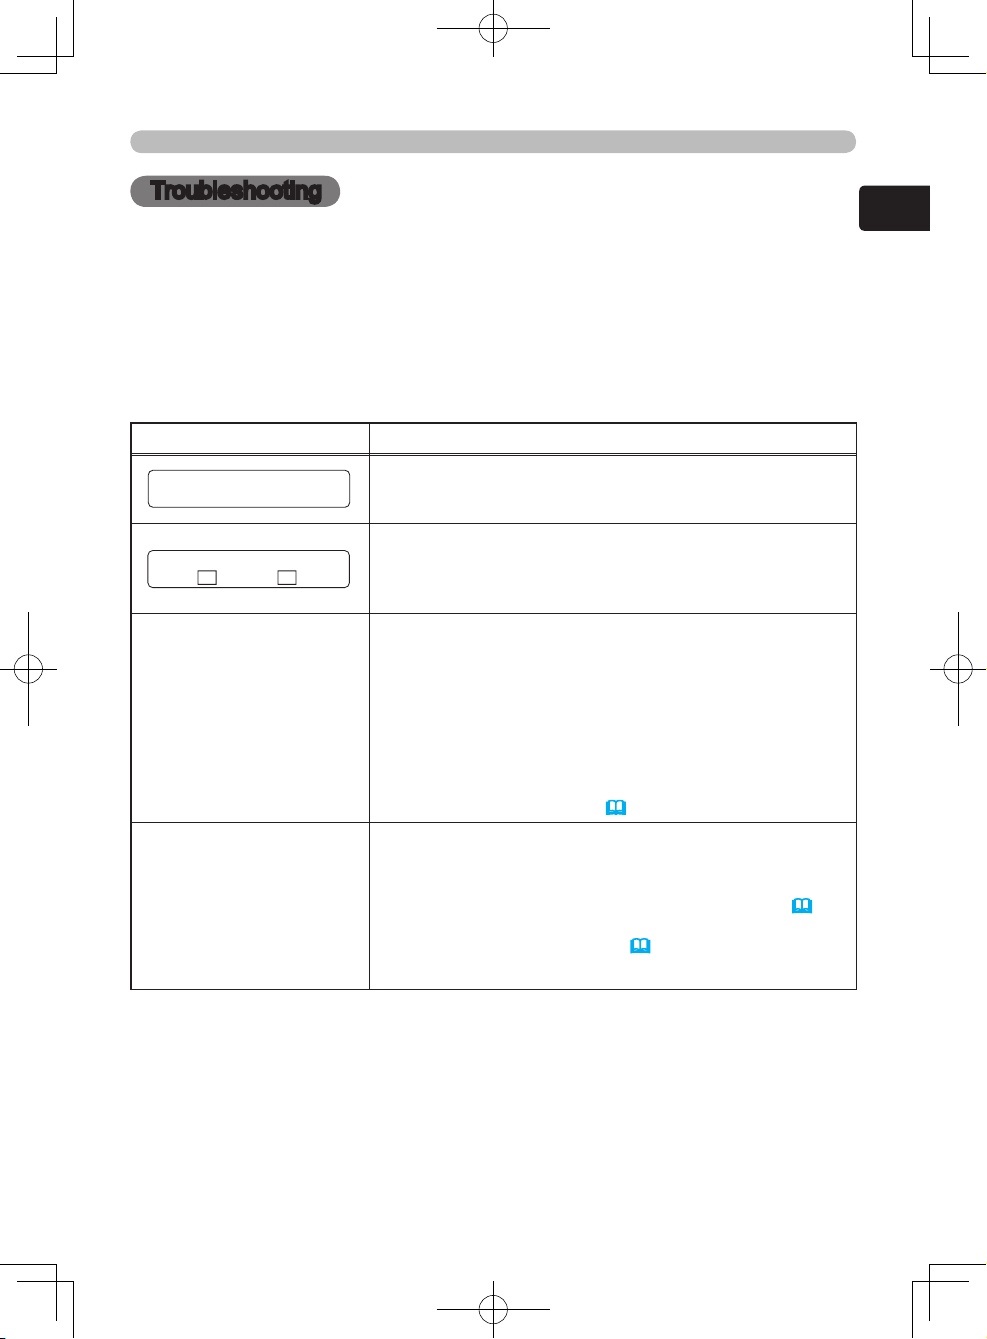
61
ENGLISH
Troubleshooting
Troubleshooting
Related messages
When the projector is turned on, the following messages may be displayed. When
any such message is displayed on the screen, please follow the instructions
described below. If the same message is displayed after trying the solutions
below, or if a message other than the following appears, please contact your
dealer or service company.
Although these messages will be automatically disappear after several minutes,
they will reappear every time the power is turned on.
Message Description
There is no input signal.
Please confirm the input signal connection, and the status
of the signal source.
T
he horizontal or vertical wavelength of the input signal
is out of the response parameter range of this projector.
Please confirm the specs for the projector and the signal
source specs.
CHECK THE AIR FLOW
The internal temperature is high.
Please turn the power off, and allow the projector to cool
down for at least 20 minutes. After confirming the following
items, please turn the power on again.
• Is there blockage of the air passage aperture?
• Is the air filter dirty?
• Does the peripheral temperature exceed 35°C?
If the same indication is displayed after trying the solutions
above, please set the F
AN SPEED of the SERVICE item in
the OPTION menu to HIGH (
54).
REMINDER
*** HRS PASSED AFTER THE
LAST FILTER CHECK.
FILTER MAINTENANCE IS ESSENTIAL
TO REMOVE WARNING MESSAGE,
RESET FILTER TIMER.
SEE MANUAL FURTHER INFO
A note of precaution when cleaning the air filter.
Please immediately turn the power off, and clean or change
the air filter, according to the directions in “Air filter” (
58).
After you have cleaned or changed the air filter, please be
sure to reset the FILTER TIME (
53).
NO INPUT IS DETECTED
ON ***
SYNC IS OUT OF RANGE
ON *** fH *****kHz fV *****Hz
62
POWER
indicator
LAMP
indicator
TEMP
indicator
Description
Lit In
Orange
Turned
off
T
urned
off
The projector is in a standby state.
Please refer to the “T
urning the power on” (
20) and
“Turning the power off” (
23).
Blinking
Green
Turned
off
T
urned
off
The projector is warming up.
Please wait.
Lit In
Green
Turned
off
T
urned
off
The projector is on and ready.
Ordinary operations may be performed.
Blinking
Orange
Turned
off
T
urned
off
The projector is cooling down.
Please wait.
Blinking
Red
(varies) (varies)
The projector is cooling down.
An error has been
detected.
Please wait until the POWER indicator fi
nishes blinking,
and then try the suggested solution, referring to the
following error descriptions.
Blinking
Red
or
Lit In
Green
Lit In Red
Turned
off
The lamp will not light, and there is a possibility that
interior of the projector has overheated.
Please turn the power of
f, and allow the projector to cool
down for at least 20 minutes. After the projector has
cooled down sufficiently, please confirm the following
items, and then turn the power on again.
• Is there blockage of the air passage aperture?
• Is the air filter dirty?
• Does the peripheral temperature exceed 35°C?
If the same indication is displayed after trying the
solutions above, please change the lamp according to the
directions in “Lamp” (
56, 57).
Troubleshooting
Regarding the indicator lamps
The meanings of the lighting patterns of the POWER indicator, the LAMP
indicator, and the TEMP indicator are described in the table below. Please follow
the instructions within the table. If the same indication is displayed after trying
the solutions below, or if an indication other than the following appears, please
contact your dealer or service company.
(Continued on next page)
63
ENGLISH
POWER
indicator
LAMP
indicator
TEMP
indicator
Description
Blinking
Red
or
Lit In Red
Turned
off
Blinking
Red
The cooling fan is not operating.
Please turn the power of
f, and allow the projector to cool
down for at least 20 minutes. After the projector has
cooled down sufficiently, please confirm the following
items, and then turn the power on again.
•
Are any foreign objects caught in the fan?
• Are there any magnetic objects on or near the projector?
Please ensure that installation configuration/usage of
the projector does not allow any foreign materials to be
caught, or disrupt the rotation of the cooling fans.
Blinking
Red
or
Lit In Red
Turned
off
Lit In Red
There is a possibility that the interior of the projector
has overheated.
Please turn the power of
f, and allow the projector to cool
down for at least 20 minutes. After the projector has
cooled down sufficiently, please confirm the following
items, and then turn the power on again.
• Is there blockage of the air passage aperture?
• Is the air filter dirty?
• Does the peripheral temperature exceed 35°C?
If the same indication is displayed after trying the
solutions above, please set the F
AN SPEED of the
SERVICE item in the OPTION menu to HIGH (
54).
Lit In
Green
Alternative blinking
Red
There is a possibility that the interior of the projector
has become too cool.
Please use the projector within the usage temperature
parameters (5°C to 35°C).
After applying the solution set
the power switch to ON.
Lit In
Green
Simultaneously
blinking in Red
It is time to clean the air filter.
Please turn the power of
f immediately, and clean or
change the air filter referring to the “Air Filter” (
58)
section. After cleaning or changing the air filter, please be
sure to reset the filter timer. After applying the solution set
the power switch to ON.
Troubleshooting
Regarding the indicator lamps (continued)
• When the interior of the projector overheats, the power source is
automatically turned off for safety purposes, and the indicator lamps may also
be turned off. If this occurs, set the power switch to the “” (OFF) position, and
wait at least 45 minutes. After the projector has cooled down sufficiently, please
confirm that the lamp and lamp cover are properly fastened, and then turn the
power on again.
NOTE
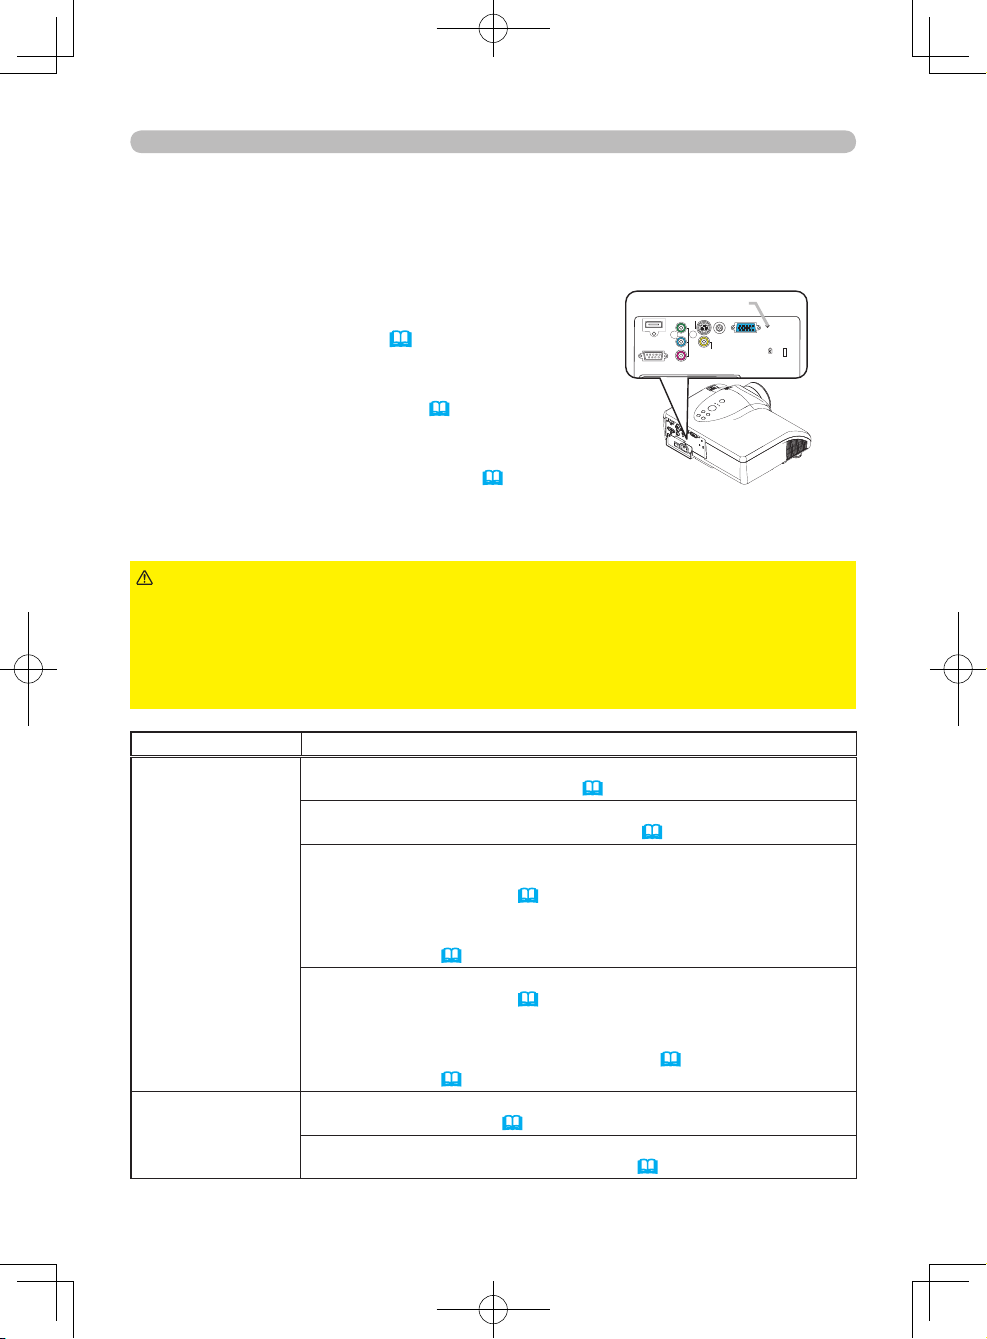
64
Phenomenon Cases not involving a machine defect
Troubleshooting
Phenomena that may be easily mistaken as machine defects
Before requesting repair, please check the following chart. This will sometimes
provide a solution to your problem.
If a situation cannot be resolved, the projector’s microprocessor may need to be
reset, or settings may be incorrect.
To reset the microprocessor, turn the projector off
once, and turn it on again (
20). If the projector
cannot be turned off, use the restart switch.
Pressing the restart switch using a pin or similar
object will restart the projector (7, 23).
To reset all settings to the factory default, please
use the F
ACTORY RESET item in the SERVICE
menu which is in the OPTION menu (
55).
If the problem is not solved after performing maintenance, please contact your
dealer or service company
.
► Never use the projector if there is any abnormality such as
smoke, strange odor, excessive noise, damaged casing, elements or cables,
penetration of liquids or foreign matter, etc. In such cases, immediately turn
the power off and then disconnect the power plug from the power outlet. After
making sure that the smoke or odor has stopped, contact your dealer or service
company.
WARNING
Power does not
come on.
No pictures are
output
The electrical power cord is not plugged in.
Correctly connect the power cord (
17).
The power switch is not set to the on position.
Set the power switch to [ | ] (On position) (
20).
The main power source has been interrupted during operation
by a power outage (blackout), etc.
Please turn the power of
f (
23), and allow the projector to cool
down for at least 20 minutes.
After the projector has cooled down suffi
ciently, please turn the
power on again (
20).
Either the lamp or lamp cover has not been properly fastened.
Please turn the power of
f (
23), and allow the projector to cool
down for at least 45 minutes.
After the projector has sufficiently cooled down, confi
rm that the
lamp and lamp cover are properly fastened (
58). Then turn the
power on again (
20).
The lens cover is closed.
Remove the lens cover (
6).
The signal cables are not correctly connected.
Correctly connect the connection cables (
13-16).
(Continued on next page)
Y
C
B/PB
CR/PR
COMPONENT VIDEO
S-VIDEO
VIDEO
COMPUTER
CONTROL
HDMI
TRIGGER
AC IN
I O
Restart switch
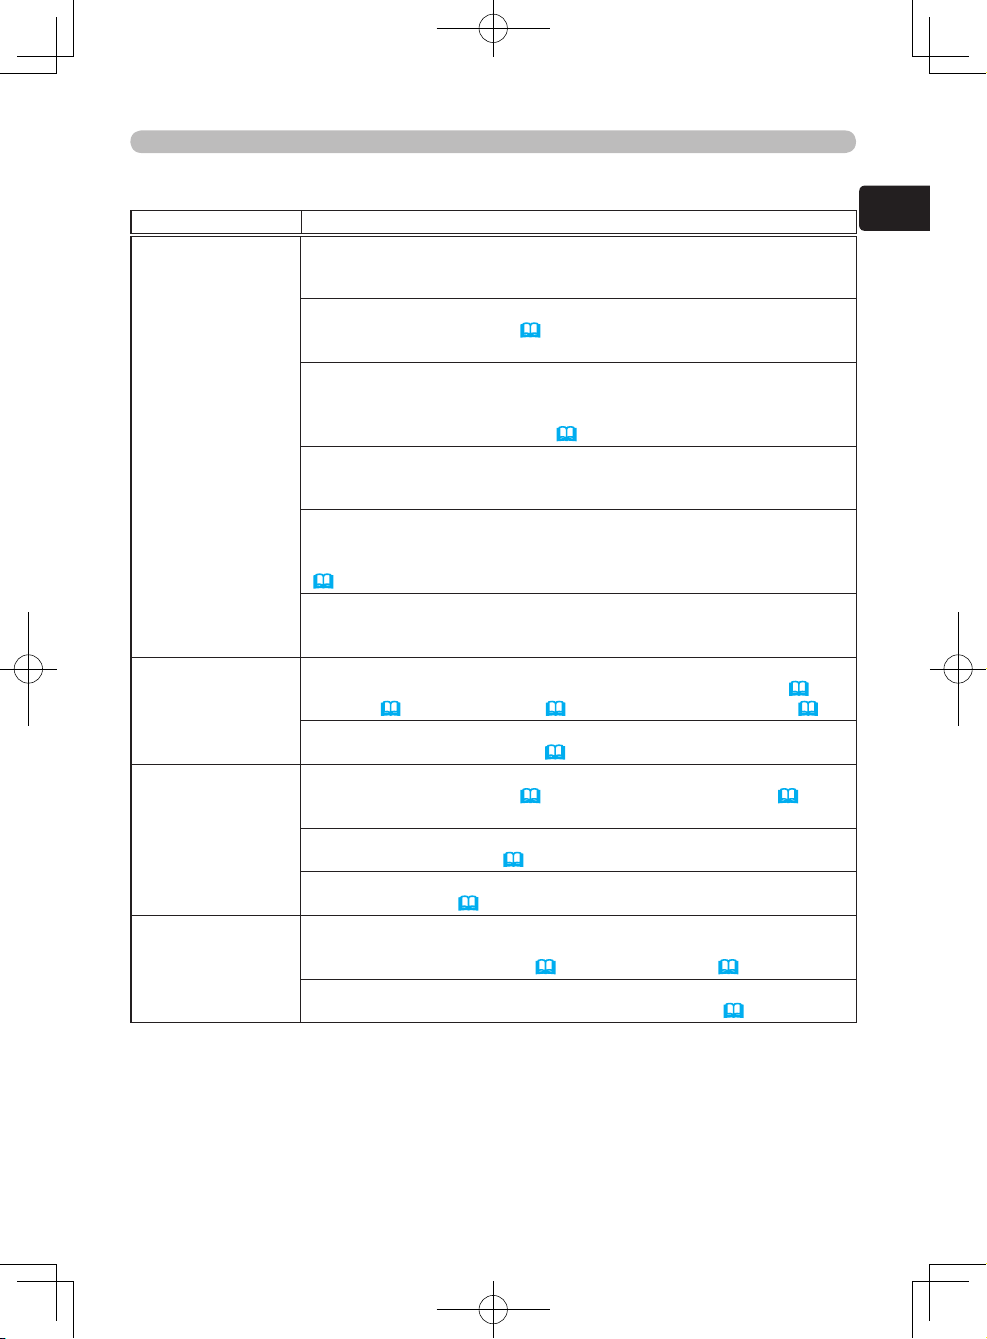
65
ENGLISH
Troubleshooting
Phenomena that may be easily mistaken for machine defects (continued)
Phenomenon Cases not involving a machine defect
No pictures are
output.
Colors have
a faded-out
appearance, or
Color tone is poor
.
Pictures appear
dark.
Pictures appear
blurry
.
Signal source does not work correctly.
Correctly set up the signal source device by referring to the manual
for the source device.
The brightness is adjusted to an extremely low level.
Adjust the BRIGHTNESS (
27, 33, 37) to a higher level using the
menu function or the remote control.
The computer cannot detect the projector as a plug and play
monitor
.
Confirm that the computer can detect a plug and play monitor using
another plug and play monitor (
16).
If the connected PC has a HDMI output, the driver software of
the HDMI board is too old.
Consult with your PC dealer to install new software.
The signal source cannot output both a HDMI signal and a VGA
signal simultaneously.
Disconnect the VGA connection when you use the HDMI input
(
14, 15).
If the output signal can be selected on the PC, it is not selected
properly
.
Check the settings. Select the digital output for HDMI connection.
Color settings are not correctly adjusted.
Perform picture adjustments by changing the COLOR TEMP (39),
COLOR (
27, 33, 40), TINT (33, 40) and COLOR SPACE (45).
COLOR SPACE setting is not suitable.
Change the COLOR SPACE (
45).
The brightness or contrast is adjusted to an extremely low level.
Adjust the BRIGHTNESS (27, 33, 37) and CONTRAST (27,
33, 37) to a higher level.
The WHISPER function is enabled.
Set the WHISPER item (
48) in the SETUP menu to normal.
The lamp is approaching the end of its product lifetime.
Replace the lamp (
53, 57).
Either the focus or horizontal phase setting is not properly
adjusted.
Check and adjust the focus (
22), and H PHASE (44).
The lens is dirty or fogged.
Clean the lens according to the directions in “Lens” (
60).
(Continued on next page)
66
Phenomenon Cases not involving a machine defect
Troubleshooting
Flicker appears on
the screen.
Projector is very
noisy
.
AUTO1 or AUTO2 is selected for the BLACK mode.
Please set the BLACK mode to TURN OFF using the BLACK button
(
27) or the BLACK item in the PICTURE menu (41).
The WHISPER function is working.
The WHISPER function may cause screen fl
icker.
Set the WHISPER item (
48) in the SETUP menu to NORMAL.
The fan speed has been automatically changed.
When the ambient temperature is, the projector will automatically
raise the cooling fan speed to keep the internal temperature stable.
Lower the ambient temperature.
If you want to reduce noise more, set the WHISPER item (
48) in
the SETUP menu to WHISPER.
• Although bright spots, dark spots, uneven color or misconvergence
may appear on the screen, these are common characteristics of liquid crystal
displays, and do not constitute or imply a machine defect.
NOTE
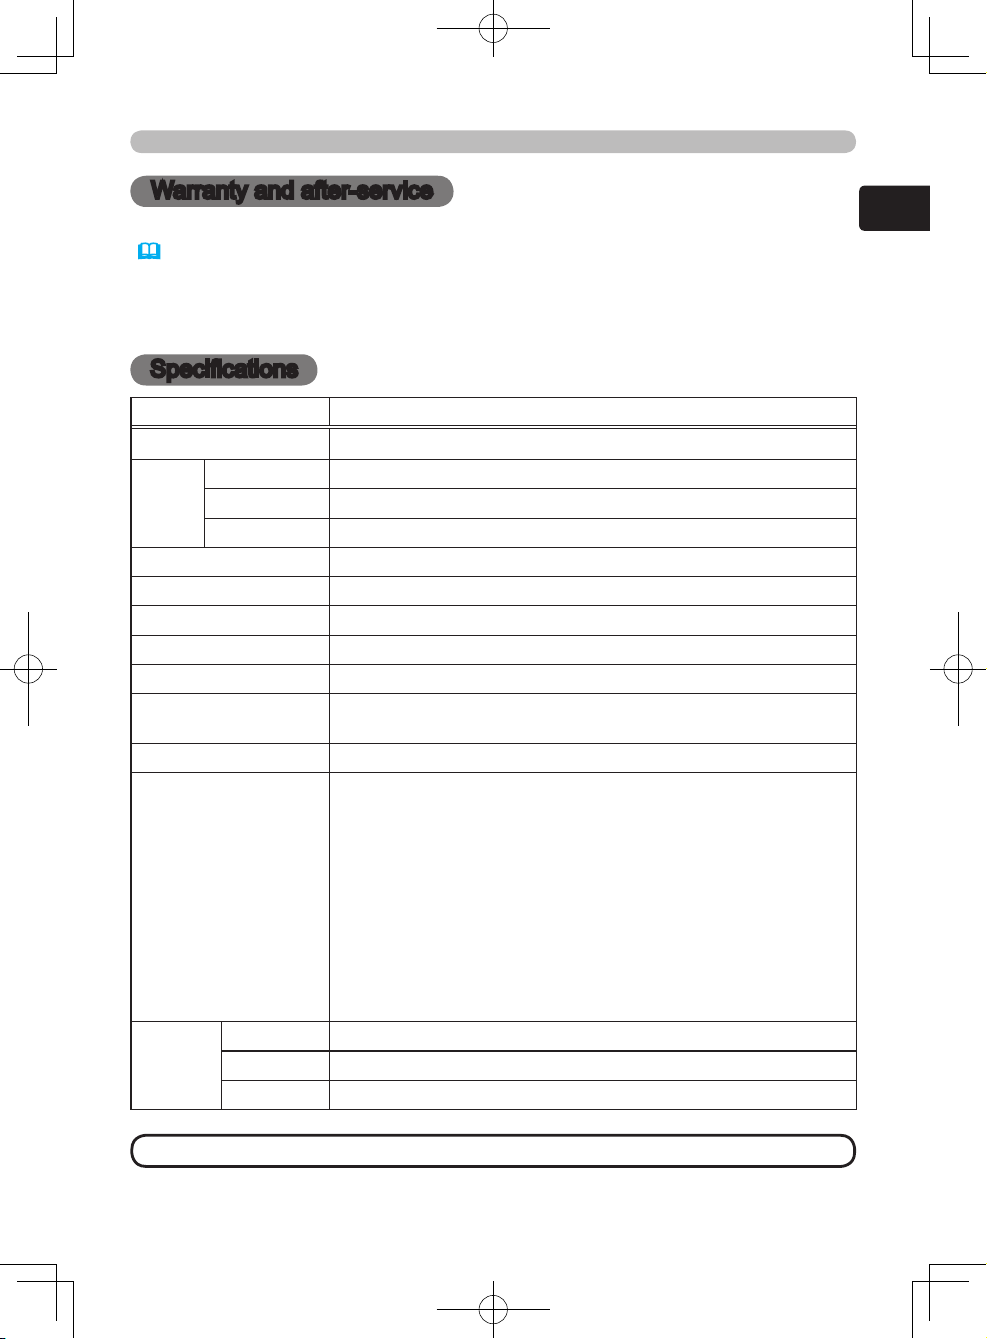
67
ENGLISH
Warranty and after-service / Specifications
Warranty and after-service
When a problem occurs with the equipment, first refer to “Troubleshooting”
(62-66) and run through the suggested checks. If this does not resolve the
problem, please contact your dealer or service company. They will tell you what
warranty condition is applied.
Specifications
Item Specification
Product name Liquid crystal projector
Liquid
crystal
panel
Panel size 1.8 cm (0.7 Type)
Drive system TFT
active matrix
Pixels 921,600 pixels (1280 horizontal x 720 vertical)
Lens Zoom lens F=1.7 ~ 2.4 f = 20.0 ~ 31.9 mm
Lamp 150W UHB
Power Supply AC100-120V/2.4A,
AC220-240V/1.3A
Power Consumption 220W
T
emperature range 5 ~ 35°C (Operating)
Size
340 (W) x 1
13 (H) x 299 (D) mm
(Not including protruding parts)
W
eight (mass) 4.7 kg
Ports
RGB input port:
COMPUTER ...................... D-sub 15pin mini shrink jack x 1
Digital input port:
HDMI .................................................... HDMI connector x 1
Communication port:
CONTROL
..............................................D-sub 9pin plug x 1
Video input port:
VIDEO ............................................................. RCA
jack x 1
S-VIDEO ........................................... Mini DIN 4pin jack x 1
COMPONENT
VIDEO ..................................... RCA jack x 3
Other port:
TRIGGER (12V/25mA) ..................................................... x 1
Optional
parts
Lamp DT00665
Air filter NJ22632
Others • Please consult your dealer
.
• These specifications are subject to change without notice.NOTE

68
Specifications
Dimension diagram
[unit: mm]

69
ENGLISH
Glossary
Glossary
Entry Explanation
Page(s) in
which the entry
appears
3-2 Pull-Down
A
system for converting a film source such as a
movie into a video signal.
45
Color space A
standard for determining color value. 45
Color temperature
A
system for expressing a color of light
Refers to the luminance of white which a display
device radiates.
A higher color temperature
expresses a more bluish color. A lower color
temperature expresses a more reddish color.
28, 39, 41
Gamma
In this manual, “Gamma” refers to a gamma
characteristic that is the state of brightness and
darkness between the white level and the black
level.
28, 37, 41
Ghost
A
phenomenon where a double image is
displayed.
Generally caused by an RGB signal problem.
54
HDMI
HDMI stands for High Defi
nition Multi-Media
Interface which is an interface standard for
transmission of digital images and audio signals.
1, 14, 15, 21,
24, 27, 31, 33,
40, 43, 44, 46,
47
Interlaced
Refers to interlaced scanning which is a system
to scan twice alternately for one picture
↔ Progressive.
45
Iris
Refers to an iris diaphragm that is a mechanism
to adjust the amount of light projected.
25, 27, 28, 41
Keystone
T
rapezoidal image distortion. This manual refers
to Keystone adjustment for the correction of
trapezoidal image distortion caused by image
projected onto a screen or wall which is not
perpendicular to the projector lens.
48
NTSC
A
standard for terrestrial analog broadcasting.
Mainly adopted in Japan, North America, and
South Korea.
46
(Continued on next page)
70
Entry Explanation
Page(s) in
which the entry
appears
P
AL
A standard for terrestrial analog broadcasting.
Mainly adopted in UK, Germany, China, Australia,
et al.
46
Progressive
Refers to progressive scanning which is a system
to scan in order
.
↔ Interlaced
45
RGB (signal)
O
utput image signaling that displays image based
on three primary colors, Red, Green, and Blue. It
is also called
Analog RGB.
Both D-sub 15 pin and BNC are connection types
for RGB signals.
15, 16, 24, 31,
43, 44, 46, 47
S2-video
A
standard for signal interface. S2-video signals
can include a signal of a 4:3 image, squeezed
16:9 image or letterbox 4:3 image.
47
SCART
A type of audio-video equipment connector. 21pin
trapezoidal connector which is connected with an
RGB signal, V
ideo signal, or 2ch audio signal.
Widespread in Europe.
14, 21, 44, 45,
46, 47
SECAM
A
standard for terrestrial analog broadcasting.
Mainly adopted in France, Russia, et al.
40, 46
Glossary