Loading ...
Loading ...
Loading ...
5
Mini 2.0 Soundbar with Bluetooth
www.insigniaproducts.com
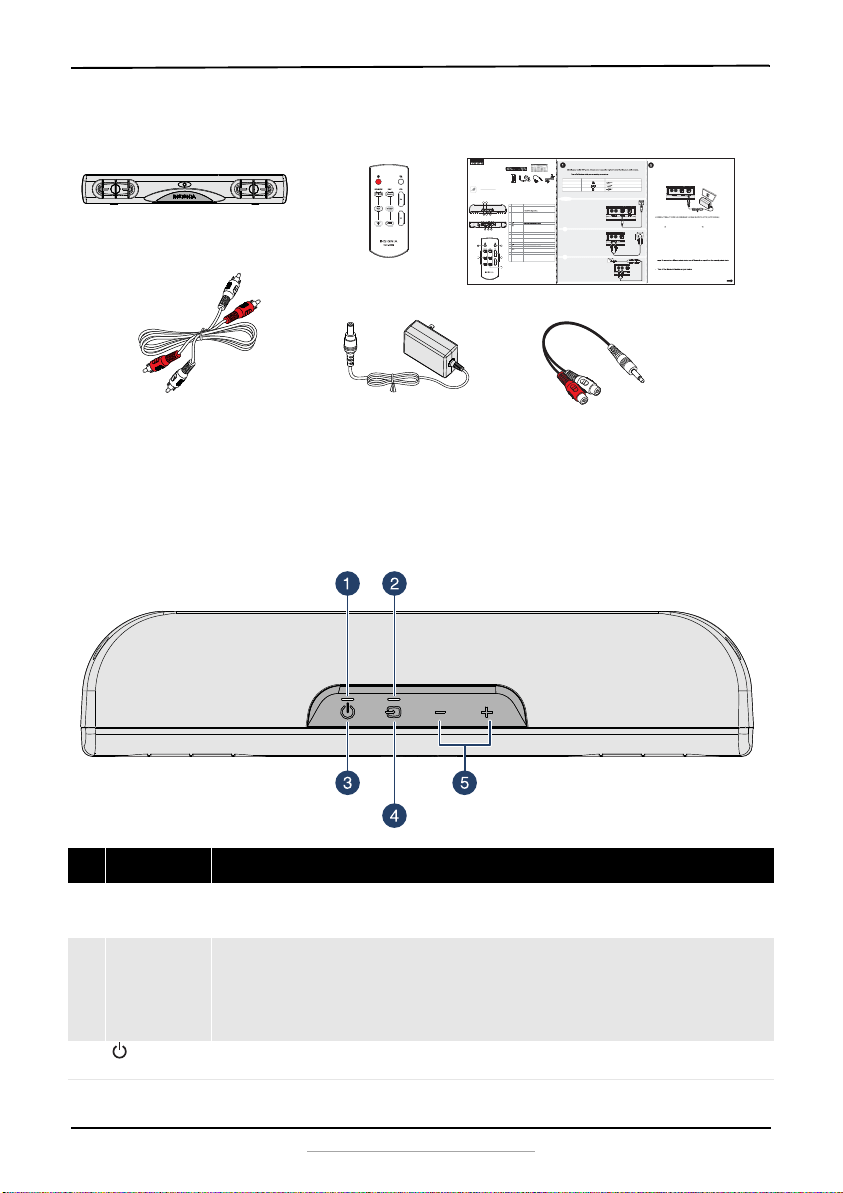
Package contents
Features
Top view
# Item Description
1
Power
indicator
• Lights red when the soundbar is in standby mode.
• Blinks red when the soundbar is muted.
• Turns off when the power is on.
2 Source
indicator
• Green: Optical source
• Orange: RCA source
• Blue: Bluetooth source (blinks when in pairing mode)
• Purple: DSP selected (on remote)
• Flashes: when adjusting volume. Turns solid when the maximum or minimum
sound level is reached.
3 (Power)
button
Press to turn the soundbar on. Press again to turn the soundbar to standby mode.
CONNECTING THE SOUNDBAR
Look at the back of your sound source device, such as a TV, DVD/Blu-ray player, or cable box, to
You can connect several devices and switch the sound source as required.
Note:
CONNECTING THE AC ADAPTER
Cautions:
• Make sure that the electrical outlet matches the AC adapter’s input requirements of 100-240 V, 50/60 Hz before
connecting.
• Use only the AC adapter provided.
• Plug in the AC adapter only after all other connections have been made.
1 Connect the AC adapter to the DC IN jack on the back of the soundbar.
2 Plug the other end of the AC adapter into a power outlet or surge protector.
RCA connection (GOOD)
1 Connect one end of the RCA audio cable to the RCA ports
on your soundbar.
2 Connect the other end into the RCA audio OUTPUT ports
on your audio source device.
Note: Make sure that the cable ends match the color of the
ports.
Digital connections (BEST)
1 Connect one end of the digital optical cable (not included)
to the OPTICAL jack on your soundbar.
2 Connect the other end into the digital optical output port
on your audio source device.
3 Change the device’s audio output to 'PCM' format (typically
found in audio settings). Refer to the documentation that
came with your audio source device for more information.
3.5 mm connection (GOOD)
1 Connect one end of the RCA audio cable connectors
to your soundbar, then connect the other end to the
3.5 mm to RCA adapter (included).
2 Plug the other 3.5 mm male end of the adapter into
the headphone or AUX Output on your audio source
device.
OVER
PACKAGE CONTENTS
Before using your new product, please read these instructions to prevent any damage.
Pairing your devices
1 Turn on your soundbar.
2 Place your Bluetooth device within 30 ft. (10 m) of your soundbar.
3 Press the (Bluetooth) button on the remote control or the (source) button on the soundbar to
select Bluetooth mode. The LED blinks blue.
4 Navigate to your device’s Bluetooth settings, turn on Bluetooth, then search for available devices. For
additional information on pairing your device, refer to your devices’ documentation.
5 On your Bluetooth device, select “NS-SB216” from the device list. Repeat steps 1-4 if “NS-SB216” is not
displayed.
6 If a PIN code is requested, enter “0000.”
7 When pairing is completed the LED lights solid blue.
Notes:
• Some devices, such as an iPhone, connect immediately after pairing so the Bluetooth indicator on your
soundbar remains on. Other devices, such as notebook computers, may ask you if you wish to connect. In this
instance, the Bluetooth indicator continues to blink until a connection is established.
• Your soundbar saves pairing information for up to eight devices. However, it can only be connected and play
content from one device at a time.
• When you turn on your soundbar, it automatically connects to the last connected device if that device is in
and manually connect to the other paired device.
Disconnecting your devices
Note: For more information about using Bluetooth, see the online User Guide.
# DESCRIPTION
1 Power indicator
2 Source indicator
3 (Power) button
4 (Source) button
5 VOL +/– buttons
6 RCA (R and L) jacks
7 OPTICAL (input) jack
8 DC IN jack
9 (Power) button
10 SOURCE buttons
11 (Mute) button
12 VOL +/– buttons
13 DSP buttons
FUNCTION
• Lights red when the soundbar is in standby mode.
• Blinks red when the soundbar is muted.
• Green: Optical source
• Orange: RCA source
• Blue: Bluetooth source (blinks when in pairing mode)
• Purple: DSP selected (on remote)
• Flashes: when adjusting volume. Turns solid when the maximum or
minimum sound level is reached.
Press repeatedly to cycle through the available sound sources:
• Optical
• RCA
• Bluetooth
Press to increase or decrease the volume of the soundbar.
If your TV (or other audio source device) has RCA out jacks, connect the
RCA cables to your source device and these jacks.
If your TV (or other audio source device) has an optical out jack, connect
a digital optical cable (not included) to your source device and this jack.
Connect the AC adapter to this jack to power the soundbar.
Press to select the sound source. Select Optical, RCA, or Bluetooth.
Press to mute the sound from the soundbar. Press again to restore the
sound.
Press to increase or decrease the volume of the soundbar.
Press to select the Digital Signal Processor (DSP) sound mode:
• Standard: Lets you enjoy normal sound.
• Theater: Best for enjoying movies. Bass frequencies are enhanced.
• News: Select for clear voice reproduction.
RMC-SB216
- OR -
- PICK ONE -
- OR -
AUDIO QUALITY
BEST
GOOD
GOOD
JACK TYPE (on source device)
Digital optical cable (not included)
RCA audio cable (included)
3.5 mm audio cable (adapter included)
CABLE
QUICK SETUP GUIDE
Mini 2.0 Soundbar
with Bluetooth
NS-SB216
FIND YOUR USER GUIDE ONLINE!
Go to www.insigniaproducts.com, then click Support & Service.
Enter NS-SB216 in the box under Manual, Firmware, Drivers &
Product Information, then click ►.
RCA audio cable
3.5 mm to
RCA adapter
Quick Setup Guide
Remote control
AC adapter
FEATURES
Top view
Remote control
Back view
Back of the soundbar
Digital optical cable
(not included)
TV or DVD/Blu-ray
player
Soundbar
Back of the soundbar
AC adapter
AC wall plug
RCA audio cable (included)
reyalp yar-ulB/DVD ro VTrabdnuos eht fo kcaB
Back of the
soundbar
TV or
DVD/Blu-ray
player
3.5mm to RCA adapter
(included)
RCA audio cable (included)
Soundbar
Remote control
AC Adapter
RCA Audio Cable
Quick Setup Guide
3.5 mm to RCA adapter
NS-SB216_16-0248_MAN_V1_ENG.fm Page 5 Wednesday, July 6, 2016 11:42 AM
Loading ...
Loading ...
Loading ...