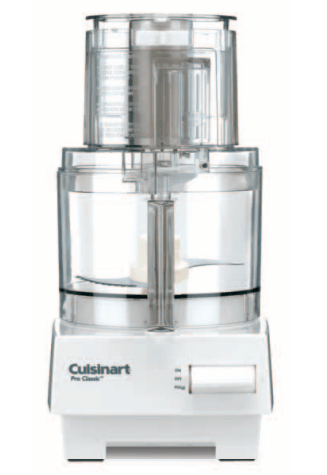
USER MANUAL Pro Classic™ Food Processor
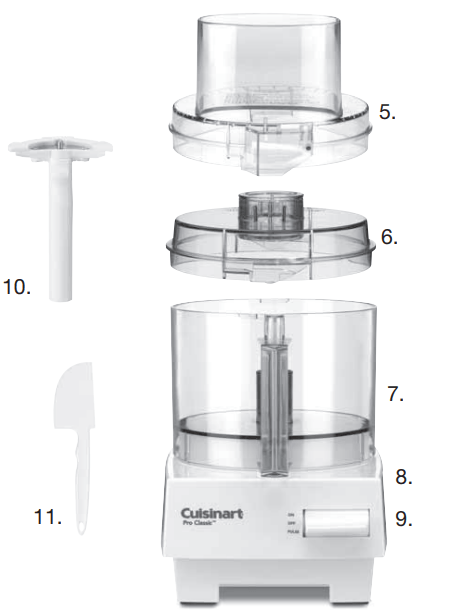
Parts
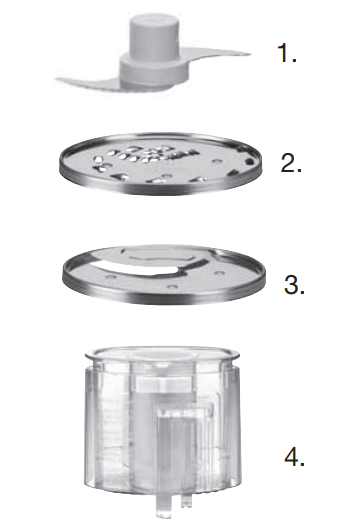
1. Chopping/Mixing/Dough Blade
2. Shredding Disc
3. Slicing Disc
4. Feed Tube
5. Work Bowl Cover
6. Flat Cover
7. Work Bowl
8. Motor Base
9. Control Switch
10. Stem Adapter
11. Spatula
INSTRUCTIONS FOR USE
1. Put base on counter, with nameplate facing you. Pick up work bowl, with handle facing you, and place it on base with handle at about 7 o’clock.
2. Turn work bowl counterclockwise until it clicks.
3. Place metal blade over shaft matching outline on top of hub to the same shape on shaft. Lower blade will almost touch bottom of bowl.
4. Put cover on work bowl, with feed tube at about 7 o’clock. Turn cover counterclockwise until it fits into position.
5. The pusher assembly slides over the large feed tube. It has a large pusher and a small pusher. Push the small white pusher all the way down until it twists it to lock. Push the large pusher all the way down and push the white Slide Lock right to lock.
6. Hold pusher with white Slide Lock toward you. Slide pusher over feed tube on cover and push locking tab down until locking tab clicks. CAUTION: Machine must be unplugged when you practice locking and unlocking pusher. Repeated locking and unlocking with machine plugged in is never necessary in normal use and will make machine inoperable.
7. Plug machine in. Move control switch to ON position to start motor. Move control switch down to OFF position to stop motor. Move control switch to PULSE position and release it for pulse/chopping. If machine doesn’t start, make sure it is plugged in and work bowl, cover and pusher assembly are locked in position.
8. To remove cover, hold pusher assembly with thumb away from two locking tabs. Turn clockwise, and lift. The work bowl won’t come off until the cover is unlocked.
INSTRUCTIONS FOR SLICING AND SHREDDING
1. Lock bowl in place.
2. Place disc, cutting side down, on flat, stable surface and hold it down firmly with one hand. With other hand, line up two symbols (o and Δ) on stem with similar symbols on disc. Turn stem clockwise until it clicks into position.
3. Place disc over shaft, matching outline on its top to same shape on shaft. Without touching blade edge, push disc down as far as it will go.
4. Put cover on bowl, feed tube at 7 o’clock, and turn clockwise until it clicks. Insert food in feed tube.
5. Twist small pusher to lock it and push Slide Lock to left to unlock pusher sleeve. Slide large pusher sleeve over feed tube and push all the way down until tabs click into place.
6. Apply even pressure to large pusher while holding lever down at PULSE position, and push food through.
7. To remove pusher assembly, hold it with thumb on large tab. Press firmly on tab and lift straight up. Cover will stay in place, allowing you to reload feed tube.
8. To remove disc from stem, slide button up as far as it will go and turn stem counterclockwise.
PRACTICING WITH FOOD
Try chopping some practice foods before you process food to eat. A zucchini or potato is a good choice. First cut it into 1-inch pieces. Insert the metal blade and put pieces into work bowl. Put on the cover and the pusher assembly; press the pusher assembly down to lock it into place. Press the lever down to PULSE and release it. Repeat two to three times and see what happens.
Each time the blade stops, let the pieces drop to the bottom of the bowl before you pulse again. That puts them in the path of the blade each time the motor starts. Using the pulse/chopping technique, you can get an even chop without danger of over-processing. Check the texture frequently by looking through the cover of the work bowl. If you want a finer chop, keep pressing the lever down to PULSE and releasing it until you achieve that desired texture.
Onions and other foods with a high water content will quickly end up as a purée unless examined after each pulse to make sure it is not over-processed. Try chopping other food, like meat for hamburger and sausage. Then make mayonnaise, pastry or bread, as described in the recipes in this book. To obtain consistent results:
- Be sure all the pieces you add to the bowl are the same size.
- Be sure the amount of food is no larger than recommended
Removing processed food
Before you do anything, wait for the blade to stop spinning. When it does, remove the cover first. You can remove the cover and pusher assembly in one operation. Hold the pusher assembly with your thumb away from the descending tabs and turn it clockwise. Lift it off, and the cover will come with it. Never try to remove the cover and the work bowl together; this can damage the work bowl. Remove the bowl from the base of the machine before removing the blade.
This creates a seal to prevent food from leaking. Turn the bowl clockwise to unlock it from the base and lift it straight up to remove it. To prevent the blade from falling out of the work bowl onto your hand, be sure your hands are dry. Remove the metal blade before tilting the bowl, using a spatula to scrap off any food sticking to it. Or insert your finger through the hole in the bottom of the work bowl, gripping the blade from the bottom, and grip the outside of the work bowl with your thumb. Or hold the blade in place with your finger or a spatula while pouring out processed food.
To chop raw fruits and vegetables:
First cut the food into 1-inch pieces. You can get more even chop when all pieces are about the same size. Put no more than 2 cups of food into work bowl. Lock the cover and pusher assembly in place. Press the lever down to PULSE and release it, repeating at the rate of 1 second on, 1 second off, until the food is chopped. Check frequently to avoid over-processing. Use the spatula to scrape down any pieces that stick to the sides.
To purée fruit and cooked vegetables:
First, cut the food into 1-inch pieces. You get a smoother purée faster when all the pieces are about equal in size. Put no more than 2 cups of food in the work bowl. Lock the cover and pusher assembly in place. Pulse to chop coarsely, then move the lever up to ON and process continuously until the food is puréed. (NOTE: Cooked potatoes are an exception to this procedure. They develop a gluey texture when processed with the metal blade. See the recipe for mashed potatoes at the end of the book.)
- When making soup, you will want to purée vegetables that have cooked in liquid. Don’t add the liquid to the work bowl–just the cooked vegetables; remove them with a slotted spoon. They will purée faster and smoother without liquid. After processing, add just enough liquid to make the purée pourable, return it to the soup liquid and stir to combine.
- • Occasionally, a piece of food may become wedged between the blade and the work bowl. If this happens, remove the cover, lift the blade out carefully and remove the wedged piece. Empty the bowl, reinsert the blade and lock the cover and the pusher assembly into place, first removing the small pusher. Move the lever up to ON and drop the food piece through the small feed tube while machine is running. Add the remaining food to the bowl and process usual way
To chop hard food like garlic and hard cheese:
Remove the small pusher, press the ON lever and drop the food through the small feed tube while machine is running. Small foods like garlic can be dropped in whole. Large foods like hard cheese should be cut into 1-inch pieces. This method of processing minces garlic, shallots and onions. Hard cheese and coconut will have the same texture as if they had been hand grated.
IMPORTANT: Never try to process cheese that is too hard to cut with a knife. You may damage the blade or the machine.
To chop parsley and other fresh herbs:
The herbs, the work bowl and the metal blade must all be thoroughly cleaned and dry. Remove stems from herbs. Add leaves to bowl and process until they are chopped as fine as you want. The more herbs you chop at a time, the finer chop you can obtain. If completely dry when chopped, parsley and other herbs will keep for at least 10 days, stored in an airtight bag in the refrigerator. They may be frozen for months, stored in an airtight container or bag.
To chop peel from citrus fruits or to chop sticky fruits like dates or raisins:
For citrus, remove the peel with a vegetable peeler, leaving on the white pith, which is bitter tasting. Cut the peel into lengths of 2 inches or less and process with ½ cup granulated sugar until finely chopped. This may take 2 minutes or longer. For sticky fruits like dates, raisins, prunes and candied fruit, first freeze the fruit for about 10 minutes. Add to it some of the flour called for in the recipe. Use no more than 1 cup of flour for each cup of fruit.
COMPACT FLAT COVER
Use the compact cover for added convenience when your recipe calls for chopping, mixing, puréeing and kneading. It is particularly useful when preparing baked goods such as cakes, cookies, pies and breads.
To assemble the compact cover:
Begin with the work bowl and the metal blade, dough blade, or whisk attachment in place. Place the compact cover on the work bowl so that the Cuisinart logo written on the cover is face up andreadable. Then turn cover counterclockwise to lock into place.
To disassemble the compact cover:
Place one hand near the Cuisinart logo and other hand on opposite end of cover; turn cover clockwise. Lift cover up and off work bowl.
To chop meat, poultry, fish and seafood:
The food should be very cold, but not frozen. Cut it into 1-inch pieces to ensure an even chop. Process no more than 2½ cups (1¼ pounds) at a time. Press the lever down to PULSE and release it, repeating 3 or 4 times at a rate of 1 second on, 1 second off. If the food is not chopped fine enough, let the processor run continuously for a few seconds. Check the texture often to avoid over-processing. Use a spatula to scrape food from the sides of the bowl as necessary.
To purée meat, poultry, fish and seafood:
Prepare the food as described above. Pulse until it is evenly chopped, then process continuously to the desired texture. Scrape the bowl with spatula as needed. Leave the purée in the work bowl and add eggs, cream and seasoning as called for by the recipe. Process to combine thoroughly. Remember, you control texture by length of time you process. By varying the processing time, you can get a range of textures suitable for hamburgers, hash, stuffed peppers, rough pâtés or smooth mousses.
To chop nuts:
Chop no more than 2 cups at one time. Press the lever down to PULSE and release it, repeating several times. Check frequently to avoid letting powdered nuts clump together in a nut butter. When a recipe calls for flour or sugar, add some to the nuts before you chop them—about ½ cup for each cup of nuts. This allows you to chop the nuts as fine as you want without turning them into a nut butter. You can also chop nuts with a shredding disc. The optional Fine Shredding Disc is particularly good.
To make peanut butter and other nut butters:
Process up to 2 cups of nuts. Let the machine run continuously. After 2 or 3 minutes, the ground nuts will form a ball that will gradually smooth out. Scrape sides of the bowl and continue processing until drops of oil are visible. Taste for consistency. The longer you process, the softer the butter will be. For chunky style, add a handful of nuts just after the ball of nut butter begins to smooth out. To make cashew butter, add a little bland vegetable oil. Processor nut butters contain no preservatives. Store in the refrigerator to keep them without separating.
To make fl avored butters,
spreads and dips: Cut room-temperature butter into tablespoon-size pieces. Process flavoring ingredients first–anchovies, cheese, herbs, etc.–chopping them fine. Be sure the work bowl is clean and dry. Add small, hard ingredients like garlic and hard cheese through feed tube while machine is running. Next, add the butter and process until smooth. Add any liquid ingredients last, while the processor is running, and process just long enough to blend. Process ingredients for spreads and dips in the same way. They should be at room temperature and cut into 1-inch cubes, or added by tablespoonfuls.
To make mayonnaise:
The work bowl and metal blade must be clean and dry. Use one large whole egg, or the yolks from two large eggs. Mayonnaise made from yolks will almost be as thick as butter. You should be able to add 2⁄3 cup of oil for each yolk or 1¼ cups for a whole egg. Process the yolks or egg with salt, mustard and 2 tablespoons of vegetable oil for at least 30 seconds. Then, while the machine is running, pour ¼ cup of oil into the small pusher. After it dribbles through the pinhole at the bottom, remove the small pusher and slowly add the remaining oil while machine runs. See the recipe at the back of this book.
To beat egg whites:
Use this method only for recipes that can be done almost entirely by a food processor. The work bowl must be absolutely clean. Add 3 or more egg whites and press the ON lever. Add about 1 teaspoon of lemon juice or vinegar for every egg white. Vinegar makes stiffer whites; its flavor is hardly detectable in cakes, soufflés and ice creams. Continue processing until the egg whites hold their shape – about 1½ to 2½ minutes. For the lightest, fluffiest egg whites, use the Whisk Attachment, which is an optional attachment for the Pro Classic™ Food Processor.
To whip cream:
Processor whipped cream holds its shape very well. It is good for decoration or as a topping for gingerbread, berries or other desserts. It will not whip to the light, fluffy consistency obtained by methods that beat in more air. Use the optional Whisk Attachment for the fluffiest whipped cream. Chill the cream well before starting. Process continuously until it begins to thicken. Then add sugar as desired and continue processing, watching carefully until the cream reaches the desired consistency. For consistently reliable results, add 2 tablespoons of non-fat dry milk for every cup of cream, before whipping
To make crumbs and crumb crusts:
Cut out or break bread, crackers or cookies into pieces and put them in the work bowl. Process continuously until they reach the desired texture. For seasoned crumbs, chop the parsley or other fresh herbs with the crumbs. For buttered crumbs, process until the dry crumbs are the desired texture, then dribble melted butter through small feed tube while machine is running. For crumb crust, process crackers or cookies as described above. Add sugar, spices and butter, cut into pieces, as specified by your recipe. Process until well combined.
To make pastry:
This describes a general procedure. A recipe giving exact proportions is in the back of this book. Combine unbleached, all-purpose flour, salt and pieces of very cold or frozen butter in the work bowl.Process to the consistency of cornmeal. While the machine is running, start pouring ice water through the feed tube, a tablespoon at a time. Stop processing as soon as the dough begins to form a ball, to ensure tender, flaky pastry. Use the dough immediately or form it into a round disk about 1 inch thick. Wrap in plastic and refrigerate or freeze for later use.
To make quick breads and cakes that use baking powder and/or soda:
The most important rule for success is not to overmix after the flour is added. The ingredients for these soft doughs should be cold. If the recipe calls for chopped ingredients like lemon peel or nuts, chop them first while work bowl is clean and dry.
Then set them aside until needed. (Always use sugar when chopping lemon peel.) Put dry ingredients like flour, salt and leavening in the work bowl and process with the metal blade for 5 seconds to mix them. Remove and reserve the dry ingredients. Add the eggs and sugar to the work bowl and process to mix, letting the machine run about 1 minute. Next, add butter at room temperature, cut into 1-inch pieces.
Let the machine run continuously for 1 minute, until the butter is thoroughly mixed with the eggs and sugar. Then add flavoring and liquid—vanilla, spices, cocoa, etc., and process until mixed. Add the dry ingredients to the work bowl. Process by pulsing, inspecting after each pulse. Stop pulsing as soon as the dry ingredients have almost disappeared into the batter. Over-processing will cause quick breads and cakes to be tough. (If your recipe calls for ingredients that are coarsely chopped—like raisins or nuts–add them last with the mixed dry ingredients.)
To make cake mix:
Your food processor work bowl is large enough for the preparation of an 15.25 oz. packaged cake mix. Insert the metal blade and add the cake mix to the work bowl. While the machine is running, add the eggs and liquid through the small feed tube and process for 5 seconds.
Scrape down the side of the work bowl and process again for 1 minute for maximum volume. Do not remove the metal blade. Insert a finger into the underside of the blade from the bottom of the work bowl to hold the blade in place while emptying the batter. TIP: After emptying cake batter or puréed soup from the work bowl, replace the bowl on the motor base. Insert the metal blade and pulse once.
Centrifugal force will spin the batter off the blade onto the side of the work bowl. Remove the blade, and use the spatula to scrape remaining batter from the bowl.
TECHNIQUES FOR KNEADING YEAST DOUGH WITH THE BLADE
The Pro Classic™ Food Processor can mix and knead in a fraction of the time it takes to do it by hand. You will get perfect results every time if you follow these directions. NEVER TRY TO PROCESS DOUGH THAT IS TOO STIFF TO KNEAD COMFORTABLY BY HAND. There are two general types of yeast dough.
Typical bread dough is made with a flour mix that contains at least 50% white flour. It is uniformly soft, pliable and slightly sticky when properly kneaded. It always cleans the inside of the work bowl completely when properly kneaded.
Typical sweet dough contains a higher proportion of sugar, butter and/or eggs than a typical bread dough. It is rich and sticky and it does not clean the inside of the work bowl. It requires less kneading after the ingredients are mixed. Although 30 seconds is usually sufficient, 60 to 90 seconds gives better results if the machine does not slow down. Except for kneading, described below, the processing procedures are the same for both types of dough.
Machine capacity
If a bread dough calls for more than the recommended amount of flour, mix and knead in equal batches. Do the same for sweet doughs that call for more than 3½ cups of flour. Recommended maximum amount of flour is: 4 cups of all-purpose flour or 2½ cups of whole-grain flour.
Measuring the flour
It’s best to weigh it. If you don’t have a scale, or the recipe doesn’t specify weight, measure by the “stir, scoop, sweep” method. Use a standard graduated dry measure, not a cup for liquid ingredients. With a spoon or fork, stir the flour in its container. With the dry measure, scoop up the flour so it overflows. With a spatula knife or chopstick—being careful to not press down—sweep excess flour back into the container so the top of the measure is level.
Proofing the yeast
The expiration date is marked on the package. To be sure your yeast is active, dissolve it in a small amount of warm liquid (about 1⁄3 cup for one package of dry yeast). If the recipe includes a sweetener like sugar or honey, add a tablespoon with the yeast. If no sweetener is called for, add a pinch. The yeast won’t foam without it. Let the mixture stand until it foams–up to 10 minutes.
Processing dry ingredients
Put the flour in the work bowl with all the other dry ingredients. If the recipe calls for herbs, oil or solid fat like butter, add them with the flour. Turn the machine on and let it run for about 20 seconds. (Cheese, nuts and raisins may be added with the dry ingredients or during the final kneading. To leave them almost whole, add them 5 seconds before you stop kneading. For a finer texture, add them sooner.)
Adding liquids
All liquids should be added through the feed tube while the machine is running. Add liquid in a slow,steady stream, only as fast as dry ingredients absorb it. If liquid sloshes or splatters, stop adding it, but do not turn off machine.
Wait until ingredients in the bowl have mixed, then add remaining liquid slowly. Pour liquid onto dough as it passes under feed tube opening. Do not pour liquid directly onto bottom of bowl. Follow the recipe carefully. It is important to add enough liquid to make the dough soft enough to knead. Kneading dough that is too stiff strains the machine. The temperature of the liquid used to dissolve and activate yeast must be between 105 degrees F and 120 degrees F.
Yeast cells are not activated at temperatures lower than this and they die when exposed to temperatures higher than 130 degrees. All liquids, except those used to activate yeast, should be cold to minimize the possibility of overheating the dough. You must never knead a yeast dough to a temperature higher than 100 degrees. Doing so will slow or even prevent the action of the yeast.
Kneading bread dough
Do not try to use the machine to knead dough that is too stiff to knead comfortably by hand. Doing so can strain the machine. After the dough starts to clean the inside of the work bowl completely and forms a ball, process it for 60 seconds to knead it. Stop the machine and test the dough to be sure it is properly kneaded. Typical bread dough should have a soft, pliable texture and it should feel slightly sticky. Stretch the dough with your hands to test it. If it feels hard, lumpy or uneven, continue processing until it feels uniformly soft and pliable. Make sure the blade is firmly pressed back into place after removing dough to test it.
Kneading dough for coffee cakes, batter bread and brioche
Process dough for at least 30 seconds after all the ingredients are incorporated. It will not clean the inside of the work bowl. If necessary, scrape the bowl and process for 5 more seconds.
Rising
Put the dough in a large, lightly floured plastic bag. Squeeze out all the air and close the end with a wire twist, allowing space for the dough to rise. Or put the ball of dough in a large bowl coated with soft butter or vegetable oil. Roll the dough around to coat its entire surface. Cover it with a damp towel or a piece of oiled plastic wrap. Let it rise in a warm, draft-free place—about 80 degrees. The rising time is about 1½ hours, but will vary from 45 minutes to several hours, depending on the type of flour and the humidity of the air. To test if the dough has risen enough, stick a finger in it. An indentation should remain. If it doesn’t, let the dough rise more and test again. When it has risen enough, punch the dough down.
Shaping, finishing and baking
If you shape the dough in loaf pans, fill them only half full. Let rise until dough is just slightly above the top of the pan. If shaping free-form loaves, let them rise on an oiled baking sheet until at least doubled in bulk.
Making consecutive batches
You can make several batches of bread dough in a row. The motor in the Pro Classic™ Food Processor is extremely efficient. Follow the recipe for White Bread at the end of this book.
TROUBLESHOOTING WITH TYPICAL BREAD DOUGHS
Blade doesn’t incorporate ingredients
Always start processor before adding liquid. Add liquid in a slow, steady stream, only as fast as dry ingredients absorb it. If you hear liquid sloshing, stop adding it, but do not turn off machine. Instead, wait for ingredients in work bowl to have mixed, then add remaining liquid slowly. Pour liquid onto dough as it passes under feed tube; do not pour liquid directly onto bottom of work bowl.
Blade rises in work bowl
Blade may not have been pushed down as far as it will go before processing started. Excessively sticky dough can cause blade to rise even though it cleans inside of the work bowl. If dough feels very sticky, reinsert blade and immediately add 2 tablespoons flour through feed tube while machine is running.
Dough doesn’t clean inside of work bowl
- Amount of dough may exceed maximum capacity of your food processor. Remove half and process in two batches
- Dough may be too dry. If it feels crumbly, add water–1 tablespoon at a time–while machine is running, until dough becomes moist and cleans inside of work bowl. Wait 10 seconds between additions of water.
- Dough may be too wet. While machine is running, add 1 tablespoon of flour. If necessary, add more – 1 tablespoon at a time–until dough cleans inside of work bowl and forms a ball.
Nub of dough forms on top of blade and does not become uniformly kneaded
Stop machine, carefully remove dough, divide it into 3 pieces and redistribute them evenly in work bowl. Continue processing until dough is uniformly soft and pliable.
Dough feels tough after kneading
Divide dough into 2 or 3 pieces and redistribute evenly in work bowl. Process 10 seconds or until uniformly soft and pliable.
Soft dough or liquid leaks onto base of food processor
Always start processor before adding liquid and add liquid only as fast as dry ingredients absorb it.
Motor stops
- Pusher assembly may have become unlocked. Push down pusher sleeve to lock it into place and continue processing.
- Cover may have become unlocked. Lock cover and continue processing
- Power cord may have become unplugged. Plug machine back in and continue processing.
- Excessive strain may have caused motor to overheat and stop. Wait for the motor to cool off, 5–10 minutes. A safety protector in the motor prevents it from excessive overheating. If the motor stops, turn the machine off. After 5–10 minutes, divide dough into 2 batches and complete processing. Pinch dough to make sure that it is not too stiff to knead comfortably by hand. If it is, add liquid—1 teaspoon at a time—until dough is sufficiently moist to clean inside work bowl.
Dough doesn’t rise
We recommend that you always test activity of yeast before using it by stirring it and at least ½ teaspoon sugar into about 1 ⁄3 cup of warm liquid. Within 10 minutes foam should develop, indicating yeast is active. Do not use dry yeast after expiration date on package.
Avoid killing yeast cells by dissolving yeast in too warm water or overheating dough by excessive kneading. Dissolve yeast in about 1 ⁄3 cup warm liquid at 105–120 degrees F. All other liquids should be cold.
Do not knead so long that it becomes overheated. The ideal temperature for kneaded dough is 80 degrees. It should never exceed 100 degrees. Let dough rise in draft-free environment of about 80–90 degrees F.
Baked bread is too heavy
Next time, feel dough to be sure it is uniformly soft, pliable and slightly sticky before setting it aside to rise. Let dough fully double in bulk in bowl or bag, punch it down, then let it double up again after it is shaped
TROUBLESHOOTING WITH TYPICAL SWEET DOUGHS
Motor slows down
- Amount of dough may exceed maximum capacity of your food processor. Remove half and process in 2 batches.
- Don’t process too long after all the ingredients are incorporated. These rich doughs will give you good results after only 30 seconds of kneading.
Blade doesn’t incorporate ingredients
Butter or margarine, if not melted, must be cut into tablespoon-size pieces before added to work bowl.
Metal blade rises in work bowl
Blade may not have been pushed down as far as it will go before processing started. Machine may be overloaded. Stop it, remove half of dough and process in 2 batches.
PREPARATION FOR SLICING AND SHREDDING
Round fruits and vegetables
Before processing onions, apples and other large, round fruits and vegetables, trim them with a knife. Cut the bottom end flat, to make the food lie stable on the disc. Place the food in the feed tube, fl at side down. Position it as far right as possible, to prevent it from tilting when being processed. Choose fruits that are firm and not too ripe. Always remove large hard pits and seeds from fruits before processing. Seeds from citrus fruits need not be removed. You may remove the rind before slicing or shredding, or leave the rind on.
Whole peppers are the exception
Remove the stem and cut the stem end flat. Remove the core and scoop out the seeds. Leave the end opposite the stem whole, to keep the structure stiff. This ensures round, even slices.
Large fruits like pineapple and cantaloupe
Cut them in half and remove the seeds or core. If necessary, cut the halves into smaller pieces to fit in the feed tube. Remember to cut the ends flat.
Cabbage and iceberg lettuce
Turn the head on its side and slice the top and bottom, leaving a center section about 3 inches deep. Remove the core and cut the center section in wedges to fit the feed tube. Remove the core from the bottom piece and cut it and the top piece into two wedges to fit the feed tube. The optional 2mm or 1mm Slicing Discs are excellent for slicing cabbage for coleslaw.
If the fruit or vegetable doesn’t fit
Try inserting it from the bottom of the feed tube. The opening there is slightly larger.
Pack the feed tube for desired results
For small, round slices or short shreds from carrots, zucchini and other long vegetables, cut them in feed tube heights and pack them tightly upright. For long slices or shreds, cut the food in feed tube widths and pack the pieces horizontally. Food should fit snuggly, but not so tight that it prevents the pusher from moving. When slicing or shredding food, always use the pusher. Never put your fingers or a spatula into the feed tube. Never push down hard on the pusher. Use light pressure for soft fruits and vegetables like bananas, mushrooms, strawberries and tomatoes, and for all cheese. Use medium pressure for most food—apples, celery, citrus fruit, potatoes and zucchini. Use firm pressure for really hard vegetables like carrots and yams.
PRACTICING SLICING AND SHREDDING
- Insert a slicing or shredding disc, put the cover on the work bowl and insert the prepared food in feed tube.
- Prepare the pusher assembly. Lock small pusher in place and unlock the slide lock on back of the sleeve, so the pusher can move up and down freely.
- Slide the pusher over the feed tube and push the sleeve down to lock it into place, apply pressure to the pusher while pressing the lever down to PULSE. Release the lever as soon as the food is sliced or shredded.
- You can load the feed tube repeatedly without removing the work bowl cover. Simply grasp the pusher assembly with your thumb on the wide locking tab. Press firmly on the tab and lift up. The pusher assembly will come off easily, leaving cover and feed tube in place. Your other hand is free to reload the feed tube.
REMOVING SLICED OR SHREDDED FOOD
- Before you do anything, wait for the disc to stop spinning. When it does, remove the cover first. Hold the pusher assembly with your thumb away from the locking tabs and turn it clockwise.
- Lift, and the pusher assembly and cover will come off together. Remove the slicing or shredding disc before removing the work bowl. Place two fingers under each side of the disc and lift it straight up.
- Then turn the bowl clockwise to unlock it from the base and lift it straight up to remove it. You can place the disc on top of the inverted work bowl cover, to minimize drips and spills.
SLICING AND SHREDDING TECHNIQUES
Small, round fruits and vegetables
For large berries, radishes and mushrooms, trim the opposite ends flat with a knife. Insert the food through the feed tube, standing each piece on a fl at end. You can fill the tube to about 1 inch from the top. The bottom layer gives you perfect slices for garnish. If you want all the slices to be perfect, it’s best to process one layer at a time.
Long fruits and vegetables
Trim food like bananas, celery and zucchini by cutting them into pieces a little shorter than the feed tube. Cut both ends flat. Fill in the feed tube with the pieces, standing them vertically and adding enough pieces so they are solidly packed and cannot tilt sideways as they are sliced or shredded.
Small amounts of food
Use the small feed tube and the small pusher. Remove the small pusher from pusher assembly. Slide the pusher assembly over the feed tube and press the sleeve down to lock it into place. Be sure the slide lock on the sleeve is locked. Cut the food in lengths a little shorter than the feed tube. If you are slicing one or two long, thin vegetables like carrots, push them against the right. If you are slicing a few vegetables that are wide at one end and narrow at the other—carrots, celery, or scallions—cut them in half and pack in pairs, one wide end up, one narrow end up.
French-cut green beans
Trim fresh green beans to feed tube width. Blanch them for 60 seconds in boiling salted water. Plunge them immediately into cold water to stop the cooking. When they are cold to the touch, drain and dry them. Stack them in the feed tube horizontally to about 1 inch from the top. Use the slicing disc. Be sure the small pusher is locked and the slide lock on the sleeve is unlocked. Apply light pressure to the pusher and press the lever down to PULSE until beans are sliced. To make long, horizontal slices or shreds of raw zucchini or carrots, use the same procedure.
Matchsticks or julienne strips
Process the food twice—“double-slice” it. Insert any large fruit or vegetable—potatoes, turnips, zucchini, apples—in the feed tube horizontally. Apply pressure to the pusher while pressing the lever down to PULSE until food is sliced. You will get long slices. Remove the slices from work bowl and reassemble them. Reinsert them in the feed tube, wedging them in tightly. Slice them again. You will obtain long julienne strips. With the optional Square Julienne Discs, you can make square julienne strips in one operation.
Slicing Meat and Poultry
Cooked meat and poultry
The food must be very cold. If possible, use a chunk of food just large enough to fit in the feed tube. To make julienne strips of ham, bologna or luncheon meat, stack slices of them. Then roll or fold them double and stand them upright in the feed tube, wedging in as many rolls as possible. This technique works better with square or rectangular pieces than with round ones.
Uncooked meat and poultry
Cut the food into pieces to fit the feed tube. Boned, skinned chicken breasts will usually fit when cut in half crosswise. Wrap the pieces in plastic wrap and put them in the freezer. They are ready to slice when they pass this “knife test”: They are easily pierced with the tip of a sharp knife, although semi-frozen to the touch. Stand them in the feed tube, cut side down, and slice them against the grain, using firm pressure on the pusher. Or lay them flat in the feed tube, as many as will fit, and slice with the grain using firm pressure.
Frankfurters, salami and other sausages
If the sausage is soft, freeze it until hard to the touch, but easily pierced with the tip of a sharp knife. Hard sausages need not be frozen. If the sausage is thin enough to fit in the small feed tube, use that tube. Otherwise, cut the sausage into pieces to fit the large feed tube completely. Stand the pieces vertically, packing them in tightly so they cannot tilt sideways.
SLICING AND SHREDDING CHEESE
Firm cheese like Swiss and Cheddar
Cut the cheese into pieces to fit the feed tube. Put it in the freezer until it is semi-frozen—hard to the touch, but easily pierced with the tip of a sharp knife. Stand the pieces in the feed tube and apply light pressure to the pusher.
IMPORTANT: Never try to slice soft cheese like mozzarella or hard cheese like Parmesan. You may damage the slicing disc or the food processor itself. You can successfully shred most cheeses except soft ones. The exception is mozzarella, which shreds well if thoroughly chilled. Hard cheeses like Parmesan shred well only at room temperature.
Most problems with the food processor are easily solved. Here are some possible problems and their solutions.
Food is unevenly chopped
Either you are trying to process too much food at one time, or you are running the machine continuously instead of pulsing on and off until pieces of food are no larger than ½ -inch cubes.
Liquid leaks from bottom of bowl onto motor base
Remove bowl from base as soon as you finish processing. Do not remove metal blade first. When bowl and blade are removed together, blade drops down and forms almost a perfect seal against bowl.
Liquid leaks out between bowl and cover when machine is running
You added too much liquid. Never use more than 23⁄4 cups thin, 5 cups thick liquid. The thicker the liquid, the more you can use. The figures above are for thick mixtures, like pancakes or cake batter.
Slices are uneven or slanted
Pack feed tube more carefully. Maintain even pressure on pusher.
Carrots or similar foods fall over in feed tube
Cut food into enough short pieces of equal height to fill feed tube. To slice one or two pieces, use small feed tube. Cut carrots in half and insert one piece point down and the other stem down.
Sliced or shredded food piles up on side of work bowl
This is normal. Remove disc occasionally and even out processed food. When food gets close to bottom of the disc, empty the work bowl.
A few pieces of food remain on top of slicing or shredding disc
This is normal. In most cases, you can shred more of the food by moving the large pusher up and down, allowing the piece to be shredded, or by repositioning the piece in the feed tube and reshredding it.
Soft cheese like mozzarella spreads out and collects on top of shredding disc
The cheese was not cold enough, or the pressure on the pusher was too great. To shred soft cheese, do not push the pusher, but let the cheese go through by itself. Tap on the pusher to guide it through.
CLEANING, STORAGE AND MAINTENANCE
Keep your Pro Classic™ Food Processor ready to use on a kitchen counter. When its not being used, leave it unplugged. Don’t leave it with the pusher assembly in lock position; this could damage the on-off mechanism. Store the blades and discs as you would sharp knives—out of the reach of children.
The Disc and Blade Holders, optional accessories, offer safe and convenient storage. All parts, except for the motor base, are dishwasher safe, and we recommend washing them in the dishwasher. Insert the work bowl upside down. Remember where you place sharp blades and discs and unload the dishwasher carefully. To simplify cleaning, rinse the work bowl, cover, pusher assembly and blade or disc completely after use so food won’t dry on them. Openings at the bottom of the large pusher provide drainage and make cleaning easy. If food lodges in the pusher, remove it by using a bottle brush. If you wash blades and discs by hand, do it carefully. Avoid leaving them in soapy water where they may disappear from sight.
To clean the metal blade, fill the work bowl with soapy water, hold the blade by its plastic center and move it rapidly up and down on the center shaft of the bowl. Use of a spray attachment is also effective. If necessary, use a brush. The work bowl is made of Lexan® plastic, which is shatter resistant and heat resistant. It should not be placed in a microwave oven. The tube at the back of the bowl houses the metal rod that activates the motor. Chopping certain foods may scratch or cloud the work bowl. Among them are ice, whole spices and oils like wintergreen. If you like to prepare your own spice blends, you may want to keep a second bowl for just that purpose. The base housing is made of a tough plastic with high impact resistance. Its smooth surface will look new for years.
Keep a sponge handy as you work to wipe spills from the base. Four rubber feet on the underside keep the base from moving on most work surfaces when the machine is processing heavy loads. If the feet 17 leave spots on the countertop, spray them with a spot remover and wipe with a damp sponge. If any trace of the spot remains, repeat procedure and wipe the area with a damp sponge and nonabrasive powder. To clean the inside of the detachable stem, slide the stem release button on the side up as far as it will go and hold it there as you run water through the stem. IMPORTANT: Never store any blade or disc on the motor shaft. No blade or disc should be placed on the shaft except when the processor is about to be used.
Maintenance: Any other servicing should be performed by an authorized service representative.