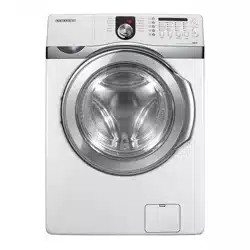
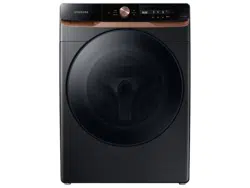
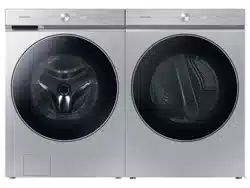
User Manual Washer
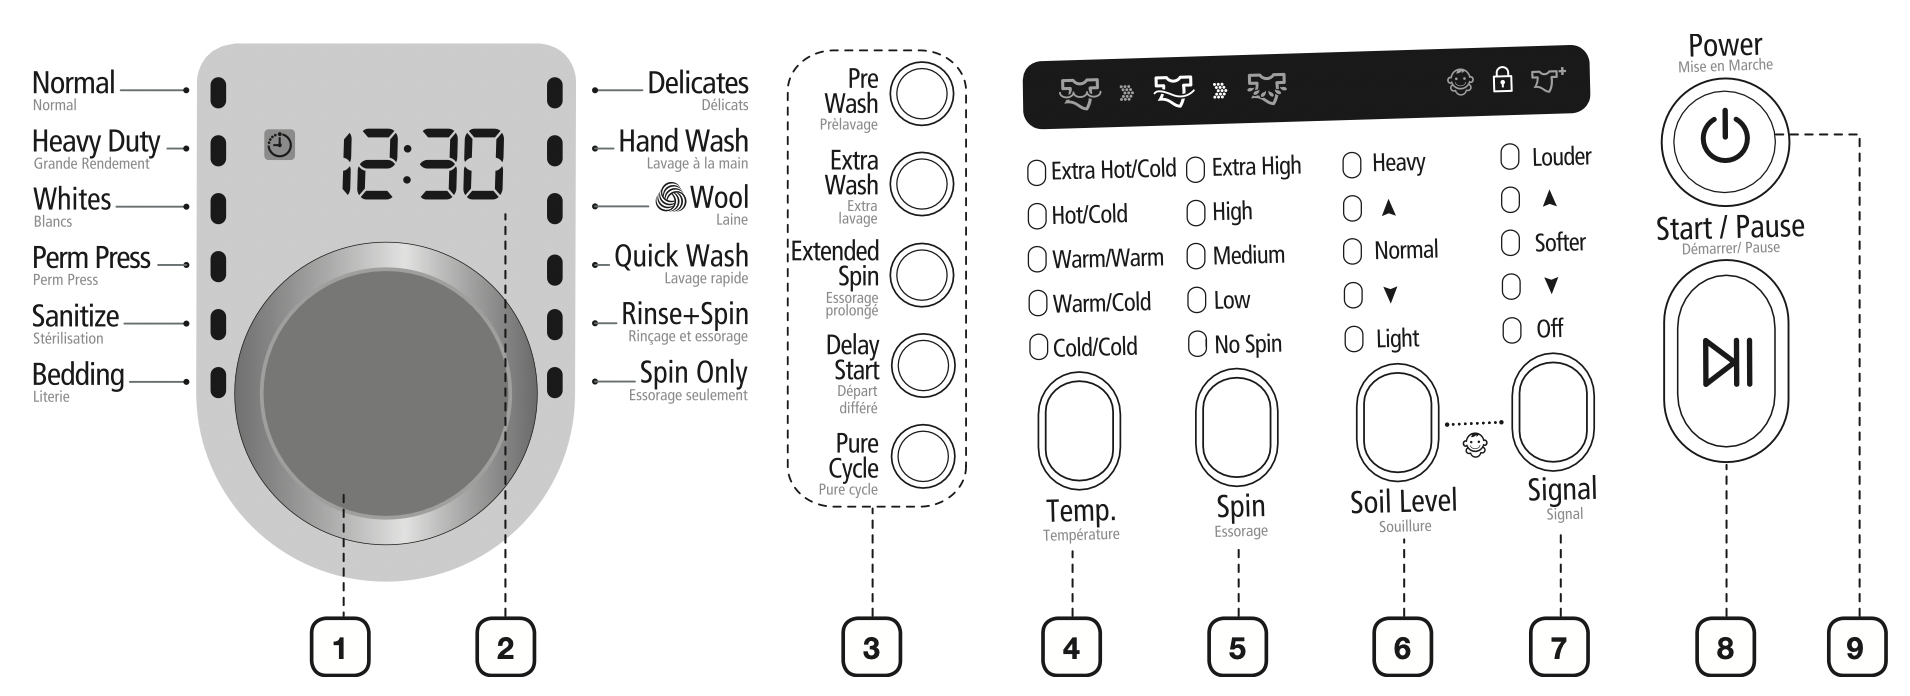
Washing A Load Of Laundry
LOADING YOUR WASHER
- You can fill the tub with dry, unfolded clothes; but DO NOT OVERLOAD the tub.
- Overloading may reduce washing efficiency, cause excess wear, and possibly cause creasing or wrinkling of the load.
- Wash delicate items such as bras, hosiery, and other lingerie in the delicates cycle with similar lightweight items.
- When washing big bulky items or a few smaller items that don’t fill the tub completely – a rug, a pillow, stuffed toys, or one or two sweaters, for example – add a few towels to improve tumbling and spin performance.
Note: During the spin cycle, the washer may add additional water to redistribute the excessive imbalance inside the tub.
- When washing heavily soiled loads, do not overload your washer in order to assure good cleaning results.
- To add a forgotten item:
- Press the Power button.
- Press the Start/Pause button.
- Wait for the door lock light to go out (Immediately).
- Add the item, close the door, and press the Start/Pause button.
The door safety state continues for 15 seconds and the cycle is restarted.
Note: To ensure thorough cleaning, add items within five minutes of starting the wash cycle.
GETTING STARTED
- Load your washer.
- Close the door.
CAUTION: Push the laundry into the tub completely to prevent the laundry from being caught in the door or from falling out of the tub.
- Press the Power button.
- Add detergent and additives to the dispenser (See page 22~24).
- Select the appropriate cycle and options for the load (See page 18~19).
- Press the Start/Pause button.
- The Wash Indicator will illuminate.
- The estimated cycle time will appear in the display.
The time may fluctuate to better indicate the time remaining in the cycle.
Note: The actual time required for a cycle may differ from the estimated time in the display depending on the water pressure, water temperature, detergent, and laundry.
- Before your washer starts to fill, it will make a series of clicking noises to check the door lock and do a quick drain.
Note:
- When the cycle is complete, the door lock light will go out and “End” will appear in the display.
- DO NOT attempt to open the door until the door lock light is off. To add a forgotten item, see “Loading your washer” section (See page 17).
- When your washer is restarted after a pause, expect a delay of up to 15 seconds before the cycle continues.
- Pressing Power button cancels the cycle and stops your washer.
- The Wash, Rinse and Spin indicators will illuminate during those portions of the cycle.
OVERVIEW OF THE CONTROL PANEL
Child Lock
This function prevents children from playing with your washer.
Activating the Child Lock function
Press and hold both the Spin and Soil Level buttons simultaneously for approximately 3 seconds.
- If the Child Lock function is activated, the door is locked and the “Child Lock [
 ]” lamp is lit.
- If the Start/Pause button is pressed after the Child Lock function is activated, none of the buttons will work except for the Power button.
- If a button is pressed when the buttons are locked, the “Child Lock [
 ]” lamp blinks.
Pausing the Child Lock function
When the door is locked or the buttons are locked by the Child Lock function, you can pause the Child Lock operation for 1 minute by pressing and holding both the Spin and Soil Level buttons simultaneously for approximately 3 seconds.
- If Child Lock mode is paused temporarily, the door lock is released for 1 minute for user convenience. During this period, the “Child Lock [
 ]” lamp blinks.
- If the door is opened after the minute is over, an alarm sounds for up to 2 minutes.
- If the door is closed within the 2 minutes, the door is locked and the Child Lock function is reactivated. If the door is closed after the 2 minutes, the door will not be locked automatically and no alarm will be heard.
Deactivating the Child Lock function
Press and hold both the Spin and Soil Level buttons simultaneously for approximately 6 seconds.
- If the Child Lock function is deactivated, the door is unlocked and the “Child Lock [
 ]” is turned off.
WARNING:
- Child Lock is a function to prevent children or the infirm from accidently operating the washer and injuring themselves.
- If a child enters the washing machine, the child may become trapped and suffocate.
CAUTION:
- Once the Child Lock function is activated, the Child Lock function continuous working even if the power is turned off.
- Opening the door by force can result in injury due to damage to the product.
Note: To add laundry when the Child Lock function is activated, you have to first pause or deactivate the Child Lock function.
Note: If you want to open the door of the washing machine when the Child Lock function is activated:
- Pause or deactivate the Child Lock function.
- Turn the washing machine off and then on again.
Garment+ 
You can add or take out laundry items even after the wash has started, as long as the “Garment+  ” light is turned on. Pressing the Start/Pause button unlocks the door, unless the water is too hot or if there is too much water in your washer. If you are able to unlock the door and wish to continue the wash cycle, close the door and press the Start/Pause button.
Washing clothes using the cycle selector
Your new washer makes washing clothes easy, using Samsung’s “Fuzzy Control” automatic control system. When you select a wash program, the machine will set the correct temperature, washing time, and washing speed.
- Almost no customers will have the washer hooked up via the sink’s tap.
- Press the Power button.
- Open the door.
- Load the articles of clothing one at a time loosely into the tub, without overfilling it.
- Close the door.
- Add detergent, softener, and pre-wash detergent (if necessary) into the appropriate compartments.
Note: Pre-wash is only available when selecting the Normal, Perm Press, Sanitize, Bedding, Whites, and Heavy Duty cycles. It is only necessary if your clothing is heavily soiled(See page 33).
- Use the Cycle Selector to select the appropriate cycle according to the type of material:
The relevant indicators will illuminate on the control panel.
- At this time, you can control the wash temperature, the number of rinse cycles, the spinning speed, and the delay time by pressing the appropriate Option button.
- Press the Start/Pause button on the Cycle Selector and the wash will begin. The process indicator will light up and the remaining time for the cycle will appear in the display.
Pause Option
To unlock the door when the “Garment+” light is turned on, press the Start/Pause button.
- Within 5 minutes of starting a wash, you can still add/remove laundry items to the wash.
- Press the Start/Pause button to unlock the door.
- The door cannot be opened when the water is too HOT or the water level is too HIGH.
- After closing the door, press the Start/Pause button to restart the wash.
When the cycle is finished:
When the cycle is complete, “End” is displayed and the power remains on. The power is turned off in the following two cases.
- When the Power button is pressed.
- If the door is opened when “End” is displayed.
DETERGENT USE
Your washer is designed to use high efficiency (HE) detergents.
- For best cleaning results, use a high efficiency detergents such as Tide HE, Wisk HE, Cheer HE or Gain HE*. High efficiency detergents contain suds suppressors that reduce or eliminate suds. When fewer suds are produced, the load tumbles more efficiently and cleaning is maximized.
CAUTION: Regular detergent is not recommended. Please use HE detergents only.
Note: Reducing the amount of detergent may reduce the cleaning quality. It is important to pre–treat stains, sort carefully by color and soil level, and avoid overloading.
* Brand names are trademarks of their respective manufacturers.
FEATURES
Automatic dispenser
Your Washer has separate compartments for dispensing detergent and color-safe bleach, chlorine bleach, and fabric softener. All laundry additives are added to their respective compartments before starting your Washer.
The automatic dispenser MUST ALWAYS be in place before starting your Washer.
DO NOT open the automatic dispenser when your washer is running.
To use:
- Never exceed the manufacturer’s recommendations when adding detergent.
- This compartment holds liquid detergent for the main wash cycle, which is added to the load at beginning of cycle.
Note: When using powdered detergent, remove the detergent liquid from the compartment. Powdered detergent will not dispense with detergent liquid.
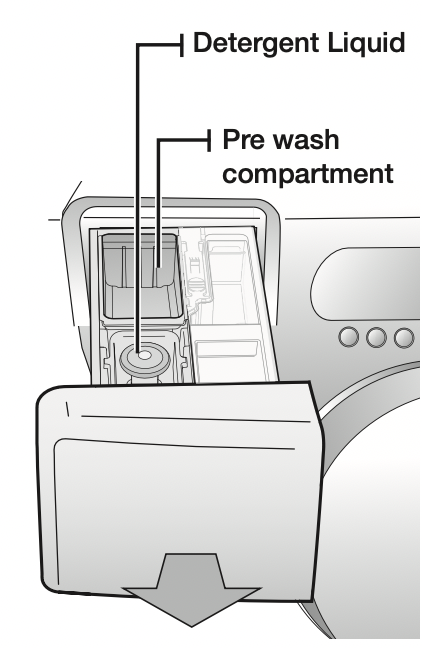
Detergent compartment
- Pour the recommended amount of laundry detergent directly into the detergent compartment before starting your washer.
- If color-safe bleach is to be used, it should be added with detergent to the detergent compartment.
Note: When adding color-safe bleach with detergent, it is best if both laundry products are in the same form – granular or liquid.
Pre Wash compartment
When using the Pre Wash option, detergent should be added to both the Pre Wash compartment and the detergent compartment. The detergent will automatically be dispensed during Pre Wash.
- If high efficiency (HE) detergent is used, add 1/3 of the recommended amount to the Pre Wash compartment and 2/3 of the recommended amount to the detergent compartment.
Bleach compartment
(Liquid chlorine bleach only)
- Add chlorine bleach to the bleach compartment.
DO NOT exceed the MAX FILL line.
- Avoid splashing or over–filling the compartment.
- Your washer automatically dispenses bleach into the tub at the appropriate time.
- The dispenser automatically dilutes liquid chlorine bleach before it reaches the wash load.
Note:
- Never pour undiluted liquid chlorine bleach directly onto the load or into the tub. It is a powerful chemical and can cause fabric damage, such as weakening of the fibers or color loss, if not used properly.
- If you prefer to use color–safe, non–chlorine bleach, add it to the appropriate detergent compartment. DO NOT pour color–safe bleach into the Bleach compartment.
Fabric softener compartment
- Pour the recommended amount of liquid fabric softener into the softener compartment.
For smaller loads, use less than one capful.
- Fabric softener should be diluted with water until it reaches MAX FILL in the compartment.
- The dispenser automatically releases liquid fabric softener at the proper time during the rinse cycle.
Note:
- Use the softener compartment ONLY for liquid fabric softeners.
- DO NOT use a Downy Ball* in the Fabric softener compartment of this washer. It will not add fabric softener at the appropriate time.
Use the detergent compartment.
* Brand names are trademarks of their respective manufacturers.
Cleaning And Maintaining Your Washer
Keeping your washer clean improves its performance, wards off unnecessary repairs, and lengthens its life.
CLEANING THE EXTERIOR
Turn off the water faucets after finishing the day’s washing.
This will shut off the water supply to your washer and prevent the unlikely possibility of damage from escaping water. Leave the door open to allow the inside of your washer to dry out.
Use a soft cloth to wipe up all detergent, bleach or other spills as they occur.
Clean the following as recommended:
Control Panel – Clean with a soft, damp cloth. Do not use abrasive powders or cleaning pads. Do not spray cleaners directly on the panel.
Cabinet – Clean with soap and water.
CLEANING THE INTERIOR
Clean the interior of your washer periodically to remove any dirt, soil, odor, mold, mildew, or bacterial residue that may remain in your washer as a result of washing clothes.
Failure to follow these instructions may result in unpleasant conditions, including odors and/or permanent stains on your washer or laundry.
Hard water deposits may be removed, if needed. Use a cleaner labeled “washer safe”.
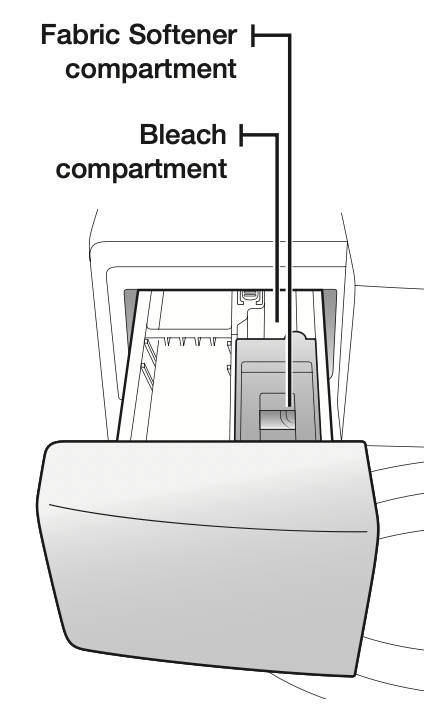
CLEANING THE DISPENSERS
The automatic dispenser may need to be cleaned periodically due to laundry additive buildup.
- Pull out the detergent liquid from detergent compartment.
- Remove the siphon cap from the fabric softener and bleach compartments.
- Wash all of the parts under running water.
- Clean the dispenser recess with a soft brush.
- Reinsert the siphon cap and push it firmly into place.
- Push the dispenser back into place.
- Run a Rinse+Spin cycle without any load in your washer.
STORING YOUR WASHER
Washers can be damaged if water is not removed from hoses and internal components before storage. Prepare your washer for storage as follows:
- Select the Quick Wash cycle and add bleach to the automatic dispenser. Run your washer through the cycle without a load.
- Turn the water faucets off and disconnect the inlet hoses.
- Unplug your washer from the electrical outlet and leave your washer door open to let air circulate inside the tumbler.
- If your washer has been stored in below–freezing temperatures, allow time for any leftover water in your washer to thaw out before use.
CLEANING THE DEBRIS FILTER
We recommend cleaning the debris filter when water does not drain well or the “nd” error message is displayed.
- Open the filter cover by pressing and pulling the handle of the filter cover with your finger.

- Unscrew the drain cap by turning it counterclockwise.
- Hold the cap on the end of the drain tube and slowly pull it out about 6 in.(15 cm) and drain off all the water.
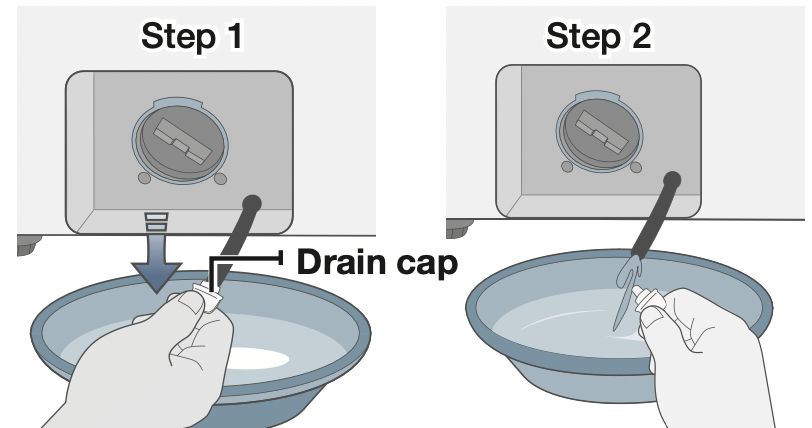
- Remove the debris filter cap.

- Wash any dirt or other material from the debris filter. Make sure the drain pump propeller behind the debris filter is not blocked.
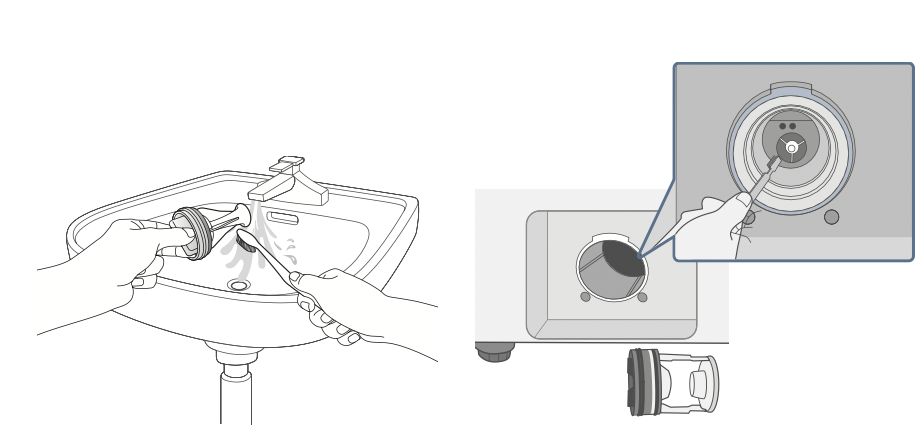
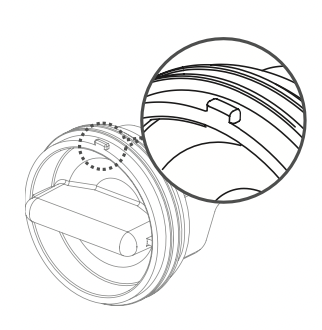
- To assemble the filter cap, align the projected part of the filter cap to your 12 o’clock (on an imaginary clock) and turn it clockwise.
- Replace the debris filter cap.
- Replace the filter cover.
CLEANING THE DOOR SEAL/BELLOW
- Open the washer door and remove any clothing or items from the washer.
- Inspect the gray colored seal/bellow between the door opening and the basket for stained areas. Pull back the seal/bellow to inspect all areas under the seal/bellow and to check for foreign objects.
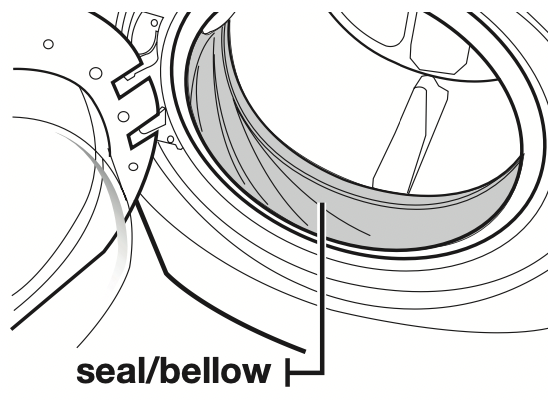
- If stained areas are found, wipe down these areas of the seal/bellow, using the procedure that follows.
a) Mix a dilute solution, using ¾ cup (177 mL) of liquid chlorine bleach, and 1 gal. (3.8 L) of warm tap water.
b) Wipe the seal/bellow area with the dilute solution, using a damp cloth.
c) Let stand 5 minutes.
d) Wipe down area thoroughly with a dry cloth and let the washer interior air dry with door open.
IMPORTANT:
- Wear rubber gloves when cleaning for prolonged periods.
- Refer to the bleach manufacturer’s instructions for proper use.
PRESERVING THE TOP COVER AND THE FRONT FRAME
Do not place any heavy or sharp objects or a detergent box on the washer. Keep them on the purchased pedestal or in a separate storage box.
CAUTION: This may scratch or damage the top cover. And there are dangers for drop.
Note: Since the entire washer has a high-gloss finish, the surface can be scratched or damaged. Therefore, avoid scratching or damaging the surface when using the washer.
PURE CYCLE
This course is a self-cleaning course that removes mold that may occur inside the washing machine.
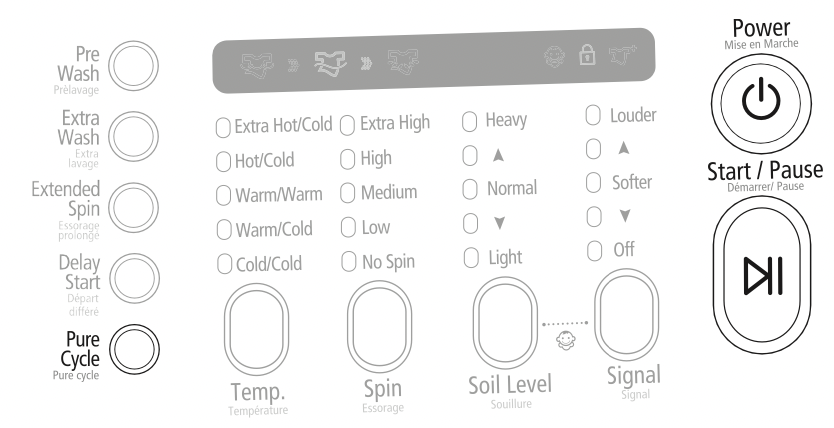
- Press the Power button.
- Press the Pure Cycle button.
You can only use the Delay Start function.
- Press the Start/Pause button.
If you press the Start/Pause button, the Pure Cycle course begins.
CAUTION
- Using the Pure Cycle course, you can clean the drum without using a cleansing agent.
- Never use the Pure Cycle course when laundry is in the washing machine. This may result in damage to the texture or a problem with the washing machine.
- If you want to use drum cleansing agent, use only 1/10 of the amount of the drum cleansing agent recommended by the cleansing agent manufacturer.
Note: The Pure Cycle Auto Alarm Function
- If the “Pure Cycle” button is lit after a wash, it indicates that tub (drum) cleaning is required.
In this case, remove the laundry from the washing machine, turn the power on, and clean the drum by performing the Pure Cycle course.
- If you do not perform the Pure Cycle course, the lamp of the “Pure Cycle” button is turned off. However, the “Pure Cycle” button is lit again after two washes are performed. However this will not result in a problem with the washing machine.
- Although generally, the Pure Cycle Auto Alarm appears once a month or so, the frequency may differ depending on the number of times the washing machine is used
CHECK THESE POINTS IF YOUR WASHER…
| PROBLEM |
SOLUTION
|
| Will not start.. |
- Make sure the door is firmly closed.
- Make sure your washer is plugged in.
- Make sure the water source faucets are open.
- Make sure to press the Start/Pause button to start your washer.
- Make sure the Child Lock is not activated (page 20).
- Before your washer starts to fill, it will make a series of clicking noises to check the door lock and do a quick drain.
- Check the fuse or reset the circuit breaker.
|
| Has no water or not enough water.. |
- Turn both faucets on fully.
- Make sure the door is tightly closed.
- Straighten the water inlet hoses.
- Disconnect hoses and clean screens. Hose filter screens may be clogged.
- Open and close the door, then press the Start/Pause button.
|
|
Has detergent remains in the automatic dispenser after the wash cycle is complete.
|
- Make sure your washer is running with sufficient water pressure.
- Make sure the Detergent Selector dial is in the upper position when using granular detergent.
|
| Vibrates or is too noisy. |
- Make sure your washer is set on a level surface. If the surface is not level, adjust your washer feet to level the appliance.
- Make sure that the shipping bolts are removed.
- Make sure your washer is not touching any other object.
- Make sure the laundry load is balanced.
|
| Stops |
- Plug the power cord into a live electrical outlet.
- Check the fuse or reset the circuit breaker.
- Close the door and press the Start/Pause button to start your washer.
For your safety, your washer will not tumble or spin unless the door is closed.
- Before your washer starts to fill, it will make a series of clicking noises to check the door lock and do a quick drain.
- There may be a pause or soak period in the cycle. Wait briefly and it may start.
- Check the screens on the inlet hoses at the faucets for obstructions.
Clean the screens periodically.
|
| Fills with the wrong temperature water. |
- Turn both faucets on fully.
- Make sure the temperature selection is correct.
- Make sure the hoses are connected to the correct faucets.
Flush water lines.
- Check the water heater. It should be set to deliver a minimum 120°F(49°C) hot water at the tap. Also check the water heater capacity and recovery rate.
- Disconnect the hoses and clean the screens. The hose filter screens may be plugged.
- As your washer is filling, the water temperature may change as the automatic temperature control feature checks incoming water temperature. This is normal.
- While your washer is filling, you may notice just hot and/or just cold water going through the dispenser when cold or warm wash temperatures are selected. This is a normal function of the automatic temperature control feature as your washer determines the temperature of the water.
|
| Door locked or will not open. |
- Press the Start/Pause button to stop your washer.
- Your washer door will remain locked during the heating portion of the Sanitize cycle.
- It may take a few moments for the door lock mechanism to disengage.
|
| Does not drain and/or spin. |
- Check the fuse or reset the circuit breaker.
- Straighten the drain hoses. Eliminate kinked hoses. If there is a drain restriction, call for service.
- Close the door and press the Start/Pause button. For your safety, your washer will not tumble or spin unless the door is closed.
|
| Load is too wet at the end of the cycle. |
- Use the High or Extra High spin speed.
- Use high efficiency detergent to reduce over–sudsing.
- Load is too small. Very small loads (one or two items) may become unbalanced and not spin out completely.
|
| Leaks water. |
- Make sure the door is firmly closed.
- Make sure all hose connections are tight.
- Make sure the end of the drain hose is correctly inserted and secured to the drainage system.
- Avoid overloading.
- Use high efficiency detergent to prevent over–sudsing.
|
| Has excessive suds. |
- Use high efficiency detergent to prevent over-sudsing.
- Reduce the detergent amount for soft water, small or lightly soiled loads.
- Non-HE detergent is NOT recommended.
|
INFORMATION CODES
Information codes may be displayed to help you better understand what is occurring with your washer.
|
CODESYMBOL
|
MEANING
|
SOLUTION
|
|
dc
|
Unbalanced load prevented your washer from spinning.
|
Redistribute the load, press the Start/Pause button.
|
|
dL
|
Door is unlocked when washer is running.
|
Press the Power button to turn off your washer, then restart the cycle. If the code reappears, call for service.
|
|
dS
|
Door is open when washer is running.
|
Close the door tightly and restart the cycle. If the code reappears, call for service.
|
|
FL
|
Your washer failed to lock the door.
|
Close the door tightly and restart the cycle. If the code reappears, call for service.
|
|
Hr
|
Water temperature control problem.
(Heater control problem)
|
Call for service.
|
|
LE
|
Your washer has tried to fill but has not reached the proper water level.
|
Call for service.
|
|
LO
|
The door will not unlock.
|
Make sure the door is firmly closed.
Press the Power button to turn off your washer, then turn it on again. If the code reappears, call for service.
|
|
nd
|
Your washer is not draining.
It can also mean that the unit senses a small clog while draining.
|
Calling for service, check the following.
Clean the filter (See page 25).
Before or
- Turn off the unit for 10 seconds and then turn it on again.
- Select the Spin Only cycle.
- Press the Start/Pause to drain the water.
If it still does not drain, call for service.
|
|
nF
|
Your washer has tried to fill but was unsuccessful.
|
Make sure the water faucets are open all the way. Check for kinked hoses.
Check the inlet screens on the fill hoses.
|
|
nF1
|
The hot/cold water hose connection is not correct.
|
Please connect the hot/cold water hose connection correctly.
|
|
Sr
|
Problem with control.
|
Call for service.
|
|
OE
|
A fault is detected in the water level sensor.
|
Call for service
|
|
E2
|
Jammed key.
|
Call for service
|
|
tE
|
Temperature sensor problem.
|
Restart the cycle.
If the code reappears, call for service.
|
|
3E
|
Motor problem.
|
Restart the cycle.
If the code reappears, call for service.
|
|
2E
|
High/Low voltage detected.
|
Restart the cycle.
If the code reappears,call for service.
|
|
7E
|
Ag+ Kit problem
|
Call for service
|
|
AE
|
Communication error between SUB PBA and MAIN PBA
|
Call for service
|
|
SF1 SF2 SF3
|
System error
|
Call for service
|
|
SUdS
|
Too many suds are detected during the washing session. The unit is put on hold until the suds are reduced. Then, the unit will go back to the operation. When it finishes washing, “End” and “SUdS” codes will blink in turn.
|
To prevent it, cutdown on detergents.
|