User manual Dryer
Before you start
Here are a few things you should know before starting your dryer.
Sort and load
- Put one wash load in the dryer at a time.
- Do not mix heavy and lightweight items together.
- To improve drying efficiency for one or two items, add a dry towel to the load.
- For best results, untangle items before inserting them into the dryer.
- Overloading reduces the tumbling action, resulting in uneven drying and wrinkling.
- Unless recommended on the care label, do not dry woolens or fiberglass items.
- Avoid drying unwashed items.
- Do not dry items soiled with oil, alcohol, gasoline, etc
Functional prerequisite
Lint filter
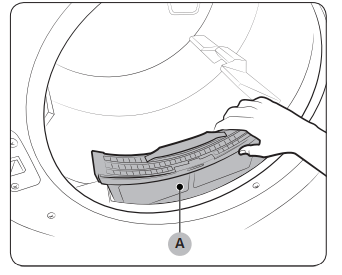
To prevent a risk of fire, make sure to clean the lint filter before or after every load.
- Turn off the dryer.
- Open the door, and pull out the lint filter (A) from inside the tumbler.
- Open the lint filter by separating it at the top. Remove the lint that has accumulated, and then clean the lint filter.
- Close the lint filter, reinsert the lint filter into the dryer, and then close the dryer door.
CAUTION
- Do not operate the dryer without the lint filter in place.
- Do not use a damaged or broken lint filter. This may reduce performance and/or cause fire.
WARNING: To reduce the risk of fire, electric shock, or injury, read the “Safety information“ before operating this appliance.
Feature panel

| 01. Cycle Selector |
Turn the Cycle Selector to select the desired cycle. The indicator by the cycle name lights up.
- Sensor Dry cycles: The dryer senses the internal humidity and uses it to determine the drying time.
- Manual Dry cycles: The drying time is fixed.
- Steam cycles: The dryer sprays water into the drum to deodorize clothes and reduce static electricity and wrinkles.
|
| 02. Digital Graphic Display |
Displays all cycle information, including the cycle time, information code, and operating status.
|
| 03. Anti Static |
Anti Static reduces static electricity that occurs from clothing friction. This is done by spraying steam into the drum in a later stage of the drying cycle.
NOTE: The Anti Static function is only available with NORMAL, HEAVY DUTY, PERM PRESS, DELICATES, and TIME DRY.
|
| 04. Mixed Load Bell |
The Mixed Load Bell notifies you when the average dry level in a load is damp dry (80 % dried). This lets you take items that you don’t want fully dried or that dry quickly out of the dryer early while letting others continue to dry.
You can select this option in all Sensor Dry cycle except for SANITIZE. Available dry levels are Normal, More, and Very.
|
| 05. Wrinkle Prevent |
Wrinkle Prevent provides approximately 180 minutes of intermittent tumbling in unheated air at the end of the cycle to reduce wrinkling. Press Wrinkle Prevent to activate this feature. The load is dry and can be removed at any time during the Wrinkle Prevent cycle.
NOTE: After 2 minutes of inactivity, the drum light automatically turns off.
|
| 06 Small Load Care™ |
To control operation rate for drying a small loads at Sensor Dry course.
- It is only available with: NORMAL, HEAVY DUTY, PERM PRESS, and DELICATES.
- It can’t be selected/cancelled when the drying course is running.
- In order to improve drying effect and control operation rate, the drum can be paused during operation.
|
| 07 Dry Level |
Press Dry Level to select a dry level. This is available only with the Sensor Dry cycles.
- Larger or bulkier loads may require Very or More for complete dryness.
- Damp is designed to partially dry items. Use for items that lay flat or hang to dry.
NOTE: This option is not available with: SANITIZE
|
| 08. Temp. |
Press Temp. to change the temperature of the current cycle.
- High: For sturdy cottons or those labeled Tumble Dry.
- Medium: For permanent press, synthetics, lightweight cottons, or items labeled Tumble Dry Medium.
- Low: For heat sensitive items labeled Tumble Dry Low or Tumble Dry Warm.
- Extra Low: Provides the lowest heated drying temperature possible.
|
| 09. Time |
Press Time to select a drying time for the selected cycle. This is available only with TIME DRY, QUICK DRY, and WRINKLE AWAY. This button is not available for Sensor Dry cycles because exact drying times are determined by fluctuating humidity levels. |
| 10. Eco Dry |
This function is available with Normal and Time Dry.
With the Eco Dry activated, drying takes a longer time but power consumption is reduced.
The drying time can be extended by up to 3 times normal depending on the temperature and load. The Eco Dry function is enabled by default.
|
| 11. Adjust Time |
You can change the set time for the selected cycle. This is available only with TIME DRY, QUICK DRY, and WRINKLE AWAY. To change the cycle time, press Adjust Time  or Adjust Time or Adjust Time  until the desired time is displayed. until the desired time is displayed. |
| 12. My Cycle |
Choose your favorite cycle including the cycle time, temperature, and dry level. See “My Cycle” for details. |
| 13. POWER |
Press to turn on/turn off the dryer. |
| 14. START/PAUSE |
Press and hold to start operation or press to stop operation. |
NOTE: Extremely tangled items finished by the washer may degrade the drying efficiency or cause the door to open. We recommend that you untangle the items before drying. Do not put objects on the dryer, especially on the feature panel.
CAUTION: Do not spray water onto the feature panel. This may cause a system failure.
Simple steps to start
- Press POWER to turn on the dryer.
- Turn the Cycle Selector to select a cycle.
- Change the cycle settings (Dry Level, Temp. and Time) as necessary.
- Optionally, you can activate options available by pressing the relevant button (Anti Static, Mixed Load Bell, Wrinkle Prevent, and/or Eco Dry).
- Press and hold START/PAUSE. The dryer indicator turns on with an estimated cycle time on the display.
To change the cycle during operation
- Press START/PAUSE to stop operation.
- Select a different cycle.
- Press and hold START/PAUSE to start new cycle.
Cycle overview
| Cycle |
Description |
| NORMAL |
For most fabrics including cottons and linens.
If Normal is selected, the Eco Dry function is enabled by default. For more information, see Eco Dry in the “Feature panel“ section.
|
| HEAVY DUTY |
For drying items made out of heavy fabrics, such as jeans, corduroys, or work clothes, with high temperature heat. |
| BEDDING |
For bulky items such as blankets, sheets, and comforters. |
| PERM PRESS |
Dry wrinkle-free cottons, synthetic fabrics, knits, and permanent press fabrics automatically |
| DELICATES |
For heat-sensitive items at a low drying temperature |
| QUICK DRY |
A quick drying cycle that runs for 30 minutes |
| TIME DRY |
You can specify a cycle time in minutes.
If Time Dry is selected, the Eco Dry function is enabled by default. For more information, see Eco Dry in the “Feature panel“ section.
|
| REFRESH |
Use to smooth out wrinkles and reduce odors in loads of one to four items. With this cycle selected, a small amount of water is sprayed into the dryer drum after several minutes of tumbling with heat. Before removing the laundry, confirm that the laundry load is dry. |
| WRINKLE AWAY |
For best results, load 2-3 items at once. You can extend the drying time by a minimum of 20 minutes, depending on the item type or load. Before removing the laundry, confirm that the laundry load is dry |
| SANITIZE |
Lets you sanitize garments by infusing high temperature heat deep into the fabric during the drying cycle. Use this cycle to keep your bedding and curtains clean through sanitization. |
Drying guide
The best way to dry items is to follow the instructions on the care label. If no drying instructions are provided, see the following table for reference.
| Item |
Description |
| Bedspreads & Comforters |
Follow the care label instructions or dry using Bedding.
- Make sure the item is thoroughly dry before using or storing.
- May require repositioning in the drum to ensure even drying.
|
| Blankets |
Use Normal and dry only one blanket at a time for best tumbling action.
- Make sure blankets are is thoroughly dry before using or storing.
|
| Curtains & Draperies |
Use Perm Press and the Medium temperature setting to help minimize wrinkling.
- Dry curtains and draperies in small loads for best results and remove as soon as possible after the cycle is complete.
|
| Cloth Diapers |
Use Normal and the Medium temperature setting for soft, fluffy diapers |
| Down–filled Items (jackets, sleeping bags, comforters, etc.) |
Use Normal and the Medium temperature setting.
- Add a couple of dry towels to absorb moisture and shorten drying time.
|
| Foam Rubber (rug backs, stuffed toys, shoulder pads, etc.) |
Do not dry on a heat setting.
WARNING: Drying a rubber item with heat may damage it or cause a fire
|
| Pillows |
Use Normal.
- Add a couple of dry towels and a pair of clean sneakers to help the tumbling action and to fluff the pillows.
- Do not dry kapok or foam pillows using a heated drying cycle.
|
| Plastics (shower curtains, outdoor furniture covers, etc.) |
Use TIME DRY and the Low temperature settings depending on the care label instructions. |
WARNING - Do not dry:
- Fiberglass items (curtains, draperies, etc.)
- Woolens, unless recommended on the label
- Items spotted or soaked with vegetable or cooking oils
Special features
Child Lock 
- Child Lock prevents children from playing with the dryer. When Child Lock is activated, all buttons except for the POWER button are disabled.
- To activate/deactivate Child Lock, simultaneously press and hold Temp. and Time for 3 seconds.
- NOTE: Once Child Lock is activated, it will remain active even after you restart the dryer. If other buttons, except for the POWER button, do not respond, check the Child Lock indicator. If the indicator is on, follow the instructions above to turn Child Lock off.
Smart Care:
If the dryer displays an information code, you can use Smart Care to check the status of the dryer on a smartphone. To use Smart Care, you must have the Samsung Smart Care app installed on your smartphone.
NOTE: Smart Care is optimized for Samsung Galaxy and Apple iPhones. (Not compatible with some models). Download the Samsung Smart Care app from the Google Play Store or Apple App store (Search term: “Samsung Smart Washer/Dryer”), and install it on your smartphone. If an information code appears on the dryer, follow these steps:
- Press and hold Eco Dry for 3 seconds to activate Smart Care. The Smart Care indicator turns on.
- Open the Smart Care app on your smartphone.
- Put the smartphone’s camera close to the display of the dryer. The app automatically recognizes the information code, and displays suggestions on your smartphone.
- If the smartphone fails to recognize the information code more than twice, type the information code manually into the Smart Care app.
CAUTION
- If light is reflected on the display of the dryer, the smartphone may not recognize the information code.
- If you hold the smartphone at an angle to the dryer’s display, the smartphone may not recognize the information code. For best results, hold the smartphone so that the front of the panel and the smartphone are parallel or nearly parallel.
- After you use this function, the dryer will delete the record of the information code from its code log.
Sound On/Off
- To turn off the dryer’s notification beeps and melodies, press and hold Dry Level for 3 seconds. To unmute the dryer, press and hold Dry Level again for 3 seconds.
- NOTE: This function remains active even after you restart the dryer. Drum Light To turn on the drum light while the dryer is running, press and hold Small Load Care™ for 3 seconds.
- NOTE: After 2 minutes of inactivity, the drum light automatically turns off.
My Cycle
- You can create your own cycle that contains your preferred settings, and use it at your convenience.
- Turn the Cycle Selector to select a cycle. The cycle indicator turns on.
- Set or change the settings (Dry Level, Temp., Time, etc) and/or options as necessary. Each corresponding indicator blinks.
- Press and hold My Cycle for 3 seconds. The dryer stores the selected cycle with its settings.
- To use My Cycle, press My Cycle.
- NOTE: Wrinkle Prevent is not available with My Cycle.
Maintenance
Keep the dryer clean to prevent decreased performance and to lengthen its life.
WARNING: The control board and inlet valve are intentionally not grounded and may present a risk of electric shock only during servicing. Service personnel - Do not contact these parts while the dryer is energized.
Vent sensor
- The dryer features a vent sensor that detects and notifies you when it is time to clean the ductwork. The
 indicator lets you know the status of the duct.
| Level |
Indicator |
Status |
Action |
| 0 |
Off |
The ductwork is not clogged |
|
| 1 |
On |
- The duct or lint filter is clogged.
- The pressure applied to the duct is high because the duct is too long or bent
|
- Check the lint filter or duct and clean if necessary.
- Check the duct connections and shorten or straighten the duct if necessary.
|
| 2 |
Blinking |
- The duct or lint filter is severely clogged.
- The pressure applied to the duct is very high because the duct is too long or bent
|
- Check and clean the lint filter or duct and make sure they are not clogged.
- Check the duct connections and shorten or straighten the duct work.
|
- If the dryer is in the Level 2 state, the indicator blinks for 3 hours after the completion of the current cycle. If you press POWER or open the door, the dryer powers off immediately.
NOTE
- For duct installation, see “Exhaust ducting guide” on page 28 and “Ducting requirements” on page 14.
- The dryer may keep running even if the duct is clogged, but the drying time will be extended.
- If the indicator turns on for the first time and is solid (not blinking), check and clean the lint filter and/or duct.
- If the indicator turns on again later, it is because the duct is installed or connected with some restrictions (it’s too long or has too many bends). This is not a system failure. However, drying time may be extended or the drying performance may be degraded.
Cleaning
Feature panel
- Clean with a soft, damp cloth. Do not use abrasive substances.
- Do not spray liquid cleaning agents directly on the display of the dryer.
- Some laundry pre-treatment soil and stain removers may damage the feature panel.
- When using liquid cleaning agents, apply them to the cleaning cloth. Do not apply them directly to the dryer. Wipe up any spills or overspray immediately.
Tumbler
- Remove any stains from the tumbler with an all-purpose cleaner.
- Tumble old towels or rags to remove any remaining stains or cleaning substances. Stains may still be visible, but will not affect subsequent loads.
Powder coat tumbler
- To clean the powder coat tumbler, use a damp cloth with a mild, non-abrasive cleaner suitable for easily marred surfaces. Remove cleaner residue and dry with a clean cloth.
Dryer exterior
- Clean with a soft, damp cloth. Do not use abrasive substances.
- Protect the surface from sharp objects.
- Do not place any heavy or sharp objects or a detergent container on the dryer. They can scratch or damage the top cover of the dryer.
- The dryer has a high-gloss finish on the entire surface. Be careful not to scratch or damage the surface.
Exhaust system
- Check and clean the exhaust system on a yearly or regular basis to maintain optimum performance.
- The external exhaust hood must be cleaned more frequently to ensure proper air flow.
Troubleshooting
Checkpoints
If the dryer operates abnormally, first check the list of problems in the table below and try the suggested actions.
| Problem |
Action |
| Does not run. |
- Make sure the door is latched shut.
- Make sure the power cord is plugged into a live electrical outlet.
- Check your home’s circuit breakers or fuses.
- Press or tap START/PAUSE again if the door was opened during a cycle.
- Clean the lint filter
|
| Does not heat. |
- Check your home’s circuit breakers or fuses.
- Some cycles do not require heat. Check the selected cycle again.
- For a gas dryer, make sure the gas supply is on.
- Clean the lint filter and exhaust duct.
- The dryer may have moved into the cool-down phase of the cycle.
|
| Does not dry. |
- Check all of the above, plus...
- Make sure the exhaust hood outside your home can open and close freely.
- Check the exhaust system for lint buildup. Ducting should be inspected and cleaned annually.
- Use a 4” rigid metal exhaust duct.
- Do not overload. 1 wash load = 1 dryer load.
- Dry heavy items and light weight items separately.
- Large, bulky items, such as blankets or comforters, may require repositioning to ensure even drying.
- Make sure that your washer is draining properly and extracting adequate water from the load.
- The load may be too small to tumble properly. Add a few towels and restart the dryer.
- The load may be too large to tumble properly. Remove some items and restart the dryer.
- Clean the lint filter.
|
| Is noisy. |
- Check the load for objects such as coins, loose buttons, nails, etc. Remove promptly.
- It is normal to hear the dryer gas valve or heating element cycle on and off during the drying cycle.
- Make sure the dryer is leveled properly as outlined in the installation instructions.
- It is normal for the dryer to hum due to the high velocity of air moving through the dryer drum, fan, or exhaust system.
|
| Dries unevenly. |
- Seams, pockets, and other similarly heavy areas may not be completely dry when the rest of the load has reached the selected dryness level. This is normal. You can choose a higher dryness level or a cycle that involves a higher dryness level.
- If one heavy item is dried with a light weight load, such as one towel with sheets, it is possible that the heavy item will not be completely dry when the rest of the load has reached the selected dryness level.
- For the best drying results, dry heavy items and light weight items separately.
|
| Has odors. |
- Household odors from paint, varnish, strong cleaners, etc. may enter the dryer with the surrounding room air. This is normal as the dryer draws the air from the room, heats it, pulls it through the tumbler, and exhausts it outside.
- When these odors linger in the air, completely ventilate the room before using the dryer.
- Use a cycle featuring the Refresh function. If odors persist, wash and dry the items again.
|
| Lint on clothes. |
- Make sure the lint filter is cleaned before every load. For clothes that naturally build up lint, clean the filter during the cycle.
- Some fabrics are lint producers (for example, a fuzzy white cotton towel) and they must be dried separately from clothes that are lint trappers (for example, a pair of black linen pants).
- Divide larger loads into smaller loads for drying.
- Check pockets thoroughly before drying, then dry clothes.
- Remove lint inside the drum before drying a load.
|
| Items still wrinkled after Wrinkle Prevent (Wrinkle Away, Wrinkle Release). |
- Small loads of 1 to 4 items work best.
- Load fewer items. Load similar-type items.
- Take out the items immediately after drying is complete.
|
| Water drips from the nozzle when the Steam cycles starts. |
- This is steam condensation. The dripping water will stop after a short time.
|
| Sprayed water is not visible during Steam cycles. |
- Sprayed water is difficult to see when the door is closed.
|
| Extended time. |
- Sensor Dry automatically senses the moisture in the load and shuts the dryer off when the selected dryness level is reached. The drying time can change according to the type and amount of laundry. See the cycle chart for reference.
|
If a problem persists, contact a local Samsung service center.
Information codes
If the dryer fails to operate, you may see an information code on the display panel. To determine what you should do, check the list of codes in the table below, and then try the suggested actions.
| Code |
Action |
| DC |
Operating the dryer with the door open.
- Make sure the door is properly closed.
- Make sure laundry is not caught in the door.
|
| FC |
Invalid power source frequency
- Try restarting the cycle.
- If this information code remains, contact a Samsung service center.
|
| AC |
Electronic control problem (Invalid Communication).
- Contact a Samsung service center.
|
| HC |
High temperature heating check
- Clean the lint filter.
- If this information code remains, contact a Samsung service center.
|
| 9C1 |
The electronic control needs to be checked.
- Check if power is supplied properly.
- If the information code remains, contact a Samsung service center
|
| tC |
The Thermistor1 resistance is very low or high.
- Check for a clogged lint screen
- Check if the vent system is restricted.
- If this information code remains, contact a Samsung service center.
|
| tC5 |
The Thermistor2 resistance is very low or high.
- Check for a clogged lint screen.
- Check if the vent system is restricted.
- If this information code remains, contact a Samsung service center.
|
| dF |
Incorrect door switch.
- Contact a Samsung service center.
|
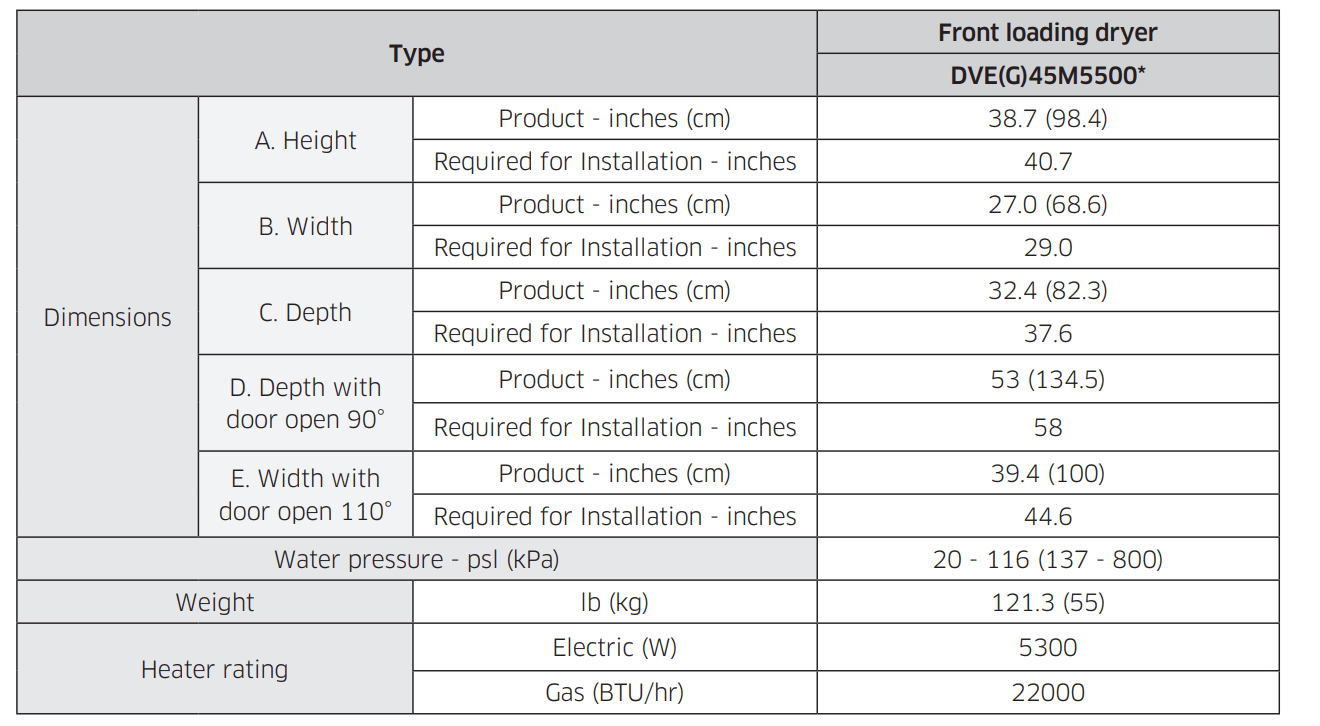
Specification
Specification sheet
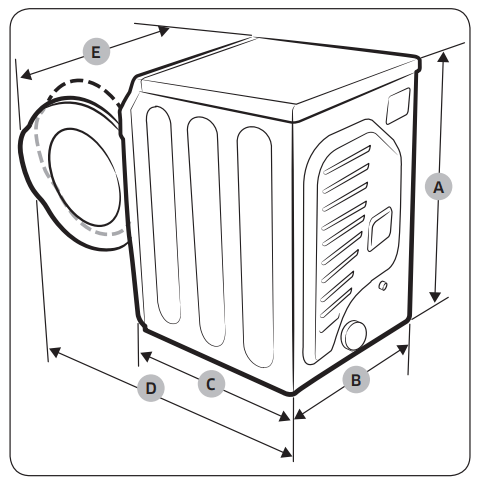
NOTE: “A. Height” Spec can vary from 42.4 to 43.3 inches (107.7 - 108.9 cm) depending on the leveling feet adjustments.