Owner's Guide Vacuum Cleaner
INSTALLATION
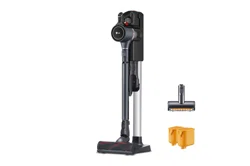
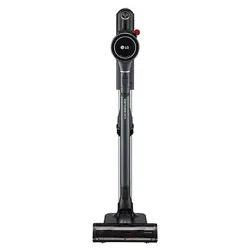
Product Overview
The images in this guide may be different from the actual components and accessories, which are subject to change by the manufacturer without prior notice for product improvement purposes.
NOTE
- For your safety and for extended product life, use only authorized components. The manufacturer is not responsible for product malfunction, property damage or bodily injury caused by the use of separately purchased unauthorized components, parts, or non-LG products.
- The floor stand dock and floor stand pipe are not installed in wall-mount installation.
Front View
†: This feature is only available on some models.
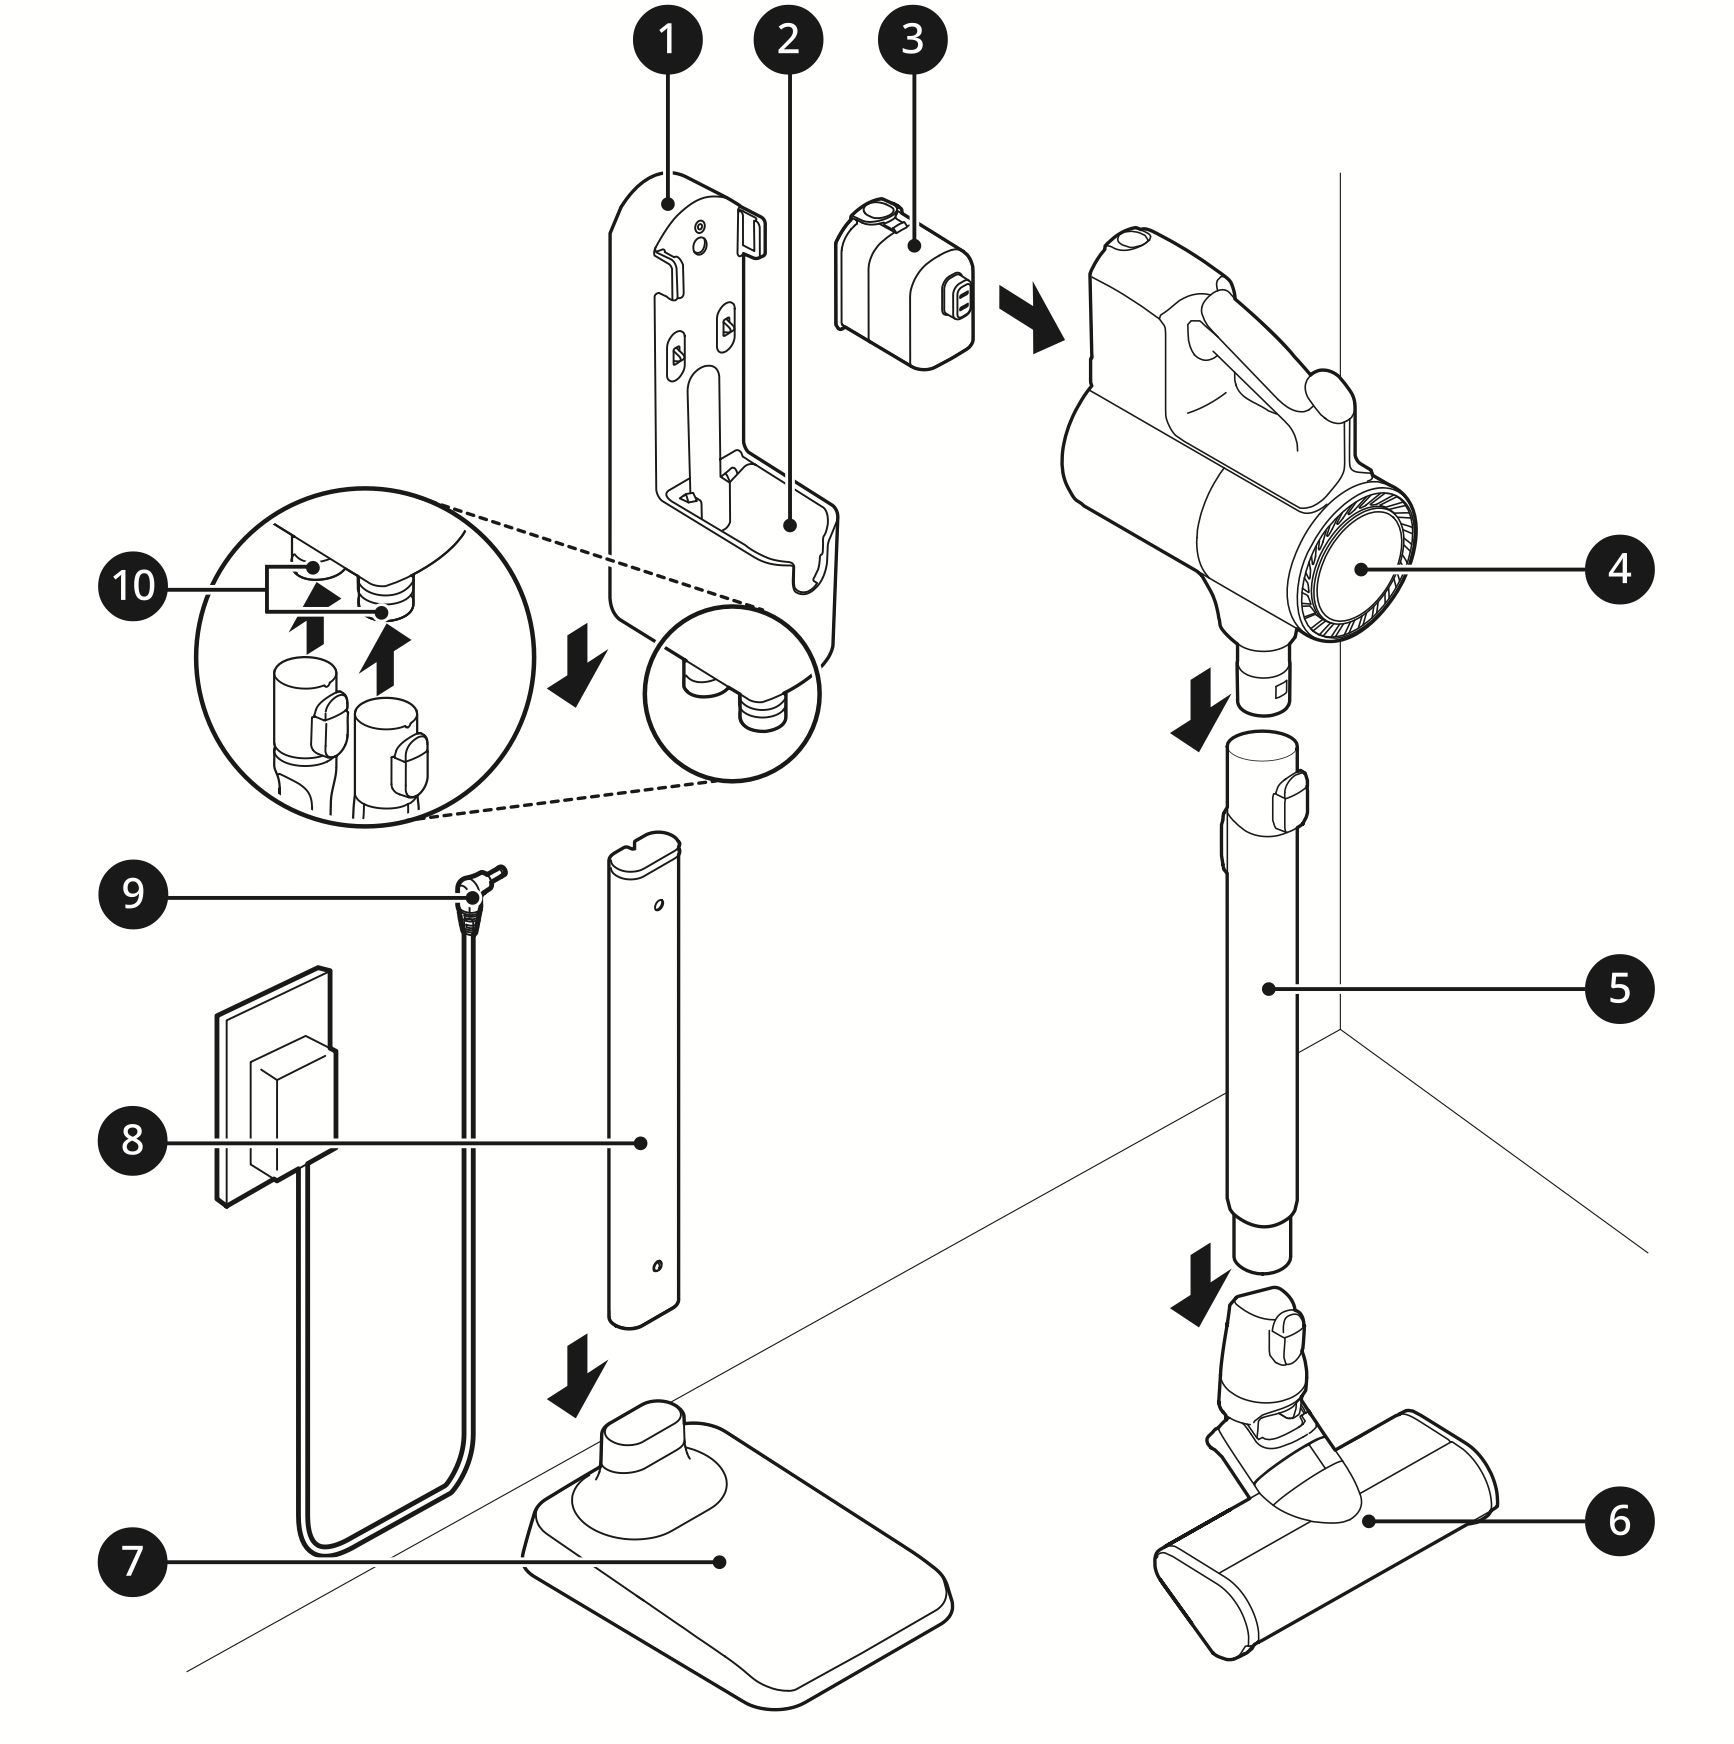
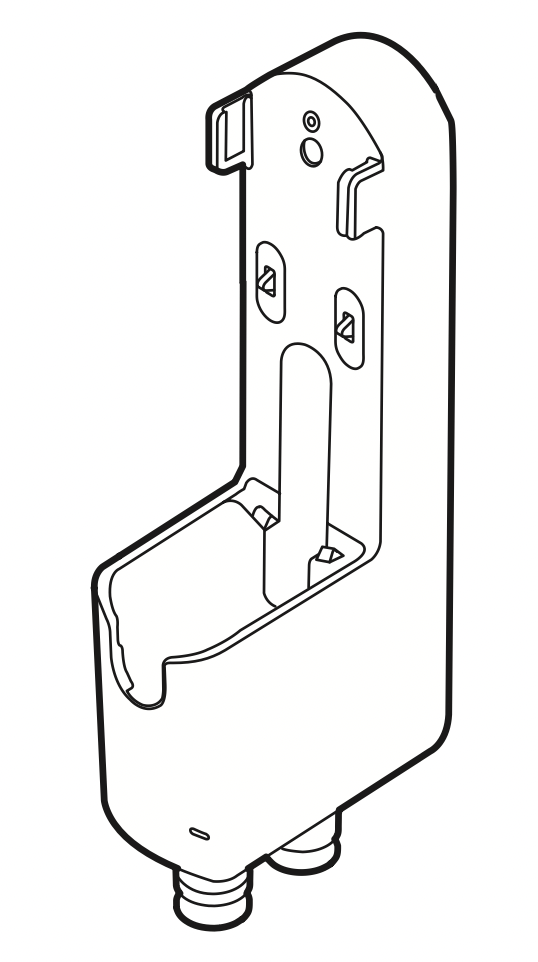
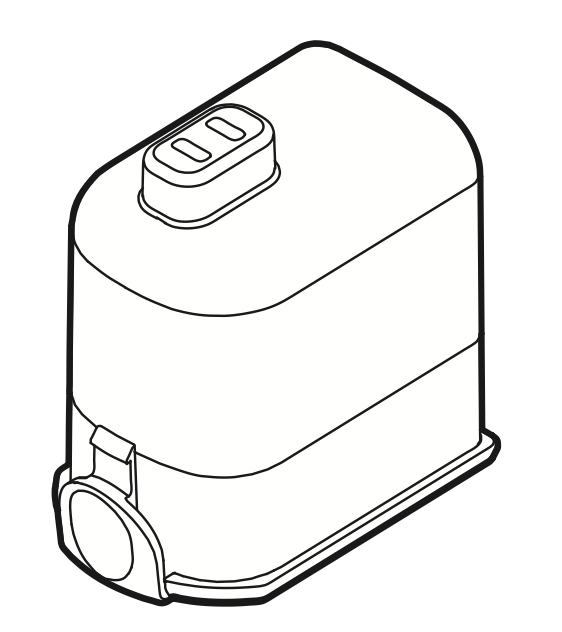
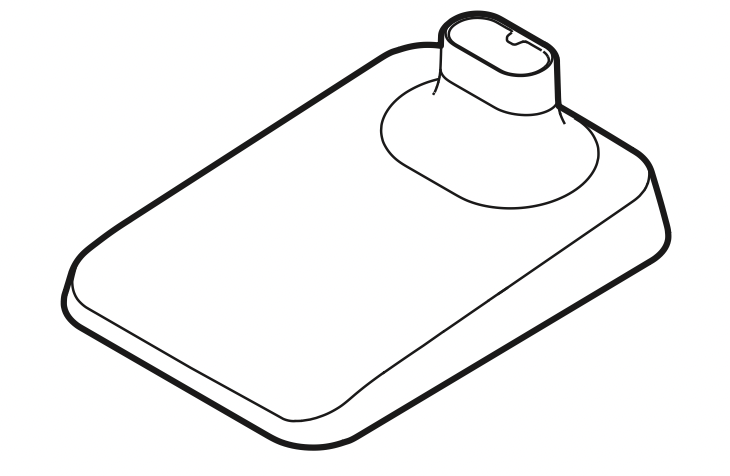
- Charging Station
- Auxiliary Charging Station
- Battery (Dual Battery†)
- Product Body
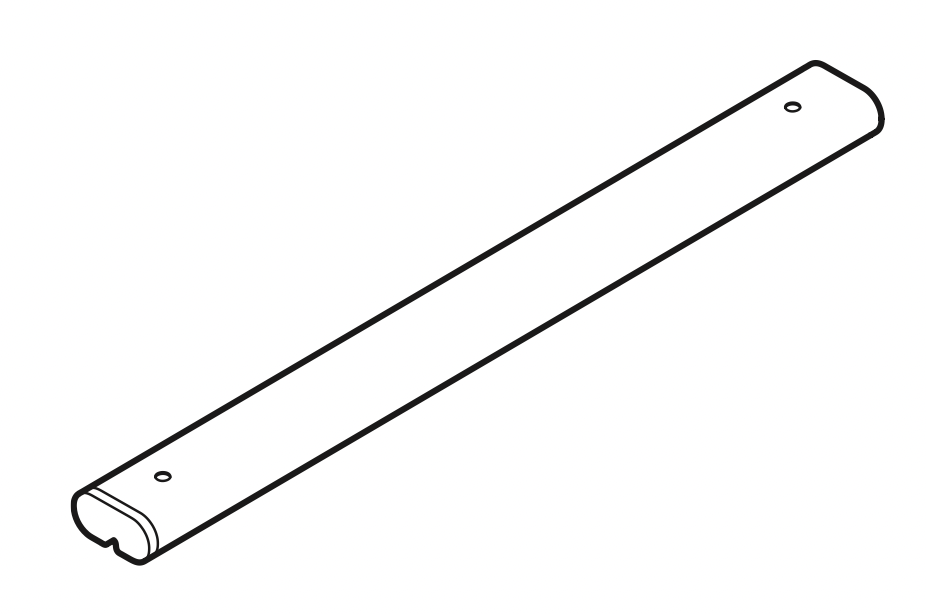
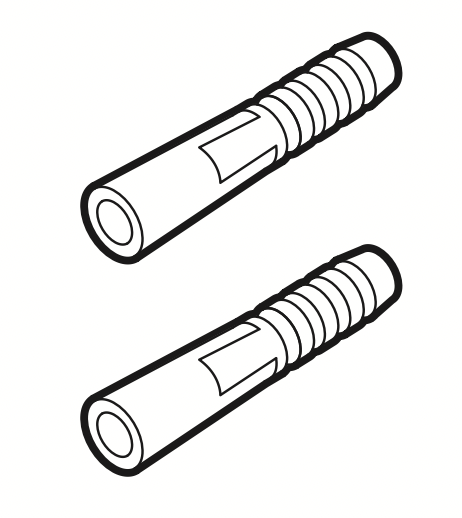
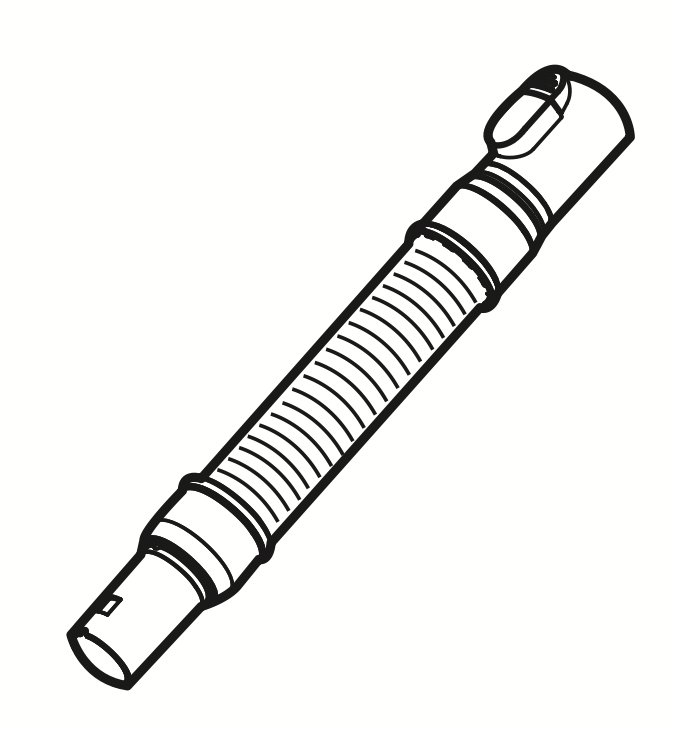
- Extension Pipe
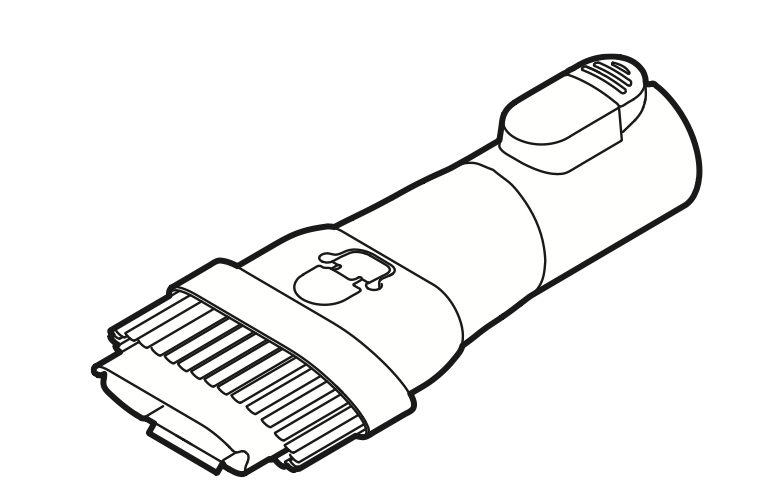
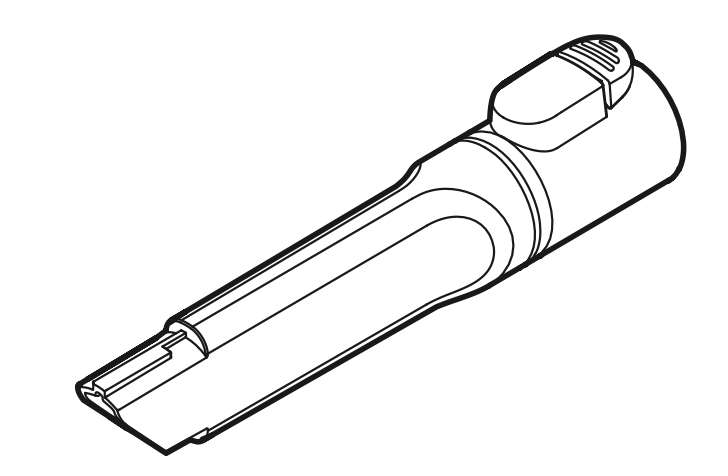
- Nozzle
- Floor Stand Dock
- Floor Stand Pipe
- Adapter
- Tool Holders
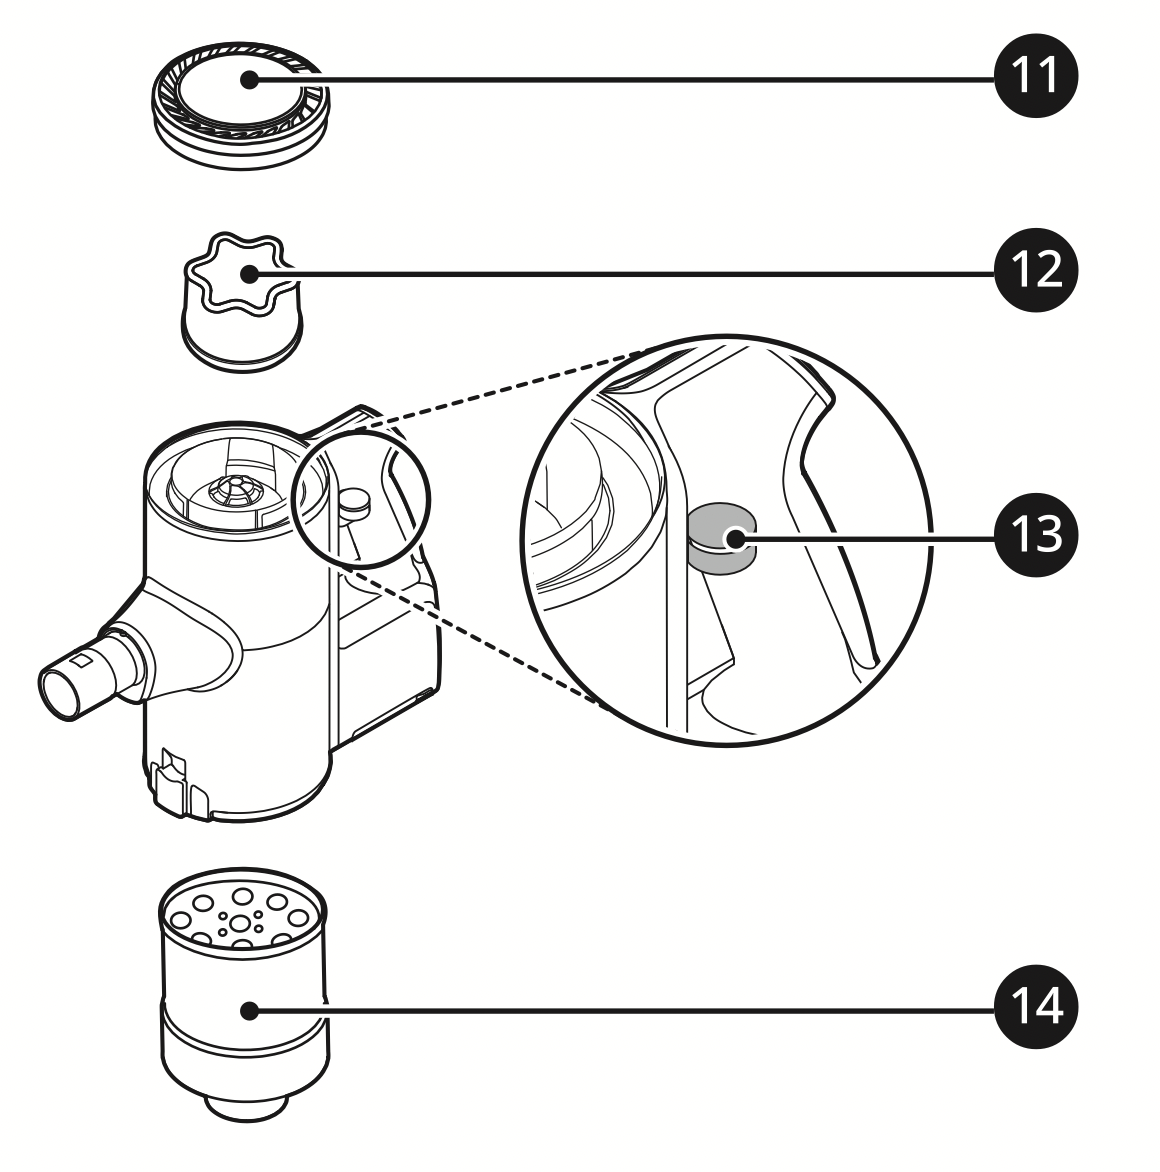
- Exhaust Filter
- Pre-filter
- Kompressor Lever
- Cyclonic Mesh Filter
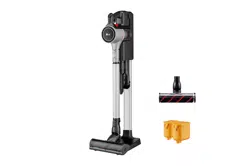
Accessories
†: This accessory is only available on some models.
Included Accessories
- Charging Station
- Extension Pipe
- Adapter
- Pre-filter
- Battery (Dual Battery†)
- Floor Stand Dock†
- Floor Stand Pipe†
Basic Accessories
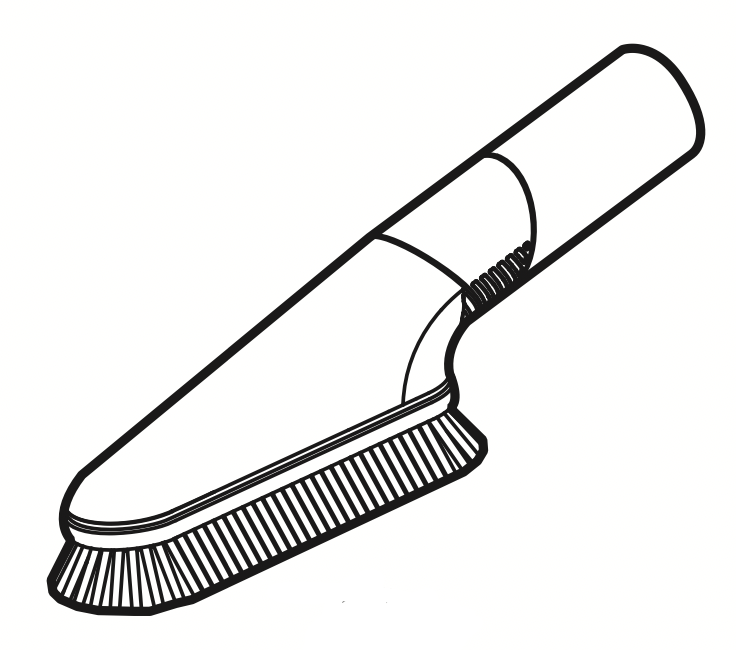
- Combination Tool
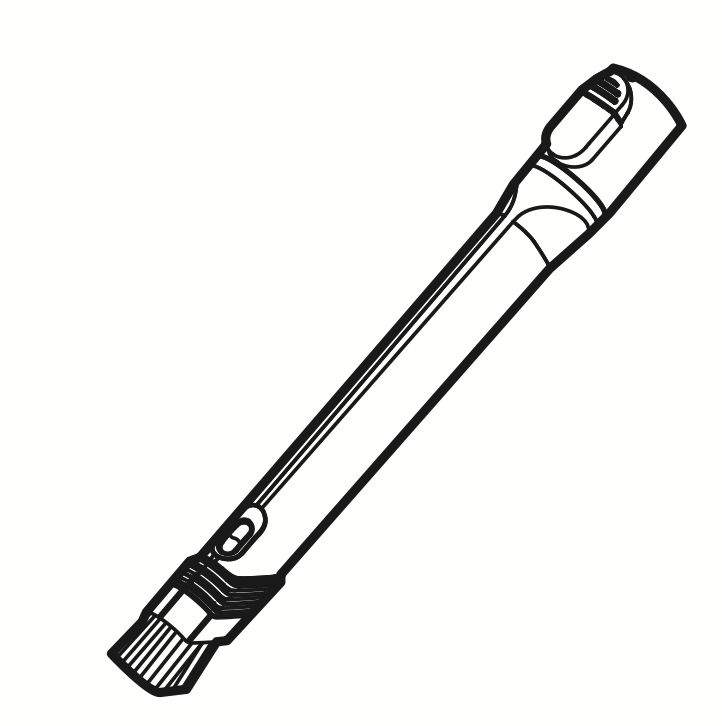
- Crevice Tool
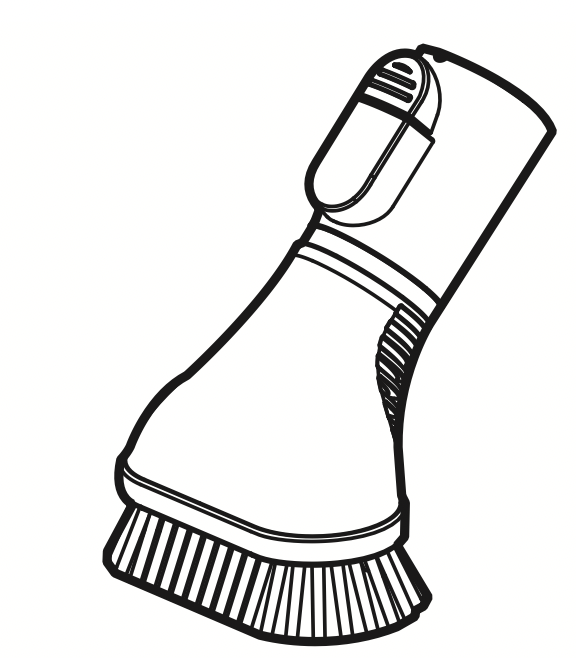
- Cleaning Brush
Nozzles
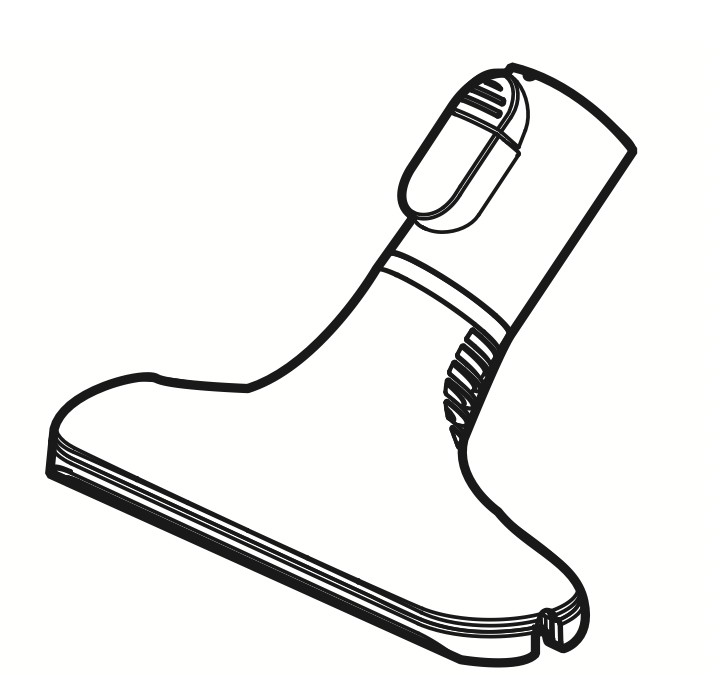
- Power Carpet Nozzle†
- Power Punch Nozzle†

Installation Kit
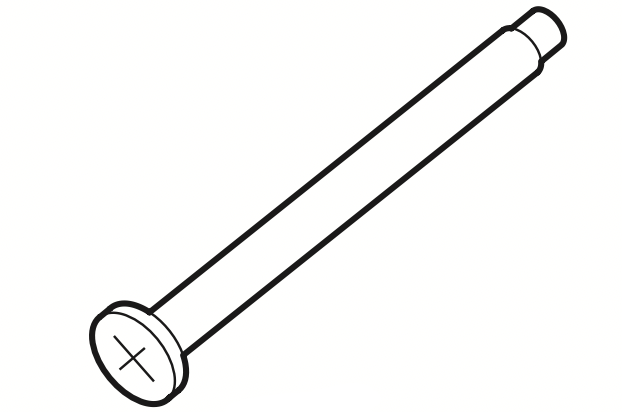
- Wall Anchoring Block†
- Double-Sided Tape†
- Drywall Anchor†
- Wall Anchoring Screw†
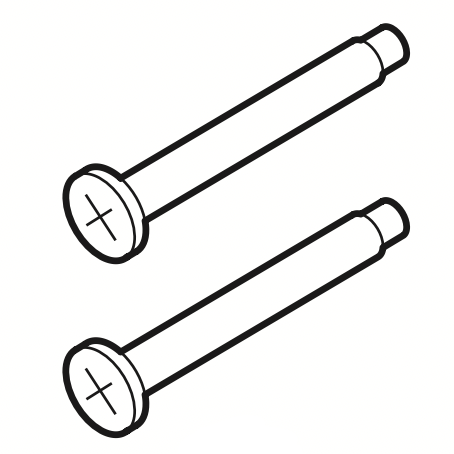
- Stand Anchoring Screw†
Tools and Accessory Bag
- Hard Dirt Tool†
- Mattress Tool†
- Multi-angle Tool†
- Flexible Crevice Tool†
- Flexible Hose Extension†
- Accessory Bag†
NOTE: The batteries, exhaust filter and the pre-filter will eventually need to be replaced. Contact an LG Electronics customer service center.
Installing the Charging Station
WARNING: To prevent tipping, self-standing mode installations should be anchored to the wall using the provided stand anchoring screw, anchoring block and double-sided tape.
CAUTION
- Do not allow children or pets to hang onto the charging station. They could be injured or cause damage to the appliance.
- Take care not to drop the product parts while unpacking them to avoid appliance damage or personal injury.
- Do not use double-sided tape to attach the charging station to wallpaper. The weight of the charging station and the product body could damage the paper.
- Use the stand anchoring screw on concrete or solid walls. If the appliance is not anchored securely and falls, it could result in damage to property or the product.
NOTE:
- Once assembled, the floor stand dock and the floor stand pipe cannot be disassembled.
- The cost of a service call to install or reinstall the charging station is not covered under the warranty.
Self-Standing Installation
Follow the steps below to install the charging station on a hard and level floor.
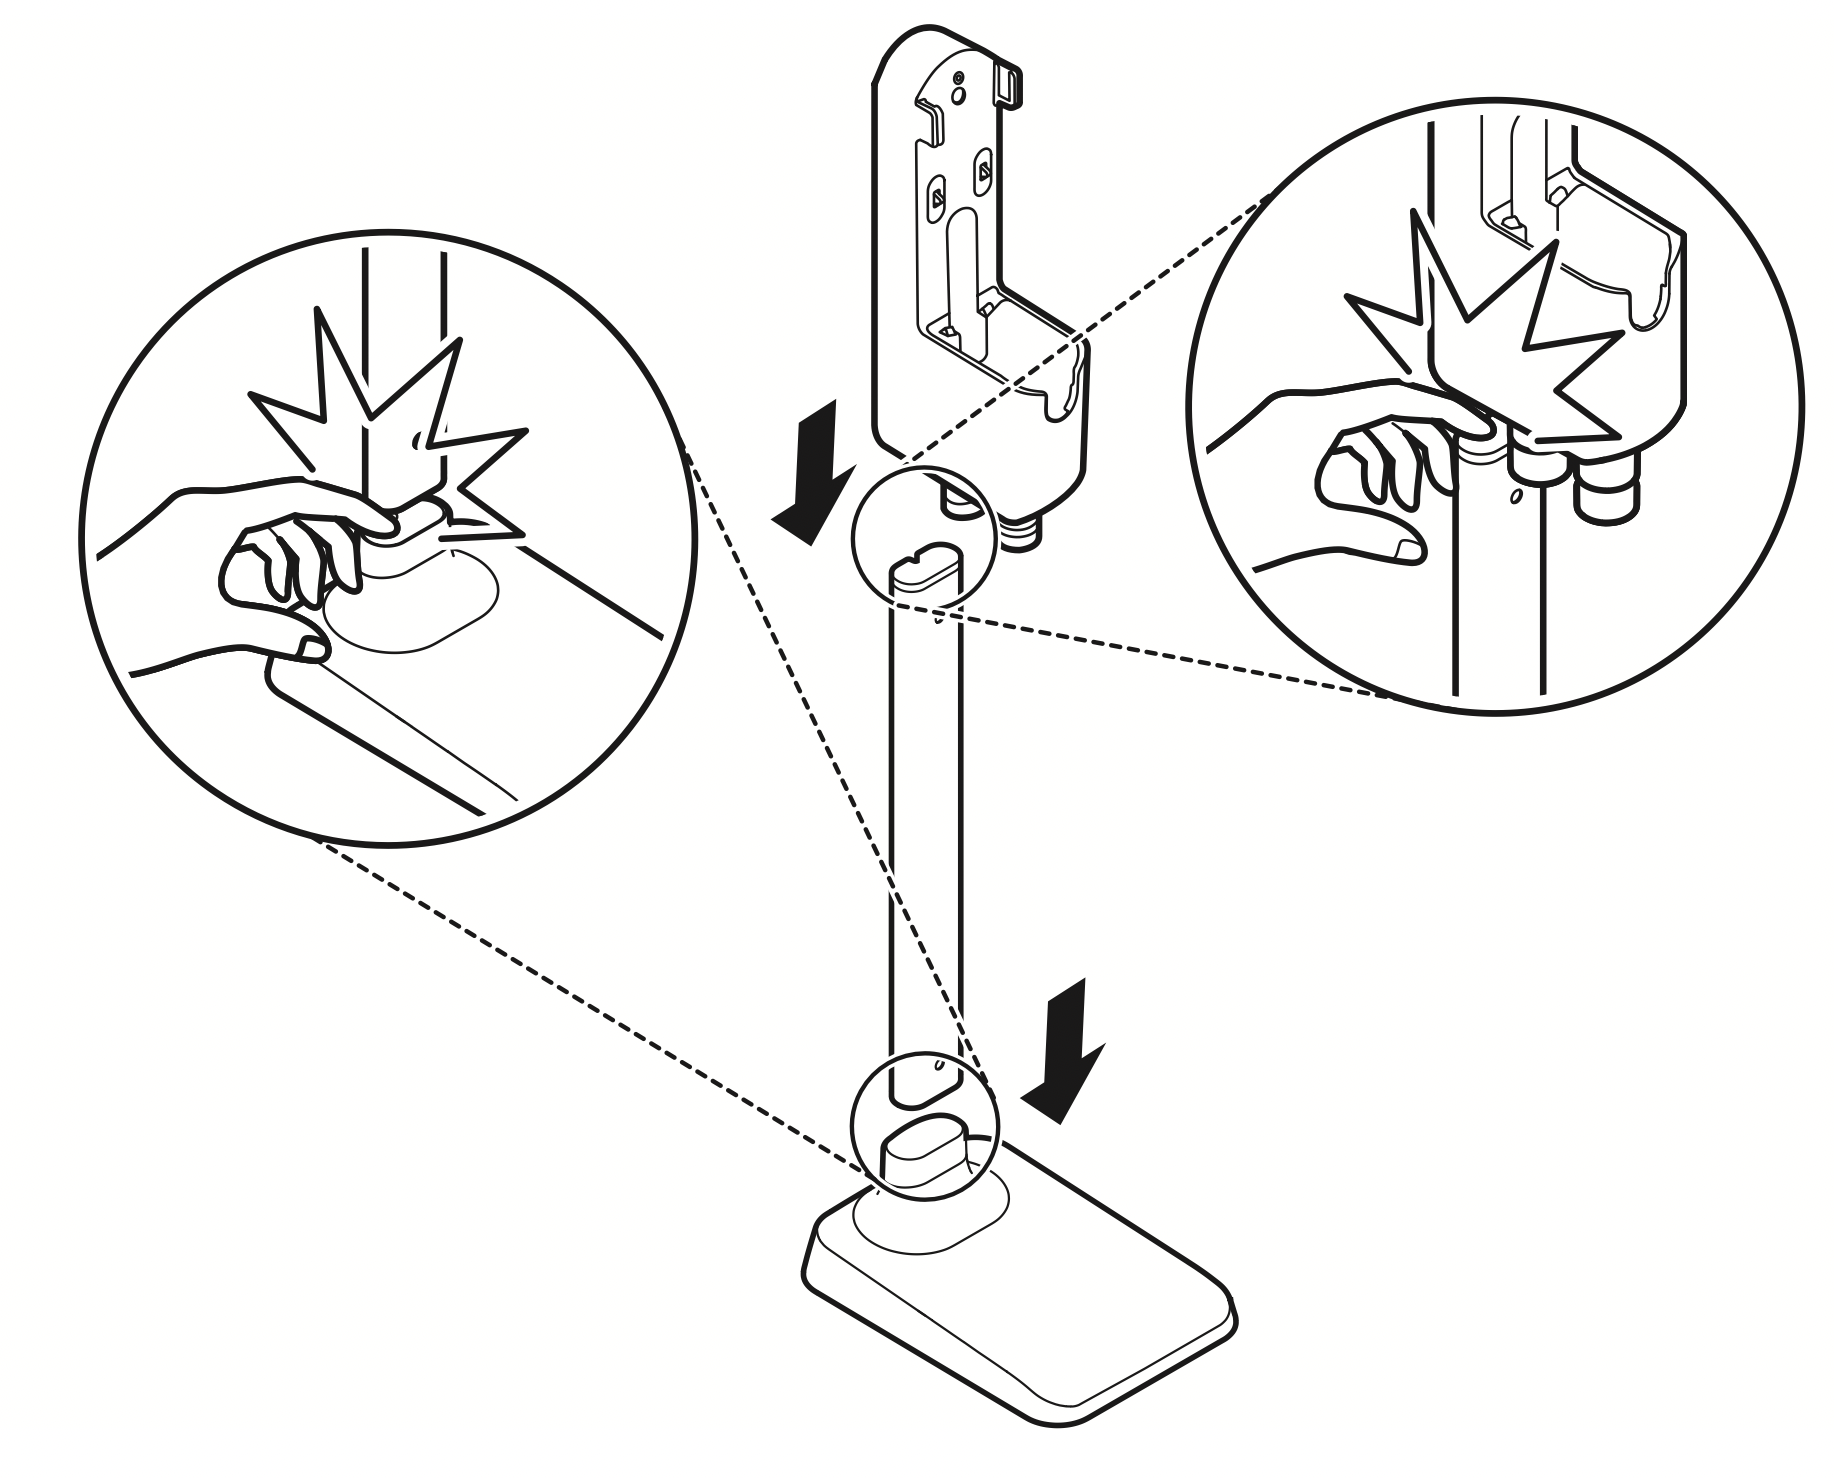
CAUTION: Keep fingers away from pinch points when assembling the appliance or the charging station.
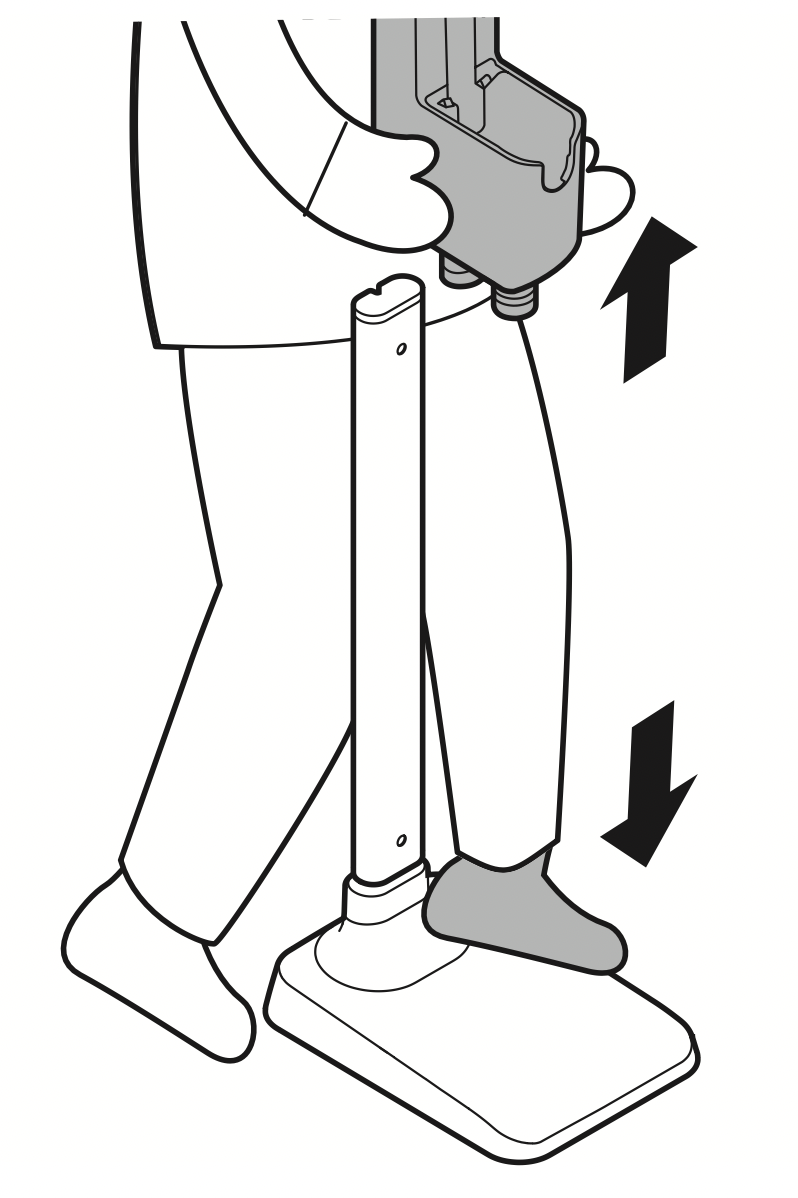
NOTE: The charging station can be removed as needed. To remove it, hold the floor stand dock steady and pull up on the charging station.
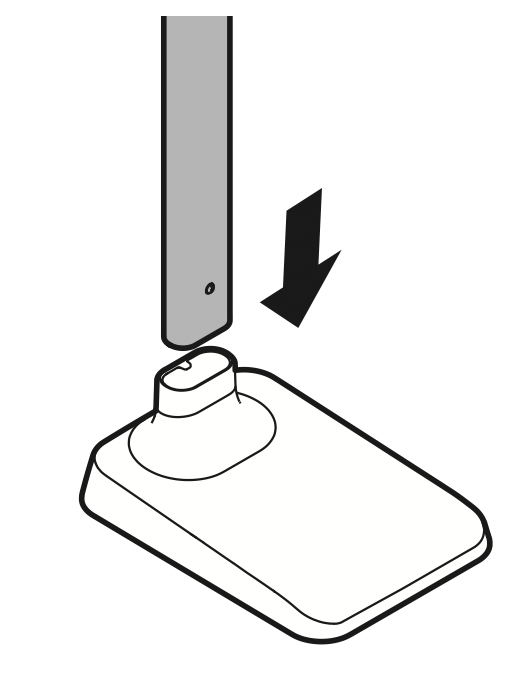
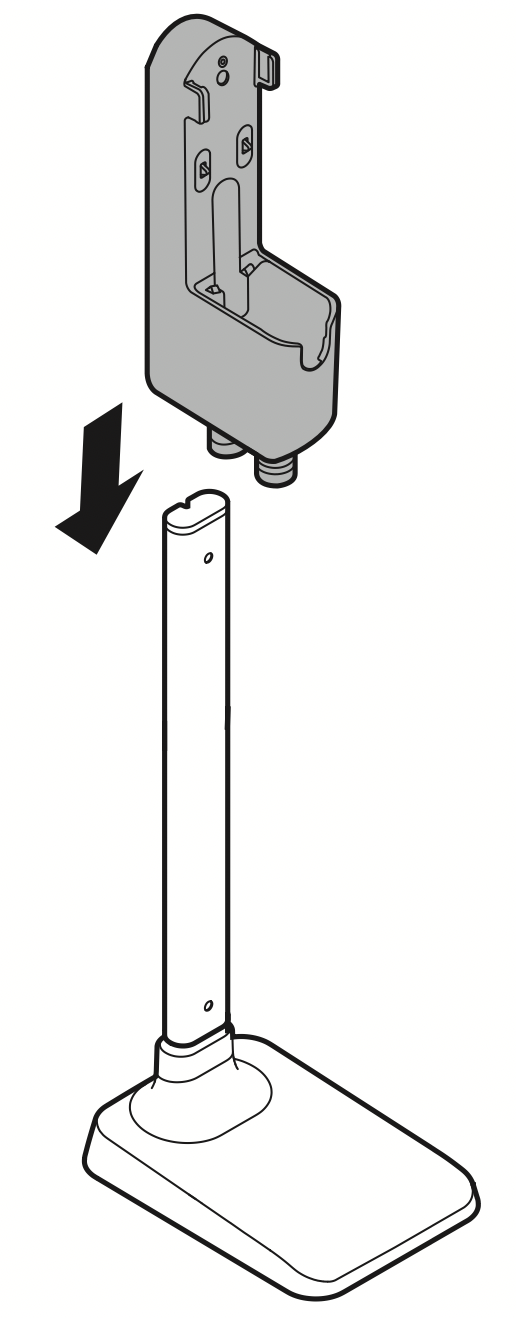
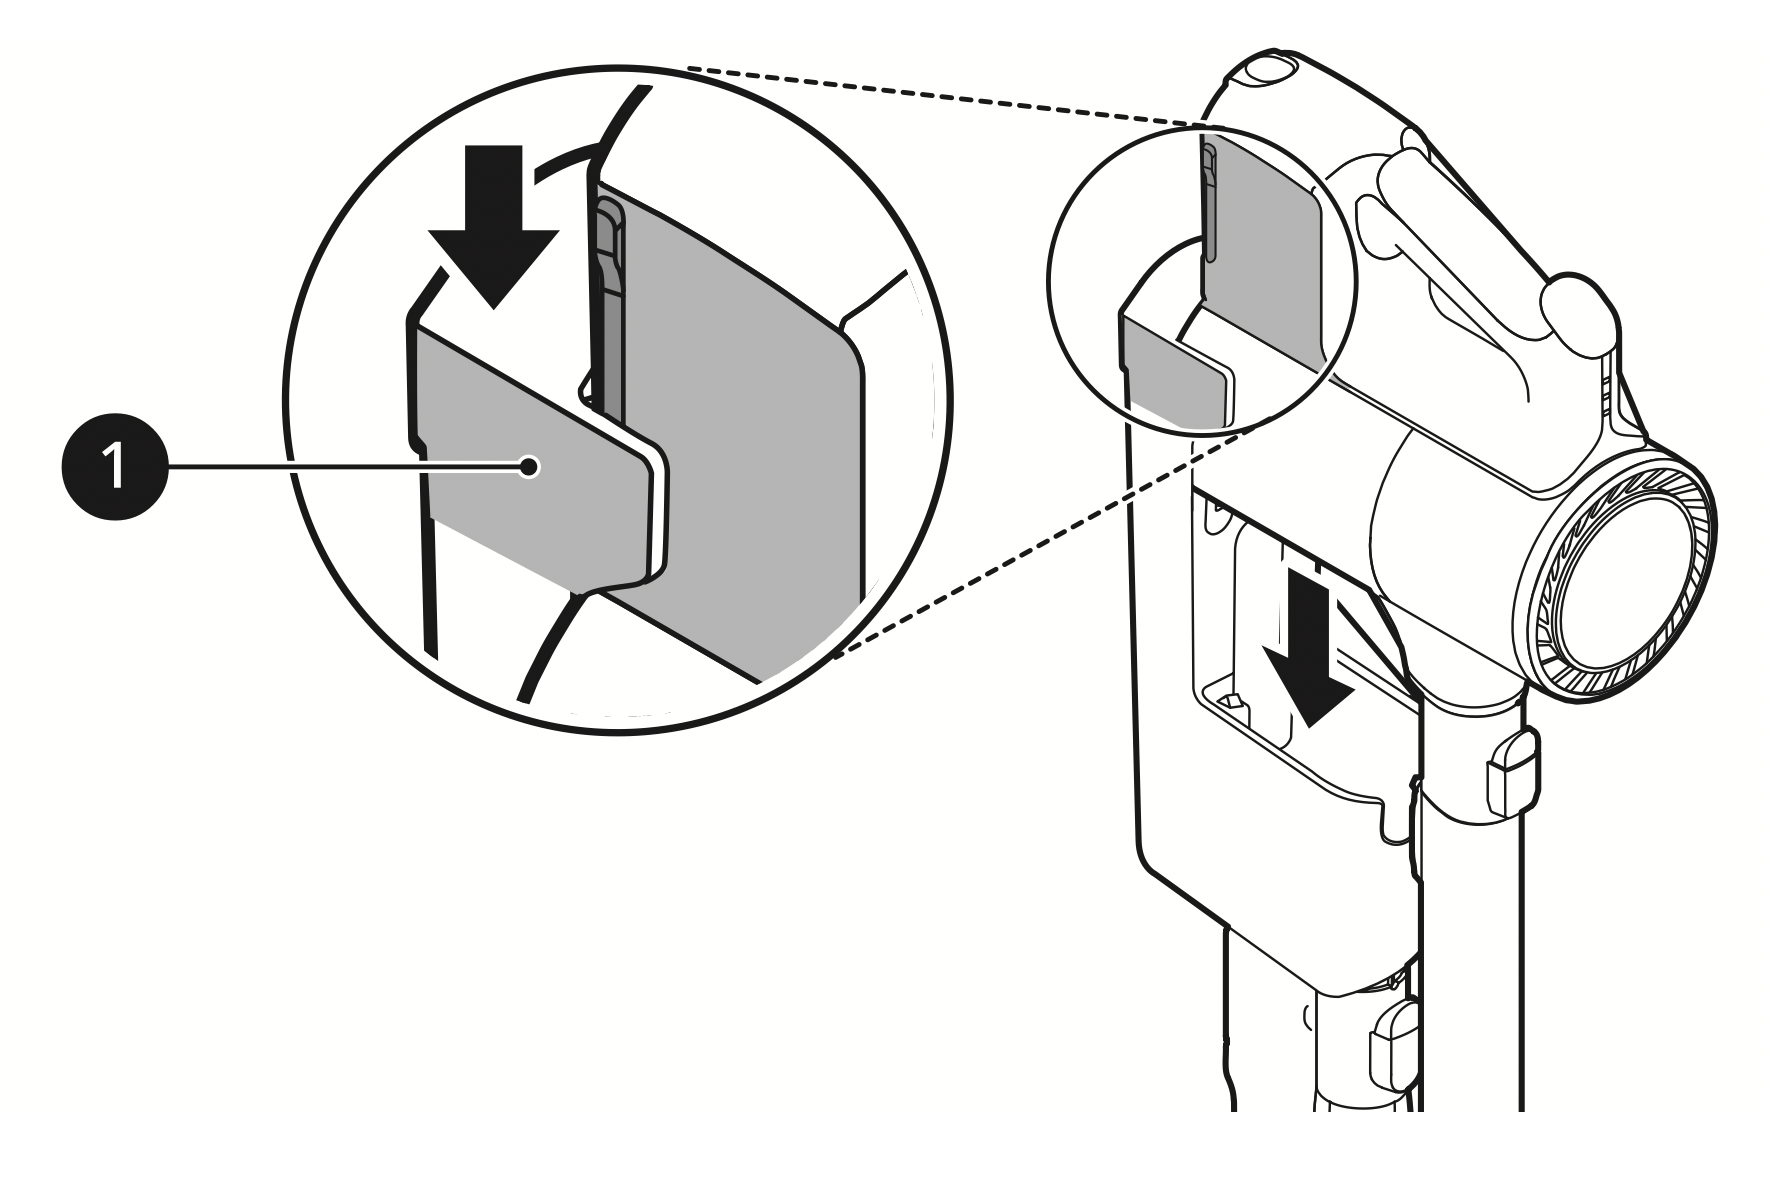
- Place the floor stand dock on a hard and level floor and assemble the floor stand pipe.
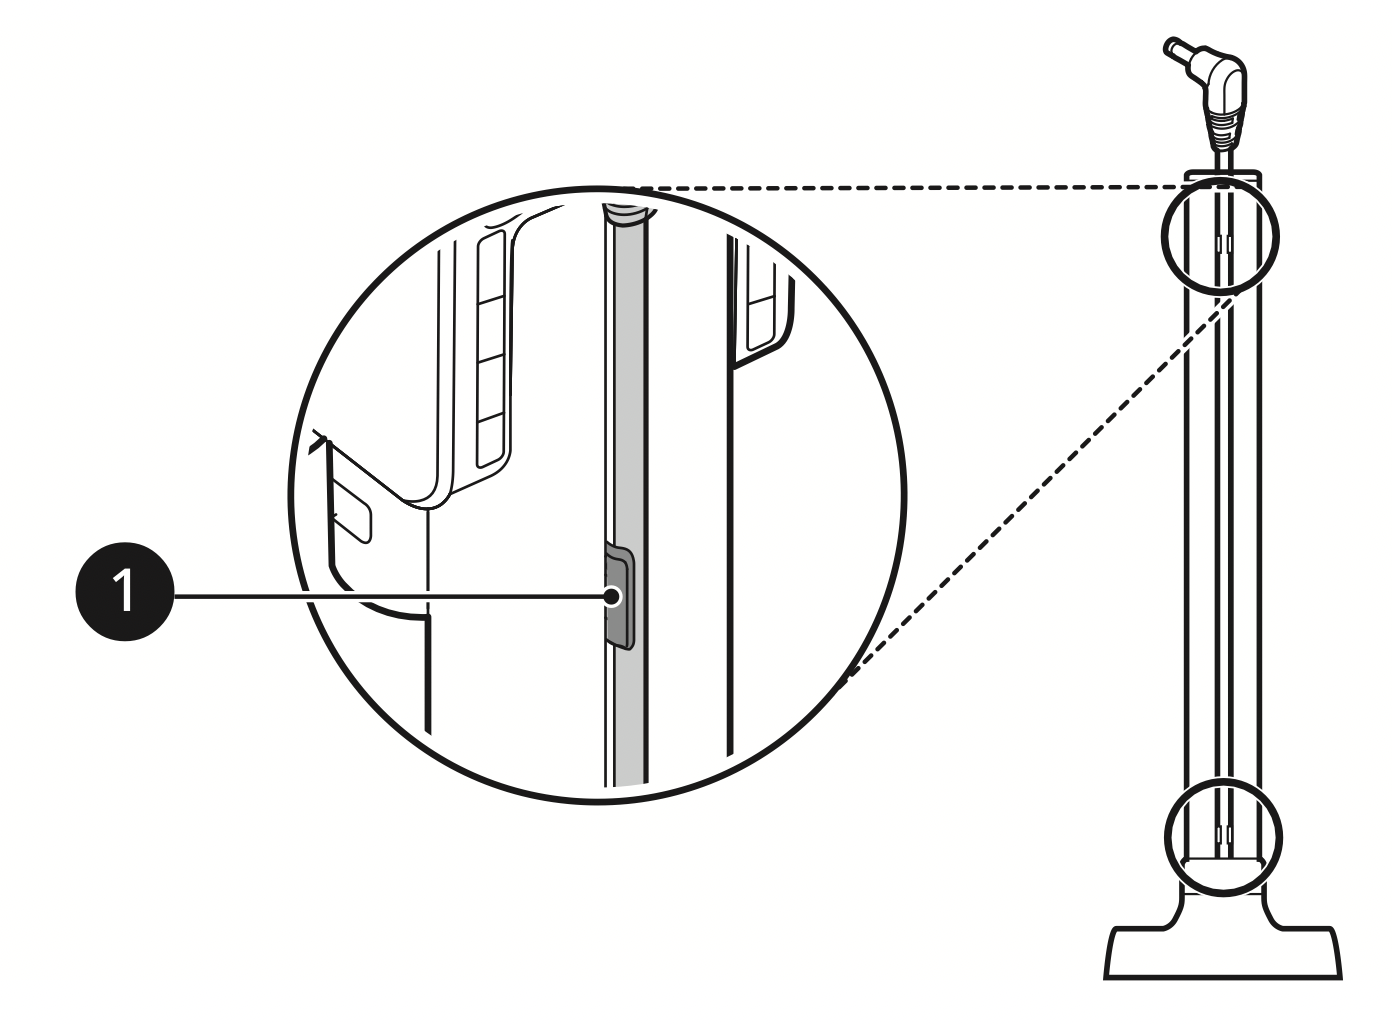
- Clip the power cord tidily into the cord keeper 1 a on the back of the floor stand pipe.
- Assemble the charging station onto the top of the floor stand pipe.
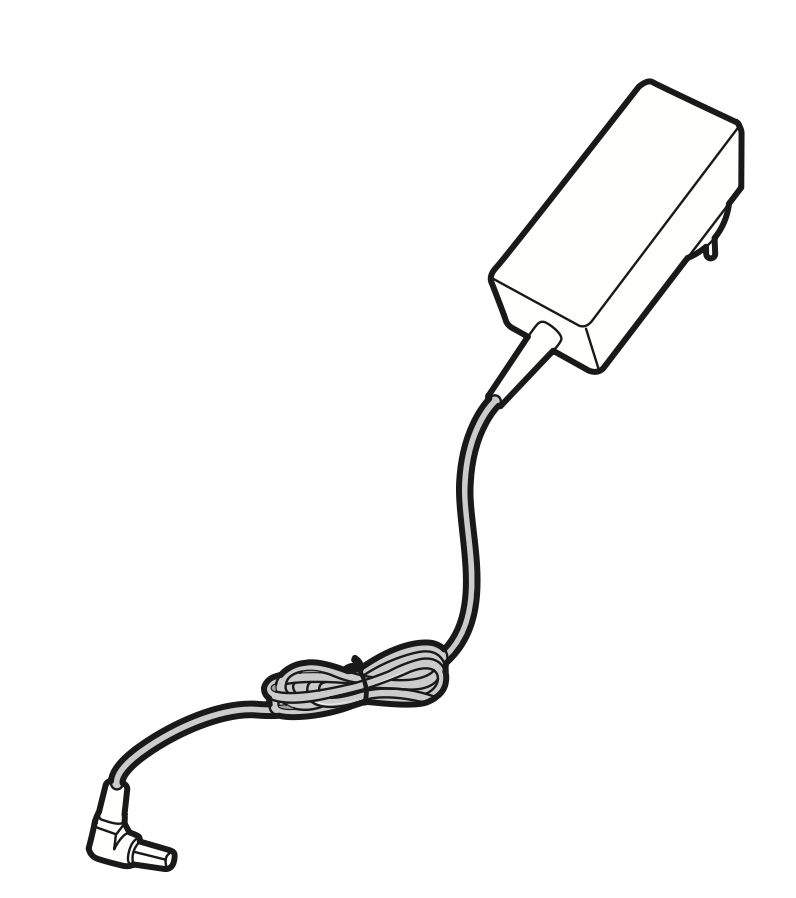
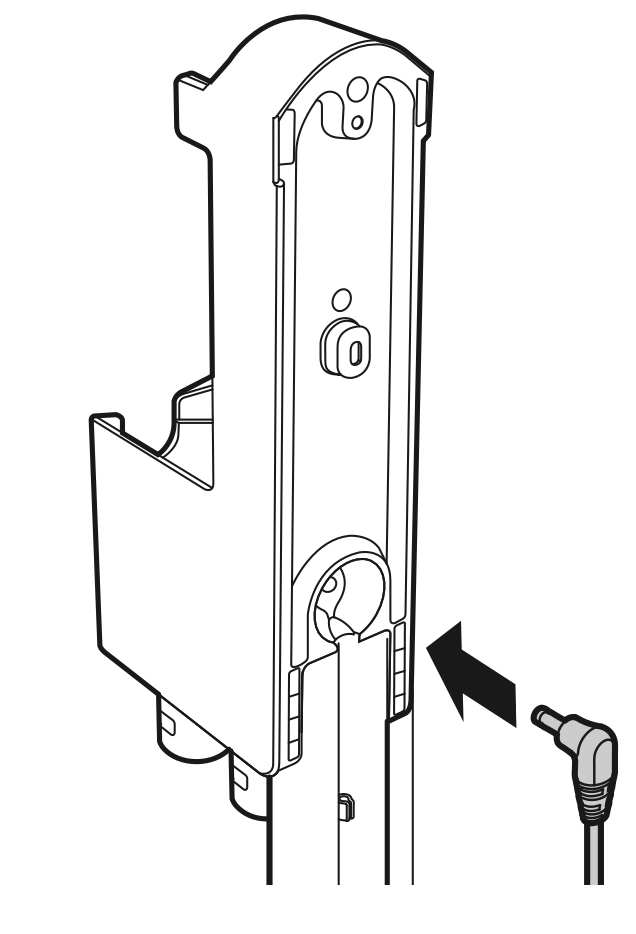
- Connect the power adapter to the port on the back of the charging station.
- Drill a hole in the wall and insert the drywall anchor 2 if needed.
Before drilling, make sure that there are no pipes or electrical wires inside the wall at the desired location.
For drywall anchor: use 1/4″ (6.5 mm) drill bit
For concrete or wall stud: use 1/8″ (3 mm) drill bit
If screwing into drywall, use the drywall anchor.
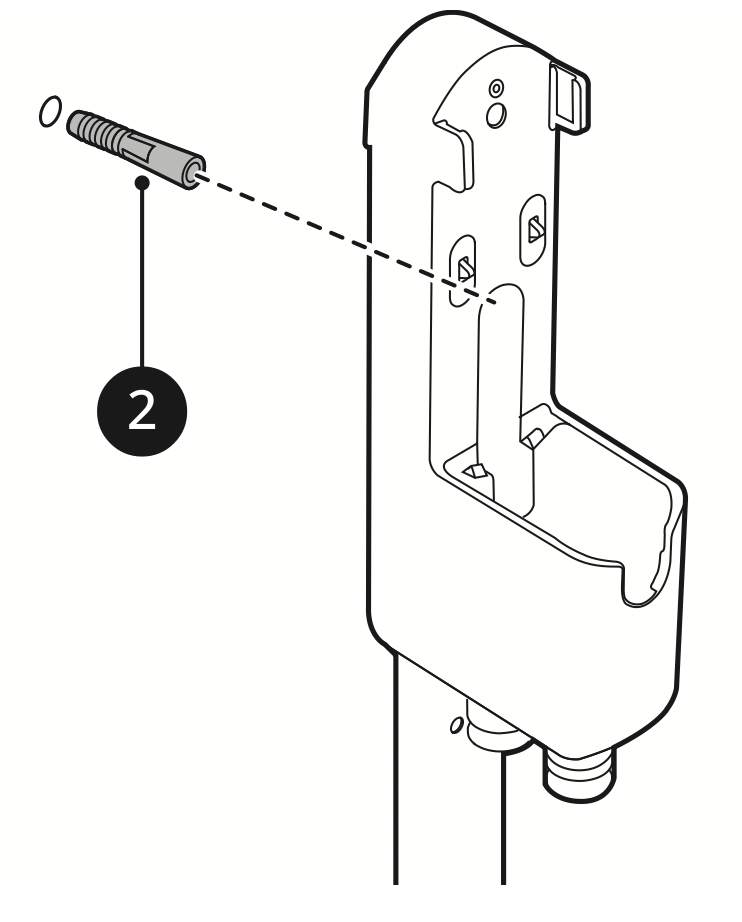
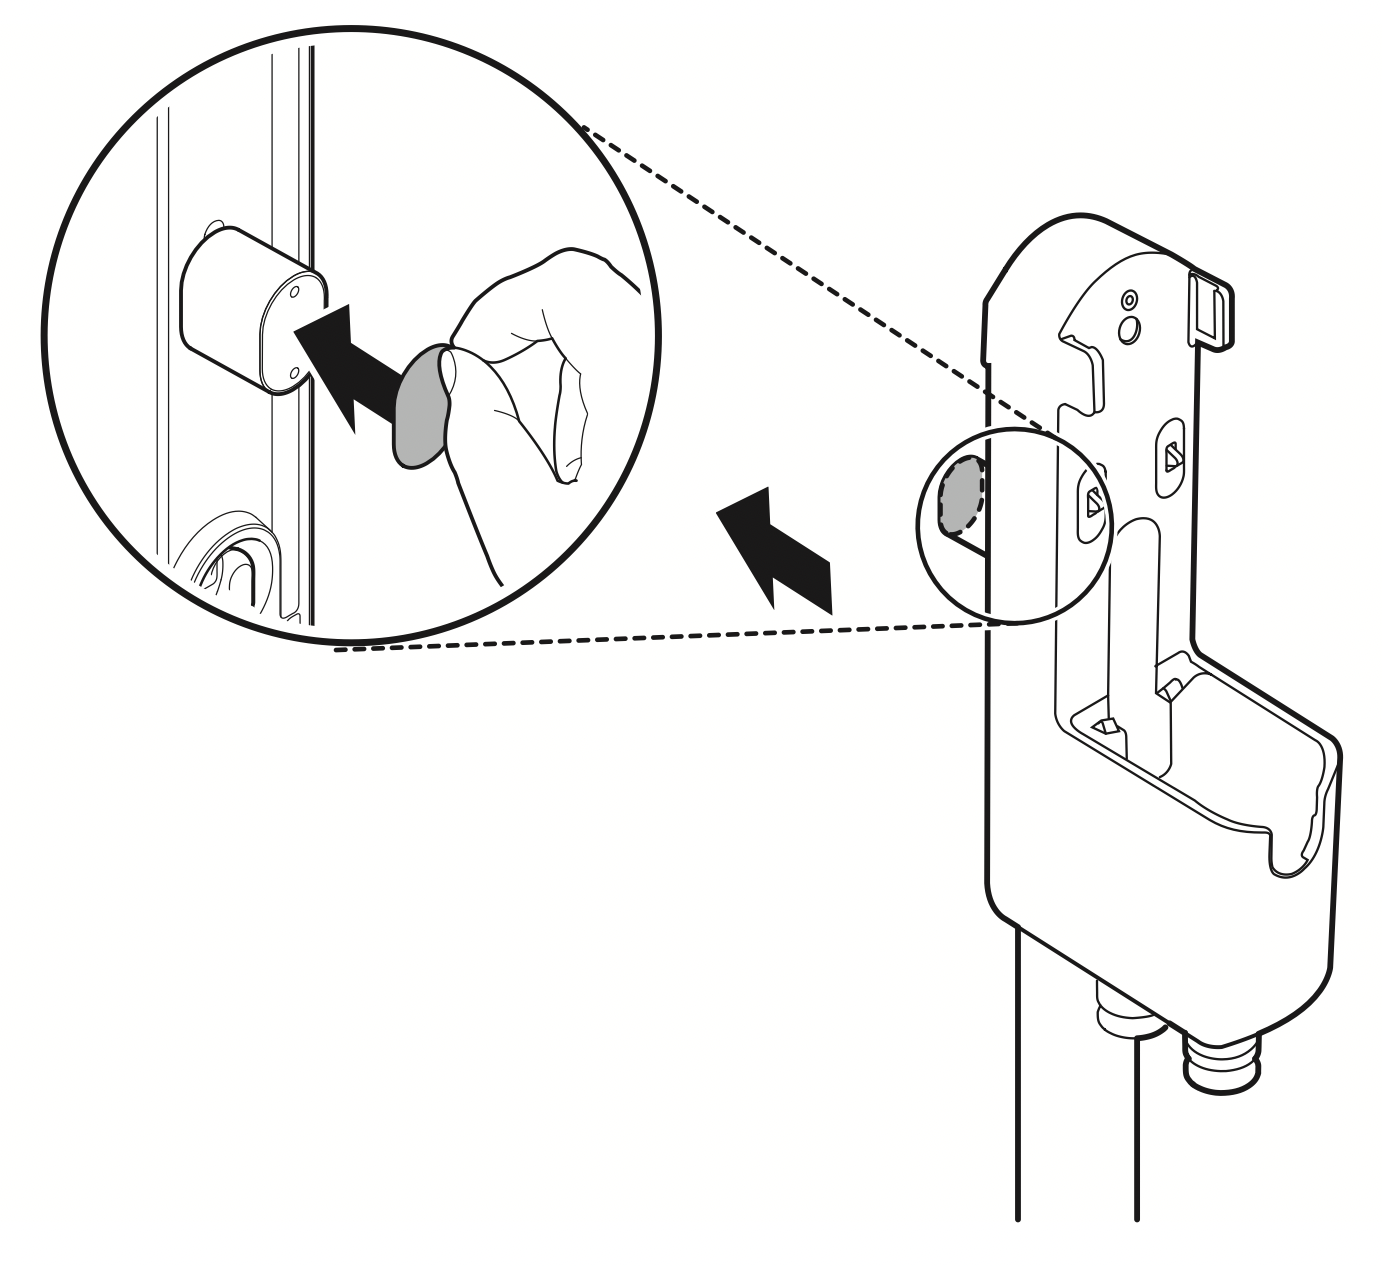
- Align the wall anchoring block 3 of the chanrging station, and fix the charging station to the wall by tightening the anchoring screw 4 all the way.
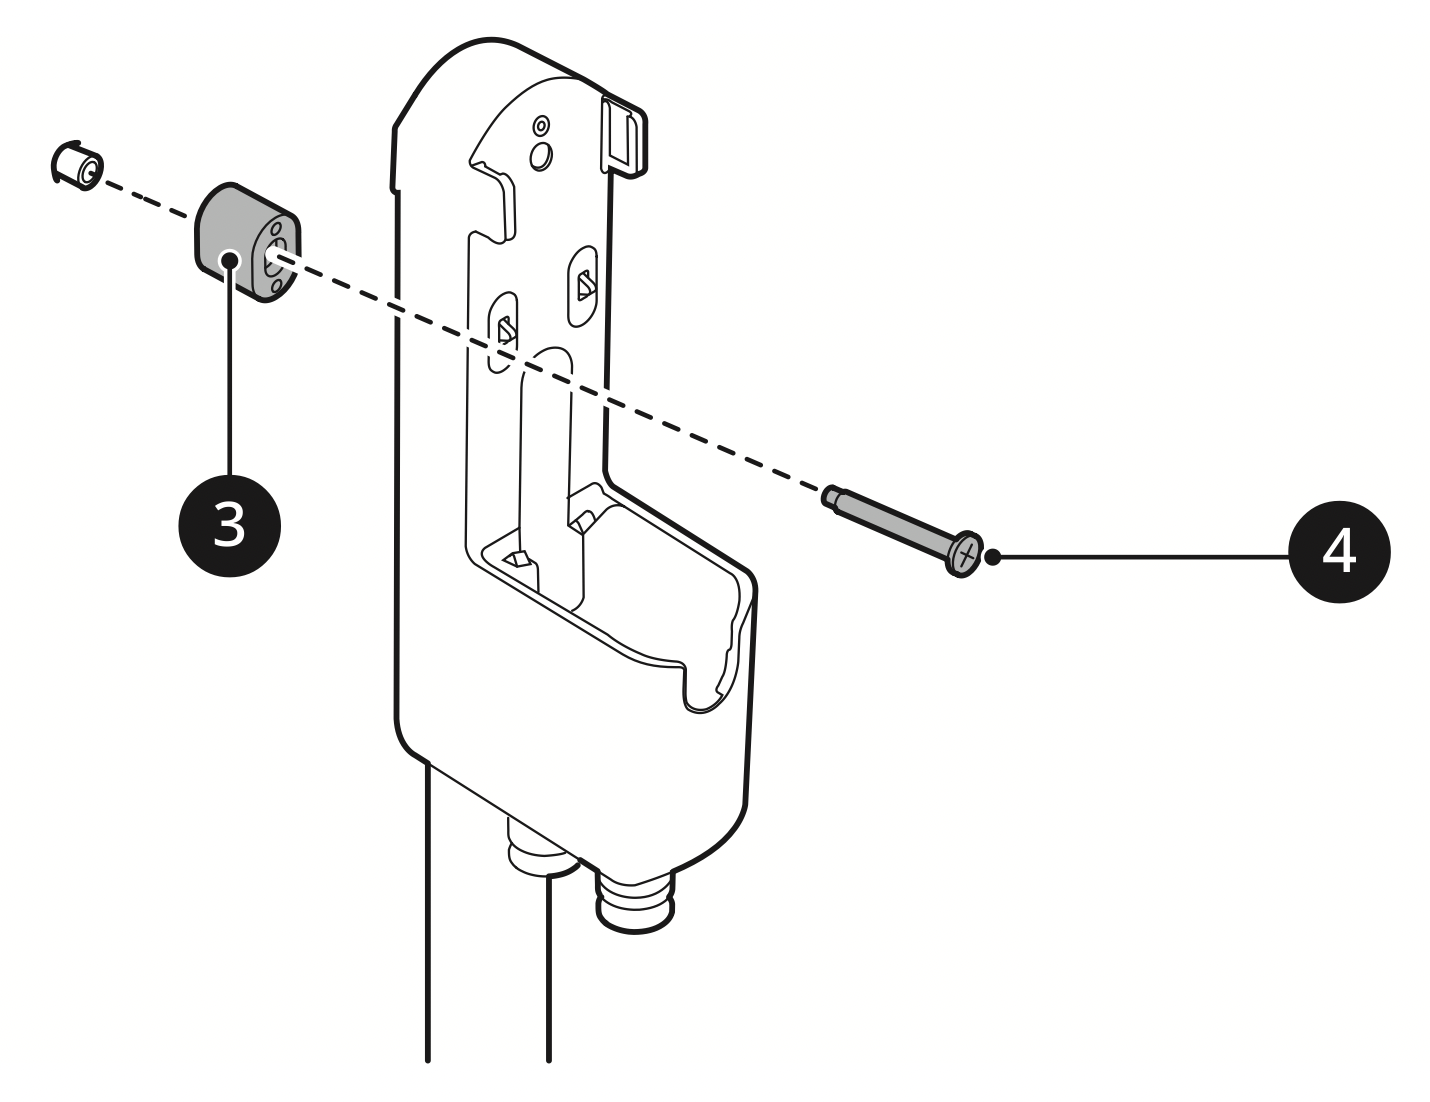
- lug the power cord into the power outlet.
Using Double-Sided Tape to Secure the Appliance
- Use the double-sided tape 1 to attach the wall anchoring block 2 to the charging station.
Remove the center section of double-sided tape before attaching it to the wall anchoring block.
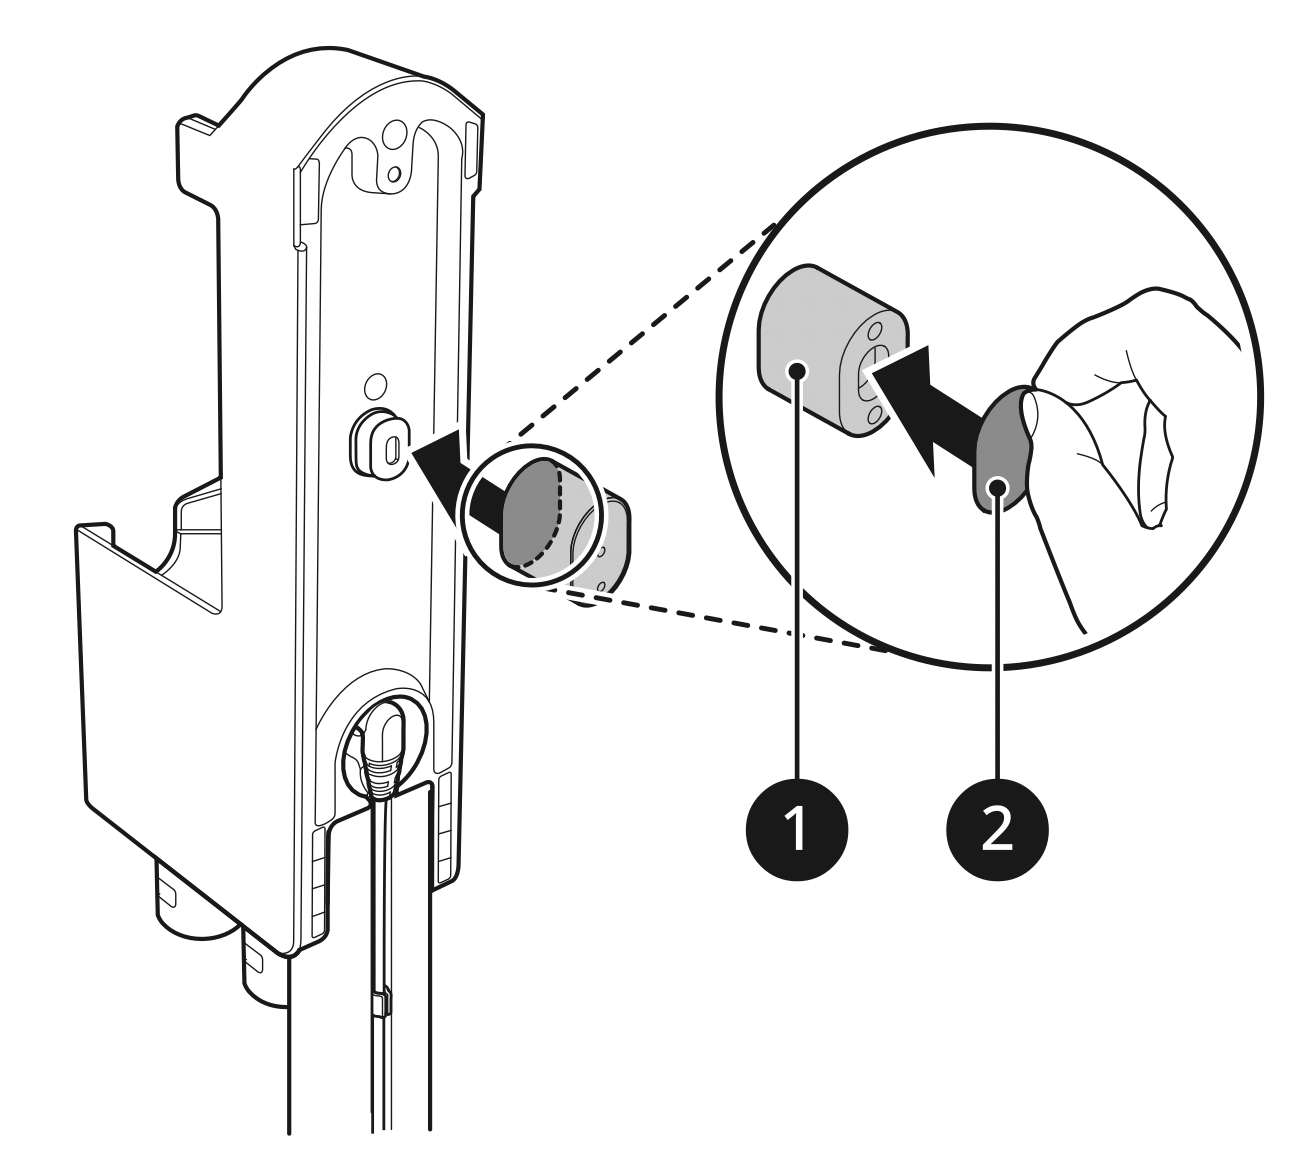
- Attach the second piece of double-sided tape to the other side of the wall anchoring block to secure it to the wall.
Do not use double-sided tape on wallpaper.
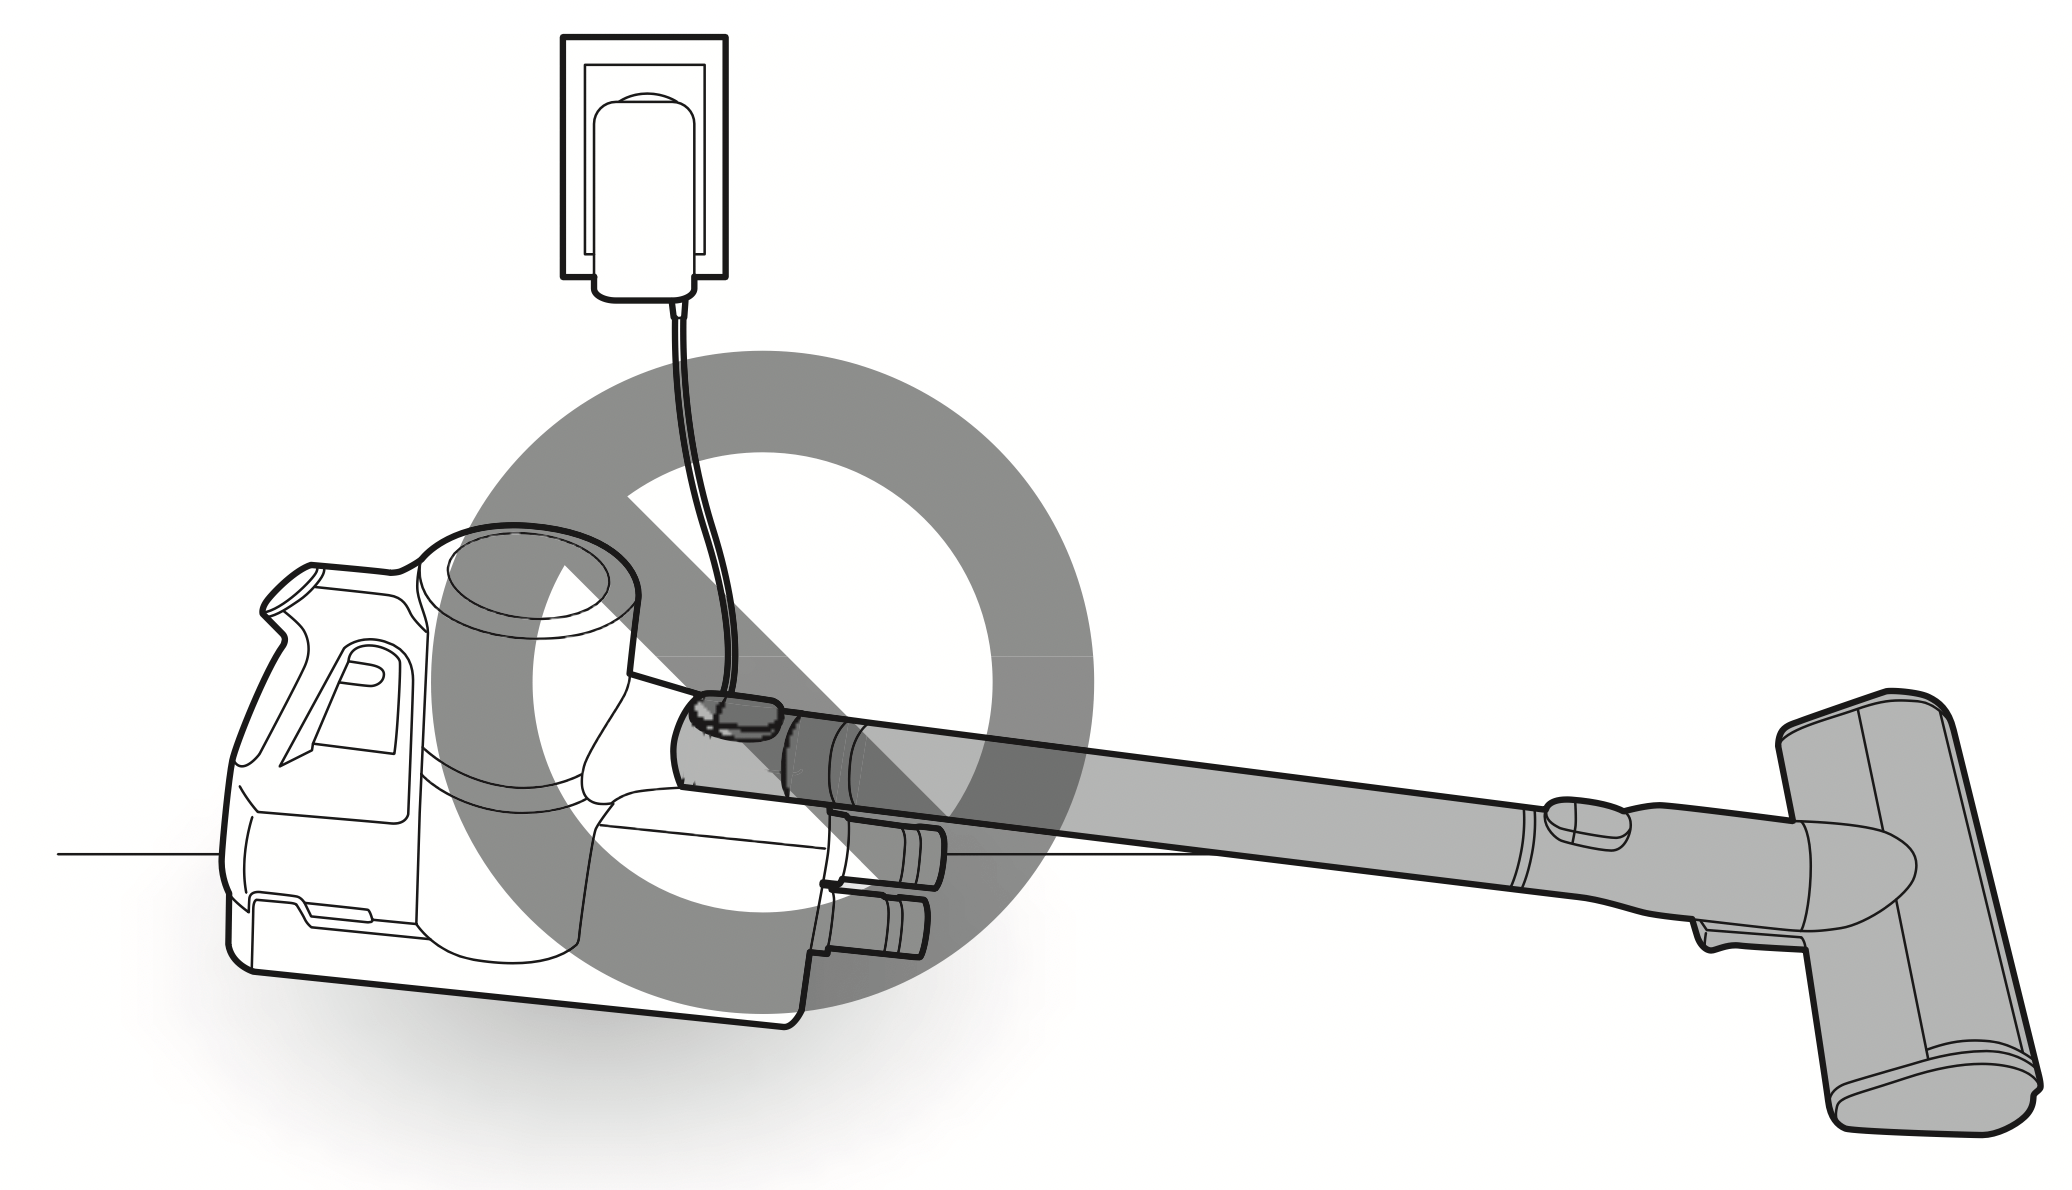
Compact Installation
For safety and convenience, install the charging station using the self-standing or wall-mounted installation methods. If you choose not to install the charging station, place it on a level floor for charging or storage.
- Connect the power adapter to the port on the back of the charging station.
- Place the charging station on a hard and level floor.
- Separate the extension pipe and nozzle from the product body before charging or storing the appliance.
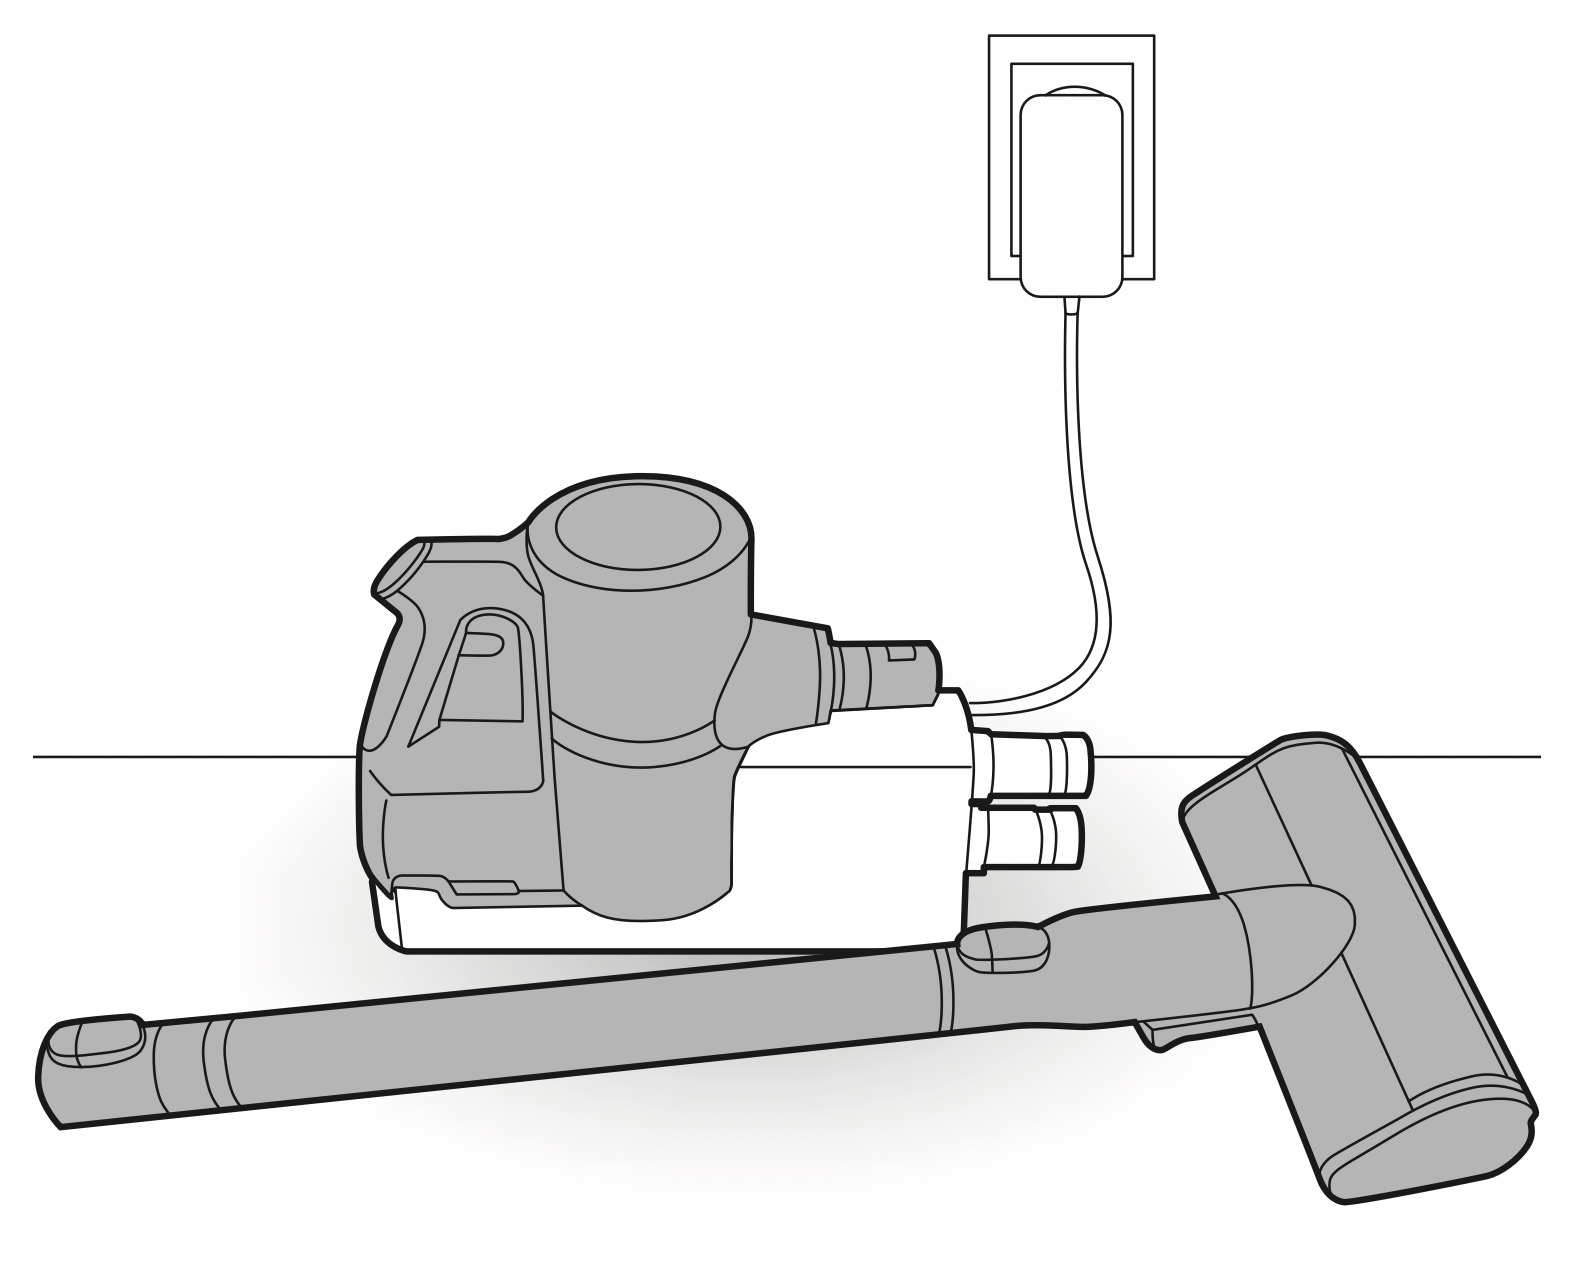
- Plug the power cord into the power outlet.
CAUTION: Leaving the appliance on a level floor for a long time with the extension pipe and nozzle attached may damage the appliance.
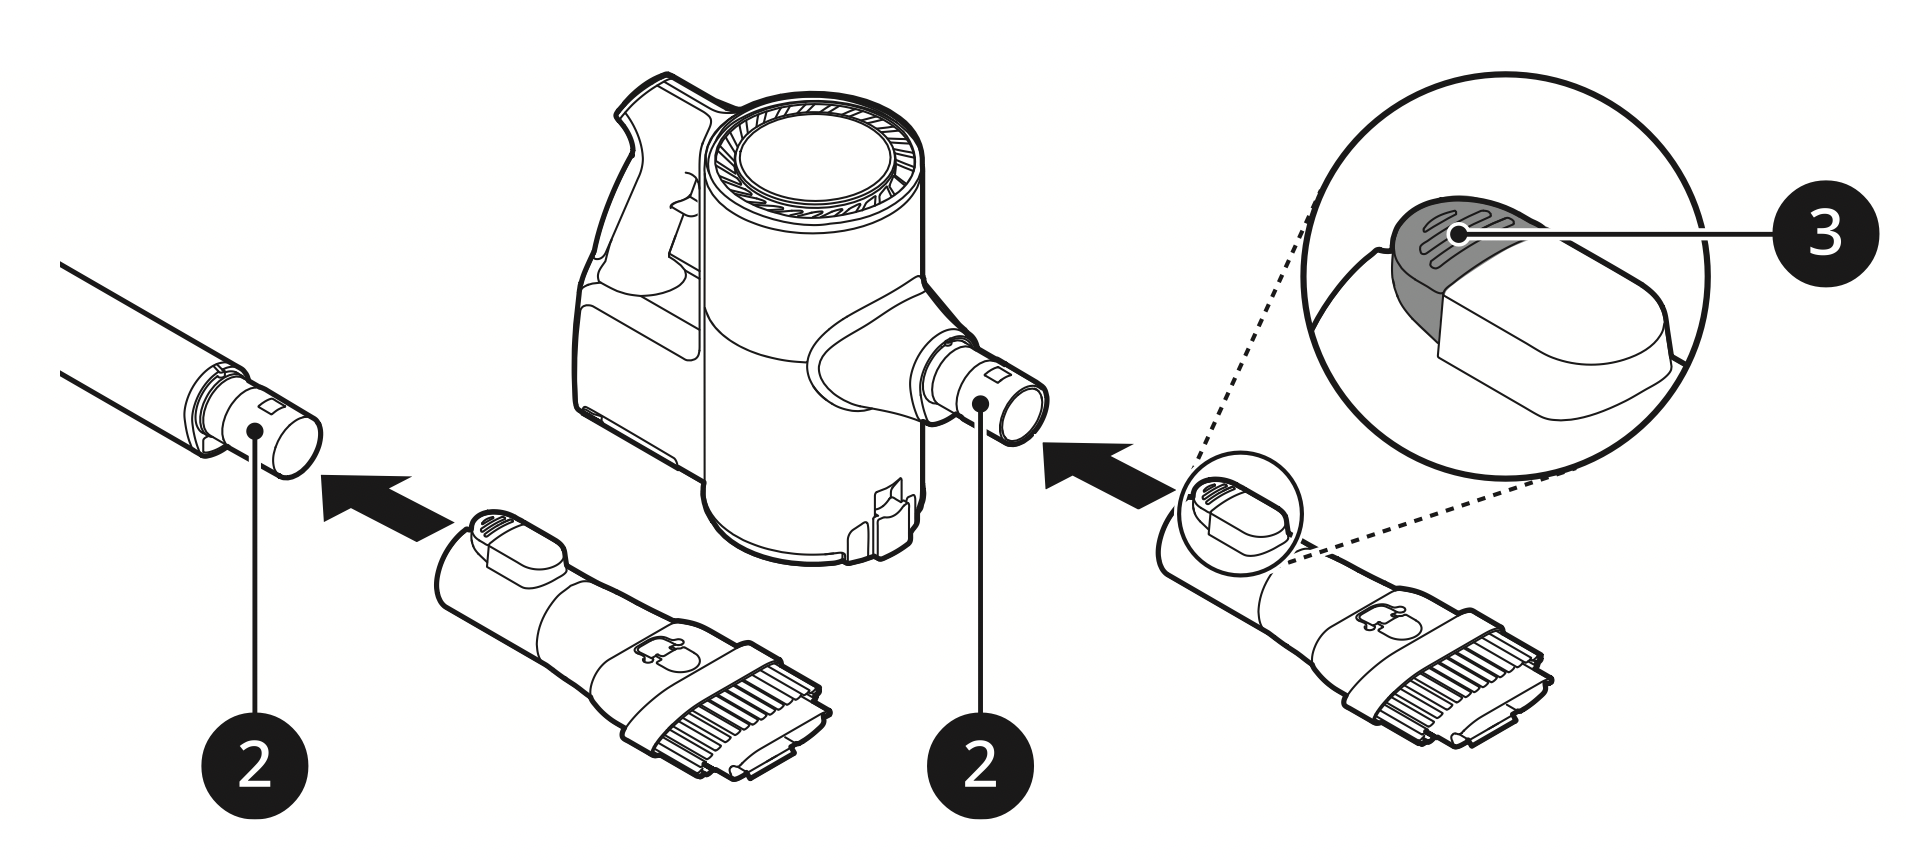
Assembling the Appliance
Follow these steps to safely assemble the appliance.
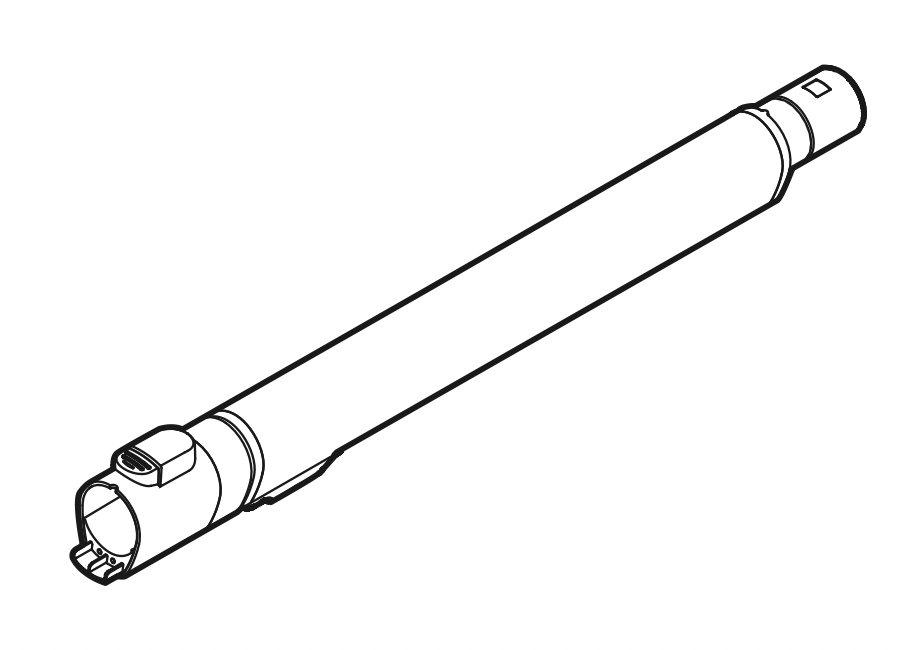
- Firmly attach the extension pipe 3, nozzle 4, or tool onto the product body 1.
To detach the extension pipe, press the extension pipe release button 2.

- Put the product body on the charging station.
See Charging the Battery for instructions on installing and charging the battery.
Storing the Accessories
Storing the Tools
Store the frequently used tools such as the combination tool, crevice tool and cleaning brush at the bottom of the charging station.
- Slide the cleaning brush up into the tool holder.
- Slide the combination tool over the cleaning brush and onto the tool holder.
- To remove a tool, press the release button at the front of the tool.
Storing in the Accessory Bag
If the accessory bag is included in the model you purchased, you can store the tool in the accessory bag.
CAUTION
- Do not store the product body or battery in the accessory bag. If the appliance or battery are damaged, it could cause an explosion or fire.
- Do not throw or drop the accessory bag containing accessories. It may damage the appliance or cause personal injury.
NOTE: Do not use the accessory bag for purposes other than for storage of nozzles or tools.
OPERATION
Getting Started
Before Using the Appliance
- Make sure that the exhaust filter and pre-filter are properly assembled before using the appliance.
- Close the dust bin cover properly before using the appliance. If the dust bin cover is left open, the suction strength may deteriorate and affect the cleaning performance.
- This appliance has a built-in safety device to prevent overheating. If the appliance becomes overheated after extended use, it may automatically turn off. If this occurs, leave the appliance in a cool, well-ventilated area for about an hour before turning on the power again.
- Make sure to remove any foreign object such as a sock or stocking before using the appliance. Any foreign object on the inlet port or extension pipe will prevent the appliance from functioning properly.
- Environmental conditions such as temperature and humidity may cause static electricity to accumulate on the appliance. Please contact LG Electronics customer information center if the problem persists.
- Please use the product at normal room temperatures as the battery runtime may deteriorate severely if used at temperatures lower than 41 °F (5°C) or higher than 100 °F (38°C) for an extended period of time.
- Do not use the appliance to suck up oils or any liquids, including water.
- Support the bottom of the appliance when cleaning an elevated surface.
- Store the appliance in the charging station or place it flat on the floor when not in use. Leaning the appliance against a wall or chair can result in product damage or personal injury if the appliance falls.
- To avoid scratches on polished floors, keep the brushes of the nozzles and tools free from grit, sand, or abrasive objects.
- Refer to the Specifications section for battery runtime details.
- The battery runtime is dependent on the surface type and the suction power.
- Follow manufacturer’s recommendations when cleaning flooring, carpets, and rugs.
- Do not use tools to clean a TV, monitor or LCD display as they may scratch these surfaces.
Assembling Attachments
Nozzles and tools can be attached to either the product body or the end of the extension pipe.
CAUTION
- Running the appliance for a long period of time with a tool connected may cause the motor to overheat.
- This appliance has a built-in safety device to prevent overheating. If the appliance becomes overheated after extended use, it may automatically turn off. If this occurs, leave the appliance in a cool, well-ventilated area for about an hour before turning on the power again.
- Do not use the Kompressor lever while the appliance is running. Doing so may cause product damage.
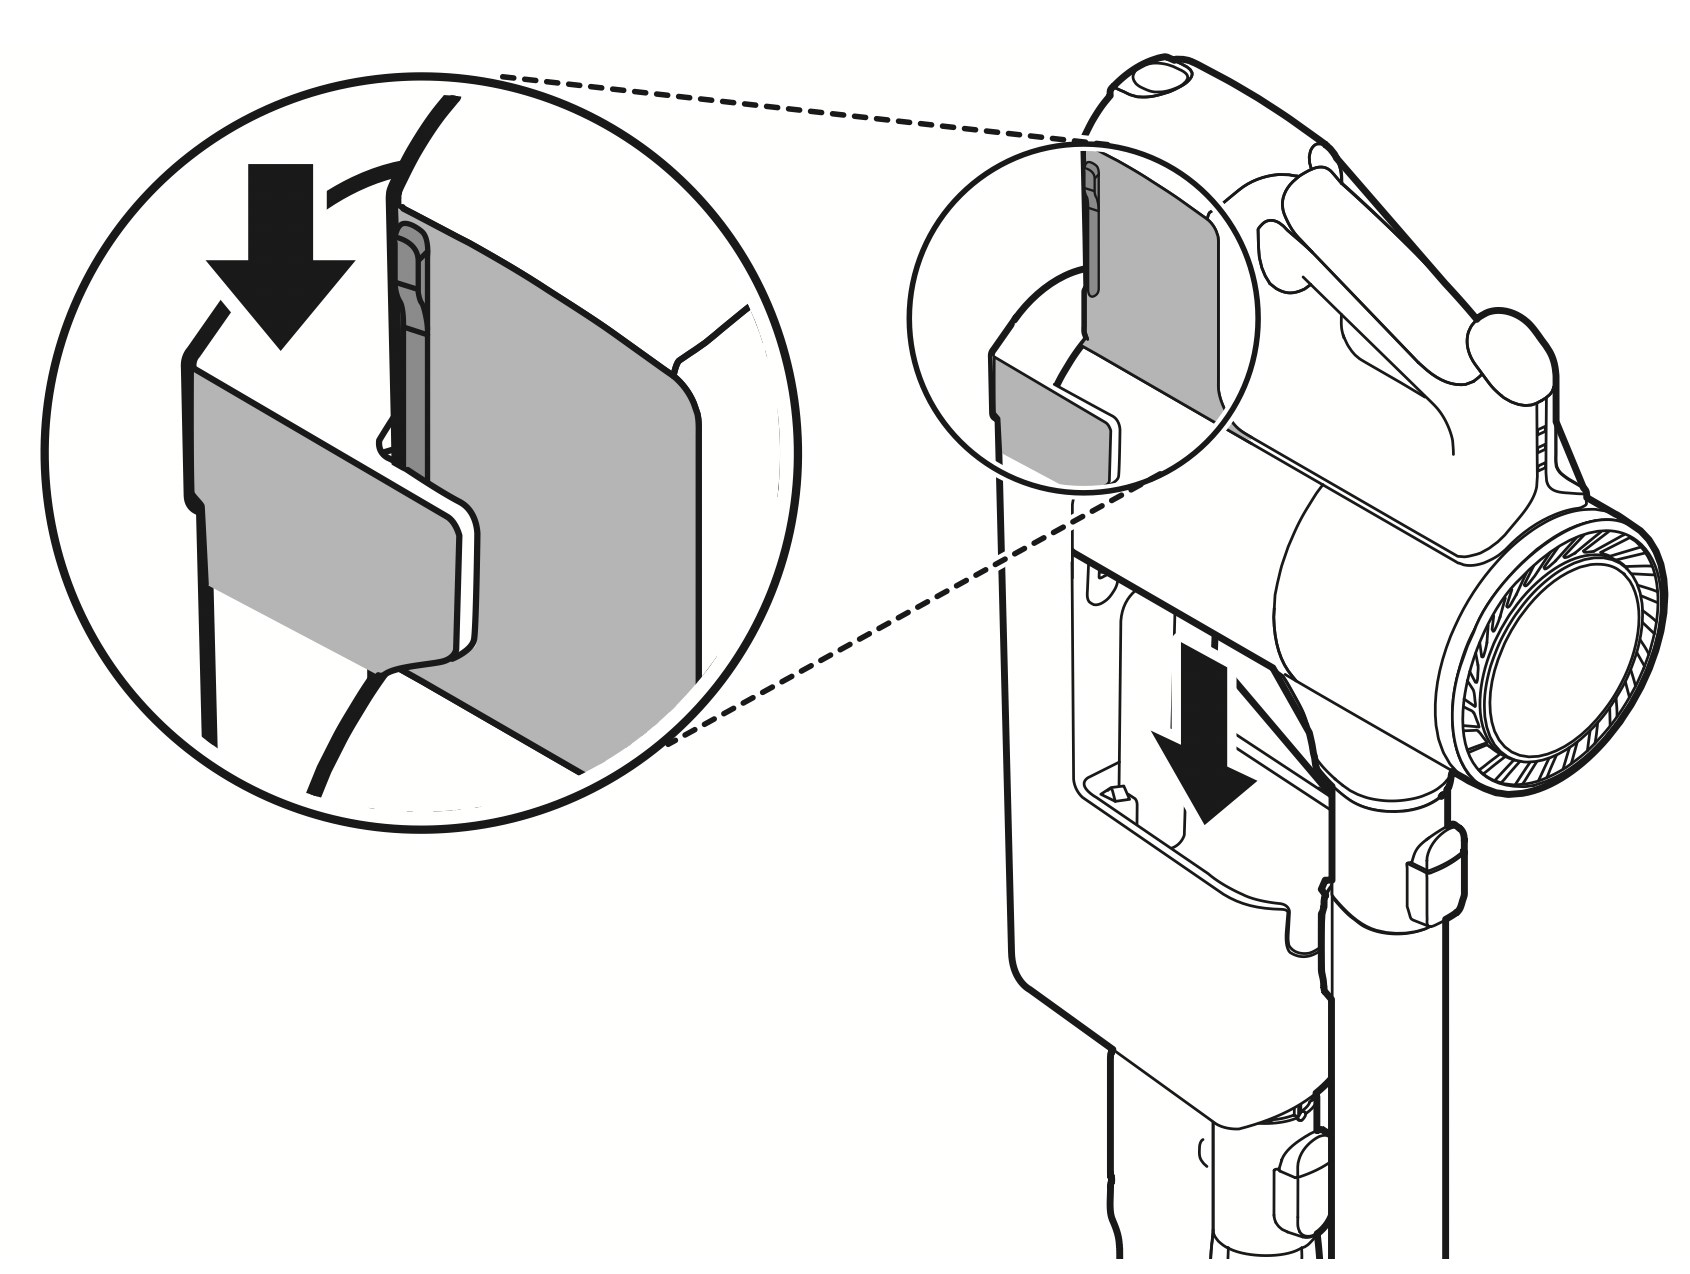
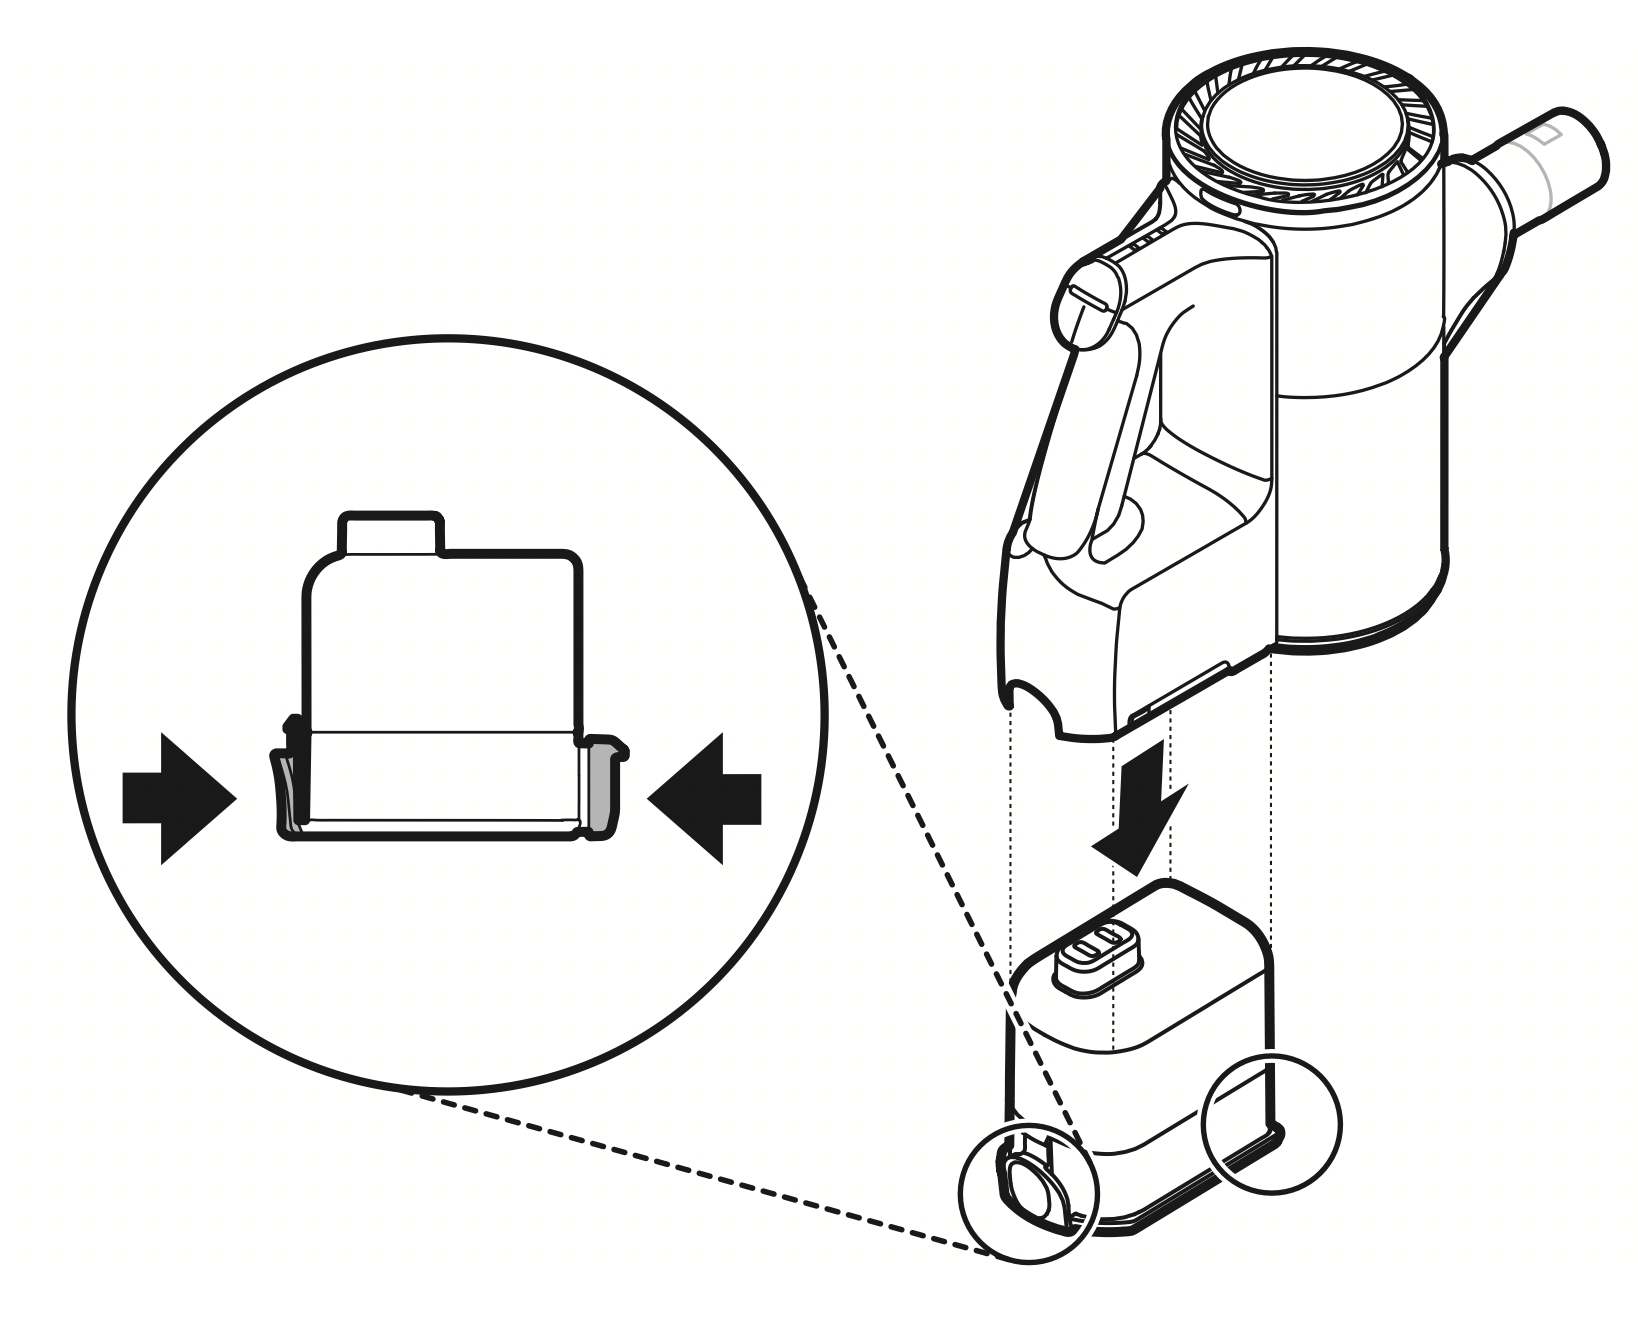
- Insert the fully charged battery 1 into the cavity at the bottom of the handle on the product body.
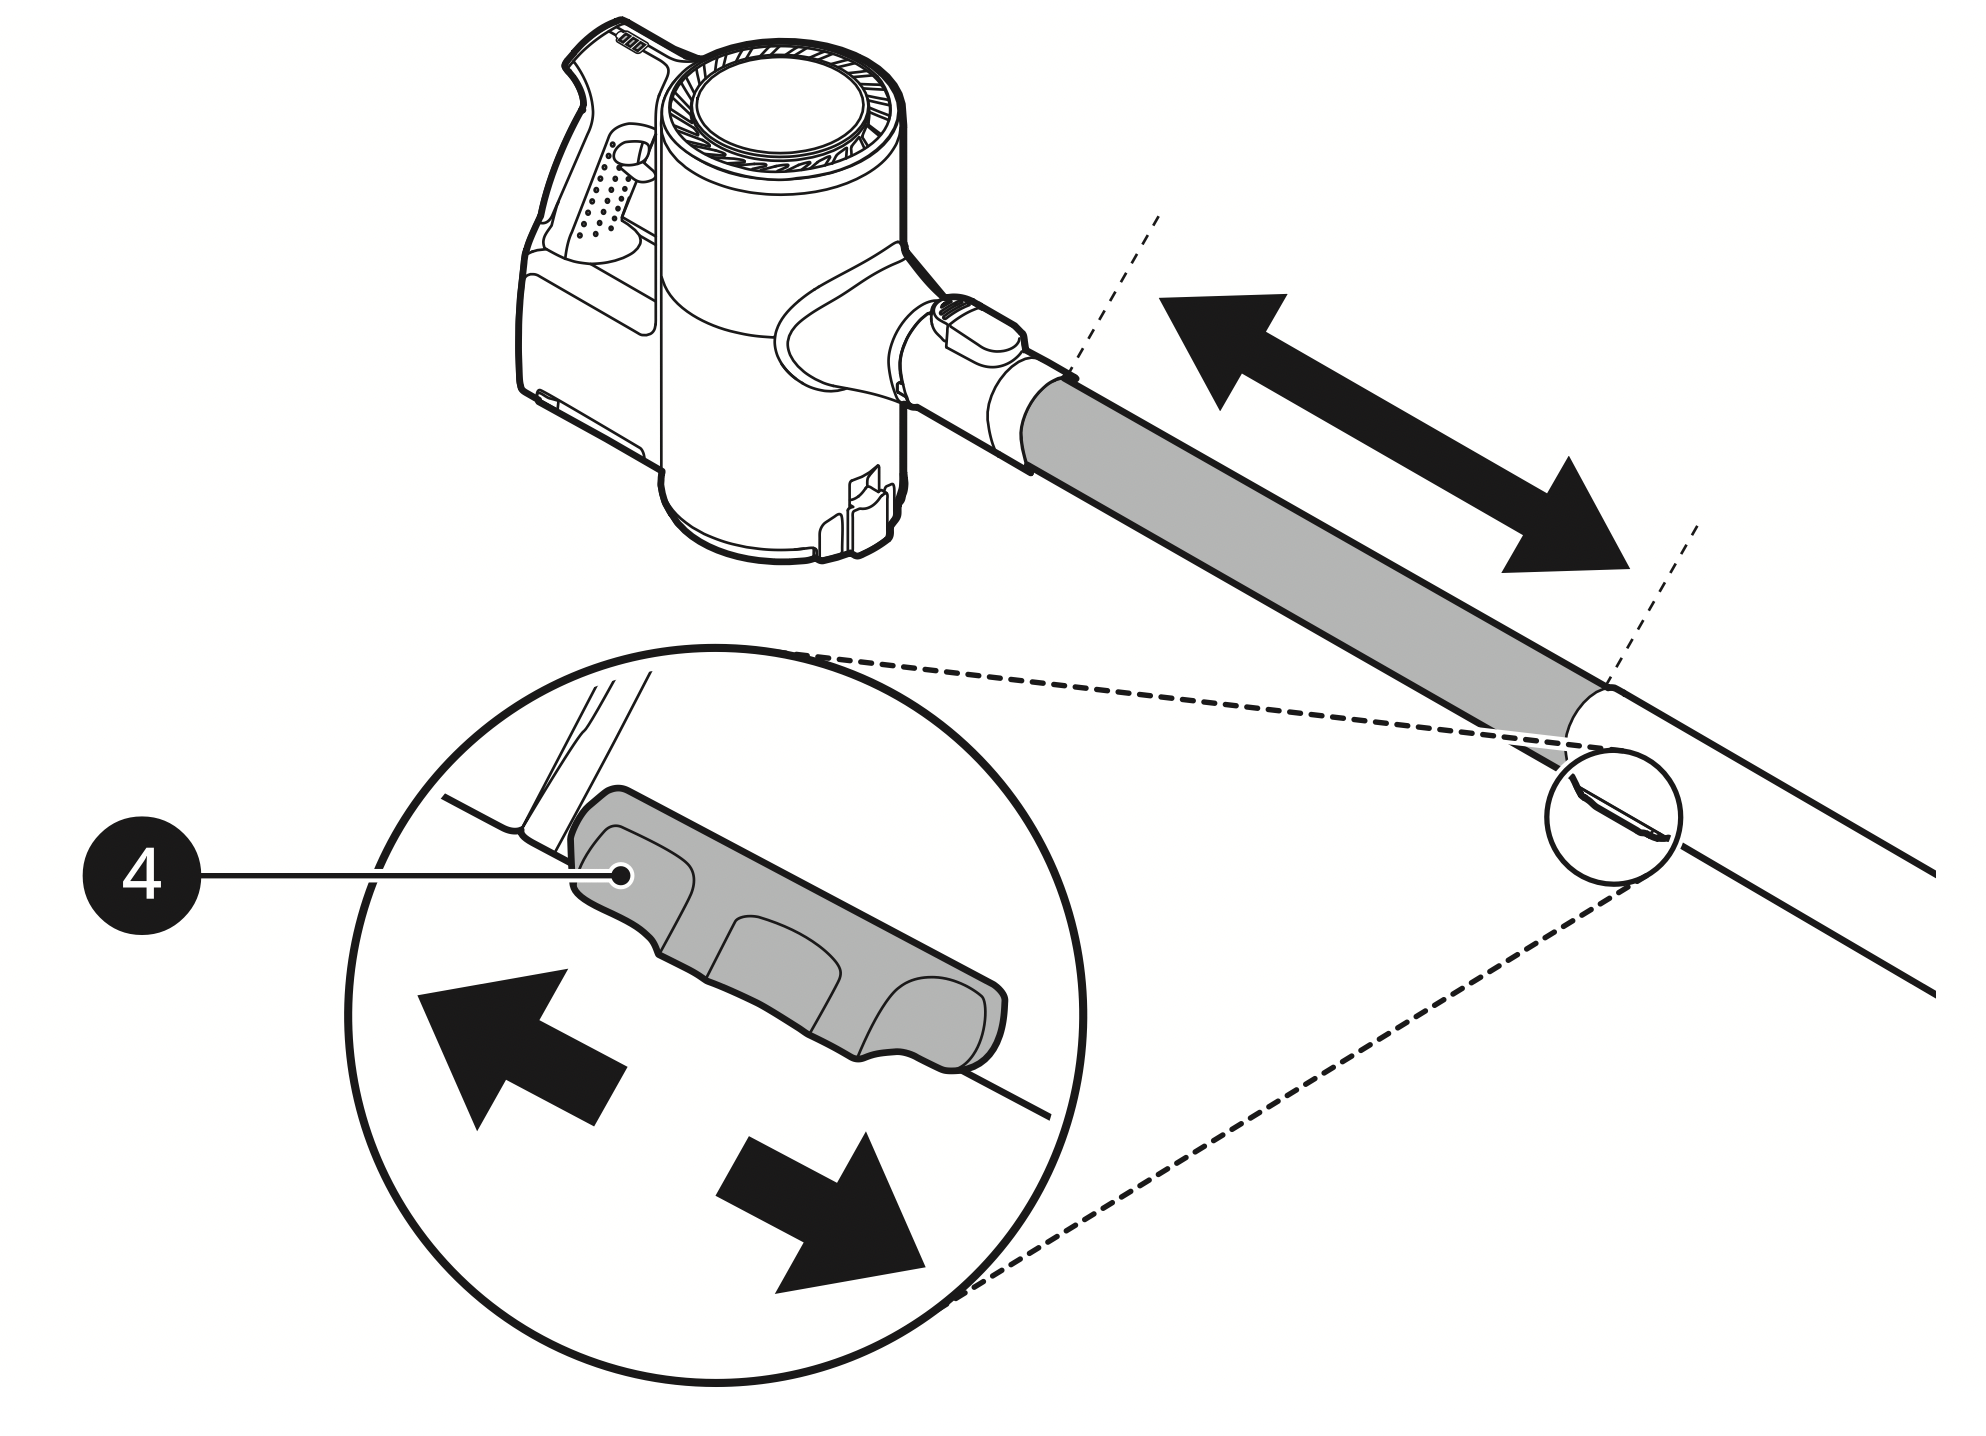
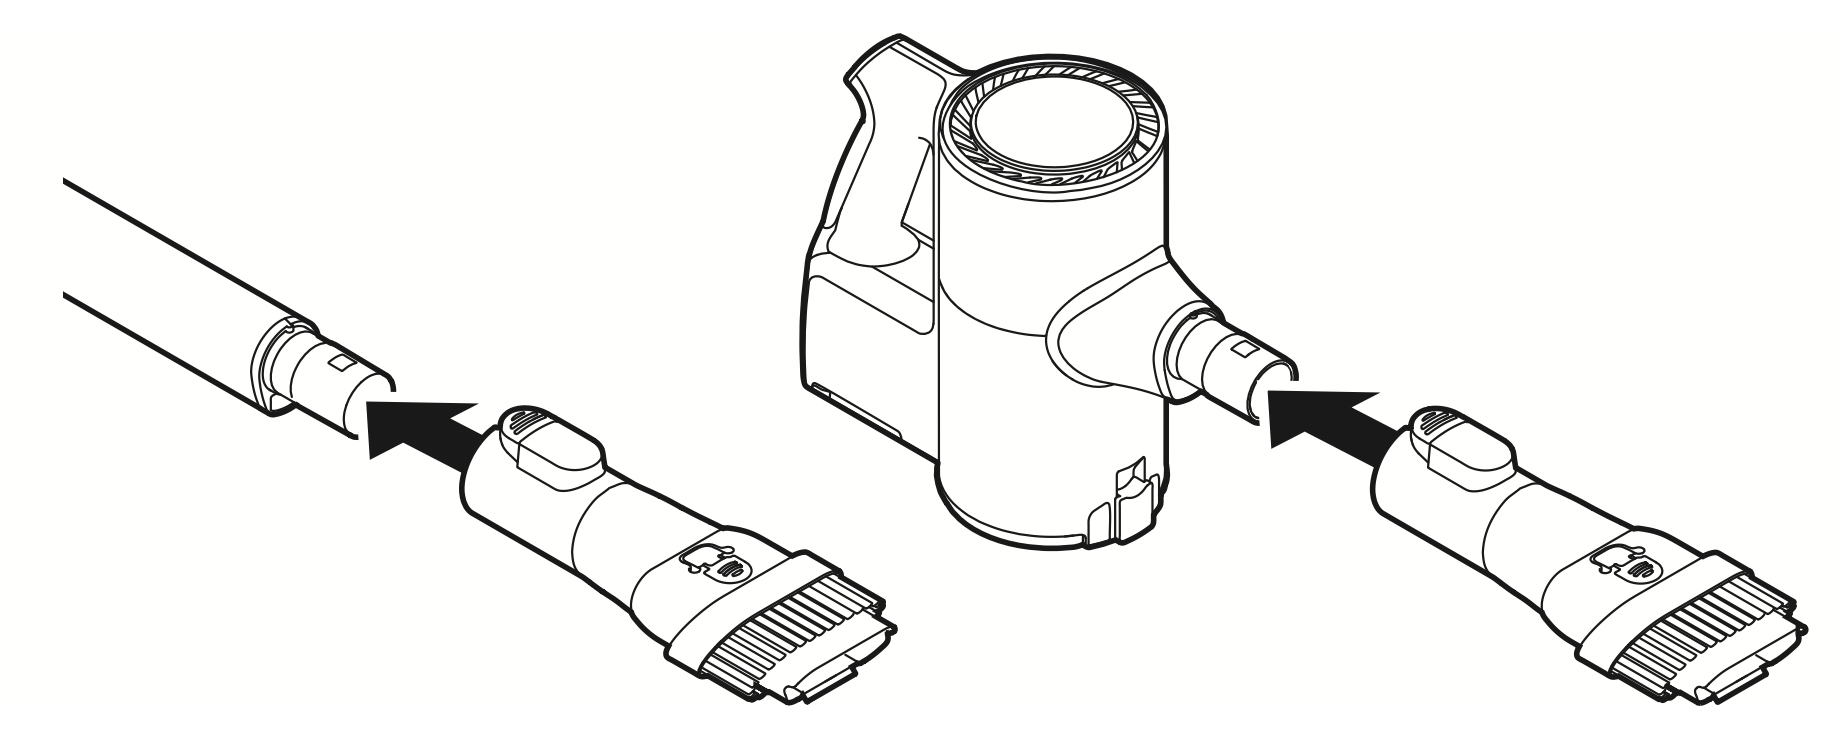
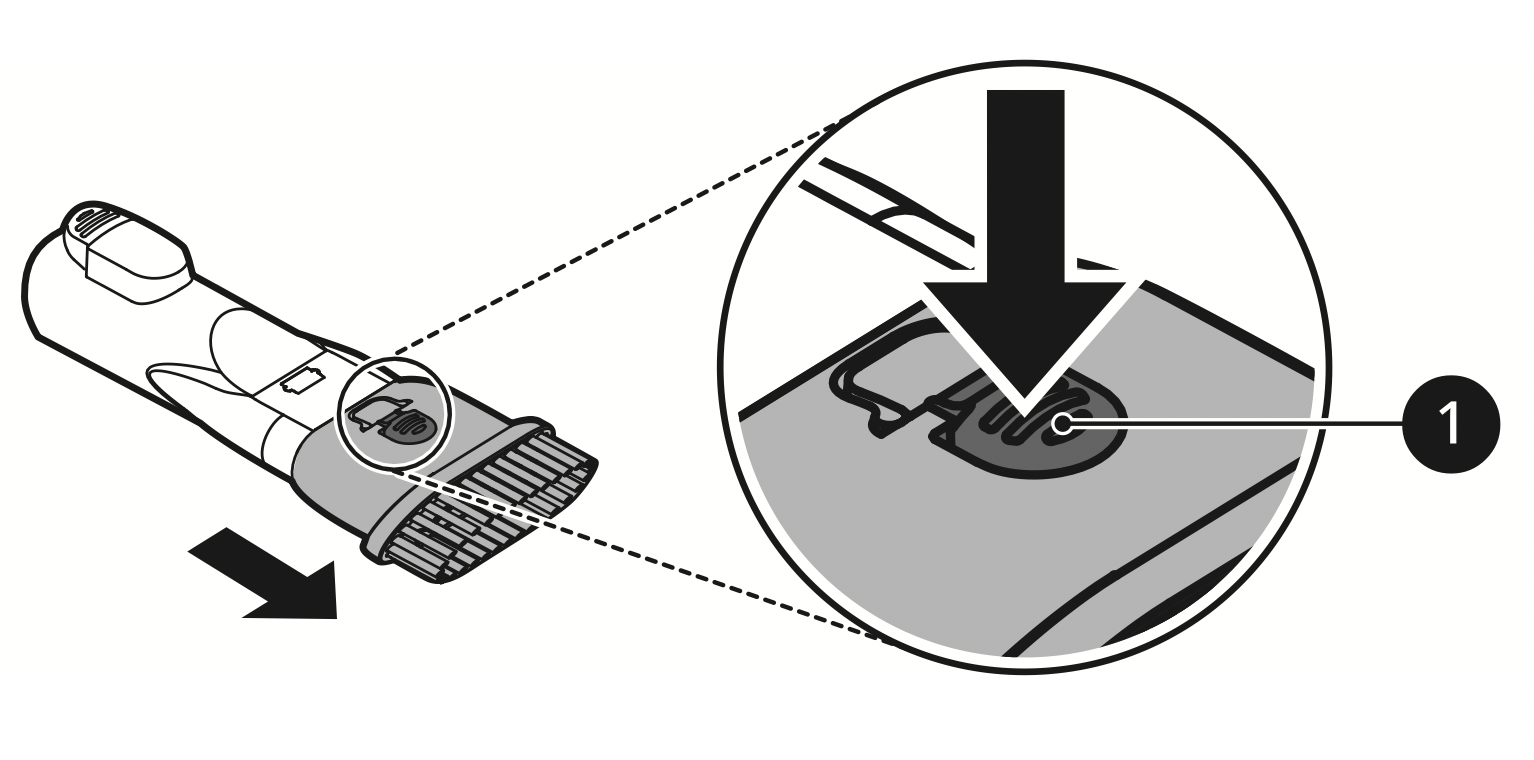
- Attach the nozzles, tools, or extension pipe by sliding them onto the inlet 2 on the body until they click into place. The nozzles and tools can also be attached to the end of the extension pipe 2.
Detach the accessories by pressing the release button 3.
- Adjust the extension pipe by pressing the length adjustment button 4 on the back of the pipe and sliding until it clicks into place at the desired length.
The extension pipe extends in four steps.
- Press the Power button to activate the Normal mode.
To turn off the appliance, press the Power button again.
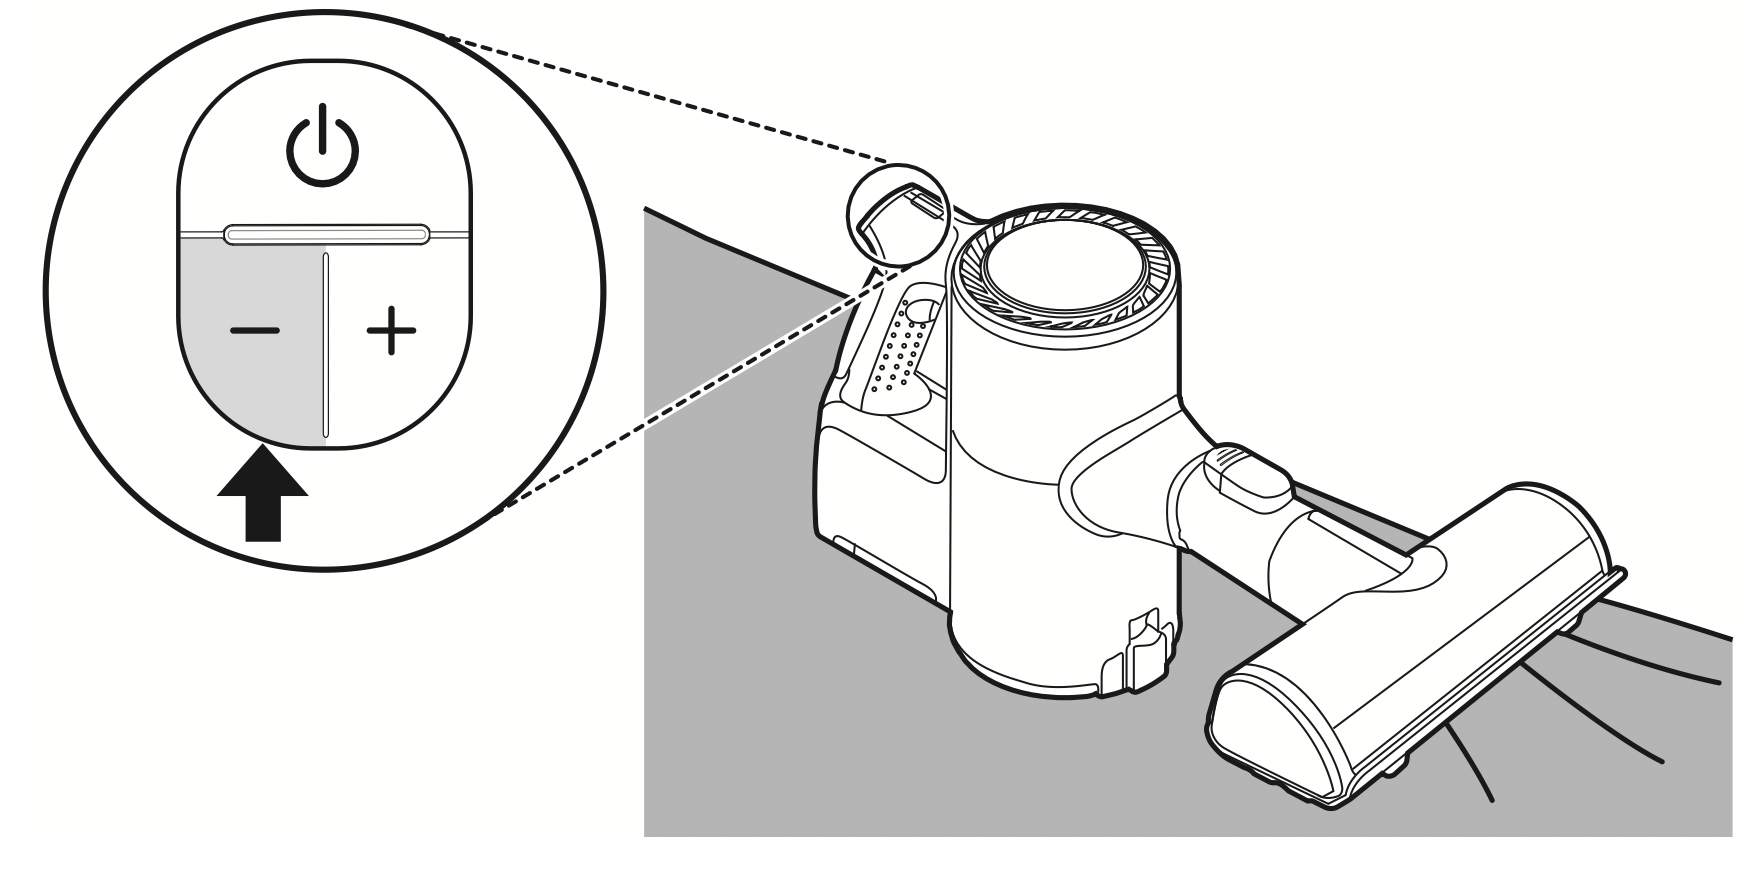
Adjusting the Suction Power
Adjust the suction power using the suction power adjustment button on the handle.
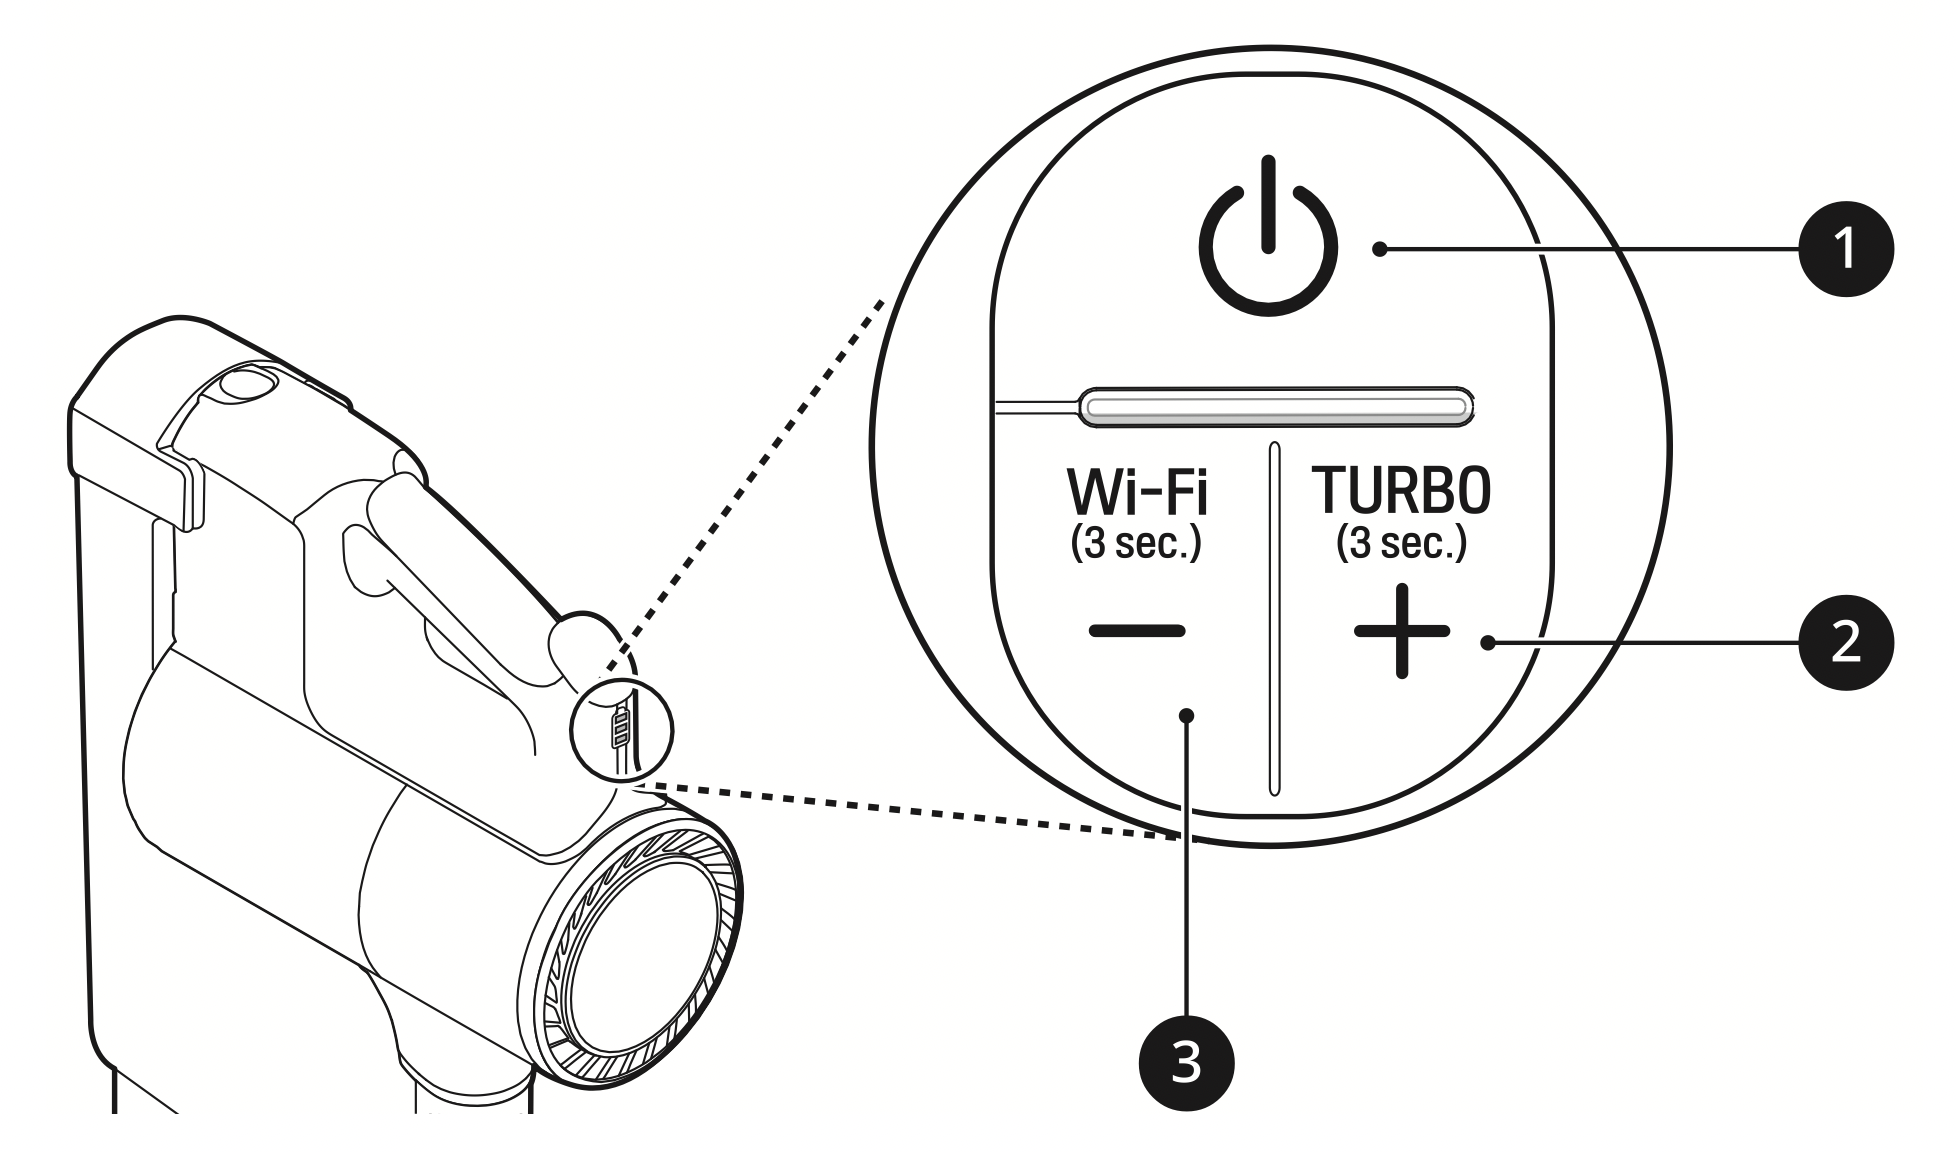
1. Power Button
- • Press the Power button to turn the appliance on or off.
- • Press the Power button to activate Normal mode.
2. Suction Power Up (+) Button / Turbo Mode
- Press the + button to increase the suction power. (Normal -> Power -> Turbo)
- Press and hold the + button for more than 3 seconds to activate Turbo mode from Power mode.
3. Suction Power Down (-) Button / Wi-Fi Mode
- Press the - button to decrease the suction power. (Turbo -> Power -> Normal)
- Press and hold the - button for 3 seconds to activate Wi-Fi and connect the appliance in the LG ThinQ application.
Display
The handle of the appliance displays indicators for clogged objects, filter cleaning alerts, appliance connection status, and the remaining battery charge.
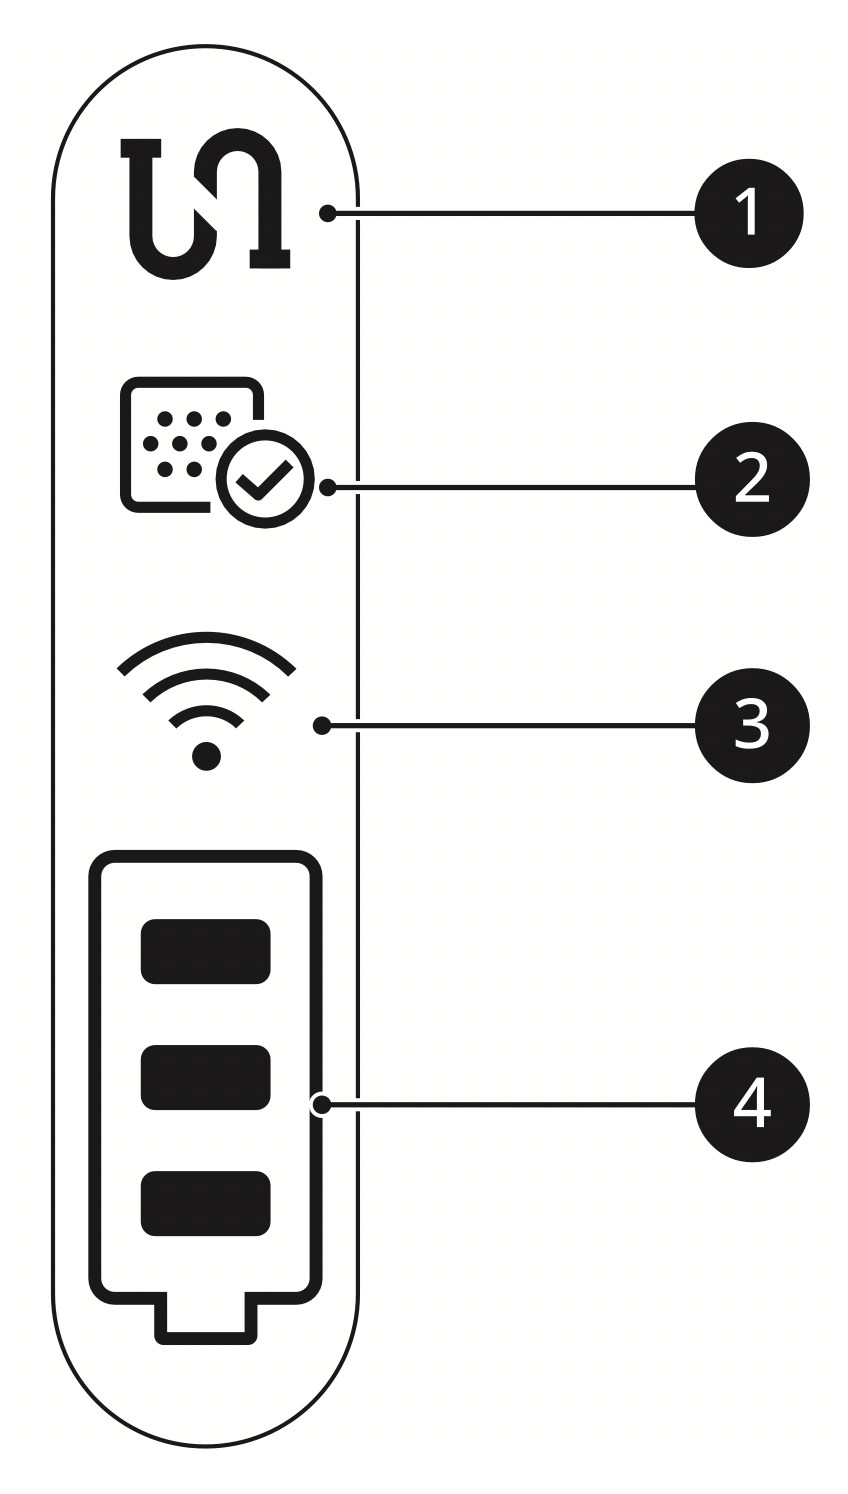
1. Clogged Objects Indicator
- This indicator lights up when the interior of the product body, extension pipe, inlets, nozzle, exhaust filter, pre-filter, or cyclonic mesh filter is clogged with foreign objects.
- If clogging persists, the motor will cycle and the appliance will shut off. Remove the foreign objects and clean the exhaust filter, pre-filter and cyclonic mesh filter following the steps in the Removing Foreign Objects section.
2. Filter Cleaning Cycle Alarm Indicator
- This indicator lights up when the appliance is used for a certain period of time. Clean the exhaust filter, pre-filter and cyclonic mesh filter if necessary.
3. Wi-Fi Indicator
- This indicator blinks when the appliance is connecting to the LG ThinQ application or home Wi-Fi network, and the indicator lights up when the connection is complete.
4. Battery Level Indicator
- The remaining battery level is displayed in 3 stages according to the remaining battery power.
- The battery level indicator blinks when the battery needs to be charged.
- As the product is charging, bars light up on the battery level indicator to indicate the level of charge.
- Once the battery is fully recharged, 3 bars will remain lighted on the battery level indicator.
Charging the Battery
Before Charging the Battery
- Make sure that the adapter is connected to both the charging station and the power outlet.
- Fully charging a single battery usually takes about 4 hours. It will take twice as long to charge both the main and auxiliary batteries.
- The battery will not be charged if the indoor temperature is below 41 °F (5°C). Only charge the battery when indoor temperatures are between 41 °F (5°C) and 100 °F (38 °C).
- The battery will eventually need to be replaced.
Due to the battery characteristics, runtime is shortened after using the appliance repeatedly for an extended period.
- The last bar on the battery indicator begins to blink when the battery needs to be recharged. Use the appliance with a fully charged battery.
- If the main battery is charging on the charging station, the auxiliary battery will only start charging once the main battery is fully charged.
- To maintain battery life on dual-battery models, swap the positions of the two batteries periodically, between the main body and the auxiliary charging station.
Charging the Product Body
Storing the appliance on the charging station automatically recharges the battery.
- Press the Power button to turn the appliance off.
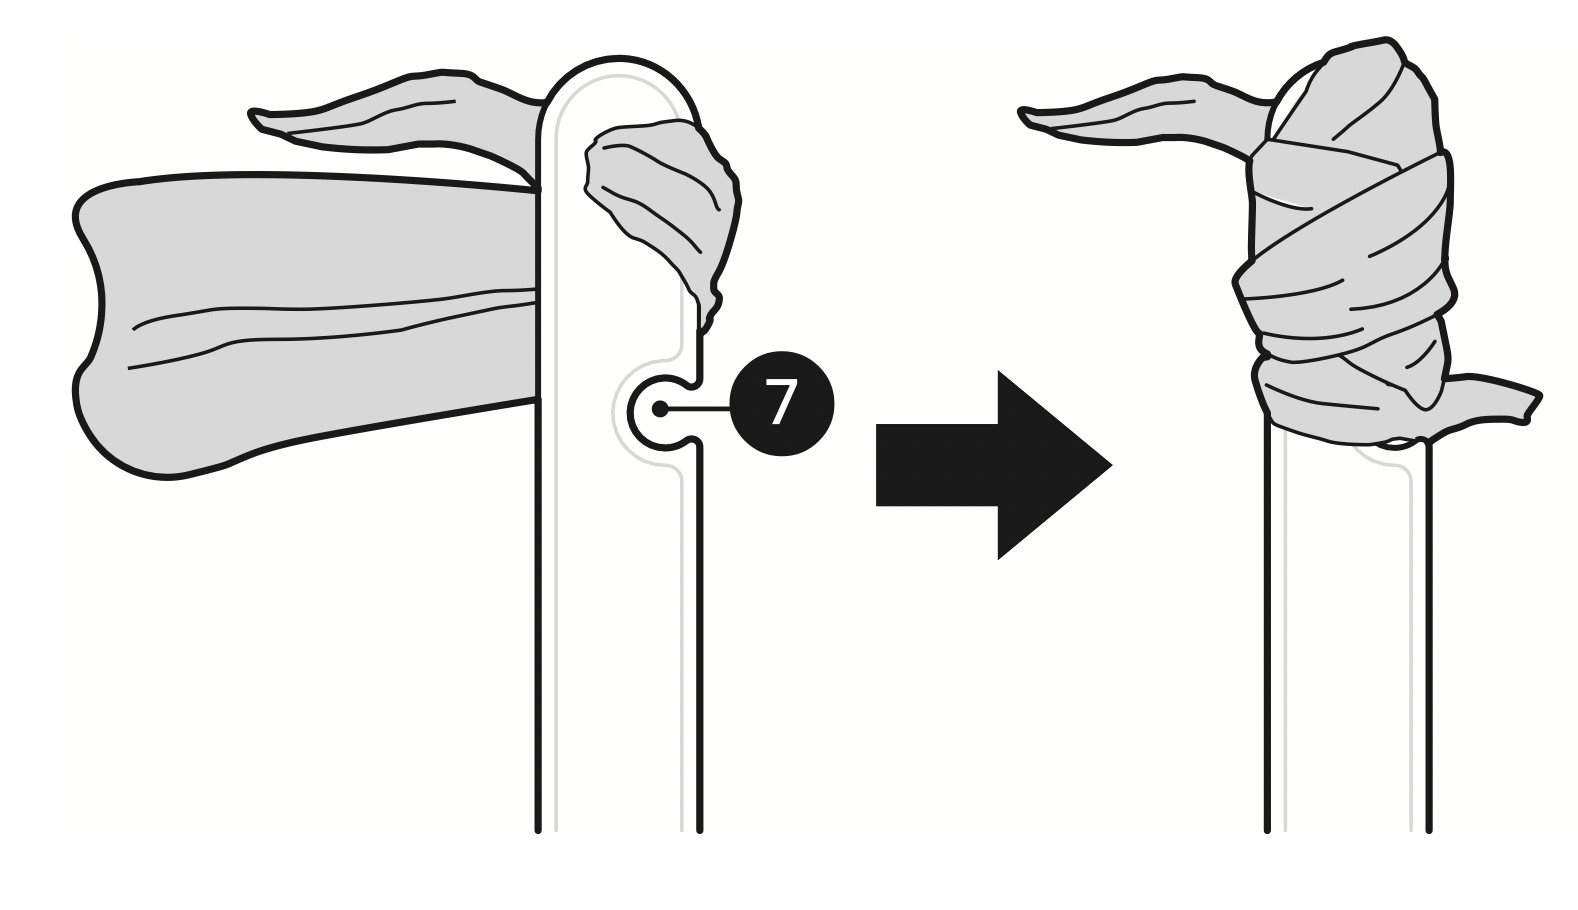
- Put the product body onto the charging station by aligning it to the hook 1 of the charging station.
The battery level indicator starts to blink and begins charging the battery.
If you don't hear a beep, reload the appliance on the charging station.
WARNING: Make sure to securely fit the product body onto the charging station. If the appliance falls off the charging station, it could cause injuries, property damage or product damage.
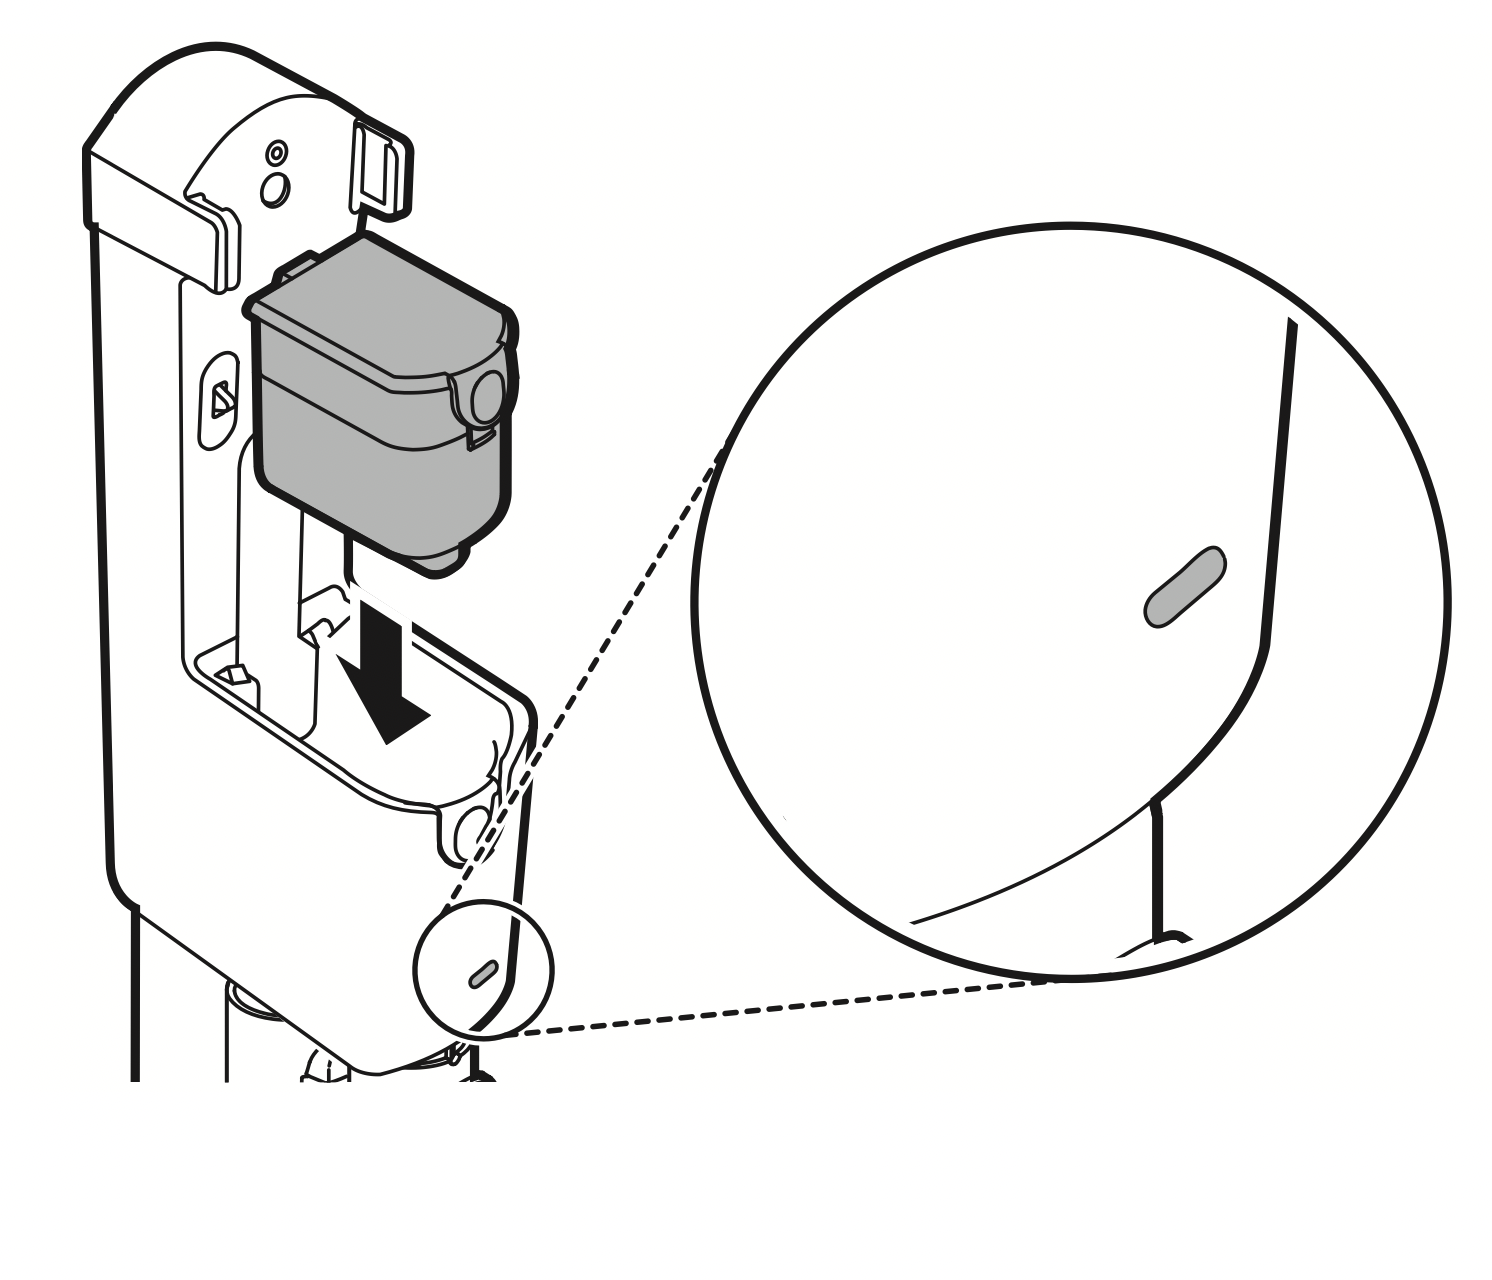
Charging the Auxiliary Battery
An auxiliary battery can be stored and charged in the base of the charging station.
CAUTION: Keep fingers away from pinch points when assembling or disassembling the battery from the product body or the charging station to avoid personal injury.
- Remove the discharged battery from the product body by pressing the battery release button on either side of the battery and pulling.
- Insert the discharged battery into the auxiliary charging station.
The battery will only fit into the cavity if aligned properly.
The auxiliary charging indicator blinks while recharging is in progress.
The auxiliary charging indicator lights up when charging is complete.
Using the Nozzles and Tools
Some accessories are only available on some models.
Specialized attachments can help you clean more effectively. Tools and nozzles can be attached to the product body or the extension pipe.
- Adjust the suction power if the inlet gets stuck on the floor, carpet, or bedding.
- Each Power Drive Nozzle (Power Carpet or Power Punch) is equipped with a motor and may make a sound when operating.
CAUTION: Do not use Power Floor Nozzle or Power Carpet Nozzle on PVC or polyurethane mats for infants and children. The mat may stick to the nozzle, making it difficult to operate, causing damage to the mat or static electricity on the appliance. Clean mats using the crevice tool.
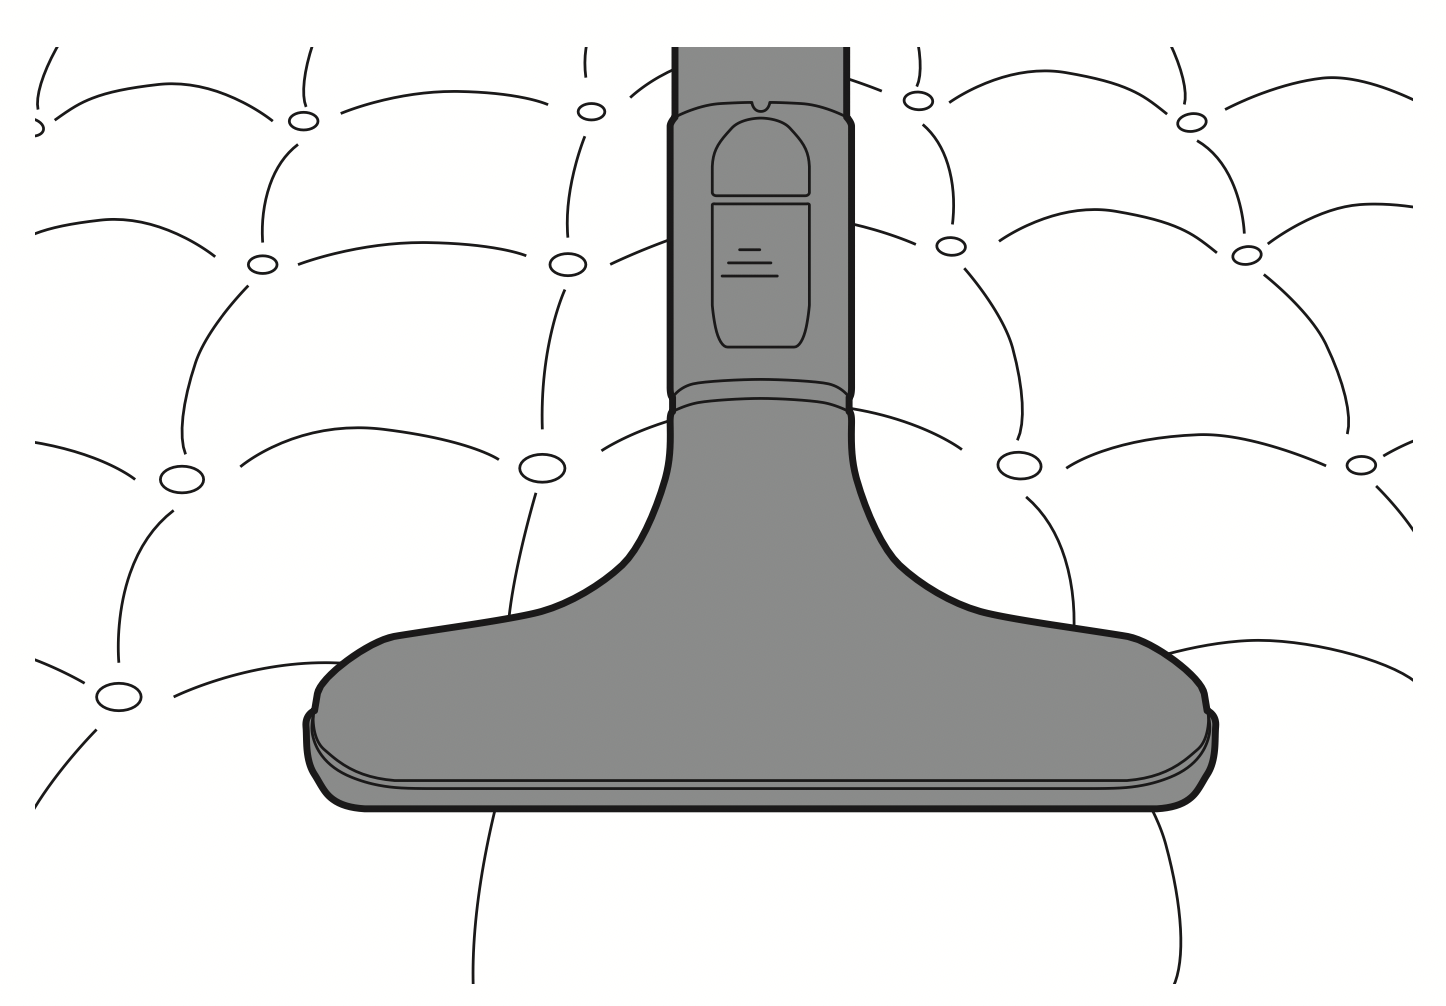
Power Carpet Nozzle
Use this nozzle to clean carpets or rugs.
- If used on hard flooring, this nozzle will be noisy.
Power Punch Nozzle
This nozzle lets you clean sheets and bedding more effectively. It removes dust in bedding using strong suction and a punching motion.
- Lower the suction level when vacuuming bedding such as duvet covers to avoid the thin fabric getting sucked into the nozzle.
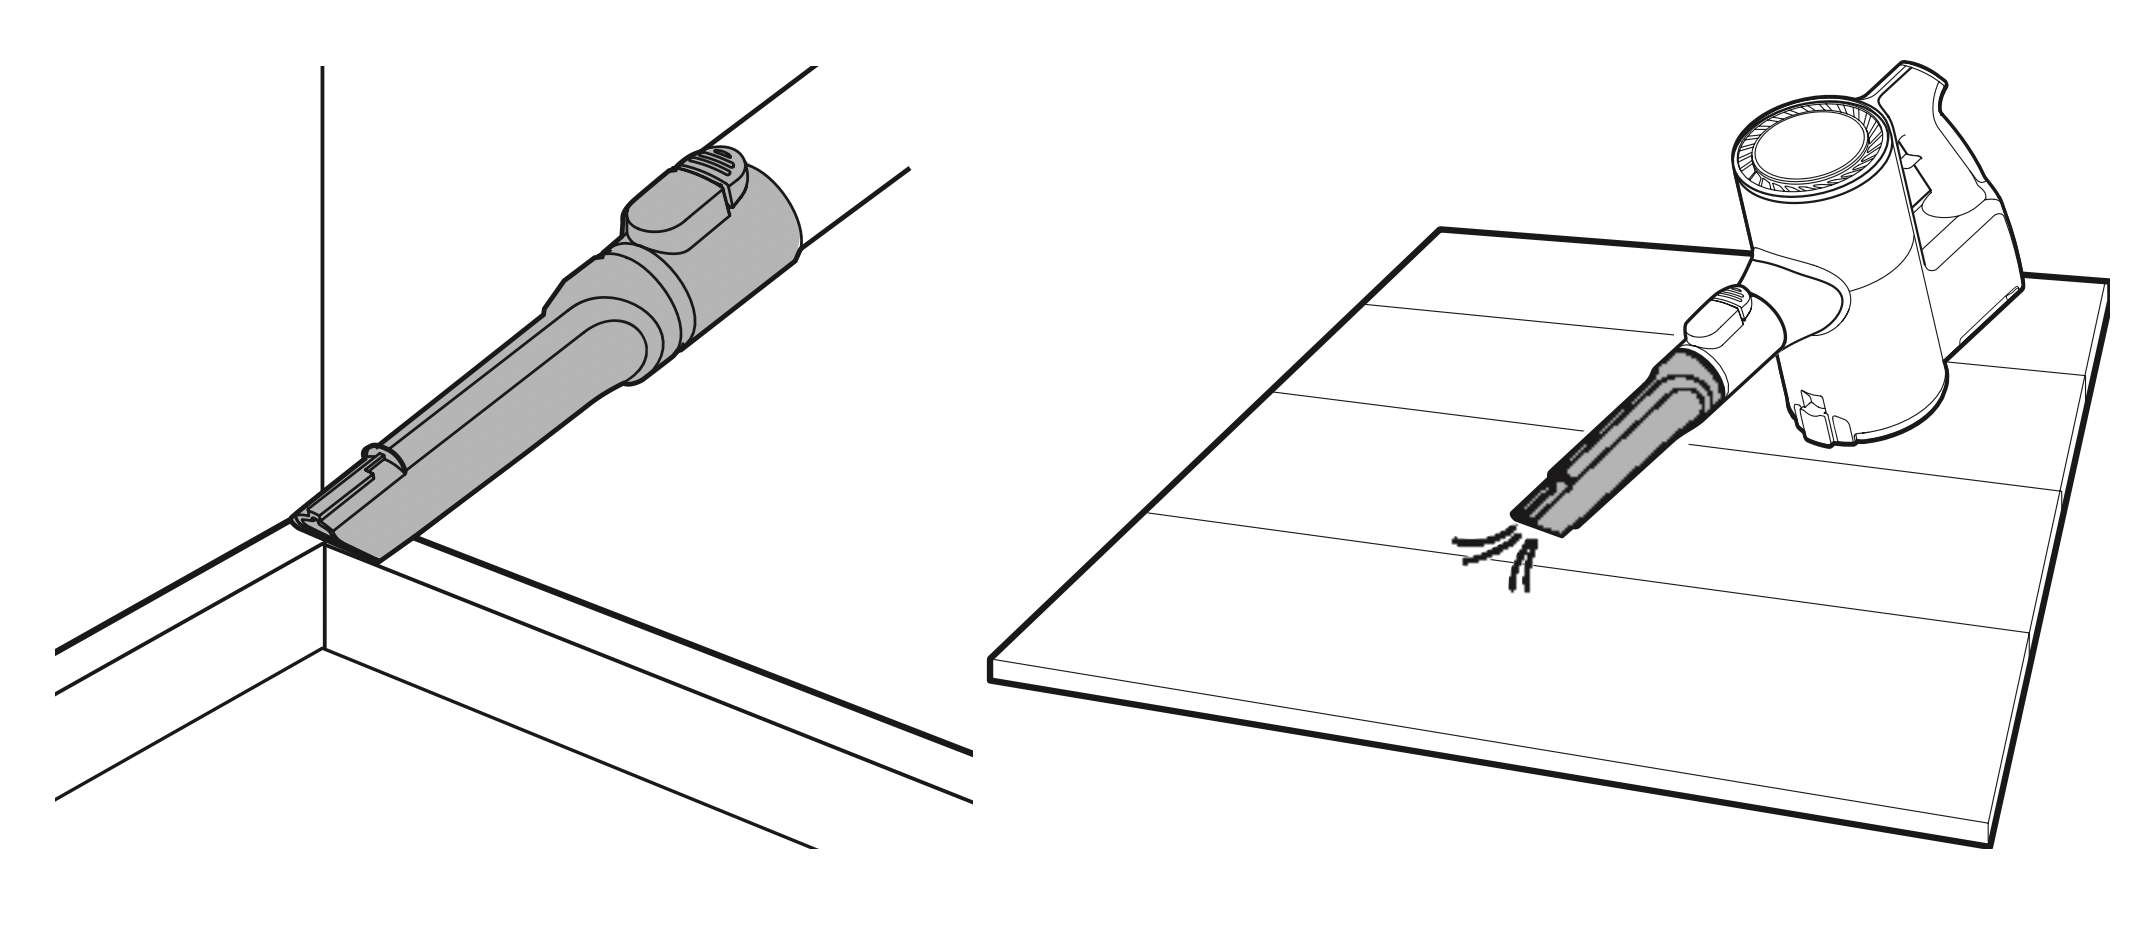
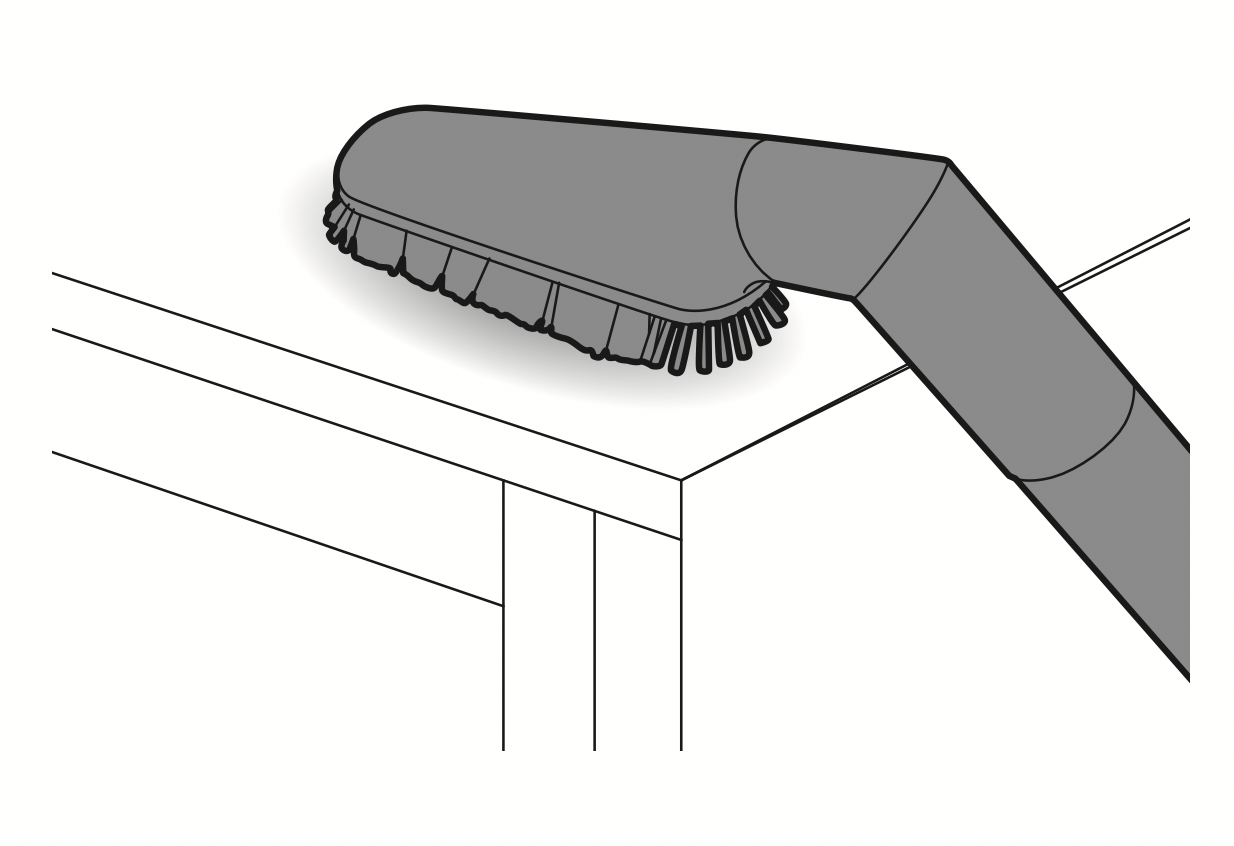
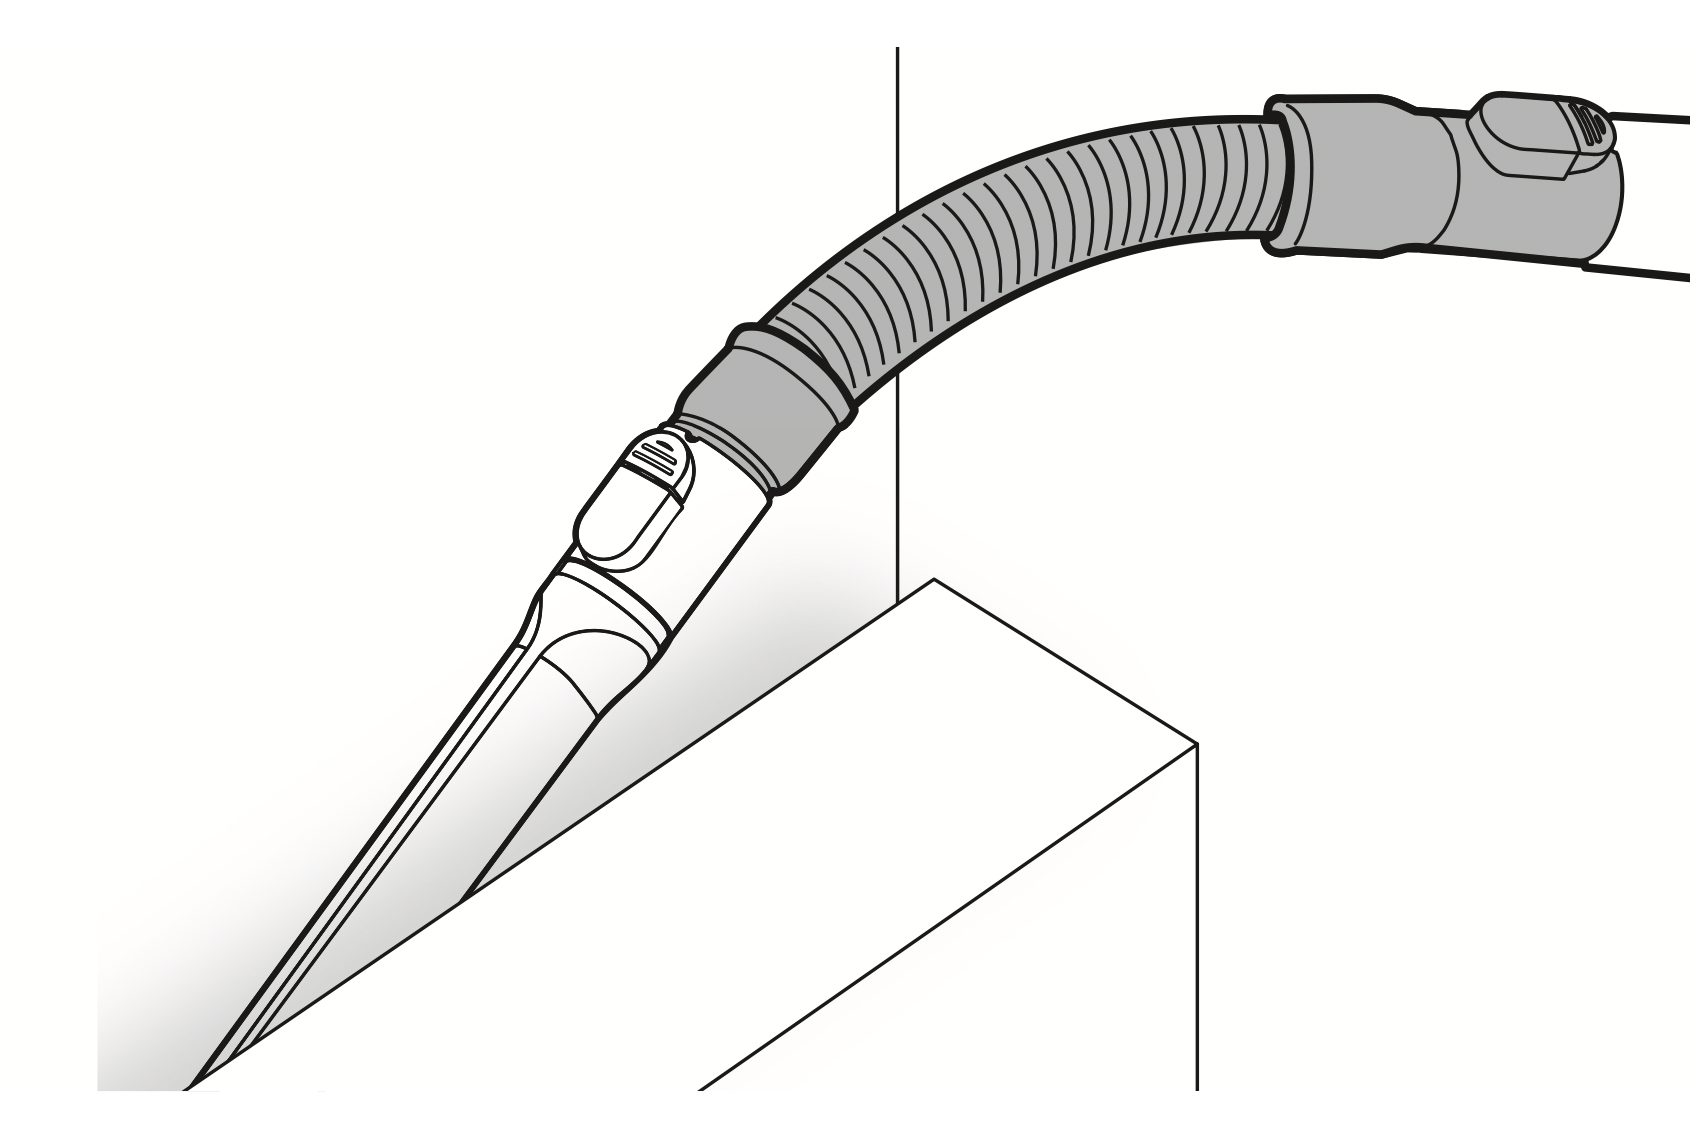
Crevice Tool
Use this tool to remove dust from corners or narrow spaces.
- Use it for areas with static electricity such as mats.
- Use it with the Turbo mode to clean pet hair out of furniture, mats, or tight areas like corners.
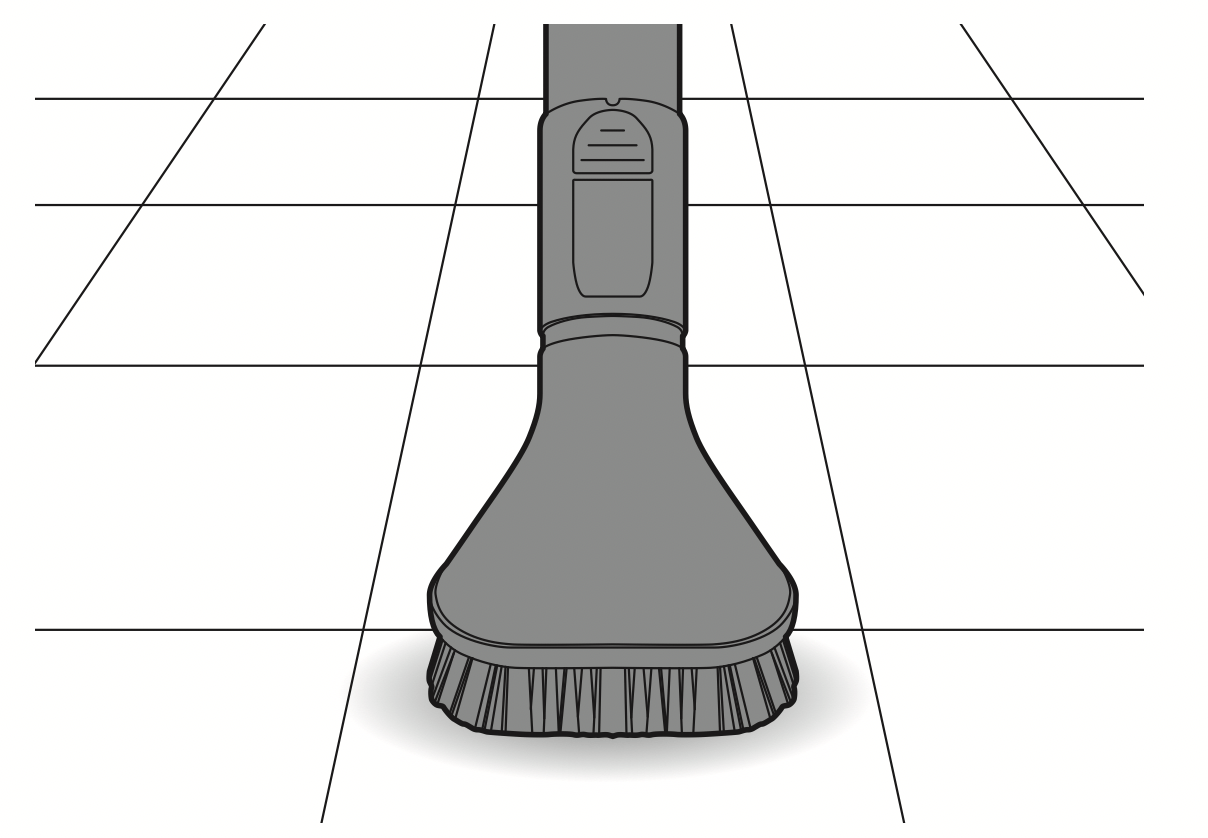
Combination Tool
Can be used in either crevice mode or brush mode for cleaning corners or small gaps where dust and dirt gather.
- Crevice Mode
Use the tool in the crevice mode to clean flat surfaces such as sofas or mattresses.
- Brush Mode
Use the tool in the brush mode to clean delicate surfaces such as frames or furniture.
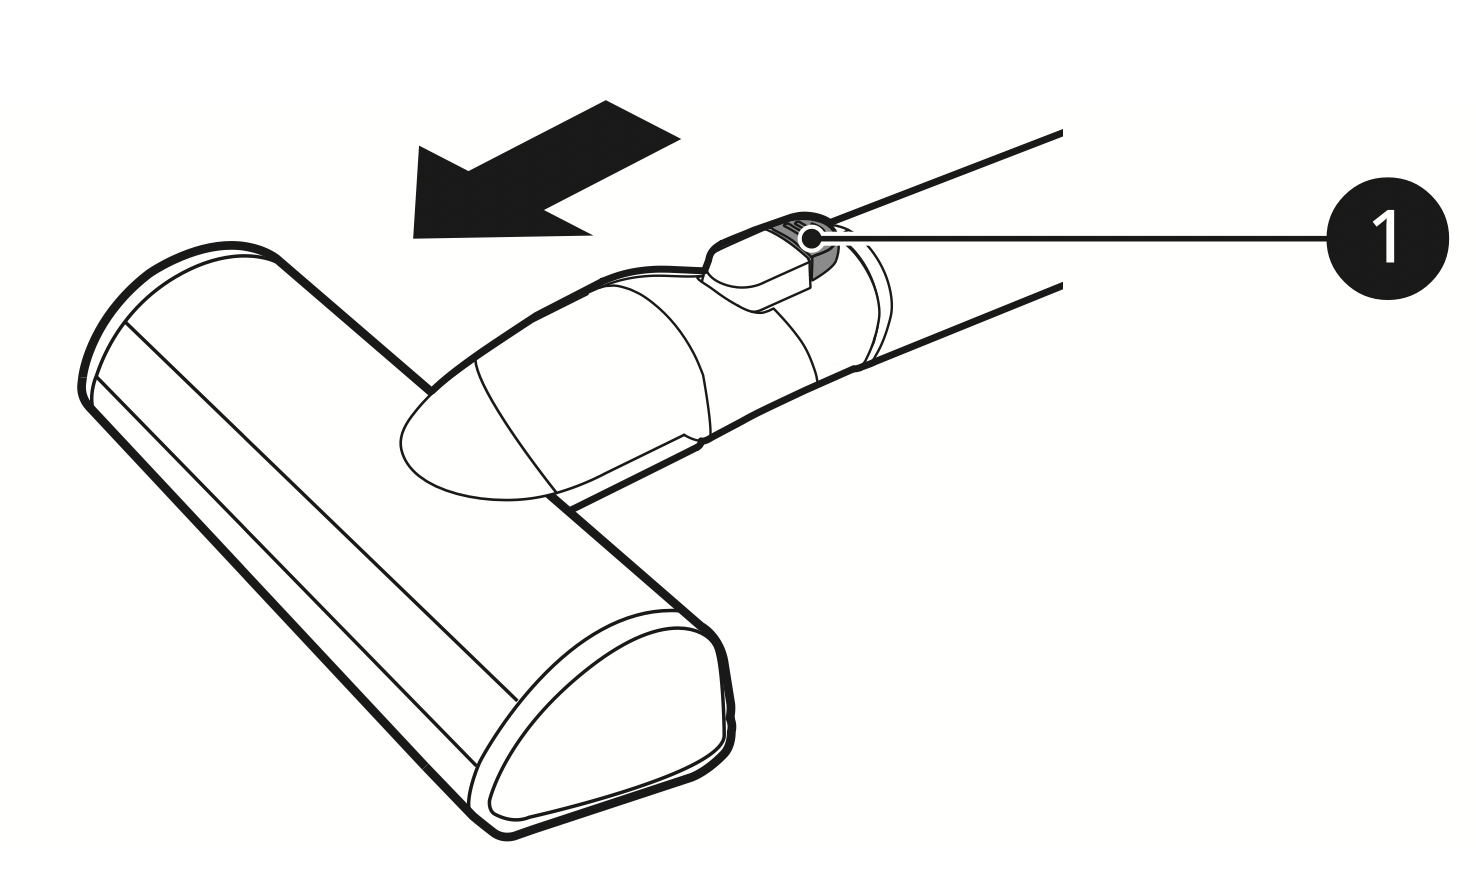
To convert modes, press the adjustment button 1 and push forward.
Hard Dirt Tool
Firm bristles remove solidified dirt from hard surfaces. Clean up hair or foreign objects that are entangled in carpets or rugs.
Mattress Tool
Use this tool to clean up dust and foreign objects from mattresses, delicate fabrics, and upholstery.
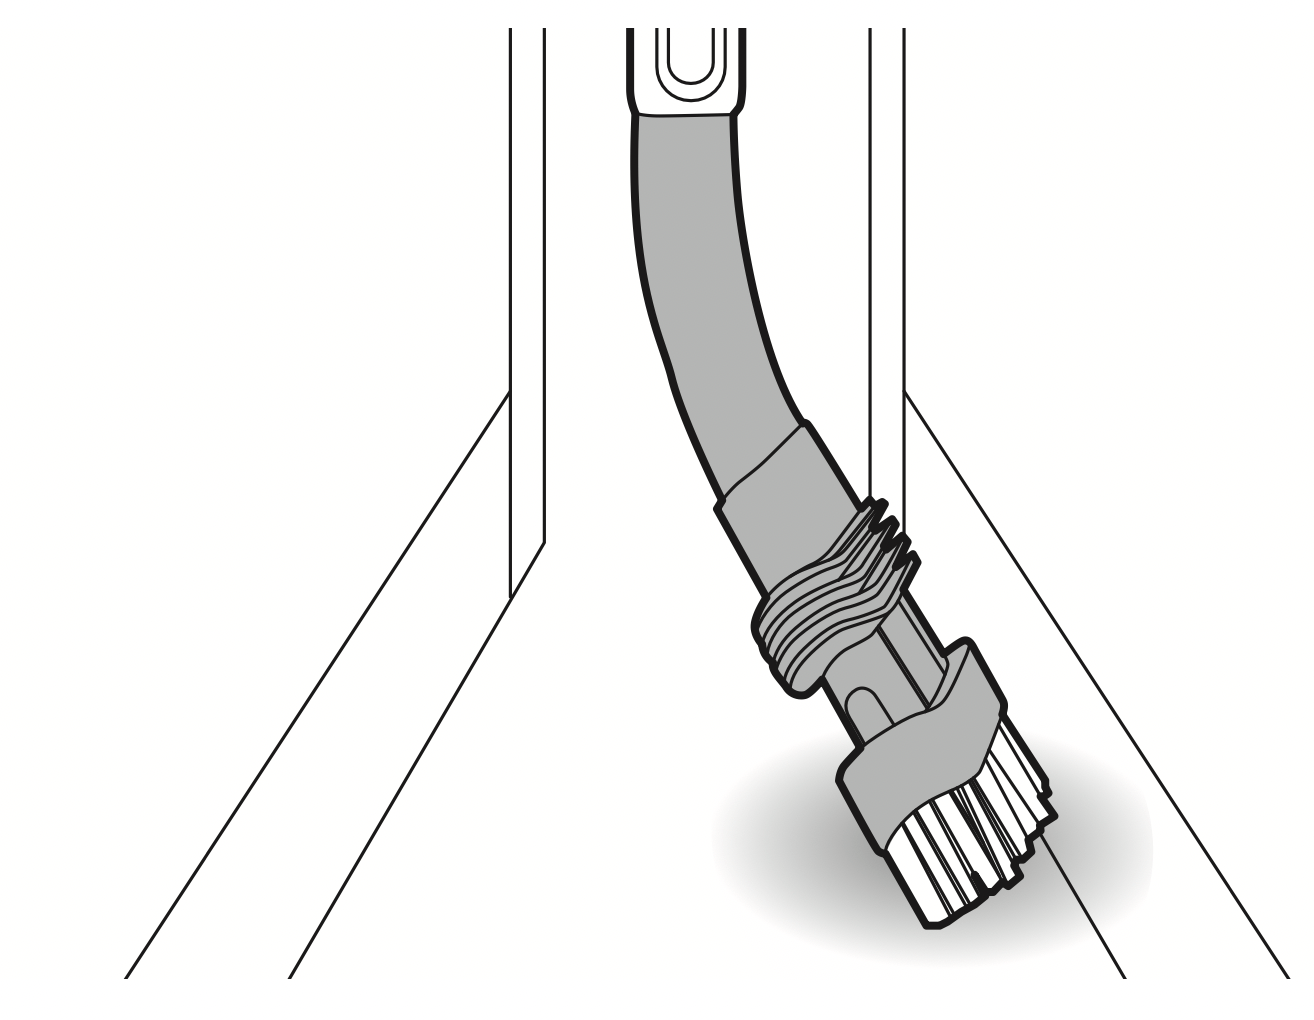
Flexible Crevice Tool
This tool is flexible and its length can be adjusted, making it especially useful for cleaning inside vehicles or in narrow spaces under and behind furniture where an angled tool is needed.
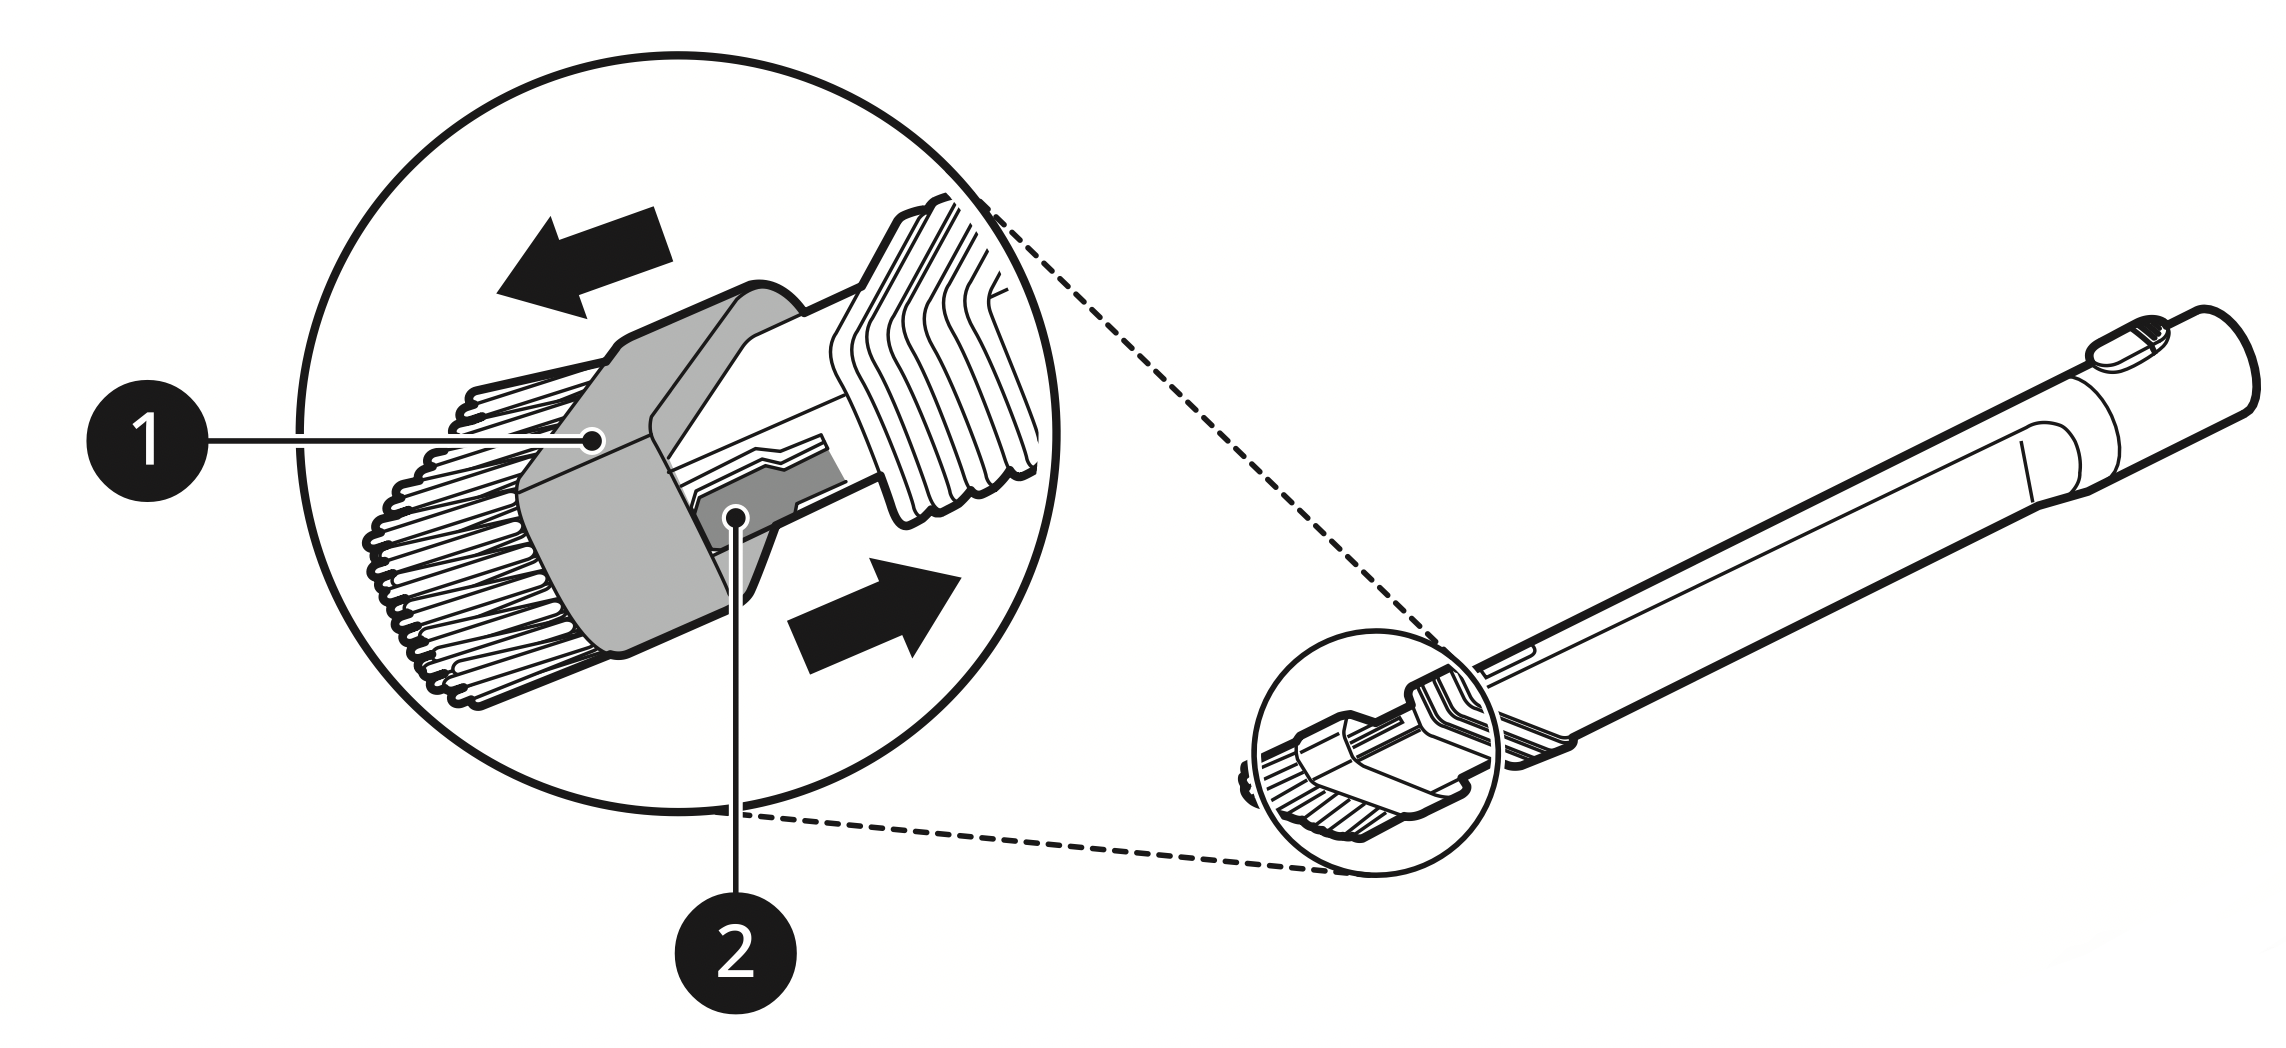
Using the Brush
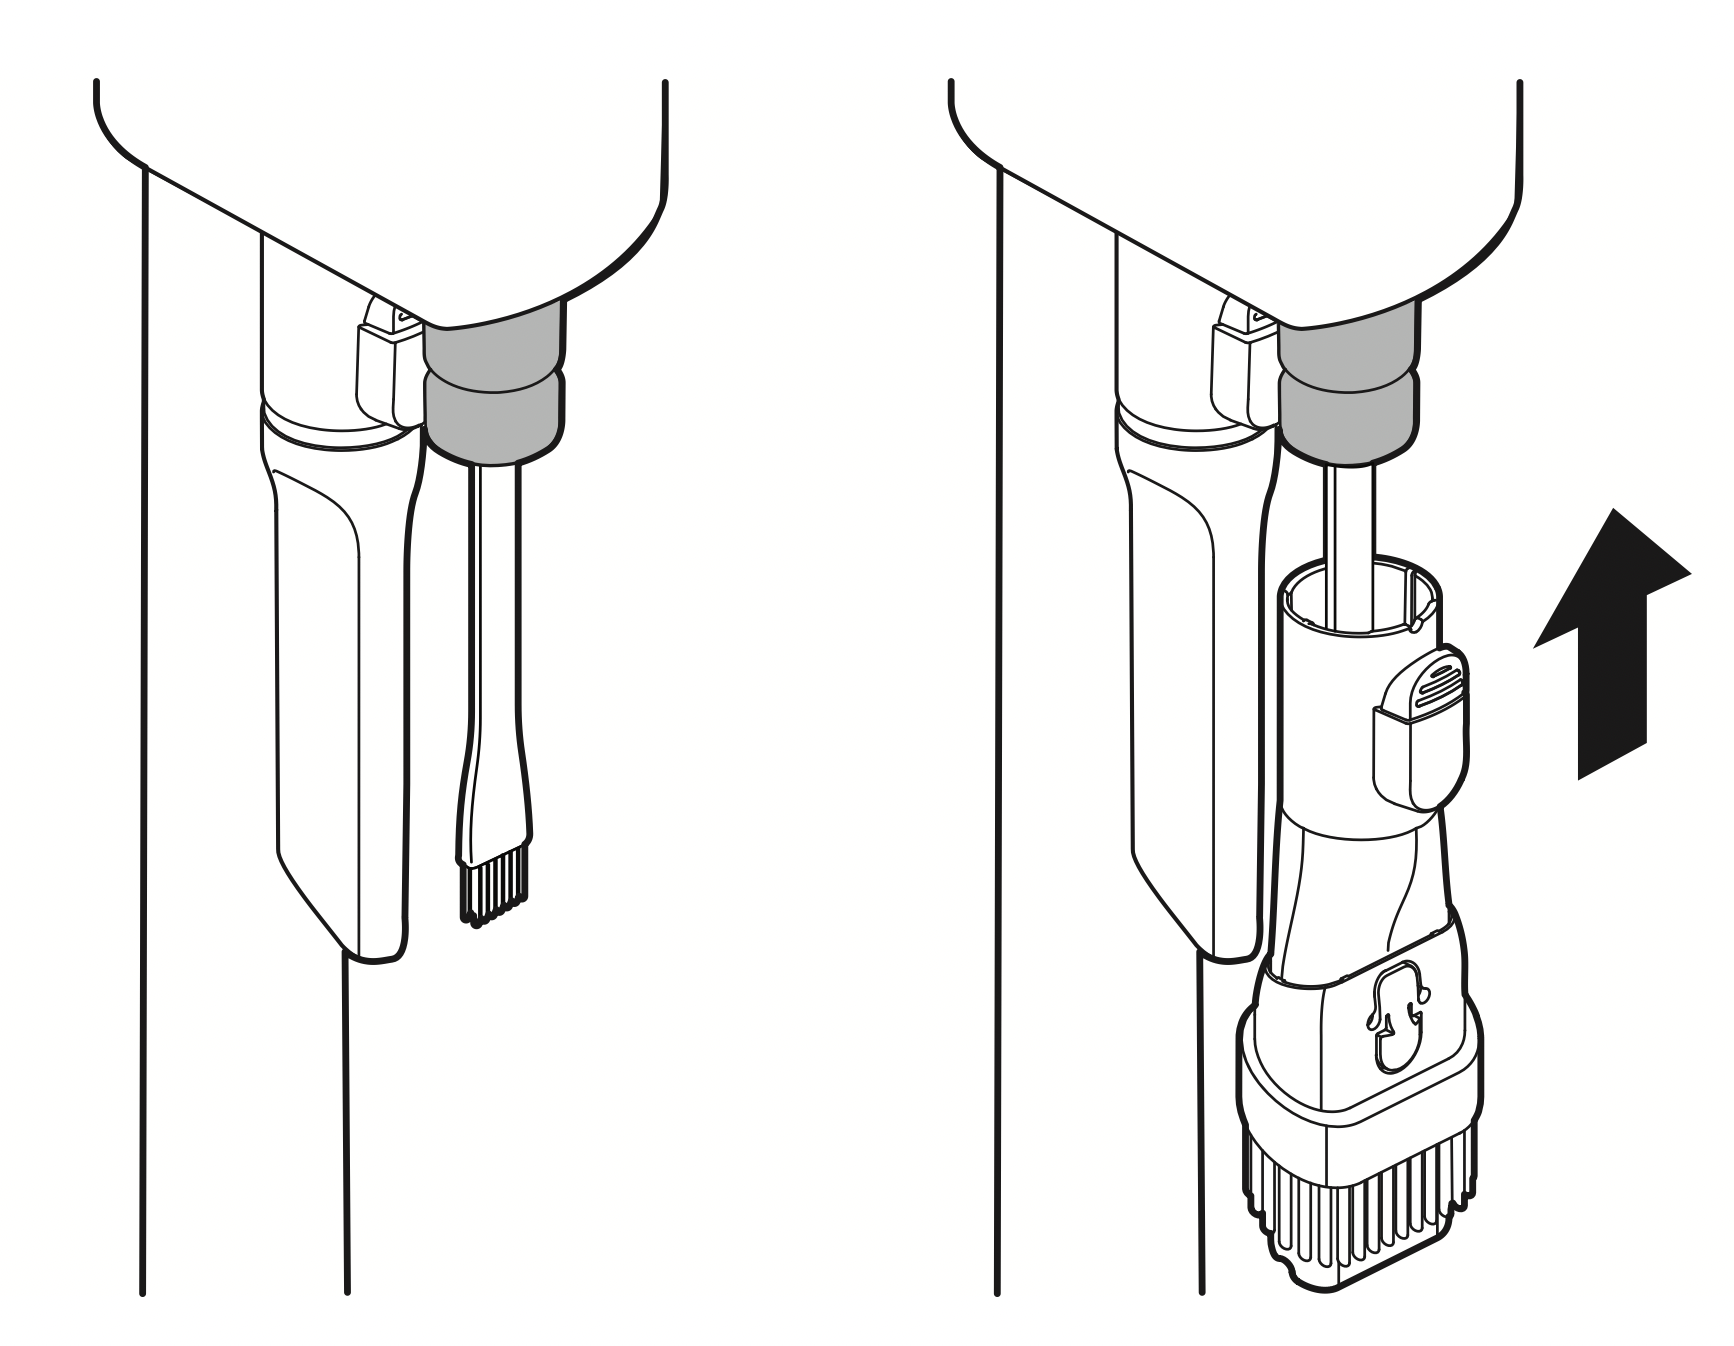
To convert the tool from crevice to brush mode, press in on the sides of the brush head 1 and pull the brush down.
- To convert back to the crevice mode, press in on the brush release button 2 and slide the brush up.
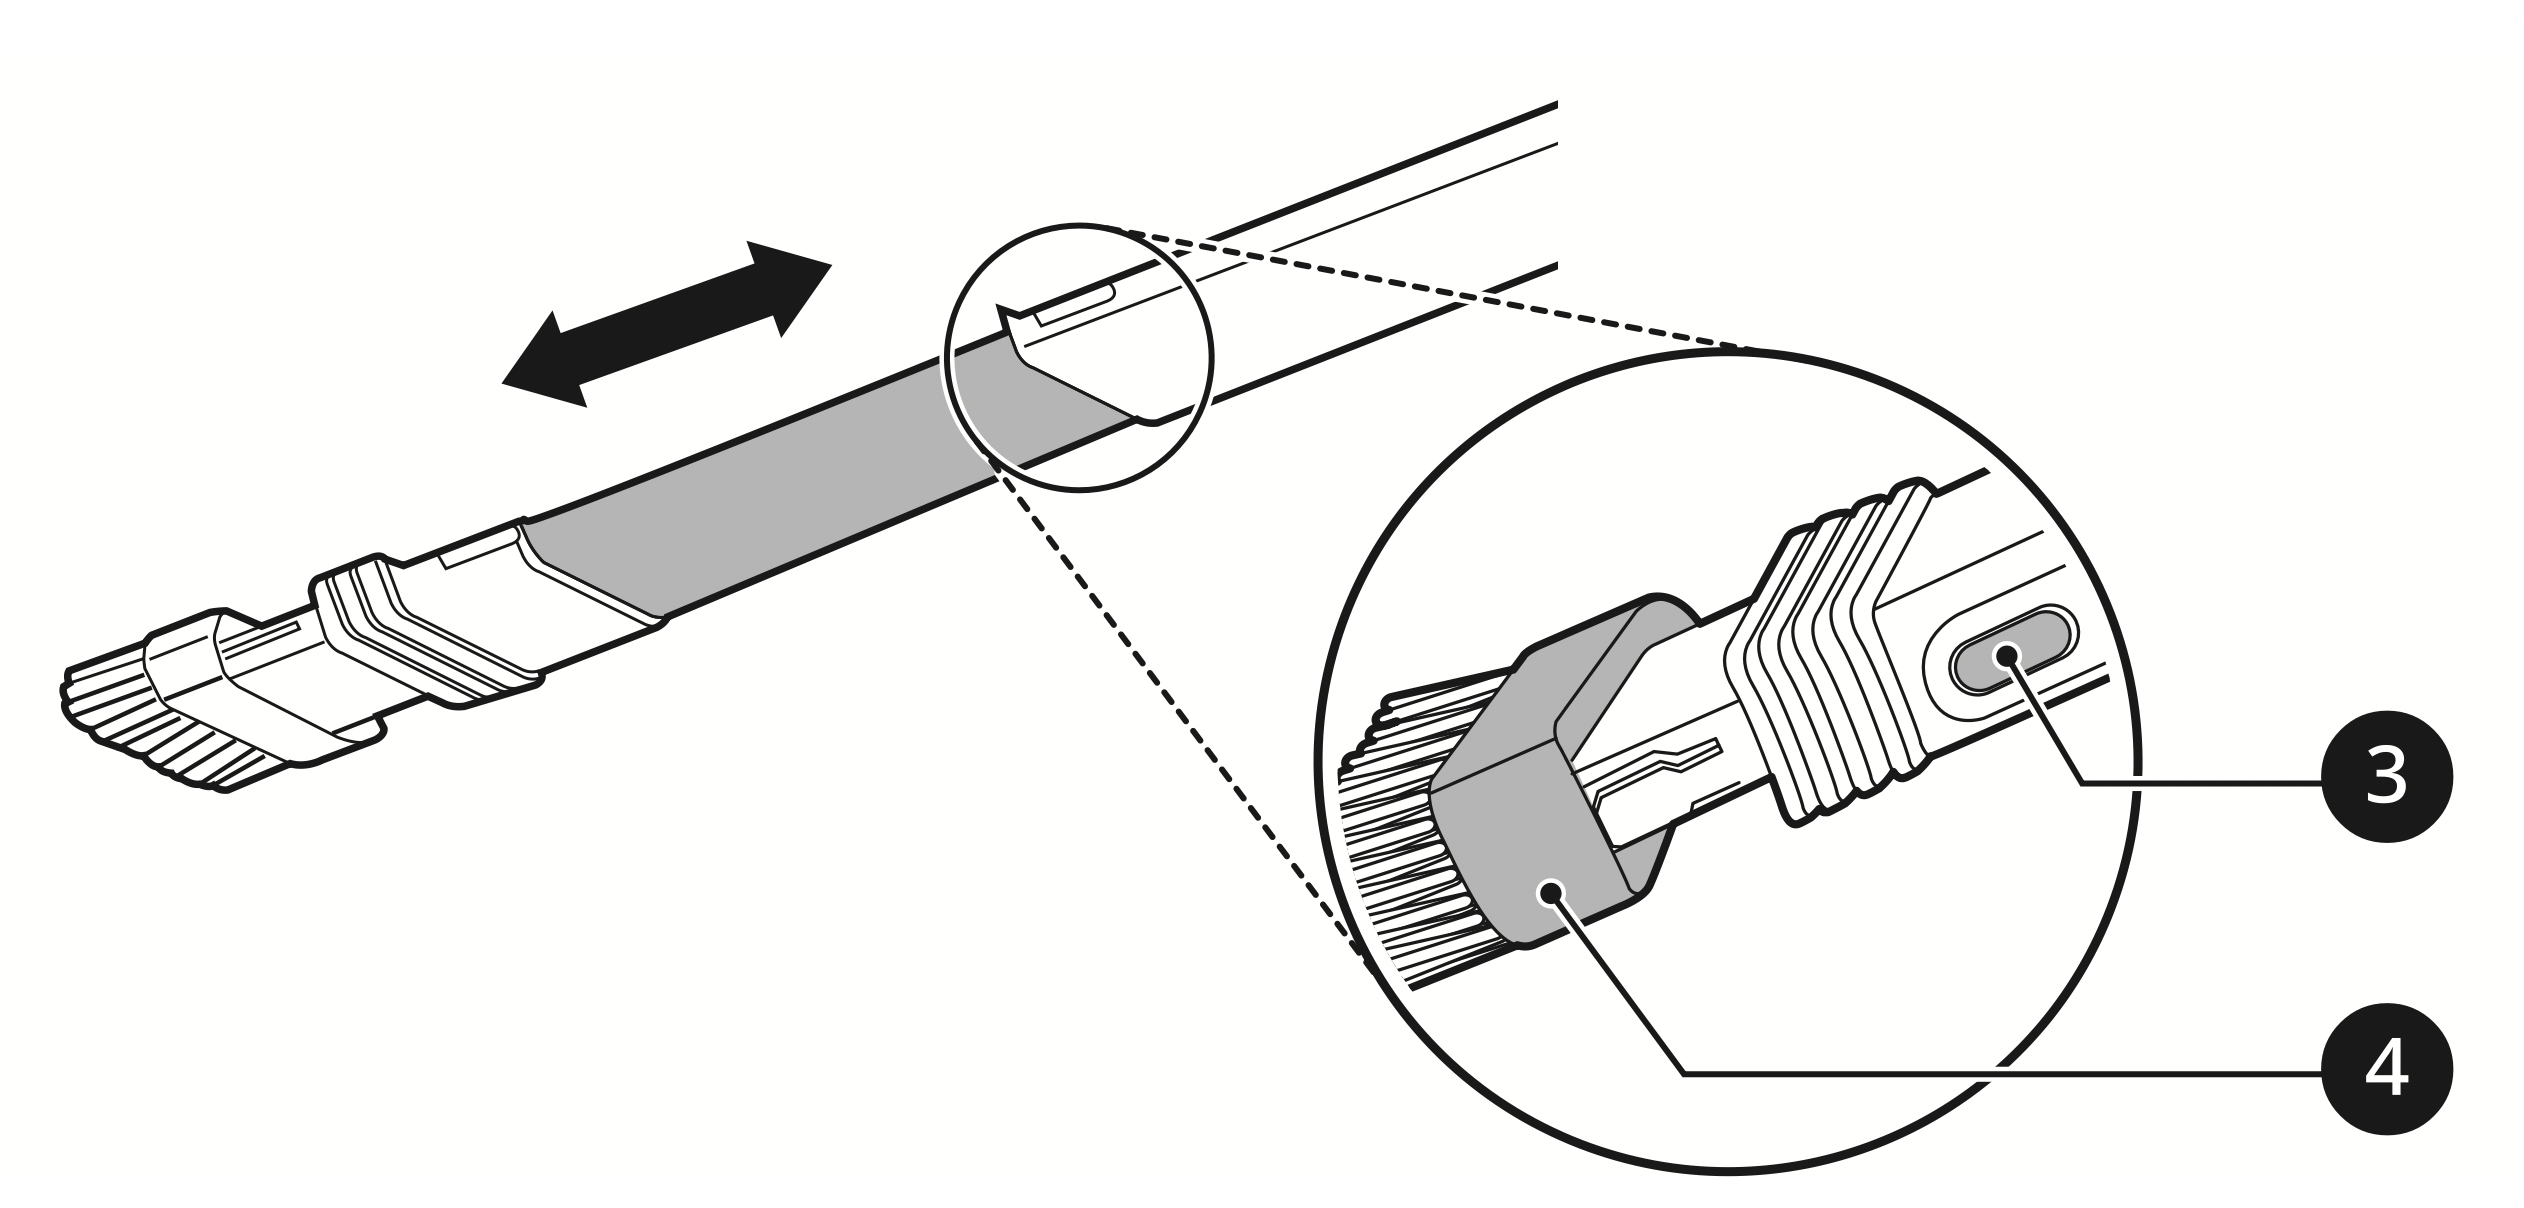
Adjusting the Length
To adjust the length of the tool, press and hold the release button 3 on the side of the tool. Pull or push on the brush head 4 to extend or retract the extension tube.
Multi-angle Tool
This tool has a soft brush that can be adjusted to a variety of angles, making it especially useful for cleaning vehicle consoles or the tops of furniture.
Flexible Hose Extension
Connect this flexible, extendable hose between the product body and the tools to clean hard to reach areas.
- The flexible hose extension cannot be used with the Power Drive Nozzle.
Using the Kompressor Lever
Use the Kompressor lever to compress hair and fibers inside the dust bin after vacuuming and before emptying the dust bin.
- The vacuum must be turned off before using the Kompressor lever.
- Compressing the dust clears it off the interior walls of the dust bin and allows you to vacuum for longer periods before emptying the dust bin. It also makes cleaning the dust bin easier and less messy.
- The dust bin must be at least half full for the compression plate to be effective.
- Press the Kompressor lever down several times to compress the dust and clean off the interior walls of the dust bin.
MAINTENANCE
Cleaning the Appliance
Before Cleaning the Appliance
To maintain the optimum suction power, the cyclonic mesh filter, the exhaust filter and the prefilter should be cleaned regularly and washed under running water at least once a month.
- Turn off the power before cleaning the appliance.
- The frequency of cleaning varies depending on the usage environment and usage time. In a dusty environment, clean frequently.
WARNING
- Never wash the Power Drive Nozzle, rotating brush or product body with water. Water could reach the motor and cause electric shock or fire.
- Do not allow foreign objects to enter the motor.
Doing so may cause electric shock, fire or product damage.
- Do not insert fingers or sharp objects into the motor. Doing so could cause product damage, personal injury or electric shock.
CAUTION:
- Do not apply force or allow impacts to the cyclonic mesh filter. Doing so could deform the filter, compromise product performance, or cause the product to malfunction.
- If the Kompressor lever does not return to the top, remove the cyclonic mesh filter from the dust bin and clean it. A clogged or dirty filter may cause poor product performance.
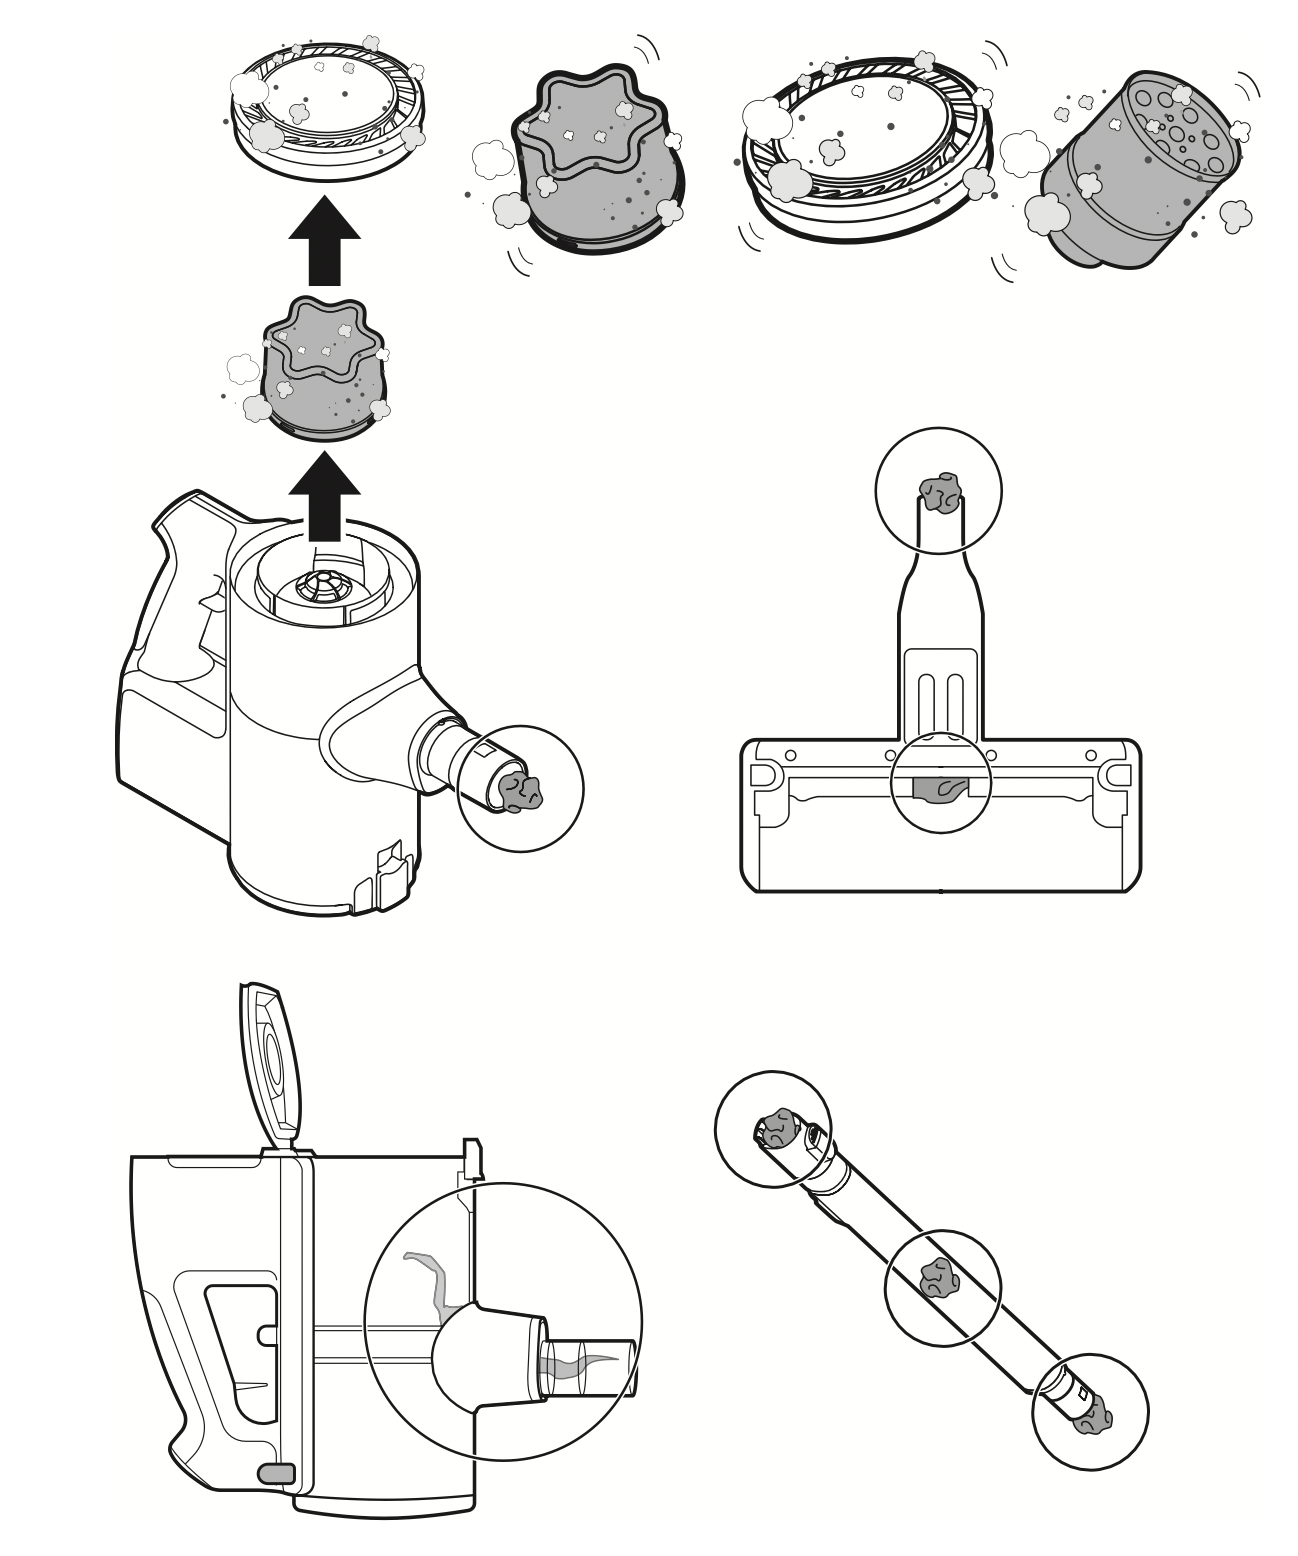
Removing Foreign Objects
If the appliance is clogged with foreign objects, the suction power changes, the motor cycles repeatedly, and the foreign objects clogging alarm icon blinks.
If clogging persists, the appliance will turn off automatically to prevent damage. Separate the battery from the product body and remove the foreign objects before resuming use of the appliance.
- Check the inside of the product body, above the Kompressor working plate, the extension pipe, inlets, exhaust filter, pre-filter and cyclonic mesh filter for foreign objects.
- If the inlets are not completely blocked, the foreign objects clogging alarm indicator may not light up.
- If the sound of the appliance becomes loud or the cleaning performance is poor, check for foreign objects.
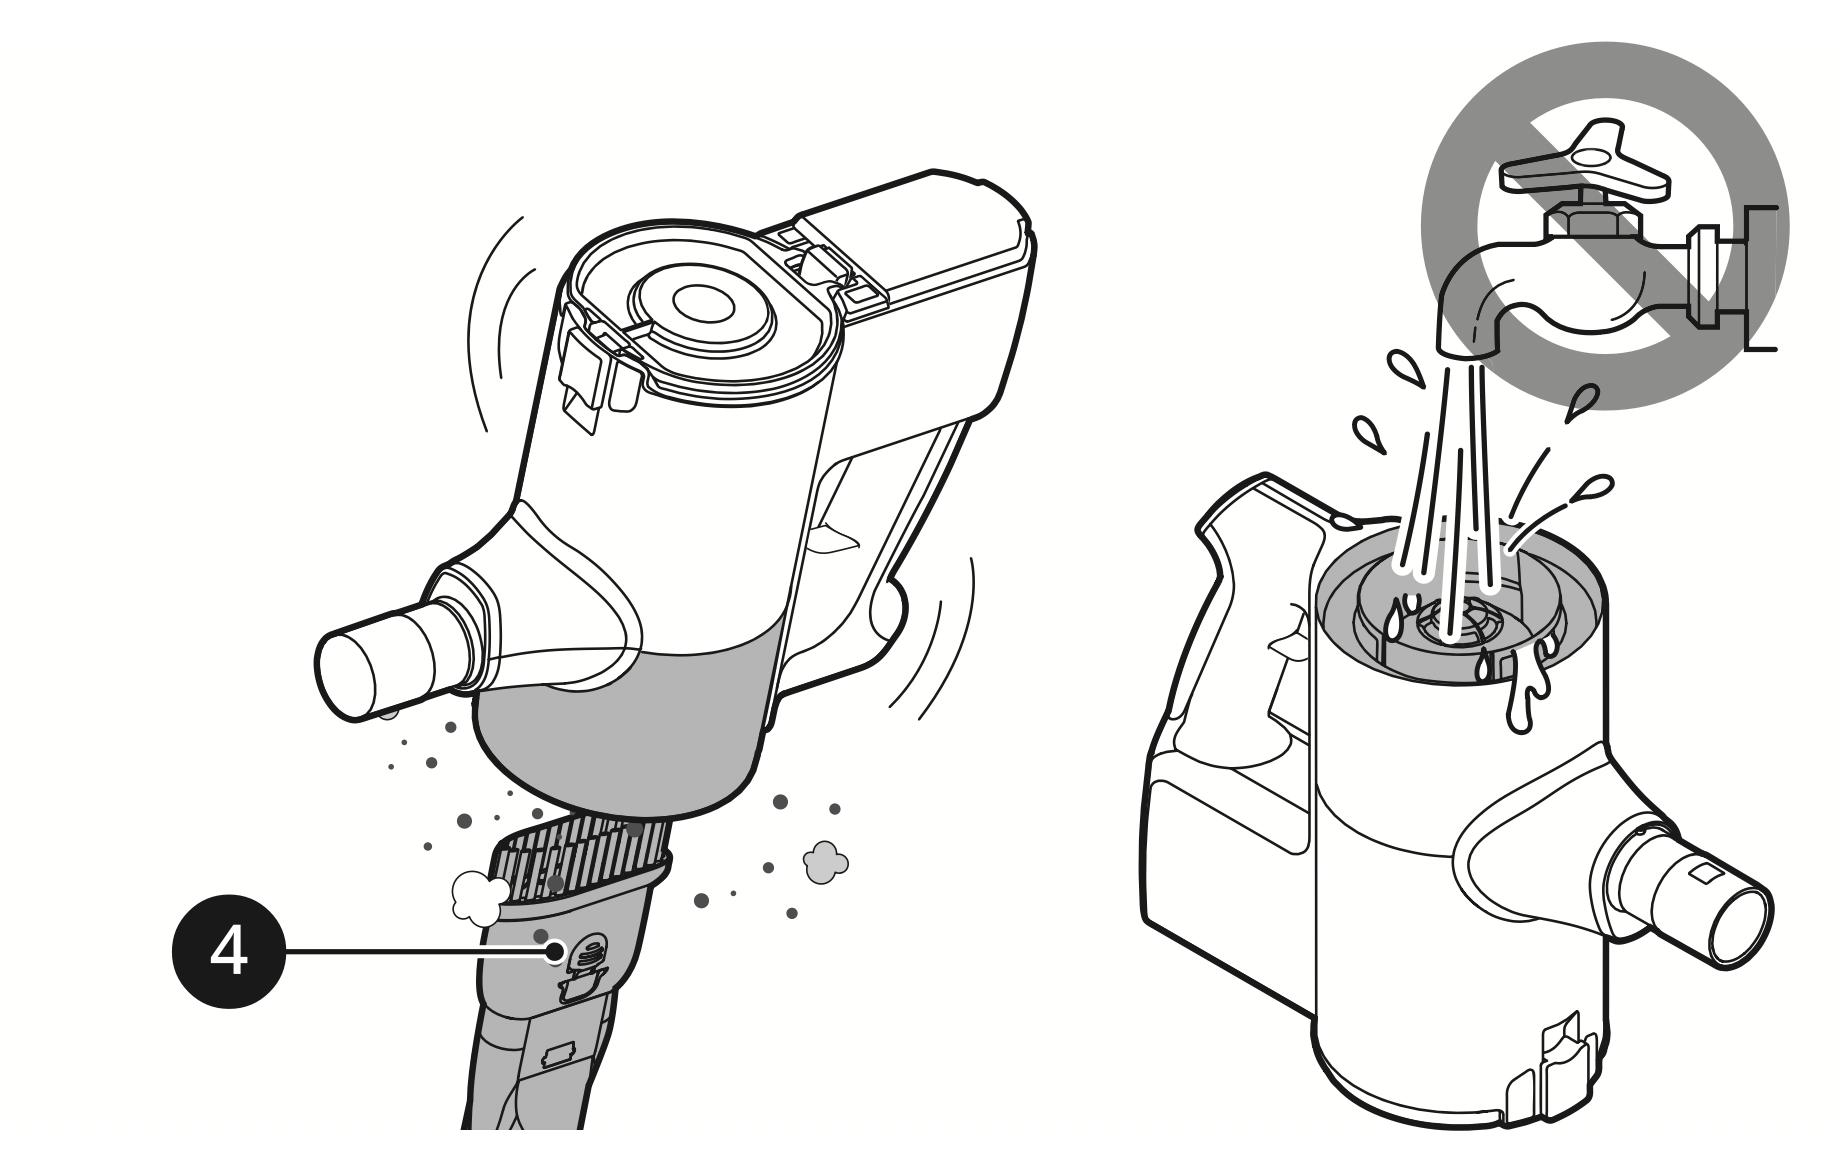
Cleaning the Dust Bin
Empty and clean the dust bin after every use.
- If the dust bin is completely full of dust or the filter is clogged, the suction power may be reduced.
CAUTION: Do not use the appliance without the cyclonic mesh filter installed. Doing so could damage the appliance.
- Remove the battery from the product body before cleaning the dust bin.
- Push down the Kompressor lever 1 several times to collect and compact the dust from the outside of the cyclonic mesh filter and the interior walls of the dust bin.
Foreign objects which become lodged in the cyclonic mesh filter may be difficult to dislodge with the Kompressor lever. Remove the cyclonic mesh filter and use the provided cleaning brush to clean it.
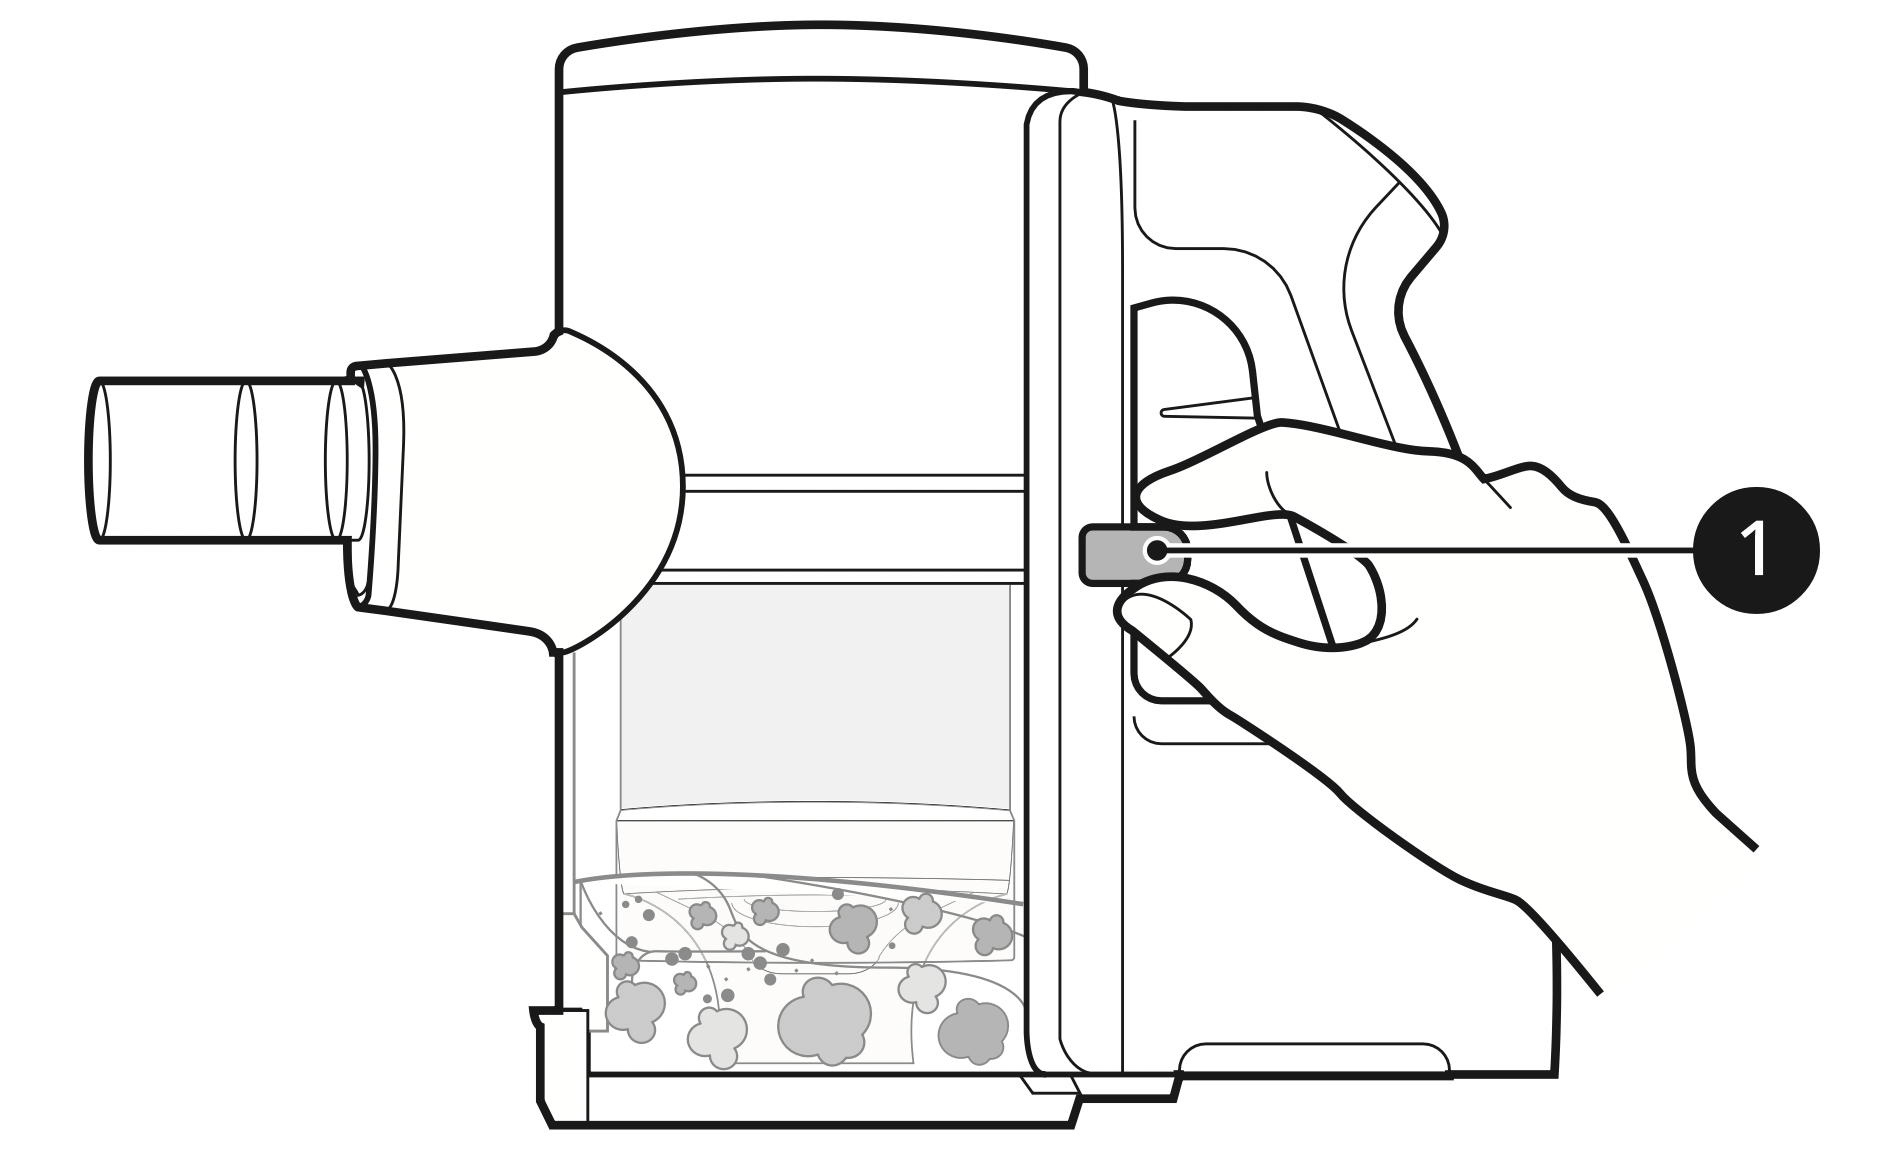
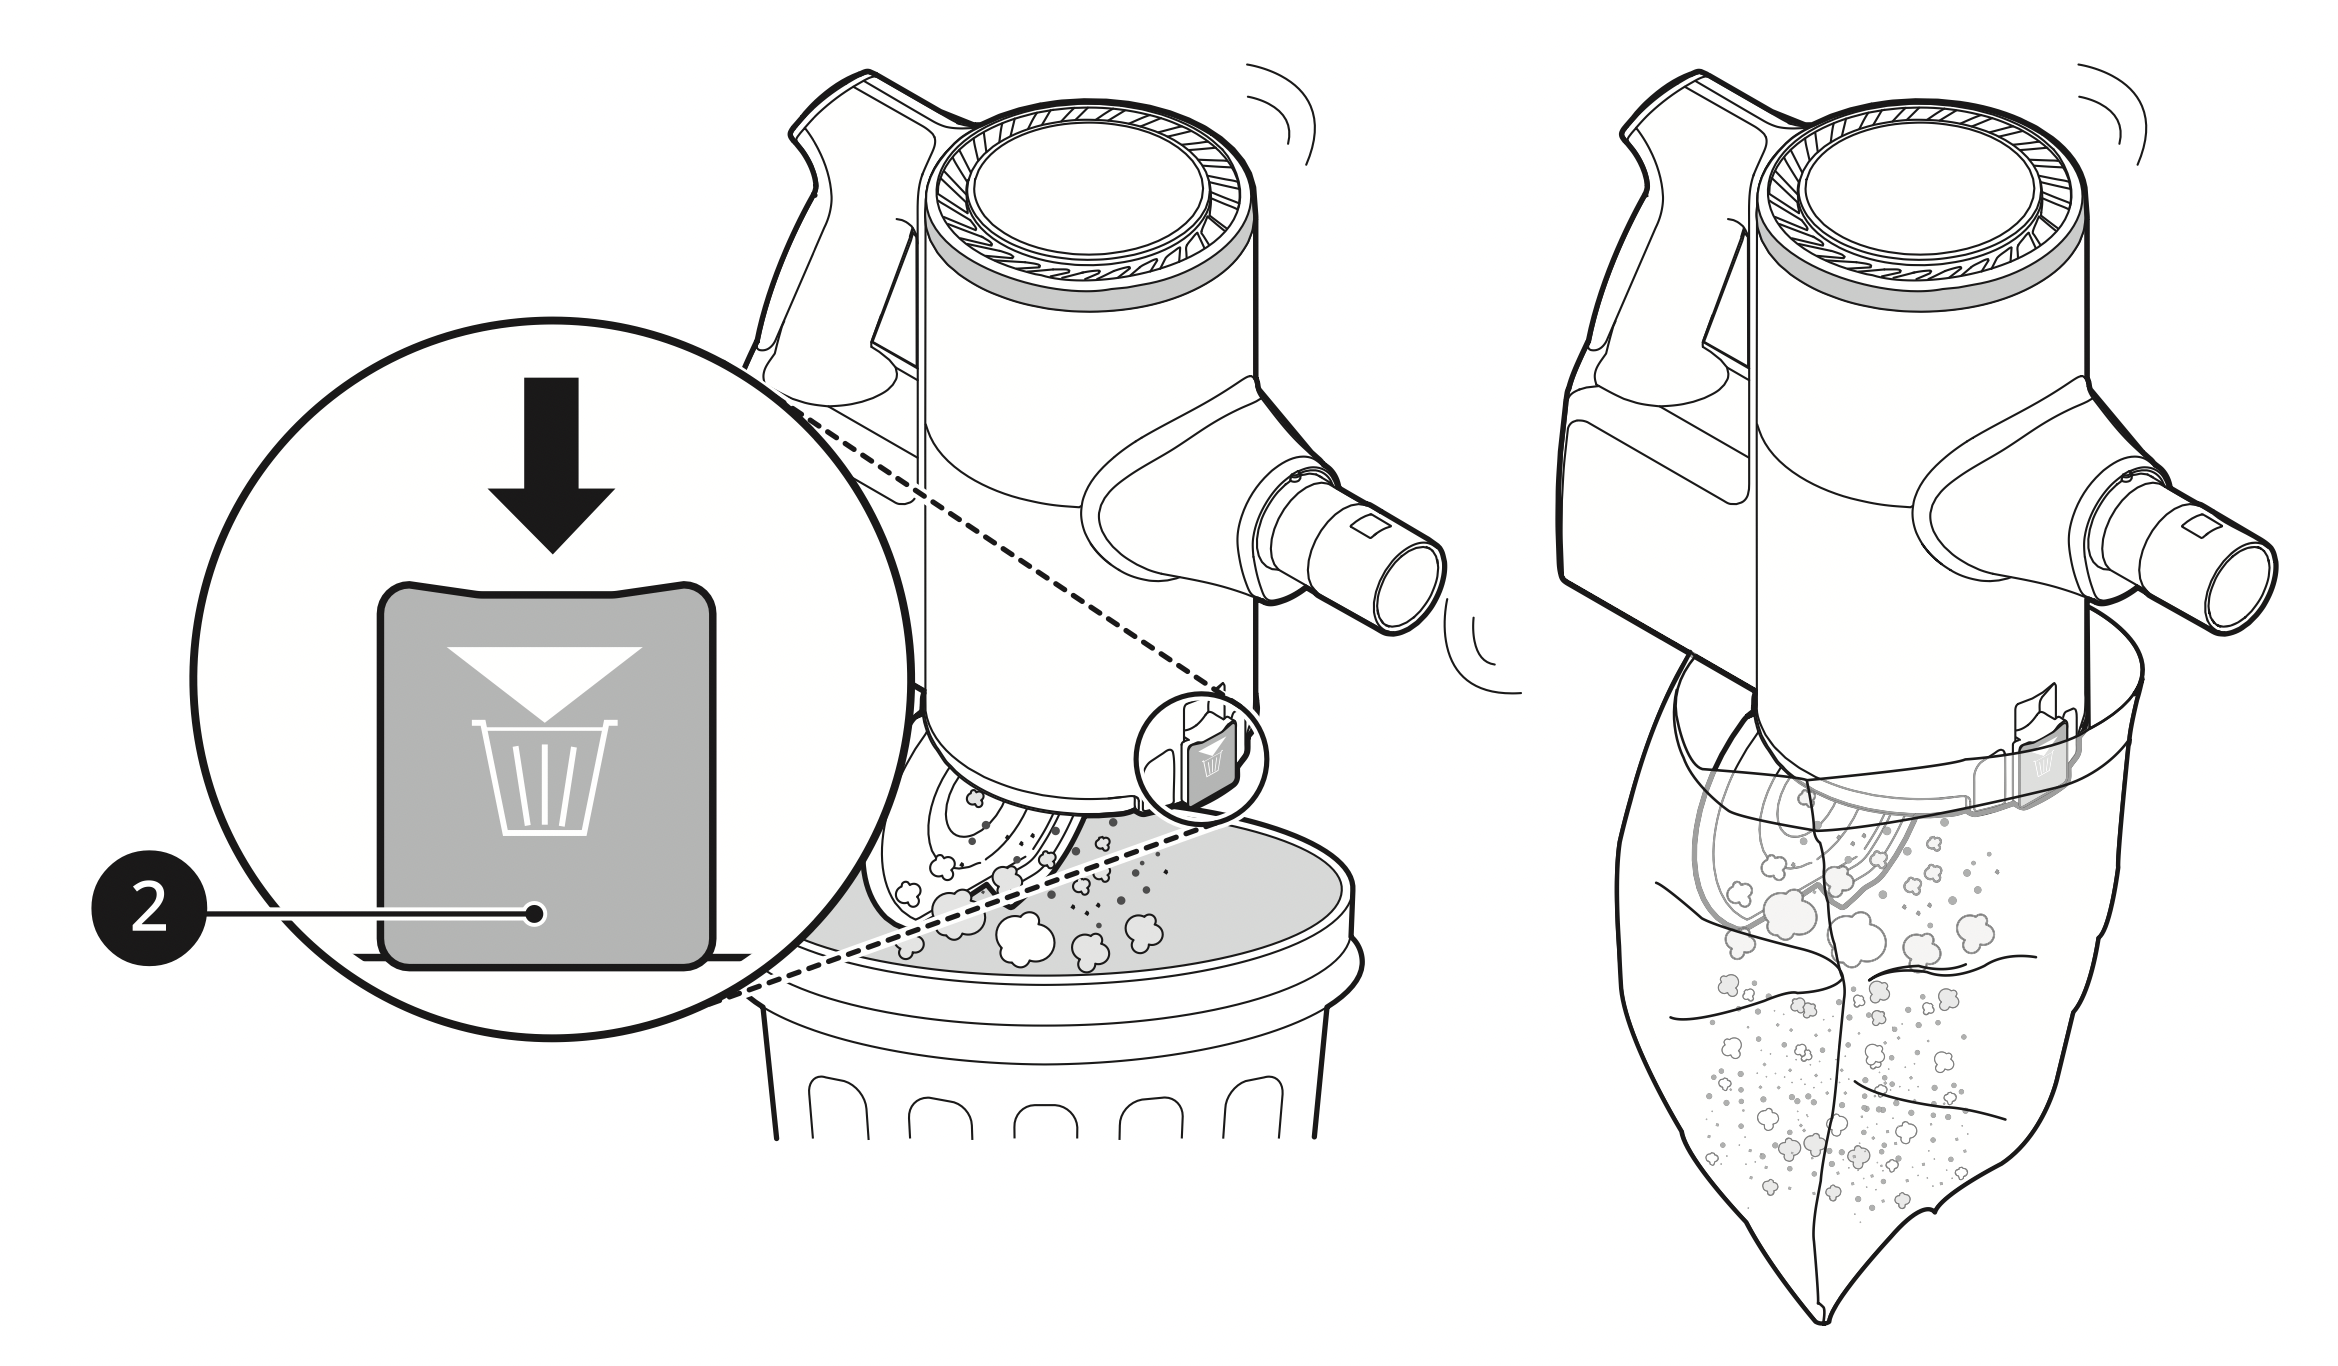
- Press the dust bin cover release button 2 to open the dust bin cover. Shake the dust bin to empty it.
Be careful as dust or foreign objects may spill out when opening the dust bin. Empty the dust bin into a wastebasket or where dust and foreign objects can be easily removed.
The dust bin can be wrapped in a plastic bag to contain the dust when emptying the dust bin.
WARNING
If the Kompressor lever does not slide down smoothly, foreign objects may be trapped between the dust bin and the cyclonic mesh filter. Clean the dust bin and cyclonic mesh filter to avoid product damage.
Do not force the Kompressor lever down if foreign objects are caught around the working plate of the Kompressor system. Doing so may cause product damage.
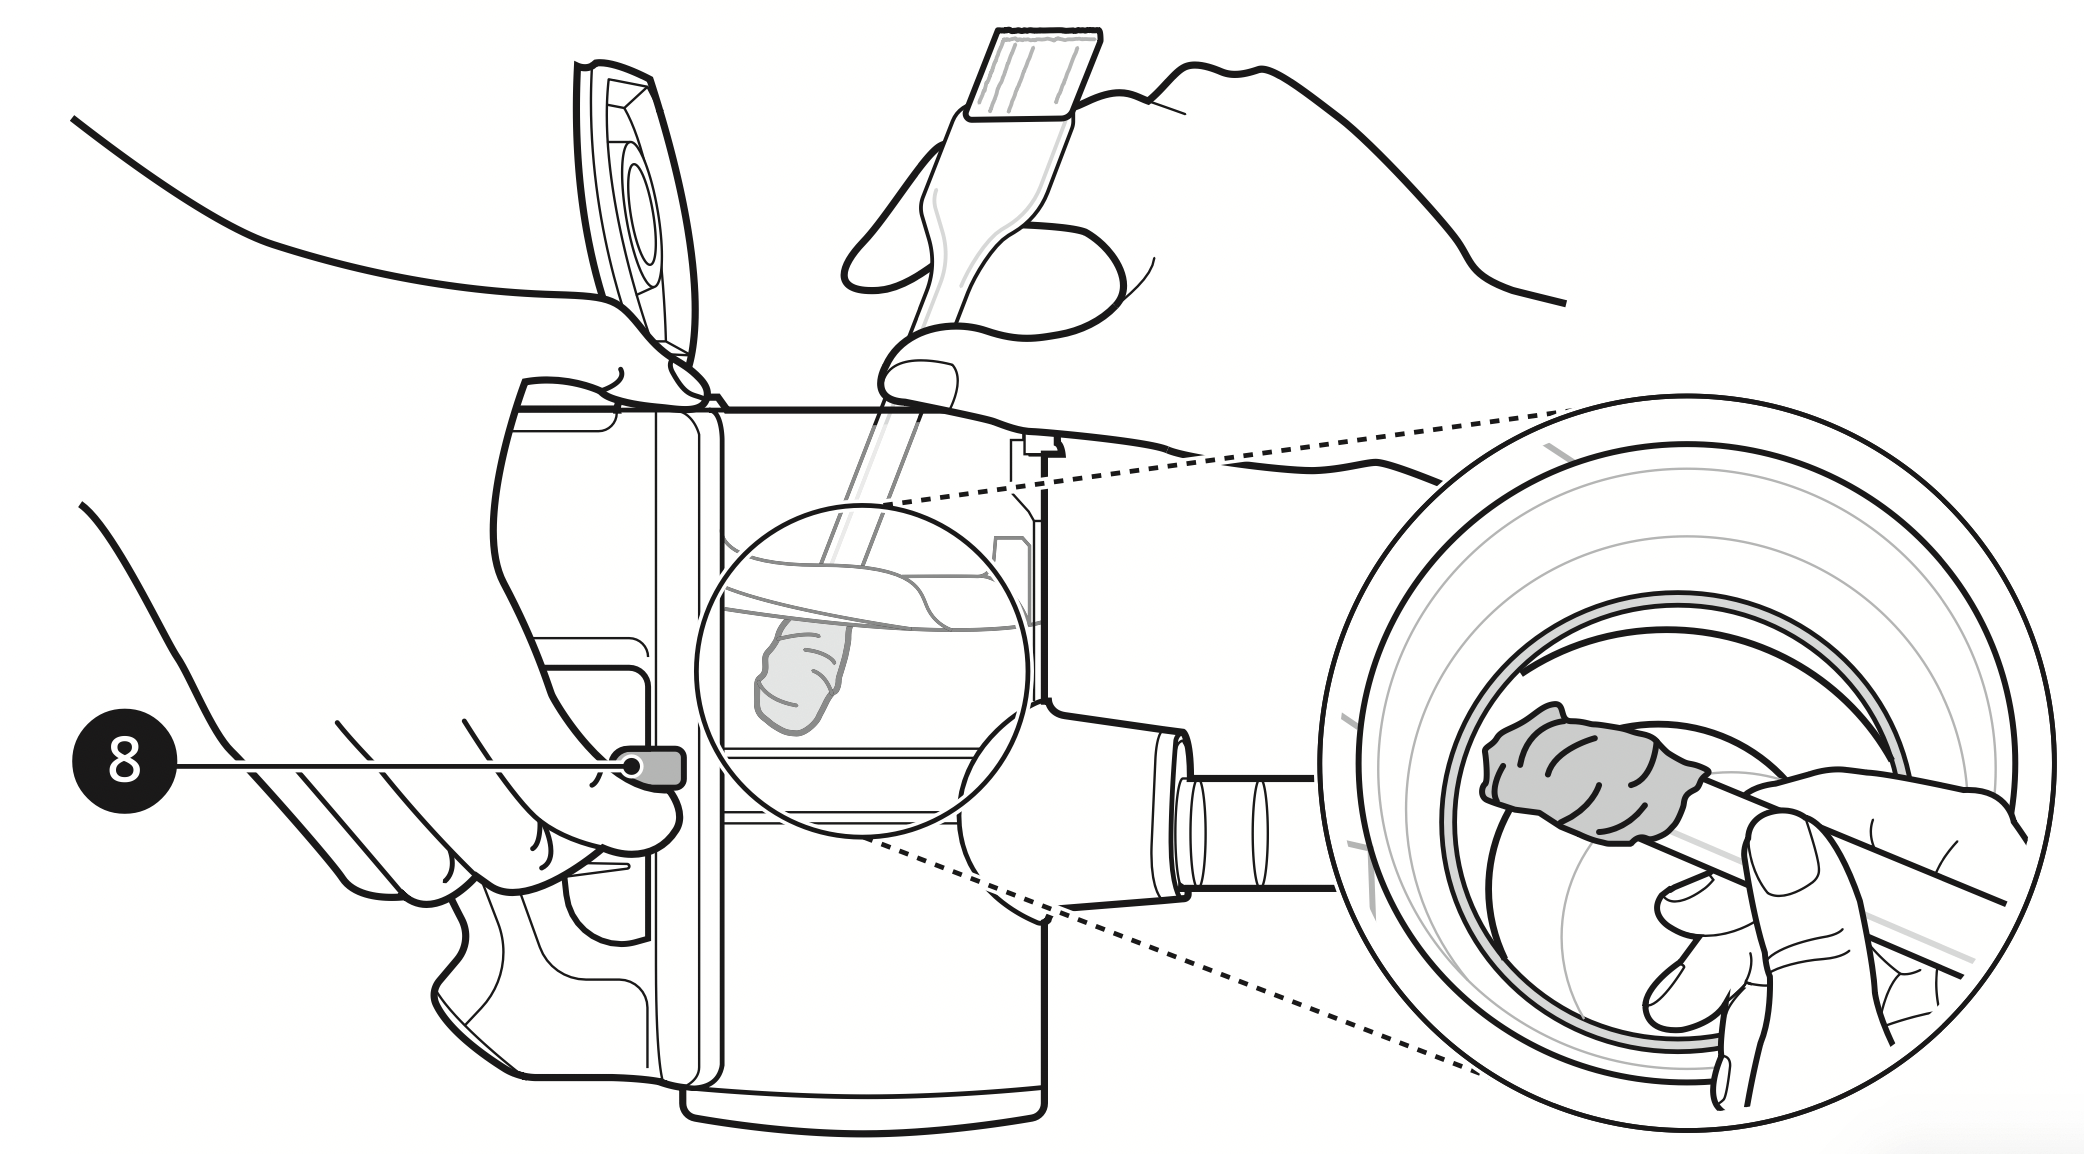
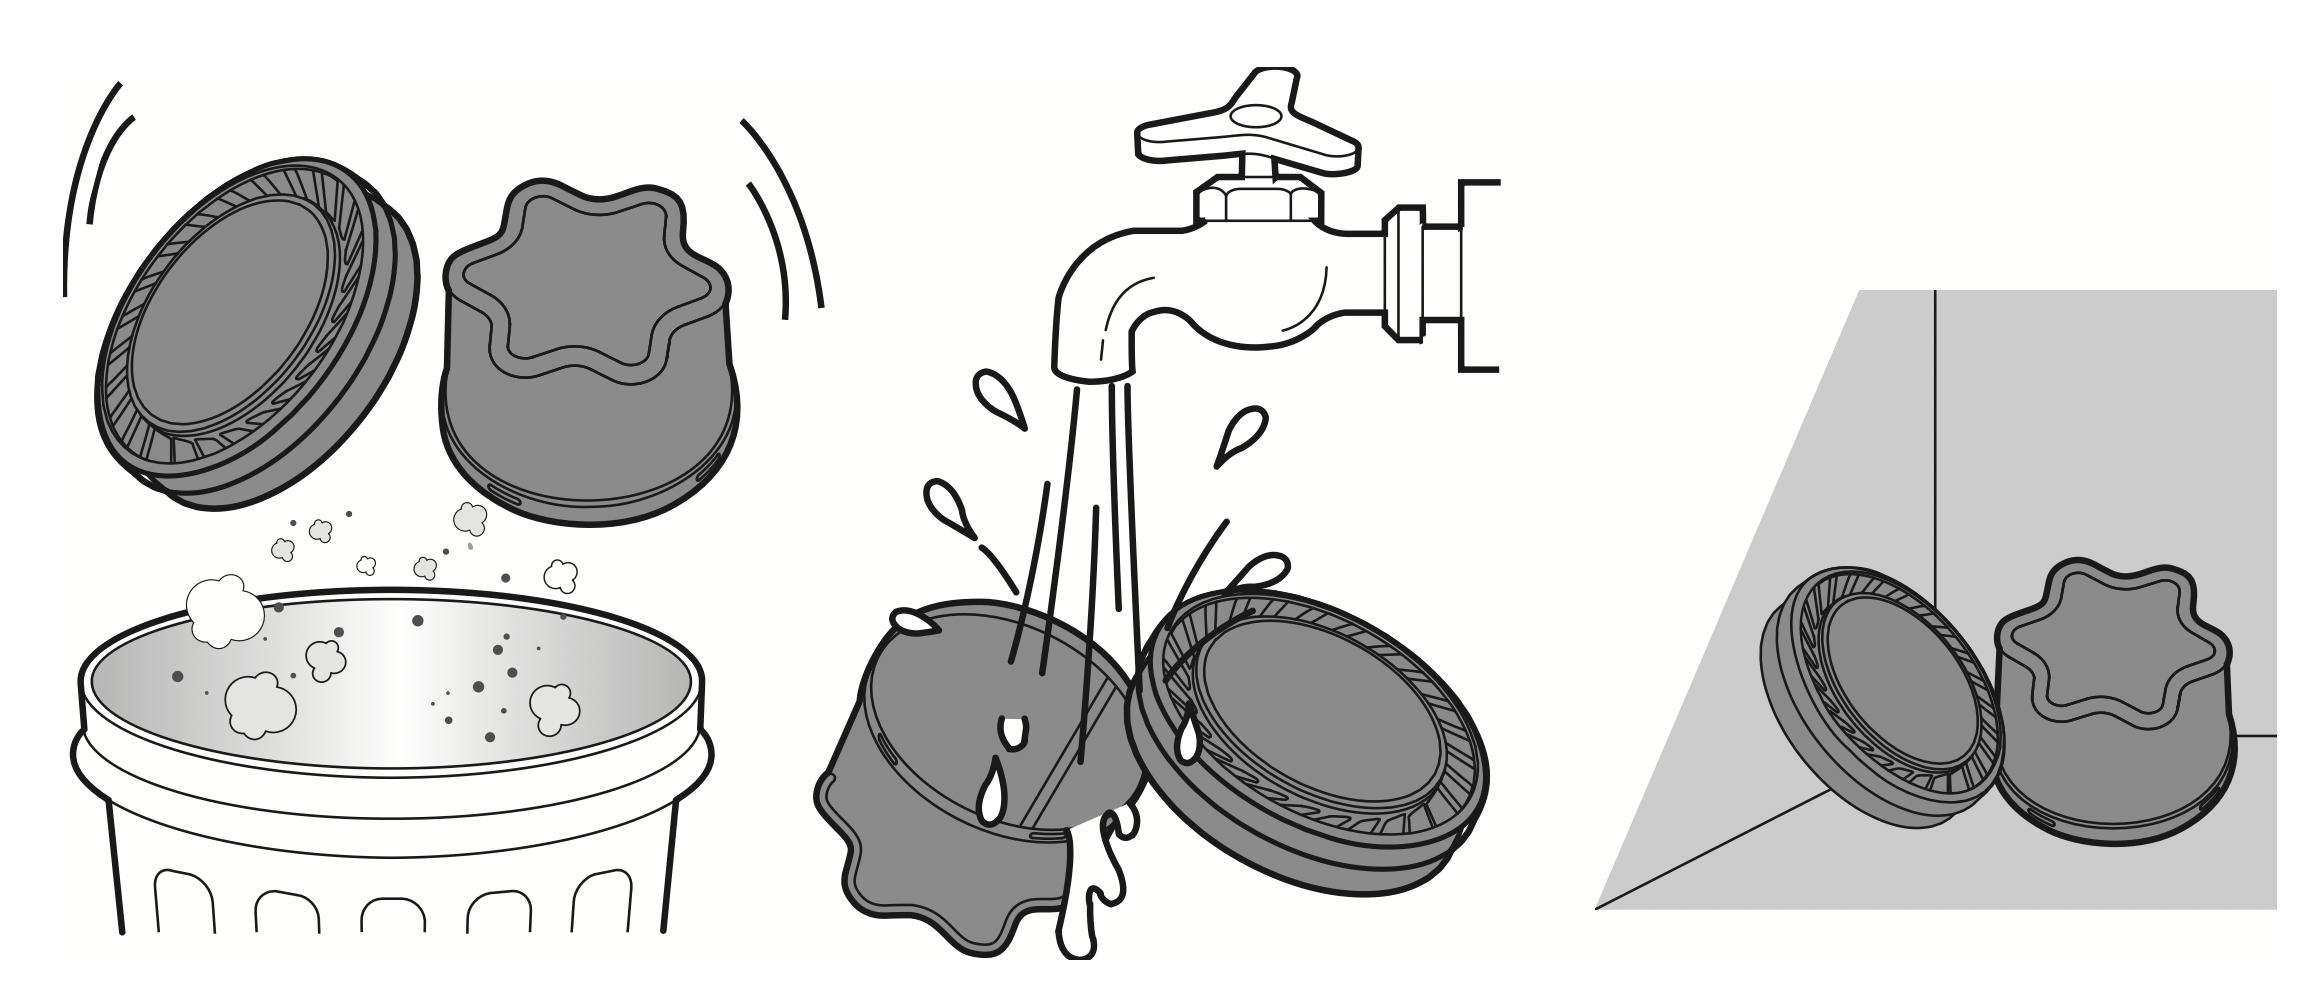
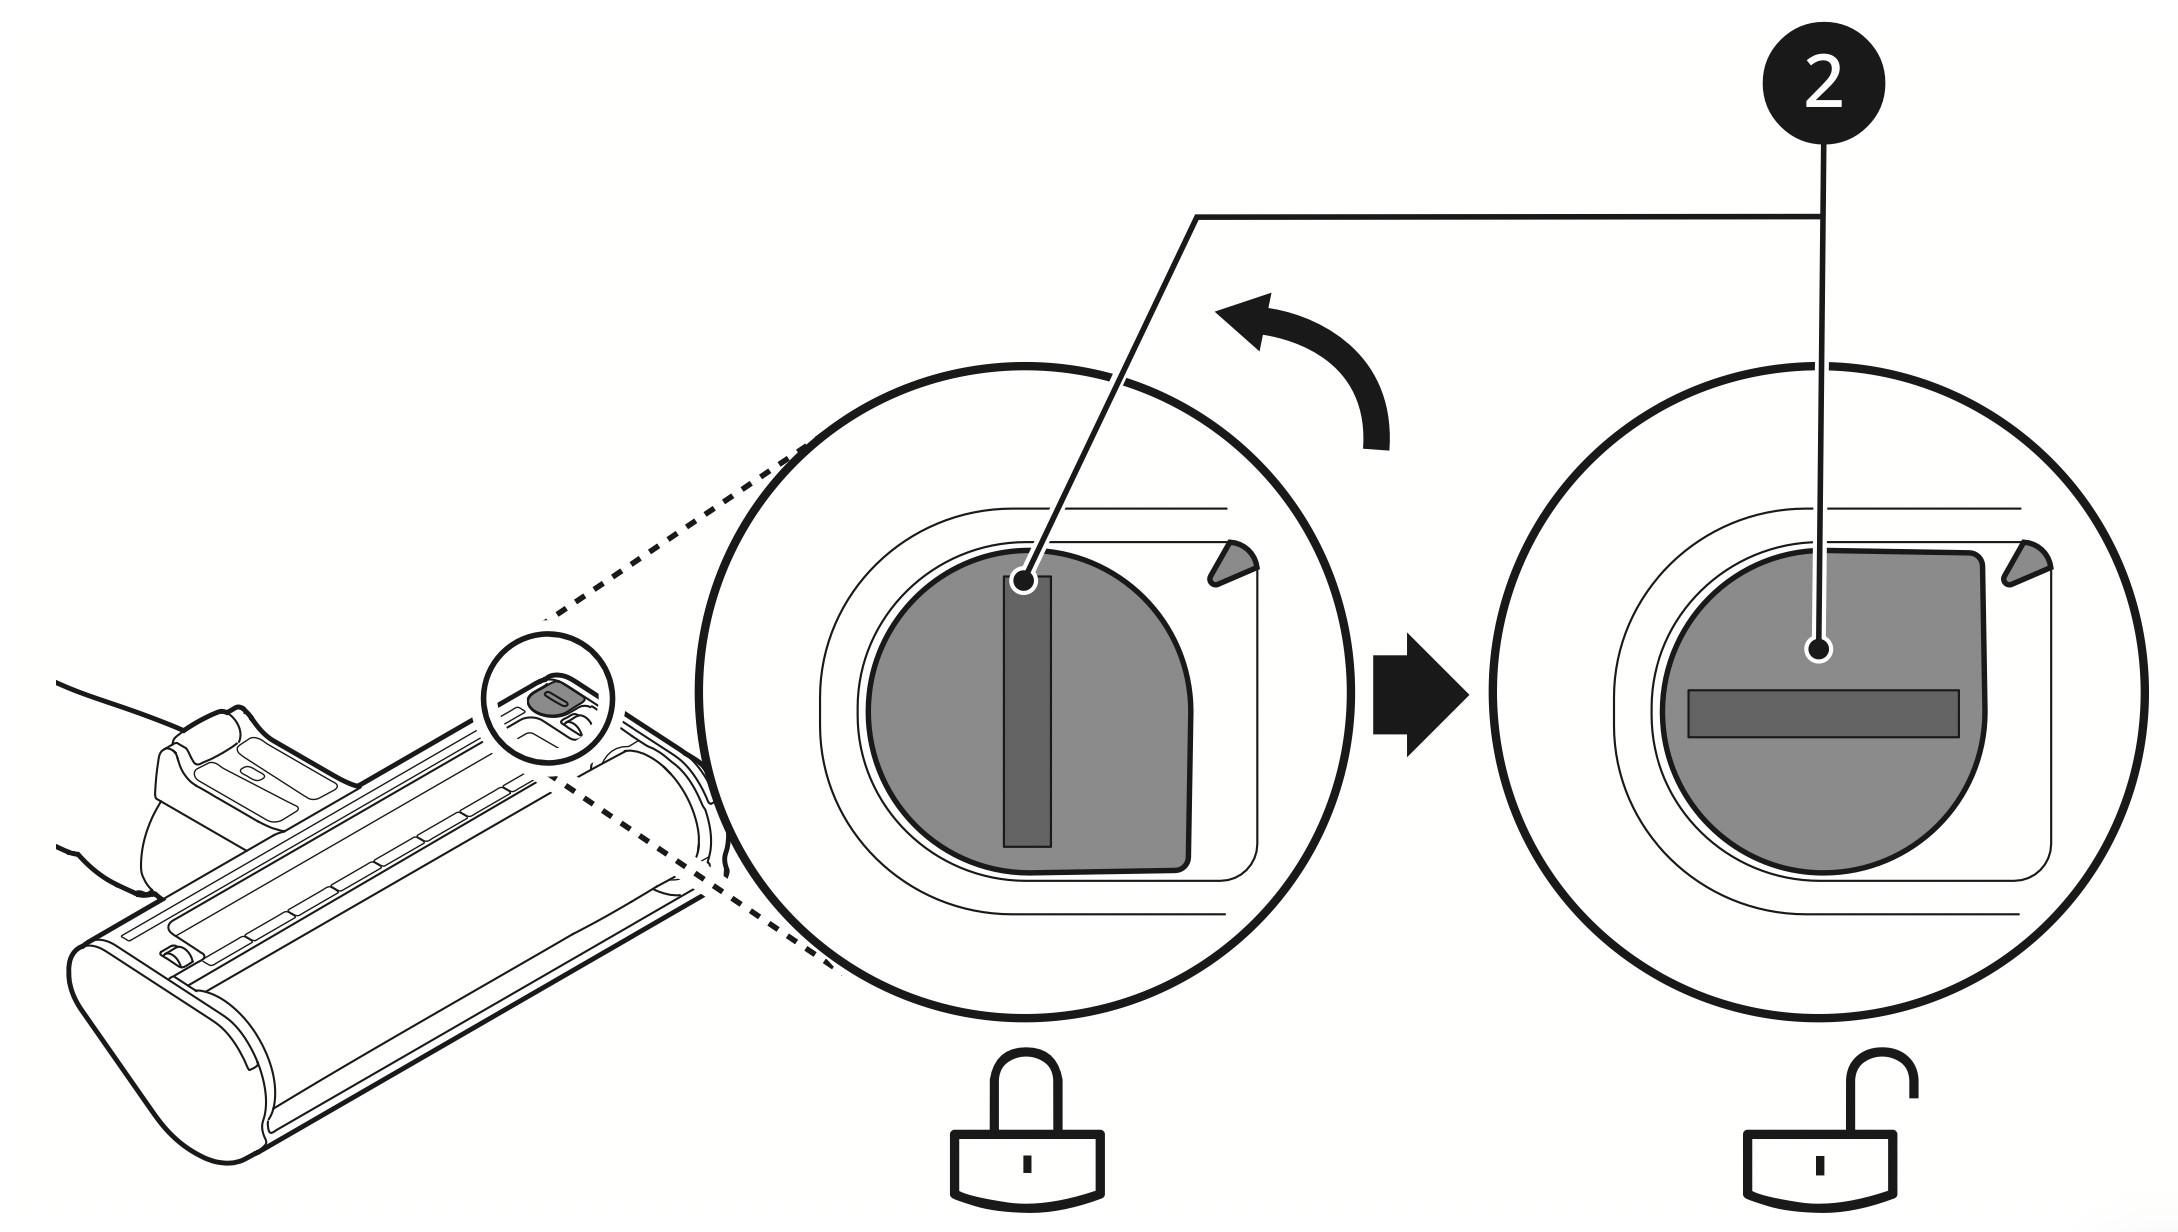
- Insert the crevice tool 4 into the cyclonic mesh filter 3 and turn it counterclockwise to remove the filter.
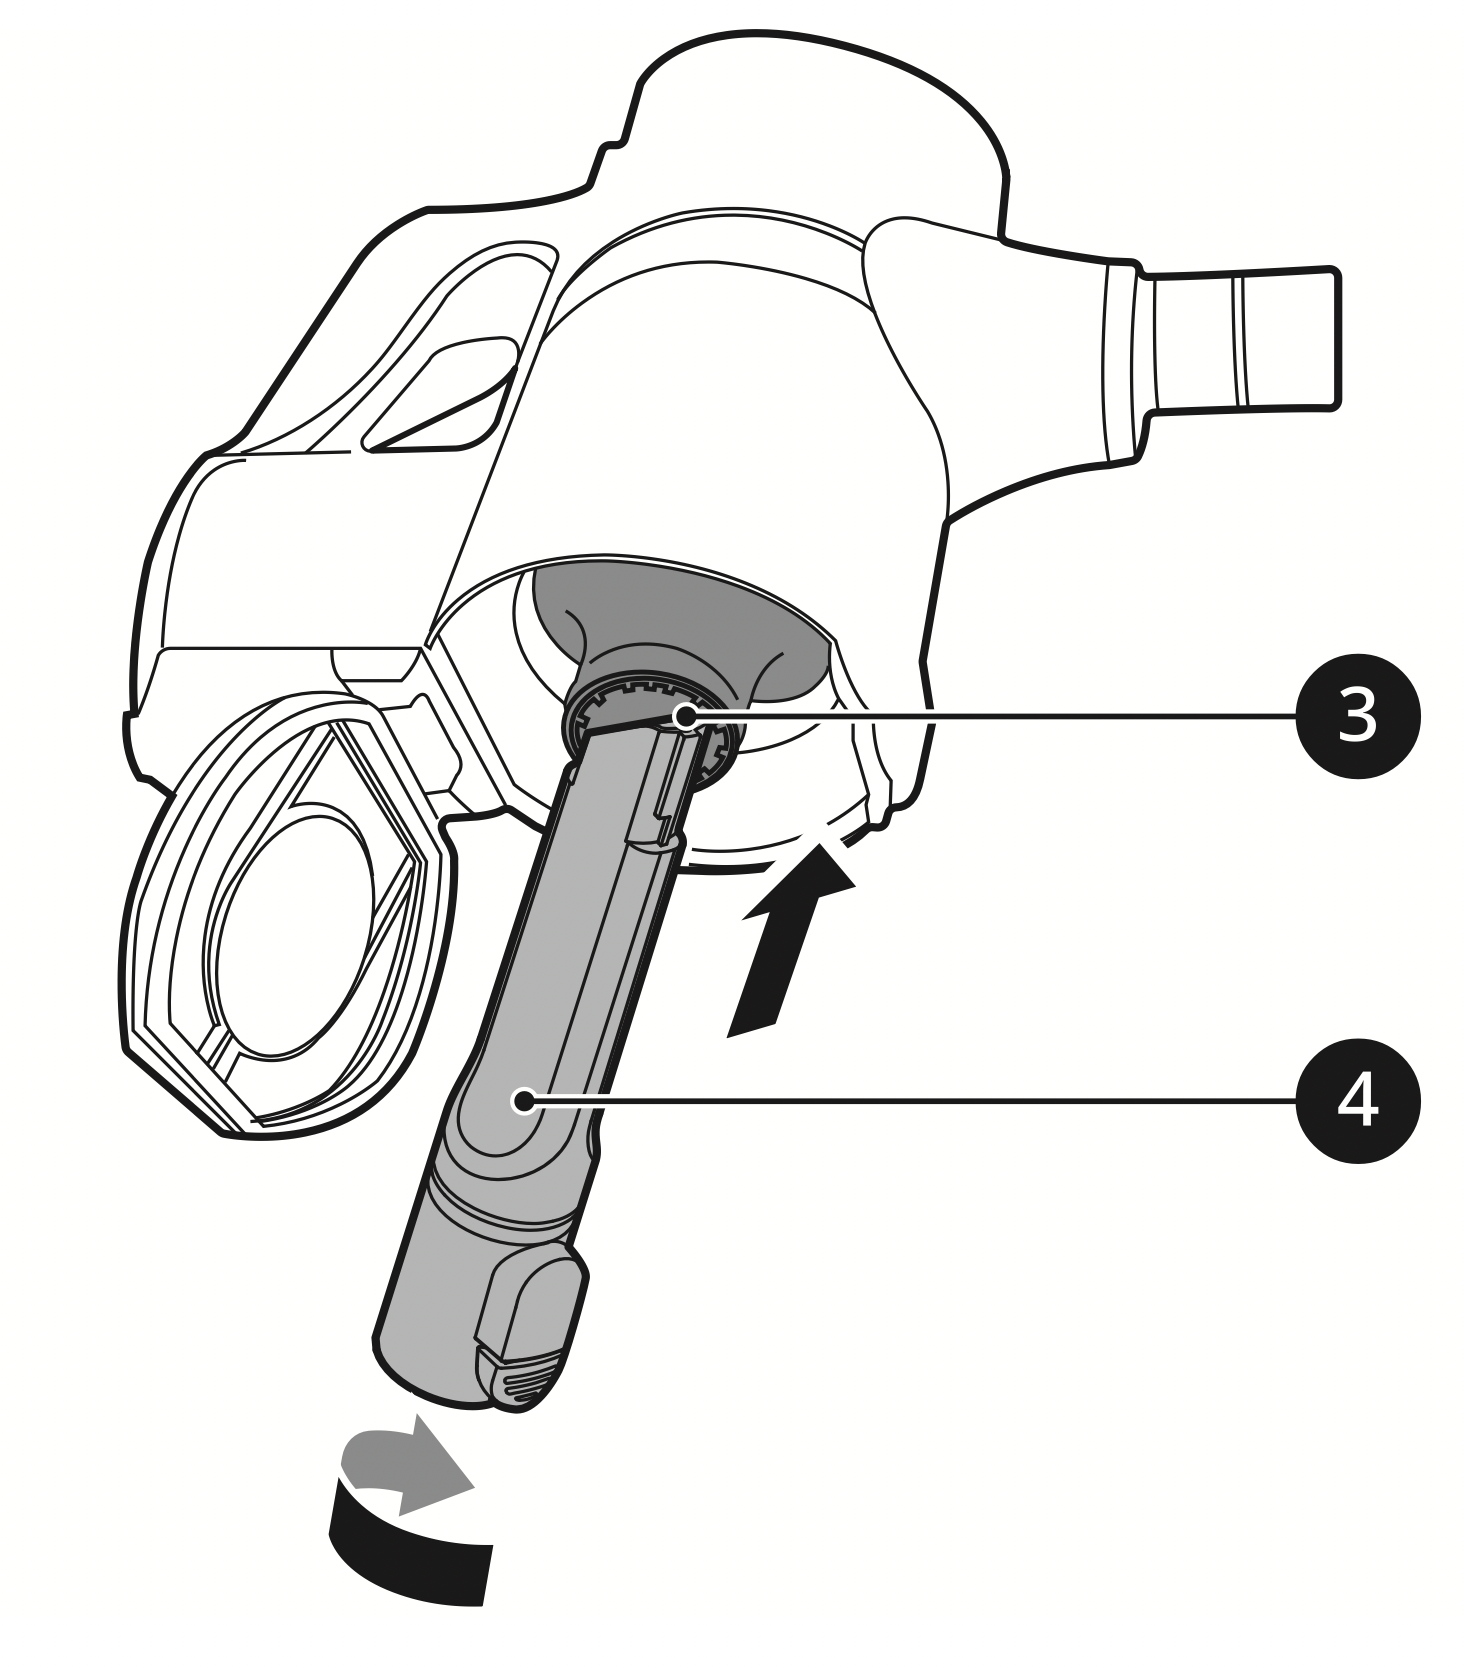
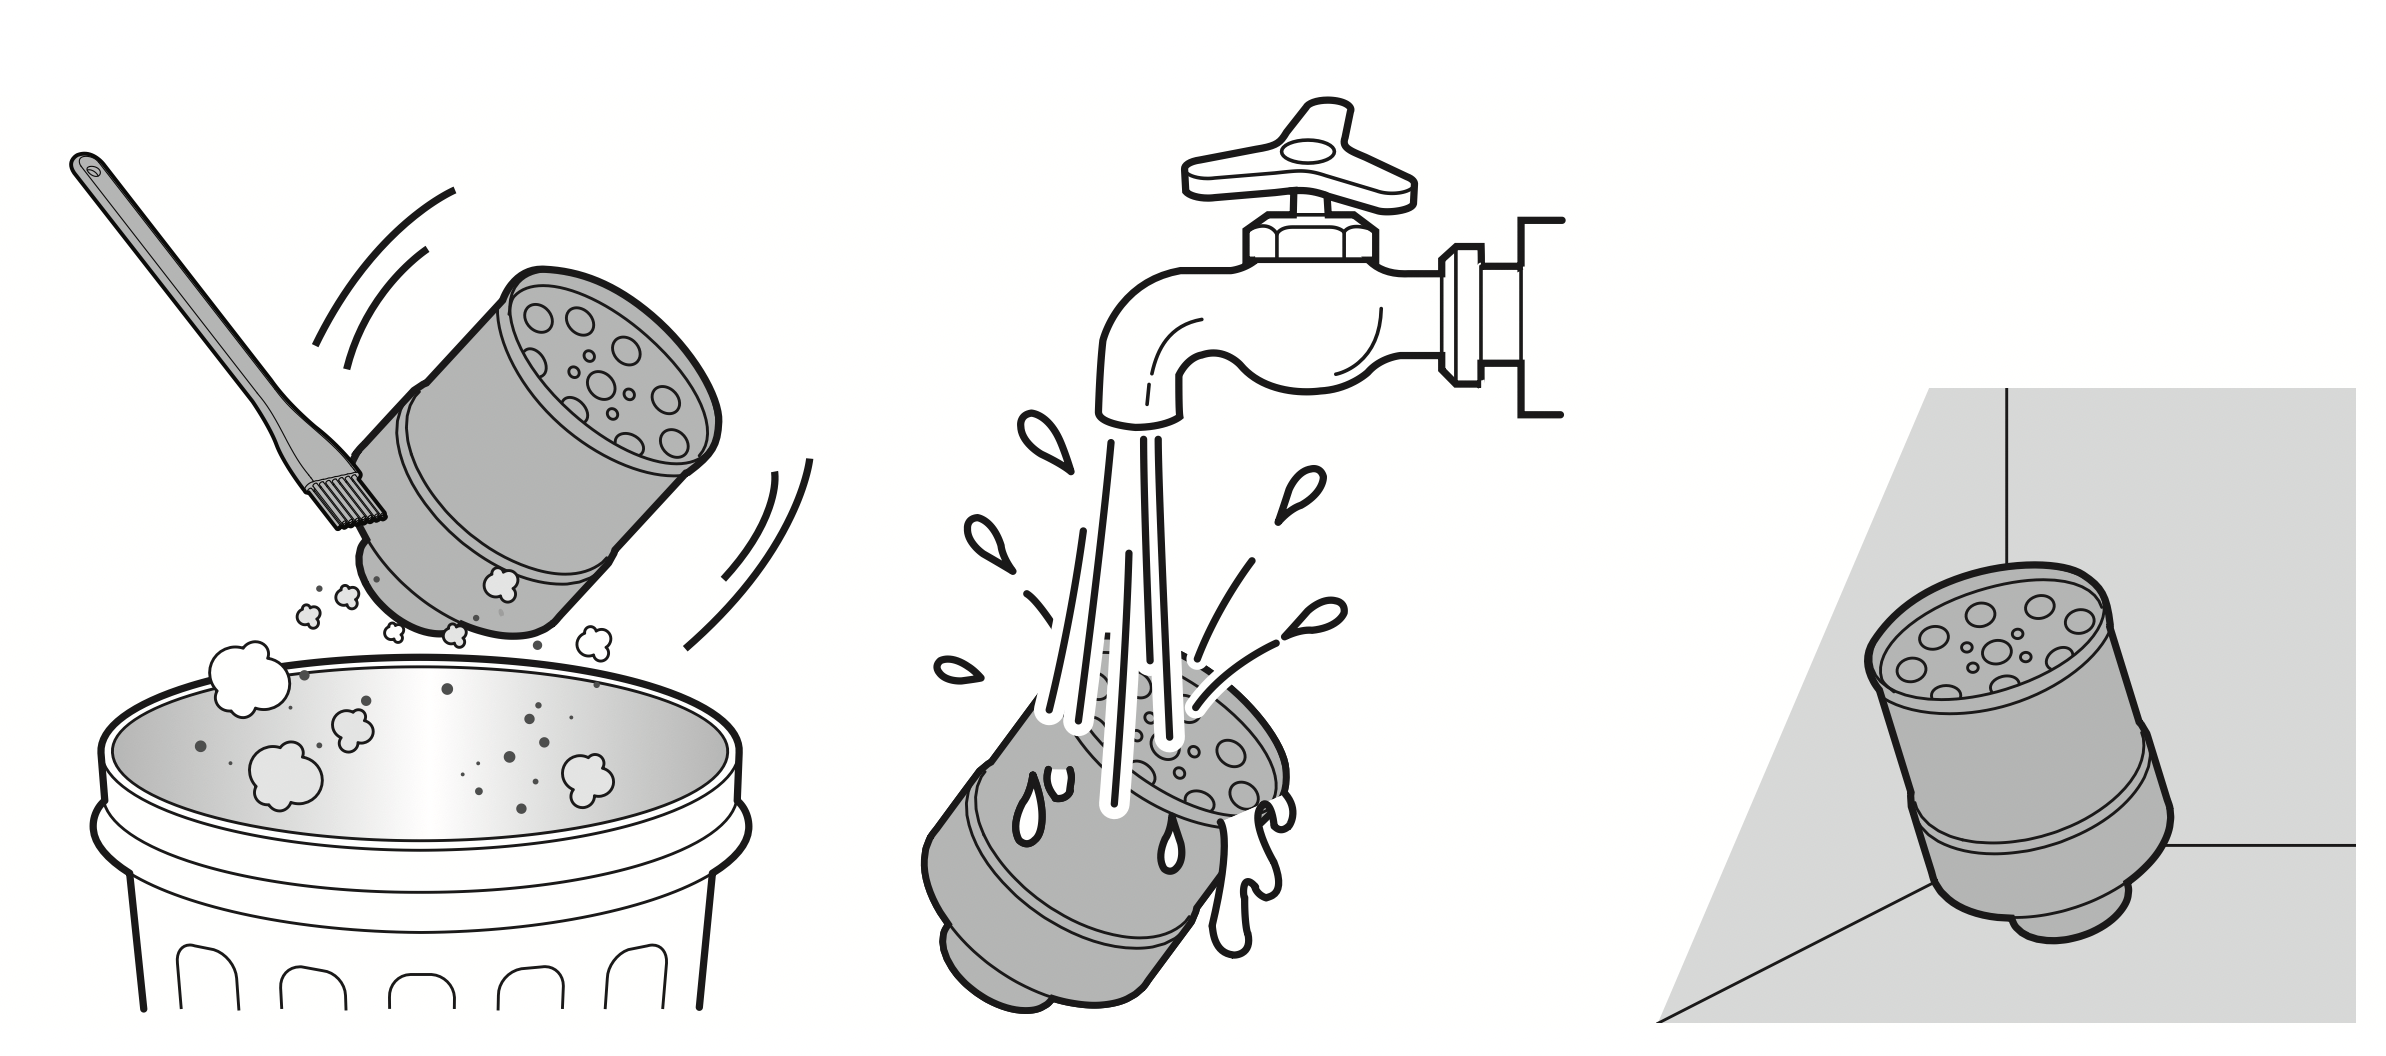
- Wash the cyclonic mesh filter under running water.
To avoid odor and the malfunction of the motor, allow the cyclonic mesh filter to dry completely in a well-ventilated area out of direct sunlight for at least 24 hours before reassembling.
- Use the combination tool 5 to clean out dust or foreign objects inside the dust bin.
Do not wash the product body or motor with water.

- Turn the product body over and lift the Kompressor lever 6 up to clean the inside of the working plate with the provided cleaning brush.
Do not push the Kompressor lever down hard. The working plate may be damaged.
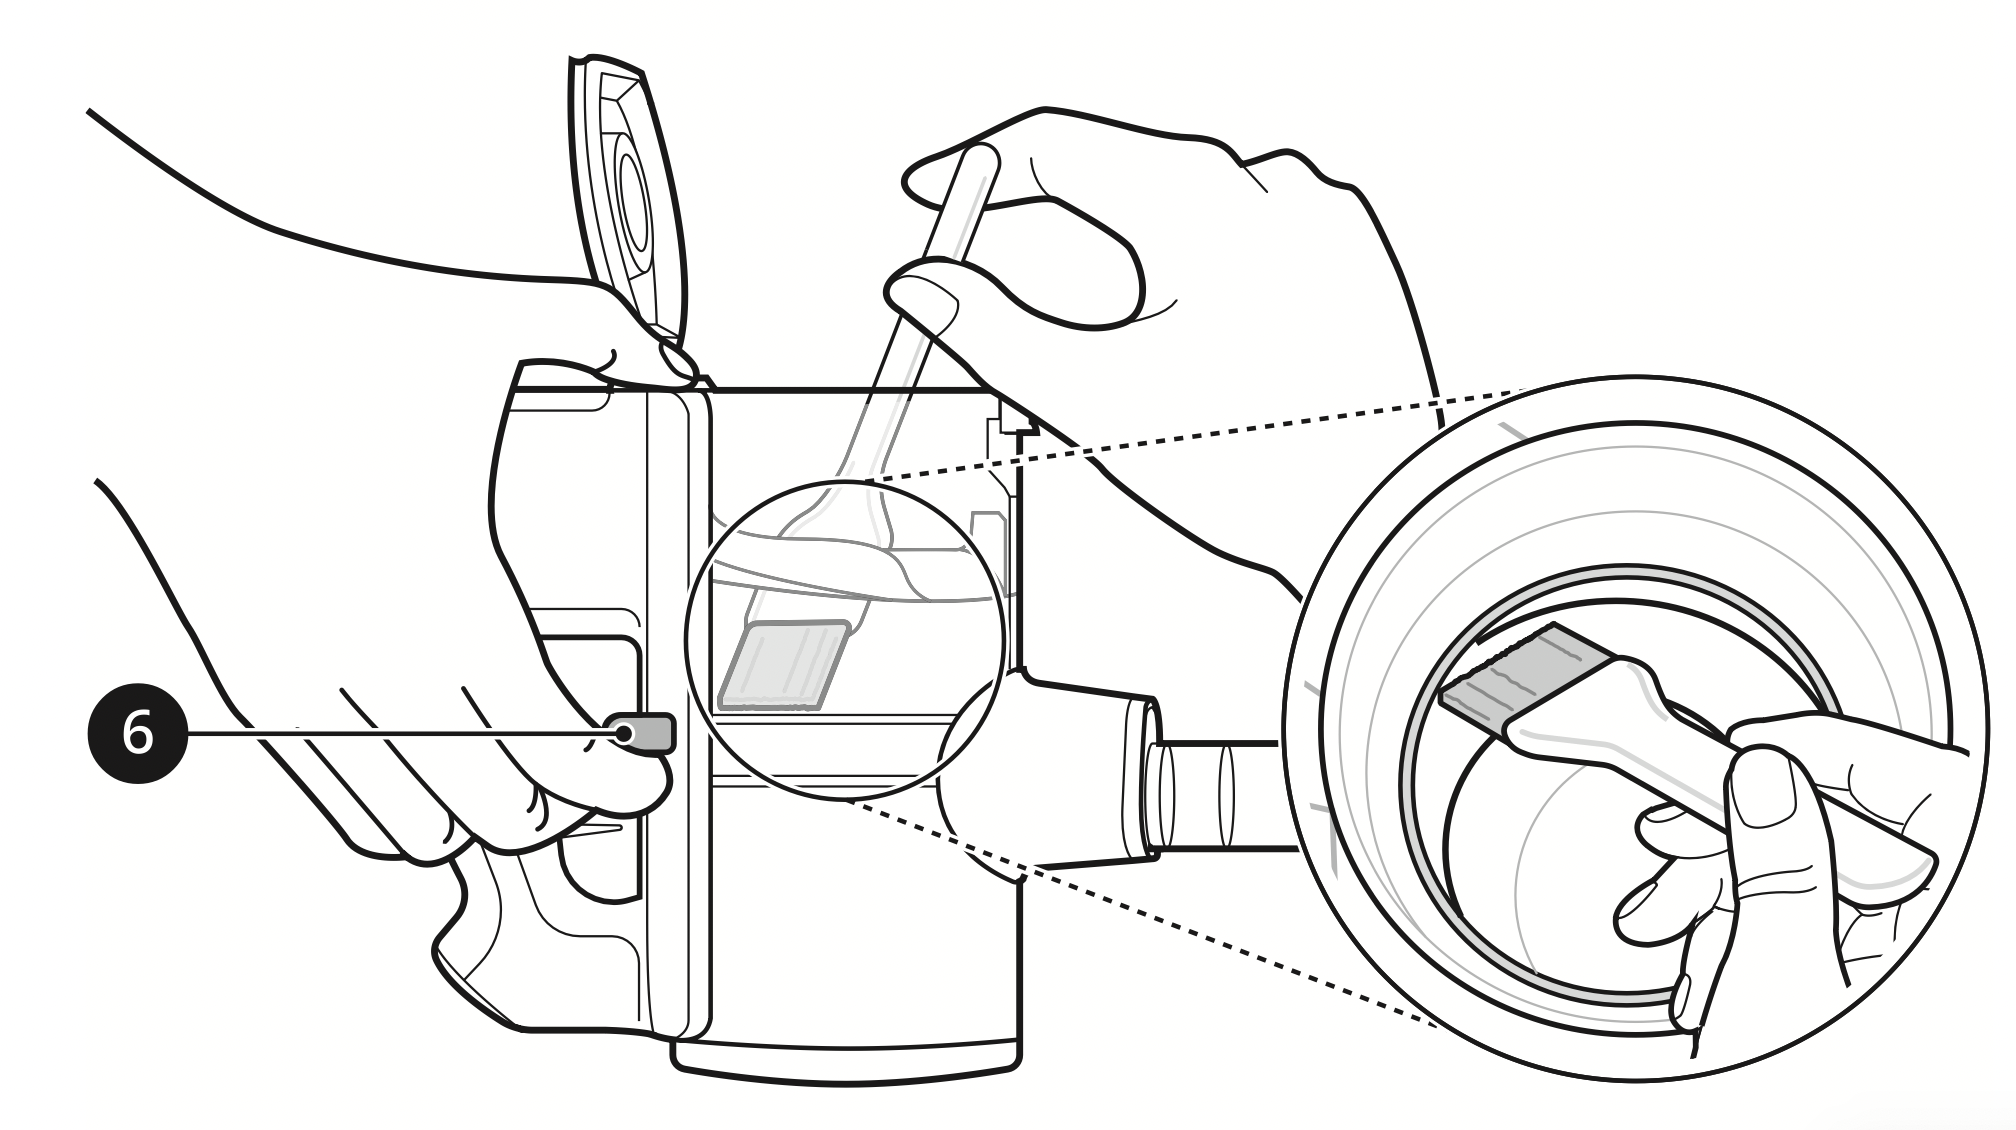
- Turn the product body over again and shake it while pressing down the lever to remove the dust.
- Wrap the provided cleaning brush with a wet paper towel, tucked into the slots 7 on the handle.
- Turn the product body over, lift the Kompressor lever 8 up, and clean the inside of the working plate with the towel-wrapped brush handle.
Cleaning the Filters
Clean the exhaust filter and the pre-filter when the filter cleaning icon  lights up.
- Clean the filters more frequently if the appliance is used regularly or in areas with a lot of dust.
CAUTION: Do not use the appliance without the exhaust filter and pre-filter installed. Doing so could result in product damage.
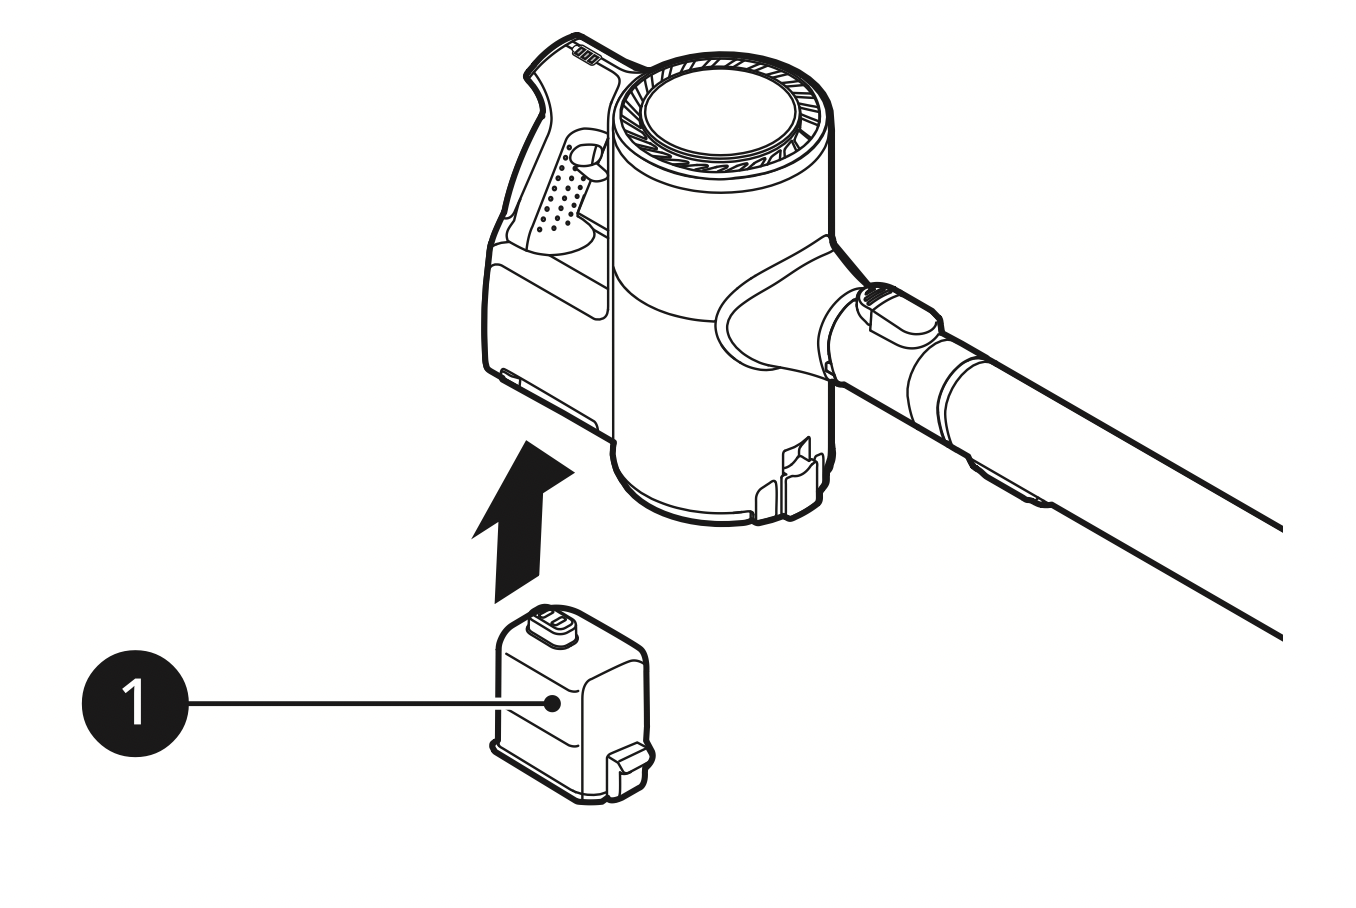
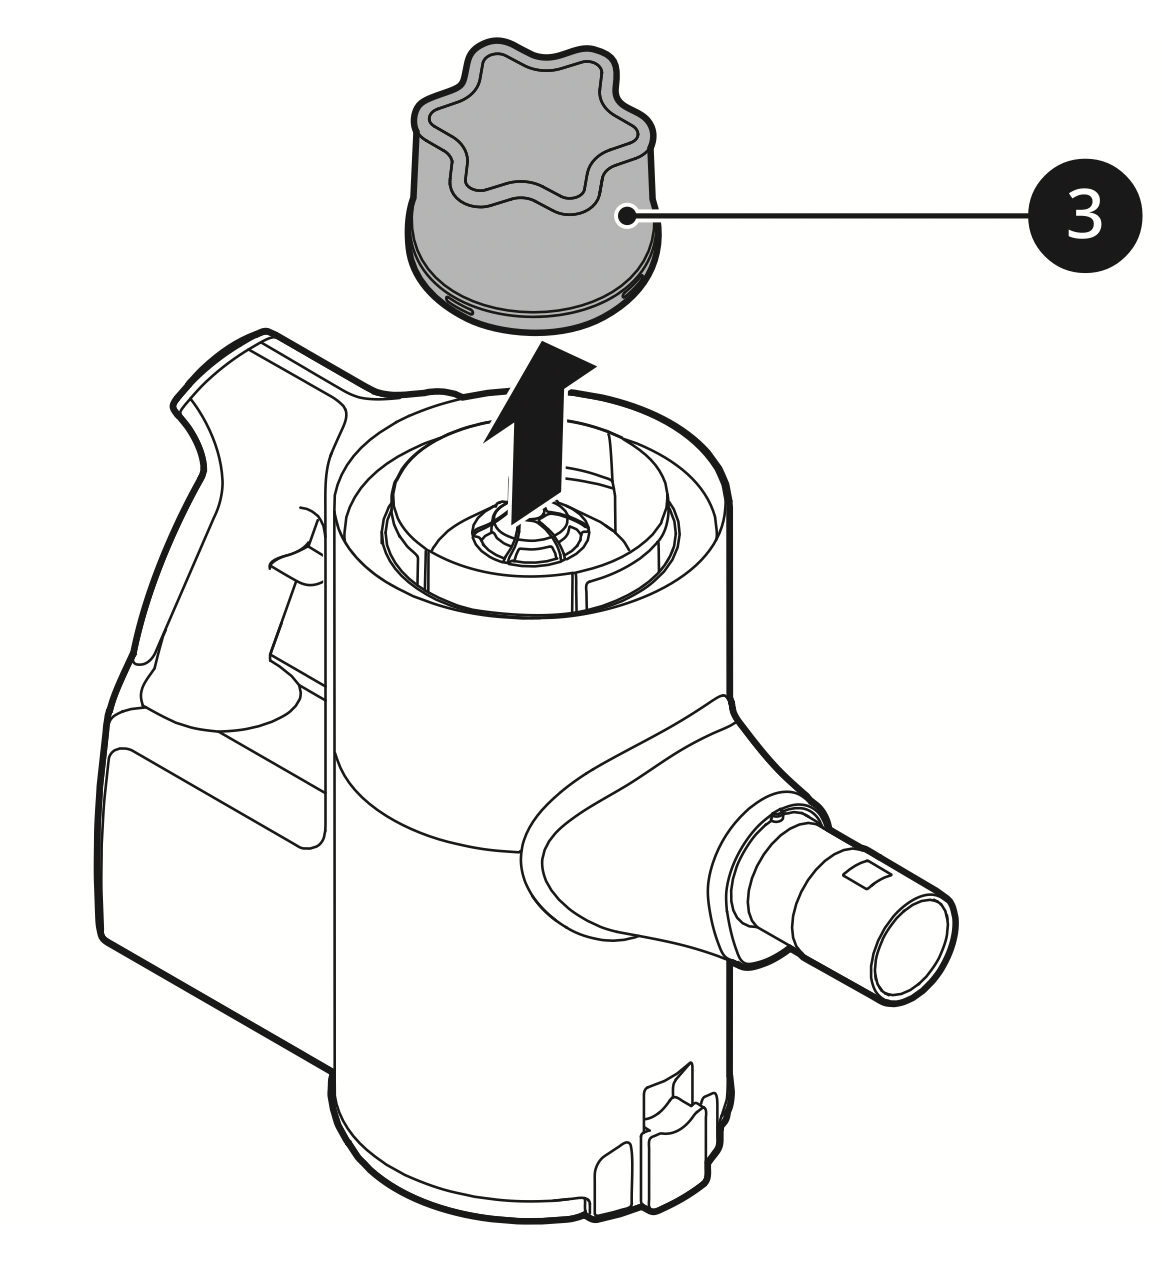
- Remove the battery from the product body.
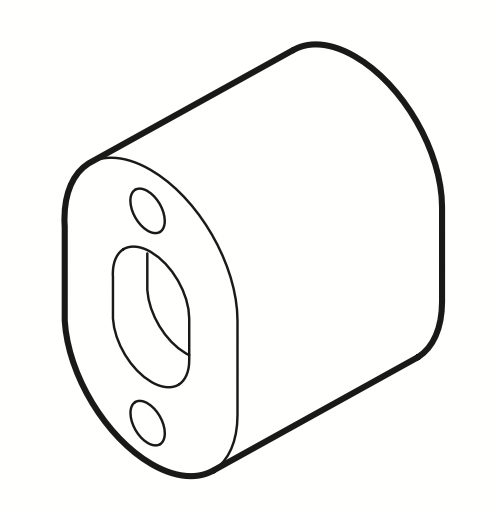
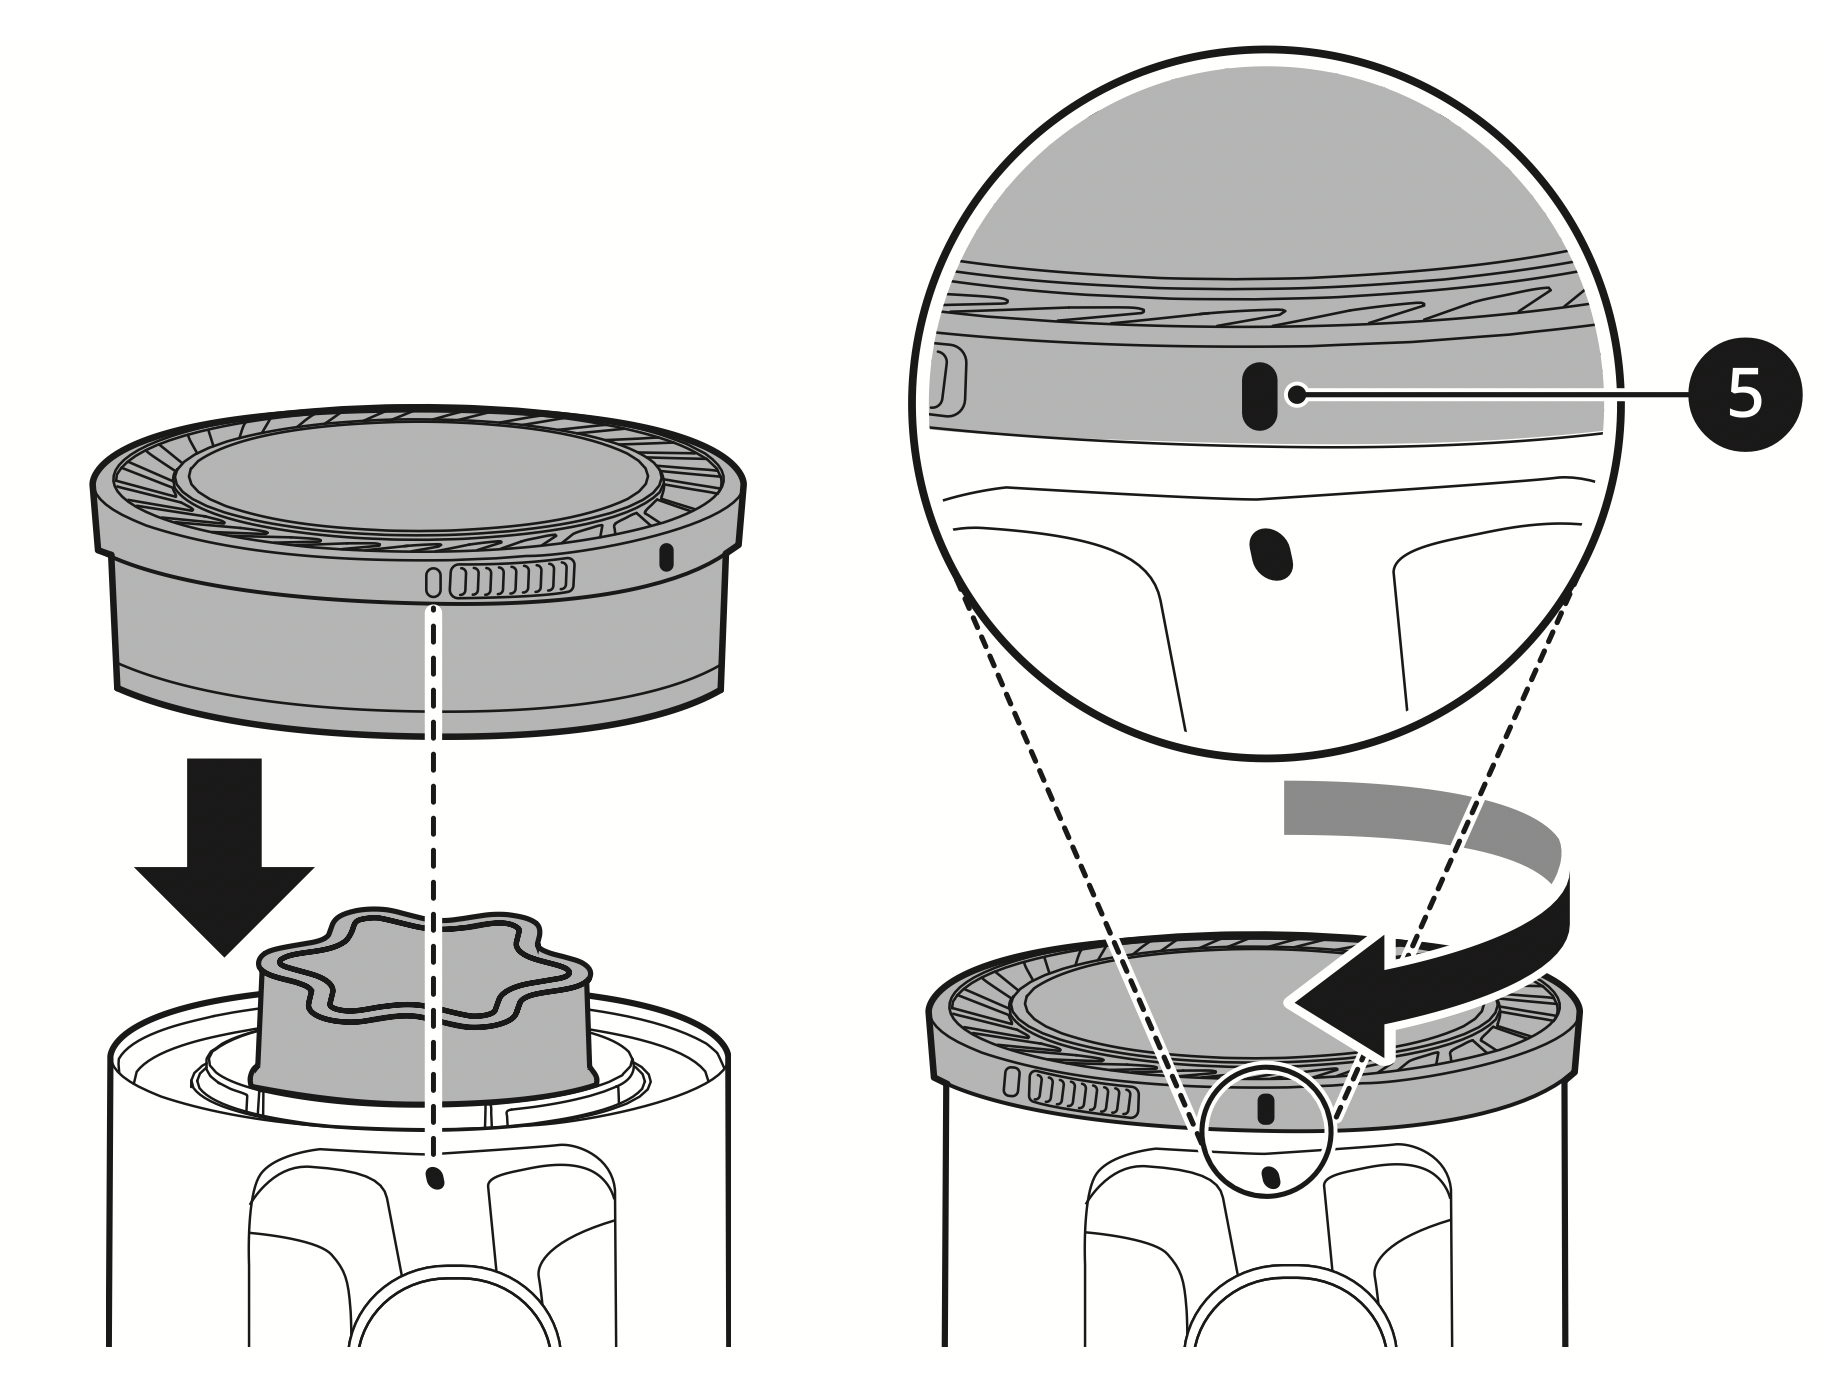
- Rotate the exhaust filter 1 to the unlocked position 2 to separate it from the product body.
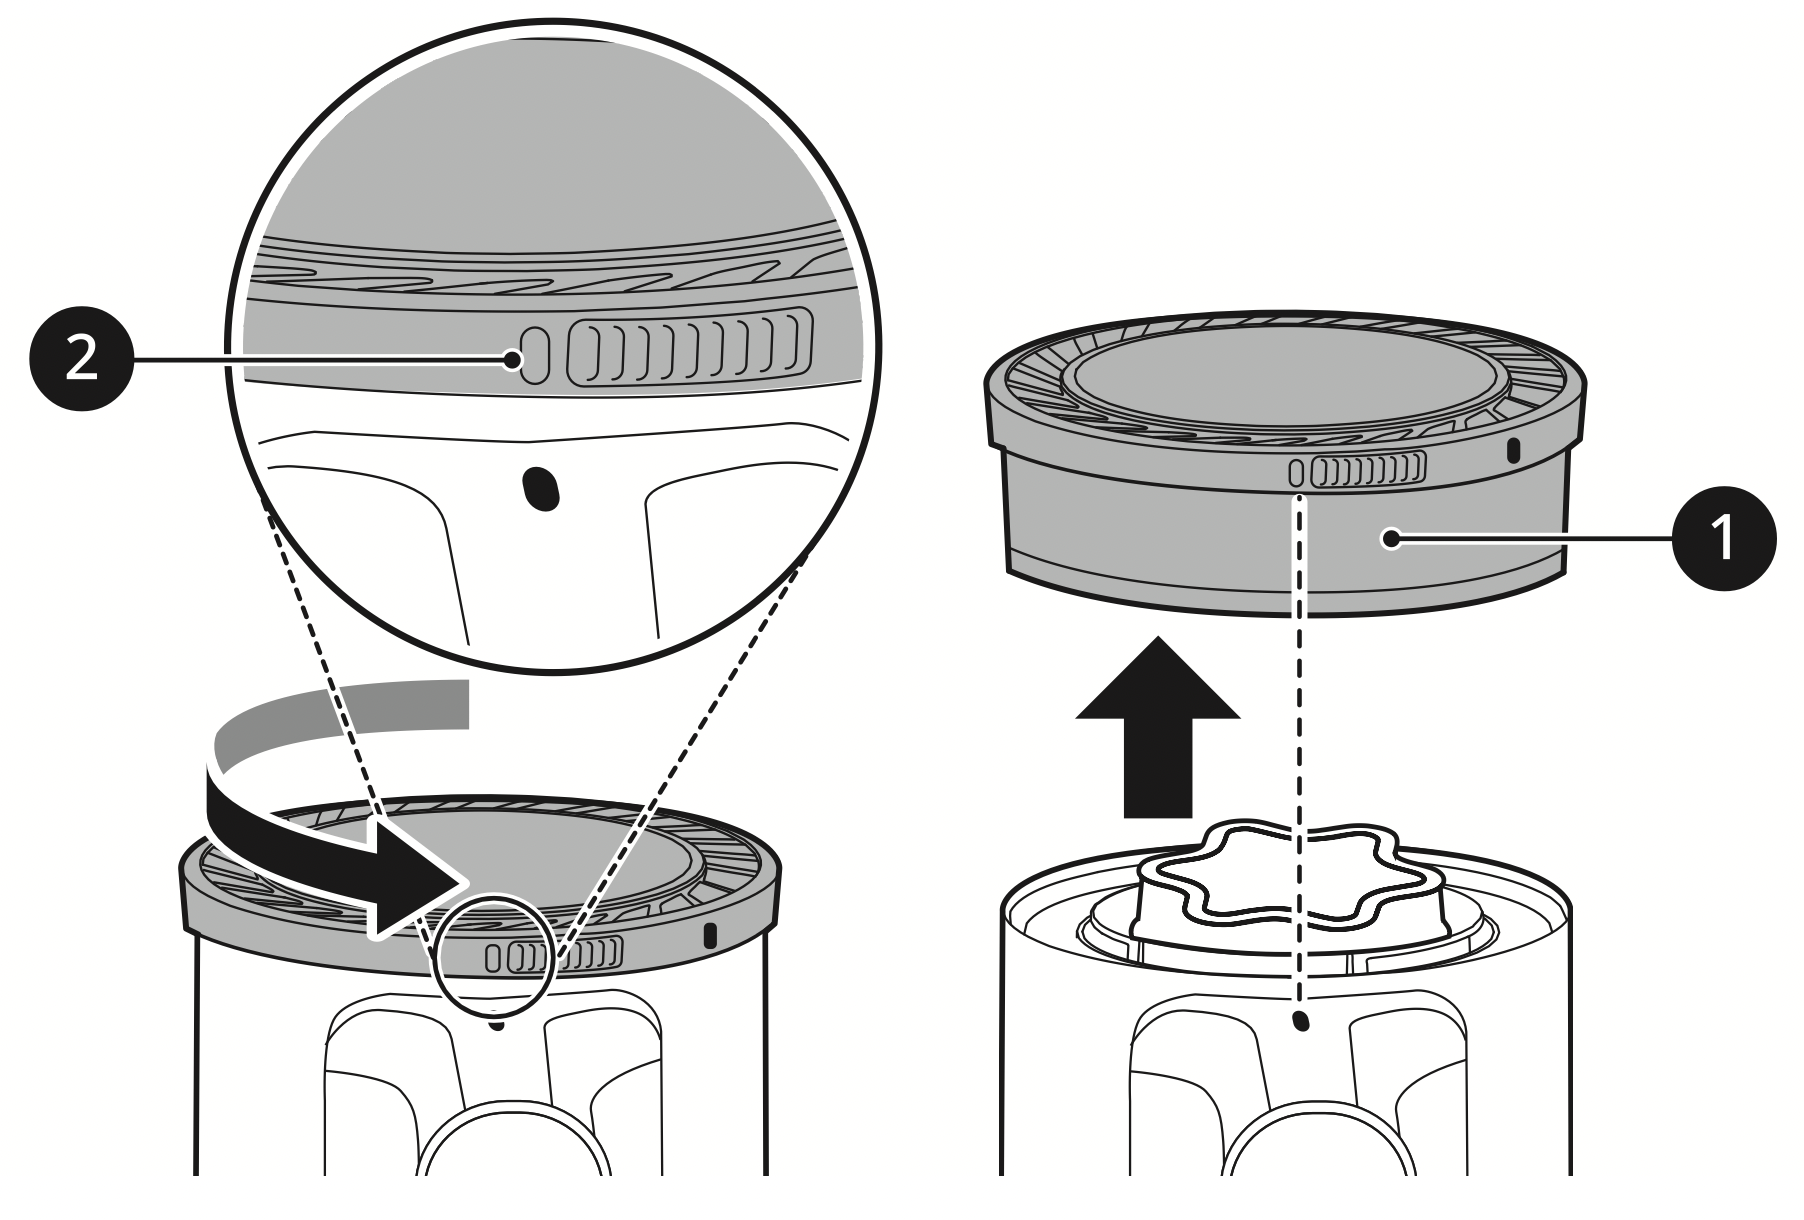
- Lift out the pre-filter 3 from the product body.
- Use the combination tool 4 to clean any dust off the motor.
Do not wash the motor with water.
- Clean filters by brushing the dust off and wash them in running water at least once a month.
To avoid odor and the malfunction of the motor, allow the exhaust filter to dry completely in a well-ventilated area out of direct sunlight for at least 24 hours before reassembling.
- Insert the dried pre-filter and rotate the exhaust filter to the locked position 5 to reassemble it on the product body.
Cleaning the Nozzle
Clean the nozzle and rotating brush regularly.
CAUTION
- Always separate the nozzle from the product body or remove the battery before cleaning. If the nozzle starts to operate during cleaning, it could cause an injury.
- Keep fingers away from pinch points when assembling the nozzle on the appliance or the rotating brush on the nozzle.
- Do not use the rotating brush as a wet mop. It may cause product damage.
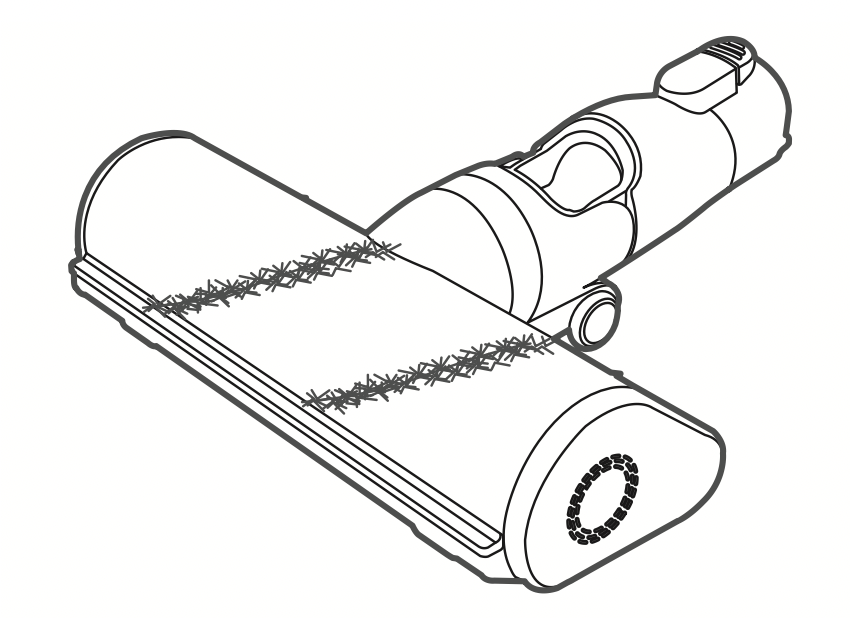
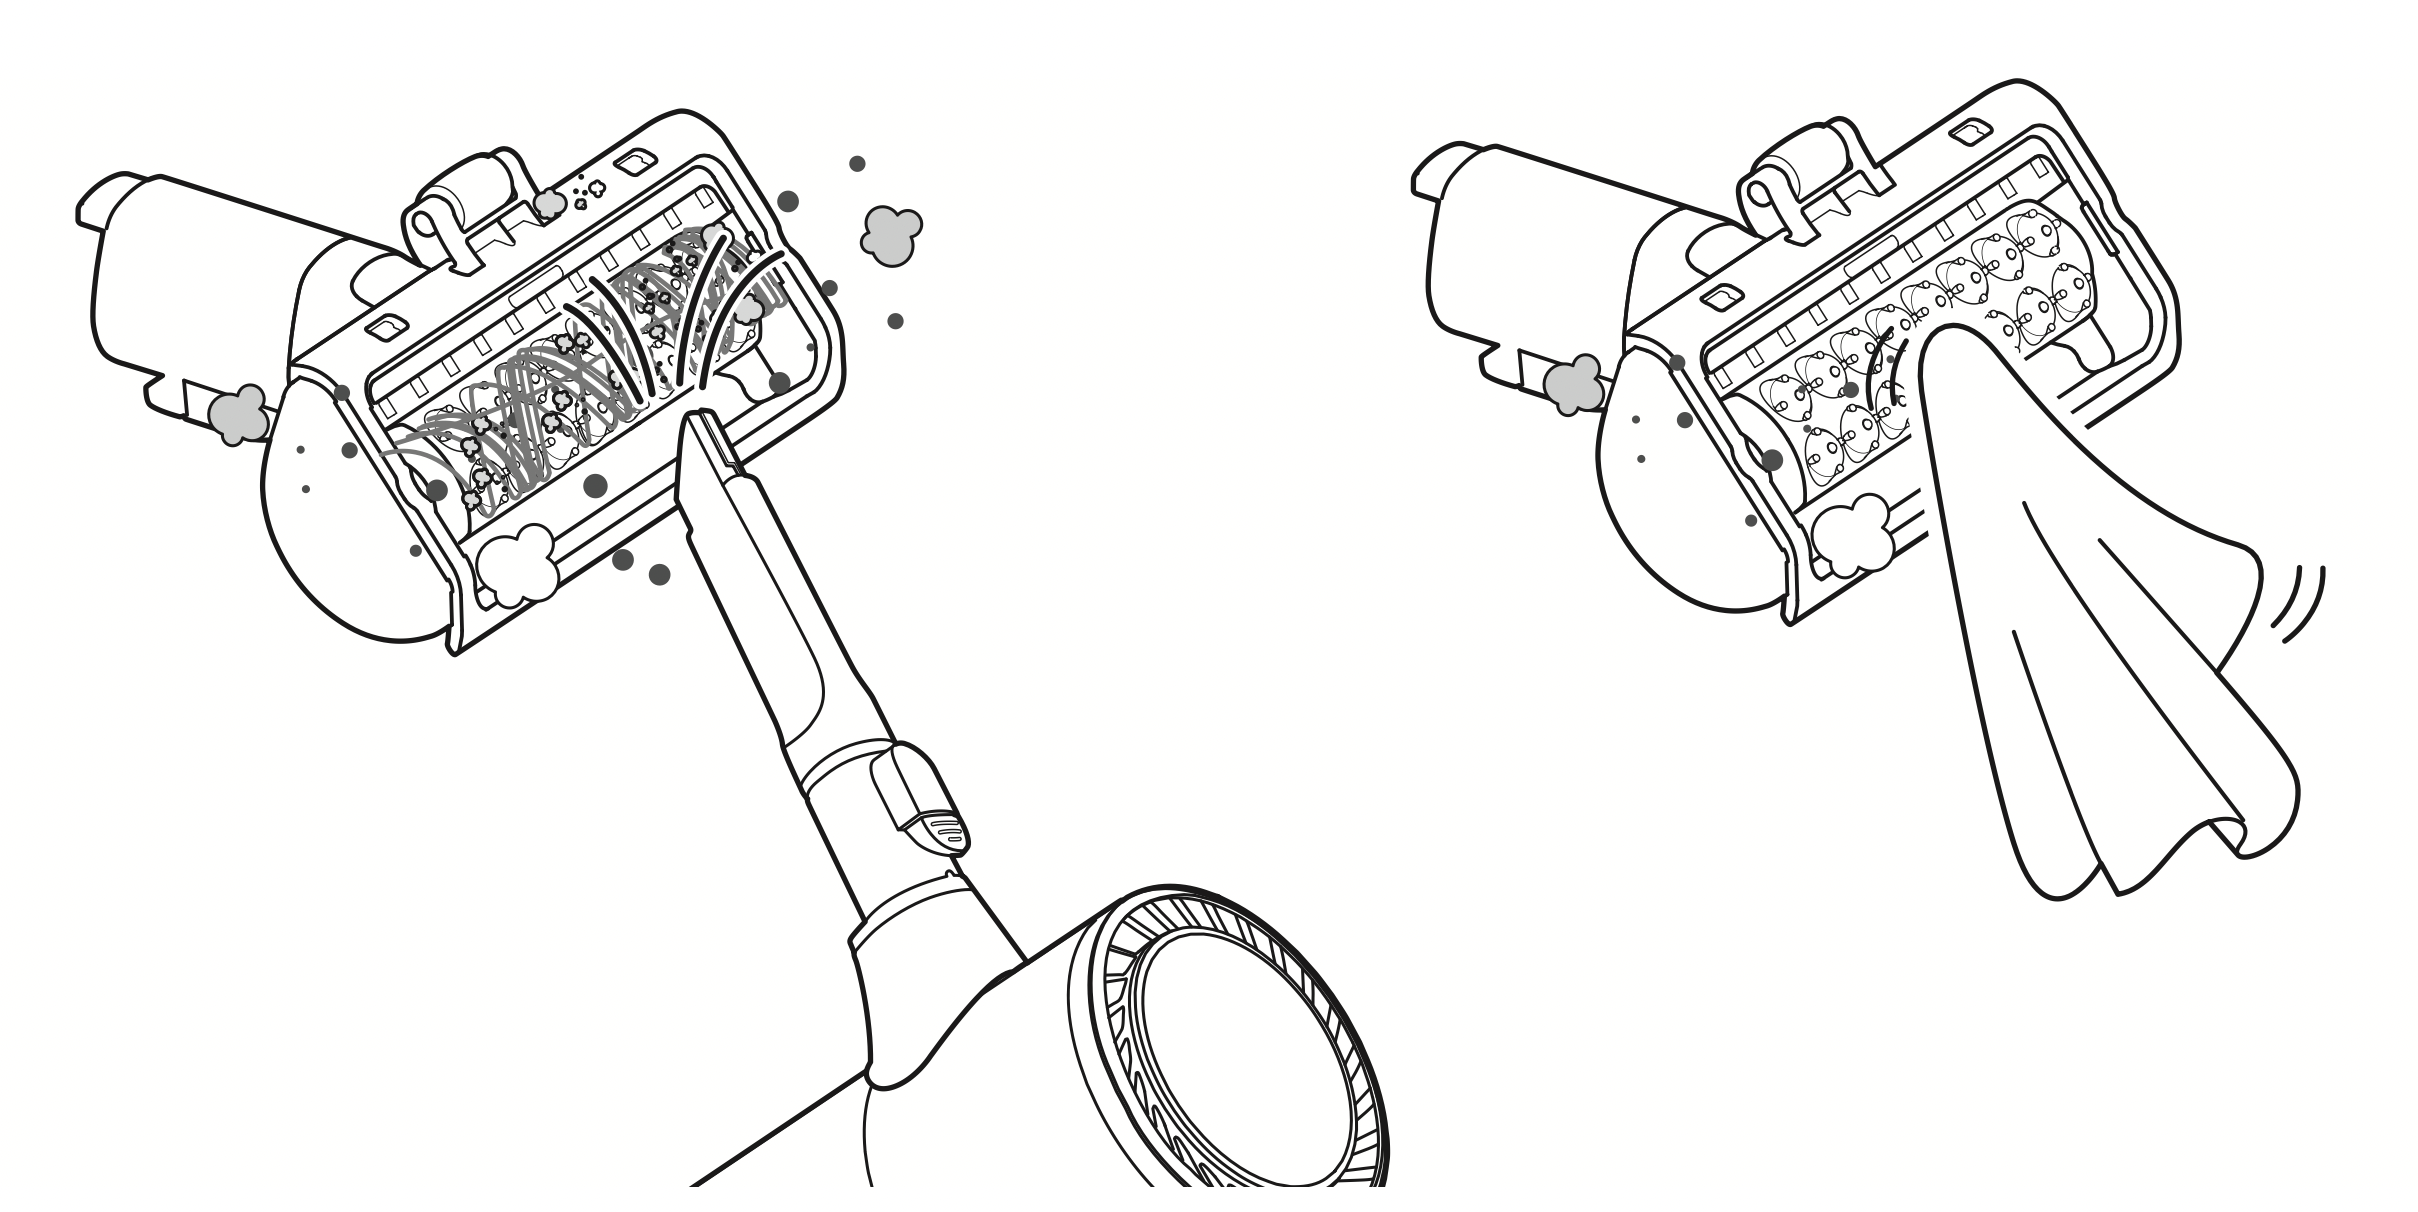
Cleaning the Power Carpet Nozzle
Clean the brush and roller heads before each use.
- If the brush contains foreign objects, the brush may not spin or a noise may occur during operation.
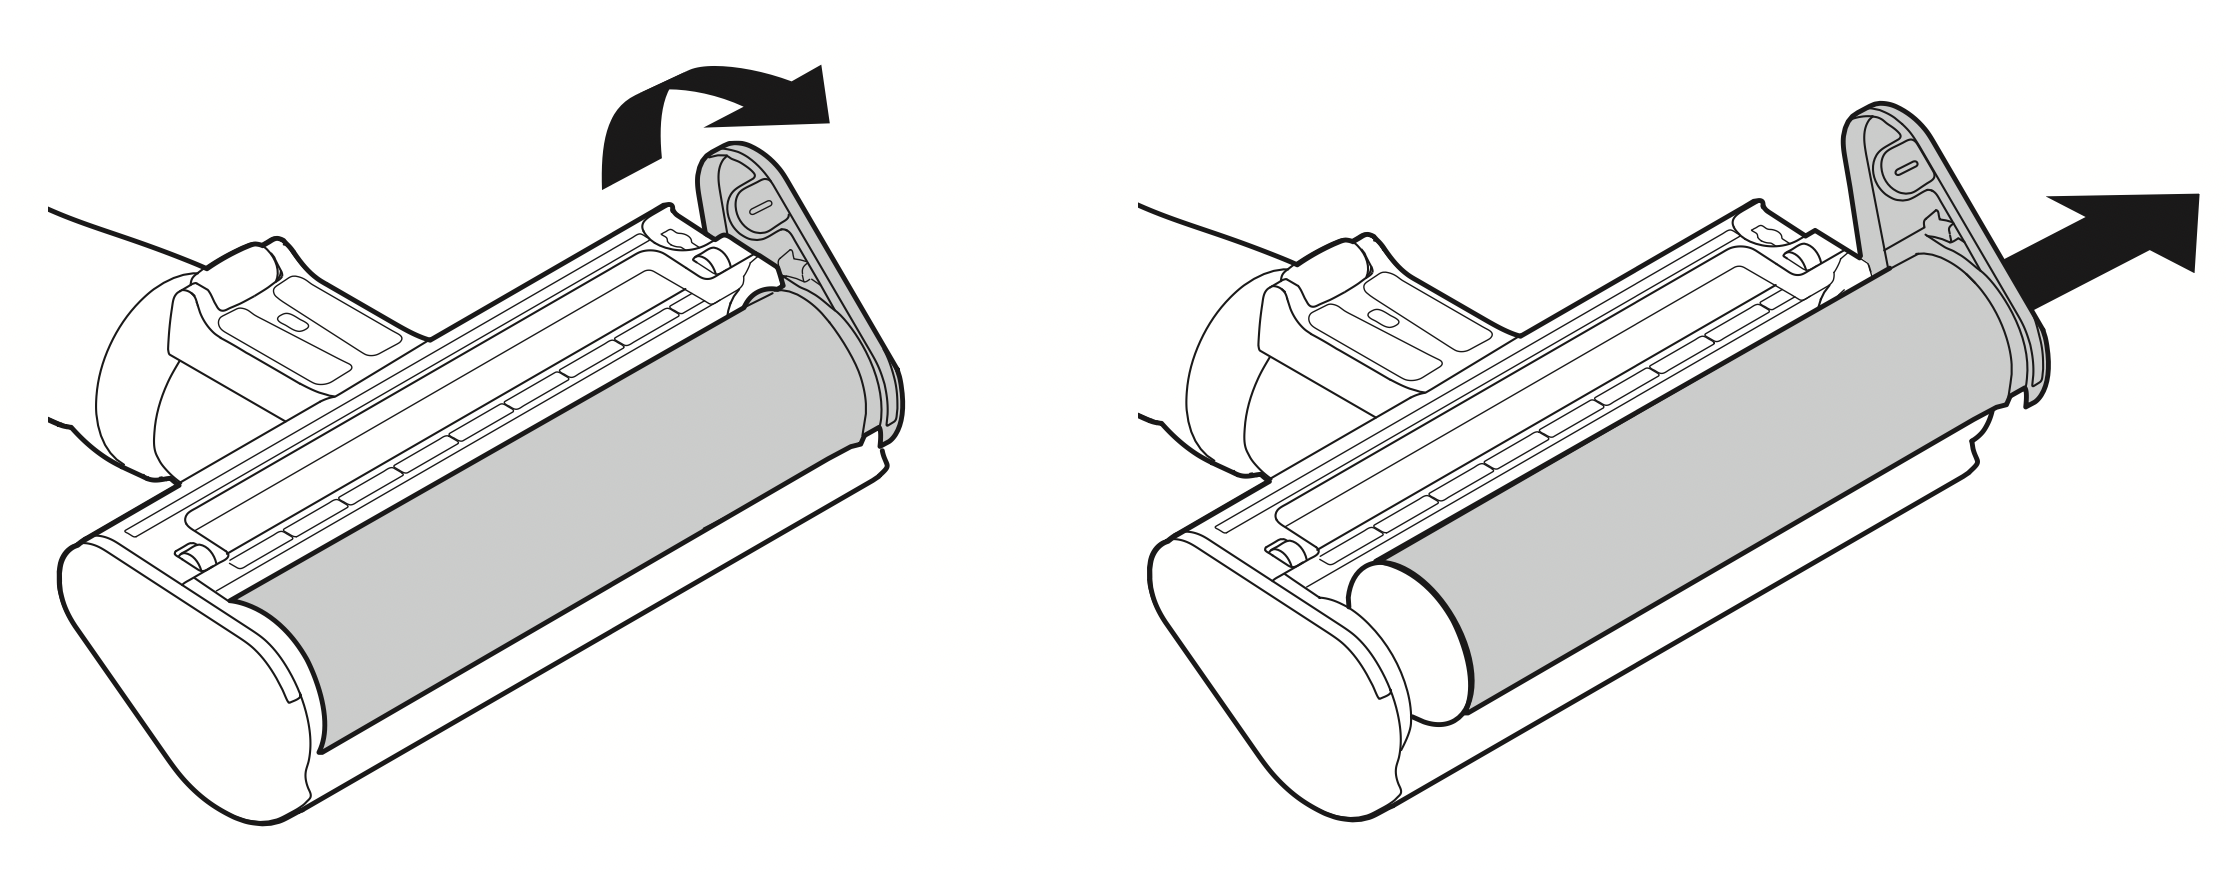
- Press the nozzle release button 1 to remove the nozzle from the extension pipe or product body.
- Turn the nozzle upside down and rotate the cover lock slot 2 counterclockwise.
- Pull the brush cover forward and pull the brush out.
- Attach the crevice tool to the product body and use the vacuum to remove foreign objects and dust from the brush and the bottom of the nozzle.
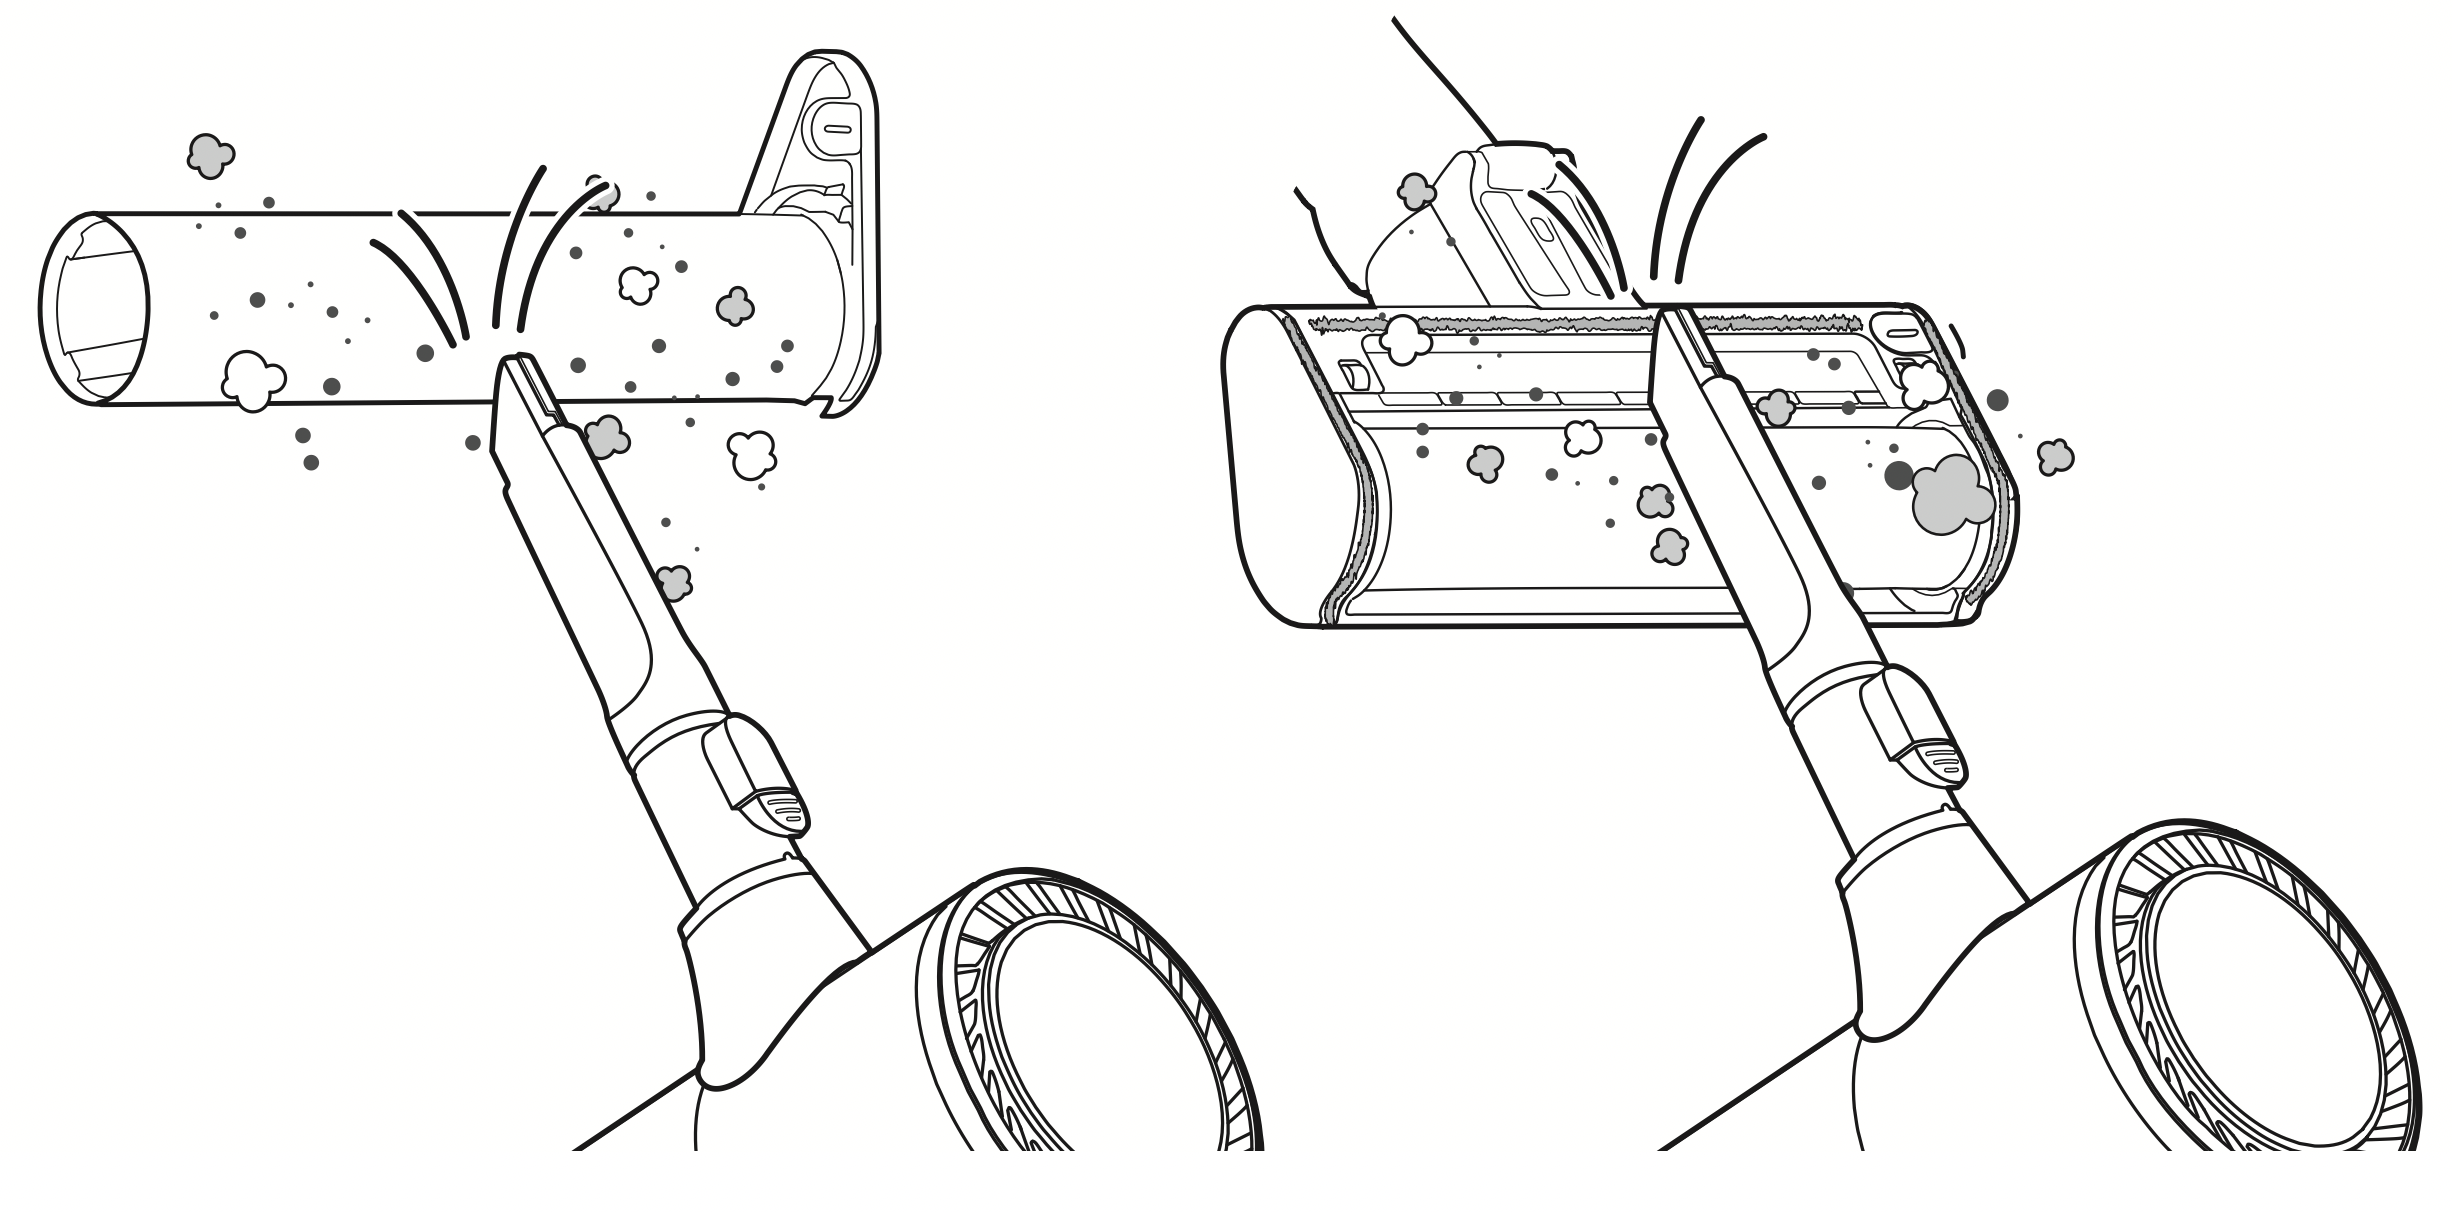
- Use a damp towel or cloth to remove any remaining foreign objects and dust from the brush and the bottom of the nozzle.
Carefully use a tweezers to remove foreign objects from the nozzle rollers.
Do not rinse or submerge the rotating brush or nozzle in water.
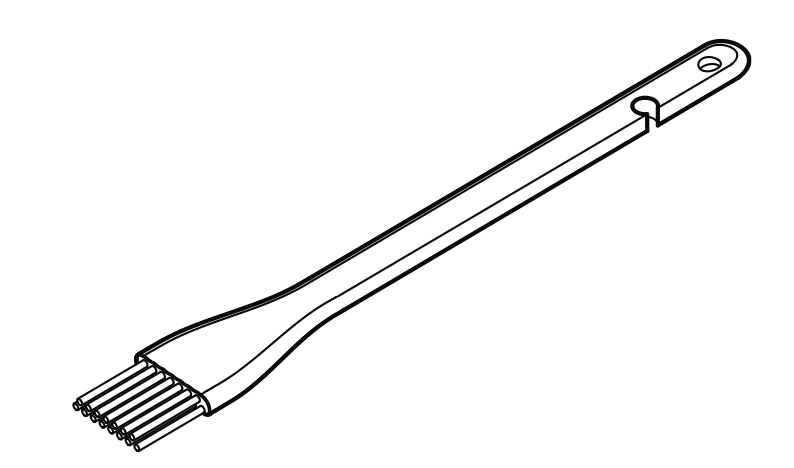
Wrap the handle of the cleaning brush with a wet towel or cloth and use it to clean the rotating brush and nozzle.
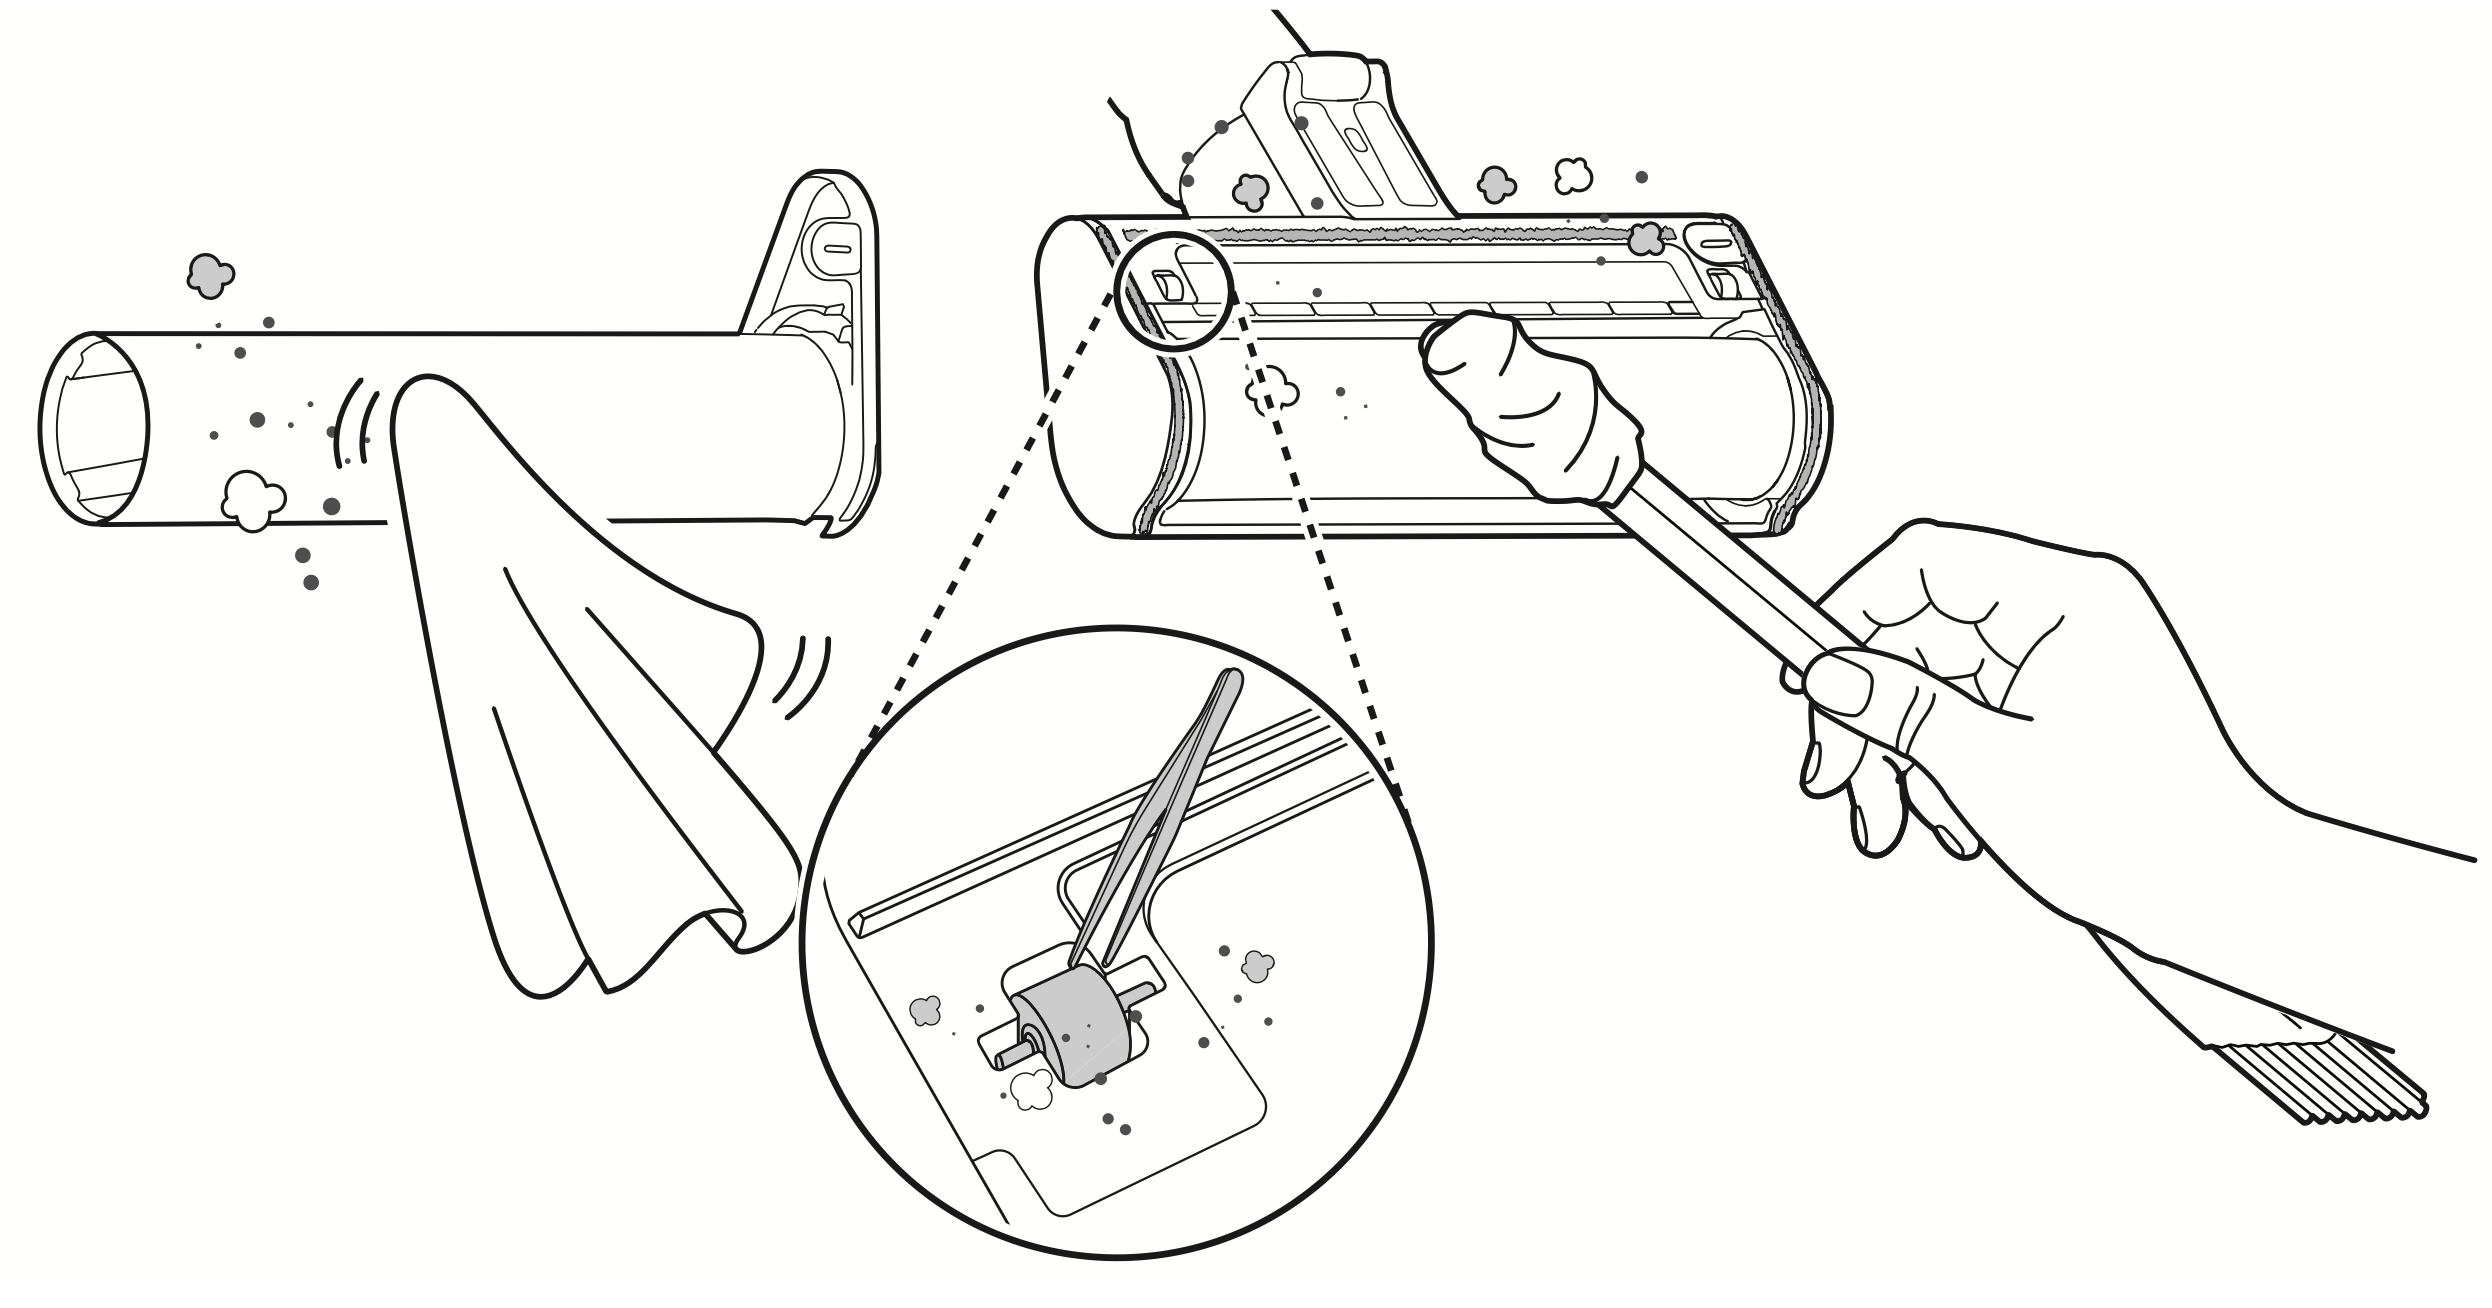
- Slide the brush back into the nozzle and rotate the cover back into place. Turn the cover lock clockwise to lock the cover.
Cleaning the Power Punch Nozzle
- Press the nozzle release button to remove the nozzle from the extension pipe or product body and turn the nozzle upside down.
- Attach the crevice tool to the product body and use the vacuum to remove foreign objects and dust from the bottom of the nozzle.
Use a damp towel or cloth to remove any remaining foreign objects and dust from the bottom of the nozzle. After cleaning, wipe the nozzle dry.
Do not rinse or submerge the nozzle in water.
TROUBLESHOOTING
Operation
| Problem |
Possible Cause & Solution |
| The appliance does not operate. |
Battery is fully discharged.
|
|
Appliance is turned off.
- Press the Power button to turn on the appliance.
|
| Suction power is too weak. |
Dust bin is full of dust.
|
|
Filters are clogged.
- Clean the pre-filter and the exhaust filter.
|
|
Inlet is clogged.
- Remove any foreign objects from inside the product body or the extension pipe.
|
|
Foreign object is on rotating brush, or in inlet port.
- Remove any foreign objects (thread, hair) from the rotating brush or the inlet port.
|
| The product body does not appear to be charging. |
Power adapter is not connected to the charging station.
- Plug the adapter firmly into the charging station.
|
|
Power cord is unplugged.
- Plug the power cord securely into the charging station.
|
|
Foreign object is on the charging terminals.
- Remove dirt or foreign objects from the charging terminals with a dry cloth.
|
| Hot air is coming from the product body. |
Motor is cooling.
- If the appliance is running normally, the hot air is a result of the motor cooling and is not a sign of malfunction.
|
| A strange odor is coming from the appliance. |
Appliance was purchased within the last 3 months.
- The cleaner may emit a smell of rubber for about 3 months after purchase.
|
|
Dust bin is full of dust.
- The dust in the bin may cause some odor. Empty the bin and clean it.
|
|
Foreign object is on the filter.
- The filter may emit an odor if it has not been cleaned for some time. Clean the pre-filter and exhaust filter regularly.
|
|
Pre-filter was installed while damp or wet.
- Wash the pre-filter with running water. To avoid odor, allow the pre-filter to dry completely in a well-ventilated area out of direct sunlight for at least 24 hours before reassembling.
|
|
Exhaust filter was installed while damp or wet.
- Wash the exhaust filter with running water. To avoid odor, allow the exhaust filter to dry completely in a well-ventilated area out of direct sunlight for at least 24 hours before reassembling.
|
| The appliance makes too much noise. |
Vacuum cleaner is running in Turbo mode.
- The motor may be louder at the higher suction power settings. This is normal.
|
| The appliance turns off unexpectedly or by itself after the motor speed fluctuates repeatedly. |
Battery is not fully charged.
- The battery must be fully charged before cleaning. If the problem persists when the battery is fully charged and the pipes and attachments are clear from obstructions, contact an LG customer information center for service.
|
|
Foreign object is in the product body, extension pipe, inlet port or nozzle.
- Remove any foreign objects from the product body, extension pipe, inlet port or nozzle.
|
|
Filters are clogged.
- Clean the pre-filter and the exhaust filter.
|
| The rotating brush does not rotate. |
Brush is improperly installed.
- Remove the brush, clean it if necessary and attach it again.
|
|
Foreign object is on rotating brush.
- Remove any foreign objects from the rotating brush.
|