1. Overview
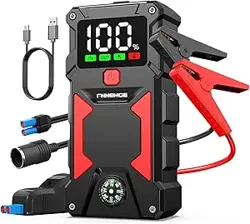
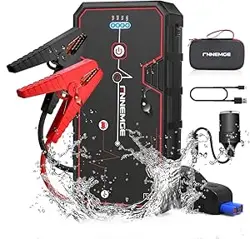
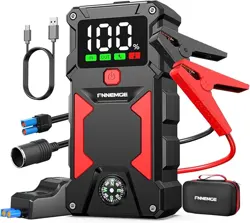
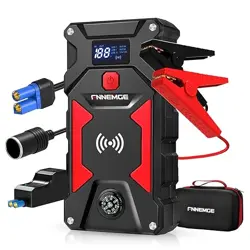
The FNNEMGE FG302 is a portable 12V jump starter and power bank designed to start vehicles with discharged batteries. It incorporates a high-definition LCD screen, a multi-mode LED light, and USB charging ports.

The unit is compact and includes a storage bag for transport.
2. Package Contents
- 1 x Portable Jump Starter (FG302 model)
- 1 x Smart Jump Lead (clamps)
- 1 x USB-C Charging Cable
- 1 x Storage Bag
- 1 x User Manual (this document)

3. Key Features & Specifications
3.1 Power Specifications
- Peak Current: 6000A
- Rated Voltage: 12V DC
- Battery Capacity: 7200mAh
- Battery Type: Lithium Polymer
- Operating Temperature: -20°F to 70°F (-29°C to 21°C)
3.2 Device Ports and Functions
- HD LCD Display: Shows battery level, input/output status, and temperature alerts.
- USB Output Ports: Two ports for charging mobile devices (e.g., phones, tablets).
- USB-C Input Port: For recharging the jump starter itself.
- LED Light: 400 lumens with multiple modes.
- Smart Jump Clamps: Include indicator lights and audible alarms for connection status.


3.3 Safety Protections
The device includes 10 intelligent safety mechanisms:
- Overload Protection
- Short Circuit Protection
- Reverse Polarity Protection
- Over-voltage/Surge Protection
- Spark Prevention
The smart jump clamps provide visual and audible feedback to indicate correct or incorrect connections.
4. Use Guide
4.1 Charging the Jump Starter
- Use the provided USB-C cable to connect the jump starter to a standard USB power adapter (5V/2A or greater recommended).
- The LCD screen will illuminate and show the current battery level and charging status.
- Charging is complete when the battery indicator on the screen shows 100%.
4.2 Using the LED Light
- Press the light button (typically located near the LED) to cycle through modes: Flashlight (steady) -> Strobe -> SOS.
- Press and hold the button to turn the light off.

4.3 Using as a Power Bank
- Ensure the jump starter is charged.
- Connect your device (phone, tablet) to one of the USB output ports using your own USB cable.
- The LCD screen will show an output indicator. The device will begin charging.

4.4 Jump Starting a Vehicle
WARNING: Read all instructions before proceeding. Incorrect use can cause injury or damage. Ensure the vehicle is in Park (automatic) or Neutral (manual) with the ignition OFF.
- Prepare the Jump Starter: Ensure it is sufficiently charged (at least 20% as shown on the display).
- Connect the Smart Clamps:
- Connect the RED clamp to the POSITIVE (+) terminal of the vehicle's dead battery.
- Connect the BLACK clamp to the vehicle's chassis ground or NEGATIVE (-) terminal of the battery, or a clean, unpainted metal part of the engine block.
- Check Connection: The smart clamps will emit a beep and show a green light if the connection is correct and safe. A red light or continuous beeping indicates reverse polarity or another fault. Disconnect immediately and correct the connection.
- Start the Vehicle:
- Turn on the jump starter unit (if required by your model).
- Enter the vehicle and start the engine as normal. It should start within 3-5 seconds.
- Disconnect the Clamps: Once the vehicle is running, disconnect the clamps in the reverse order:
- Black clamp (negative/ground).
- Red clamp (positive).
- Turn off the jump starter and store the clamps. Recharge the jump starter at your earliest convenience.

4.5 Understanding the LCD Display
- Battery Icon/Percentage: Shows the remaining charge of the jump starter.
- Input/Output Icons: Indicate when the unit is being charged (input) or is charging another device (output).
- Temperature Alert: A warning symbol may appear if the operating temperature is too high or too low.
- Error Codes: Refer to the specific error messages in the manual for troubleshooting.
5. Compatible Vehicles
This 12V jump starter is suitable for gasoline vehicles of all sizes and diesel engines up to 8.0L displacement. This includes:
- Passenger Cars, Trucks, SUVs, MPVs
- Motorcycles, Scooters, ATVs/Quads
- Boats/Watercraft, Lawn Mowers, Tractors
- Snowmobiles, RVs, Buses
6. Care and Maintenance
- Recharge the unit every 3-6 months if not used to maintain battery health.
- Store in the provided bag in a cool, dry place away from direct sunlight and moisture.
- Keep the clamps clean and free of corrosion.
- Do not disassemble the unit.
7. Troubleshooting
- Unit does not turn on: Recharge the device fully.
- Smart clamps beep continuously/red light: Check clamp connections for reverse polarity. Ensure clamps have solid metal contact.
- Vehicle does not start: Ensure the jump starter has sufficient charge (above 20%). Confirm the vehicle battery is not damaged or frozen. Allow the jump starter to transfer power for 30 seconds before attempting to start.
- LCD shows temperature warning: Move the unit to an environment within the specified operating temperature range (-20°F to 70°F) and allow it to acclimate.
- USB ports not charging devices: Try a different USB cable. Ensure the jump starter battery is not depleted.
8. Warranty and Support
FNNEMGE offers a 2-year warranty from the date of purchase and lifetime technical support.
For product support or warranty claims: Please contact FNNEMGE using the email address provided in the printed manual included in your package.