This manual provides instructions for the safe and effective use of the OMAIGA Steamer & Iron for Clothes (Model: KBSC-301). Please read all instructions before using the appliance.

1. Overview & Key Features
The OMAIGA Steamer & Iron is a 2-in-1 appliance that functions as a handheld garment steamer and a traditional steam iron. It is designed for home use, travel, and removing wrinkles from a variety of fabrics.
1.1 Main Components
- Main Body: Houses the heating element, water tank, and control electronics.
- 180° Rotating Handle: Allows the unit to be used in both horizontal (ironing) and vertical (steaming) positions.
- Ceramic Soleplate: The smooth, non-stick ironing surface with 46 steam holes.
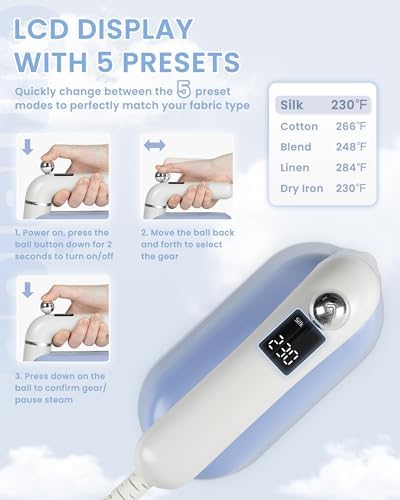
- LCD Display: Digital screen showing selected mode and status.
- Water Tank: 100 ml (3.38 oz) capacity, located at the rear of the unit.
- Power Cord: 8 ft (243 cm) cord.
- Mode/Control Buttons: For selecting fabric settings and controlling steam.
1.2 Key Specifications
| Specification | Detail |
|---|---|
| Model | KBSC-301 (Travel Steam Iron) |
| Power | 1500W |
| Voltage | 120V AC (For use in the United States) |
| Water Tank Capacity | 100 ml / 3.38 oz |
| Steam Output | Continuous: 25 g/min |
| Heat-up Time | Approximately 30 seconds |
| Dimensions | 7.09" L x 5" W |
| Weight | 2.64 lbs |
| Special Features | 5 Fabric Modes, LCD Display, 180° Swivel Handle, Ceramic Soleplate, Auto Shut-off, E9 Low Water Alert |
2. Safety Information
- Read all instructions before using the steamer/iron.
- Use the appliance only for its intended purpose.
- Always plug the appliance directly into a wall outlet. Do not use an extension cord.
- Do not leave the appliance unattended while it is plugged in or on an ironing board.
- The appliance features an automatic safety shut-off that activates after approximately 10 minutes of inactivity. The unit must cool down before it can be used again.
- To avoid circuit overload, do not operate another high-wattage appliance on the same circuit.
- Do not let the cord touch hot surfaces.
- Always unplug the appliance from the electrical outlet before filling with water, emptying, cleaning, or when not in use.
- Do not immerse the appliance in water or other liquids.
- Burns can occur from touching hot metal parts, hot water, or steam. Use caution when handling the appliance.
- Do not direct steam at people, animals, or electrical equipment.
- Use distilled or demineralized water to minimize mineral buildup. Do not use chemical fragrances or descaling agents.
3. Getting Started
3.1 Filling the Water Tank
- Ensure the appliance is unplugged and has cooled completely.
- Hold the unit upright. Locate the water tank opening, usually at the back or side of the handle.
- Using the provided cup or a small funnel, slowly fill the tank with water. Do not exceed the maximum fill line (100 ml / 3.38 oz).
- Securely close the water tank cap.
3.2 Setting the Fabric Mode
The appliance has five preset temperature modes for different fabric types. Use the mode button to cycle through the options, which will be displayed on the LCD screen.
- Silk / Delicate: Lowest temperature setting.
- Synthetic / Blends: Low to medium temperature.
- Wool: Medium temperature.
- Cotton: High temperature.
- Linen: Highest temperature setting.
Select the mode appropriate for the fabric you are ironing or steaming. When in doubt, start with a lower temperature on an inconspicuous area of the garment.

4. Operating Instructions
4.1 Using as a Handheld Steamer (Vertical)
- Fill the water tank and select the appropriate fabric mode.
- Plug the appliance into a wall outlet. The LCD display will light up.
- Wait approximately 30 seconds for the unit to heat up. An indicator light or display change may signal it is ready.
- Hold the appliance by the handle in a vertical position. Point the soleplate towards the hanging garment, keeping it about 1-2 inches away from the fabric.
- Gently pull the fabric taut with your other hand. Move the steamer in slow, downward strokes, following the natural drape of the fabric.
- For stubborn wrinkles, you may hold the steamer in place for a few seconds to allow the steam to penetrate.
4.2 Using as a Steam Iron (Horizontal)
- Fill the water tank and select the appropriate fabric mode.
- Plug in the appliance and allow it to heat up.
- Rotate the handle 180 degrees to lock it in the horizontal ironing position.
- Place the garment on a stable, heat-resistant ironing board.
- Glide the iron over the fabric with steady, forward pressure. Do not leave the iron stationary on the fabric.
- Use the steam continuously during ironing for best results on cotton and linen. For delicate fabrics, you may prefer to use little or no steam.

5. Care & Maintenance
5.1 Emptying and Storage
- Unplug the appliance and allow it to cool completely.
- Hold the unit over a sink and open the water tank cap to empty any remaining water.
- Shake gently to remove excess water.
- Store the appliance in an upright position in a cool, dry place. Wrap the cord loosely around the handle or base if designed for it.
- Due to its compact size, the unit can be stored in a drawer or suitcase for travel.
5.2 Cleaning the Soleplate
- Ensure the appliance is unplugged and completely cool.
- Wipe the ceramic soleplate with a soft, damp cloth to remove any residue or starch buildup. Do not use abrasive cleaners or scouring pads.
- If fabric fibers or other debris are stuck to the soleplate, they can often be removed by rubbing gently with a paste of baking soda and water on a soft cloth. Wipe clean afterward.
5.3 Descaling
Mineral deposits from water can build up inside the steam chamber over time, affecting performance.
- Regular use of distilled or demineralized water will significantly reduce scaling.
- If you notice reduced steam output or spitting, descaling may be necessary. Follow the general process of running a mixture of half distilled water and half white vinegar through the steam system, followed by several tanks of clean water to rinse. Refer to any specific descaling instructions provided with the unit.
6. Troubleshooting
| Problem | Possible Cause | Solution |
|---|---|---|
| No steam or low steam | Water tank is empty. Unit is not fully heated. Mineral buildup (scale). | Refill water tank. Wait for full heat-up (30 sec). Descale the unit. |
| Water is dripping from soleplate | Unit is not hot enough. Fabric temperature setting too low for steam function. Using steam while ironing in a vertical position. | Allow more time to heat. Select a higher temperature mode suitable for steam. Use steam primarily in the horizontal ironing position. |
| E9 displayed on LCD | Low water level. | Unplug the unit, let it cool, and refill the water tank. |
| Appliance does not turn on | Not plugged in. Automatic shut-off is active. Circuit breaker tripped. | Check plug and outlet. Unplug, let cool for 10+ minutes, then plug back in. Check home circuit breaker/fuse. |
| Soleplate is sticky or scratches fabric | Residue on soleplate. Abrasive cleaner was used. | Clean soleplate as per instructions. Replace if damaged; avoid abrasive cleaners. |
7. Product Information & Compliance
Brand: OMAIGA
Model Number: KBSC-301
ASIN: B0CR3RHF6S
This product is designed for use with a 120-volt AC power source and is intended for indoor use in homes, dorms, and similar environments.
The automatic safety shut-off feature is a critical safety component. Do not attempt to disable it.
This user manual is based on information available from the product listing. Specifications are subject to change. OMAIGA is a registered trademark.