User manual Multi-Cooker
Features and Functions
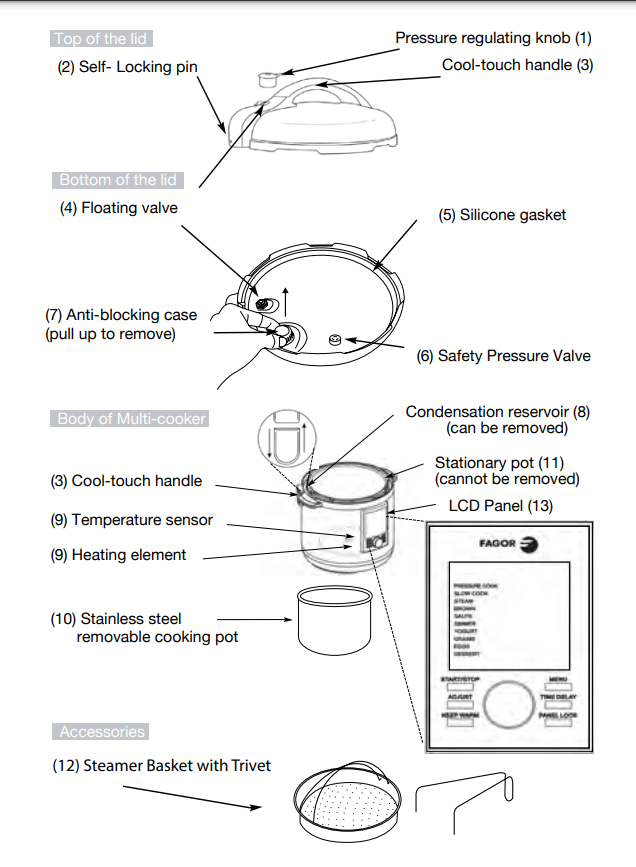
- Pressure Regulator Knob: Turn the regulator knob to the “Pressure” position when using the PRESSURE COOK, GRAINS, EGGS and DESSERT functions. Turn the knob to the “Steam” position to release the pressure after using those functions and when using the SLOW COOK, YOGURT, STEAM, SIMMER and KEEP WARM functions.
- Self-Locking Pin: The lid will lock automatically when it is properly aligned and closed. While cooking under pressure you will not be able to open the lid until all of the pressure is released.
- Cool-Touch Handles: The cool to the touch handles of the multi-cooker allow for easy handling and opening of the lid.
- Floating Valve: The floating valve controls the amount of pressure inside the cooker by allowing excess pressure to be released.
- Silicone Gasket: Creates an airtight seal needed for the cooker to build pressure. Check the silicone gasket for any tears or cracks before using the multicooker. To order a new gasket, please contact a Fagor Representative at 1-800- 207-0806 or purchase it directly on the Fagor website at www.fagoramerica.com.
- Safety Pressure Valve: The safety pressure valve allows excess pressure to escape from the cooker when it is being used for pressure cooking. It works independently of the floating valve.
- Anti-Blocking Case: Pull it towards yourself to release the pressure regulator knob for cleaning.
- Condensation Reservoir: Collects excess condensation during cooking. If there is liquid in the reservoir after cooking, simply empty it.
- Heating Element and Temperature Sensor: Both elements regulate the cooking temperature inside the pot.
- Removable Cooking Pot: Stainless steel pot is dishwasher safe, but hand washing is always recommended.
- Stationary Pot: This pot should NEVER be used for cooking. Before cooking, make sure to place the removable cooking pot into the stationary pot first. All ingredients should be placed into the removable cooking pot ONLY.
- Steamer Basket with Trivet: Needs to be placed inside the cooking pot to steam delicate foods and vegetables.
- LCD Panel: The easy to navigate interactive screen allows you to select different programs with the touch of a finger. Main functions are: Pressure Cook, Slow Cook, Steam, Brown, Sauté, Simmer, Yogurt, Grains, Eggs and Dessert. In addition, each of the main functions has a selection of settings with preset cooking times and temperatures/pressure levels. The control panel also includes 6 buttons described below.
START/STOP - Used to begin or stop cooking.
MENU – Used to go back to the main MENU screen.
ADJUST – Used to adjust pressure/temperature and cooking time.
TIME DELAY – Used to delay the cooking process by up to 6 hours. You can use the delay time setting after choosing a cooking function.
- Select the desired cooking function and setting. Adjust the time if needed. Press TIME DELAY and use the dial to adjust the delay time. Press the START/STOP button to confirm. The multi-cooker will begin cooking after the time delay has elapsed.
- For Example: It is 8:00 am and you want your dinner to be ready at 6:00 pm. You use a recipe that calls for a SLOW COOK function and the Beans setting (which is 8 hours preset cooking time). Turn the pressure regulator knob to “Steam”. Turn a dial until the SLOW COOK function is selected and confirm it by pressing the dial. From the settings shown to the right, select the Beans setting and confirm it by pressing the dial. To program your delay time, press the TIME DELAY button and adjust the time so the screen displays 2 hours. Press the START/STOP button to confirm and you are all set! The unit will start cooking at 10:00 am and your dinner will be ready around 6:00 pm. Please note that exact cooking time may vary since the unit needs to build the temperature and/or pressure.
- CAUTION: DO NOT LEAVE PERISHABLE FOODS SUCH AS MEAT, POULTRY, FISH, CHEESE AND DAIRY PRODUCTS AT ROOM TEMPERATURE FOR MORE THAN 2 HOURS (OR MORE THAN 1 HOUR WHEN THE ROOM TEMPERATURE IS ABOVE 90°F). WHEN COOKING WITH THESE FOODS, DO NOT SET THE DELAY FUNCTION FOR MORE THAN 1-2 HOURS.
KEEP WARM – Used for keeping cooked food warm up to 12 hours or reheating it.
- After the cooking time is finished, the unit will automatically switch to the KEEP WARM function (at a temperature of 165°F) for up to 12 hours. Press the START/STOP button to cancel the KEEP WARM program.
- To reheat food:
- Place the removable cooking pot into the multi-cooker. Then place the food into the removable cooking pot to reheat.
- Place the lid on the multi-cooker; align the pin on the handle with the condensation collector, and turn it counterclockwise until it locks into place. The locking pin will click when it’s in place.
- Turn the pressure regulator knob to STEAM.
- Press the KEEP WARM button. Adjust time and then press START/STOP button to begin heating food.
- When the time is up, the unit will beep to let you know the heating process has ended. Please note the minimum amount of time for this function is 30 min.
PANEL LOCK – Used to disable and re-enable the buttons. This is for safety reasons, to prevent children from tampering with the multi-cooker. To lock or unlock, press and hold the PANEL LOCK button.
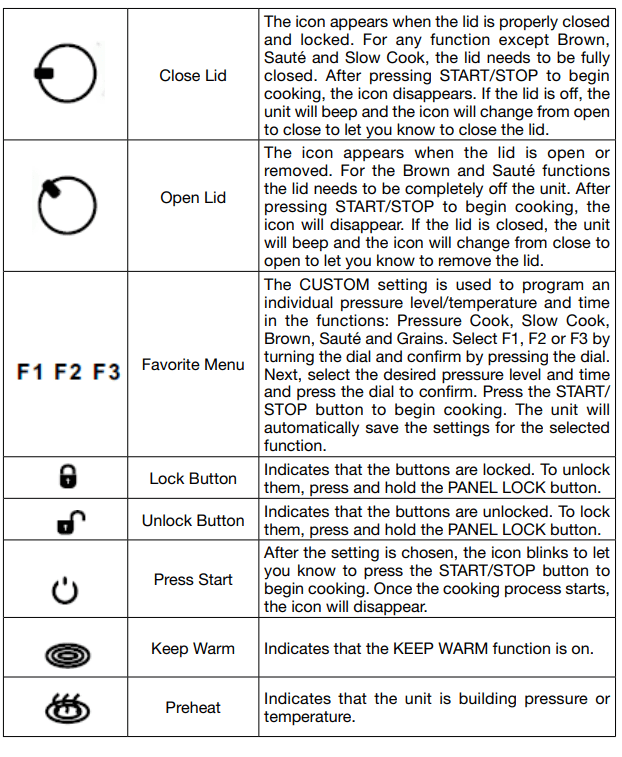
Icons Chart
Getting Started: Before First Use
Read the safety instructions found in this manual before plugging in and operating the unit. Before using the multi-cooker for the first time, follow these steps:
- Remove all packing materials and literature from inside the Fagor LUX™ LCD Multi-Cooker. Lift out the removable cooking pot and remove any pieces of paper from under it. Remove the plastic protection from the control panel and any stickers from the stainless steel body.
- Wash all removable parts in warm soapy water. Rinse and dry all parts thoroughly. Wipe the stainless steel outer housing with a clean damp cloth. NEVER submerge the stainless steel outer housing in water or any other liquid. Only the removable cooking pot is dishwasher safe.
- To clean the pressure regulator knob, gently push the pressure regulator knob down and turn it counterclockwise past STEAM to the CLEAN setting. Once the dot on CLEAN is aligned with the dot on the base of the pressure regulator, you can lift the pressure regulator up and out of the housing. Look through the holes of the pressure regulator to make sure there is nothing obstructing the pressure stream, then clean the pressure regulator knob with warm soapy water, allowing the water to run through the pressure regulator to remove all particles.
- To put the pressure regulator back into the lid, simply align the CLEAN setting with the dot on the base, gently push down on the pressure regulator and turn the knob clockwise until it slides back into place.
- Make sure the silicone gasket is placed properly inside the lid or else the cooker will not function properly.
- After thoroughly drying all parts, place the removable cooking pot back into the multi-cooker before cooking.
Operating Functions
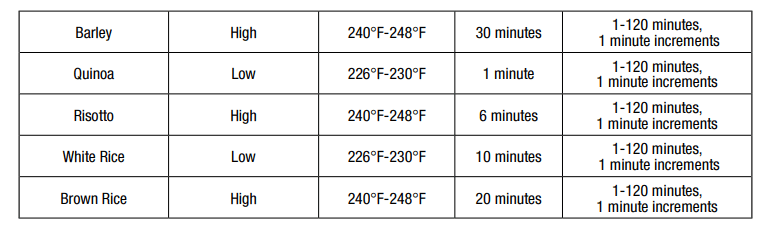
Pressure Cook Function:
- This program will allow food to cook faster under pressure by reducing cooking time up to 70% compared to traditional cooking methods. Pressure cooking is fast, easy, safe and healthy
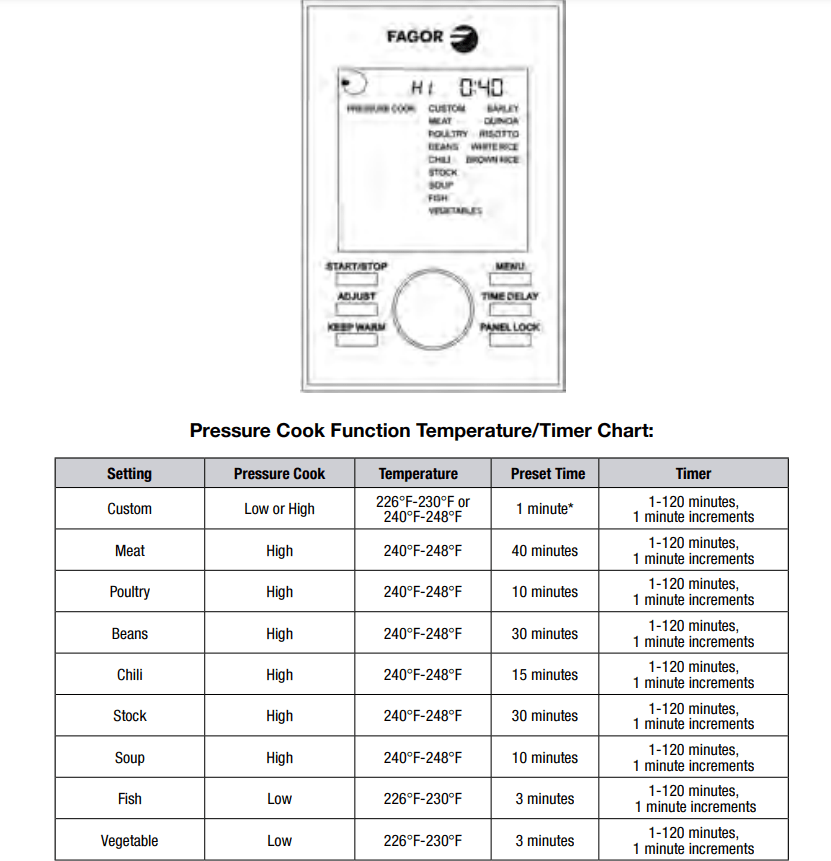
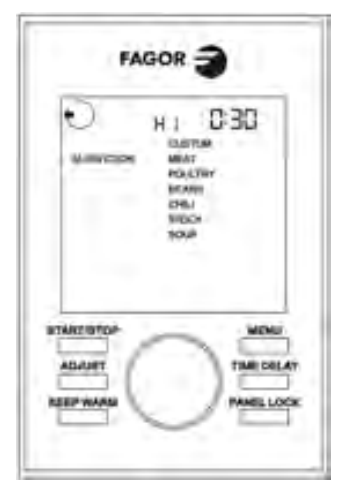
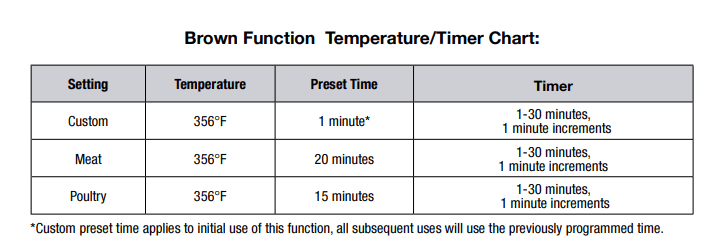
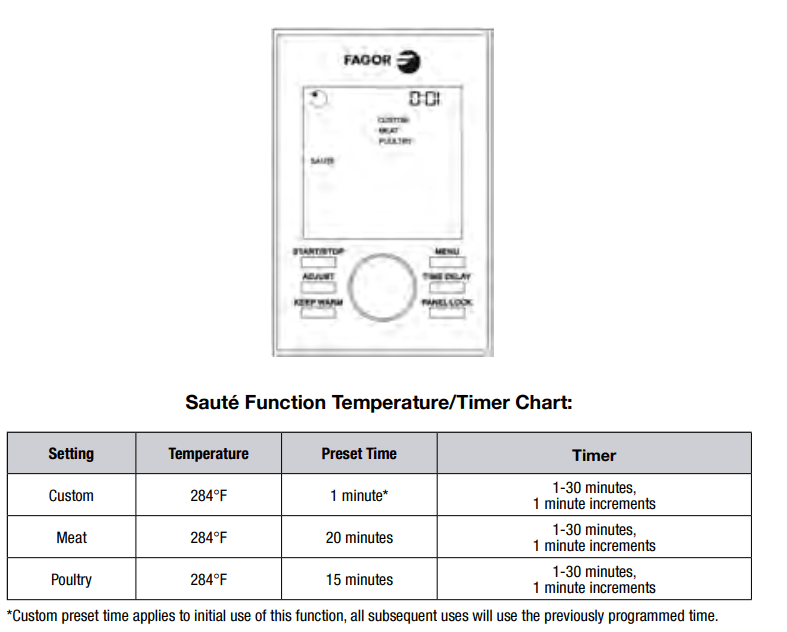
*Custom preset time applies to initial use of this function, all subsequent uses will use the previously programmed time.
- Before each use, make sure the silicone gasket and the pressure regulating valves are clean and properly positioned in/on the cooker.
- Plug the cord into a wall outlet. The screen will light up blue and display all of the main functions.
- Place the removable cooking pot into the cooker, and add the ingredients following your recipe. When cooking foods under pressure, a minimum of 1 cup (8 oz.) of liquid is required. NOTE: Do not fill the pot more than 2 /3 full with food and liquid. Do not fill the unit more than 1 /2 full when cooking foods that expand during cooking. NOTE: The following foods tend to foam, froth and/or sputter: applesauce, cranberries, pearl barley, oatmeal, split peas, noodles/pasta, rhubarb, etc. These items may block the pressure valve if filled too high in the removable cooking pot. Please be sure not to fill the removable cooking pot more than half way when pressure cooking these items.
- Place the lid on the cooker; align the self-locking pin with the unlocked symbol and turn your lid counterclockwise until it locks into place. You will know it’s properly closed and locked once you hear the pin click into place and the screen will display the Close Lid icon
 . If you press the START/STOP button to begin cooking but the lid is open or not locked properly, the icon on the screen will change from open
  to close
  and the unit will beep to notify you that the lid needs to be closed.
- Turn the pressure regulator knob to PRESSURE.
- Turn the dial until the PRESSURE COOK function is selected (the words will blink) and confirm it by pressing the dial. The screen will show the settings for this function to the right. In addition to the settings, there is also a CUSTOM setting. For instruction on how to use the CUSTOM setting. NOTE: To go back to the main menu, press MENU.
- Choose your desired setting by turning the dial. Press the dial to select the setting. The preset pressure level (High – “Hi” or Low – “Lo”) and cooking time will appear at the top of the screen. If you wish to adjust those settings, turn the dial to select the pressure level (High - “Hi”, or Low - “Lo”) and then press the dial or the ADJUST button to confirm it. The cooking time will then start blinking to show it can be adjusted. Change the time by turning the dial and set your time by pressing the START/STOP button. NOTE: Pressing the ADJUST button will only switch the programming option between pressure level and cooking time.
- After you press the START/STOP button, the screen will turn green and it will display the programmed pressure setting and time at the top of the screen. You will also see the preheat icon
 on the bottom of the screen. NOTE: If you forget to press the START/STOP button, the unit will beep twice after 30 seconds, the light on the screen will turn off and the unit will return to standby mode.
- Once pressure has been reached, the unit will beep and it will start to count down. This is when your cooking time begins. The floating valve located in the lid will rise, indicating that there is pressure inside the unit. WARNING: NEVER TRY TO FORCE THE LID OPEN WHILE YOU ARE COOKING UNDER PRESSURE, THIS CAN RESULT IN A SERIOUS ACCIDENT. WARNING: NEVER DEEP FRY OR PRESSURE FRY IN THE MULTI-COOKER. IT IS DANGEROUS AND MAY CAUSE A FIRE AND SERIOUS DAMAGE.
- When the cooking time ends, the unit will beep and switch to the KEEP WARM function, which will be displayed on the screen as
 . The unit will beep periodically to let you know that there is pressure inside the unit. Once you release the pressure, the unit will stop beeping and will remain on the KEEP WARM function. Press the START/STOP button to cancel the program.
- After the cooking time is up, release the pressure. You have two options for releasing the pressure:
- Quick Release Method: Release the pressure immediately by turning the pressure regulator knob to STEAM. CAUTION: THE STEAM COMING OUT OF THE COOKER WILL BE HOT, AND MIGHT CONTAIN DROPLETS OF HOT LIQUID. BE SURE TO USE POT HOLDERS, OVEN MITTS OR A KITCHEN TOWEL WHEN RELEASING PRESSURE.
- Natural Release Method: Release the pressure by shutting the unit off completely. This allows the pressure to drop naturally without turning the pressure regulator knob to STEAM. This will take several minutes, during which the food inside will continue cooking. Some recipes (such as risotto) benefit from this extra cooking time. You will know when the pressure has been released because the floating valve will drop and you will be able to open the lid.
- Once all the pressure is released, remove the lid by turning it clockwise, lifting it up and tilting it away from yourself to avoid getting burnt by any remaining steam or hot water condensation dripping from the inner portion of the lid.
WARNING: AFTER COOKING, THE REMOVABLE COOKING POT WILL BE HOT. USE POT HOLDERS, OVEN MITTS OR A KITCHEN TOWEL TO HANDLE IT OR LET IT COOL DOWN BEFORE REMOVING.
Slow Cook Function
- Prepare slow cooker classics such as pot roasts, soups and stews in up to 10 hours with this function. Load your ingredients in the morning and dinner will be waiting for you in the evening.
- Place the removable cooking pot into the multi-cooker.
- Place all ingredients as needed into the removable cooking pot.
- For recipes that require a closed lid, place the lid on the cooker; align the selflocking pin with the unlocked symbol and turn the lid counterclockwise until it locks into place.
- Turn the pressure regulator knob to STEAM.
- Turn the dial until the SLOW COOK function is selected (the words will blink) and confirm it by pressing the dial. The screen will show the settings for this function to the right. In addition to the settings, there is also a CUSTOM setting. For instruction on how to use the CUSTOM setting, see page 8. NOTE: To go back to the main menu screen, press MENU.
- Choose your desired setting by turning the dial. Press the dial to select the setting. The preset temperature (High – “Hi” or Low – “Lo”) and cooking time will appear at the top of the screen. If you wish to adjust those settings, turn the dial to select the temperature (High - “Hi”, or Low - “Lo”) and then press the dial or the ADJUST button to confirm it. The cooking time will then start blinking to show it can be adjusted. Change the time by turning the dial and set your time by pressing the START/STOP button. NOTE: Pressing the ADJUST button will only switch the programming option between temperature and cooking time.
- After you press the START/STOP button, the screen will turn green and it will display the programmed temperature and time. You will also see the preheat icon at the bottom of the screen. NOTE: If you forget to press the START/STOP button, the unit will beep twice after 30 seconds, the light on the screen will turn off and the unit will return to standby mode.
- Once the temperature has been reached, the unit will beep and it will start to count down your cooking time.
- When the cooking time ends, the unit will beep and switch to the KEEP WARM function, which will be displayed on the screen as . Press the START/STOP button to cancel the program.
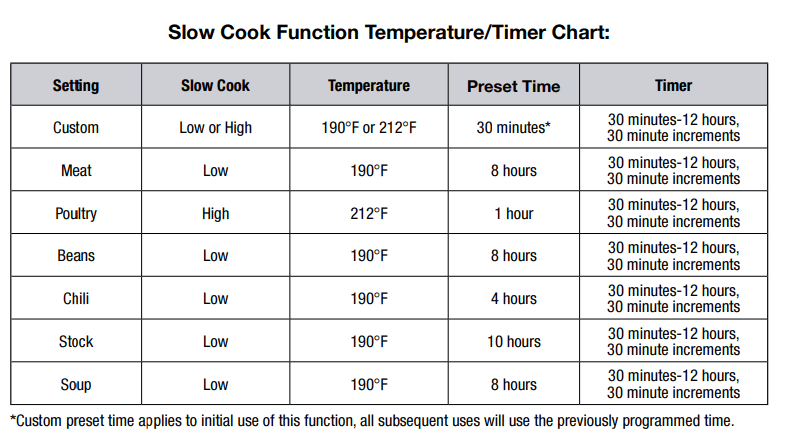
Steam Function
- This program allows you to steam delicate foods such as fish and vegetables.
- Place the removable cooking pot into the multi-cooker.
- Place about 1-2 cups of water into the removable cooking pot. Insert the trivet and steamer basket making sure that the water sits a little bit below the steamer basket.
- Place ingredients into the steamer basket and close the lid of the cooker. The screen will display a Close Lid icon . If you press the START/STOP button to begin cooking and the lid is open or not locked properly, the icon on the screen will change from open to close and the unit will beep to indicate that the lid needs to be closed.
- Turn the pressure regulating knob to STEAM.
- Turn the dial until the STEAM function is selected (the words will blink) and confirm it by pressing the dial. The screen will show the settings for this function to the right. NOTE: To go back to the main menu screen, press MENU.
- Choose your desired setting by turning the dial. Press the dial to select the setting. The preset steaming time will appear at the top of the screen. If you wish to adjust it, turn the dial to select the desired time. Next, press the START/STOP button to confirm it.
- After you press the START/STOP button, the screen will turn green and it will display the programmed time at the top. You will also see the preheat icon at the bottom of the screen. NOTE: If you forget to press the START/STOP button, the unit will beep twice after 30 seconds, the light on the screen will turn off and the unit will return to standby mode.
- Once the temperature has been reached, the unit will beep and it will start to count your steaming time.
- When the cooking time ends, the unit will beep and switch to the KEEP WARM function, which will be displayed on the screen as . Press the START/STOP button to cancel the program. NOTE: When using the STEAM function the regulator knob must be turned to STEAM. NOTE: If you are using the STEAM function without enough liquid in the removable cooking pot, the unit will beep every 5 seconds to alert you that more liquid needs to be added.
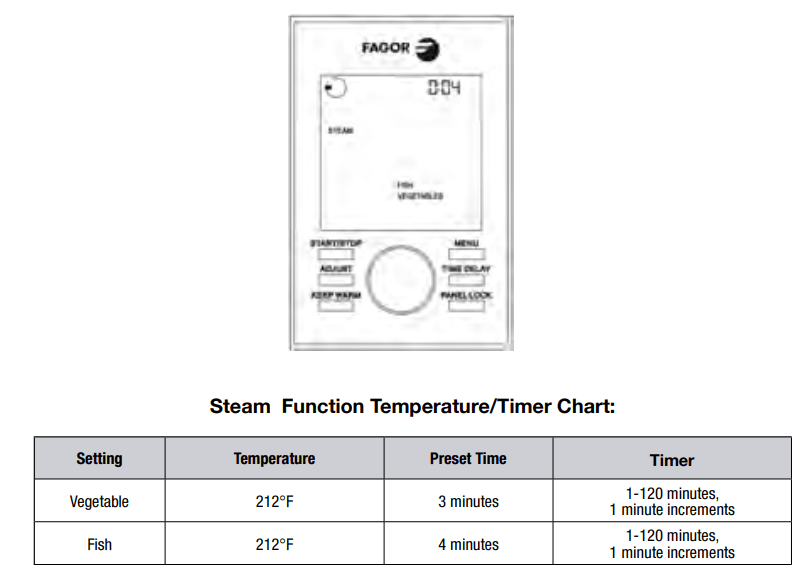
Brown Function
- This program allows you to brown foods such as meat or poultry, to help bring forth the best flavor and texture before cooking. Pat food dry with a paper towel before browning. For best results, make sure the oil is hot before adding your food. Brown the food in batches to keep the correct oil temperature for even browning.
- Place the removable cooking pot into the multi-cooker.
- Add the appropriate amount of oil into the removable cooking pot as indicated in your recipe. NOTE: When using the BROWN function do not place the lid on the multi-cooker. If the lid is closed and you press the START/STOP button, the icon on the screen will change from close
 to open
  and the unit will beep to indicate that the lid needs to be removed.
- Turn the dial until the BROWN function is selected (the words will blink) and confirm it by pressing the dial. The screen will show the settings for this function to the right. In addition to the settings, there is also a CUSTOM setting. For instruction on how to use the CUSTOM setting, see page 8. NOTE: To go back to the main menu screen, press MENU.
- Choose your desired setting by turning the dial. Press the dial to select the setting. The preset browning time will appear at the top of the screen. If you wish to adjust it, turn the dial to select the desired time. Next, press the START/STOP button to confirm it.
- After you press the START/STOP button, the screen will turn green and it will display the programmed time at the top of the screen. You will also see the preheat icon on the bottom of the screen. NOTE: If you forget to press the START/STOP button, the unit will beep twice after 30 seconds, the light on the screen will turn off and the unit will return to standby mode.
- Once the temperature has been reached, the unit will beep and it will start to count your browning time.
- When done browning, press the START/STOP button to cancel the program.
Sauté Function
- This program allows you to sauté food before cooking. Sauté small amounts of food on high heat with very little oil before cooking. Pat food dry with a paper towel before sautéing. For best results, make sure the oil is hot before adding your food. Sauté the food in batches to keep the correct oil temperature for even sautéing.
- Place the removable cooking pot into the multi-cooker.
- Add the appropriate amount of oil into the removable cooking pot as indicated in your recipe. NOTE: When using the SAUTÉ function do not place the lid on the multi-cooker. If the lid is closed and you press the START/STOP button, the icon on the screen will change from close to open the unit will beep to indicate that the lid needs to be removed.
- Turn the dial until the SAUTÉ function is selected (the words will blink) and select it by pressing the dial. The screen will show the settings for this function to the right. In addition to the settings, there is also a CUSTOM setting. For instruction on how to use the CUSTOM setting, see page 8. NOTE: To go back to the main menu screen, press MENU.
- Choose the desired setting by turning the dial. Press the dial to select the setting. The preset sautéing time will appear at the top of the screen. If you wish to adjust it, turn the dial to select the desired time. Next, press the START/STOP button to confirm it.
- After you press the START/STOP button, the screen will turn green and it will display the programmed time at the top of the screen. You will also see the preheat icon on the bottom of the screen. NOTE: If you forget to press the START/STOP button, the unit will beep twice after 30 seconds, the light on the screen will turn off and the unit will return to standby mode.
- Once the temperature has been reached, the unit will beep and it will start to count your sautéing time.
- When done sautéing, press the START/STOP button to cancel the program.
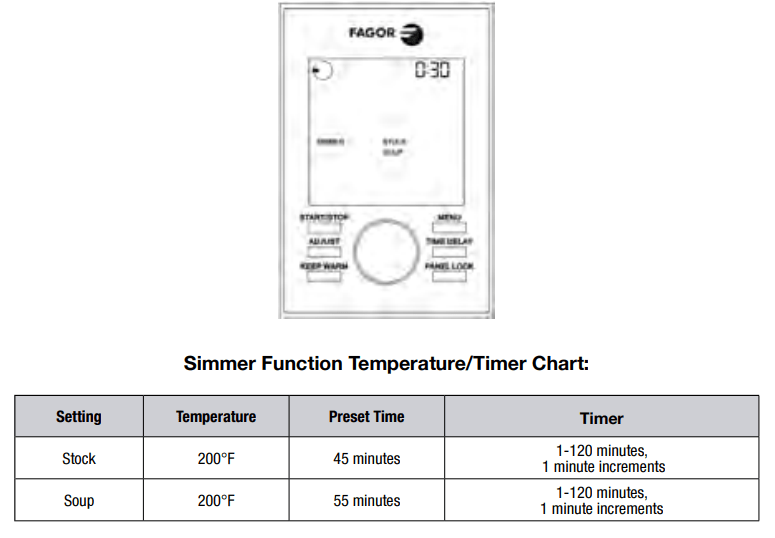
Simmer Function
- Prepare your foods with this fantastic technique used to make soups, stocks, sauces and other wonderful creations. The SIMMER function ensures your food stays just below the boiling point while still being heated.
- Place the removable cooking pot into the multi-cooker, add the ingredients and close the lid. The screen will display a Close Lid icon . If the lid is open or not closed properly, the icon on the screen will change from open to close and the unit will beep to indicate that the lid needs to be closed.
- Turn the pressure regulating knob to STEAM.
- Turn the dial until the SIMMER function is selected (the words will blink) and confirm it by pressing the dial. The screen will show the settings for this function to the right. NOTE: To go back to the main menu screen, press MENU.
- Choose your desired setting by turning the dial. Press the dial to select the setting. The preset simmering time will appear at the top of the screen. If you wish to adjust it, turn the dial to select the desired time. Next, press the START/STOP button to confirm it.
- After you press the START/STOP button, the screen will turn green and it will display the programmed time at the top of the screen. You will also see the preheat icon at the bottom of the screen. NOTE: If you forget to press the START/STOP button, the unit will beep twice after 30 seconds, the light on the screen will turn off and the unit will return to standby mode.
- Once the temperature has been reached, the unit will beep and it will start to count your simmering time.
- When the cooking time ends, the unit will beep and switch to the KEEP WARM function, which will be displayed on the screen as . Press the START/STOP button to cancel the program.
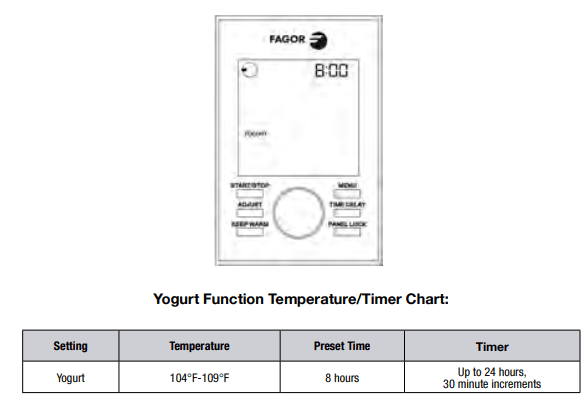
Yogurt Function
- You only need two ingredients to make yogurt at home: any type of milk and plain store-bought yogurt (with live active cultures) or starter yogurt.
- Choosing the Milk: The following types of milk may be used:
- Pasteurized milk of any fat content (full, 2%, 1% or skim milk)
- Powdered milk
- Long-life UHT sterilized milk
- Soy Milk. Be sure to use UHT soy milk, which contains one of the following ingredients: fructose, honey or malt. These ingredients are necessary for fermentation and you will not succeed if none are available in the milk.
- Live Active Cultures-Unflavored Yogurt:
- All you need is a small amount of plain, unflavored yogurt with live active cultures, often called probiotics. The plain yogurt can either be purchased from a store or used from a previous batch of homemade yogurt. Homemade yogurt can only be used a maximum of 2 times as starter yogurt. If you use the store bought yogurt and prefer a particular brand, try using that one as a starter.
- The Live & Active Culture seal, from the National Yogurt Association (NYA), helps you recognize those products containing significant amounts of live and active cultures. The seal is a voluntary identification available to all manufacturers of yogurt whose products contain at least 100 million cultures per gram at the time of manufacture. Since the seal program is voluntary, some yogurt products may have some live cultures but not carry the seal.

- NOTE: For 5 cups of milk use ½ cup of plain yogurt or 1 packet starter culture. For 1 cup of milk use about one tablespoon of plain yogurt.
- NOTE: You can make yogurt either directly in the removable cooking pot or using glass jars in the removable cooking pot by placing them in the steamer.
Yogurt Making Process:
- Remove the starter yogurt from the refrigerator so that it has time to get closer to room temperature while you heat the milk.
- Place the amount of milk desired in the removable cooking pot. Place the lid on the multi-cooker, turn the pressure regulator knob to STEAM and heat the milk to 180-185°F by using the Slow Cook function on the Custom setting on Low temperature. Turn the dial until the SLOW COOK function is selected (the words will blink) and confirm it by pressing the dial. Next, choose the CUSTOM function and press the dial to confirm. Select the Low temperature by turning the dial and confirm it by pressing it. Next, program about 30 minutes of cooking time and confirm by pressing START/STOP. Use a thermometer to make sure that proper temperature has been reached.
- Remove the removable cooking pot from heat using a kitchen towel or oven mitts and allow the milk to cool to anywhere between 100°F-110°F. To accelerate the cooling down process, place the removable cooking pot in cold water. Do not let it cool below 90°F.
- Add the yogurt or starter culture packet and use a silicone whisk to mix it with the milk until the consistency is smooth with no lumps remaining.
- Place the lid on the cooker; align the self-locking pin with the unlocked symbol and turn your lid counterclockwise until the locking pin clicks into place. The screen will display the Close Lid icon . If you press the START/STOP button to begin cooking and the lid is open or not locked properly, the icon on the screen will change from open to close, and the unit will beep to notify you that the lid needs to be closed. Turn the pressure regulator knob to STEAM when using the yogurt function. Turn the dial until the Yogurt function is selected (the words will blink) and confirm it by pressing the dial. The preset cooking time is 8 hours. Depending on the flavor of yogurt you like best, you can choose how long to cook the yogurt for by adjusting the time. To do that, turn the dial to your desired time and then press the START/STOP button to confirm it. The longest cooking time is 24 hours. The preparation time impacts the flavor of the yogurt. With a longer cooking time, the yogurt will have a tarter flavor. With a shorter time, the yogurt will have a milder flavor.
- Press the START/STOP button to begin the yogurt function. The screen will turn green and it will display the programmed time at the top of the screen. You will also see the preheat icon on the bottom of the screen. NOTE: If you forget to press the START/STOP button, the unit will beep twice after 30 seconds, the light on the screen will turn off and the unit will return to standby mode.
- Once the temperature has been reached, the unit will beep and it will begin to count down.
- When the cooking time ends, the unit will beep to let you know that the function is done and the unit will switch back to standby mode
- When the yogurt is ready, remove the lid. There may be some yellowish liquid, whey, on top of the yogurt. This is normal, whey contains nutrients and protein. Mix it back into the yogurt.
- If you prefer regular yogurt, cover and place it in the refrigerator for 2 to 3 hours before serving, or until yogurt cools down. If you prefer Greek yogurt, please refer to page 28.
NOTE: THE MULTI-COOKER SHOULD REMAIN PERFECTLY STILL DURING THE INCUBATION PROCESS. DO NOT MOVE THE APPLIANCE; DO NOT REMOVE THE REMOVABLE COOKING POT OR THE LID AS THIS WILL AFFECT THE FIRMNESS OF THE YOGURT. DO NOT ADD ANY FLAVORING BEFORE COMPLETING THE INCUBATION PROCESS.
Yogurt Making in Glass Jars:
- Remove the starter yogurt from the refrigerator so that it has time to get closer to room temperature while you heat the milk.
- When you heat the milk in glass jars, add 1 cup of water into the removable cooking pot, then insert the trivet and steamer basket rack and place your glass jars on top. Place the lid on the multi-cooker and turn the pressure regulator knob to STEAM. Select the SLOW COOK function to heat the milk to 180-185°F by turning the dial and confirm it by pressing the dial. Next, choose the CUSTOM function and press the dial to confirm. Select the Low temperature by turning the dial and confirm it by pressing it. Next, program about 30 minutes of cooking time and confirm by pressing START/STOP. Use a thermometer to make sure that proper temperature has been reached.
- Next, allow the milk to cool to lukewarm (100-110°F). To accelerate the cooling down process, take out the jars with the help of a jar lifter. Do not let it cool below 90°F.
- Add the plain yogurt with live active cultures and use a spoon to mix it with the milk until the consistency is smooth with no lumps remaining.
- Place the lid on the multi-cooker; align the self-locking pin on the handle with the open lock symbol, and turn it counterclockwise until the locking pin clicks into place. The screen will display a Close Lid icon . If you press the START/STOP button to begin cooking and the lid is open or not locked properly, the icon on the screen will change from open to close, and the unit will beep to notify you that the lid needs to be closed. Turn the pressure regulator knob to STEAM. Turn the dial until the Yogurt function is selected (the words will blink) and confirm it by pressing the dial. The preset cooking time is 8 hours. Depending on the flavor of yogurt you like best, you can choose how long to cook the yogurt for by adjusting the time. In order to do that, turn the dial to select the desired time and then press the START/STOP button to confirm it. The longest cooking time is 24 hours. The preparation time impacts the yogurt taste. With a longer cooking time, the yogurt will have a tarter flavor. With a shorter time, the yogurt will have a milder flavor.
- Press the START/STOP button to begin the yogurt function. The screen will turn green and it will display the programmed time at the top. You will also see the preheat icon on the bottom of the screen. NOTE: If you forget to press the START/STOP button, the unit will beep twice after 30 seconds, the light on the screen will turn off and the unit will return to standby mode.
- Once the temperature has been reached, the unit will beep and it will begin to count down.
- When the cooking time ends, the unit will beep to let you know that the function is done and the unit will switch back to standby mode.
- When the yogurt is ready, remove the lid. There may be some yellowish liquid, whey, on top of the yogurt. This is normal, whey contains nutrients and protein. Mix it back into the yogurt.
- If you prefer regular yogurt, cover and place in the refrigerator for 2 to 3 hours before serving, or until yogurt cools. If you prefer making Greek yogurt, please see below
Cleaning and Maintenance
Do not wash any parts of the multi-cooker in the dishwasher except for the removable cooking pot. Always wash the removable cooking pot thoroughly after every use, or if it has not been used for an extended period of time.
- Unplug the multi-cooker and let the unit cool before cleaning.
- Remove the removable cooking pot and wash with warm soapy water or in the dishwasher. Hand washing is always recommended. Rinse and dry thoroughly.
- Wipe the body of the unit with a clean damp cloth and rinse the lid with warm water and soap. Do not submerge the multi-cooker or the lid in water. NOTE: To remove odor from the inside of the lid, clean it with water and vinegar (1:1 ratio).
- Remove the condensation reservoir by pulling it down. Wash with warm, soapy water. Rinse and dry thoroughly. Replace by pushing it back into place.
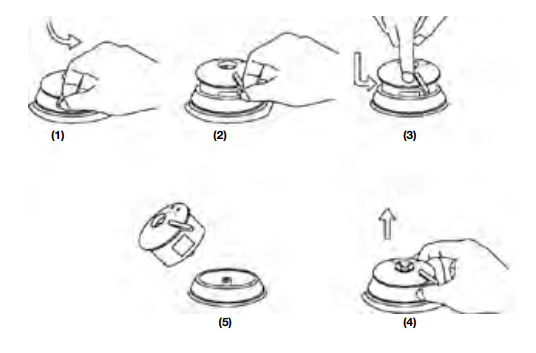
- Turn the lid upside down; grip the silicone gasket and pull up to remove. Clean the silicone gasket with warm soapy water. Rinse and dry thoroughly. Replace the gasket by positioning it inside the edge of the lid and pushing it down. Make sure the groove in the center of the gasket is positioned around the metal ring on the inside edge of the lid. NOTE: The silicone gasket must always be properly positioned on the underside of the lid; otherwise the unit will not work. Check periodically to make sure that it is clean, flexible, and not cracked or torn. (See “Getting Started” section in this manual.)
- If the silicone gasket appears damaged, cracked or torn, do not use the unit and contact the Fagor Customer Service Department at 1-800-207-0806 or visit the Fagor website to purchase a new silicone gasket at www.fagoramerica.com.
- For optimal performance, the inside of the cooker, in the area under the removable cooking pot where the temperature sensor and heating pad are located, must be cleaned after each use. Wipe with a soft damp cloth and be sure to dry thoroughly. 8. Never use abrasive cleaners or scouring pads to clean any of the parts.
Cleaning the Pressure Regular Knob
ALWAYS check that the pressure regulator knob and the pressure safety valves are in good working order before each use.
- After the unit has cooled, remove the lid from the multi-cooker.
- Press down and turn the pressure regulator knob counterclockwise past STEAM to CLEAN and carefully lift to remove. Look through the removed knob to make sure there is no particle build-up, and put it under running water to clean.
- Turn the lid over and place it on a table top. Pull out the anti-blocking case. Using a brush or toothpick, check and remove any food or foreign particles that may be lodged in the pressure discharging tube that is located inside the anti-block cover. Replace the anti-blocking case pressing it down back into place.
- Replace the pressure regulator knob by lining the CLEAN dot with the dot on the lid of the unit and turning clockwise until it goes into place. The dot on the base of the pressure regulator should line up with the PRESSURE or STEAM setting on the pressure regulator knob. If it doesn’t, remove the knob again and try realigning the dots the other way around.
Troubleshooting
If the LUX™ LCD detects an internal error or a wrong connection, it will show an error code on the display panel and will stop functioning. These codes will allow you to identify the cause of the error and help you find the solution to the problem. If the error persists, please call our customer service department for assistance at 1-800- 207-0806.
- E1: Internal circuits have disconnected. Self-help: Call our customers service department for assistance.
- E2: The internal sensor has short-circuited or the unit is overheating. Self-help: Try to cool the unit by turning it off and unplugging as well as removing the cooking pot.
- E3: Unit is overheating. Self-help: Try to cool the unit by turning it off and unplugging as well as removing the cooking pot. If the E3 message persists, the cooking pot or heating plate may be deformed. You will need to contact our customer service department.
- E4: Pressure switch has malfunctioned. Self-help: Check the cooking pot for warping. Check the heating plate for any food residue.
| Problem |
Easy Solution |
| The lid cannot be opened at the end of the cooking cycle |
- Please be advised that the lid can’t be opened until the floating valve drops down.
- Make sure you turn the regulator to steam until all internal pressure is released and the lid opens easily.
- If this occurs frequently, the gasket may need to be adjusted.
|
| Steam is escaping from the lid |
- Close the lid correctly ensuring there is no gap between lid and base.
- Ensure the silicone gasket is clean, free from damage or cracks and is properly inserted.
- If problem persists, call our customer service department.
|
| Self-locking pin does not rise |
- Close the lid correctly ensuring there is no gap between lid and base.
- Ensure the silicone gasket is clean, free from damage or cracks and is properly inserted.
- Ensure that the self-locking pin can move freely.
- If problem persists, call our customer service department.
|
| Cooker is not getting to pressure |
- Ensure that the pressure regulator valve is properly placed in its housing.
- Add more liquid/food to the bowl. There should be a minimum of 1 cup of food and liquid in total.
- If problem persists, call our customer service department.
|
| Timer will not count down |
- When the lid is locked, ensure the self-locking pin is properly secured.
- Ensure that the pressure regulator valve is properly placed in its housing.
- Add more liquid/food to the bowl. There should be a minimum of 1 cup of food and liquid in total.
- If problem persists, call our customer service department.
|
| Water is collecting on the countertop |
- Ensure the cooker is on a flat, level surface and that the condensation drip cup is installed on the side of the cooker.
- Empty the condensation drip cup.
|
| The unit is beeping and not turning on |
- Ensure that the lid is on the correct position. For Brown and Sauté the lid needs to be off. If the lid is closed under these functions the unit will beep and an icon will indicate to open the lid. For all other functions, the lid must be closed. If the lid is open the unit will beep and an icon will indicate to close the lid.
|
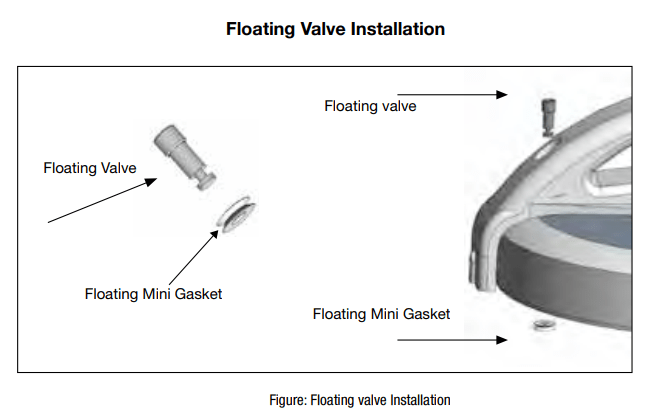
Insert the floating valve from the top of the lid and secure it in place with the washer from the bottom of the lid.