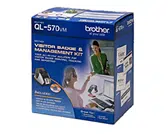
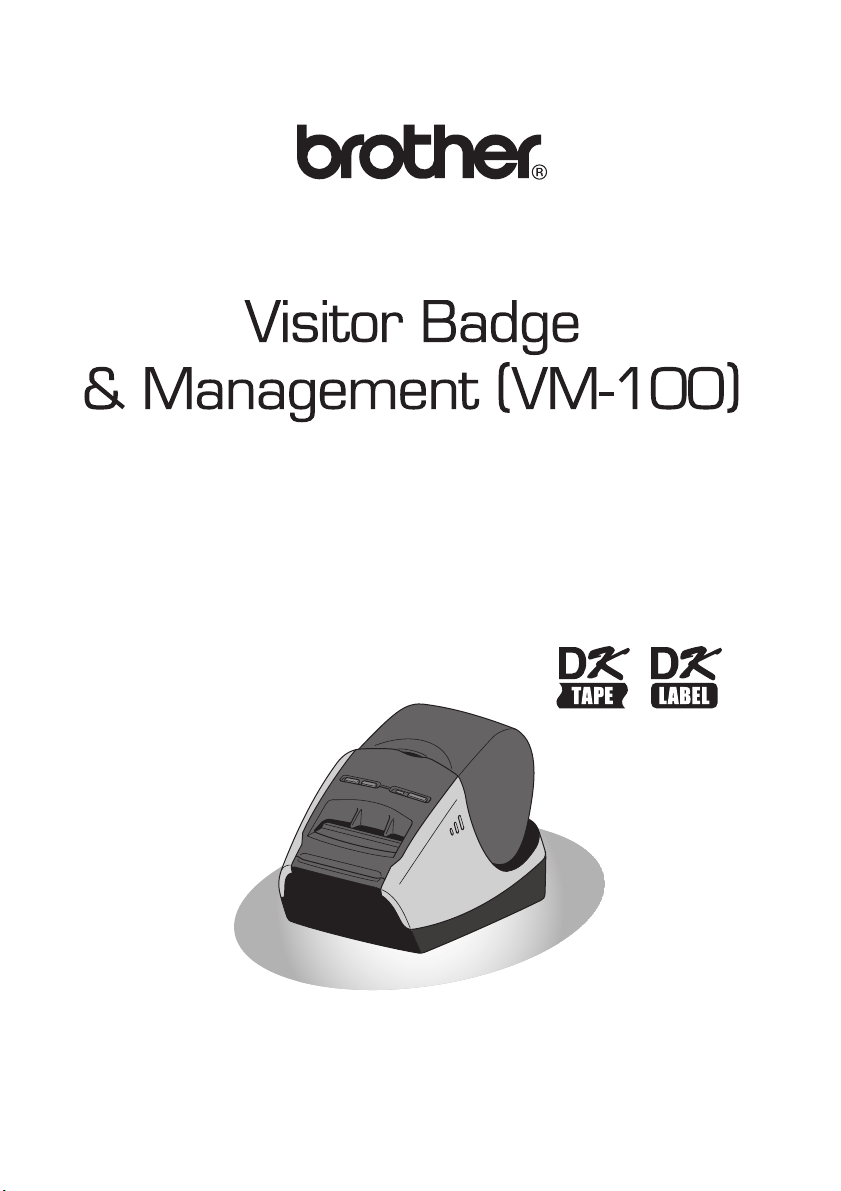
User's Guide
QL-570VM
Be sure to read this guide before using the machine. We recommend that
you keep this guide nearby for future reference.
www.brother.com

2
Thank you for purchasing the Brother QL-570VM.
This guide briefly describes the steps to start using the Brother QL-570VM.
We strongly recommend that you read this guide carefully before using the Brother
QL-570VM, and then keep it nearby for future reference.
To take full advantage of our service and support we recommend that you take this
opportunity to register with us by visiting us at:
Online User Registration
http://registermybrother.com/
Online Support Page
http://solutions.brother.com/
If a UPC must be entered, refer to the back cover.
NOTE: It is also possible to access the above sites from the online user registration
window on the included CD-ROM. We look forward to your registration.
Federal Communications Commission (FCC) Declaration of Conformity (For USA Only)
Responsible Party: Brother International Corporation
100 Somerset Corporate Boulevard
Bridgewater, NJ 08807-0911 USA
TEL: (908) 704-1700
declares that the product
Products Description: Label Printer
Product Name: QL-570VM
Model Number: QL-570
This device complies with Part 15 of the FCC Rules. Operation is subject to the following two
conditions: (1) this device may not cause harmful interference, and (2) this device must accept
any interference received, including interference that may cause undesired operation.
This equipment has been tested and found to comply with the limits for a Class B digital device,
pursuant to Part 15 of the FCC Rules. These limits are designed to provide reasonable
protection against harmful interference in a residential installation. This equipment generates,
uses and can radiate radio frequency energy and, if not installed and used in accordance with
the instructions, may cause harmful interference to radio communications. However, there is no
guarantee that interference will not occur in a particular installation. If this equipment does cause
harmful interference to radio or television reception, which can be determined by turning the
equipment off and on, the user is encouraged to try to correct the interference by one or more
of the following measures:
• Reorient or relocate the receiving antenna.
• Increase the separation between the equipment and receiver.
• Connect the equipment into an outlet on a circuit different from that to which the receiver is
connected.
• Consult the dealer or an experienced radio/TV technician for help.
Important
• The enclosed USB interface cable should be used in order to ensure compliance with the
limits for a Class B digital device.
• Changes or modifications not expressly approved by Brother Industries, Ltd. could void the
user's authority to operate the equipment.

3
Brother
®
Two-Year Limited Warranty and Replacement Service
(USA Only)
Who is covered:
• This limited warranty ("warranty") is given only to the original end-use/retail
purchaser (referred to in this warranty as "Original Purchaser") of the
accompanying product, consumables and accessories (collectively referred to in
this warranty as "this Product").
• If you purchased a product from someone other than an authorized Brother reseller
in the United States or if the product was used (including but not limited to floor
models or refurbished product), prior to your purchase you are not the Original
Purchaser and the product that you purchased is not covered by this warranty.
What is covered:
• This Product includes a Machine and Consumable and Accessory Items.
Consumable and Accessory Items include but are not limited to label and tape rolls
and print servers.
• Except as otherwise provided herein, Brother warrants that the Machine and the
accompanying Consumable and Accessory Items will be free from defects in
materials and workmanship, when used under normal conditions.
• This warranty applies only to products purchased and used in the United States.
For products purchased in, but used outside, the United States, this warranty
covers only warranty service within the United States (and does not include
shipping outside the United States).
What is the length of the Warranty Periods:
• Machines: two year from the original purchase date.
• Accompanying Consumable and Accessory Items: 90 days from the original
purchase date or the rated life of consumable, whichever comes first.
What is NOT covered:
This warranty does not cover:
(1) Physical damage to this Product;
(2) Damage caused by improper installation, improper or abnormal use, misuse,
neglect or accident (including but not limited to transporting this Product without
the proper preparation and/or packaging);
(3) Damage caused by another device or software used with this Product (including
but not limited to damage resulting from use of non Brother
®-brand parts and
Consumable and Accessory Items);
(4) Consumable and Accessory Items that expired in accordance with a rated life;
and,
(5) Problems arising from other than defects in materials or workmanship.
This limited warranty is VOID if this Product has been altered or modified in any way
(including but not limited to attempted warranty repair without authorization from
Brother and/or alteration/removal of the serial number).

4
What to do if you think your Product is eligible for warranty service:
Report your issue to our P-touch Customer Service Hotline at 1-877-BROTHER (1-
877- 276-8437) or to a Brother Authorized Service Center within the applicable
warranty period. Supply Brother or the Brother Authorized Service Center with a
copy of your dated bill of sale showing that this Product was purchased within the
U.S.. For the name of local Brother Authorized Service Center(s), call 1-877-
BROTHER (1-877-276-8437) or visit www.brother-usa.com.
What Brother will ask you to do:
After contacting Brother or a Brother Authorized Service Center, you may be required
to deliver (by hand if you prefer) or send the Product properly packaged, freight
prepaid, to the Authorized Service Center together with a photocopy of your bill of
sale.
You are responsible for the cost of shipping, packing product, and insurance
(if you desire).
You are also responsible for loss or damage to this Product in shipping.
INTRODUCTION
What Brother will do:
If the problem reported concerning your Machine and/or accompanying Consumable
and Accessory Items is covered by this warranty and if you first reported the problem
to Brother or an Authorized Service Center within the applicable warranty period,
Brother or its Authorized Service Center will repair or replace the Machine and/or
accompanying Consumable and Accessory Items at no charge to you for parts or
labor. The decision as to whether to repair or replace the Machine and/or
accompanying Consumable and Accessory Items is made by Brother in its sole
discretion.
Brother reserves the right to supply a refurbished or remanufactured replacement
Machine and/or accompanying Consumable and Accessory Items and use
refurbished parts provided such replacement products conform to the manufacturer's
specifications for new product/parts.
The repaired or replacement Machine and/or accompanying Consumable and
Accessory Items will be returned to you freight prepaid or made available for you to
pick up at a conveniently located Authorized Service Center.
If the Machine and/or accompanying Consumable and Accessory Items are not
covered by this warranty (either stage), you will be charged for shipping the Machine
and/or accompanying Consumable and Accessory Items back to you and charged for
any service and/or replacement parts/products at Brother's then current published
rates.

5
The foregoing are your sole (i.e., only) and exclusive remedies under this
warranty.
What happens when Brother elects to replace your Machine:
When a replacement Machine is authorized by Brother, and you have delivered the
Machine to an Authorized Service Center, the Authorized Service Center will provide
you with a replacement Machine after receiving one from Brother. If you are dealing
directly with Brother, Brother will send to you a replacement Machine with the
understanding that you will, after receipt of the replacement Machine, supply the
required proof of purchase information, together with the Machine that Brother agreed
to replace. You are then expected to pack the Machine that Brother agreed to replace
in the package from the replacement Machine and return it to Brother using the
prepaid freight bill supplied by Brother in accordance with the instructions provided by
Brother. Since you will be in possession of two machines, Brother will require that you
provide a valid major credit card number.
Brother will issue a hold against the credit card account number that you provide until
Brother receives your original Product and determines that your original Product is
entitled to warranty coverage. Your credit card will be charged up to the cost of a new
Product only if: (i) you do not return your original Product to Brother within five (5)
business days; (ii) the problems with your original Product are not covered by the
limited warranty; (iii) the proper packaging instructions are not followed and has
caused damage to the product; or (iv) the warranty period on your original Product has
expired or has not been sufficiently validated with a copy of the proof of purchase (bill
of sale).
The replacement Machine you receive (even if refurbished or remanufactured) will be
covered by the balance of the limited warranty period remaining on the original
Product, plus an additional thirty (30) days. You will keep the replacement Machine
that is sent to you and your original Machine shall become the property of Brother.
Retain your original Accessory Items and a copy of the return freight bill,
signed by the courier.

6
Limitations:
Brother is not responsible for damage to or loss of any equipment, media, programs
or data related to the use of this Product. Except for that repair or replacement as
described above, Brother shall not be liable for any direct, indirect, incidental or
consequential damages or specific relief. Because some states do not allow the
exclusion or limitation of consequential or incidental damages, the above limitation
may not apply to you.
THIS WARRANTY IS GIVEN IN LIEU OF ALL OTHER WARRANTIES, WRITTEN
OR ORAL, WHETHER EXPRESSED BY AFFIRMATION, PROMISE,
DESCRIPTION, DRAWING, MODEL OR SAMPLE. ANY AND ALL WARRANTIES
OTHER THAN THIS ONE, WHETHER EXPRESS OR IMPLIED, INCLUDING
IMPLIED WARRANTIES OF MERCHANTABILITY AND FITNESS FOR A
PARTICULAR PURPOSE, ARE HEREBY DISCLAIMED.
• This Limited Warranty is the only warranty that Brother is giving for this Product. It
is the final expression and the exclusive and only statement of Brother's obligations
to you. It replaces all other agreements and understandings that you may have with
Brother or its representatives.
• This warranty gives you certain rights and you may also have other rights that may
vary from state to state.
• This Limited Warranty (and Brother's obligation to you) may not be changed in any
way unless you and Brother sign the same piece of paper in which we (1) refer to
this Product and your bill of sale date, (2) describe the change to this warranty and
(3) agree to make that change.
Important:
We recommend that you keep all original packing materials, in the event that you ship
this Product.

7
Important Information
Should you have questions, or need information about your Brother Product, we have
a variety of support options for you to choose from:
USA-Customer Service:
Customer Service
1-877-BROTHER (1-877-276-8437)
Customer Service
1-901-379-1210 (fax)
Website
www.brother-usa.com
Supplies / Accessories
www.brothermall.com
or 877-552-6255
BROTHER INTERNATIONAL CORPORATION
100 SOMERSET CORPORATE BLVD.
BRIDGEWATER, NEW JERSEY 08807-0911
Record your model and serial number and your date and location of Purchase below
for your records. Keep this information with your proof of purchase (bill of sale) in case
your Product requires service.
Model #
Serial #
Date of purchase:
Store where purchased:
Location of store:
Important: We recommend that you keep all original packing materials, in the event
that you need to ship the machine.
Save Time - Register On-Line!
Don’t stand in line at the post office or worry about lost mail. Visit us on-line at
www.registermybrother.com
Your product will immediately be registered in our database and you can be on your way!
Also, while you're there, look for contests and other exciting information!
If a UPC must be entered, refer to the back cover.

8
Contents
Contents......................................................... 8
1 Introduction ................................................. 12
1-1. General Information ................................................... 12
Compilation and Publication Notice............................................12
Trademarks ................................................................................ 12
Symbols Used in this Guide ....................................................... 13
1-2. Safety Precautions..................................................... 14
To use the machine safely ......................................................... 15
General Precautions................................................................... 17
2 Getting started ............................................. 19
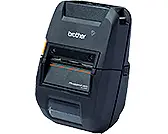
2-1. Unpacking the QL-570VM.......................................... 19
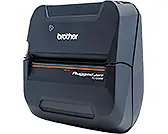
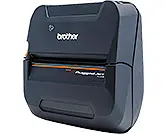
2-2. Parts Description (Main Printing Unit)........................ 20
Front ........................................................................................... 20
Rear............................................................................................20
2-3. Connecting the Power Supply.................................... 21
2-4. Removing the Protective Sheet ................................. 22
2-5. Installing the DK Roll.................................................. 23
2-6. Status LED Indications............................................... 25
2-7. Maintenance .............................................................. 26
Print head maintenance ............................................................. 26
Roller maintenance .................................................................... 26
Label outlet maintenance ........................................................... 28
3 Installing the VM-100 Software.................. 29
3-1. Introduction ................................................................ 29
VM-100 Modes ........................................................................... 29
3-2. Installing the VM-100 Software .................................. 30
3-3. Uninstalling VM-100................................................... 34
3-4. Uninstalling the QL-570 printer driver ........................ 35

9
Contents
4 Using the VM-100 Software ....................... 38
4-1. Launching the VM-100 Software................................ 38
Initial startup operation (Specifying the database file path)........ 39
4-2. Logging On ................................................................ 42
4-3. Logging Off ................................................................ 43
Administrator mode .................................................................... 43
Reception mode ......................................................................... 43
Self Check-in mode.................................................................... 43
5 Administrator Mode .................................... 44
5-1. Administrator Mode Dialog Box ................................. 44
5-2. Initial Settings............................................................. 45
Editing login settings ..................................................................45
Registering host information....................................................... 50
Importing host information.......................................................... 52
Options ....................................................................................... 56
5-3. List Management ....................................................... 64
Displaying the visitor log............................................................. 64
Exporting the visitor log .............................................................. 66
Displaying host information ........................................................ 67
5-4. Important Administrator Functions ............................. 71
Printing emergency reports ........................................................ 71
Restoring the backup file............................................................ 72
6 Reception Mode .......................................... 74
6-1. Receptionist Procedures............................................ 74
Making a reservation and signing in a visitor ............................. 74
Signing out a visitor .................................................................... 74
6-2. Reception Mode Window ........................................... 75
6-3. Entering Visitor Information........................................ 77
Entering new visitor information ................................................. 77
Recalling Visitor Information from Previous Visits
("Signed Out") ............................................................................ 80
Searching for host information ................................................... 82

Contents
10
6-4. Including Visitor Photos on Badges ........................... 84
6-5. Previewing Visitor Badges ......................................... 85
6-6. Signing In (Issuing Visitor Badges)/
Signing Out Visitors ................................................... 86
Signing in.................................................................................... 86
Signing out ................................................................................. 89
6-7. Issuing Visitor Badges without Signing In .................. 90
6-8. Issuing Parking Permits ............................................. 92
6-9. Making Visitor Reservations ...................................... 93
6-10. Editing Visitor Reservations ....................................... 95
6-11. Deleting Visitor Information........................................ 97
6-12. Printing Emergency Reports ...................................... 98
6-13. Importing Visitor List .................................................. 98
6-14. Backing Up Visitor Information................................. 100
7 Self Check-in Mode .................................. 101
7-1. Initial Screen of Self Check-in Mode........................ 101
7-2. Visitor Operations .................................................... 102
7-3. Exiting Self Check-in Mode or Printing the
Emergency Report ................................................... 103
Unlocking.................................................................................. 103
8 Customizing Layouts................................. 105
9 Troubleshooting ........................................ 109
9-1. QL-570 Label Printer................................................ 109
9-2. Visitor Badge & Management Software (VM-100) ... 110
10 Error Messages.......................................... 112

11
Contents
11 Reference................................................... 114
11-1. Main Specifications .................................................. 114
Product specifications .............................................................. 114
Operating environment............................................................. 114
11-2. Accessories (For USA Only) .................................... 115
DK Rolls .................................................................................. 115
Cleaning Sheet......................................................................... 116

12
1 Introduction
1-1. General Information
Compilation and Publication Notice
• Under the supervision of Brother Industries Ltd., this guide has
been compiled and published, covering the latest product’s
descriptions and specifications.
• The contents of this guide and the specifications of this product
are subject to change without notice.
• The actual windows and dialog boxes of the software and its
operation may differ from those described in this manual. The
names of people and companies used in this manual and software
are fictional.
• Brother reserves the right to make changes without notice in the
specifications and materials contained herein and shall not be
responsible for any damages (including consequential) caused by
reliance on the materials presented, including but not limited to
typographical and other errors relating to the publication.
• The screen images in this guide can differ depending on your
Operating System (OS) or printer.
© 2008 Brother Industries Ltd.
Trademarks
• The Brother logo is a registered trademark of Brother Industries,
Ltd.
• Brother is a registered trademark of Brother Industries, Ltd.
© 2008 Brother Industries, Ltd. All rights reserved.
• Microsoft, Windows Vista, Windows Server and Windows are
either registered trademarks or trademarks of Microsoft Corp. in
the United States and/or other countries.
• The names of other software or products used in this document
are trademarks or registered trademarks of the respective
companies that developed them.
• Each company whose software title is mentioned in this guide has
a Software License Agreement specific to its proprietary
programs.
• All other brand and product names mentioned in this User's Guide
are registered trademarks of their respective companies.

13
Introduction
1
Symbols Used in this Guide
The symbols used throughout this guide are as follows:
NOTE
• This symbol shows information or directions that should be followed. If
ignored, the result may be damage, or failed operations.
Introduction
1
14
1-2. Safety Precautions
We recommend that you read all of these instructions prior to using this product,
and save them for later reference. Follow all warnings and instructions marked on
the product.
The symbols used in this guide are as follows:
WARNING
Tells you what to do to avoid the risk of injury.
CAUTION
Tells you about procedures you must follow to prevent damage to the
machine.
Action NOT allowed to do
DO NOT splash the product with or immerse the product in water.
Mandatory action
Alerts to the possibility of electrical shock
DO NOT disassemble the product.
DO NOT touch a given portion of the product.
Unplugging
15
Introduction
1
To use the machine safely
WARNING
Follow these guidelines to avoid fire, electric shock, or other damage.
The Machine
Unplug the power cord immediately and stop using the machine during an electrical storm.
There may be a remote risk of electric shock from lightning.
Do not touch any metal parts near the print head. The print head becomes very hot during
use and remains very hot immediately after use. Do not touch it directly with your hands.
Dispose of plastic bags correctly and keep away from babies and children. Do not wear or
play with plastic bags.
Unplug the power cord immediately and stop using the machine if you notice any abnormal
odor, heat, discoloration, deformation or anything unusual whilst the machine is in use or
storage.
Do not disassemble the machine. For inspection, adjustment and repair of the machine
contact the retail outlet where the machine was purchased or your local authorized service
center.
Do not drop, hit or otherwise bang the machine.
Do not hold and lift the machine by the DK Roll cover. The cover could come off and the
machine could fall and become damaged.
Do not allow the machine to get wet in any way.
Do not use the machine with foreign objects in it. If water or any foreign objects should
enter the machine, unplug the power cord from the electric outlet and remove the foreign
object. If necessary, contact the retail outlet where the machine was purchased or your
local authorized service center.
Do not hold the machine with only one hand. The machine may slip out of your hand.
Never disassemble the machine or allow it to get wet to avoid possible fire or electrical
shock. Doing so could cause an electrical shock or fire.
Do not use paint thinner, benzene, alcohol or any other organic solvents to clean the
machine. Doing so may cause damage to the surface finish. Use a soft, dry cloth to clean
the machine.
Do not put any heavy objects or objects containing water on top of the machine.
If water or any foreign object enters the machine, contact the retail outlet where the
machine was purchased or your local authorized service center. If you continue to use the
machine with water or a foreign object in the machine, the machine may be damaged or
personal injury could result.
The electrical outlet should be close to the machine and be easily accessible.
Do not touch the cutter. Personal injury could result.
Do not expose the machine to direct sunlight or near heaters or other hot appliances, in
any area exposed to extremely high or low temperatures, high humidity or dusty areas.
Doing so could cause the machine to malfunction.
Introduction
1
16
Follow these guidelines to avoid fire, electric shock, or other damage.
Power Cord
Use only the authorized power source (120V AC) for the machine.
Use only the power cord included with the machine.
Do not handle the power cord or plug if your hands are wet.
Do not overload the electrical outlet sockets with too many appliances or plug the power
cord into a damaged electrical outlet.
Do not cut, damage, alter or place heavy objects on the power cord.
Do not use the power cord if it is damaged.
Ensure the power cord is correctly inserted into the electrical outlet.
Always hold the power cord when unplugging the power cord from or plugging it into
electrical outlet. Do not pull on the power cord. The wire in the electrical cord may become
damaged.
If the machine will not be used for an extended period, remove the power cord from the
electrical outlet.
Cutter
Do not touch the blade of the cutter.
Do not open the top cover when the cutter is operating.
CAUTION
Follow these guidelines to avoid fire, electric shock, or other damage.
Installation/Storage
Put the machine on a flat, stable surface such as a desk.
Do not put any heavy objects on top of the machine.
DK Roll (DK Label, DK Tape)
Be careful not to drop the DK Roll.
DK Rolls use thermal paper and thermal film. Both the label and print will fade with sunlight
and heat. Do not use DK Rolls for outdoor use that requires durability.
Depending on the area, material, and environmental conditions, the label may unpeel or
become irremovable, the color of the label may change or be transferred to other objects.
Before applying the label, check the environmental condition and the material. Test the
label by affixing a small piece of it to an inconspicuous area of the intended surface.
WARNING

17
Introduction
1
General Precautions
The Machine
• The machine is a precision machine. Do not drop, hit or otherwise bang the
machine.
• Do not lift the machine by the DK Roll compartment cover. The cover could
come off and the machine could fall and become damaged.
• The machine may malfunction if left near a television, radio, etc. Do not use
the machine near any machine that can cause electromagnetic interference.
• Do not insert any objects into or block the label output slot or USB port.
• Use only the interface cable (USB cable) included with the machine.
• When not in use for an extended period, remove the DK Roll from the
machine.
• Do not attempt to print labels while the DK Roll cover is open.
Power Cord
• You should put the machine near an easily accessible, standard electrical
socket.
DK Roll (DK Label and DK Tape)
• Use only genuine Brother accessories and supplies (with , marks).
Do not use any unauthorized accessories or supplies.
• If the label is attached to a wet, dirty, or oily surface, it may peel off easily.
Before applying the label, clean the surface to which the label will be applied.
• DK Roll uses thermal paper and thermal film so that ultraviolet rays, wind,
and rain may cause the color of the label to fade and the ends of the label
to peel off.
• Do not expose the DK Rolls to direct sunlight, high temperatures, high
humidity, or dust. Store in a cool, dark place. Use the DK Rolls soon after
opening the package.
• Scratching the printed surface of the label with your finger nails or metal
objects, or touching the printed surface with hands dampened by water,
sweat, or medicated cream, etc., can cause the color to change or fade.
• Do not apply labels to any persons, animals, or plants.
• As the end of the DK Roll is designed to not adhere to the label spool, the
last label may not be cut properly. If this happens, remove the remaining
labels, insert a new DK Roll, and reprint the last label.
Note: To account for this, the number of DK Labels included on each DK Roll
may be more than indicated on the package.

Introduction
1
18
• If a label is removed after begin applied to a surface, some portion of the
label may remain. Remove the remaining portion before attaching a new
label.
• Some DK Rolls use permanent adhesive for their labels. These labels
cannot be easily peeled off once attached.
• Prior to using CD/DVD labels, be sure to follow the instructions in your CD/
DVD player's instruction guide regarding applying CD/DVD labels.
• Do not use CD/DVD labels in a slot loading CD/DVD player, for example a
CD player in a car where the CD is slid into a slot in the CD player.
• Do not peel off the CD/DVD label once it is applied to the CD/DVD, a thin
surface layer may come off, resulting in damage to the disk.
• Do not apply CD/DVD labels to CD/DVD disks designed for use with ink jet
printers. Labels peel off these disks easily and using disks with peeled labels
can result in loss or damage of data.
• When applying CD/DVD labels, use the applicator included with the CD/
DVD label rolls. Failure to do so could cause damage to the CD/DVD player.
• User's shall take full responsibility for applying CD/DVD labels. Brother
accepts no responsibility for any loss or damage of data caused by the
inappropriate use of CD/DVD labels.
CD-ROM and Software
• Do not scratch or subject the CD-ROM to high or low temperatures.
• Do not put heavy objects on the CD-ROM or apply force to the CD-ROM.
• The software contained on the CD-ROM is meant for use with the machine
only. See the License on the CD for details. This software may be installed
on multiple computers for use in an office, etc.
When you handle personal information, comply with relevant
laws or guidelines in your country.
19
2 Getting started
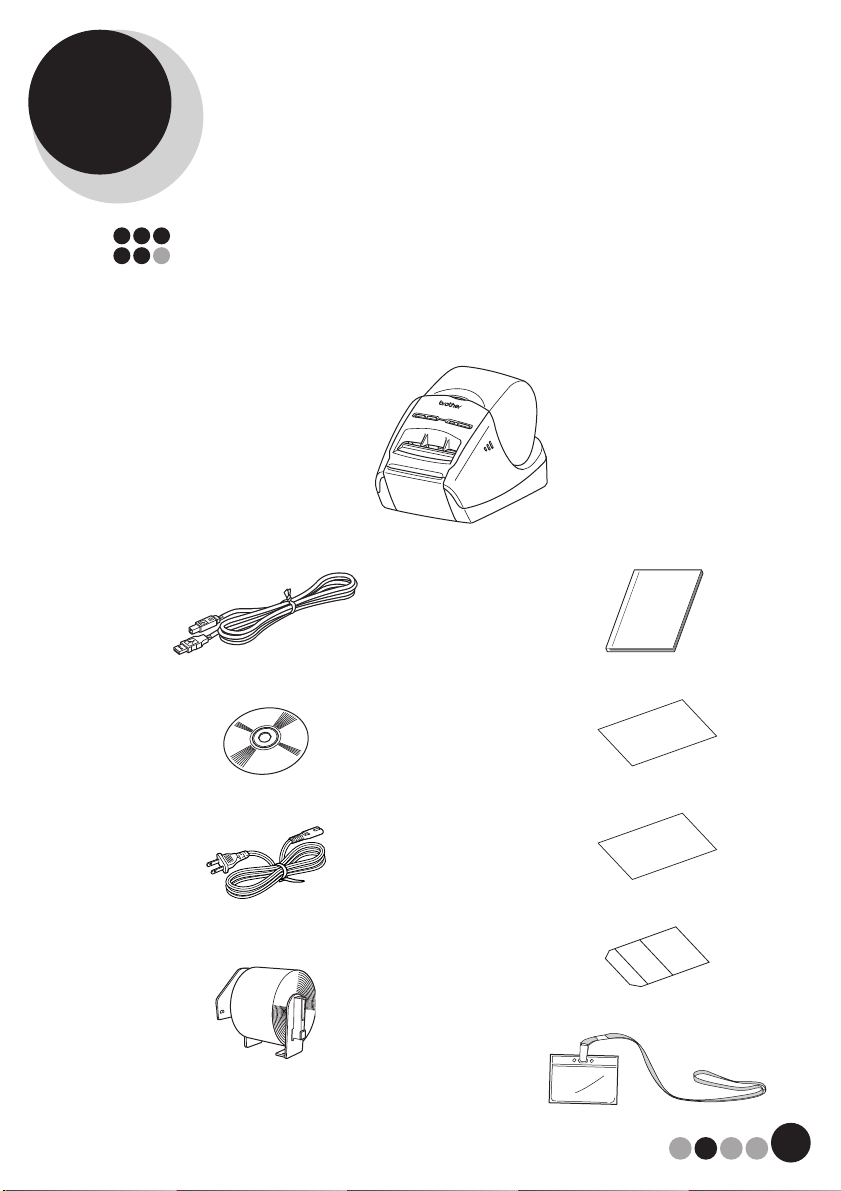
2-1. Unpacking the QL-570VM
Check that the package contains the following before using the printer. If any item
is missing or damaged, contact your Brother dealer.
QL-570
USB cable
CD-ROM
AC Power cord
The plug may differ by country.
DK Roll
The Brother QL-570VM includes two
rolls of DK-N5224, containing 2-1/8" (54
mm) × 100 feet non-adhesive tape.
User's Guide
Quick Reference Sheet
Registration Card
Cleaning Sheet
Badge holders and lanyards (12)

Getting started
2
20
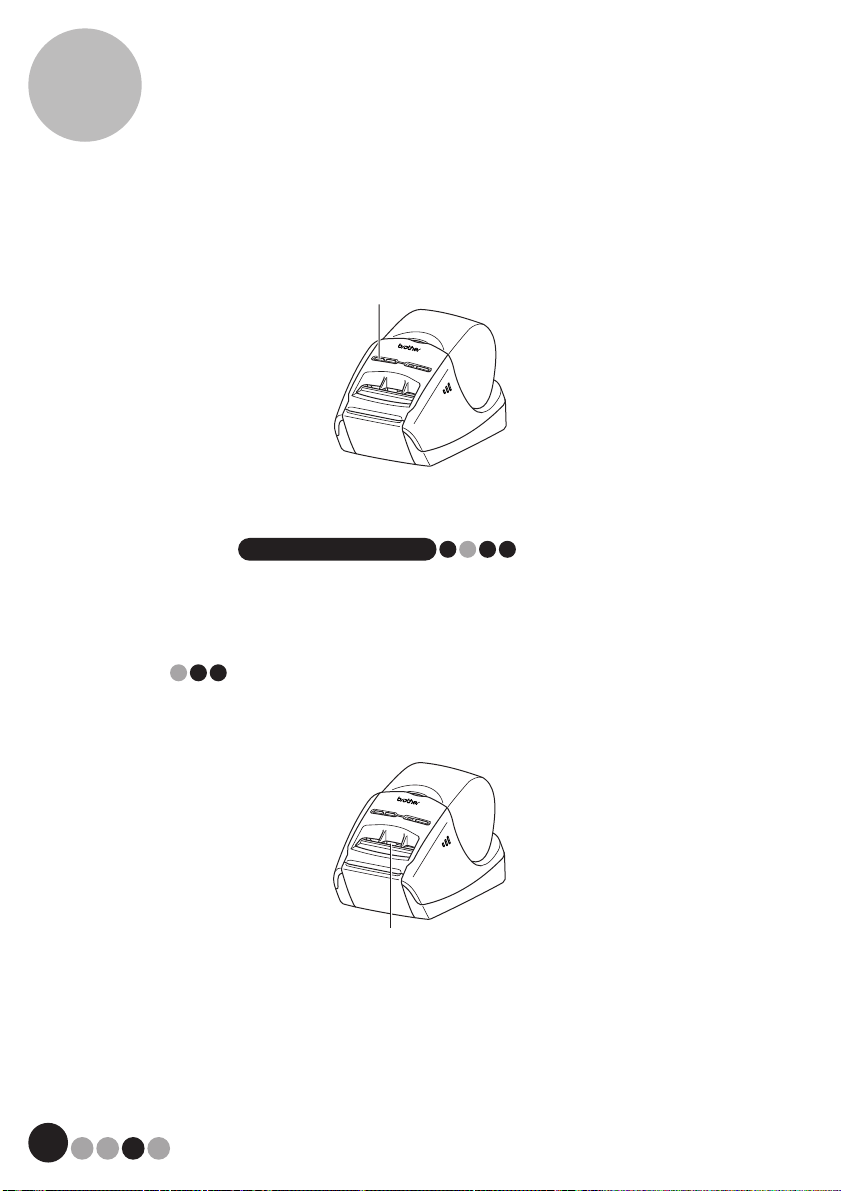
2-2. Parts Description (Main Printing
Unit)
Front
Rear
FEED button
CUT button
LED lamp
ON/OFF button
DK Roll compartment cover
Power port
Power cord
USB port
21
Getting started
2
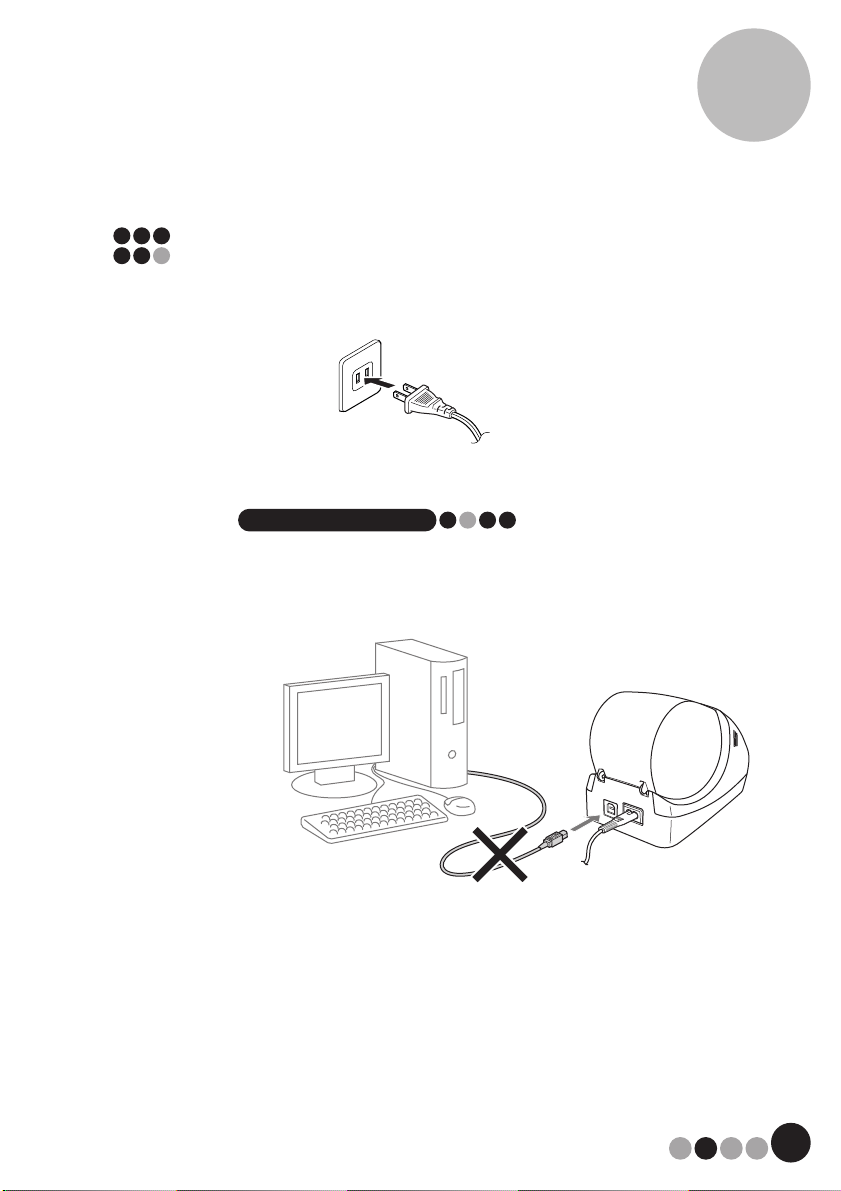
2-3. Connecting the Power Supply
Connect the power cord to the QL-570 and then plug the power cord into a 120V
AC electrical outlet.
NOTE
• Do not pull the power cord when unplugging it from the electrical outlet.
The wire in the power cord may become damaged.
• Do not connect the QL-570 to the computer until directed to do so when
installing the printer driver.
The plug may differ by country.

Getting started
2
22
2-4. Removing the Protective Sheet
1. Hold the Brother QL-570 by the front of the machine, and firmly
lift the DK Roll compartment cover to open the cover.
2. Remove the protection sheet.
Protection sheet
Protection sheet
23
Getting started
2
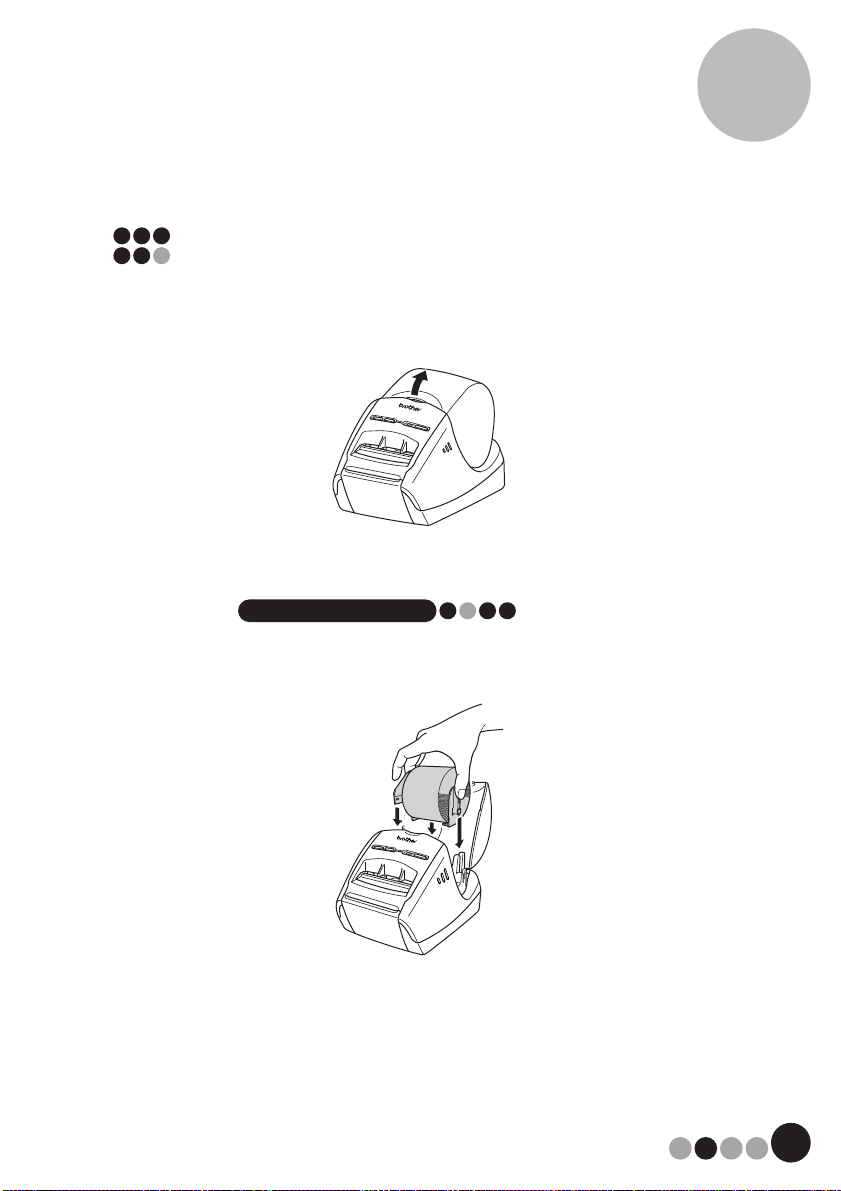
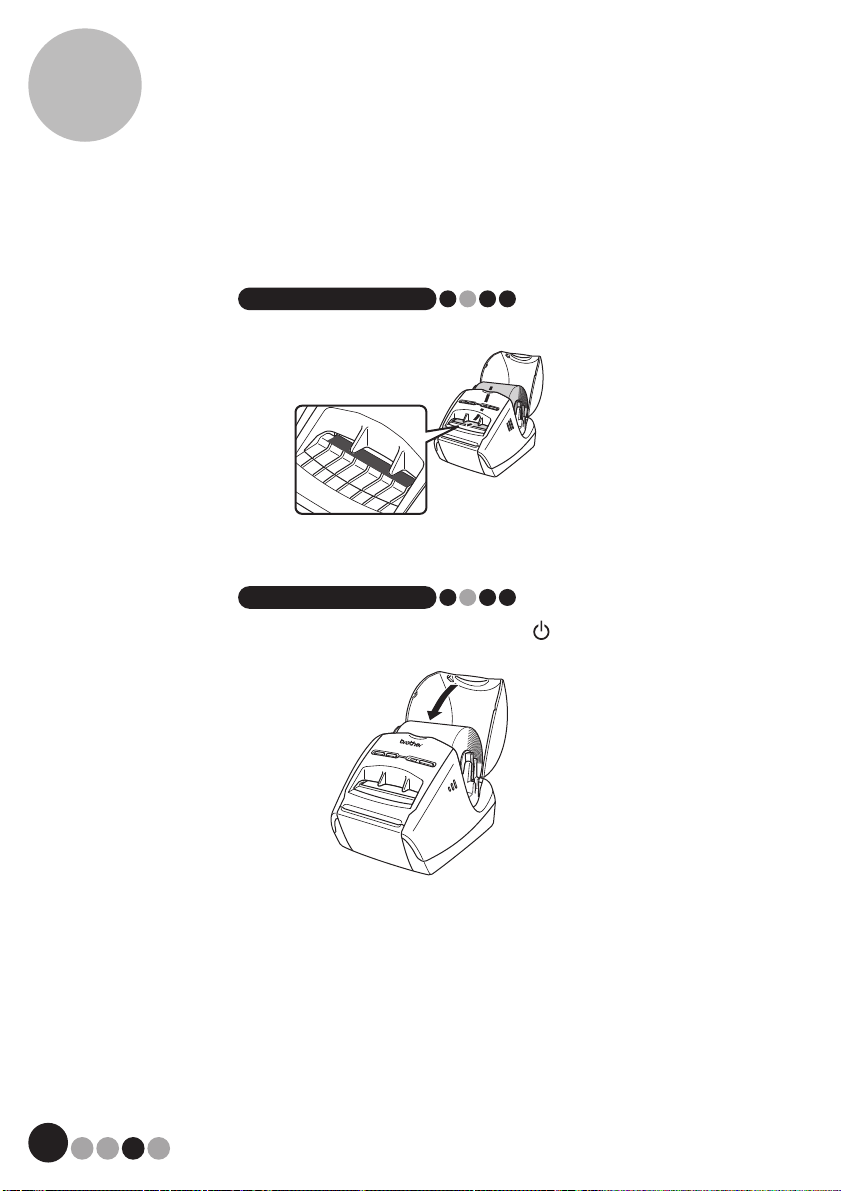
2-5. Installing the DK Roll
1. Press and hold the ON/OFF button to turn the QL-570 off. Hold
the DK Roll compartment cover at the front of the Brother QL-
570 and firmly lift up to open the cover.
2. Put the spool into the spool guides in the DK Roll compartment.
NOTE
• Make sure that the spool arms are inserted firmly in the spool guides on
the left and right.
• Insert the spool into the machine as shown in the illustration.
Getting started
2
24
3. Thread the end of the DK Roll into the slot until it aligns to the
shaded area shown in the illustration.
NOTE
• Align the end of the roll with the upright edge of the label output slot.
4. Close the DK Roll compartment cover.
NOTE
• When you press the ON/OFF button ( ) to turn the Brother QL-570 on,
the end of the DK Die-cut Label is aligned automatically.
25
Getting started
2
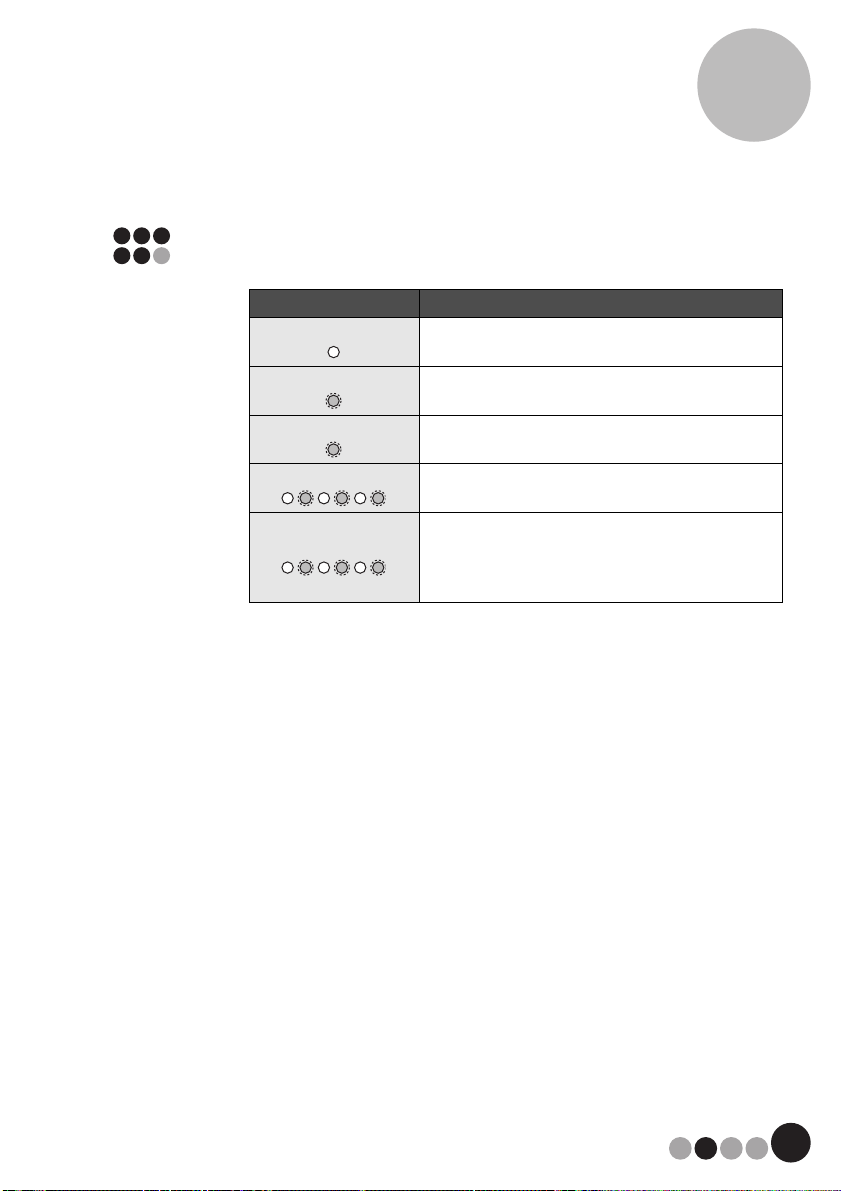
2-6. Status LED Indications
Lamp Condition
Lamp is not lit
Power is OFF.
Lamp is Green
Power is ON.
Lamp is Orange
The roll cover is opened. Close the roll cover properly.
Lamp is Orange (flashing)
Cooling
(Wait for temperature of print head to lower)
Lamp is Red (flashing)
Indicates one of the following errors.
• Label sensor error
(End of DK Roll or label jam)
• Incorrect DK Roll installed
• Transmission error

Getting started
2
26
2-7. Maintenance
Maintenance of the machine must be done as needed. However, some
environments require that maintenance must be done more frequently (e.g. in
dusty conditions).
Print head maintenance
The DK Roll (thermal recording paper type) used with the machine
is designed to clean the print head automatically. When the DK Roll
passes the print head during printing and label feeding, the print
head is cleaned.
Roller maintenance
Clean the roller using the cleaning sheet (available separately).
The machine contains only one cleaning sheet. To purchase
additional cleaning sheets, refer to page 115.
NOTE
• When doing maintenance on the roller, be sure to only use the cleaning
sheet designed for this machine.
• If using other cleaning sheets, the surface of the roller may become
scratched and may cause a malfunction.
1. Press and hold the ON/OFF button to turn the QL-570 off.
2. Hold the DK Roll compartment cover at the front of the Brother
QL-570 and firmly lift up to open the cover.
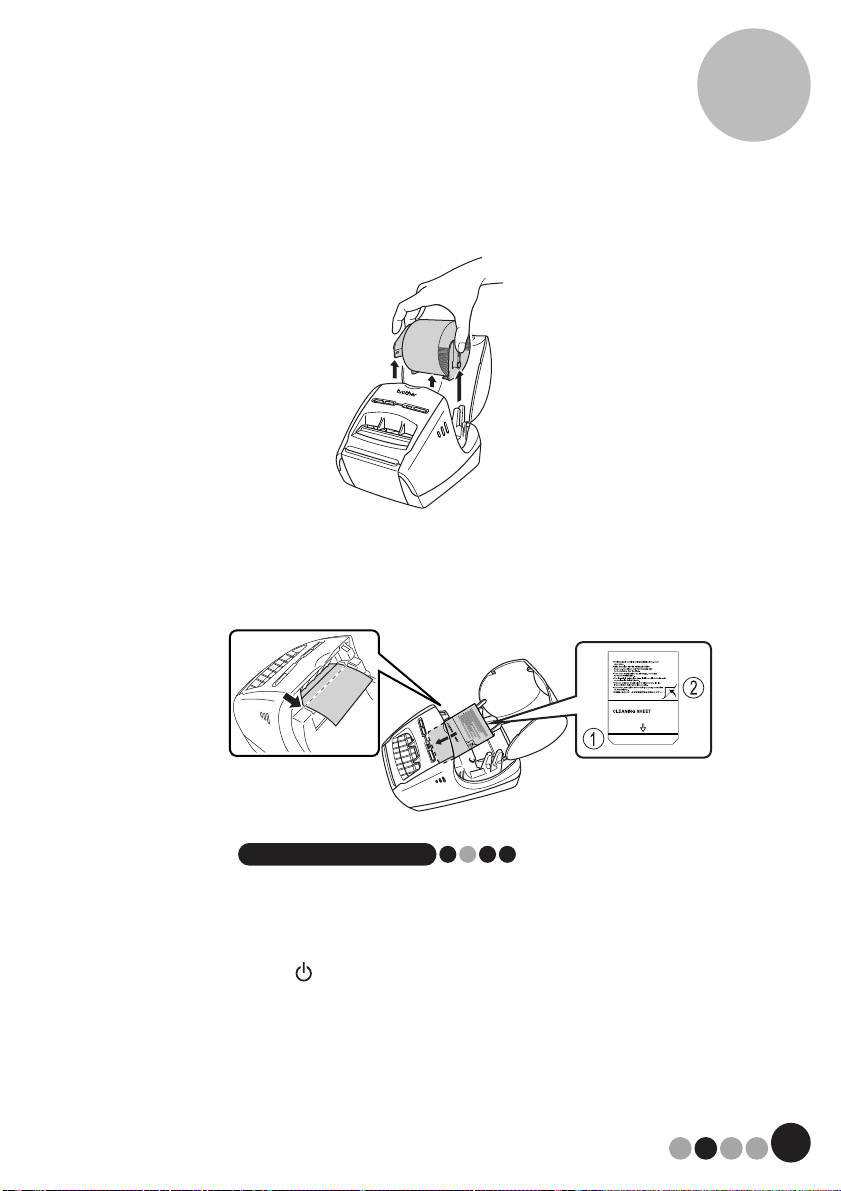
27
Getting started
2
3. Remove the DK Roll from the machine.
4. Remove the backing paper 2 and insert the edge 1 of cleaning
sheet into the printing unit as indicated by the arrow in the
diagram below.
NOTE
• Insert the sheet without removing the 1 part of sheet.
• Check that the printing surface of cleaning sheet is upward.
5. Close the DK Roll compartment cover and press the ON/OFF
button ( ) to turn the Brother QL-570 on.
Getting started
2
28
6. Press down the FEED button for more than one second until the
cleaning sheet begins to feed out.
As the cleaning sheet feeds completely out of the machine, the adhesive face
of the cleaning sheet removes stains and dust on the roller.
NOTE
• If the FEED button is not pressed for more than one second, the roller
spins only 0.32".
• Dispose the cleaning sheet after use.
Label outlet maintenance
If glue accumulates on the label outlet and the machine becomes
jammed, disconnect the power plug from the machine and clean the
label outlet with a cloth dipped in isopropyl alcohol.
FEED button
Label outlet

29
3
Installing the VM-100 Software
3-1. Introduction
VM-100 is software that can be used to easily manage visitors at a business,
organization or school. The following operations can be performed with this
software:
• Enter visitor information in advance and make reservations.
• On location, enter information for visitors without a reservation.
• Issue visitor badges.
• Include a message when making a reservation, and print the message.
• Take a photo of the visitor, and include the photo on the visitor badge.
• Manage the arrival and departure of visitors with the "sign in/sign out" feature.
• Issue a parking permit.
• In an emergency, display/print a list of visitors who have signed in.
• Allow visitors to issue themselves badges and sign in.
VM-100 Modes
The VM-100 software can run in three different modes.
Administrator mode
This mode allows users to specify visitor information form settings, print
settings, backup locations and frequencies, as well as register host
information and user logins. Only users with Administrator permissions can log
on to Administrator mode.
Reception mode
This mode is selected when a receptionist is greeting and signing in visitors.
Within this mode, the receptionist can enter visitor information, sign in or sign
out visitors, and issue visitor badges and parking permits. Only users with
Administrator or Receptionist permissions can log on to Reception mode.
Self Check-in mode
This mode allows visitors to enter their own information, sign in, and issue
themselves a visitor badge. Only users with Administrator or Receptionist
permissions can log on to Self Check-in mode.

Installing the VM-100 Software
3
30
3-2. Installing the VM-100 Software
The procedure for installation varies depending on the computer's operating
system (OS). The following example is using Windows Vista
®
. Do not connect
the QL-570 label printer to the computer until you are instructed to do so. If
the label printer has already been connected, disconnect it.
NOTE
• Install procedure is subject to change without notice.
• To use the VM-100 software on multiple computers within the same
business location, install the software on each personal computer and set
the new database file location (page 39). It is possible to merge visitor
logs by using export function.
1. Turn off the QL-570.
2. Start the computer and put the CD-ROM into the CD-ROM
drive.
If it does not start up automatically, go to [My Computer (Computer)] double-
click the CD-ROM icon, and then double-click [Start.exe].
3. If the [User Account Control] dialog box appears, click
[Continue].
31
Installing the VM-100 Software
3
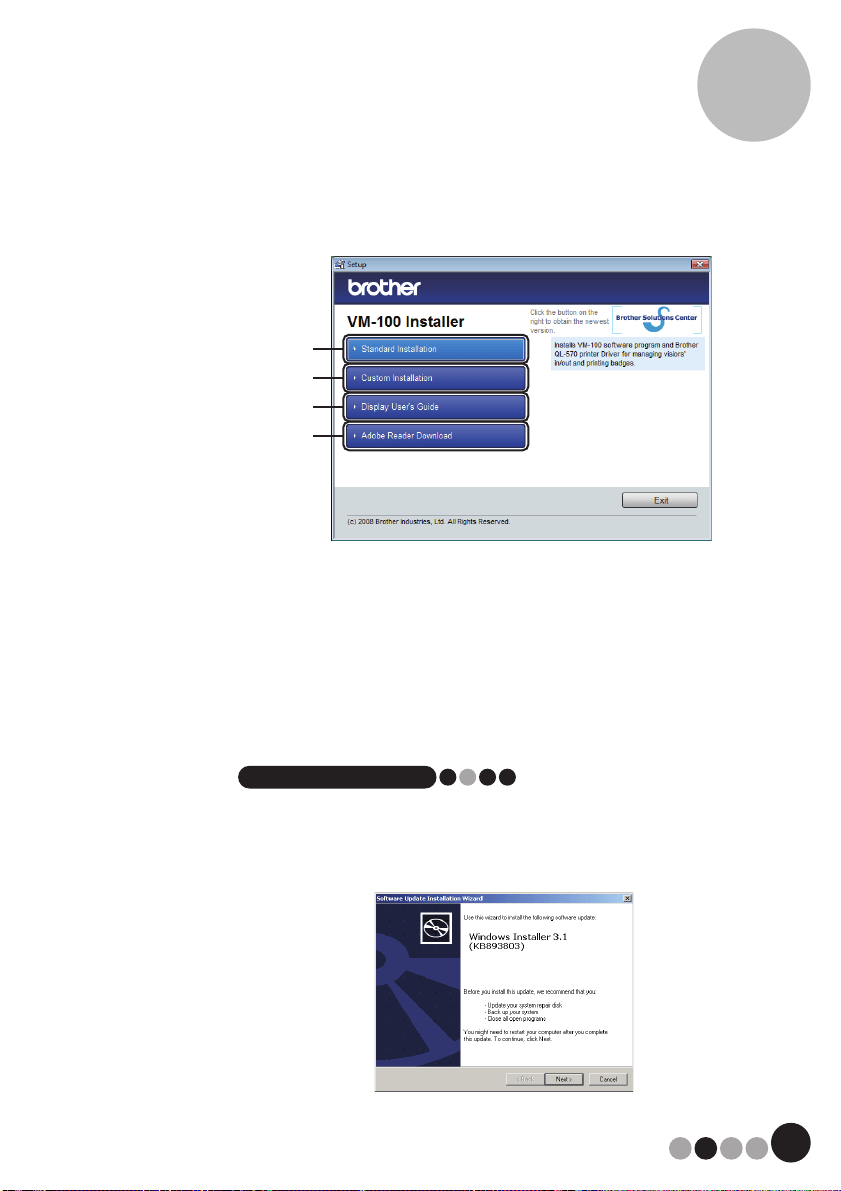
4. Click [Standard Installation].
1Standard Installation
VM-100, P-touch Editor 5.0, Printer Driver, and User's Guide (PDF)
2Custom Installation
VM-100, P-touch Editor 5.0, Printer Driver, or User's Guide (PDF)
3Display User's Guide
The User's Guide (PDF) and the Quick Reference Guide will be
displayed.
4Adobe Reader Download
Link to the download page for Adobe
®
Reader
®
will be displayed.
NOTE
• If Microsoft .NET Framework 2.0 and Windows Installer 3.0 or later are not
installed on your computer, the installation screen is displayed. Follow the
instructions on the screen to complete installation. If you cancel this step,
no software will be installed.
1
2
3
4
Installing the VM-100 Software
3
32
5. Read the license agreement and click [Yes] if you agree with
the terms and conditions.
6. Follow the on-screen instructions.
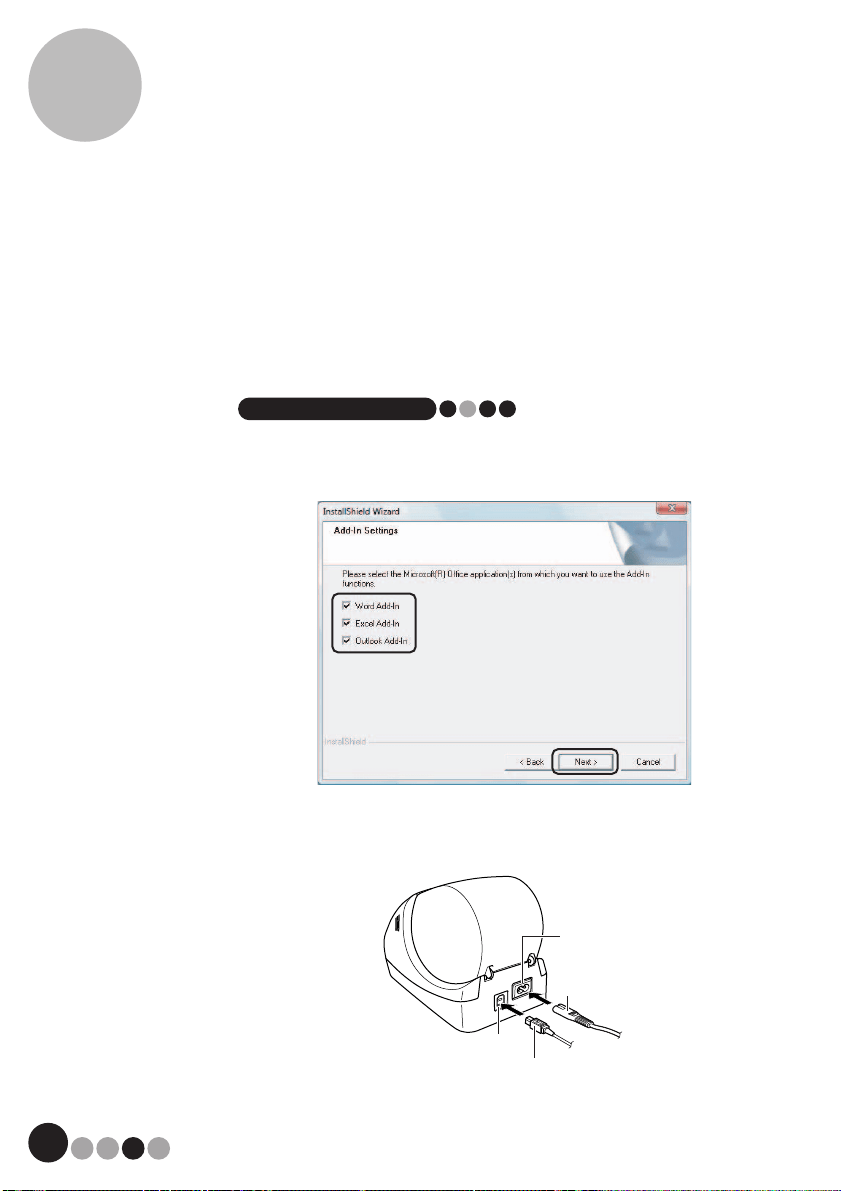
7. Put a check mark in the box to install the Add-in and click the
[Next] button.
NOTE
• Make sure that you closed all Microsoft
®
Office applications.
• For details on the add-in, refer to the corresponding Help topic in P-touch
Editor after it has been installed.
8. Connect the QL-570 and turn it on, click [Next], and then follow
the on-screen instructions for the driver installation.
USB port
USB cable
Power cord
Power port

33
Installing the VM-100 Software
3
9. Make your choice and click [Next].
If you choose "Yes, display the page", you will go to the online user registration
page before finishing the installation. (recommended)
If you choose "No, do not display the page", you will continue the installation.
NOTE
• Once you have completed the registration process, close your web
browser to return to the installation.
10. Click [Finish].
11. Click [Exit] to finish the installation.
12. Click [Start] - [All Programs (Programs)] -
[Brother Visitor Badge & Management] - [VM-100] to start
VM-100.
NOTE
• You can find this User's Guide in PDF format as well by clicking [Start] -
[All Programs (Programs)] - [Brother Visitor Badge & Management] -
[VM-100 User's Guide].
Installing the VM-100 Software
3
34
3-3. Uninstalling VM-100
1. For Windows Vista
®
/Windows
®
7
From the [Control Panel] - [Programs] - [Programs and
Features].
The [Uninstall or change a program] dialog box appears.
For Windows
®
XP
Click [Start] - [Control Panel] - [Add/Remove Programs /
Add or Remove Programs (XP)].
The [Add or Remove Programs] dialog box appears.
2. For Windows Vista
®
/Windows
®
7.
Choose [Brother Visitor Badge & Management], and click
[Uninstall].
For Windows
®
XP
Choose [Brother Visitor Badge & Management], and click
[Remove].
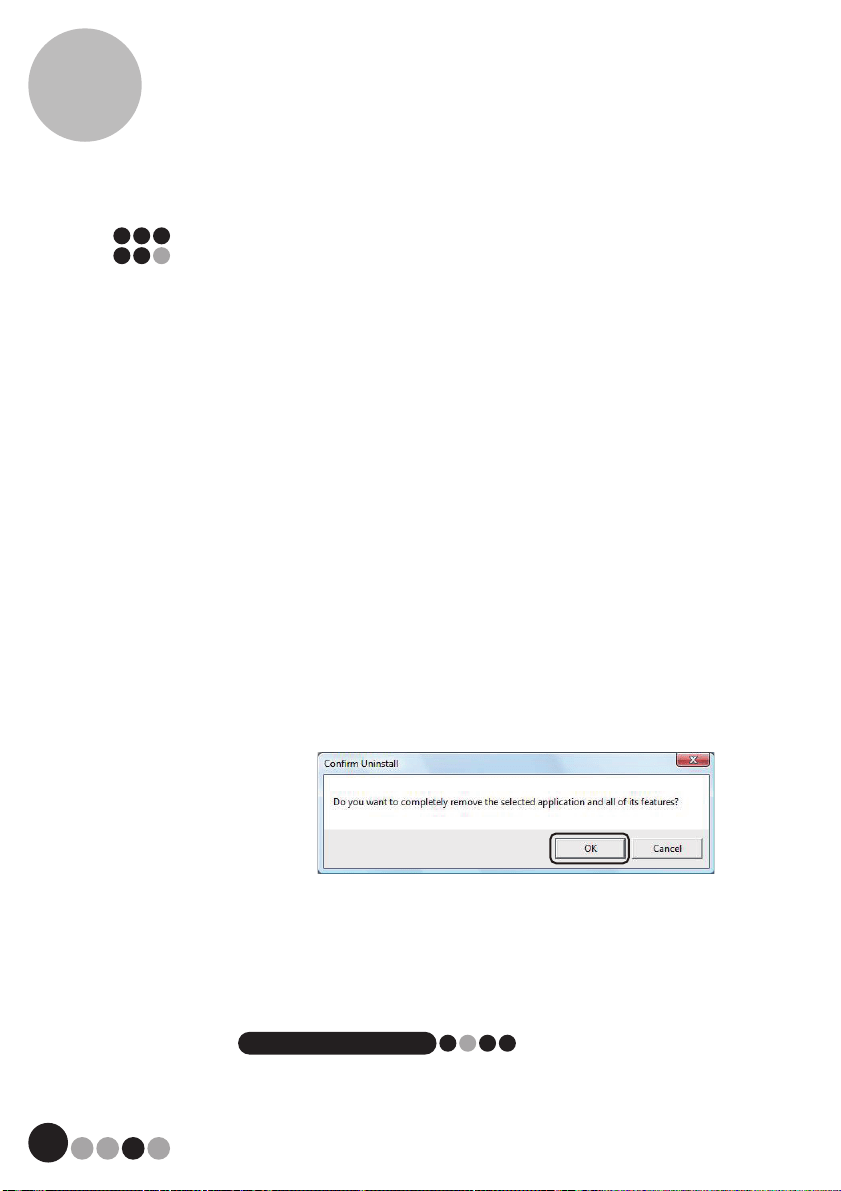
3. Click [OK].
The uninstall operation starts. After the software is removed from your
computer, the [Maintenance Complete] dialog box appears.
4. Close the [Add or Remove Programs] (XP) / [Programs and
Features] (Windows Vista
®
/Windows
®
7) dialog.
The VM-100 software has been uninstalled.
NOTE
• To uninstall P-touch Editor 5.0, select [Brother P-touch Editor 5.0] in
Step 2.
35
Installing the VM-100 Software
3
3-4. Uninstalling the QL-570 printer
driver
1. Turn off the Brother QL-570.
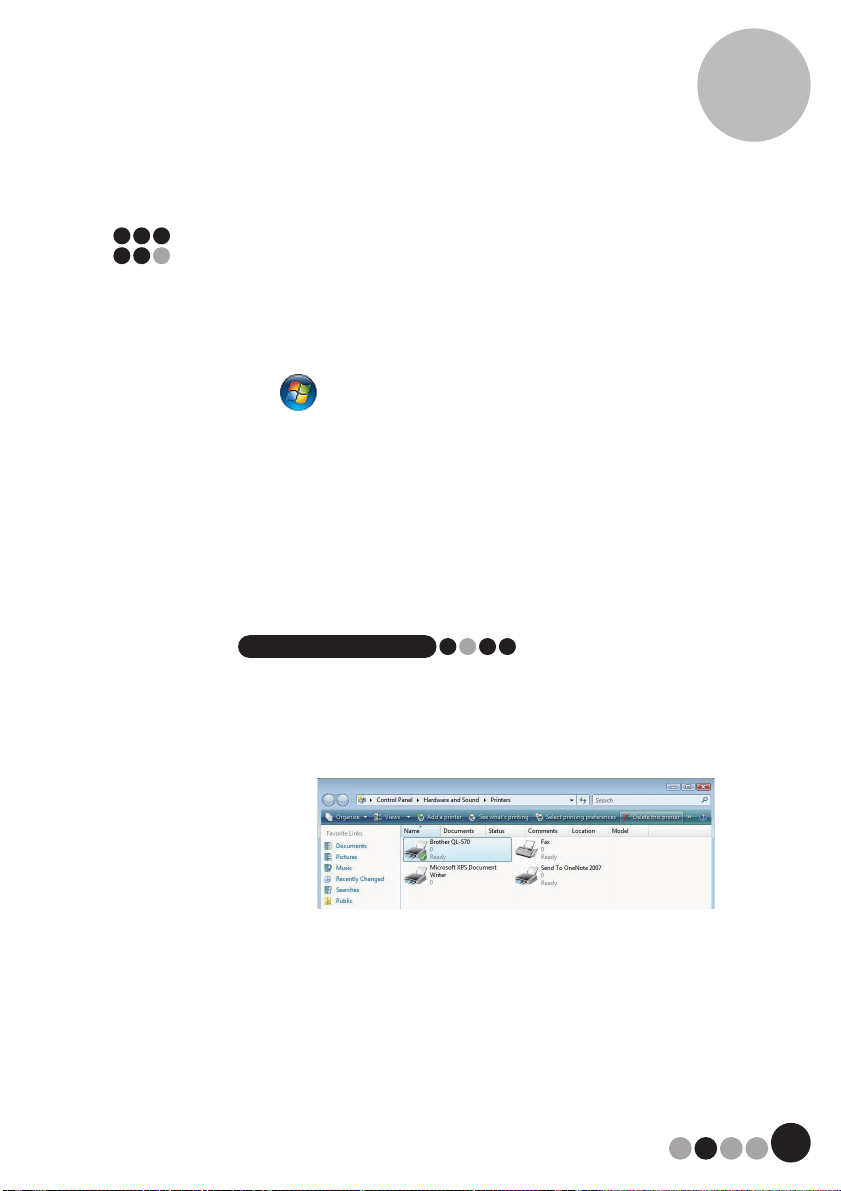
2. For Windows
®
7
Click , go to [Devices and Printers].
For Windows Vista
®
Click [Start] - [Control Panel] - [Hardware and Sound] -
[Printers].
For Windows
®
XP
Click [Start] - [Control Panel] - [Printers and Faxes].
NOTE
• For details, refer to Windows
®
Help.
3. For Windows Vista
®
/Windows
®
7
Click [Brother QL-570], right click on the icon, and then click
[Delete] (Windows Vista
®
)/ [Remove device] (Windows
®
7).
For Windows
®
XP
Click [Brother QL-570] - [File] - [Delete].
4. For Windows
®
7
Choose [Fax] or [Microsoft XPS Document Writer] in the
[Devices and Printers] window, and then click [Print server
properties], which appears in the menu bar.
Installing the VM-100 Software
3
36
For Windows Vista
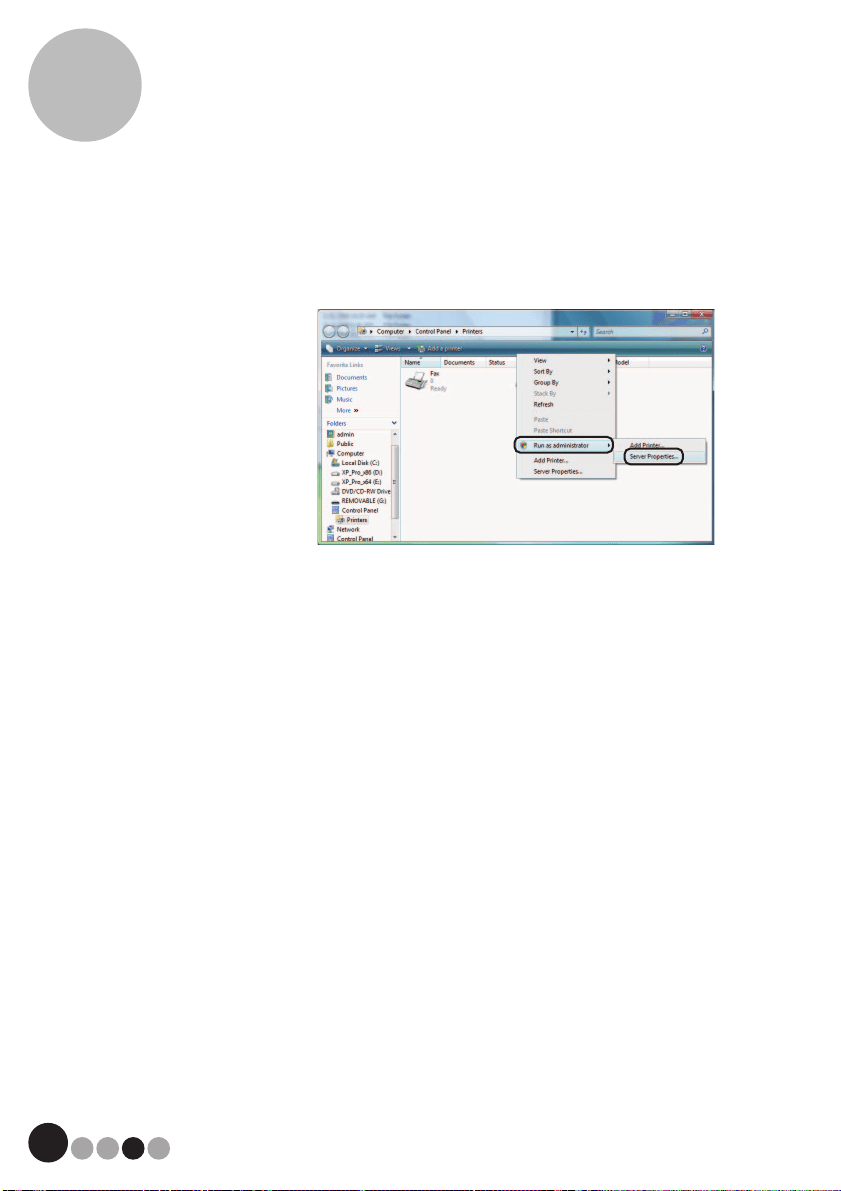
®
In the [Printers] window, right click and click [Run as
administrator] - [Server Properties...].
If the authorization confirmation dialog appears, click
[Continue]. If the [User Account Control] dialog box appears,
enter the password and click [OK].
For Windows
®
XP
Click [File] - [Server Properties].
5. For Windows
®
7
Click the [Drivers] tab, and then click [Change Driver Settings].
(If a User Account Control message appears, type in the
password, and then click [OK]).
Choose "Brother QL-570", and then click [Remove...].
For Windows Vista
®
Click the [Drivers] tab and click [Brother QL-570] -
[Remove...].
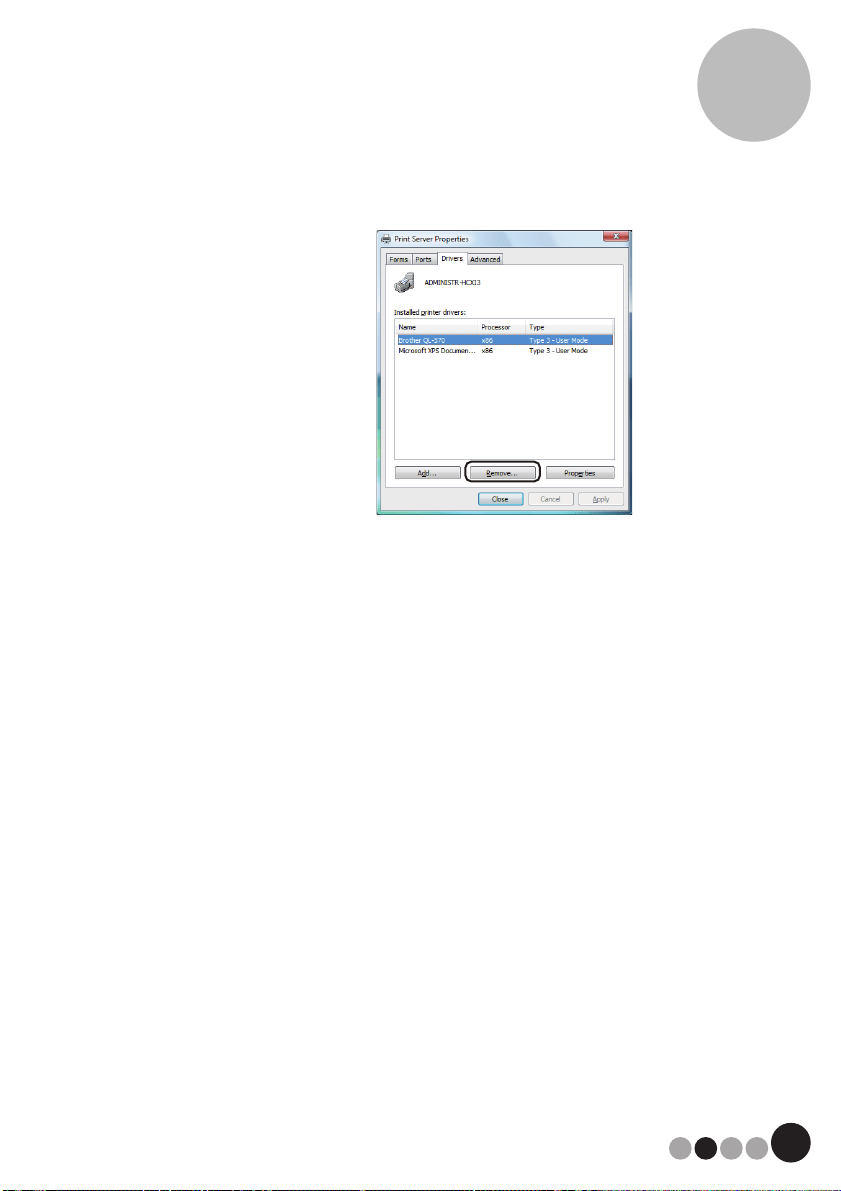
37
Installing the VM-100 Software
3
For Windows
®
XP
Click the [Drivers] tab and click [QL-570] - [Remove...].
6. For Windows Vista
®
/Windows
®
7
Choose [Remove driver and driver package], and then click
[OK].
For Windows
®
XP
Go to step 7.
7. Close the [Print Server Properties] window.
The printer driver has been uninstalled.
38
4
Using the VM-100 Software
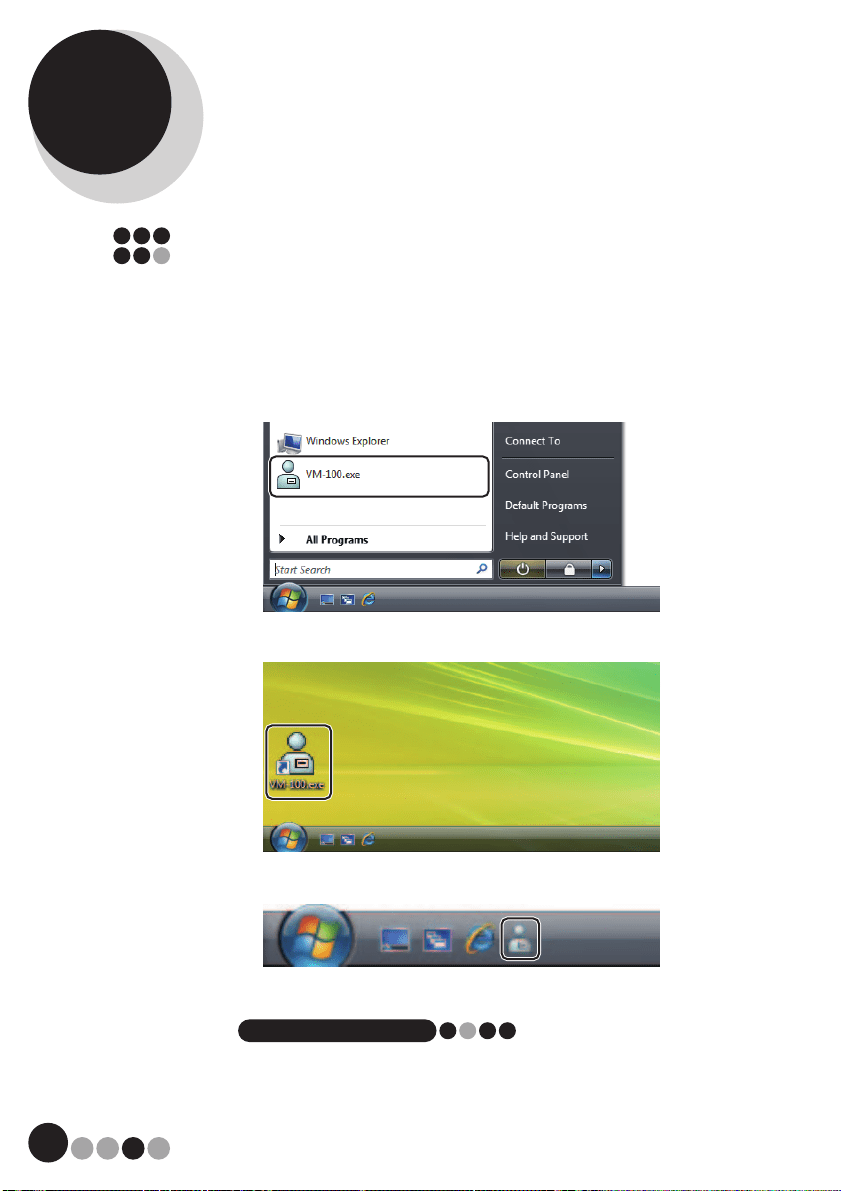
4-1. Launching the VM-100 Software
The VM-100 software can be started using any of the following three methods.
When starting the VM-100 software for the first time, the User must be
logged on to their computer with Administrator privileges in order to
execute this function. For Windows Vista
®
, right click the VM-100 icon and
select "Run as administrator".
• From the Start menu, click the VM-100 icon.
• Double-click the VM-100 icon on the desktop.
• Click the shortcut icon on the Quick Launch bar.
When the application is started, the Login dialog box (page 42) appears.
NOTE
• Follow the procedure described below when starting the application for the
first time.
39
Using the VM-100 Software
4
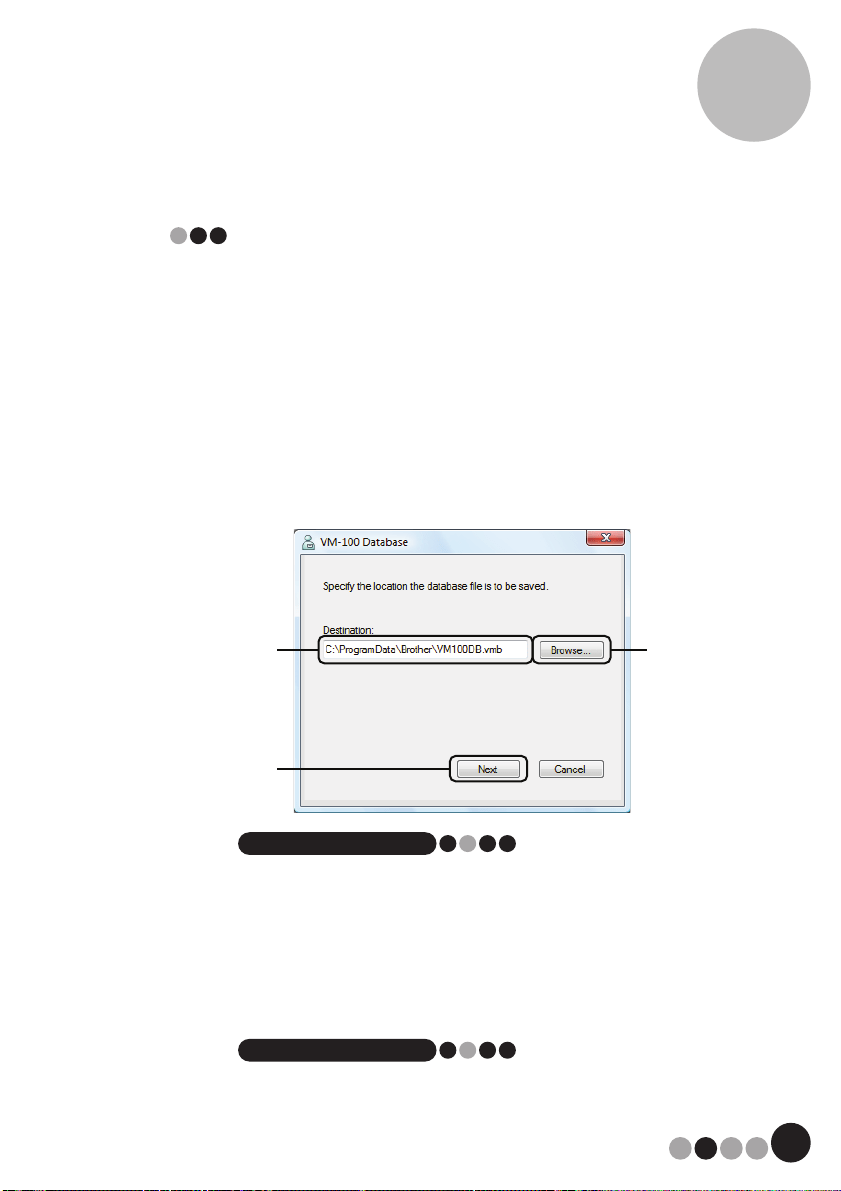
Initial startup operation (Specifying the
database file path)
The database file contains host information as well as visitor logs.
Users have the ability to save or "back up" these files to a specified
location.
When the VM-100 software is started for the first time, the following
dialog box appears. Follow the procedure described below to
specify the location that database files are to be saved. Users will
also be prompted to register a name and password for an
administrator at this time. If no location is selected, the database
files will be saved to the default location. If the database becomes
corrupted, please refer to page 72.
NOTE
• If the database file is in a folder on a server and the administrator and
receptionist are using different computers, specify the following settings
on the administrator's computer, and then install VM-100 on the
receptionist's computer and perform only step 1.
1. Click in the "Destination:" box 1 (illustration above), and then
type the path to the database file. Otherwise, click 2, and then
browse the computer for the location of the database file.
NOTE
• If the database file has already been specified, the path to that file appears.
• To change the database file path, refer to page 63.
1
2
3

41
Using the VM-100 Software
4
3. In 4, type the user name for the administrator (255 characters
or less). In 5, type the password for the administrator (6 to 255
characters). In 6, retype the password.
4. Click the [Finish] button.
A database file is created and the administrator information is registered.
Once complete, the Administrator Mode dialog box (page 44) appears.
NOTE
• The following settings can be specified from the
Administrator mode.
•Register login users.
•Register host information.
•Specify settings for the badge layout and the visitor information form.
Using the VM-100 Software
4
42
4-2. Logging On
When VM-100 is started, the Login dialog box appears. Select the mode to be
logged on to, and then type in the user name and password.
1. From 1, click the mode to be logged on to.
Reception: Select to enter the Reception mode. Select this mode if a
receptionist will sign in visitors and issue visitor badges.
(page 74)
Self Check-in: Select to enter the Self Check-in mode. Select this mode if
visitors will log in and create badges themselves. (page 101)
Administrator: Select to enter the Administrator mode. (page 44)
NOTE
• The mode selected during the previous login session is already selected.
• A user registered with Administrator permissions can log on to all modes
(Reception, Self Check-in and Administrator modes). A user registered
with Receptionist permissions can only log on to Reception mode or Self
Check-in mode.
2. In 2, type in the user name. In 3, type in the password.
3. Click the [OK] button.
The user is logged on to the selected mode.
1
2
3

43
Using the VM-100 Software
4
4-3. Logging Off
The VM-100 software can be exited using the following methods described for
each mode.
Administrator mode
1. Click the [×] button at the right end of the title bar.
Reception mode
1. Click the [×] button at the right end of the title bar.
NOTE
• If there is data that has not yet been saved in Reception mode, a
confirmation message appears.
Self Check-in mode
Refer to page 103.
44
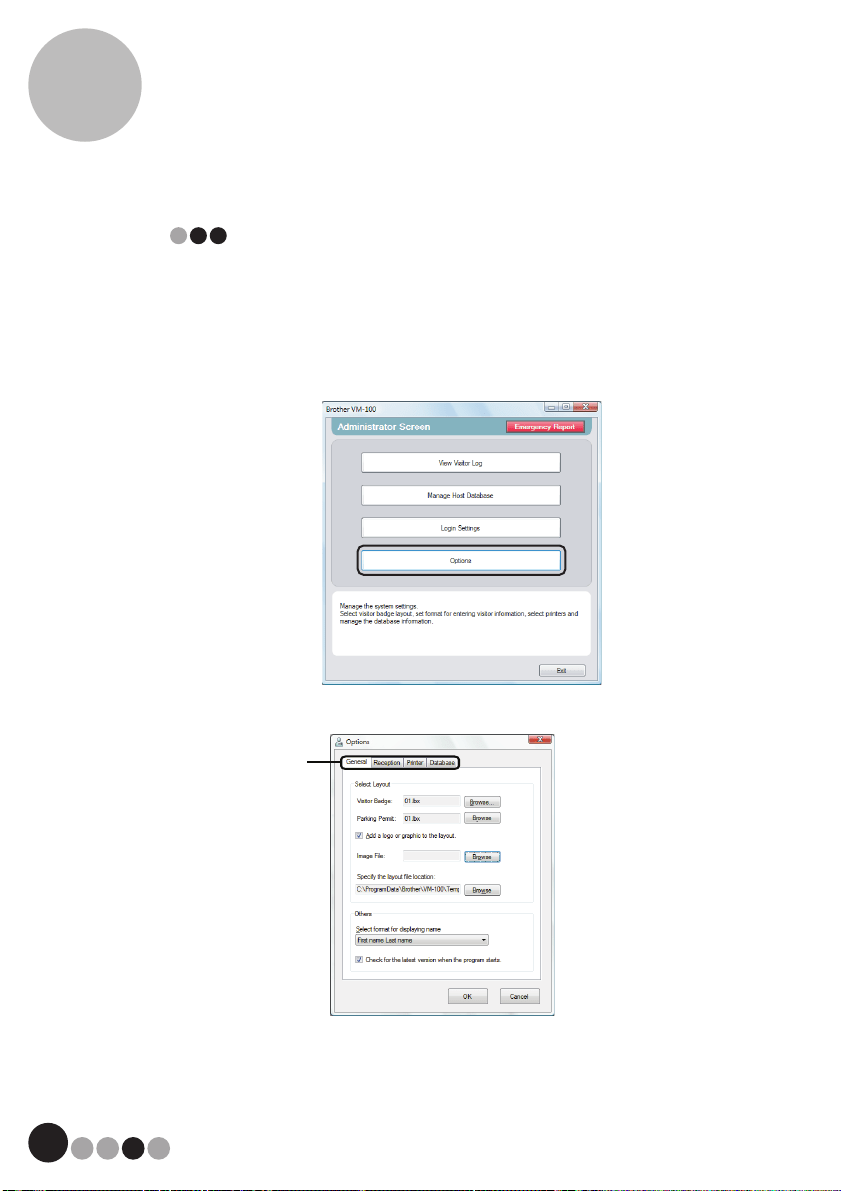
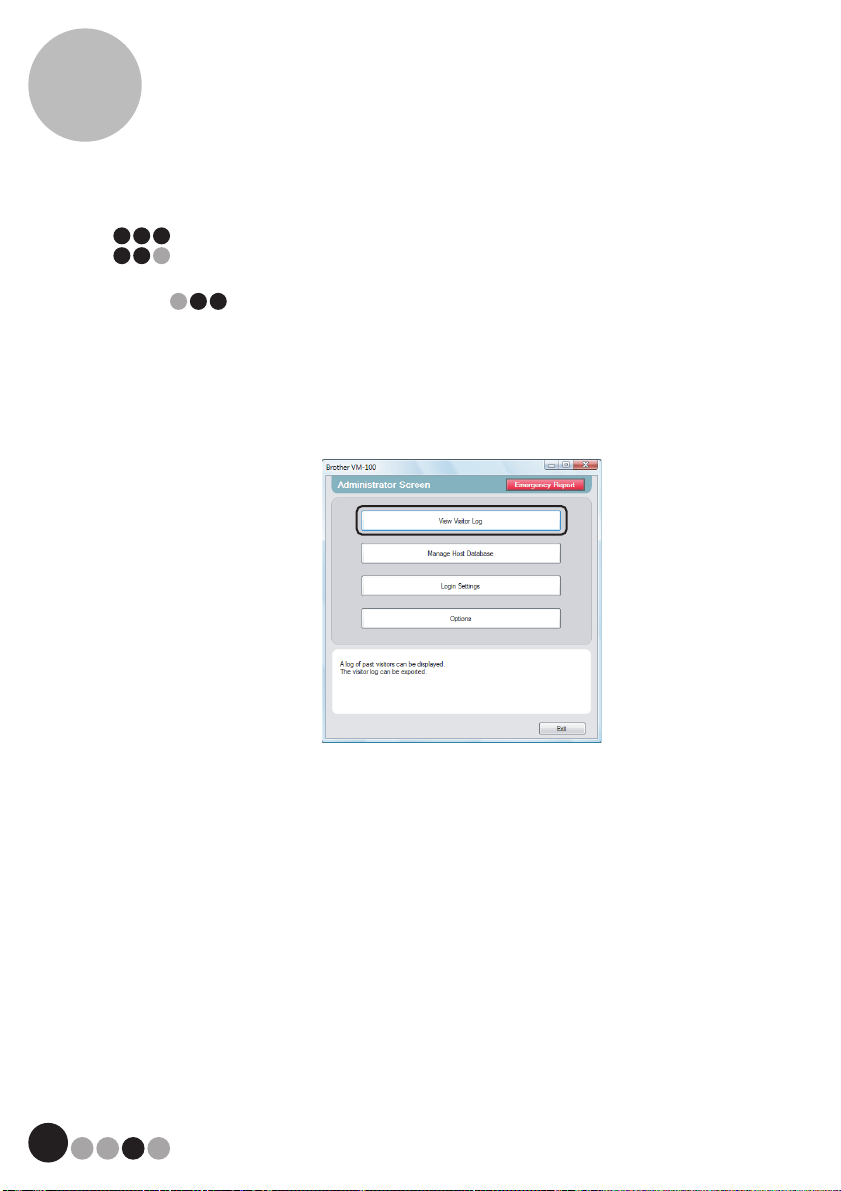
5 Administrator Mode
5-1. Administrator Mode Dialog Box
When VM-100 is started in Administrator mode, the Administrator Mode dialog
box appears.
1 Enables the administrator to display and print a list of visitors that have
signed in. (page 71)
2 Lists the different tasks available.
[View Visitor Log] button (page 64)
Click to display the visitor log and export its data.
[Manage Host Database] button (page 50)
Click to register new hosts, to change or delete registered information, or
to import a database.
[Login Settings] button (page 45)
Click to register or delete users who can log in as an administrator or a
receptionist.
[Options] button (page 56)
Click to specify the printer settings for the visitor badge layout, to establish
the layout for entering visitor information and to select the locations and
length of time that database information is stored.
3 Displays a general description for each button in 2.
4 Click to exit Administrator mode of VM-100.
1
2
3
4
45
Administrator Mode
5
5-2. Initial Settings
The administrator should first specify the necessary settings.
Editing login settings
Users who can log on can be registered or deleted and their
passwords can be changed.
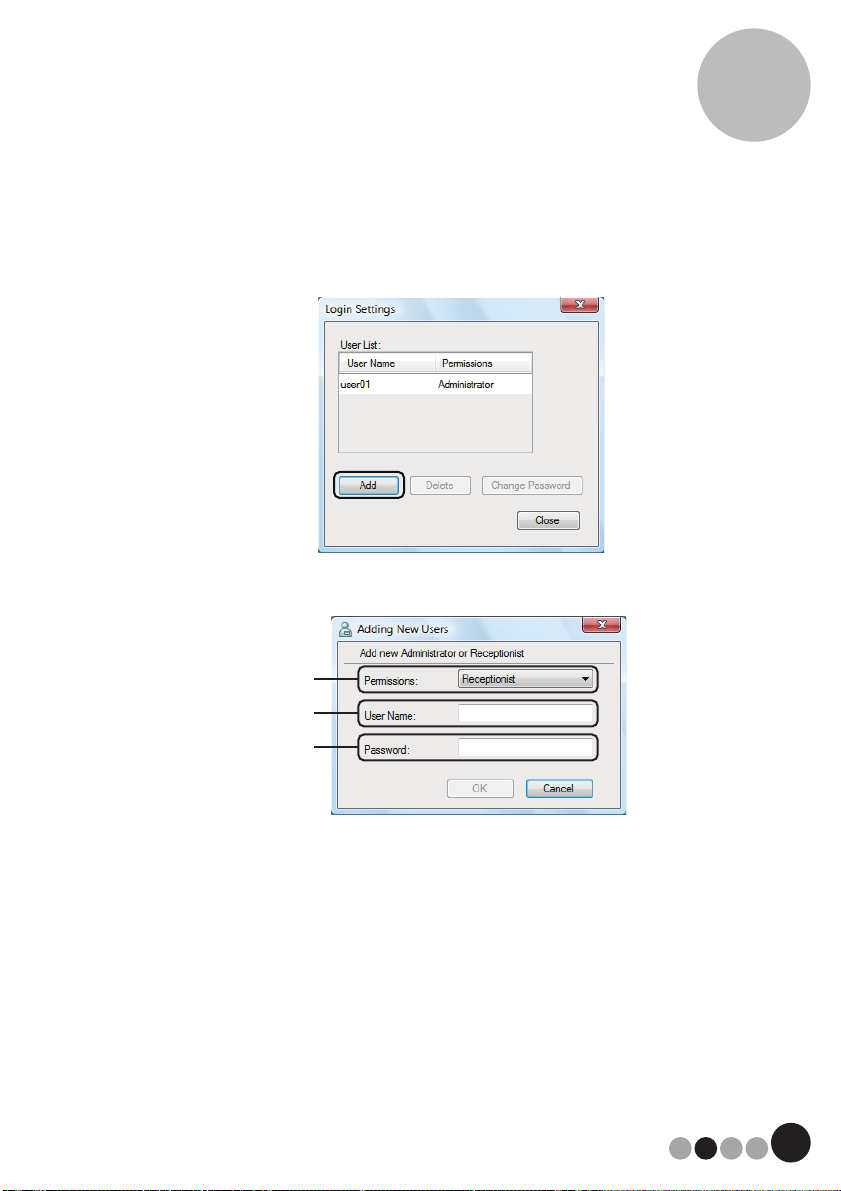
Displaying the Login Settings dialog box
1. Click the [Login Settings] button in the Administrator Mode
dialog box.

Administrator Mode
5
46
The Login Settings dialog box appears.
1 Displays information on registered users.
2 Click to add a new login user.
3 Click to delete a login user.
4 Click to change the password for a login user.
NOTE
• Administrator: Users can log on to all modes (Administrator, Reception
and Self Check-in modes).
• Receptionist: Users can log on to Reception mode and Self Check-in
mode.
1
2
3
4
47
Administrator Mode
5
Registering new users
1. Click the [Add] button in the Login Settings dialog box.
2. Type in the information for the user to be added.
1 Select "Receptionist" or "Administrator" as the user permissions.
2 Type in the User Name (255 characters or less).
3 Type in the password (6 to 255 characters).
3. Click the [OK] button.
The new user is registered.
1
2
3
Administrator Mode
5
48
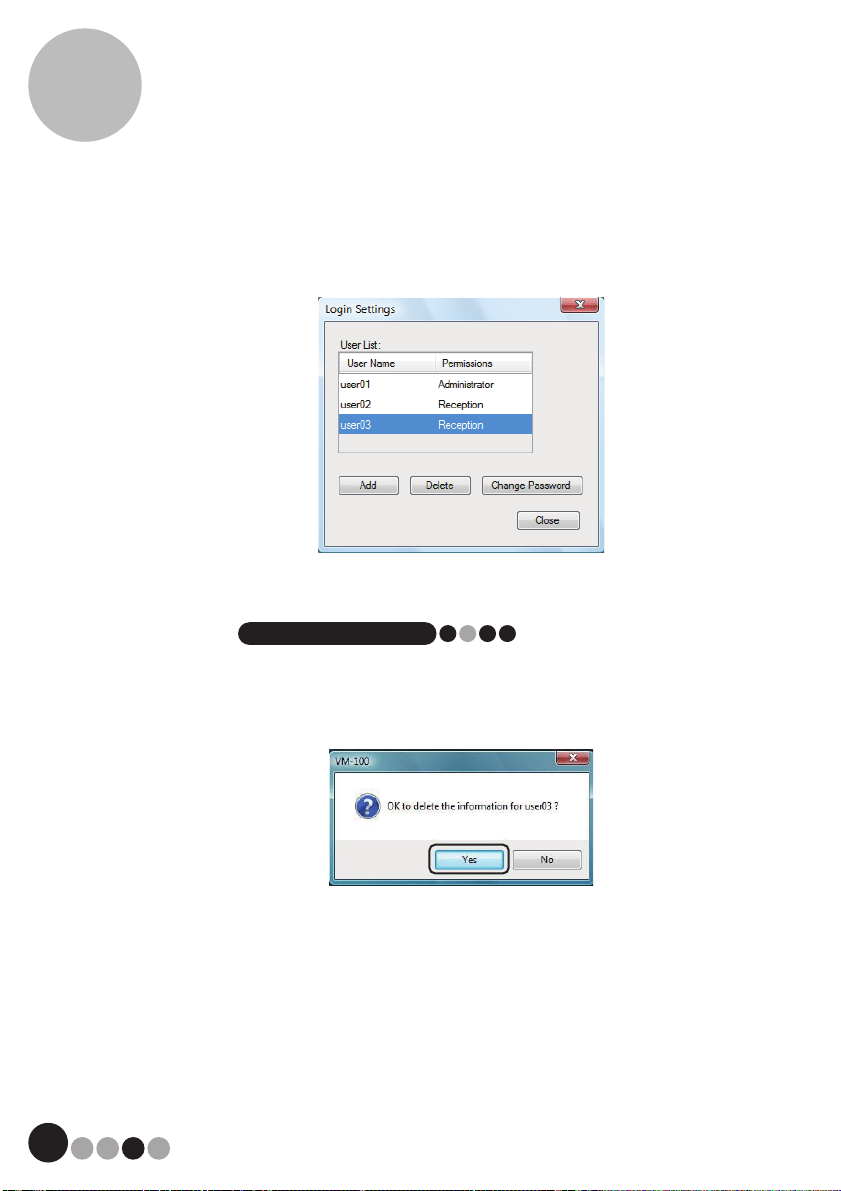
Deleting users
1. In the Login Settings dialog box, select the user to be deleted.
2. Click the [Delete] button.
NOTE
• It is not possible to delete all administrators. An error message will appear
if you try to delete all administrators.
3. Click the [Yes] button.
The selected user is deleted.
49
Administrator Mode
5
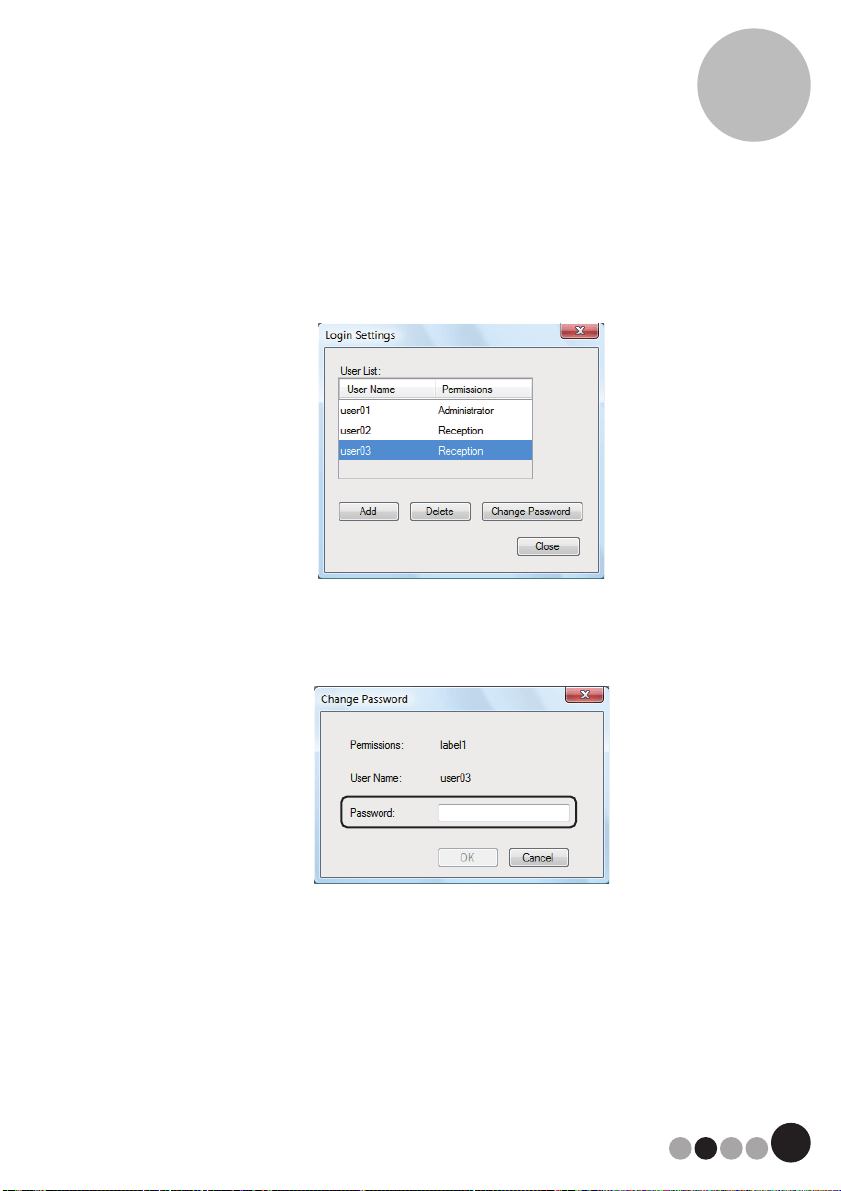
Changing the password
1. In the Login Settings dialog box, select the user whose
password is to be changed.
2. Click the [Change Password] button.
3. Type in the new password (6 to 255 characters).
4. Click the [OK] button.
The password is changed.
Administrator Mode
5
50
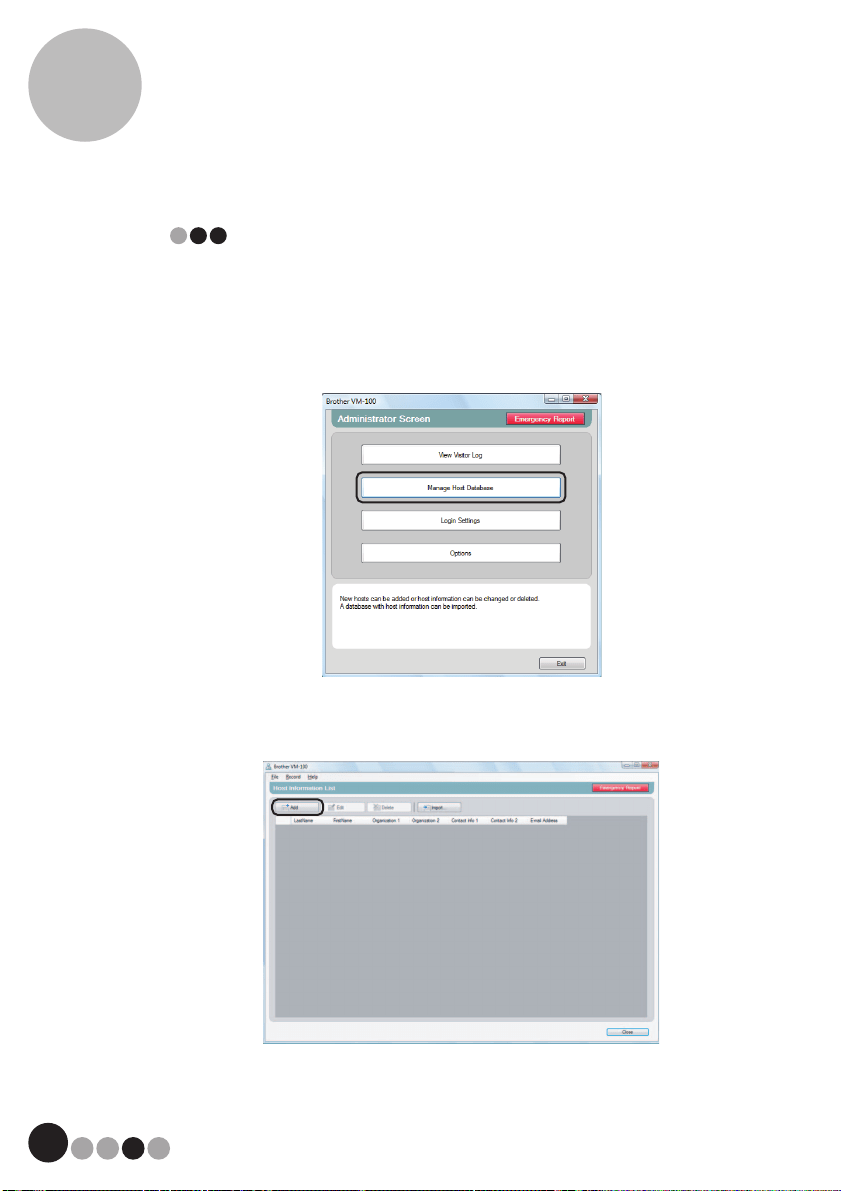
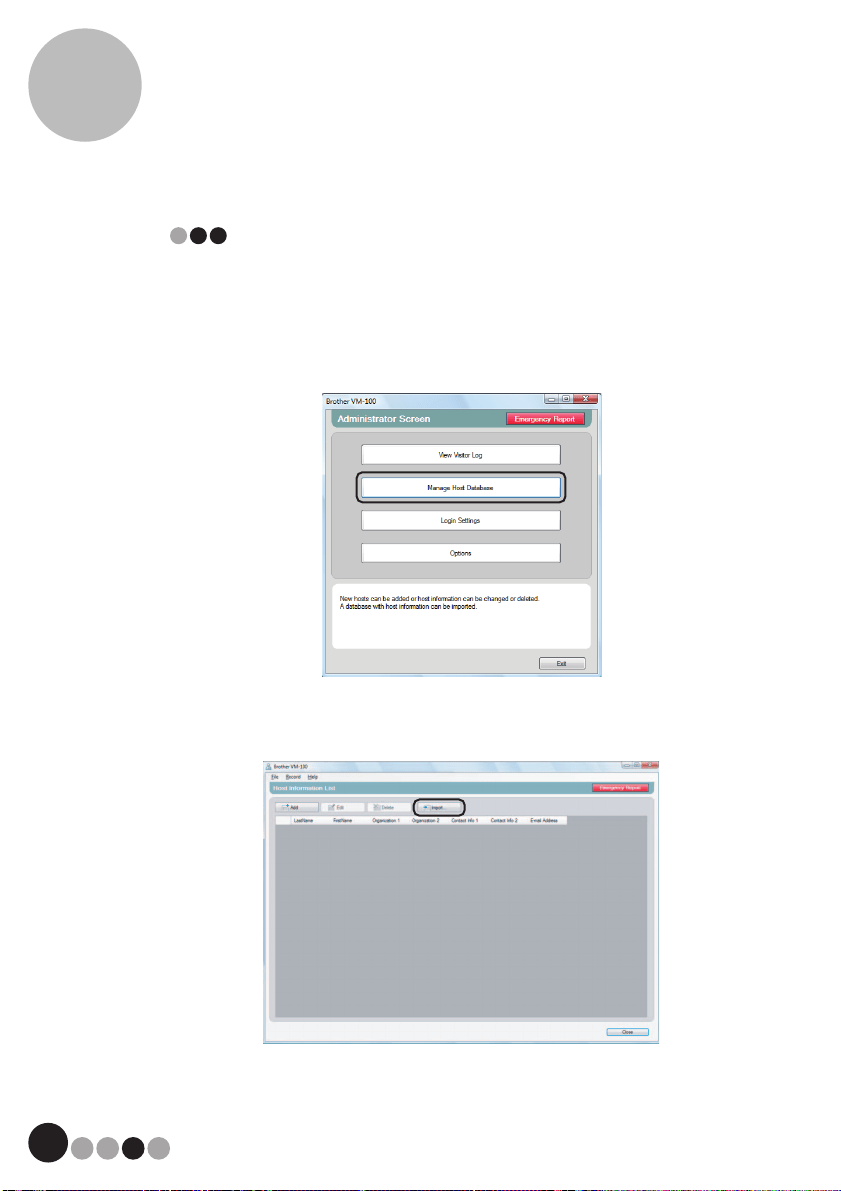
Registering host information
With the VM-100 software, users have the ability to register hosts
(the person being visited) and import host information from a
database.
1. Click the [Manage Host Database] button in the Administrator
Mode dialog box.
The Host Information List window appears.
2. Click the [Add] button.
51
Administrator Mode
5
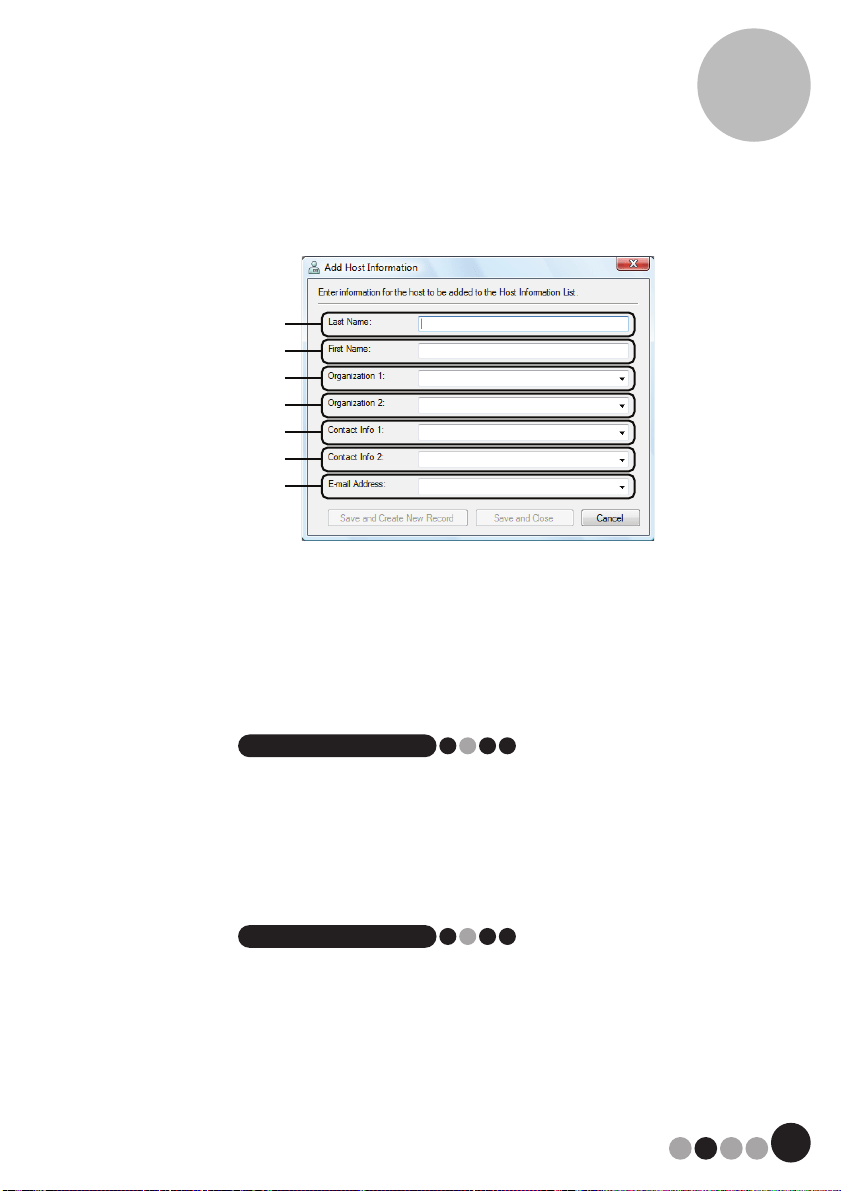
3. Type in the information for the host to be added.
1 Type in the last name.
2 Type in the first name.
3 Type in or select the organization (for example, company name).
4 Type in or select the organization (for example, division name).
5 Type in or select the telephone number.
6 Type in or select the alternate telephone number (for example, mobile
phone).
7 Type in or select the e-mail address.
NOTE
• No more than 255 characters can be entered into each text box.
• The 20 most recently entered data appear as choices on the drop down
menus for 3 through 7.
4. Click the [Save and Close] button.
The dialog box is closed, and the entered host information is added to the
Host Information List window.
NOTE
• Clicking the [Save and Create New Record] button adds the entered host
information to the Host Information List window. Then, an empty New Host
Information dialog box appears so an additional host can be added.
1
2
3
4
5
6
7
Administrator Mode
5
52
Importing host information
Host information can be imported. When importing host information,
all existing information will be deleted so the database will contain
only the imported information.
1. Click the [Manage Host Database] button in the Administrator
Mode dialog box.
The Host Information List window appears.
2. Click the [Import…] button.
53
Administrator Mode
5
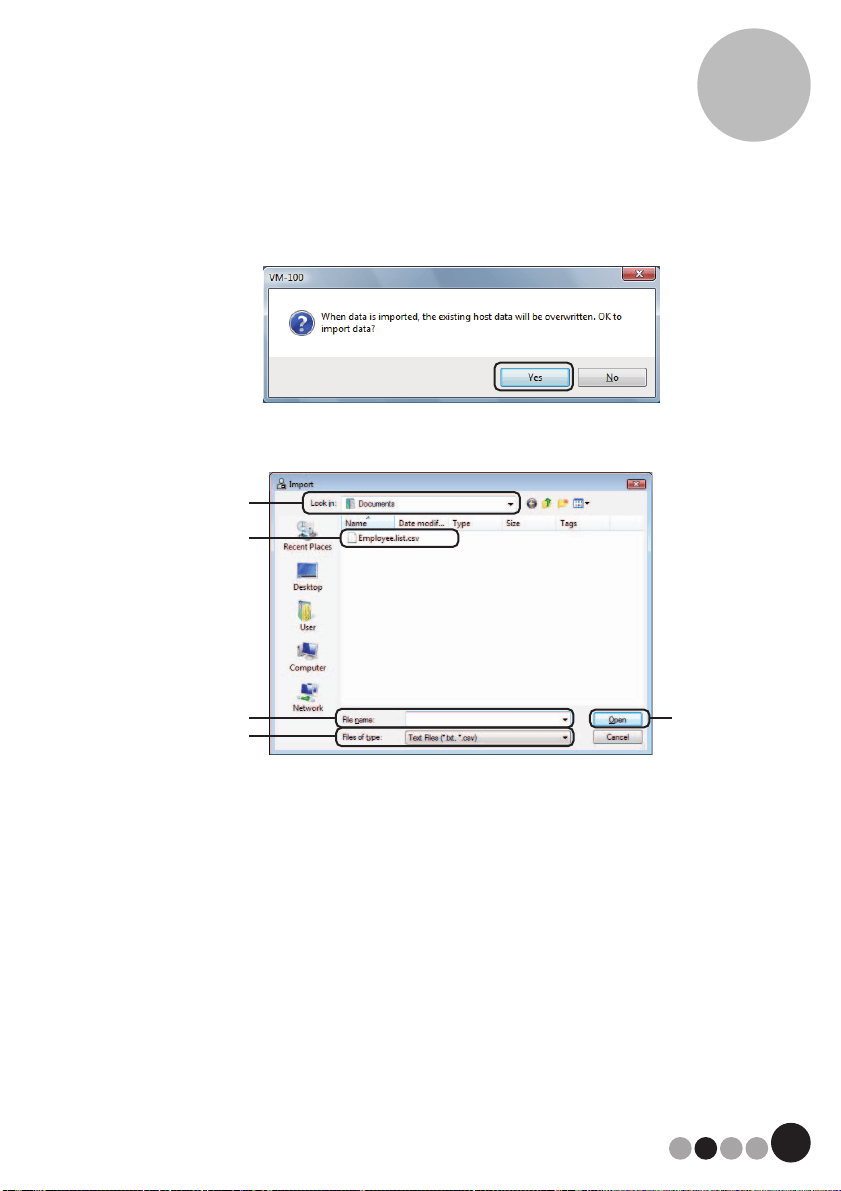
3. Click the [Yes] button.
4. Specify the file containing the information to be imported.
1 Specify the folder containing the file to be imported.
2 Select the file containing the information to be imported.
3 Displays the name of the selected file.
4 Select the format of the file to be imported. CSV and text format files can
be selected.
5 Click to import the selected file.
1
3
2
4
5
Administrator Mode
5
54
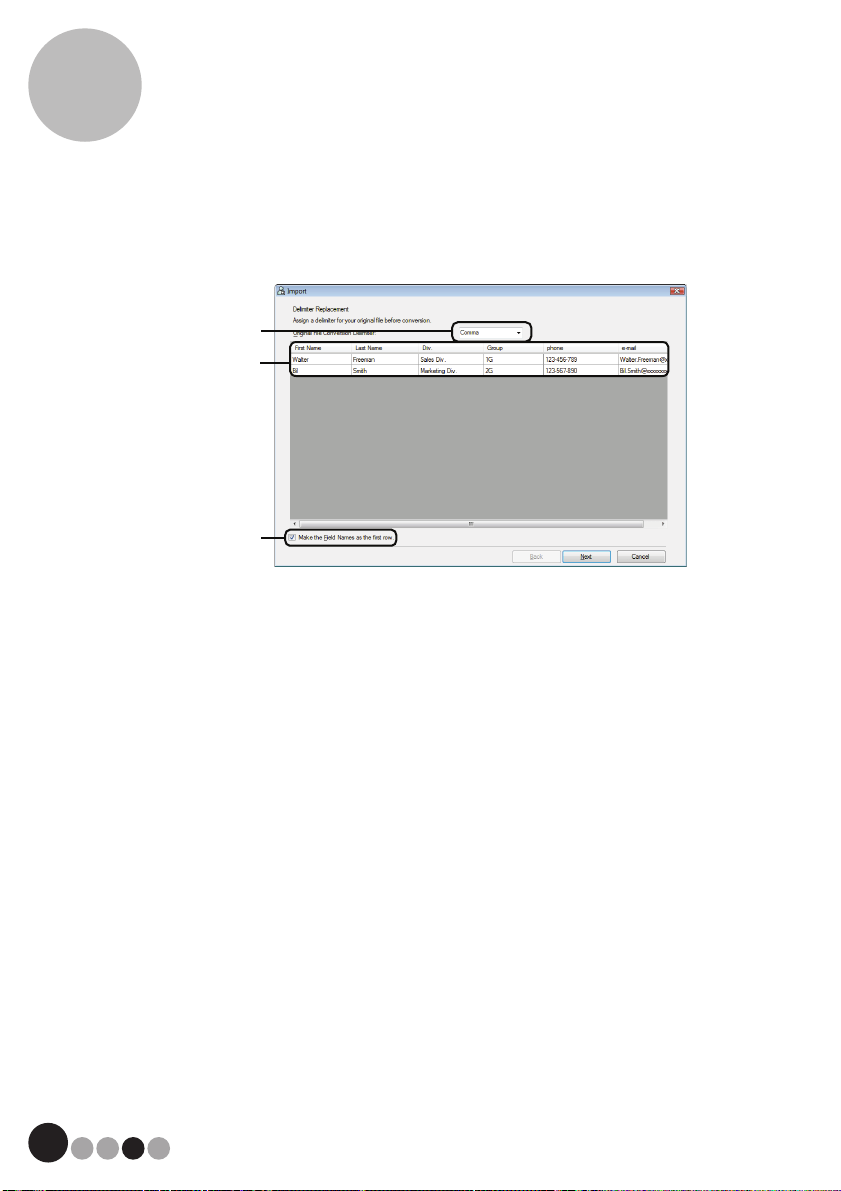
5. Select the delimiter character, and select whether or not the first
line of text contains the field names.
1 Select "Comma", "Tab", "Space" or "Semicolon" as the delimiter character
in the file before it is converted. Otherwise, any other character can be
entered.
2 Displays a preview of the file after it has been converted.
3 Select this check box if the text is to be imported with the first line
containing the field names and the field data starting with the second line.
Clear this check box if the text is to be imported with the field data starting
with the first line.
6. Click the [Next] button.
1
2
3
55
Administrator Mode
5
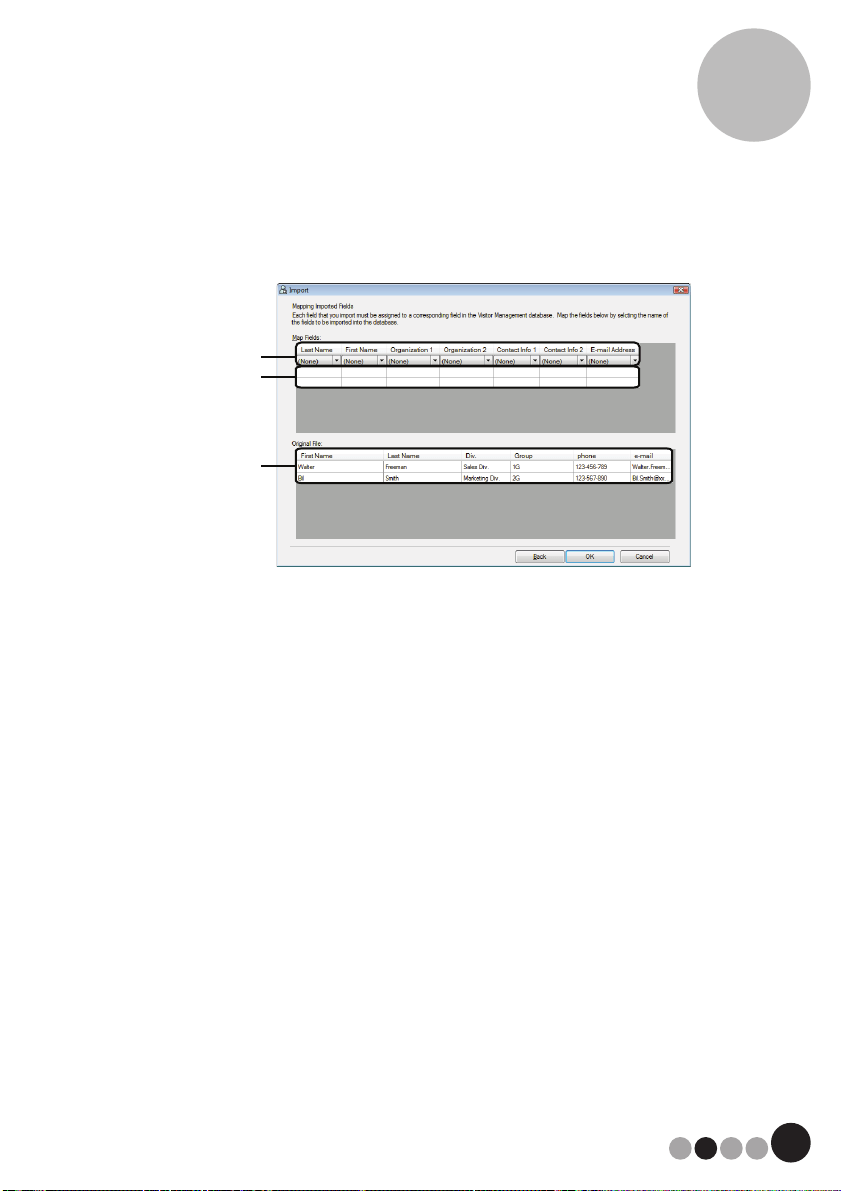
7. Specify how the fields in the file to be imported are assigned to
the fields in the host database.
1 The fields in the host database are shown in the first row. From the drop-
down lists that appear in the second row, select the field from the file to be
imported that is to be assigned to the fields in the host database.
2 Displays a preview of the contents of the host database after the file is
imported. If "(None)" was not selected in 1, the data from the selected field
is displayed.
3 Displays the data in the file to be imported. Only the columns of data from
mapped fields (where "(None)" is not selected in 1) are displayed.
8. Click the [OK] button.
The file is imported with the specified settings, and the Host Information List
window appears.
1
2
3
Administrator Mode
5
56
Options
Settings can be specified for visitor badge layouts, printer settings,
parking permits, visitor information forms as well as database
locations and backup.
Displaying the Options dialog box
1. Click the [Options] button in the Administrator Mode dialog box.
The Options dialog box appears.
1 Click the tab containing the parameters to be specified.
1
57
Administrator Mode
5
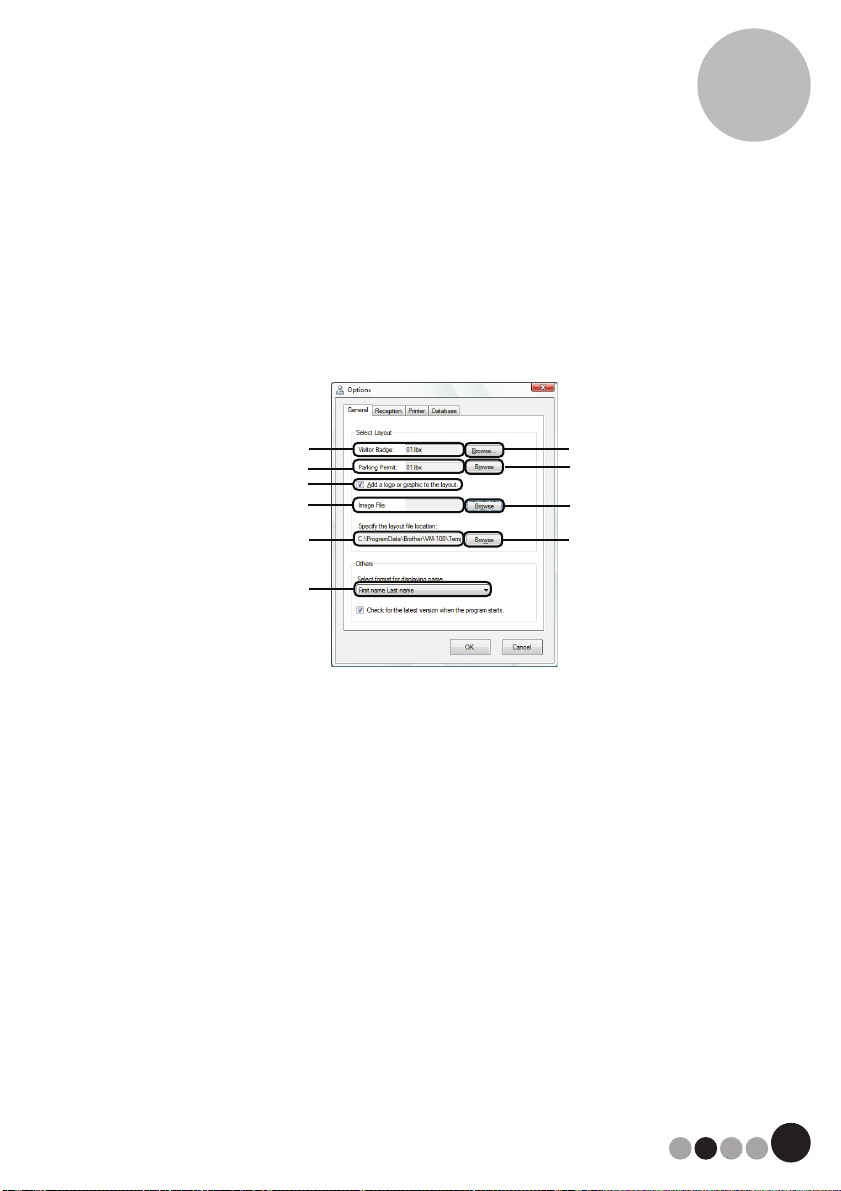
Layout settings ("General" tab)
The layouts for the visitor badges, parking permits and the format for
displaying the names of visitors and hosts can be specified.
1. In the Options dialog box, click the "General" tab.
2. Specify the necessary settings.
1 Displays the name of the layout specified for visitor badges.
2 Click to display a dialog box containing options for changing the layout of
visitor badges. (page 58)
3 Displays the name of the layout specified for parking permits.
4 Click to display a dialog box containing options for changing the layout of
parking permits. (page 58)
5 If a layout containing a logo has been selected, the logo file can be
replaced. Select this check box to replace the logo in the visitor badge with
the selected logo. (page 59)
6 Displays the file name for the replacement logo. This box is displayed in
gray if check box 5 is cleared.
7 Click to display a dialog box for specifying the file for the replacement logo.
8 Displays the path to the folder containing custom layouts. (page 105)
9 Click to display a dialog box for selecting the folder in 8.
0 Select "Last name, First name", "First name Last name", "Last name First
name" or "First name, Last name" as the format for displaying visitor
names.
1
3
2
4
5
6
7
8
9
0
Administrator Mode
5
58
3. Click the [OK] button.
The specified settings for the various parameters are applied.
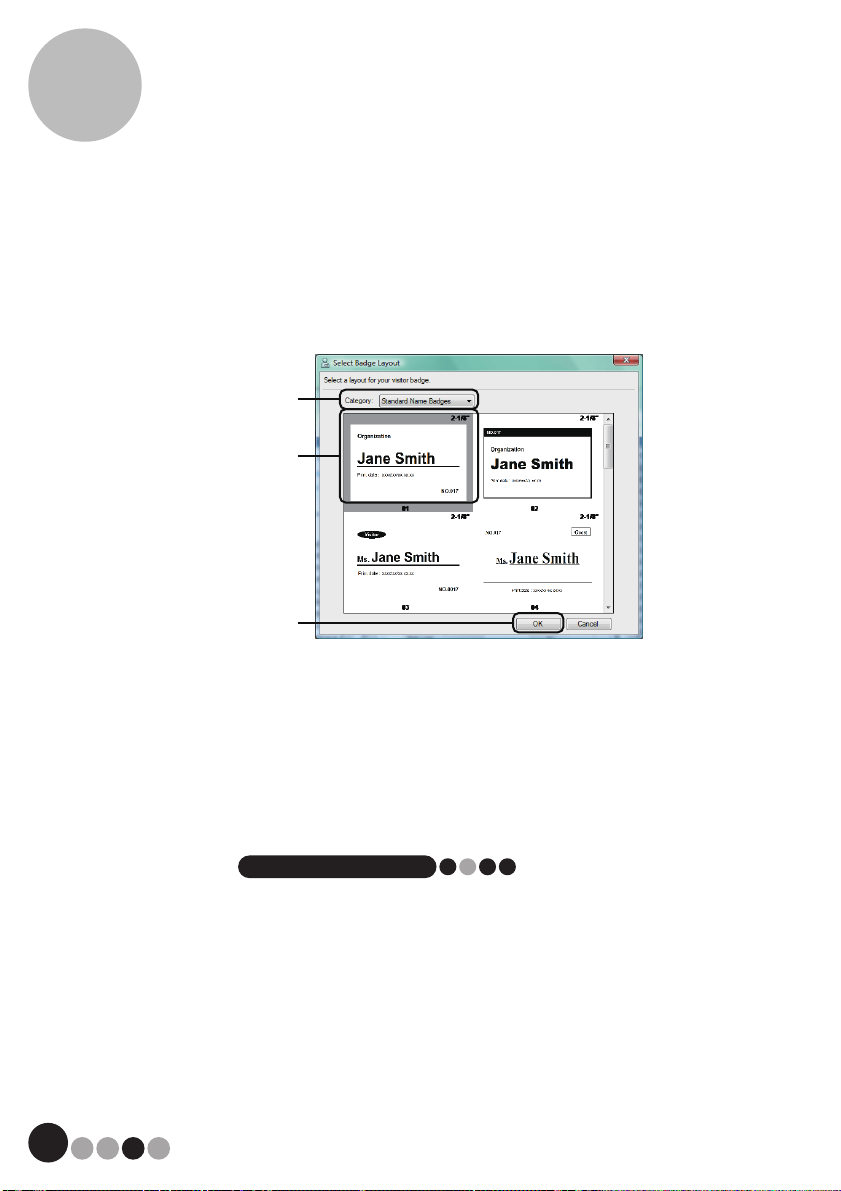
Specifying the layout for visitor badges and parking permits
If 2 or 4, described in Step 2 were clicked, a dialog box for selecting a layout
appears.
1 Select "Standard Name Badges", "Generic Badges" or "Photo Badges" as
the layout category for visitor badges. The "My Badge" category is created
when new badges are created. Newly created badges are saved in the "My
Badge" category (Select Badge Layout dialog box only). (page 105)
2 Displays images of the layouts in the selected category. Select the image
of the layout to be used for visitor badges by clicking the desired layout.
3 Click the [OK] button.
NOTE
• If a layout from the "Photo Badges" category is selected, but no photo was
taken, a sample image is printed in the photo area. If a layout from the
"Photo Badges" category has been selected, be sure to take a photo.
• In Self Check-in mode, photos cannot be taken. If Self Check-in mode is
to be used, select a layout from a category other than the "Photo Badges"
category.
1
2
3
Select Badge Layout dialog box
59
Administrator Mode
5
Selecting a replacement logo
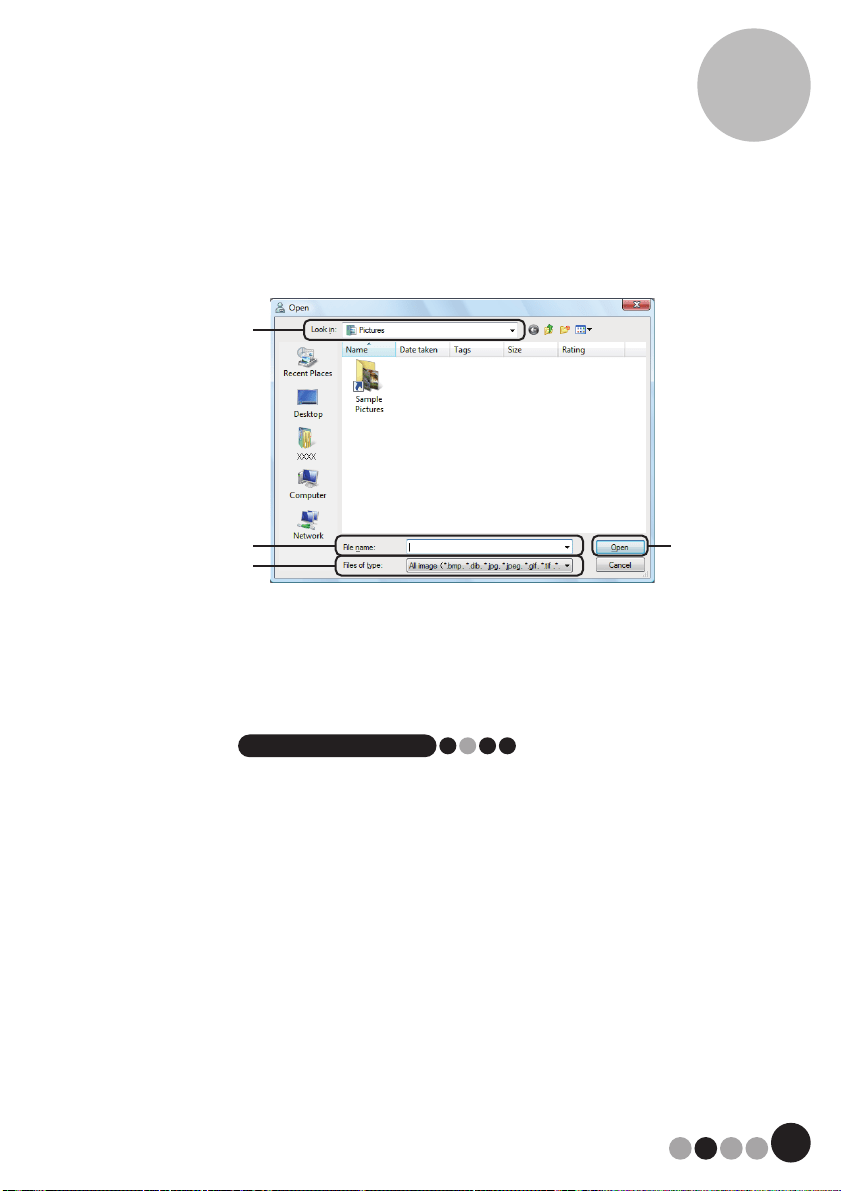
If 7, described in Step 2 is clicked, a dialog box appears so the file for the
replacement logo can be specified.
1 Select the folder containing the replacement logo.
2 Specify the file name for the replacement logo.
3 Select "All image", "BitMap Files", "JPEG Files", "Gif", "TIFF", "Icon",
"WindowsMetaFile" or "PNG" as the file format for the replacement logo.
4 Click to replace the logo.
NOTE
• If a badge containing a logo was selected, be sure to specify the logo or
graphic. If the logo or graphic is not specified, a sample logo appears.
1
2
3
4

Administrator Mode
5
60
Settings for the visitor information form ("Reception" tab)
This setting controls which fields appear in the visitor information form and
whether or not data input is possible.
NOTE
• In the "Reception" tab, the fields to manage the visitor information for
administrators can be specified. To specify the items to be printed, refer to
page 57.
1. In the Options dialog box, click the "Reception" tab.
2. Specify field settings for the visitor information form.
1 Select whether to enable or disable the visitor reservation function.
The VM-100 software allows users to "Reserve" or "Pre-Register" visitors.
With the reservation function, you can make a reservation before a visitor's
arrival, thus making signing in much quicker and easier. If "Disable" is
selected, the visitor reservation function will not be available, and the
visitor information form appears as described below.
NOTE
• If you disable the reservation function, "Reserved" in the "View Visitor List"
changes to "Pre-registered". If you print the visitor's badge without signing
in, the visitor will be shown in the "Pre-registered" list.
• If you disable the reservation function, the [Overwrite] and [Reserve]
buttons for editing visitor information are not available.
• If you disable the reservation function, the fields for estimated arrival date
and time do not appear.
1
2

61
Administrator Mode
5
2 Specify settings for the buttons and text fields in the visitor information
form.
If "Required" is selected, the text box is framed in red, and the visitor
information cannot be registered until data has been entered.
3. Click the [OK] button.
The specified settings for the various parameters are applied.
Administrator Mode
5
62
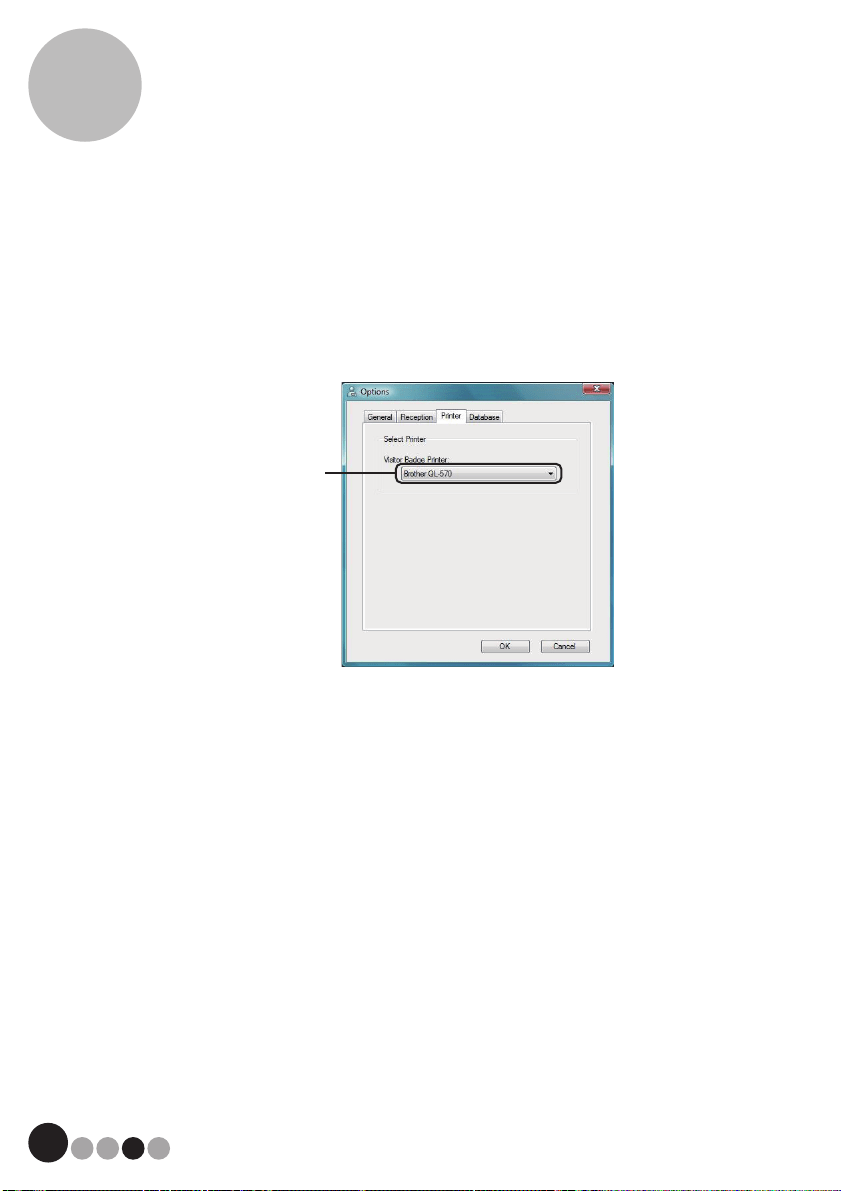
Printer settings ("Printer" tab)
The printer used for printing visitor badges and parking permits can be
specified.
1. In the Options dialog box, click the "Printer" tab.
2. Specify the printer.
1 Select a Brother QL label printer compatible with the VM-100 software as
the printer for printing visitor badges, messages and parking permits. This
is normally specified automatically when the application is started.
3. Click the [OK] button.
The printers are specified.
1
63
Administrator Mode
5
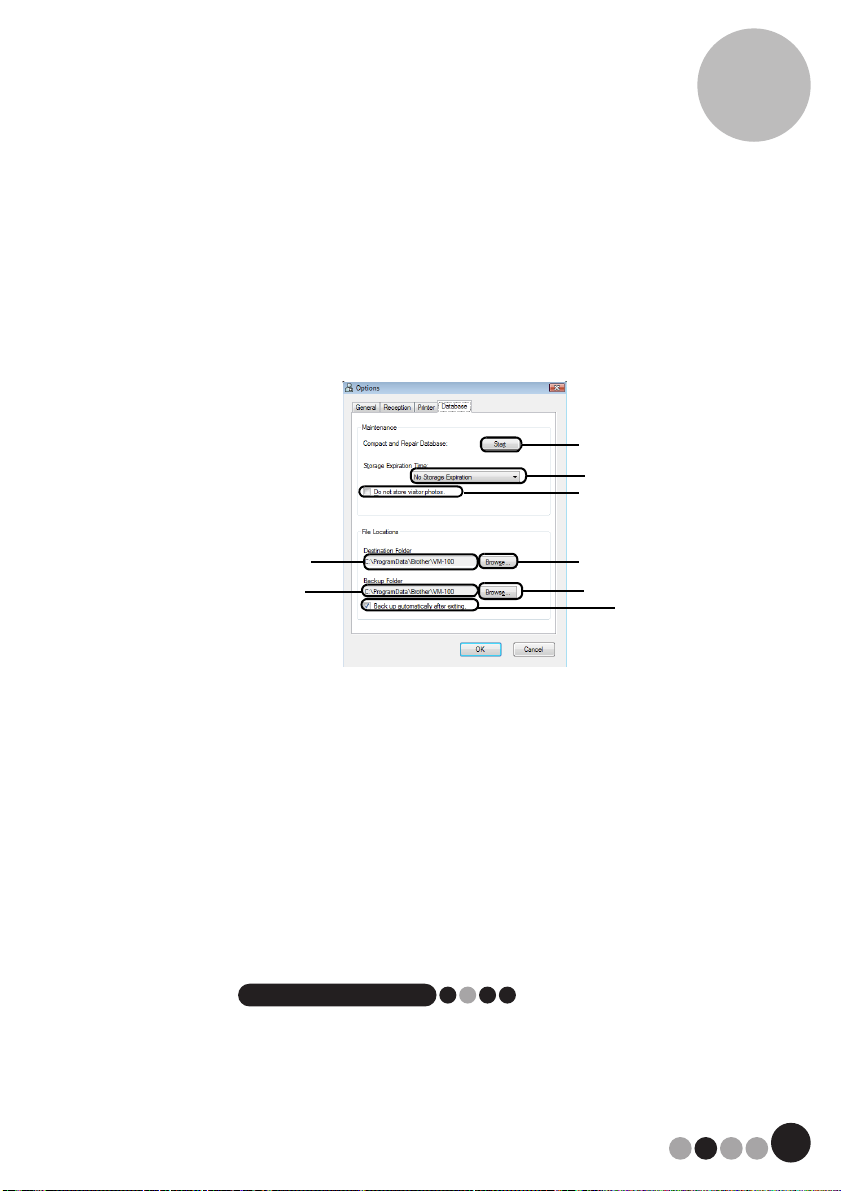
Database and backup settings ("Database" tab)
Settings for the location and length of time that database information is stored,
as well as back up frequency can be specified. The User must be logged in to
their computer with Administrator privileges in order to execute this function.
1. In the Options dialog box, click the "Database" tab.
2. Specify the necessary settings.
1 Click "Start..." to optimize the database.
2 Select "No Storage Expiration", "1 week", "1 month", "3 months", "6
months" or "1 year" as the length of time that visitor records are saved.
3 Select this check box to not save the photo taken in Reception Mode. If this
is selected, the photo data is deleted when the visitor signs out.
4 Specify the path to the file of the VM-100 database. As a default, this is the
path that was specified the first time that the application was started.
(page 39)
5 Click to display a dialog box for selecting the folder when changing 4.
6 Specify the path to the folder used for backing up the VM-100 database.
When backing up to the same folder, backup files older than the 10 most
recent files are deleted.
7 Click to display a dialog box for selecting the folder when changing 6.
8 Select this check box to automatically back up when the application is
exited. (The backup file is in the *.bmb format.)
NOTE
• If no folder is specified in 5 for the backup file, this check box cannot be
selected.
3. Click the [OK] button.
The database settings are applied.
1
45
7
2
3
6
8
Administrator Mode
5
64
5-3. List Management
Displaying the visitor log
A list of visitors who have signed out can be displayed. To display
the information for visitors who have signed in, click the
[Emergency Report] button.
1. Click the [View Visitor Log] button in the Administrator Mode
dialog box.
The Visitor Log window appears.

65
Administrator Mode
5
2. Specify the time period for the visitor information to be
displayed.
NOTE
• Regardless of the specified display period, all information in the visitor log
remains in the database.
1 Specify the start date for the display period.
NOTE
• If a start date later than the end date is specified, the end date is
automatically set to the start date.
2 Specify the end date for the display period.
3 Select this check box to display all information in the visitor log. If this is
selected, settings cannot be specified for 1 and 2.
4 Displays the information in the visitor log for the specified period.
5 Click to return to the Administrator Mode dialog box (page 44).
1
2
4
3
5
Administrator Mode
5
66
Exporting the visitor log
The data in the visitor log can be saved to a file in the CSV format.
1. Select "File" on the tool bar and click "Export".
2. Specify the file name, file format and the location where the file
is to be exported.
1 Specify the location where the file is to be exported.
2 Specify the name of the file to be exported.
3 Select the format of the file to be exported. Only a CSV format can
be selected.
3. Click the [Save] button.
The file is exported with the specified contents.
1
2
3
67
Administrator Mode
5
Displaying host information
Host information can be registered, edited or deleted. This
registered information is accessed when a host search is performed
while visitor information is being entered.
1. Click the [Manage Host Database] button in the Administrator
Mode dialog box.
The Host Information List window appears.

69
Administrator Mode
5
2. Click the [Edit] button.
3. Edit the host information, and then click the [Save and Close]
button.
The dialog box is closed, and the edited host information is displayed in the
Host Information List window.

Administrator Mode
5
70
Deleting
Unnecessary host information can be deleted.
1. In the host information display area, select the host information
to be deleted.
2. Click the [Delete] button.
3. Click the [Yes] button.
The dialog box is closed, and the selected host information is deleted from
the Host Information List window.
71
Administrator Mode
5
5-4. Important Administrator Functions
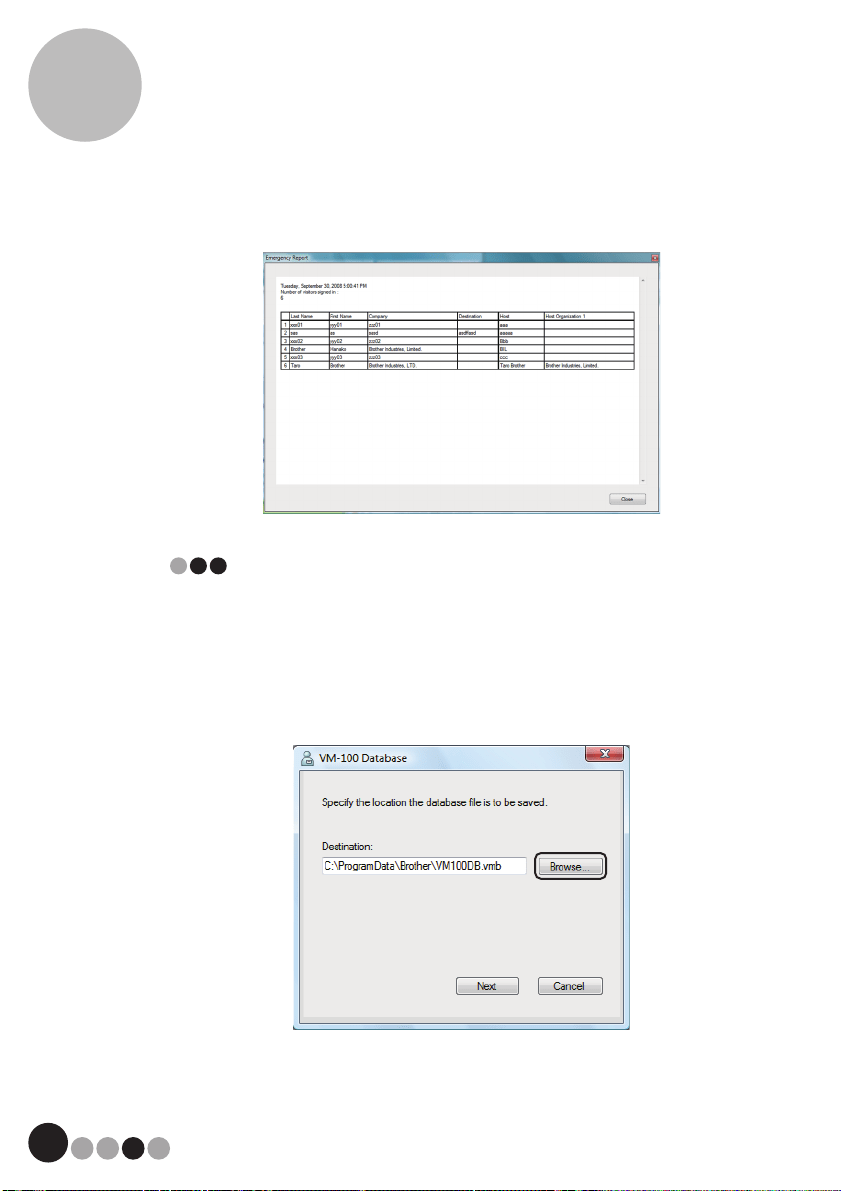
Printing emergency reports
In an emergency, an emergency report (list of visitors who have
signed in) can be displayed and printed. The emergency report
contains the visitor's name, company name and destination as well
as the host's name and organization. Emergency reports are printed
on the printer selected as your PC's default printer. The PC used for
printing visitor badges should also have a default printer using
A4-size paper or larger attached.
1. Click the [Emergency Report] button.
NOTE
• In Reception mode, the emergency report can also be printed by clicking
"Print Emergency Report" in the "File" menu.
Administrator Mode
5
72
The emergency report is displayed and printed.
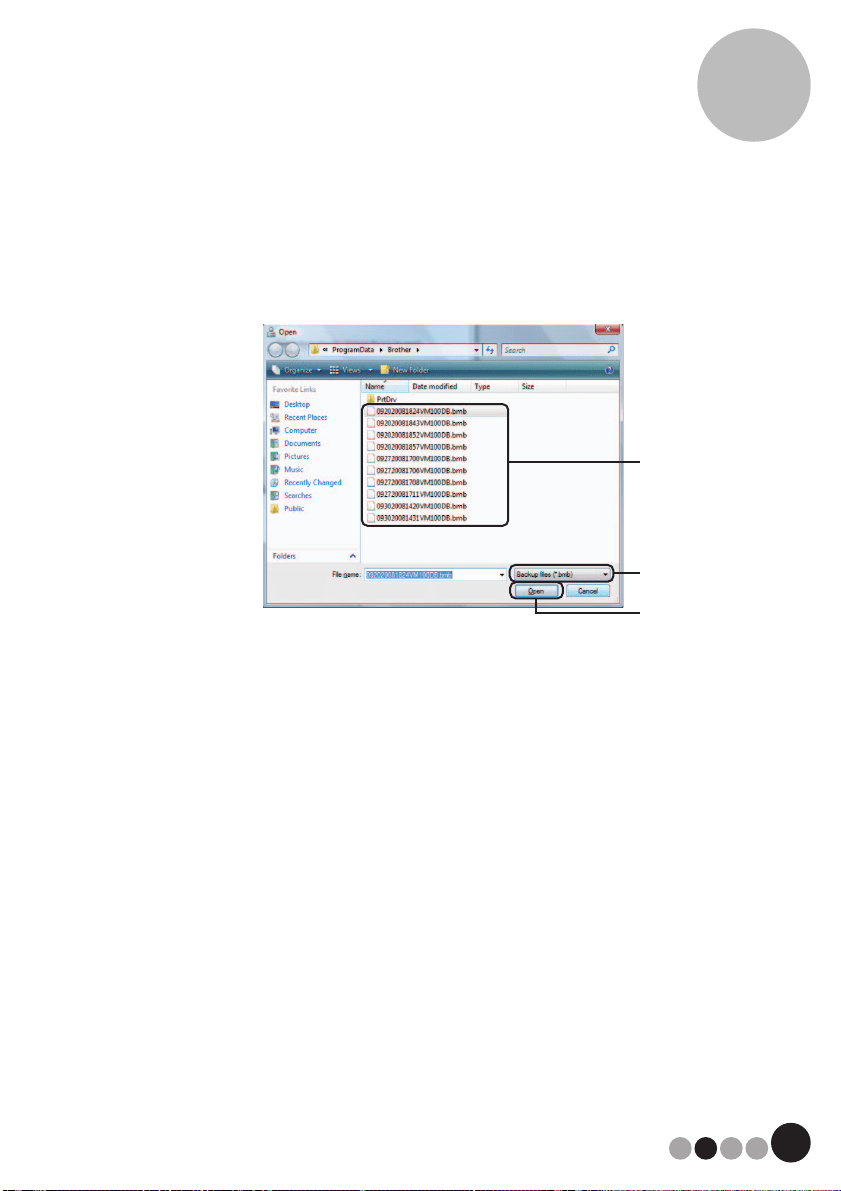
Restoring the backup file
If the data becomes corrupted or if it cannot be accessed, the
backup file can be used to restore the host file. When the VM-100
software is started, a message box appears. Clicking the [OK]
button displays the VM-100 Database dialog box. Follow the
procedure described below to restore the backup file.
1. In the VM-100 Database dialog box, click the [Browse] button.
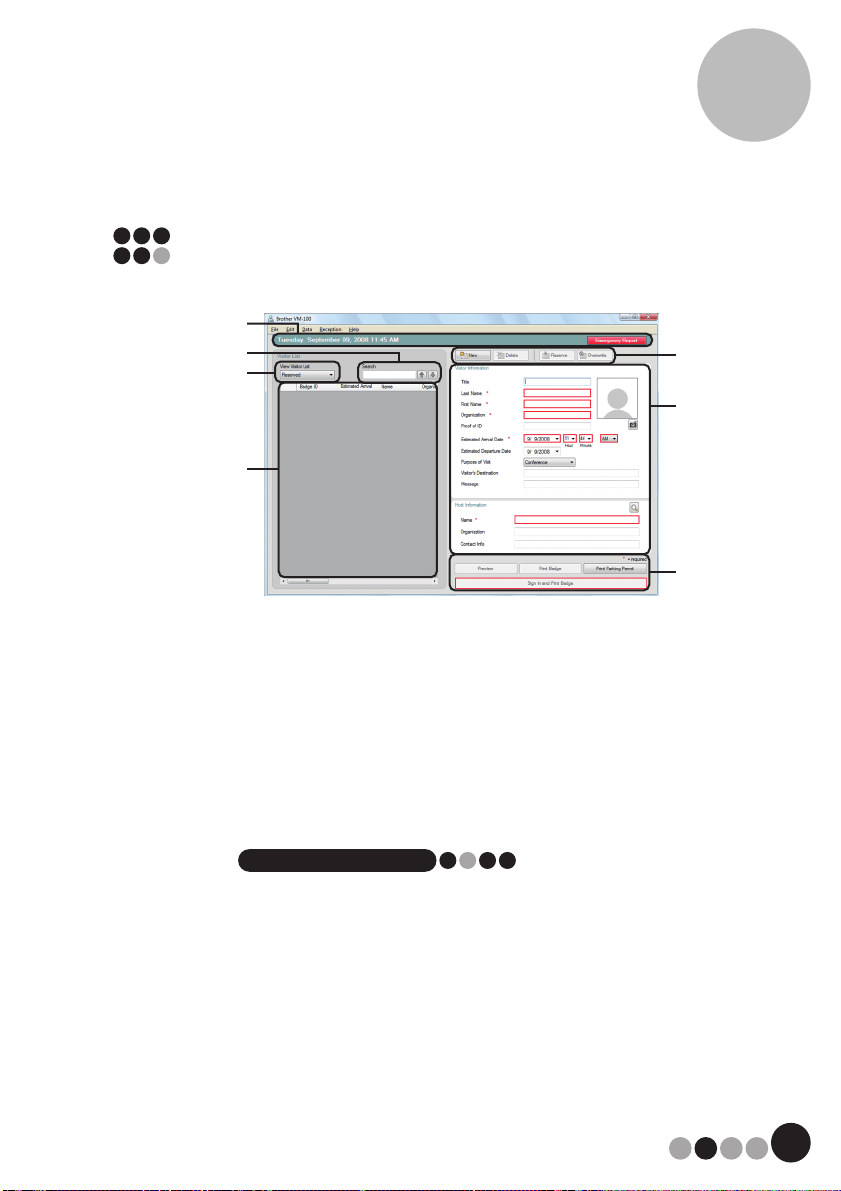
73
Administrator Mode
5
2. The BMB files are listed by date. Select the BMB file to be
restored, and then click the [Open] button.
The VM-100 Database dialog box appears again, and the selected BMB file
is indicated.
1 From the drop-down list, select "Backup files (*.bmb)".
2 The BMB files are listed. The numbers in the file name indicate the date
that the information was backed up. Select the BMB file to be restored.
3 Click the [Open] button.
3. Click the [Next] button, and then click the [Finish] button in the
next dialog box that appears.
The backup file with the selected date is restored.
1
3
2

74
6 Reception Mode
6-1. Receptionist Procedures
The receptionist can prepare for visitors by using two different methods:
1. Receptionist enters visitor information, issues badges, and
signs in visitors as they arrive. Receptionist signs out visitors as
they leave.
2. If a host provides the receptionist with visitor information prior to
their arrival, the receptionist can pre-enter the required visitor
information (make a reservation). The receptionist will then
have the option of either printing the badge prior to the visitor's
arrival (and simply signing them in upon arrival) or waiting for
the visitor to arrive to print the badge and sign them in. When
the visitor leaves, the receptionist signs the visitor out.
Making a reservation and signing in a visitor
1. Enter information in a visitor information form.
2. Click the [Reserve] button.
3. When the visitor arrives, select the visitor from the "Reserved"/
"Pre-registered" list.
4. Click the [Sign In and Print Badge] button to sign the visitor in
and print the visitor badge.
NOTE
• To print badge prior to visitor's arrival, select the visitor from the
"Reserved"/"Pre-registered" list and click the [Print Badge] button. When
visitor arrives, select the visitor badge ID from the list and click the [Sign
In] button.
Signing out a visitor
1. Select the visitor information from the "Signed in" list and click
the [Sign Out] button.
75
Reception Mode
6
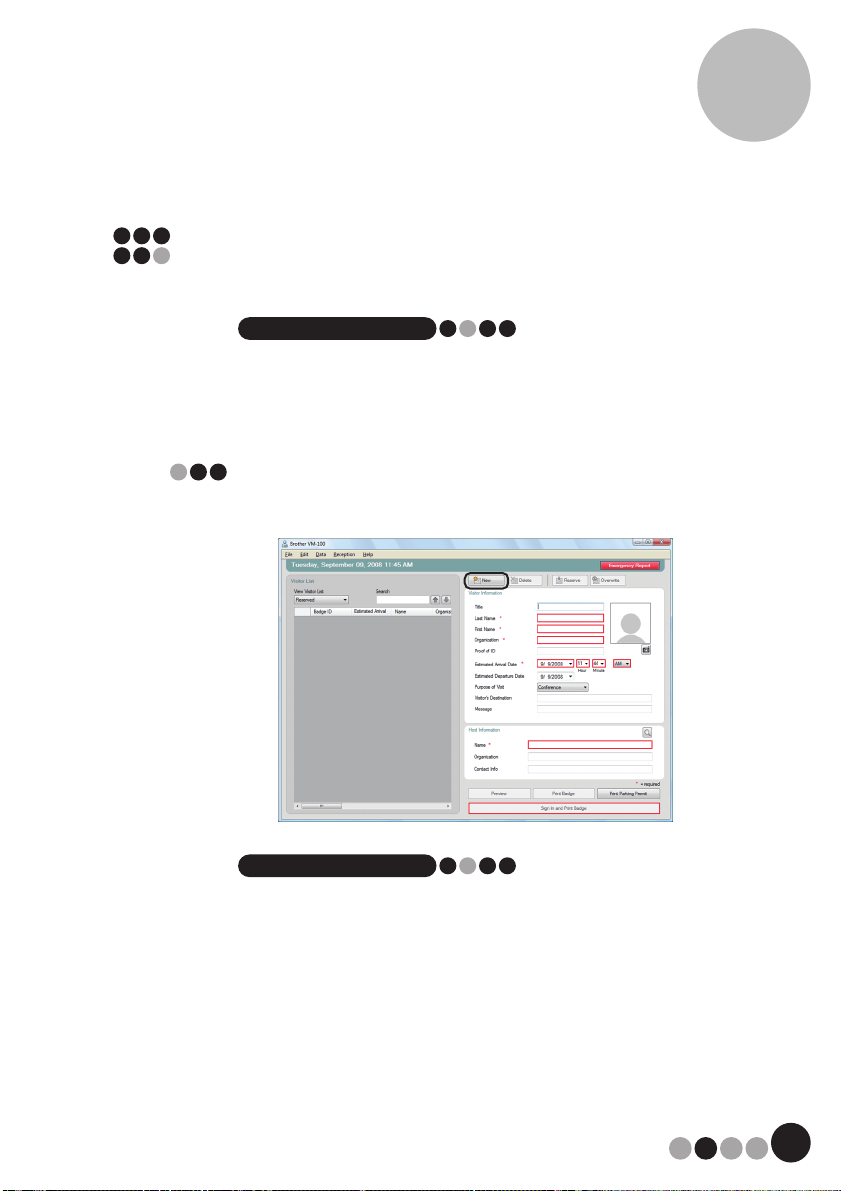
6-2. Reception Mode Window
The following items are available in the Reception mode window.
1 Displays the current date and time and the [Emergency Report] button
(page 71).
2 Enables users to choose selections from "View Visitor List" drop down
menu.
Reserved:Displays the information for visitors who have reservations, but
have not yet signed in. ("Reserved" list)
Signed in:Displays the information for visitors who have signed in, but not
yet signed out. ("Signed in" list)
Signed out:Displays the information for visitors who have signed out.
("Signed out" list)
NOTE
• By changing the filter condition, the information displayed in the list and its
order can be changed. (For example: When "Signed in" is selected, the
sign-in date and time is displayed. When "Signed out" is selected, the
sign-out date and time is displayed.)
• If the visitor reservation function is disabled in Administrator mode
(page 60), "Reserved" changes to "Pre-registered", and information is
displayed for visitors whose badges have been printed, but who have not
yet signed in ("Pre-registered" list).
1
2
3
4
5
6
7

Reception Mode
6
76
3 Allows information in the visitor list (4) to be searched.
4 Visitor list - Displays the information for visitors registered in the database.
• The information displayed in this list can be updated by changing the
"View Visitor List" condition ("Reserved" or "Pre-registered"/"Signed in"/
"Signed out") or visitor information.
• The visitor badge ID is assigned a number between 001 and 999, in
order, when the badge is issued. The ID numbering returns to 001 after
number 999 is assigned. "---" appears if the badge has not yet been
issued.
• Clicking a column title sorts the list according to the information entered
for that field.
• Dragging a borderline on either side of a column changes the width of
the column.
5 Click to display an empty visitor information form, or to change, register or
delete visitor information.
6 Enter visitor information, or edit existing visitor information. In addition,
host information can be searched, and a photo can be taken of visitors.
7 Click to issue visitor badges, parking permits and to sign in or sign out
visitors.
77
Reception Mode
6
6-3. Entering Visitor Information
Information for visitors without a reservation can be entered on location.
NOTE
• To enter information in advance for visitors with scheduled appointments,
refer to page 93.
• To enter information using that of visitors who have visited in the past
("Signed out"), refer to page 80.
Entering new visitor information
1. Click the [New] button.
NOTE
• If displayed visitor information has not yet been saved, a message
appears, requesting whether the visitor information should be erased. To
save the information, click the [Reserve] button.
Reception Mode
6
78
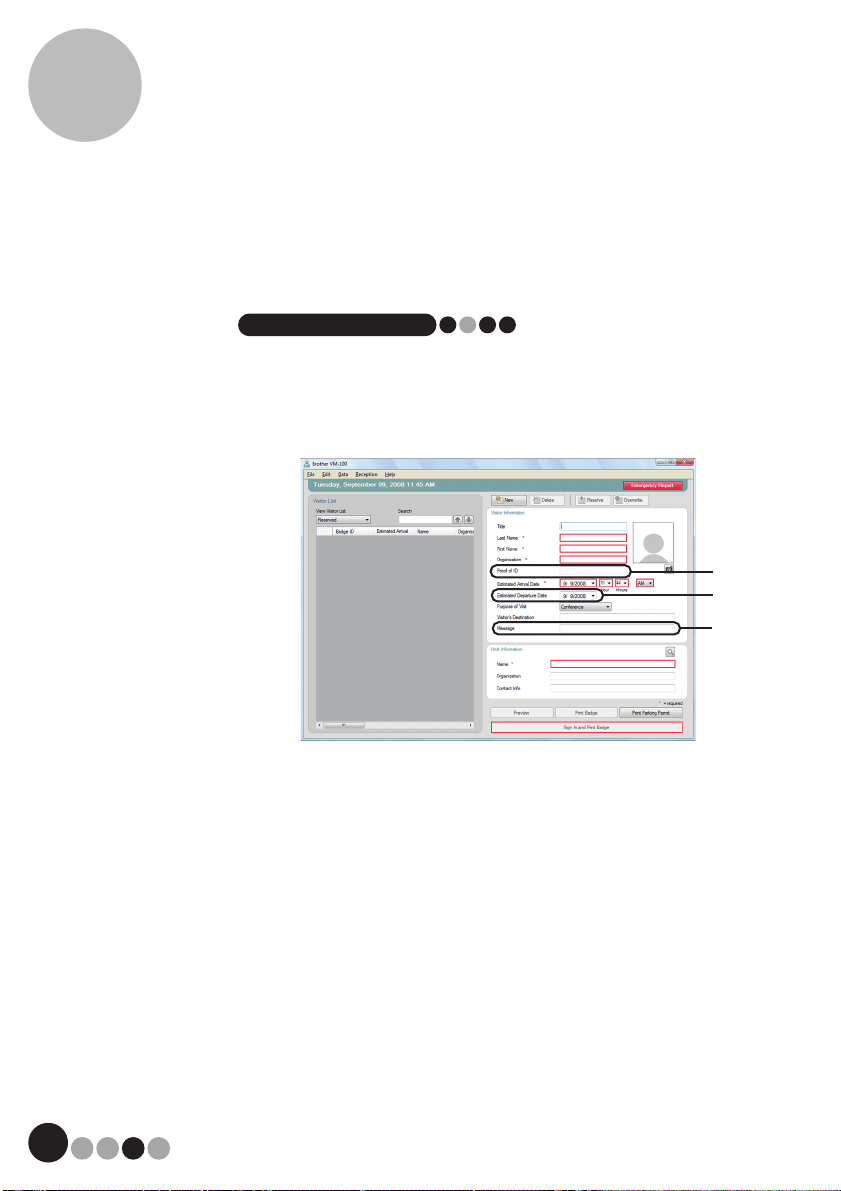
2. Type in the visitor information. Data must be entered into fields
framed in red. If data is not entered, the visitor information
cannot be registered.
NOTE
• The fields that appear differ depending on the settings selected in
Administrator mode.
• No more than 255 characters can be entered for the following fields.
[Title], [Last Name], [First Name], [Organization], [Proof of ID], [Visitor's
Destination], [Message]
1 Type the visitor's personal identification information (for example, driver's
license number or passport number).
2 Enter the expected departure date.
3 Type in any message required for the visitor (for example, "meeting room
has been changed to 7B").
1
2
3
79
Reception Mode
6
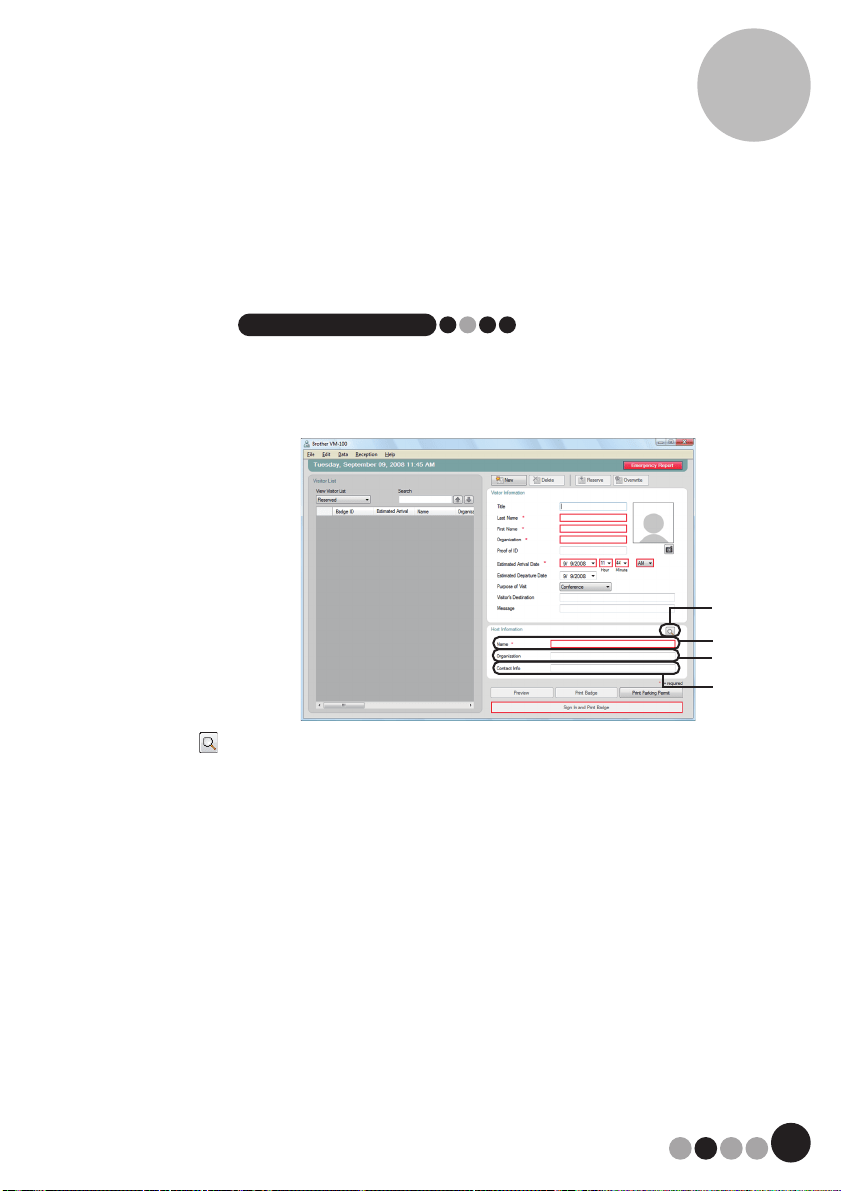
3. Type in the host information. Data must be entered into fields
framed in red. If data is not entered, the visitor information
cannot be registered.
NOTE
• No more than 255 characters can be entered for the following fields.
[Name], [Organization], [Contact Info]
• The fields framed in red (mandatory fields) are established in
Administrator mode.
4 button
If host information has already been registered, click this button to search
the database in order to easily enter the host information. (page 82)
5 Type in the host's name (person being visited).
When information is entered, the database is searched for registered host
names, and a list of possible matches appears. From this list, select a host
name to automatically enter the host name, organization information and
telephone numbers.
6 Enter the host's organization.
If a host name is found in the database search results, this appears in the
format "Organization1/Organization2". If only one field was registered with
the host, this appears in the format "Organization1".
7 Enter the host's telephone numbers.
If a host's name is found in the database search results, this appears in the
format "Phone1/Phone2". If only one field was registered with the host, this
appears in the format "Phone1".
4
5
6
7
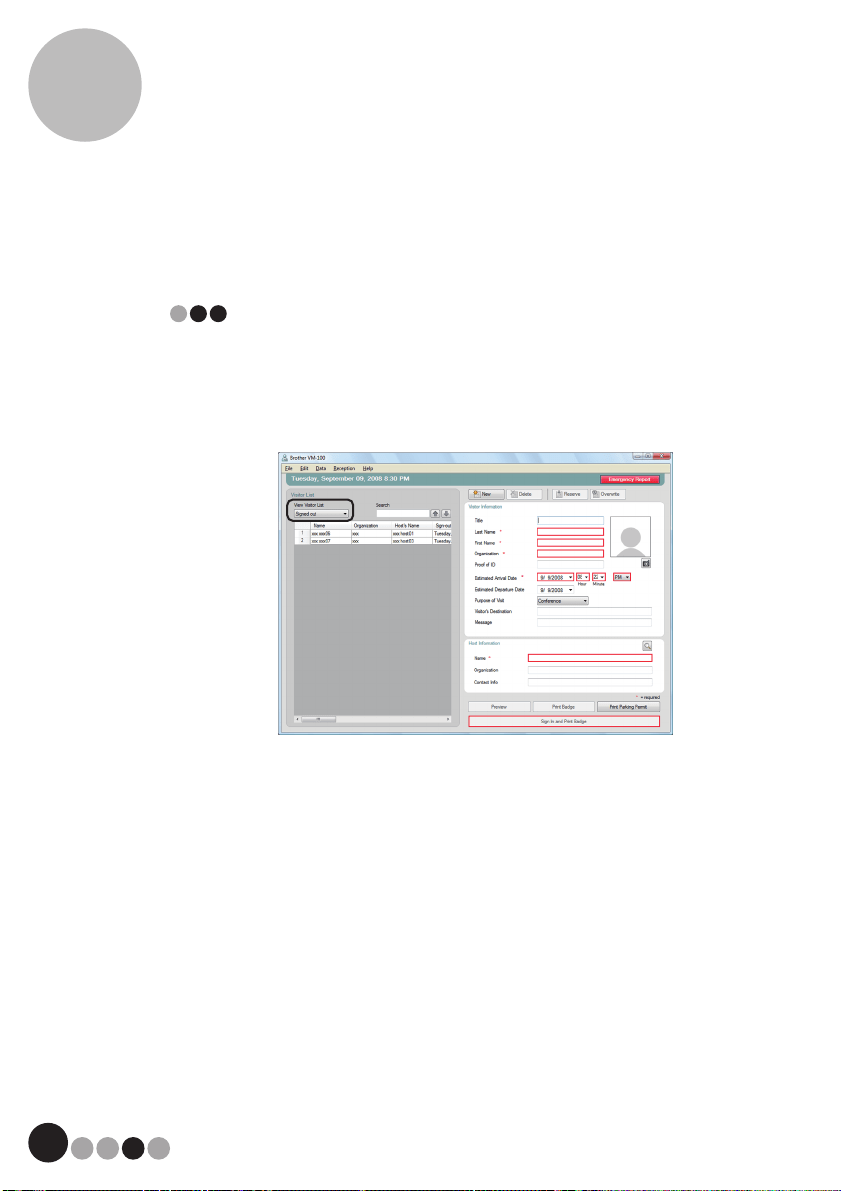
Reception Mode
6
80
4. If required, take a photo of the visitor (page 84), sign them in
(page 86) or issue their visitor badge (page 90).
Recalling Visitor Information from Previous
Visits ("Signed Out")
Visitor information can easily be entered by using information of
visitors who have visited in the past ("Signed out").
1. In the "View Visitor List", select "Signed out".
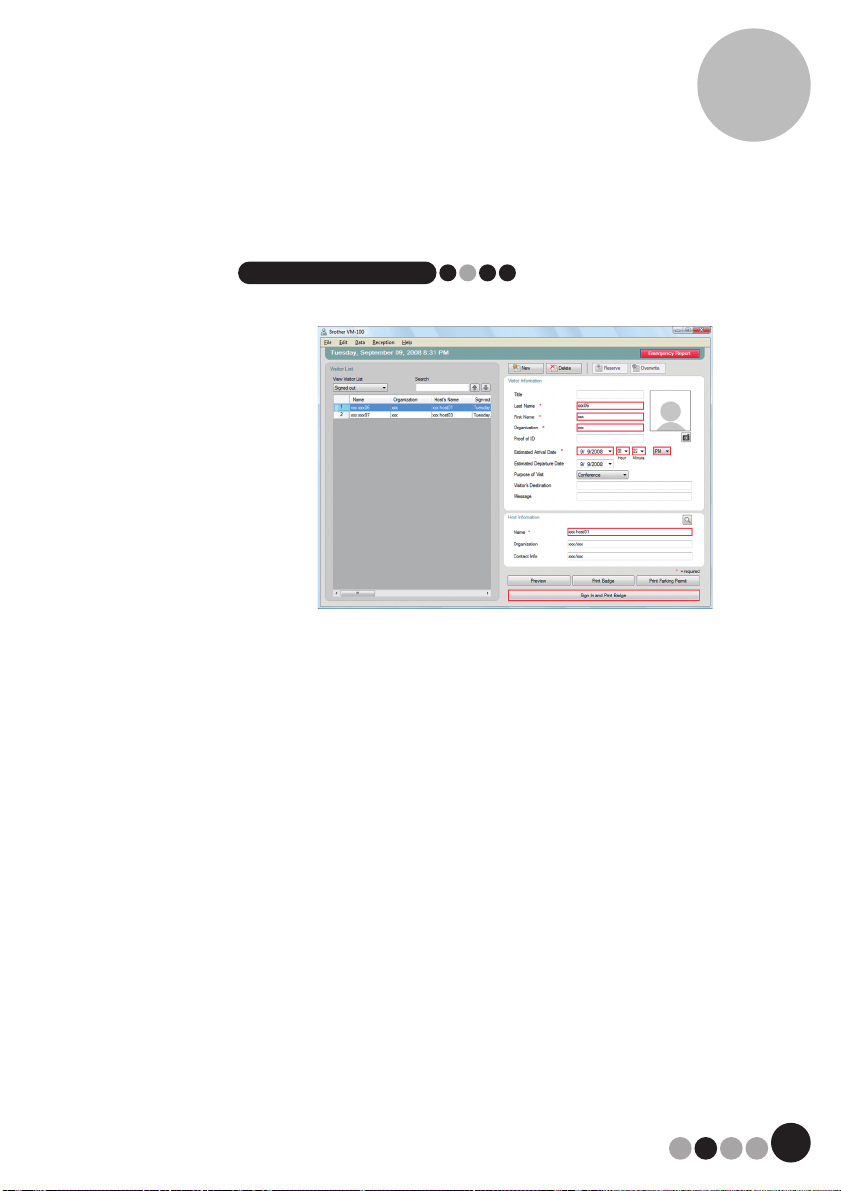
81
Reception Mode
6
2. Select the visitor whose information is to be used.
NOTE
• A search can be performed by entering the visitor name in the search box.
3. If necessary, edit the information in the visitor information form.
4. If necessary, take a photo of the visitor (page 84), sign them in
(page 86) or issue their visitor badge (page 90).
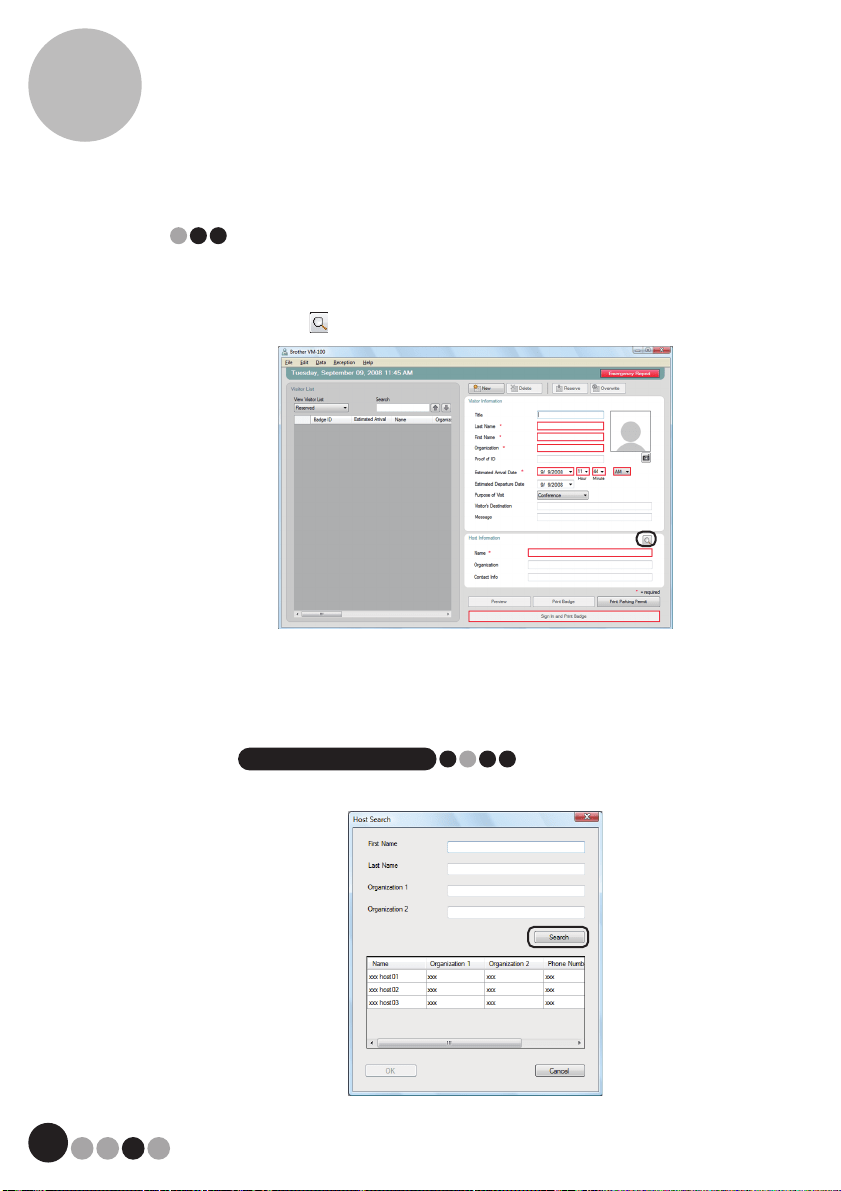
Reception Mode
6
82
Searching for host information
A host registered in the database can be searched for in order to
easily enter the host information.
1. Click the button.
2. Type information in the "First Name", "Last Name",
"Organization 1" or "Organization 2" text box, and then click the
[Search] button.
NOTE
• No more than 255 characters can be entered for each field.
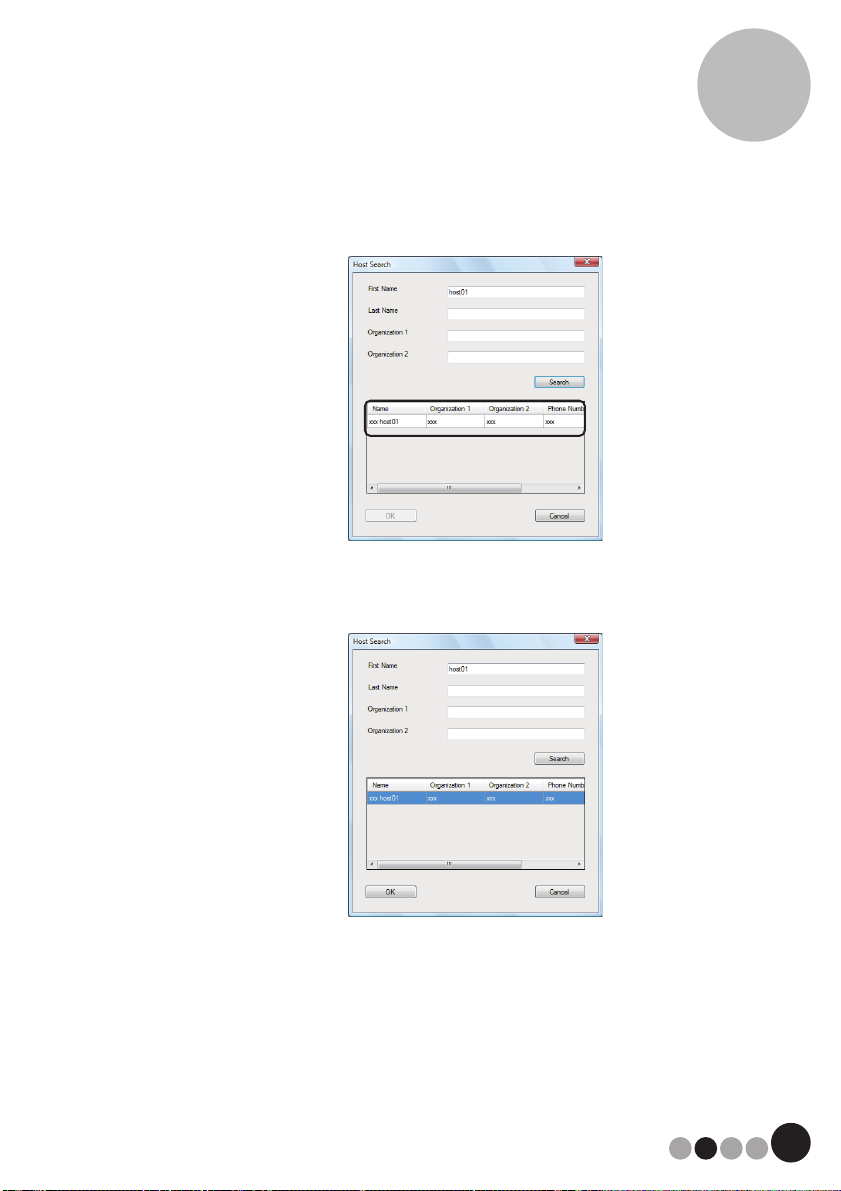
83
Reception Mode
6
3. The host information is searched.
4. Select the host whose information is to be entered into the
visitor information form.
5. Click the [OK] button.
The information for the selected host is entered into the visitor information
form.
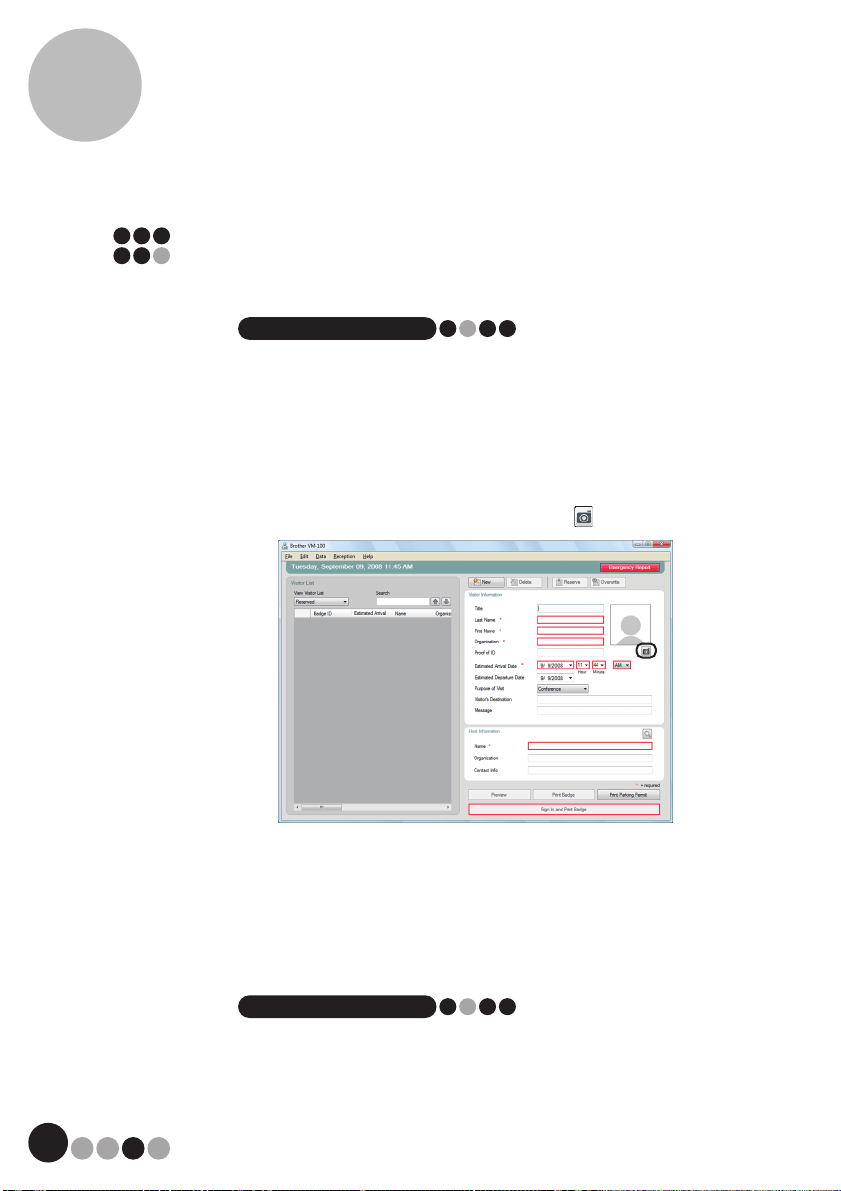
Reception Mode
6
84
6-4. Including Visitor Photos on Badges
A photo can be taken and added to the visitor badges.
NOTE
• Depending on the settings specified in Administrator mode, photographing
may not be available.
• A web camera (not included with the QL-570VM) must be connected in
order to take photos.
• Due to many types of web cameras on the market Brother cannot
guarantee all web cameras will work with the QL-570VM. For a list of
recommended web cameras please visit our web site at
http://www.brother.com.
1. In the visitor information form, click the button.
In the Camera View dialog box, the image from the camera (video image)
appears.
2. Position the visitor in front of the camera so that their face is
correctly framed, and then click the [Take Photo] button.
The visitor's photo is imported and appears on the screen. The [Take Photo]
button changes to [Retake Photo].
NOTE
• To take the photo again, click the [Retake Photo] button.
3. Click the [Save] button.
The photo is saved in the database.
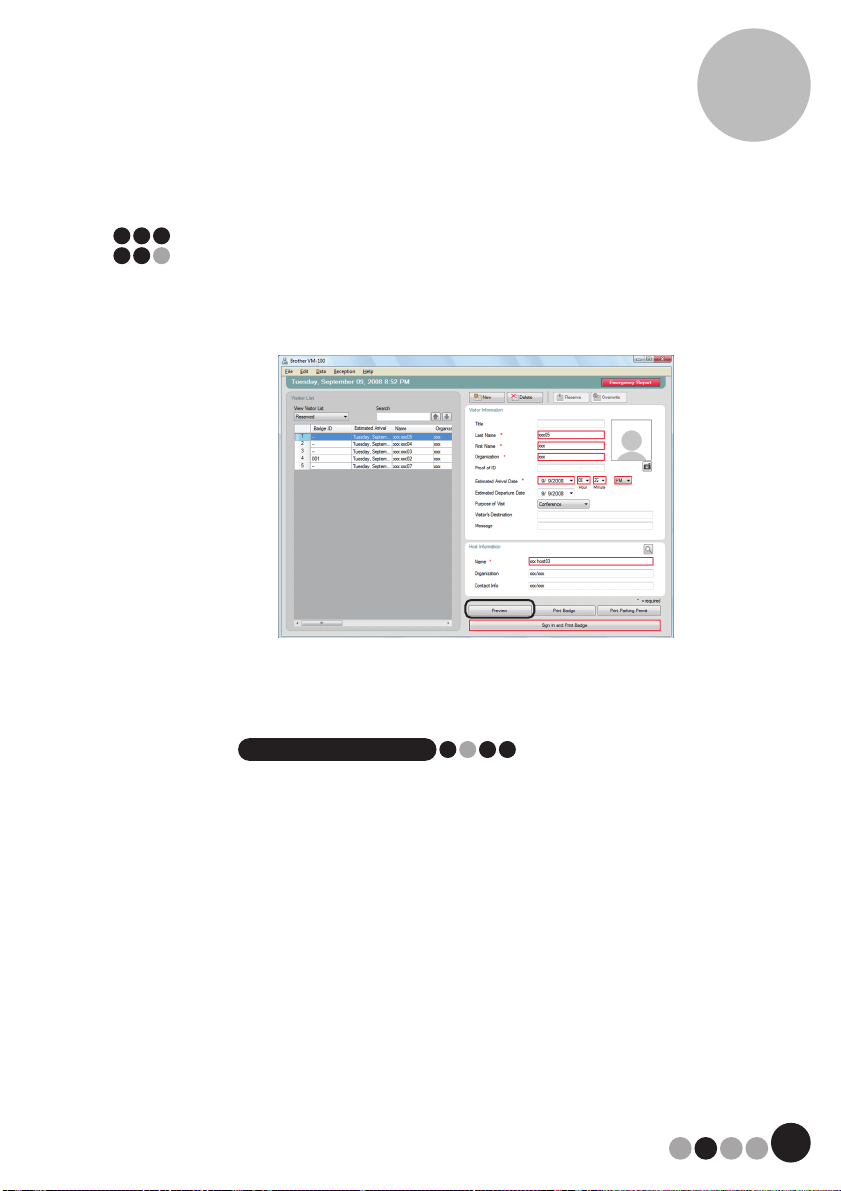
85
Reception Mode
6
6-5. Previewing Visitor Badges
To preview visitor badges before printing, follow the steps below.
1. Click the [Preview] button.
2. Preview the badge, and then click the [Close] button to close
the dialog box.
NOTE
• To print the visitor badge without signing the visitor in, click the [Print
Badge] button. To sign the visitor in, refer to page 86.
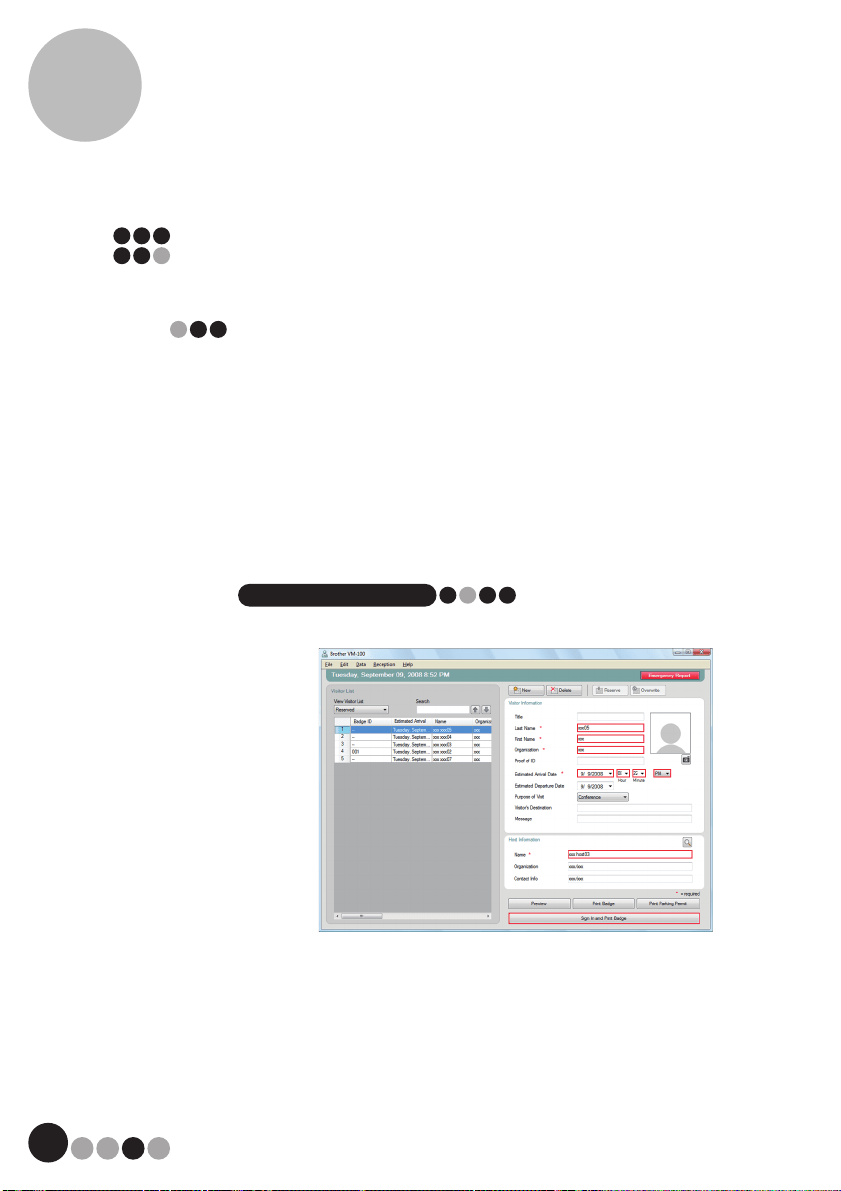
Reception Mode
6
86
6-6. Signing In (Issuing Visitor Badges)/
Signing Out Visitors
Signing in
Visitor badges are issued at the same time that the visitor is signed
in.
1. Perform one of the following operations.
• If a reservation has been made for the visitor, select the information for the
visitor to be signed in from the "Reserved" list. (shown below)
• If a reservation has not been made for the visitor, but the visitor has visited in
the past, select the information for the visitor to be signed in from the "Signed
out" list. (page 80)
• If a reservation has not been made for the visitor, enter the information for the
visitor to be signed in the visitor information form. (page 77)
NOTE
• A search can be performed by entering the visitor name in the search box.
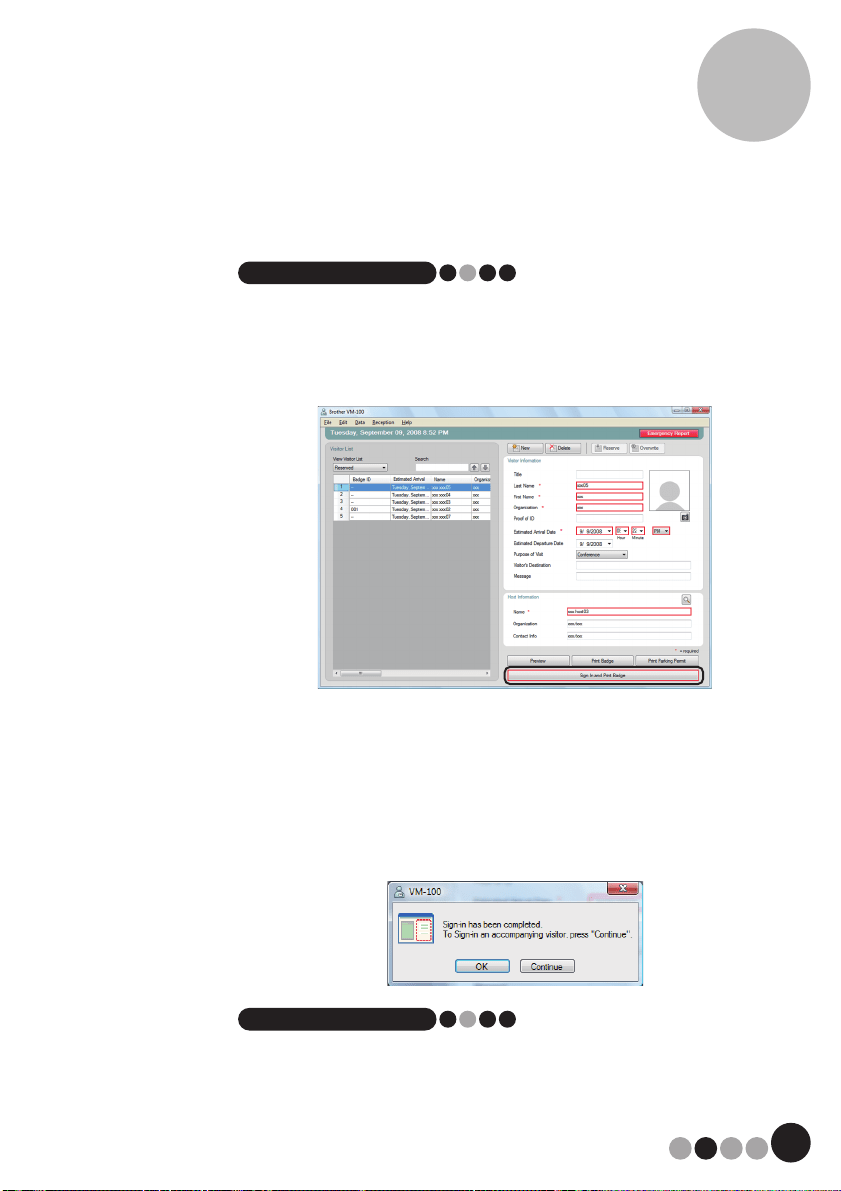
87
Reception Mode
6
2. Click the [Sign In and Print Badge] button.
NOTE
• If the host is not registered, a confirmation message appears. Click the
[OK] button to continue signing in. Click the [Cancel] button to return to
Step 2. If multiple visitors are selected in Step 1, only the visitor
information where an unregistered host was entered appears. Verify the
host information.
3. If a message was entered with the visitor information, click the
[Yes] button to print the message, or click the [No] button to not
print the message.
4. To cancel out of adding information for a visitor who has been
signed in, click the [OK] button. To sign in another visitor, click
the [Continue] button.
NOTE
• Clicking the [Continue] button is convenient for adding information for
additional visitors since all information for the signed-in visitor remains in
the visitor information form except for the last name and first name.

Reception Mode
6
88
5. If the [Continue] button was clicked in step 4, type in the
information for the additional visitor, and then repeat steps 2
through 4 to sign in the visitor.
The visitor information is added to the "Signed in" list.
If the visitor was selected from the "Signed out" list, the visitor information is
added to the database as a newly registered visitor.
If an expected departure date prior to the arrival date is specified, the
departure date is set to the arrival date.
NOTE
• If the visitor badge has already been printed, the visitor is simply signed
in, and the badge is not printed.
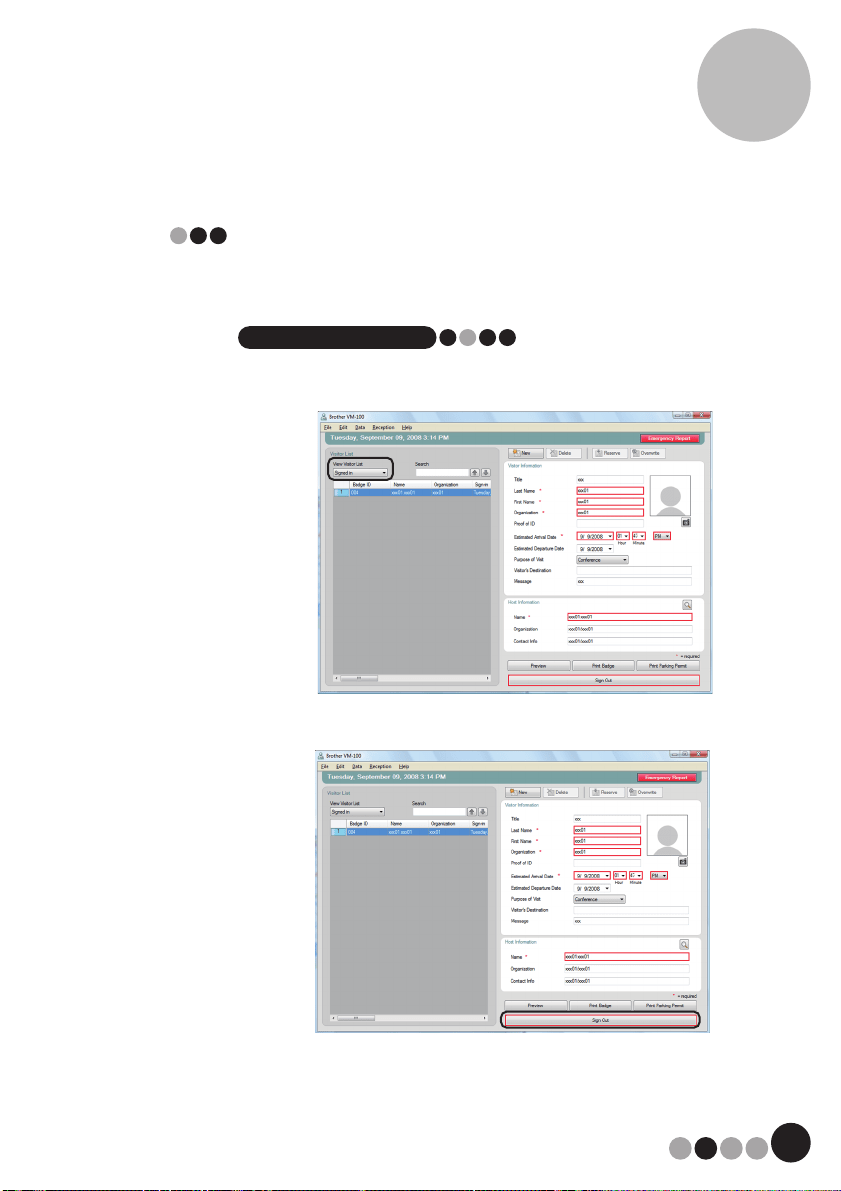
89
Reception Mode
6
Signing out
1. From the "Signed in" list, select the information for the visitor to
be signed out.
NOTE
• A search can be performed by entering the visitor badge ID or name in the
search box.
2. Click the [Sign Out] button.
3. Click the [OK] button.
The visitor is signed out, and the visitor information is added to the "Signed
out" list.
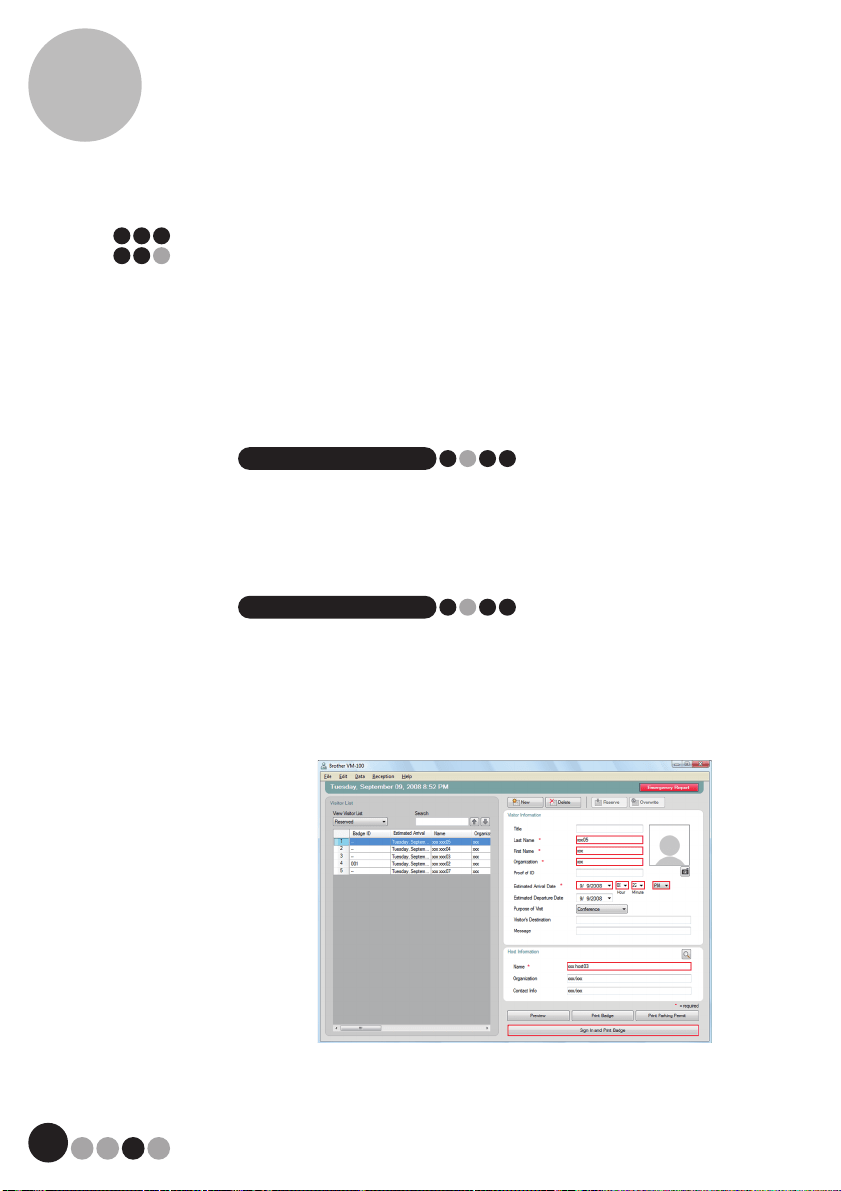
Reception Mode
6
90
6-7. Issuing Visitor Badges without
Signing In
A visitor badge can be issued without signing in the visitor.
1. Perform one of the following operations.
• If a reservation has been made for the visitor, select the information for the
visitor whose visitor badge is to be issued from the "Reserved" list. (shown
below)
NOTE
• A search can be performed by entering the visitor name in the search box.
• If a reservation has not been made for the visitor, but the visitor has visited in
the past, select the information for the visitor whose visitor badge is to be
issued from the "Signed out" list.
NOTE
• To select the information for multiple visitors, hold down the [Ctrl] key while
clicking the visitor information.
• If a reservation has not been made for the visitor, enter the information for the
visitor whose visitor badge is to be issued in the visitor information form.
(page 77)
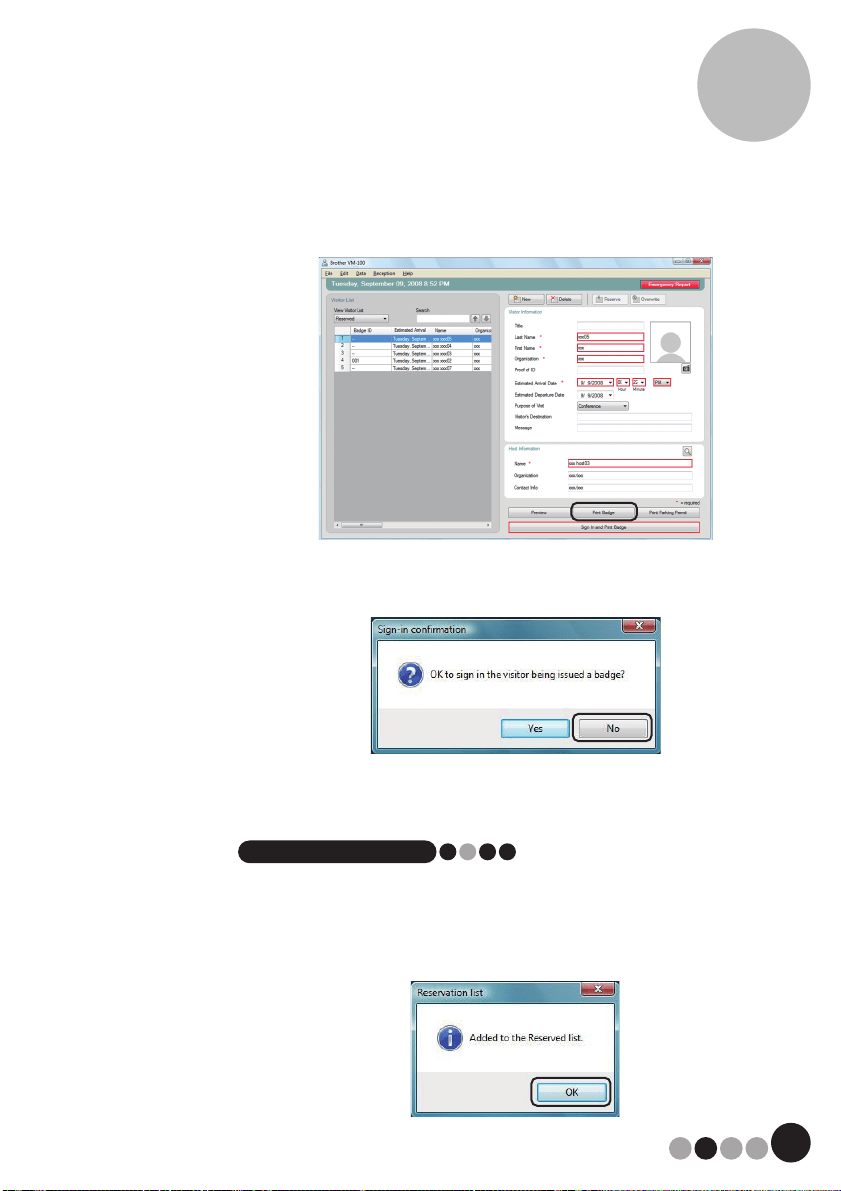
91
Reception Mode
6
2. Click the [Print Badge] button.
Sign-in confirmation dialog box appears.
3. Click the [No] button.
A visitor badge is issued with the selected visitor information or with the
information entered in the form. In addition, the visitor badge ID is entered in
the "Reserved" or "Pre-registered" list. The visitor is not signed in.
NOTE
• If a visitor record with a previously assigned visitor badge ID is selected
and the information is edited or the badge is reprinted, the visitor
information is registered as a different record.
4. Click the [OK] button.
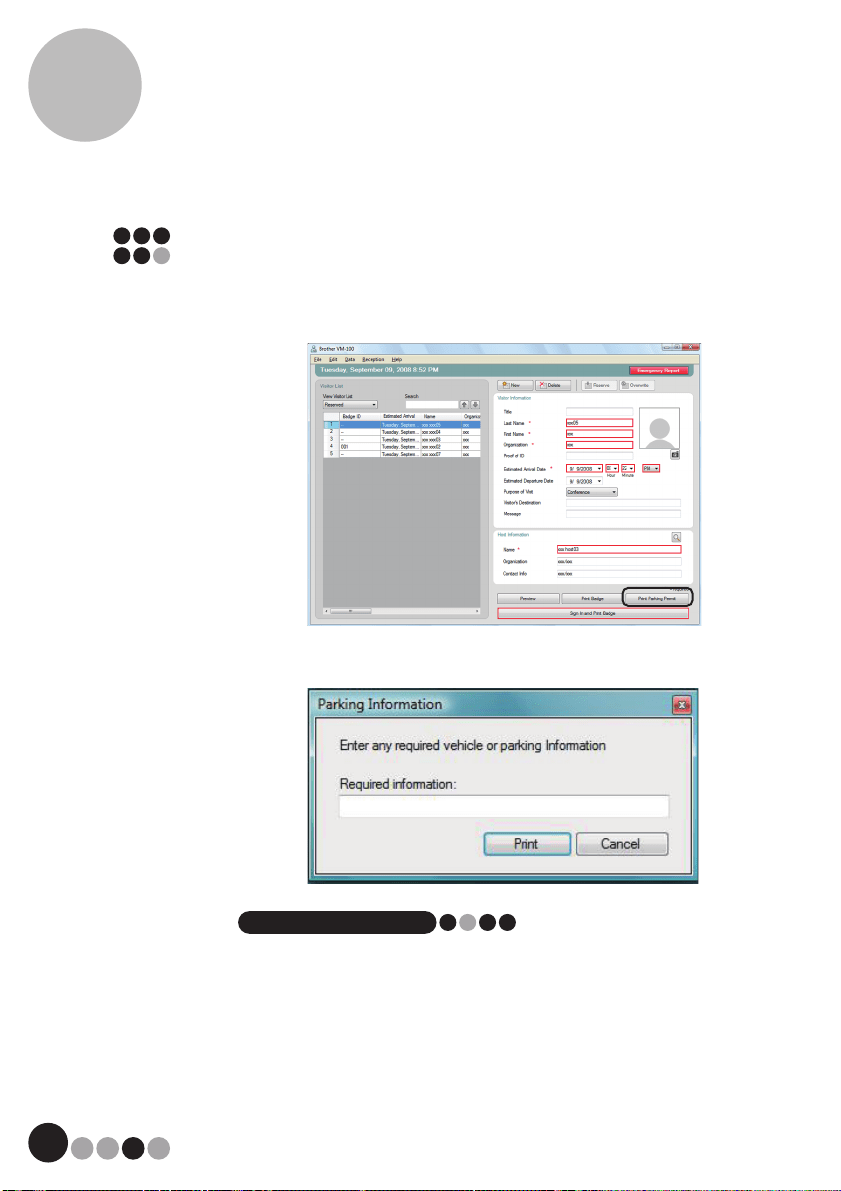
Reception Mode
6
92
6-8. Issuing Parking Permits
1. Open the visitor record for whom the parking permit will be
issued, and then click the [Print Parking Permit] button.
2. Type in the number.
NOTE
• If the settings in Administrator mode have been set so that it is not
necessary to enter a number, the parking permit is simply printed, and
steps 2 and 3 can be skipped.
3. Click the [Print] button.
The parking permit is printed with the relevant information.
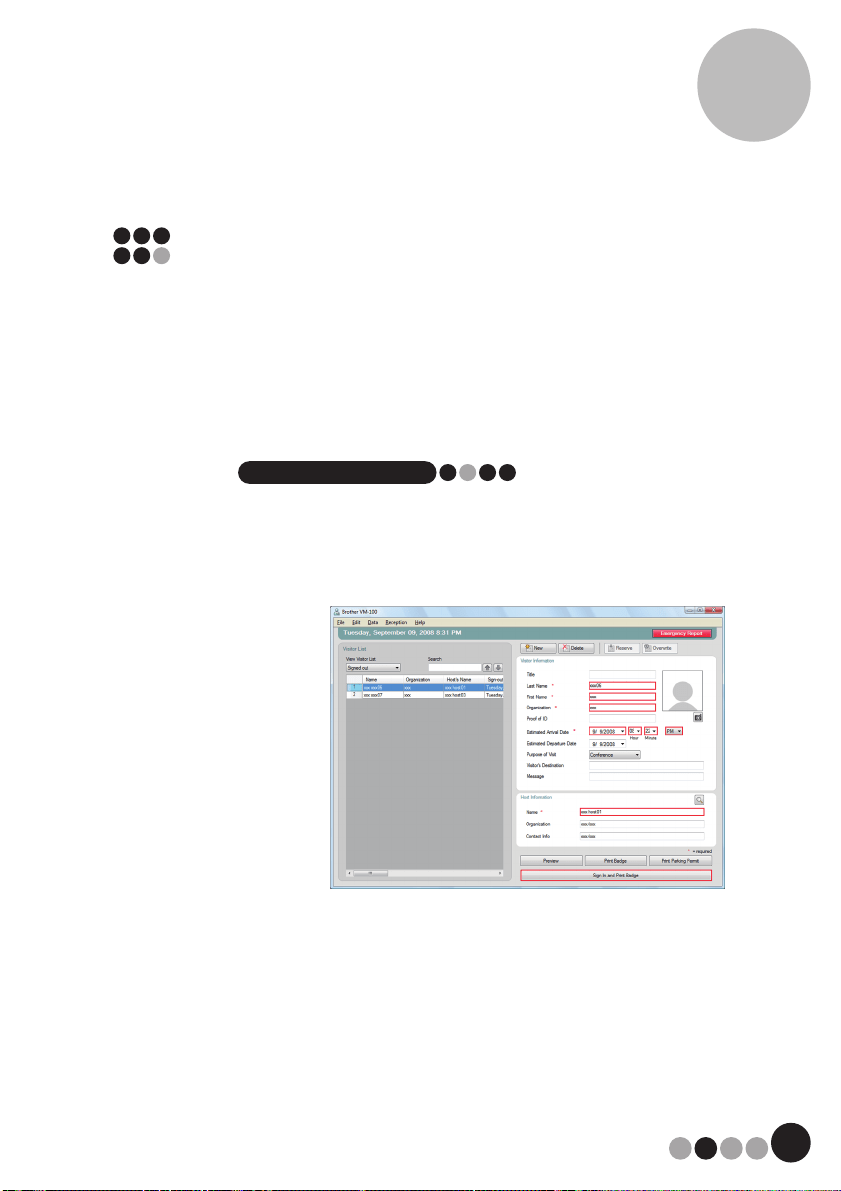
93
Reception Mode
6
6-9. Making Visitor Reservations
Visitor information can be entered in advance, and a reservation can be made for
the visitor.
1. Perform one of the following operations.
• For a new visitor, enter the visitor information. (page 77)
• For a visitor who has visited in the past, select the information for the visitor
who the reservation is to be made for from the "Signed out" list. (shown
below)
NOTE
• A search can be performed by entering the visitor name in the search box.
• If data has been entered in the "Message" text box, the message will also
be printed when the visitor badge is printed.
• If the entered host information has not been registered in the host
database, a confirmation message appears.
2. If necessary, edit the information in the visitor information form.
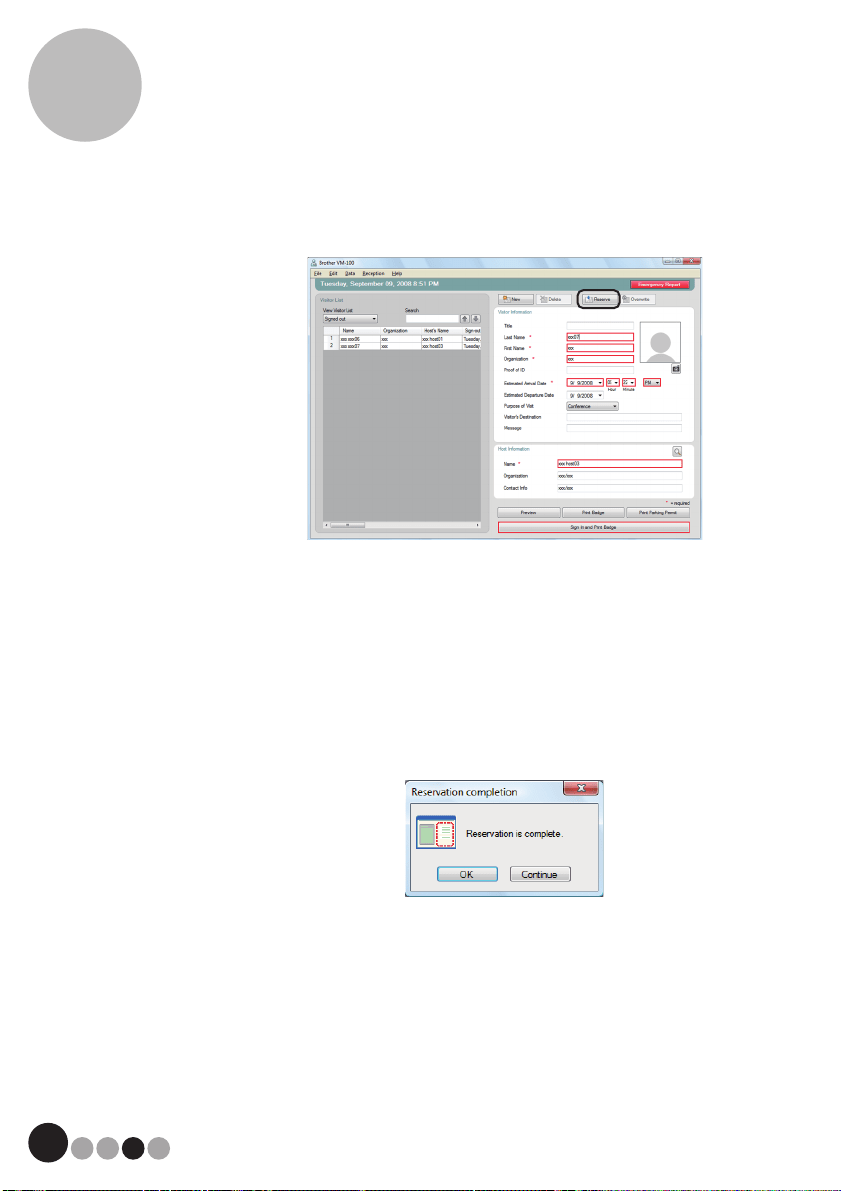
Reception Mode
6
94
3. Click the [Reserve] button.
The entered or selected visitor information is added to the "Reserved" list.
If an expected arrival date prior to the current date is specified, the arrival date
is set to the current date.
If an expected departure date prior to the expected arrival date is specified,
the departure date is set to the arrival date.
4. To make reservations for multiple visitors, click the [Continue]
button. Continue with step 5.
To finish making reservations, click the [OK] button to close the
dialog box.
5. Edit the information in the visitor information form, and then click
the [Reserve] button.
6. Repeat steps 4 and 5 until the information for all selected
visitors is entered.
7. Click the [OK] button to close the dialog box.
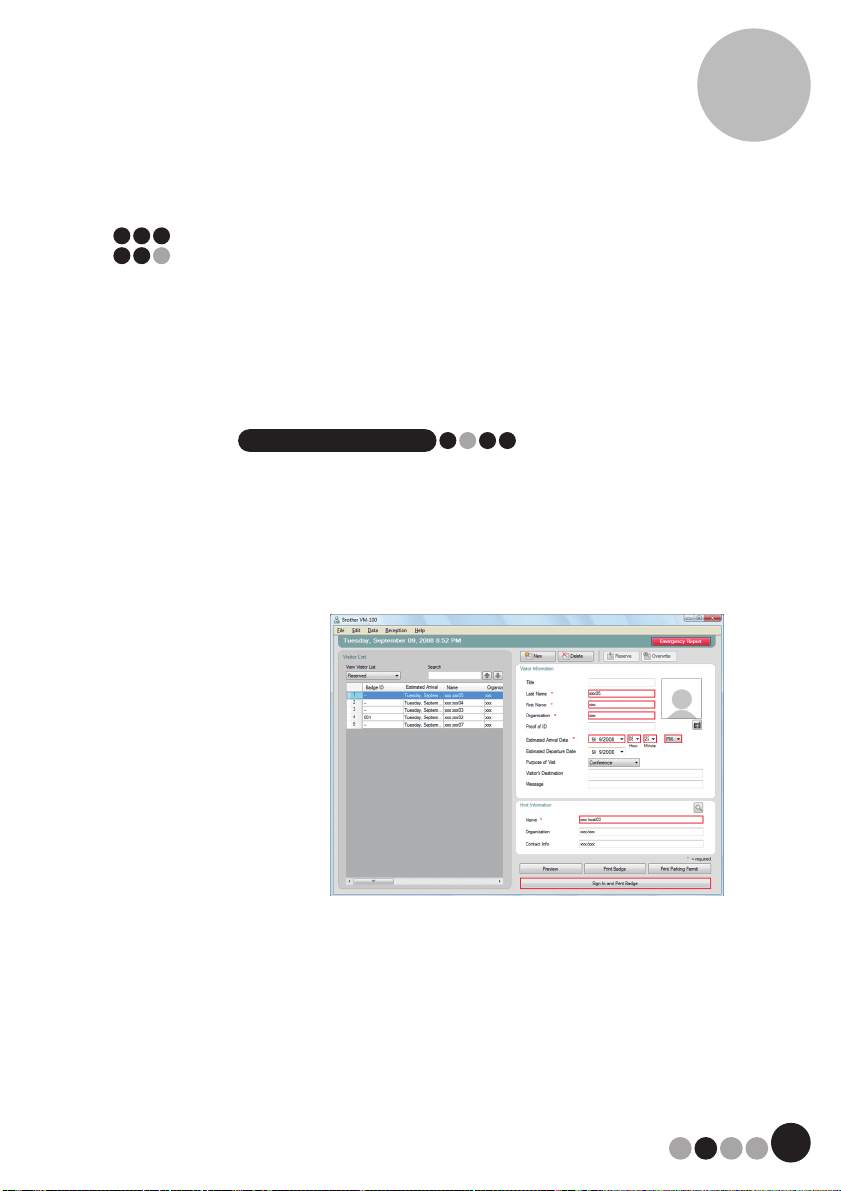
95
Reception Mode
6
6-10.Editing Visitor Reservations
Reservation information can only be edited for visitors who have not yet been
issued a visitor badge. Reservation information cannot be edited if the visitor has
already been issued a badge.
1. From the "Reserved" list, select the visitor whose information is
to be edited.
NOTE
• A search can be performed by entering the visitor badge ID or name in the
search box.
• The visitor badge ID appears only for visitors who have been issued a
badge.
• If a visitor record already assigned a visitor badge ID is selected and the
information is edited or the badge is reprinted, the visitor information is
registered as a different record.
2. Edit the visitor information.
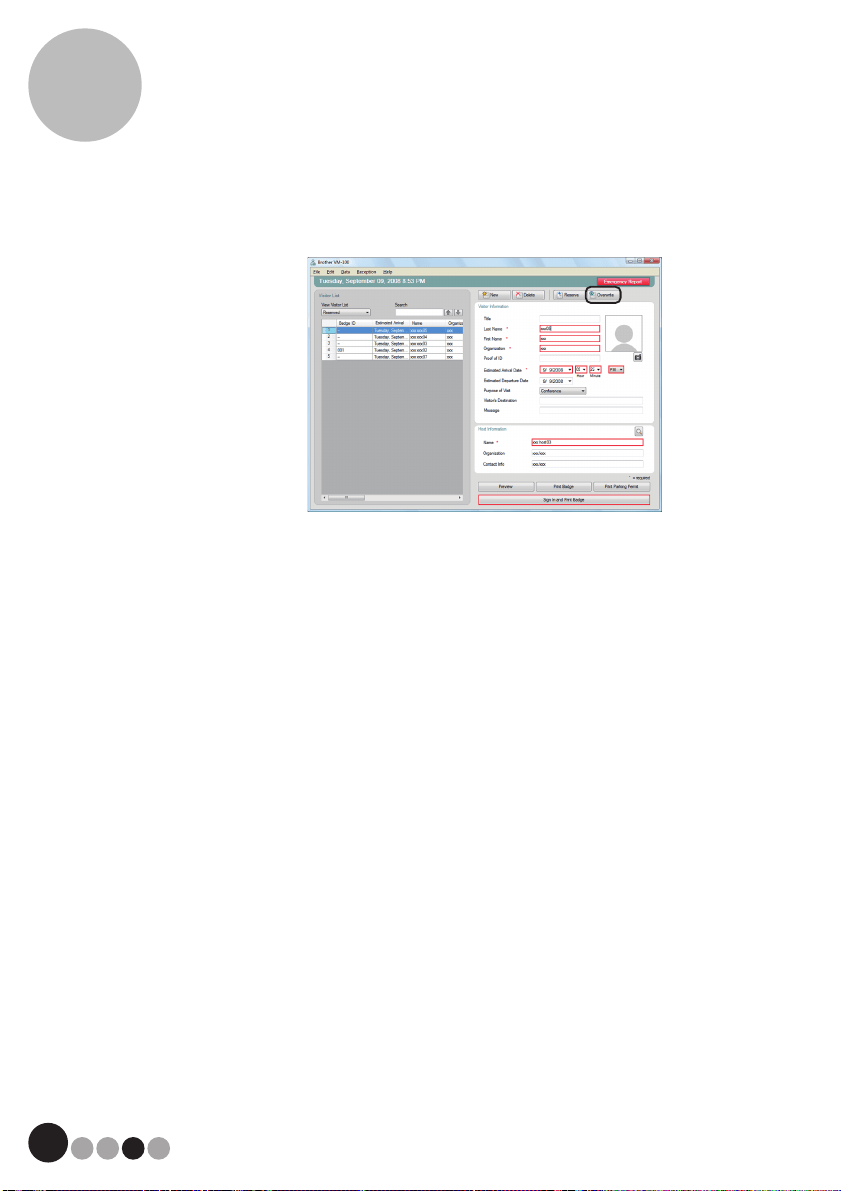
Reception Mode
6
96
3. Click the [Overwrite] button.
4. Click the [Yes] button.
The edited visitor information is saved and added to the "Reserved" list.
If an expected arrival date prior to the current date is specified, the arrival date
is set to the current date.
If an expected departure date prior to the expected arrival date is specified,
the departure date is set to the arrival date.
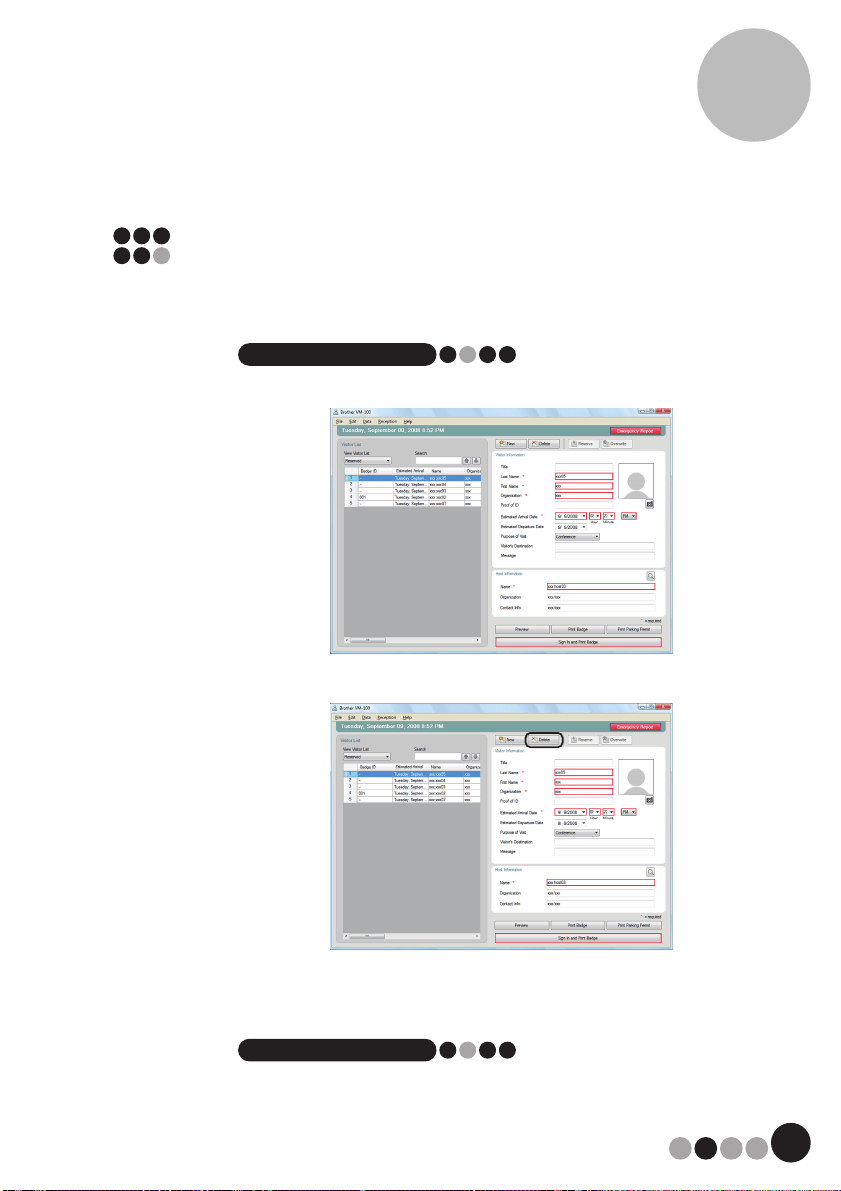
97
Reception Mode
6
6-11.Deleting Visitor Information
1. From the "Reserved" or "Signed out" list, select the visitor
whose information is to be deleted.
NOTE
• A search can be performed by entering the visitor name in the search box.
2. Click the [Delete] button.
3. Click the [Yes] button.
The selected visitor information is deleted from the "Reserved" or "Signed
out" list.
NOTE
• Information deleted from the "Signed Out" or "Reserved" lists are deleted
from the window, but are not deleted from the visitor log.
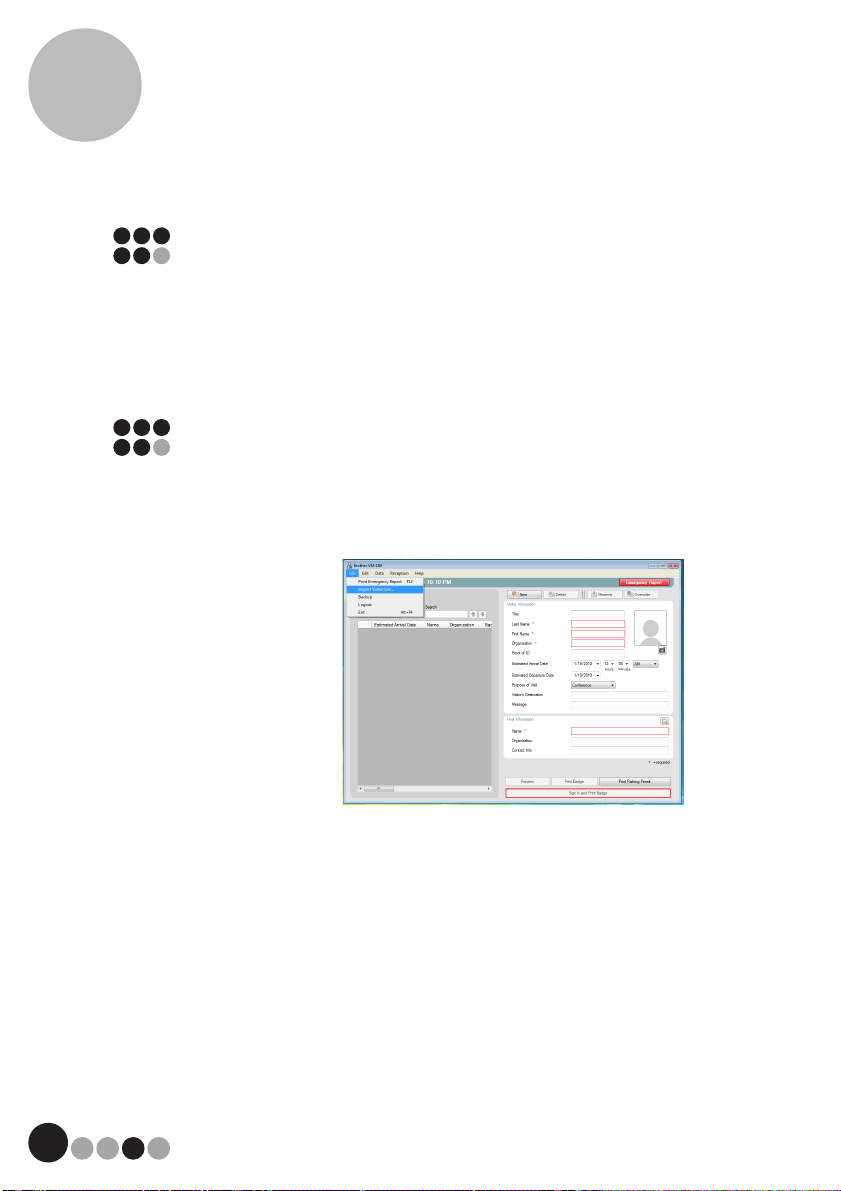
Reception Mode
6
98
6-12.Printing Emergency Reports
In an emergency, an emergency report (list of visitors who have signed in and
have not yet signed out) can be displayed and printed by clicking the [Emergency
Report] button. The emergency report contains the visitor's name, company
name and destination as well as the host's name and organization.
For details, refer to the procedure described in "Administrator mode" (page 71).
6-13. Importing Visitor List
Visitor List can be imported. When importing visitor list, the information will be
added to the existing visitor database.
1. From the [File] menu, click [Import Visitor List…].
2. Specify the file name containing the information to be imported.
Select the format of the file to be imported, and then click
[Open].
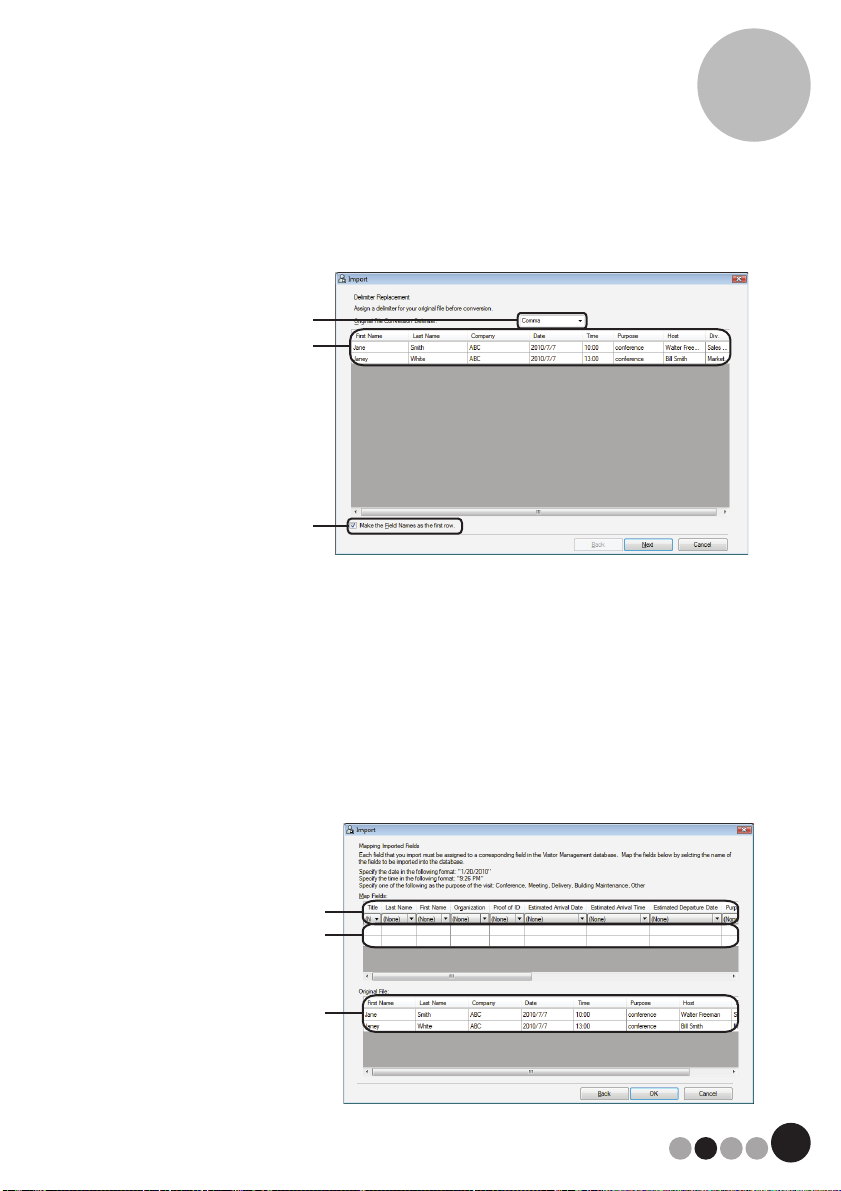
99
Reception Mode
6
3. Select the delimiter character, and select whether or not the first
line of text contains the field names.
1 Select "Comma", "Tab", "Space" or "Semicolon" as the delimiter character
in the file before it is converted.
2 Displays a preview of how the file will look once converted.
3 Select this check box if the text is to be imported with the first line
containing field names and the field data starting with the second line.
Clear this check box if the text is to be imported with the field data starting
with the first line.
4. Click the [Next] button.
5. Specify how the fields in the file to be imported are assigned to
the fields in the Visitor List.
1
2
3
1
2
3

Reception Mode
6
100
1 The fields in the Visitor List are shown in the first row. From the dropdown
list that appears in the second row, select the field from the file to be
imported that is to be assigned to the field in the Visitor List.
2 Displays a preview of the Visitor List after the file is imported. If "(None)"
was not selected in 1, the data from the selected field is displayed.
3 Displays the data in the file to be imported. Only the columns of data from
mapped fields (where "(None)" is not selected in 1) are displayed.
6. Click the [OK] button.
The file is imported with the specified settings, and the
Reception Mode window appears.
6-14.Backing Up Visitor Information
Up to ten backup files can be created to store visitor information. Backup files
older than the ten most recent files are deleted.
1. On the "File" menu, click "Backup".
A backup of the visitor information is created.
NOTE
• If the settings in Administrator mode have been set to back up
automatically, the data is backed up each time VM-100 is exited.
(page 63)
• To restore the backup file when the database file is corrupted, refer to
"Restoring the backup file". (page 72)

101
7 Self Check-in Mode
The Self Check-in mode can be used by visitors to issue visitor badges and sign
themselves in. The User must be logged on to their computer with Administrator
privileges in order to execute this function.
7-1. Initial Screen of Self Check-in Mode
Log on to Self Check-in mode. (page 42)
The following screen appears.
This screen also appears if the procedure times out while Self Check-in mode is
being used.
NOTE
• In Self Check-in mode, photos cannot be taken. If Self Check-in mode is
to be used, prepare a badge that does not contain a photo.
• Visitors cannot be signed out when Self Check-in mode is used. Visitor
badges should be collected upon departure and held until a receptionist or
administrator signs the visitors out using the Reception mode.
• In Self Check-in mode, the error message "Please call an attendant. We
are sorry for the inconvenience." may appear. We recommend placing a
sign beside the printer to notify users of the necessary contact information
in case this error message would appear.
1 Displays various messages.
2 When the visitor clicks this button, the following screen appears.
3 Displays a sample visitor badge.
4 This is the locked status display area, and it is where receptionists and
administrators perform operations.
4
3
2
1
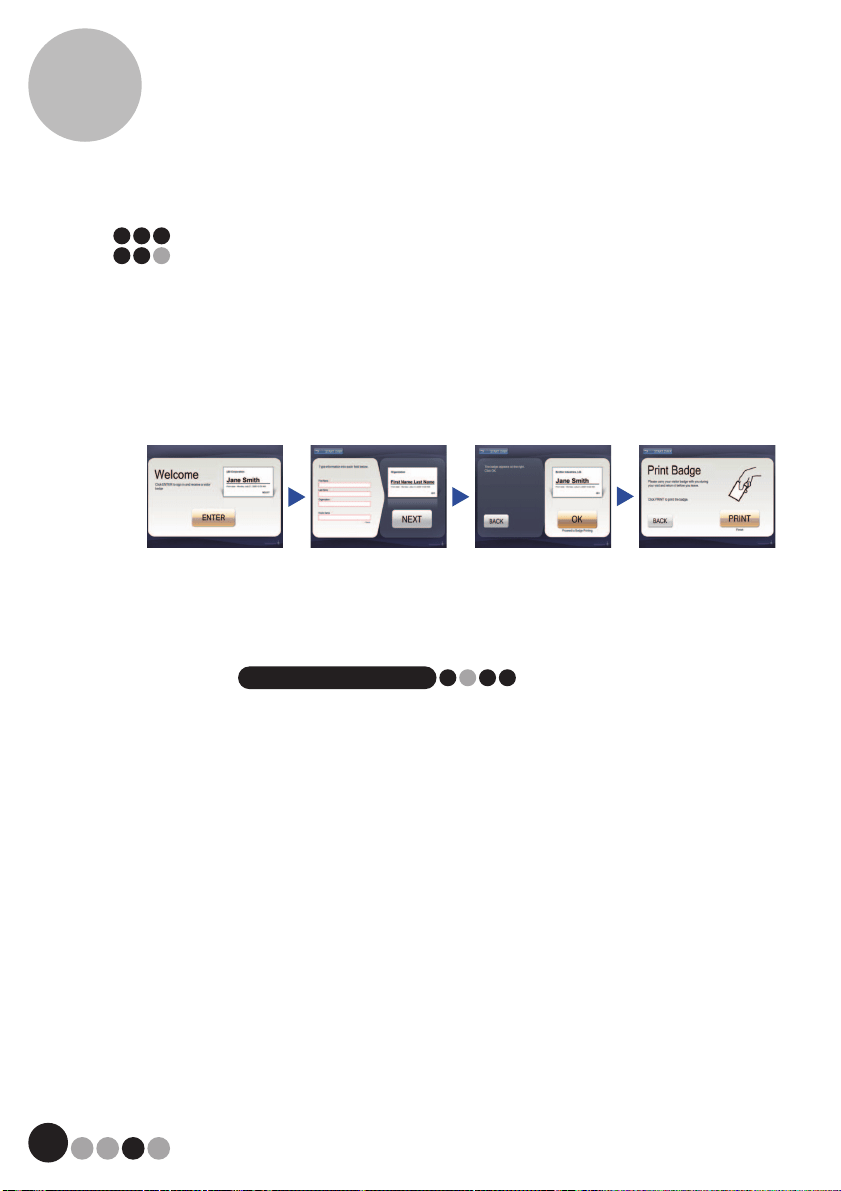
Self Check-in Mode
7
102
7-2. Visitor Operations
Visitors follow the on-screen instructions to enter their name and company name.
Depending on the settings specified in Administrator mode, it may not be
necessary to enter data in some fields. When the visitor clicks the [PRINT] button
in the last screen, the visitor badge is issued and the visitor is signed in.
If no operation is performed for 30 seconds in any of the screens, the procedure
times out. In this case, all entered data is erased, and the initial screen appears.
NOTE
• The items that are entered and the number of steps in the procedure differ
depending on the settings specified in Administrator mode.
1. Click the
[ENTER]
button.
2. Enter the necessary
information, and
then click the
[NEXT]
button.
3. Check the badge
contents, and then
click the
[OK]
button.
4. Click
[PRINT]
to
issue a visitor
badge.
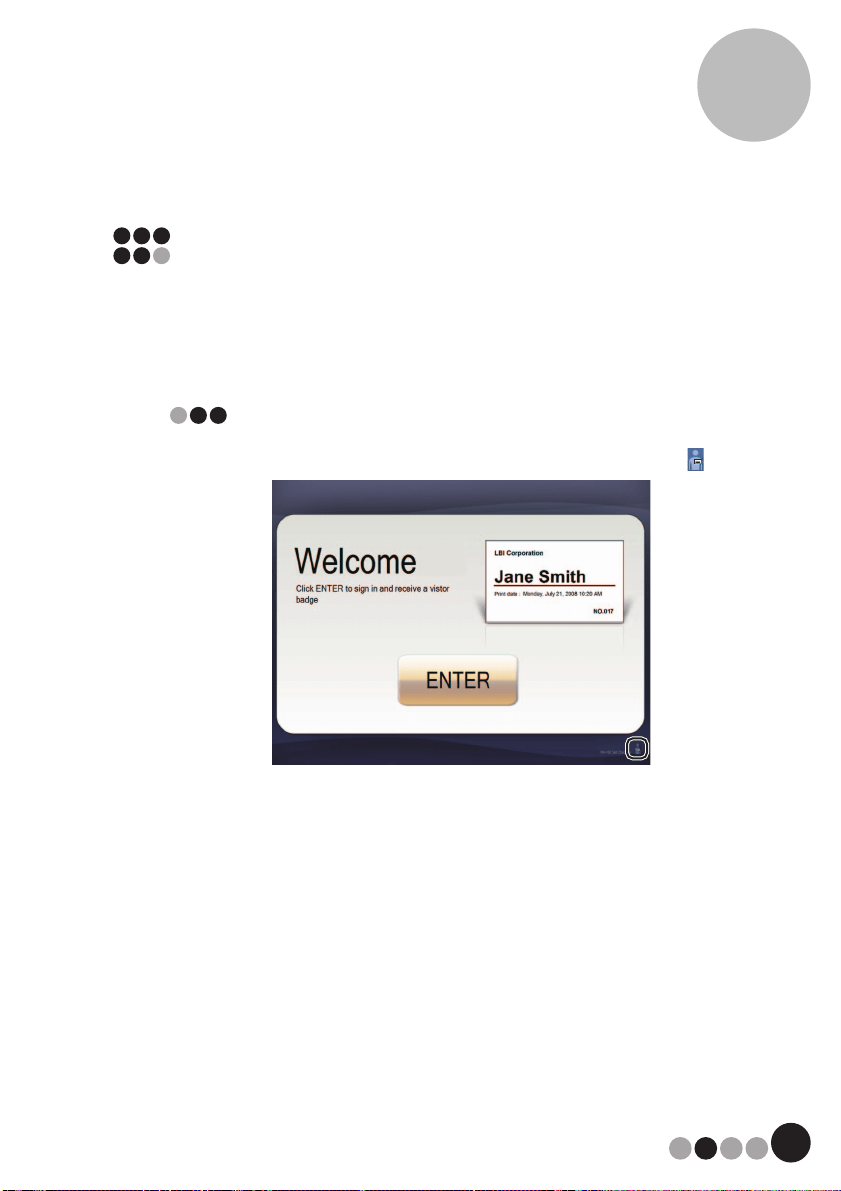
103
Self Check-in Mode
7
7-3. Exiting Self Check-in Mode or
Printing the Emergency Report
A password must be entered in order to exit Self Check-in mode or print the
emergency report. These operations can be performed only by users with
Administrator or Receptionist permissions.
Unlocking
1. In the initial screen of the Self Check-in mode, click .
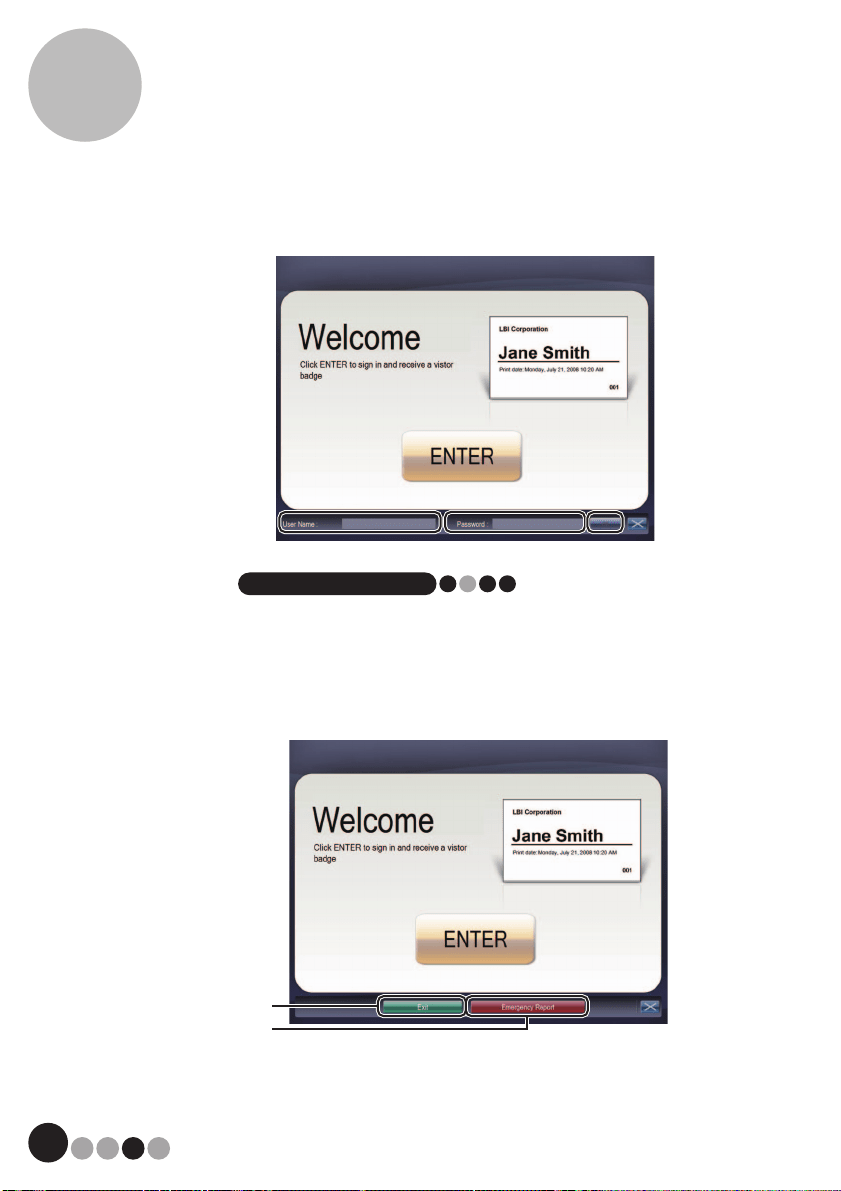
Self Check-in Mode
7
104
2. Type in the user name and password.
NOTE
• If no operation is performed for 30 seconds while the application is
unlocked, the application returns to the locked status.
3. Click the [OK] button.
The application is unlocked, and the [EXIT] and [Emergency Report] button
appear.
1 Click to exit the Self Check-in mode, and display the Login dialog box.
2 Click to print an emergency report. (page 71)
1
2
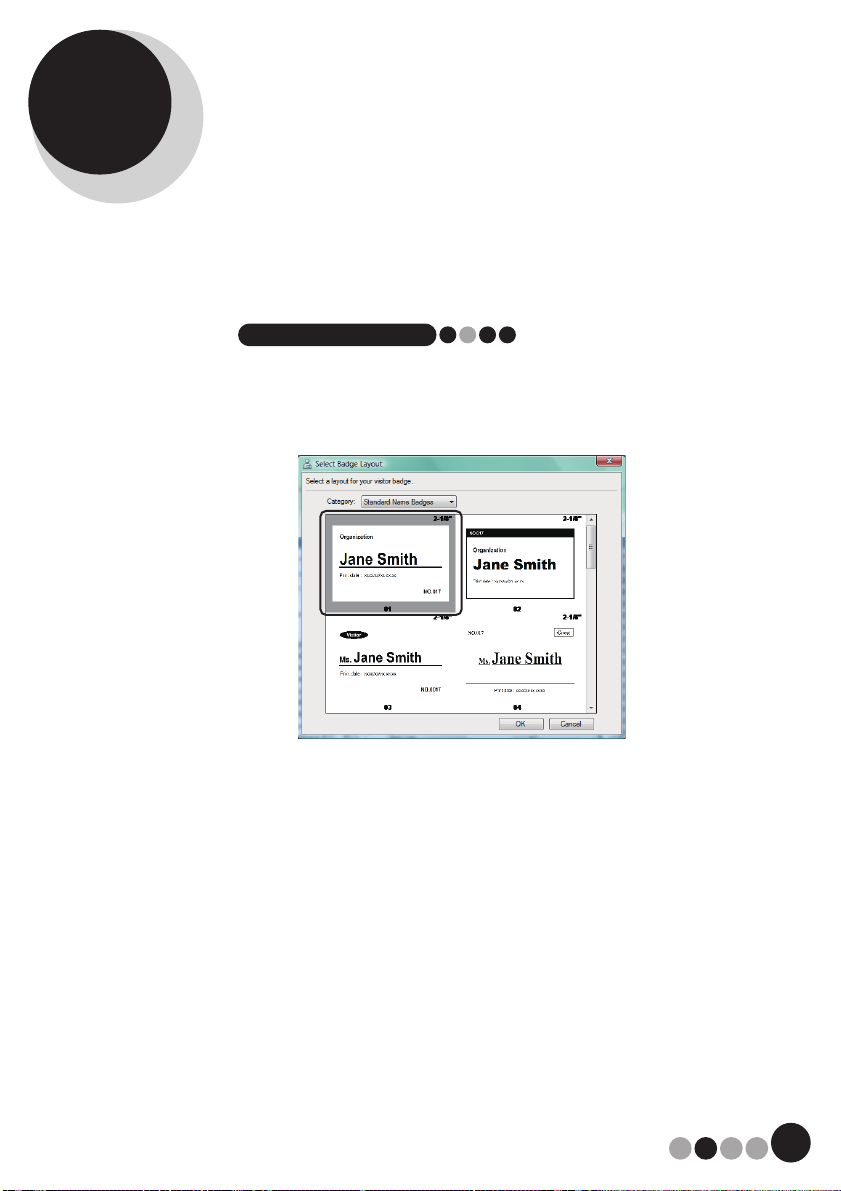
105
8 Customizing Layouts
Preset layouts can be edited and customized. The positions of items, sizes of
logos and photos, and fonts can be changed, or items can be removed. To
customize layouts, use P-touch Editor 5.0, which is included on the CD-ROM that
comes with your machine.
NOTE
• Items cannot be edited to create additional input areas.
1. From the list of layouts, determine the file name for the layout to
be edited.
(page 56 - page 58)
2. Click [Start] - [All Programs (Programs)] - [Brother P-touch]
- [P-touch Editor 5.0] to start P-touch Editor 5.0.
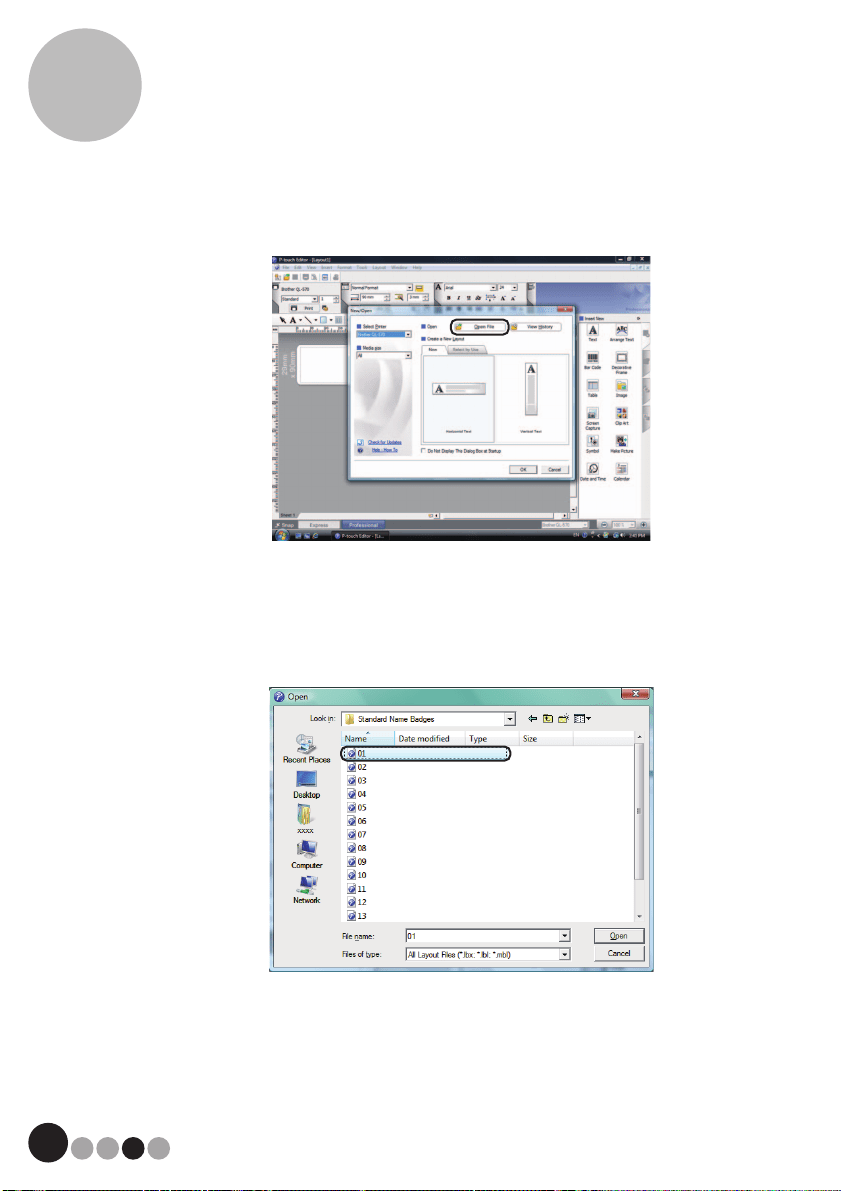
Customizing Layouts
8
106
3. Click [Open File].
4. Open the layout to be edited.
Browse to the folder at C:\Program Files\Brother\VM-
100\Template\Badge, and then select the file with the name
determined in step 1.
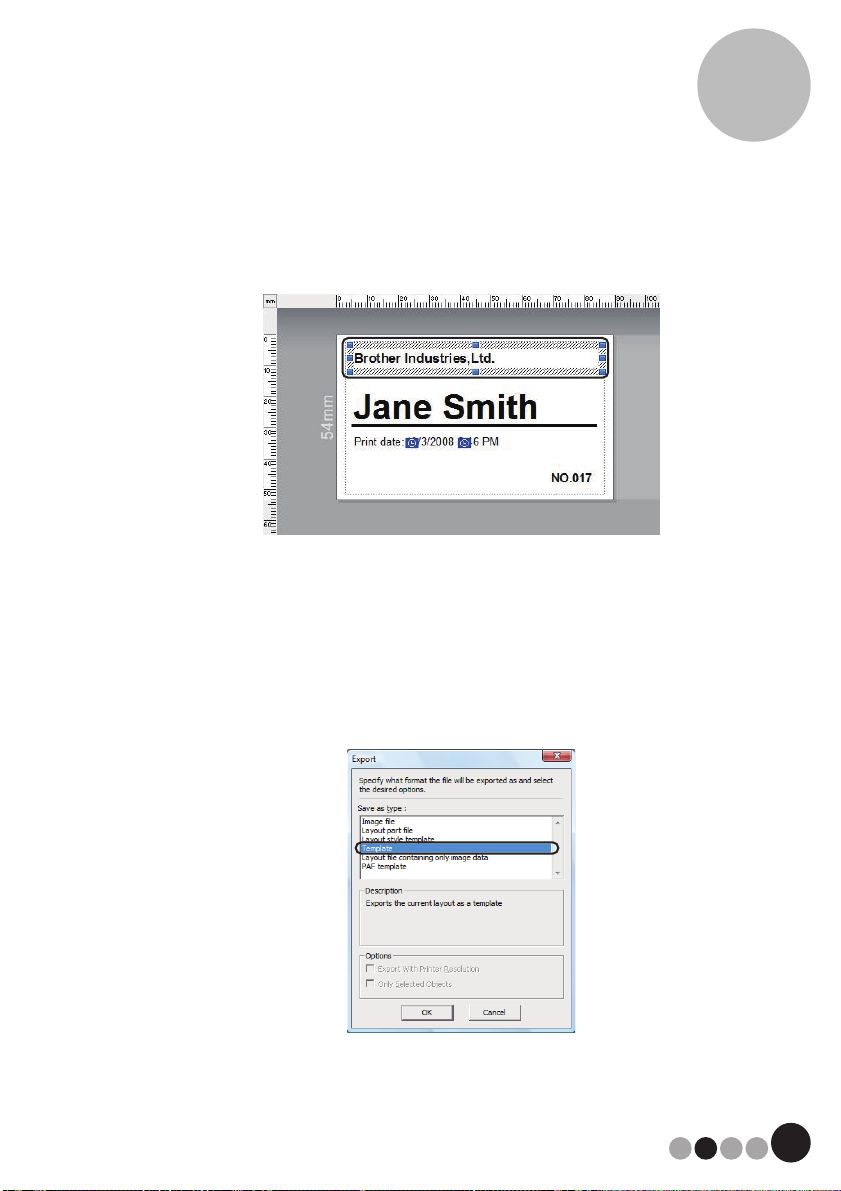
107
Customizing Layouts
8
5. Within the layout area, select the item to be moved, and then
drag it to the desired location.
6. Select any items to be resized and then stretch to the desired
size.
You can also select any text object and change the font.
7. Save the edited layout as a new one.
Select "File" on the toolbar and click "Export".
8. Select "Template", and then click the [OK] button.
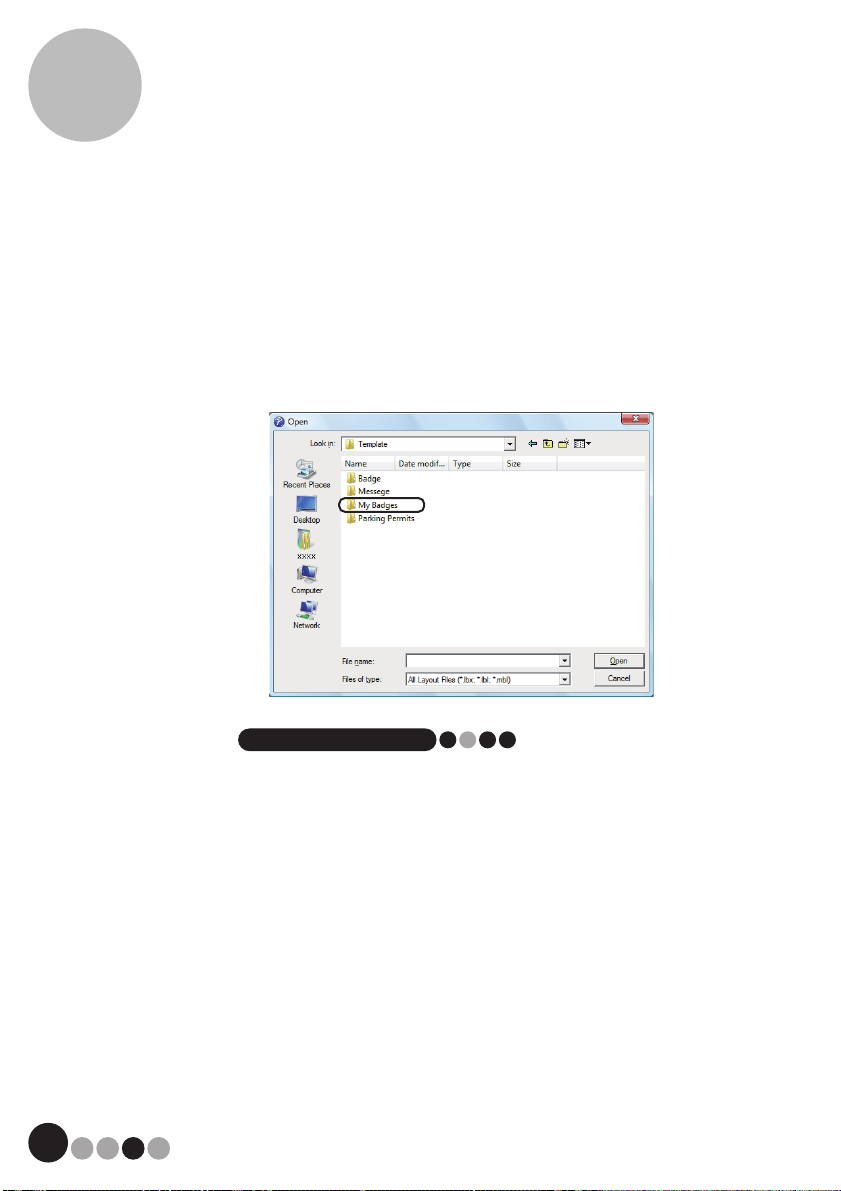
Customizing Layouts
8
108
9. For Windows Vista
®
/Windows
®
7
In the "Save in" box, specify "C:\ProgramData\Brother\VM-
100\Template\My Badges".
For Windows
®
XP
In the "Save in" box, specify "C:\Documents and Settings\All
Users\Application Data\Brother\VM-100\Template\My Badges".
NOTE
• If the database file is on a server, save the template on the same server.
In the "Specify folder of custom layouts" box on the "General" tab of the
Options dialog box, specify the folder specified here.
10. Click the [Save] button.
The edited layout is saved as a template in the specified folder.

109
9 Troubleshooting
9-1. QL-570 Label Printer
Problem Solution
The Brother QL-570 Label printer
does not print, or a printing error is
received.
• Is the cable loose?
Check that the cable is connected securely.
• Is the DK Label or DK Tape roll installed correctly?
If not, remove the DK Roll and reinstall.
• Is there enough label/tape roll remaining?
Check that there is enough label/tape roll remaining.
• Is the DK Roll compartment cover open?
Check that the DK Roll compartment cover is closed.
• Has a print error or transmission error occurred?
Turn off the Brother Label Printer and on again. If problem still occurs, contact
Brother Customer Service at 1-877- BROTHER.
The Status LED lamp is not lit. • Is the power cord plugged correctly?
Check that the power cord is plugged. If inserted, try plugging it into another
electrical outlet.
* If the power button still does not light up, contact Brother Customer Service
at 1-877-BROTHER.
The printed label contains streaks
or poor quality characters, or the
label is not fed correctly.
• Is the print head or roller dirty?
While the print head generally remains clean under normal use, lint or dirt
from the roller may become stuck on the printer head.
If this occurs, clean the roller. (page 26)
A data transmission error appears
on the personal computer screen.
• Is the correct port chosen?
Check that the correct port is chosen from the “Print to the following port” list
in the Printer Properties dialog box.
• Is the Brother Label Printer in cooling mode (the LED lamp is flashing in
orange)?
Wait until the LED lamp stops flashing and then try printing again.
Labels are jammed in the Label
outlet.
• Contact Brother Customer Service at 1-877-BROTHER.
The label is not ejected properly
after printing.
• Check that the ejection path of the label is not blocked.
• Check that the DK Label or DK Tape roll is set properly by removing the DK
Label or DK Tape roll and reinstalling.
• Ensure that the DK Label or DK Tape roll compartment cover is closed
properly.
The print quality is poor. • Is there dirt or lint on the roller preventing it from rolling freely?
Clean the roller using the cleaning sheet (separately available). (page 26)
Layout style is not updated when
Add-in feature is still activated and
a new label roll is installed.
• Was a new label roll installed before activating the Add-in feature?
Exit the Add-in feature, load the second label roll type, reactivate the Add-in
feature, choose "Select Layout", and then verify the layout.
Troubleshooting
9
110
9-2. Visitor Badge & Management
Software (VM-100)
Problem Possible cause
Page reference
Reservations cannot be made. (The
[Reserve]
button is not available.)
Has the reservation function been turned off by the administrator? page 60
Have multiple visitors been selected in the list?
Information can be saved for only one visitor at a time.
page 93
page 95
Reservation information cannot be
overwritten.
Has the reservation function been turned off by the administrator? page 60
Reservation information cannot be
edited.
Reservation information cannot be edited for visitors who have
been issued a visitor badge.
-
Data cannot be entered for the
estimated arrival date and time.
Has the reservation function been turned off by the administrator? page 60
A visitor cannot be signed in. Has information been entered for each required field? page 77
The visitor badge was not printed. Is a printer connected, and has it been turned on? page 20
page 21
Was the DK roll installed in the printer? page 23
If a message has appeared in the lower-right corner of the
window, follow the instructions that are indicated.
-
A custom layout cannot be
selected.
Was the layout saved in an appropriate location?
If the database file is on a server, save the custom layout on the
same server.If the database file is on a local computer, save the
custom layout on the same local computer.
page 63
page 105
A custom layout cannot be printed
cleanly.
Are there more items in the custom layout than in the original
preset layout?
With VM-100, the number of items in the layout cannot be
increased. Edit the layout by moving or deleting items.
page 105
A logo cannot be specified when
trying to replace the logo in the
layout.
If the database file is on a server, save the logo file on the same
server. If the database file is on a local computer, save the logo
file on the same local computer.
page 63
page 105
The database file cannot be
accessed.
The User must be logged on to their computer with Administrator
privileges in order to execute this function. For Windows Vista
®
,
right click the VM-100 icon and select "Run as administrator".
Is the path to the file correctly specified?
If the file cannot be accessed even though the path to the file is
correctly specified, the file may be corrupted. Use a backup file.
-
page 63
page 72
The emergency report cannot be
printed.
Is a printer connected, and has it been turned on?
Is the printer driver installed on the computer sending the print
command?
Has the printer for printing the emergency report been set as the
default printer?
The emergency report can only be printed with the default printer.
page 30
111
Troubleshooting
9
"---" appears as the host name in a
list.
The specified host information has been deleted. -
The [Delete] button cannot be
clicked.
Information for a visitor who is signed in cannot be deleted. Sign
out the visitor, and then delete their information.
page 89
page 97
The [Overwrite] button is not
available.
Has the reservation function been turned off by the administrator?
page 60
Have multiple visitors been selected in the list?
Information can be saved for only one visitor at a time.
page 93
page 95
Visitor information cannot be changed for visitors who have
signed in or for whom a reservation has been made and whose
badge has been printed. Make a new reservation with the new
visitor information or sign in the visitor with the new information,
and then delete the record and badge for the old visitor
information.
page 93
page 95
page 97
A visitor cannot enter visitor
information in Self Check-in mode.
Confirm [Options] button - [Reception] tab - "Setting for Visitor
Information Fields" of the Administrator mode. Visitors will not be
able to view or enter information for any categories where
"Unnecessary" is selected. To add the category to the Visitor
Information Fields, change the settings to "Necessary",
"Required" or "Optional" to allow visitors to enter information.
page 60
Task manager can be started
when using Self Check-in mode.
The User must be logged on to their computer with Administrator
privileges in order to execute this function. For Windows Vista
®
,
right click the VM-100 icon and select "Run as administrator".
-
To use the VM-100 software on
multiple computers within the
same business location.
Install the software on each personal computer and set the new
database file location (page 39). It is possible to merge visitor
logs by using export function.
-
The VM-100 software cannnot be
started for initial use.
The User must be logged on to their computer with Administrator
privileges in order to execute this function. For Windows Vista
®
,
right click the VM-100 icon and select "Run as administrator".
page 38
The VM-100 software cannot be
started.
The VM-100 software is already in use by another user. Access
is not possible.
-
The administrator password has
been forgotten and you cannot log
in to the VM-100 software.
Delete the VM100DB.vmb file from the database folder (by
default, it is stored in C:\Documents and Settings\All Users\
Application Data\Brother\VM-100. For Windows Vista
®
/
Windows
®
7, C:\ProgramData\Brother\VM-100).
This will delete all your entered data and login details.
Restart the VM-100 software, and the program will prompt you to
reconfigure the database path and administrator login details.
-
Problem Possible cause
Page reference
112
10 Error Messages
Error Message Remedy
Software cannot start.
Restart OS.
Restart the computer.
Database cannot be accessed.
Confirm if the path is specified correctly?
Check that the path to the file is correctly specified.
If the file cannot be accessed even though the path to the file is
correctly specified, the file may be corrupted.
Use a backup file.
The password does not match. Type in the password again.
The User Name entered has not been
registered.
Confirm the user name.
Incorrect password Confirm the password.
Printer is not connected. Connect a printer.
To complete this function a compatible printer
drive must be installed.
Install the printer driver.
An invalid value has been entered. Enter the
correct time.
Type in the correct time.
No Web camera is connected. Connect a Web camera.
Check that the printer driver for the Web camera is installed.
Visitor information matching the search
conditions could not be found.
Check the search conditions.
Incorrect dates.
End date cannot be prior to start date.
Check the date.
Failed to export. There may be no memory available.
The folder may be write-protected.
If this error still cannot be corrected, restart the application.
Cannot delete all administrators. Must have at
least 1 administrator.
Be sure to leave at least one administrator.
The file format is incorrect.'<file name>' The file format of "<path/file_name>" is incorrect.
This user is not authorized as an Administrator. This user is not authorized to log on to Administrator mode.
A host with the same information already exists. A host with the same information already exists.
The password contains invalid characters.
Passwords must be between 6 and 255
characters and must contain alphanumeric
characters.
The password contains invalid characters. Specify a password
with alphanumeric characters.
A user with the same name already exists. A user with the same name already exists.
113
Error Messages
10
Please call an attendant. We are sorry for the
inconvenience.
• Check the printer connections.
• Check that the database file is located at the currently specified
file path. If the database file is on a network computer, check
that the network is running correctly. If the database still cannot
be accessed, it may be corrupted; therefore, restore the backup
file. (page 72)
• Exit Self Check-in mode, and then following the instructions that
appear in the lower-right corner of the window.
The user name contains invalid characters. User
name cannot contain more than 255 characters
and must contain alphanumeric characters.
The user name contains invalid characters. Specify a user name
with alphanumeric characters.
The backup file "<specified_file_name>" does
not exist.
• Check that the path to the file has been correctly entered.
• Type in the correct path to the desired backup file.
All data fields are empty. Enter data in required fields.
Badge template not found. Verify that the Administrator has not moved or deleted the badge
template.
Parking permit template not found. Verify that the Administrator has not moved or deleted the parking
permit template.
Backup Directory does not exist. • Confirm the location of the backup files set by the Administrator.
• VM-100 software is unable to access the back up files. Please
verify local/network connection.
The estimated arrival date is in an unrecognised
format. The data will be changed to today's date
and imported.
Check the field has been assigned correctly.
Check the date information is correct.
The example format is displayed on the import screen.
Check the field only includes date information
The estimated arrival time is in an unrecognised
format. The data will be changed to 00:00 and
imported.
Check the field has been assigned correctly.
Check the time information is correct.
The example format is displayed on the import screen.
Check the field only includes time information
The estimated departure date is in an unrecog-
nised format. The data will be changed to to-
day’s date and imported.
Check the field has been assigned correctly.
Check the date information is correct.
The example format is displayed on the import screen.
Check the field only includes date information
The purpose of the visit is in an unrecognised
format. The data will be changed to “Confer-
ence” and imported.
Check the field has been assigned correctly.
Check the purpose of visit information is correct.
The example format is displayed on the import screen.
Check the field only includes purpose of visit information
Error Message Remedy
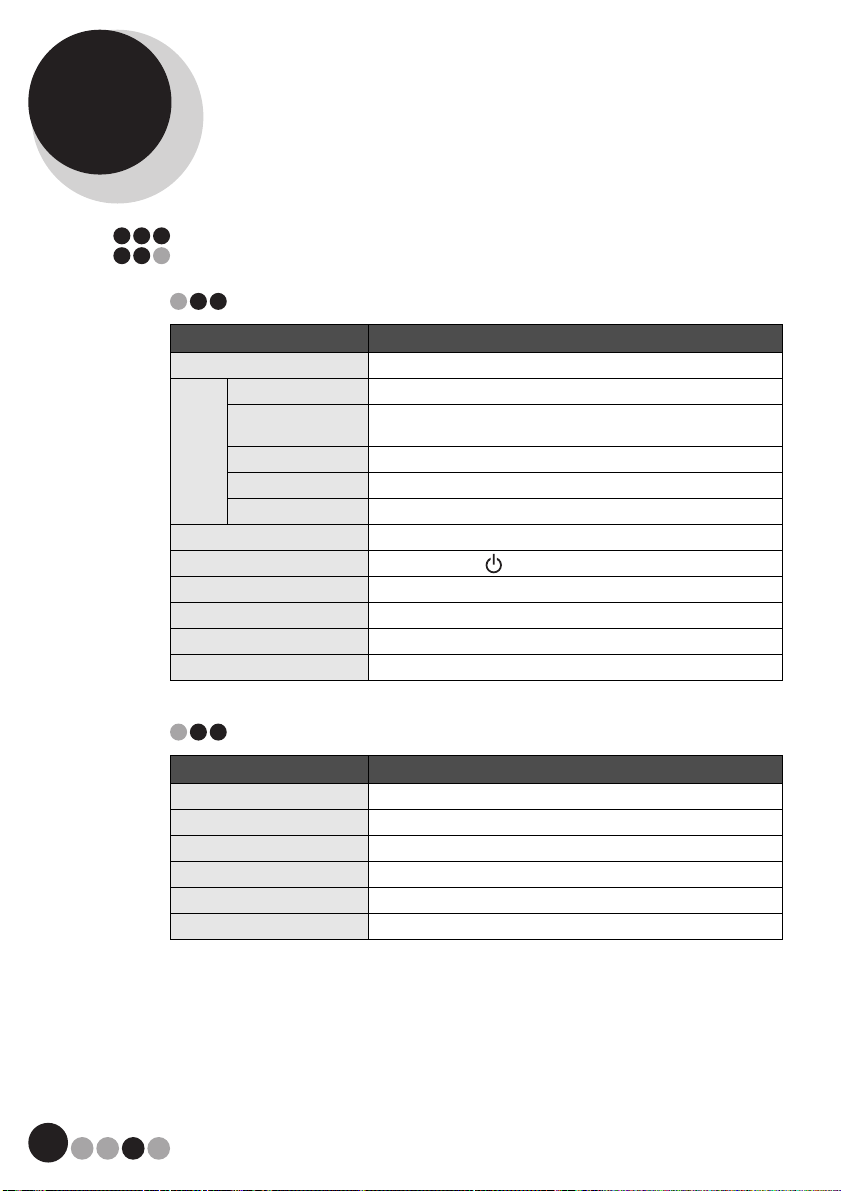
114
11 Reference
11-1.Main Specifications
Product specifications
Operating environment
*1 The computer should meet Microsoft
®
's recommendations for the OS
installed.
*2 Required available space when installing the software with all of the
options.
Items Specifications
Display LED lamp (green, red, orange)
Print Printing method Direct thermal printing via thermal head
Speed of printing Max. 4.3 inch (110 mm)/sec, Max. 68 labels/min. (Standard
Address Labels) (When connecting USB cable)
Print head 300 dpi/720 dot
Max. printing width 2.3 inch (59 mm)
Min. printing length 0.5 inch (12.7 mm)
Cutter Durable automatic cutter
Button ON/OFF button ( ), FEED button, CUT button
Interface USB
Power supply 120V AC 60 Hz 1.7 A
Size (W × D × H) 5.2" (133 mm) × 8.2" (208 mm) × 5.6" (143 mm)
Weight Approx. 2.5 lb (1.1 kg) (Without DK Rolls)
Items Specifications
OS
*1
Windows
®
XP SP2 or later/Windows Vista
®
/Windows
®
7
Interface USB port (USB Spec. 1.1 or 2.0 protocol)
Hard Disk Disk space more than 70 MB
*2
Others CD-ROM drive
Operating temperature 50°F to 95 °F (10°C to 35°C)
Operating humidity 20% to 80% (without condensation)
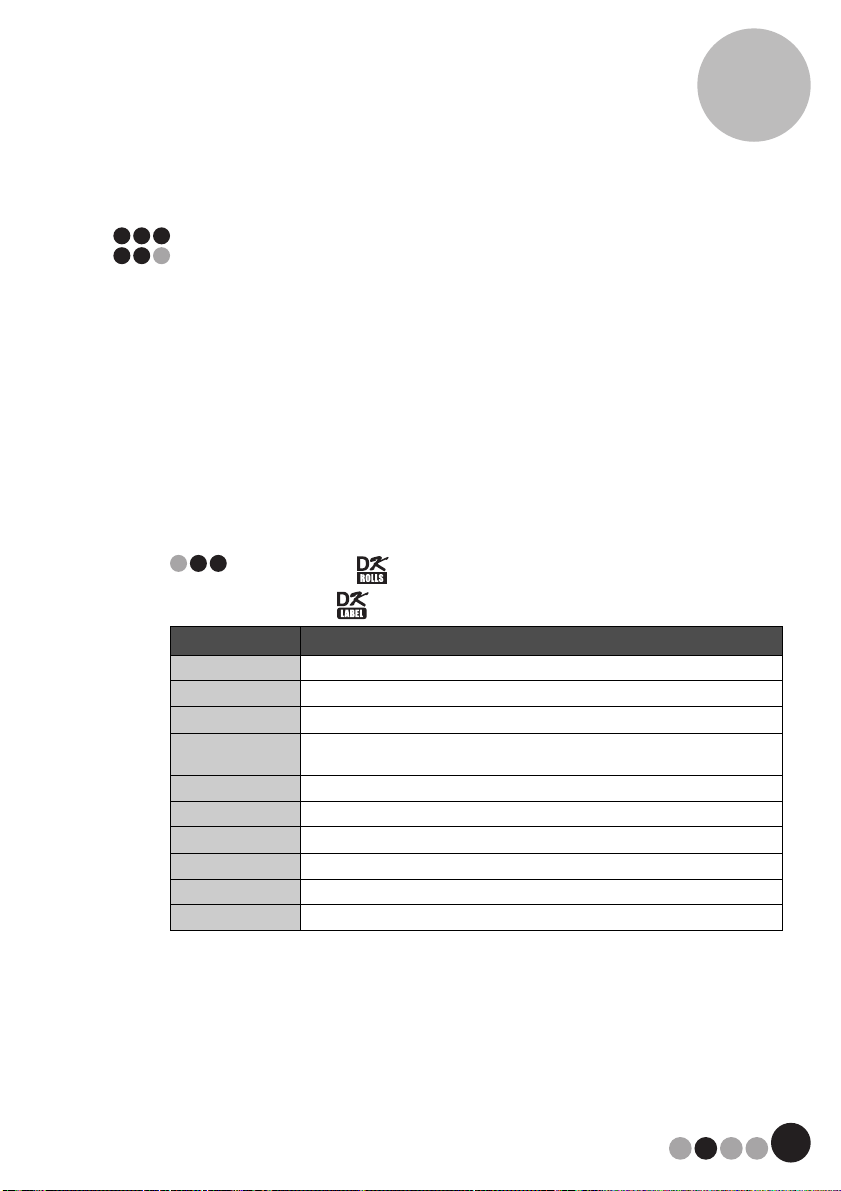
115
Reference
11
11-2.Accessories (For USA Only)
Your Brother QL-570 printer, when used with VM-100 visitor badge and
management software, uses DK-N5224 Continuous Length Tape for printing
visitor badges and parking permits. In addition to the DK Continuous Length Tape
(DK-N5224) that comes with your machine, you can also use other DK label and
tape supplies if you wish to use your QL-570 with P-touch Editor 5.0 as a standard
label printer.
The use of other products may effect the print quality or may damage the Brother
QL-570. The following supplies and accessories are available for the Brother QL-
570 and can be ordered directly from Brother should your retailer not stock them.
Availability and price of accessories subject to change without notice. For the
latest information of accessories and supplies: http://www.brothermall.com
DK Rolls
DK Die-cut Label
Stock No.
Description
DK-1201 Standard Address Labels, 1-1/7" × 3-1/2" (29 mm × 90 mm), 400 labels
DK-1202 Shipping Labels, 2-3/7" × 4" (62 mm × 100 mm), 300 labels
DK-1203 File Folder Labels, 2/3" × 3-7/16" (17 mm × 87 mm), 300 labels
DK-1204 Multi Purpose/Return Address Labels, 2/3" × 2-1/8" (17 mm × 54 mm), 400
labels
DK-1207 CD / DVD Film Round Labels, 2-1/3" (58 mm) Diameter, 100 labels
DK-1208 Large Address Labels, 1-1/2" × 3-1/2" (38 mm × 90 mm), 400 labels
DK-1209 Small Address Labels, 2-3/7" × 1-1/7" (62 mm × 29 mm), 800 labels
DK-1218 Round Paper Labels, 1" (24 mm) Diameter, 1000 labels
DK-1219 Round Paper Labels, 1/2" (12 mm) Diameter, 1200 labels
DK-1221 Square Paper Labels, 10/11" x 10/11" (23 mm × 23 mm), 1000 labels
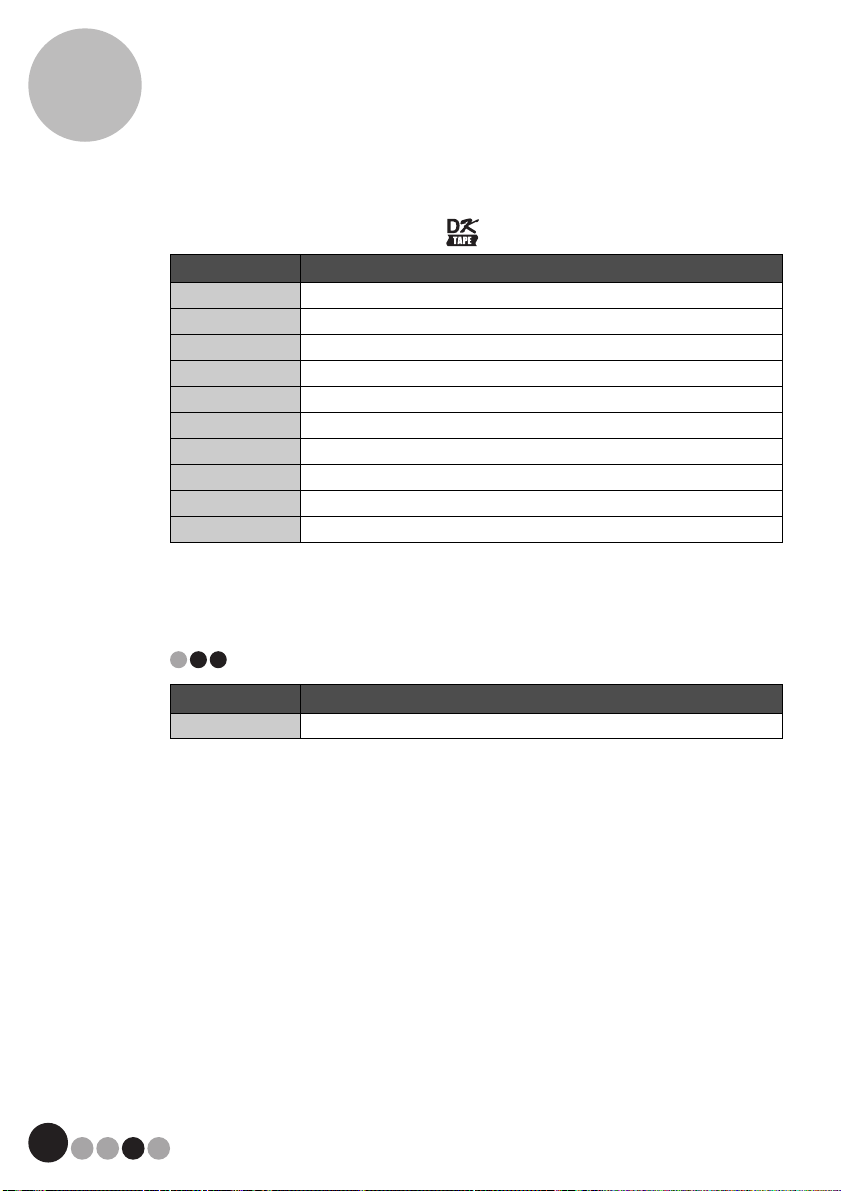
Reference
11
116
DK Continuous Length Tape
*1 Removable adhesive labels can be cleanly removed from several flat,
smooth surfaces.
*2 Removing other labels, once applied, may damage label and/or surface.
Cleaning Sheet
Stock No.
Description
DK-N5224 White Paper Non-Adhesive Tape 2-1/8" (54mm), 100 ft (30.48 M)
DK-2205 Wide Paper Tape 2-3/7" (62mm), 100 ft (30.48 M)
DK-2210 Medium Width Paper Tape 1-1/7" (29mm), 100 ft (30.48 M)
DK-2211 Medium Film Tape - White 1-1/7" (29mm), 50 ft (15.24 M)
DK-2212 Wide Film Tape - White 2-3/7" (62mm), 50 ft (15.24 M)
DK-2113 Wide Film Tape - Clear 2-3/7" (62mm), 50 ft (15.24 M)
DK-2214 Narrow Width Paper Tape 1/2" (12mm), 100 ft (30.48 M)
DK-2606 Wide Film Tape - Yellow 2-3/7" (62mm), 50 ft (15.24 M)
DK-4205
*1*2
Removable Wide Paper Tape - White 2-3/7" (62mm), 100 ft (30.48 M)
DK-4605
*1*2
Removable Wide Paper Tape - Yellow 2-3/7" (62mm), 100 ft (30.48 M)
Stock No. Description
DK-CL99 Cleaning Sheet (10 sheets)


UPC:012502621980
Printed in China
LB8702001