User manual Washer
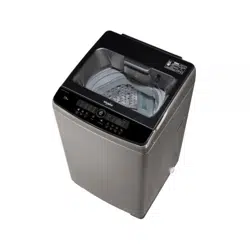
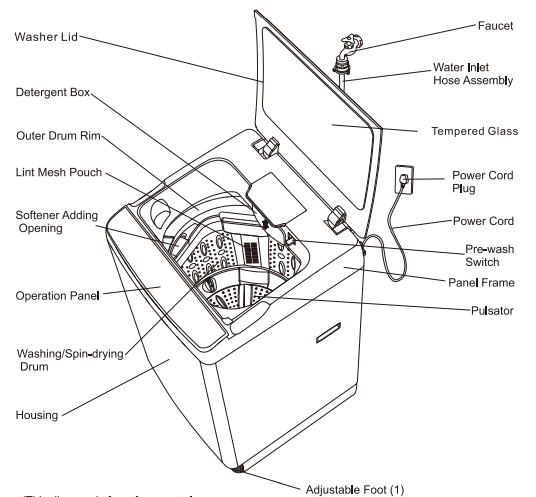
NAME OF PARTS
Instalation Intructions
Shield Installation
- Take out the Shield on the Panel Frame protective packaging and the Screws in the bag.
- Tilt the Washing Machine backward and slowly put it down on a cushion.
- Push the Shield straight along the Seat Slot until it is installed in place.
- Fix the Shield and Seat with Screws.
- Lift the Washing Machine gently until it is placed steadily.
-812859.png)
Placement of the Washing Machine
- Choose a dry place without direct sunlight to the Washing Machine.
- Place the Washing Machine on steady solid ground.
- The Washing Machine should be placed where there is a suitable drainage so as to drain water smoothIy. The floor drainer shall be in the same plane as that where the Washing Machine is placed or slightly lower than the plane, to avoid Washing Machine leakage causing any damage.
- Place the Washing Machine as firmly as possible. If necessary, level the Washing Machine by adjusting the This diagram is for reference only. The actual product shall prevail.) Tempered Glass er Cord er Cord e-wash el Frame Pulsator Adjustable Feet of the Washing Machine according to the order shown in the figures. The maximum allowable inclination of the plane on which the Washing Machine is placed is 2°.
Notes:
When the Washing Machine is placed on the floor or a flexible support stand, the Washing Machine may vibrate.
Do not place any object such as a carpet below the Washing Machine to prevent the bottom opening from being locked
-290730.png)
Faucet Selection
Faucet Type: (the faucet mouth shall be smooth)
Type A: The most appropriate
Type B: Faucet length must be greater than 16mm. Otherwise the universal joint cannot be installed.
Type C: Water leakage may occur with the part shown in the figure.
-682896.png)
Notes:
- When installing the Washing Machine, please be sure to remove the Pedestal and Bracket for transportation at the bottom of the Washing Machine. Otherwise it cannot be used.
- During installation or initial use, a small amount of water will flow out of the Drain Hose, which is residual water left over from the factory during routine inspection.
- Unplug the Power Cord and turn off the Faucet when the Washing Machine is not in used to avoid accidental fires and water leakage accidents.
Installation of the Universal Joint
- Hold the Universal Joint in one hand and the Locking Rod in the other hand and then detach the Universal Joint from the Water Inlet Hose.
-763690.png)
- Evenly adjust the four screws on the Universal Joint so that the two screws near the wall fully contact the outside of the Faucet first.
-291700.png)
- Insert the Universal Joint vertically onto the Faucet with its internal seal tightly attaching to the opening of the Faucet and tighten the 4 screws with a screwdriver.
-398405.png)
- Remove the seal from the Universal Joint and tighten the Universal Joint.
-870560.png)
Connection of the Water Inlet Hose
- Connect the Water Inlet Hose to the Universal Joint.
-551390.png)
- Align the Water Inlet Hose with the opening of the Water Inlet Valve, and turn the fastening screw nut clockwise on the Water Inlet Hose until it cannot be turned.
-749559.png)
- Check whether the Water Inlet Hose is Connected Firmly
- PuII the Water Inlet Hose downwards to check whether the Water Inlet Hose is firmly connected to the Universal Joint. Then slowly turn on the Faucet to see if water leakage occurs. If water leakage occurs, turn off the Faucet and reinstall.
-789477.png)
- After long-term use, the Universal Joint a become loose. Reinstall it.
- Turn off the Faucet when the laundry Program ends or the Machine will not be used for a long time.
Removal of the Water Inlet Hose
- Turn off the Faucet.
- Press the Power Button to turn on the power. Then press the Start/Pause Button.
- Turn off the power after 15 seconds.
- Pull down the Locking Rod and Sleeve with your fingers and remove the Water Inlet Hose.
- Turn the Water Inlet Hose on the Inlet Valve anticlockwise until the Water Inlet Hose is removed.
-591283.png)
Connection of the Drain Hose
- Connect the Drain Hose to the Drain Mouth and then fix it with a hose clamp as shown in the figure on the right:
-459762.png)
Changing of the Position of the Drain Hose
Depending on the use location, the Drain Hose can be changed from being on the right side to being on the left side.
- During the changing, unplug the Power Cord.
- To prevent scratches or injuries, please wear gloves.
- Remove the cap on the Drain Mouth on the left.
- Lay the Washing Machine backward down on a soft cushion.
- Loosen the Hose Clamp and unplug the Inner Drain Pipe from the Drain Valve.
- Push the joint on the Drain Mouth and pull the Drain Pipe out of the Drain Mouth on the right side of the Washing Machine.
- Insert the Inner Drain Pipe from the Drain Mouth on the left side and snap the joint.
- Connect the Inner Drain Pipe to the Drain Valve and fix it with the Hose Clamp.
- Install the Drain Mouth Cap on the left in the appropriate position on the right.
- Lift the Washing Machine gently until it is placed steadily
-838228.png)
Description of Operation Panel Functions
-277230.png)
- Power Button
- To turn on the Washing Machine, please press this Button. To cut off the power, press the Button again. After this Button is pressed, if no other Buttons are pressed within 10 minutes, the power will be cut off automatically. After the program stops running, the power will be cut off automatically within 5 seconds (within 10 minutes if the Draining Function is enabled).
- StarUPause Button
- When the power is turned on, the Washing Machine will start running after this Button is pressed. This Button can also be used to temporarily stop the operation. You can just press this Button again to resume the operation.
- 6t‘ Sense Button
- After the Machine is powered up and the Power Button is pressed, you can press the 6 tb Sense Button to switch between 12 automatic programs: Preset, Normal Heavy Duty, Quick Wash, Gentle, Wool, Textile, Blanket, Soft, Rinse+Spin, Spin and Tub Dry.
- When the Machine is power up, you can start the Normal Wash Program by pressing and holding the 6th Sense Button for three seconds.
- Note: If you select the Pre,set, Normal, Heavy Duty, Quick Wash, Textile or Soft Program,the Washing Machine will carry out automatic fuzzy judgment to automatically select the appropriate water level, water flow and other procedures.
- Function Button
- You can use this Button to switch between the Specialized Programs: Hand (Wash), Eco, Ex-Rinse and Retain (Water) Functions.
- This Button can be used to set the Child Lock Function. See Page 18 for the method for setting the Child Lock Function.
- Water Level Button
- This Button is used to select the water level appropriate for the laundry to be washed. Washing and rinsing can be done at different water levels. Only Levels 5 to 8 can be chosen for the Blanket Program. Only Levels 3 to 8 can be chosen for the Wool or Gentle Program.
- preset time
- You can use this Button to set the end time of the Program.
- Note: This function is unavailable for the Gentle, Wool, Rinse+Spin, Spin and Tub 9 Dry Programs.
- Procedure Button
- You can use this group of Buttons to set the Soak Time, Wash Time, Rinse Times, and Spin Time freely.
- Description of Digital Display Functions
- DispIays the remaining time during operation.
- DispIays when will the Scheduled/ Preset Program ends during Preset Time Setting.
- DispIays the Fault Code when an abnormity occurs
Wool Program Instructions
- This Program is used for washing wool clothes. Please check the clothing care tag before starting the wash.
- When the Wool Program is used, the water level is automatically set to Level 6. However, you can change the water level to Level 3 - 8 according to the size of the wool clothes
Operation Steps
- Open the Washer Lid and press the Power Button.
- Press the 6" Sense Button until the Wool Indicator is lit.
- Pour the liquid detergent into the Washing Machine. If you are using powder detergent, dissolve it thoroughly in 5L of warm water (about 30°C) and then slowly pour the solution into the Washing Machine.
- Put wool clothes in the Washing Machine.
- Press the Start/Pause Button (If necessary, you can adjust the Water Level manually.) 6.Close the Washer Lid.
- If the Drum Cover is not closed properly, the Washing Machine will automatically stop running before starting spin-drying.
- After the wash ends, there will be beeps and the power will be cut off automatically within 5 seconds.
- After the wash ends, turn off the Faucet and clean the Lint Filter Pouch.
Note
- The laundry amount shall be less than 1.5kg.
- After the Program ends, please immediately take out the clothes and air them to prevent them from becoming deformed due to too long placement.
- The Wool Program cannot be scheduled.
- In order to avoid damage to the clothes, the temperature of the washing water shall not exceed 30°C.
- PIease wash clothes of white or bright colors and the clothes of dark colors separately. Using dedicated wool detergents can reduce the damage to clothes and improve the washing effect.
Program Customization
Description of Three Rinse Methods
1. Soak Rinse (the usual method)
-465309.png)
At the end of the Spin cycle, Water is added into the drum. A rinse will start.
2. Spray Rinse (water-saving)
-223257.png)
After the spin-drying ends, the spin drier will rotate slowly while water is added. Like taking a shower, the laundry will have the detergent on it removed and drained to the sewer (the Washing Machine will immediately stop working when the Washer Lid is opened during the spray rinse).
3. Spill Rinse (in the event too much detergent is being used)
-232846.png)
At the end of the Spin cycle, Water is added into the drum while a rinse cycle starts. The foam produced during the rinse will overflow from the Spill Mouth and drained into the sewer.
Non-malfunction Cases
- Sometimes water is added during a wash or rinse. This is automatic water replenish ment due to a lowered water level.
- At the beginning of Spin-drying, the Drum will stop and start intermittently. This is intermittent Spin-drying designed to achieve a better Spin-drying effect.
- During the Spill Rinse, the Drain Hose does not drain water. This is due to the set water level being too low or the water pressure being too low.
- Sometimes water is replenished during Spin-drying. This is an automatic replenish ment due to the improper placement of the laundry to be Spin-dried.
- After the Spin-drying ends, there is the sound of residual water, which is the sound of the balance liquid that is in the balance ring and designed to reduce Spin-drying vibration.
- There was a power failure during operation and the operation cannot be automatically resumed after the power supply restores. Please set the Machine again.
TROUBLE SHOOTING GUIDE
When the following problems occur, the microcomputer will detect the abnormal condition and an electronic buzzer sounds for approximately 10 seconds and the indicators flash as shown below. At the same time, the washer stops operation.
The washer does not work at all.
- Press the POWER ON/OFF button.
- Press the START/PAUSE button.
- Check whether power failure occurs.
- Check whether the fuse or circuit breaker has been activated.
Water does not flow into the Wash/Spin Tub.
-871762.png)
- Turn on the water supply faucet.
- Check whether the water supply has been cut off.
- Check whether the metal filter of the water inlet is clogged.
- Check whether the water inlet has been blocked .
- Check whether water pressure is too low.
Water does not drain out
-481534.png)
- Check whether the height of drain hose is more than 1000mm .
- Check whether the drain hose is clogged.
The washer does not spin.
-705293.png)
- Check whether the laundry is clumped on one side of the Wash/Spin Tub.
- Check whether the washer is on the level surface.
-556569.png)
The buzzer keeps beeping.
-956603.png)
- Check whether the CHILD LOCK is set.
- Close the washer lid.
Other troubles.
-745470.png)
Please press the Power Button to turn off the power, unplug the Power Cord Plug, and call the company’s Customer Service number as soon as possible.