601(W)X632(D)X999(H)mm
52
100
1600
220-240V~50hz
WVMD1208AHG
WVMD1208BHG
601(W)X632(D)X999(H)mm
52
100
1600
220-240V~60hz
WVMD1208AHG
WVMD1208BHG
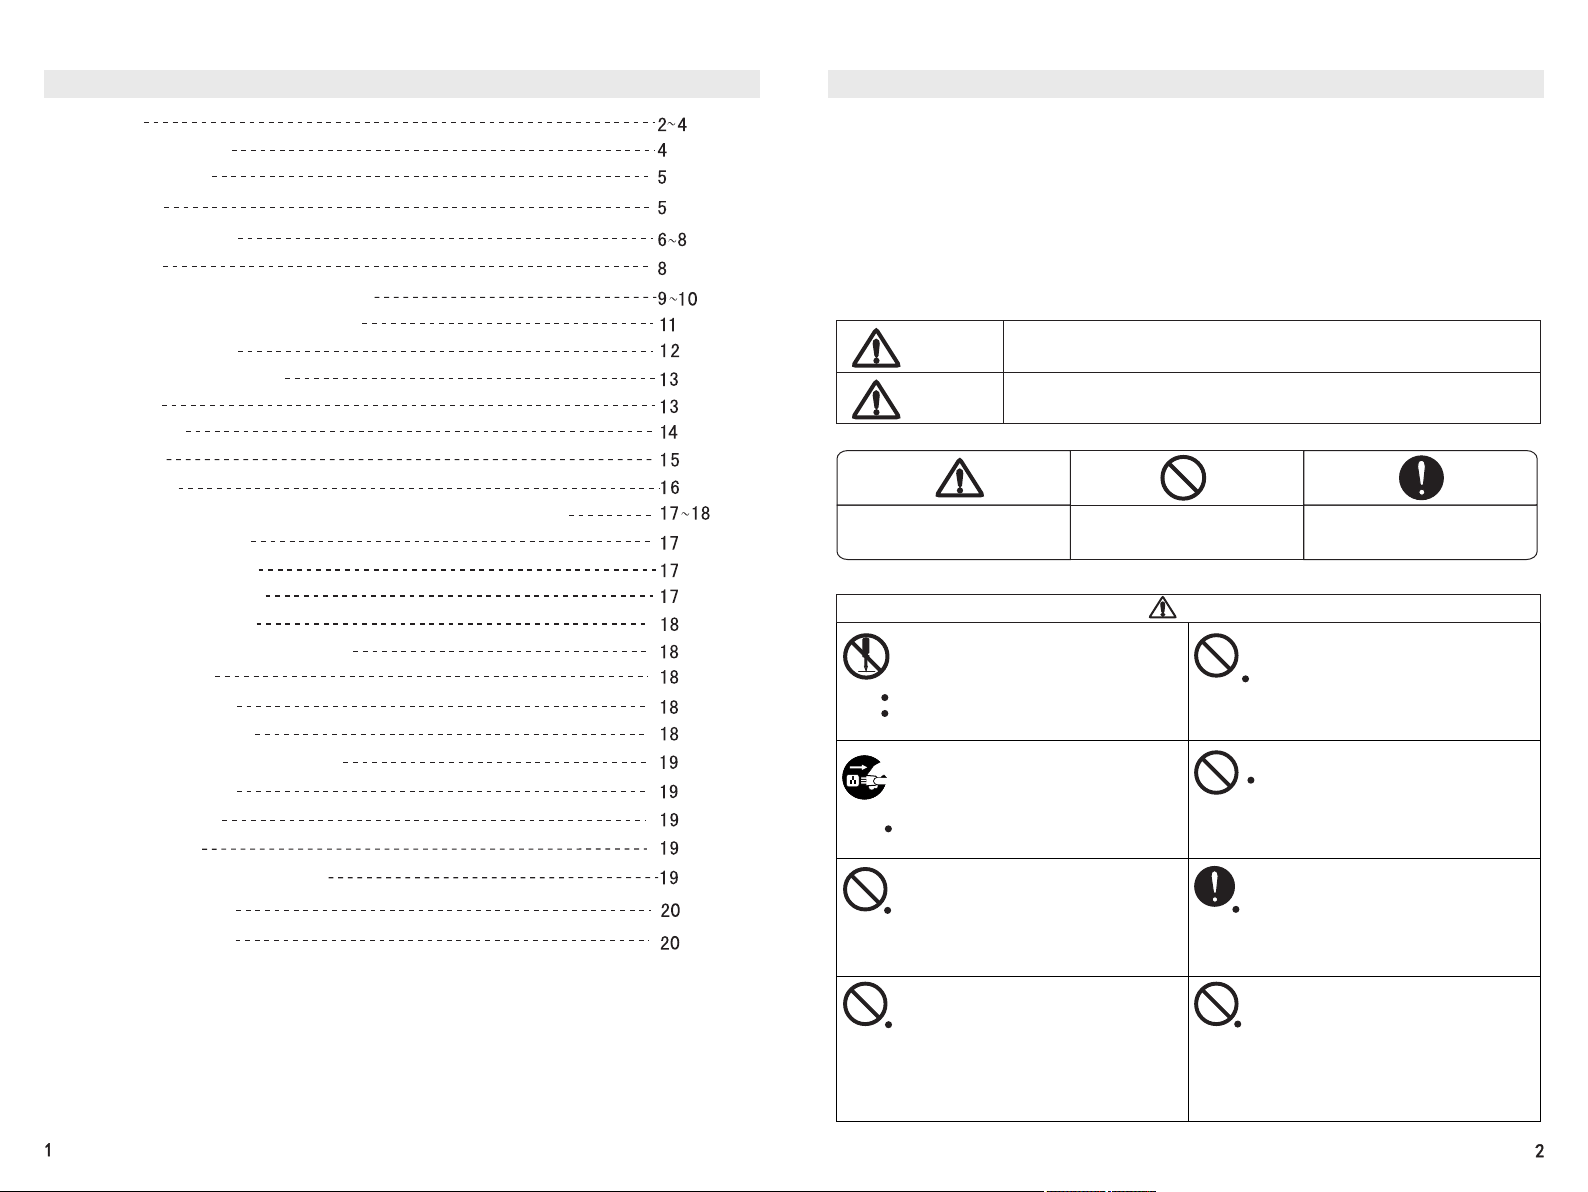
Table of Contents
Precautions
Notes on Maintenance
Packing Instructions
Parts Names
Installation Instructions
Washing Tips
Description of Operation Panel Functions
th
6 Sense One Key Smart Select Program
Program Customization
th
The 6 Sense Smart Program
Warm Wash
Home Textile
Wool Wash
Down Wash
Description of other Functions, Method for Setting These Functions
Preset Time/ Schedule
Smart Memory Function
Two-step Clean Function
Variable Wave Function
Water Level (Varied Wash Function)
Tub Light Function
Super Soak Function
Energy-saving Function
Program Midway Change Function
Auto Dosing System
Child Lock Function
Disabling Beeps
Residual Water Draining Function
Troubleshooting Guide
Non-malfunction Cases
Precautions
• Please read the precautions carefully before using this product.
• This appliance is not designed to be used by persons with insufficient physical, sensory or
mental functions (including children) or without experience and knowledge unless when
such person uses this product, he/she is supervised or guided by another person who can
ensure his/her safety to prevent a fire or injury from occurring.
• In order to avoid any property damage or personal injury to the user, we hereby give the
following notes on matters that need to be observed in respect to safety:
Warning
Caution
Contents with this mark indicate that there may be
the possibility of death or injury.
Contents with this mark indicate that there may be
the possibility of injury or object damage.
Warning or Caution Contents.
Prohibited Contents. Advisory Contents.
Warning
Non qualified or inexperienced personal
are not allowed to disassemble or repair
the Washing Machine.
Fires, electric shocks or injuries may occur.
Please report to the company when a
breakdown occurs.
Do not bend, pull or twist the Power Cord
too much.
The Power Cord may be damaged leading
to fires or electric shocks.
During maintenance, please be sure to
unplug the Power
Cord from the outlet and not to unplug the
Power Cord with wet hands.
Electric shocks or injuries may occur.
Do not use voltages other than 220V.
Injuries, fires or electric shocks may
occur.
Do not use a damaged or loosened Power
Cord or Power Cord Plug.
Fires may occur. Electric shocks or short
circuits may cause injuries or fires.
Dust and other dirt on the Power Cord Plug
shall be removed regularly.
If dust accumulates on the Power Cord, a
fire may occur due to poor insulation caused
by moisture.
Do not use the Washing Machine for other
purposes.
This Washing Machine shall not be used
for other purposes except for the washable
clothes specified in the instructions to
prevent any danger or damage to the
Washing Machine from occurring.
Do not place it in an unsteady place.
The Machine may topple over or move due
to external forces and thereby cause
personal injuries or damage to the Machine.

Precautions
Warning
Do not put your hands in the Drum while the
Washing Machine is running.
• If you touch the Drum, you may be
injured.
• During spin-drying, if the Drum does
not stop rotating 15 seconds after the
Drum Cover is opened, please turn off
the power and call the company’s
Customer Service number as
soon as possible.
Do N ot To uc h
Do not wash clothes stained by volatile
solvents.
• Do not wash the clothes stained by
gasoline, kerosene, thinner, etc.
This may cause fires or
explosions.
Please be sure it is grounded
properly.
• To avoid current leakage
accidents.
Do not install it in a humid or rainy place.
• Poor electrical insulation
may cause current
leakage or malfunction.
The socket shall
be grounded properly
Prohibitions
Do not allow children to play on the Washing
Machine or in the Drum.
• If a child accidentally falls into
the Drum, it can cause
serious injury.
Prohibitions
Prohibitions
Do not use a socket of a voltage other than 220V.
• This may result in a risk of injuries, fires or electric
shocks.
• Please use an independent
socket of more than 10A.
Do not use a power
strip or share a power
supply with other electric
appliances.
Plugging and Unplugging of the Power Cord.
• When plugging or unplugging the Power Cord, the
fingers must grip the insulation part of the Plug
without touching the metal pins of the Plug to
prevent an electric shock from occurring or force
being applied to the wire and thereby
resulting in breakage of the wire
inside the Power Cord.
• When moving the Washing
Machine, be sure to unplug
the Plug of the Power Cord.
Prohibitions
Keep the Machine away from fires.
• Keep the Machine away from fires. Do not place
lit candles, cigarettes or mosquito coils or kettles
on the Washing Machine. This is the main cause
of fires or deformation.
Prohibitions
Protection of the Power Cord.
• During use, please check whether the Power Cord
sheath is damaged, improperly bent or stretched,
or pressed and deformed by heavy objects.
Damage to the Power Cord may
result in poor insulation, which is the
cause of electric shocks and fires. If
the Power Cord is damaged, it must be
replaced by professionals of the
manufacturer or its repair
department or a similar department
in order to avoid danger.
Prohibitions
Unauthorized modification or repair is prohibited.
• Unless conducted by the maintenance
department designated by the company, any
unauthorized modification or repair is prohibited to
prevent the risk of fires or electric shocks.
Do not disassemble the Machine.
Do not wash any water-repellent or non-water-
absorbing laundry in the Washing Machine
• to prevent abnormal vibration from
occurring during washing or
spin-drying. (such as
raincoats, car covers)
Prohibitions
Cautions when Checking the Running Washing
Machine.
• When a woman or a long-
haired person checks the
running Washing Machine,
please be careful not to let the
hair fall into a gap so as to
avoid the risk of hair being caught.
Advisory
Precautions
Caution
Pay attention to spillage.
• Do not wash water-repellent
clothing so as to avoid damage
caused by spillage during
spin-drying.
Caution: Do not place your finger or any object on
the curved section of the washer lid center or the
area on the Panel Frame and over the washer lid.
• This is a cause of injury or
malfunction.
Do not connect it with a hot water source
• Hot water can deform plastic parts, which is
a cause of malfunctions.
Do not wash the parts of the main body of the
washing machine directly with water
• so as to avoid poor insulation,
which will result in the risk
of electric shock.
Prohibitions
Prohibitions
Do not attempt to touch internal moving parts
while the Washing Machine
is running
• so as to avoid the risk
of injury.
Do not place a toddler or heavy object on
the Washing Machine
• so as to avoid parts
deformation or
damage leading
to any danger.
Do not plug or unplug the Power Cord Plug
with wet hands
• so as to avoid the risk
of electric shock.
When the Washing Machine is not Used:
• turn off the Faucet to avoid
damage to or falling off of the
Water Inlet Hose leading to
water leakage;
• Unplug the Power cord to
prevent fires or other accidents.
Do Not Touch
Prohibitions
Wet Hands Prohibited
Unplug the Plug
Notes on Maintenance
Use a soft cloth to wipe water and dirt on the Housing
• Do not pour water directly on the Housing. This may result in a short circuit or electric shock.
• Do not use a brush, polish, gasoline or other volatile materials to wipe the Washing
Machine. This may damage the Main Body Surface Coating or plastic parts.
You can choose to retain or tear off the Transport Protection Film on the Housing Surface,
which will not influence the normal use of the product.
Cleaning of the Water Inlet Valve (recommended once every half yearly)
• Dirt deposits will influence the Water Inlet Volume. Please remove the Water Inlet
Hose, remove the Lint Filter of the Inlet Valve, and remove the dirt on the lint
before re-installing it.
Water Inlet Valve
Cleaning of the Lint Filter (clean it each time after it is used)
• Remove the Lint Filter.
• Remove large lint and brush fine lint from the Lint Filter.
Reinstall the Lint Filter. During the installation, snap the frame claws into
the bottom groove. (The Lint Filter is a wearing part)
Prohibitions
Advise! Advise!
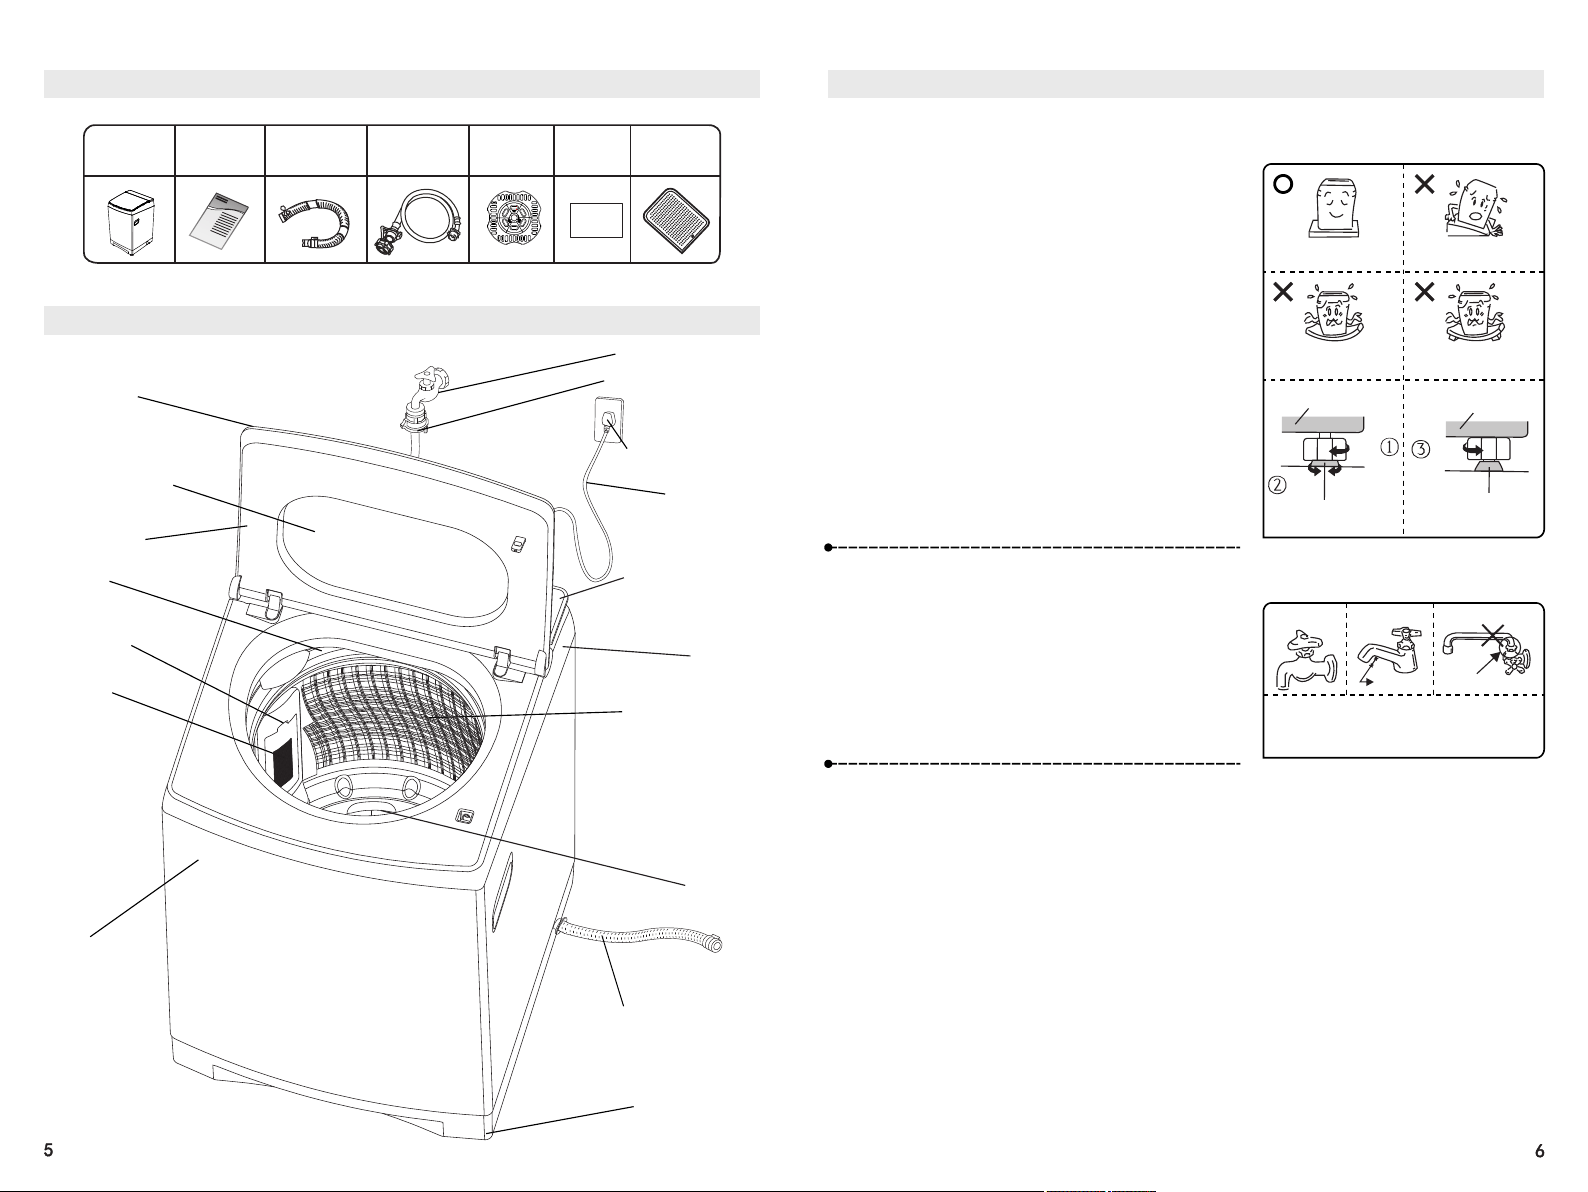
Packing Instructions
Washing
Machine
(1)
Manual
(1)
Drain Hose
Assembly
(1)
Water Inlet
Hose Assembly
(1)
Down
Pressing Plate
(1)
Warranty
Card
(1)
Parts Names
Outer
Drum Rim
Circulation
Water Channel
Adjustable
Foot (1)
Drain Hose Assembly
Pulsator
Washing/Spin-
drying Drum
Panel
Frame
Detergent Mouth
Cap
Power Cord
Power Cord Plug
Water Inlet Hose
Assembly
Faucet
(This diagram is for reference
only. The actual product shall prevail.)
Operation
Panel
Drum Cover
Lint Filter
Housing
Installation Instructions
Solid and
Steady Ground
Tilted Ground
Unsteady Ground
Support Stand
and Platform
Loosen
Lower
Raise
Bottom Bracket
Tighten
Adjustable Foot
Adjustable Foot
Bottom Bracket
Placement of the Washing Machine
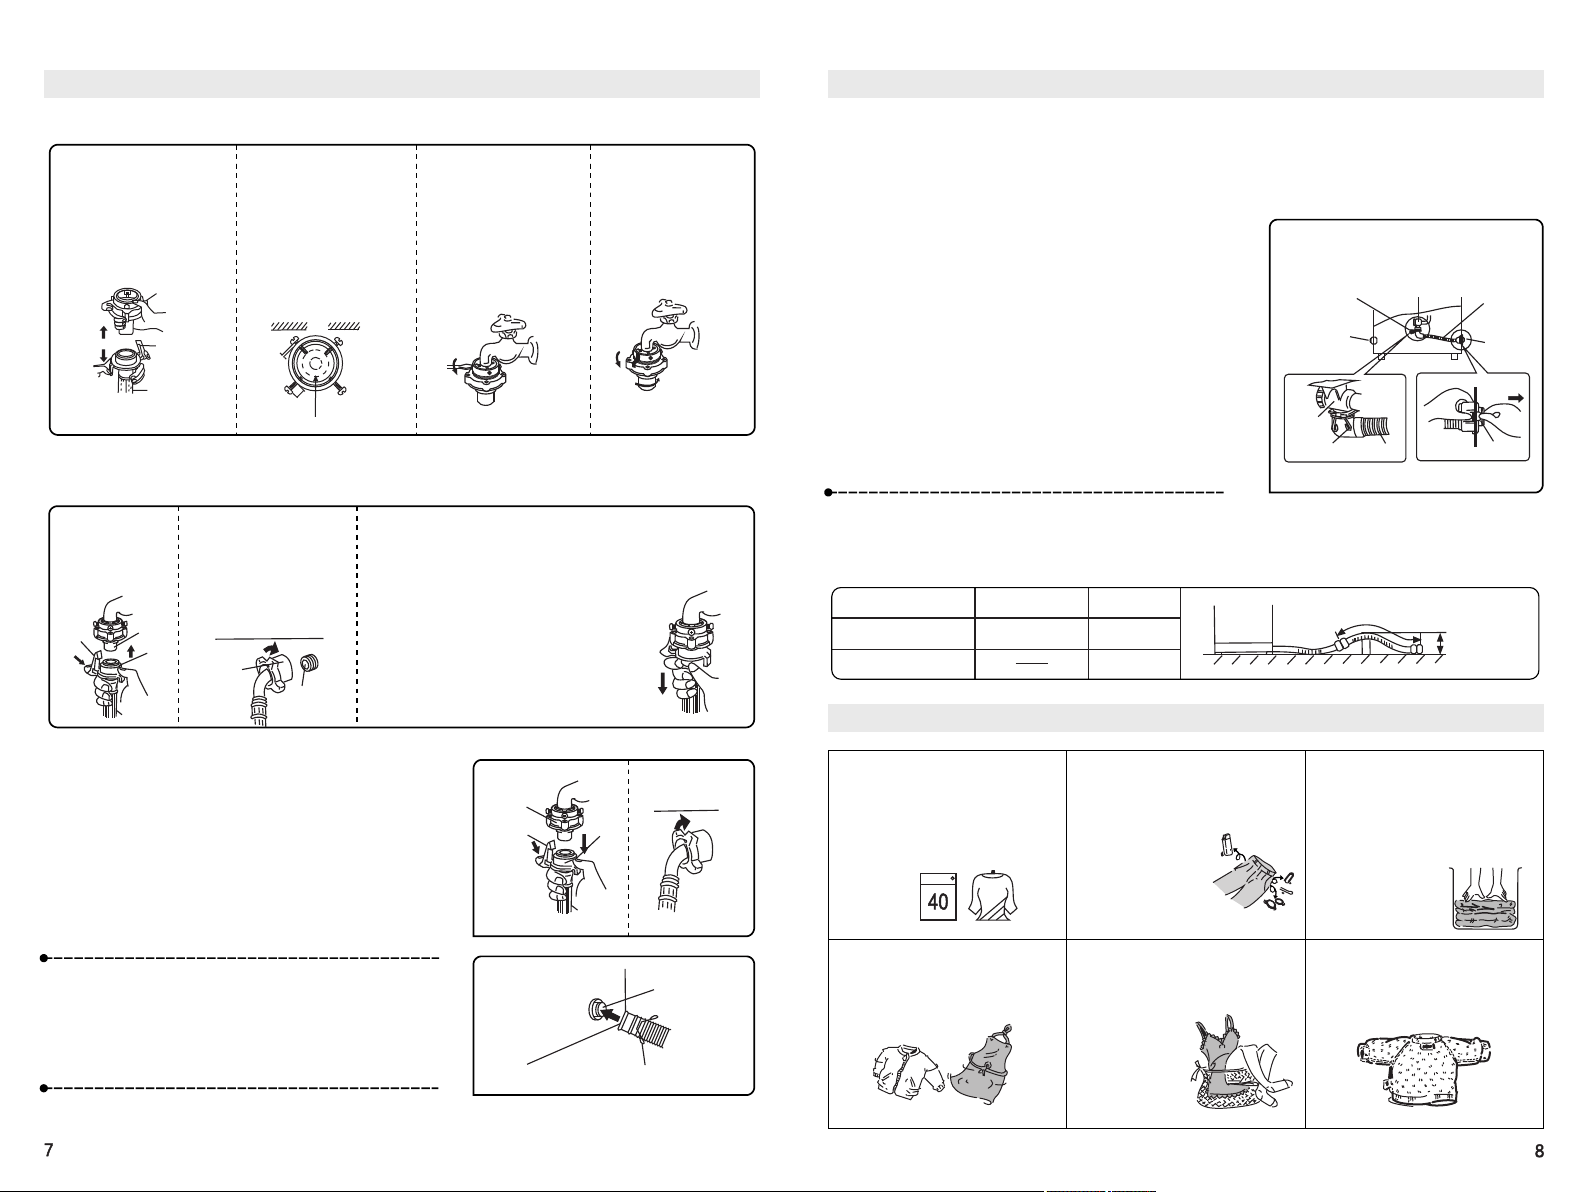
1. Choose a dry place without direct sunlight to the Washing Machine.
2. Place the Washing Machine on steady solid ground.
3. The washing machine should be placed where there
is a suitable drainage and can drain water smoothly.
The drainage shall be on the same plane that the
machine is placed on or slightly lower than the plane,
to avoid Washing Machine leakage causing any
damage.
4. Place the Washing Machine as firmly as possible.
If necessary, level the Washing Machine by
adjusting the Adjustable Feet of the Washing
Machine according to the order shown in the figures.
The maximum allowable inclination of the plane on
which the Washing Machine is placed is 2°.
Notes:
• When the Washing Machine is placed on the floor
or a flexible support stand, the Washing Machine
may vibrate.
• Do not place any object such as a carpet below the
Washing Machine to prevent the bottom opening
from being blocked.
Faucet Selection
Faucet Type: (the faucet mouth shall be
smooth)
Type A: The most appropriate
Type B: Faucet length must be greater
than 16mm. Otherwise the universal joint
cannot be installed.
Type C: Water leakage may occur with
the part shown in the figure.
Type A
Type B Type C
• If you do not use the appropriate faucet,
please replace it.
16mm above
Water leakage may occur
with this part.
Notes:
1. When installing the Washing Machine, please be sure to remove the Pedestal and Bracket
for transportation at the bottom of the Washing Machine. Otherwise it cannot be used.
2. During installation or initial use, a small amount of water will flow out of the Drain Hose,
which is residual water left over from the factory during routine inspection.
3. Unplug the Power Cord when Washing Machine is not in use and turn off the faucet to
avoid accidental fires and water leakage accidents.
Rat Guard
(1)
War ranty C ard
Tempered Glass
Installation Instructions
Installation of the Universal Joint
1. Hold the Universal Joint
in one hand and the
Locking Rod in the other
hand and then detach the
Universal Joint from the
Water Inlet Hose.
2. Evenly adjust the four
screws on the Universal
Joint so that the two
screws near the wall fully
contact the outside of the
Faucet first.
3. Insert the Universal
Joint vertically onto the
Faucet with its internal
seal tightly attaching to
the opening of the
Faucet and tighten the 4
screws with a
screwdriver.
4. Remove the seal from
the Universal Joint and
tighten the Universal
Joint.
Jniversal Joint
Locking Rod
Water Inlet Hose
Wall
Small
Large
Faucet
Connection of the Water Inlet Hose
1. Connect the
Water Inlet Hose
to the Universal
Joint.
2. Align the Water Inlet
Hose with the opening of
the Water Inlet Valve, and
turn the fastening screw
nut clockwise on the
Water Inlet Hose until it
cannot be turned any
more.
3. Check whether the Water Inlet Hose is Connected
Firmly
• Pull the Water Inlet Hose downwards to check whether
the Water
Inlet Hose is firmly connected to the Universal Joint.
Then slowly
turn on the Faucet to see if water leakage
occurs. If water leakage occurs, turn off the
Faucet and reinstall.
• After long-term use, the Universal Joint
may become loose. Reinstall it.
• Turn off the Faucet when the laundry
Program ends or the Machine will not be used
for a long time.
Locking
Rod
Sleeve
Protruding
Connection
Section
Tighten
the Nut
Water Inlet Valve
Removal of the Water Inlet Hose
1. Turn off the Faucet.
2. Press the Power Button to turn on the power. Then press
the Start/Pause Button.
3. Turn off the power after 15 seconds.
4. Pull down the Locking Rod and Sleeve with your fingers
and remove the Water Inlet Hose.
Turn the Water Inlet Hose on the Inlet Valve
anticlockwise until the Water Inlet Hose is
removed.
Connection of the Drain Hose
Connect the Drain Hose to the Drain Mouth and then fix it
with a hose clamp as shown in the figure on the right:
Note: Be sure to use the new Water Inlet Hose included in the accessories instead
of an old Water Inlet Hose.
Universal Joint
Locking Rod
Sleeve
Drain Mouth
Hose Clamp
Installation Instructions
Changing of the Position of the Drain Hose
Depending on the use location, the Drain Hose can be changed from being on the right side to being on
the left side.
• During the changing, unplug the Power Cord.
• To prevent hand scratches or injuries , please wear gloves.
1. Remove the cap on the Drain Mouth on the left.
2. Lay the Washing Machine backward down on a soft cushion.
3. Loosen the Hose Clamp and unplug the Inner Drain Pipe from
the Drain Valve.
4. Push the joint on the Drain Mouth and pull the Inner Drain
Pipe out of the Drain Mouth on the right side of the Washing
Machine.
5. Insert the Inner Drain Pipe from the Drain Mouth on the left
side and snap the joint.
6. Connect the Inner Drain Pipe to the Drain Valve and fix it with
the Hose Clamp.
7. Install the Drain Mouth Cap on the left in the appropriate
position on the right.
8.Lift the Washing Machine gently until it is placed steadily.
(Front View)
Drain Valve
Hose Clamp
Inner
Drain Pipe
Drain Mouth
Cap
Drain
Mouth
Drain
Valve
Hose Clamp
Inner Drain
Pipe
Drain Mouth
Extension of the Drain Hose
If the drain hose length is not sufficient, please purchase more Drain Hoses
from the seller or the company and then connect the Drain Hoses to each other.
Extension of the
Drain Hose
Extension Height
There is a step in the
middle
There are no steps
in the middle
Extension
Length
within 15cm within 1cm
within 3cm
within 1cm
within 15cm
Washing Tips
• Please wash colored and white,
thick and thin laundry separately.
Please wash laundry according
to the clothing care tags.
Legend
• Please wipe dirt and sand off the
laundry first.
• Make sure there are no items in
the clothing pockets. (such as
nails, coins, etc. that may damage
clothes, create
abnormal sounds or
cause a malfunction
of the washing
machine.)
• Please put clothes that can easily
float, or large, heavy clothes in
first. If any clothes come to the
surface, please temporarily stop
washing and press the clothes
down into the water. (A pressing
plate needs to be placed on the
clothes)
• Tighten loose straps on the
clothes, ensure zippers and
buttons are done up.
• When washing fine fabrics such
as lingerie, lace-trimmed items,
nylon and thin chemical fiber
fabrics, etc., they should be
placed in a mesh
washing bag.
• For the clothes that lose their
wool or thread easily, please
turn them inside out during
washing.
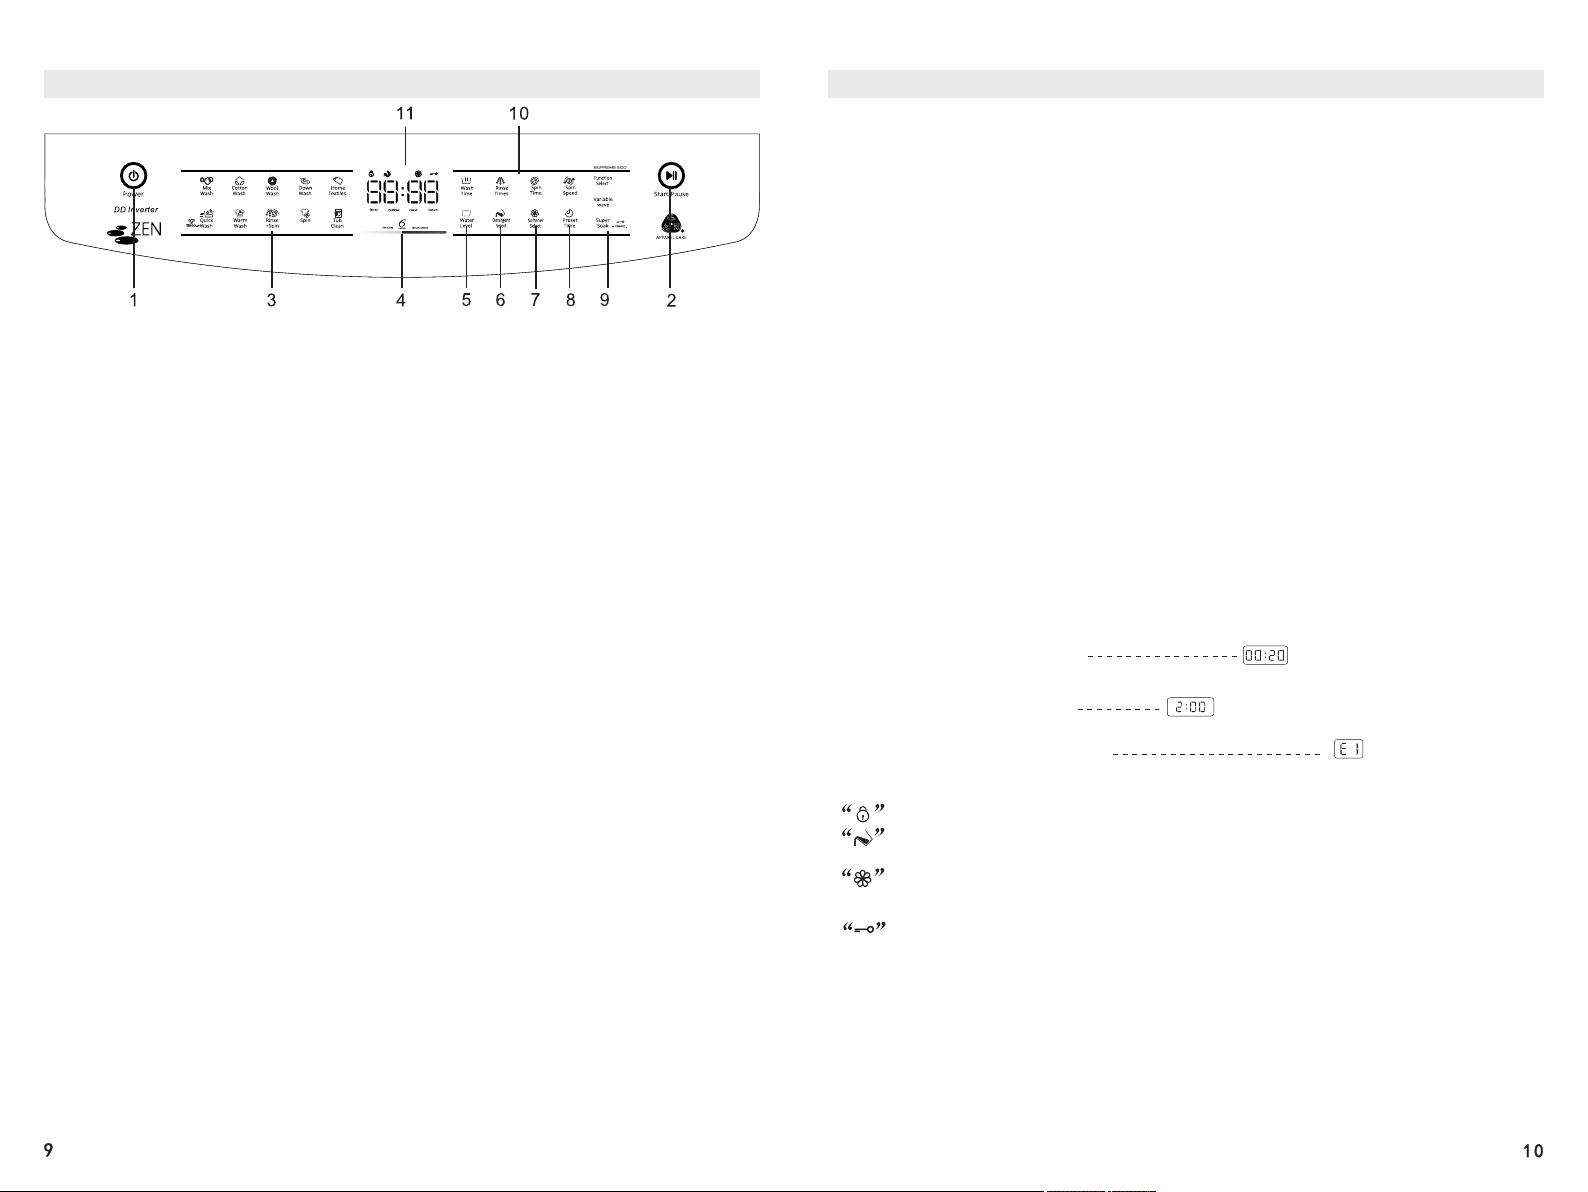
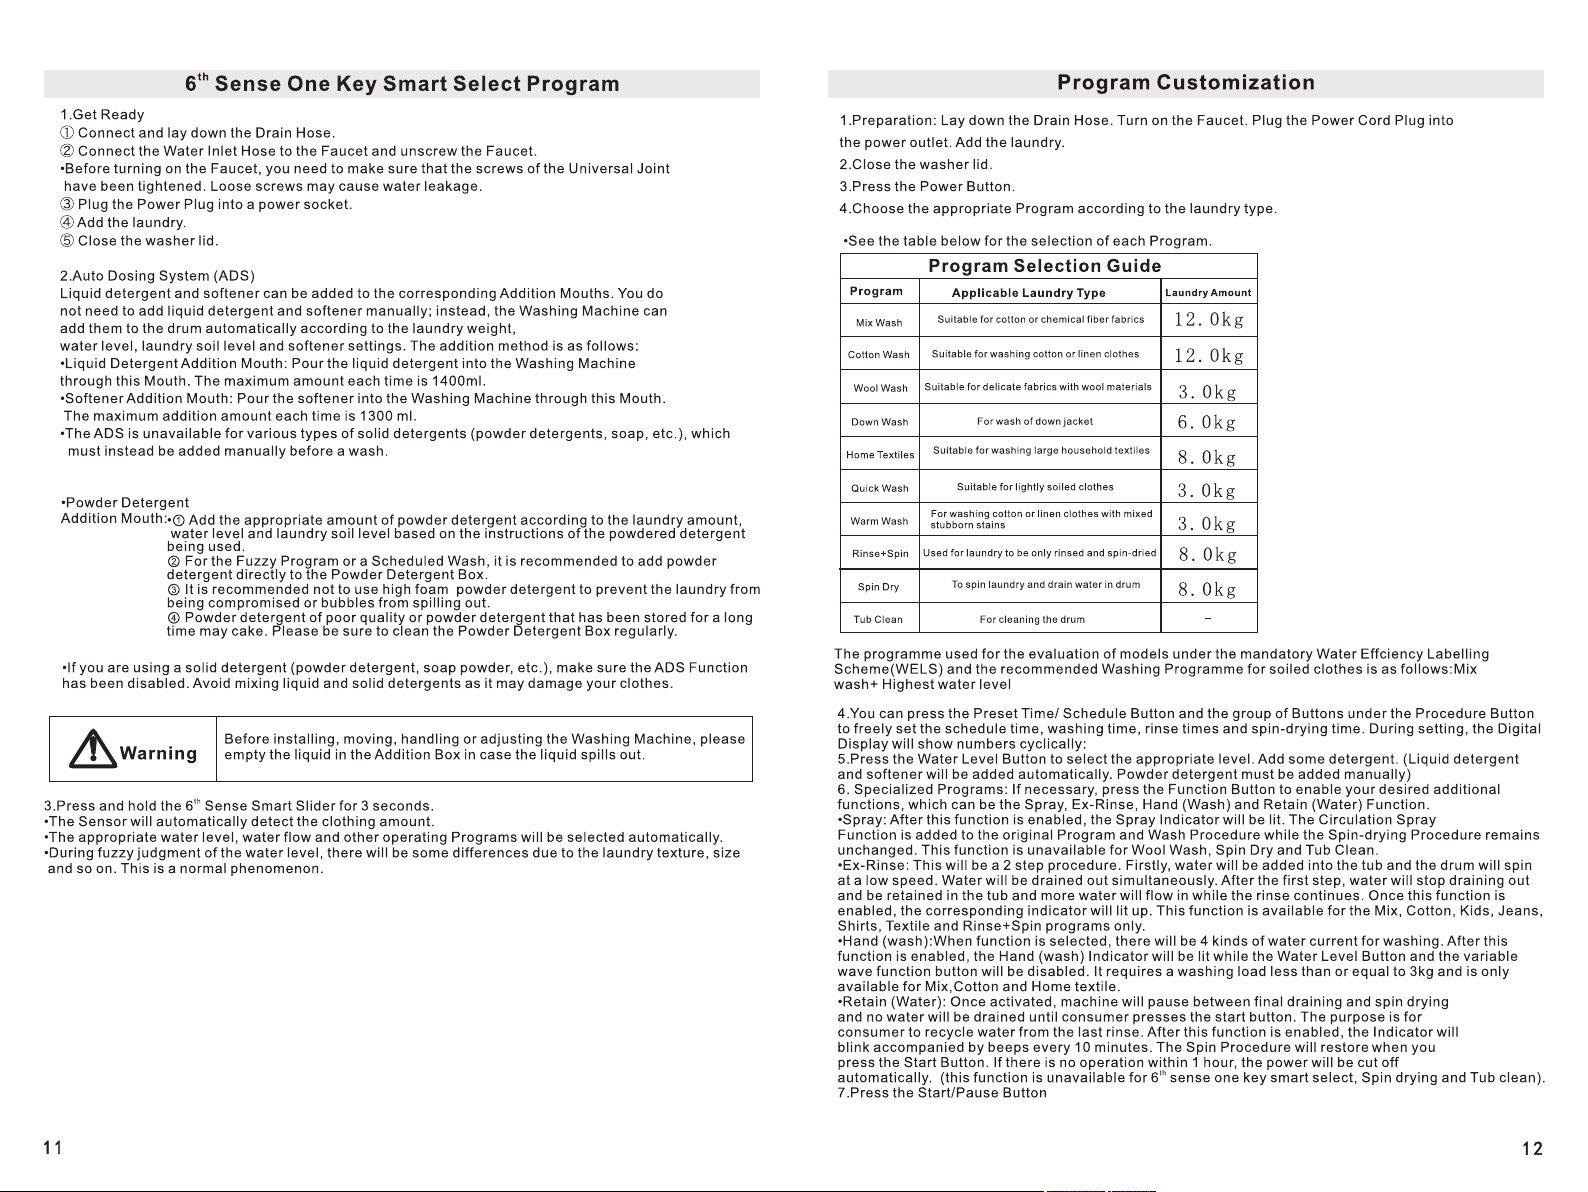
Description of Operation Panel Functions
1. Power Button
• To turn on the Washing Machine, please press this Button. To cut off the power, press the
Button again. After this Button is pressed, if no other Buttons are pressed within 10 minutes,
the power will be cut off automatically. After the Program stops running, the power will be cut
off automatically (within 10 minutes if the Draining Function is enabled).
2. Start/Pause Button
• When the power is turned on, the Washing Machine will start running after this Button is
pressed. This Button can also be used to temporarily stop the operation. You can just press
this Button again to resume the operation.
3. Program Selection Area
• Mix Wash, Cotton Wash, Wool Wash, Down Wash, Home Textiles, Quick Wash, Warm Wash,
Rinse+Spin, Spin Dry and Tub Clean.
• Press and hold the Quick Button for 3 seconds to control the tub light.
th
4. 6 Sense Smart Slider
• After the Machine is powered up, you do not need to press the Power Button but instead
th
press the central part of this Smart Slider for 3 seconds to automatically start the 6 Sense
One Key Smart Select Program.
th
• In the Idle state, you can press this Button to start the 6 Sense Smart Program and slide the
th
Slider to adjust the total time required of the 6 Sense Smart Program.
• For Programs other than the 6th Sense Smart Program, when setting the parameters of each
procedure, you can slide this Slider right and left to control the parameters of a certain
procedure.
5. Water Level Button
• This Button is used to select the water level appropriate for the laundry to be washed.
Washing and rinsing can be done at different water levels. Only Levels 6 to 10 can be chosen
for the Textiles Program. Only Levels 3 to 10 can be chosen for the Wool Program. Only
Levels 6 to 10 can be chosen for the Down Program.
6. Detergent Select Button
• Depending on the soil level of the laundry, you can use this Button to select the
amount of liquid detergent to be added or cancel the automatic addition of liquid detergent.
You can freely choose three levels of addition amount - LI, L2 and L3 (in an ascending order).
Description of Operation Panel Functions
7. Softener Select button
• You can use this button to choose the option of adding or excluding softener.
8. Preset Time Button
• You can use this Button to set the time from the start of the Program to the end of the
Program.
th
Note: This function is unavailable for the 6 Sense One Key Smart Select Program.
9. Special Function Buttons
Function Button
• You can use this between the Specialized Programs: Spray, Ex-Rinse, Hand (Wash)
and Retain (Water) Functions.
Variable Wave Button
• Use this Button to select the washing or rinsing strength according to the soil level of the
laundry. You can choose between four levels of water flow - HI, H2, H3 and H4 (in an
ascending order).
Super Soak Button
• You can use this Button to enable the Super soak Function and set the appropriate Soak time.
• This Button can also be used to set the Child Lock Function. See Page 19 for the method for
setting the Child Lock Function.
10. Procedure Buttons
• You can use this group of Buttons to freely set the Wash Time, Rinse Times, Spin Time and
Spin Speed.
• You can choose between four spin speeds - SI, S2, S3 and S4 (in an ascending order where
S1 indicates no spin-drying but draining and the spin-drying speed is 0)
11. Description of Display Functions
• Displays the remaining time during operation. For example
: Remaining Time: 20 minutes:
• Displays when will the Scheduled Program end during Preset Time Setting.
For example: Ends in 2 hours:
The Schedule Indicator will blink
•Displays the Fault Code when an abnormity occurs.
For example: Failed to add water:
•Displays whether some functions are enabled where the constantly lit Function Indicators
show the functions that are enabled.
Lid Lock Indicator; the constantly lit Indicator indicates that the lid is locked.
Detergent Indicator; the constantly lit Indicator indicates that the Automatic Detergent
Addition Function is enabled.
Softener Indicator; the constantly lit Indicator indicates that the Automatic Softener Addition
Function is enabled.
Child Lock Indicator; the constantly lit Indicator indicates that the Child Lock Function is enabled.
Dry
th
The 6 Sense Smart Program
When washing the laundry, you can freely choose the end time of the Washing Program
via the Smart Program.
Operation Steps
1. Preparation: Lay down the Drain Hose. Turn on the Faucet. Plug the Power Cord Plug into
the power socket. Add the laundry.
2. Close the washer lid.
3. Press the Power Button.
4. Choose the Smart Program.
• The Smart Program is the default Program. You can go directly to the next step.
• If you ran the Cotton or Mix Wash Program last time, due to the Smart Memory Function of
th th
the Program, you need to press the 6 Sense Smart Slider to switch to the 6 Sense Smart
Program.
5. Choose the Program end time you need.
• You can adjust the desired wash completion time (adjustable from 15 minutes - 1 hours 30
minutes; depending on the laundry weight and water pressure, the actual washing time will
th
be different) by sliding the 6 Sense Smart Slider.
6. Press the Start/Pause Button to start the Washing Program.
Warm Wash Program
The Warm Wash Program heats the water up to 40°C, helping to remove various stubborn
stains and aids in effective allergen removal.
Operation Steps
1. Preparation: Lay down the Drain Hose. Turn on the Faucet. Plug the Power Cord Plug into
the power socket. Add the laundry.
2. Close the washer lid.
3. Press the Power Button.
4. Press the Warm Wash Button to select the Warm Wash Program.
6. Press the Start/Pause Button to start the Washing Program.
Caution
• Applicable to cotton and linen clothes of less than 3.0kg. (Corresponding to two water
levels)
• When the laundry amount exceeds 3.0kg, please select the appropriate level. The wash
effect of the Hot Wash Program will be influenced.
• This Program is influenced by the ambient temperature. When the ambient temperature is
too low, the heating effect of this Program will be influenced.
• The water temperature is high. Please do not wash dark and other clothes that are
inclined to fade. Do not use this Program to wash clothes that require a wash water
temperature below 40°C.
• You can just dry them after the Program ends. The normal operation of the machine will
not be influenced.
To improve the washing effect, you can increase the detergent amount appropriately.
Home Textiles Program Instruction
The Home Textiles Program applies to washing blankets and other large items
• When this Program is used, the water level is automatically set to Level 10. However, you
can change the water level to Levels 6 ~ 10 according to the size of the household textiles.
Operation Steps
1. Close the Washer Lid.
2. Pour the liquid detergent into the corresponding Detergent Box. If you are using powder
detergent, it is recommended to dissolve it thoroughly in 5L of warm water (about 30°C)
and then slowly pour the solution into the Washing Machine.
3. Place the rolled side of the household textile down in the Washing Machine.
4. Select the Home Textiles Function.
• Press the Power Button and then press the Home Textiles Button in the Program Selection
Area. The Home Textiles Indicator will blink. Press the Start/Pause Button to start running
the Program. (If necessary, you can adjust the water level manually.)
• After the wash ends, the beeper will beep. Then by default, the Draining Function will start
immediately and the power will be cut off automatically.
• After the wash ends, turn off the Faucet and clean the Lint Filter Pouch.
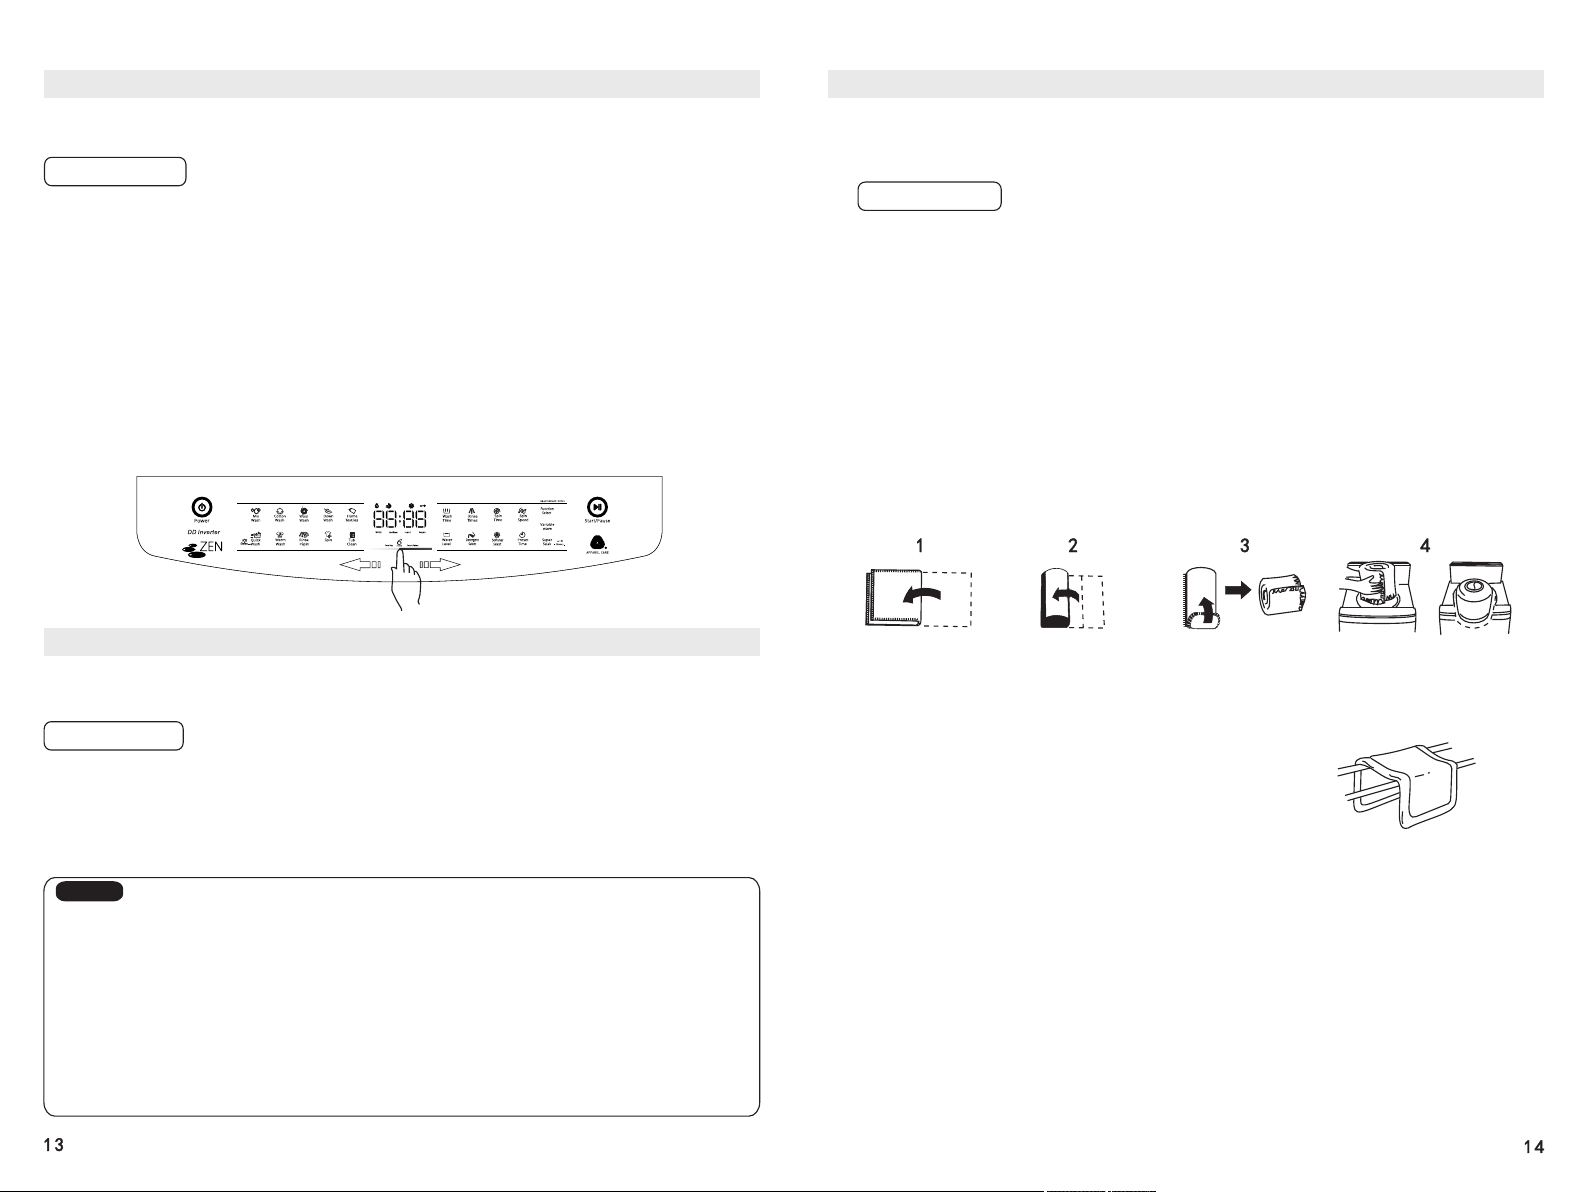
How to Fold a Blanket and Put it in the Washing Machine
Fold the blanket in half
Then fold it in the same
direction into 4 layers
Roll up the blanket
Place the rolled side of the
blanket down in the Washing
Machine.
After the wash ends
Take out the blanket and hang it from the middle in the shade.
Note: • Pre-wash the dirty parts by hand.
• Do not use too much detergent.
• Stains can be removed effectively with warm water (about 30°C).
• During the washing process, if a part of the blanket is exposed
above the water surface, press the Start/Pause Button.
The Washing Machine will temporarily stop running. Press the exposed part into the water
and press the Start/Pause Button again to resume the wash.
Dry
Wool Wash Program Instructions
• This Program is used for washing wool clothes. Please check the clothing care tag before
starting the wash.
• When the Wool Wash Program is used, the water level is automatically set to Level 5.
However, you can change the water level to Level 3 ~ 10 according to the size of the wool
clothes.
Operation Steps
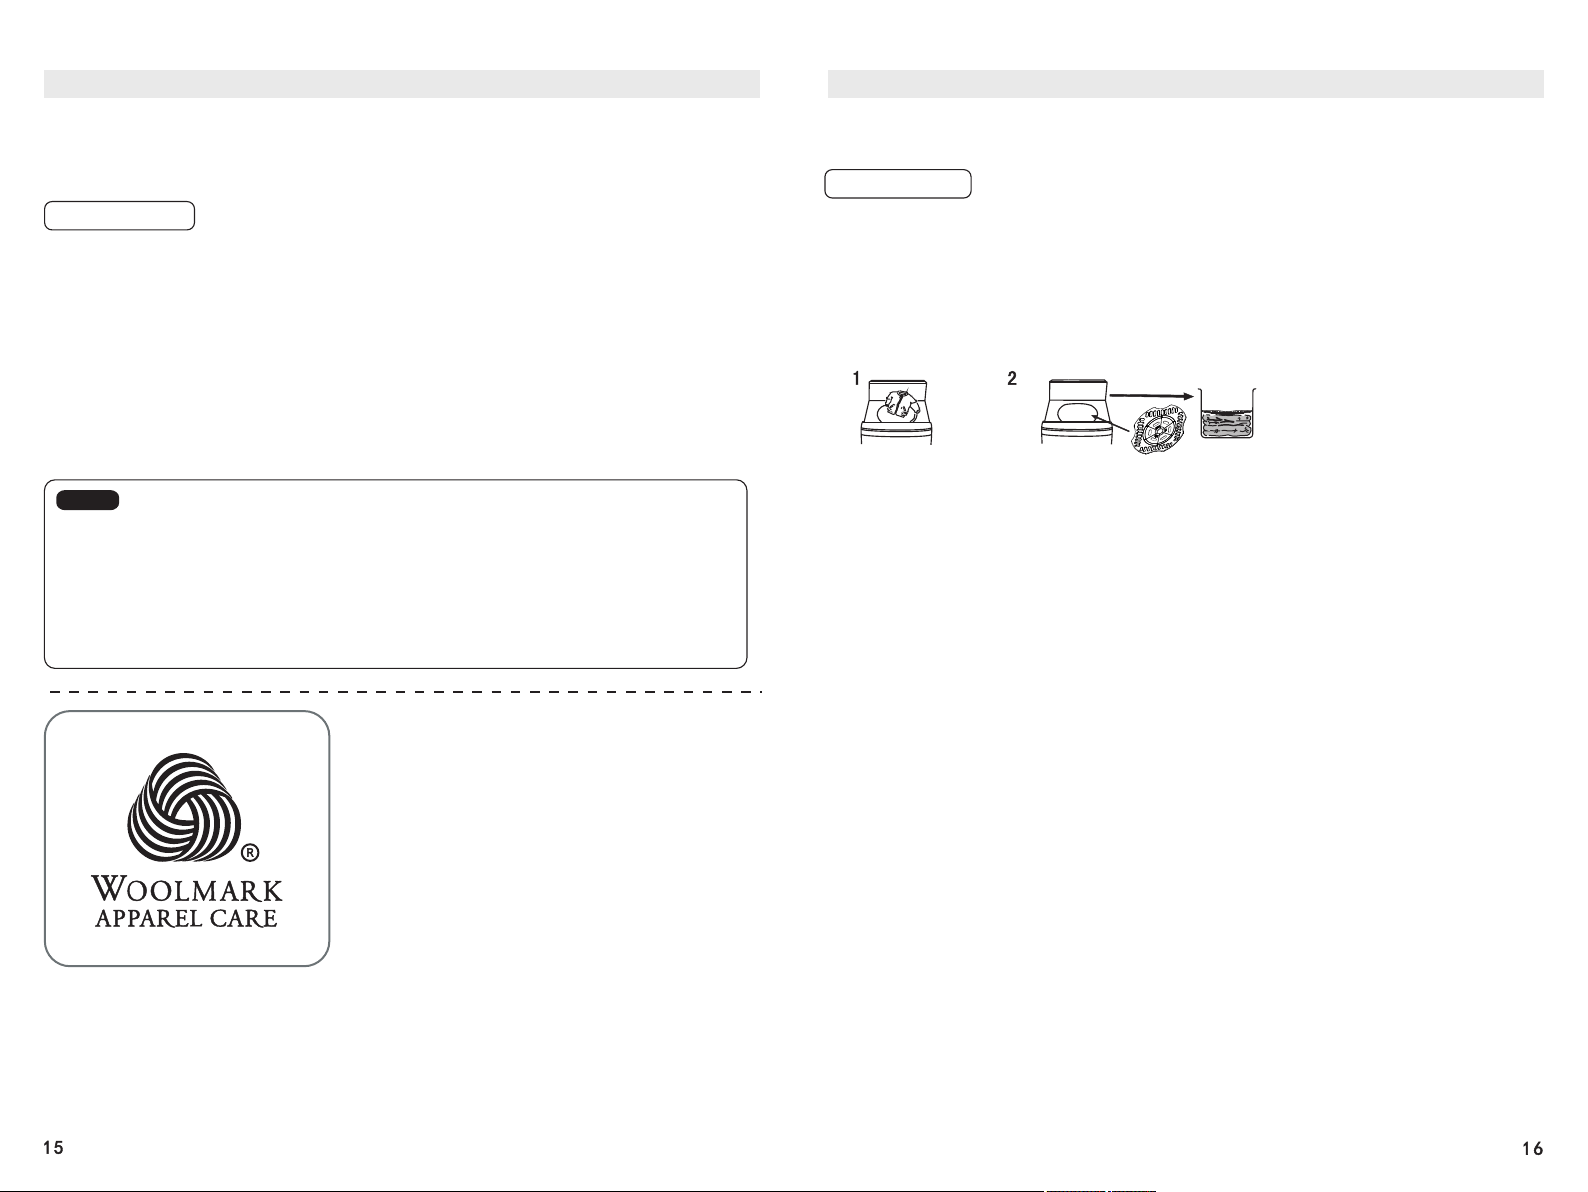
1. Close the Washer Lid.
2. Pour the liquid detergent into the corresponding Detergent Box. If you are using powder
detergent, it is recommended to dissolve it thoroughly in 5L of warm water (about 30°C) and
then slowly pour the solution into the Washing Machine.
3. Put wool clothes in the Washing Machine.
4. Choose the Wool Wash Program.
• Press the Power Button and then press the Wool Wash Button in the Program Selection Area.
The Wool Wash Indicator will blink. Press the Start/Pause Button to start running the
Program. (If necessary, you can adjust the water level manually.)
• After the wash ends, the beeper will beep. Then by default, the Draining Function will start
immediately and the power will be cut off automatically.
• After the wash ends, turn off the Faucet and clean the Lint Filter Pouch.
Caution
• The laundry amount shall be less than 3.0kg.
• After the Program ends, please immediately take out the clothes and air them to
prevent them from becoming deformed due to too long placement.
• In order to avoid damage to the clothes, the temperature of the washing water shall not
exceed 30°C.
• Please wash clothes of white or bright colors and the clothes of dark colors separately.
Using dedicated wool detergents can reduce the damage to clothes and improve the
washing effect.
The wool wash cycle of this machine has
been approved by The Wool mark Company
for the washing of machine washable wool
products provided that the products are
washed according to the instructions on the
garment label and those issued by the
manufacturer of this washing machine.
Accreditation Number of the Washing
Machine: M0000
Down Wash Program Instructions
• When this Program is used, the water level is automatically set to Level 8. You can change
the water level from Level 6 ~ 10 according to the size of the down products.
Operation Steps
1. Close the Washer Lid.
2. Pour the liquid detergent and softener into the corresponding positions of the Washing
Machine. If you are using powder detergent, dissolve it thoroughly in 5L of warm water
(about 30°C) and then slowly pour the solution into the Washing Machine.
3. You can put down products that can be washed in a washing machine into the Washing
Machine as shown in the figure.
4. Close the Washer Lid and press the Power Button.
5. Press the Down Wash Program Button to choose the Down Wash Program.
Put the down products
that can be washed into
the Washing Machine
Put the down pressing plate on top of
the laundry and place them into the
Washing Machine
As shown in the figure
6. Press the Start/Pause Button (If necessary, you can adjust the water level manually.)
• After the wash ends, the beeper will beep. Then by default, the Draining Function
will start immediately and the power will be cut off automatically.
• After the wash ends, turn off the Faucet and clean the Lint Filter Pouch.
Description of other Functions, Method for Setting These Functions
Preset Time/ Schedule
• The Pre-set Schedule Time is the Program end time.
• Before making a Schedule, first turn on the Faucet, and then lay down the Drain
Hose and check whether the Universal Joint is tightened to avoid water leakage
accidents.
Operation Steps
1. Close the Washer Lid.
2. Put the laundry in the Drum and close the Washer Lid.
3. Choose the appropriate Program, procedures and water level needed.
4. Press the Preset Time Button to set the Schedule Time.
• Preset Time Time Options Displayed:
(hours)
5. Add detergent.
• Detergent Addition for a Preset Time: Add detergent, powder detergent and
softener to the corresponding boxes.
6. Press the Start/Pause Button
th
• All the Indicators except the Preset Time Indicator and the 6 Sense Smart Slider
Indicator will go out in about one minute. (If the Child Lock Function is enabled,
the corresponding Child Lock Indicator will be lit)
th
• The Preset Time/ Schedule Function is unavailable for the 6 Sense One Key
Smart Select Program.
• If you want to check the Preset/ Scheduled Program, please press any Button
other than the Power Button. The Preset/ Scheduled Program will be displayed for
several seconds.
• To change the Preset/ Scheduled Program, turn off the power and then restart the
Machine and carry out the resetting.
• The Preset Time Program will be disabled if the Power Cord Plug is unplugged or
a power failure occurs.
Smart Memory Function
th
If you choose the Mix Wash, Cotton Wash, or 6 Sense Smart Program the
Washing Machine will remember your choice after the Program ends. When turning
on the Machine the next time, you can just press the Start/Pause Button to start the
remembered Program.
th
• Wash Parameters are remembered only for the 6 Sense Smart Program but not
for the Mixed Wash or Cotton Wash Program.
• The Child Lock and ADS will also remember its last settings.
Two-step Clean Function
During the washing process, after the water level of the washing machine reaches
the level that is two levels lower than the pre-set water level, the wash will start
while water continues to flow in.
• When the two lowest levels are set, the wash will start after the pre-set water
levels are reached.
• The Two-step Clean Function is unavailable for the Wool Wash, Textiles Wash,
Quick Wash, Warm Wash, Rinse+Spin and Spin Dry Programs
• If the Super Soak Program is chosen, after the soak ends, the Two-step Clean
Function will be disabled during the wash.
Description of other Functions, Method for Setting These Functions
Variable Wave Function
Water Level (Varied Wash) Function
Setting Method
Tub Light Function
Super Soak Function
Energy-saving Function
After this function is enabled, the washing or rinsing strength can be changed.
This function can be enabled before a Program starts or while a Program is
running. (this function is unavailable for Wool Wash, Down Wash,
Warm wash, Spin Dry and Tub Clean.)
In order to improve the detergent content in the washing water and save water,
you can set different water levels for a wash and rinse respectively. It is
recommended that the wash proceeds at a lower water level and the rinse at a
higher water level. In this way, a clean wash and a thorough rinse can be ensured.
Press the Power Button to turn on the power. After selecting the appropriate
Program, press the Wash Button to set the washing time, press the Water Level
Button to set the wash water level, press the Rinse Button to set the rinsing times,
press the Water Level Button again to set the rinsing water level, press the Spin-
drying Button to set the spin-drying time, and finally, press the Start/Pause
Button to start. Then the wash and rinse will proceed at different pre-set water
levels.
Press the Power Button to turn on the power. The Tub Light will be lit when the
Washer Lid is opened and will go out 2 minutes after the Washer Lid is closed.
The Tub Light will go out automatically 3 minutes after the Washer Lid is not
closed.
• You can press and hold the Quick Wash for 3 seconds to turn on or turn off the
Tub Light.
After the Super Soak Function is enabled, a dynamic soak can be added
before a wash (this function is unavailable for Wool Wash, Quick, Warm Wash,
Rinse+Spin, Spin Dry and Tub Clean.) The soaking time is
0 - 40 minutes with an increment of 10 minutes.
This function is enabled by default in the factory settings. Once enabled, the
backlight will automatically go off after 30 seconds of inactivity upon switching on
the machine. All the indicators except the 6th Sense Smart Slider and Child Lock
indicator will go out and be locked. If a program has been chosen, the backlight of
the programs will stay lit for 10 seconds and automatically go off after. When any
button other than the Power Button is pressed and held for 2 seconds, you will
hear a beep, and the Backlight will be turned on and the Buttons will be unlocked.
Press and hold the Wash Button for 4 seconds until you hear a beep, and the
Automatic Button Lock Function will be enabled. When you want to disable the
function, repeat the above steps until you hear a beep, and the function will be
disabled.
Description of other Functions, Method for Setting These Functions
Program Midway Change Function
Auto Dosing System (ADS)
Child Lock Function
Setting Method
Disabling Beeps
Residual Water Draining Function
This is a function that can change the parameters of a procedure that has not been
performed after a wash starts. Procedures that are being performed and has
already been performed cannot be changed. The Scheduled Procedure cannot be
changed. (this function is unavailable for One Key Smart Select, Spin Dry and
Tub Clean.)
Automatic Addition of Liquid Detergent: The L2 level is enabled by default. You can
also adjust the addition amount according to the water level or laundry soil level.
Automatic Addition of Softener: You can enable the Softener Function only when a
rinse will proceed. The Softener Indicator will be lit constantly after the function is
enabled.
Note: • If the Detergent or Softener Indicator is blinking, it is an alarm prompting you
that you need to add liquid detergent or softener. Pour an appropriate amount of
the liquid detergent or softener through the Liquid Detergent or Softener Addition
Mouth.
• After the proper addition ends, please wipe the surrounding of the Addition Mouth
Cap, put the stopper in place, and close the Addition Mouth Cap.
• The ADS can remember the last addition status.
You can enable the Child Lock Function to avoid injury to a child opening the
Drum Cover of the Washing Machine.
Press the Power Button to turn on the power. Press and hold the Super Soak
Button for more than 3 seconds until the Indicator is lit and you hear a
beep. Repeat the operation to enable it again.
• After the Child Lock is enabled, while a Program is running, no Buttons except the
Power Button will respond.
Cancel Method: Press the Power Button to turn on the power. Press and hold the
Start/Pause Button for more than 4 seconds until you hear a beep. Repeat the
operation to enable beeps.
Enable the Residual Water Draining Function. 9 minutes after the set Program
ends, the Display will show and the Drain Valve will be opened for 30
seconds to drain the residual water in the Machine. Afterward, if there is no
operation for 30 seconds, the power will be cut off automatically. (The Program will
perform this function by default)
• The Residual Water Draining Function is enabled by default. During Residual
Water Draining, no Buttons except the Power Button will respond. After the
Residual Water Draining ends, the power will be cut off automatically without beeps.
• Method to Disable the Residual Water Draining Function: Press the Power Button
to turn on the power. Press and hold the Spin Time Button for more than 4
seconds and the function will be disabled. Repeat the operation to enable the
function.
Note: The Residual Water Draining Function will not work in Programs without
draining and spin-drying.
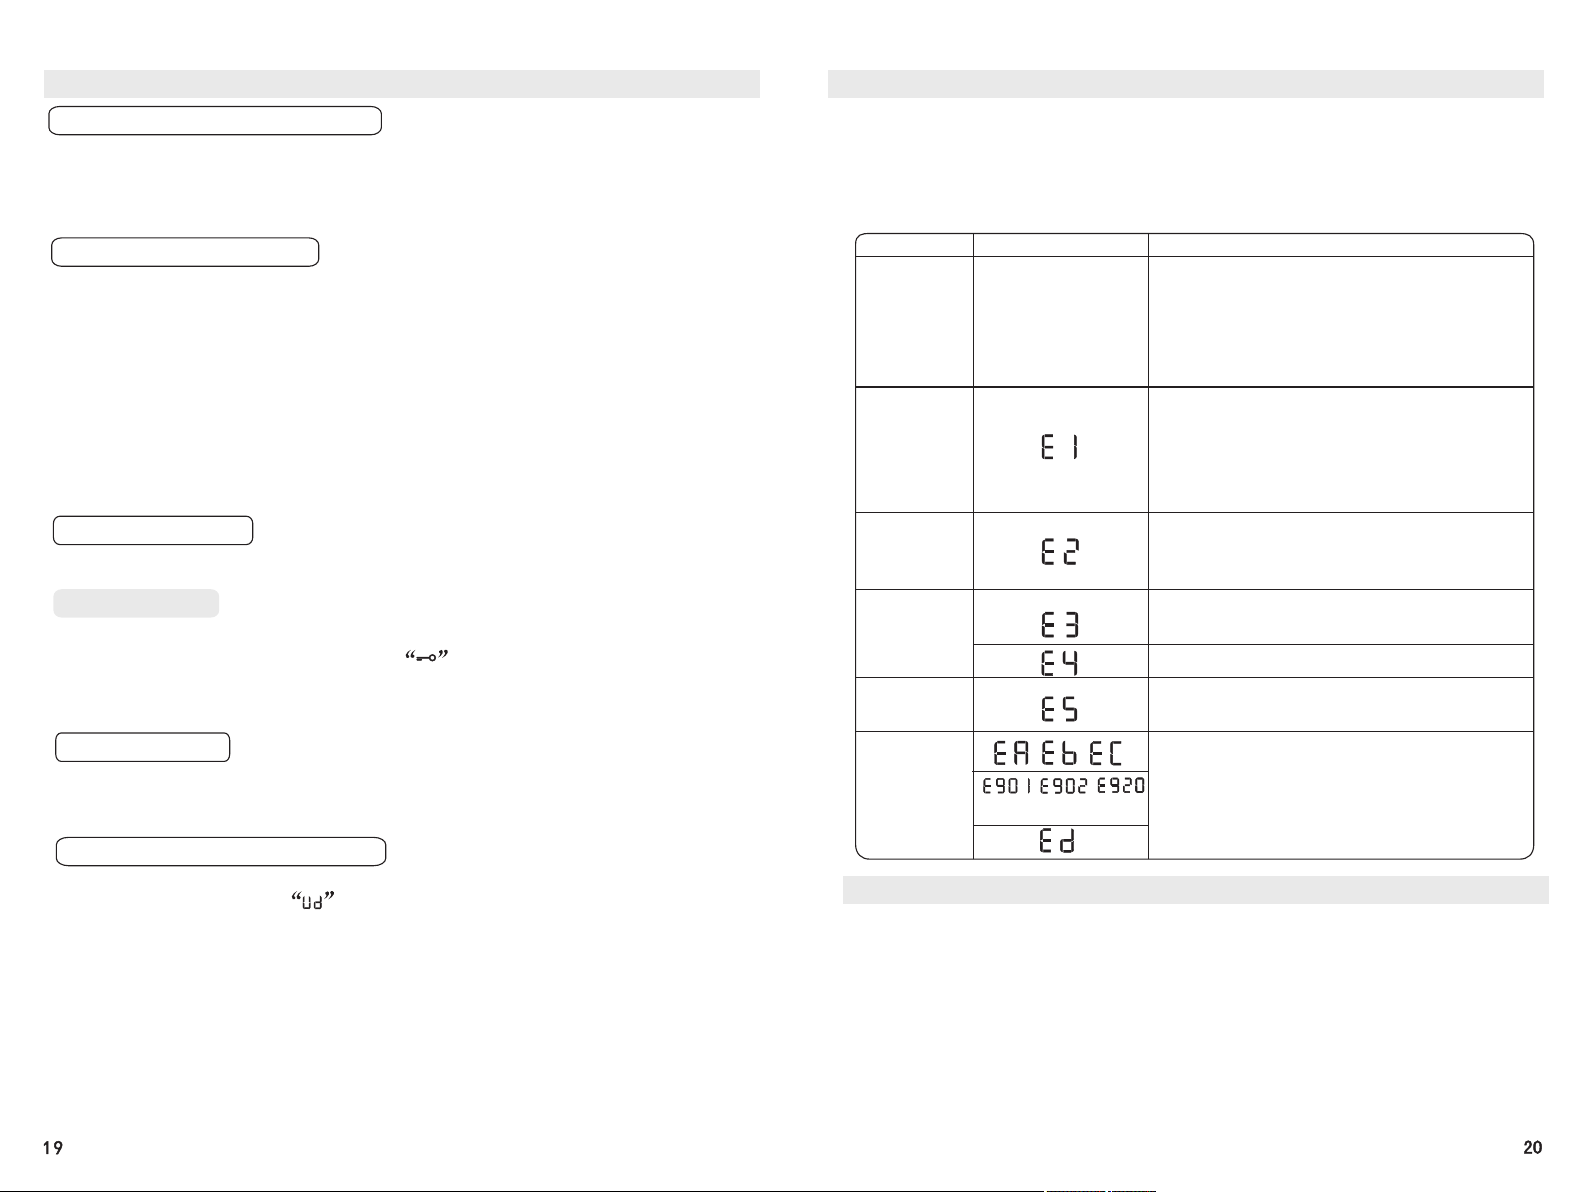
Troubleshooting Guide
When any of the following problems occurs, the Smart Microcontroller will detect
the abnormal status and emit alarming beeps for about 10 seconds, and the Digital
Display will display the following in the Table below.
Notes:
After all the items are checked and addressed, press the Start/Pause Button. If no
fault is displayed, the Washing Machine will resume its running. If there is still any
abnormality, please unplug the Power Cord and call the company’s Customer
Service number as soon as possible.
Fault Type
Fault Displayed
Cause
The washer
does not
work at all
Water does
not flow into
the drum
Water does
not drain out
Washer does
not spin
Wash Failure
Others
etc.
• Is the power connected?
• Has the Start/Pause Button been pressed?
• Is it in a Schedule State?
• Is the power fuse or current circuit breaker
intact ?
• Is there a power failure?
• Is the Faucet turned on?
• Is the Water Inlet Hose or the Screen Lint Filter
of the Water Inlet Valve blocked?
• Has the Water Inlet Hose of the Washing
Machine Water Hose been frozen?
• Is the water pressure too small and the water
addition time too long?
• Is the Drain Hose laid down?
• Is the Drain Mouth in a too high position (of
more than 15cm)?
• Is the Drain Mouth blocked?
• Is the laundry mostly on one side of the
Washing/Spin-drying Drum?
• Is the Washing Machine placed flatly?
Is the washer lid open?
• Is the Child Lock Function enabled?
• Is the washer lid open?
• Please press the Power Button to turn off
the power, unplug the Power Cord Plug,
and call the company’s Customer Service
number as soon as possible.
Non-malfunction Cases
1. Sometimes water is added during a wash or rinse. This is automatic water
replenishment due to a lowered water level.
2. At the beginning of Spin-drying, the drum will stop and start intermittently. This
is intermittent Spin-drying designed to achieve a better Spin-drying effect.
3. During the Spill Rinse, the Drain Hose does not drain water. This is due to the
set water level being too low or the water pressure being too low.
4. Sometimes water is replenished during Spin-drying. This is an automatic
replenishment due to the improper placement of the laundry to be Spin-dried.
5. After the Spin-drying ends, there is the sound of residual water, which is the
sound of the balance liquid that is in the balance ring and designed to reduce
Spin-drying vibration.
6. There was a power failure during operation and the operation cannot be
automatically resumed after the power supply restores. Please set the Machine
again.