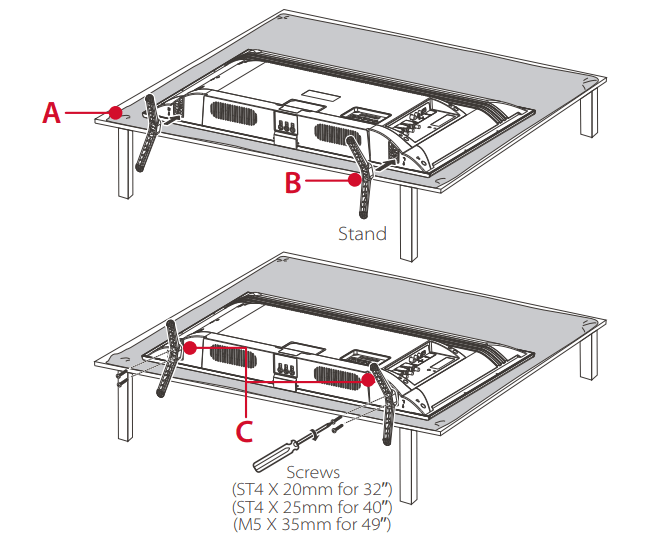
A. To prevent damage to the screen, carefully place your TV on a soft, cushioned surface.
B. Align the base stand with the screw hole located on the TV stand column.
C. Secure the stands to the TV with four (4) screws.
To mount on a wall
If you are mounting your TV to the wall, don’t attach the stands.
To mount your TV to the wall, purchase a VESA wall mount
Models of 32” or 40”
Purchase a VESA 100x100, M4x12 screw
Model of 49”
Purchase a VESA 200x200, M6x16 screw
The VESA number is the horizontal and vertical measurement of the mounting holes. For example, 200X200 refers to the fact that the mounting measurements are 200mm horizontally and 200mm vertically.
Follow the instructions that come with the wall mount.
Your wall mount must be able to bear a minimum of five times the TV’s net weight to avoid causing damage.
Table Stand Placement Safety:
Never place a television set in an unstable location. A television set may fall, causing serious personal injury or death. Many injuries, particularly to children, can be avoided by taking simple precautions such as:
- Using cabinets or stands recommended by the television manufacturer.
- Only using furniture that can safely support the television set.
- Ensuring the television set is not overhanging the edge of the supporting furniture.
- Not placing the television set on tall furniture (for example, cupboards or bookcases) without anchoring both the furniture and the television set to a suitable support.
- Not placing the television set on cloth or other materials that may be located between the television set and supporting furniture.
- Educating children about the dangers of climbing on furniture to reach the television set or its controls.
If your existing television set is being retained and relocated, the same considerations as above should be applied.
Power up
In this step, we’ll make sure all systems are GO!
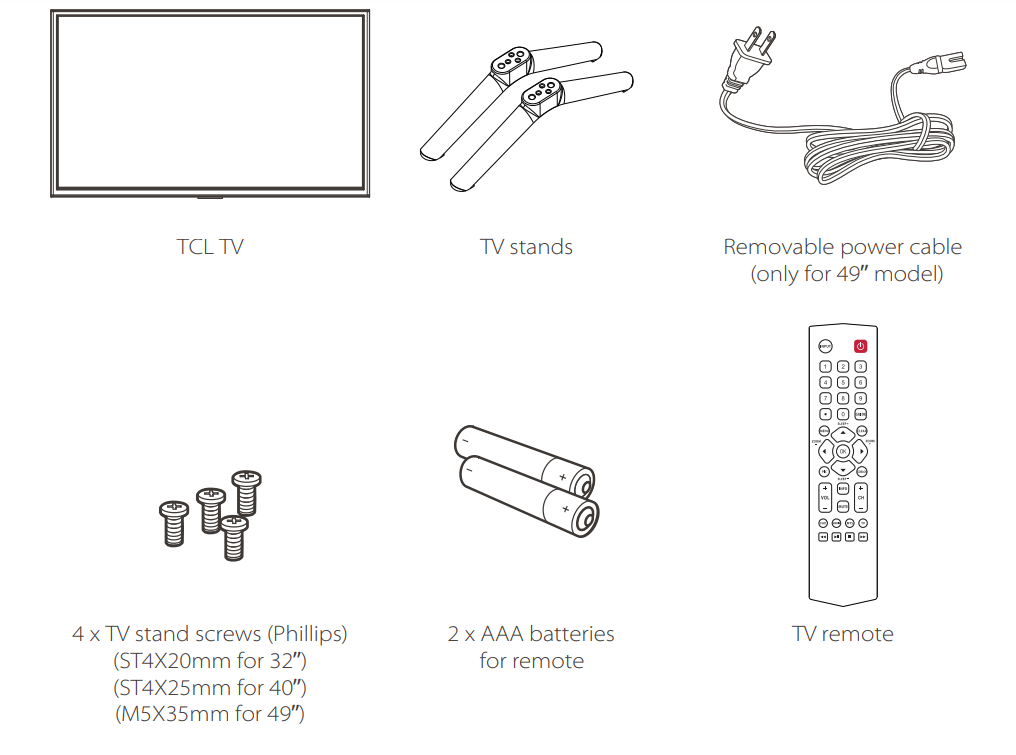
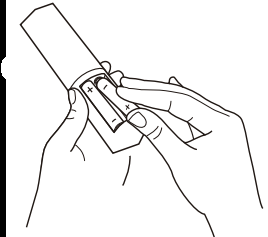
Power your TV remote by inserting the included batteries.
Plug your power cable in to the wall outlet. (connect the power cable to the TV first for 49”)
Connect other devices by referencing port label and descriptions on the bottom of page 6.
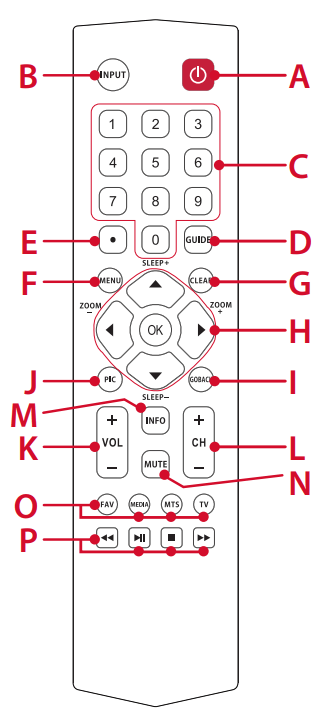
Your remote
Here are some buttons you should know about.
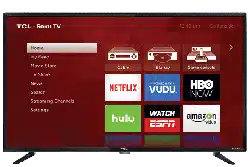
A. POWER Turn TV on and off
B. INPUT Source selection
C. 0-9 Numeric keys for Channel input
D. GUIDE The Electronic Program Guide for digital channels
E. For digital channel input
F. MENU Main menu
G. CLEAR Clear the screen and return to normal viewing
H. OK Adjusts the menu controls
I. GOBACK Return to the previously viewed channel
J. PIC Selects picture mode
K. VOL+/- Volume adjusting
L. CH+/- Channel adjusting
M. INFO Channel information
N. MUTE Turn volume on and off
O. FAV Choose your favorite channel
MEDIA Goes to the USB mode
MTS Press to select your desired sound track
TV Press to access to the TV mode
P. For playing music and photos
Get to know your TV
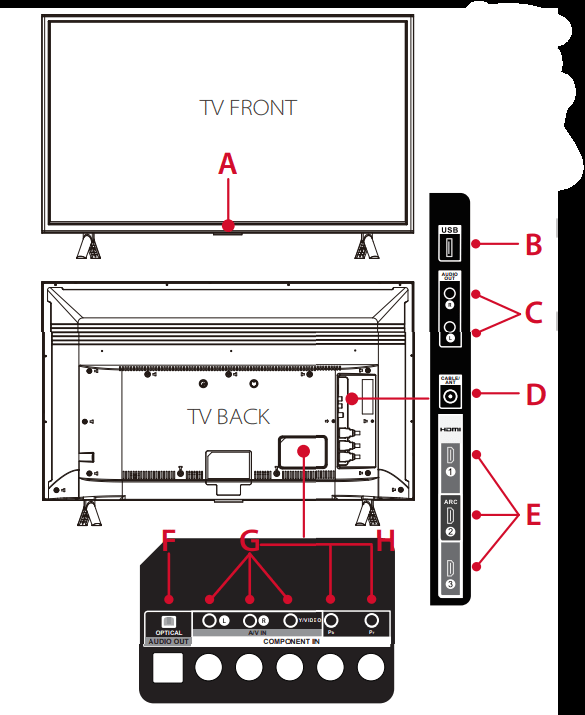
A. STATUS LIGHT Glows when the TV is in standby, flashes when the TV is busy, flashes once with each button press of the remote control.
B. USB PORT Connect a USB device to access photos and music.
C. AUDIO OUT Use an RCA audio cable to connect your TV to a compatible audio receiver.
D. CABLE/ANTENNA IN Connect an outdoor VHF/UHF antenna or Cable TV feed.
E. 3 HDMI® PORTS Highest Quality audio/video connection. Connect cable box, Blu-ray player, gaming console, or other devices to your TV using HDMI cables.
HDMI ARC PORT Connect HDMI ARC (audio return channel) capable audio devices like sound bars or AV receivers.
F. OPTICAL(AUDIO OUT) Connect an optical cable to an external digital audio system.
G. A/V IN If your device isn’t able to connect using HDMI®, connect to your TV using standard red/white/yellow cables.
H. COMPONENT IN If your device isn’t able to connect using HDMI®, connect to your TV using standard green/blue/red/white/red cables.
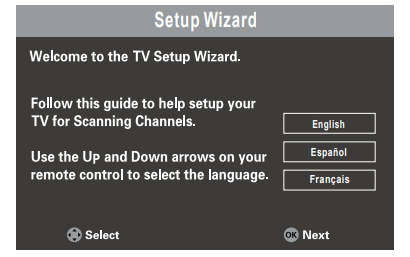
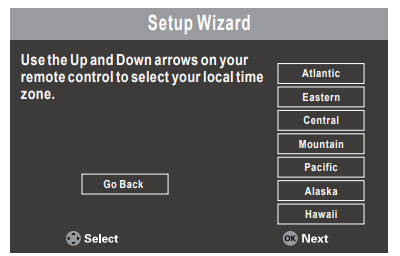
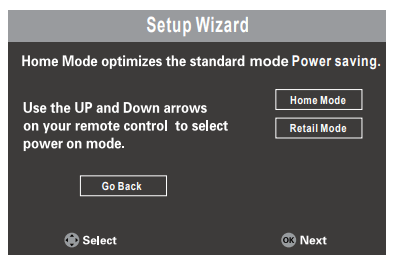
Initial Setup
Use the arrows on the remote to adjust the initial menu.
Select your preferred language for the menu system.
Select your local time zone.
Set the power on mode, Select “ Home Mode” for best viewing and energy efficiency at home.
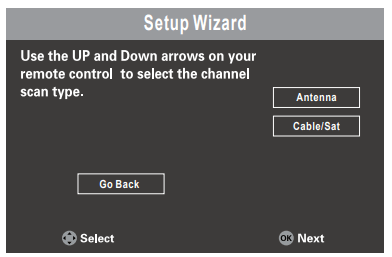
Select either “Antenna” or “Cable/Sat” as the channel scan type.
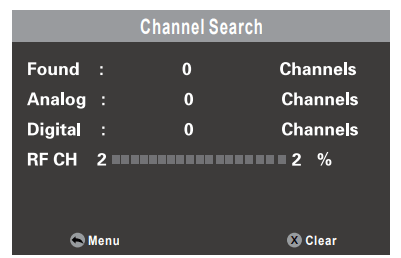
The screen will change to show the progress of the channel scanning process.
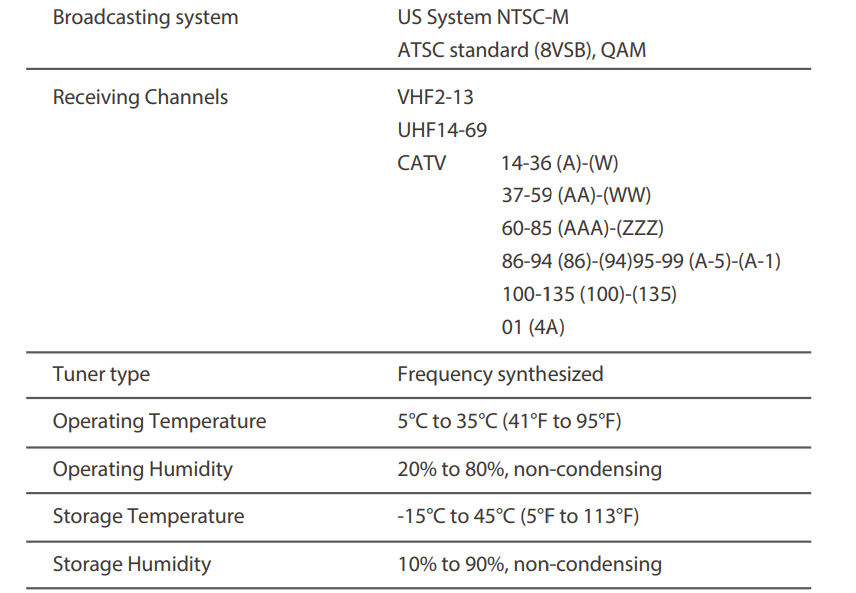
Broadcasting & Operating Environment
Troubleshooting
Having trouble completing the guided setup? Don’t worry, it’s usually an easy fix.
My picture is too small
• Press zoom-/zoom+ button to select picture mode, then select zoom to adjust picture size.
Problems connecting my cable/satellite box or antenna through a coax cable
• For best performance, use the HDMI connection. If not available, then:
• Make sure the cable connections to the TV and your device are securely fastened.
• Select cable/satellite box or antenna TV input.
• Select “start finding channels” and follow the on-screen instructions to perform a full channel scan.
What is the remote code for programming my Universal or Cable/ Satellite box remote control
• Pleade visit tclusa/remotecodes website
The Voice Guidance feature is not working as expected:
• If using a soundbar or external audio device, make sure the TV’s Sound / SPDIF Type option is set to “PCM”.
• To quickly turn the Voice Guidance feature on/off:
Press the Menu button
Press buttons “1”, “2” and “3”
The Voice Guidance turns on or off
Important Safety Instructions
Read these instructions.
Keep these instructions.
Heed all warnings.
Follow all instructions.
Do not use this apparatus near water.
Clean only with dry cloth.
Do not block any ventilation openings. Install in accordance with the manufacturer’s instructions.
Do not install near any heat sources such as radiators, heat registers, stoves, or other apparatus (including amplifiers) that produce heat.
Protect the power cord from being walked on or pinched particularly at plugs, convenience receptacles, and the point where they exit from the apparatus.
Only use attachments/accessories specified by the manufacturer.
Use only with the cart, stand, tripod, bracket, or table specified by the manufacturer, or sold with the apparatus. When a cart is used, use caution when moving the cart/ apparatus combination to avoid injury from tip-over.
Unplug this apparatus during lightning storms or when unused for long periods of time.
Refer all servicing to qualified service personnel. Servicing is required when the apparatus has been damaged in any way, such as power-supply cord or plug is damaged, liquid has been spilled or objects have fallen into the apparatus, the apparatus has been exposed to rain or moisture, does not operate normally, or has been dropped.
For safe operation of the apparatus, observe these installation requirements: Keep at least 2 inches of ventilation space between the rear cover of the apparatus and the wall. Keep at least 1 inch of ventilation space between the apparatus and all other surfaces. Do not allow any of the apparatus’ ventilation openings to be blocked by objects that might obstruct them, such as; newspapers, curtains, table-cloths or any other objects. Do not expose the apparatus to any external heat sources. Do not place any heat sources such as candles, lamps, etc. on the apparatus. Do not expose the device to high levels of humidity or to any possible sources of moisture. When disposing of used batteries from the remote control, consult local regulations regarding proper disposal.
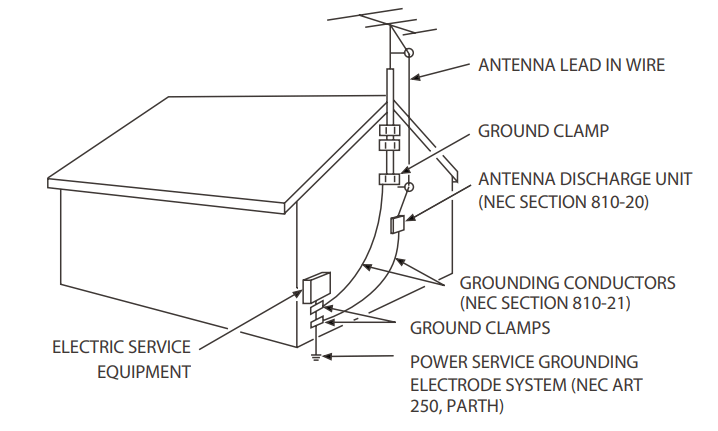
If an outside antenna or cable system is connected to the product, be sure the antenna or cable system is grounded so as to provide some protection against voltage surges and built-up static charges. Section 810 of the National Electrical Code, ANSI/NFPA No. 70-2011 (Section 54 of Canadian Electrical Code, Part 1) provides information with respect to proper grounding of the mast and supporting structure, grounding of the lead in wire to an antenna-discharge unit, size of grounding conductors, location of antenna discharge unit, connection to grounding electrodes, and requirements for the grounding electrode. See following example:
 For digital channel input
 For playing music and photos