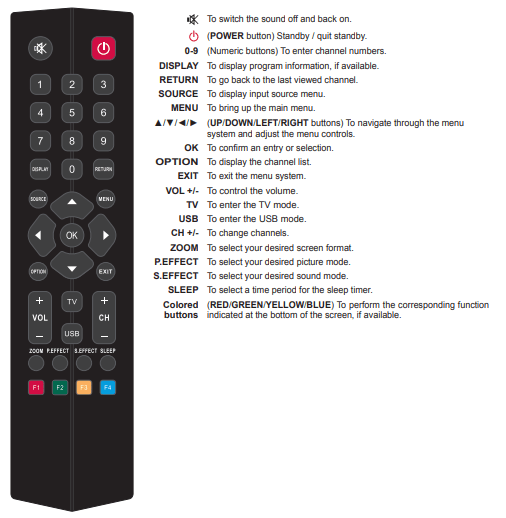
Most of your television's functions are available via the menus that appear on the screen. The remote control supplied with your set can be used to navigate through the menus and to configure all the general settings.
Note: Figures and illustrations in this operation manual are provided for reference only and may differ from actual product appearance.
TV Menu Operations
Using Main Menu
Allows you to access the TV’s main menu and do settings.
1. Press MENU on the remote control to display the main menu.
2. In the menu system, press ◄/► to select Picture, Sound, Channel, Lock or Setup and use ▲/▼ to enter its menu.
3. In each menu, press ▲/▼ to select menu options, then press ◄/► to do the adjustment directly, or press OK or ◄/► to enter the corresponding submenu, if available.
4. Press MENU to return to the previous menu.
5. Press EXIT to close the menu.
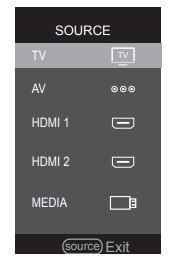
Source
1. Press SOURCE on the remote control to display the source menu.
2. Press ▲/▼ to select your desired source.
3. Press OK to confirm the selection.
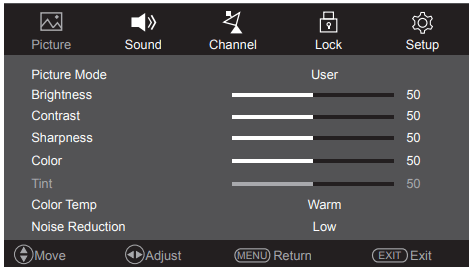
Picture
Press MENU on the remote control, select Picture and press ▲/▼ to enter the picture menu. The Picture options are as follows:
Note: Some options may be not available for certain signal sources.
Picture Mode
Press ◄/► to scroll through the picture mode settings: Standard, Mild, Dynamic and User. When you select User, you can have access to the following five options’ settings.
- Brightness: Press ◄/► to adjust the brightness of the picture.
- Contrast: Press ◄/► to adjust the difference between light and dark areas of the picture.
- Sharpness: Press ◄/► to adjust the crispness of the edges in the picture.
- Color: Press ◄/► to adjust the richness of color.
- Tint: Press ◄/► to adjust the balance between the red and green levels.
Note: This option is only available under NTSC mode.
Color Temp
Adjusts the color temperature of the picture. Press ◄/► to scroll through the color settings: Cool for a more blue palette of picture colors; Medium and Warm for a more red palette of picture colors.
Note: For some models, the Color Temp option is not available.
Noise Reduction
Improves the quality of the picture in the case of poor reception. Press ◄/► to scroll through the list: High, Middle, Low and Off.
Aspect Ratio
Press ◄/► to select the picture size among Auto, 4:3, 16:9, Zoom1 and Zoom2.
Note: The option Just Scan can be available in HDMI or DVI mode.
Backlight
Press ◄/► to adjust the brightness of the backlight to match lighting conditions.
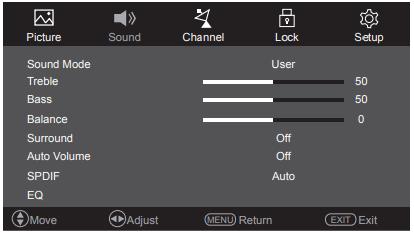
Sound
Press MENU on the remote control, select Sound and press ▲/▼ to enter the sound menu. The Sound options are as follows:
Sound Mode
Press ◄/► to scroll through the sound mode settings: Standard, Movie, Music, Sports and User. When you select User, you can have access to the following two options’ settings.
- Treble: Press ◄/► to adjust the treble level.
- Bass: Press ◄/► to adjust the bass level.
Balance
Press ◄/► to balance the sound between the left and right speakers.
Surround
Press ◄/► to toggle between Off and On.
Auto Volume
Press ◄/► to select On to reduce the annoying blasts in volume during commercial breaks and also amplifies softer sounds in program material. Eliminates the need to constantly adjust the volume.
SPDIF
Selects a proper sound type for your SPDIF output. Press ◄/► to toggle between Auto and PCM.
- If you select Auto, the SPDIF output format is
Dolby Digital when the program’s sound format is Dolby Digital or Dolby Digital Plus or HE-AAC.
PCM when the program’s sound format is MPEG.
- If you select PCM, the SPDIF output format is PCM, regardless of the program’s sound format.
Note: The options you may choose depend on the program you are watching.
EQ
Press OK or ◄/► to enter the submenu. Use ▲/▼ to select an option and press ◄/► to adjust.
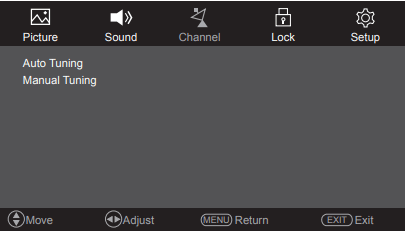
Channel
Press MENU on the remote control, select Channel and press ▲/▼ to enter the channel menu. The Channel options are as follows:
Auto Tuning
Press OK/► to enter the submenu. Press OK/► again to see a confirmation page. Press ◄ to confirm to start your automatic search. The channel search may take a few minutes. During the process, you can press MENU first, and then ◄ to confirm to stop the search halfway.
Manual Tuning
Press OK/► to enter the submenu. You can search channels manually
- Use ◄/► to select a channel number at Current CH.
- Use ◄/► to select a color system at Color System.
- Use ◄/► to select a sound system at Sound System.
- Select Search, then use ◄/► to start searching. When the channel you want is retrieved, it will be saved automatically.
- If the picture is not clear, select Fine-Tune and use ◄/► to fine tune the channel.
- You can also use ◄/► to select On to turn on AFC (automatic frequency control) function at AFC to help get a better signal.
Lock
Press MENU on the remote control, select Lock and press ▲/▼ to enter the lock menu. The Lock options are as follows:
Note: Some options may be not available for certain signal sources.
Lock System
Press ◄/► to select On or Off, but you have to enter the correct password with the numeric buttons first. After you enter the correct password, you can have access to the following two options:
- Set Password: Press OK/► to enter. You can set a new password with the numeric buttons.
Notes:
- The default password is 0000.
- The super password is 8888. If you forget your code, enter the super password to override any existing codes.
- Channel Lock: Press OK/► to enter the submenu.
• Use ▲/▼ to select a channel and press the green button to lock it. A lock icon will appear on the right. To unlock the channel, press the green button again.
• Use ▲/▼ to select a channel and press the blue button to skip it. A skip icon will appear on the right. To unskip the channel, press the blue button again.
Note: When Lock System is set to On, you have to enter the correct password before you start Auto tuning or Manual tuning channels under the Channel menu.
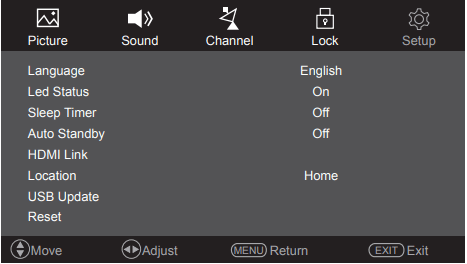
Setup
Press MENU on the remote control, select Setup and press ▲/▼ to enter the setup menu. The Setup options are as follows:
Language
Press ◄/► to select your desired language.
Led Status
Press ◄/► to toggle between On and Off to turn on or off the LED indicator when the TV goes into standby.
Sleep Timer
Press ◄/► to select a period of time after which the TV will go into standby mode. To disable the sleep timer function, select Off.
Auto Standby
Press ◄/► to select a period of time after which the TV will go into standby mode if there is no operation during the time period. To disable the auto standby function, select Off.
HDMI Link
Note: For some models, the HDMI Link option is not available.
Allows you to search for CEC devices connected to the HDMI 2 socket in your TV. Press OK/► to enter the submenu.
- Enable HDMI Link: Use ◄/► to select On or Off to turn on or off HDMI Link function. When the function is enabled, you can do the settings of the following options.
- TV Auto PowerOn: Use ◄/► to select On or Off. Select On to enable the TV to automatically power on when you power on a CEC device (e.g. DVD) with the device’s remote.
- Device Auto Standby: Use ◄/► to select On or Off. Select On to enable all CEC devices to automatically go to the standby mode when you turn off the TV with the TV remote.
- Speaker Preference: Use ◄/► to select Amplifier or TV Speakers as your preferred speaker.
- Amplifier Support ARC: When Amplifier is set as the speaker, this option is available. Use ◄/► to select On or Off to turn on or off ARC function.
Note: The CEC functions depend on the devices connected and it is possible that some devices may not interoperate correctly when connected to this TV. The user manual or the manufacturer of the problematic devices should be consulted for further information.
Location
Press ◄/► to toggle between Home and Shop.
USB Update
Allows you to update the software. Insert the USB stick in which a new version software is stored into a USB socket of the set first and press OK/► to enter. Follow the on-screen instructions to complete the process.
Reset
Press OK/► to reset the TV menus to factory default settings.
Advanced Operations
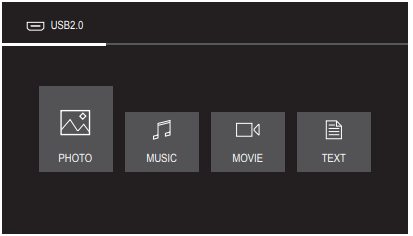
Multimedia
Your TV is fitted with one USB connector that enables you to view pictures, listen to music, watch videos or read texts stored on USB drives.
When a USB device is connected, press SOURCE on the remote control to display the source menu, use ▲/▼ to select Media and press OK to enter. Or press USB on the remote control to enter the USB mode directly. To exit USB mode, press EXIT.
PHOTO
Use this function to display pictures, if available.
1. Use ◄/► to select PHOTO and press OK to confirm. Then select the USB device and press OK again to enter the main file content browser.
2. Use ▲/▼ to select a picture in either main or sub file content browser, press OK to watch, and a slide show begins from the selected picture when Repeat Mode in the Quick Menu is set to All.
3. Press OK to display the console. Use ◄/► to select an option and press OK to confirm. To exit the console, press EXIT.
4. Press EXIT to return to the previous interface.
MUSIC
Use this function to play back music, if available.
1. Use ◄/► to select MUSIC and press OK to confirm. Then select the USB device and press OK again to enter the main file content browser.
2. Use ▲/▼ to select a song in either main or sub file content browser, press OK to play, and automatic playback begins from the selected song.
3. Use ◄/► to select an option on the console and press OK to confirm. You can press the blue button to enter the Audio Only mode and listen to music with the screen turned off. To exit the Audio Only mode, press the blue button again.
4. Press EXIT to return to the previous interface.
MOVIE
Use this function to watch videos, if available.
1. Use ◄/► to select Movie and press OK to confirm. Then select the USB device and press OK again to enter the main file content browser.
2. Use ▲/▼ to select a video in either main or sub file content browser, press OK to watch, and automatic playback begins from the selected video.
3. Press OK to display the console. Use ◄/► to select an option and press OK to confirm. To exit the console, press EXIT.
4. Press EXIT to return to the previous interface.
TEXT
Use this function to read text files.
1. Use ◄/► to select TEXT and press OK to confirm. Then select the USB device and press OK again to enter the main file content browser.
2. Use ▲/▼ to select a file in either main or sub file content browser, press OK to read.
3. Press EXIT to return to the previous interface.
Other Information
Problems & Solutions
Note: Problems & solutions 1 to 2 are for the TV models which have network functions, so users of non-connected TV models can disregard them.
1. Fail to link to the network.
- Check if your TV is connected with the network;
- Reboot your TV;
- Consult your internet service provider, to confirm if access of your router is supported. Refer to the operation manual of your router.
- Make sure your TV is connected to a router, and make sure your router is powered on. Check that your router/modem has an internet connection, and that your Ethernet cables/wireless connection is OK. Test your connection with a computer to make sure it is OK. Should the problem persist, contact customer service.
2. The video could not be played smoothly.
- Videos from your USB flash drive --- It may result from data transmission, or its code flow is far beyond the supported formats of this TV set.
- Videos downloaded from internet, or online videos.
a. It may be caused by the lower bandwidth of your network. A high network speed is required to handle online videos.
b. Peak internet usage times may affect the bandwidth.
c. Check if any other computers on the same network are also operating, as they may be using up bandwidth. Especially if they are downloading or playing on-line videos.
d. The video may not be smooth itself, it is not the problem of your TV or network.
3. When two mobile hard disks are connected with the TV at the same time, they will not be recognized some times.
- All mobile hard disks consume a lot of power, which may result in power supply problems. We recommend inserting only one hard disk, or a low power consumption mobile hard disk.
4. The video from a mobile hard disk (USB) is playing with no sound.
- The audio format of the video in your mobile hard disk is not supported by the TV player.
5. Some videos fail to play.
- The formats of the videos may not be supported by the TV, especially videos shot by certain kinds of cameras, generally with their private protocol of formats, which are not compatible with your TV.
6. Video stops playing midway.
- Mistakes may occur when videos are copied or compressed, so they may automatically stop playing during playback.
7. What should I pay attention to, when I do SW updating?
- No power cuts when SW updating;
- Avoid any operations with your remote control when SW updating;
- Depending on your internet connection speed, the software updating process may take some time.
8. There are no distinct changes of TV interface after SW updating.
- Under certain conditions, SW updating may not only update or add new functions but also improve the performance of the TV set, without distinct changes to the user interface. Also, there may be no changes to the user interface at all.
9. External device cannot be recognized.
- Some external devices (e.g. webcam, smart phone, tablet, game handle, and external wireless adapter) may not be compatible with the TV and cannot be supported for certain functions (nScreen, wireless display, gesture control, face recognition, if any). Please try a similar device. If it does not work, contact your local dealer.
Troubleshooting
Most problems you encounter with your TV can be corrected by consulting the following troubleshooting list.
No picture, no sound
Check if the fuse or circuit breaker is working.
Plug another electrical device into the outlet to make sure it is working or turned on.
Power plug is in a bad contact with the outlet.
Check the signal source.
No color
Change the color system.
Adjust the saturation.
Try another channel. Black-white program may be received.
Remote control does not work
Change the batteries.
Batteries are not installed correctly.
No picture, normal sound
Adjust the brightness and contrast.
Broadcasting failure may happen.
Normal picture, no sound
Press the VOLUME UP button to increase volume.
Volume is set to mute, press the MUTE button to restore sound.
Change the sound system.
Broadcasting failure may happen.
Unorderly ripples on the picture
It is usually caused by local interference, such as cars, daylight lamps and hair driers. Adjust the antenna to minimize the interference.
Snowy dots and interference
If the antenna is located in the fringe area of a television signal where the signal is weak, the picture may be marred by dots. When the signal is extremely weak, it may be necessary to install a special antenna to improve the reception.
Adjust the position and orientation of the indoor/ outdoor antenna.
Check the connection of antenna.
Fine tune the channel.
Try another channel. Broadcasting failure may happen.
Ignition
Black spots or horizontal streaks appear, or the picture flutters or drifts. This is usually caused by interference from car ignition system, neon lamps, electric drills, or other electrical appliance.
Ghost
Ghosts are caused by the television signal following two paths. One is the direct path, the other is reflected from tall buildings, hills, or other objects. Changing the direction or position of the antenna may improve the reception.
Radio frequency interference
This interference produces moving ripples or diagonal streaks, and in some case, loss of contrast in the picture. Find out and remove the radio interference source.
* To bring you better visual experience, please remove all labels from TV front panel and screen before use.
Q: Why my tcl 40D3000F not showing picture when I turned it on and I'm using for 4years now.I turned it o and we watched for a week and the next day l struggled with every fixed videos on YouTube to turn it back on but it didn't what's wrong with it?can you help me? Reply
Q: I have a refurbished model with a 90 day warranty. Its working ok but when I turn it on the start screen doesnt show the menu with Apps, Youtube etc. Should I do a factory reset?