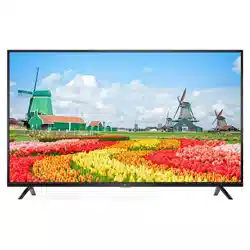
TCL L40D2700F Full HD LED TV
Product's Documents
Below are documents related to this product, you can read online or download:
- Owner's manual - (English) Read Online | Download pdf
User Manual TCL L40D2700F Full HD LED TV
Follow the instructions on this page on how to switch on your TV set and the remote control before going on to following pages describing how to use the channel set-up procedure.
1. Insert two AAA batteries in the remote control.
Precautions on using batteries:
2. Connect the power cable FIRST to the television, THEN to a mains socket. (Note: If the power cable is connected to the television, please only connect the power cable to the mains socket.)
Your TV set should only be connected to an AC supply. It must not be connected to a DC supply. If the plug is detached from the cable, do not, under any circumstances, connect it to a mains socket, as there is a risk of electric shock.
Note: The figures are for representation only. The location of the power socket at the back of the television might differ depending on the model.
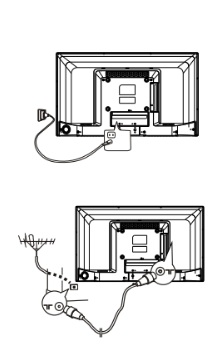
3. Connect an outside aerial to the ANTENNA IN socket at the back of the TV set.
The aerial socket (75 OHM - VHF / UHF / cable) can be used for connecting an external aerial or other equipment fitted.
4. When powered on, the TV will be turned on directly or be in standby.
Note: For some models, switch the TV on by pressing the power button.
If the power indicator lights up, the TV set is in standby mode. Press the button on the remote control or on the TV set to turn on the TV.
The following instructions will introduce how to access and operate the main menu of the TV. Please note that some function might be unavailable in certain input source.
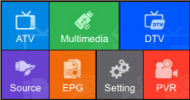
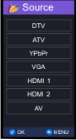
Display the menu by pressing the Menu button. Press the down,left or right direction button to select the Source icon and press the OK button to enter the Source menu.
Note: ATV and DTV icon in Main Menu is the same function with ATV and DTV in Source Menu.
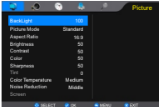
Display the menu by pressing the Menu button. Press the down,left or right direction button to select the Setting icon and press the OK button to enter the Setting menu. left or right direction button to select :Picture,Sound,Time, Option,Channel.
Note: Some options may be not available for certain signal sources.
Back Light: this option can be used to adjust the brightness of the backlight, depending on room lighting. Use the left or right direction button to adjust.
Picture Mode: use the right direction or OK button to enter the selectable options, then press the up or down direction button to scroll through the picture preset settings: Standard, Dynamic, Mild or User, and press the right direction or OK to confirm.
Note: When selecting Standard, Dynamic, Mild, the Back Light will restore to the defaulted setting in factory. You are recommended to use the Brightness for vivid palette.
Aspect Ratio: Selects the picture scale. This options
Include: Auto, 4:3, 16:9, Zoom1, Zoom2, Panorama.
Brightness: adjusts the brightness of the picture.
Contrast: adjusts the difference between the light and dark areas of the picture.
Color: adjusts the richness of color.
Sharpness: adjusts the crispness of the edges in the picture.
Tint: adjusts the balance between the red and green levels.
Note: Tint is available to be adjusted only when the system of the video signal is NTSC.
Color Temperature: adjusts the color temperature of the picture. options include Cool, Medium and Warm. Cool is for a more blue palette of picture colors; Warm is for a more red palette of picture colors; medium is between the two.
Noise Reduction: options include: Off, Low, Middle and High.
Screen: This function is only available in VGA mode.
Press Menu to return or Exit to close the menu.
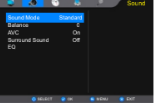
The SOUND menu allows you to adjust each option for your listening pleasure.
Sound Mode: options include User, Standard, Music, Movie and Sports.
Balance: adjusts the volume between the left and right speaker. Sets to “0 ”in the normal condition.
AVC: options include Off and On.
Surround Sound: options include Off and Surround.
EQ: adjusts the audio frequency settings.
Using this function you may know the following programme.
Reminder Setting
Using this function, you will not forget to watch the programme you desire.
Allows you to record your favorite programme so that you will not miss the favorite part even if you go out.. If you go out, you may set the time that programme will play, then add it in the schedule list, at that time, it will start to record automatically. But, before that ,need to set the turnon timer for the TV.
Record the Programme
Allows you to perform scheduled recoding and reminding.
Attention
1. Some non-standard mobile storage devices maybe cannot be recognized. Please change to use the standard device.
1. Under the following conditions, this system cannot decode the file and the file cannot be play normally:
2. Hot plug: Do not disconnection when the system is reading or transmitting data, avoid damaging the system or the device.
4. The system supports standard USB1.1 and USB2.0 devices, such as standard U-disks, MP3 players, mobile hard disks, etc..
5. For obtaining better audio and video quality, suggests to use the external device which accords with USB2.0 standard.
6. Connecting two USB hard disk devices USB hard disk and one U-disk simultaneously can cause to slow the speed of reading or other problems, suggests to connect two U disk or one USB hard disk and one U-disk simultaneously.
7. When playing the video with high compression ratio, these phenomenons, such as picture standstill and menu long time response, are normal.
8. For some USB device with power supply, such as large size hard disk, MP4, etc., Suggests using it with power to avoid electric power shortage.
Most problems you encounter with your TV can be corrected by consulting the following troubleshooting list.
No picture, no sound
No color
Remote control does not work
No picture, normal sound
Normal picture, no sound
Unorderly ripples on the picture
It is usually caused by local interference, such as cars, daylight lamps and hair driers. Adjust the antenna to minimize the interference.
Blank screen in VGA mode
Perhaps the TV can not recognize the resolution set by the PC. Suggest to change to the best resolution or other standard resolutions of the Windows system.
Snowy dots and interference
If the antenna is located in the fringe area of a television signal where the signal is weak, the picture may be marred by dots. When the signal is extremely weak, it may be necessary to install a special antenna to improve the reception.
Ignition
Black spots or horizontal streaks appear, or the picture flutters or drifts. This is usually caused by interference from car ignition system, neon lamps, electric drills, or other electrical appliance.
Ghost
Ghosts are caused by the television signal following two paths. One is the direct path, the other is reflected from tall buildings, hills, or other objects. Changing the direction or position of the antenna may improve the reception.
Radio frequency interference
This interference produces moving ripples or diagonal streaks, and in some case, loss of contrast in the picture. Find out and remove the radio interference source.
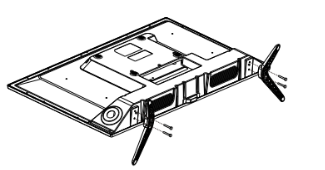
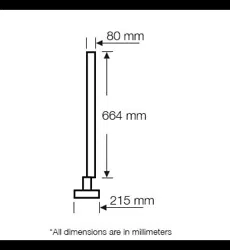
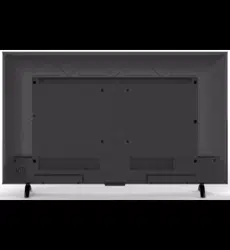
To fix the double support base on the unit by screws, the installation is completed.