Congratulations on your purchase. Use this instruction manual to learn about the great features of your Ninja Chef blender. From assembly to use to maintenance, you will find it all in here.
There are a variety of accessories that are compatible with this blender series.
NOTE: The top flap of your box shows the select accessories that are included with your model.
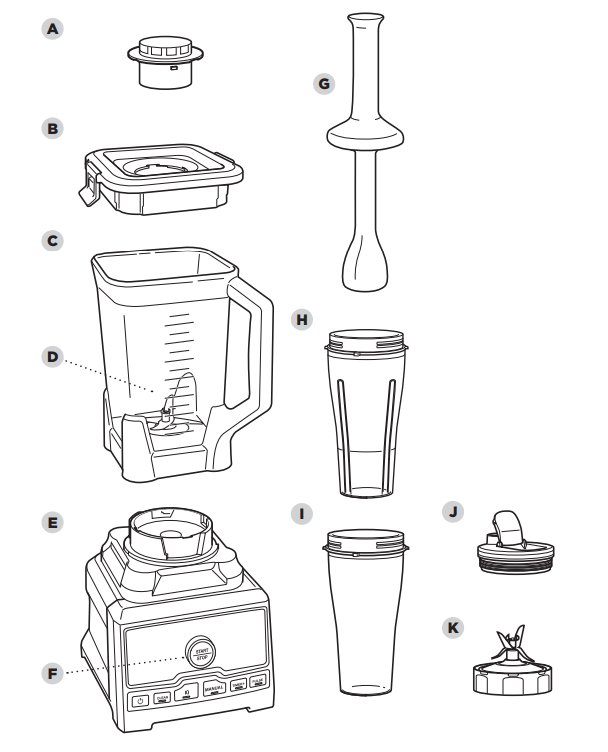
MAIN UNIT
AVAILABLE ACCESSORIES
A Lid Cap
H 24 oz. Double-Walled To-Go Tumbler
B Pitcher Lid
I 24 oz. Single-Serve Cup
C 72 oz. Pitcher*
J Spout Lid
D Bottom Blades
K Pro Extractor Blades® Assembly
E Motor Base
F Activation Dial
G Tamper
FEATURES
IMPORTANT: Review all warnings on pages 3-6 before proceeding.
DID YOU KNOW?
All containers and lids are BPA free.
All blades, containers, and lids are dishwasher safe.
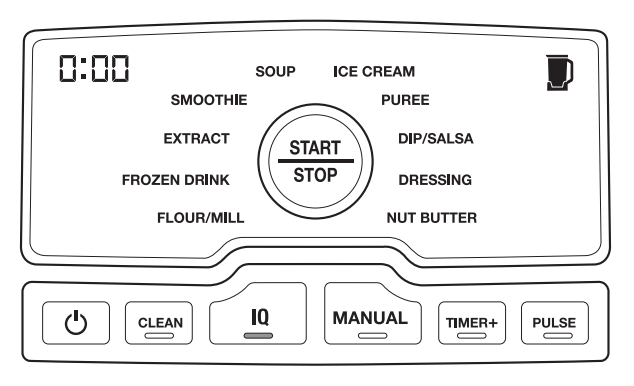
MODES:
CLEAN
To run the self-cleaning program, first add warm water to the CLEAN line and a couple drops of dishwashing soap to the pitcher. Select CLEAN mode, then press START/STOP to begin. The unit will shut down when the cleaning cycle is complete. Once complete, thoroughly rinse and air-dry the pitcher.
iQ
These 10 pre-set programs combine a unique set of pulsing, pausing, and blending patterns to take the guesswork out of making meals and drinks. The speed changes and pauses are designed to provide consistent, delicious results every time at the touch of a button.
MANUAL
The activation dial gives you total control over blending speed. By turning the dial while in MANUAL mode, you can vary blending speed from 1 (slowest) to 10 (highest).
TIMER+
Use TIMER+ mode to set a countdown timer. Select TIMER+ and add blend time in 10-second intervals by repeatedly pressing the TIMER+ button. Set the speed by turning the dial to the desired setting. Press START/STOP to activate the unit. Blending will stop automatically when countdown is complete.
PULSE
Select PULSE and turn the dial to the desired speed. Press the START/STOP button in short bursts to pulse. The unit will blend only while the button is pressed.
1 Remove all packaging materials from the unit. Exercise caution when handling the pitcher, as bottom blade assembly is sharp.
2 If included with your model, handle the Pro Extractor Blades® Assembly by grasping around the perimeter of the blade assembly base.
3 Wash containers, lids, blade assemblies, and tamper in warm, soapy water using a dishwashing utensil with a handle to avoid direct contact with the blades. The pitcher and the Single-Serve Cup can be cleaned automatically by running the self-cleaning cycle (see instructions on page 19). Exercise care when cleaning the blade assemblies, as the blades are sharp.
4 Thoroughly rinse and air-dry all parts.
5 All attachments are dishwasher safe. It is recommended that the lids and tamper be placed on the top rack of the dishwasher.
6 Wipe the motor base with a clean, damp cloth.
USING YOUR 72 OZ. PITCHER
IMPORTANT: Review all warnings on pages 3-6 before proceeding.
IMPORTANT: Hot ingredients are meant only for blending in the pitcher, NOT in the cup.
TIP: To learn more about the unit's programs, refer to page 9.
TIP: Use the lid cap to easily add oil to emulsify dressings. Add desired measurement of oil to the cap, then pour into the pitcher through the hole in the lid. Replace cap when finished.
1 Plug in motor base and place on a clean, dry, level surface such as a countertop or table. Press downward on the motor base to adhere the suction cups to the work surface. Ensure the motor base is connected to power.
2 Lower the pitcher onto the motor base. The pitcher can be installed in two different orientations. The handle can be aligned on either the right side or the front of the motor base. The pitcher should be oriented so the LOCK symbols are visible on the motor base. Then rotate the pitcher clockwise until it clicks into place.
3Add ingredients to the pitcher, making sure not to exceed the MAX LIQUID line on the side of the pitcher. When blending any room temperature, cold, or freezing ingredients, such as beverages or smoothies, DO NOT exceed the MAX LIQUID line on the side of the pitcher. When blending hot ingredients, such as soups and sauces, NEVER exceed the MAX HOT LIQUID line.
4Place lid onto pitcher, then press down firmly, making sure that both side clips on lid fully snap onto lip of pitcher. Insert the lid cap into the lid and turn clockwise to lock. When the unit is connected to power and the pitcher is correctly locked onto the motor base, the unit is ready to be powered on.
IMPORTANT: Review all warnings on pages 3-6 before proceeding.
IMPORTANT: As a safety feature, if the pitcher is not properly installed, a flashing “JAR” message will appear on the control panel. If this happens, repeat step 2 on page 11. When the pitcher is properly installed, the power light will flash and the mode light will illuminate steadily, indicating the unit is ready for use.
TIP: If unmixed ingredients are sticking to the pitcher, remove lid cap and insert tamper through the hole in the lid. Use tamper to push ingredients closer to the blades. When used correctly, the tamper will not contact the blades. Remove tamper when finished and replace the lid cap.
NOTE: Press the power button to turn the unit on. The button will flash when vessel is assembled and ready to use. Press the power button to turn the unit off when finished.
5 AUTO-iQ® MODE
To begin, press the button. The unit will automatically default to Auto-iQ mode and the power button will flash, indicating the unit is ready to operate. To use an Auto-iQ program, turn the dial to your desired program and press START/STOP to begin. The Auto-iQ program will automatically stop when complete.
6 MANUAL MODE
To switch to Manual mode, select MANUAL. To choose a blending speed, turn the dial to the desired speed. As you turn the dial, the control panel will display the speed level in the upper left corner. Press START/STOP to begin. During blending, turn the dial clockwise to increase speed and counterclockwise to decrease speed.
If desired, or if ingredients are not blending properly, use the tamper to help push ingredients towards the blades. When ingredients have reached the desired consistency, press the START/STOP button on the dial. Be sure to wait for the unit to come to a complete stop before removing the pitcher from the base or the lid from the pitcher.
7 To remove the pitcher from the motor base, turn the pitcher counterclockwise and then lift it off the motor base.
8To remove the lid, pull up one of the side tabs, then lift off the lid. The pitcher can then be emptied.
If hot ingredients were blended, place the pitcher on a flat surface, carefully hold the pitcher handle, and remove the lid. Exercise caution when pouring ingredients to prevent possible burns.
For units that include the Double-Walled To-Go Tumbler, pour your finished blended drink into the cup and twist the Spout Lid onto the cup to take your drink on the go.
9When finished, unplug the unit and release the motor base from the work surface. To release the motor base, place your hands underneath it and gently pull it toward you. Refer to page 19 for storing instructions.
USING YOUR SINGLE-SERVE CUPS
IMPORTANT: Review all warnings on pages 3-6 before proceeding.
WARNING: DO NOT blend hot ingredients in the cup. Doing so may cause excessive pressure buildup, resulting in the risk of the user being burned. Hot blending is meant for the pitcher only.
NOTE: The Single-Serve Cup may not be included with your blender model. Please view the top flap of the box to see which accessories are included with your unit.
1Place the unplugged motor base on a clean, dry, and level surface such as a countertop or table. Press downward on the motor base to adhere the suction cups to the work surface. Ensure the motor base is connected to power.
2Add ingredients to the Single-Serve Cup. DO NOT add ingredients past the MAX LIQUID line on the cup.
3Place Pro Extractor Blades® Assembly on top of cup and rotate clockwise until sealed tightly.
4Turn the Single-Serve Cup upside down and install onto the motor base. Align the tabs on the cup with the slots on the base, then rotate cup clockwise until it clicks into place.
IMPORTANT: Review all warnings on pages 3-6 before proceeding.
IMPORTANT: As a safety feature, the timer will flash “JAR” and the motor will be disabled if the cup is not properly installed. If this happens, repeat step 4 on page 16. When the cup is properly installed, the power light will flash and the mode light will illuminate steadily, indicating the unit is ready for use.
NOTE: Press the power button to turn the unit on. The button will flash when vessel is assembled and ready to use. Press the power button to turn the unit off when finished.
5 AUTO-iQ® MODE
To begin, press the button. The unit will automatically default to Auto-iQ mode and the power button will flash, indicating the unit is ready to operate. To use an Auto-iQ program, turn the dial to your desired program and press START/STOP to begin. The Auto-iQ program will automatically stop when complete.
6MANUAL MODE
To switch to Manual mode, select MANUAL. To choose a blending speed, turn the dial to the desired speed. As you turn the dial, the control panel will display the speed level in the upper left corner. Press START/STOP to begin. During blending, turn the dial clockwise to increase speed and counterclockwise to decrease speed.
When ingredients have reached the desired consistency, press the START/STOP button on the dial. Be sure to wait for the unit to come to a complete stop before removing the cup from the base.
7 To remove the cup from the motor base, turn the cup counterclockwise and then lift it off the motor base.
8 Remove the Pro Extractor Blades® Assembly by twisting it counterclockwise. Exercise care when handling the blade assembly, as the blades are sharp. DO NOT store blended contents with the Pro Extractor Blades Assembly attached.
9 To enjoy your drink on the go, place the Spout Lid onto the Single-Serve Cup and twist clockwise until firmly sealed. For storage in the cup, use only Spout Lid to cover.
10 Unplug the appliance when finished and release the motor base from the work surface. To release the motor base, place your hands underneath it and gently pull it toward you. Refer to page 19 for storing instructions.
CARE & MAINTENANCE
CLEANING
1 Separate all parts.
2 Hand-Washing
Wash containers, blade assemblies, lids, and tamper in warm, soapy water, using a dishwashing utensil with a handle to avoid direct contact with the blades. Exercise care when washing Pro-Extractor Blades® Assembly and pitcher, as the blade assemblies are sharp. Thoroughly rinse and air-dry all parts.
Dishwasher
The tamper and all containers, lids, and blade assemblies are dishwasher safe. It is recommended that the tamper and lids be placed on the top rack of the dishwasher. Exercise care when handling pitcher and Pro Extractor Blades assembly, as the blade assemblies are sharp.
Using Clean Mode To run the self-cleaning program with the pitcher, first add warm water to the MAX CLEAN line and a couple drops of dishwashing soap to the pitcher. Secure the pitcher lid and lid cap in place. Select CLEAN mode, then press START/STOP to begin. The unit will shut down when the selfcleaning cycle is complete. Make sure to thoroughly rinse and air-dry the pitcher. When using CLEAN mode for the blender cup, fill the cup halfway with warm water and add one drop of dishwashing soap.
Motor Base
Turn off the unit and unplug the motor base before cleaning. Wipe motor base with a clean, damp cloth.
Clean the control panel with a soft cloth, such as microfiber, to prevent scratching. To remove residue from the control panel, you may use an all-purpose cleaner.
NEVER directly spray the base or control panel with water or other liquids.
DO NOT use abrasive cloths/pads/brushes to clean the base or control panel, as this can dull or scratch the surface.
STORING
Store the unit upright with the lid on the pitcher. DO NOT store blended or unblended ingredients in the Single-Serve Cup with the Pro Extractor Blades assembly attached.
DO NOT stack items on top of the containers. Store any remaining attachments alongside the unit or in a cabinet where they will not be damaged or create a hazard.
RESETTING THE MOTOR THERMOSTAT
This unit features a unique safety system that prevents damage to the motor and drive system should you inadvertently overload the unit. If the unit is overloaded, the motor will be temporarily disabled, and the control panel will not function when modes are pressed. Should this occur, follow the reset procedure below.
1 Unplug the unit from the electrical outlet.
2 Allow the unit to cool for approximately 15 minutes.
3 Remove the pitcher lid. Empty the pitcher and ensure no ingredients are jamming the blade assembly.
4 Return the pitcher to the motor base.
IMPORTANT: Ensure that maximum capacities are not exceeded. This is the most typical cause of appliance overload.
If your unit needs servicing, please call Customer Service at 1-877-646-5288.
ORDERING REPLACEMENT PARTS
To order additional parts and attachments, please visit ninjaaccessories.com or contact Customer Service at 1-877-646-5288.
TROUBLESHOOTING GUIDE
WARNING: To reduce the risk of shock and unintended operation, turn off power and unplug unit before troubleshooting.
Motor does not start or blade assembly does not rotate.
Make sure the pitcher or blender cup is securely placed on motor base. If “JAR” message appears on control panel, the pitcher or cup is not installed correctly.
The unit is turned off. Press the power button (6) to turn on.
Check that the plug is securely inserted into the electrical outlet.
Check the fuse or circuit breaker.
The unit may have overloaded or overheated. The unit will stop and the control panel will not function when modes are pressed. Unplug and wait approximately 15 minutes before using again.
Food is chopped too fine or is too watery.
The food has been over-processed. Use PULSE mode for controlled processing.
Food collects on lid or on the sides of the pitcher.
The mixture is too thick. Add more liquid or use the tamper to help push the ingredients toward the blades.
You cannot create snow from solid ice.
DO NOT use ice that has been sitting out or has started to melt. Use ice straight from the freezer.
Start with a few pulses and then go to a continuous blending cycle.
For best results, use the tamper to push the ice down toward the blades.
Motor base won’t stick to counter or tabletop.
Make sure surface and suction feet are wiped clean. Suction feet will only stick to smooth surfaces. Suction feet WILL NOT stick on some surfaces such as wood, tile, and non-polished finishes.
DO NOT attempt to use appliance when the motor base is stuck to a surface that is not secure (cutting board, platter, plates, etc.)
You get a blinking “JAR” message.
The container is not installed properly. For your safety, the unit will only be able to be turned on when it is properly assembled. Please refer to the assembly pages of this instruction manual for assistance.
Why can’t I run the CLEAN program twice?
CLEAN mode is intended to be used as a single cycle. The unit will lock the user out from running back-to-back CLEAN mode cycles. If container is not completely clean after the CLEAN cycle is complete, please follow hand-washing or dishwasher instructions above.


 to turn the unit on. The button will flash when vessel is assembled and ready to use. Press the power button
 button. The unit will automatically default to Auto-iQ mode and the power button will flash, indicating the unit is ready to operate. To use an Auto-iQ program, turn the dial to your desired program and press START/STOP to begin. The Auto-iQ program will automatically stop when complete.