After setting up your computer as illustrated in the Setup Guide, let us show you around your new Acer computer.
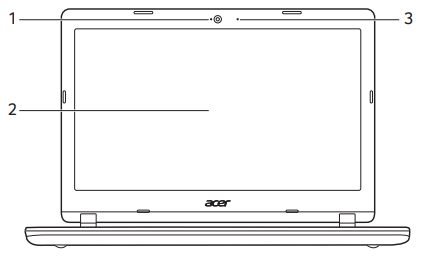
Screen view
#
Icon
Item
Description
1
Webcam
Web camera for video communication.
A light next to the webcam indicates that the webcam is active.
2
Screen with lay-flat hinge
Displays computer output.
3
Microphone
Internal digital microphone for sound recording.
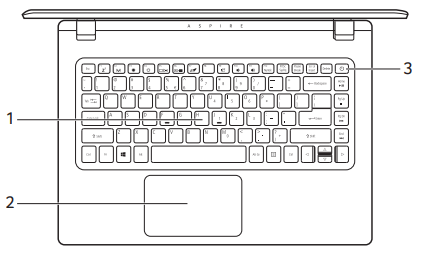
Keyboard view
#
Icon
Item
Description
1
Keyboard
For entering data into your computer. See "Using the keyboard" on page 13.
2
Touchpad
Touch-sensitive pointing device. The touchpad and selection buttons form a single surface.
Press down firmly on the touchpad surface to perform a left click.
Press down firmly on the lower right corner to perform a right click.
3
Power button
Turns the computer on and off.
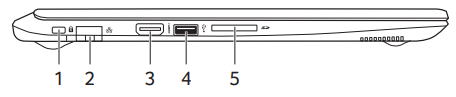
Left view
#
Icon
Item
Description
1
Kensington lock slot
Connects to a Kensington-compatible security lock.
2
Ethernet (RJ-45) port
Connects to an Ethernet 10/100/ 1000-based network.
Pull the lip down to open the port fully.
3
HDMI port
Supports high-definition digital video connections.
4
USB ports
Connect to USB devices.
5
SD card reader
Accepts one Secure Digital (SD, SDHC or SDXC) card.
Only one card can operate at a time.
USB 3.0 information
• USB 3.0 compatible ports are blue.
• Compatible with USB 3.0 and earlier devices.
• For optimal performance, use USB 3.0-certified devices.
• Defined by the USB 3.0 specification (SuperSpeed USB).
Right view
#
Icon
Item
Description
1
Headset/ speaker jack
Connects to audio devices (e.g., speakers, headphones) or a headset with microphone.
2
USB port
Connects to USB devices.
3
Power indicator
Indicates the computer’s power status.
Battery indicator
Indicates the computer’s battery status.
Charging: The light shows amber when the battery is charging.
Fully charged: The light shows blue when in AC mode.
4
DC-in jack
Connects to an AC adapter.
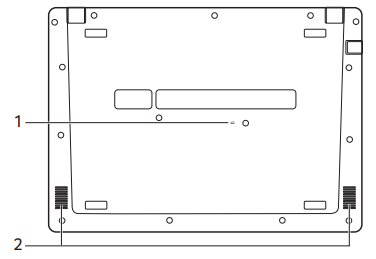
Base view (A114-32)
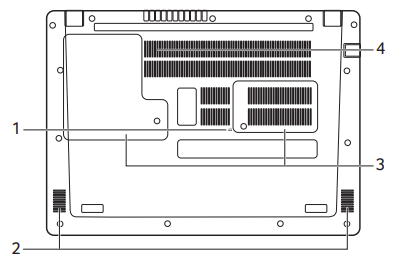
Base view (A314-32)
#
Icon
Item
Description
1
Battery reset pinhole
Simulates removing and reinstalling the battery.
Insert a paperclip into the hole and press for four seconds.
2
Speakers
Deliver stereo audio output.
3
Main storage compartment
Houses the computer’s main storage.
You may upgrade your computer’s main storage. Acer recommends asking an approved service center to do this.
Memory compartment
Houses the computer’s memory.
You may upgrade your computer’s mmemory. Acer recommends asking an approved service center to do this.
4
Ventilation and cooling fan
Allows the computer to stay cool.
Do not cover or obstruct the openings.
RECOVERY
If you are having trouble with your computer, and the frequently asked questions (see Got a question? on page 51) do not help, you can recover your computer.
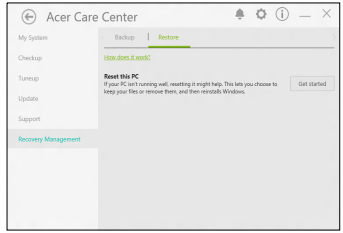
This section describes the recovery tools available on your computer. Acer provides Acer Care Center, which allows you to reset your PC, refresh your PC, or create a factory default backup. If you cannot access Acer Care Center, click Settings in the Start menu, select Update & Security and then click Recovery.
Note Acer Care Center vary depending on model or Operating System.
Important We recommend that you create a Factory Default Backup as soon as possible. In certain situations a full recovery will require a USB recovery backup.
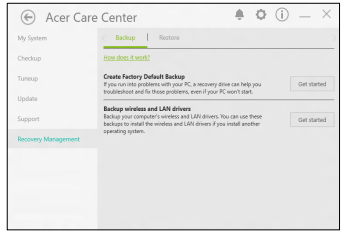
Creating a factory default backup
Recovery Management allows you to quickly and easily back up your operating system, installed apps and data.
Note Since the recovery backup requires at least 8 GB of storage after formatting, it is recommended to use a USB drive with a capacity of 16 GB or larger.
1. From Start, select Acer then Acer Recovery Management.
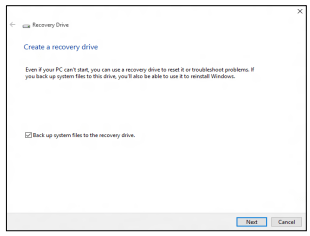
2. Select the Backup tab and click Get Started for Create Factory Default Backup to open the Recovery Drive window.
3. Make sure Back up system files to the recovery drive is selected and click Next.
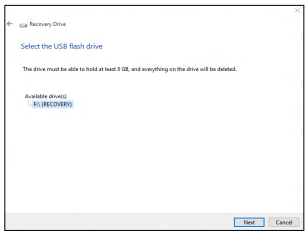
4. Plug in the USB drive and wait for the PC to detect the USB drive then click Next.
5. Everything on the drive will be deleted. Click Create to continue.
6. You will be shown the backup progress on the screen.
7. Follow the process until it completes.
8. Unplug the USB drive and label it clearly.
Important Write a unique, descriptive label on the backup, such as 'Windows Recovery Backup'. Make sure you keep the backup in a safe place that you will remember.
Backing up your wireless and LAN drivers
Back up your wireless and LAN drivers. You can use these backups to install the wireless and LAN drivers if you install another operating system.
1. From Start, select Acer then Acer Recovery Management.
2. Select the Backup tab and click Get started for Backup wireless and LAN drivers. Choose a folder to save your drivers and select OK.
Restoring your computer
Recovery Management allows you to quickly and easily restore your computer back to its default status. You can choose to keep your files or remove them before reinstalling Windows.
Reset this PC and keep my files
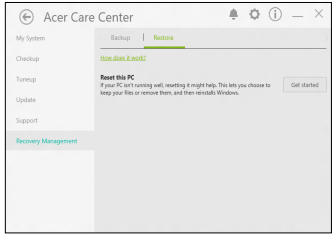
1. From Start, select Acer then Acer Recovery Management.
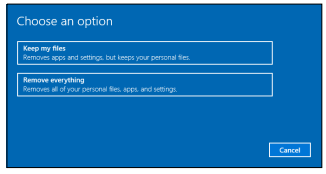
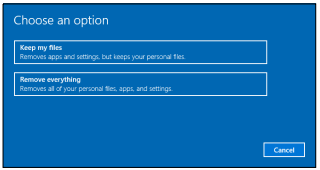
2. Select the Restore tab and click Get started to Choose an option.
3. Select Keep my files to refresh your PC and reinstall your operating system without removing your personal files. Click Next to continue.
Important If you have apps installed on your PC, they will be removed.
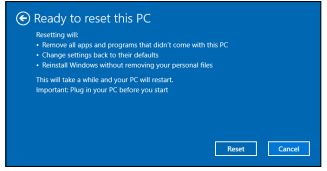
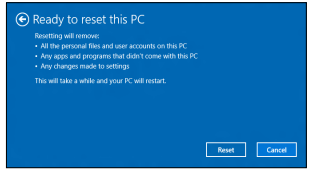
4. Resetting the PC will reinstall Windows, change settings back to their factory defaults and remove all preinstalled apps and programs without removing your personal files. Click Reset to continue.
5. You will be shown the reset progress on the screen. The screen will turn off during the reset process.
6. The screen will turn back on when it is installing Windows. Your PC will restart several times during the reset process.
7. Follow the process until it completes.
8. When your PC has completed the reset process, Windows will have been reset back to its factory default settings without removing your personal files.
Reset this PC and remove everything
1. From Start, select Acer then Acer Recovery Management.
2. Select the Restore tab and click Get Started to Choose an option.
3. Select Remove everything to reset your PC back to its factory default. This process will reinstall your operating system and remove all of your personal files, apps, and settings.
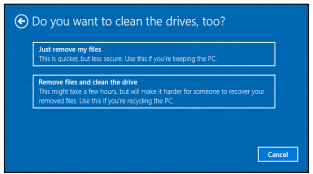
4. Select Just remove my files if you are keeping your computer. This will be quicker, but less secure. Files may still be recovered with a file recovery program.
Select Remove files and clean the drive if you are not keeping your computer. This process will take longer, but will be more secure.
Warning Selecting "Remove files and clean the drive" will remove all of your personal files and accounts, along with pre-existing drivers that may affect your Windows installation.
5. Click Reset to continue.
6. You will be shown the reset progress on the screen. The screen will turn off during the reset process.
7. The screen will turn back on when it is installing Windows. Your PC will restart several times during the reset process.
8. Follow the process until it completes.
9. When your PC has completed the reset process, Windows will use factory default settings.
USING A BLUETOOTH CONNECTION
Bluetooth is a technology enabling you to transfer data wirelessly over short distances between many different types of devices. Bluetoothenabled devices include computers, cell phones, tablets, wireless headsets, and keyboards. To use Bluetooth, you must ensure the following:
1. Bluetooth is enabled on both devices.
2. Your devices are "paired" (or connected)
Enabling and disabling Bluetooth
The Bluetooth adapter must be enabled on both devices. For your computer, this may be an external switch, a software setting, or a separate Bluetooth dongle plugged into the computer’s USB port (if no internal Bluetooth adapter is available).
Note Please check your devices owner’s manual to determine how to turn on its Bluetooth adapter.
Enable Bluetooth and add a device
Every new device must first be "paired" with your computer’s Bluetooth adapter. This means it must first be authenticated for security purposes. You only need to pair once. After that, simply turning on the Bluetooth adapter of both devices will connect them.
Bluetooth on your computer is disabled by default. To enable your computer’s Bluetooth adapter, do the following:
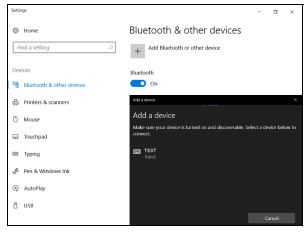
1. Press the Windows key or select the Windows Start button > Settings > Devices > Bluetooth & other devices, and click the toggle under Bluetooth to enable/disable it.
2. Click on Add Bluetooth or other device then select the device that you want to add.
3. Your computer will automatically start searching for devices, as well as make itself visible to other devices.
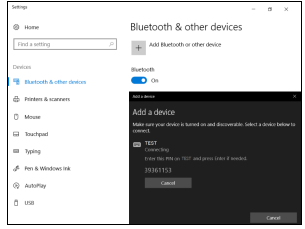
4. Select the device you wish to pair from the list of discovered devices.
5. After pairing, if there is a code displaying on the screen, enter that code on the device to proceed the connection.
Note Some devices using older versions of the Bluetooth technology require both devices to enter a PIN. In the case of one of the devices not having any inputs (as in a headset), the passcode is hardcoded into the device (usually "0000" or "1234"). Consult your device’s user manual for more information.
You can also enter the Bluetooth settings by selecting the Notifications icon in the lower right-hand corner of the screen to open the Notifications pane. From here, you can enable or disable Bluetooth or right-click on Bluetooth > Go to Settings to enter the Bluetooth settings.
CONNECTING TO THE INTERNET
This chapter includes general information on types of connections, and getting connected to the internet. For detailed information, please refer to Network connections on page 64.
Your computer’s built-in network features make it easy for you to connect your computer to the internet.
First though, in order to connect to the internet from home, you’ll need to sign up for internet services from an ISP (Internet Service Provider) -- usually a phone or cable company -- that will have to go to your home or office to set up internet service. The ISP will install a small box, a router or modem, that will allow you to connect to the internet.
Connecting to a wireless network
Connecting to a wireless LAN
A wireless LAN (or WLAN) is a wireless local area network, which can link two or more computers without using wires. Once connected to WLAN, you can access the internet. You can also share files, other devices, and even your internet connection itself.
Your computer's wireless connection is turned on by default and Windows will detect and display a list of available networks during setup. Select your network and enter the password if required.
Warning Using wireless devices while flying in aircraft may be prohibited. All wireless devices must be switched off before boarding an aircraft and during take-off, as they may be dangerous to the operation of the aircraft, disrupt communications, and even be illegal. You may turn on your computer’s wireless devices only when informed that it is safe to do so by the cabin crew.
Acer notebook computers feature an Airplane mode hotkey that turns the network connection on or off. You can use the network management options to turn your wireless network on/off or control what is shared over the network.
To connect to a wireless network, please follow the steps below.
1. Ensure you have a wireless router/access point and current internet connection through the ISP of your choice. Make a note of the wireless network’s name and password (if necessary). If you are trying to connect to a public network (such as at a coffeeshop), make sure you have the wireless network’s name.
Note Please refer to your ISP or router documentation for details on connecting to the internet.
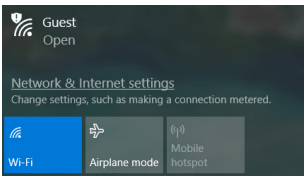
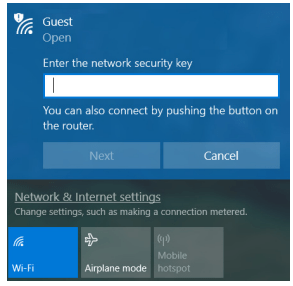
2. Click Network icon in the notification area.
Note If Wi-Fi is turned off, please click Wi-Fi tile to turn it on.
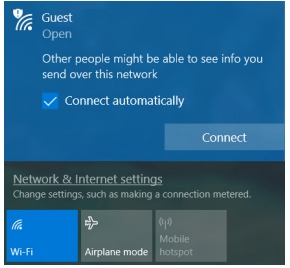
3. You will see a list of available wireless networks. Select the one you wish to use.
4. Once you select a wireless network, select Connect.
5. If required, enter the network’s password.
Connecting with a cable
Built-in network feature
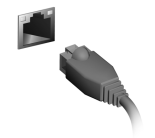
If your computer has a network port, plug one end of a network cable into the network port on your computer, and the other end into a port on your router (refer to the image below.) Then, you'll be ready to get online.
Connecting to a cellular network
If your computer has a SIM slot, you can connect to the internet using a cellular phone network. To do this, you must have a compatible SIM card and a data contract with your cellular provider. Contact your cellular provider for more information on connecting to the internet using a cellular network.
SECURING YOUR COMPUTER
Your computer is a valuable investment that you need to take care of. Learn how to protect and take care of your computer.
Security features include hardware and software locks — a security notch and passwords.
Using a computer security lock
The computer comes with a computer security slot for a security lock. Wrap a computer security lock cable around an immovable object such as a table or handle of a locked drawer. Insert the lock into the notch and turn the key to secure the lock. Some keyless models are also available.
Using passwords
Passwords protect your computer from unauthorized access. Setting these passwords creates several different levels of protection for your computer and data:
• Supervisor Password prevents unauthorized entry into the BIOS utility. Once set, you must enter this password to gain access to the BIOS utility. See Setting passwords on page 35.
• User Password secures your computer against unauthorized use. Combine the use of this password with password checkpoints on boot-up and resume from Hibernation (if available) for maximum security.
• Password on Boot secures your computer against unauthorized use. Combine the use of this password with password checkpoints on boot-up and resume from Hibernation (if available) for maximum security
Important Do not forget your Supervisor Password! If you forget your password, please get in touch with your dealer or an authorized service center.
Entering passwords
When a password is set, a password prompt appears in the center of the display screen.
• When the Supervisor Password is set, a prompt appears when you enter the BIOS utility.
• Type the Supervisor Password and press Enter to access the BIOS utility. If you enter the password incorrectly, a warning message appears. Try again and press Enter.
• When the User Password is set and the password on boot parameter is enabled, a prompt appears at boot-up.
• Type the User Password and press Enter to use the computer. If you enter the password incorrectly, a warning message appears. Try again and press Enter.
Important You have three chances to enter a password. If you fail to enter the password correctly after three tries, the system halts. Press and hold the power button for four seconds to shut down the computer. Then turn on the computer again, and try again.
POWER MANAGEMENT
This computer has a built-in power management unit that monitors system activity. System activity refers to any activity involving one or more of the following devices: keyboard, mouse, hard disk, peripherals connected to the computer, and video memory. If no activity is detected for a period of time, the computer stops some or all of these devices in order to conserve energy.
Savingpower
Disable Fast startup
Your computer uses Fast startup to start quickly, but also uses a small amount of power to check for signals to start. These checks will slowly drain your computer’s battery.
If you prefer to reduce your computer’s power requirements and environmental impact, turn off Fast startup:
Note If Fast startup is off, your computer will take longer to start from Sleep. Your computer will also not start if it receives an instruction to start over a network (Wake on LAN).
1. Press the Windows key or select the Windows Start button then select Settings > System > Power & sleep.
2. Select Additional power settings.
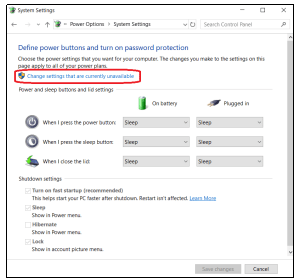
3. Select Choose what the power buttons do.
4. Select Change settings that are currently unavailable.
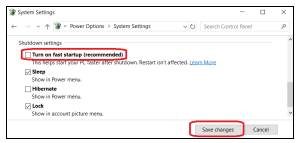
5. Scroll down and disable Turn on fast startup.
6. Select Save changes.
BATTERY PACK
The computer uses an embedded Lithium battery that gives you long use between charges.
Battery characteristics
The battery is recharged whenever you connect the computer to the AC adapter. Your computer supports charge-in-use, enabling you to recharge the battery while you continue to operate the computer. However, recharging with the computer turned off significantly reduces charge time.
The battery will come in handy when you travel or during a power failure
Charging the battery
Plug the AC adapter into the computer, and connect to a mains power outlet.
Note You are advised to charge the battery before retiring for the day. Charging the battery overnight before traveling enables you to start the next day with a fully charged battery.
Conditioning a new battery pack
Before you use a battery pack for the first time, there is a conditioning process that you should follow:
Connect the AC adapter and fully charge the battery.
Turn on the computer and complete setting up the operating system.
Disconnect the AC adapter.
Operate the computer using battery power.
Fully deplete the battery until the battery-low warning appears.
Reconnect the AC adapter and fully charge the battery again.
Follow these steps again until the battery has been charged and discharged three times.
Use this conditioning process for all new batteries, or if a battery hasn't been used for a long time.
Warning Do not expose battery packs to temperatures below 0° C (32° F) or above 45° C (113° F). Extreme temperatures may adversely affect the battery pack.
The battery conditioning process ensures your battery accepts the maximum possible charge. Failure to follow this procedure will prevent you from obtaining the maximum battery charge, and will also shorten the effective lifespan of the battery.
In addition, the useful lifespan of the battery is adversely affected by the following usage patterns:
• Using the computer on constant AC power.
• Not discharging and recharging the battery to its extremes, as described above.
• Frequent use; the more you use the battery, the faster it will reach the end of its effective life. An embedded battery has a life span of more than 1,000 charge/discharge cycles
Optimizing battery life
Optimizing battery life helps you get the most out of battery operation, prolonging the charge/recharge cycle and improving recharging efficiency. You are advised to follow the suggestions set out below:
• Use AC power whenever possible, reserving battery for mobile use. • Remove accessories that are not being used (e.g. a USB disk drive), as they can continue to draw power.
• Store your PC in a cool, dry place. The recommended temperature is 10° C (50° F) to 30° C (86° F). Higher temperatures cause the battery to self-discharge faster.
• Excessive recharging decreases the battery life.
• Look after your AC adapter and battery.
Checking the battery level
The power meter indicates the current battery level. Rest the cursor over the battery/power icon on the taskbar to see the battery's present charge level.
TRAVELING WITH YOUR COMPUTER
This section gives you tips and hints to consider when moving around or traveling with your computer.
Disconnecting from the desktop
Follow these steps to disconnect your computer from external accessories:
Save any open files.
Remove discs from optical drive.
Shut down the computer or put it into Sleep or Hibernate mode.
Close the display cover.
Disconnect the cord from the AC adapter.
Disconnect the keyboard, pointing device, printer, external monitor and other external devices.
Disconnect the Kensington / Noble lock if you are using one to secure the computer.
Moving around
When you are just moving within short distances, for example, from your office desk to a meeting room.
Preparing the computer
Before moving the computer, close and latch the display cover to place it in Sleep mode. You can now safely take the computer anywhere you go within the building. To wake the computer from
Sleep mode, open the display and, if necessary, press and release the power button.
If you are taking the computer to a client's office or a different building, you may choose to shut down the computer:
Press the Windows key, click Power then select Shut Down
Or:
You can put the computer in Sleep mode by pressing the Sleep hotkey or by closing the display.
When you are ready to use the computer again, open the display and, if necessary, press and release the power button.
Note The computer may enter Hibernation or Deep Sleep mode after being in Sleep mode for a period of time.
What to bring to meetings
If your meeting is relatively short, you probably do not need to bring anything with you other than your computer. If your meeting will be longer, or if your battery is not fully charged, you may want to bring the AC adapter with you to plug in your computer in the meeting room. If the meeting room does not have an electrical outlet, reduce the drain on the battery by putting the computer in Sleep mode. Press the Sleep hotkey or close the display cover whenever you are not actively using the computer.
FREQUENTLY ASKED QUESTIONS
The following is a list of possible situations that may arise during the use of your computer. Easy solutions are provided for each one.
I turned on the power, but the computer does not start or boot up.
Check if power is being supplied to the computer (if your computer has a power indicator, it will be off); if there is no power, check the following:
• If you are using on the battery, it may be low and unable to power the computer. Connect the AC adapter to recharge the battery pack. You may need to wait a few minutes before trying to turn your computer on again.
• Make sure that the AC adapter is properly plugged into the computer and to the power outlet.
If power is being supplied to the computer, check the following:
• Do you have a USB storage device (USB drive, CD drive or smartphone) plugged into your computer? Unplug it and press Ctrl + Alt + Del to restart the system.
Nothing appears on the screen.
The computer’s power management system automatically blanks the screen to save power. Press any key to turn the display back on.
If pressing a key does not turn the display back on, three things might be the cause:
• The brightness level might be too low. Use the Brightness up hotkey to adjust the brightness level.
• The display device might be set to an external monitor. Press the display toggle hotkey to toggle the display back to the computer.
• The computer may be in Sleep or Hibernate mode (if there is a power LED, it will flash). Press and release the power button to resume.
No audio is heard from the computer.
Check the following:
• The volume may be muted. Look at the volume control (speaker) icon in the taskbar. If it is crossed-out, click the icon and drag the slider to the right to increase the volume.
• The volume level may be too low. Check the volume from the volume control (speaker) icon in the taskbar. You can also use the volume control hotkeys to adjust the volume.
• If headphones, earphones or external speakers are connected to the headphone jack on the computer, the internal speakers automatically turn off.
The keyboard does not respond.
Try attaching an external keyboard to a USB port on the computer. If it works, contact your dealer or an authorized service center as the internal keyboard cable may be loose.
The printer does not work.
• Make sure that the printer is connected to a power outlet and that it is turned on.
• Make sure that the printer cable is connected securely to a USB port and the corresponding port on the printer.
I want to restore my computer to its original settings.
Note If your system is the multilingual version, the operating system and language you choose when you first turn on the system will be the only option for future recovery operations.
This recovery process helps you restore the C: drive with the original software content that is installed when you purchased your computer.
Warning Your C: drive will be reformatted and all data will be erased. It is important to back up all data files before using this option.
Before performing a restore operation, please check the BIOS settings.
1. If there is a D2D Recovery setting in Main, make sure it is Enabled.
2. Exit the BIOS utility and save changes. The system will reboot.
Note To access the BIOS utility, press F2 when you see the Acer logo during boot up.
For more information, see Restoring your computer on page 21.
Requesting service
International Travelers Warranty (ITW)
Your computer is backed by an International Travelers Warranty (ITW) that gives you security and peace of mind when traveling. An ITW passport came with your computer and contains all you need to know about the ITW program. A list of available, authorized service centers is in this handy booklet. Read this passport thoroughly.
Always have your ITW passport on hand, especially when you travel, to receive the benefits from our support centers. Attach your proof-ofpurchase to the ITW passport.
If the country you are traveling in does not have an Acer-authorized ITW service site, you can still get in contact with our offices worldwide.
Tips and hints for using Windows 10
We know this is a new operating system that will take some getting used to, so we've created a few pointers to help you get started
How do I get to Start?
Press the Windows key or select the Windows Start button on the lower left-hand corner of the screen. Selecting it will open Start where you can launch apps.
How do I see all of my apps?
Press the Windows key or select the Windows Start button to show a list of installed apps on the computer.
How do I turn off my computer?
Press the Windows key or select the Windows Start button and select the power icon > Shut down. You can also turn off the computer by right-clicking the Windows Start button > Shut down or sign out > Shut down.
Can I turn off notifications?
You can turn off notifications so that you can leave your computer running, but not be disturbed by notifications.
Press the Windows key or select the Windows Start button and select Settings > System > Notifications & actions. From here you can enable/disable notifications for all of your apps or choose which apps to enable/disable.
How do I unlock my computer?
Press the space bar and select a user account icon to unlock the computer. If your account has a password set, you will need to enter the password to continue.
Can I personalize the Lock screen?
You can personalize the lock screen with a different image, to run a slideshow of images, or to show you quick status and notifications to suit your personal needs.
To change the background, press the Windows key or select the Windows Start button and select Settings > Personalization > Lock screen. From here you can:
• Select a background image for the lock screen
• Turn the Slideshow on or off
• Select lock screen apps.
How do I set up the lock screen slideshow?
Press the Windows key or select the Windows Start button and select Settings > Personalization.
Under Lock screen, select Slideshow.
Select Add a folder and open the folder you wish to use (your Pictures folder will open by default). Select Choose this folder to add the folder to the lock screen slideshow.
Select a folder and select Remove to remove the folder from the lock screen slideshow.
Change the other settings to suit your needs.
How do I move tiles?
Select a tile and drag it to the place on Start that you want it to appear. Other tiles will be moved to accommodate the tile in its new location.
Can I arrange tiles in groups?
Yes, you can. Select an existing tile and drag the tile to arrange Start to your liking. Right-click on an app and select Pin to Start to create a new group on Start. From here, you can drag the tile to an existing group on Start. You can give the group(s) a name and arrange the tiles within the groups to suit your needs.
Can I make tiles bigger or smaller?
Yes, you can. Right-click on a tile and select Resize. Select a size from the menu that appears.
Can I change the screen resolution?
Yes, you can. Move your cursor to the lower left-hand corner of the screen and type 'Resolution' in the text box to display the results; select Change the resolution of the display. Alternatively, you can also rightclick anywhere on the desktop and select Display settings > Display.
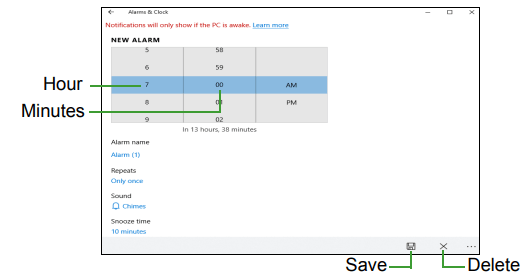
How do I set the alarm?
Your computer can act as an alarm clock. Type ’Alarms’ to search for the Alarms & Clock app.
Select an alarm from the list, or select the + in the lower-right corner to create a new alarm.
Enter the Alarm name.
Set the time by choosing the hour and minute.
Select AM or PM.
Choose which days the alarm should go off.
Select the sound notification.
Select the snooze time.
Select the Save icon in the bottom right-hand corner to save the alarm.
Select On or Off to activate or deactivate the alarm.
Note The alarm will only sound if your computer is awake at the set time.
Where are my apps?
Move your cursor to the lower left-hand corner of the screen and click search box, start typing the name of the app you would like to open.
How do I make an app appear on Start?
If you're in all apps list and you want to make an app appear on Start, right-click an app and select Pin to Start.
How do I remove a tile from Start?
Right-click a tile to select it and select Unpin from Start to remove the tile from Start.
How do I make an app appear on my taskbar?
If you're in all apps list and you want to make an app appear on the taskbar, right-click an app or tile and select More > Pin to taskbar.
How do I install apps?
You will need to have a Microsoft ID to purchase and download apps from Microsoft Store.
I can't find apps like Notepad and Paint! Where are they?
Move your cursor to the lower left-hand corner of the screen and click search box. Type the name of the app you would like to open. Alternatively, open all apps list and scroll to ’Windows Accessories’ to see the list of legacy programs.
What is a Microsoft ID (account)?
A Microsoft account is an email address and password that you use to sign in to Windows. You can use any email address, but it is best if you choose the one you already use to communicate with friends and sign in to your favorite websites. When you sign in to your PC with a Microsoft account, you'll connect your PC to the people, files, and devices you care about.
Do I need one?
You do not need a Microsoft ID to use Windows 10, but it makes life easier because you can sync data across different machines you sign in to using a Microsoft ID.
How do I get one?
If you've already installed Windows 10 and didn't sign in with a Microsoft account or you don't have a Microsoft account and want to get one, press the Windows key or select the Windows Start button > Settings > Accounts > Sign in with a Microsoft account instead, and follow the onscreen instructions.
How do I check for Windows updates?
Press the Windows key or select the Windows Start button > Settings > Update & Security > Windows Update. Select Advanced options to configure the settings.
Troubleshooting
This chapter shows you how to deal with common system problems. Read it before calling a technician if a problem occurs. Solutions to more serious problems require opening up the computer. Do not attempt to open the computer yourself; contact your dealer or authorized service center for assistance.
Troubleshooting tips
This computer incorporates an advanced design that delivers onscreen error message reports to help you solve problems.
If the system reports an error message or an error symptom occurs, see "Error messages" below. If the problem cannot be resolved, contact your dealer.
Error messages
If you receive an error message, note the message and take the corrective action. The following table lists the error messages in alphabetical order together with the recommended course of action.
Error messages
Corrective action
CMOS battery bad
Contact your dealer or an authorized service center.
CMOS checksum error
Contact your dealer or an authorized service center.
Disk boot failure
Insert a system (bootable) disk, then press Enter to reboot.
Equipment configuration error
Press F2 (during POST) to enter the BIOS utility, then press Exit in the BIOS utility to reboot.
Hard disk 0 erro
Contact your dealer or an authorized service center.
Hard disk 0 extended type error
Contact your dealer or an authorized service center.
I/O parity error
Contact your dealer or an authorized service center.
Keyboard error or no keyboard connected
Contact your dealer or an authorized service center.
Keyboard interface error
Contact your dealer or an authorized service center.
Memory size mismatch
Press F2 (during POST) to enter the BIOS utility, then press Exit in the BIOS utility to reboot.
If you still encounter problems after going through the corrective measures, please contact your dealer or an authorized service center for assistance.