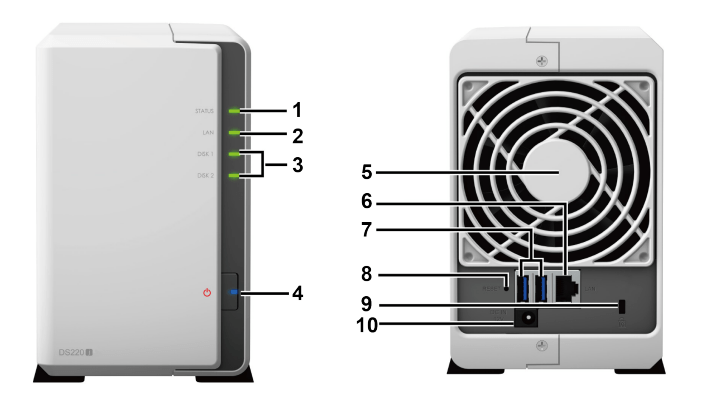
Displays the status of the system. For more information, see "LED Indicator Table".
2
LAN Indicator
Displays the status of the network connection. For more information, see "LED Indicator Table".
3
Disk Indicator
Displays the status of the installed drive. For more information, see "LED Indicator Table".
4
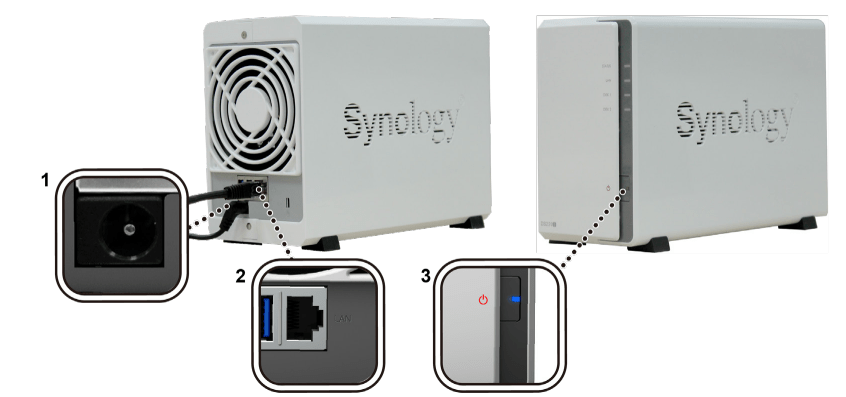
Power Button
Press to power on the Synology NAS.
To power off the Synology NAS, press and hold until you hear a beep sound and the Power LED starts blinking.
5
Fan
Back Panel
Disposes of excess heat and cools the system. If the fan malfunctions, the Synology NAS will emit a beeping sound.
6
LAN Port
Connect a network cable here.
7
USB 3.0 Port
Connect external hard drives or other USB devices to the Synology NAS here.
8
Reset Button
Press and hold until you hear a beep sound to restore the default IP address, DNS server, and password for the admin account.
Press and hold until you hear a beep sound, then press and hold again until you hear three beep sounds to return the Synology NAS to “Not Installed” status so that DiskStation Manager (DSM) can be reinstalled.
9
Kensington Security Slot
Attach a Kensington security lock here.
10
Power Port
Connect the AC power adapter here.
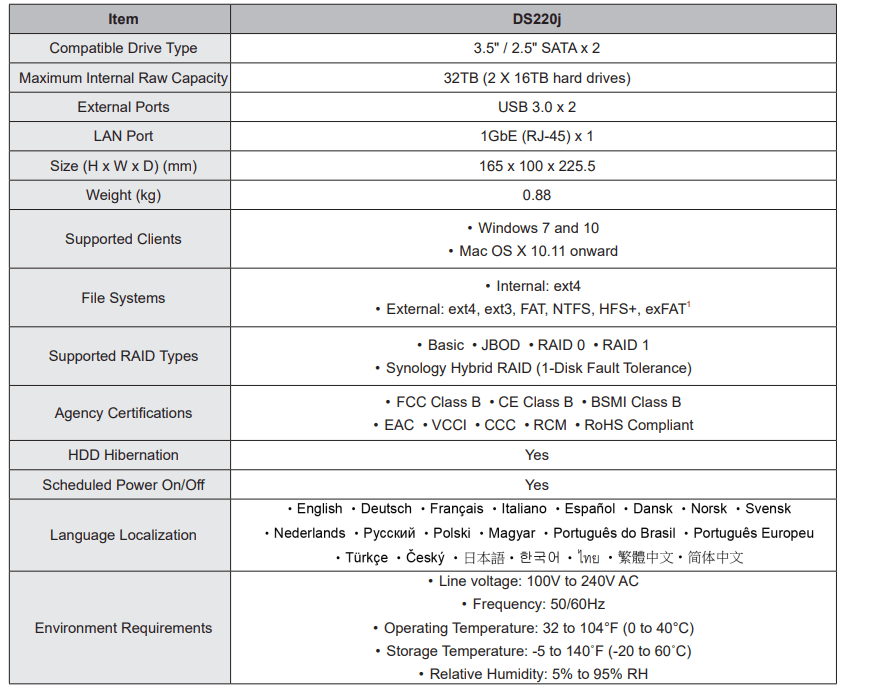
Hardware Specification
Safety Instructions
Keep away from direct sunlight and away from chemicals. Make sure the environment does not experience abrupt changes in temperature or humidity.
Place the product right side up at all times.
Do not place near any liquids.
Before cleaning, unplug the power cord. Wipe with damp paper towels. Do not use chemical or aerosol cleaners.
To prevent the unit from falling over, do not place on carts or any unstable surfaces
The power cord must plug in to the correct supply voltage. Make sure that the supplied AC voltage is correct and stable.
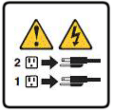
To remove all electrical current from the device, ensure that all power cords are disconnected from the power source.
Risk of explosion if battery is replaced with an incorrect type. Dispose of used batteries appropriately.
Spare Parts
Model Name
Picture
Description
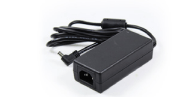
Adapter 60W_1
Adapter 60W Level VI
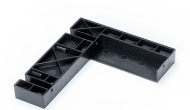
Disk Holder (Type C)
2.5" Disk Holder Type C
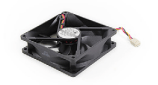
Fan 92*92*25_1
System Fan
Hardware Setup
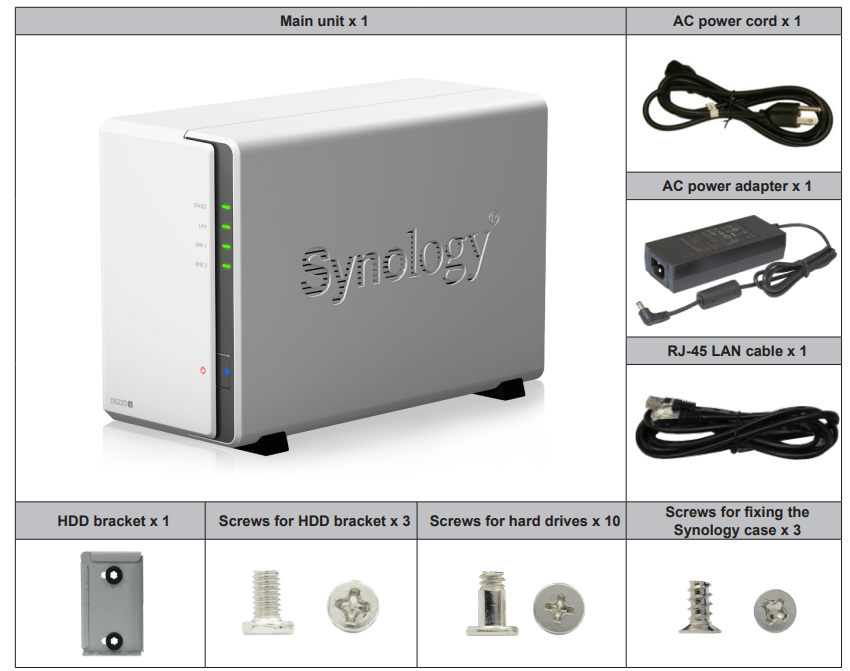
Tools and Parts for Component Installation
Please prepare the tools and parts below before setting up your Synology NAS:
A Screwdriver
At least one 3.5” or 2.5” SATA drive
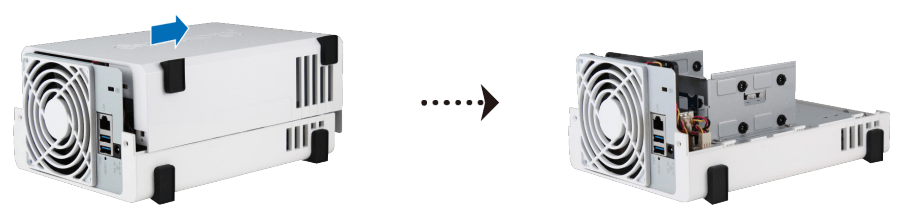
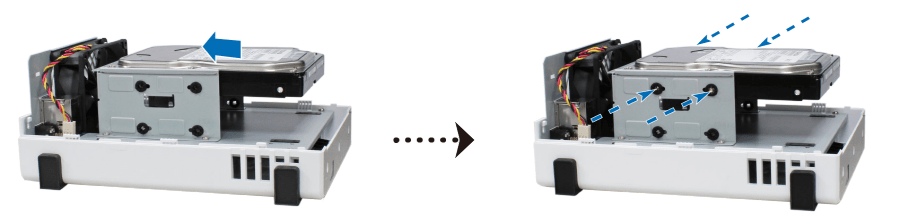
Install Drives
1. Push the upper case in the direction as shown below. Lift the upper case and set it aside.
2. Install drives:
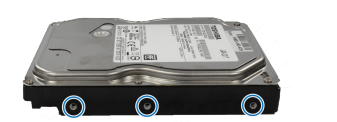
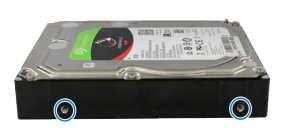
• For 3.5” drives with 3 screw holes on each side (indicated below):
a. Slide the drive into the hard drive bay, and push it all the way until it’s firmly connected to the SATA connector.
b. Secure the drive with the screws provided.
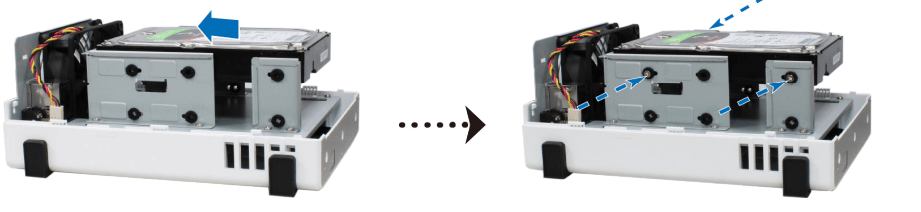
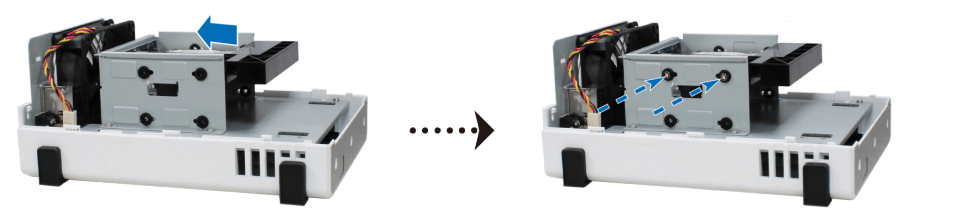
• For 3.5” drives with 2 screw holes on each side (indicated below):
a. Place the HDD bracket on your Synology NAS, and fasten the bracket to the Synology NAS with the screws provided.
b. Slide the drive into the hard drive bay, and push it all the way until it’s firmly connected to the SATA connector. Secure the drive with the screws provided.
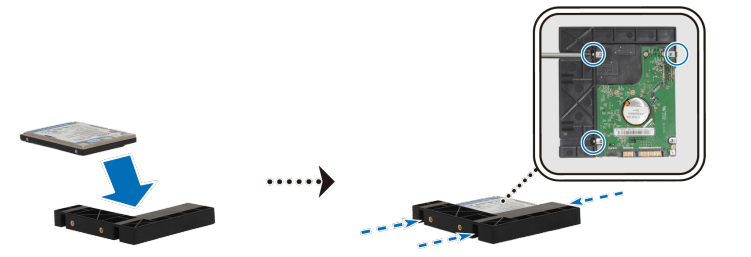
• For 2.5” drives:
a. Place the drive in the 2.5" Disk Holder (Type C, sold separately), and then tighten the 2.5" screws to secure the drive.
b. Slide the 2.5" Disk Holder into the hard drive bay, and push it all the way until the drive is firmly connected to the SATA connector. Secure the Disk Holder with the provided screws.
3. Repeat the steps above to install the other drive if you have prepared one.
4. The position of drives is as follows:
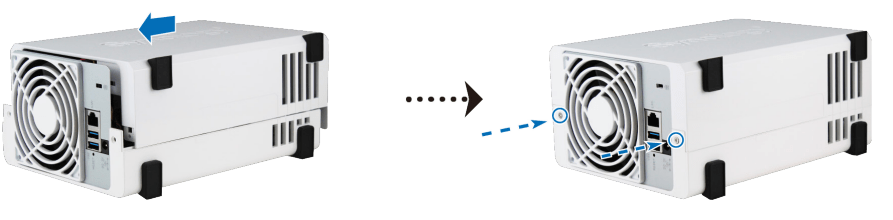
5. Replace the upper case, and tighten the screws on the back panel.
Start Up Your Synology NAS
1. Connect one end of the AC power adapter to the power port of your Synology NAS. Connect the other end to a power outlet.
2. Use the LAN cable to connect the Synology NAS to your switch, router, or hub.
3. Press the power button to turn on your Synology NAS.
Congratulations! Your DS220j is now online and detectable from a network computer.
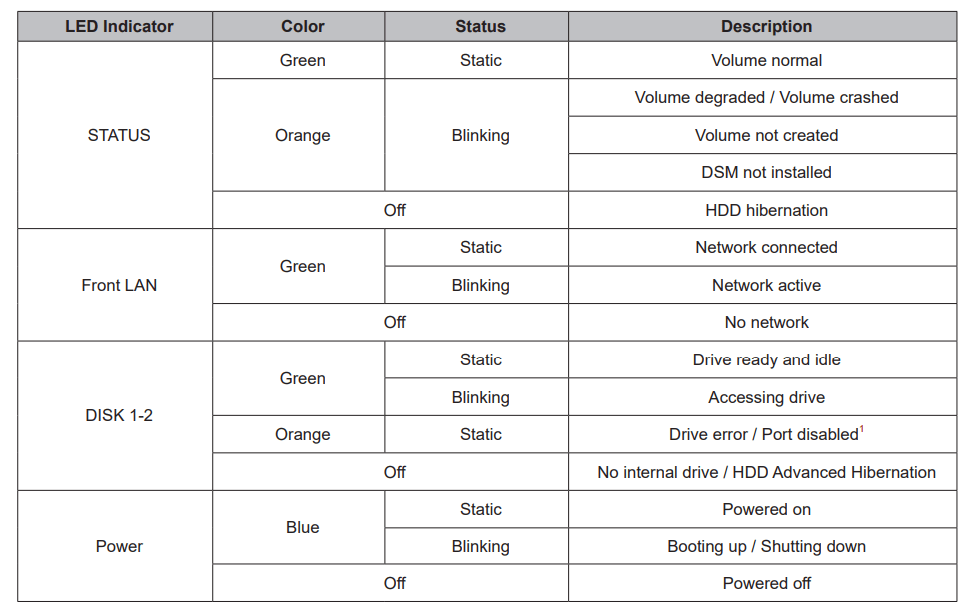
LED Indicator Table
System Maintenance
Initial Troubleshooting Guide
We have selected several helpful articles on frequently asked questions to help you do initial troubleshooting on your Synology NAS. To view the articles, please click on the links provided below:
General
What can I do to troubleshoot NAS connection problems?
Check the status of the Power LED indicator
The Power LED indicator is off: This means that your device is off. Boot up your Synology NAS. If you cannot boot it up, there could be an issue with the power, adapter, or other hardware issues. Please contact your local reseller for RMA service if your Synology NAS is still within its warranty period.
The Power LED indicator is flashing: This means that the device is powering on or powering off. Wait for half an hour before trying to connect to the device again. If the Power LED indicator keeps flashing, unplug the device and plug it back in before powering on the device again. If the problem still remains, refer to this article for troubleshooting.
The Power LED indicator is on: This means that the device is powered on. If you still cannot access your Synology NAS, it could be due to network issues. Proceed to the following section to resolve this issue.
Check the connection of your Synology NAS to the local network
Make sure that the LED indicators of the connected LAN ports on your Synology NAS are flashing properly.
Make sure that the LED indicators of your switch or router are flashing properly.
Run a PING command to check the connectivity between Synology NAS and your computer. Refer to this article for more details.
Find your Synology NAS using either of the following methods. If you cannot find your device using either of these two tools, refer to this article.
Web Assistant: Enter find.synology into the address bar of your web browser.
Synology Assistant: This desktop utility can be found at Download Center > select your Synology NAS model > the Desktop Utilities tab.
In Web Assistant or Synology Assistant, you will be able to see all of your Synology devices and their statuses.3 Refer to the list below for more information.
Not installed: Do not proceed with the installation, or else all of your data will be deleted. If you need to retrieve your data from your drives, refer to this article.
Configuration lost/Migratable: The data in the shared folders will not be deleted after you reinstall DSM.
Ready: The system has been successfully installed and is ready to use.
Connection failed: There may be an issue with the network connection of your Synology NAS. To reset the settings of your NAS, press the RESET button for four seconds until you hear a beep.4 5 To learn more about how to reset your Synology NAS, refer to this tutorial for DSM 6.2.3 and below and this tutorial for DSM 6.2.4 and above.
Why does my Synology NAS make unusual noises?
A Synology NAS in operation may emit some noises. Possible factors of noises include:
Drives
Fan
Vibration of the drives and drive trays
Others
To identify the cause of unusual noises:
Shut down your Synology NAS.
Remove all drives and drive trays.
Power on the device again without installing any drive trays to check if the unusual noises persist.
If you hear no more unusual noises:
The noise you heard may be the vibration of drives and drive trays. If so, we suggest replacing the fastening panels with screws to reduce the noise.
The noise may be caused by the drives you use. You can use a different drive to fix the issue.
If you still hear unusual noises:
The noises may come from the fan or the device itself:
Try cleaning up the dust inside the device and on the fan.
Check if the fan screws are fastened.
If you think the fan is making too much noise:
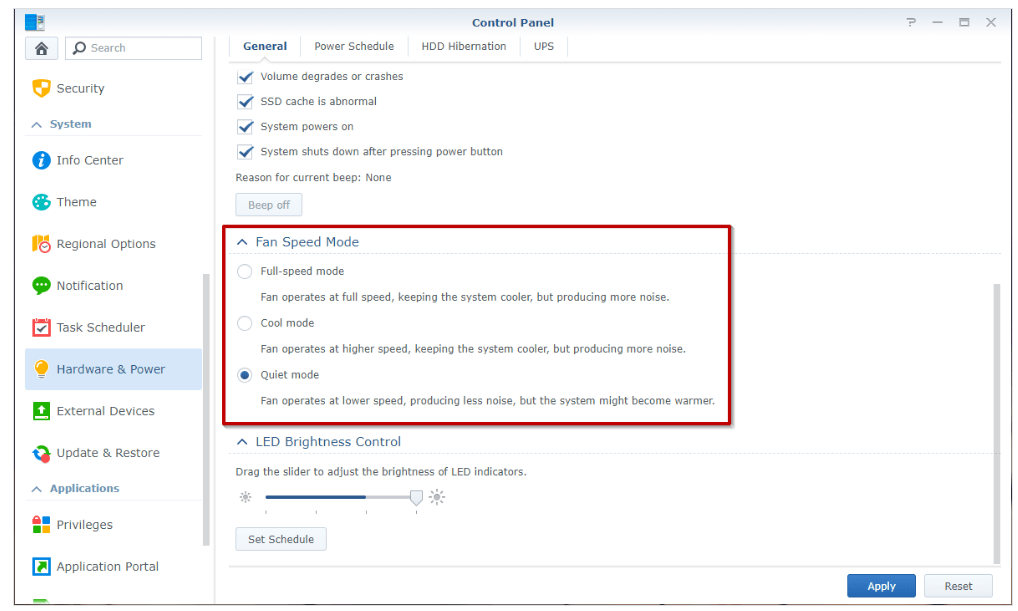
Try switching the Fan Speed Mode to Quiet Mode by going to Control Panel > Hardware & Power > General.
If switching to Quiet Mode still doesn't solve the problem and your Synology NAS is out of warranty, you can check the fan model for your device here and purchase a new one for replacement.
If your device is within warranty and its fan malfunctions, or if you still cannot find the cause of the unusual noises, please contact the reseller from which you purchased the Synology NAS for the RMA service.
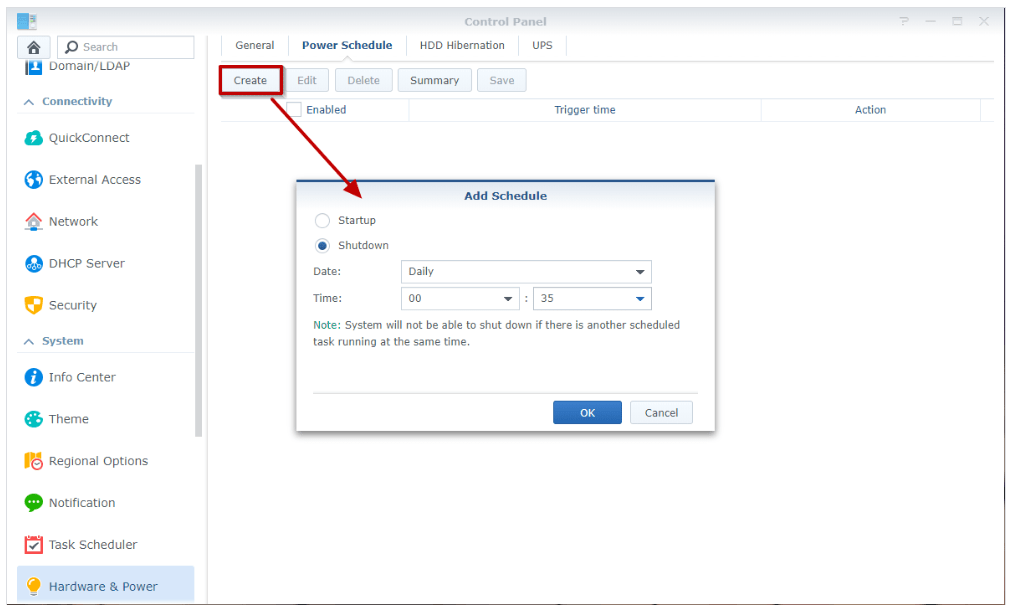
If you are still bothered by the noise when the NAS is idle:
Set up scheduled shutdowns and startups to have your Synology NAS run only when you are not sleeping.
How to reset my Synology NAS
Mode 1: Reset administrator login credentials and network settings
Locate the RESET button on your Synology NAS.
Use a paper clip to gently press and hold down the RESET button for about 4 seconds until you hear a beep, and then release the button immediately.
Launch Web Assistant. Double-click on your Synology NAS. On the login page, enter the system default username admin, leave the password field blank, and click Sign In.
Create a strong password and click Submit.
Sign in to DSM with the username admin and the password that you have just created.
Go to Control Panel > User > the User tab and double-click on the administrator account you want to use.
In the pop-up window, go to the Info tab and reset your password. Click OK.
Disable the admin account by first signing in with your administrator account, and then going to Control Panel > User > the User tab. Double click on admin and tick the Disable this account checkbox. Click OK.
The admin account status should now be Disabled.
Mode 2: Reset Synology NAS and re-install the operating system DSM
This mode wipes out all system configurations and carries out all the reset functions included in Mode 1.
Find the RESET button at the back of your Synology NAS (please click here to consult the Hardware Installation Guide for your Synology NAS model if you have difficulty locating the RESET button).
Use a paper clip to gently press and hold down the RESET button for about 4 seconds until you hear a beep, and then release the button immediately.
Within 10 seconds, press and hold down the RESET button again for 4 seconds until you hear 3 more beeps.
Wait for about 2 minutes until the STATUS light on your Synology NAS blinks orange, indicating that your Synology NAS has been successfully reset and the system configurations have been wiped.
To re-install DSM, enter find synology website in the search bar of your web browser and find your Synology NAS on the Web Assistant page. The server name of your Synology NAS should be either DiskStation, FlashStation, or RackStation, depending on your Synology NAS model. The status of your device should be Configuration lost.
Double-click on your Synology NAS and follow the wizard to complete the re-installation process.
Hard Disk Drive
How to choose the right HDD for my Synology NAS
Enterprise HDD
An enterprise HDD is generally manufactured using more advanced technology and superior components to provide better performance, POH, MTBF, vibration protection, and error correction.
These HDDs are suitable for environments requiring high data availability and consistent throughput even when huge amounts of data are being transferred.
Enterprise HDDs are suitable for businesses with many employees accessing files, database servers, or virtual storage systems simultaneously.
NAS HDD
A NAS HDD is specifically designed for NAS usage and often features better durability, balanced performance, and lower power consumption when compared to a desktop HDD. These HDDs are a more affordable option compared to enterprise HDDs.
Some NAS HDDs do not come with vibration sensors and may not be suitable for Synology’s multi-bay or rackmount models. Make sure to check with the HDD manufacturers for detailed HDD specifications before purchase.
Surveillance HDD
Designed to fulfill the 24/7 demands of long video recordings, surveillance HDDs are optimized for sequential write-operations, but offer lower random-access performance.
Some surveillance HDDs do not come with vibration sensors and may not be suitable for Synology’s multi-bay or rackmount models. Make sure to check with the HDD manufacturers for detailed HDD specifications before purchase.
We recommend using enterprise HDDs if the workloads of your Synology servers exceed the maximum capacity of surveillance HDDs.
Desktop HDD
A desktop HDD is designed for desktop or laptop computers, which usually requires the installation of a single HDD.
Most desktop HDDs are more affordable, but seldom come with vibration protection. The lack of vibration protection makes the HDDs more vulnerable in RAID environments, since vibration from the system chassis and other HDDs may affect the system performance and the HDD health status. Therefore, we do not recommend installing desktop HDDs on your Synology servers.
How to diagnose drives' health status when receiving bad sector warning
Run an extended S.M.A.R.T. test
Run an extended S.M.A.R.T. test on the suspected failed drive. For detailed steps, refer to the respective help article for DSM 7.0 and DSM 6.2. If the drive receives a Failing test result, it is likely to be defective and needs to be replaced. You can refer to the Replace the defective drive section for more information.
Check the bad sector count graph
Monitor whether the bad sector count is increasing.
Go to Storage Manager > HDD/SSD.
Select the suspected failed drive.
Click Health Info and go to History > Key Information of Drives.
Check the Bad sector count graph.
If the count is increasing, the drive may fail in the future. We recommend replacing the drive to avoid possible data loss. You can refer to the Replace the defective drive section for more information.
If the count is stable, it is possible that the bad sectors have been corrected. Keep monitoring the drive.
Replace the defective drive
Check the Synology Products Compatibility List to ensure the replacement drive is compatible with your Synology NAS model.
For RAID types without data protection:
Back up all your data. (Tutorial)
Power off your Synology NAS.
Remove and replace the defective drive.
Power on your Synology NAS.
Install DSM if your Synology NAS is a one-bay model. (Tutorial)
Create a new storage pool and volume.
Restore the backed up data to the storage pool and volume. (Tutorial)
For RAID types with data protection:
Remove and replace the defective drive.
If your Synology NAS has at least one unused drive and its DSM version is DSM 7, use the Replace Drive feature.
If your Synology NAS does not have any unused drives or if its DSM version is older than DSM 7, replace the defective drive one at a time and repair the storage pool (DSM 7 / DSM 6.2) after each replacement.
How to fix hard drive failure and retrieve the data from your hard drives
Run an extended S.M.A.R.T. test
Run an extended S.M.A.R.T. test on the suspected failed drive. For detailed steps, refer to the respective help article for DSM 7 and DSM 6.2. If the drive receives a Failing test result, it is likely to be defective and needs to be replaced. You can refer to the Replace the defective drive section for more information.
Check the drive reconnection count graph
Monitor whether the drive reconnection count is increasing.
Go to Storage Manager > HDD/SSD.
Select the suspected failed drive.
Click Health Info. Go to History > Key Information of Drives.
Check the Drive reconnection count graph.
If the count is increasing, refer to the Swap the drives for testing section to conduct more testing.
If the count is stable, continue to monitor the drive. The drive might have been removed and reinserted, causing a slight increase to occur.
Swap the drives for testing
Check if the issue follows the drive or remains with the drive slot.
For models in a high-availability cluster:
Remove and replace the suspected failed drive. (Tutorial)
Continue to monitor the drive reconnection count.
If the count is increasing, the issue may be with the drive slot. We recommend backing up all your data and replacing your Synology NAS.
If the count is stable, the issue may be with the suspected failed drive you just replaced.
For one-bay models:
Back up all your data. (Tutorial)
Power off your Synology NAS.
Remove the suspected failed drive1 and replace it with a healthy compatible drive.
Power on your Synology NAS.
Install DSM. (Tutorial)
Create a new storage pool and volume.
Restore the backed up data to the storage pool and volume. (Tutorial)
Go to Storage Manager > HDD/SSD.
Select the healthy compatible drive to check.
Click Health Info. Go to History > Key Information of Drives.
Check the Drive reconnection count graph.
If the count is increasing, the issue may be with the drive slot. We recommend backing up all your data and replacing your Synology NAS.
If the count is stable, the issue may be with the suspected failed drive you just replaced.
For multi-bay models:
Make sure all the storage pools are in a Healthy status.
Power off your Synology NAS.
Remove the suspected failed drive and insert it into a functioning empty drive slot. If there is no empty drive slot on your Synology NAS, swap the drive with another healthy drive on the same Synology NAS.
Power on your Synology NAS.
Go to Storage Manager > HDD/SSD.
Do the following for both the suspected failed drive and the healthy drive in the suspected failed drive slot:
Select the drive you want to check.
Click Health Info. Go to History > Key Information of Drives.
Check the Drive reconnection count graph:
If the count is increasing for the suspected failed drive, the issue may be with the drive. We recommend replacing the drive to avoid possible data loss. You can refer to the Replace the defective drive section for more information.
If the count is increasing for the healthy drive in the suspected failed drive slot, the issue may be with the drive slot. We recommend backing up all your data and replacing your Synology NAS.
For expansion units:
Make sure all the storage pools are in a Healthy status.
Power off your Synology NAS.
Remove the suspected failed drive and insert it into a functioning empty drive slot. If there is no empty drive slot on your expansion unit, swap the drive with another healthy drive on the expansion unit.
Power on your Synology NAS.
Go to Storage Manager > HDD/SSD.
Do the following for both the suspected failed drive and the healthy drive in the suspected failed drive slot:
Select the drive you want to check.
Click Health Info. Go to History > Key Information of Drives.
Check the Drive reconnection count graph:
If the count is increasing for the suspected failed drive, the issue may be with the drive. We recommend replacing the drive to avoid possible data loss. You can refer to the Replace the defective drive section for more information.
If the count is increasing for the healthy drive in the suspected failed drive slot, the issue may be with the drive slot or the expansion unit cable. We recommend replacing the expansion unit cable and continuing to monitor the Drive reconnection count.
Replace the defective drive
Check the Synology Products Compatibility List to ensure the replacement drive is compatible with your Synology NAS model.
For RAID types without data protection:
Back up all your data. (Tutorial)
Power off your Synology NAS.
Remove and replace the defective drive.
Power on your Synology NAS.
Install DSM if your Synology NAS is a one-bay model. (Tutorial)
Create a new storage pool and volume.
Restore the backed up data to the storage pool and volume. (Tutorial)
For RAID types with data protection:
Remove and replace the defective drive. Then, repair the storage pool. For detailed steps on repairing the storage pool, refer to the respective help article for DSM 7 and DSM 6.2.
What should I do if my Synology NAS cannot recognize installed drives?
Run an extended S.M.A.R.T. test
Run an extended S.M.A.R.T. test on the suspected failed drive. For detailed steps, refer to the respective help article for DSM 7 and DSM 6.2. If the drive receives a Failing test result, it is likely to be defective and needs to be replaced. You can refer to the Replace the defective drive section for more information.
Check the drive reconnection count graph
Monitor whether the drive reconnection count is increasing.
Go to Storage Manager > HDD/SSD.
Select the suspected failed drive.
Click Health Info. Go to History > Key Information of Drives.
Check the Drive reconnection count graph.
If the count is increasing, refer to the Swap the drives for testing section to conduct more testing.
If the count is stable, continue to monitor the drive. The drive might have been removed and reinserted, causing a slight increase to occur.
Swap the drives for testing
Check if the issue follows the drive or remains with the drive slot.
For models in a high-availability cluster:
Remove and replace the suspected failed drive. (Tutorial)
Continue to monitor the drive reconnection count.
If the count is increasing, the issue may be with the drive slot. We recommend backing up all your data and replacing your Synology NAS.
If the count is stable, the issue may be with the suspected failed drive you just replaced.
For one-bay models:
Back up all your data.(Tutorial)
Power off your Synology NAS.
Remove the suspected failed drive1 and replace it with a healthy compatible drive.
Power on your Synology NAS.
Install DSM. (Tutorial)
Create a new storage pool and volume.
Restore the backed up data to the storage pool and volume. (Tutorial)
Go to Storage Manager > HDD/SSD.
Select the healthy compatible drive to check.
Click Health Info. Go to History > Key Information of Drives.
Check the Drive reconnection count graph.
If the count is increasing, the issue may be with the drive slot. We recommend backing up all your data and replacing your Synology NAS.
If the count is stable, the issue may be with the suspected failed drive you just replaced.
For multi-bay models:
Make sure all the storage pools are in a Healthy status.
Power off your Synology NAS.
Remove the suspected failed drive1 and insert it into a functioning empty drive slot. If there is no empty drive slot on your Synology NAS, swap the drive with another healthy drive on the same Synology NAS.
Power on your Synology NAS.
Go to Storage Manager > HDD/SSD.
Do the following for both the suspected failed drive and the healthy drive in the suspected failed drive slot:
Select the drive you want to check.
Click Health Info. Go to History > Key Information of Drives.
Check the Drive reconnection count graph:
If the count is increasing for the suspected failed drive, the issue may be with the drive. We recommend replacing the drive to avoid possible data loss. You can refer to the Replace the defective drive section for more information.
If the count is increasing for the healthy drive in the suspected failed drive slot, the issue may be with the drive slot. We recommend backing up all your data and replacing your Synology NAS.
For expansion units:
Make sure all the storage pools are in a Healthy status.
Power off your Synology NAS.
Remove the suspected failed drive1 and insert it into a functioning empty drive slot. If there is no empty drive slot on your expansion unit, swap the drive with another healthy drive on the expansion unit.
Power on your Synology NAS.
Go to Storage Manager > HDD/SSD.
Do the following for both the suspected failed drive and the healthy drive in the suspected failed drive slot:
Select the drive you want to check.
Click Health Info. Go to History > Key Information of Drives.
Check the Drive reconnection count graph:
If the count is increasing for the suspected failed drive, the issue may be with the drive. We recommend replacing the drive to avoid possible data loss. You can refer to the Replace the defective drive section for more information.
If the count is increasing for the healthy drive in the suspected failed drive slot, the issue may be with the drive slot or the expansion unit cable. We recommend replacing the expansion unit cable and continuing to monitor the Drive reconnection count.
Replace the defective drive
Check the Synology Products Compatibility List to ensure the replacement drive is compatible with your Synology NAS model.
For RAID types without data protection:
Back up all your data. (Tutorial)
Power off your Synology NAS.
Remove and replace the defective drive.
Power on your Synology NAS.
Install DSM if your Synology NAS is a one-bay model. (Tutorial)
Create a new storage pool and volume.
Restore the backed up data to the storage pool and volume. (Tutorial)
For RAID types with data protection:
Remove and replace the defective drive. Then, repair the storage pool. For detailed steps on repairing the storage pool, refer to the respective help article for DSM 7 and DSM 6.2.
How do I know whether the problem is with my Synology NAS or drive when drive errors occur?
Run an extended S.M.A.R.T. test
Run an extended S.M.A.R.T. test on the suspected failed drive. For detailed steps, refer to the respective help article for DSM 7 and DSM 6.2. If the drive receives a Failing test result, it is likely to be defective and needs to be replaced. You can refer to the Replace the defective drive section for more information.
Check the drive reconnection count graph
Monitor whether the drive reconnection count is increasing.
Go to Storage Manager > HDD/SSD.
Select the suspected failed drive.
Click Health Info. Go to History > Key Information of Drives.
Check the Drive reconnection count graph.
If the count is increasing, refer to the Swap the drives for testing section to conduct more testing.
If the count is stable, continue to monitor the drive. The drive might have been removed and reinserted, causing a slight increase to occur.
Swap the drives for testing
Check if the issue follows the drive or remains with the drive slot.
For models in a high-availability cluster:
Remove and replace the suspected failed drive. (Tutorial)
Continue to monitor the drive reconnection count.
If the count is increasing, the issue may be with the drive slot. We recommend backing up all your data and replacing your Synology NAS.
If the count is stable, the issue may be with the suspected failed drive you just replaced.
For one-bay models:
Back up all your data. (Tutorial)
Power off your Synology NAS.
Remove the suspected failed drive and replace it with a healthy compatible drive.
Power on your Synology NAS.
Install DSM. (Tutorial)
Create a new storage pool and volume.
Restore the backed up data to the storage pool and volume. (Tutorial)
Go to Storage Manager > HDD/SSD.
Select the healthy compatible drive to check.
Click Health Info. Go to History > Key Information of Drives.
Check the Drive reconnection count graph.
If the count is increasing, the issue may be with the drive slot. We recommend backing up all your data and replacing your Synology NAS.
If the count is stable, the issue may be with the suspected failed drive you just replaced.
For multi-bay models:
Make sure all the storage pools are in a Healthy status.
Power off your Synology NAS.
Remove the suspected failed drive and insert it into a functioning empty drive slot. If there is no empty drive slot on your Synology NAS, swap the drive with another healthy drive on the same Synology NAS.
Power on your Synology NAS.
Go to Storage Manager > HDD/SSD.
Do the following for both the suspected failed drive and the healthy drive in the suspected failed drive slot:
Select the drive you want to check.
Click Health Info. Go to History > Key Information of Drives.
Check the Drive reconnection count graph:
If the count is increasing for the suspected failed drive, the issue may be with the drive. We recommend replacing the drive to avoid possible data loss. You can refer to the Replace the defective drive section for more information.
If the count is increasing for the healthy drive in the suspected failed drive slot, the issue may be with the drive slot. We recommend backing up all your data and replacing your Synology NAS.
For expansion units:
Make sure all the storage pools are in a Healthy status.
Power off your Synology NAS.
Remove the suspected failed drive and insert it into a functioning empty drive slot. If there is no empty drive slot on your expansion unit, swap the drive with another healthy drive on the expansion unit.
Power on your Synology NAS.
Go to Storage Manager > HDD/SSD.
Do the following for both the suspected failed drive and the healthy drive in the suspected failed drive slot:
Select the drive you want to check.
Click Health Info. Go to History > Key Information of Drives.
Check the Drive reconnection count graph:
If the count is increasing for the suspected failed drive, the issue may be with the drive. We recommend replacing the drive to avoid possible data loss. You can refer to the Replace the defective drive section for more information.
If the count is increasing for the healthy drive in the suspected failed drive slot, the issue may be with the drive slot or the expansion unit cable. We recommend replacing the expansion unit cable and continuing to monitor the Drive reconnection count.
Replace the defective drive
Check the Synology Products Compatibility List to ensure the replacement drive is compatible with your Synology NAS model.
For RAID types without data protection:
Back up all your data. (Tutorial)
Power off your Synology NAS.
Remove and replace the defective drive.
Power on your Synology NAS.
Install DSM if your Synology NAS is a one-bay model.(Tutorial)
Create a new storage pool and volume.
Restore the backed up data to the storage pool and volume. (Tutorial)
For RAID types with data protection:
Remove and replace the defective drive. Then, repair the storage pool. For detailed steps on repairing the storage pool, refer to the respective help article for DSM 7 and DSM 6.2.
Memory
How can I run a memory test on my Synology NAS?
Run a memory test to ensure the memory (i.e., onboard memory and memory module) of your Synology NAS is working properly. We recommend running the test three times to make sure the memory is normal.
Download and install Synology Assistant (available at Download Center).
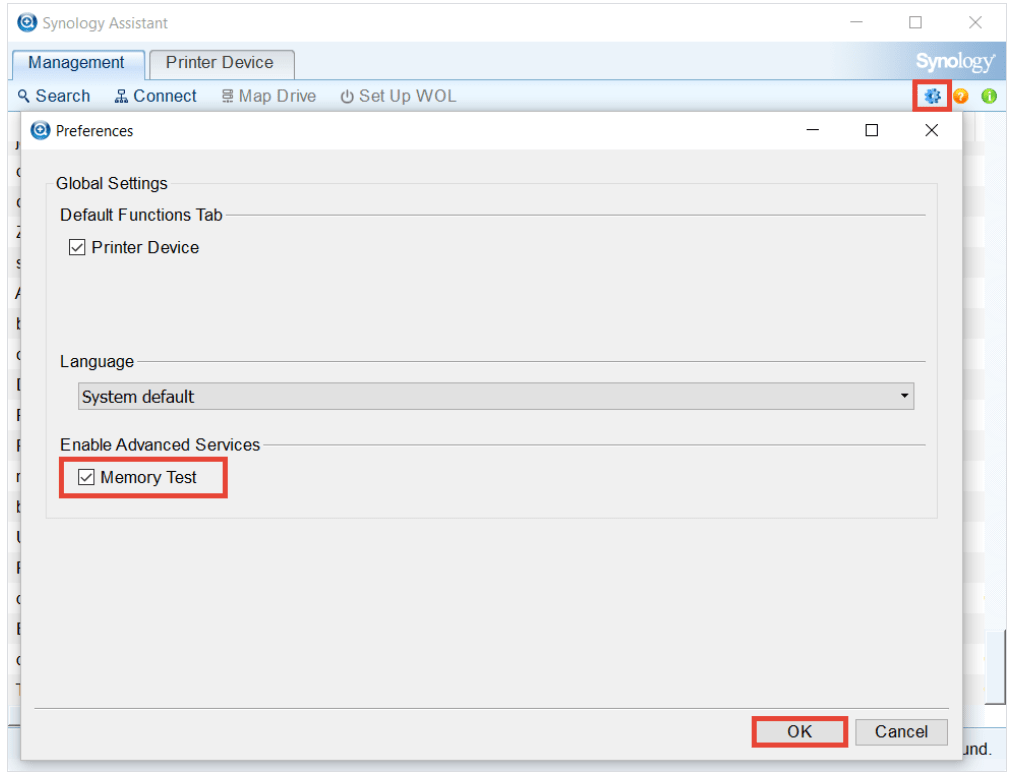
Launch Synology Assistant and click the upper-right icon.
Tick the Memory Test checkbox and click OK
4. Select the Synology NAS to run the memory test. Make sure the status of the Synology NAS is Ready and then click the Memory Test button.
5. Follow the wizard to complete the process.
Your Synology NAS will be rebooted during the memory test. Do not close Synology Assistant during the test. During the test, the status of your Synology NAS will show Performing memory test (x%).
If your Synology NAS passes the memory test, the status of your Synology NAS will be Ready. At this time, you can run the test again if needed.
If your Synology NAS fails the memory test, the error message "One or more errors have been found by the memory diagnostic test" will appear on the screen. This indicates that the memory may be defective. In this case, we strongly recommended returning your Synology NAS for repair if it is still within the warranty period. Please note that even if your Synology NAS fails the memory test, its status will still show Ready.
LED
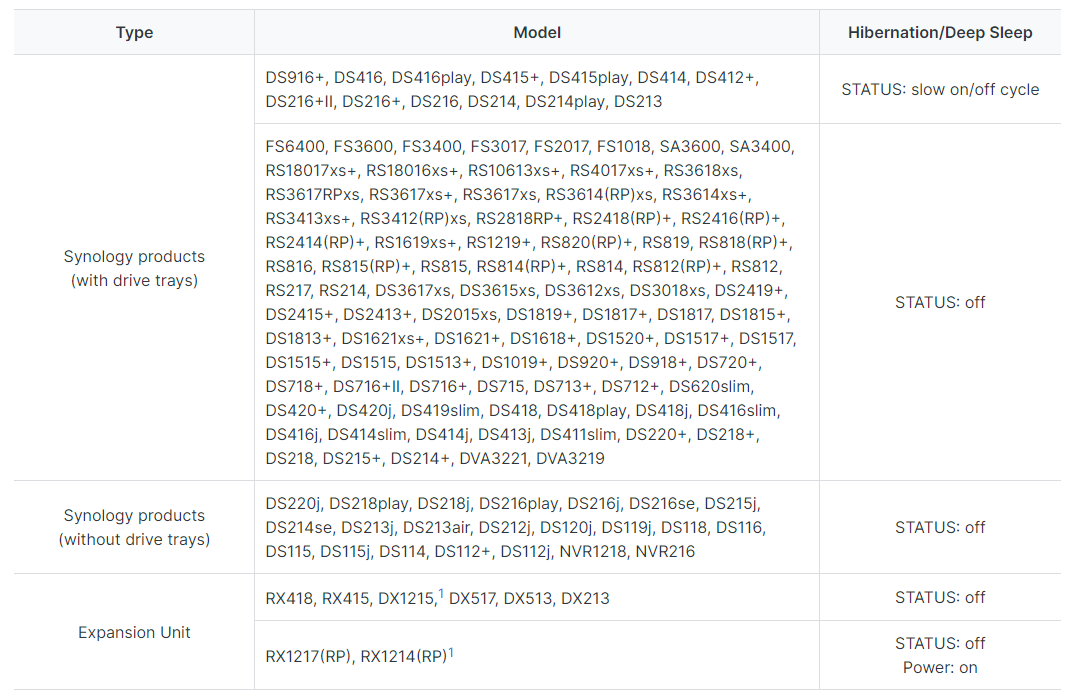
How do I recognize a hibernating Synology NAS via the LED indicators?
Please note that System Hibernation is also supported on certain models. For the status of LED indicators on those models, refer to the table below:
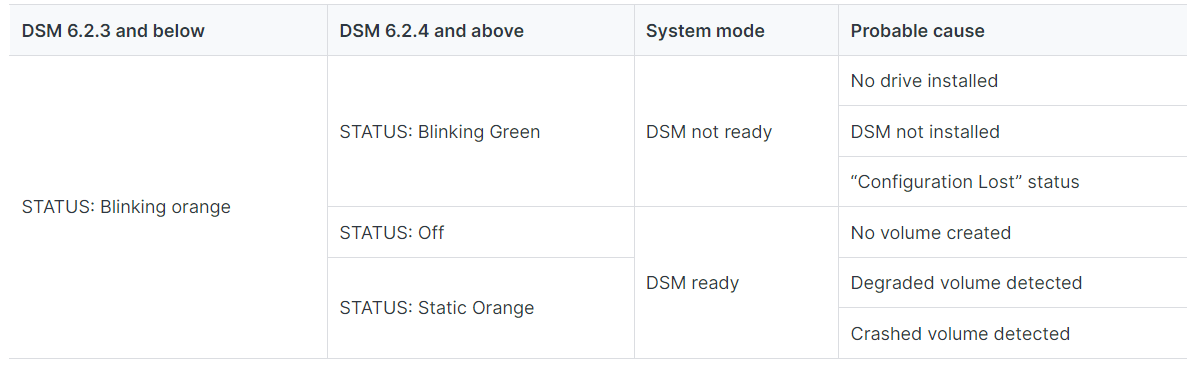
What can I do if the STATUS LED keeps flashing in orange?
Synology NAS models without ALERT LED
Synology NAS models with ALERT LED
Check the status in Synology Assistant
If the STATUS or ALERT LED lights up orange for any of the reasons shown in the previous tables, we recommend you to check the Status of your Synology NAS using Synology Assistant.
Go to Download Center, select your model, and go to the Desktop Utilities tab to download and install Synology Assistant.
Launch Synology Assistant and find your device. If you cannot find your Synology NAS with Synology Assistant, resolve the connection problems first before trying the solutions below.
The following list provides common statuses in Synology Assistant and their solutions:
DSM not installed: Do not continue installing DSM, or all data on the drives will be deleted. Make sure to retrieve the data from your drives before doing anything else.
Configuration Lost: There may be a failed system partition or drive on your Synology NAS, or you may have triggered Mode 2 reset. Troubleshoot Configuration Lost status.
Migratable/Recoverable: Follow the instructions in the Synology Assistant wizard to re-install DSM. None of the system configurations or data in shared folders will be deleted.
Ready: If the STATUS LED indicator still blinks orange when the status is Ready, there may be an issue with the volume or storage pool:
No volume created: To create a volume, go to DSM Storage Manager. Refer to the respective help articles for DSM 7.0 and DSM 6.2 for more details..
Storage pool degraded: Refer to the respective help articles for DSM 7.0 or DSM 6.2 for instructions on how to repair a storage pool.
Storage pool crashed: Troubleshoot crash issues.
Why am I unable to install my Synology NAS and why is the Power LED indicator flashing constantly?
Check the status of the motherboard
Power off your Synology NAS.
Remove all attached external devices and installed drives
Power on your Synology NAS.
Check the status of the Power LED indicator.
The Power LED indicator is blinking continuously: If the Power button still isn't responding or the Power LED indicator keeps blinking for more than 20 minutes, the motherboard or power supply may be faulty or damaged. You may be eligible for warranty claims. Since Synology does not provide direct replacement services outside North America, contact the local reseller or distributor where you purchased the product for further assistance.
The Power LED indicator is static with a beep sound: If you hear a beep within three minutes and the Power LED light is static, this means the motherboard is healthy, but the hard drives or attached external devices could be the cause. Continue to the following sections.
Check the health of your drives
Refer to this article to check the health of your drives.
Check the status of attached external devices
If both motherboard and drives are functioning properly, the issue may have resulted from attached external devices.
Power off your Synology NAS.
Attach external devices one at a time.
Power on your Synology NAS.
Check the status of the Power LED indicator.
If the Power LED indicator keeps blinking for more than 20 minutes, the issue is the attached external devices. Contact the local reseller or distributor where you purchased the product for further assistance.
More information
If you have conducted the above checks and the motherboard of your Synology NAS is functioning properly with drives installed, but the Power LED indicator keeps blinking for more than 20 minutes, follow the below steps:
Refer to this article to check the status of your Synology NAS. Check the status and description in the Status Indication Table to resolve issues with your device.
Remove all attached external drives.
Unplug and replug the power cord, and then boot up the device again.
Monitor the LED indicator and check whether it continues to blink for more than 10 minutes.
If the problem persists, contact Synology Technical Support for further assistance.
Fan
What type of fan speed modes are available on my Synology NAS?
There are four fan speed modes available on your Synology NAS. You can choose the one you prefer at DSM Control Panel > Hardware & Power > General > Fan Speed Mode.
Full-Speed Mode: Fan operates at full speed, keeping the system cooler, but emitting more noise.
Cool Mode: Fan operates at a higher speed, keeping your Synology NAS cooler, but emitting more noise.
Quiet Mode: Fan operates at a lower speed, emitting less noise, but the temperature of your Synology NAS may rise.
Low-Power Mode: Fan operates at a lower speed, emitting less noise, but the temperature of your Synology NAS may rise. In addition, when your Synology NAS has cooled down, the fan will stop to save power.
Install DSM on Synology NAS
After hardware setup is finished, please install DiskStation Manager (DSM) – Synology’s browser-based operating system – on your DS220j.
Install DSM with Web Assistant
Your DS220j comes with a built-in tool called Web Assistant that helps you download the latest version of DSM from the Internet and install it on your DS220j. To use Web Assistant, please follow the steps below.
1. Power on your DS220j.
2. Open a web browser on a computer connected to the same network as the DS220j.
3. Enter either of the following into the address bar of your browser
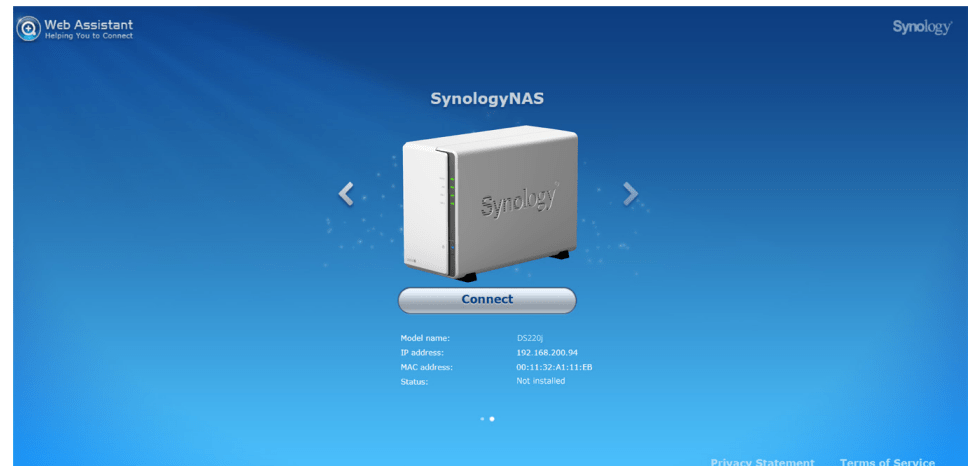
4. Web Assistant will be launched in your web browser. It will search for and find the Synology NAS within the local network. The status of the DS220j should be Not Installed.
5. Click Connect to start the setup process and follow the onscreen instructions.
6. If you accidentally leave the installation process before it is finished, log in to the DSM as admin (default administrative account name) with the password left blank.


 icon.
icon.