Loading ...
Loading ...
Loading ...
EN
7
Use & Care guide
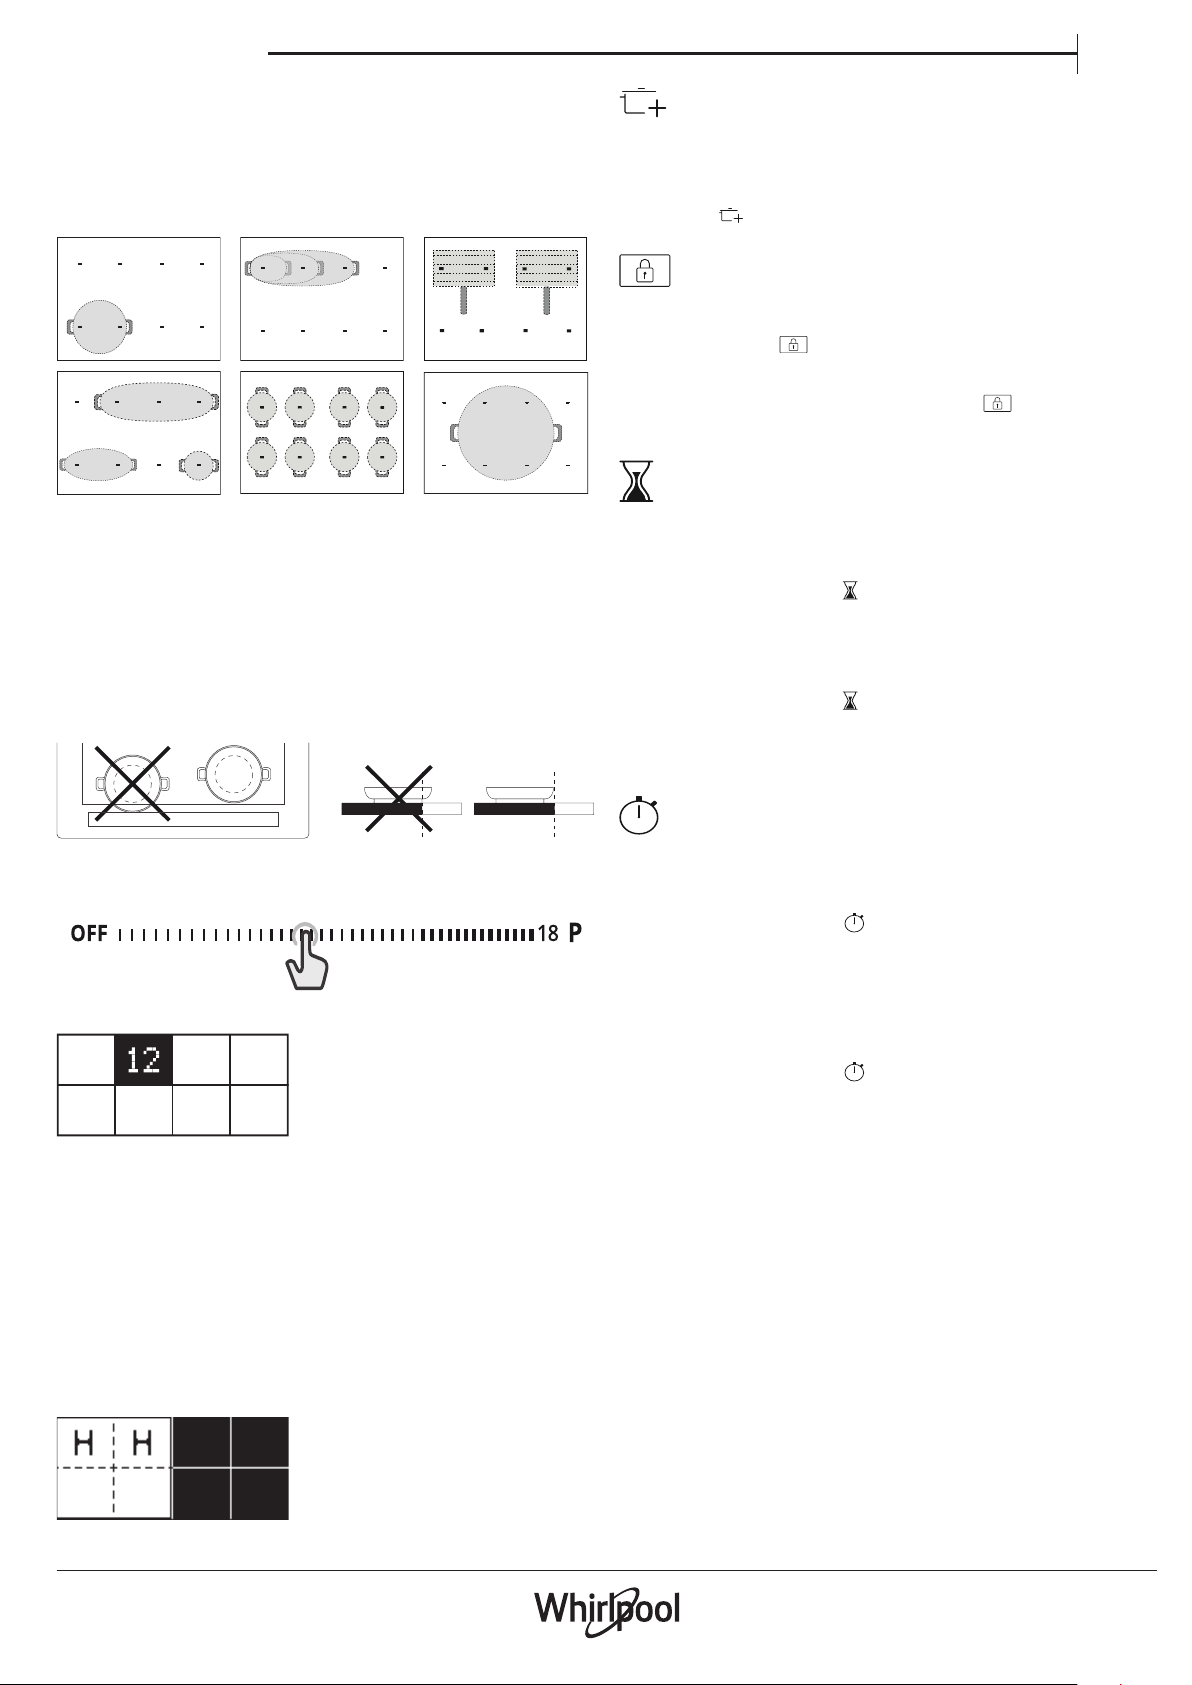
ACTIVATING/DEACTIVATING COOKING ZONES AND ADJUSTING
POWER
To activate the cooking zones:
1. Switch on the hob. If a recipient is already in place, the hob automatically
detects it. Select the suggested zone to choose the power.
2. Place the pot in the chosen cooking zone, ensuring that it is covering
one or more of the reference points on the surface of the hob.
*
* Using this position will allow you to benet from maximum power output.
Please note: Do not cover the display or the slide touchscreen with
accessories. If a utensil is covering one of the displays, the hob may not
function properly. On the right display, the message «CHECK TOUCH AREA,
remove the object within one minute» will appear. Remove the object and
wait until the message disappears. If the problem persists, disconnect and
reconnect the power to the cooktop.
In the cooking zones close to the control panel, it is advisable to keep pots
and pans inside the markings (taking both the bottom of the pan and the
upper edge into consideration, as this tends to be larger).
This prevents excessive overheating of the touchpad. When grilling or
frying, please use the rear cooking zones wherever possible.
3. Select the cooking zone or exible area from the left-hand display.
4. Set the desired power level by pressing or moving your nger
horizontally across the slide touchscreen.
The power level set will appear in the pane of the cooking zone selected.
Each cooking zone oers a range of dierent heat settings, from “1”
(minimum power) to “18” (maximum power).
Using the slide touchscreen, you can also select the quick heat function,
which will appear on the display with the letter “P”.
Please note: If the pot is not suitable for induction cooking, is not positioned
correctly or is not of an appropriate size, the cooking zone pane will ash. If
no pot is detected within 30seconds of making the selection, the cooking
zone switches o.
To deactivate the cooking zones:
Select the cooking zone in the left-hand display and press the “OFF”
button at the top of the slide touchscreen. If the cooking zone is still hot,
the residual heat indicator “H” will appear in the corresponding pane.
PLACE A POT
When using a cooking area composed of several zones, the pot can
be placed anywhere on the active area. The hob will automatically
recognise the actual positioning of the pot.
If you wish to add an additional pot to the active cooking area, use the
“Place a pot”
command to allow the hob to detect the new pot.
KEY LOCK
To prevent accidental activation of the hob during cleaning, or to
prevent the controls from being changed accidentally whilst cooking,
press the “Key lock”
button for 3 seconds: a beep and a warning
light indicate that this function has been activated.
The control panel will be locked, with the exception of the o button.
To reactivate the controls, press the “Key Lock” button again for 3
seconds. The warning light switches o and the hob is active again.
TIMER
When the hob is o, you can use the right-hand display as a timer.
To activate the timer:
1. Switch on the hob.
2. Press the hourglass icon
that appears on the manage functions
display.
3. Use the +/- buttons to set the time.
4. When the set time has elapsed, an acoustic signal sounds.
To change or deactivate the timer:
1. Press the hourglass icon
that appears on the manage functions
display.
2. Use the + and - buttons to reset the desired time, or press the
“STOP” button to turn o the timer.
SETTING THE COOKING TIME
The cooking zones can be programmed to switch o automatically.
To set the cooking time:
1. Select the cooking zone and set the required power level.
2. Press the stopwatch icon
that appears on the manage functions
display.
3. Use the +/- buttons to set the time.
4. Once the set time has elapsed, an acoustic signal sounds and the
cooking zone switches o automatically.
To change or deactivate the cooking timer:
1. Select the active cooking zone.
2. Press the stopwatch icon
that appears on the manage functions
display.
3. Use the + and - buttons to reset the desired time, or press the
“STOP” button to cancel the set cooking time.
A cooking time can be set for each zone or exible area by following the
same steps.
Loading ...
Loading ...
Loading ...