User manual Beverage Cooler
Components
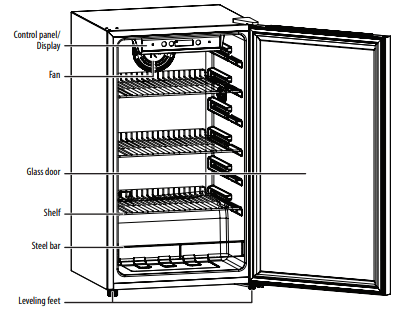
Control and display panel
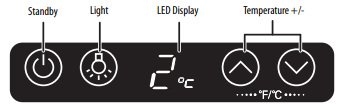

- Press to turn the power on or off.
- Hold for three seconds to set your cooler to “Standby” mode.
 Press to turn the interior light on or off.
 Press to increase the temperature by one degree.
 Press to decrease the temperature by one degree.
 Press both buttons simultaneously to change the display from F° to C° or back again.
Notes:
- Touch the control panel lightly when pressing the keys.
- To avoid scratching the control panel, do not touch it with sharp objects.
Setting up your beverage cooler
Before using your cooler
- Remove the exterior and interior packaging.
- Let the cooler stand upright for approximately half an hour before connecting it to power. This reduces the possibility of a malfunction in the cooling system from improper handling during transportation.
- Clean the interior surface with a damp, warm cloth.
Finding a suitable location
- This cooler is designed to be free standing only, and it should not be recessed or built into a countertop or wall.
- Place your cooler on a floor, counter top, or cabinet that is strong enough to support the cooler when it is fully loaded.
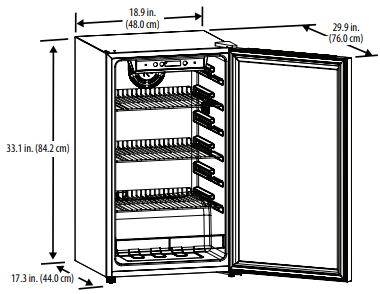
- Allow 1.6 in. (4 cm) of space on all sides of the cooler to allow for proper air ventilation.
- Place the cooler away from direct sunlight and sources of heat (stove, heater, radiator, etc.). Direct sunlight may affect the acrylic coating and heat sources may increase electrical consumption. Ambient temperature below 50°F (10°C) or above 85°F (29.4 °C) will hinder the performance of this cooler. This cooler is not designed for use in a garage or any other outside location.
- Avoid placing the cooler in moist areas.
- This unit is not designed to be installed in an RV or used with an inverter.
- Do not stack your cooler.
- For your cooler to operate normally, avoid placing it in areas with high magnetic fields or high humidity.
Leveling your cooler
- It is very important for the cooler to be level in order to function properly. If the cooler is not leveled during installation, the door may not close or seal properly, causing cooling, frost, or moisture problems.
- To level your cooler, you may turn either leveling foot clockwise to raise that side of the cooler or turn it counter-clockwise to lower that side.
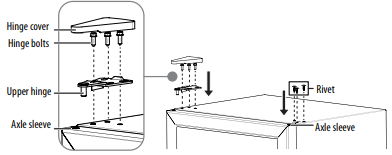
Reversing the door
You will need a 10 mm socket wrench and a Phillips screwdriver. Have someone available to assist you in the process. Make sure that you keep all of the parts you remove to reuse them later.
CAUTION: Do not lay the wine cooler completely flat as that could damage the coolant system.
1 Make sure that your wine cooler is unplugged and empty.
2 Adjust the leveling feet to their highest position.
3 Use a blade to remove the rivets.
4 Use a blade to remove the hinge cover, then use a Phillips screwdriver to remove the hinge bolts.
5 Remove the upper hinge.
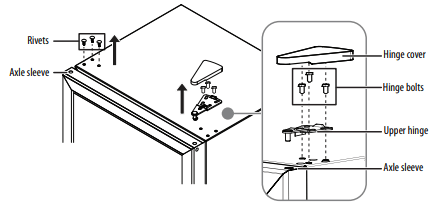
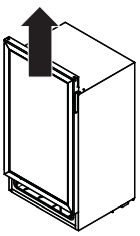
6 Remove the door from the wine cooler.
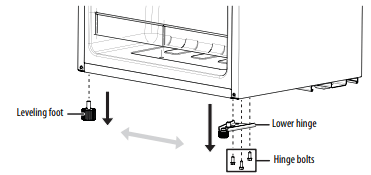
7 Use a Phillips screwdriver to remove the door stopper screws, then remove the door stopper.

8 Use a Phillips screwdriver to remove the hinge bolts, then remove the lower hinge and the leveling foot.
9 Attach the lower hinge and leveling feet to the opposite sides of the wine cooler.
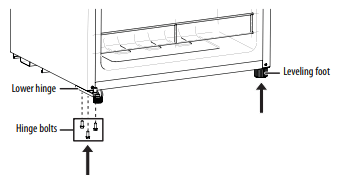
10 Replace the glass door, then reinstall the upper hinge. Make sure that you align the door and check the tightness of the door gasket.
11 Adjust the leveling feet to level the cooler.
Grounding requirement
This cooler must be grounded. This cooler is equipped with a cord having a grounding wire with a grounding plug. The plug must be inserted into an outlet that is properly installed and grounded.
Consult a qualified electrician or service person if the grounding instructions are not completely understood, or if doubt exists as to whether the cooler is properly grounded.
WARNINGS:
- Improper use of the grounding plug can result in a risk of electric shock.
- Do not, under any circumstances, cut or remove the third ground prong from the supplied power cord.
Connecting to power
- Plug the appliance into a dedicated, properly installed grounded wall outlet. This appliance should be operated on a separate electrical circuit from other operating appliances.
CAUTION: This unit is not designed to be installed in an RV or used with an inverter.
- Plug in and run your cooler for three to four hours before making any temperature adjustments and before adding beverages. This allows your cooler to reach a stable temperature.
Notes:
- Check your local power source. This cooler requires a 110V-120V, 60 Hz power supply.
- Use a receptacle that accepts the grounding prong. The power cord is equipped with a 3-prong (grounding) plug which plugs into a standard 3-prong (grounding) wall outlet to minimize the possibility of electric shock hazard from this cooler.
- To prolong the service life of the compressor, wait for at least five minutes before restarting the cooler after a power failure.
- Do not use an extension cord with this cooler. If the power cord is too short, have a qualified electrician install an outlet near the cooler. Use of an extension cord can negatively affect the cooler’s performance.
Using your beverage cooler
Turning on your cooler
Press the button to turn your cooler on. The display screen and indicators blink for three seconds and an audible beep is heard, then the compressor starts working.
You can manually set your unit to “Standby” mode by touching the button for approximately three seconds, provided that the control keys are unlocked and no other setting is in effect (the display is not blinking). Repeating this action restarts the unit.
Setting the temperature
- Press the temperature up or down buttons to increase or decrease the temperature by one degree. The temperature range is 34–50° F (1–10° C).
- Press and hold the temperature up and down buttons at the same time for three seconds to switch between Fahrenheit and Celsius.
Notes:
- A large number of beverages will lower the cooling efficiency of the cooler.
- When you put several beverages in the cooler at one time, the temperature in the cooler may rise temporarily.
- Adjust the thermostat setting by one increment at a time. Allow several hours for the temperature to stabilize between adjustments.
- The screen display always shows the set temperature. When adjusting the temperature, the temperature display blinks to indicate that the temperature is being adjusted.
Memory function
If you experience a power outage, when your cooler is turned on again it resumes the same temperature that was set when the power went off.
Using the display
- When you plug in your cooler for the first time, the display screen turns on for three seconds and you hear a start-up tone.
- In normal mode, the display shows the set temperature.
Lighting your cooler
- Press the light button to turn the interior light on and off.
Using the adjustable shelves
- All of the shelves have tabs to engage the cabinet on both sides.
- Any of the shelves can be removed to accommodate larger beverages.
To remove a shelf:
- Remove all bottles from the shelves.
- Lift the shelf upward and then gently pull out the shelf.
To replace a shelf:
- Place the sides of the shelf back onto the supporting guides of the cabinet and push back until the shelf tabs slide into place.
CAUTION: Make sure that the tabs are firmly engaged in the supporting guides before storing any beverages.
Arranging your beverages
In order to maintain good air circulation in the cooler, do not let the beverages touch the back of the cooler.
Maintaining your beverage cooler
Your cooler is designed for year-round use with only minimal cleaning and maintenance.
When you first receive it, wipe the cabinet with a mild detergent and warm water, then wipe dry with a dry cloth. Do this periodically to keep your cooler looking new.
CAUTION: To prevent damage to the finish, do not use:
- Gasoline, benzine, thinner, or other similar solvents.
- Abrasive cleaners.
Cleaning the interior of your cooler
1 Turn off the cooler and unplug it from the wall outlet.
2 Remove all beverages.
3 Wash the interior with a damp, warm cloth.
Note: It is recommended that you soak your cloth in a baking soda solution before washing the interior. Mix one quart of warm water and two tablespoons of backing soda.
4 Clean the door gasket (seal) so the door closes properly.
5 Dry the interior and exterior with a soft cloth.
Defrosting your cooler
The ice build-up on the inner back wall of your cooler will automatically be defrosted in a compressor-off cycle.
When you press the button, the compressor and circulation fan stops running while defrosting is in process.
Defrost water will drain out of the cooler, passing through the drain outlet in the inner back wall into a drain pan located above the compressor. The water will evaporate from the drain pan on its own.
Storing your cooler
1 Turn off the cooler and unplug it from the wall outlet.
2 Remove all beverages.
3 Clean the cooler.
4 Leave the door open slightly to avoid possible formation of condensation, mold, or odor.
WARNING: Make sure that children do not have access to your beverage cooler. If the door accidentally closes while a child is inside your cooler, the child may suffocate.
Moving your beverage cooler
Note: Make sure that the cooler stays in the upright position during transportation.
1 Turn off the cooler and unplug it from the wall outlet.
2 Remove all beverages.
3 Securely tape down all loose items inside your cooler.
4 Tape the door shut.
Tips on saving energy
- Locate your cooler in the coolest area of the room, away from heat-producing appliances or heating ducts, and out of direct sunlight.
- Do not overload the cooler. It forces the compressor to run longer.
- Do not open the door too often, especially if the weather is very hot. Close the door as soon as possible to prevent cool air from escaping.
- Make sure that the door seals completely to keep your cooler running efficiently.
- Make sure that the appliance is sufficiently ventilated, with adequate air circulation behind it.
Troubleshooting
Error codes
If a fault is detected, the display shows one of the following codes:
- E1: Temperature sensor fault
- E4: Defrost sensor fault
If any of these error codes appears on the display, contact your local dealer or service center. Do not try to repair the cooler yourself.
The cooler does not operate.
- Make sure that the cooler is plugged in and that the plug is pushed completely into the outlet.
- Check the house fuse/circuit breaker box and replace the fuse or reset the circuit breaker.
- If a power failure occurs, the cooler turns off. Wait until the power is restored, then turn it on again.
The cooler door does not close completely.
- Adjust the shelf properly.
- Clean the door gaskets.
- Level the cooler with the leveling feet.
The cooler is not cold enough.
- Make sure that the door is closed properly.
- Allow time for new beverages to cool, then check again.
- Set the control to a colder setting.
The cooler makes unusual noises or vibrates.
- Level the cooler with the leveling feet.
- Move the cooler out from the wall.
- This is normal.
Moisture is building up in the interior of the cooler.
- Make sure that the door is closed properly.
- Move the cooler to a dryer location.
The cooler turns on and off frequently
- Make sure that your cooler is in a room that is 50– 85 °F (10–29.4 °C) or place your cooler in a cooler location.
- Make sure that the door is closed properly.
- Clean the door gaskets.
- Set the control to a colder setting.