Contact an installation specialist for installation.
Plug in the power plug properly.
Use a dedicated circuit.
Do not use an extension cord.
Do not start/stop operation by plugging/unplugging the power cord.
If the cord/plug is damaged, replace it with only an authorized replacement part.
Usage
Being exposed to direct airflow for an extended period of time could be hazardous to your health.
No correlation between fan usage and oxygen depletion.
Do not use this air conditioner for non-specified special purposes (e.g. preserving precision devices, food, pets, plants, and art objects). Such usage could damage the items.
Cleaning and Maintenance
Do not touch the metal parts of the unit when removing the filter. Injuries can occur when handling sharp metal edges.
Do not use water to clean inside the air conditioner. Exposure to water can destroy the insulation, leading to possible electric shock.
When cleaning the unit, first make sure that the power and breaker are turned off. The fan rotates at a very high speed during operation. There is a possibility of injury if the unit’s power is accidentally triggered on while cleaning inner parts of the unit.
Service
For repair and maintenance, contact an Authorized Service Center. See the warranty page for details or call (800) 243-0000. Have your model number and serial number available. They should be written on page 2 of this manual.
Introduction
Symbols Used in this Manual
This symbol alerts you to the risk of electric shock.
This symbol alerts you to hazards that could cause harm to the air conditioner.
NOTICE: This symbol indicates special notes.
Features
WARNING
This appliance should be installed in accordance with the National Electric Code.
Installation
Remove packing materials from the wall sleeve and tape from the air conditioner.
INSTALLATION REQUIREMENTS
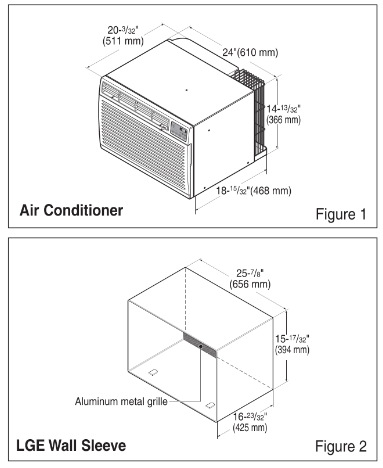
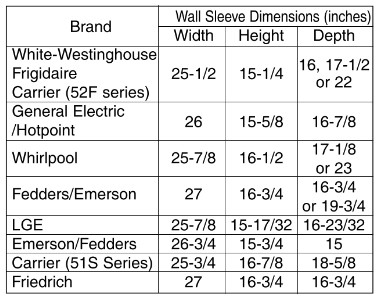
If you use an existing wall sleeve, you should measure its dimensions.
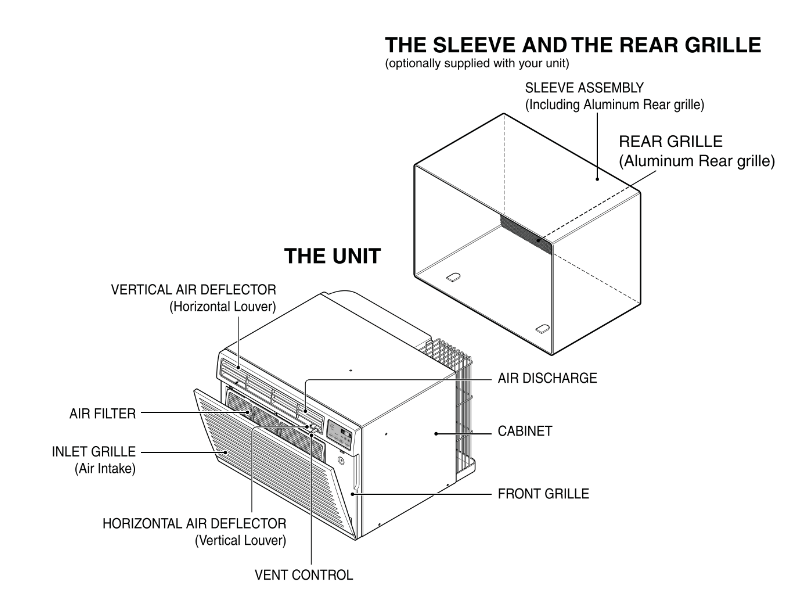
Install the new air conditioner according to these installation instructions to achieve the best performance. All wall sleeves used to mount the new air conditioner must be in good structural condition and have a rear grille to securely attach the new air conditioner. (Figure 1)
With the LGE sleeve(optionally supplied with your unit), you can maintain the best performance of the new air conditioner. (Figure 2)
ELECTRICAL SERVICE
Check your available electrical service. The power supply available must be the same as that shown on the unit nameplate (found on left side of cabinet).
All models are equipped with a 3-prong service plug to provide proper service and safe positive grounding. Do not change plug in any way. Do not use an adapter plug. If your present wall outlet does not match your plug, call a qualified electrician to make the necessary corrections. SAVE CARTON for storage and this OWNER'S MANUAL for future reference. The carton is the best way to store unit during winter or when not in use.
INSTALLATION HARDWARE
CAUTION
To avoid risk of personal injury, property damage, or product damage due to the weight of this device and sharp edges that may be exposed:
Air conditioners covered in this manual pose an excessive weight hazard. Two or more people are needed to move and install the unit.
To prevent injury or strain, use proper lifting and carrying techniques when moving unit.
Carefully inspect location where air conditioner will be installed. Be sure it will support the weight of the unit over an extended period of time.
Handle air conditioner with care. Wear protective gloves whenever lifting or carrying the unit. AVOID the sharp metal fins of front and rear coils.
Make sure air conditioner does not fall during installation.
INSTALLATION
CAUTION
We strongly recommend the removal of the old wall sleeve and the Installation of a new LGE Wall Sleeve.
If you decide to keep the existing wall sleeve, you have to redirect the louvers at the back of the wall sleeve illustration. The use of pliers is recommended. If you DO NOT redirect, you run the risk of poor performance or product failure. This is not covered under the terms of the LGE warranty.
Pick a location which will allow the conditioned air to blow into the area you want. Good installation with special attention to the proper position of the unit will lessen the chance that service will be needed.
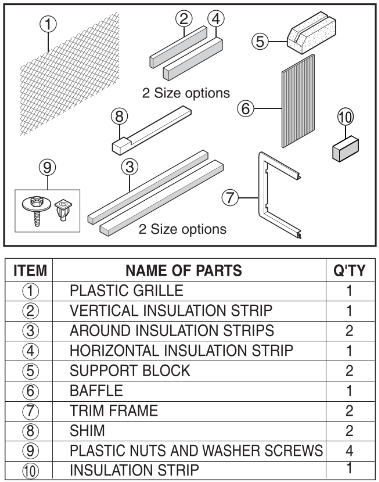
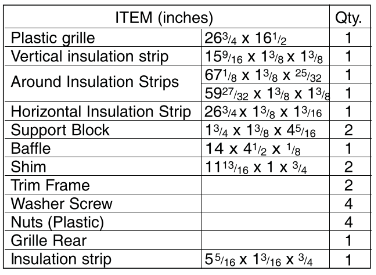
ITEMS IN INSTALLATION HARDWARE
You may not need all parts in the kit. Discard unused parts.
HOWTO INSTALL
1. Indentify the existing wall sleeve before installing
NOTICE: All wall sleeves used to mount the new Air Conditioner must be in sound structural condition and have a rear grille that securely attaches to sleeve, or rear flange that serves as a stop for the Air Conditioner.
2. Remove the old airconditioner from existing wall sleeve.
3. Clean the interior of the existing sleeve. (Do not disturb seals.)
4. Wall sleeve must be securely fastened in wall ” before installing the air conditioner. Use the nails or screws through sleeve into wall, if needed. Repaint sleeve if needed.
5. Prepare the wall sleeve for installation of the unit. If you plan to use your existing wall sleeve, and it is not LGE, use procedure B or C below.
6. Install new unit into wall sleeve
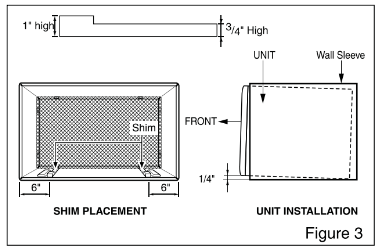
CAUTION: When installation is completed, the replacement unit MUST have a rearward slope as shown. To achieve 1/4" slope, remove the backing from the 11-13/16" shim strips and attach them as shown below in Fig. 3. Place the higher portion of the shim to the front of the rib on the base of the wall sleeve.
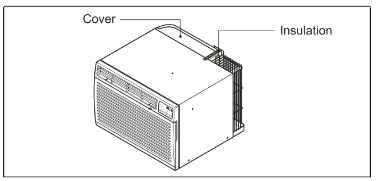
7. Remove the backing from the insulation strip 5 5/16 x 1 3/16 x /4 and attach that top of the cover as show below.
PROCEDURE A
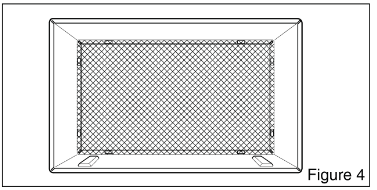
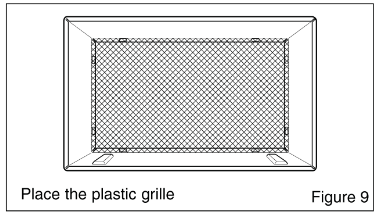
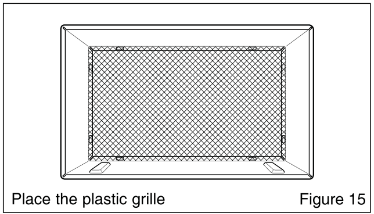
1. If you are using the new sleeve (optionally supplied with your unit), skip to step 3. Otherwise, install the plastic grille from the kit. Cut the plastic grille to 25-1/2" wide and 15-1/4" high. Place the plastic grille to the inside of the wall sleeve at the rear flange.
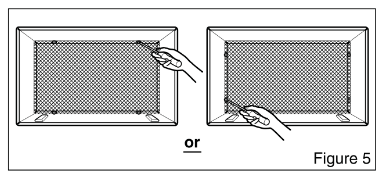
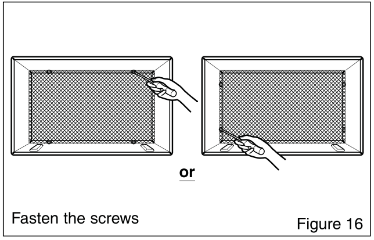
2. Fasten the 4 washer screws to secure the grille to the wall sleeve. If you need plastic nuts to mount plastic grille to the inside of the wall sleeve, there are plastic nuts in the installation kit. The nuts are installed from the inside of the sleeve and are pressed into the square holes of the rear flanges.
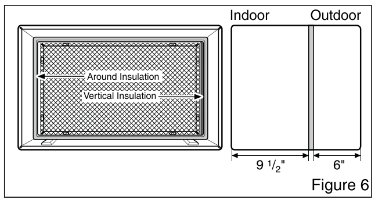
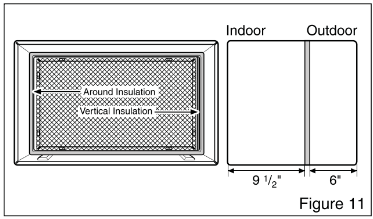
3. Remove the backing from the vertical insulation strip 15%16 x 13/s x 13/a and attach that to the inside right of the sleeve as shown below. Remove the backing from the around insulation strip 671/a x 13/e x 35/32 and attach that to the inside front of the sleeve as shown below.
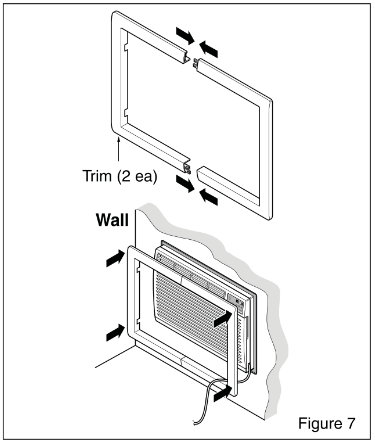
4. Install the new unit into the wall sleeve.
5. To assemble trim, snap the tab of each piece into the slot of the other piece as shown below. Slide trim over the front of the air conditioner until trim is flush with sleeve as shown below.
CAUTION
Air conditioners covered in this manual pose an excessive weight hazard. Two or more people are needed to move and install the unit.
To prevent injury or strain, use proper lifting and carrying techniques when moving unit.
When handling the air conditioner, be careful to avoid cuts from sharp metal fins on front and rear coils.
Make sure air conditioner does not fall during removal.
If unit does not operate after installation check, to be sure the circuit interrupter has not been tripped. Refer to the Troubleshooting guide for reset procedure.
PROCEDURE B
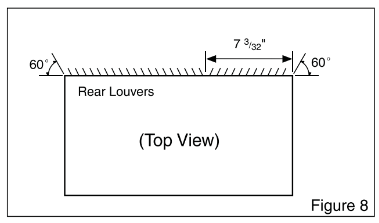
1. Redirect the louvers at the back of the wall sleeve to 60° angle as shown in the Figure 8. The use of pliers is recommended.
2. If the wall sleeve already has a rear grille, skip to step 4. If the wall sleeve does not have a rear grille or louvered panel, install the plastic grille from the kit. Cut the plastic grille to 25-1/2" wide and 15-1/4" high. Place the plastic grille to the inside of the wall sleeve at the rear flange.
3. Fasten the 4 washer screws to secure the grille to the wall sleeve. If you need plastic nuts to mount plastic grille to the inside of the wall sleeve, there are plastic nuts in the installation kit. The nuts are installed from the inside of the sleeve and are pressed into the square holes of the rear flanges.
4. Remove the backing from the Vertical Insulation strip 159/ie x 13/a x 1 3/b and attach that to the inside right of the sleeve as shown below. Remove the backing from the Around Insulation strip 671/s x 13/a x 25/32 and attach that to the inside front of the sleeve as shown below.
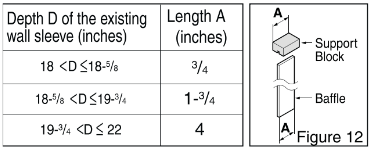
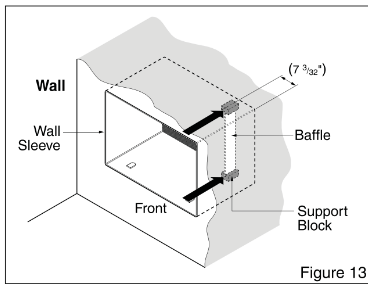
5. If the depth of your existing wall sleeve is less than or equal to 18", skip to step 6. Otherwise, cut the baffles and the support blocks according to length A in the table below.
6. Remove the backing from the support blocks and attach them to the inside of the wall sleeve as shown In Figure 13. Slide the baffle into slots of the support blocks.
7. Install the unit into the wall sleeve
8. Assemble trim as discibed in Step 5, Procedure A
CAUTION
Air conditioners covered in this manual pose an excessive weight hazard. Two or more people are needed to move and install the unit.
To prevent injury or strain, use proper lifting and carrying techniques when moving unit.
When handling the air conditioner, be careful to avoid cuts from sharp metal fins on front and rear coils.
Make sure air conditioner does not fall during removal.
If unit does not operate after installation check, to be sure the circuit interrupter has not been tripped. Refer to the Troubleshooting guide for reset procedure.
PROCEDURE C
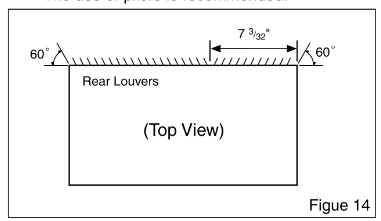
1. Redirect the louvers at the back of the wall sleeve to 60° angle as shown in the Figure 14. The use of pliers is recommended.
2. If the wall sleeve already has a rear grille, skip “ to step 4. If the wall sleeve does not have a rear grille or louvered panel, install the plastic grille from the kit. Cut the plastic grille to 26-1/2" wide and 15-1/2" high. Place the plastic grille to the inside of the wall sleeve at the rear flange.
3. Fasten the 4 washer screws to secure the grille to the wall sleeve. If you need plastic nuts to mount plastic grille to the inside of the wall sleeve, there are plastic nuts in the installation kit. The nuts are installed from the inside of the sleeve and are pressed into the square holes of the rear flanges.
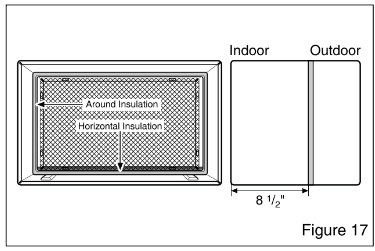
4. Remove the backing from the horizontal insulation strip 263m x13/«x 13/is and attach that to the inside right of the sleeve as shown below. Remove the backing from the around insulation strip 5927/32 x 13/a x 13/s and attach that to the inside front of the sleeve as shown below.
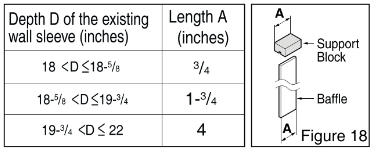
5. If the depth of your existing sleeve is less than or equal to 18”, skip to step 7. Otherwise, cut the baffles and the support blocks according to Length A in the table below.
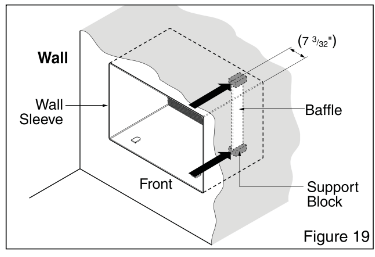
6. Remove the backing from the support blocks and attach them to the inside of the wall sleeve as shown in Figure 19. Slide the baffle into slots of the support blocks
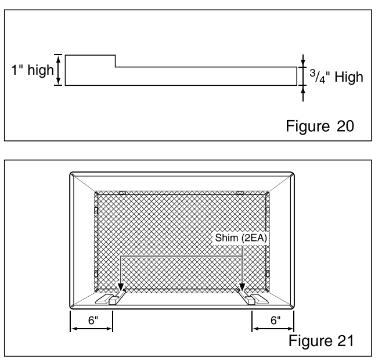
7. To achieve rearward slope for unit draining, remove the backing from the 1113/16" shim strips and attach them as shown below in Figure 21. The higher portion of shim is to be placed in front of the rib on the base of wall sleeve.
8. Install the new unit into the wall sleeve
9. Assemble trim as decribed in Step 6, Procedure A.
CAUTION
Air conditioners covered in this manual pose an excessive weight hazard. Two or more people are needed to move and install the unit.
To prevent injury or strain, use proper lifting and carrying techniques when moving unit.
When handling the air conditioner, be careful to avoid cuts from sharp metal fins on front and rear coils.
Make sure air conditioner does not fall during removal.
If unit does not operate after installation check, to be sure the circuit interrupter has not been tripped. Refer to the Troubleshooting guide for reset procedure.
Operating Instructions
Remote Control Operations
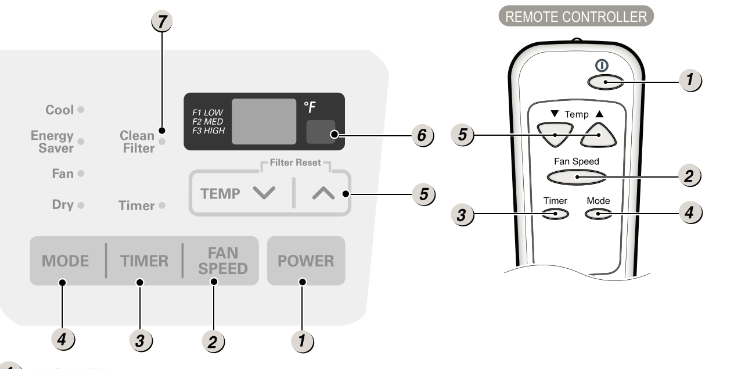
1 POWER
Operation starts when this button is pressed and stops when you press the button again.
2 FAN SPEED SELECTOR
Use to set the fan speed to Low (F1), MED (F2), High (F3).
3 ON/OFF TIMER
Delay ON - when the air conditioner is off, it can be set to automatically turn on from 1 to 24 hours at its previous mode and fan settings.
Delay OFF- when the air conditioner is on, it can be set to automatically turn off from 1 to 24 hours.
4 OPERATION MODE SELECTOR
Push the MODE button to rotate between Energy Saver / Cool / Fan / Dry.
Energy Saver- The fan stops when the compressor stops cooling. Approximately every 3 minutes the fan will turn on and check the room air temperature if cooling is needed.
Cool - Compressor runs and cools the room. Use the A / V and FAN buttons to set the desired temperature and circulation fan speed.
Fan - Fan circulates air but compressor does not run. Use the FAN button to set the desired fan speed.
Dry- Dry mode is used to remove humidity from the room without additional cooling. Once the set temperature is reached, the compressor and circulation fan turns off. Fan speed is pre-set and cannot be adjusted.
5 TEMPERATURE CONTROL
The thermostat monitors room temperature to maintain the desired temperature. The thermostat can be set between 60°F~86 °F (16 °C~30 °C).
6 REMOTE CONTROL SENSOR
7 CLEAN FILTER
Clean Filter' LED will light up to notify you that your filter needs to be cleaned. After cleaning the filter, press “Temp A V” together to turn off ‘Clean Filter’ light. (Filter reset must be done from unit control panel not remote control).
NOTICE: This feature is reminder to clean the Air Filter (See Maintenance) for more efficient operation. The LED (light) will illuminate after 250 hours of operation.
AUTO RESTART: During operation in failure of electric power, the unit runs as previous setting operation. rmsmmsm-
ENERGY SAVER: The unit defaults to Energy Saver mode each time the unit is switched on except restoration after an electrical power outage and fan mode.
CAUTION : The remote controller will not function properly if strong light strikes the sensor of the air conditioner or if there are obstacles between the remote controller and the air conditioner.
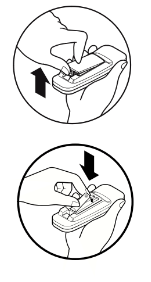
Inserting the Remote Control Battery
Push out the cover on the back of the remote control with your thumb.
Pay attention to polarity and insert one new AAA 1.5 V battery.
Reattach the cover.
NOTICE
Do not ure rechargeable battery. Make sure that the battery is new.
Do not mix alkaline, standard (Carbon-zinc) or rechargeable (Nickel-cadmium) battery.
In order to prevent discharge, remove the batteries from the remote control if the air conditioner is not going to be used for an extended period of time. Keep the remote control away from extremely hot or humid places. To maintain optimal operation of the remote control, the remote sensor should not be exposed to direct sunlight.
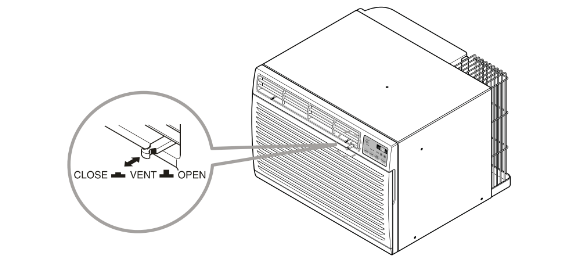
Ventilation
The ventilation lever is located in the right of the air discharge.The ventilation lever must be in the CLOSE posotion in order to maintain the best cooling conditions. When fresh air is necessary in the room, set the ventilation lever to the OPEN position. The damper is opened and room air is exhausted outside.
Air Direction
The direction of air can be controlled wherever you want by adjusting the horizontal louver and the vertical louver. • •
HORIZONTAL AIR-DIRECTION CONTROL
The horizontal air direction is adjusted by moving vertical louver.
The lever of vertical louver is located in the right and left side of the air discharge.
VERTICAL AIR-DIRECTION CONTROL
The vertical air direction is adjusted by moving the horizontal louver.
Maintenance and Service
TURN THE AIR CONDITIONER OFF AND REMOVE THE PLUG FROM THE POWER OUTLET.
Air Filter Cleaning
The air filter should be checked at least twice a month to see if cleaning is necessary. Trapped particles in the filter will build up and block the airflow. This reduces the cooling capacity and also causes an accumulation of frost on the cooling coils.
If the filter becomes turn or damaged you should replace immediately. Replacement filters are available from your salesperson, dealer, and the authorized customer service centers.
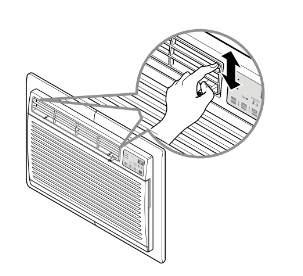
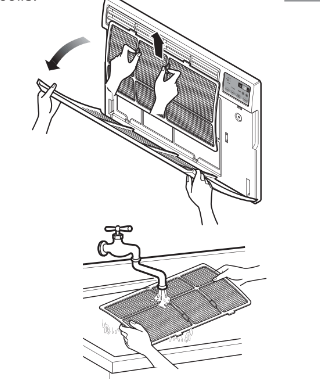
Open the inlet grille downward by pulling out the top of the inlet grille.
Remove the air filter from the front grille assembly by pulling the air filter up slightly.
Wash the filter using lukewarm water below 40 °C (104 °F).
Gently shake the excess water from the filter completely. Replace the filter.
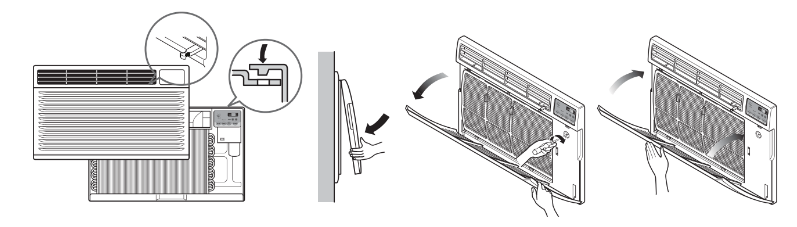
How To Attach Front Grille To Cabinent
The front grille can be removed for cleaning or to check the model and serial numbers. For your safety, you should attach the front grille as the following procedures.
Pull down front grille from the cabinet top.
Push front grille's tips toward the cabinet in order to insert front grille’s tabs into the cabinet.
Open the inlet grille.
Tighten the screw through the front grille into the plate of control box.
Close inlet grille.
NOTICE: Guide the lever carefully through the grille as you push it in.
Common Problems and Solutions
Before Calling for Service
If you have problems with your air conditioner, read the following information and try to solve the problem. If you cannot find a solution, turn off the air conditioner and call 1-800-243-0000.
Air conditioner does not operate
Ensure that the air conditioner is plugged into an outlet of the proper voltage and amperage.
Check the fuse or circuit breaker.
Check whether the voltage is unusually high or low.
Air does not feel cold enough on the cooling setting
Ensure that the temperature settings are correct.
Check to see if the air filter is clogged with dust. If so, clean the filter.
Ensure that the air flow from the outside is not obstructed and that there is a clearance of over 20" between the back of the air conditioner and the wall or fence behind it.
Close all doors and windows and check for any source of heat in the room. Water drip from the rear of the unit
Water drip from the rear of the unit
You see water dripping from the rear of the unit. Water may be collected in the base pan in highly humid conditions or on rainy days. This water overflows and drips from the rear of the unit.
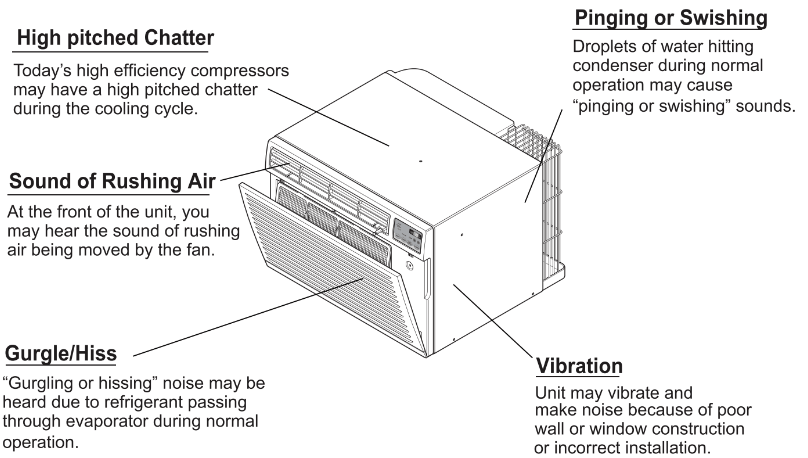
Normal Sound
Troubleshooting
The air conditioner may be operating abnormally when:
Problem
Possible Causes
What To Do
Air conditioner does not start
The air conditioner is completely into the outlet.
Make sure the air conditioner plug is pushed unplugged
The fuse is blown/circuit breaker is tripped
Check the house fuse/circuit breaker box and replace the fuse or reset the breaker
Power failure
If the power failure occurs, turn thr mode control to Off. When the power is restrore, wait 3 minutes to restart the air conditioner to prevent tripping of the compressor overload
The current interupter device is tripped
Press the RESET button located on the power cord plug. If the RESET button will not stay engaged, discontinue use of the air conditioner and contact a qualified service technician
Air conditioner does not cool as it should
Airflow is restricted.
Make sure there are no curtains, blinds, or furniture blocking the front of the air conditioner
The temp control may not be set correctly.
In COOL model, press the DECREASE*pad.
The air filter is dirty.
Clean the filter at least every 2 weeks. See the care and Maintenance section.
The room may have been hot.
When the air conditioner is first turned on, you need to allow time for the room to cool down.
Cold air is escaping.
Check for open furnace floor registers and cold air returns
Cooling coil have iced up.
See Air Conditioner Freezing Up below.
Air conditioner freezing up
The cooling coils are iced over.
Ice may block the air flow and obstruct the air conditioner from properly cooling the room.
Set the mode control at High Fan or High Cool
Water drips outside
Hot, humid weather.
This is normal.
Water drips indoors
The air conditioner is not tilted to the outside.
For proper water disposal, make sure the air conditioner slants slightly from the case front to the rear.
Water collects in base pan
Moisture removed from air and drains into base pan.
This is normal for a short period in areas with little humidity; normal for a longer period in very humid areas.
Air conditioner turns on and off rapidly.
Dirty air filter - air restricted.
Clean air filter.
Outside temperature extremely hot.
Set FAN speed to a faster setting to bring air through cooling coils more frequently.
Noise when unit is cooling.
Air movement sound.
This is normal. If too loud, set to lower FAN setting.
Window vibration - poor installation.
Refer to installation instructions or check with installer
Remote Sensing Deactivating Prematurely
Remote control not located within range.
Place remote control within 20 feet & 120° radius of the front of the unit.
 This symbol alerts you to the risk of electric shock.
 This symbol alerts you to hazards that could cause harm to the air conditioner.