Owner Manual Thermal Coffeemaker
FEATURES AND BENEFITS
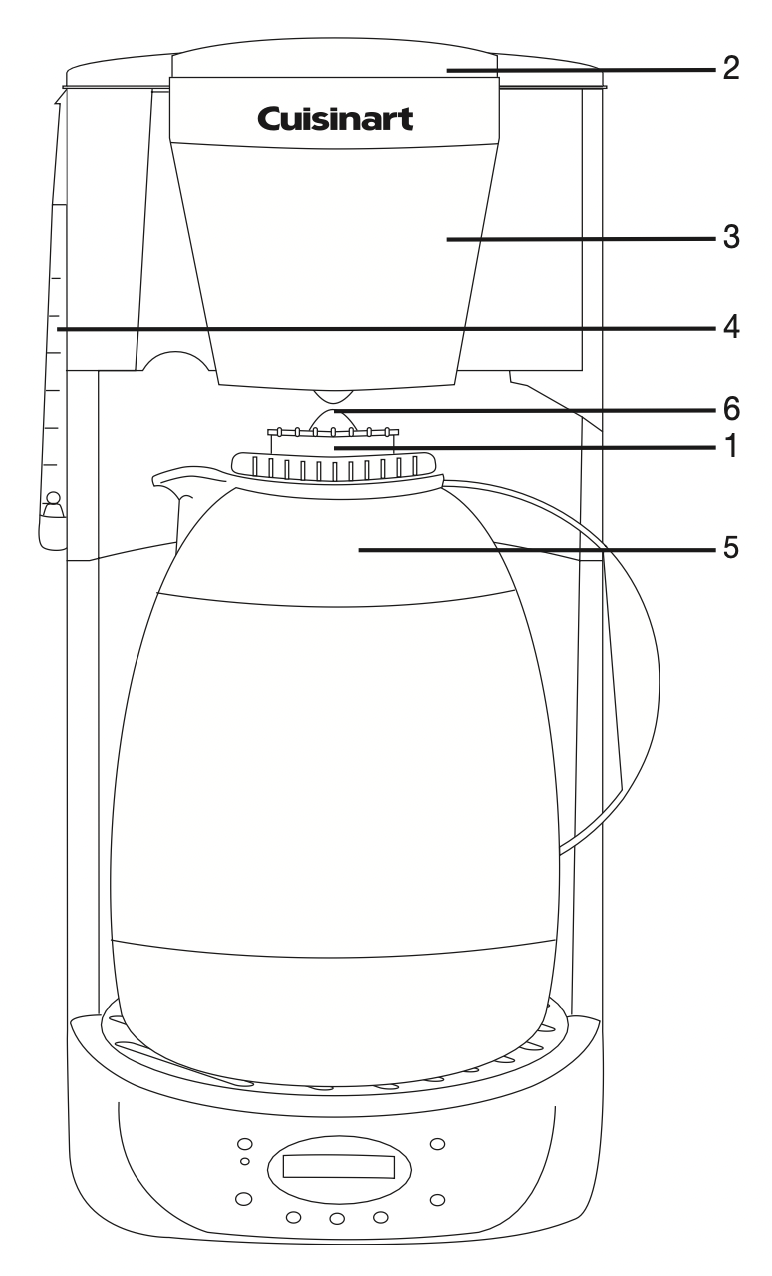
- Brew-Through/Pour-Through Lid
Allows coffee to brew in and pour out of carafe without opening or adjusting. Keeps coffee hot and flavorful for hours. - Reservoir Cover
Simply lift to fill with water. Close cover once water has been added. - Filter Basket
Swings open for easy insertion of coffee filter. - Water Window
Magnified markings indicate water needed to make corresponding cups of coffee. - Stainless Double-Wall Thermal Insulated Carafe
- Brew Pause™
Stops flow of water from basket when carafe is removed from heater plate, so a cup can be poured during brewing cycle. - Auto-Brew Cycle
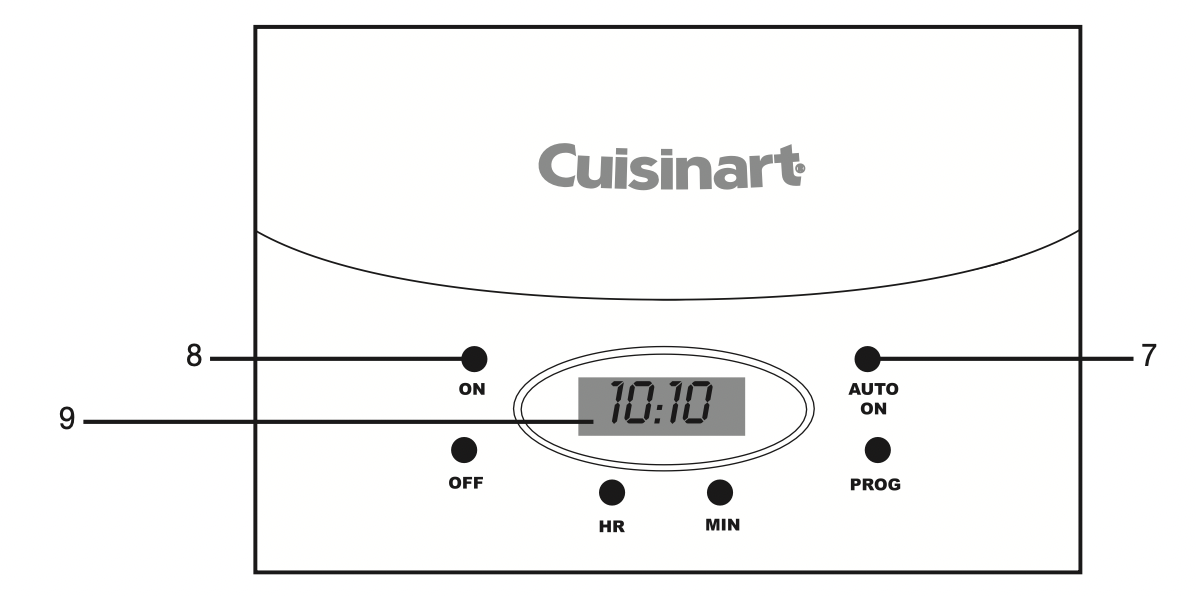
Program time to brew. - ON Indicator Light
Illuminates when power is on. - LCD Readout
PROGRAMMING YOUR COFFEEMAKER
To Set The Clock
- To set the time, press and hold the hour or minute button for two seconds. “Time set” starts flashing in the upper left corner of the LCD screen.
- Press the HOUR button to advance the clock to the desired time. The hour numeral moves in one-hour increments. When numeral passes 12 am, the PM indicator will illuminate in the lower left corner of the LCD screen.
- Press the MINUTE button to advance the minutes to the desired time. Minutes move in one-second increments.
- When complete, press the HOUR button again, or wait for 15 seconds and your time change will be accepted.
To Program the Brew Time
- To program the brew time, press and hold the PROG button for two seconds. The “prog” symbol starts flashing in the lower right corner of the LCD screen.
- Press the HOUR button to advance the clock to the desired time. The hour numeral moves in one-hour increments. When numeral passes 12 am, the PM indicator will illuminate in the lower left corner of the LCD screen.
- Press the MINUTE button to advance the minutes to the desired time. Minutes move in one-second increments.
- When complete, press the PROG button, or wait for 15 seconds and your set time will be accepted.
To Activate the Auto Brew Cycle
- To activate the auto brew mode, depress the AUTO ON button. The auto symbol will illuminate in the upper right corner of the LCD screen.
- The unit will now begin the brewing cycle at the programmed time. When the programmed time initiates the cycle, the red ON indicator light will show that the brewing cycle has started.
NOTE: The unit will continue to attempt to brew at the programmed time, each day, until the OFF button is pressed. The red ON indicator light will illuminate each time the attempt to brew is made. If there is no water in the reservoir, the unit will automatically shut off one minute later.
BREWING COFFEE
Follow instructions in “Before First Use” on this page.
- Open thermal carafe lid in direction of arrow.
Fill thermal carafe with cold, fresh water. Open hinged water reservoir cover; pour water into reservoir opening. Markings on water level indicator show amount of water needed to make desired number of cups of coffee. TO AVOID OVERFLOW, DO NOT FILL ABOVE 12-CUP MARK. Close reservoir cover. - Before thermal carafe is returned to platform, prewarm carafe by running warm water through it. Prewarming carafe will help keep coffee warmer.
- Return carafe lid to thermal carafe. To close lid, turn it in direction of Close arrow until it fits tightly on carafe, and Pour arrow is aligned with spout. Return empty thermal carafe to platform. Be certain thermal carafe lid is in closed position and is securely in place during brew cycle.
- Open filter basket by grasping basket handle and swinging outward. Insert a paper filter OR gold-tone filter (not included) into filter basket; make sure filter fits snugly in basket.
- After placing 2 level tablespoons per cup of ground coffee into cone filter, return basket to closed position. To ensure safe operation, make sure basket is closed securely.
- With thermal carafe and basket securely in place, press ON button; LED will light. CAUTION: Coffeemaker becomes very hot during brew cycle; handle with extreme care, as hot parts and escaping steam may cause burns.
- The Brew-Through lid allows coffee to drip from coffeemaker through closed lid. When coffee has completely stopped dripping into thermal carafe and water level indicator is empty, brew cycle is complete. When dripping stops, Brew-Through lid will seal so coffee freshness and temperature are preserved.
- An audible “beep” tone will signal when brew cycle is complete. The coffeemaker will switch off automatically. Bottom of Thermal Carafe is hot to touch for several minutes after brewing. Use caution.
- After coffee grounds have cooled, carefully open filter basket and discard used coffee filter and grounds. To remove filter basket from coffeemaker (A) grasp basket handle and swing basket outward, and (B) with basket in far right position, lift up and pull basket hinge.
- Brew-Through lid allows coffee to be poured with lid in closed position, so coffee freshness and temperature can be preserved.
NOTE: Reservoir cover may be hot during and directly after brewing. Wait at least 10 minutes before opening.
BREW PAUSE ™ FEATURE
This feature interrupts the flow of coffee from the basket to let you pour that first cup mid-brew. Because the flavor profile of coffee brewed at the start of a cycle differs from that brewed toward the end, be aware that using this feature will weaken the flavor strength of the finished pot.
NOTE: Removing carafe for more than 20 seconds may cause filter basket to overflow.
TIPS & HINTS
- Do not place a cloth or otherwise restrict airflow beneath coffeemaker.
- To avoid accidents, make sure thermal carafe lid is in closed position during brewing and while pouring; do not pour in the direction of people.
- When pouring, use thermal carafe handle only bottom of thermal carafe is hot to touch for several minutes after brewing.
- CAUTION: Burns may result from spilled hot liquid and/or contact with hot parts.
CLEANING AND MAINTENANCE
Always turn coffeemaker off and remove the plug from the electrical outlet before cleaning.
Lift up the reservoir cover. Remove and discard the paper filter and ground coffee. The filter basket can be washed in warm, soapy water and rinsed thoroughly or cleaned in the upper rack of the dishwasher.
Dry all parts after use.
Do not put any water in the unit once the filter basket has been removed. Wipe the area under the filter basket with a damp cloth.
Remove the carafe from the resting plate. Discard any remaining coffee. The carafe and lid can be washed in warm, soapy water and rinsed thoroughly or placed in a dishwasher. The carafe and carafe lid should be placed on the upper rack only.
Helpful Hint: Coffee contains oils that can build up on your carafe. For best performance, wash carafe and wipe pour spout clean after each use.
Do not use any scouring agents or harsh cleansers on any part of the coffeemaker.
Never immerse base unit in water or other liquids. To clean base, simply wipe with a clean, damp cloth and dry before storing. Fingerprints and other blemishes on the stainless steel housing can be washed off with soap and water or a nonabrasive cleaning solution. Wipe resting plate with a clean, damp cloth. Never use rough, abrasive materials or cleansers to clean the resting plate. Do not dry the inside of the water reservoir with a cloth, as lint may remain.