FR Manuel de l’Utilisateur
Register your product and get support at
www.philips.com/welcome
BDP5010
EN User manual
ES Manual del usuario
EN: For further assistance, call the customer support service in your country.
• To obtain assistance in the U.S.A., Canada, Puerto Rico, or the U.S. Virgin Islands, contact Philips
Customer Care Center at 1-866-309-0866
• To obtain assistance in Mexico, contact Philips Customer Care Center at 01 800 504 62 00
ES: Para obtener más información, llame al servicio de soporte al cliente de su país.
•
Para obtener asistencia en los Estados Unidos, en Canadá, Puerto Rico o en las Islas Vírgenes de los
Estados Unidos, comuníquese con Centro de atención al cliente de Philips al 1-866-309-0866
• Solo para Mexico CENTRO DE ATENCIÓN A CLIENTES LADA. 01 800 504 62 00 Solo
Para México.
FR: Pour obtenir de l’aide supplémentaire, communiquez avec le centre de service à la clientèle de
votre pays.
•
Pour obtenir de l’aide aux États-Unis, au Canada, à Puerto Rico ou aux Îles Vierges américaines,
communiquez avec le centre de service à la clientèle Philips au : 1-866-309-0866
• Pour obtenir l’aide au Mexique, entrez en contact avec le centre de soin de client de Philips à
01 800 504 62 00
Register your product and get support at
www.philips.com/welcome
HTS3051BV/F7
HTS3051BV/F8
E1S07UD_E1S08UD_EN.book Page 0 Monday, January 31, 2011 2:42 PM
EN2
PRECAUTIONS
Registering your model with PHILIPS makes you eligible for all of the valuable benets listed below,
so don't miss out. Complete and return your Product Registration Card at once, or register online at
www.philips.com/welcome to ensure:
Return your Product Registration Card or register online at
www.philips.com/welcome today to get the very most from your purchase.
Know these
safety
symbols
CAUTION:
TO REDUCE THE RISK OF ELECTRIC
SHOCK, DO NOT REMOVE COVER (OR BACK). NO
USER-SERVICEABLE PARTS INSIDE. REFER SERVICING
TO QUALIFIED SERVICE PERSONNEL.
CAUTION
RISK OF ELECTRIC SHOCK
DO NOT OPEN
*Proof of
Purchase
Returning the enclosed card guar-
antees that your date of purchase
will be on le, so no additional
paperwork will be required from
you to obtain warranty service.
*Product Safety
Notication
By registering your product, you'll
receive notication - directly from
the manufacturer - in the rare
case of a product recall or safety
defect.
*Additional
Benets
Registering your product guar-
antees that you’ll receive all of
the privileges to which you're
entitled, including special money-
saving oers.
Congratulations on your purchase,
and welcome to the “family!”
Dear PHILIPS product owner:
Thank you for your condence in PHILIPS.
You’ve selected one of the best-built, best-
backed products available today. We’ll do
everything in our power to keep you happy
with your purchase for many years to come.
As a member of the PHILIPS “family,” you’re
entitled to protection by one of the most
comprehensive warranties and outstanding
service networks in the industry. What’s more,
your purchase guarantees you’ll receive all the
information and special oers for which you
qualify, plus easy access to accessories from
our convenient home shopping network.
Most importantly, you can count on our
uncompromising commitment to your total
satisfaction.
All of this is our way of saying welcome - and
thanks for investing in a PHILIPS product.
P.S. To get the most from your PHILIPS
purchase, be sure to complete and
return your Product Registration Card
at once, or register online at:
www.philips.com/welcome
For Customer Use
Enter below the Serial No. which is located on the cabinet.
Retain this information for future reference.
Model No. _______________________________________
Serial No. _______________________________________
Visit our World Wide Web Site at http://www.philips.com/welcome
The symbol for CLASS ll (Double Insulation)
This “bolt of lightning” indicates uninsulated material
within your unit may cause an electrical shock. For
the safety of everyone in your household, please do
not remove product covering.
The “exclamation point” calls attention to features
for which you should read the enclosed literature
closely to prevent operating and maintenance
problems.
WARNING
:
To reduce the risk of re or electric
shock, this apparatus should not be exposed to rain or
moisture, and objects lled with liquids, such as vases,
should not be placed on this apparatus.
:NOITUAC
To prevent electric shock, match wide blade of
.tresni ylluf ,tols ediw ot gulp
:NOITNETTA Pour éviter les chocs électriques, introduire la
lame la plus large de la che dans la borne correspondante de
.dnof ua’uqsuj ressuop te esirp al
The important note and rating are located on the rear or
bottom of the cabinet.
E1S07UD_E1S08UD_EN.book Page 2 Monday, January 31, 2011 2:42 PM

3
PRECAUTIONS
EN
EN
FCC WARNING
This equipment may generate or use radio frequency energy. Changes or modications to this equipment may
cause harmful interference unless the modications are expressly approved in the manual. The user could lose the
authority to operate this equipment if an unauthorized change or modication is made.
RADIO-TV INTERFERENCE
This equipment has been tested and found to comply with the limits for a Class B digital device, pursuant to Part
15 of the FCC Rules. These limits are designed to provide reasonable protection against harmful interference in a
residential installation. This equipment generates, uses, and can radiate radio frequency energy and, if not installed
and used in accordance with the instructions, may cause harmful interference to radio communications. However,
there is no guarantee that interference will not occur in a particular installation. If this equipment does cause harmful
interference to radio or television reception, which can be determined by turning the equipment o and on, the user
is encouraged to try to correct the interference by one or more of the following measures:
1) Reorient or relocate the receiving antenna.
2) Increase the separation between the equipment and receiver.
3) Connect the equipment into an outlet on a circuit dierent from that to which the receiver is connected.
4) Consult the dealer or an experienced radio/TV technician for help.
This Class B digital apparatus complies with Canadian ICES-003.
Disconnect the mains plug to shut o when nd trouble or not in use. The mains plug shall remain readily operable.
IMPORTANT SAFETY INSTRUCTIONS
1. Read these instructions.
2. Keep these instructions.
3. Heed all warnings.
4. Follow all instructions.
5. Do not use this apparatus near water.
6. Clean only with dry cloth.
7. Do not block any ventilation openings. Install in
accordance with the manufacturer’s instructions.
8. Do not install near any heat sources such as radiators,
heat registers, stoves, or other apparatus (including
ampliers) that produce heat.
9. Do not defeat the safety purpose of the polarized or
grounding-type plug. A polarized plug has two blades
with one wider than the other. A grounding type plug
has two blades and a third grounding prong. The wide
blade or the third prong are provided for your safety. If
the provided plug does not t into your outlet, consult
an electrician for replacement of the obsolete outlet.
10. Protect the power cord from being walked on
or pinched particularly at plugs, convenience
receptacles, and the point where they exit from the
apparatus.
11. Only use attachments/accessories specied by the
manufacturer.
12. Use only with the cart, stand, tripod,
bracket, or table specied by the
manufacturer, or sold with the apparatus.
When a cart is used, use caution when
moving the cart/apparatus combination to
avoid injury from tip-over.
13. Unplug this apparatus during lightning storms or
when unused for long periods of time.
14. Refer all servicing to qualied service personnel.
Servicing is required when the apparatus has been
damaged in any way, such as power-supply cord or
plug is damaged, liquid has been spilled or objects
have fallen into the apparatus, the apparatus has
been exposed to rain or moisture, does not operate
normally, or has been dropped.
CAUTION: Danger of explosion if battery is incorrectly replaced. Replace only with the same or equivalent type.
WARNING:
Batteries (Battery pack or battery installed) shall not be exposed to excessive heat such as sunshine, re, or the like.
LASER SAFETY
This apparatus employs a laser. Only a qualied service person should remove the cover or attempt to service this
apparatus, due to possible eye injury.
CAUTION: Use of controls or adjustments or performance of procedures other than those specied herein may
result in hazardous radiation exposure.
CAUTION: Laser radiation when open. Do not stare into beam.
LOCATION: Inside, near the BD mechanism.
Introduction Connections Basic Setup Playback OthersFunction Setup
E1S07UD_E1S08UD_EN.book Page 3 Monday, January 31, 2011 2:42 PM
4
PRECAUTIONS
EN
Do not place the unit on the furniture that is capable of being tilted by a child and an adult leaning, pulling, standing
or climbing on it. A falling unit can cause serious injury or even death.
This apparatus should not be placed in a built-in installation such as a bookcase or rack unless proper ventilation is provided.
Make sure to leave a space of 7.8 inches (20cm) or more around this apparatus.
To Avoid the Hazards of Electrical Shock and Fire
Do not handle the AC power cord with wet hands.
Do not pull on the AC power cord when disconnecting it from an AC outlet. Grasp it by the plug.
Do not put your ngers or objects into the unit.
Location and Handling
Do not install the unit in direct sunlight, near strong magnetic elds, or in a place subject to dust or strong vibration.
Avoid a place with drastic temperature changes.
Install the unit in a horizontal and stable position. Do not place anything directly on top or bottom of the unit.
Depending on your external devices, noise or disturbance of the picture and/or sound may be generated if the unit is
placed too close to them. In this case, please ensure enough space between the external devices and the unit.
Depending on the environment, the temperature of this unit may increase slightly. This is not a malfunction.
Be sure to remove the disc and unplug the AC power cord from the outlet before carrying the unit.
Dew Condensation Warning
Dew condensation may form inside the unit in the following conditions. If so, do not use this unit at least for a few
hours until its inside gets dry.
- The unit is moved from a cold place to a warm place.
- Under conditions of high humidity.
- After heating a cold room.
Notice for Progressive Scan Output
Consumers should note that not all high denition television sets are fully compatible with this product and may
cause artifacts to be displayed in the picture. In case of picture problems with 525(480) progressive scan output,
it is recommended that the user switch the connection to the ‘standard denition’ output. If there are questions
regarding your TV set compatibility with this 525p(480p) BD/DVD player, please contact our customer service center.
•
•
•
•
•
•
•
•
•
•
ENERGY STAR
®
is a joint program of the U.S. Environmental Protection Agency and the
U.S. Department of Energy helping us all save money and protect the environment
through energy ecient products and practices.
IMPORTANT COPYRIGHT INFORMATION
Unauthorized copying, broadcasting, public performance and lending of discs are prohibited.
This item incorporates copy protection technology that is protected by U.S. patents and other intellectual property
rights of Rovi Corporation. Reverse engineering and disassembly are prohibited.
E1S07UD_E1S08UD_EN.book Page 4 Monday, January 31, 2011 2:42 PM

5
PRECAUTIONS
EN
EN
• Please refer to relevant topics on “TROUBLESHOOTING”
on page 56 before returning the product.
• If you need to call a customer service representative,
please know the model number and serial number of
your product before you call. This information is
displayed on the back of the product. Also, please take a
moment to identify the problem you are having, and be
prepared to explain this to the representative. If you
believe the representative will need to help you with
operations, please stay near the product. Our
representatives will be happy to assist you. For online
reference, please visit our web site at
http://www.philips.com/welcome
• Wipe the front panel and other exterior surfaces of the
unit with a soft cloth.
• Never use a solvent, thinner, benzene or alcohol to clean
the unit. Do not spray insecticide liquid near the unit.
Such chemicals may discolor the surface or damage the
unit.
• When a disc becomes dirty, clean it with a cleaning cloth.
Wipe the disc from the center to out. Do not wipe in a
circular motion.
• Do not use solvents such as benzine, thinner,
commercially available cleaners, detergent, abrasive
cleaning agents or antistatic spray intended for analog
records.
• If this unit still does not perform properly although you
refer to the relevant sections and to “TROUBLESHOOTING”
in this user manual, the laser optical pickup unit may be
dirty. Consult your dealer or an Authorized Service Center
for inspection and cleaning of the laser optical pickup
unit.
• Handle the discs so that fingerprints and dust do not
adhere to the surfaces of the discs.
• Always store the disc in its protective case when it is not
used.
• Note that discs with special shapes (heart-shaped discs,
octagonal discs, etc.) cannot be played back on this unit.
Do not attempt to play such discs, as they may damage
the unit.
Specifications are subject to change without notice.
Trademarks are the property of Koninklijke Philips
Electronics N.V. or their respective owners. P&F USA
reserves the right to change products at any time without
being obliged to adjust earlier supplies accordingly.
The material in this manual is believed adequate for the
intended use of the system. If the product, or its individual
modules or procedures, are used for purposes other than
those specified herein, confirmation of their validity and
suitability must be obtained. P&F USA warrants that the
material itself does not infringe any United States patents.
No further warranty is expressed or implied.
P&F USA cannot be held responsible neither for any errors
in the content of this document nor for any problems as a
result of the content in this document. Errors reported to
P&F USA will be adapted and published on the P&F USA
support website as soon as possible.
No components are user serviceable. Do not open or
remove covers to the inside of the product. Repairs may
only be done by Service Centers and official repair shops.
Failure to do so shall void any warranty, stated or implied.
Any operation expressly prohibited in this manual, any
adjustments, or assembly procedures not recommended
or authorized in this manual shall void the warranty.
Maintenance
Servicing
Cleaning the Cabinet
Cleaning Discs
Cleaning the Disc Lens
Disc Handling
Notice
Warranty
Introduction Connections Basic Setup Playback OthersFunction Setup
E1S07UD_E1S08UD_EN.book Page 5 Monday, January 31, 2011 2:42 PM
6
PRECAUTIONS
EN
Registering your model with Philips makes you eligible for
all of the valuable benefits listed below, so don’t miss out.
Complete and return your Product Registration Card at
once, or register online at www.philips.com/welcome to
ensure :
Proof of Purchase
Returning the enclosed card guarantees that your date of
purchase is on file, so no additional paperwork is required
from you to obtain warranty service.
Product Safety Notification
By registering your product you receive notification - directly
from the manufacturer - in the rare case of a product recall or
safety defect.
Additional Benefits of Product Ownership
Registering your product guarantees that you receive all of
the privileges to which you’re entitled, including special
money-saving offers.
For further assistance
For further assistance, call the customer support service in
your country.
• To obtain assistance in the U.S.A., Canada, Puerto Rico, or
the U.S. Virgin Islands, contact Philips Customer Care
Center at 1-866-309-0866
The packaging of this product
is intended to be recycled.
Contact your local authorities
for information about how to
recycle the packaging.
End of life directives
Philips pays a lot of attention
to produce environment-
friendly products in green
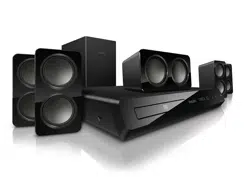
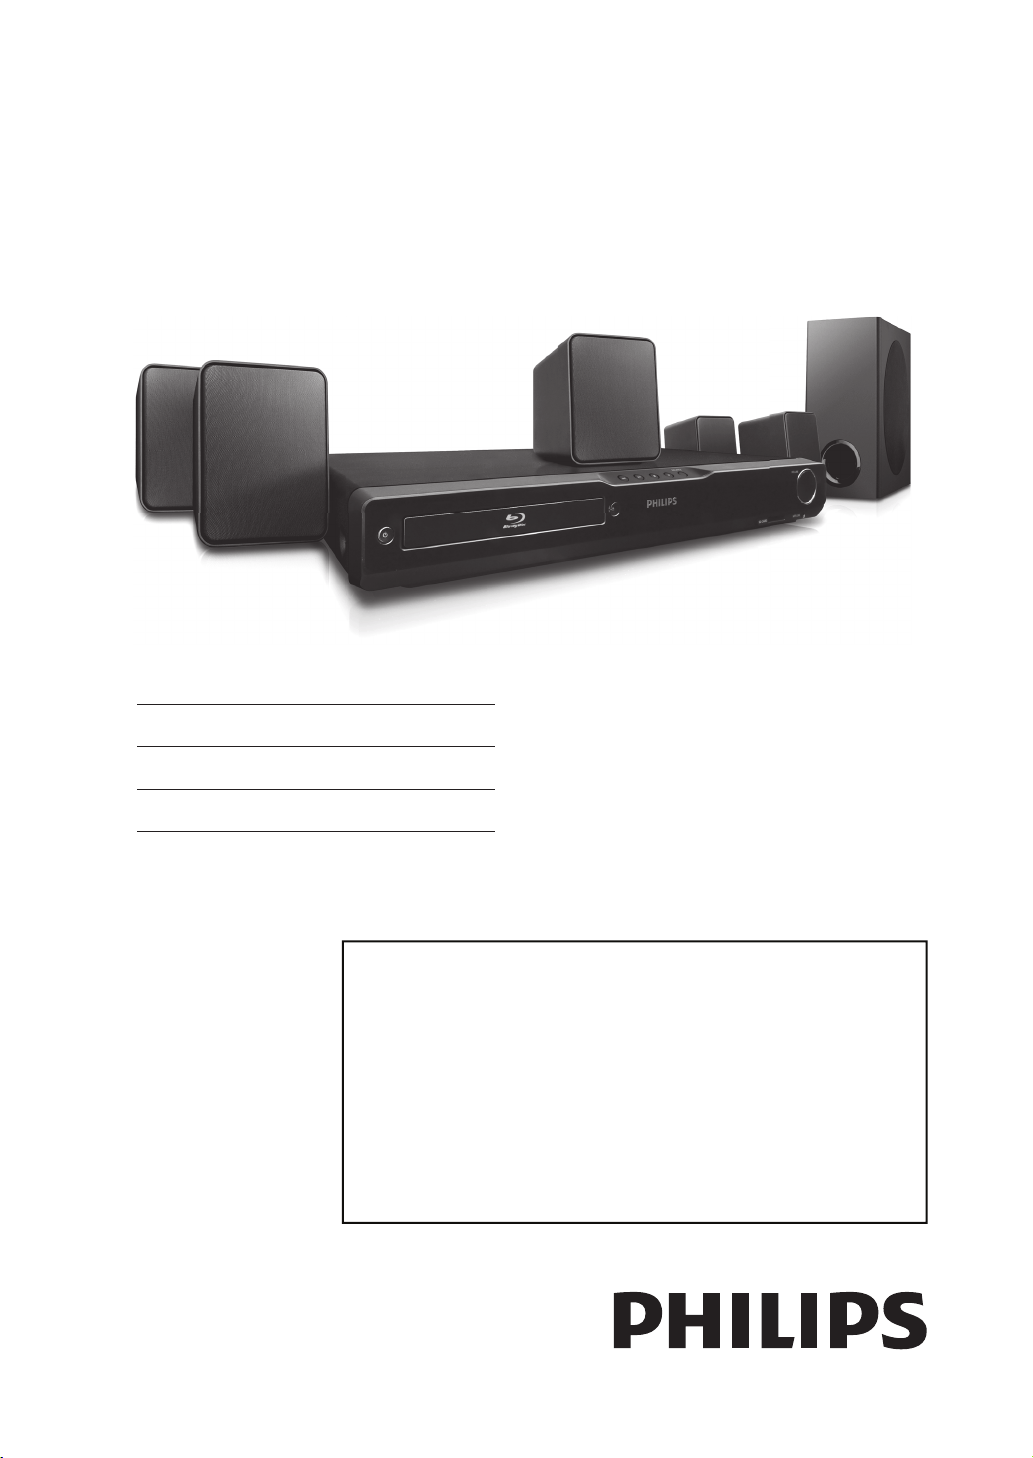
focal areas. Your new Blu-ray
Disc Home Theater System
contains materials which can
be recycled and reused. At the
end of its life, specialized
companies can dismantle the
discarded Home Theater
System to concentrate the
reusable materials and to
minimize the amount of
materials to be disposed of.
Please ensure you dispose of
your old Home Theater
System according to local
regulations.
Disposal of used batteries
The batteries supplied do not contain the heavy metals
mercury and cadmium. Nevertheless, in many areas
batteries may not be disposed of with your household
waste. Please ensure you dispose of batteries according to
local regulations.
Important
Environmental Care
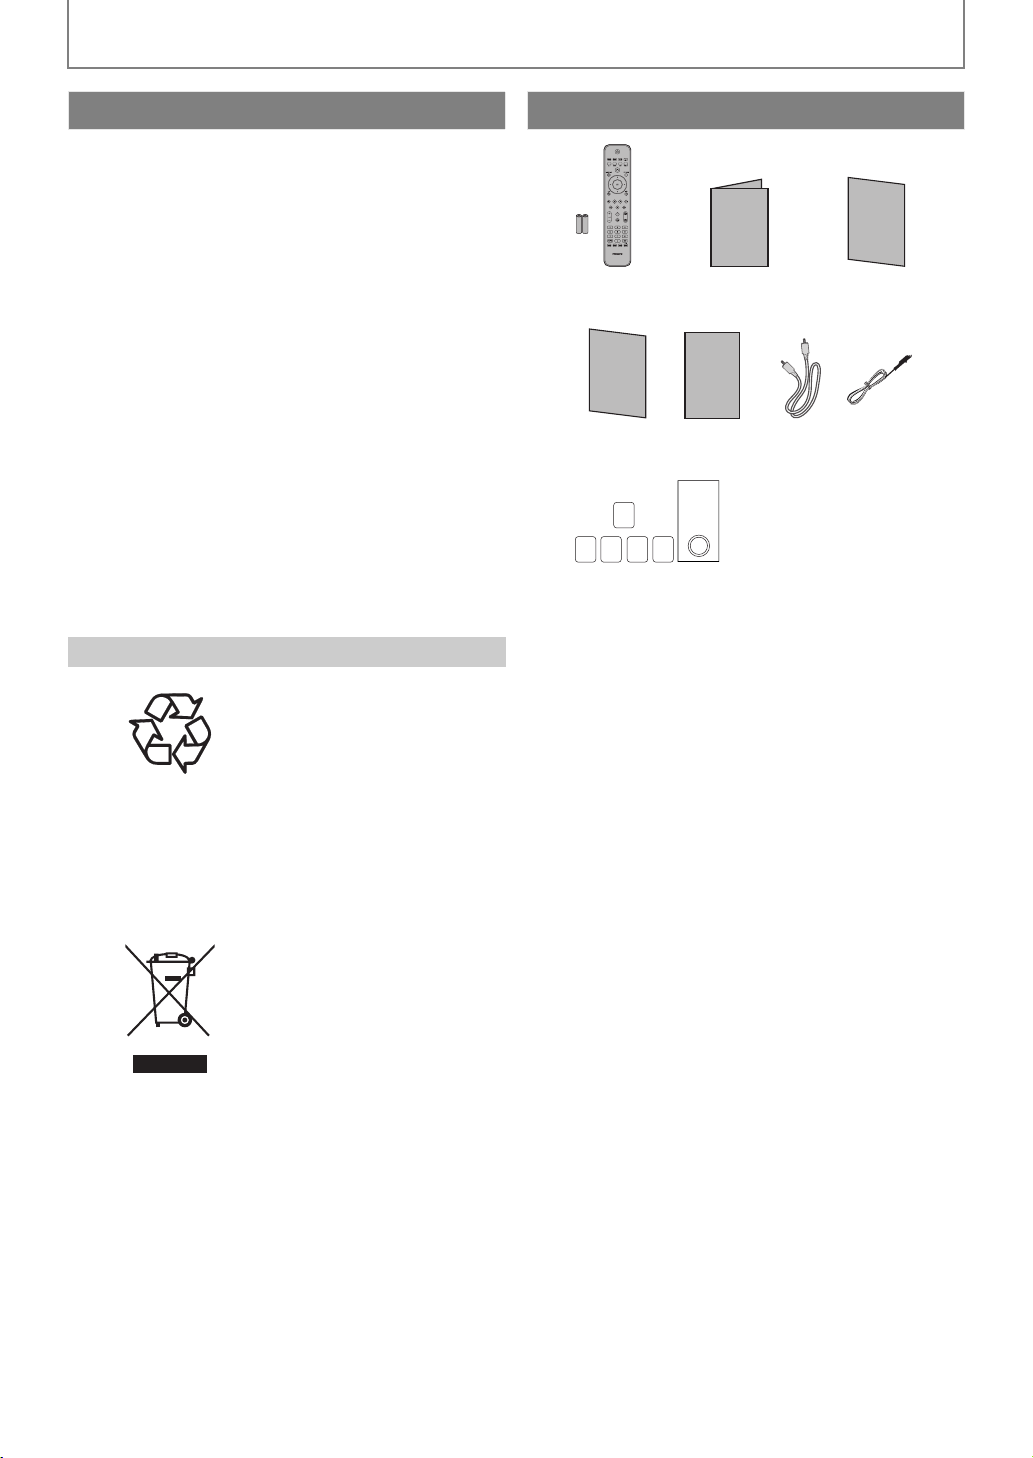
Supplied Accessories
User Manual
VUDU sheet
Q
uick Start G
u
ide
Registr
ation c
ard
User Manual Quick Start
Guide
Registration card
RCA video
cable
• Remote Control
• Batteries (AAA, 1.5V x 2)
FM wire
antenna
1 center, 2 front, 2 rear
speakers and 1 subwoofer
VUDU sheet
E1S07UD_E1S08UD_EN.book Page 6 Monday, January 31, 2011 2:42 PM
7
PRECAUTIONS
EN
EN
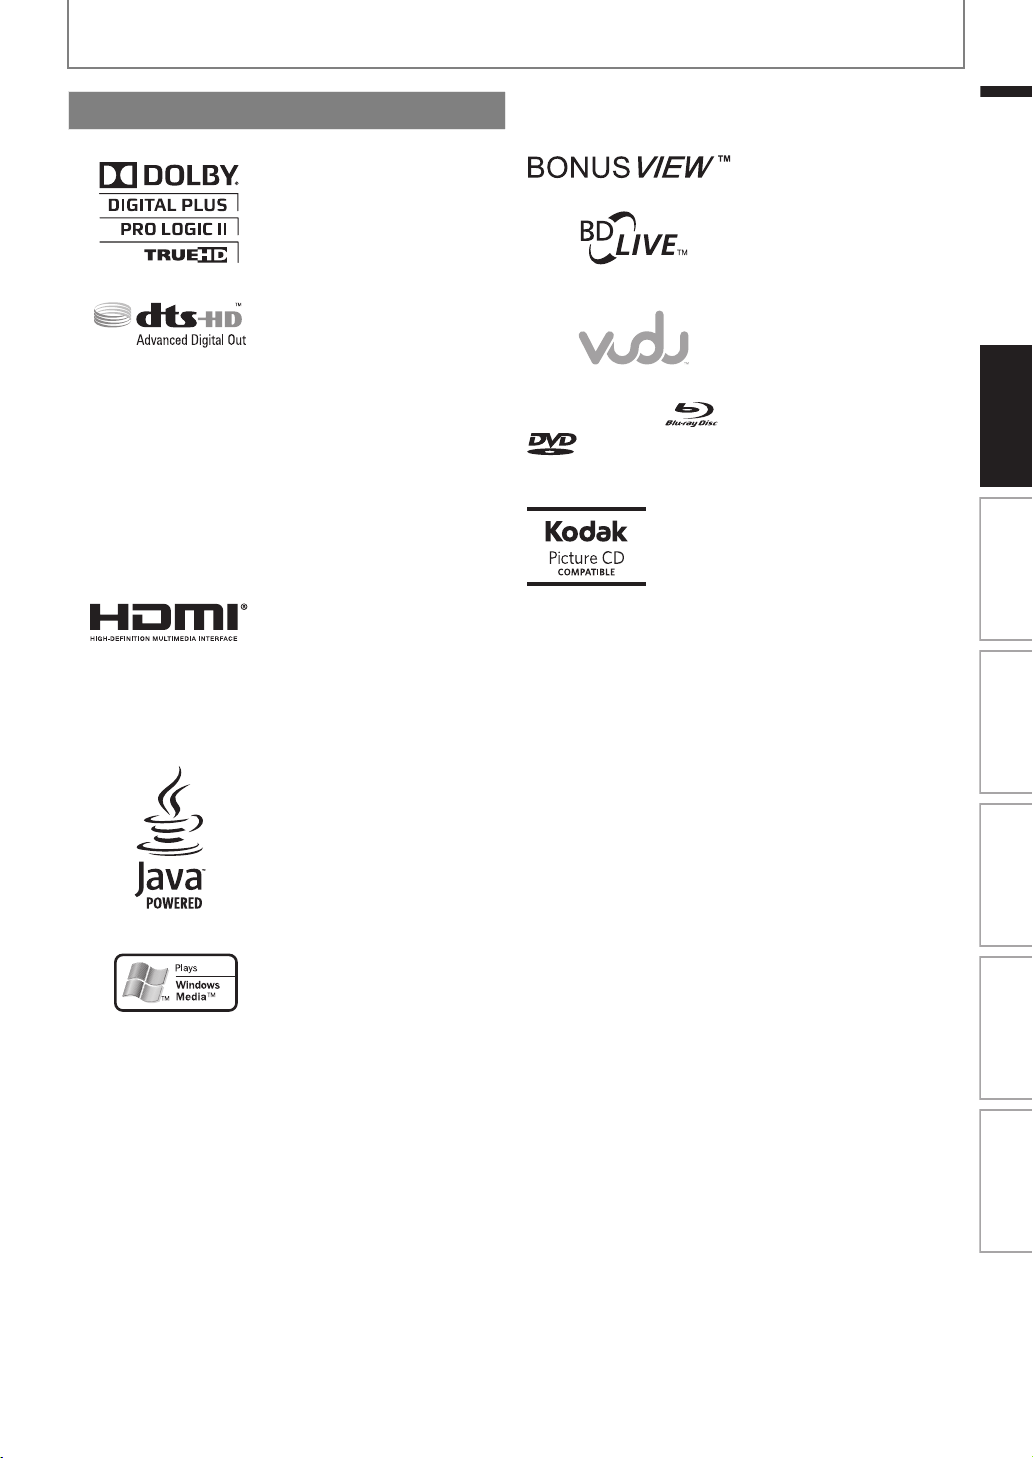
Manufactured under license
from Dolby Laboratories.
“Dolby”, “Pro Logic”, and the
double-D symbol are
trademarks of Dolby
Laboratories.
Manufactured under license
under U.S. Patent #'s:
5,451,942; 5,956,674;
5,974,380; 5,978,762;
6,487,535 & other U.S. and
worldwide patents issued &
pending. DTS and the Symbol
are registered trademarks, &
DTS-HD, DTS-HD Advanced
Digital Out and the DTS logos
are trademarks of DTS, Inc.
Product includes software.
© DTS, Inc. All Rights
Reserved.
HDMI, the HDMI Logo, and
High-Definition Multimedia
Interface are trademarks or
registered trademarks of
HDMI Licensing LLC in the
United States and other
countries.
Java and all other Java
trademarks and logos are
trademarks or registered
trademarks of Sun
Microsystems, Inc. in the
United States and/or other
countries.
Windows Media and the
Windows logo are trademarks
or registered trademarks of
Microsoft Corporation in the
United States and/or other
countries.
“BONUSVIEW” is trademark of
Blu-ray Disc Association.
“BD-Live” and “BD-Live” logo
are trademarks of Blu-ray Disc
Association.
VUDU™ is a trademark of
VUDU, Inc.
“Blu-ray Disc” and are trademarks.
is a trademark of DVD Format/Logo Licensing
Corporation.
Trademark Information
Kodak and KODAK Picture CD
Compatible are trademarks of Kodak
used under license.
Introduction Connections Basic Setup Playback OthersFunction Setup
E1S07UD_E1S08UD_EN.book Page 7 Monday, January 31, 2011 2:42 PM

EN8
CONTENTS
Introduction
Precautions ...................................................................2
Maintenance ...............................................................................5
Notice ............................................................................................5
Important .....................................................................................6
Supplied Accessories ...............................................................6
Trademark Information ...........................................................7
Features ........................................................................9
Features ........................................................................................9
Product Info .............................................................................. 10
Symbols Used in this User Manual ................................... 10
Functional Overview ..................................................11
Front Panel ................................................................................ 11
Rear Panel .................................................................................. 11
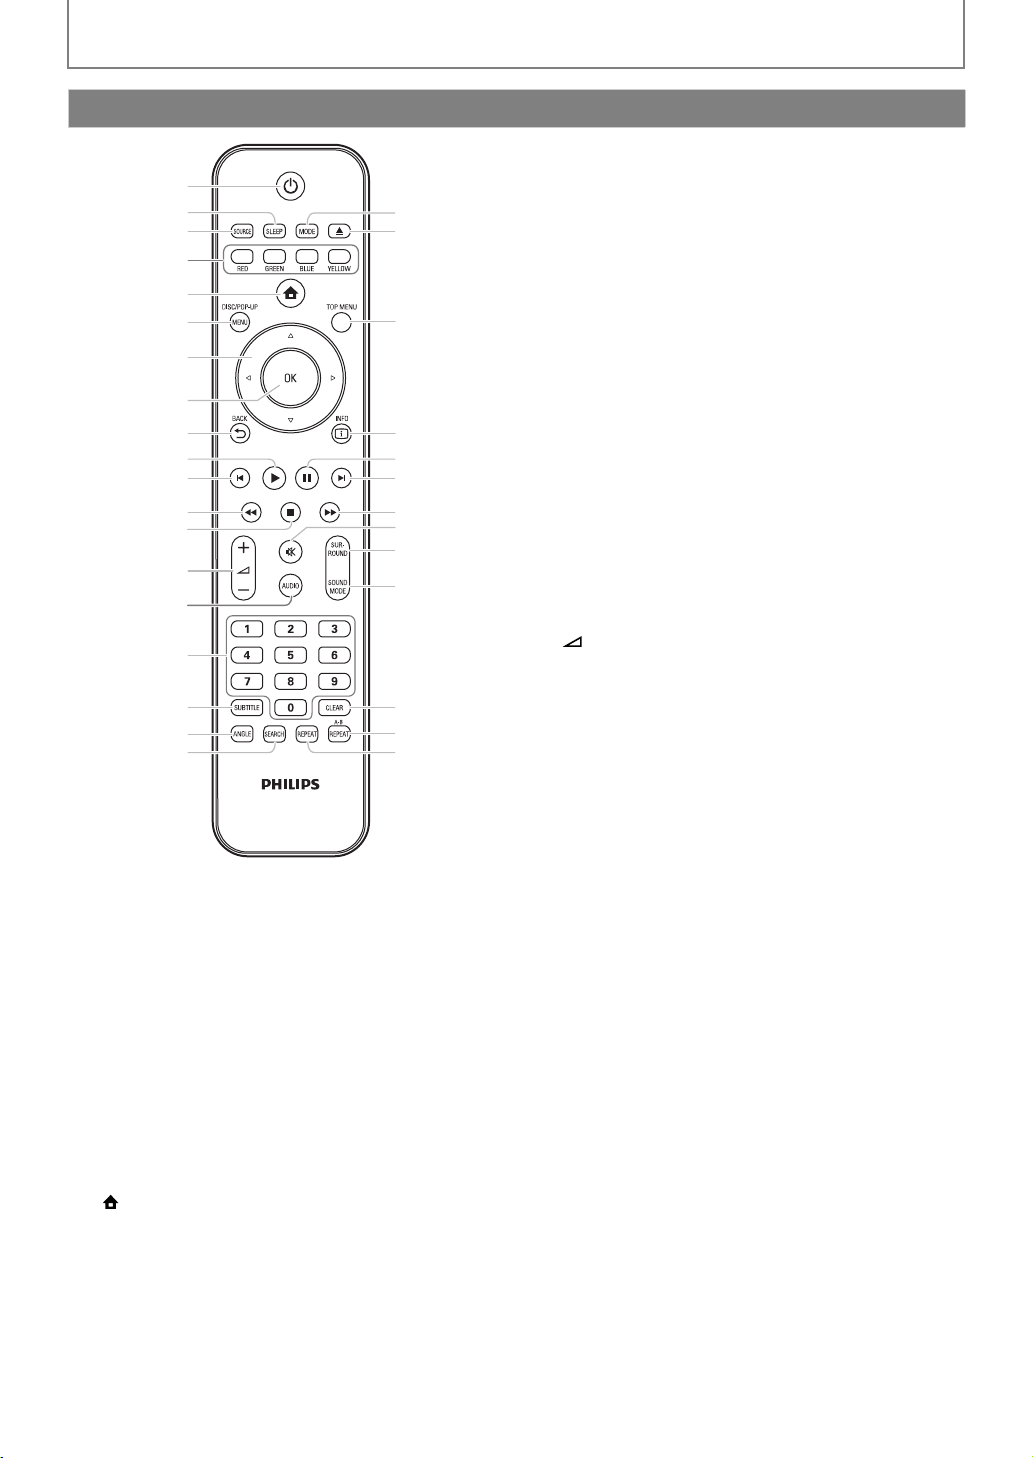
Remote Control ....................................................................... 12
Front Panel Display ................................................................ 14
Guide to On-Screen Display ............................................... 15
Connections
Connections ................................................................16
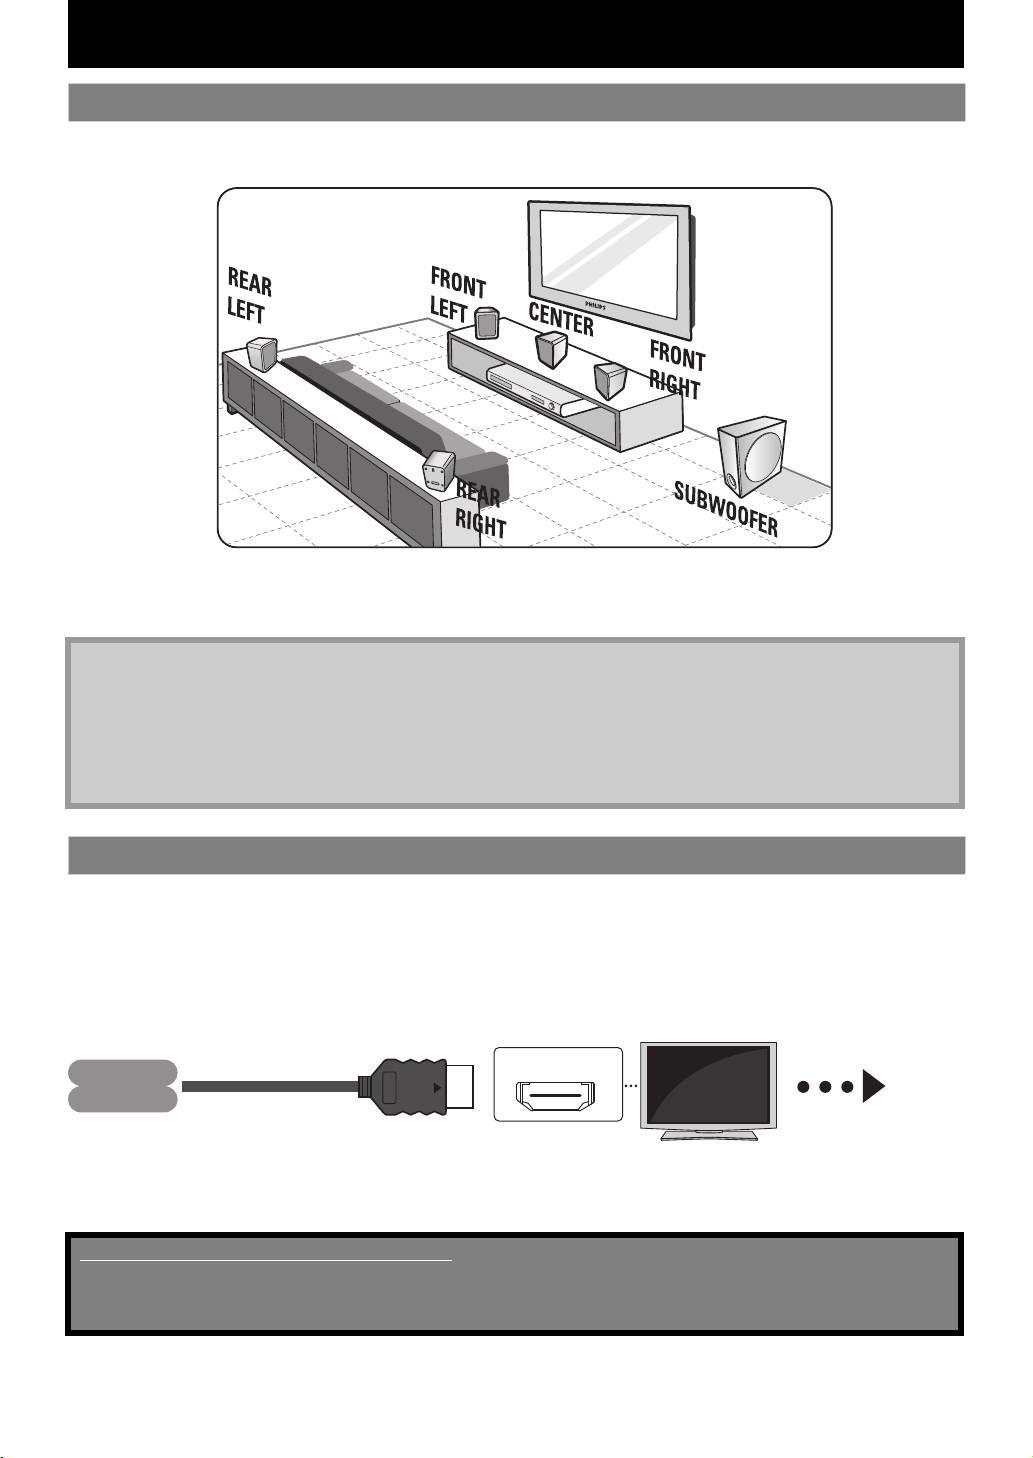
Placing the Speakers ............................................................. 16
Connection to the TV ............................................................ 16
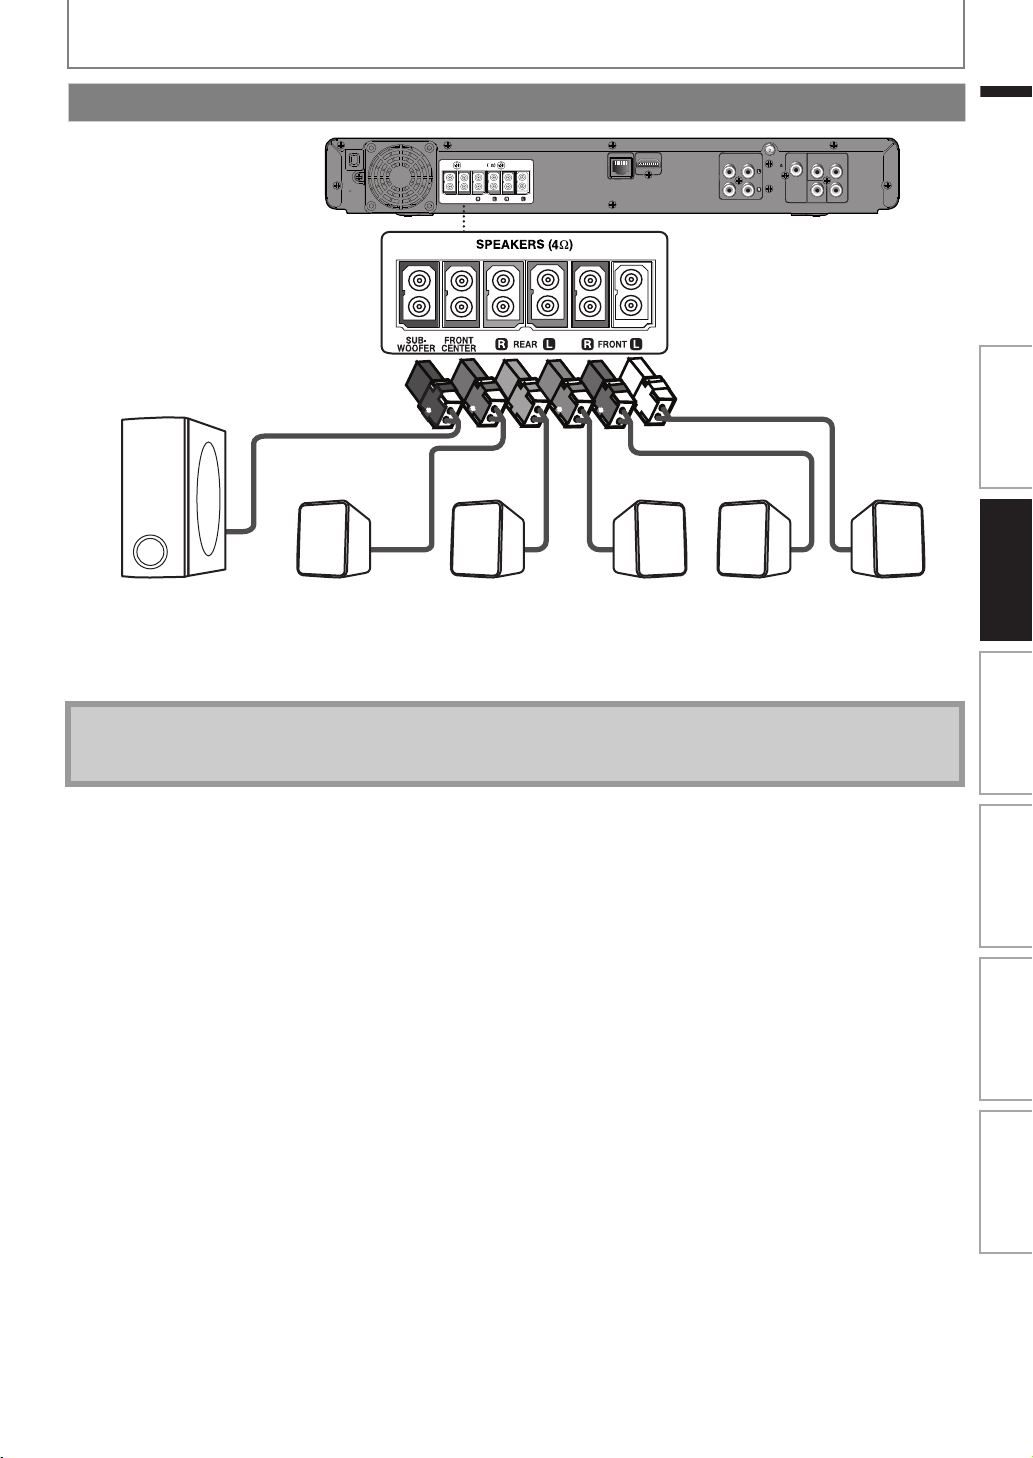
Connecting Speakers and Subwoofer ............................ 19
Connecting Audio from Cable Box / Recorder / Game
Console or TV ........................................................................ 20
Connecting Portable Media Player .................................. 21
Connecting FM Radio Antenna ......................................... 21
Network Connection with LAN .........................................22
Basic Setup
Before You Start .........................................................23
Finding the Viewing Channel on Your TV ..................... 23
Playback
Information on Playback ...........................................24
Information on Playback ...................................................... 24
Guide to File List .....................................................................26
How to Insert a Disc ............................................................... 26
Basic Playback ............................................................27
Playing Back a BD or a DVD ................................................ 27
Playing Back an Audio CD or a Disc with MP3 / Windows
Media™ Audio / JPEG Files ............................................... 28
KODAK Picture CD ..................................................................30
Reading the SD Memory Card ...........................................30
Using the Title / Disc Menu ................................................. 31
Special Playback ........................................................ 32
Fast Forward / Fast Reverse .................................................32
Slow Forward Playback .........................................................32
Step by Step Playback ...........................................................32
Repeat Playback ......................................................................32
A-B Repeat .................................................................................32
Slide Show .................................................................................33
PiP (BONUSVIEW) Setting .....................................................33
Enjoying BD-Live Discs with Internet ...............................33
Title / Chapter Search ............................................................34
Track Search ..............................................................................34
Time Search ...............................................................................34
Switching Subtitles .................................................................35
Switching Audio Soundtrack ..............................................35
Switching Camera Angles ....................................................36
Play from Portable Media Player .......................................36
Radio Operations ....................................................................36
VUDU Operations ....................................................................37
Function Setup
List of Settings ............................................................ 39
Setups ......................................................................... 45
TV Shape .....................................................................................45
HDMI Video Resolution .........................................................45
Audio Output ...........................................................................46
Ratings Lock ..............................................................................48
EasyLink (HDMI CEC) ..............................................................49
Network Connection .............................................................49
Software Upgrade ...................................................................53
Reset to Factory Default .......................................................53
Sound Settings ........................................................... 54
Volume Control .......................................................................54
Selecting Surround Mode ....................................................54
Selecting Sound Effect Mode .............................................54
Other Settings ............................................................ 55
Switching Active Source Mode ..........................................55
Sleep Timer ................................................................................55
Others
Troubleshooting ........................................................ 56
Downloading an Electronic Copy .....................................58
Contact Us .................................................................................58
Glossary ......................................................................59
Specifications ............................................................. 61
NETWORK SERVICE DISCLAIMER .............................. 62
ONE (1) YEAR LIMITED WARRANTY .......................... 63
E1S07UD_E1S08UD_EN.book Page 8 Monday, January 31, 2011 2:42 PM

9EN
EN
FEATURES
Congratulations on your purchase, and welcome to Philips!
To fully benefit from the support that Philips offers, register your product at www.philips.com/welcome.
Blu-ray Disc
You can enjoy Blu-ray Disc which is capable of storing five
times more data than a conventional DVD.
BD-Java
With some BDs which support Java applications, you can
enjoy the interactive functions such as games or interactive
menus.
DVD upscaling for enhanced picture quality
Your current DVD will look even better than before thanks to
video upscaling. Upscaling will increase the resolution of
standard definition DVD to high definition up to 1080p over
an HDMI connection. The picture will be less jagged and more
realistic for a near high definition experience.
Enjoy your content on different kinds of media
Full backwards compatibility with DVD, CD and SD card
ensures that you can continue to enjoy your current audio-
video collection. Additionally, you can view JPEG digital
pictures or listen to MP3 or Windows Media™ Audio music
files.
Listen to rich multi-channel surround sound
Multi-channel surround sound, which realizes real-to-life
sound and makes you feel that you are really there.
Intuitive user interface and remote control
The Philips logical user interface allows you to easily navigate
through your content and settings, so you can quickly find
what you are looking for.
Easy and simple connection to your HDTV via HDMI
Connect your HTS3051BV to your HDTV with one single HDMI
(High Definition Multimedia Interface) cable. Philips
recommends HDMI1.3 (category 2) cable (also known as High
Speed HDMI cable) for better compatibility. The high definition
video output signal will be transferred to your HDTV without
conversion to analog signals, so you will get excellent picture
and sound quality, completely free from noise.
Thanks to other multiple outputs, you can also easily connect
to your home theater system or amplifier.
About EasyLink (HDMI CEC) (Consumer Electronics
Control)
EasyLink (HDMI CEC) allows you to operate the linked
functions of this home theater system with Philips brand TV
with EasyLink feature.
Philips does not guarantee 100 % interoperability with other
brands of HDMI CEC compliant devices.
PiP (BONUSVIEW)
Some BD-videos have the PiP function which enables you to
display the secondary video in the primary video. You can call
up the secondary video by pressing [MODE] whenever the
scene contains the secondary video.
BD-Live
BD-Live (BD-ROM version 2 Profile 2.0) that allows interactive
functions to be used when this unit is connected to the
Internet in addition to the BONUSVIEW function. The various
functions differ depending on the disc.
Pop-up menu
Some BD-videos have a pop-up menu which is a navigation
menu that can be called up and be operated on the TV screen
without interrupting playback. You can call up the pop-up
menu by pressing [DISC MENU / POP-UP MENU]. Contents in
the pop-up menu vary depending on the disc.
HDMI Deep Color
Deep Color reduces posterization effect of the playback
image. Refer to “HDMI Deep Color” in the “LIST OF SETTINGS”
on page 40.
HDMI 1080p/24 output (BD only)
This unit is equipped with the feature which can provide smooth
movement during playback of film originated material with the
frame rate of 24 frames per second with progressive. (Available
only when the display device is connected by an HDMI cable.)
Refer to “HDMI 1080p/24” in the “LIST OF SETTINGS” on page 40.
Playing back contents from an SD Memory Card
You can play back MP3 / WMA / JPEGs stored in an SD Memory
Card. BD-ROM Profile 2.0 (BD-Live) and Profile 1.1 discs
sometimes store picture-in-picture commentary, subtitles or
other extras in the SD Memory Card for use during playback with
the BD-video.
VUDU
This unit supports VUDU which is the leading HD on-demand
video service. With VUDU, you can also enjoy various kinds of
Internet applications. In order to use this feature, you must
connect this unit to the Internet.
Features
Introduction Connections Basic Setup Playback OthersFunction Setup
E1S07UD_E1S08UD_EN.book Page 9 Monday, January 31, 2011 2:42 PM
10
FEATURES
EN
“Product Info” screen provides information about this
unit’s hardware and software version.
You can also download the latest software from the Philips
web site and upgrade it yourself if it is newer than the
version currently on your unit. The current version of
software on your unit can be seen on the "Product Info"
screen.
To access “Product Info”, select “Product Info” in the home
menu.
To specify which media type each function is applicable to, we
put the following symbols at the beginning of each item to
operate.
If you do not find any of the symbols listed above under the
function heading, the operation is applicable to all media.
Product Info
Symbols Used in this User Manual
Symbol Description
Description refers to BD-video
Description refers to DVD-video
Description refers to audio CD / DTS-CD
Description refers to BD-RE/-R, DVD-RW/-R,
CD-RW/-R and SD card with MP3 files
Description refers to BD-RE/-R, DVD-RW/-R,
CD-RW/-R and SD card with
Windows Media™ Audio files
Description refers to BD-RE/-R, DVD-RW/-R,
CD-RW/-R and SD card with JPEG files
E1S07UD_E1S08UD_EN.book Page 10 Monday, January 31, 2011 2:42 PM
11EN
EN
FUNCTIONAL OVERVIEW
* The unit can also be turned on by pressing these buttons.
1. Q (standby/on) button
• Press to turn on the unit, or to turn the unit into the
standby mode. (To completely turn off the unit, you
must unplug the AC power cord.)
• Press and hold for 10 seconds to shut down the unit.
• This button lights up in red when the unit is in
standby mode and turns off when the power is on.
2. Disc tray
• Place a disc after opening the disc tray.
3. A (open/close) button*
• Press to open or close the disc tray.
4. H / G (previous / next) button
• Press to skip to the previous or next title / chapter /
track.
5. C (stop) button
• Press to stop playback.
6. B (play) button*
• Press to start or resume playback.
7. SOURCE button
• Press to switch the active source mode.
8. Infrared sensor window
• Receive signals from your remote control so that
you can control the unit from a distance.
9. Display
• Refer to “Front Panel Display” on page 14.
10. VOLUME jog
• Rotate to adjust the volume.
11. SD CARD slot
• Insert an SD Memory Card and play back the
contents in it.
12. MP3 LINK jack
• Use to connect your portable audio player with
3.5mm stereo audio cable.
1. AC power cord
• Connect to a standard AC outlet to supply power to
this unit.
• Unplug this cord from the AC outlet to completely
turn off the unit.
2. 5.1ch Audio Out jacks (SPEAKERS (4))
• Use to connect supplied 5.1ch speakers.
3. LAN terminal
• Use to connect a telecommunications equipment
with LAN cable.
4. HDMI OUT jack
• Use to connect to a display with an HDMI
compatible port with an HDMI cable.
5. AUDIO IN (AUX1 / AUX2) jacks
• Use to connect an other device with audio out jack
with an RCA audio cable.
6. FM ANT 75 jack
• Use to connect the supplied FM wire antenna.
7. DIGITAL AUDIO IN (COAXIAL) jack
• Use to connect an other device with a digital audio
coaxial output jack with a digital audio coaxial
cable.
8. COMPONENT VIDEO OUT jacks
• Use to connect a TV monitor with component video
inputs with an RCA component video cable.
9. VIDEO OUT jack
• Use to connect a TV monitor, an AV receiver /
amplifier or other device with an RCA video cable.
Front Panel
21 5 6* 7 8 10
11
12
3* 4 9
Note
• This unit will be turned into the standby mode
automatically after 25 minutes of no action.
Rear Panel
SUB-
WOOFER
FRONT
CENTER
REAR
FRONT
SPEAKERS
4
AC 120V
60Hz
LAN HDMI OUT
COMPONENT VIDE O OUT
VIDEO OUT
YPr
Pb
DIGITAL
AUDIO IN
COAXIAL
FM
ANT
75
AUDIO IN
AUX 1
AUX 2
1
9
87
463
2
5
Note
• Do not touch the inner pins of the jacks on the rear
panel. Electrostatic discharge may cause permanent
damage to the unit.
• This unit does not have the RF modulator.
Introduction Connections Basic Setup Playback OthersFunction Setup
E1S07UD_E1S08UD_EN.book Page 11 Monday, January 31, 2011 2:42 PM
12
FUNCTIONAL OVERVIEW
EN
* The unit can also be turned on by pressing these buttons.
1. Q (standby/on) button
• Press to turn on the unit, or to turn the unit into the
standby mode. (To completely shut down the unit,
you must unplug the AC power cord.)
2. SLEEP button
• Press to set the sleep timer.
3. SOURCE button
• Press to switch the active source mode; Home
Menu (Disc / SD card), “Aux1”, “Aux2”, “Coaxial”,
“MP3 Link” or “FM”.
4. RED / GREEN / BLUE / YELLOW button
• Press to activate short cut keys on some BD-video
function.
• When file list / setup list is shown, press to switch
between pages.
5. (home) button
• Press to display the home menu.
6. DISC MENU / POP-UP MENU button
BD:
• Press to display the pop-up menu.
DVD:
• Press to display the disc menu.
7. K / L / s / B buttons
DISC:
• Press to select items or settings.
RADIO:
• Press up or down to tune the radio frequency.
• Press left or right to start auto search.
8. OK button
• Press to confirm or select menu items.
9. BACK U button
• Press to return to the previously displayed menu or
screen function.
10. B (play) button*
• Press to start playback or resume playback.
11. S (previous) button
• During playback, press once to return to the
beginning of the current title, chapter, track or file.
• During playback, press twice to return to the
previous title, chapter, track or file.
• During the JPEG playback, press to return to the
previous file.
12. E (reverse) button
• During playback, press to fast reverse the playback.
13. C (stop) button
• Press to stop playback.
14. ⴐ / ⴑ (volume) button
• Press to adjust the volume.
15. AUDIO button
DISC:
• Press to select the audio channel (such as audio
languages).
RADIO:
• Press to switch between stereo and mono mode.
16. Number buttons
• Press to select a chapter during playback.
• Press to enter values in the input field.
17. SUBTITLE button
• Press to select subtitles on a disc.
18. ANGLE button
• Press to select camera angles on a disc.
• Press to rotate a picture (JPEG).
19. SEARCH button
• Press to display the search menu.
20. REPEAT button
• Press to toggle between various repeat modes.
21. REPEAT A-B button
• Press to play back a defined section between point
A and B repeatedly.
22. CLEAR button
DISC:
• Press to clear the information once entered.
RADIO:
• Press to erase the selected preset station.
23. SOUND MODE button
• Press to select a sound effect mode.
Remote Control
32
31*
30
29
27
23
24
22
21
26
25
28
20
1
2
5
6
7
9
11
10*
12
13
14
15
16
17
18
4
3
8
19
E1S07UD_E1S08UD_EN.book Page 12 Monday, January 31, 2011 2:42 PM
13
FUNCTIONAL OVERVIEW
EN
EN
24. SURROUND button
• Press to select surround mode.
25. d (mute) button
• Press to mute the volume.
26. D (forward) button
• During playback, press to fast forward the playback.
• When playback is in pause, press to slow forward
the playback.
27. T (next) button
• During playback, press to skip to the next chapter,
track or file.
28. F (pause) button
• Press to pause playback.
• When playback is in pause mode, press repeatedly
to forward the playback step by step.
29. INFO button
• Press to display the information display.
30. TOP MENU button
BD:
• Press to display the top menu.
DVD:
• Press to display the title menu.
31. A (open/close) button*
• Press to open or close the disc tray.
32. MODE button
• During BD playback, press to switch the picture-in-
picture feature on/off (only applicable to BD-video
which supports the PiP(BONUSVIEW) function).
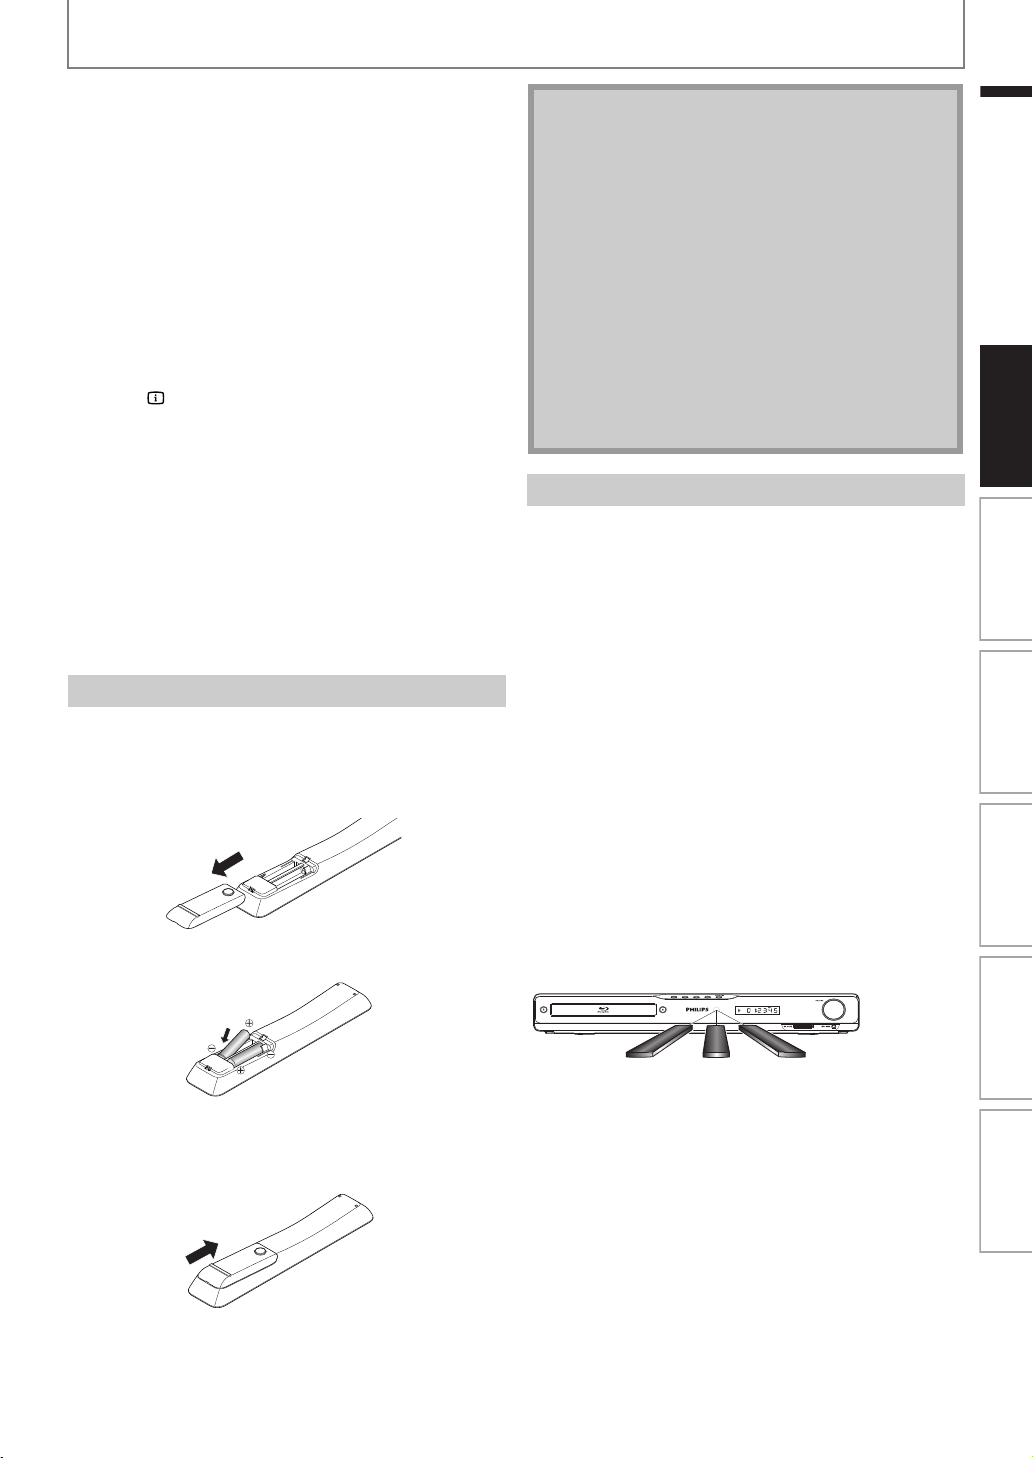
Install 2 AAA (1.5V) batteries matching the polarity
indicated inside battery compartment of the remote
control.
Remote Control Usage Guidelines:
• Make sure that there are no obstacles between the
remote control and the infrared sensor window on the
unit.
• Remote operation may become unreliable if strong
sunlight or fluorescent light is shining on the infrared
sensor window of the unit.
• Remote control for different devices can interfere with
each other. Avoid using remote control for other device
located close to the unit.
• Replace the batteries when you notice a fall off in the
operating range of the remote control.
• The maximum operable ranges from the unit are as
follows.
- Line of sight:
approx. 23 feet (7 m)
- Either side of the center:
approx. 16 feet (5 m) within 30°
-Above:
approx. 16 feet (5 m) within 15°
-Below:
approx. 10 feet (3 m) within 30°
Installing the Batteries in the Remote Control
1) Open the cover.
2) Insert batteries.
Make sure to match + and - on the batteries to the
marks indicated in the battery compartment.
3) Close the cover.
Note
Incorrect use of batteries can result in hazards such as
leakage and bursting. Please observe the following:
• Do not mix new and old batteries together.
• Do not use different kinds of batteries together.
Although they may look similar, different batteries
may have different voltages.
• Make sure that the + and - ends of each battery
match the indications in the battery compartment.
• Remove batteries from battery compartment that is
not going to be used for a month or more.
• When disposing of used batteries, please comply
with governmental regulations or environmental
public instruction’s rules that apply in your country
or area.
• Do not recharge, short-circuit, heat, burn or
disassemble batteries.
Using a Remote Control
30˚ 30˚
16 feet (5 m) 23 feet (7 m)
16 feet (5 m)
Introduction Connections Basic Setup Playback OthersFunction Setup
E1S07UD_E1S08UD_EN.book Page 13 Monday, January 31, 2011 2:42 PM
14
FUNCTIONAL OVERVIEW
EN
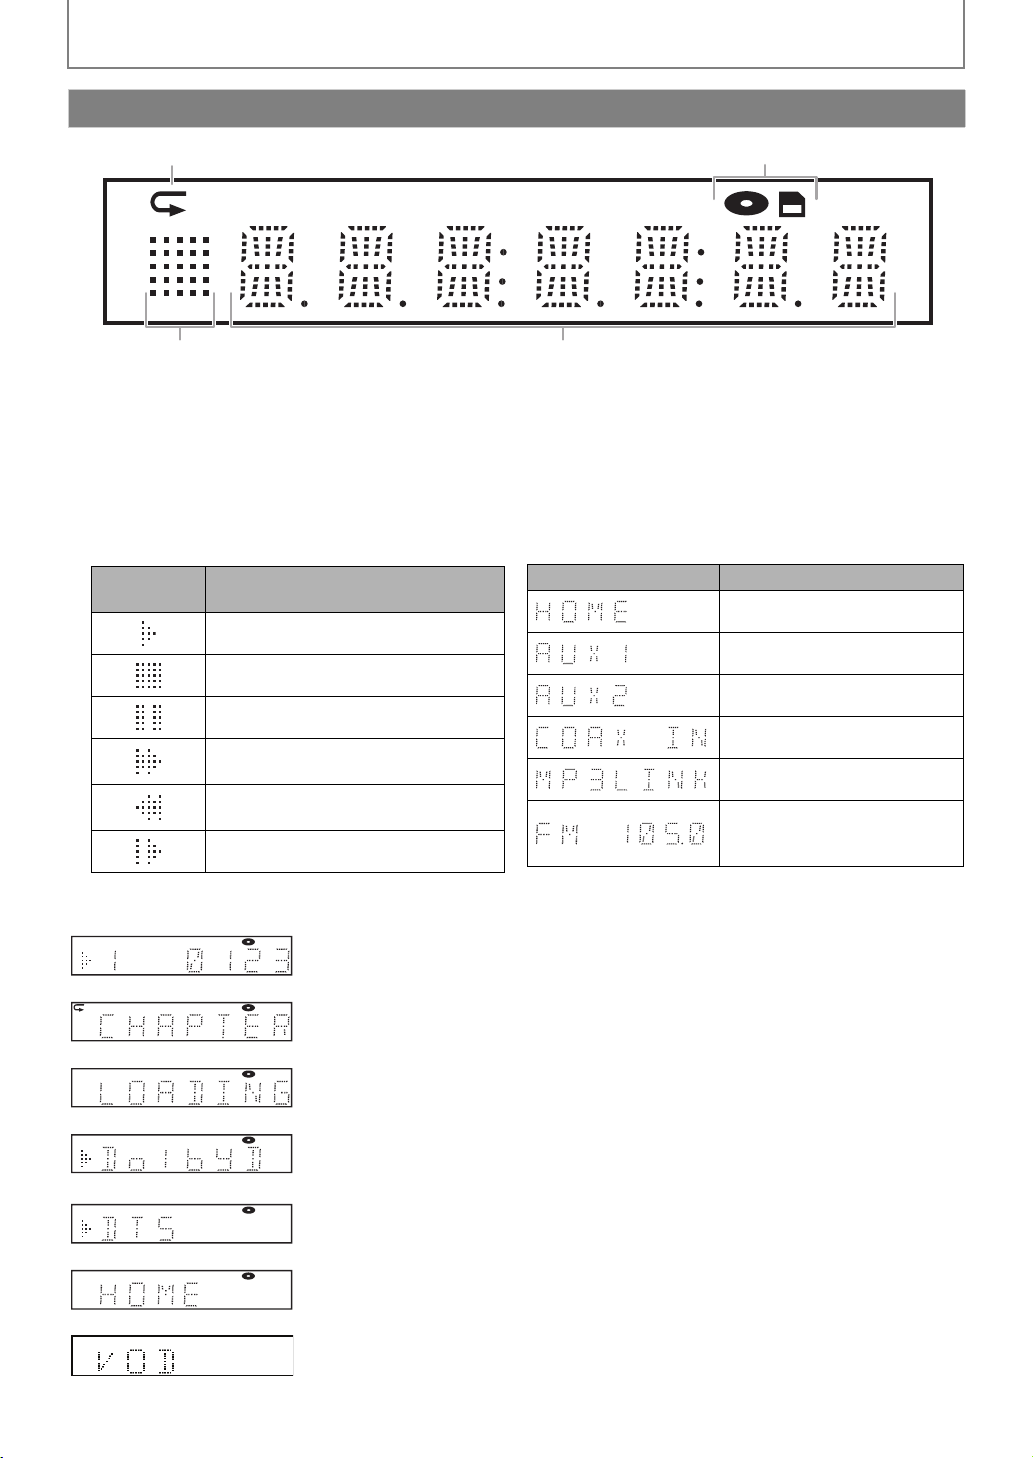
1. Displays repeat icon. (Appears during repeat playback.)
2. Displays media mode icon (disc mode or SD card mode).
3. Displays playback status icon. Refer to table A below.
4. Displays source mode status (refer to table B below) or information such as title number, elapsed playing time,
repeat type, menu type, etc.
<Table A> <Table B>
• When switching the source mode, the following will be
displayed.
e.g.)
Front Panel Display
1 2
3
4
* Brightness of the display can be adjusted. Refer to “Front Panel Brightness” in “LIST OF SETTINGS” on page 42.
Playback
status icon
Mode
Playback is in progress
Stop mode
Pause mode
Fast forward mode
Tuning radio station (in FM mode)
Fast reverse mode
Tuning radio station (in FM mode)
Slow forward mode
Display Mode
Disc / SD card mode
“Aux1” mode
“Aux2” mode
“Coaxial” mode
“MP3 Link” mode
“FM” mode
(Frequency of radio station will
be displayed.)
Disc is being played back.
Indicating the current title number and the elapsed time.
Current chapter is in chapter repeat mode during playback of disc.
Loading a disc.
Dolby Digital audio is being played back during playback of disc.
DTS audio is being played back during playback of disc.
Home menu is displayed and the unit is in disc mode.
Loading VUDU.
E1S07UD_E1S08UD_EN.book Page 14 Monday, January 31, 2011 2:42 PM
15
FUNCTIONAL OVERVIEW
EN
EN
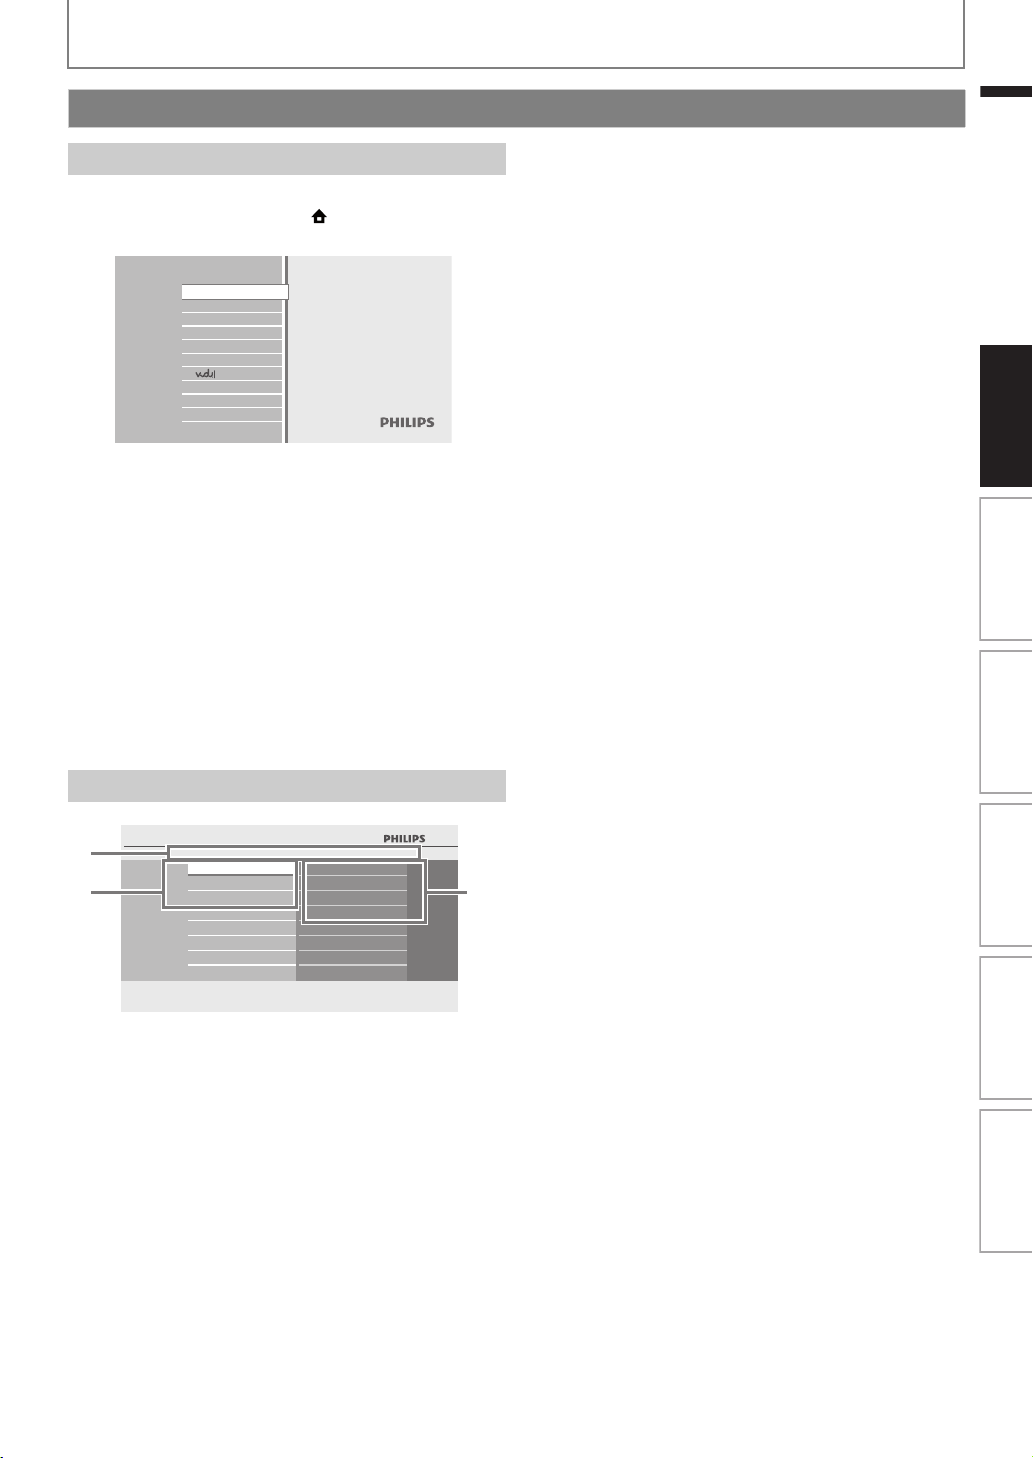
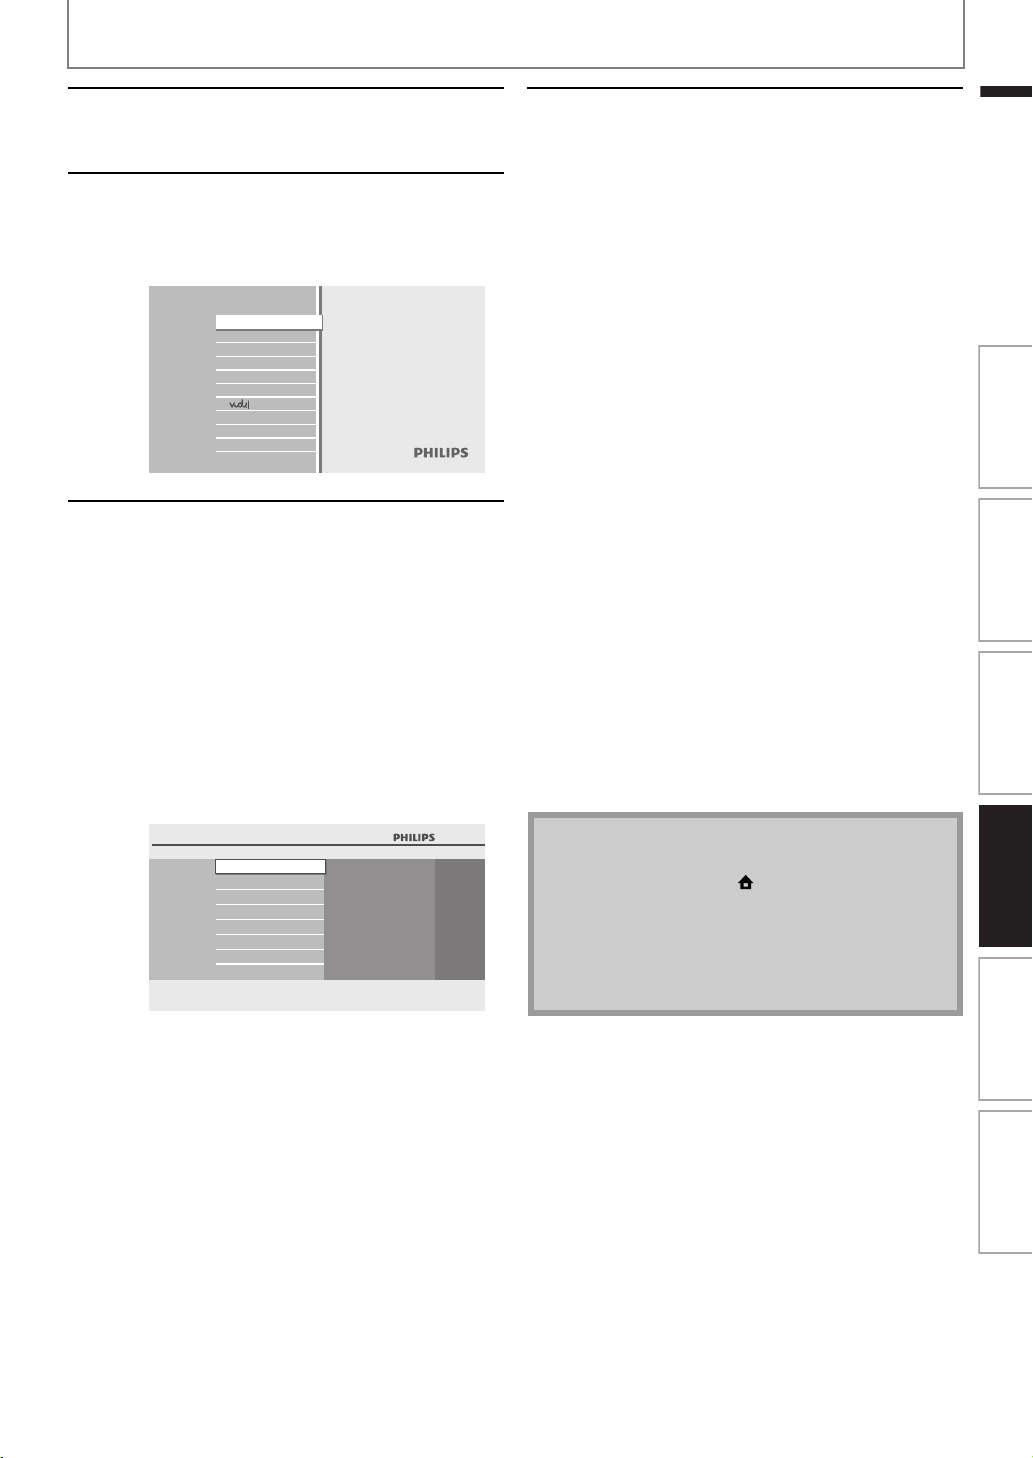
When you turn on the unit, home menu will appear
automatically. Otherwise, press [(home)].
1. Directory
Displays the current hierarchy.
2. Menus
3. Options
Displays options for the highlighted item on the left
whenever available.
Guide to On-Screen Display
Home Menu
“Disc Tray” : To access the track / file list or media
filter screen
“SD Card” : To access the file list or media filter
screen
“External audio
input”
: To access the selection menu of
external audio input
“FM” : To access the menu screen of FM
radio
“Settings” : To access the settings menus
“Product Info” : To access the product information
“vudu” : To access the VUDU App Home
screen
Menu Screen
Blu-ray Disc Home Theater System
Disc Tray
SD Card
External audio input
FM
Settings
Product Info
Watch HD movies
BD Home Theater System
Settings
Quick Setup
Player Menu
TV Shape
HDMI Video Resolution
Audio Output
Advanced Setup
Factory Default
23
1
Introduction Connections Basic Setup Playback OthersFunction Setup
E1S07UD_E1S08UD_EN.book Page 15 Monday, January 31, 2011 2:42 PM
EN16
CONNECTIONS
The Philips Blu-ray Disc Home Theater is simple to install. However, proper system placement is critical to ensure an
optimum sound experience.
1) Place the main unit near to the TV.
2) Place the speakers system at normal listening ear-level and directly parallel to the listening area.
3) Place the subwoofer at the corner of the room or at least 1 meter away from the TV.
(Supports up to 1080i
(*1)
, 1080p
(*2)
, 1080p/24 resolution.)
(*1)
1080i : Outputs the video data with frame rate of 30 frames per second.
(*2)
1080p : Outputs the video data with frame rate of 60 frames per second.
Placing the Speakers
Note
• The placement diagram shown here is only a guideline that provides great system performance. You may find other
placement choices that are more suitable for your room layout that provide the sound experience you enjoy.
• To avoid magnetic interference, never position the front speakers too close to your TV.
• The rear speakers are labeled as REAR LEFT or REAR RIGHT.
• The front speakers are labeled as FRONT LEFT or FRONT RIGHT.
• For speaker setup, refer to “Speaker Setup” on page 41.
Connection to the TV
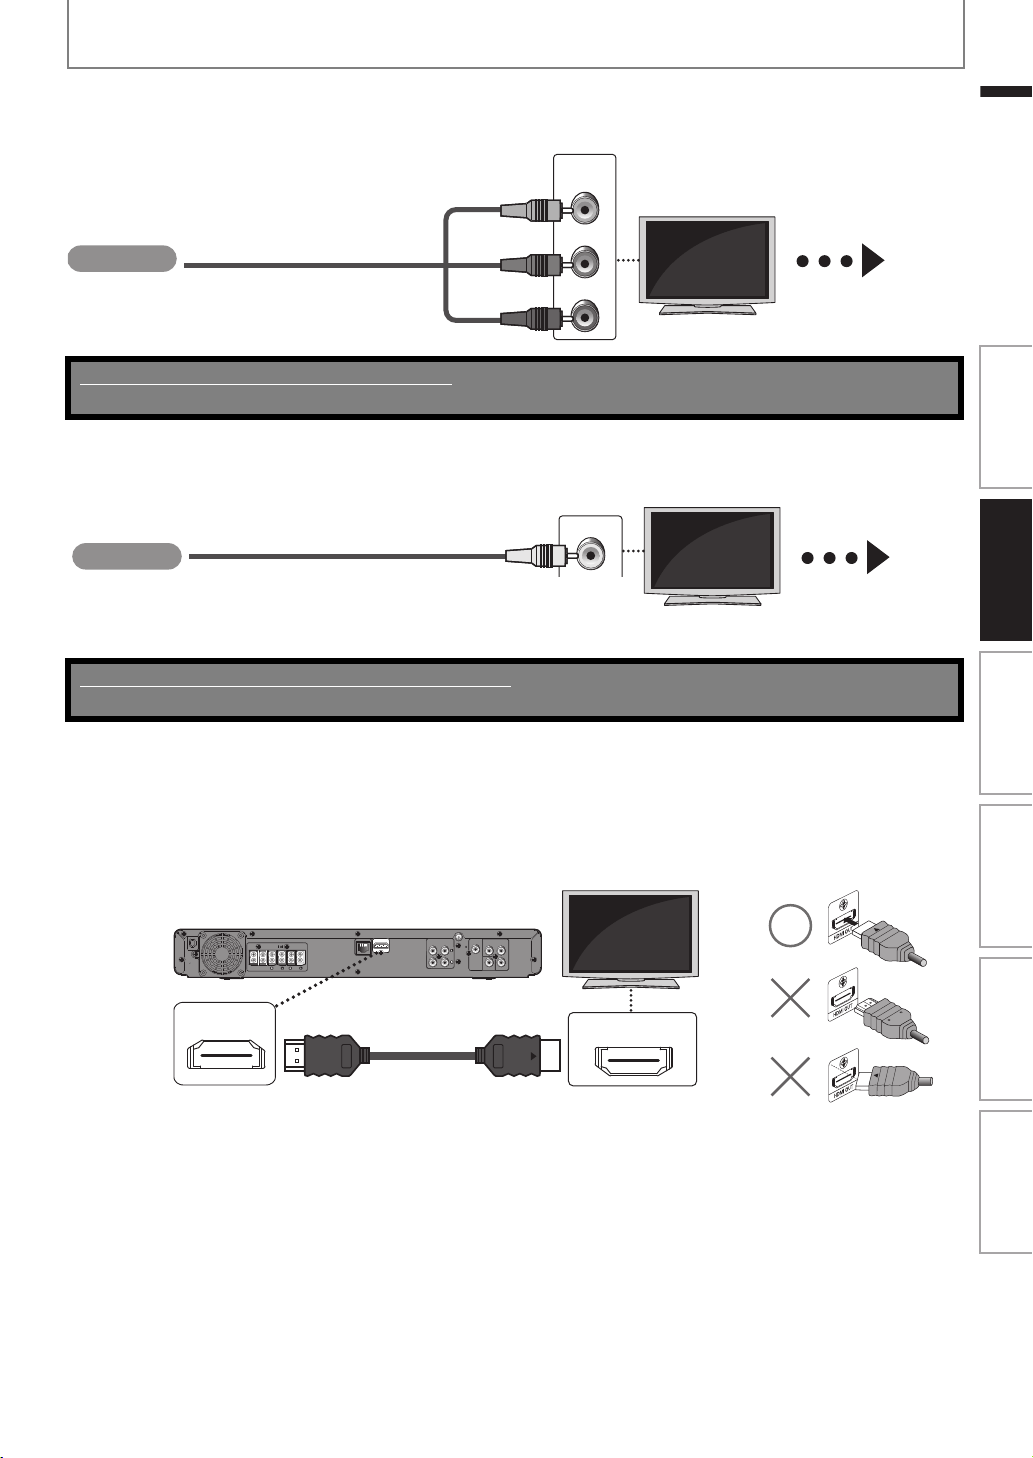
1
Choose the appropriate connection, then proceed to the corresponding
instruction (A, B or C) on the pages 17-18.
Best
HDMI IN
A
Video
Audio
HDMI cable
Your TV
Go To
No supplied cables are used in this connection:
Please purchase the necessary cables at your local store.
Use an HDMI cable with the HDMI logo (a certified HDMI cable) for this connection.
High Speed HDMI cable (also known as HDMI category 2 cable) is recommended for better compatibility.
E1S07UD_E1S08UD_EN.book Page 16 Monday, January 31, 2011 2:42 PM
17
CONNECTIONS
EN
EN
(Supports up to 1080i resolution.)
(Supports only 480i resolution.)
• Connect this unit directly to the TV. If the RCA video cables are connected to a VCR, pictures may be distorted due to
the copy right protection system.
HDMI Connection
Better
COMPONENT
VIDEO IN
Y
PB/CB
PR/CR
B
Video
RCA component video cable
Your TV
Go To
No supplied cables are used in this connection:
Please purchase the necessary cables at your local store.
Basic
VIDEO IN
C
Video
RCA video cable
Your TV
Go To
Supplied cables used in this connection are as follows:
• RCA video cable x 1
2
Connect the cables by following the descriptions below.
A
HDMI IN
HDMI OUT
AC 120V
60Hz
LAN
COMPONENT VIDEO OUT
VIDEO OUT
YPr
Pb
DIGITAL
AUDIO IN
COAXIAL
FM
ANT
75
HDMI OUT
SUB-
WOOFER
FRONT
CENTER
REAR
FRONT
SPEAKERS
4
AUDIO IN
AUX 1
AUX 2
HDMI cable
Your TV
Introduction Connections Basic Setup Playback OthersFunction Setup
E1S07UD_E1S08UD_EN.book Page 17 Monday, January 31, 2011 2:42 PM
18
CONNECTIONS
EN
Component Video Connection
Standard Video Connection
You can change the resolution of the video signal being output from the HDMI OUT jack in the settings menu.
For details, refer to “HDMI Video Resolution” on page 45.
HDMI Mode and Actual Output Signals
B
COMPONENT
VIDEO IN
Y
PB/CB
PR/CR
AC 120V
60Hz
LAN
COMPONENT VIDEO OUT
VIDEO OUT
YPr
Pb
DIGITAL
AUDIO IN
COAXIAL
FM
ANT
75
HDMI OUT
SUB-
WOOFER
FRONT
CENTER
REAR
FRONT
SPEAKERS
4
AUDIO IN
AUX 1
AUX 2
RCA component video cable
Your TV
C
VIDEO IN
AC 120V
60Hz
LAN
COMPONENT VIDEO OUT
YPr
Pb
DIGITAL
AUDIO IN
COAXIAL
FM
ANT
75
HDMI OUT
SUB-
WOOFER
FRONT
CENTER
REAR
FRONT
SPEAKERS
4
AUDIO IN
AUX 1
AUX 2
VIDEO OUT
Your TV
RCA video cable
Copyright protection system
To play back the digital video images of a BD-video or DVD-video via an HDMI connection, it is necessary that both the
player and the display device (or an AV receiver / amplifier) support a copyright protection system called HDCP (high-
bandwidth digital content protection system). HDCP is copy protection technology that comprises data encryption
and authentication of the connected AV device. This unit supports HDCP. Please read the operating instructions of
your display device (or AV receiver / amplifier) for more information.
Note
• When connected to an HDCP incompatible display device, the picture will not be displayed properly.
• To output the audio signals from the HDMI OUT jack, set “Audio Output” to “HDMI Normal” or “HDMI LPCM” in the
settings menu. (refer to page 41.)
• The audio signals from the HDMI OUT jack (including the sampling frequency, the number of channels and bit
length) may be limited by the device that is connected.
• Among the display device(s) that support HDMI, some do not support audio output (for example, projectors). While
connected to a device such as a projector, audio will not be output from the HDMI OUT jack.
• When this unit’s HDMI OUT jack is connected to a DVI-D compatible display device(s) (HDCP compatible) with an
HDMI-DVI converter cable, the signals are output in digital RGB.
E1S07UD_E1S08UD_EN.book Page 18 Monday, January 31, 2011 2:42 PM
19
CONNECTIONS
EN
EN
1) Connect the speaker cables to the matching color sockets on the speakers.
2) Connect all the speakers and subwoofer to the matching sockets at the rear of the main unit.
Make sure that the colors of the cables and sockets are matched.
Connecting Speakers and Subwoofer
AC 120 V
60Hz
LAN
COMPONENT VIDEO OUT
VIDEO OUT
YPr
Pb
DIGITAL
AUDIO IN
COAXIAL
FM
ANT
75
HDMI OUT
AUDI O IN
AUX 1
AUX 2
SUB-
WOOFER
FRONT
CENTER
REAR
FRONT
SPEAKERS
4
FRONT
LEFT
FRONT
RIGHT
FRONT CENTER REAR LEFTREAR RIGHTSUBWOOFER
Note
• To prevent unwanted noise, never place the speakers too close to the main unit, subwoofer, AC power adapter, TV or
any other radiation sources.
Introduction Connections Basic Setup Playback OthersFunction Setup
E1S07UD_E1S08UD_EN.book Page 19 Monday, January 31, 2011 2:42 PM
20
CONNECTIONS
EN
• This unit provides analog and digital audio connection. You can connect the audio output from an audio / video device
(e.g. DVD Recorder, VCR, Cable / Satellite Box, game console or TV) to this Blu-ray Disc Home Theater in order to enjoy
the multi-channel surround sound capabilities.
• Use an RCA audio cable (not supplied) to connect the AUDIO IN (AUX1 / AUX2) jacks on the main unit to the AUDIO OUT
jacks on the connected device.
• Use a digital audio coaxial cable (not supplied) to connect the DIGITAL AUDIO IN (COAXIAL) jack on the main unit to the
DIGITAL OUT (COAXIAL) jack on the connected device.
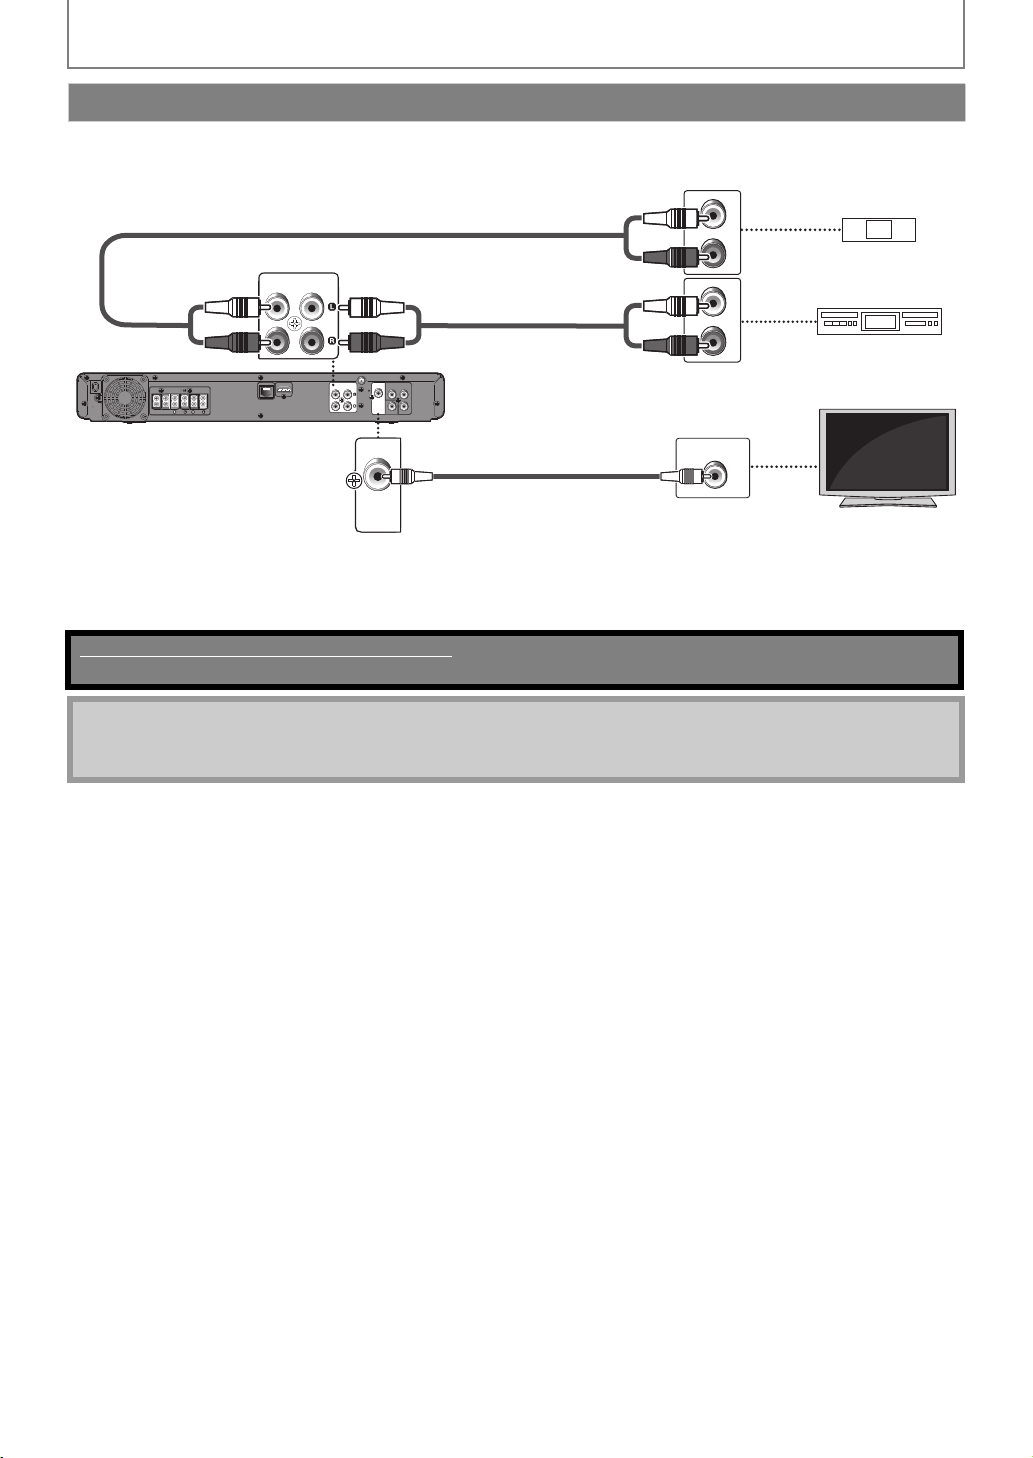
Connecting Audio from Cable Box / Recorder / Game Console or TV
AUDIO IN
AUX 1
AUX 2
AUDIO OUT
R
L
AC 120V
60Hz
LAN
COMPONENT VIDEO OUT
YPr
Pb
DIGITAL
AUDIO IN
COAXIAL
FM
ANT
75
HDMI OUT
SUB-
WOOFER
FRONT
CENTER
REAR
FRONT
SPEAKERS 4
VIDEO OUT
AUDIO IN
AUX 1
AUX 2
COAXIAL
DIGITAL OUT
AUDIO OUT
R
L
DIGITAL
AUDIO IN
COAXIAL
DVD Recorder / VCR
Cable / Satellite Box
Your TV
RCA audio cable
Digital audio coaxial cable
RCA audio cable
No supplied cables are used in this connection:
Please purchase the necessary cables at your local store.
Note
• To listen to the audio output from these connections, select “Speakers” in “Audio Output” (refer to page 41) and
change the active source mode to the connected input. (Refer to “Switching Active Source Mode” on page 55.)
E1S07UD_E1S08UD_EN.book Page 20 Monday, January 31, 2011 2:42 PM
21
CONNECTIONS
EN
EN
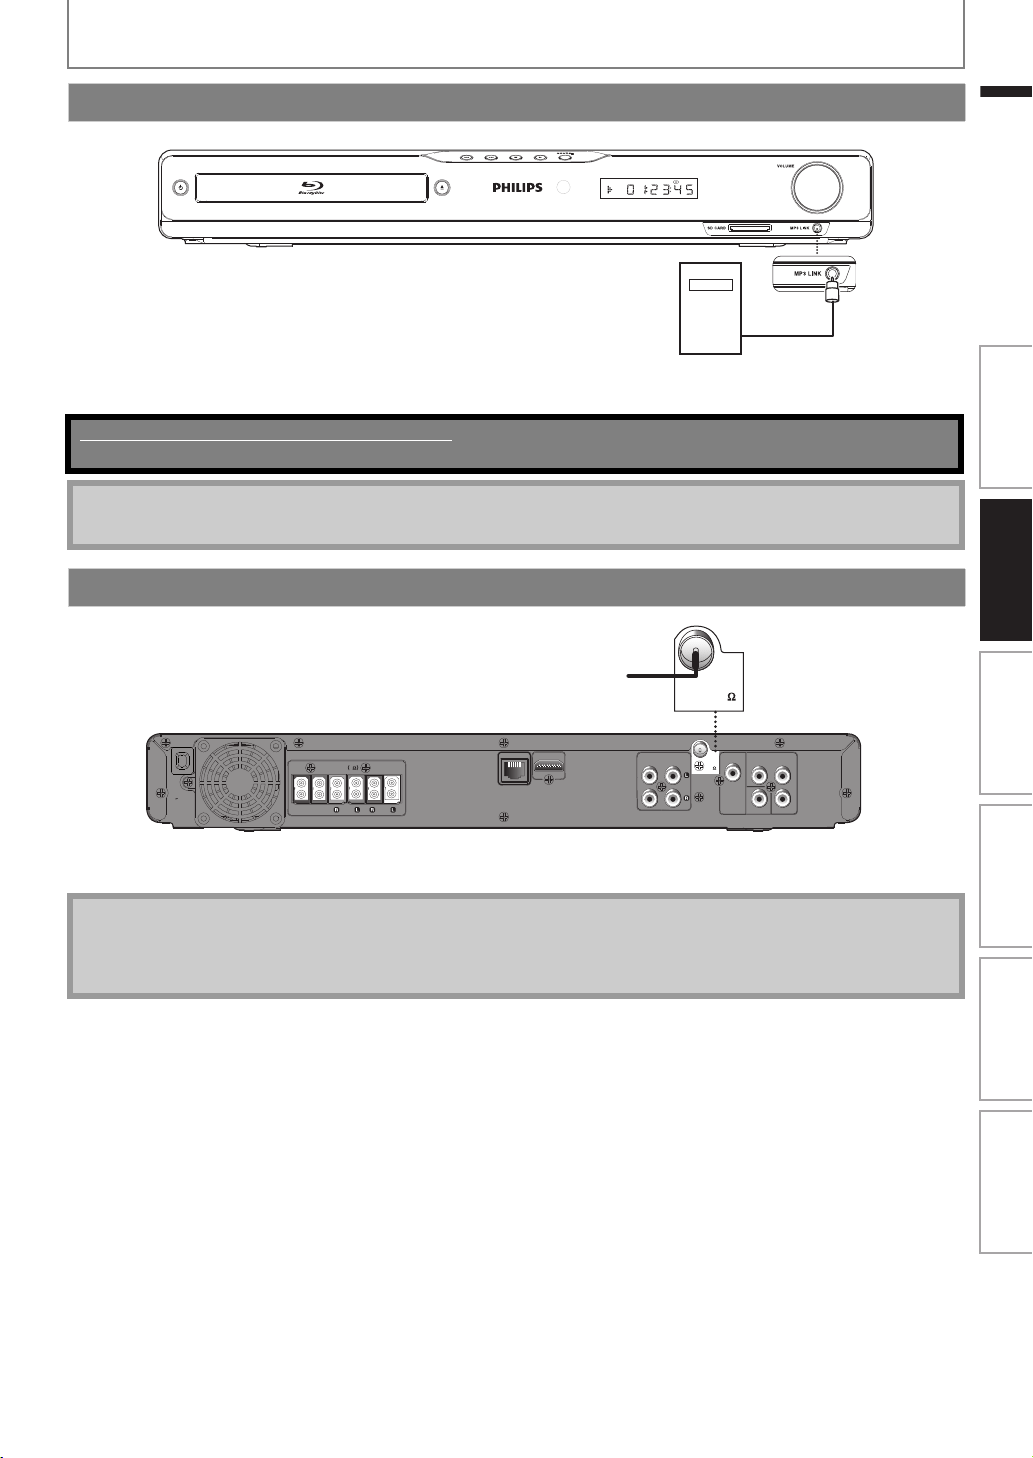
Connect a 3.5mm stereo audio cable(not supplied) to the MP3 LINK jack on this unit and the headphone jack on
your portable media player.
1) Connect the supplied FM wire antenna to the FM ANT 75 jack on this unit.
2) Extend the FM antenna and fix its ends to the wall for optimum reception.
Connecting Portable Media Player
MP3
No supplied cables are used in this connection:
Please purchase the necessary cables at your local store.
Note
• To playback the audio from your portable media player, refer to “Play from Portable Media Player” on page 36.
Connecting FM Radio Antenna
AC 120 V
60Hz
LAN
COMPONENT VIDE O OUT
VIDEO OUT
YPr
Pb
DIGITAL
AUDIO IN
COAXIAL
FM
ANT
75
HDMI OUT
SUB-
WOOFER
FRONT
CENTER
REAR
FRONT
SPEAKERS
4
AUDIO IN
AUX 1
AUX 2
FM
ANT
75
AC 120V
60Hz
Note
• For better FM stereo reception, connect an external FM antenna (not supplied).
• Place the antenna away from your TV, VCR or other radiation source to prevent any unwanted interference.
• For FM radio playback, refer to “Radio Operations” on page 36.
Introduction Connections Basic Setup Playback OthersFunction Setup
E1S07UD_E1S08UD_EN.book Page 21 Monday, January 31, 2011 2:42 PM
22
CONNECTIONS
EN
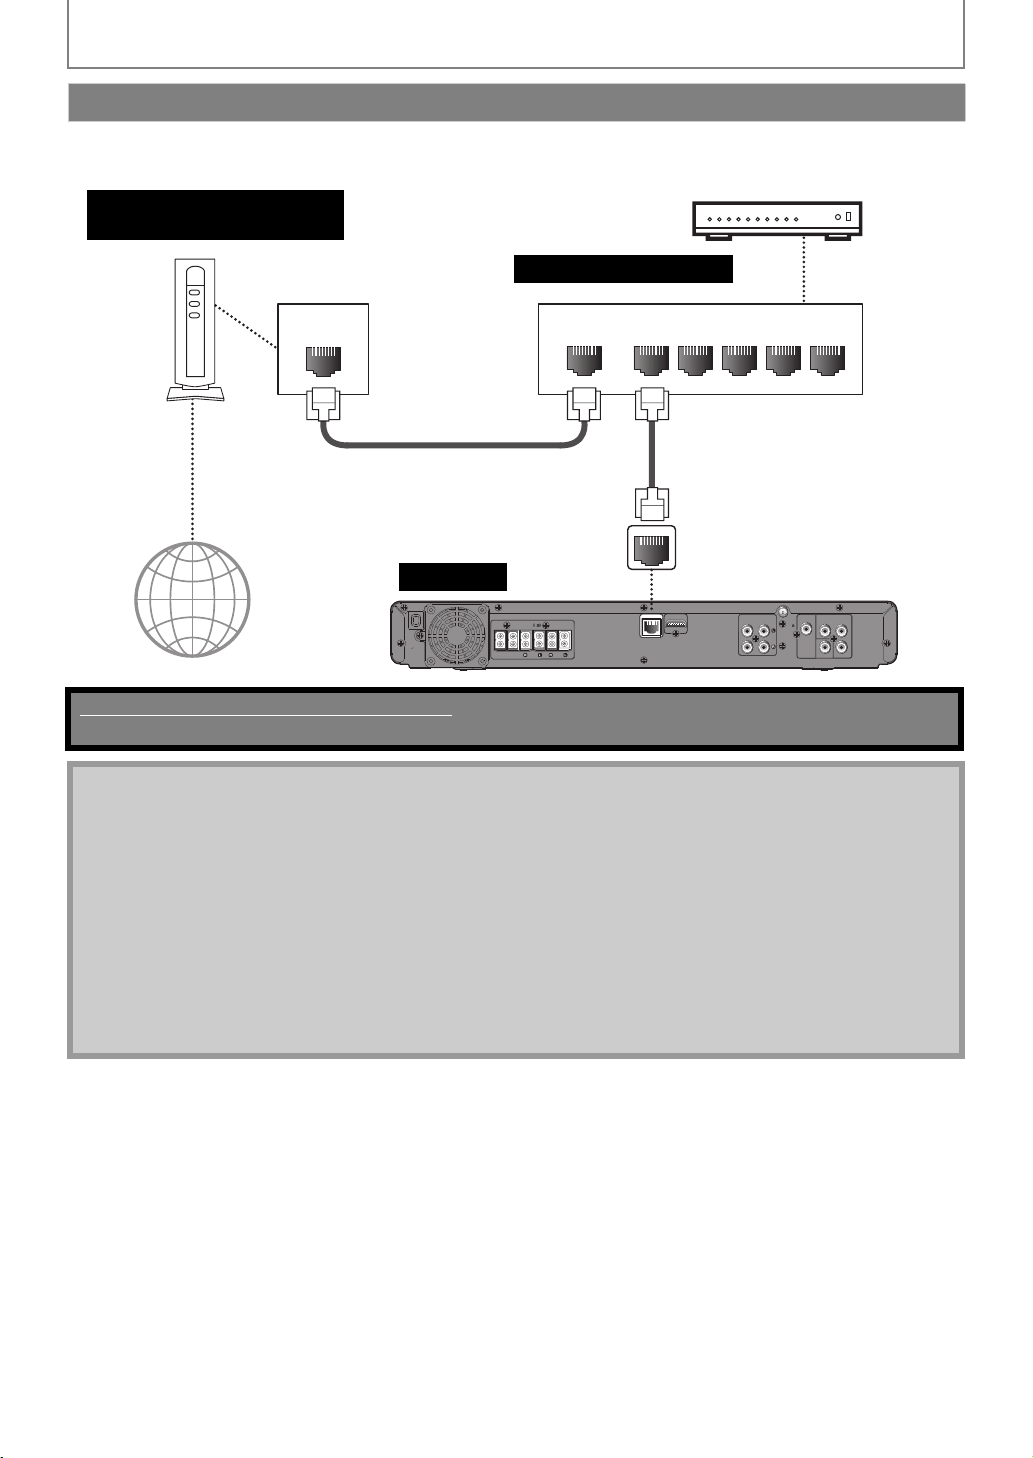
• By connecting this unit to the Internet, you can access VUDU services and applications, BD-Live features on a Blu-ray
Disc and perform network upgrade.
Network Connection with LAN
No supplied cables are used in this connection:
Please purchase the necessary cables at your local store.
LAN
LAN
WAN LAN
12345
AC 120V
60Hz
LAN
COMPONENT VIDEO OUT
VIDEO OUT
YPr
Pb
DIGITAL
AUDI O IN
COAXIAL
FM
ANT
75
HDMI OUT
SUB-
WOOFER
FRONT
CENTER
REAR
FRONT
SPEAKERS
4
AUDI O IN
AUX 1
AUX 2
this unit
Internet
LAN cable
LAN cable
Hub or broadband router
Telecommunications
equipment (modem, etc.)
Note
• After connecting a LAN cable, set up necessary network settings.
(For the network setup, refer to “Network Connection” on page 49.)
• For more information about software upgrade, refer to “Network Upgrade” on page 53.
• For more information about BD-Live, refer to “Enjoying BD-Live Discs with Internet” on page 33.
• For more information about VUDU, refer to “VUDU Operations” on page 37.
• Do not insert any cable other than a LAN cable to the LAN terminal to avoid damaging the unit.
• If your telecommunications equipment (modem, etc.) does not have broadband router functions, connect a
broadband router.
• If your telecommunications equipment (modem, etc.) has broadband router functions but there is no vacant port,
use a hub.
• For a broadband router, use a router which supports 10BASE-T / 100BASE-TX.
• Do not connect your PC directly to the LAN terminal of this unit.
• Please purchase shielded LAN cables at your local store and use them when you connect to network equipment.
E1S07UD_E1S08UD_EN.book Page 22 Monday, January 31, 2011 2:42 PM
23EN
EN
BEFORE YOU START
After you have completed all the connections, you must find the viewing channel (external input channel) on your TV.
Finding the Viewing Channel on Your TV
1
After you have made all the necessary
connections, press [Q (standby/on)] to
turn on the unit.
2
Turn on your TV.
3
Press the button on the TV’s remote
control that accesses the external input
channel. It may be labeled “SOURCE”,
“AV” or “SELECT” (refer to your TV’s
user manual). Or press “2” on the TV’s
remote control, then press channel
down button repeatedly until you see
the PHILIPS splash screen.
This is the correct viewing channel (external
input channel).
• If a certain amount of time has passed since
you turned on the unit, you may see the home
menu instead of the PHILIPS splash screen.
Home menu:
Blu-ray Disc Home Theater System
Disc Tray
SD Card
External audio input
FM
Settings
Product Info
Watch HD movies
Introduction Connections Basic Setup Playback OthersFunction Setup
E1S07UD_E1S08UD_EN.book Page 23 Monday, January 31, 2011 2:42 PM

EN24
INFORMATION ON PLAYBACK
Before you start playing back a disc, read the following information.
This unit is compatible to play back the following discs / files.
To play back a disc / file, make sure that it meets the
requirements for region codes and color systems as
described below. You can play back discs that have the
following logos. Other disc types are not guaranteed to
play back.
(*) Due to the intentional progression of the Blu-ray Disc
format by its standard setting authority, the company
cannot guarantee or warrant the playability of future
extensions of the Blu-ray Disc format with this product.
• This unit cannot play back the disc contents protected by
Windows Media™ Digital Rights Management (DRM).
Information on Playback
Playable Discs and Files
Playable discs Logos
Blu-ray Disc
- BD-video
- BD-RE* (ver. 2.1)
(Recorded in BDMV format)
- BD-R* (ver. 1.1 / 1.2 / 1.3)
(Recorded in BDMV format)
(Unclosed discs may not be played
back.)
DVD-video
DVD-RW
(finalized video mode discs only)
DVD-R
(finalized video mode discs only)
CD-DA (audio CD)
CD-RW
CD-R
KODAK Picture CD
DTS-CD
-
Playable files Media
MP3
BD-RE/-R
DVD-RW/-R
CD-RW/-R
SD Memory Card (including SDHC)
miniSD Card
microSD Card
Windows Media™ Audio
JPEG
Readable cards Playable files / data
SD Memory Card (8 MB - 2 GB)
MP3, WMA, JPEG, picture-in-
picture commentary,
subtitles or other extras for
BD-ROM ver. 2 (Profile 2.0 /
Profile 1.1)
SDHC Memory Card (4 GB - 8 GB)
miniSD Card (8 MB - 2 GB)
microSD Card (8 MB - 2 GB)
Note for SD Memory Cards
• This unit supports SD Memory Card with FAT12 /
FAT16 file system, and SDHC Memory Card with FAT32
file system.
• This unit does not support NTFS file system.
• This unit may not read SD Memory Cards formatted
on a computer. If that is the case, please reformat the
SD Memory Cards in this unit and try again.
• This unit does not support miniSDHC and microSDHC
Memory Card.
• For miniSD Card and microSD Card, an adapter is
necessary.
• Portions of this product are protected under
copyright law and are provided under license by
ARIS / SOLANA / 4C.
• Please keep the SD Memory Cards in their cases when
you are not using them.
• Do not try to open or modify the card.
• Do not touch the terminal surface with your fingers or
any metals.
• Do not attach additional labels or stickers to cards.
• Do not remove the label of the SD Memory Cards.
• This unit recognizes up to 8 characters of file name in
the SD Memory Card. Characters after 8th will not be
displayed.
miniSD Card
adapter
miniSD Card
microSD
Card
microSD Card
adapter
E1S07UD_E1S08UD_EN.book Page 24 Monday, January 31, 2011 2:42 PM
25
INFORMATION ON PLAYBACK
EN
EN
The following discs will not be played back in this unit.
• BD-RE (ver.1.0)
• BD-RE (ver.2.1) (Recorded in BDAV format)
• BD-R (ver.1.1 / 1.2 / 1.3) (Recorded in BDAV format)
• BD / DVD / CD / SD Memory Card contains DivX® files
• BD / DVD hybrid disc (played back as a BD-video only)
• Super Audio CD - Only the sound on the CD layer can be
heard. The sound on the high-density Super Audio CD
layer cannot be heard.
• Playability of dual discs are not guaranteed.
BD-video and DVD-video are recorded in different color
systems throughout the world. The most common color
system is NTSC (which is used primarily in the United
States and Canada).
This unit employs NTSC color system, so the disc you play
back must be recorded in the NTSC system. You cannot
play back the disc recorded in other color systems.
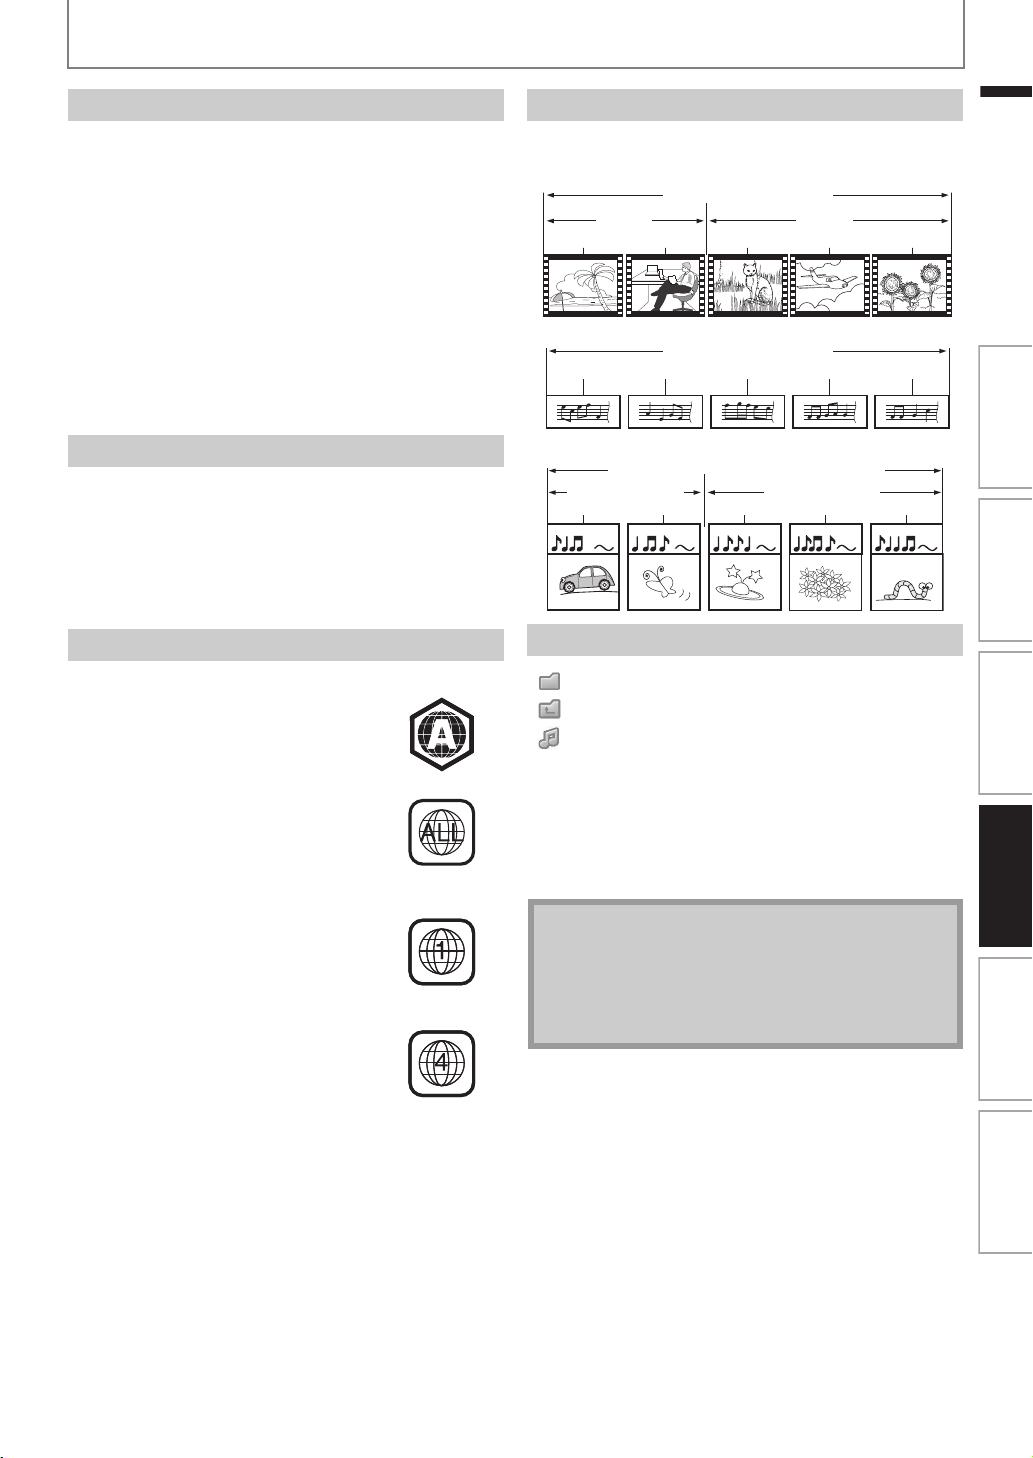
The contents of disc are generally divided into sections or
folders (groups of titles / files) as shown below.
[ ] : group (folder) icon
[ ] : group (folder) return icon
[ ] : music file icon
- “Folders” refers to the groups of files.
- “Tracks” refers to the contents recorded on the audio
CD.
- “Files” refers to the contents on a disc which are
recorded in MP3, Windows Media™ Audio, JPEG file
format.
Unplayable Discs and Files
• CD-ROM • CD-I (compact disc-interactive)
•DVD-RAM •VSD (video single disc)
•DVD-audio •video CD
• HD DVD • SVCD
• unfinalized disc
Color Systems
Region Codes
This unit has been designed to play back
BD-video with region “A”, DVD-video with
region “ALL” or “1” for HTS3051BV/F7
(USA / Canada) and region “ALL” or “4” for
HTS3051BV/F8 (Mexico). You cannot play
back BD-video or DVD-video that are
labeled for other regions. Look for the
symbols on the right on your
BD-video or DVD-video.
If these region symbols do not appear on
your BD-video or DVD-video, you cannot
play back the disc in this unit. The letter or
number inside the globe refers to region
of the world. A BD-video or DVD-video
labeled for a specific region can only be
played back in the unit with the same
region code.
BD-video
DVD-video
For HTS3051BV/F7
(USA / Canada)
For HTS3051BV/F8
(Mexico)
Hint for Disc Playback
Description for Icons
Note
• Unrecognizable characters will be replaced by “”.
• For BD, DVD and SD card, this unit can recognize up
to 999 groups (folders), and 9,999 tracks / files.
• For CD, this unit can recognize up to 255 groups
(folders), and 999 tracks / files.
BD-video, DVD-video
title 1 title 2
chapter 1
chapter 2 chapter 2chapter 1 chapter 3
Audio CD
track 1 track 2 track 3 track 4 track 5
MP3,Windows Media™ Audio, JPEG
folder (group) 1
folder (group) 2
file 1
file 2 file 1 file 2 file 3
Introduction Connections Basic Setup Playback OthersFunction Setup
E1S07UD_E1S08UD_EN.book Page 25 Monday, January 31, 2011 2:42 PM
26
INFORMATION ON PLAYBACK
EN
1) Total track number
2) Repeat status
3) Image
4) Elapsed playing time of the current track
5) Playing track number
6) Total time of the current track
7) Playing media
8) Track list
9) Playback status
e.g.) MP3 mode
1) Number of contents in the current hierarchy
2) Repeat status (Music mode only)
3) Image
4) Elapsed playing time of the current track
5) Current file name
6) Media type
7) Group (folder) / File list
8) Playback status
9) Root folder
10) Directory
1) Directory
2) Number of contents in the current hierarchy
3) Current file name
4) Group (folder) / File list (thumbnails)
5) Root folder
1) Press [A (open/close)] to open the disc tray.
2) Place the disc on the disc tray with its label side
facing up.
* Make sure the disc is compatible with this unit (refer to page 24 for the list
of compatible discs).
3) Press [A (open/close)] to close the disc tray.
To eject the disc:
Press [A (open/close)] to open the disc tray.
Remove the disc.
Press [A (open/close)] to close the disc tray.
Guide to File List
Audio CD Track List
Music Mode File List
CDDA
00 : 03 : 40
00 : 00 : 39
14
001
002
003
004
005
006
007
008
001
BD Home Theater System
Music
Track
Track
Track
Track
Track
Track
Track
Track
Page Down
Tr ack
7
6
5
4
3
1
9
8
2
MP3_1.mp3
MP3
MP3_3.mp3
00:00:13
MP3_2.mp3
MP3_3.mp3
MP3_4.mp3
MP3_5.mp3
MP3_6.mp3
MP3_7.mp3
9
..
BD Home Theater System Disc Tray
Music
Media Filter Page Down
|
110
2
3
4
56
7
8
9
Picture Mode File List
How to Insert a Disc
It may take a while to load the disc.
..
24
BD Home Theater System Disc Tray
Pictures
Media Filter Page Down
|
12
4
5
3
Align the disc to the
disc tray guide.
E1S07UD_E1S08UD_EN.book Page 26 Monday, January 31, 2011 2:42 PM
27EN
EN
BASIC PLAYBACK
Playing Back a BD or a DVD
1
Insert a disc (refer to “How to Insert
a Disc” on page 26).
2
Playback may start automatically.
If not, press [B (play)].
Some discs may show a title or a disc menu. In
this case, refer to “Using the Title / Disc Menu”
on page 31.
To pause playback:
Press [F (pause)].
To return to the normal playback:
Press [B (play)].
To stop playback:
Press [C (stop)].
Playback will be in Resume-On-Stop mode,
and the home menu will appear.
<Resume-On-Stop mode>
When you press [B (play)] next time, the
playback will start from the point where it has
been stopped.
Note
• Playback will also stop and the home menu will
appear when you press [(home)].
• For BD-Java application, the Resume-On-Stop may
not be available.
• If you press [OK] instead of [B (play)], playback can
be started from the beginning of the disc even if it
was in the Resume-On-Stop mode.
• You can also start from the beginning of the disc if
you press [S (previous)] while the resume message
is displayed.
• The resume message can be removed by pressing
[BACK U].
• Resume-On-Stop mode remains in effect even after
power is turned off, but will be cancelled once the
disc is ejected.
Introduction Connections Basic Setup Playback OthersFunction Setup
E1S07UD_E1S08UD_EN.book Page 27 Monday, January 31, 2011 2:42 PM
28
BASIC PLAYBACK
EN
•Use [K / L] to move the highlight up and down in the
list.
• To access the files in a group (folder), select the desired
group (folder), then press [OK].
•Press [s], or select [ ], then press [OK] to go back to
the previous hierarchy.
•Press [s] to go back to the previous screen.
•Press [BLUE] or [YELLOW] to change the page of the list.
•Press [RED] to go back to the media filter screen.
•Press [(home)] to go back to the home menu.
Recommended specifications:
MP3 / Windows Media™ Audio
JPEG
Resolution
Folder / File number limitations:
BD, DVD and SD card
• 999 folders (groups) and 9,999 files.
CD
• 255 folders (groups) and 999 tracks / files.
Playing Back an Audio CD or a Disc with MP3 / Windows Media™ Audio / JPEG Files
How to Navigate through the Track / File List
• Sampling frequency : 32 kHz, 44.1 kHz or 48 kHz
• Constant bit rate : 112 kbps - 320 kbps (MP3),
48 kbps - 192 kbps
(Windows Media™ Audio)
• Upper limit :
:
2,560 x 1,900 dots
(sub sampling is 4:4:4)
5,120 x 3,840 dots
(sub sampling is up to
4:2:2)
• Lower limit : 32 x 32 dots
• Maximum file size of a
picture
:5 MB
E1S07UD_E1S08UD_EN.book Page 28 Monday, January 31, 2011 2:42 PM
29
BASIC PLAYBACK
EN
EN
1
Insert a disc (refer to “How to Insert
a Disc” on page 26).
• Home menu appears automatically.
2
With “Disc Tray” selected, press
[OK].
• Media filter screen will appear.
• For audio CD, skip to step 4.
3
Select the type of the file you want
to play back in the media filter
screen. Then press [OK] to display
the file list.
Blu-ray Disc Home Theater System
Disc Tray
SD Card
External audio input
FM
Settings
Product Info
Watch HD movies
“Music” : If you want to play back music
files such as MP3 or Windows
Media™ Audio, select “Music”.
“Pictures” : If you want to play back the still
images such as JPEG pictures,
select “Pictures”.
BD Home Theater System
Disc Tray
Music
Pictures
4
Select a group (folder) or track / file
you want to play back. Then press
[B (play)] or [OK] to start playback.
Refer to “How to Navigate through the Track /
File List” on page 28.
To skip to the next track / file:
Press [T (next)].
To skip to the previous track / file:
Press [S (previous)].
To pause playback:
Press [F (pause)].
To return to the normal playback:
Press [B (play)].
To stop playback:
Press [C (stop)].
Playback will be in Resume-On-Stop mode.
<Resume-On-Stop mode for audio CD>
Playback will start from the point where it is
stopped next time you press [B (play)].
If you press [OK] instead of [B (play)],
playback will start from the beginning of the
track / file instead of resuming from the stop
point.
<Resume-On-Stop mode for MP3 /
Windows Media™ Audio / JPEG>
Playback will start from the beginning of the
current file next time you press [B (play)] or
[OK].
To go back to the media filter screen:
Press [RED] in Resume-On-Stop mode.
Note
• Playback will also stop and the home menu will
appear when you press [(home)].
• With regard to the multi-border BD-RE/-R,
additionally recorded sections cannot be recognized.
• With regard to the multi-border DVD-RW/-R,
additionally recorded sections may not be
recognized.
Introduction Connections Basic Setup Playback OthersFunction Setup
E1S07UD_E1S08UD_EN.book Page 29 Monday, January 31, 2011 2:42 PM

30
BASIC PLAYBACK
EN
This unit can also run JPEG files stored on KODAK Picture
CD. You can enjoy picture images on the TV set by playing
back the KODAK Picture CD. This unit conforms to ver.7.0 of
KODAK Picture CD. For details of KODAK Picture CD, contact
a shop that provides developing service of Kodak Inc.
You can play back the MP3 / WMA / JPEG files in an SD
Memory Card.
With the SD Memory Card, you can also enjoy the
following functions.
- Special additional contents for BD-ROM Profile 1 ver.1.1.
(For more information about the special additional
contents, refer to the instruction book that came with
the disc.)
- BD-Live function (BD-ROM ver. 2 Profile 2.0). (For more
information about BD-Live, refer to page 33.)
KODAK Picture CD
1
Insert a KODAK Picture CD.
• Home menu appears automatically.
2
With “Disc Tray” selected, press
[OK].
• Media filter screen will appear.
3
Select “Pictures” in the media filter
screen. Then press [OK] to display
the file list.
4
Follow step 4 in “Playing Back an
Audio CD or a Disc with MP3 /
Windows Media™ Audio / JPEG
Files” on pages 28-29.
Tips for JPEG / KODAK Picture CD Playback
• Every press on [ANGLE] will turn the image
clockwise by 90 degrees when an image is displayed.
Note
• Some unplayable folders or files may be listed due to
the recording status.
• High-resolution JPEG files take longer to be
displayed.
• Progressive JPEG files (JPEG files saved in progressive
format) cannot be played back in this unit.
Reading the SD Memory Card
1
Insert an SD card and then press
[(home)].
Home menu appears.
2
With “SD Card” selected, press
[OK].
• Media filter screen will appear.
3
Select the type of the file you want
to play back in the media filter
screen. Then press [OK] to display
the file list.
4
Follow step 4 in “Playing Back an
Audio CD or a Disc with MP3 /
Windows Media™ Audio / JPEG
Files” on pages 28-29.
To remove the SD Memory Card:
In stop mode, gently push in the SD Memory
Card, then pull it out slowly.
SD Memory Card
E1S07UD_E1S08UD_EN.book Page 30 Monday, January 31, 2011 2:42 PM
31
BASIC PLAYBACK
EN
EN
Some BD-video or DVD-video may contain a title menu
which describes the contents of the disc, or a disc menu
which guides you through the available functions in the
disc.
With such discs, a title menu or a disc menu may appear
automatically when you insert the disc. Otherwise, press
[TOP MENU] or [DISC MENU / POP-UP MENU] to call up
the menu. Refer to the disc’s manual on how to navigate
through the menu.
Note
• In the “SD Card” mode, the resume information will
be cleared when;
-[C (stop)] is pressed while in the Resume-On-Stop
mode.
-the SD Memory Card is removed.
-the unit is turned into the standby mode.
• Do not remove the SD Memory Card or turn the unit
to the standby mode while the contents of the card
are in playback. It may result in malfunction or loss of
the card’s data.
• Do not delete the folders or files in the SD Memory
Card with your computer. This unit may not read SD
Memory Cards formatted on a computer.
• If a folder or file name includes one of the following
unrecognizable characters, the folder or file name
may not be displayed correctly.
-Unrecognizable characters :
Using the Title / Disc Menu
Note
• Menus vary among discs. Refer to the information
accompanying the disc for details.
• [TOP MENU] or [DISC MENU / POP-UP MENU] may
not work with some discs.
. , " = + [ ] ; / \ : | ¥
Introduction Connections Basic Setup Playback OthersFunction Setup
E1S07UD_E1S08UD_EN.book Page 31 Monday, January 31, 2011 2:42 PM
EN32
SPECIAL PLAYBACK
1) During playback, press [D (forward)] repeatedly
for fast forward.
During playback, press [E (reverse)] repeatedly
for fast reverse.
Every time you press [D (forward)] or [E (reverse)],
the playback speed will change.
2) Press [B (play)] to return to the normal playback.
1) During playback, press [F (pause)] . Then press
[D (forward)].
Every time you press [D (forward)], the playback
speed changes in 3 different levels.
2) Press [B (play)] to return to the normal playback.
1) In pause mode, press [F (pause)] repeatedly.
Every time you press [F (pause)], playback will
advance one step at a time.
2) Press [B (play)] to return to the normal playback.
Available repeat function varies depending on the discs.
1) During playback, press [REPEAT] repeatedly to
select the desired repeat function.
You can play back the specific part (between point A and
point B) repeatedly.
1) During playback, press [REPEAT A-B] once at the
point where you want to set point A.
2) During playback, press [REPEAT A-B] again at the
point where you want to set point B.
As soon as you set point B, the part between point A
and point B will start to play repeatedly.
To cancel A-B repeat:
Press [REPEAT A-B] repeatedly until “Off” appears.
Fast Forward / Fast Reverse
Note
• For BD and DVD, speed changes in 5 different levels.
• For audio CD, MP3 and Windows Media™ Audio,
speed changes in 3 different levels.
Slow Forward Playback
Note
• Only slow forward is available.
Step by Step Playback
Note
• Only step by step forward is available.
Repeat Playback
REPEAT MODE AVAILABLE MEDIA
Chapter Repeat
BD-video / DVD-video
The current chapter will be
played back repeatedly.
Title Repeat
BD-video / DVD-video
The current title will be
played back repeatedly.
Track Repeat
Audio CD / DTS-CD /
MP3 / Windows Media™
Audio
The current track or file will
be played back repeatedly.
All Repeat
Audio CD / DTS-CD
All tracks in the media will be
played back repeatedly.
Group Repeat
MP3 / Windows Media™
Audio / JPEG
The current group (folder)
will be played back
repeatedly.
Random Repeat (Audio CD)
Audio CD / DTS-CD
Repeats the random
playback.
Random Repeat
(MP3 /
Windows Media™ Audio /
JPEG)
MP3 /
Windows Media™ Audio /
JPEG
Repeats the random
playback in a folder.
Note
• The repeat setting will be cancelled when you stop
playback.
• If you press [REPEAT A-B] when the repeat setting
for BD, DVD or CD playback is set, the repeat setting
will be cancelled.
• When the repeat setting is set for a MP3 or WMA
folder (file), the repeat setting will be cancelled if you
select other MP3 or WMA folder (file) to playback.
A-B Repeat
E1S07UD_E1S08UD_EN.book Page 32 Monday, January 31, 2011 2:42 PM
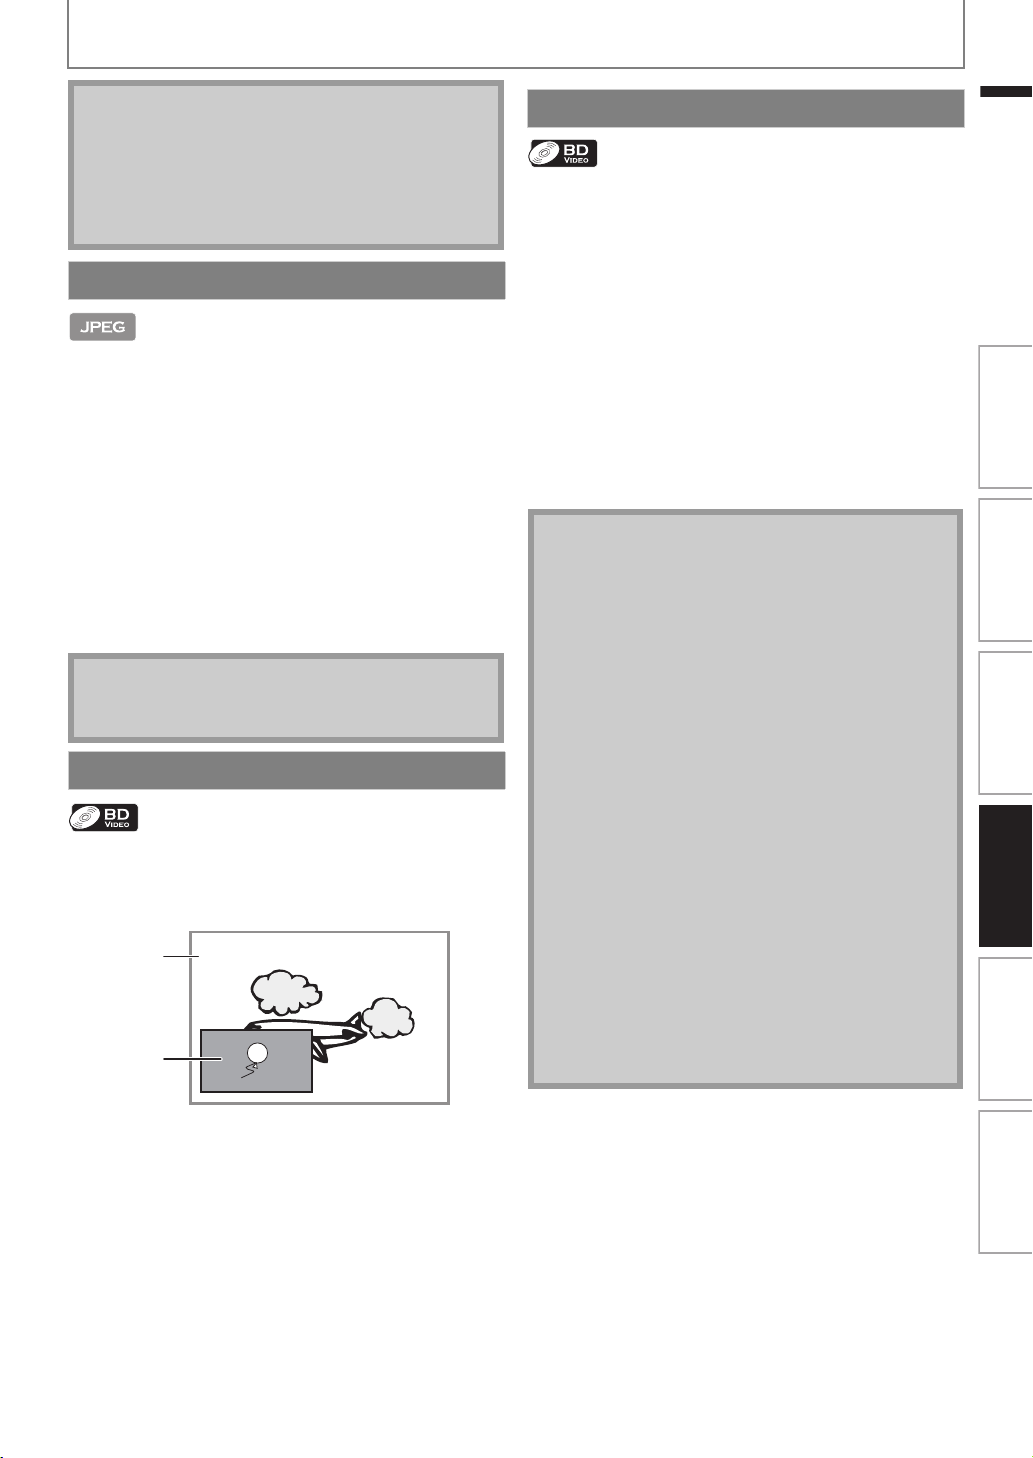
33
SPECIAL PLAYBACK
EN
EN
1) Follow steps 1 to 3 in “Playing Back an Audio CD or a
Disc with MP3 / Windows Media™ Audio / JPEG
Files” on pages 28-29.
2) Open the folder which contains the desired JPEG files.
3) Use [K / L / s / B] to select a desired file to be
played back, then press [B (play)] or [OK].
• An image will be played back from the selected file
and go to the next one in turn every 10 seconds.
4) Press [C (stop)] to stop playback.
To return to the first item:
Press [TOP MENU].
To return to the file played last:
Press [DISC MENU / POP-UP MENU].
Some BD-videos have the PiP function which enables you
to display the secondary video in the primary video. You
can call up the secondary video by pressing [MODE]
whenever the scene contains the secondary video.
1) During playback, press [MODE].
PiP information will appear.
2) Use [K / L] to select the secondary video you want
to show.
• The secondary video will be displayed with the
secondary audio.
•Use [s / B] to switch between current setting and
“Off”.
3) Press [BACK U] to remove the PiP information.
• On how to output the secondary audio, refer to
“Switching Audio Soundtrack” on page 35 and
“Blu-ray Disc Audio” on page 41.
You can enjoy BD-Live which enables you to use
interactive features when the unit is connected to the
Internet.
Examples of BD-Live features:
• Online access to additional content such as movie
trailers, subtitles, BD-Java applications, etc.
• While downloading, special video data may be played
back.
- Service and functions differ depending on the disc.
Follow the instructions given by the disc when using
the BD-Live function.
- You must insert an SD Memory Card when using the
BD-Live function.
(SD Memory Card of 1GB or more is recommended.)
- Do not remove the SD Memory Card when using the
BD-Live function.
Note
• Point B should be set within the same title or track as
point A.
• If you press [REPEAT A-B] when the repeat setting
for BD, DVD or CD playback is set, the repeat setting
will be cancelled.
• To cancel the A point which was set, press [CLEAR].
Slide Show
Note
• Large-size JPEG files take a few moments to be
displayed.
PiP (BONUSVIEW) Setting
Primary
video
Secondary
video
Enjoying BD-Live Discs with Internet
Note
• You must connect the unit to the Internet and set up
necessary settings in order to use BD-Live.
• For the network connection, refer to “Network
Connection with LAN” on page 22.
• For the network setup, refer to “Network
Connection” on page 49.
• For certain discs, “BD-Live Setting” may need to be
changed.
• Depending on your connection environment, it may
take time to connect to the Internet or the Internet
may not be connected.
• When BD-Live functions are used and the unit is
connected to the Internet, you may be charged for
this communication.
• Some discs with BD-Live function require memory
when playing back the content. If you cannot play
back a disc with BD-Live function, insert an SD
card(1GB or more) which is formatted on this unit.
Note for AACS Online
• The player or disc IDs may be sent to the content
provider when playing back a disc with BD-Live
function.
• If you save your viewing history on the server by
using these IDs, you will be introduced to other
similar movies.
• You can save game score histories.
Introduction Connections Basic Setup Playback OthersFunction Setup
E1S07UD_E1S08UD_EN.book Page 33 Monday, January 31, 2011 2:42 PM
34
SPECIAL PLAYBACK
EN
1) During playback, press [T (next)] to skip the
current title or chapter and move to the next.
The title or chapter will move forward by one at a time.
• If there is no chapter in one title, the current title may
be skipped.
To go back to the beginning of the current title or
chapter, press [S (previous)].
Press [S (previous)] repeatedly to go to the previous
title or chapter. The title or chapter may move
backward one at a time.
1) During playback, press [SEARCH].
2) Use [K / L] to select “Title” or “Chapter”.
3) Use [the Number buttons] or [s / B] to enter the
title / chapter number.
4) Press [OK].
Playback will start from the beginning of the title /
chapter.
5) Press [SEARCH] to remove the information display.
Title Search
In stop mode, enter the title number you want to
search using [the Number buttons].
Playback of the title will start in a few seconds.
Chapter Search
During playback of a title, enter the chapter number
you want to search using [the Number buttons].
Playback of the chapter will start in a few seconds.
1) During playback, press [T (next)] to skip the
current track or file and move to the next.
The track / file will move forward one at a time. To go
back to the beginning of the current track / file press
[S (previous)].
Press it repeatedly to go to the previous track / file. The
track / file will move backward one at a time.
1) During playback, press [SEARCH].
2) Use [K / L] to select “Playing Time”.
3) Use [the Number buttons] to enter the time count
you want to jump to.
e.g.)
Entering 1 hour 45 minutes and 15 seconds.
Press
4) Press [OK].
Playback will start from the desired time count.
5) Press [SEARCH] to remove the information display.
Title / Chapter Search
Using [S (previous)] / [T (next)]
Using [SEARCH]
Using [the Number buttons] (Direct Search)
Note
• As for the BD-video, how it performs will be strongly
determined by the disc, and may not perform as
described.
001/023
00:01:31
Dolby Digital
001/012
Disc
Title
Chapter
Playing Time
Audio
Track Search
Using [S (previous)] / [T (next)]
Time Search
001/023
00:01:31
Dolby Digital
001/012
Disc
Title
Chapter
Playing Time
Audio
E1S07UD_E1S08UD_EN.book Page 34 Monday, January 31, 2011 2:42 PM
35
SPECIAL PLAYBACK
EN
EN
Some video materials may have subtitles in one or more
languages. For commercially available discs, the
supported languages can be found on the disc case.
Follow the steps below to switch the subtitle language
during playback.
1) During playback, press [SUBTITLE] repeatedly to
display “Primary”, “Secondary” or “Subtitle Style”.
2) Use [K / L] to select your desired subtitle or style.
•Use [s / B] to switch between current subtitle
setting and “Off”.
3) Press [SUBTITLE] repeatedly to exit.
1) During playback, press [SUBTITLE].
2) Use [K / L] to select your desired subtitle.
•Use [s / B] to switch between current subtitle
setting and “Off”.
3) Press [SUBTITLE] to exit.
When playing back video material recorded with two or
more soundtracks (these are often in different audio
languages or audio formats), you can switch them during
playback.
For BD, available audio varies depending on “Blu-ray Disc
Audio” setting. Refer to page 41 for more information.
1) During playback, press [AUDIO] repeatedly to
display “Primary” or “Secondary”.
2) Use [K / L] to select your desired audio stream
channel.
• For “Secondary”, use [s / B] to switch between
current audio setting and “Off”.
3) Press [AUDIO] repeatedly to exit.
1) During playback, press [AUDIO].
2) Use [K / L] to select your desired audio stream
channel.
3) Press [AUDIO] to exit.
Switching Subtitles
“Primary” : Sets the subtitle for the primary
video.
“Secondary” : Sets the subtitle for the secondary
video.
“Subtitle Style” : Sets style of the subtitle.
Note
• Some discs will only allow you to change the
subtitles from the disc menu or pop-up menu. Press
[TOP MENU] or [DISC MENU / POP-UP MENU] to
display the disc menu or pop-up menu.
• If the disc has no subtitle language or subtitle style,
“Not Available” will be displayed on the TV screen.
• During playback of the secondary video, the primary
subtitle setting is not available except when there is
no subtitle for the secondary video.
1
Primary English
1
Subtitle English
Switching Audio Soundtrack
“Primary” : Sets the audio for the primary video.
“Secondary” : Sets the audio for the secondary video.
Note
• The secondary audio will not be output when the
secondary video is not displayed or when “Blu-ray
Disc Audio” is set to “Primary Audio Only”. (For some
BD, secondary audio will be output even when
secondary video is off.)
• The sound mode cannot be changed during
playback of discs not recorded in multiple audio.
• Some discs allow changing the audio language
setting on the disc menu. (Operation varies
depending on the discs. Refer to the manual
accompanying the disc.)
• [AUDIO] may not work on some discs with multiple
audio streams or channels (e.g. DVDs that allow
changing audio setting on the disc menu).
• If the disc has no audio language, “Not Available” will
be displayed on the TV screen.
• For DTS-CD (5.1 music disc), selecting audio streams
or channels is not available.
• You can check the selected audio stream in the
information display. To call up the information
display, press [INFO ] during playback.
2
Primary English Dolby Digital
Multi
2
Audio English Dolby Digital Multi
Introduction Connections Basic Setup Playback OthersFunction Setup
E1S07UD_E1S08UD_EN.book Page 35 Monday, January 31, 2011 2:42 PM
36
SPECIAL PLAYBACK
EN
Some BD-video and DVD-video contain scenes which have
been shot simultaneously from various angles. You can
change the camera angle when appears on the TV
screen.
1) During playback, press [ANGLE].
• The selected angle will be displayed on the display
bar at the top of the TV screen.
2) Use [K / L] to select your desired angle.
3) Press [ANGLE] to exit.
Simply connect your portable media player (e.g. MP3
player) to this unit to enjoy superior sound quality from
your music collections.
1) Connect your portable media player to the MP3
LINK jack on this unit.
• Re fer to “Connecting Po rtable Media Pl ayer ”
on page 21.
2) Turn on your portable media player.
3) Press [ (home)].
4) Use [K / L] to select “External audio input”, then
press [OK].
5) Use [K / L] to select “MP3 Link”, then press [OK].
6) Start play music on your portable media player.
By connecting the supplied FM wire antenna, you can
listen to FM radio on this unit.
When you access radio mode for the first time, follow the
instruction to store a radio station to your preset station
list. You can store up to 40 FM radio stations in the
memory.
1) Connect the supplied FM wire antenna to the FM
ANT 75 jack on this unit.
• Refer to “Connecting FM Radio Antenna” on page 21.
2) Press [ (home)].
3) Use [K / L] to select “FM”, then press [OK].
4) Press [s / B].
• This unit will start tuning automatically until a radio
station with sufficient signal strength is found.
• If necessary, repeat press [s / B] again until you find
the desired radio station.
• To fine-tune the reception of a weak station, press
[
K
/
L
]
repeatedly until an optimal reception is found.
5) Press [OK].
• The radio station is added to the preset station list.
1) Follow steps 1) to 3) in “Presetting Radio Stations”
on page 36.
2) Use [RED] / [GREEN] to select the desired preset
station.
• This unit will tune to the selected preset radio station.
• To go to the previous / next page of the preset station
list, press [BLUE] / [YELLOW].
Switching Camera Angles
Note
• If “Angle Icon” setting is set to “Off”, will not
appear on the TV screen. (refer to page 42)
Play from Portable Media Player
Note
• Control playback is only possible on the portable
media player.
• Stop playback on the portable media player before
you switch to other source mode.
• You can also change the source mode to “MP3 Link”
by pressing [SOURCE] repeatedly until “MP3 Link” is
displayed.
1 / 5
Angle
Radio Operations
Presetting Radio Stations
Note
• While auto tuning, audio will be muted until this unit
finds a radio station with sufficient signal strength.
Listening to a Preset Radio Station
Note
• You can also select the preset station by :
-Entering the desired preset station number using
[the Number buttons]
-Pressing [SEARCH] and then enter the desired preset
station number using [the Number buttons].
• You can change the audio mode(stereo or mono
mode) by pressing [AUDIO] repeatedly.
E1S07UD_E1S08UD_EN.book Page 36 Monday, January 31, 2011 2:42 PM

37
SPECIAL PLAYBACK
EN
EN
Guide to the FM Radio Screen
1) Directory
2) Total number of preset stations
3) Audio mode (Stereo or Mono mode)
4) Frequency of current radio station
5) Button guide for tuning
6) Color key (RED / GREEN / BLUE / YELLOW) guide
7) Preset station list
8) Current status
1) Follow steps 1) to 3) in “Presetting Radio Stations”
on page 36.
2) Use [RED] / [GREEN] / [BLUE] / [YELLOW] to select the
desired preset station.
3) Press [CLEAR].
• The selected station is deleted from the preset station
list.
With this unit, you can enjoy VUDU HD on-demand movies /
TV episodes and Internet applications.
In order to use this feature, you must connect this unit to
the Internet. (Broadband Internet connection of 8 Mbps or
faster is recommended.)
- For network connection, refer to “Network Connection
with LAN” on page 22.
- For network setup, refer to “Network Connection” on
page 49.
For complete instructions on using VUDU service,
please visit www.vudu.com/docs
to view an updated
in-depth online manual.
After you set up the network connection, you must set up
a VUDU account and activate this unit before watching
VUDU movies.
1) Press [ (home)] to access the home menu.
2) Use [K / L] to select “vudu”, then press [OK].
• VUDU App Home screen will appear.
• For the first time only, “Network Service Disclaimer”
screen will appear. After confirming the content, use
[s / B] to select “Agree”, then press [OK].
3) Use [K / L / s / B] to select “VUDU movies”, then
press [OK].
• VUDU welcome screen will appear.
4) Select “SIGN Up Now”, then press [OK].
5) Enter the e-mail address you would like associated
with your VUDU account. After you enter your e-mail
address correctly, select “Done” and press [OK].
• Activation e-mail will be sent to the e-mail address.
(You must have access to the e-mail address to
activate VUDU.)
6) Follow directions in the activation e-mail to
complete your account activation.
Deleting a Preset Radio Station
Nevada
23
100.00MHz
101.50MHz
102.50MHz
103.50MHz
104.50MHz
107.50MHz
Received
87.50MHz
105.00MHz
Tuning -
Tuning +
FM Stereo
08
09
10
11
12
13
14
Page Up Page DownNext
BD Home Theater System
1
4
5
6
7
8
2 3
Prev
VUDU Operations
Activating VUDU
Note
• You can deactivate the connection to VUDU by
setting “Vudu Deactivate” to “Yes”. (Refer to page 44.)
• For questions regarding VUDU service, please contact
VUDU Customer Care at 1-888-554-VUDU (8838) or
visit www.vudu.com/support.
Introduction Connections Basic Setup Playback OthersFunction Setup
E1S07UD_E1S08UD_EN.book Page 37 Monday, January 31, 2011 2:42 PM
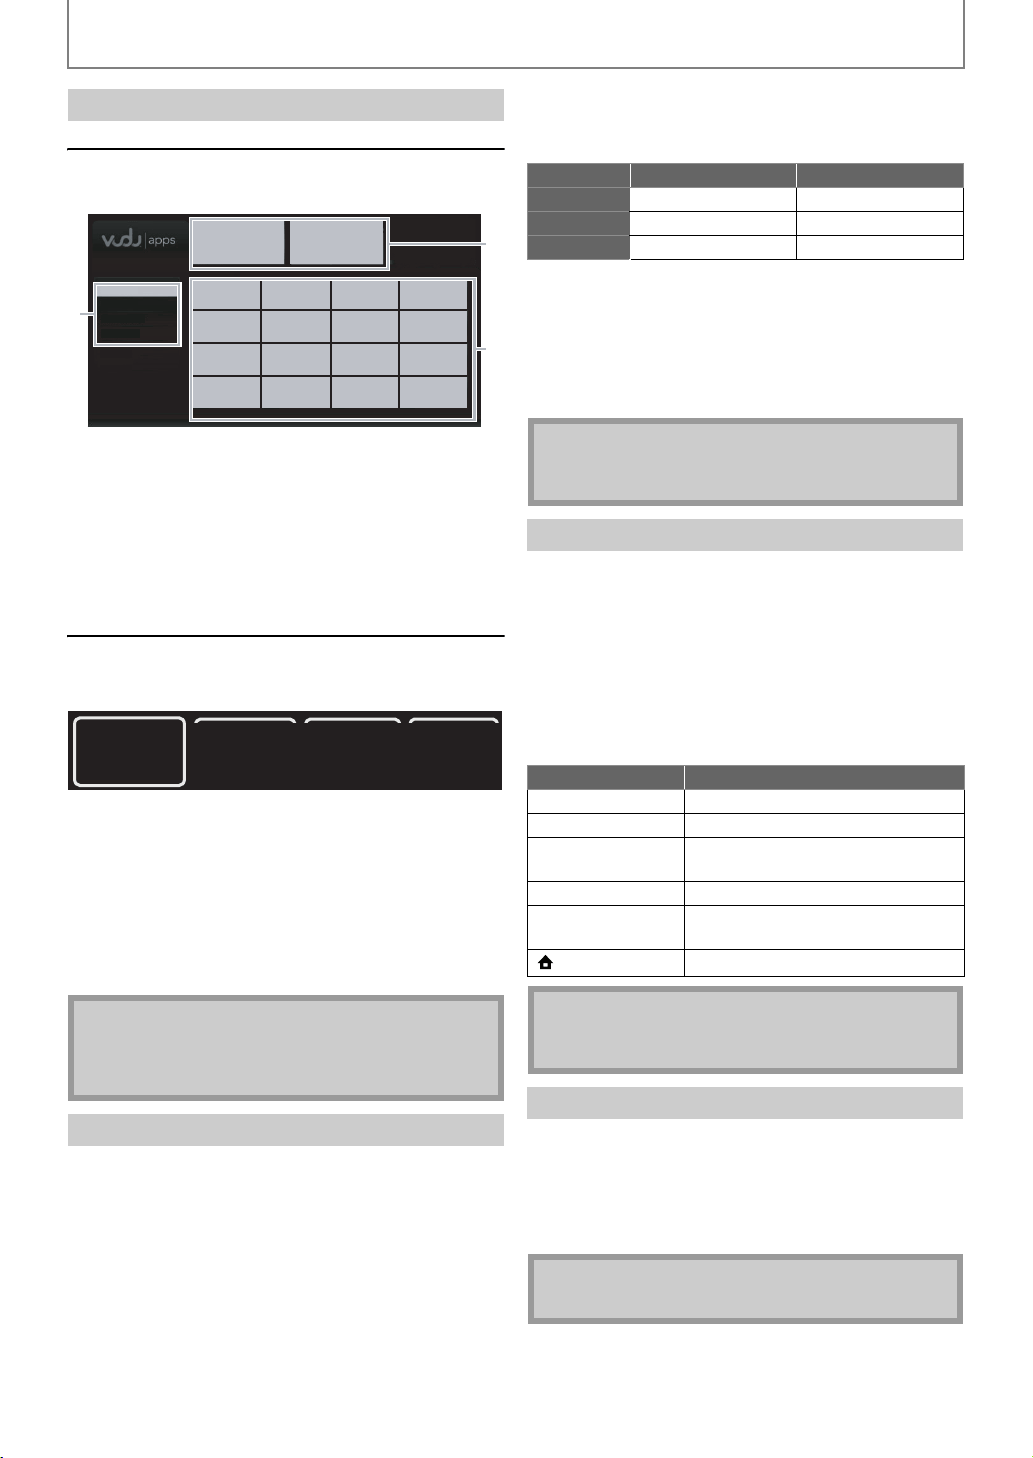
38
SPECIAL PLAYBACK
EN
App Home Screen
App Home screen is the entry point to VUDU applications
including VUDU movies.
VUDU Movies Home Screen
When you select “VUDU movies” in App Home screen,
VUDU movies home screen will appear.
After activating this unit, you are ready to purchase or rent
movies / TV episodes and watch directly on your TV.
1) Select a desired movie or TV episode by navigating
VUDU movies menus. Press [OK] to display the
“MOVIE DETAILS” screen.
2) Use [K / L] to select “Rent / Own”, then press [OK].
3) Use [K / L] to select a desired quality option, then
press [OK].
• Select the quality option that best suits your network
environment.
4) Use [K / L] to select “Rent for $*.**” or “Buy for
$*.**”, then press [OK] to confirm your rental or
purchase.
5) Select “Watch Now” to start playing the movie / TV
episode.
• If you want to return to the “MOVIE DETAILS”, select
“Watch Later”.
1) In VUDU movies home screen, select “My Vudu” and
press [OK].
2) Use [s / B] to select “My Rentals”, “My Movies” or
“My TV Shows”, then press [OK].
3) Use [K / L] to select a desired movie / TV episode,
then press [OK].
4) Select “Watch” or “Watch ***” to start watching the
movie / TV episode.
• During playback, use following buttons to control the
playback.
In addition to VUDU movies, you can use various kinds of
Internet applications.
1) In App Home screen, use [K / L / s / B] to select a
desired application and press [OK].
2) Follow the instructions on screen of the selected
application.
Guide to VUDU Menu Screen
1) Viewing mode : List of different viewing modes for
App Home applications
2) Promotional
graphics
: Placeholder where promotional
graphics are displayed
3) Application list : Grid of applications in the selected
viewing mode
1) Most Watched : To access the list of popular
movies / TV episodes on VUDU
2) New on Vudu : To access the list of newly
available movies / TV episodes
3) Explore Catalog : To access the list of options to
search movies / TV episodes
4) My Vudu : To access the list of rented or
purchased contents
Note
• You can go back to VUDU movies home screen by
pressing [BLUE] while you are using VUDU movies
features.
Renting or Purchasing VUDU Movies
Most Popular
1
2
3
My Favorites
Most Popular
Newest
Browse by Genre
1234
Most
Watched
New
on Vudu
Explore
Catalog
My
Vudu
Video Resolution Minimum Bit Rate
SD 480p 1 Mbps
HD 720p 2.25 Mbps
HDX 1080p 4.5 Mbps
Note
• Available quality options differ depending on the
content.
Watching Rented or Purchased VUDU movies
Button Action
[F (pause)] Pause the playback.
[C (stop)] Stop the playback.
[E (reverse)] /
[D (forward)]
Fast reverse or forward the
playback.
[B (play)] Resume the playback.
[YELLOW] Display the info banner which
shows the playback information.
[(home)]
Go back to the home menu.
Note
• Available buttons and actions may subject to change
without notice.
Using Internet Applications
Note
• Available applications may change without notice.
E1S07UD_E1S08UD_EN.book Page 38 Monday, January 31, 2011 2:42 PM
39EN
EN
LIST OF SETTINGS
In the settings menu, you can customize the various kinds of settings as you prefer.
Refer to the following instruction to navigate through the settings menus.
1) Press [ (home)] to access the home menu.
2) Use [K / L] to select “Settings”, then press [OK].
3) Use [K / L] to select the desired setting, then press [OK].
4) Use [K / L] to move the highlight up and down in the list.
• Options of the highlighted item will be displayed in the list on the right whenever available.
5) To make a selection or to access options of an item, select the desired item, then press [OK].
• To go back to the previous screen, press [BACK U].
6) Press [ (home)] to exit.
Refer to the following table for the types of settings you can customize.
Settings with (*) can be accessed from the “Quick Setup” also.
The item highlighted in gray is the default setting.
Category Menus / Options Description
Advanced Setup
Language Audio Default Sets the audio language for BD-video
or DVD-video playback.
• If you select “Default”, the disc’s
original language will be in effect.
Ceština
Dansk
Deutsch
English
Español
Français
Italiano
Magyar
Nederlands
Norsk
Polski
Português
Ó³¹¹ð¦Ð
suomi
Svenska
Türkçe
Subtitle
Off Sets the subtitle language for BD-
video or DVD-video playback.
Ceština
Dansk
Deutsch
English
Español
Français
Italiano
Magyar
Nederlands
Norsk
Polski
Português
Ó³¹¹ð¦Ð
suomi
Svenska
Türkçe
Disc Menu
Ceština
Dansk
Deutsch
Norsk
Polski
Português
Ó³¹¹ð¦Ð
suomi
Svenska
Türkçe
Sets the language for disc menu.
English
Español
Français
Italiano
Magyar
Nederlands
Player Menu* Auto (XXXX) Sets the language for player menu
(OSD menu)
“Auto”:
Activates the Get & Set Menu
Language function. Refer to page 49.
• “Auto” is available only when
“EasyLink (HDMI CEC)” is set to “On”.
• Inside the parenthesis next to “Auto”
will be the current selected
language.
English
Español
Français
Video
Output
TV Shape*
• Refer to page 45 for
more information.
4:3 Normal
4:3 Crop
16:9 Widescreen
Sets the aspect ratio of the playback
image to fit your TV.
16:9 Squeeze
Introduction Connections Basic Setup Playback OthersFunction Setup
E1S07UD_E1S08UD_EN.book Page 39 Monday, January 31, 2011 2:42 PM

40
LIST OF SETTINGS
EN
Category Menus / Options Description
Advanced Setup
Video
Output
HDMI Video HDMI 1080p/24
• This feature is available
only when the display
device is connected by
an HDMI cable.
• Refer to page 45 for
more information.
Auto “Auto”:
Outputs the picture in 1080p/24
(1080 progressive with 24 frames per
second) when it meets all the
conditions listed below:
• The video resolution and the frame
rate of the material is 1080p/24 .
• “HDMI Video Resolution” setting is
set to “1080p”.
• The display device supports the
1080p/24 output.
“Off”:
• Out pu ts th e p ic tu re i n 1 080p /6 0.
(60 frames per second, progressive)
Off
HDMI Video Resolution*
• This feature is available
only when the display
device is connected by
an HDMI cable.
• Refer to page 45 for
more information.
Auto
Sets the resolution of the video signal
being output from the HDMI OUT jack.
• The selected resolution must also be
supported by your TV monitor.
480p
720p
1080i
1080p
HDMI Deep Color
• This feature is available
only when the display
device is connected by
an HDMI cable, and
when it supports Deep
Color feature.
Auto Reduces the posterization effect of
the playback picture.
“Auto”:
Reduces the posterization effect by
automatically outputting up to 36 bit
color whenever the unit recognizes
the connected display device
supports Deep Color feature.
“Off”:
Outputs the standard 24 bit color.
Off
Component Output
480i Sets resolution for component output
picture.
• The selected resolution must also be
supported by your TV monitor.
• Refer also to your TV’s manual.
• If you have selected the resolution
not supported by your TV by mistake
and the picture gets disturbed, press
and hold
[
B
(play)]
on the front
panel for 5 seconds to change the
setting back to its default.
• When HDMI cable is connected, only
“480i” and the resolution selected in
the “HDMI Video Resolution” will be
available.
480p
720p
1080i
With regard to DVD-video
with copy protection, the
resolution will be set to
480p regardless of the
setting here.
If 480p output is not
available, 480i will be
output.
De-interlacing Mode
Auto “Auto”:
Automatically detects film or video
content, and appropriately converts it.
“Video”:
Select this option when the picture is
distorted when using “Auto”.
Video
Black Level
On Adjusts brightness to compensate for
ambient room light.
Off
HD Noise Reduction On Reduces noise of the playback picture.
“On”:
Activates Noise Reduction.
“Off”:
Deactivates Noise Reduction.
Off
E1S07UD_E1S08UD_EN.book Page 40 Monday, January 31, 2011 2:42 PM
41
LIST OF SETTINGS
EN
EN
Category Menus / Options Description
Advanced Setup
Audio Night Mode Auto Compresses range between soft
and loud sounds.
“Auto”:
Night Mode will be activated
automatically when Dolby TrueHD
audio is played back.
“On”:
Activates the Night Mode.
“Off”:
Deactivates the Night Mode.
On
Off
Blu-ray Disc Audio
Mix Audio Output “Mix Audio Output”:
The audio for the secondary video
and the interactive application will
be output together with the audio
for the primary video.
“Primary Audio Only”:
Only audio for the primary video
will be output.
When playing back a BD-video which
only contains primary audio, the
audio output will be the same case
as “Primary Audio Only” even if the
“Blu-ray Disc Audio” is set to “Mix
Audio Output”.
Primary Audio Only
Audio Output*
• Refer to page 46 for
more information.
Speakers “Speakers”
Audio will be output from the
5.1ch speakers.
“HDMI Normal”
The Multi-channel audio signals
are output from HDMI OUT jack
with Bitstream or LPCM depending
on the material.
“HDMI LPCM”
The Multi-channel or stereo audio
signals are output from HDMI OUT
jack with LPCM.
HDMI Normal
HDMI LPCM
Speaker Setup
•This feature is
available only when
“Audio Output” is set
to “Speakers”.
(Refer to page 46.)
Surround Effects
• Sets the surround
effect of audio when
the setting of
surround mode is set
to “Dolby Pro Logic II
Movie” or “Dolby Pro
Logic II Music”.
(Refer to “Selecting
Surround Mode” on
page 54.)
Center
Width
0 ~ 7
default is 3 Adjust the sound balance between
center and front speakers.
Dimension -3 ~ 3
default is 0 Adjust the sound balance between
front and rear speakers.
Panorama On “On” :
Sets the sound of center speaker to
have surround-sound effect.
“Off” :
Sets the sound of center speaker to
normal.
Off
Speaker Distance Unit
Feet Sets the unit of measure for
“Speaker Distance”.
Meters
Front (L/R) Feet :
0 ~ 15
Meters :
0 ~ 4.5
default is 3 Sets the distance from the listening
point to each speaker to get the
ideal delay time.
• If you change the setting of
“Front (L/R)”, the setting of
“Center” and “Surround” will be
set to the same setting
automatically.
• If you set “Front (L/R)” to 0 ft (0m),
you can only select 0 ft (0m) for
“Center” and “Surround”.
• Difference of the values among
“Front (L/R)” and “Center” cannot
exceed 5 ft (1.5m).
Center
default is 3
Surround
default is 3
Default Yes Sets all speaker distance settings to
the default setting.
No
Introduction Connections Basic Setup Playback OthersFunction Setup
E1S07UD_E1S08UD_EN.book Page 41 Monday, January 31, 2011 2:42 PM
42
LIST OF SETTINGS
EN
Category Menus / Options Description
Advanced Setup
Audio Speaker Setup
•This feature is
available only when
“Audio Output” is set
to “Speakers”.
(Refer to page 46.)
Speaker Level Front(L)
-10dB
~
+10dB
default is 0 Sets the volume level for each
speaker to get ideal audio
balance.
• Test tone will be output when
you select a speaker. Press
[K / L] to adjust the volume of
the speaker, then press [OK].
• If you want to stop the test
tone, press [BACK U].
Center
default is 0
Front(R)
default is 0
Subwoofer
default is 0
Surround(R)
default is 0
Surround(L)
default is 0
Ratings Lock
• Refer to
page 48 for
more
information.
Rating Level
All Sets the rating level for the disc
playback.
8 [Adult]
to
1 [Kid Safe]
New PIN Sets the new password for the
“Ratings Lock” setting.
Others Angle Icon
On “On”:
Off The angle icon automatically
appears on the TV screen when
playing back content with
various camera angles available.
“Off”:
The angle icon does not
automatically appear on the TV
screen when playing back
content with various camera
angles available.
Front Panel Brightness Bright
Dim
Sets the brightness of the front
panel display.
When “Auto” is selected, the
front panel display automatically
goes dim during playback.
Auto
Screen Saver
On Sets whether to activate the
screen saver after 5 minutes of
no action on the unit.
Off
Slide Show Transition
Cut In/Out Sets the visual effect for the slide
show transition mode.
“Cut In/Out”:
The pictures will cut in and out
sharply as playback progresses.
“Fade In/Out”:
The pictures will fade in and out
as playback progresses.
Fade In/Out
EasyLink (HDMI CEC)
•This feature is
available only when
the display device is
connected with an
HDMI cable, and
when it supports
EasyLink (HDMI CEC)
feature.
• Refer to page 49 for
more information.
On Sets whether to utilize the
EasyLink (HDMI CEC) function.
EasyLink (HDMI CEC) function
allows your PHILIPS brand
EasyLink TV to act in conjunction
with this unit or vice versa.
Off
E1S07UD_E1S08UD_EN.book Page 42 Monday, January 31, 2011 2:42 PM

43
LIST OF SETTINGS
EN
EN
Category Menus / Options Description
Advanced Setup
Others Network Connection
• Refer to pages 49-52
for more
information.
Connection
Test
Perform a network connection
test. After you change IP address
or DNS setting, always perform
this test.
Enable(Easy)
If you select “Enable(Easy)”,
Connection test will automatically
start.
Enable
(Custom)
IP Address
Setting
Auto(DHCP) Set the IP address.
In most cases, you can connect to
the Internet without making any
changes to the default setting.
Manual IP Address
Subnet Mask
Default
Gateway
DNS
Setting
Auto(DHCP) Set the DNS setting.
In most cases, you can connect to
the Internet without making any
changes to the default setting.
Manual Primary DNS
Secondary
DNS
Proxy
Setting
Do Not Use Set the proxy server.
In most cases, you can connect to
the Internet without using proxy
server.
Use Proxy
Address
Proxy Port
Connection
Speed
Auto Set the connection speed.
In most cases, you can connect to
the Internet without making any
changes to the default setting.
10BASE Half
10BASE Full
100BASE Half
100BASE Full
BD-Live
Setting
Allow You can restrict Internet access
when BD-Live functions are used.
Limited Allow
Prohibit
Network Status You can check the current status of
the network setting.
Disable Yes Deactivate the network
connection.
No
Disclaimer Displays the network service
disclaimer.
Software Upgrade
• Refer to page 53 for
more information.
Disc
Upgrade
Yes Set the disc upgrade.
You can upgrade the software
version by using a disc.
To download the latest software
version, please visit
www.philips.com/support.
No
Network
Upgrade
Yes Set the network upgrade.
You can upgrade the software
version by connecting this unit to
the Internet.
No
Introduction Connections Basic Setup Playback OthersFunction Setup
E1S07UD_E1S08UD_EN.book Page 43 Monday, January 31, 2011 2:42 PM

44
LIST OF SETTINGS
EN
Category Menus / Options Description
Factory Default
Settings Yes “Yes”:
Resets all the settings, except for
“Ratings Lock” and “Network
Connection”, in “Settings” to the
factory default.
“No”:
Does not perform the initialization.
No
Format SD
Card
Yes “Yes”:
Re-format SD card.
“No”:
Does not format the SD card.
No
Local
Storage
Player Yes “Yes”:
Re-format local storage (Player) used
for BD-Java.
“No”:
Does not perform the initialization.
No
SD Card Yes “Yes”:
Re-format local storage (SD card)
used for BD-Java.
“No”:
Does not format the SD card.
No
Network
Settings
Yes “Yes”:
Initializes manually entered or
automatic (default) network settings.
“No”:
Does not perform the initialization.
No
Vudu
Deactivate
Yes “Yes”:
Deactivates the connection to VUDU.
“No”:
Does not perform the deactivation.
No
E1S07UD_E1S08UD_EN.book Page 44 Monday, January 31, 2011 2:42 PM

45EN
EN
SETUPS
Use this feature to adjust the aspect ratio of the video
source which is different from your TV’s ratio to fit your TV
monitor without distorting the picture. Descriptions of
each setting are as follows:
Set the resolution of the video signal being output from
the HDMI OUT jack.
You can select the desired “HDMI Video Resolution”
among the settings listed below:
“Auto”,“480p”,“720p”,“1080i”,“1080p”
• When you make a selection, the TV monitor temporarily
goes blank and then comes back again. If it does not,
press and hold [B (play)] on the front panel for 5
seconds to change the setting back to its default.
Actual Output Resolution by Media:
(*1)
To output the video in 24 Hz, the connected display device must
support 24 Hz output, and “HDMI 1080p/24” should be set to “Auto”.
Otherwise, the image will be output in 60 Hz.
• When HDMI cable is connected, only “480i” and the
resolution selected in the “HDMI Video Resolution” will
be available for the “Component Output”.
• Composite video out (VIDEO OUT) can only output
480i/60.
TV Shape
home A “Settings” A
“Advanced
Setup”
A “Video Output” A “TV Shape”
Video
source
Your
TV
Option Description
16:9
4:3
4:3 Normal To enjoy 16:9
picture on 4:3
monitor:
16:9 picture is
scaled down until
both sides of the
picture fits the 4:3
TV.
4:3 Crop To enjoy 16:9
picture on 4:3
monitor:
Both sides of the
picture are
trimmed to fit the
4:3 TV without
distorting the
aspect ratio of the
picture.
16:9
16:9 Widescreen To enjoy 16:9
picture on 16:9
monitor:
Select this setting
when you want to
enjoy 16:9 picture
on the 16:9 TV.
4:3
16:9 Squeeze To enjoy 4:3
picture on 16:9
monitor:
Use this setting to
display 4:3 picture
on the 16:9 TV
without distorting
the aspect ratio of
the picture.
HDMI Video Resolution
home
A
“Settings”
A
“Advanced
Setup”
A
“Video
Output”
A
“HDMI
Video”
A
“HDMI Video
Resolution”
Media BD
Setting in
the “HDMI
Video
Resolution”
Source
480i/60
720p/60 1080i/60 720p/24 1080p/24
480p
480p/60 480p/60 480p/60 480p/60 480p/60
720p 720p/60 720p/60 720p/60 720p/60 720p/60
1080i 1080i/60 1080i/60 1080i/60 1080i/60 1080i/60
1080p 1080p/60 1080p/60 1080p/60 1080p/60
1080p/24
or 60
(*1)
Auto
The highest resolution supported by your display device
will be in effect automatically.
Media DVD Photo viewing
OSD-only
viewing
Setting in the
“HDMI Video
Resolution”
Source
480i/60
480p
480p/60 480p/60 480p/60
720p 720p/60 720p/60 720p/60
1080i 1080i/60 1080i/60 1080i/60
1080p 1080p/60 1080p/60 1080p/60
Auto
The highest resolution supported by your display
device will be in effect automatically.
Note
• The selected resolution must also be supported by
your display device.
• If your TV and the unit is connected by a DVI cable
and if you select “Auto”, “480p” will be in effect
automatically.
•Pressing [B (play)] on the front panel for 5 seconds
changes the setting back to its default. (“Component
Output” setting will also be reset to default (480i).)
• Refer also to your TV’s manual.
Introduction Connections Basic Setup Playback OthersFunction Setup
E1S07UD_E1S08UD_EN.book Page 45 Monday, January 31, 2011 2:42 PM
46
SETUPS
EN
If you set to “Speakers” :
The audio output from the 5.1ch speakers differs depending on the audio source and the setting of surround mode.
(Refer to “Selecting Surround Mode” on page 54.)
If you set to “HDMI Normal” or “HDMI LPCM” :
Refer to the table below for the audio output from HDMI OUT jack.
Audio Output
home A “Settings” A “Advanced Setup” A “Audio” A Audio Output
“Audio Output” setting A “HDMI Normal” “HDMI LPCM”
“Blu-ray Disc Audio” setting A
“Primary Audio
Only”
“Mix Audio
Output”
“Primary Audio
Only”
“Mix Audio
Output”
Media
Audio Source
Which audio format can be output depends on the compatibility of the
connected device.
BD-video
Dolby Digital
Dolby Digital
or
Multi LPCM
or
Mute
Dolby Digital
or
Multi LPCM
or
Mute
Multi LPCM
or
Mute
Multi LPCM
or
Mute
Dolby Digital Plus
Dolby Digital Plus
or
Dolby Digital
or
Multi LPCM
*1
or
Mute
Dolby Digital
or
Multi LPCM
*2
or
Mute
Multi LPCM
*1
or
Mute
Multi LPCM
*2
or
Mute
Dolby TrueHD
Dolby TrueHD
or
Dolby Digital
or
Multi LPCM
*3
or
Mute
Dolby Digital
or
Multi LPCM
*4
or
Mute
Multi LPCM
*3
or
Mute
Multi LPCM
*4
or
Mute
DTS®
DTS®
or
Multi LPCM
or
Mute
DTS®
or
Multi LPCM
or
Mute
Multi LPCM
or
Mute
Multi LPCM
or
Mute
DTS-HD®
DTS-HD®
or
DTS®
or
Multi LPCM
*5
or
Mute
DTS®
or
Multi LPCM
*5
or
Mute
Multi LPCM
*5
or
Mute
Multi LPCM
*5
or
Mute
LPCM
Multi LPCM
or
Mute
Multi LPCM
or
Mute
Multi LPCM
or
Mute
Multi LPCM
or
Mute
DVD-video
Dolby Digital Dolby Digital, Multi LPCM or Mute Multi LPCM or Mute
DTS® DTS®, Multi LPCM or Mute Multi LPCM or Mute
LPCM 2ch LPCM or Mute 2ch LPCM or Mute
DTS-CD DTS® DTS®, Multi LPCM or Mute Multi LPCM or Mute
Audio CD PCM 2ch LPCM or Mute 2ch LPCM or Mute
MP3 MP3 2ch LPCM or Mute 2ch LPCM or Mute
Windows Media™ Audio WMA 2ch LPCM or Mute 2ch LPCM or Mute
E1S07UD_E1S08UD_EN.book Page 46 Monday, January 31, 2011 2:42 PM

47
SETUPS
EN
EN
*1
) Full decoded.
*2
) Only the independent substream is decoded.
*3
) Dolby TrueHD stream is decoded.
*4
) Only the Dolby Digital substream is decoded.
*5
) Only the core substream is decoded.
• When playing back a BD-video which only contains the primary audio, the audio output will be the same case as the
“Primary Audio Only” even if the “Blu-ray Disc Audio” is set to “Mix Audio Output”.
• If you unplug the HDMI cable when “Audio Output” is set to “HDMI Normal” or “HDMI LPCM”, the audio will be output
from 5.1ch speakers.
“Audio Output” setting A “HDMI Normal” “HDMI LPCM”
“Blu-ray Disc Audio” setting A
“Primary Audio
Only”
“Mix Audio
Output”
“Primary Audio
Only”
“Mix Audio
Output”
Media
Audio Source
Which audio format can be output depends on the compatibility of the
connected device.
External audio input
(COAXIAL)
Dolby Digital
Dolby Digital
or
Multi LPCM
or
Mute
Multi LPCM
or
Mute
DTS®
DTS®
or
Multi LPCM
or
Mute
Multi LPCM
or
Mute
LPCM
2ch LPCM
or
Mute
2ch LPCM
or
Mute
External audio input
(AUX1 / AUX2 / MP3 LINK)
Analog audio
2ch LPCM
or
Mute
2ch LPCM
or
Mute
FM Analog audio
2ch LPCM
or
Mute
2ch LPCM
or
Mute
VUDU
Dolby Digital Plus
Dolby Digital Plus
or
Dolby Digital
or
Multi LPCM
*1
or
Mute
Dolby Digital
or
Multi LPCM
*2
or
Mute
Multi LPCM
*1
or
Mute
Multi LPCM
*2
or
Mute
MP3
2ch LPCM
or
Mute
2ch LPCM
or
Mute
Introduction Connections Basic Setup Playback OthersFunction Setup
E1S07UD_E1S08UD_EN.book Page 47 Monday, January 31, 2011 2:42 PM
48
SETUPS
EN
Some BD-video or DVD-video feature a ratings lock level.
Playback will stop if the ratings exceed the levels you set, it
will require you to enter a password before the disc will
playback. This feature prevents your children from viewing
inappropriate material.
1) With “Ratings Lock” selected in the “Advanced
Setup” menu, press [OK].
2) If a PIN code has not been set, proceed to step 2-a).
If a PIN code has already been set, proceed to step
2-b).
If you want to change the PIN code, proceed to
step 2-c).
If you forget the PIN code, proceed to step 2-d).
2-a) Enter 4 digit PIN code using
[the Number buttons].
• “4737” cannot be used.
• Press [RED] to return to the previous screen.
2-b) Enter 4 digit PIN code using
[the Number buttons].
2-c) Follow step 2-b). Select “New PIN”, then press
[OK]. Enter the new PIN code.
2-d) Enter “4737”. Current PIN code and the “Ratings
Lock” settings are now cleared. Follow step 1) and
step 2-a) to create a new PIN code.
3) After entering the PIN code, “Rating Level” appears.
(If not, use [K / L] to select “Rating Level”.)
Select desired rating level then press [OK].
To cancel ratings lock temporarily
Some discs allow you to cancel the ratings lock
temporarily. With those discs, the message below will
appear when you try to play them back.
“Please enter your PIN to unblock content.”
Follow the instruction which appears on the TV screen to
cancel the ratings lock. After entering the PIN code,
“Rating Level” appears.
Select desired rating level, then press [OK].
Ratings Lock
home A
“Settings”
A “Advanced Setup” A
“Ratings
Lock”
Language
Video Output
Audio
Ratings Lock
Rating Level
New PIN
Others
Enter new PIN.
Enter your PIN.
RATING EXPLANATIONS
All • Ratings Lock Control is inactive; all
discs can playback.
8 [Adult] • DVD software of any grades (adult /
general / children) can be played
back.
7 [NC-17] • No one under 17 admitted.
6 [R] • Restricted; under 17 requires
accompanying parent or adult
guardian.
5 [PGR] • Parental Guidance Recommended.
4 [PG-13] • Unsuitable for children under 13.
3 [PG] • Parental Guidance suggested.
2 [G] • General Audience.
1 [Kid Safe] • Suitable for children.
Rating Level
All
8 [Adult]
7 [NC-17]
6 [R]
5 [PGR]
4 [PG-13]
3 [PG]
2 [G]
New PIN
E1S07UD_E1S08UD_EN.book Page 48 Monday, January 31, 2011 2:42 PM

49
SETUPS
EN
EN
This unit supports Philips EasyLink, which enables your TV
(limited to PHILIPS brand EasyLink TV) to act in
conjunction with this unit, or vice versa. Compliant TV
must be connected to the HDMI OUT jack.
When “EasyLink (HDMI CEC)” setting is set to “On”,
functions listed below will be available.
One Touch Play
When the operations with following buttons of the
remote control of this unit are performed, the TV will
automatically be turned on and switched to the
appropriate input channel.
Buttons for one touch play:
- [B (play)], [S (previous)], [T (next)],
[the Number buttons], [(home)], [INFO ], or
[SOURCE]
- [TOP MENU], or [DISC MENU / POP-UP MENU]
(when a disc is inserted in the unit)
Standby
When you press and hold [Q (standby/on)] for 2
seconds, it turns off the power of the TV first and then
turns off the power of this unit also.
System Information
Get & Set Menu Language
The unit recognizes the OSD language set for the TV and
automatically sets the same language as the player
menu language (OSD menu language) for this unit.
Refer to the “Player Menu” on page 39 for available
languages.
• This feature is available only when “Auto” is selected in
the “Player Menu” in the settings menu.
Set up network connection settings in order to use
BD-Live, VUDU or network upgrade function.
After you made IP address / DNS settings or when a LAN
cable is connected, always perform the connection test to
check if the connection is correctly made.
1) Use [K / L] to select “Settings” in the home menu,
then press [OK].
2) Use [K / L] to select “Advanced Setup”, then press
[OK].
3) Use [K / L] to select “Others”, then press [OK].
4) Use [K / L] to select “Network Connection”, then
press [OK].
5) Use [K / L] to select “Connection Test”, then press
[OK].
Connection test will start automatically and the test result
will appear right after the connection test finishes.
• “Testing...” : The test is in progress.
• “Pass” : Connection test is successfully completed.
• “Fail” : Connection test failed. Check the connection
settings.
Press [OK] to go to the list of network status confirmation
screen.
6) Press [OK] to go back to the previous screen, or
press [ (home)] to go back to the home menu.
EasyLink (HDMI CEC)
home A “Settings” A
“Advanced
Setup”
A “Others” A
“EasyLink
(HDMI CEC)”
Note
• For external input mode, “One Touch Play” is not
available.
Network Connection
Connection Test
home
A
“Settings”
A
“Advanced
Setup”
A
“Others”
A
“Network
Connection”
A
“Connection
Test”
Note
• If the connection test passes, you are ready to use
BD-Live, VUDU or network upgrade function using
the Internet without making any additional settings.
• If the connection test fails, you may need to change
the MAC address settings on your router. You can
check the MAC address of this unit on “Network
Status” screen (refer to page 52).
• When connecting this unit directly to a modem for
the first time or connecting it to a modem which was
previously connected to any other network
device(e.g. a router, PC, etc.), you may have to
power cycle the modem to reset the settings on the
modem.
xxx.xxx.xxx.xxx
xxx.xxx.xxx.xxx
xxx.xxx.xxx.xxx
xxx.xxx.xxx.xxx
xxx.xxx.xxx.xxx
IP Address
Subnet Mask
Default Gateway
Primary DNS
Secondary DNS
then press 'OK'.
Introduction Connections Basic Setup Playback OthersFunction Setup
E1S07UD_E1S08UD_EN.book Page 49 Monday, January 31, 2011 2:42 PM
50
SETUPS
EN
Network settings are set to the following settings initially.
(In most cases, you can connect to the Internet without
making any changes to the default settings.)
If you want to set the network settings back to the default
settings as above (except “BD-Live Setting”), follow the
procedure below.
1) Follow steps 1) to 4) in “Connection Test” on page
49.
2) Use [K / L] to select “Enable(Easy)”, then press [OK].
• The unit will start the connection test automatically
and the test result will appear right after the test
finishes.
• After the connection test finishes, press [OK] to go to
network status confirmation screen.
3) Press [OK] to activate the network settings and set
the network connection automatically. [ (home)]
to go back to the home menu.
In following cases, select “Enable(Custom)” to set each
setting as necessary.
- When connection test failed with the setting of
“Enable(Easy)”.
- When instructed by your Internet service provider to
make specific settings in accordance with your
network environment.
IP Address Setting / DNS Setting
1) Follow steps 1) to 4) in “Connection Test” on page
49.
2) Use [K / L] to select “Enable(Custom)”, then press
[OK].
3) Use [K / L] to select “IP Address Setting”, then press
[OK].
4) Use [K / L] to select the desired setting, then press
[OK].
If you select “Manual”, follow the following
instruction to set the IP address and DNS.
4-a) IP address setting screen will appear. Enter IP
address, subnet mask and default gateway with
cursor buttons and number buttons.
• Enter the IP address number after checking the
specifications of your router.
• If the IP address is unknown, check the IP
address of other devices. (e.g. PC connected via
LAN cable) and assign a different number from
those of other devices.
After you enter all correctly, press [OK] to go to the
DNS setting screen.
4-b) DNS setting screen will appear. Enter primary DNS
and secondary DNS with cursor buttons and
number buttons.
• Enter the DNS addresses provided by your
Internet provider.
• If the DNS address is unknown, check the DNS
address of other devices (e.g. PC connected via
LAN cable) and assign the same DNS address.
4-c) After you enter all correctly, press [OK].
• Confirmation message will appear. Select “Yes”
to complete the settings.
5) Press [BACK U] to go back to the previous screen,
or press [ (home)] to go back to the home menu.
Enable(Easy)
home A“Settings” A
“Advanced
Setup”
A
“Others”
A
“Network
Connection”
A
“Enable
(Easy)”
- IP Address Setting Auto(DHCP)
- DNS Setting Auto(DHCP)
- Proxy Setting Do Not Use
- Connection Speed Auto
- BD-Live Setting Allow
Note
• The setting of “BD-Live Setting” will not be set back
to the default, even if you follow the procedure.
Enable(Custom)
home A“Settings” A
“Advanced
Setup”
A
“Others”
A
“Network
Connection”
A
“Enable
(Custom)”
“Auto(DHCP)” : If your router has DHCP server
function, select “Auto(DHCP)”.
“Manual” : If your router does not have DHCP
server function, select “Manual”.
IP Address Setting
IP Address
Subnet Mask
Default Gateway
Clear OK
DNS Setting
Primary DNS
Secondary DNS
Clear
OK
xxx.xxx.xxx.xxx
xxx.xxx.xxx.xxx
xxx.xxx.xxx.xxx
xxx.xxx.xxx.xxx
xxx.xxx.xxx.xxx
IP Address
Subnet Mask
Default Gateway
Primary DNS
Secondary DNS
Is Setting OK?
Ye s
No
E1S07UD_E1S08UD_EN.book Page 50 Monday, January 31, 2011 2:42 PM
51
SETUPS
EN
EN
Proxy Setting
1) Follow steps 1) to 4) in “Connection Test” on page
49.
2) Use [K / L] to select “Enable(Custom)”, then press
[OK].
3) Use [K / L] to select “Proxy Setting”, then press
[OK].
4) Use [K / L] to select the desired setting, then press
[OK].
• For default settings, select “Do Not Use”.
• If you need to change the proxy setting as instructed
by your Internet service provider to set the designated
proxy address and port, select “Use”.
If you select “Use”, follow the following instructions
to set the proxy address and proxy port.
4-a) Proxy address setting screen will appear.
Enter proxy address.
• The keyboard screen will appear.
After you enter all correctly, press [YELLOW] to go to
the proxy port setting screen.
4-b) Enter proxy port number with number buttons.
4-c) After you enter all correctly, press [YELLOW].
• Confirmation message will appear. Select “Yes”
to complete the settings.
5) Press [BACK U] to go back to the previous screen,
or press [ (home)] to go back to the home menu.
Note
• The range of input numbers is between 0 and 255.
• If you enter a number larger than 255, the number
will automatically be 255.
• The manually entered addresses will be saved even if
you change the setting to “Auto(DHCP)”.
• When you enter a wrong number, press [RED] to
cancel. (the number will be back to “0”.)
• If you want to enter 1 or 2 digit number in one cell,
press [B] to move on to the next cell.
• If the entered IP address or the default gateway or
primary DNS address is same as the default setting,
IP address setting will be set to “Auto(DHCP)”. (The
manually entered number will be saved).
• When IP address setting is set to “Manual”, the
setting of DNS setting will automatically be “Manual”
and when IP address setting is set to “Auto(DHCP)”,
you can set either “Auto(DHCP)” or “Manual” for DNS
setting.
[K / L / s / B] : Move the highlight.
[the Number buttons] : Enter number.
[OK] : Enter the highlighted number / word.
*[RED] : Clear the entered number or word.
[GREEN] : Clear all the entered numbers or words.
[BLUE] : Switch between abc, ABC and @!?
*[YELLOW] : Set the entered number or word.
* These buttons can be used in other network settings.
1
a
k
u
2
b
l
v
3
c
m
w
4
d
n
x
5
e
o
y
6
f
p
z
7
g
q
.
8
h
r
-
9
i
s
_
0
j
t
OK
xxxxxxxx_
Proxy Setting
Proxy Address
Clear All Clear OKa/A/@
Note
• The range of input numbers for the port number is
between 0 and 65535. (If you enter a number larger
than 65535, it will be regarded as 65535.)
• For proxy port, certain ports might be closed,
blocked or unusable depending on your network
environment.
• If the proxy address is entered with blank only, proxy
server setting will be set to “Do Not Use”.
x
Proxy Setting
Proxy Port
Clear OK
xxxxxxxxxxxxxxx
xxxxx
Proxy Address
Proxy Port
Is Setting OK?
Ye s
No
Introduction Connections Basic Setup Playback OthersFunction Setup
E1S07UD_E1S08UD_EN.book Page 51 Monday, January 31, 2011 2:42 PM

52
SETUPS
EN
Connection Speed
You can set connection speed as your preference. (The
default setting is “Auto”.)
1) Follow steps 1) to 4) in “Connection Test” on page
49.
2) Use [K / L] to select “Enable(Custom)”, then press
[OK].
3) Use [K / L] to select “Connection Speed”, then press
[OK].
4) Use [K / L] to select the desired setting, then press
[OK].
“Auto”:
Set the appropriate connection speed automatically, in
accordance with your network environment.
“10BASE Half”:
Set the connection speed to “10BASE Half”.
“10BASE Full”:
Set the connection speed to “10BASE Full”.
“100BASE Half”:
Set the connection speed to “100BASE Half”.
“100BASE Full”:
Set the connection speed to “100BASE Full”.
5) Press [BACK U] to go back to the previous screen,
or press [ (home)] to go back to the home menu.
BD-Live Setting
You can limit Internet access for BD-Live discs. (The default
setting is “Allow”.)
1) Follow steps 1) to 4) in “Connection Test” on page
49.
2) Use [K / L] to select “Enable(Custom)”, then press
[OK].
3) Use [K / L] to select “BD-Live Setting”, then press
[OK].
4) Use [K / L] to select the desired setting, then press
[OK].
“Allow”:
Internet access is permitted for all BD-Live contents.
“Limited Allow”:
Internet access is permitted only for BD-Live contents
which have content owner certificates. Internet access
without the certificates is prohibited.
“Prohibit”:
Internet access is prohibited for all BD-Live contents.
5) Press [BACK U] to go back to the previous screen,
or press [ (home)] to go back to the home menu.
Network Status
You can check the status of network settings.
1) Follow steps 1) to 4) in “Connection Test” on page
49.
2) Use [K / L] to select “Enable(Custom)”, then press
[OK].
3) Use [K / L] to select “Network Status”, then press
[OK].
• Network setting list will be displayed.
• MAC address of this unit will be displayed in the list.
4) Press [BACK U] to go back to the previous screen,
or press [ (home)] to go back to the home menu.
Deactivate all the network connection and settings.
1) Follow steps 1) to 4) in “Connection Test” on page
49.
2) Use [K / L] to select “Disable”, then press [OK].
3) Use [K / L] to select “Yes”, then press [OK].
4) Press [BACK U] to go back to the previous screen,
or press [ (home)] to go back to the home menu.
Note
• Choose a connection speed in accordance with your
network environment.
• The network connection may be disabled depending
on the device, when the settings are changed.
Disable
home A“Settings” A
“Advanced
Setup”
A
“Others”
A
“Network
Connection”
A“Disable”
Note
• The network connection can be reactivated by
setting the network connection to “Enable(Easy)” or
“Enable(Custom)”.
E1S07UD_E1S08UD_EN.book Page 52 Monday, January 31, 2011 2:42 PM

53
SETUPS
EN
EN
Philips continuously tries to improve its products and we
strongly recommend that you upgrade the software when
upgrades are available.
New software can be downloaded from our website at
www.philips.com using the type number of your Home
Theater System (e.g. HTS3051BV) to find information.
You can upgrade the software by using disc.
1) Follow steps 1) to 3) in “Connection Test” on page
49.
2) Use [K / L] to select “Software Upgrade”, then
press [OK].
3) Use [K / L] to select “Disc Upgrade”, then press
[OK].
4) Use [K / L] to select “Yes”, then press [OK].
5) Disc tray will open automatically.
• Insert the disc for software upgrade and then press
[A (open/close)].
6) After completing loading disc, confirmation
message will appear. Use [s / B] to select “Yes” and
press [OK] to start upgrading.
• It may take a while to complete the upgrading.
7) After the disc upgrade finishes, this unit will restart
and open the disc tray automatically. Remove the
disc.
You can upgrade the software by connecting the unit to
the Internet.
1) Follow steps 1) to 3) in “Connection Test” on page 49.
2) Use [K / L] to select “Software Upgrade”, then press
[OK].
3) Use [K / L] to select “Network Upgrade”, then press
[OK].
4) Use [K / L] to select “Yes”, then press [OK].
• This unit will then start checking for the latest
software version.
5) Confirmation message will appear.
Use [s / B] to select “Yes”, then press [OK].
• The unit will start downloading the latest software
version.
6) When the download completes, confirmation
message will appear. Press [OK].
• The unit will start upgrading the software version.
• It may take a while to complete the upgrading.
7) After upgrading finishes, this unit will restart and
open the disc tray automatically.
Menus to reset player settings, format SD card, local
storage, clear network settings and deactivate VUDU.
1) Use [K / L] to select “Settings” in the home menu,
then press [OK].
2) Use [K / L] to select “Factory Default”, then press
[OK].
3) Use [K / L] to select the desired setting, then press
[OK].
“Settings”:
All the settings except for the “Ratings Lock” and
“Network Connection” setting will be reset to default.
“Format SD Card” (Available only when an SD
Memory Card is inserted):
Initialize the SD Memory Card.
“Local Storage”:
Local storage for Player or SD card (Available only when
an SD Memory Card is inserted) used for BD-Java will be
initialized.
“Network Settings”:
Reset the network setting to the default.
“Vudu Deactivate”:
Deactivates the connection to VUDU.
4) Use [K / L] to select “Yes”, then press [OK].
• Confirmation message will appear. Press [OK] to
complete the setting.
5) Press [BACK U] to go back to the previous screen,
or press [ (home)] to go back to the home menu.
Software Upgrade
Disc Upgrade
home A“Settings” A
“Advanced
Setup”
A
“Others”
A
“Software
Upgrade”
A
“Disc
Upgrade”
Note
• Please visit www.philips.com to download the latest
software version. Please read the software upgrade
Read-me file carefully before performing an upgrade
using a disc.
• Please do not unplug the AC power cord while
executing the “Disc Upgrade”.
• All settings will remain the same even if you upgrade
the software version.
Network Upgrade
home A“Settings” A
“Advanced
Setup”
A
“Others”
A
“Software
Upgrade”
A
“Network
Upgrade”
Note
• In order to upgrade the software via the Internet, you
must connect the unit to the Internet and set up
necessary settings.
• For the network connection, refer to “Network
Connection with LAN” on page 22.
• For the network setup, refer to “Network
Connection” on page 49.
• Please do not unplug the AC power cord or LAN
cable while executing the “Network Upgrade”.
• All settings will remain the same even if you upgrade
the software version.
• The disc tray will open automatically after upgrading
finishes. This is not a malfunction.
Reset to Factory Default
Note
• Do not remove the SD Memory Card while executing
the “Format SD Card” or “Local Storage” (SD card). It
will damage the card.
• “Format SD Card” and “Local Storage” (SD card) are
not available when a Blu-ray Disc is in the unit.
Introduction Connections Basic Setup Playback OthersFunction Setup
E1S07UD_E1S08UD_EN.book Page 53 Monday, January 31, 2011 2:42 PM

EN54
SOUND SETTINGS
You can control the volume level of the audio output from
5.1ch speakers.
To increase or decrease the volume level :
Press [ ⴐ / ⴑ (volume)].
• The volume level will increase or decrease, every time
you press [ ⴐ (volume)] or [ ⴑ (volume)].
• The volume level will be displayed on the front panel display.
To turn off the volume temporarily :
Press [d (mute)].
• To restore the volume, press [d (mute)] again or press
[ ⴐ / ⴑ (volume)].
• “MUTE” will be displayed on the front panel display.
Select the surround mode for the audio output from 5.1ch
speakers.
1) During playback, press [SURROUND] repeatedly to
select the desired surround mode.
“Off”:
Turns off virtual surround modes and enables 2ch PCM
or multi-channel Dolby or DTS sound modes
depending on source audio.
“2.1ch Stereo”:
Set the surround mode to “2.1ch Stereo”.
(2.1ch Stereo sound from front left/right speakers.)
“Multi ch Stereo”:
Set the surround mode to “Multi ch Stereo”.
(5.1ch stereo sound from 5.1ch speakers.)
“Dolby Pro Logic II Movie”:
Set the surround mode to “Dolby Pro Logic II Movie”.
(Dolby Pro Logic II 5.1ch surround sound.)
“Dolby Pro Logic II Music”:
Set the surround mode to “Dolby Pro Logic II Music”.
(Dolby Pro Logic II 5.1ch surround sound.)
Select the sound effect mode for the audio output from
5.1ch speakers to suit your video or music.
1) During playback, press [SOUND MODE] repeatedly
to select the desired sound effect mode.
Volume Control
Note
• This function is only available for the audio output
from 5.1ch speakers.
•Pressing [ ⴐ / ⴑ (volume)] does not work while
the settings menu is displayed.
• If you turn up the volume too much, the audio may get
distorted. To enjoy clear sounds, please turn down the volume.
Selecting Surround Mode
Note
• The availability of surround sound modes will
depend on the audio source.
• In disc or SD card mode, pressing [SURROUND] does
not work while in the Resume-On-Stop mode.
• In FM mode, pressing [SURROUND] does not work
when no audio is being input.
•Pressing [SURROUND] does not work during
playback of JPEG files.
• This function is effective only for the audio output
from 5.1ch speakers.
• The volume will be restored If you press
[SURROUND] when the audio is muted.
• For mulch-channel audio, “Multi ch Stereo”, “Dolby
Pro Logic II Movie” or “Dolby Pro Logic II Music”
cannot be set.
Selecting Sound Effect Mode
Video Music Description
Off Off
Turns off the sound effect
mode.
Action Rock
Enhanced low and high-
range. Ideal for action
movies and rock or pop
music.
Drama Jazz
Clear mid and high-range.
Ideal for drama movies
and jazz music.
Concert Classic
Neutral sound. Ideal for
live concerts and classical
music.
Sports Sports
Moderate mid-range and
surround effects for clear
vocals and the
atmosphere of a live sport
venue.
Note
• In disc or SD card mode, pressing [SOUND MODE]
does not work while in the Resume-On-Stop mode.
• In FM mode, pressing [SOUND MODE] does not
work when no audio is being input.
•Pressing [SOUND MODE] does not work during
playback of JPEG files.
• This function is effective only for the audio output
from 5.1ch speakers.
• The volume will be restored if you press
[SOUND MODE] when the audio is muted.
E1S07UD_E1S08UD_EN.book Page 54 Monday, January 31, 2011 2:42 PM

55EN
EN
OTHER SETTINGS
You can change the active source mode to the desired
external audio inputs and enjoy audio from the connected
device with the multi-channel surround sound
capabilities.
1) Press [ (home)] to access the home menu.
2) Use [K / L] to select “External audio input”, then
press [OK].
3) Use [K / L] to select the desired source mode, then
press press [OK].
“Aux1”:
Set the active source mode to the AUDIO IN(AUX1).
“Aux2”:
Set the active source mode to the AUDIO IN(AUX2).
“Coaxial”:
Set the active source mode to the DIGITAL AUDIO IN
(COAXIAL).
“MP3 Link”:
Set the active source mode to the MP3 LINK jack.
4) Press [BACK U] to go back to the previous screen,
or press [ (home)] to go back to the home menu.
The sleep timer enables the unit to switch to the standby
mode automatically after the selected preset time.
To set the sleep timer :
Press [SLEEP] repeatedly to select the desired preset
time.
“SLP OFF”:
Turns off the sleep timer.
“SLP 15”:
Set the preset turn-off time to 15 minutes.
“SLP 30”:
Set the preset turn-off time to 30 minutes.
“SLP 60”:
Set the preset turn-off time to 60 minutes.
“SLP 90”:
Set the preset turn-off time to 90 minutes.
“SLP 120”:
Set the preset turn-off time to 120 minutes.
“SLP 150”:
Set the preset turn-off time to 150 minutes.
To check or change the setting :
Press [SLEEP] once to display the remaining time.
To change the setting, press [SLEEP] repeatedly until your
desired preset time is displayed.
To cancel sleep timer :
Press [SLEEP] repeatedly until “SLP OFF” is displayed.
Switching Active Source Mode
Note
• You can also change the active source mode by
pressing [SOURCE] repeatedly.
(Home Menu (Disc / SD card), “Aux1”, “Aux2”,
“Coaxial”, “MP3 Link” or “FM”.)
Sleep Timer
Note
• The sleep timer will be activated even if the unit is in
operation.
•Pressing [SLEEP] does not work while the settings
menu is displayed.
Introduction Connections Basic Setup Playback OthersFunction Setup
E1S07UD_E1S08UD_EN.book Page 55 Monday, January 31, 2011 2:42 PM

EN56
TROUBLESHOOTING
Problem Tip
POWER
No reaction to the remote control. Connect the product to the power outlet.
Point the remote control at the product.
Insert the batteries correctly.
Insert new batteries in the remote control.
No video signal on the display
device.
Turn on the TV.
Set the TV to the correct external input.
Select the correct video resolution in the “HDMI Video Resolution” in the
settings menu.
Press and hold [B (play)] on the front panel for 5 seconds to change the
setting back to its default.
No audio / video signal on the
display device via HDMI cable.
If the unit is connected to the unauthorized display device with an HDMI
cable, the audio / video signal may not be output.
Perform an HDMI cable hotplug, wherein you disconnect the HDMI cable
from the TV and this unit and then reconnect it to both the devices while
they are powered on.
Ensure that your HDMI cable is certified.
No high-definition video signal on
the TV.
Does the disc contain high-definition video? High-definition video is not
available when the disc does not contain it.
Does the TV support high-definition video? High-definition video is not
available when the TV does not support it.
No audio signal from the
loudspeakers of the TV connected
via an HDMI cable.
Set “Audio Output” to “HDMI Normal” or “HDMI LPCM” in the settings
menu.
Ensure that the TV's speakers are turned on in the TV menu.
Ensure that the TV speakers are not muted.
No audio from the speaker system. Increase the volume level of the speaker system.
Set “Audio Output” to “Speakers” in the settings menu.
Make sure that audio is not muted.
Make sure you have selected the correct active source for external audio
input.
GENERAL
No 5.1-channel audio from the
speaker system.
Does the disc contain 5.1-channel audio? The 5.1-channel audio is not
available when the disc does not contain it.
Set “Audio Output” to “Speakers” in the settings menu.
Make sure that the surround mode is not set to “2.1ch Stereo”.
When listening to a stereo (2 channel) source, press [SURROUND] and
select “Dolby Pro Logic II Music” or “Dolby Pro Logic II Movie” to upmix the
stereo source to 5.1 channel surround.
When I press the [SURROUND]
button on my HTS remote while
playing movies, I only get “Off” and
“2.1ch Stereo” as available
surround modes.
-Most movies have multi-channel audio tracks, i.e. 5.1 channel or 7.1
channel audio in DTS®, Dolby or PCM. Virtual surround modes such as
“Multi ch Stereo”, “Dolby Pro Logic II Movie” or “Dolby Pro Logic II Music”
are not available (and not necessary) when the source audio is already
multi-channel. It is best to use Surround = Off
in such cases as it enables
the appropriate multi-channel decoder.
Cannot play back a disc. Make sure that the product supports the disc.
Check the region code of the disc. This unit supports following region codes.
-BD : “A”
-DVD : “ALL” or “1” for HTS3051BV/F7 (USA / Canada)
“ALL” or “4” for HTS3051BV/F8 (Mexico)
For DVD-RW/-R, make sure that the disc is finalized.
Clean the disc.
SD Memory Card cannot be read. The format of the card does not match that accepted by this unit or the card
is not compatible.
Cannot play back JPEG files from a
disc.
Make sure that the disc was recorded in the UDF, ISO9660 or JOLIET format.
Cannot play back MP3 files from a
disc.
Make sure that the disc was recorded in the UDF, ISO9660 or JOLIET format.
Make sure that the bit rate of the MP3 files is between 112 and 320 kbps.
Make sure that the sample rate of the MP3 files is 32 kHz, 44.1 kHz or 48 kHz.
Cannot play back Windows Media™
Audio files from a disc.
Make sure that the sample rate of the Windows Media™ Audio files is
44.1 kHz or 48 kHz.
E1S07UD_E1S08UD_EN.book Page 56 Monday, January 31, 2011 2:42 PM
57
TROUBLESHOOTING
EN
EN
Problem Tip
in the upper right hand corner
of the TV screen.
The operation is not possible.
Buttons do not work or the unit
stops responding.
To completely reset the unit, press and hold [Q (standby/on)] on the front
panel for 10 seconds to shut down the unit or unplug the AC cord from the
AC outlet for 15-20 seconds.
GENERAL
Cannot find a JPEG file. Make sure that the selected group (folder) does not contain more than
9,999 files for BD / DVD / SD card, and 999 files for CD.
Make sure that the file extension is .jpg, .JPG, .jpeg or .JPEG.
Cannot find an MP3 and
Windows Media™ Audio file.
Make sure that the selected folder does not contain more than 9,999 files for
BD / DVD / SD card, and 999 files for CD.
Make sure that the file extension is .mp3 or .MP3 for MP3, and .wma or .WMA
for Windows Media™ Audio.
Error message appears when I
select “Auto” in the “Player Menu”.
Make sure that the unit is connected to the PHILIPS brand EasyLink TV and
the “EasyLink (HDMI CEC)” is set to “On”.
This error message may appear when your TV’s OSD language is not
supported by this unit.
Cannot connect to the network. Check if the LAN cable connection is properly made.
Turn on the modem or broadband router.
Check the network settings.
Check if the broadband router and/or modem is correctly connected.
Check the “BD-Live Setting”.
When connecting directly to a modem via a LAN cable, you might need to
power cycle the modem to reset settings on the modem.
Cannot connect to the network while
my PC is connected to the network.
Check the content of your Internet service contract to see if your Internet
Service Provider prevents multiple terminals connecting at the same time.
The capacity of the SD card
decreased.
Data may be written to the SD card when a BD-video that supports the
virtual package is used and an SD card is in the slot.
MPEG-2 video and audio on the SD
card cannot be played back.
MPEG-2 is noncompliant on this unit.
The contents of the card cannot be
read.
The card is not compatible or the contents on the card may be damaged.
Turn off and then turn the unit on again.
Cannot use the BD-Live function or
download of data does not perform
properly.
Insert an SD card with enough capacity(1GB or more).
Check if an SD card is correctly inserted.
Make sure the write-protect switch on the SD card is not enabled.
Cannot play back BD-video
(BD-ROM Profile 2.0).
Insert an SD card(1GB or more) which is formatted on this unit.
Some discs with BD-Live function require memory when playing back the
content.
Do not remove the card during playback.
Make sure the write-protect switch on the SD card is not enabled.
Cannot use the VUDU service. Check if the network connection is properly made.
Cannot rent or buy movies / TV
shows on VUDU.
You need to activate the VUDU account. (Refer to page 37)
Log into your account at http://my.vudu.com
and check your payment
information.
The picture quality of VUDU movie
is poor.
Check the speed of your Internet connection. You need speeds of of at least
8 Mbps to this player for high quality uninterrupted playback.
VUDU movie often stops or starts
buffering during playback.
Contact your Internet service provider to troubleshoot your Internet
connection for speed and line quality. Consistent line quality and speed are
very important for Internet video playback.
Radio reception is poor. If the signal is too weak, adjust the antenna or connect an external antenna
for better reception.
Increase the distance between this unit and your TV or VCR.
Tune in to the correct frequency.
Place the antenna further away from any equipment that may be causing
the interference.
Introduction Connections Basic Setup Playback OthersFunction Setup
E1S07UD_E1S08UD_EN.book Page 57 Monday, January 31, 2011 2:42 PM

58
TROUBLESHOOTING
EN
To obtain an electronic copy of this manual :
1) Point your browser to www.philips.com/support.
2) Choose your country of location.
3) Enter the model number or a keyword in the “Find your product” field. Alternatively, you can browse the catalog.
4) Click the description or model.
5) Under Product support, click “User manuals”.
If you cannot resolve your problem, refer to the FAQ for this Home Theater System at www.philips.com/support.
If the problem remains unresolved, contact the Customer Support Center in your country.
Downloading an Electronic Copy
Contact Us
Note
• Do not attempt to repair the Home Theater System yourself. This may cause severe injury, irreparable damage to
your Home Theater System or void your warranty.
• Please have available your Home Theater System model and serial number before contacting us.
These numbers are available on the cabinet, as well as on the packaging.
E1S07UD_E1S08UD_EN.book Page 58 Monday, January 31, 2011 2:42 PM

59EN
EN
GLOSSARY
Analog Audio
An electrical signal that directly represents sound.
Compare this to digital audio which can be an electrical
signal, but is an indirect representation of sound. See also
“Digital Audio”.
Aspect Ratio
The width of a TV screen relative to its height.
Conventional TVs are 4:3 (in other words, the TV screen is
almost square); widescreen models are 16:9 (the TV screen
is almost twice as wide as it is high).
BD-Live
BD-Live is a BD-video (BD-ROM version 2 Profile 2.0) which
contains new functions (e.g. Internet connection), in
addition to the BONUSVIEW function.
Blu-ray Disc (BD)
Blu-ray Disc is a next generation optical video disc which is
capable of storing much more data than a conventional
DVD. The large capacity makes it possible to benefit from
the features such as high-definition videos, multi-channel
surround sounds, interactive menus and so on.
Chapter
Just as a book is split up into several chapters, a title on a
BD-video or DVD-video is usually divided into chapters.
See also “Title”.
Component Video Output
Each signal of luminance (Y) and component (PB/CB, PR/CR)
is independent to output so that you can experience
picture color as it is.
Also, due to compatibility with progressive video (525p/
480p), you can experience higher-density picture than that
in interlace (525i/480i).
Digital Audio
An indirect representation of sound by numbers. During
recording, the sound is measured at discrete intervals
(44,100 times a second for CD audio) by an analog-to-
digital converter, generating a stream of numbers. On
playback, a digital-to-analog converter generates an
analog signal based on these numbers. See also “Sampling
Frequency” and “Analog Audio”.
DNS Server
A server which translates Internet domain names into IP
addresses.
Dolby Digital
The system to compress digital sound developed by Dolby
Laboratories. It offers you sound of stereo (2ch) or multi-
channel audio.
Dolby Digital Plus
Dolby Digital Plus is the next generation digital audio
compression technology developed as an extension to
Dolby Digital. Blu-ray Disc supports 7.1 multi-channel
surround sound output.
Dolby Pro Logic II
Dolby Pro Logic II technology processes any high quality
stereo (two-channel) movie and music audio into five
playback channels of full-bandwidth surround sound.
A matrix surround decoding technology, Dolby Pro Logic II
detects the directional cues that occur naturally in stereo
content and uses these elements to create a five-channel
surround sound playback experience.
Dolby TrueHD
Dolby TrueHD is a lossless coding technology developed
for next generation optical discs. Blu-ray Disc supports
7.1 multi-channel surround sound output.
DTS® (Digital Theater System)
DTS® is a multi channel surround sound system. You can
enjoy movie dynamic and realistic sound like movie
theater. DTS surround sound technologies were
developed by DTS, Inc.
DTS-HD®
DTS-HD® is a lossless coding technology developed as an
extension of the original DTS Coherent Acoustics format.
Blu-ray Disc supports 7.1 multi-channel surround sound
output.
Gateway
IP address of the electronic devices (such as router) which
provide Internet access.
HDMI (High Definition Multimedia Interface)
A digital interface between audio and video source. It can
transmit component video, audio, and control signal with
one cable connection.
Hub
A device used for connecting multiple device to the
network.
IP Address
A set of numbers which are assigned to devices
participating in a computer network.
JPEG (Joint Photographic Experts Group)
JPEG is a method of compressing still picture files. You can
copy JPEG files on CD-RW/-R, DVD-RW/-R, BD-RE/-R or SD
Memory Card from a computer and play back the files on
this unit.
Introduction Connections Basic Setup Playback OthersFunction Setup
E1S07UD_E1S08UD_EN.book Page 59 Monday, January 31, 2011 2:42 PM

60
GLOSSARY
EN
LAN (Local Area Network)
A group of computer networks covering a small area like a
company, school or home.
Local Storage
A storage area of sub contents for playing virtual packages
on BD-video.
MP3 (MPEG audio layer 3)
MP3 is a method of compressing files. You can copy MP3
files on CD-RW/-R, DVD-RW/-R, BD-RE/-R or SD Memory
Card from the computer and play back the files on this
unit.
PCM (Pulse Code Modulation)
The most common system of encoding digital audio,
found on CD and DAT. Excellent quality, but requires a lot
of data compared to formats such as Dolby Digital and
MPEG audio. For compatibility with digital audio recorders
(CD, MD and DAT) and AV amplifiers with digital inputs,
this unit can convert Dolby Digital, DTS, and MPEG audio
to PCM. See also “Digital Audio”.
Proxy Server
Proxy server is a server which acts as an intermediary
between a workstation user and the Internet to ensure
security.
Region Code
Regions associate discs and players with particular areas of
the world. This unit will only play back discs that have
compatible region codes. You can find the region code of
your unit by looking on the rear panel. Some discs are
compatible with more than one region (or all regions).
Router
A networking device which distinguishes the IP address
assigned to each device and routing and forwarding
information in the computer network.
Sampling Frequency
The rate which sound is measured by a specified interval
to turn into digital audio data. The numbers of sampling in
one second defines as sampling frequency. The higher the
rate, the better the sound quality.
Subnet Mask
A mask which is used to determine what subnet an IP
address belongs to.
Title
A collection of chapters on BD-video or DVD-video. See
also “Chapter”.
Track
Audio CD uses tracks to divide up the content of a disc.
The BD-video or DVD-video equivalent is called a chapter.
See also “Chapter”.
Virtual Package
The function which copies data to other media (local
storage) from the Internet and plays secondary video,
secondary audio and subtitles at the same time. The
method of the playback varies depending on discs.
VUDU
VUDU is a leading HD on-demand video service which
utilizes the Internet connection to deliver the highest
quality on-demand video and Internet applications.
Windows Media™ Audio
Windows Media™ Audio is the audio compressing
technology developed by Microsoft. You can copy
Windows Media™ Audio files on CD-RW/-R, DVD-RW/-R or
SD Memory Card from a computer and play them back on
this unit.
E1S07UD_E1S08UD_EN.book Page 60 Monday, January 31, 2011 2:42 PM
61EN
EN
SPECIFICATIONS
General
Signal system NTSC Color
Power requirements 120 V AC, 60 Hz
Power consumption 70 W (standby: 0.6 W)
Total output power (Amplifier) Home theater mode: 1000 W
FTC* output power : 700 W
*(Main Ch @ 1 kHz within 10% THD, Sub Ch 60 Hz within 2.5% THD)
Dimensions (width x height x depth) 17.2 x 2.4 x 11.7 inches (435 x 59 x 297 mm)
Weight Total weight: 27.56 lbs. (12.5 kg)
Main unit: 8.16 lbs. (3.7 kg)
Operating temperature 41°F (5°C) to 104°F (40°C)
Operating humidity Less than 80 % (no condensation)
Terminals
Front
SD card slot
slot x 1
MP3 LINK jack
mini jack x 1 500 mVp-p (75)
Rear
Analog audio output
(SPEAKERS (4))
Front and rear speakers System: Full range satellite
Impedance: 4
Frequency response: 180 Hz ~ 20 kHz
Dimensions: 3.9 x 5.1 x 4 inches (100 x 130 x 100.5 mm)
Speaker cable length: front - 118.1 inches (3000 mm)
rear - 360.2 inches (9150 mm)
Weight: front - 1.19 lbs. (0.54 kg)
rear - 1.13 lbs. (0.51 kg)
Center speaker System: Full range satellite
Impedance: 4
Frequency response: 180 Hz ~ 20 kHz
Dimensions: 3.9 x 5.1 x 4 inches (100 x 130 x 100.5 mm)
Speaker cable length: 118.1 inches (3000 mm)
Weight: 1.61 lbs. (0.73 kg)
Subwoofer Impedance: 4
Speaker drivers: 6.5 inches (160 mm) woofer
Frequency response: 60 Hz ~ 150 Hz
Dimensions: 5.9 x 12.2 x 12.1 inches (149.5 x 310.5 x 308 mm)
Speaker cable length: 169.3 inches (4300 mm)
Weight: 8.29 lbs. (3.76 kg)
Video output
RCA jack x 1 1 Vp-p (75)
Component video output
RCA jack x 3 Y: 1 Vp-p (75)P
B: 700 mVp-p (75)PR: 700 mVp-p (75)
Analog audio input
(AUX1 / AUX2)
RCA jacks(L / R) x 2 L/R: 2 Vrms (47k)
Digital audio input (COAXIAL)
RCA jack x 1 500 mVp-p (75)
HDMI output
HDMI jack x 1 Video: 480p, 720p, 1080i, 1080p, 1080p24/Audio
LAN terminal 10BASE-T / 100BASE-TX
RADIO
FM ANT 75 jack × 1
Tuning range: FM 87.5 - 108 MHz (100kHz)
Antenna terminal: 75 (unbalanced)
Note
• The specifications and design of this product are subject to change without notice.
Introduction Connections Basic Setup Playback OthersFunction Setup
E1S07UD_E1S08UD_EN.book Page 61 Monday, January 31, 2011 2:42 PM

EN62
NETWORK SERVICE DISCLAIMER
Network Service Disclaimer
Content and services made available through this product are transmitted by third parties
by means of networks and transmission facilities over which Company has no control and
third party services may be terminated or interrupted at any time, and Company makes no
representation or warranty that any content or service will remain available for any period
of time. Without limiting the generality of this disclaimer, Company expressly disclaims
any responsibility for any interruption or suspension of any content or service made
available through this product. Company is not responsible for customer service related to
the content and services. Any question or request for service relating to the content or
services should be made directly to the respective content and service providers.
THIRD PARTY CONTENT AND SERVICES MADE AVAILABLE THROUGH THIS PRODUCT ARE
PROVIDED “AS IS.” COMPANY DOES NOT WARRANT CONTENT OR SERVICES SO PROVIDED,
FOR ANY PURPOSE WHATSOEVER. COMPANY EXPRESSLY DISCLAIMS ANY WARRANTIES,
EXPRESS OR IMPLIED INCLUDING WITHOUT LIMITATION, WARRANTIES OF
MERCHANTABILITY OR FITNESS FOR A PARTICULAR PURPOSE, ACCURACY, VALIDITY,
TIMELINESS, LEGALITY, SUITABILITY, OR QUALITY OF ANY CONTENT OR SERVICE MADE
AVAILABLE THROUGH THIS PRODUCT.
IN NO EVENT SHALL COMPANY BE LIABLE FOR, ANY DAMAGES, WHETHER ARISING IN
CONTRACT OR TORT, INCLUDING WITHOUT LIMITATION, ANY DIRECT, INDIRECT,
INCIDENTAL, SPECIAL OR CONSEQUENTIAL DAMAGES, LOST PROFITS, ATTORNEY FEES,
EXPENSES, OR ANY OTHER DAMAGES ARISING OUT OF, OR IN CONNECTION WITH, ANY
CONTENT (OR ANY INFORMATION CONTAINED THEREIN) OR SERVICE PROVIDED TO THE
USER OR ANY THIRD PARTY, EVEN IF ADVISED OF THE POSSIBILITY OF SUCH DAMAGES.
All content and services accessible through this product belong to third parties and are
protected by copyright, patent, trademark and/or other intellectual property rights. Such
content and services are provided solely for the User’s personal noncommercial use. User
may not use any content or services in a manner that has not been authorized by the
content owner or service provider. Without limiting the foregoing, unless expressly
authorized by the applicable content owner or service provider, you may not modify,
copy, republish, upload, post, transmit, translate, sell, create derivative works, exploit, or
distribute in any manner or medium any content or services made available through this
product.
E1S07UD_E1S08UD_EN.book Page 62 Monday, January 31, 2011 2:42 PM

63EN
EN
ONE (1) YEAR LIMITED WARRANTY
WARRANTY COVERAGE:
This warranty obligation is limited to the terms set forth
below.
WHO IS COVERED:
This product is warranted to the original purchaser or the per-
son receiving the product as a gift against defects in materials
and workmanship as based on the date of original purchase
(“Warranty Period”) from an Authorized Dealer. The original
sales receipt showing the product name and the purchase date
from an authorized retailer is considered such proof.
WHAT IS COVERED:
This warranty covers new products if a defect in material
or workmanship occurs and a valid claim is received within
the Warranty Period. At its option, the company will either (1)
repair the product at no charge, using new or refurbished
replacement parts, or (2) exchange the product with a product
that is new or which has been manufactured from new, or ser-
viceable used parts and is at least functionally equivalent or
most comparable to the original product in current inventory,
or (3) refund the original purchase price of the product.
The Company warrants replacement products or parts provided
under this warranty against defects in materials and workmanship
from the date of the replacement or repair for ninety (90) days
or for the remaining portion of the original product’s warranty,
whichever provides longer coverage for you. When a product or
part is exchanged, any replacement item becomes your property
and the replaced item becomes the company’s property. When a
refund is given, your product becomes the company’s property.
Note: Any product sold and identied as refurbished or
renewed carries a ninety (90) day limited warranty.
Replacement product can only be sent if all warranty
requirements are met. Failure to follow all
requirements can result in delay.
WHAT IS NOT COVERED - EXCLUSIONS AND
LIMITATIONS:
This Limited Warranty applies only to the new products that
can be identied by the trademark, trade name, or logo afxed
to it. This Limited Warranty does not apply to any non-Philips
hardware product or any software, even if packaged or sold
with the product. Non-Philips manufacturers, suppliers, or
publishers may provide a separate warranty for their own
products packaged with the bundled product.
The Company is not liable for any damage to or loss of any
programs, data, or other information stored on any media
contained within the product, or any non-Philips product or
part not covered by this warranty. Recovery or reinstallation
of programs, data or other information is not covered under
this Limited Warranty.
This warranty does not apply (a) to damage caused by accident,
abuse, misuse, neglect, misapplication, or non-Philips product,
(b) to damage caused by service performed by anyone other
than an Authorized Service Location, (c) to a product or
a part that has been modied without written permission,
or (d) if any serial number has been removed or defaced,
or (e) product, accessories or consumables sold “AS IS”
without warranty of any kind by including refurbished Philips
product sold “AS IS” by some retailers.
This Limited Warranty does not cover:
•
Shipping charges to return defective product.
•
Labor charges for installation or setup of the product, adjust-
ment of customer controls on the product, and installation or
repair of antenna/signal source systems outside of the product.
•
Product repair and/or part replacement because o mproper
installation or maintenance, connections to improper voltage
supply, power line surge, lightning damage, retained images or
screen markings resulting from viewing xed stationary con-
tent for extended periods, product cosmetic appearance items
due to normal wear and tear, unauthorized repair or other
cause not within the control of the company.
•
Damage or claims for products not being available for use, or
for lost data or lost software.
•
Damage from mishandled shipments or transit accidents when
returning product.
• A product that requires modication or adaptation to enable
it to operate in any country other than the country for which
it was designed, manufactured, approved and/or authorized, or
repair of products damaged by these modications.
• A product used for commercial or institutional purposes
(including but not limited to rental purposes).
•
Product lost in shipment and no signature verication receipt
can be provided.
•
Failure to operate per Owner’s Manual.
TO OBTAIN ASSISTANCE IN THE U.S.A., CANADA,
PUERTO RICO, OR U.S. VIRGIN ISLANDS...
Contact Customer Care Center at:
1-866-309-0866
This warranty gives you specic legal rights. You may have other rights which vary from state/province to state/province.
P&F USA, Inc.
PO Box 430 Daleville, IN 47334-0430
WARRANTY IS THE EXCLUSIVE REMEDY FOR THE CON-
SUMER. PHILIPS SHALL NOT BE LIABLE FOR ANY INCIDEN-
TAL OR CONSEQUENTIAL DAMAGES FOR BREACH OF
ANY EXPRESS OR IMPLIED WARRANTY ON THIS PROD-
UCT. EXCEPT TO THE EXTENT PROHIBITED BY APPLICABLE
LAW, ANY IMPLIED WARRANTY OF MERCHANTABILITY OR
FITNESS FOR A PARTICULAR PURPOSE ON THIS PRODUCT
IS LIMITED IN DURATION TO THE DURATION OF THIS
WARRANTY.
Some states do not allow the exclusions or limitation o ncidental
or consequential damages, or allow limitations on how long
an implied warranty lasts, so the above limitations or exclusions
may not apply to you.
REPAIR OR REPLACEMENT AS PROVIDED UNDER THIS
Introduction Connections Basic Setup Playback OthersFunction Setup
E1S07UD_E1S08UD_EN.book Page 63 Monday, January 31, 2011 2:42 PM
Meet Philips at the Internet
http://www.philips.com/welcome
P&F USA, Inc.
PO Box 430 Daleville, IN 47334-0430
IMPORTADOR: Sojitz Mexicana, S.A. de C.V.
Av. Paseo de las Palmas no. 239-302
Col. Lomas de Chapultepec, c.p. 11000
México, D.F. 52 (55) 5202 - 7222
P&F Mexicana, S.A. de C.V.
Av. La Palma No. 6, Col. San Fernando La Herradura,
Huixquilucan Edo. de México C.P. 52787
EXPORTADOR : FUNAI ELECTRIC CO. L.T.D.
País de Origen : CHINA
Comercializado por : P&F Mexicana, S.A. DE C.V.
LEA CUIDADOSAMENTE ESTE INSTRUCTIVO
GARANTIA INCLUIDA EN EL INSTRUCTIVO DE USO
ANTES DE USAR SU APARATO.
ENERGIA
HTS3051BV 120 V ~ 60 Hz 70 W
Printed in China
JpnYN-1033/F7-3
1VMN29994★★★★
E1S07UD_E1S08UD
Philips and Philips Shield are used under
license of Koninklijke Philips Electronics NV.
E1S07UD_E1S08UD_EN.book Page 64 Monday, January 31, 2011 2:42 PM