
Dishwasher Operating
& Installation Manual
ILVE Dishwasher Installation and Operating Instructions template pages.indd 1 1/05/2015 9:16 am
ILVE Dishwasher Installation and Operating Instructions template pages.indd 2 1/05/2015 9:16 am

OPEN 24
/
7
ILVE ACCESSORIES ONLINE SHOP
For a wide range of coee machines, pods, and other ILVE
accessories at the click of a button shop.ilve.com.au
ILVE Dishwasher Installation and Operating Instructions template pages.indd 3 1/05/2015 9:16 am
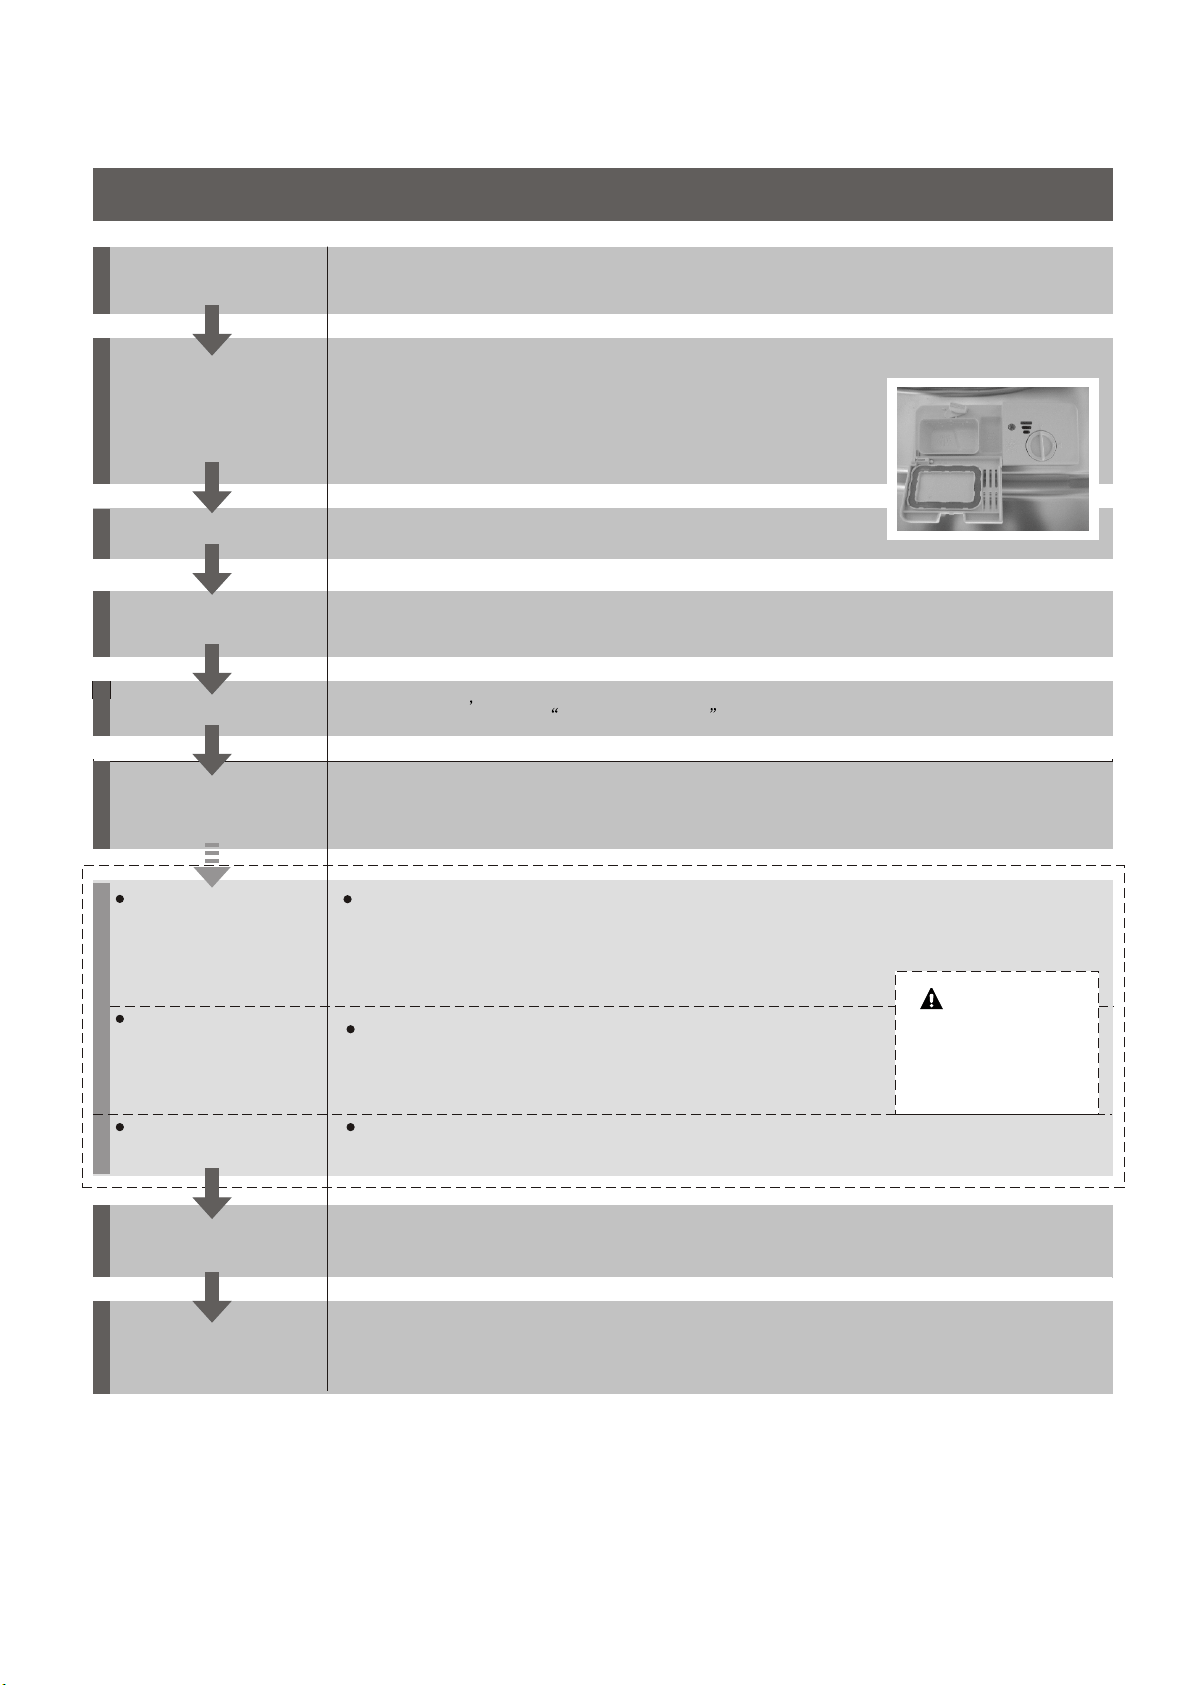
Compartment A:Compartment A:
For each wash cycle.
Compartment B:B:
For programs with pre-wash only.
(Follow the user instructions)
Mechanical indicator C. Mechanical indicator C.
Electric indicator on control panel (if provided).
Check the rinse aid level
Load the baskets
Select a programme
T urn on the water tap and press the Start/Pause button. The machine will start working
after about 10 seconds.
Running the dishwasher
Switch off the appliance
Turn off the water tap,
unload the baskets
Fill the detergent dispenser
Warning: wait a few minutes (about 15 minutes) before unloading the dishwasher to avoid scald,
as the dishes and utensils are still hot and more susceptible to break.
They also could dry better.
Changing the programme
Add forgotten dishes in the
dishwasher.
Scrape off any large food particles. Soften remnants of burnt food in pans,
then load the baskets. Refer to the dishwasher loading instructions.
Close the door Press the program button until the selected program lights up.
( See the section entitled Operation instruction )
If the appliance is switched
off during a wash cycle.
Open the door carefully.
Hot steam may escape
when the door is opened!
WARNING!
If the appliance was switched off during a wash cycle, when switch
on again, please re-select the washing cycle and operate the dishwasher from the beginning.
Switch on the appliance
Press the Power switch button to switch on the appliance, Open the door.
1.Press the start/pause button to stop the machine.
2.Open the door.
3.Add the forgotten dishes.
4.Close the door, then press the start/pause button, the dishwasher will
start running again after 10 seconds.
Quick Operation GuideQuick Operation Guide
For detailed operating method read the corresponding content on the instruction manual.
1. A running cycle can only be modified if it has been running for a short time. Otherwise the detergent
may have already been released and the water already drained. If this is the case, the detergent
dispenser must be refilled.
2. Press the Start/Pause button ,then press the program button more than 3 seconds to cancel the
running programme. .
3. Select a new programme.
4. Restart the dishwasher.
When the working cycle is finished, the buzzer of the dishwasher will sound 8 times, then stop.
Turn off the appliance using the Power button.
Since the appliance is standing by, it will power off automaticly after 30 minutes without any operation.
A
B
C

1-11-1
This appliance is intended to be used in household and similar
applications such as:
-staff kitchen areas in shops, offices and other working environments;
-farm houses;
-by clients in hotels, motels and other residential type environments;
-bed and breakfast type environments.
This appliance can be used by children aged from 8 years and above and
persons with reduced physical, sensory or mental capabilities or lack of
experience and knowledge if they have been given supervision or
instruction concerning use of the appliance in a safe way and understand
the hazards involved. Children shall not play with the appliance. Cleaning
and user maintenance shall not be made by children without supervision.
(For EN60335-1)
This appliance is not intended for use by persons(including children )with
reduced physical, sensory or mental capabilities, or lack of experience and
knowledge ,unless they have been given supervision or instruction
concerning use of the appliance by a person responsible for their safety.
(For IEC60335-1)
This appliance is for indoor use only, for household use only. To protect
against the risk of electrical shock, do not immerse the unit, cord or plug in
water or other liquid.
Please unplug before cleaning and maintenance the appliance .Use a soft
cloth moisten with mild soap, and then use a dry cloth to wipe it again.
1.IMPORTANT SAFETY INFORMATION1.IMPORTANT SAFETY INFORMATION
When using your dishwasher,
follow the precautions listed below:
WARNING! WARNING!
EARTHING INSTRUCTIONS
This appliance must be earthed. In the event of a malfunction or breakdown,
earthing will r e d u c e the r i s k o f an electric s h o c k b y p r o v i d i n g a p a t h o f l e a s t
resistance o f e l e c t r i c c u r r e n t . T h i s appliance is e q u i p p e d w i t h a c o r d h a v i n g
an equipment-earthing conductor and a earthing plug.
The plug must be plugged into an appropriate outlet that is installed and
earth ed in accordance with all local codes and ordinances.
Improper connection of the equipment-earthing conductor can result
in the risk of an electric shock. Check with a qualified electrician or service
representative if you are in doubt whether the appliance is properly earthed.
Do not modify the plug provided with the appliance; If it does not fit the outlet.
Have a proper outlet installed by a qualified electrician.

1-21-2
Do not abuse, sit on, or stand on the door or dish rack of the dishwasher.
Do not operate your dishwasher unless all enclosure panels are properly in place.
Open the door very carefully if the dishwasher is operating, there is a risk of water
squirting out.
Do not place any heavy objects on or stand on the door when it is open. The
appliance could tip forward.
When loading items to be washed:
1) Locate sharp items so that they are not likely to damage the door seal;
2) Warning: Knives and other utensils with sharp points must be loaded in the
basket with their points down or placed in a horizontal position.
Check that the detergent powder is empty after completion of the wash cycle.
Do not wash plastic items unless they are marked dishwasher safe or the
equivalent. For plastic it ems n check th e m anufacturer's
ot so marked,
recommendations.
Use only det ergent and rins e add itives des igned for a n a u t o m a t i c dish washer.
Never use soap, laundry detergent, or hand washing detergent in your dishwasher.
Children should be supervised to ensure that they do not play with the appliance.
The door should not be left open, since this could increase the risk of tripping.
If the supply cord is damaged, it must be replaced by the manufacturer or
its service agent or a similarly qualified person in order to avoid a hazard.
During installation, the power supply must not be excessively or dangerously
bent or flattened.
Do not tamper with controls.
The appliance is to be connected to the water mains using new hose sets and
that old hose-sets should not be reused.
The maximum number of place settings to be washed is 6.
The maximum permissible inlet water pressure is 1MPa.
The minimum permissible inlet water pressure is 0.04MPa.
Dispose of the dishwasher packaging material correctly.
All packaging materials can be recycled.
Plastic parts are marked with the standard international
abbreviations:
PE for polyethylene, e.g. sheet wrapping material
PS for polystyrene, e.g. padding material
POM polyoxymethylene, e.g. plastic clips
PP polypropylene, e.g. Salt filler
ABS Acrylonitrile Butadiene Styrene, e.g. Control Panel .
Packaging material could be dangerous for children!
For disposing of package and the appliance please go to a
recycling centre. Therefore cut off the power supply cable
and make the door closing device unusable.
Cardboard packaging is manufactured from recycled paper
and should be disposed in the waste paper collection for
recycling.
By ensuring this product is disposed of correctly, you will
help prevent potential negative consequences for the
environment and human health, which could otherwise be
caused by inappropriate waste handling of this product.
For more detailed information about recycling of this
product, please contact your local city office and your
household waste disposal service.
DISPOSAL: Do not dispose this product as unsorted
municipal waste. Collection of such waste separately for
special treatment is necessary.
WARNING! WARNING!
22
2.Disposal2.Disposal
3.Operation Instruction3.Operation Instruction
3
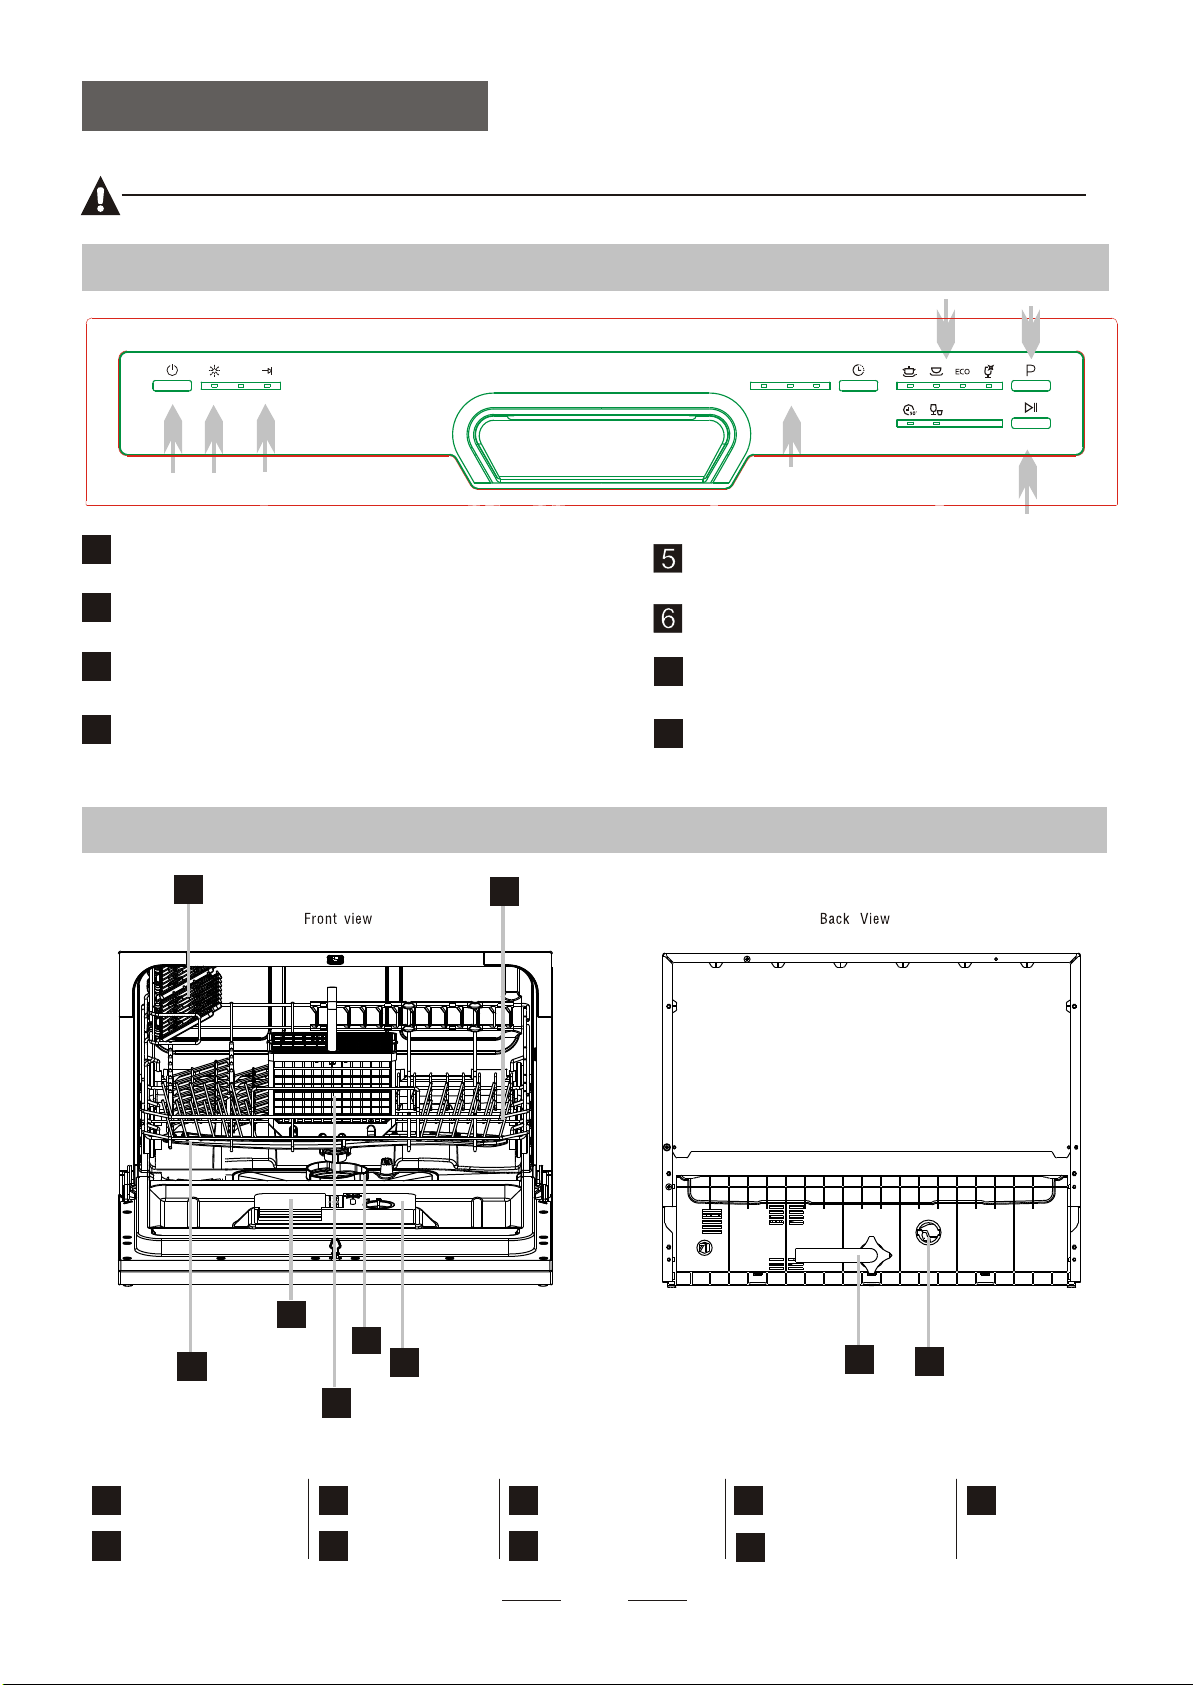
Dishwasher FeaturesDishwasher Features
Control PanelControl Panel
before using it for the first time.
To get the best performance from your dishwasher, read all operating instructions
IMPORTANTIMPORTANT
Filter assembly Detergent Dispenser
Cup Shelf
Cutlery Basket
Rinse Aid D is p e n se r
Inlet pipe connector
Drain pipe
connector
Spray Arms
Basket
1
5
6
7
8
9
3
2
4
9
7
1
2
3
4
5
6
8
11
2
3
4
7
Power Button: To turn on/off the power supply.
Program indicator light
Program Button : To select the wash cycles
Delay Button : To select the delay time.
Rinse Aid Warning Light : To be on when the
rinse aid dispenser needs to be refilled..
8
Program ending indicator: To be on when the
washing has been finished.
1
3
2
4
8
46
Start/Pause Button: Press this button to start
or pause the dishwasher.
2h2h 4 h4 h
8h8h
Delay time:2/4/6/8 hours option .
(6h:the 2h and 4h lights on at the same time).
47
C (Rinse-Aid indicator)C
A. Rinse Aid DispenserA. Rinse Aid Dispenser
The rinse aid is released during the final rinse to prevent water forming droplets on your dishes, which can leave
spots and streaks. It also improves drying by allowing water to roll off the dishes. Your dishwasher is designed to
use liquid rinse aids. The rinse aid dispenser is located inside the door next to the detergent dispenser. To fill the
dispenser, open the cap and pour the rinse aid into the dispenser until the level indicator turns completely black.
The volume of the rinse aid container is about 110ml.
Rinse Aid D i s p e n s er
Function of Rinse Aid
Rinse aid is automatically added during the last rinse, ensuring thorough rinsing, spot and streak free help the drying.
4
4.Prior to using for the first time4.Prior to using for the first time
To open the dispenser, turn the cap to the "open" (left) arrow and lift it out.
Pour the rinse aid into the dispenser, being careful not to overfill.
Replace the cap by inserting it aligned with "open" arrow and turning it to the closed (right) arrow.
1
2
3
As the rinse aid diminishes, the size of the black dot
on the rinse aid level indicator changes, as illustrated below.
Full
3 / 4 ful l
1 / 2 ful l
1 / 4 full - Should refill to eliminate spotting
Empty
When to Refill the Rinse Aid Dispenser
If there is no rinse-aid warning light in the control panel, you can judge the amount of rinse-aid by the color
of the optical level indicator C located next to the cap. When the rinse-aid container is full, the whole
indicator will be dark. As the rinse-aid diminishes, the size of the dark dot decreases. You should never let
the rinse aid get below 1 / 4 full.
C
during the next wash. Don't forget to replace the cap before you close dishwasher door.
Clean up any rinse aid spill during filling with an absorbent cloth to avoid excessive foaming
NOTE:NOTE:
Attention!
Only use branded rinse aid for dishwasher. Never fill the rinse aid dispenser with any other substances
(e.g. Dishwasher cleaning agent, liquid detergent). This would damage the appliance.
How to fill the Rinse Aid Dispenser

Adjusting Rinse Aid Dispenser
The rinse aid dispenser has six or four settings. Always start with the dispenser
set on "4". If spots and poor drying are a problem, increase the amount of rinse
aid dispensed by removing the dispenser lid and rotating the dial to "5". If the
dishes still are not drying properly or are spotted, adjust the dial to the next
higher number until your dishes are spot-free. The recommended setting is "4".
(Factory value is "4".)
Increase the dose if there are drops of water or lime spots on the dishes after washing.
Reduce it if there are sticky whitish stains on your dishes or a bluish film on glassware or
knife blades.
Ad j u st l e v er
(Rinse)
Ad j u st l e v er
(Rinse)
5
NOTE:NOTE:
Detergents have chemical ingredients that are necessary to remove dirt, crush dirt and transport it out of the dishwasher.
Most of the commercial quality detergents are suitable for this purpose.
B. DetergentB. Detergent
MAXMAX
Based on their chemical composition, detergents can be split in two basic types:
Detergent tablets of different brands dissolve at different speeds. For this reason some
detergent tablets cannot dissolve and develop their full cleaning power during short
Program. Therefore please use long program when using detergent tablets, to
ensure the complete removal of detergent residuals.
The dispenser must be refilled before the start of each wash cycle following the instructions
provided in the Wash Cycle Table. Your dishwasher uses less detergent and rinse aid then
conventional dishwasher. Generally, only one tablespoon of detergent is needed for
a normal wash load. More heavily soiled items need more detergent. Always add the
detergent just before starting the dishwasher, otherwise it could get damp and will not
dissolve properly.
Concentrated Detergent
Detergent Tablets
Detergent Dispenser
Conventional, alkaline detergents with caustic components.
Low alkaline concentrated detergents with natural enzymes.
Normally new pulverised detergent is without phosphate,thus the water softener function of
phosphate is not given. If detergents without phosphate were used in case of hard water
often white spots appear at dishes and glasses. In this case please add more detergent to reach
better results. Detergents without chlorine do only bleach a little. Strong and coloured spots will not
removed completely. In this case please choose a program with higher temperature.
The use of Normal washing program in combination with concentrated detergent reduces pollution and is
good for your dishes.

6
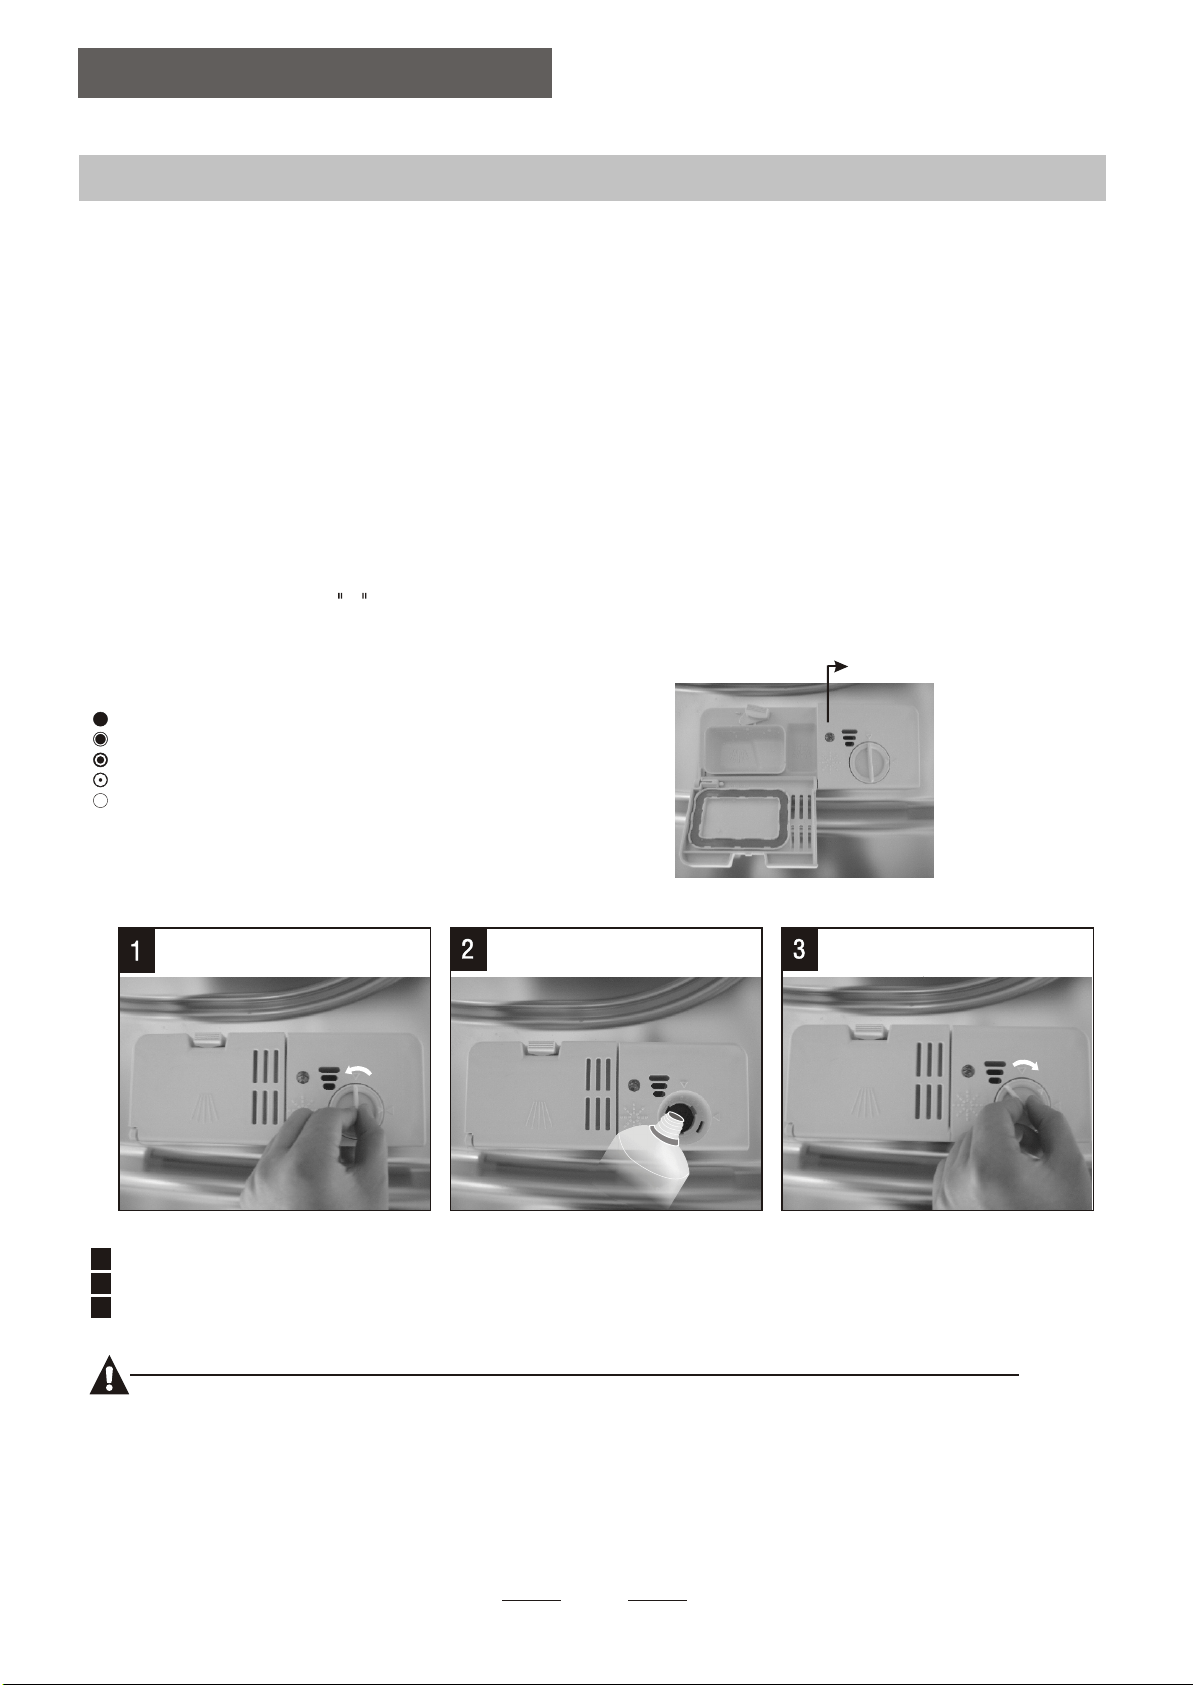
Adding detergent to dispenser
Always add the detergent just before starting each wash cycle.
Only use branded detergent and rinse aid for dishwasher.
If the lid is closed: push the latch to open.
NOTE:NOTE:
Fill the detergent dispenser with detergent.
The marking indicates the dosing levels, as
illustrated on right:
Location of main wash cycle detergent.
Location of pre-wash cycle detergent.
Please observe the manufacturers dosing and storage
Recommendations as stated on the detergent packaging.
Close the lid and press until it locks in place.
If the dishes are heavily soiled, place an additional
detergent dose in the pre-wash detergent chamber. This detergent will take effect during the pre-wash phase.
A
B
Fill in detergent dispenser
You see information about the amount of detergent for the single program on the page9.
Please be aware that soiling levels and water hardness can effect wash results.
Please observe the manufacturer's recommendations on the detergent packaging.
NOTE:NOTE:
Don't put powder detergent into the dispenser until you're ready to wash dishes.
Use only detergent specifically made for use in dishwashers. Keep your detergent fresh and dry.
Proper Use of Detergent
Dishwasher detergent is corrosive!
Take care to keep it out of reach of children.
WARNING! WARNING!
Push latch to openPush latch to open
AA BB
BA
7
5.Loading the Dishwasher Baskets5.Loading the Dishwasher Baskets
Suitability of use in the dishwasherSuitability of use in the dishwasher
Cutlery with wooden, horn china or
mother-of-pearl handles.
Plastic items that are not
Older cutlery with glued parts that is not
temperature resistant.
Bonded cutlery items or dishes.
Pewter or items.
Crystal glass .
Steel items subject to rusting
Wooden platters.
Items made from synthetic fibres.
heat resistant.
copper
Some types of glasses can become
dull after a large number of washes.
Silver and aluminium parts have a
tendency to discolour during washing.
Glazed patterns may fade if machine
washed frequently.
Not suitable for use
Limited suitability
RecommendationRecommendation
Consider buying utensils which are identified as dishwasher-proof.
Use a mild detergent that is described as 'kind of dishes'. If necessary, seek further
information from detergent manufacturers.
For particular items, select a programme with as low a temperature.
To prevent damage, do not take glass and cutlery out of the dishwasher immediately
after the programme has ended.
Dishes and items of cutlery must not lie inside one another, or cover each other.
To avoid damage to glasses, they must not to be touched.
Long bladed knives stored in an upright position are a potential hazard!
Long and/or sharp items of cutlery such as carving knives must be positioned
horizontally in the basket.
Please do not overload your dishwasher. This is important for good results and for
reasonable energy consumption.
Load hollow items such as cups, glasses, pans etc, with the opening facing downwards so that
water cannot collect in the container or a deep base.
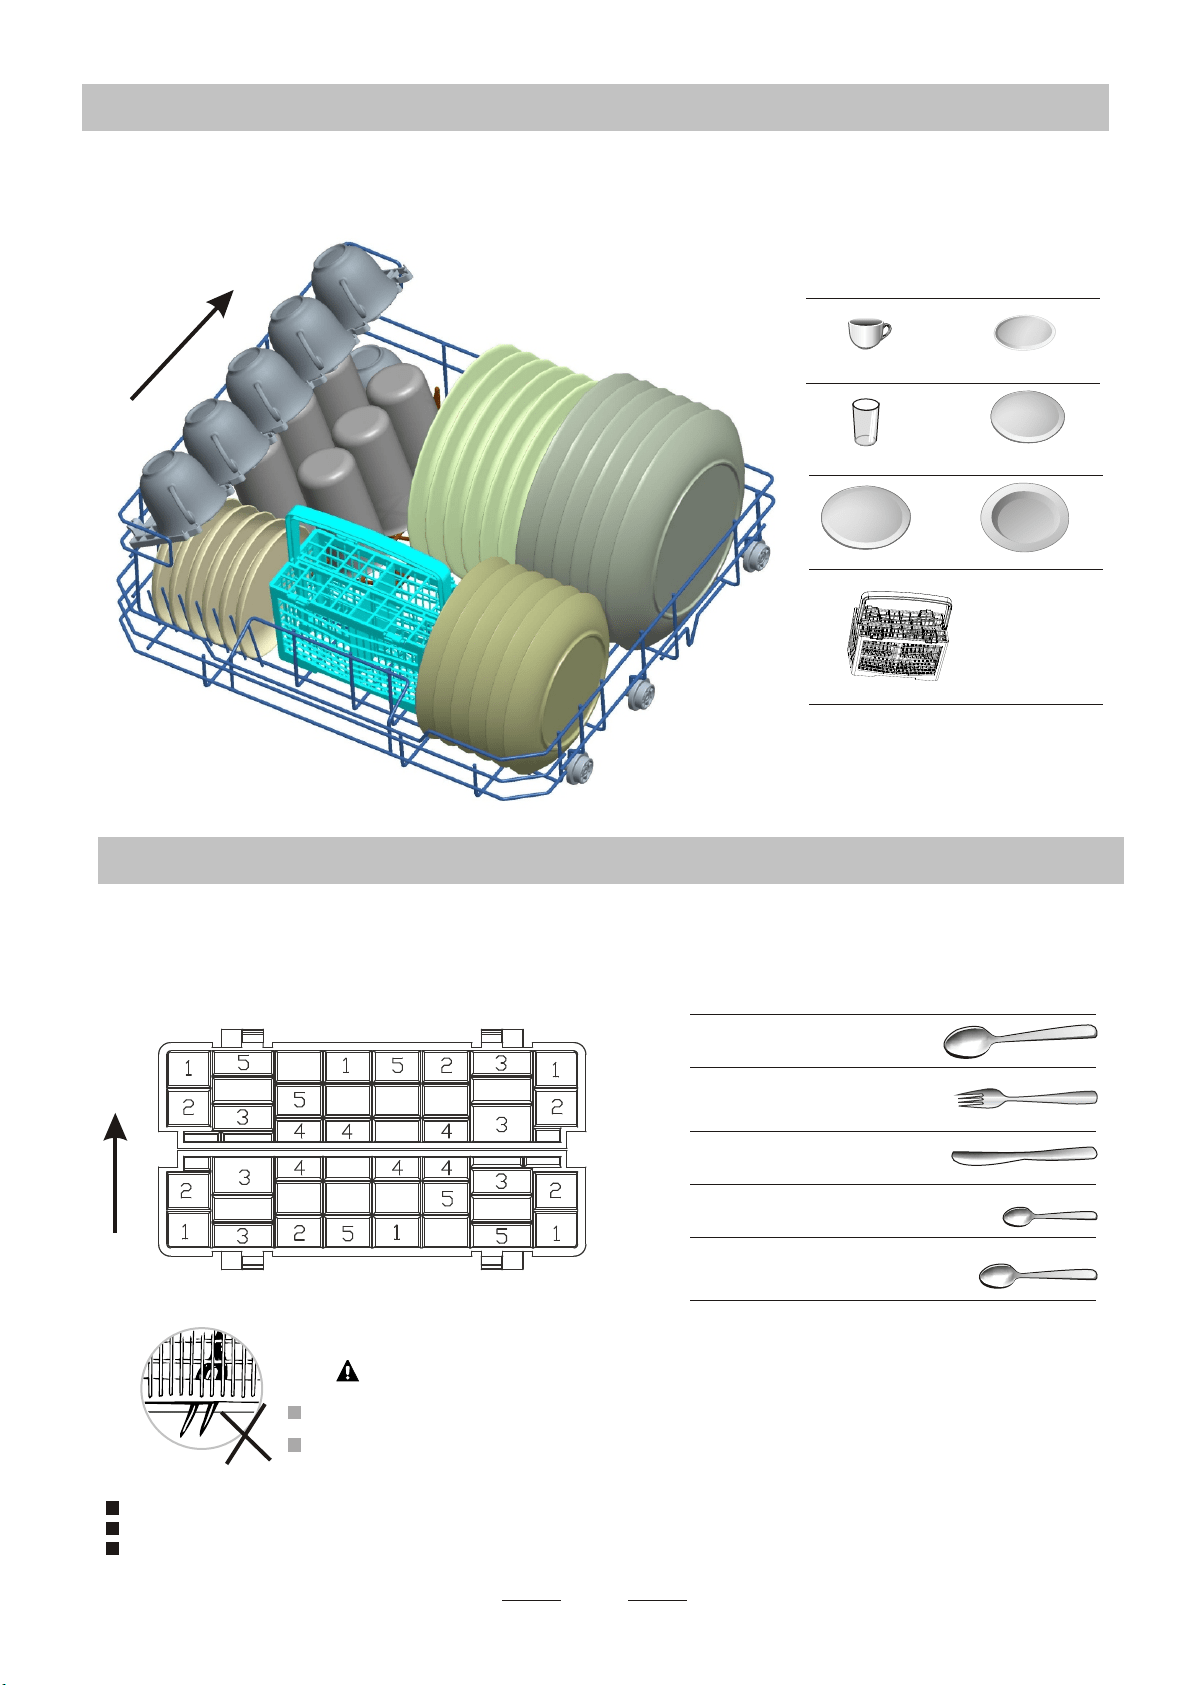
For the best performance of the dishwasher, follow these loading guidelines.
Features and appearance of baskets and cutlery baskets may vary from your model.
Scrape off any food particles. Soften remnants of burnt food in pans.
It is not necessary to rinse the dishes under running water.
Place objects in the dishwasher in following way:
1.Items such as cups, glasses, pots/pans, etc. are face downwards.
2.Curved items, or those with recesses, should be loaded at aslant so that water can run off.
3.All utensils are stacked securely and can not tip over.
4.All utensils are placed in the way that the spray arms can rotated freely during washing.
NOTE:NOTE:
Very small items should not be washed in the dishwasher as they could easily fall out of the basket.
Attention before or after loading the Dishwasher BasketsAttention before or after loading the Dishwasher Baskets
Position the dishes and cookware so that they do not get moved by the spray of water.
Loading the BasketLoading the Basket
8
11
66
33
77
44
55
22
IN
Saucers
2
3
Glasses
1
Cups
5
Dinner plates
6
Soup plates
Dessert dishes
4
7
Tea spoons
5
Soup spoons
2
Forks
1
Knives
4
3
Dessert spoons
Cutlery should be placed into the cutlery basket with handles at the bottom.
Cutlery BasketCutlery Basket
IN
Do not let any item extend through bottom.
Always load sharp utensils with the sharp point down!
WARNING!
For personal safety and a top quality clean, make sure place the silverware in the basket as follows:For personal safety and a top quality clean, make sure place the silverware in the basket as follows:
They do not nest together.They do not nest together.
Place silverware with handles-down.Place silverware with handles-down.
But place knives and other potentially dangerous utensils handles-up. But place knives and other potentially dangerous utensils handles-up.
Cutlery basket
6.Starting a washing programme6.Starting a washing programme
9
NOTE:NOTE:
Turning On the ApplianceTurning On the Appliance
1. Draw out the basket(see the section entitled Loading the Dishwasher basket ).
2. Pour in the detergent (see the section entitled Detergent and Rinse Aid ).
3. Insert the plug into the socket. The power supply is 220-240
VAC 50 HZ, the specification of the socket is 10 A 250 VAC.
4. Make sure that the water supply is turned on to full pressure.
5.Press the program button, the wash program will be changed as following direction:
ECO->Glass->90 min->Rapid->Intensive->Heavy;
If a program is selected, the corresponding light will be on. Then press the
Start/Pause button, the dishwasher begins to start.
When you press the Start/Pause button to pause during washing,
the program light will stop blinking and the dishwasher will sound
every minute unless you press the Start/Pause button to start.
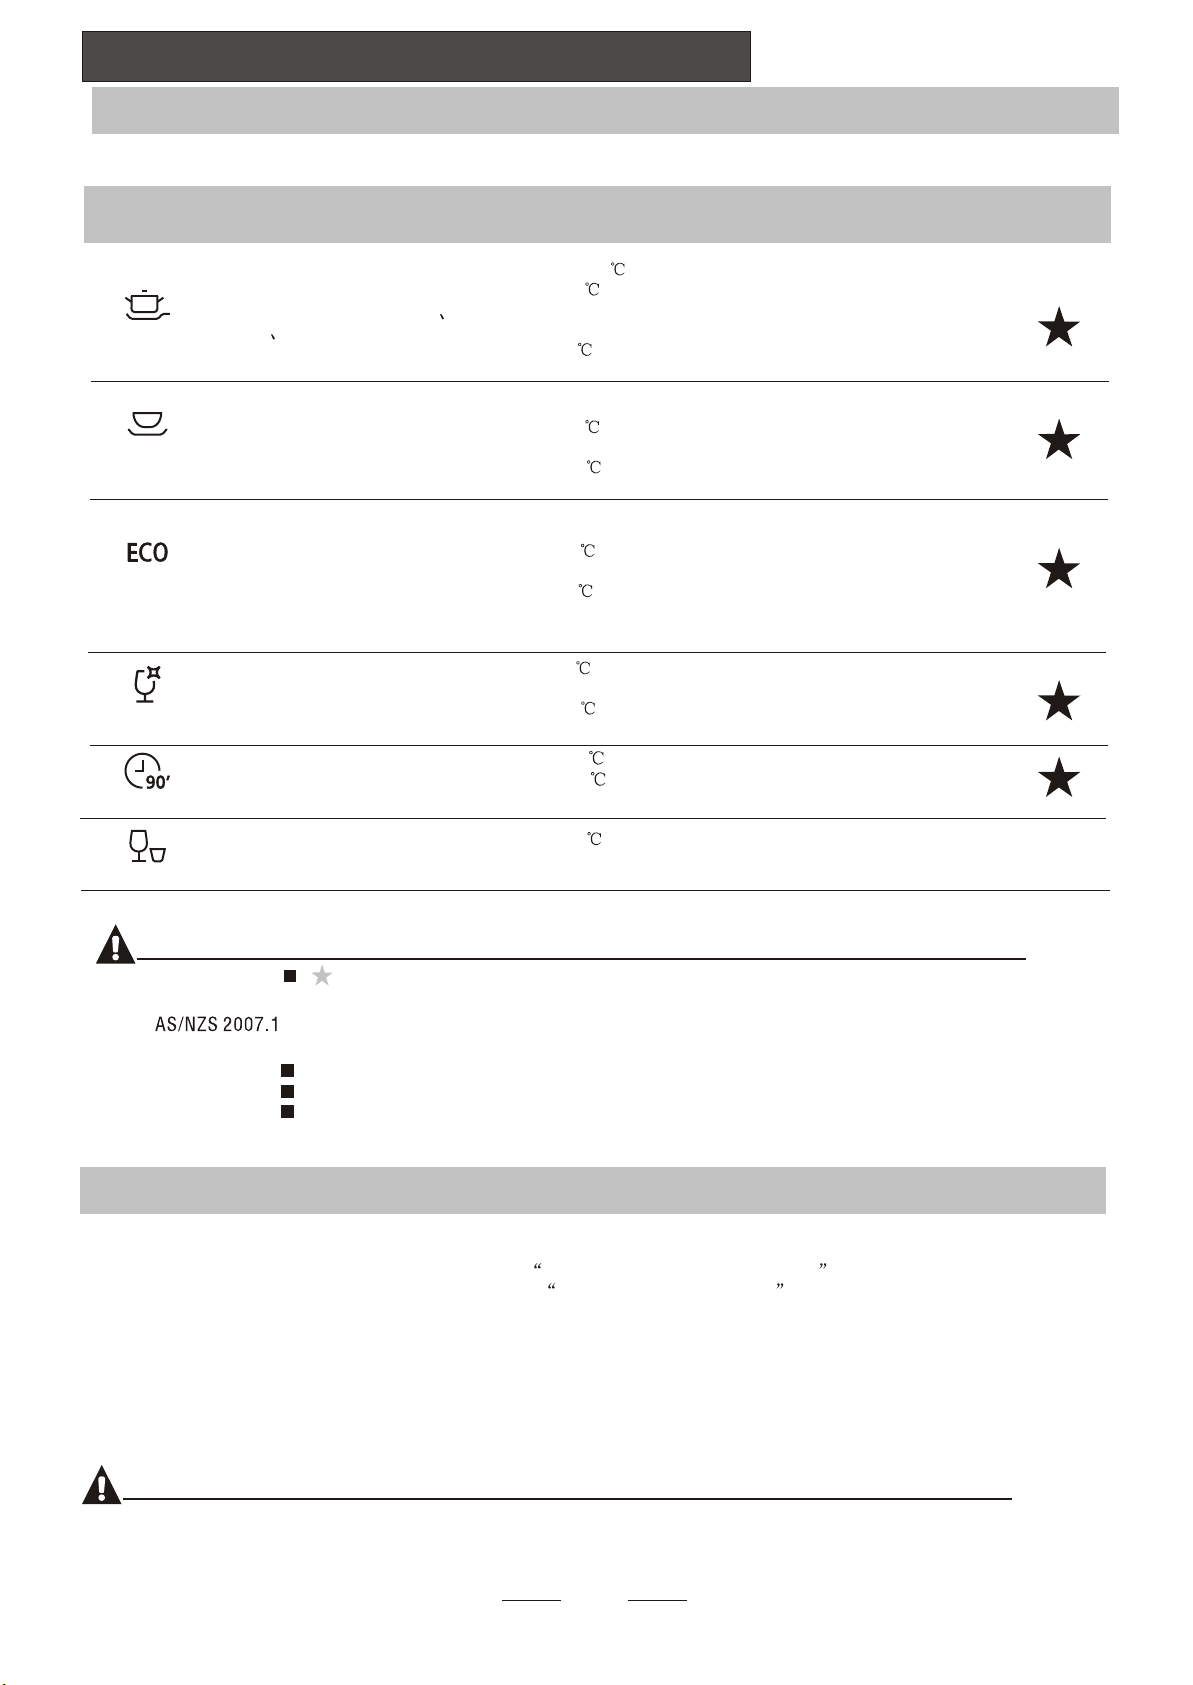
Wash Cycle TableWash Cycle Table
Means: need to fill rinse aid into the Rinse-Aid Dispenser.
( )
NOTE:NOTE:
* : This program is the test cycle. The information for comparability test
in accordance with AS/NZS 2007.1, as follows:
Capacity: 6 setting
Rinse aid setting: 6
Open the door slightly 50mm to assist in drying of the dishes after every wash
Starting a wash cycle
Detergent
pre/main
Cycle Selection
Information
Program
Running
time(min)
Energy
(Kwh)
Water
(l)
Description
o f Cycle
Rinse
Aid
For heavily soiled loads,
such as pots, plates, glasses
and lightly soiled pans.
For heaviest soiled crockery,
and normally soiled pots
pans dishes etc with dried
on soiling.
A shorter wash for lightly soiled
loads and quick wash.
For lightly soiled crockery
and glass.
Intensive
90 min
Rapid
Heavy
(* AS/NZS 2007. 1)
For normally soiled loads,
such as pots, plates, glasses
and lightly soiled pans.
standard daily cycle.
For lightly soiled loads,
such as glasses, crystal and
fine china.
Glass
5/17.5g
(1or2 pieces)
5/17.5g
(1or2 pieces)
5/17.5g
(1 pieces)
Pre-wash(50 )
Wash (55 )
Rinse
Rinse
Rinse(70 )
Drying
Pre-wash
Wash (60 )
Rinse
Rinse (70 )
Drying
Pre-wash
Wash (47 )
Rinse
Rinse(50 )
Drying
Wash (40 )
Rinse
Rinse
120
135
140
30
0.65
0.45
0.85
0.32
9.7
7.8
7.4
5.8
Wash(65 )
Rinse(70 )
Drying
90
7
0.65
22.5g
(1 pieces)
15g
22.5g
(1 pieces)
wash(45 )
Rinse
Rinse(60 )
Drying
70
0.45 6
10
When the working cycle has finished, the buzzer of dishwasher will sound 8 seconds, then stop. Turn off
the appliance using the Power button, shut off the water supply and open the door of the dishwasher.
Wait a few minutes before unloading the dishwasher to avoid scald, the dishes and utensils are still hot
and more susceptible to breakage. They will also dry better.
Switch Off the Dishwasher
1.Switch off the dishwasher by pressing the Power button.
2.Turn off the water tap.
Open the door carefully.
Hot dishes are sensitive to knocks. The dishes should be allowed to cool down around 15 minutes
before removing from the appliance.
Open the dishwasher's door, leave it ajar and wait a few minutes before removing the dishes. In this way they
will be cooler and the drying will be improved.
Unloading the dishwasher
It is normal that the dishwasher is wet inside.
Change the ProgramChange the Program
Forget to Add a Dish?Forget to Add a Dish?
, the machine will keep on working after 10 seconds.
If you open the door during washing, the machine will pause. When you close the door
NOTE:NOTE:
At the end of the Wash CycleAt the end of the Wash Cycle
A forgotten dish can be added any time before the detergent cup opens.
Add forgotten dishes.
Close the door
After the spray arms stop working, you can open the door
completely.
2
3
Open the door a little to stop the washing.
1
4
5
6
Premise:
Otherwise, the detergent may have already been
released, and the appliance may have already drained the wash water. In this
case, the detergent dispenser must be refilled (see the section entitled
"Detergent " ).
Press Start/Pause Button, then press the Program button more than three seconds the machine
will be in stand by state ,then you can change the program to the desired cycle setting (see
the section entitled " Starting a wash program ).
You can modify the washing program, If the dishwasher just
worked for a short time.
Press the start/pause button.
Press the start/pause button, the dishwasher will run
after 10 seconds.
WARNING! WARNING!
It is dangerous to open the door when washing,
because the hot water may scald you.
7.Maintenance and Cleaning7.Maintenance and Cleaning
The filter prevent larger remnants of food or other objects from getting inside the pump.
The filter system consists of a coarse filter, a flat (Main filter)
and a micro filter (fine filter).
Food and soil particles trapped by this filter are pulverized by a
special jet on the spray arm and washed down to drain.
Main filter
A
Larger items, such as pieces of bone or glass, that could block
the drain are trapped in the coarse filter. To remove the items
caught by this filter, gently squeeze the tap on the top of this
filter and lift it out.
Coarse filter
C
This filter holds soil and food residues in the sump area and
prevents it from being redeposited on the dishes during a cycle.
Fine filter
B
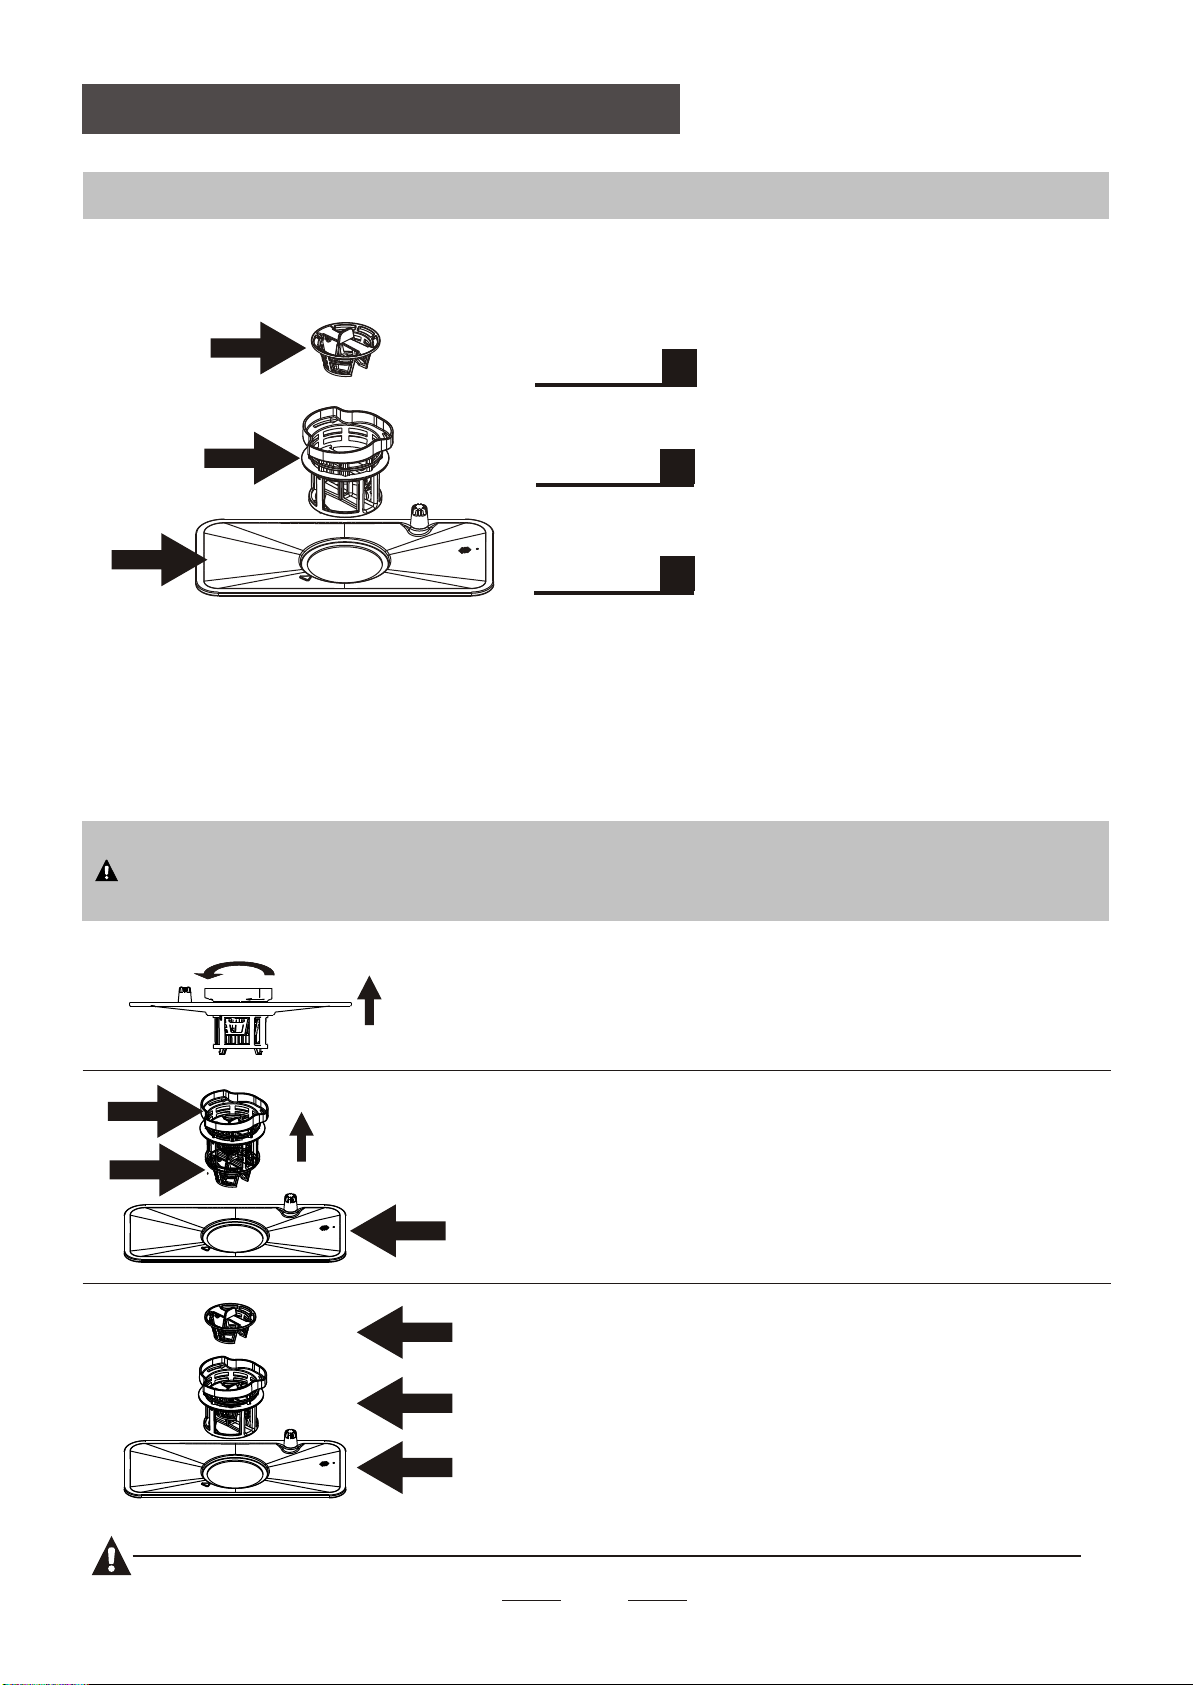
Filtering SystemFiltering System
Filter assembly
The filter efficiently removes food particles from the wash water, allowing it to be recycled during the cycle.
For best performance and results, the filter assembly must be cleaned regularly. For this reason, it is a good idea to
remove the larger food particles trapping in the filter after each wash cycle by rinsing the filter and cup under
running water. To remove the filter assembly, pull the cup handle in the upward direction.
WARNING! WARNING!
Never run the dishwasher without the filters in place.
The dishwasher must never be used without the filters.
Improper replacement of the filter may reduce the performance level of the appliance
and damage dishes and utensils.
the filter system will be installed.
If do it from step1 to step 3, the filter system will be removed; while if do it from Step 3 to Step 1,
NOTE:NOTE:
11
Step 1: Contrarotate the filter assembly(A,B and C),
then lift it all up.
OpenOpen
C
B
A
Step 2: Lift B and C up from A.
A
B
C
A
B
C
Step 3: Separate B and C.
The control panel can be cleaned by using a lightly dampened cloth. After cleaning, make sure to dry it thoroughly.
For the exterior, use a good appliance polish wax.
Never use sharp objects, scouring pads or harsh cleaners on any part of the dishwasher.
Protect Against F r e e z i n g
1. Cut off electrical power to the dishwasher.
2. Turn off the water supply and disconnect the water inlet pipe from the water valve.
3. Drain water from the inlet pipe and water valve(Use a pan to catch the water).
4. Reconnect the water inlet pipe to the water valve.
5. Remove the filter at the bottom of the tub and use a sponge to soak up water in the sump.
please take frost protection measures on the dishwasher in winter. Each time after washing cycles,
please operate as follows
Caring for the DishwasherCaring for the Dishwasher
- Inspect the filters for blocking after every time the dishwasher has been used.
- By unscrewing the coarse filter, you can remove the filter system.Remove any food remnants and
clean the filters under running water.
Notes:
Cleaning The Filter
Cleaning The Door
To clean the coarse filter and the fine filter, use a cleaning brush. Reassemble the filter parts as shown in the figures
on the last page and reinsert the entire assembly in the dishwasher, positioning in its seat and pressing downward.
The entire filter assembly should be cleaned once a week.
When cleaning the filters, don't knock on them. Otherwise, the filters could be
contorted and the performance of dishwasher could be decreased.
WARNING! WARNING!
NOTE:NOTE:
To clean the edge around the door, you should use only a soft warm,
damp cloth. To avoid penetration of water into the door lock and
electrical components, do not use a spray cleaner of any kind.
WARNING! WARNING!
Never use a spray cleaner to clean the door panel as it may damage the door lock
and electrical components.
Abrasive agents or some paper towel should not be used because of the risk of
scratching or leaving spots on the stainless steel surface.
12
NOTE:NOTE:
If your dishwasher cannot work because of the ice, please contact authorised service persons.
How to Keep Your Dishwasher in Shape
It is recommend that you run a wash cycle with the
dishwasher empty and then remove the plug from the
socket, turn off the water supply and leave the door of
the appliance slightly open. This will help the door
seals to last longer and prevent odours from forming
within the appliance.
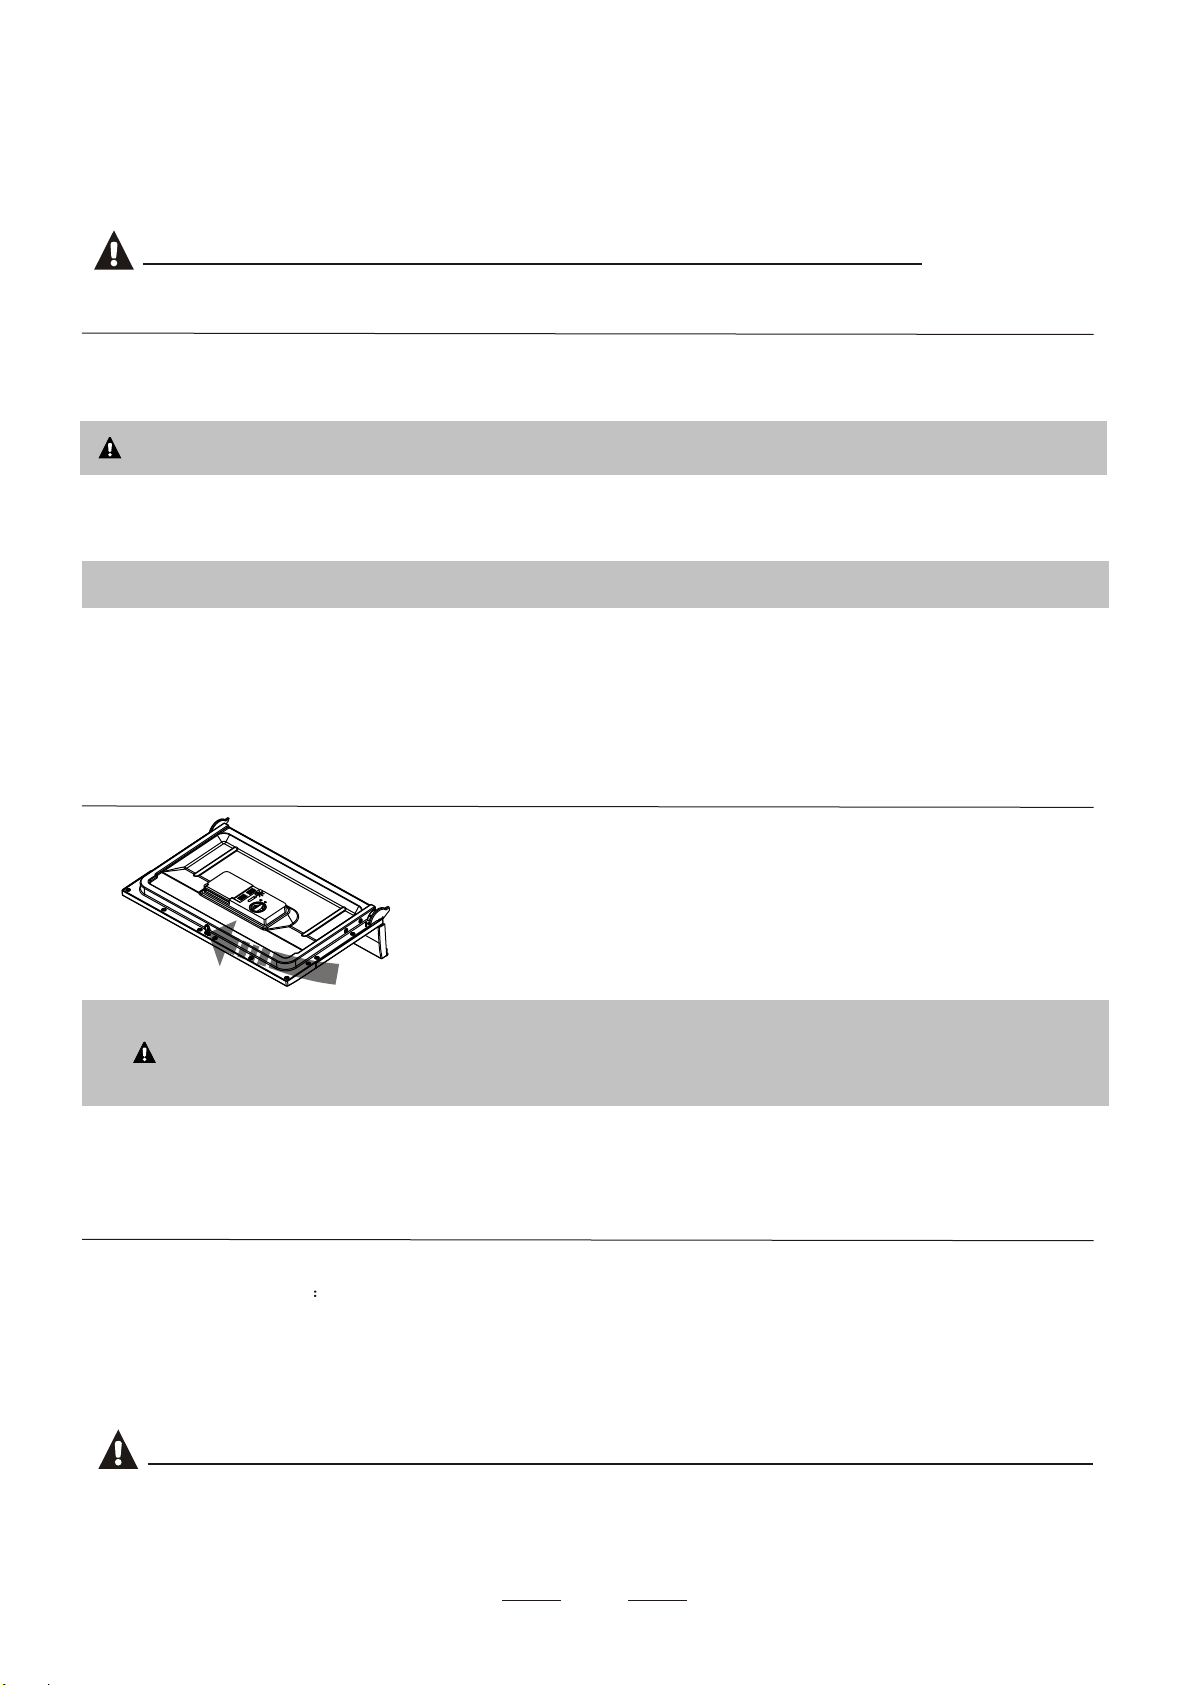
If the appliance must be moved, try to keep it in the
vertical position. If absolutely necessary, it can be
positioned on its back.
One of the factors that cause odors to form in the
dishwasher is food that remains trapped in the seals.
Periodic cleaning with a damp sponge will prevent this
from occurring.
8.Installation instruction8.Installation instruction
After every wash, turn off the water supply to the
appliance and leave the door slightly open so that
moisture and odors are not trapped inside.
Before cleaning or performing maintenance, always
remove the plug from the socket.
To clean the exterior and rubber parts of the dishwasher,
do not use solvents or abrasive cleaning products.
Only use a cloth with warm soapy water.
To remove spots or stains from the surface of the
interior, use a cloth dampened with water with a little
vinegar, or a cleaning product made specifically for
dishwashers.
After Every Wash
Remove the Plug
No Solvents or Abrasive Cleaning
Moving the Appliance
Seals
When not in use for a long time
13
The installation of the pipes
and electrical equipments
should be done by qualified
professionals.
Warning
Electrical Shock Hazard
Disconnect electrical power
before installing dishwasher.
Failure to do so can result in
death or electrical shock.
Attention:
The installation position of dishwasher should be near the existing water inlet tap and
drain outlet and power socket.
One side of the cabinet sink should be chosen to facilitate the connection of drain
hoses of the dishwasher.
Installation preparationInstallation preparation
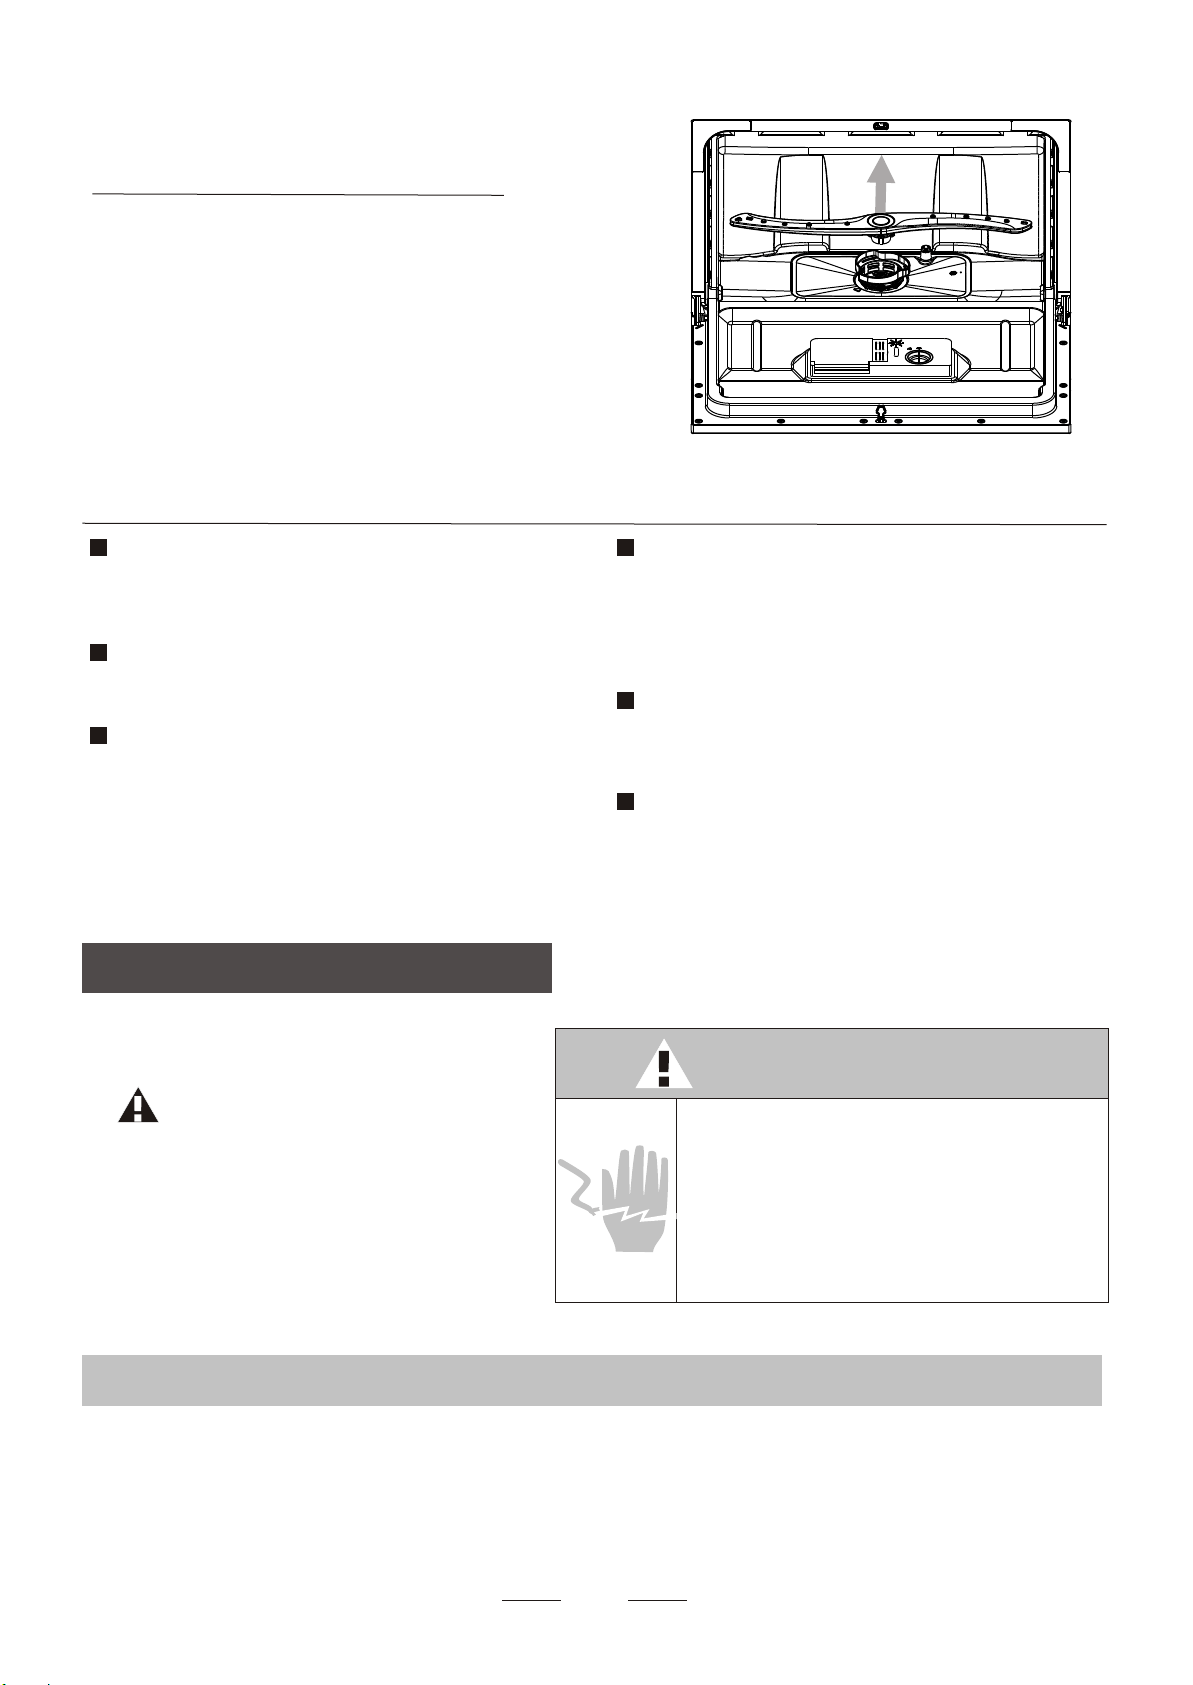
Cleaning the Spray Arms
The spray arms can be easily removed for periodic cleaning
of the nozzles to prevent possible clogging. Wash them
under running water and carefully replace them in their seats,
checking that their rotary movement is in no way impeded.
Grasp the middle of the spray arm, pull it upwards to remove
it. Wash the arm under a jet of running water and replace it
carefully to its seat. After reassembly, check that the spray
arms rotate freely. Otherwise, check that they have been
installed correctly.
14
Electrical Requirements
Ensure the voltage and frequency of the power being corresponds to
those on the rating plate. Only insert the plug into an electrical socket which is earthed
properly. If the electrical socket to which the appliance must be connected is not
appropriate for the plug , replace the socket, rather than using a adaptors or the like as
they could cause overheating and burns.
Electrical Connection
Insure proper ground
exists before use
Please look at the rating label to know the rating voltage and connect the dishwasher to the appropriate power supply.
Use the required fuse 10 amp, time delay fuse or circuit breaker recommended and provide separate circuit serving
only this appliance.
Positioning the AppliancePositioning the Appliance
and the sides, along the adjacent cabinets or wall. The dishwasher is equipped with water supply
Position the appliance in the desired location. The back should rest against the wall behind it,
and drain hoses that can be positioned to the right or the left to facilitate proper installation.
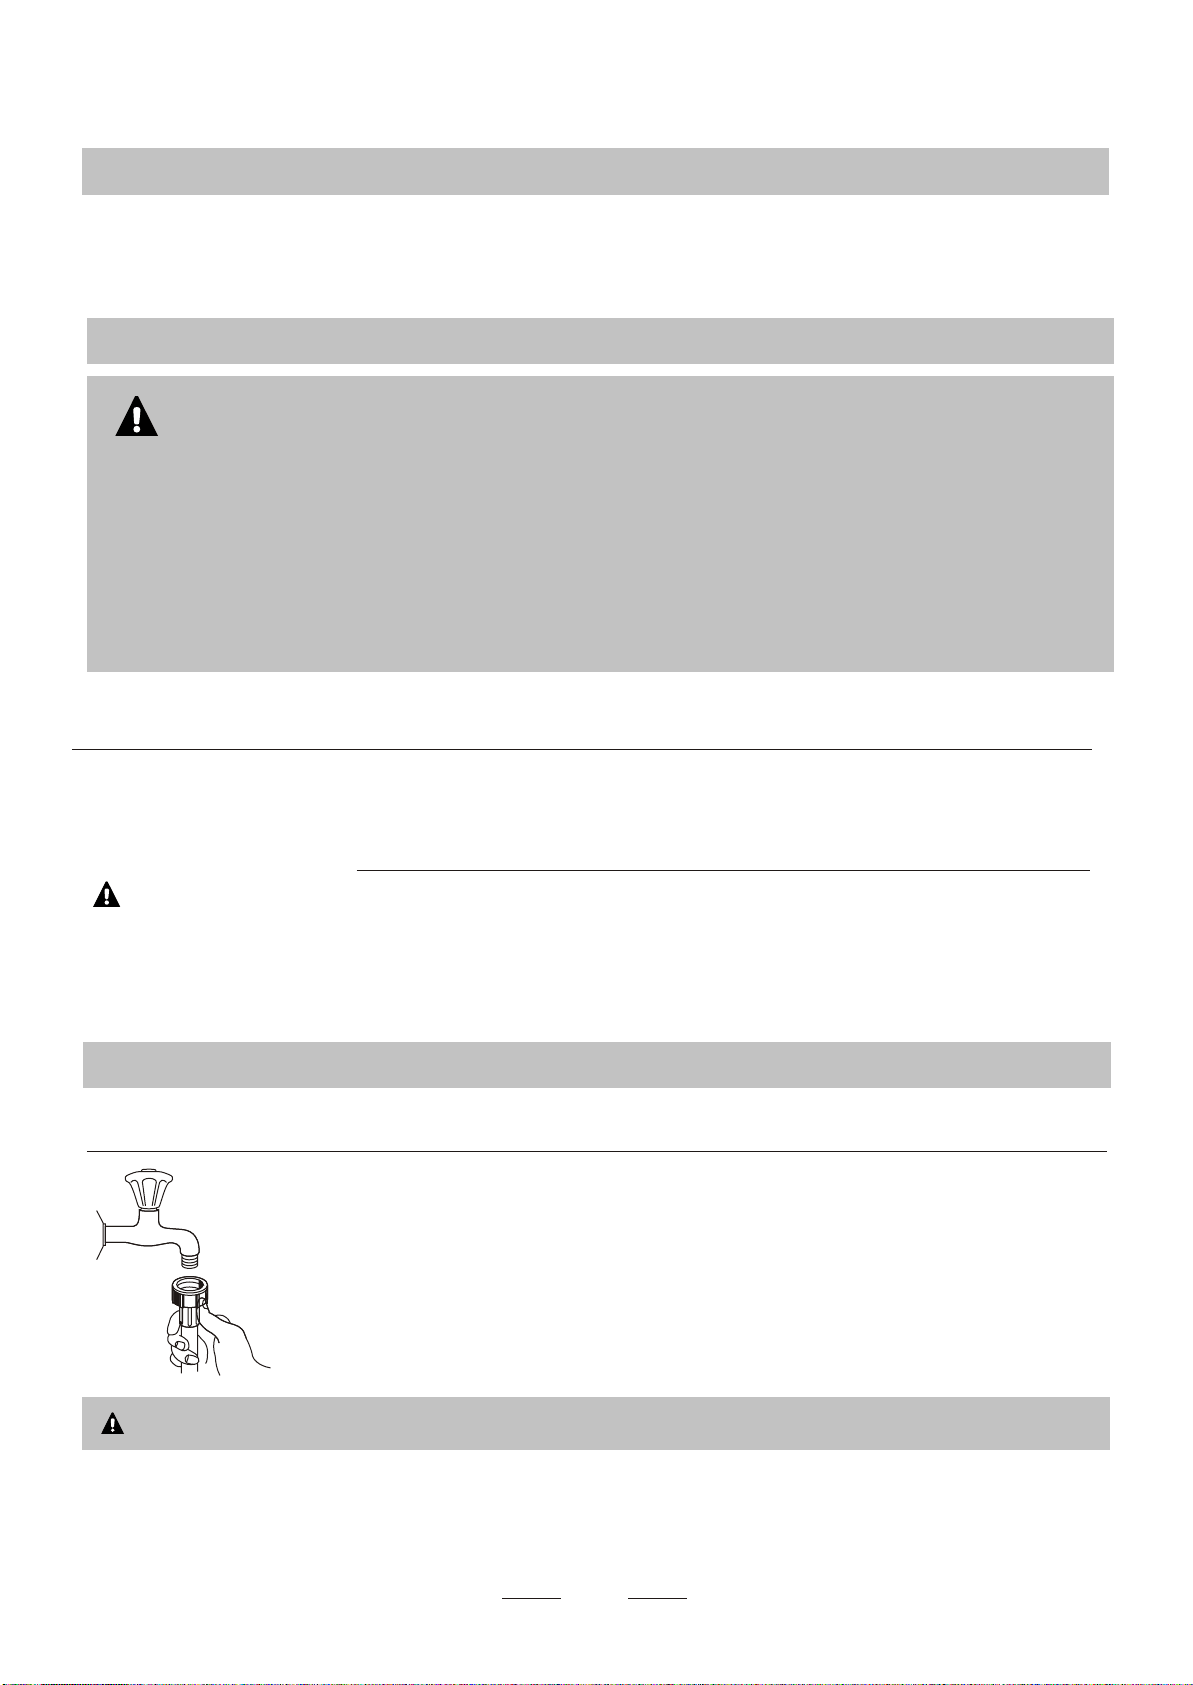
Cold Water Connection
Connect the cold water supply hose to a threaded 3/4(inch) connector and make sure
that it is fastened tightly in place. If the water pipes are new or have not been used for
an extended period of time, let the water run to make sure that the water is clear and
free of impurities. If this precaution is not taken, there is a risk that the water inlet can
get blocked and damage the appliance.
Please note: If the supplied hose cloes not fit your tap, please contact your local plumbing
supply center where adapters are available for purchase.
please close the hydrant after using.
WARNING! WARNING!
Water ConnectionWater Connection
About Power ConnectionAbout Power Connection
WARNING! WARNING!
For personal safety:
Do not use an extension cord or an adapter plug
with this appliance.
Do not cut or remove the earthing under any
circumstances.
Connection from the power cord.
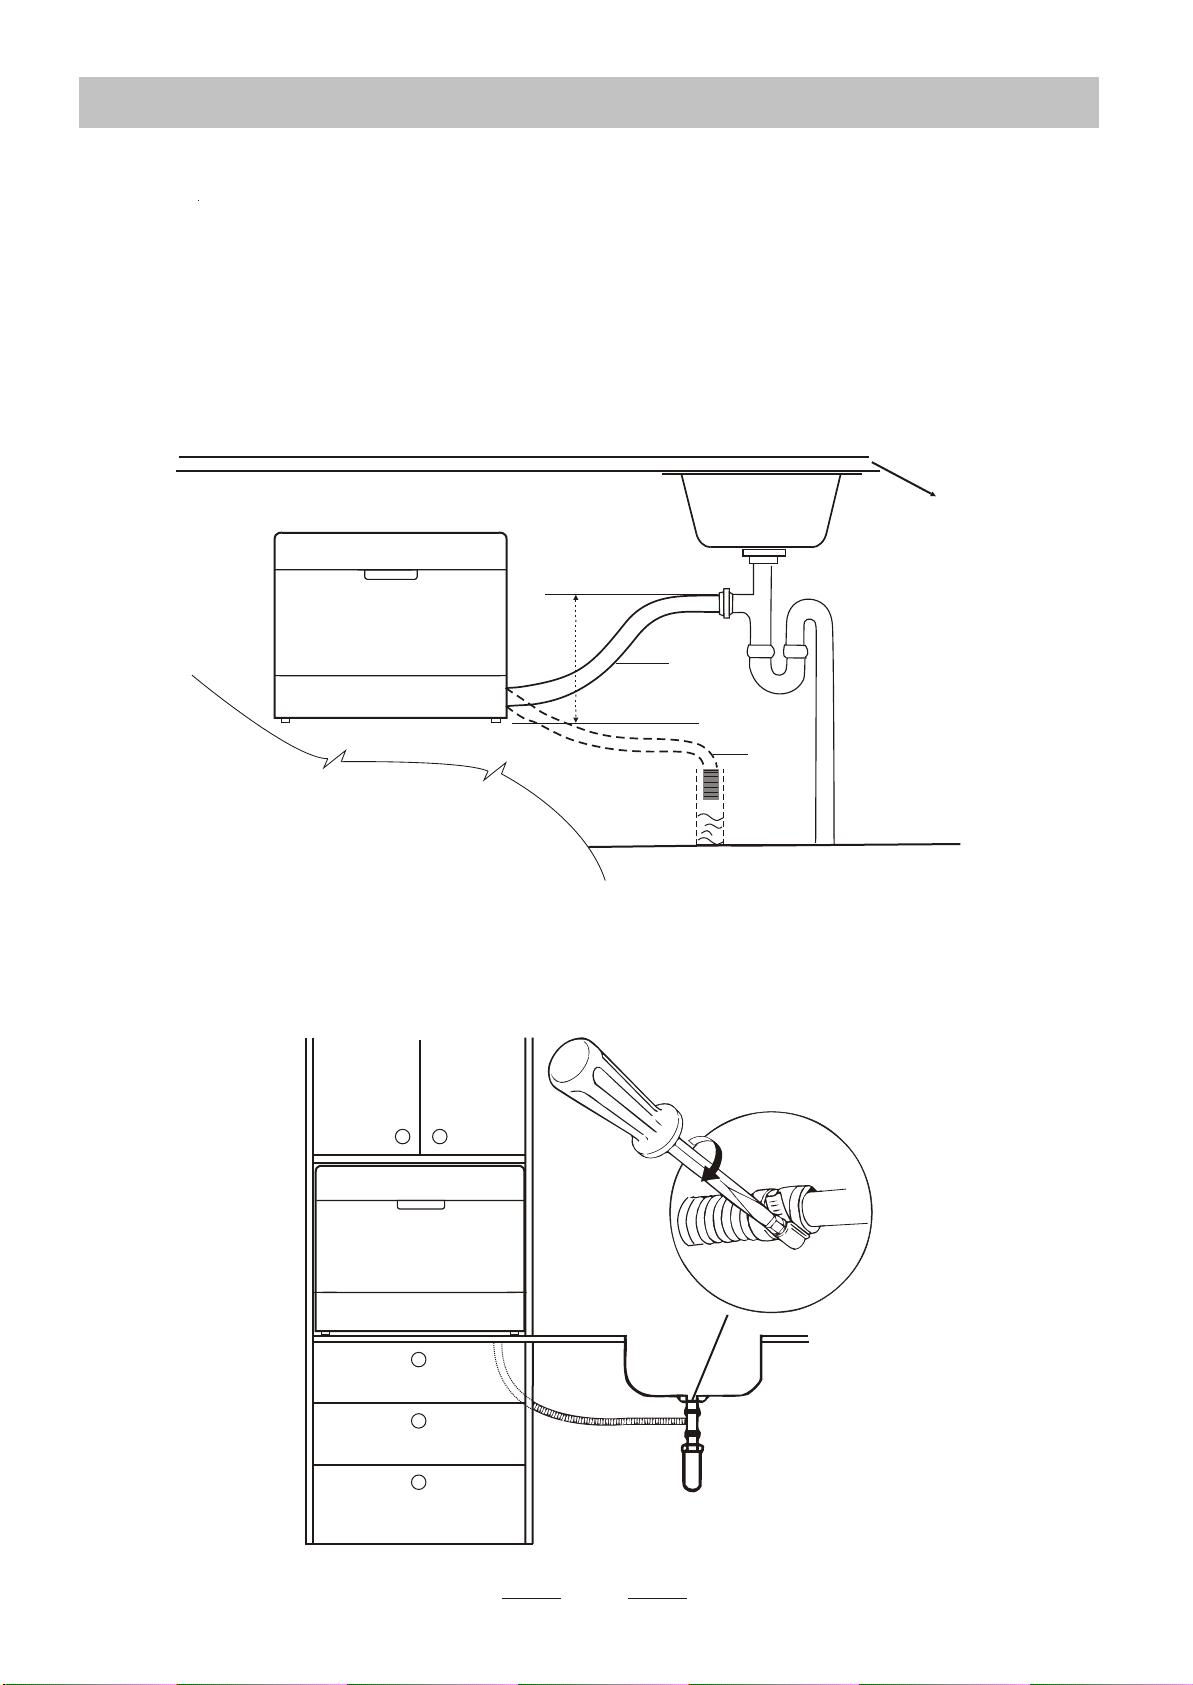
Connection of drain hosesConnection of drain hoses
Insert the drain hose into a drain pipe with a minimum diameter of 4cm, or let it
run into the sink, making sure to avoid bending or crimping it. The free end of the
hose must be at a height lower than 30 cm and must not be immersed into water to
avoid the backflow of it.
15
NOTE
The top of the hose must be less than 300mm.
MAX 300mm
Counter
Front
Drain pipe
B

16
If the sink is more than 300mm higher than the floor, the excess water in hoses cannot be drained directly
into the sink. It will be necessary to drain excess water from hoses into a bowl or suitable
container that is held outside and lower than the sink.
Connect the water drain hose. The drain hose must be correctly fitted to avoid water leaks.
Ensure that the water drain hose is not kinked or squashed.
If you need a drain hose extension, make sure to use a similar drain hose.
It must be no longer than 4 metres, otherwise the cleaning effect of the dishwasher could be reduced.
Water Outlet
Extension Hose
How to Drain Excess Water From Hoses
Start of dishwasherStart of dishwasher
The following things should be checked before starting the dishwasher.
1. The dishwasher is level and fixed properly.
2. The inlet valve is open.
4. The wires are tightly connected.
5. The power is switched on.
6. The inlet and drain hoses are not knotted.
7. All packing and print materials should be taken out of the dishwasher.
Attention:Attention:
The content of this manual is very helpful to the users.
After installation, please make sure to keep this manual.
3. Inlet hose connections are fully tightened and not leaking.

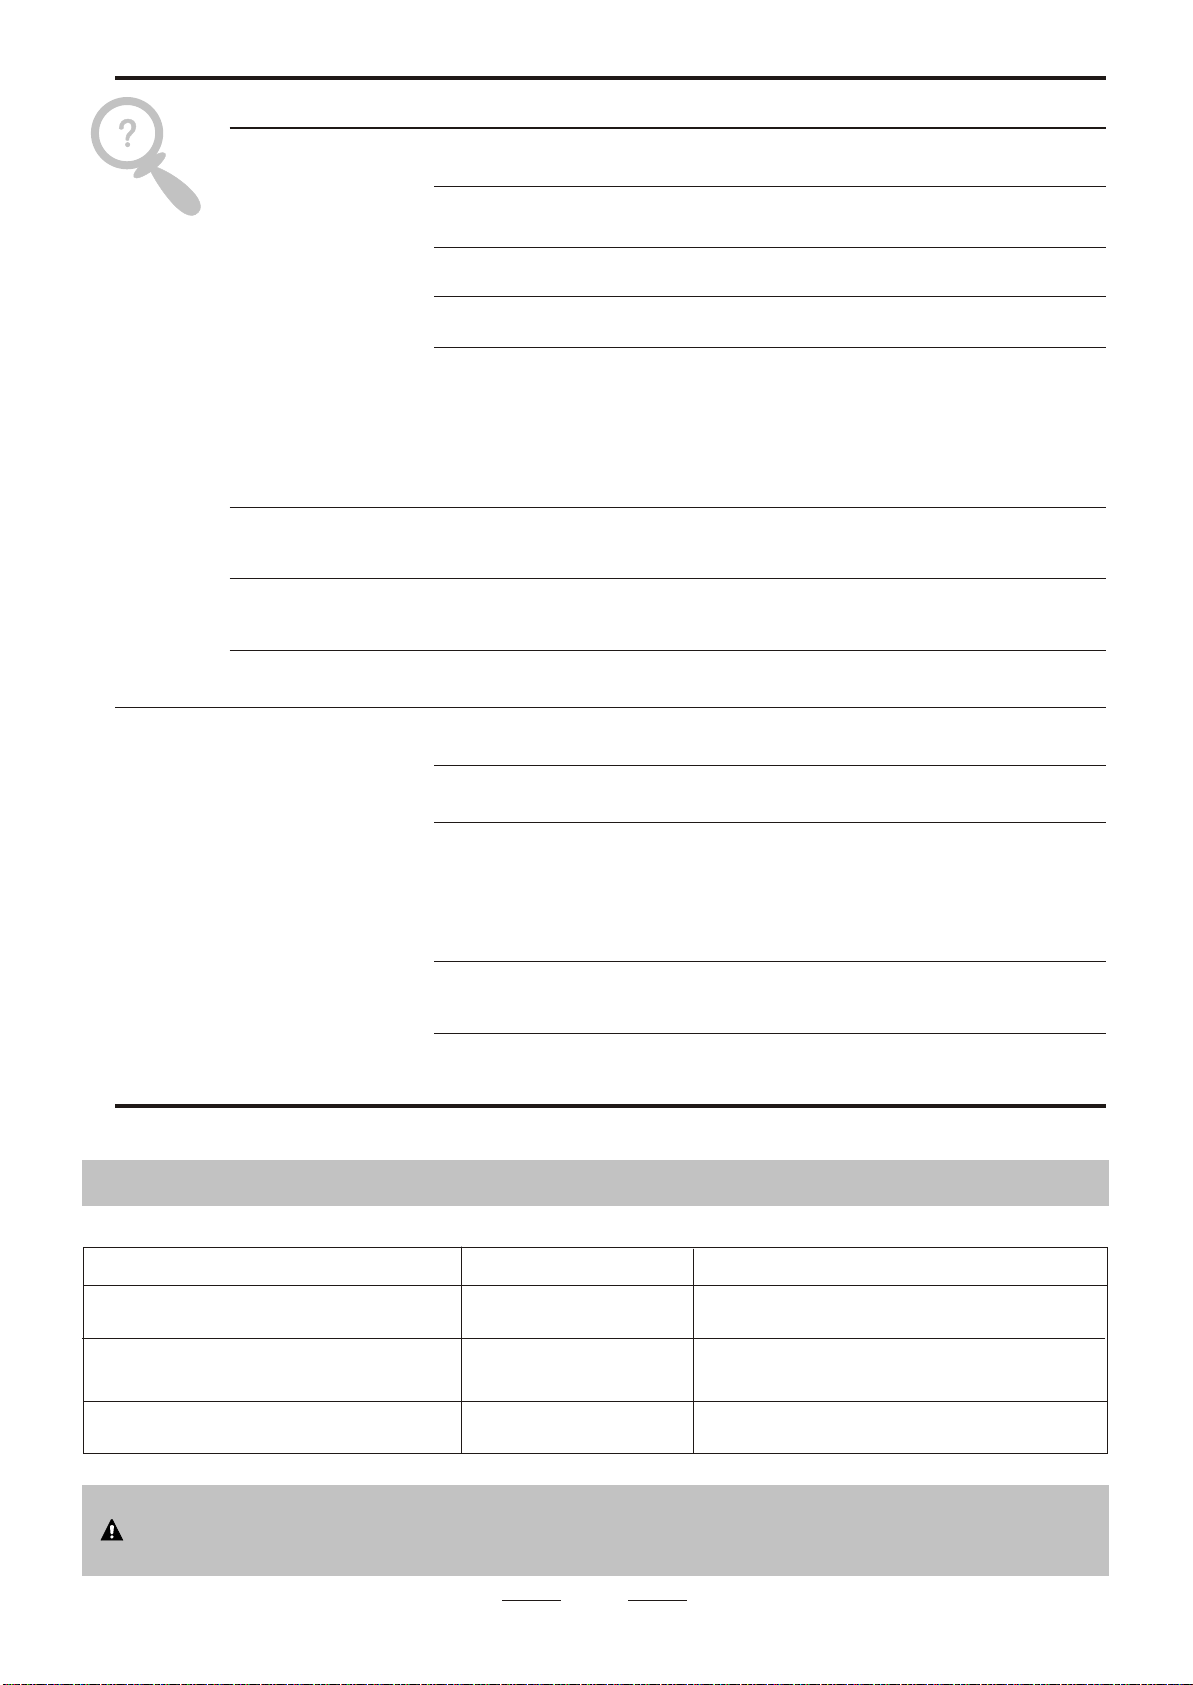
9.Troubleshooting Tips9.Troubleshooting Tips
Problem Possible Causes What To Do
Fuse blown, or the
circuit breaker tripped.
Replace fuse or reset circuit breaker. Remove any other
appliances sharing the same circuit with the dishwasher
Suds in the tub
Spilled rinse-aid
Always wipe up rinse-aid spills immediately.
Review the charts on the following pages may save you from calling for service.
White film on
inside surface
There are rust
stains on cutlery
Knocking noise
in the wash cabinet
Rattling noise
in the wash cabinet
Knocking noise
in the water pipes
Hard water minerals
The affected items are
not corrosion resistant.
The spray arm is
knocking against
an item in a basket.
Item of crockery
are loose
in the wash cabinet.
This may be caused
by on-site installation
or the cross-section of
the piping.
To clean the interior, use a damp sponge with
dishwasher detergent and wear rubber gloves.
Never use any other cleaner than dishwasher
detergent for the risk of foaming or suds.
Interrupt the programme, and rearrange the items
which are obstructing the spray arm.
Interrupt the program,
and rearrange the items of crockery.
This has no influence on dishwasher function.
if in doubt, contact a suitably qualified plumber.
Stained tub interior
Detergent with
colourant was used.
Make sure that the detergent is the one without
colourant.
Improper detergent
Dishwasher doesn t
start
'
Make sure the dishwasher is turned on and the door is
closed securely.
Make sure to close the door property and latch it.
Make sure the power cord is properly plugged into the
wall socket.
Power supply is not
turned on.
Door of dishwasher
not properly closed.
Water not pumped
from dishwasher
Kink in drain hose
Filter clogged.
Kitchen sink clogged.
Check drain hose.
Check the coarse filter.
(see section titled " Cleaning The Filter ")
Check kitchen sink to make sure it is draining well.
If the problem is the kitchen sink not draining, you may
need a plumber rather than a serviceman for dishwasher.
Use only the special dishwasher detergent to avoid
suds. If this occurred, open the dishwasher and let suds
evaporate. Add 1 gallon of cold water to the tub. Close
and latch the dishwasher, then Start any wash cycle
to drain out the water. Repeat if necessary.
Before Calling for Service Before Calling for Service
17
Technical
problems
General
problems
Noise
The items should be corrosion resisitant.
Problem Possible Causes What To Do
The dishes were not
loaded correctly.
See notes in " Loading the Dishwasher Baskets ".
The dishes
are not clean
Cloudiness
on glassware
Black or gray
marks on dishes
Detergent left in
dispenser cups
The dishes
are not drying
Select a more intensive programme.
See" Wash Cycle Table ".
Use more detergent, or change your detergent.
Rearrange the items so that the sprayer can rotate freely.
Clean and/or fit the filter combination correctly.
Clean the spray arm jets. See "Cleaning the Spray
Arms".
Use less detergent if you have soft water and select
a shortest cycle to wash the glassware and to get
them clean.
Use a mild abrasive cleaner to eliminate those marks.
Re-loading the dishes properly.
Load the dishwasher as suggested in the directions.
Increase the amount of rinse-aid/Refill the rinse-aid
dispenser.
Do not empty your dishwasher immediately after
washing. Open the door slightly so that the steam can
escape. Begin unloading the dishwasher only once the
dishes are barely warm by touching.
In short program the rinse temperature is lower.
Choose a program with a high rinse temperature.
Water drainage is more difficult with these items.
Cutlery or dishes of this type are not suitable for
washing in the dishwasher.
The program was
not powerful enough.
Not enough detergent
was dispensed.
Items are blocking
the path of spray arms.
The filter combination
is not clean or
is not correctly fitted.
This may cause
the spray arm jets
get blocked.
Combination of soft
water and too much
detergent.
Aluminum utensils
have rubbed against
dishes.
Dishes block
detergent cups opens.
Improper loading
Too little rinse-aid
Dishes are removed
too soon.
Wrong program
selection
Using cutlery with
a low-quality coating
Error CodesError Codes
When some malfunctions occur, the appliance will display error codes to warn you:
WARNING! WARNING!
If overflow occurs, turn off the main water supply before calling a service.
If there is water in the base pan because of an overfill or small leak,
the water should be removed before restarting the dishwasher.
18
Unsatis
-factory
washing
result
Unsatis
-factory
drying
result
Meanings
Possible Causes
Longer inlet time.
Faucets is not opened, or water intake is restricted,
or water pressure is too low.
Some element of dishwasher leaks .
Overflow.
Malfunction of heating element .
Not reaching required
temperature.
Codes
The rapid light flicker fleetly
The Rapid and 90Min light flicker fleetly
The Glass light flicker fleetly
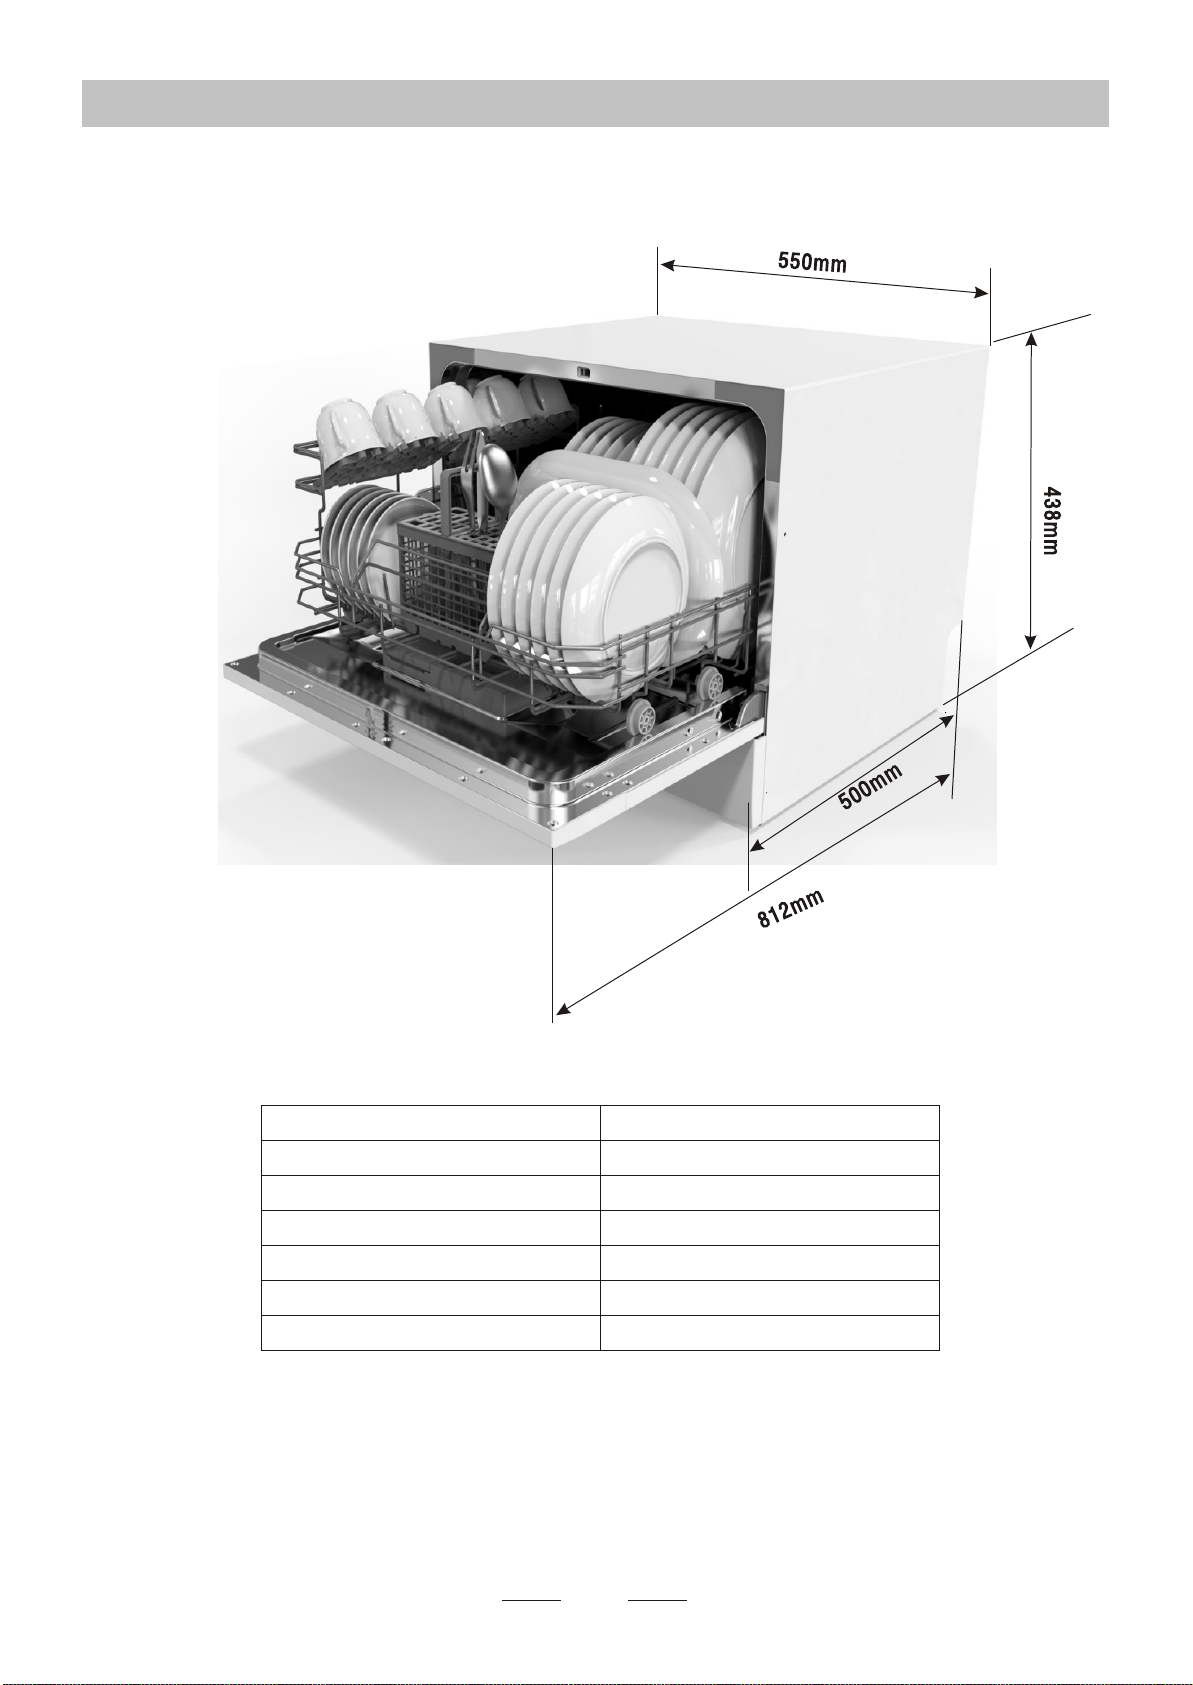
Technical InformationTechnical Information
19
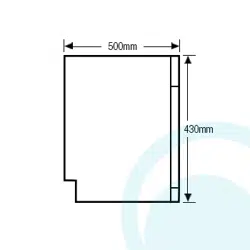
Height : 438mm
Width : 550mm
Depth : 500mm
Voltage connected Load : see rating label
Water pressure: 0.04-1.0MPa
Power supply: see rating label
Capacity: 6 Place settings

ILVE LIMITED WARRANTY
Eurolinx Pty Limited A.B.N. 50 001 473 347 trading
as ILVE (“ILVE”)
Oce: 48-50 Moore Street, Leichhardt N.S.W 2040
Post: Locked Bag 3000, Annandale, N.S.W 2038
P: 1300 MY ILVE (694 583)
WARRANTY REGISTRATION
Your ongoing satisfaction with your ILVE product is
important to us. We ask that you complete the enclosed
Warranty Registration Card and return it to us so that
we have a record of the ILVE products you purchased.
Alternatively you can register on line (see registration
card for details)
PRIVACY
ILVE respects your privacy and is committed to
handling your personal information in accordance with
the National Privacy Principles and the Privacy Act 1988
(Cth). A copy of the ILVE Privacy Policy is available at
www.ilve.com.au. ILVE will not disclose any personal
information set out in the Warranty Registration Card
(“Personal Information”) without your consent unless
required by:
1. law;
2. any ILVE related company;
3. any service provider which provide services to ILVE
or assist ILVE in providing services (including repair
and warranty services) to customers. Our purpose in
collecting the Personal Information is
to keep a record of the ILVE product purchased by you,
in order to provide a better warranty service to you in
the unlikely event that there is a problem with your ILVE
product. ILVE may contact you at any one or more of
the address, email address or telephone numbers set
out in the Warranty Registration Card. Please contact
ILVE on 1300 694 583 should you not wish to be
contacted by ILVE.
WARRANTY
1. Warranty
ILVE warrants that each ILVE product will remain, for
a period of twenty four (24) months computed from
the date of purchase of the ILVE product, free from
defects arising in the manufacture of the ILVE product
(“Warranty”). Except for consumer guarantees set
out in the Competition and Consumer Act 2010 (Cth)
(“Act”), ILVE does not make any further warranties or
representations in relation to ILVE products.
2. What is not Covered by the Warranty.
The Warranty does not apply if an ILVE product is
defective by a factor other than a defect arising in the
manufacture of the ILVE product, including but not
limited to:
(a) damage through misuse (including failure to
maintain, service or use with proper care), neglect,
accident or ordinary wear and tear (including
deterioration of parts and accessories and glass
breakage);
(b) use for purpose for which the ILVE product was not
sold or designed;
(c) use or installation which is not in accordance with
any specied instructions for use or installation;
(d) use or operation after a defect has occurred or been
discovered;
(e) damage through freight, transportation or handling in
transit (other than when ILVE is responsible);
(f ) damage through exposure to chemicals, dusts,
residues, excessive voltage, heat, atmospheric
conditions or other forces or environmental factors
outside the control or ILVE;
(g) repair, modication or tampering by the purchaser or
any person other than ILVE, an employee of ILVE or an
authorised ILVE service contractor;
(h) use of parts, components or accessories which have
not been supplied or specically approved by ILVE.
(i) damage to surface coatings caused by cleaning or
maintenance using products not recommended in the
ILVE product handbook provided to the purchaser upon
purchase of the ILVE product;
(j) damage to the base of an electric oven due to items
having been placed on the base of the oven cavity or
covering the base, such as aluminium foil (this impedes
the transfer of heat from the element to the oven cavity
and can result in irreparable damage); or
(k) damages, dents or other cosmetic imperfections not
aecting the performance of the ILVE in respect of an
ILVE product purchased as a “factory second” or from
display. The Warranty does not extend to light globes
used in ILVE products.
3. Domestic Use
Each ILVE product is made for domestic use. This
Warranty may not extend to ILVE products used for
commercial purposes; under those circumstances the
warranty period is limited to 3 month.
4. Time for Claim under the Warranty
You must make any claim under this Warranty within
twenty eight (28) days after the occurrence of an event
which gives rise to a claim pursuant to the Warranty, by
booking a service call on the telephone number below.
5. Proof of Purchase
Customers must retain proof of purchase in order to be
eligible to make a warranty claim in respect of an ILVE
product.
Continued over...

6. Claiming under the Warranty
Customers will bear the cost of claiming under this
Warranty unless ILVE determines the expenses are
reasonable, in which case the customer must claim
those expenses by providing written evidence of
each expense to ILVE at the address on the Warranty
Registration Card.
7. Statutory Rights
(a) These terms and conditions do not a ect your
statutory rights.
(b) The limitations on the Warranty set out in this
document do not exclude or limit the application of the
consumer guarantees set out in the Act or any other
equivalent or corresponding legislation in the relevant
jurisdiction where to do so would:
(i) contravene the law of the relevant jurisdiction; or
(ii) cause any part of the Warranty to be void.
(c) ILVE excludes indirect or consequential loss of any
kind (including, without limitation, loss of use of the
ILVE product) and (other than expressly provided for in
these terms and conditions) subject to all terms,
conditions and warranties implied by custom, the
general law, the Act or other statute.
(d) The liability of ILVE to you for a breach of any
express or non-excludable implied term, condition or
warranty is limited at the option of ILVE to:
(i) replacing or repairing the defective part of the ILVE
product;
(ii) paying the cost of replacing or repairing the defective
part of the ILVE product;
(iii) replacing the ILVE product; or
(iv) paying the cost of replacing the ILVE product.
(e) Our goods come with guarantees that cannot be
excluded under the Australian Consumer Law.
You are entitled to a replacement or refund for a major
failure and for compensation for any other reasonably
foreseeable loss or damage. You are also entitled to
have the goods repaired or replaced if the goods fail
to be of acceptable quality and the failure does not
amount to a major failure.
8. Defects
Any part of an ILVE product deemed to be defective and
replaced by ILVE is the property of ILVE. ILVE reserves
the right to inspect and test ILVE products in order to
determine the extent of any defect and the validity of a
claim under the Warranty.
*To locate your closest ILVE authorised service agent
eurolinx.com.au or visit
http://ilve.com.au/support/service/
IMPORTANT!
All warranty service calls must be booked via
the customer care department. The team can
be contacted on 1 300 85 64 11 option 1 or
customercare@eurolinx.com.au
Service is delivered through a network of Service
Agents. If the Appliance is located outside our
normal Service Area of our agents you, t he
Customer will need to bear the cost of travel outside
that area.
If you are unable to provide proof of purchase, the
fault is not covered under warranty or the product
is found to be working to specication you may be
required to bear the full cost of the service visit
08042016
ILVE LIMITED WARRANTY
Please complete and send to ilve at: REPLY PAID 83617
LEICHHARDT NSW
2040
Last Name: First Name:
Address:
State: Postcode: Email:
Home Phone: Mobile:
Purchase Date:
/ / (Please attach proof of purchase to validate warranty)
MODEL NUMBER
SERIAL NUMBER
(if you cannot locate the serial number please call ILVE on 1300 85 64 11)
1
2
3
4
WARRANTY REGISTRATION CARD
08042016
please contact ILVE on 1300 694 583, customercare@
01052015
facebook.com/ILVEappliances
twitter.com/ILVE_appliances
youtube.com/ILVEappliances
livewithilve.com
You can now find us on:
NOTES
ILVE.COM.AU
ILVE Dishwasher Installation and Operating Instructions template pages.indd 7 1/05/2015 9:16 am

Australia National Telephone Number 1300 MYILVE (694 583)
New Zealand Telephone Number 0508 458 369
ILVE showrooms are open daily from 9am-5pm and Saturdays 10am-4pm
(WA by appointment only on Saturdays)
ilve.com.au
NSW & ACT (Head Oce)
48-50 Moore Street
Leichhardt
F 02 8569 4699
VIC, TAS & SA
1211 Toorak Road
Camberwell
F 03 9809 2155
QLD
1/42 Cavendish Road
Coorparoo
F 07 3397 0850
WA & NT
Unit 10/55 Howe Street
Osborne Park
F 08 9201 9188
New Zealand
PO Box 11.160
Sockburn Christchurch
F 03 344 5906
ILVE Dishwasher Installation and Operating Instructions template pages.indd 8 1/05/2015 9:16 am