Loading ...
Loading ...
Loading ...
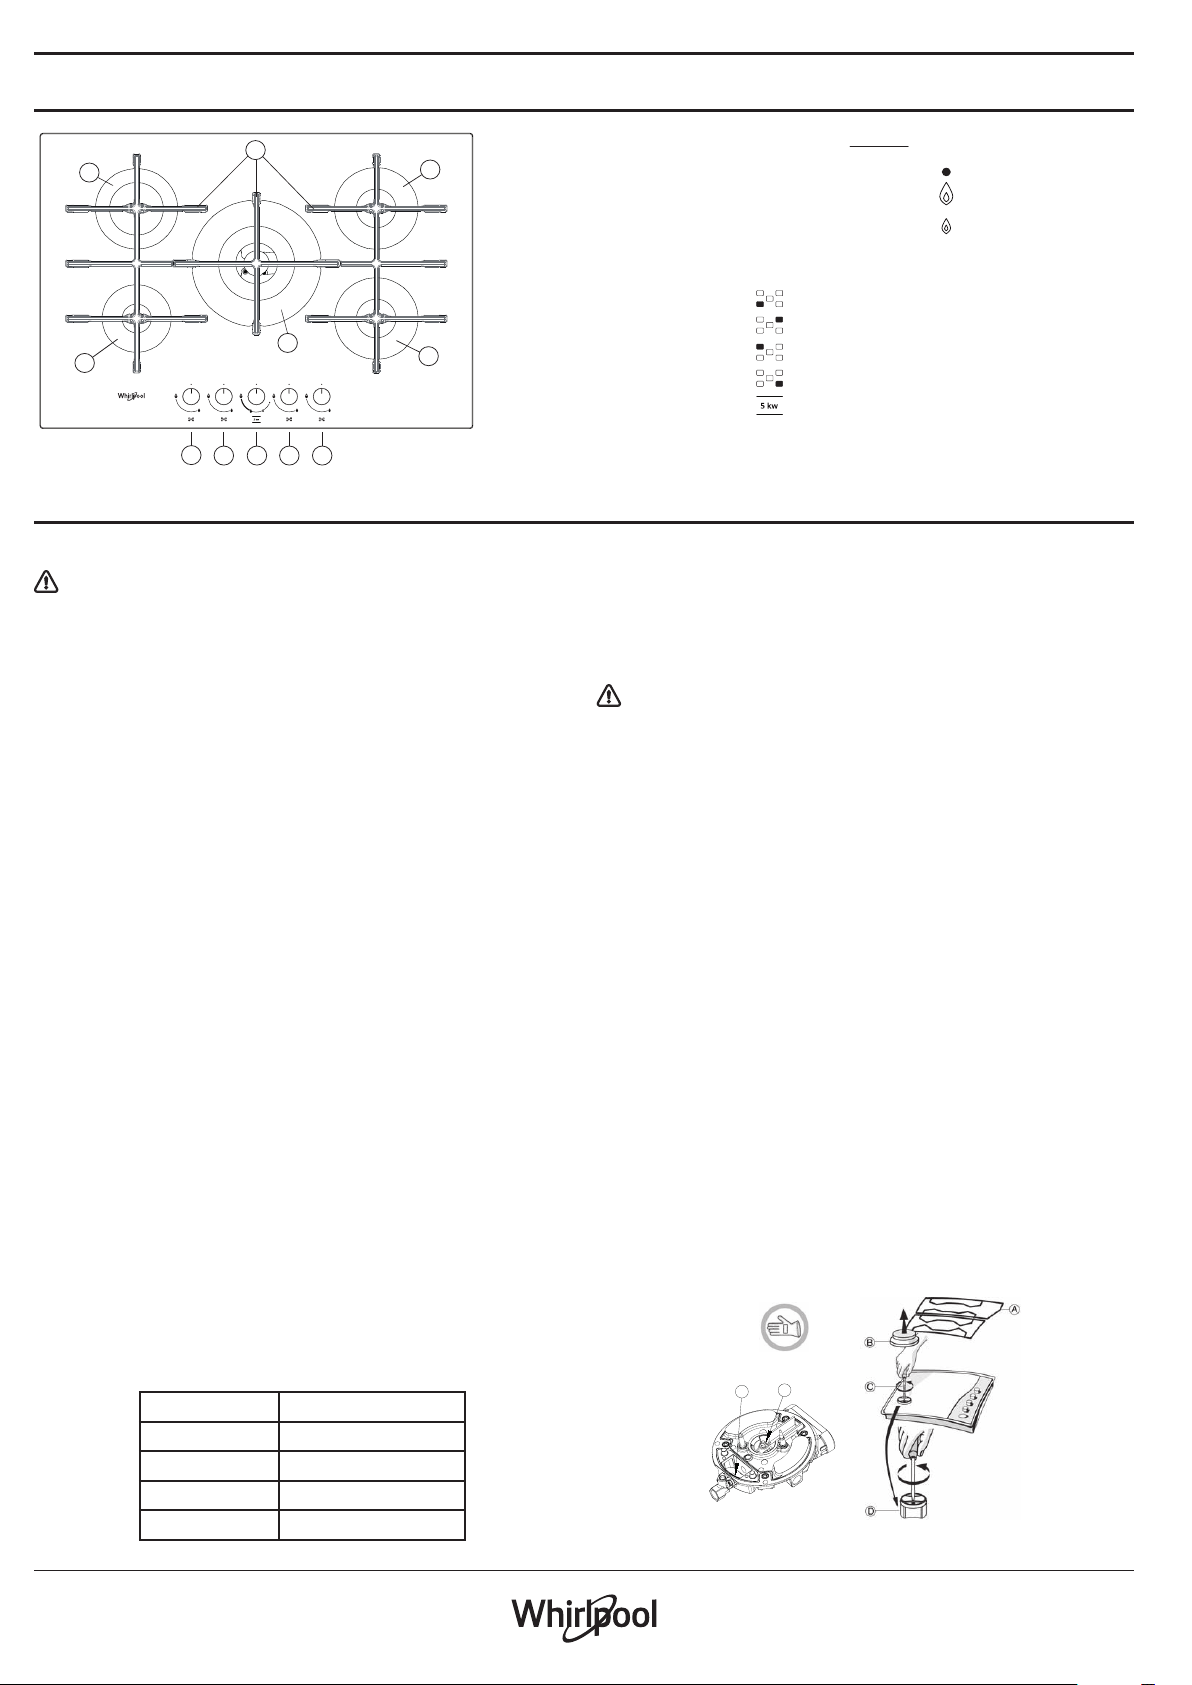
PRODUCT DESCRIPTION
HOW TO USE THE HOB
Do not let the burner ame extend beyond the edge of the pan.
IMPORTANT: when the hob is in use, the entire hob area may become
hot.
• To ignite one of the burners, turn the relative knob anti-clockwise to
the maximum ame setting.
• Press the knob against the control panel to ignite the burner.
• After the burner has ignited, keep the knob pressed for about 5-10
seconds to allow proper device operation.
• This burner safety device shuts o the gas supply to the burner if
the ame goes out accidentally (because of sudden draught, an
interruption in the gas delivery, boiling over of liquids, etc.).
• The knob must not be pressed for more than 15 sec. If, after that
time has elapsed, the burner does not remain lit, wait at least
one minute before trying to light it again.
NOTE: should particular local conditions of the delivered gas
make the ignition of burner dicult, it is advisable to repeat the
operation with the knob turned to small ame setting.
The burner might go out when the knob is released. This means that
the safety device has not warmed up enough. In this case, repeat the
operations described above.
PRATICAL ADVICE FOR USING THE BURNERS
This hob has burners of dierent diameters. For better burner performance,
please stick to the following rules:
• use pots and pans with bottoms the same width as that of the burners
or slightly larger (see table on the right);
• only use at-bottomed pots and pans;
• use the correct amount of water for cooking foods and keep the pot
covered;
• make sure pots on the grates do not protrude beyond the edge of
the hob;
• In the case of pans with convex bottoms (WOK), use the support grille
(not provided), which should be positioned only on the multi-ring
burner.
• Avoid accidentally knocking the hob with pans,racks or other kitchen
utensil.
• Do not leave empty steak grills over the lit burner for longer than 5
minutes
IMPORTANT: improper use of the grids can result in damage to the
hob: do not position the grids upside down or slide them across
the hob.
BURNER POT Ø
DCC From 24 to 26 cm
Rapid From 24 to 26 cm
Semi-rapid From 16 to 22 cm
Auxiliary From 8 to 14 cm
Do not use:
• cast iron griddles, ollar stones, terracotta pots and pans;
• heat diusers such as metal mesh, or any other types;
• two burners simultaneously for one receptacle (e.g. sh kettle).
Liquids spilled on hot hob area can cause glass damage.
ADAPTING TO DIFFERENT TYPES OF GAS
This operation must be performed by a qualied technician.
If the appliance is intended to operate with a dierent gas from the gas
type stated on the rating plate and information label on the top of the
hob, change the injectors.
Remove the information label and keep it with the instructions booklet.
Use pressure regulators suitable for the gas pressure indicated in
the Instruction:
• the gas injector must be changed by After Sales Service or a qualied
technician;
• injector not supplied with the appliance must be ordered from After
Sales Service;
• adjust the minimum setting of the taps.
NOTE: when liquid petroleum gas is used (G30/G31), the minimum
gas setting screw must be tightened as far as it will go.
IMPORTANT: should you experience diculty in turning the
burners knobs, please contact the After Sales Service for the
replacement of the burner tap if found to be faulty.
IMPORTANT: when gas cylinder is adopted, the gas cylinder or gas
container must be properly settled (vertical orientation).
REPLACING THE INJECTORS see the injector table in the Safety
instructions
• Remove grids (A).
• Extract burners (B).
• Using a socket spanner of the appropriate size unscrew the injector
(C), unscrew the injector to be replaced.
• Replace it with the injector suitable for the new type of gas.
• Re-assemble the injector in (D).
• If you have a multiple crown burner use side spanner to replace the
injector (E-D).
D
E
DAILY USE
1. Removable panstand grids
2. Auxiliary burner
3. Semi-rapid burner
4. Rapid burner
5. Semi-rapid burner
6. DCC
7. Auxiliary burner control knob
8. Semi-rapid burner control knob
9. Rapid burner control knob
10.Semi-rapid burner control knob
11. DCC control knob
Symbols
Shaded circle
Large ame
Small ame
Tap closed
Maximum opening/delivery
and electric ignition
Minimum opening
or reduced delivery
11 108
9
7
2
3
6
5
4
1
Loading ...
Loading ...