User Manual
Use of Water, Dispenser Drawer, Detergent, Bleach and Softener
Using Water
Amount of WATER LEVEL
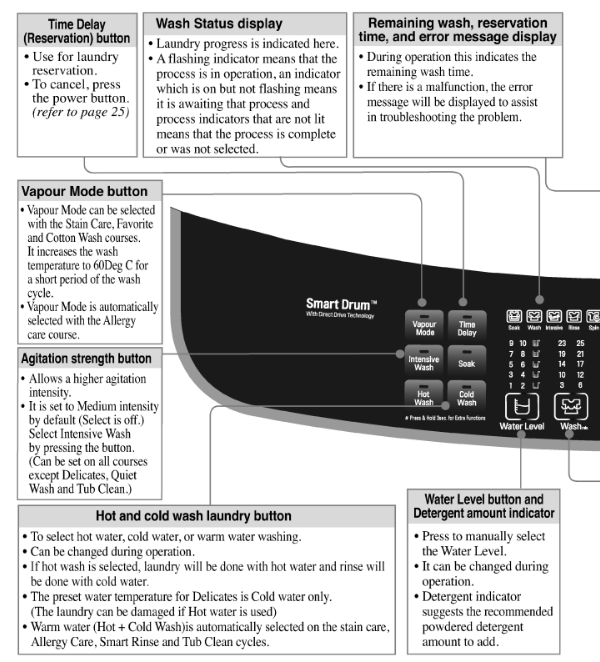
- This machine detects the weight of the of laundry automatically, then sets the Water Level and indicates the recommended amount of detergent to be added by the detergent level indicator.
- When you select a wash program, the Water Level will be shown on the control panel.
- The following table shows the amount of water.
- When the Water Level is automatically detected, it may differ depending on the quantity of laundry even though the same Water Level is indicated on the control panel.
NOTE
[ Minimum water amount ]
The washer has the ability to detect the weight of the clothes to determine the appropriate water level, but cannot detect the volume of clothes, therefore it will be necessary to increase the water level manually to avoid linting and tangling when washing bulky light weight loads.
Water Temperature
- The machine sets the appropriate temperature automatically according to the wash program.
- The temperature of the water impacts the effectiveness of all laundry additives and therefore, the cleaning results. We recommend temperatures of:
- HOT 49-60°C White items, nappies underclothing and heavily soiled, colorfast items.
- WARM 29-40°C Most items
- COLD* 18-24°C Only very bright colors with light soil.
- When washing in COLD water additional steps may be needed:
- Adjust Detergent amount and pre-dissolve Detergent in WARM water
- Pretreat spots and stains
- Soak heavily soiled items
- Use appropriate bleach
* Temperature below 18°C will not activate laundry additives and may cause linting & soap residue, poor cleaning, etc. In addition, Detergent manufactures and care labels define COLD water as 26-29°C. If the temperature of the water in the tub is too cold for your hands, the Detergent will not activate and clean effectively.
NOTE: If iron is present in the water the clothes may become an all-over yellow or they may be stained with brown or orange spots or streaks. Iron is not always visible. Installation of a water softener or an iron filter may be necessary for severe cases
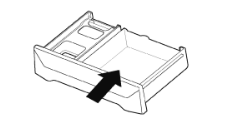
Using Dispenser Drawer
Using the Dispenser Drawer
- Liquid Fabric Softener
- Liquid or Powder Low-Sudsing. High-Efficiency Detergent
The dispenser automatically dispenses additives at the proper time in the wash cycle.
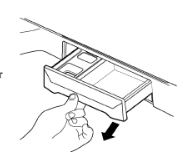
- Slowly open the dispenser drawer by pulling the drawer out until it stops.
- After adding laundry products, slowly close the dispenser drawer. Closing the drawer too quickly could result in early dispensingtif additives.
- Avoid overfilling or splashing when adding laundry products to the dispenser. Doing so could result in early dispensing of laundry products.
At the end of the cycle, you may see water the compartments. This is part of the normal operation of the washer
NOTE: Do not use bleach in the dispenser drawer Powdered detergent should only be used the soup dispenser compartment For optimum results, it may be necessary to dilute the Liquid Fabric softener before adding it to the softener dispenser
Using Detergent
Detergent
Follow the Detergent package directions. Using too little Detergent is a common cause of laundry problems.
Use more Detergent if you have hard water, large loads, greasy or oily soils or lower Water Temperature.
Choosing the right Detergent
We recommend the use of domestic Detergent, (powder, liquid or concentrated). Soap flakes or granulated soap powders should not be used in your washing machine. When washing woolens remember to use Detergent suitable for washing woolens.
How much Detergent
The correct amount of Detergent will vary depending on the amount of soil in your clothes (Jeans and work clothes may need more Detergent, while bath towels usually need less.).
For liquid and concentrated Detergents, follow the recommendations of the Detergent manufacturer.
Note: To check that you are using the correct amount of Detergent, lift the lid of your machine about half-way through the wash. There should be a thin layer of foam over the surface of the water. Lots of foam may look good, but it does not contribute to cleaning your clothes. No foam means not enough Detergent has been used; soil and lint can settle back on the clothes or the washing machine. If excess Detergent is used, the rinse will not be as clean and efficient. Also, it could cause environmental pollution, so use it accordingly.
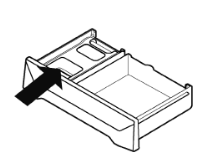
Adding Detergent
Add measured powdered detergent to the detergent compartment of the dispenser drawer.
The dispenser drawer MUST ALWAYS be in place before you start your washer
Detergent usage may need to be adjusted for water temperature, water hardness, size and soil level of the load. Avoid using too much detergent in your washer, as it can lead to oversudsing and detergent residue being left on the clothes.
Note: Using Liquid detergent
- Dilute Liquid detergent with water and pour into the tub, start the cycle.
- Delay wash course is not available if you use liquid detergent.

Attention: Using liquid detergent without diluting, or leaving laundry for a long time after pouring diluted liquid detergent into the tub might cause damage, bleaching or discoloration of the clothes.
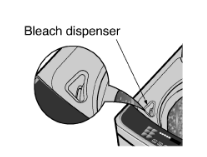
Using Liquid Bleach
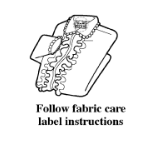
- Check clothing care label for special instructions and separate the laundry to be bleached
- Dilute liquid chlorine bleach.
- Measure the recommended amount of liquid bleach carefully following instructions on the bottle.
- Before starting the washer, pour measured amount of bleach directly into bleach dispenser. Avoid splashing or overfilling. Powdered bleach should be mixed with water before pouring.
NOTE
- Never pour undiluted liquid bleach directly onto clothes or into the wash basket. This may cause change of color or damage the laundry.
- Do not pour powdered bleach into bleach dispenser.
Using Fabric Softener
If desired, pour the recommended amount of liquid fabric softener into the right-hand compartment. Use only liquid fabric softener.
Dilute with water to the maximum fill line.
- Do not exceed the maximum fill line.
Overfilling can cause early dispensing of the fabric softener, which could stain clothes.
NOTE: Do not pour fabric softener directly on the wash load. It may stain the clothes.
Attention
- Do not mix with Detergent or bleach
- I Never pour fabric softener directly on clothes. It may stain them.
- Do not stop the washer during the first spin for timely dispensing.
- Option washing is not designed to be used with fabric softener dispenser.
Scrud(Waxy Build up)
Scrud is the name given to the waxy build-up that can occur within any washer when the fabric softener comes into contact with Detergent. This build-up is not brought about by a fault in the machine
If scrud is allowed to build-up in the machine it can result in stains on your clothes or an unpleasant smell in your washer.
If you wish to use fabric softener we recommend
- Using fabric softener sparingly.
- When filling the dispenser, do not splash or overfill
- Clean dispenser as soon as the is finished.
- Clean your machine regularly (refer to page 22 ar 36)
- Cold water washing increase se every 5th wash should i
- Fabric softener with a thin this build up occurring. We recommend a regular WARM or HOT wash less likely to leave residue on the dispenser and contribute to a baikl-up.
Special Guide for Stain Removal
WARNING
Do not use or mix liquid chlorine bleach with other household chemicals such as toilet cleaners, rust removers, acid or products containing ammonia. These mixtures can produce dangerous fumes which can cause serious injury or death.
To reduce the risk of fire or serious injury to persons or property, comply with the basic warnings listed below:
- Read and comply with all instructions on stain removal products.
- Keep stain removal products in their original labeled containers and out of children's reach.
- Thoroughly wash any utensil used.
- Do not combine stain removal products, especially ammonia and chlorine bleach. Dangerous fumes may result.
- Never wash items which have been previously cleaned in, washed in, soaked in or spotted with gasoline, dry cleaning solvents or other flammable or explosive substances because they give off vapors that could ignite or explode.
- Never use highly flammable solvents, such as gasoline, inside the home. Vapors can explode on contact with flames or sparks.
For successful stain removal:
- Remove stains promptly.
- Determine the kind of stain, then follow the recommended treatment in the stain removal chart below.
- Adhesive tape, chewing gum, nither cement
- To pretreat stains, use a prewash product, liquid Detergent, or a paste made from granular Detergent and water.
- Use COLD water on unknown stains because HOT water can set stains.
- Check care label instructions for treatments to avoid on specific fabrics.
- Check for colorfastness by testing stain remover on an inside seam.
- Rinse and wash items after stain removal.
Stain Removal
Baby fomula, dairy products, egg
Use product containing enzymes to pretreat or soak stains.
Beverages (coffee, tea, soda, juice, alcoholic beverages)
Pretreat stain. Wash using COLD water and bleach safe for fabric.
Blood
Rinse with COLD water. Rub with bar soap. Or pretreat or soak with product containing enzymes. Wash using bleach safe for fabric.
Chocolate
Pretreat or soak in WARM water using product containing enzymes. Wash using bleach safe for fabric
Collar or cuff soil, cosmetics
Pretreat with prewash stain remover or rub with bar soap.
Dye transfer on while fabric
Use packaged color remover. Wash using bicach safe for fabric.
Grass
Pretreat or soak in WARM water using product containing enzymes. Wash using bleach safe for fabric.
Grease, oil, tar (butter,fats,salad dressing,co)
Scrape off surface wax. Place stain face down between paper towels. Press with warm iron until wax is absorbed Replace paper towels frequently. Treat remaining stain with prewash stain remover or nonflammable dry cleaning fluid. Hand wash to remove solvent. Wash using bleach safe for fabric
Ink
Some inks may be impossible to remove. Washing may set sorme inks. Use prewash stain remover, denatured alcohol or nonflammable dry cleaning fluid.
Mildew,scorch
Wash with chlorine bleach if safe for fabric. Or. soak in oxygen bleach and HOT water before washing. Badly mildewed fabrics may be permanently damaged.
Mud
Brush off dry mud. Pretreat or soak with product containing enzymes
Mustard,tomato
Pretreat with prewash stain renover. Wash using beach safe for fabric.
Nail polish
May be impossible to remove. Place stain face down on paper towels. Apply nail polish remover to back of stain. Repeat, replacing paper towels frequently. Do not use on acetate fabrics
Paint,vanish
WATER BASED: Rinse fabric in cold water while stain is wet Wash. Once paint is dry, it cannot be removed. OIL BASED AND VARNISH: Use solvent recommended on can label. Rinse throughly before washing
Rust, brown or yellow discoloration
For spots, use nust remover safe for fabric. For discoloration of an entire koad, use phosphate Detergent and nonchlorine bicach. Do not use chlorine bleach because it may intensify discoloration
Shoe Polish
LIQUID: Pretrear with a paste of granular Etergent and water. PASTE: Scrape residue from fabric. Pretreat with prewash stain remover or noelamumable dry cleaning thad. Rub Detergent into dampened area. Wash using bleach safe for fabric
NOTE
- For optimizing the washing algorithm, the displayed time may change during washing-increased by a maximum of 10 minutes (not including spin irregularity correction time) or decrease by a maximum of 4 minutes.
- The Vapour Mode option cannot be used with all cycles.
- Vapour may not be clearly visible during the Vapour Mode cycles. This is normal. Too much vapour could damage clothing.
- Do not use Vapour Mode with delicate fabrics such as wool, silk, or casily discolored fabrics.
Soak Wash

Press the POWER button to turn power on.

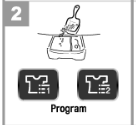
Load the clothes and Press the Program button to select the Washing Program.
- Soak is not selectable with the Stain Care, Allergy Care, Delicates, Quick Wash and Tub clean programs.
Press the Soak button.
Soak" can be selected by pressing the Soak button which then turns on the soak indicator
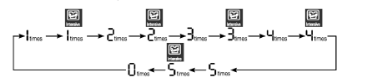
- Soak selection : 15 ► 30 ► 45 ► 1:00 ► 2:00 ► 3:00 ► off ► 15
Press the rinse and Spin buttons to select the number of Rinses and the Spin speed intensity.
Add the suggested detergent indicated by the detergent level indicator and close the Lid.

Press the START/PAUSE button.
- Water will then be supplied and the Soak wash will begin.

When the Soak wash program ends, the chime will sound for seconds before the Power turns off automatically.
Intensive Rinse

Press the POWER button to turn power on.

Load the clothes and Press the Program button to Select the Washing Program.
- Intensive Rinse can only be selected with the Cotton Wash, Extra Rinse, and Favourites courses.
Press the Rinse button to scroll through the number of Rinses. The Intensive Rinse will be selected on every second press of the Rinse button and indicated by the Intensive indicator.

Press the Wash and Spin buttons to select the wash time and spin speed intensity.

Add the suggested detergent indicated by the detergent level indicator and close the Lid.

Press the START/PAUSE button.

When the wash program ends, the chime will sound for 10 seconds before the Power turns off automatically.
NOTE
- Use intensive Rinse to remove detergents more effectively
- Intensive Rinse will be cancelled if the Water Level is changed during operation.
Tub Clean
If scrud is allowed to build-up in the machine it can result in stains on your clothes or an unpleasant smell in your washer. Scrud is the way build-up that can occur within any washer when the fabric softener comes into contact with Detergent, water quality and temperature will also contribute to the build up of this substance. the Tub clean cycle can help prevent or prolong the build up.

Press the POWER button to turn power on.

Press the Program button to Select Tub Clean Program.

Press the START/PAUSE button.
The Tub Clean duration will be displayed on the washers display.
Place the recommend dose of a suitable cleaning agent into the tub and close the Lid.
NOTE: Do not add clothes or any items into the tub during this program.

When the cleaning program ends, the chime will sound for 10 seconds before the Power turns off automatically.
Recommended cleaner:
1. Powder bleaching agent:
Purchase a suitable product and refer to usage instructions on the product packaging.
2. Liquid bleaching agent:
Read the marfufacturer's instructions carefully.
Do not put laundry for laundry tub course.
- Use oxide bleaching agent (300g). (do not use chlorine bleaching agent.)
- We recommend this program be used at regular intervals. (once a month)
- Remove all lint from the tub before commencing this program.
Automatic Tub Clean reminder.
- If after pressing the Power On button the
 is displayed, it suggests it is time for Tub Cleaning.
- If you want to skip the Tub Clean, press the Program and option buttons to continue on to the desired cycle. The Tub Clean reminder will reappear after 3 or so washes if it is skipped, and continue to do so until the Tub Clean cycle is carried out.
- After performing tub cleann. will disappear until next Tub clean reminder.
- Tub Clean reminder is automatically determined by the washer's usage. (Generally once after 30 usages)
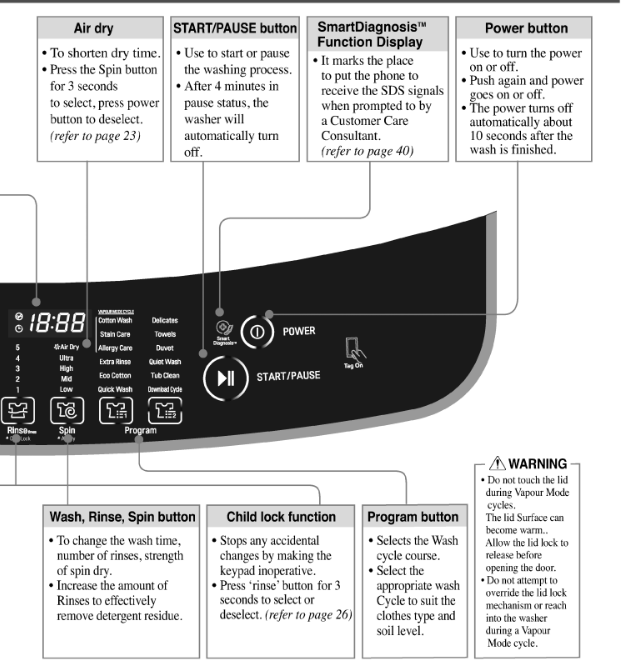
Air Dry

Press the POWER button to turn power on.
Then load up to 2kg of damp or moist clothes into the tub.
This function will have no effect on clothes that are soaking wet.
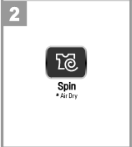
Press the Spin button for 3 seconds to select Air Dry.
- Other functions cannot be selected during Air Dry.
- This Function is automatically set to 60 minutes upon selection.
- Press the Spin button repeatedly to select the duration (90min ► 120 min ► 60 min.)
- To deselect Air Dry press power button.

Press the START/PAUSE button.

When the Air Dry program ends, the chime will sound for 10 seconds before the Power turns off automatically.
Notice:
When you select Air Dry for more than 60 minutes
- You can reduce the clothes drying time by minimzing the moisture in the clothes. however, this function will not dry clothes completely but will aid the clothes drying time when they are removed from the tub.
- Always keep the laundry amount to 2kg or less and make sure to spread it out evenly.
- Select 60 minutes for cotton clothing and 120 minutes for synthetic fiber clothing for effective Moisture removal. min.
Option Wash
When you only need the Wash, Wash/Rinse or Rinse cycles, these can be set manually.
1. Press the POWER button to turn power on. 
2.
Wash Only
Press the Wash button to select the desired wash time. 
Rinse Only
Press the Rinse button to select the desired number of Rinses. 
Rinse Only
Press the Spin button to select the desired Spin speed intensity. 
Wash and Rinse only
Press the Wash button to select the desired timing.

Press the Rinse button to select the desired number of Rinses.

You can use this option for preventing wrinkles by not allowing the tub to spin after the Rinse.
Rinse and Spin Only
Press the Rinse button to select the desired number of Rinses.

Press the Spin button to select the desired Spin speed intensity.

Drain Only
Can be used when draining of the remaining tub water in required.
Turn on the machine and press the Spin button then press START/PAUSE. The POWER can then be turned off when the remaining water has drained just before the Spin starts.
3. Press the Water vel button to select the water level according to the amount of laundry. If you do not select a level, it will remain on the middle level default setting.The correct water level is when the clothes are completely submerged in water. 
4. Add the clothes into the washing tub.
5. Press the START/PAUSE button. 
6. Add the detergent and close the lid.
NOTE
- When a Wash, Wash/Rinse or Rinse,only option is selected, after the wash is completed the water will not be drained out. If you wish to drain the water, but not engage the spin, then follow the above Drain Only instructions, after the Wash. Wash/Rinse or Rinse only program has ended.
- If you do not specify the water level, then Medium will be automatically selected
Time Delay (RESERVATION) Wash

Press the POWER button to turn power on.
Load the clothes and add the powdered detergent to the soap dispenser and Press the Program button to select the desired Washing Program.
- Do not use liquid detergent in the soap dispenser drawer. Doing so will cause it to dispense immediately and harden in the wash tub.
- This program will not work in Delicates and Tub Clean Program.

Press Time Delay (Reservation) button to set the delayed wash ending time.
- If reservation button is pressed, it will turn on the Delay Time indicator and show 3:00.
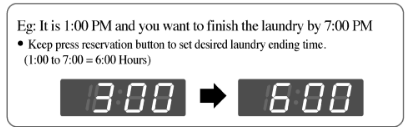
- The Time Delay can be set from 3-18 hours by 1 hour intervals up to 3-12hours and 2 hour intervals for 12-18 hours.
- A Time Delay of less than 3 hours cannot be selected.

Close the door and press the START/PAUSE button.
- The Time Delay indicator will flash and the display will show the set delay time.

The Wash cycle will be complete at the end of the Delay time indication
- The end time may vary slightly due to environmental conditions such as water temperature and water inlet pressure.
Notice: To cancel any Time Delay setting, press Time Delay (Reservation) button repeatedly until the reservation is canceled or press the POWER button to turn off the power.
Other Useful Functions
Child Lock Function
If you want to lock all the keys to prevent settings from being changed by a child, you can use the child lock option.
How to Lock
1. Press the POWER button.

2. Press the START/PAUSE button to start washing.

- After all washing conditions are set according to the manual.
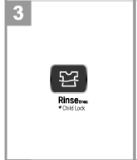
3. Press the Rinse button.
- The button lock is set, it will not be released automatically if the cycle is terminated.
- Therefore it will be necessary to turn the POWER back on and cancel the Child Lock function by holding down the "Rinse" button.
How to Unlock
If you want to unlock during wash. press the Rinse button again.
NOTE
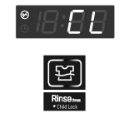
 & the remaining time are alternatively shown on the display while the child lock is active during the wash
Seeing Remaining Time
To see the remaining time for each process, press one of the Wash. Rinse or Spin buttons
The remaingame of cach process will appear for about 1 second
Turning on the NFC function of the smart phone
1. Enter the "Settings" menu of the smart phone and select "Share & Connect" or "More..." under "WIRELESS & NETWORKS".
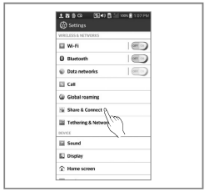
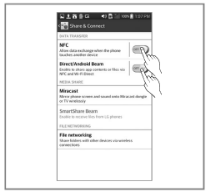
2. Set the "NFC" and "Direct Android Beam" to ON.
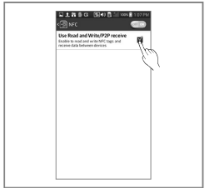
3. Check "Use Read and Write/P2P receive":
NOTE
- Depending on the smart phone manufacturer and Android OS version, the NFC activation process may differ
- Refer to the manual of your smart phone for details
The Tag On guide
►Tag On position
 Look for the Tag On icon next to the LED screen on the control panel. This is where you position your smart phone when using the Tag On function with the LG SmartDiagnosis and Cycle Download features of the LG Smart Laundry & DW Global App.
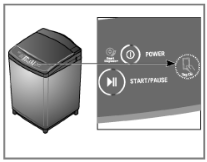
- When you use the Tag On function, position your smart phone so that the inbuilt NFC antenna in the back of your smart phone matches the position of the Tag On icon on the appliance. If you do not know the position of your NFC antenna, move your smart phone very slightly in a circular motion until the application verifies the connection.
- Because of the characteristics of NFC, if the transmission distance is too far, or if there is a metal sticker or a protective case on the phone, transmission will not be good. In some cases, NFC- equipped phones may be unable to transmit successfully. tại đây để tìm kiếm
- Press
 in the LG Smart Laundry & DW Global App for a more detailed guide on how to use the Tag On function.
Using Tag On Function
Tag On Cycle Download
This function will allow you to choose an additional cycle (available from a list in the LG Smart Laundry & DW Global app) and download the cycle to the "Download Cycle" option on the front of the washing machine control panel.
To use this function, simply select "Tag On Cycle Download in the LG Smart Laundry & DW Global app refer to "Before using the Tag On Function" in this manual) and then select your desired cycle from the list, then simply hold your phone next to "Tag On" icon on the front of the washing machine and your desired cycle data will be downloaded to the washing machine "Download Cycle" option on the front control panel.
NOTE
- If the washing machine is currently in the middle of any cycle, you cannot transfer a new cycle to the "Download Cycle" option on the front of the washing machine control panel, an error message "Notice- the appliance is running will be displayed on the application.
- After the cycle data has been downloaded to the washing machine from the LG Smart Laundry & DW Global app, the "Download Cycle" option will memorise and retain the cycle data, even if the washing machine is switched off then back on at the power point.
- After the cycle data has been downloaded to the washing machine from the LG Smart Laundry & DW Global app, the cycle will not start automatically, you can start the cycle by pressing the "Start/Pause" button on the front of the washing machine control panel.
- As the washing machine is not able to display the additional cycles anywhere on the front control panel, you can check what cycle is currently in use by selecting "Tag On Cycle Download", and tapping the refresh symbol. The app will then prompt you to "Tag on Target Area"
Laundry Stats
This function will tell you when the next Tub Clean cycle is needed for your washing machine and also tell you the 3 below points of data from the washing machine:-
- The history of the 10 most recently used cycles (in no specific order)
- The most frequently used cycle"
- The last cycle that was used or that is currently in use
To use this function simply select "Laundry Stats" in the LG Smart Laundry & DW Global app and the above cycle data will be displayed.
NOTE
- If washing machine is turned off from the power point and then back on, the washing machine will still memorise and retain all 3 above points of cycle data.
- If the unit is currently in the middle of any cycle, you can still use the "Laundry Stats" function of the LG Smart Laundry & DW Global app.
Tag On Cycle Set
This function will explain in more detail, the recommended applications for some certain cycles that are available on the front of the washing machine control panel. (excluding "Download Cycle").
To use this function simply select the "Tag On Cycle Set on your LG Smart Laundry & DW Global app, then select your applicable cycle, then simply hold your phone up to "lag On" icon of the front of the washing machine and the desired cycle will automatically start.
NOTE: If the unit is currently in the middle of a cycle, you cannot set a Tag On Cycle Set an error message "Notice-the appliance is running will be displayed on the application
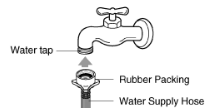
Connecting the Water Inlet Supply Hose
Before connecting the Water Supply Hose to the water tap, check the hose type and then choose the correct instruction here under. Note that the Water Supply Hose supplied may vary from country to country, Make sure to connect the blue inlet hose to the COLD water tap, and the orange inlet hose to the HOT water tap.
Connecting Water Supply Hose to water tap
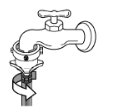
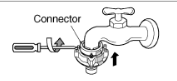
Normal Type (Normal tap without thread & screw type inlet hose.)
1. Untighten the screw
Untighten the screw of the connector so that the tap can be placed in the middle.
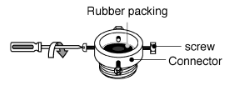
3. Fixing the connector to the tap
Push the upper connector up till the rubber packing is in tight contact with the tap. Then tighten the 4 screws.
3. Attach the water supply hose securely to the connector
Push the water supply hose vertically upwards so that the rubber seal within the hose can adhere completely to the tap.
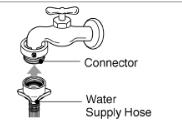
4. Fixing the connector to the water supply hose
Attach the water supply hose to the connector and then tighten it by screwing it to the right.
5. Check the connection of water supply hose and the connector
After connecting the hose, open the tap to check for any water leakage.
If the water leaks, close the tap and start again from step 1 screw

NOTE: The washing machine is to be connected to the water mains using new hose-sets and oid bose-sets should not be reused
Connecting Water Supply Hose
Normal Type (Normal tap without thread & one touch type inlet hose)
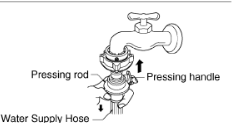
1. Separate Middle connector from Water Supply Hose
Separate Middle connector from the Water
Supply Hose by pulling the Pressing Rod and the Pressing Handle that is attached to the Water Supply Hose
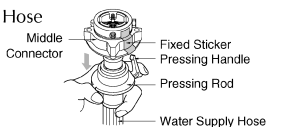
2. Loosen the fixed nuts to connect the connector
Untighten the screw of the connector so that the tap can be placed in the middle.
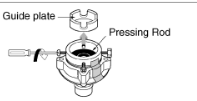
NOTE: In case tap is too large. If the tap diameter is too large or is square, untighten the 4 screws and remove the guide plate. Then follow step 1.
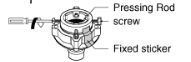
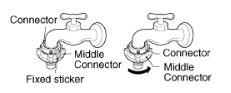
3. Fixing Connectors to the Tap
Push the upper connector up till the rubber packing is in tight contact with the tap. Then tighten the 4 screws.
4. Fixing Upper Connector and Middle Connector
Remove the fixed sticker in between the Upper and Middle Connectors. Tighten the connectors by holding one connector and twist middle connector to the right.
5.
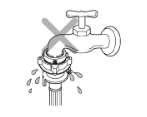
6. Check for water leakage
After connecting the hose, open the tap to check for any water leakage
If the connection leaks, close the tap and start again from step 1.
If you skip step 1. water leakage may occur.
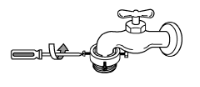
Screw Type
1. Attach the water supply hose to the tap.
Push the water supply hose up so that the rubber washer within the hose is properly seated to the tap.
2. Connect the water supply hose to the tap.
Connect the water supply hose to the tap and then tighten it by screwing it to the right. Securely Hand tighten only. Do not use any mechanical device to tighten the hose connector.

3. Check for water leakage.
After connecting the hose to both the tap and the machine, open the tap to check for any water leakage.

Connecting Water Supply Hose to the machine
- Connect the water supply hose to the inlet valve of the washing machine, and then turn the hose connector to the right until secure. Do not mechanical device to tighten. Hand tighten obly. use any
- Make sure there is a rubber washer in both connectors before connecting

Connecting the Drain Hose
Before connecting Drain Hose, check your Drain Hose model and choose the correct instructions.
Pump Model
Firmly insert the free end of the drain hose into the drain opening of your home. Make sure the soft rubber end is completely inside the drain opening.
- If the water valves and drain are built into the wall, fasten the drain hose to one of the water hoses with the cable tie (ribbed side on inside).
- If your drain is a standpipe, fasten the drain hose to the standpipe with the cable tie provided.
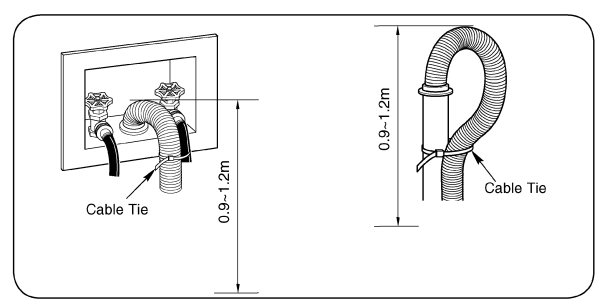
Note: The discharge height should be approximately 0.9-1.2m from the floor. Do not lay the drain pipe onto the floor as the water will syphon out when filling.
Cleaning and Maintenance
Cold water washing
- If you always use COLD water, we recommend that a WARM or HOT wash be used at a regular intervals e.g. every 5th wash should be at least a WARM one.
When you have finished
- Turn off taps to prevent the chance of flooding should a hose burst.
- Always unplug the power cord after use.
- Turning the washer off from the POWER button does not disconnect the main power.
When water supply into the tub is not clean or the inlet valve filter is clogged with particles (such as sand). clean the filter in the inlet valve occasionally. (The image of the power cord and water tap may vary according to the country)
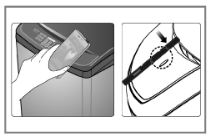
To Clean the Filter in the Inlet Valve
1. Close the taps. Turn on the washer and press START/PAUSE, the washer will attempt to commence washing and release the water in the inlet valves. When there is no more water, turn the power off from the mains outlet switch.

2. Turn off the power before pulling out the cord.

3. After removing the inlet water supply hose pull out the filter.Then use a brush to clean the filter.

4. Refit the filter after cleaning it and reconnect the inlet hose as per the installation instructions.
NOTE before reconnecting the inlet hose, turn the tap on for 30 seconds, with the hoses in the sink so that any impurities in the water line can be flushed out.
When there is a fear of freezing
- Close the water taps and remove the Water Supply Hose.
- Remove the water which remains in the water supply.
- Lower the drain hose and drain the water in the bowl and the drain hose by spinning.
If frozen
- Remove the water supply hose, and immerse it in HOT water at approx.. 40°C.
- Pour approx.. 2 liters of HOT water at approx.. 40°C, into the bowl and let it stand for 10 minutes.
- Connect the water supply hose to the water tap and confirm that the washing machine performs the supply and drainage of water.
Inner Wash tub: Leave the lid open after washing to allow moisture to evaporate. If you want to clean the inner-tub use a clean soft cloth dampened with liquid Detergent, then rinse. (Do not use harsh or gritty cleaners.)
Inlet Hoses: Hoses connecting washer to the tap should be replaced every 5 years.
Exterior: Immediately wipe off any spills. Wipe with damp cloth. Try not to hit surface with sharp objects.
Long Vacations: Be sure that the water supply is shut off at the taps. Drain all water from hoses if weather will be below freezing.
Cleaning the Inside of your Washer
If you use fabric softener or do regular COLD water washing, it is very important that you occasionally clean the inside of your washer.
- Fill your washer with HOT water.
- Add about two cups of a powdered Detergent that contains phosphate.
- Let it operate for several minutes.
- Stop the washer, open the lid and leave it to soak overnight.
- After soaking, drain the washer and run it through a normal cycle. Or use TUB CLEAN PROGRAM periodically. Do not wash clothes during this procedure.
Products that might damage your washing machine
- Concentrated bleaches and nappy sanitizer will cause damage to the paintwork and components of your washer.
- Hydrocarbon solvents i.e. petrol. paint thinners and lacquer thinners, etc. can dissolve plastic and blister paint
- Be careful when washing garments stained with these solvents as they are flammable DO NOT put them in washer or dryer.)
- Some pretreatment sprays or liquids can damage your washer's control panel when applied next to the washer.
- Use of dyes in your washer may cause staining of the plastic components. The dye will not damage the machine but we suggest you thoroughly clean your washer afterwards. We do not recommend the use of dye strippers in your, washer
- Do not use your washer lid as a work surface
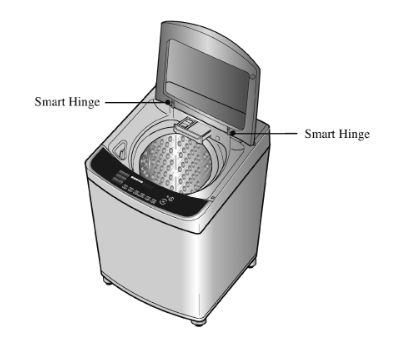
Soft Safety Door (where fitted)
- Using tempered glass, the inside of the washer can be seen safely during a wash.
- To prevent sudden close of door, it has a dampened hinge so the door closes softly.
- Door is heavy. Be careful not to place hands in the door closing area when operating. It might cause injury or damage to the product.
- For customer safety, the door will be locked automatically during operation When the door is locked, the 'door lock indicator will be on. If more clothes need to be added, press the START/PAUSE to unlock.
- Press START/PAUSE Button again to resume operation. The machine will turn off automatically if it is interrupted during the wash for any reason and is not resumed by pressing the START/PAUSE button again within 4 minutes
Common washing problems
Many washing problems involve poor soil & stain removal, Lint and scum residue, and fabric damage. For satisfactory washing results, follow these instructions.
WASH PROBLEM
Poor soil removal
- Not enough Detergent
- Use correct amount of Detergent for load size, amount of soil and water Hardness.
- Wash Water Temperature too cold.
- Different Water Temperature may be required according to soil type.
- Overloading the washer
- Reduce load size and manually increase the water level.
- Incorrect wash cycle
- Wash with DUVET or SOAK & DUVET wash cycle for heavy soiled items.
- Incorrect sorting
- Separate heavily soiled items from lightly soiled ones.
- Not pretreating stains
- Pretreat stains and heavy soil according to directions shown on page 9.
Blue Stains
- Undiluted fabric softener dispensed directly onto fabric
- Rub the stain with ber soap. Wash
- Do not overfill fabric softener dispenser and do not pour liquid fabric softener directly onto fabric. See page 12 for more instructions.
Black or gray marks on clothes
- A buildup caused by the interaction of fabric softener and Detergent can flake off and mark clothes
- Keep the recommendations against Scrud(waxy buildup). (refer to scrud page12.)
- Not enough Detergent
- Use correct amount of Detergent for load size, amount of soil and water Hardness
Yellow or brown rust stains
- Iron or manganese in water supply, water pipes. or water heater
- To restore discolored load of whites, use rust remover safe for fabric.
- Install nonprecipitating water softener or an iron filter in your water supply system for an ongoing problem.
- Before washing, run water for a few minutes to clear lines.
Lint
- Incorrect sorting
- Wash lint givers eg towels, flannelette sheets, separately from lint collectors eg synthetic fabrics and remove tissues in pockets before wash. See page 9 for sorting and caring before loading.
- Tissues left in pocket
- Overloading the washer
- Do not overload the washer. Manually increase the water level.
Residue or Detergent
- Overloading the washer
- Do not overload the washer
- Undissolved Detergent
- Some Detergents need to be pre-dissolved, check the Detergent instructions. Try pre-dissolving the Detergent.
- Using too much Detergent
- Increase Water Temperature using HOT water safe for fabric.
- Use proper amount of Detergent
Holes, tears, or snags
- Incorrect use of chlorine bleach
- Never pour chlorine bleach directly on fabric
- Unfastened zippers, hooks, buckles
- See page 11 for adding liquid bleach
- Ribs, tears and broken threads
- Fasten zippers, hooks, and buckles
- Overloading the washer
- Remove objects in pockets. See page 9 for caring before loading.
- Degradation of fabric
- Do not overload the washer
Troubleshooting
Before calling for service, check the problem against the list below.
Water Supply Failure - 
- Is the water tap shut off?
- Is the water supply cut off?
- Is the drain hose installed too low?
- Is the water pressure too high or too low, or is the filter of the inlet valve clogged with impurities?
- Is the Hot hose connected to cold?
- Is the Cold hose connected to hot?
Drainage Failure - 
- Is the drain hose positioned correctly?
- Is the drain hose bent or placed too high?
- Is the internal part of the hose or drain pump (only pump model) clogged with impurities?
- Check if electric power has gone off.
Spin Failure - 
- Is the laundry evenly balanced?
- Is the washing machine placed on a flat and level surface? Press the "Start/Pause" button to release the now distribute the laundry evenly and then press the "Start Pause" button again to resume the cycle.
Door(Lid) Open - 
Door(Lid) Lock malfunction - 
- Is the lid closed?
- Make sure that the lid is closed properly and press the START/PAUSE button. The washer will not operate unless the lid is locked.
- Make sure that nothing is caught under the lid, including shipping material or clothing.
Child Lock - 
- CL(Child Lock) does not indicate a malfunction
- This function prevents accidental cycle changes or interruptions during the wash cycle. The Child Lock function will remain engaged even after the cycle has finished. Press the Rinse button for 3 seconds to unlock. Take care-not to set up inadvertently during use.
Foreign objects - 
- Are there foreign objects. Such as coins, pins, etc., caught between the wash pulsator and the inner tub?
- Turn off the washer and then press the Power button. Press the spin speed button without selecting a cycle to drain and spin the load. When the spin is complete, remove the clothes and then find and remove any objects caught in the wash pulsator.
Tub Clean Reminder - 
- Empty the tub, insert bleach into the detergent dispenser and select the Tub Clean cycle
- If you want to skip the Tub Clean, press the program and option buttons to select desired cycle. In this case, you will see the message again after a few more wash cycles. Once the Tub Clean cycle is performed.
 will disappear until the next reminder to clean the tub

- Please call your nearest LG Electronics service center for help.
SmartDiagnosis
1. Close the washer door, and press the POWER button to turn on the machine. (Smart Diagnosis will not operate if the Washer has a power problem.)

- Do not press any buttons other than the ones indicated below.
2. Place the phone to the SmartDiagnosis™ display icon.

- Make sure that the phones mic faces the SmartDiagnosis™ display

3. Hold down the Cold Wash button to activate smart diagnosis.

- Place the phone near the SmartDiagnosisTM display, and hold down the Cold Wash button until tak tat tak sounds are heard.

4. Hold the phone while data is transmitted.
- Keep the phone placed to the SmartDiagnosis™ display while data for smart diagnosis is being transmitted. The time remaining for data transmission will be displayed on the washer display.
- Transmission sound may be irritating. For proper diagnosis, do not remove the phone. Smart Diagnosis can be cancelled at any time by pressing the POWER button
5. After the data transmission is completed, listen to the diagnosis result from the consultant.

- When data transmission is completed, the power is automatically turned off with“ End" displayed for a few seconds.
NOTE: Smart Diagnosis is a troubleshooting feature designed to assist, not replace, the traditional method of troubleshooting through service calls. The effectiveness of this feature depends upon various factors, including, but not limited to, the reception of the cellular phone being used for transmission, any external noise that may be present during the transmission, and the acoustics of the room where the machine is located. Accordingly, LG does not guarantee that Smart Diagnosis can accurately troubleshoot any given issue.