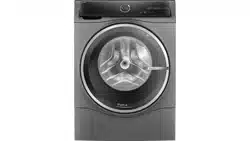
ActiveClean Technology: Bosch ActiveClean technology optimizes the wash process at every stage of the cycle by sensing load size, water level and temperature needs for superior results. Digital sensors care for all fabrics including wool, mohair and sik. This machine virtually operates at the touch of a button.
EcoSmart Technology: EooSmart Technology utilizes a network of sensors in the Bosch Vision washer for cycles that conserve the most energy possible while maintaining superior washing performance. By adjusting to the size of the load and regulating temperature to never overheat, it is no wonder that Bosch is the most efficient brand on the market.
EcoAction: This option gives you the ability to reduce energy usage up to 20%. By selecting this option the temperature is reduced to save resources hte ne wash tee slightly extended to ensure proper washing.
ActiveWater Wash System: Only Bosch Vision washers featuring the ActiveWater wash system can consume as little as 13 gallons of water but wash with the power of 400 gallons! By adding water aster and constantly raining water back down on the clothes. Bosch Vision gets the most out of every drop of water.
Stain Removal: This unique option begins each cycle with a cold water fil and heats to all the most important water temperatures to remove stains. Since each type of stain is removed at a different specific temperature, only Bosch Vision with the Stain Removal option can address the widest variety of stains and remove them all in just one load.
Exclusive Hinge and Gasket System: A reinforced hinge and our unique gasket design help seal in the heat. allowing your laundry to reach the optimum temperature. which eliminates even the toughest stains.
XxtraSanitary Cycle: With this innovative cycle, a thermostat-controlled inteligent system heats up the water to 170° F. The clothes are thoroughly cleaned and sanitized while killing 99.99% of most common household bacteria.
Baby Care Cycle: The littlest people in the house usually account for the toughest stains. This cycle heats the wash water up to 1155° F to remove even the most stubborn stains with ease.
Bosch Exclusive Paddles: As your wash gently tumbles, the paddles cascade water from high above. rinsing away suds and giving your laundry a complete, even clean. Our stainless steal drum optimizes performance to ensure not a single shirt goes unturned.
Stainless Steel Drum: The Vision washer drum has hundreds of smooth double-punched holes, which allows your garments to gently tumble completely snag-free.
Internal Water Heater: An internal heating element heats the water to up to 180° F while a digital temperature sensor continually monitors the water temperature. Bosch Vision washers deliver the most efficient and accurate water heating method for each selected fabric type.
Quiet Performance: Bosch washers use suspended brushless motors. isolated pump systems and special sound-deadening material to keep them exceptionally quiet while in operation. This means they can be installed virtually anywhere in the home without causing a disturbance. Bosch’s special unbalance control software eliminates noisy unbalance conditions.
AVS Anti-Vibration System
The AVS Anti-Vibration: System reduces vibration even luring high spins for near silent, smooth operation. So even if the Vision washer is installed on a second story you may rover now ts tres
AquaStopTM: AquaStopTM is an internal containment safety system designed to protect against flood type leakage to caease the ct os of water’ when the washer is turned on and operating.
AquaStop Hose: The AquaStop Hose stops water flow in the event the AquaStop Hose experiences flood-type leakage.
Operating instructions
Before use
Warning: To reduce the risk of fire, electric shock, or injury to persons, read the IMPORTANT SAFETY INSTRUCTIONS before operating this appliance
Warning: Before using your washing machine, read and follow all installation and operating instructions
Panel
Before Using For the First Time
WARNING: To reduce the risk of fire. electric shock, or injury to persons, read the IMPORTANT SAFETY INSTRUCTIONS before operating this appliance.
The washing machine must be installed and connected properly (refer to Page 7).
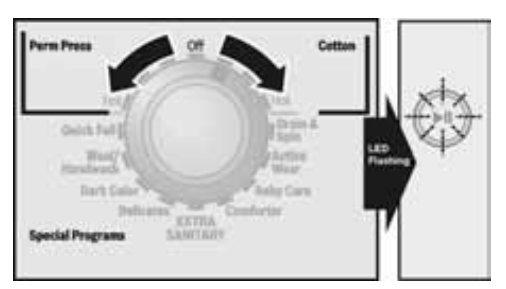
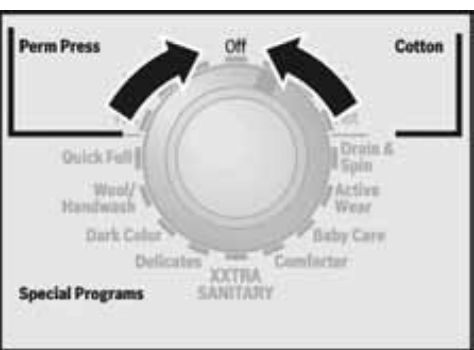
Tum the Cycle Selector to any cycle to tum the washer on and illuminate the display. Turn the Cycle Selector to “Off” to tum the washer off.
WARNING: Before using your washing machine, read and follow all installation and operating instructions.
Using For the First Time
First washing cycle (without laundry)
Your appliance was thoroughly tested before leaving the factory. A small amount of residual water may remain in the washer. To ensure a fresh wash with your initial load of clothes. first run the washer a complete cycle. without any laundry in the drum.
1. Do not load any laundry. 2. Tum on the water faucet.
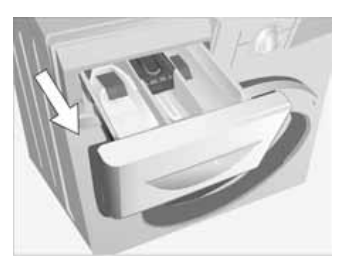
3. Open the detergent dispenser drawer.
4. Pour 1-2 Tbsp. detergent into the main detergent compartment (1 in the preceeding illustration).
Do not use special detergents for delicates or wool (this will cause excessive sudsing).
5. Close the detergent dispenser drawer.
6. Make sure the washer door is closed.
7. Set the cycle selector to Regular/Cotton hot
8. The Start/Pause indicator light flashes (red).
9. Press the Start/Pause button.
When “Finished LED" is lit:
Open the door.
Tum the cycle selector to “Off”.
Preparing the laundry
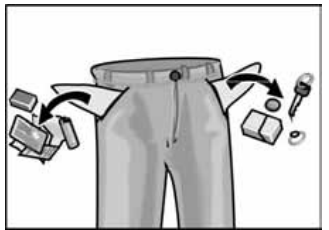
NOTICE: Loose debris (coins. paper clips nails and other hard objects) can damage items of clothing as well as. parts of the washing machine (e.g. drum).
Empty all pockets. Brush off lint and dirt.
Close fasteners that could cause laundry to catch and become entangled. These include zippers, button up duvets (quilt covers) and any hooks such as on brassieres.
Remove curtain rings or tie them up in a net bag.
Remove pins. buttons. buckles and other hard objects to avoid scratching the washer interior.
Remove non-washable trim and ornaments.
Tum synthetic knitwear inside-out to avoid pilling (the formation of tiny balls of fluff common to knitted or woven fabrics).
Treat spots and stains.
To prevent oss or damage to laundry and the machine. the foll g items can be washed only in a mesh laundry bag:
Baby socks (small items)
Hosiery
Belts
Underwired bras (due to risk of the wire coming loose during washing and causing appliance damage).
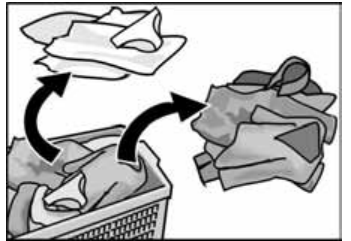
Sorting the laundry
According to color and degree of soiling
NOTICE: Items of clothing may become discolored. Never wash new multi-colored items together with other items.
White items may become gray if washed with dark items. Always wash white and colored items separately.
Degrees of soiling
Lighter Soiling
No recognizable dirt or staining. Laundry may have some body odor
Light summer clothing.
T-shirts. shirts and blouses that have been wom for up to one day.
Bed linen and guest towels that have been used for one day.
Normal Soiling
Visible dirt and/or some light recognizable staining.
T-shirts, shirts and blouses that are very sweaty or have been worn several times.
Dish towels. hand towels and bed linen that have been used for up to one week.
Sheer curtains (without smoke staining) that have not been washed for up to 6 months.
Heavy Soiling
Dirt and/or staining recognizable.
Kitchen hand towels that have been used for several days or show visible signs of soiling. Cloth napkins.
Bibs.
Children’s outer clothing or sportswear with grass and soil stains.
Work clothes such as used for outdoor work or yard work.
If possible, pretreat stains while they are stil fresh.
First, dab soapy water onto the stain. Do not rub.
Subsequently, wash the items of Clothing using the appropriate cycle.
Occasionally, several wash cycles may be required in order to remove persistent. dried-on stains.
Sorting laundry according to care label specifications
Fabric Types
Machine Wash, Cottons
Machine Wash, Permanent Press
Machine Wash, Delicates
Hand Wash
Temperatures
Cold
Warm
Hot
Do not wash clothes in washing machine if the care label says “Do Not Wash” or the DO NOT WASH symbol is on the care label.
Loading the laundry
WARNING: TO AVOID EXPLOSION HAZARDS! Items of clothing that have been pretreated with solvent-based cleaning agents, e.g, stain remover and dry cleaning solvents, represent an explosion hazard once loaded into the washing machine. Therefore, these items must first be rinsed thoroughly by hand.
NOTICE: Loose debris in the washing machine drum can damage the laundry. Before loading the laundry, check that there is no debris in the drum.
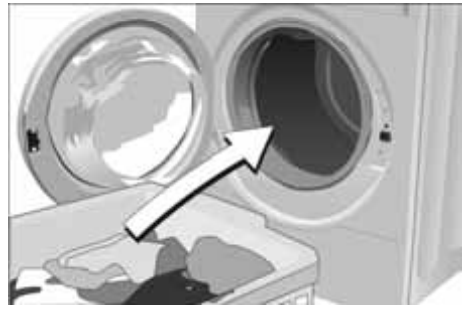
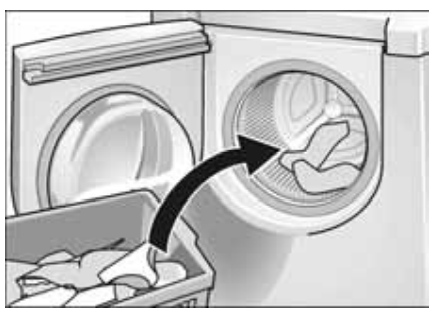
Open the door.
Place items loosely into the drum. Mix up large and small items. Items of varying size will distribute better during the spin cycle.
For best results, it is recommended to load the drum depending on the fabric type:
Full Load: Cotton and Linens
½ Load: Permanent Press. Synthetic Blends and Knitwear
⅓ Load: Wool, Delicates, Silk
Do not exceed the maximum load for the selected cycle. Overloading will cause poor wash results and will Increase wrinkling.
Load the drum at least halt full for Cotton and Permanent Press cycles. Small loads will tend to create an unbalance condition.
Close the door completely. The door should close easily. It should not be necessary to force the door to close.
Do not trap any items of clothing between the door and rubber seal.
Laundry Detergents and Additives
Adding the correct amount of detergent
WARNING: TO AVOID RISK OF POISONING! Keep detergents and additives out of the reach of children.
Measure out the detergent (powder or liquid) according to:
The water hardness. This information can be obtained from your local water authority. Soft water requires less detergent.
The amount of laundry.
The degree of soiling. Information on soiling can be found on Page 19.
The specifications of the detergent manufacturer. Measuring the correct amount of detergent reduces the strain on the environment and ensures optimum washing results.
Too little detergent:
The laundry is not cleaned properly and will eventually become gray and stiff. Grayish brown spots may appear on the laundry. The heater may calcify.
Too much detergent:
Excessive suds reduce wash agitation producing poor washing and rinsing results and may prevent proper spinning.
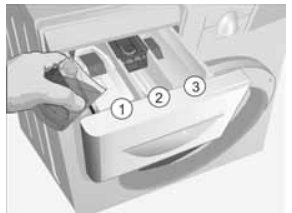
Filling laundry detergent and/or additives
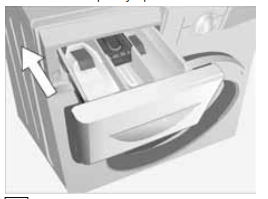
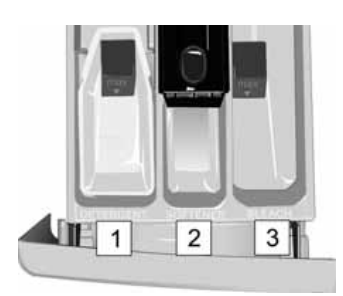
Open the detergent dispenser drawer.
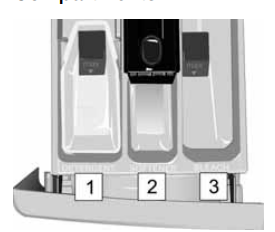
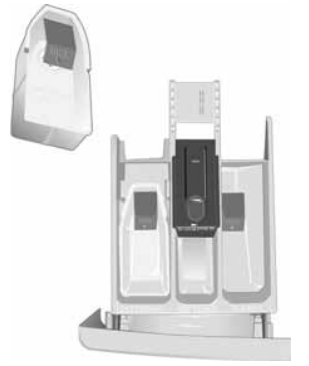
Add the liquid detergent and/or additive. First check to be sure the liquid insert is present in the detergent compartment (1). If using a powder detergent, see the note below on removing the liquid detergent insert.
Do not overfill the compartment to avoid early dispensing.
DO NOT operate the washer without the detergent drawer in place and fully closed!
If using a powder detergent. first remove the liquid detergent insert from compartment 1.
Store the liquid detergent insert for later use.
We recommend HE detergents because they are designed to achieve optimum performance with your front-loading washer. Not using HE detergent could cause problems such as oversudsing, extended cycle periods. or a decrease in wash performance.
Look for the HE logo (pictured below) on the front of your detergent product.
Detergent Dispenser Compartments it
Detergent Compartment
Use to add detergent to the wash load.
Liquid detergent should only be used with the liquid detergent insert in place.
Add only the correct measured amount of detergent to avoid oversudsing.
DO NOT overfill — for liquid detergent, stop at the fill level marked as “max” on the siphon cap (see illustration above).
At the beginning of the wash cycle. the detergent is flushed from the dispenser into the wash.
If using powder detergent, first remove the liquid detergent insert
2. Fabric Softener Compartment
Add the recommended amount of fabric softener.
DO NOT overfill — stop at the fill level marked as “max” on the siphon cap (see illustration above). Overfilling can cause the softener to be dispensed early
DO NOT pour fabric softener direcly into the wash load.
The fabric softener will automatically be dispensed during the last rinse cycle.
Do not use fabric softener with outdoor fabrics (ie: rubberized or waterproof materials).
3. Bleach Compartment
Add the correct measured amount of liquid chlorine bleach. or color safe bleach. to this compartment
DO NOT overfill — stop at the fil level marked as “max” on the siphon cap (see illustration).
Overfilling can cause the bleach to. be dispensed early. which could result in damage tothe laundry
DO NOT pour undiluted quia chlorine bleach directly on the laundry to avoid fabric damage.
The bleach will be automatically dispensed at the proper time during the wash cycle.
Concentrated or thick fabric softener. conditioner and bleach must be diluted with a litle water before being poured into the dispenser.
Bleach may cause discoloration of the washer's colored surfaces. It is important to keep leach away from the colored surfaces of your washer. Use a moist paper towel to clean up any spilled bleach
Close the detergent dispenser drawer before starting any cycle. Please make sure the drawer is fully closed.
Decolorizing
NOTICE: Dyes may contain sulfur or chlorine. These substances may cause parts of the washing machine to corrode. Do not dye items of laundry in the washing machine.
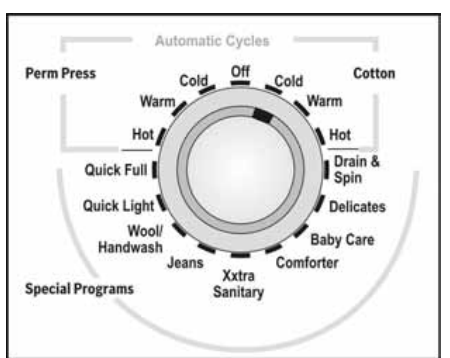
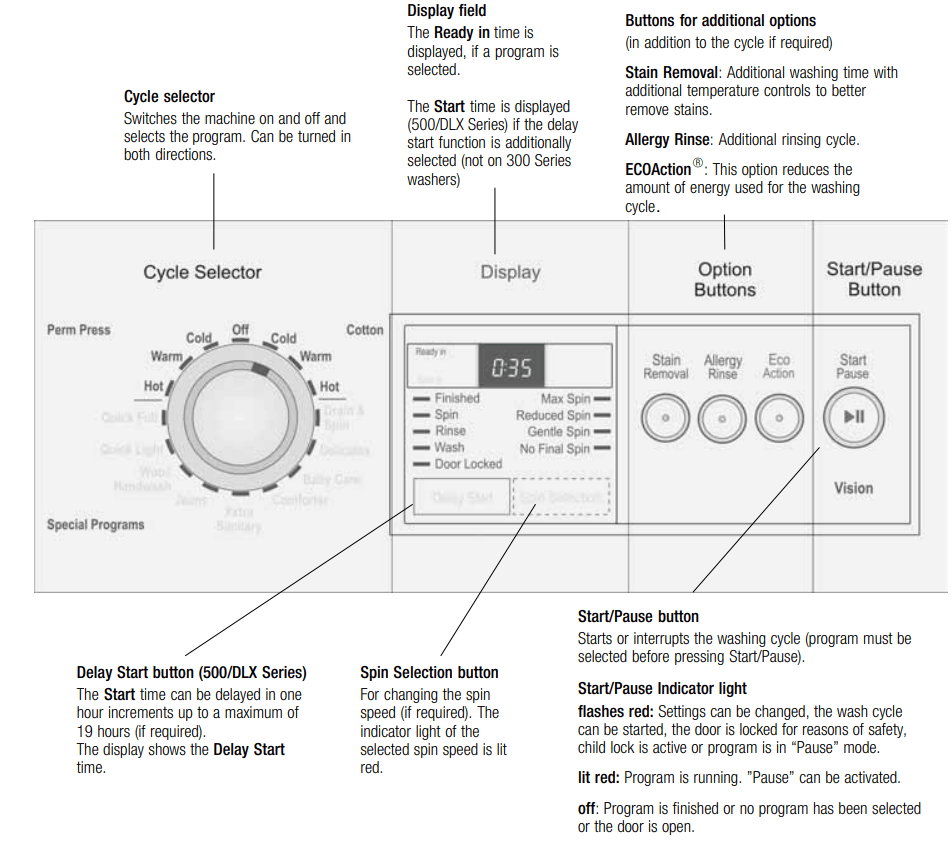
Cycles and Options
For optimum washing results, your washer offers several cycle groups and additional options.
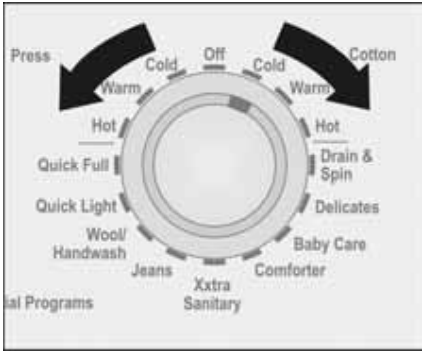
Automatic Cycles include Regular/Cotton and Permanent Press. Program selection is based in part on the laundry fabric type.
Cycle times will vary depending on cycle selected, temperature and pressure of incoming water, water hardness, size of load, type of fabrics and amount of detergent used.
Special programs are custom designed for special wash needs or specific types of fabric.
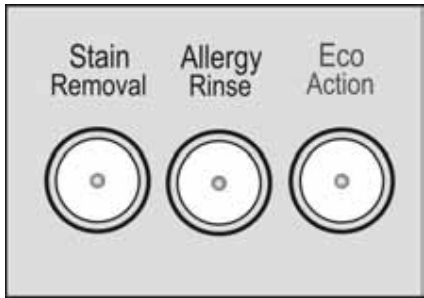
Additional options may be selected by pressing one of the panel option buttons.
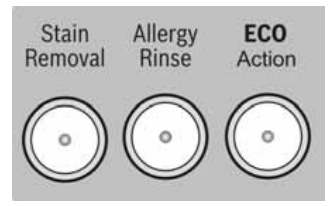
Option Buttons
Stain Removal: The Stain Removal option is recommended for use with heavily soiled clothes that require the removal of tough, ground-in, protein-based stains. It is not recommended to use the Stain Removal option when laundering normal or lightly soiled clothes.
Allergy Rinse: When this button is pressed, an additional rinsing cycle will be added to the selected cycle. The second rinse helps to remove stubborn allergy irritants.
ECO Action: This option reduces the amount of energy consumed by up to 20%. This option is not available for cold cycles.
Modifiers
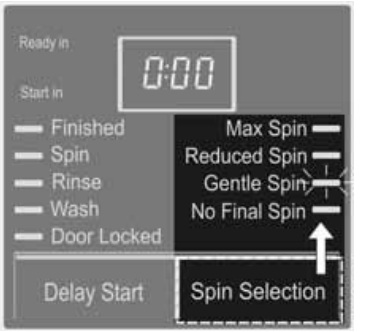
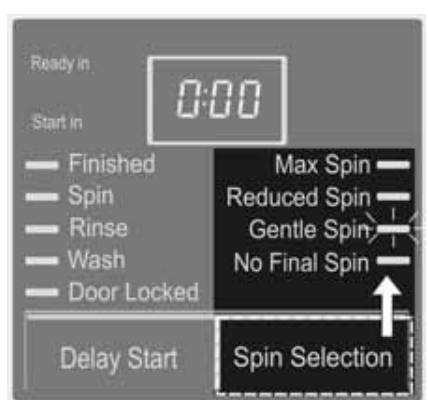
Spin Selection
Preset cycle setting of max. spin speed can be changed.
Press this button until the desired setting lights up.
*No final spin (“---”)The water is drained from the machine after the final rinse. Recommended for delicate laundry. Use this setting to avoid creasing if the clothing cannot be taken out of the washing machine immediately upon completion of the cycle.
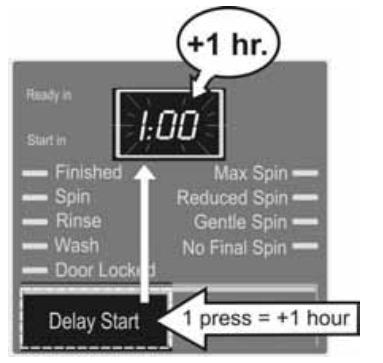
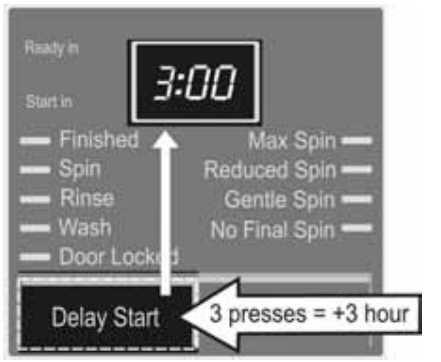
Delay Start
Before starting a program you can modify by when the cycle should be started.
Press Delay Start button. The display shows the start time 0:00.
The time can be delayed up toa maximum of 19 hours (with 1 hour increments) by pressing the Delay Start button repeatedly.
The Start time begins running immediately after pushing the Start/Pause button. This is indicated by the points between the digits flashing.
Changes to the Start time are possible at any time, press the Delay Start button until the new time appears.
If the program is changed or if the program is interrupted, the preselected Start time is also interrupted. The Ready in time of the program is displayed. The Start time must be reselected.
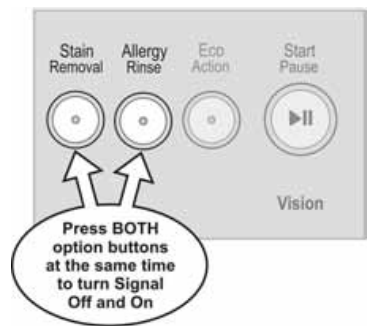
Acoustic Signal
An acoustic signal indicates program statuses (e.g. start/end of program and operating faults.)
To activate the signal:
Select a program.
Press and hold any two Option Buttons (e.g. Stain Removal and Allergy Rinse) until a long signal is emitted.
To deactivate the signal:
Q Select a program
Press two of the Option Buttons and hold until a short signal is emitted.
Do not activate/deactivate the acoustic signal during a cycle.
“Start/Pause” button light
The Start/Pause button light conveys the following information:
Indicator light flashing red:
Program can be started.
Adding laundry is possible.
Indicator light is lit red
Program is running.
Adding laundry is not possible because the door is locked for safety reasons.
Laundry may be added after pressing he Start/Pause button.
Special features
Auto Load adjust
“Auto Load adjust” adjusts the water and energy consumption for each cycle and determines the amount of laundry.
This process is built into your machine and occurs automatically.
The result is a reduction in water and energy consumption when washing small loads.
AVS Anti-Vibration System Unbalanced load detection
The AVS automatic unbalanced load detection system determines whether or not the load is correctly balanced for spinning. If the load is not evenly distributed, the spin will be restarted. If after a pre-determined number of attempts the load cannot be balanced the spin will be aborted and the cycle resumed.
Displayed Time
When a cycle has been selected. the expected cycle time is displayed.
The following will affect the displayed time:
Load size
Repeated spin attempts to evenly distribute load
Additional rinse cycles if excessive foam occurs
Low water pressure
Selection of additional options. eg. “Allergy Rinse”
Due to these and other characteristics of the controls. the actual cycle time will vary.
You may notice that these effects (more or less time) change the displayed time when they occur in the cycle. If no options are selected and these effects do not occur. the time indicated will be the time that the cycle will finish.
Washing
Turn on the water faucets
Turn the program selector to the desired program.
Load the washing machine and close the door. The Start/Pause indicator light flashes (red)
If necessary, press the button(s) for additional option(s). The indicator light of the selected button is lit (red)
If an incorrect combination was inadvertently selected, the indicator light of the selected button is turned off.
If necessary, change the spin speed with the Spin selection button until the desired spin speed indicator light is lit.
If necessary, change the Start time. Press the Delay Start button until the desired Start time is displayed.
Press The Start/Pause button. The indicator light is lit (red). Display shows the run time of the selected program. The program starts.
Each program step is indicated by the indicator lights under the display.
During washing
The washer drum system may experience a slight shudder or shake as the drum accelerates to higher spin speeds due to normal laundry imbalance.
Re-selecting a cycle
Turn the cycle selector to Off.
Turn the cycle selector to a newly selected cycle.
The Start/Pause indicator light flashes.
If required, change the settings.
Press the Start/Pause button. The cycle starts.
Add a garment / Interrupting the cycle
You can put laundry in the drum after washing begins. take laundry out of the drum early or interrupt the cycle at any time.
It is not recommended to add laundry after the washing phase is complete.
You can add or reduce laundry as long as the Start/Pause indicator light flashes and it is safe to do so.
Open the door.
Add/remove the laundry.
Close the door.
Press the Start/Pause button.
The cycle continues. The indicator light is lit.
When the Start/Pause indicator light is illuminated, the cycle can be interrupted. however in some cases the door will not be unlocked for safety reasons (high water level, water temperature or drum speed).
If the speed is too high, the Start/Pause indicator light is illuminated. Laundry can be added in “Pause” mode when the drum is at a standstill.
Canceling the active cycle
If you would like to terminate a cycle and remove the laundry:
Press the Start/Pause button
If Child Lock is active, it is necessary to press and hold down the Start/Pause button for five seconds
If the load is too wet, turn the cycle selector to Drain/Spin and run the cycle using a spin speed appropriate for the laundry type (see pg. 22 for suggested spin speeds).
If a cycle is interrupted at a high temperature, the door will remain locked until the temperature in the drum has cooled down.
If the cycle is terminated by switching the appliance to “Off “, the door will may remain locked until the appliance is switched back on. Turn the cycle selector to any other cycle. The door will unlock after approximately 5 seconds.
After Washing
The Start/Pause indicator light turns off.
Display shows: “0:00” and Finished LED is lit.
Open the door
Turn the cycle selector to Off.
Close the faucets.
Remove the laundry.
NOTICE: To avoid the risk of rust, check for foreign objects (e.g. coins, paper clips) between the drum and rubber door seal.
After washing, leave the washer loading door open for 24 hours to allow the inside of the washing machine to dry.
User Maintencance Instructions
Cleaning and Care
WARNING: To reduce the risk of fire, electric shock, or injury to persons, read the IMPORTANT SAFETY INSTRUCTIONS before operating this appliance.
WARNING: TO AVOID RISK OF ELECTRIC SHOCK! Always disconnect the appliance from the power outlet before cleaning Never clean the washing machine with a pressure washer.
WARNING: TO AVOID RISK OF EXPLOSION! Never use flammable solvents to clean the appliance.
Cleaning the appliance housing and control panel
As required
Use hot, soapy water or a mild non-abrasive cleaning agent.
Dry with a soft towel
Cleaning the drum
If rust spots have formed due to left-over debris (e.g. coins, paper clips, nails):
Use a chlorine-free cleaning agent. Follow the manufacturer's instructions. Never use steel wool.
Cleaning the Door Gasket
After washing, wipe the gasket to remove residual water or detergent.
Mold or odor issues can result if water or detergent is allowed to remain on the gasket.
Allow the drum to air out after washing by leaving the door partially open. This will allow air to circulate and help dry out any remaining moisture in the drum or on the gasket.
Cleaning the detergent dispenser
If residual detergents or additives have accumulated or if softener/bleach are not fully rinsed out:
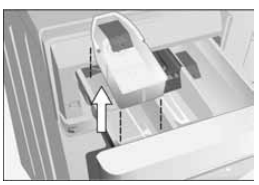
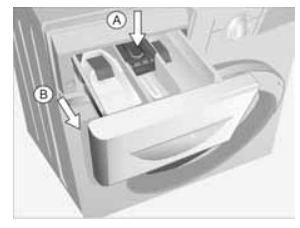
Pull open the detergent dispenser drawer. Press down (A) to release the drawer catch. Remove the drawer from the appliance.
Remove the liquid detergent insert by pulling it upwards from the detergent drawer.
Clean the detergent dispenser by inserting it under warm running water. Lightly wipe away any remaining detergent residue.
Reinsert the liquid detergent insert if using liquid detergent. Slide the detergent dispenser drawer back into place and close it completely.
DO NOT operate the washer without the detergent drawer in Place and fully closed!
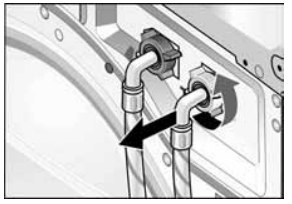
Cleaning water inlet strainers
This is necessary if very little or no water flows into the washing machine.
Cleaning is recommended every 6 months to reduce valve blockage in areas using hard water.
First release the water pressure in the supply hoses:
Turn off the water faucets.
Tum the cycle selector to any warm cycle.
Press Start/Pause button and wait for 30 seconds.
Turn the cycle selector to Off. Cleaning the strainers at the water faucet
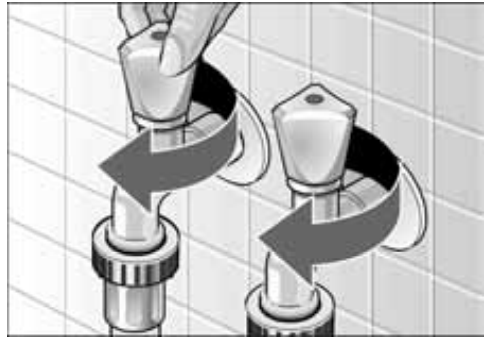
On both the hot and cold water faucet:
Disconnect the hose from the water faucet.
Rinse the strainer under running water.
Reconnect the hose.
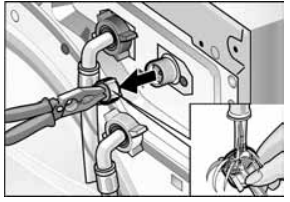
Cleaning the strainers on the washing machine
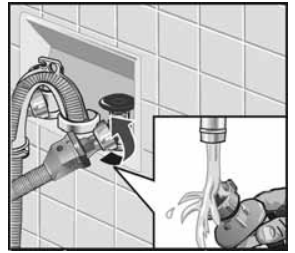
Disconnect the hose from the back of the washing machine.
Pull out the strainer and rinse under running water.
Insert the strainer and reconnect the hose.
Tum on the water faucets and check that there are no leaks. If water is leaking, check that the strainer is properly attached.
Tum off the water faucets.
Cleaning Tips
It is recommended that a small amount of household bleach be run through the washer every 3 months.
With no laundry in the machine. run the machine as follows:
Pour 1/2 cup of bleach in the detergent compartment (1) of the dispenser
Run a Regular/Cotton Hot cycle
Descaling the washing machine
NOTICE: Descaling agents contain acids which may attack parts of the washing machine and discolor the laundry.
Provided that you use the correct type of detergent, it is not necessary to descale the washing machine.
If white spots, lime or mineral deposits appear on the interior of the washing machine drum you can use a descaling agent to remove them.
However, if the appliance has to be descaled, please follow the instructions provided by the descaling agent manufacturer.
Troubleshooting of Minor Faults
Warning: TO AVOID RISK ELECTRIC SHOCK! Repairs should only be carried out by an authorized technician.
If repairs are necessary, and you cannot eliminate the fault yourself with the aid of the table below, follow these steps:
Tum the cycle selector to Off.
Disconnect the washing machine from the power outlet.
Tum off the water faucets.
Call Customer Service (refer to Page 31).
Troubleshooting items listed below may not be covered by warranty service!
Please carefully rule out any of these issues before calling for service.
Fault
Possible cause
Action
Cycle duration extended
This is not a fault.
The suds detection feature has activated an additional rinsing cycle to reduce the amount of suds.
Add more appropriate amount of detergent.
This is not a fault.
The unbalance compensation system is attempting to balance the load through repeated spins.
Aways load the drum with large and small item stems together.
This is not a fault. The laundry load may be large. requiring more time.
Allow additional washing time for larger loads.
The door cannot be opened
Power failure.
An interrupted cycle wil be resumed when power is restored. If the laundry is to be removed during a power failure, call Customer Service (refer to Page 31)
Cycle is running and/or the door is locked for safety reasons
Wait until the cycle ends (see Page 26)
Plug is loose or not inserted.
Eliminate the cause.
Cycle selector turned to Off before end of cycle
Select a cycle.
Door cannot be opened, even though the appliance has been switched off and on again.
For safely reasons the door has been locked because the water level, temperature or high drum speed
See “Adding to the laundry/interrupting the cycle”
Control lights do not light up
A fuse has blown
Reset circuit breaker
Call Customer Service if this fault recurs
Power failure
An interrupted cycle will be resumed when power is restored. If the laundry is to be removed during a power failure, call Customer Service
Cycle does not Start. Start/Pause indicator light flashes
Start/ Pause button not pressed
Press the Start/Pause button.
Cycle does not start. Indicator light “Finished? is lit and display is flashing E:01"
Door not closed property.
Check whether laundry is trapped in door.
Close the door (a click should be heard), cycle continues.
Cycle does not start. “Real Time delay" is indicated in the display field
End time selected and activated.
None. Appliance starts automatically.
Spin speed cannot be selected
Spinning is already in progress, during spin cycle the speed cannot be changed.
Select speed before spinning.
Detergent residue in the detergent dispenser.
Detergent was damp or lumpy.
Clean and dry the detergent dispenser
Use the cap of the detergent bottle to measure Iiquid detergents.
Water does not enter the machine or detergent is not washed away.
Indicator light “spin’ is lit and display is flashing “E11” or “E12”.
Water faucet not tumed on.
Turn on water faucet.
Cycle continues.
Supply hose kinked or pinched.
Eliminate the cause.
Strainers in supply hose clogged.
Clean the water inlet strainers.
Aquastop Hose safety feature activated.
Check for safety indicator (see page 13). If red, replace hose.
Water pressure too low.
Eliminate the cause.
Water cannot be seen in drum.
This is not a fault.
The water level is below the visible part of the drum.
Washing solution has not drained completely.
Indicator light “rinse? is lit “E-13" with no water remaining in the dum
Suds
Use less detergent for future wash loads. Detergents specifically designed for your High Efficiency washer produce fewer suds and will inciude the letters “HE” on and display is flashing the packaging.
Pump is blocked
Clean the water drainage pipe and/or drain hose.
Water is flowing out from underneath the machine.
The thread of the supply hose is not tight
Tighten the tread
Leak in the drain hose
Replace the drain hose.
Suds coming out of the detergent dispenser.
Too much soap or non—HE soap used, pump could not remove suds.
Mix 1 tablespoon of fabric softener with 1 pt (1/2 lire) of water and pour into the detergent compartment (do not do this with outdoor (waterproof) fabric)
Use less detergent for future wash loads. Detergents specifically designed for your High Efficiency washer produce fewer suds and will include the letters “HE” on the packaging (lok for the “HE” symbol).
Repeated spinning.
This not a fault
The unbalanced load detection system is attempting to balance the load through repeated spins.
Aways Toad the Grum with several large and small iems together.
The laundry was not spun. (Laundry is still wet)
Load size too small.
Add more laundry.
The laundry was not spun. (Laundry is still wet)
Large items of clothing have become entangled and could not be distributed evenly in the drum. For reasons of safety the high-speed spin cycle was automatically prevented.
Always load the drum with several large and small items together.
Excessive suds due to too much detergent, non—HE detergent used
Mix 1 tablespoon of fabric softener with 1 pint (1/2 iter) of water and pour into the main detergent dispenser chamber; reduce the amount of detergent used; use HE detergent. (ok for the “HE” symbol)
Unsatisfactory washing result
The degree of soiling was higher than estimated
Select suitable cycle or Stain removal as an additional option
Not enough detergent
Add detergent according to the manufacturer's specifications
Detergent residue on the laundry
Some phosphate-tree detergents contain water-insoluble residues that may appear as light spots on the laundry.
Brush off spots when laundry is dry.
Gray residue on the laundry.
Dirt accumulation from ointments, fais or ois.
Add the maximum amount of detergent and select the highest permissible temperature.
System shakes or shudders
Drum system suspension can shift during speed-up, this when passing from lower to is not a failure. higher speed spinning.
Mix small and large laundry pieces in load to minimize this effect. Make sure the unit is level.
If the fault cannot be eliminated with the aid of the above table, switch the appliance off again, select and start the cycle.
#1 How do I clean my washing machine's detergent dispenser?
Remove the dispenser from the washing machine according to the instructions in your owner's manual. Place the dispenser under warm, running water and lightly wipe away any remaining detergent residue. Reinsert the dispenser according to the instructions in your owner's manual.
#2 How do I clean my washing machine's door gasket?
After finishing a load, leave the door partially open to air the interior of the machine. This will help dry out any remaining moisture in the drum or on the gasket. Wipe the gasket with a soft cloth to remove residual water or detergent. Any leftover detergent on the gasket means that you are using too much detergent.
#3 How do I clean my washing machine's water inlet strainers?
This is necessary if very little or no water flows into the washing machine. In hard water areas, cleaning is recommended every 6 months to reduce valve blockages. The strainers are located at the ends of the two water supply hoses. Always refer to your owner's manual for specific cleaning instructions for your model. 1. Turn off the machine's water supply. 2. To clean the strainers at the water faucet end of the hoses, disconnect the hoses from the water faucets. 3. Rinse the strainers under running water. 4. Reconnect the hoses and strainers to the water faucets. 5. To clean the strainers at the machine end of the hoses, remove the hoses from the inlets on the back of the machine. 6. Use narrow pliers to grasp and pull the strainers from the inlet ports. 7. Rinse the strainers under running water. 8. Reconnect the hoses and strainers to the back of the machine and turn on the water supply. Check to see if water flows by starting a warm water wash cycle.
#4 How do I clean the exterior of my washing machine?
Use hot, soapy water or a mild, non-abrasive cleaner with a soft cloth. Rinse and then dry with a soft cloth.
#5 How do I clean the interior of my washing machine?
1. Pour 1 container of the Bosch Washing Machine Cleaner into the empty washing machine. 2. Run the hottest cycle. Purchase the Bosch Washing Machine Cleaner in the Bosch Accessories Store.
1. Pour the descaler into the empty washing machine. 2. Run the hottest cycle. 3. Rerun the program for a thorough cleaning. Purchase the Bosch Descaler in the Bosch Accessories Store.


 is on the care label.