OWNER’S MANUAL Washer Dryer Combo
OPERATING INSTRUCTIONS
CONTROL PANEL
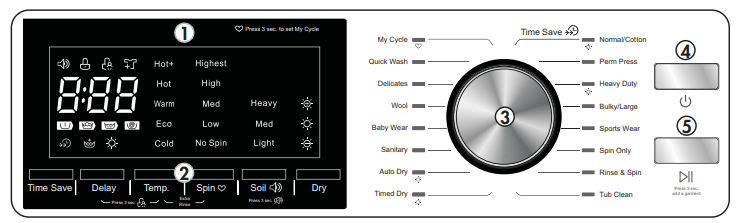
1. Display panel: displays the current program and status.
2. Function setting: shows the current function setting.
3. Program button: used to select the desired program.
4. Power button: used to turn the appliance on or off.
5. Start/Pause button: used to start a new program or pause a program already in progress.
AVAILABLE PROGRAMS
My Cycle: used to set and remember a favourite cycle. Set the desired favourite program and then press and hold Spin 3sec to remember it. Press this button at any time to start the set favourite cycle. The default favourite cycle is Perm Press.
Quick Wash: Extra short program for lightly soiled items. Delicates: for delicate washable materials like silk, satin or synthetic.
Wool: for wool washable materials. Check the label to ensure it says “machine wash” and choose the wash temperature as per the clothing label.
Baby Wear: used for baby clothing.
Sanitary: a high temperature wash suitable for difficult to wash clothes.
Auto Dry: use to allow the appliance to set the dry time based on the remaining moisture in the wash load.
Timed Dry: use to set a specific dry time.
AVAILABLE PROGRAMS
Normal/Cotton: use for hard wearing and heat resistant textiles made of cotton or linen. Perm Press: use for normal load of laundry.
Heavy Duty: use for heavy loads such as towels or jeans.
Bulky/Large: use for bulky or large items such as blankets.
Sports Wear: use for washing active wear. Spin Only: use to add an extra spin cycle to the program.
Rinse & Spin: use to add an extra rinse & spin cycle to the program.
Tub Clean: used to clean the inside of the appliance. It applies high temperature sterilization to clean the drum of the washing machine. Do not add any clothing to this cycle, only vinegar or bleach. Use whenever necessary.
WASH AND DRY CYCLE TABLE
The parameters outlined in this table are for reference purposes only. Actual cycle times and temperatures can vary.
Normal/Cotton is the standard wash program and is suitable to clean most normally soiled items. It is the most efficient program in terms of water and energy usage.
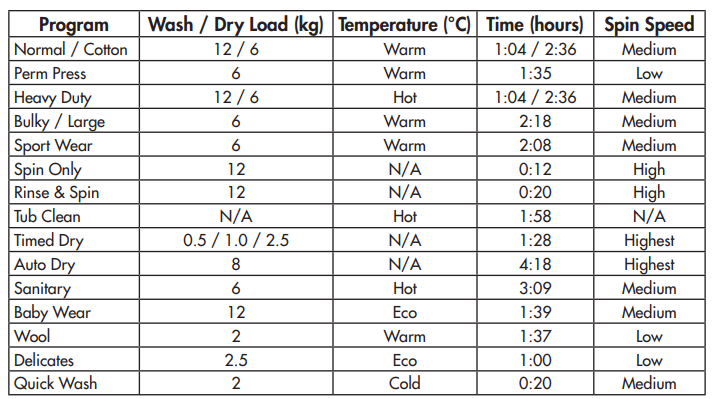
Important: Do not attempt to dry a full load of laundry. A half load is the maximum for all dry cycles
Note: The default display time is only the wash time. The drying time will display when a drying cycle is chosen.
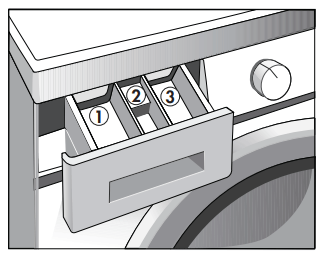
DETERGENT
This appliance is designed for high efficiency powder detergent. It is recommended to use 1/4 to 1/2 of the amount of detergent recommended by the detergent manufacturer. Remember to reduce the amount of detergent if the load is small or lightly soiled or if the water supply is very soft water.
There are three compartments in the detergent dispenser on the front of the appliance.
1. Main detergent compartment.
- Never exceed the manufacturer’s recommendations when adding detergent.
- Powder or liquid detergent can be used.
2. Fabric softener compartment.
- This compartment holds liquid fabric softener that will be dispensed automatically during the final rinse cycle.
- Do not exceed the maximum fill line.
- Adding fabric softener is optional.
3. Pre-wash detergent compartment.
- Do not use more than 1/2 of the amount that is put into the main detergent compartment.
- Adding pre-wash detergent is optional and should only be used for heavily soiled loads
FUNCTION INSTRUCTION
- Prior to starting the washing machine, check the following:
- The drain hose is in the correct position.
- There are no leaks in the inlet hoses when the faucets are turned on.
- The power cord is properly plugged into a three prong grounded outlet.
- All coins and loose items have been removed from clothing.
- Place clothing into the washing machine. Drop items loosely into the tub. Do not pack items tightly. Items must be able to move freely through the wash water for best cleaning results.
- Follow the instructions to set the desired wash program.
- Add the desired amount of detergent.
- Close the door and press the start/pause button to begin the desired program.
- A wash program can be paused once it is in operation by pressing the start/pause button.
- The appliance will not operate if the lid is open.
- When a program is finished, an alarm will sound.
- During the drying cycle, water removed from the wash load will be drained through the drain hose. Ensure that the drain hose remains in place during the drying cycle.
TIME SAVE FUNCTION
This function can decrease washing time. Note: The time save function can be used on the following cycles: normal/cotton, perm press, heavy duty, bulky/large and sports wear.
CHILD LOCK FUNCTION
The child lock will lock the control panel so that options cannot be chosen or changed by accident. Press and hold the function and select buttons at the same time for 3 seconds to engage the child lock. Repeat this procedure to disengage the child lock.
TIME DELAY FUNCTION
The time delay function can be used to set the appliance to run at a later time. To set the time delay function:
1. Select the desired wash and dry program.
2. Press the delay button repeatedly to choose the amount of time before the appliance will run the chosen cycle.
3. Press the start/pause button to confirm the selections. The appliance will count down the delay time and will begin the chosen program when the time runs out.
Note: If power to the appliance is lost during the time delay period, the appliance will remember the program when power is restored and will continue the count down.
ADDING AN ITEM
It is possible to add a forgotten item to the appliance when a wash program is already running. To add a forgotten item:
1. Press and hold the start/pause button for 3 seconds to pause the current program.
2. Wait until the drum stops rotating, the water level is below the bottom of the door and the door is unlocked.
3. Add the forgotten item and close the door.
4. Press the start/pause button to resume functioning.
Note: Do not add an item when the water level is higher than the bottom of the door as this can cause water to leak out of the appliance.
Caution: The inside of the appliance may be hot. Use caution when adding a forgotten item to a wash program.
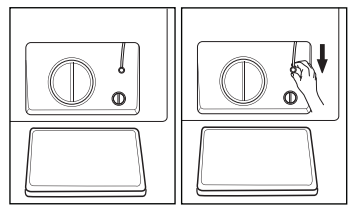
EMERGENCY DOOR RELEASE
In case of a power failure or other circumstances where the door cannot be opened, there is an emergency door release on the rear of the appliance. Open the filter door and pull down on the emergency cord to open the door
CARE & MAINTENANCE
CLEANING
Before performing any cleaning or maintenance, ensure that the water inlet hose has been disconnected and that the power cord has been unplugged. Clean the outside of the appliance with a warm, damp cloth. Avoid using detergents or chemicals as this can damage or discolor the cabinet.
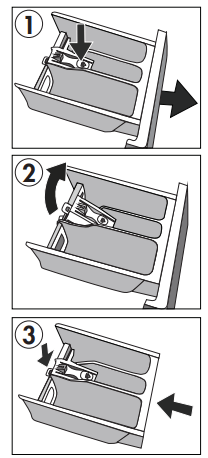
DETERGENT TRAY
The detergent dispenser may occasionally need to be cleaned of accumulated detergent.
1. Press down at the indicated location and pull the dispenser outward.
2. Lift the slip and remove the softener cover. Wash the dispenser with warm water.
3. Replace the softener cover and replace the dispenser in the appliance
FAUCET FILTER
There is a filter inside the inlet hose that may need to be cleaned of accumulated debris or hard water scale. Ensure the water supply is turned off before cleaning. Remove the inlet hose from the faucet and rinse with water.
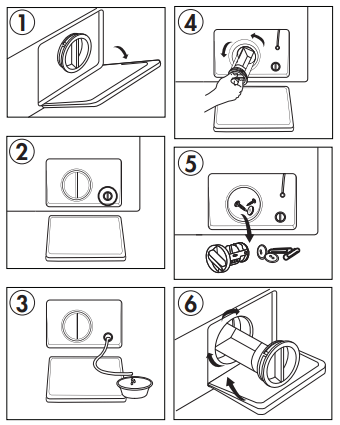
DRAIN PUMP FILTER
The drain pump filter on the rear of the appliance should be periodically cleaned of any accumulated debris.
1. Open the drain cover.
2. Rotate 90° and pull out the lower drain hose.
3. Drain any accumulated water in a drain or vessel.
4. Open the filter by turning it clockwise.
5. Remove any debris and rinse the filter with water.
6. Replace the filter and close the drain cover
TROUBLESHOOTING
| PROBLEM |
POSSIBLE CAUSE |
| Washer does not operate |
- Not plugged in.
- The circuit breaker tripped or a blown fuse.
- The door is not closed.
- The water source is not turned on.
|
| No water or insufficient water supply |
- The water source is not turned on.
- The water inlet hose is bent.
- The filter screen in the water inlet is clogged.
|
| The washing machine does not drain |
- The drain hose is bent.
- There is a problem with the drain pump.
|
| Washing machine vibrates or is too noisy |
- The washer is not level.
- The washing machine is touching another object.
- The laundry load is not balanced.
|
| Washing machine does not spin |
- The door is not closed.
- The washer is not level
|
| Water filling and draining at the same time |
- Ensure drain hose is elevated 0.7 m to 1.2 m off the floor; if the drain hose is too low it can cause water to siphon out of the appliance as it fills
|
| Cabinet leaking from bottom |
- Tub is overloaded
- Water level is too high for the amount of washing
|
| Abnormal noise |
- Ensure the transport bolts have been removed
- Ensure the appliance is level
|
ERROR CODES
E30 - Door is not closed properly
E10 - Water pressure is too low or drain pump installed incorrectly
E21 - Water is not draining correctly
E12 - Water overflow EXX - Other error