User Manual
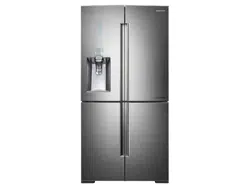
Setting up your French Door Refrigerator
GETTING READY TO INSTALL THE REFRIGERATOR
Congratulations on your purchase of the Samsung refrigerator. We hope you enjoy the state-of-art features and efficiencies that this new appliance offers.
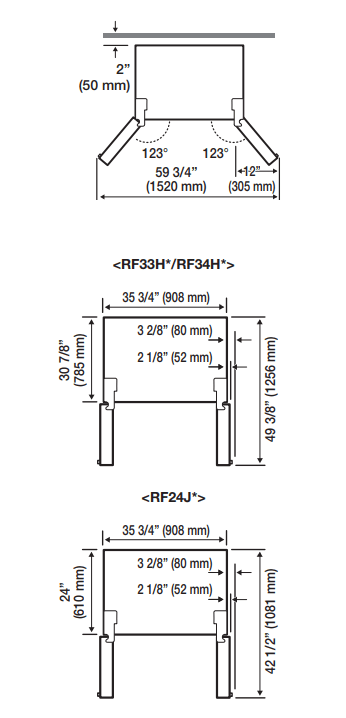
Selecting the best location for the Refrigerator
Choose :
- A location with easy access to a water supply.
- A location without direct exposure to sunlight.
- A location with level (or nearly level) flooring.
- A location with enough space for the refrigerator doors to open easily.
- A location that allows sufficient space to the right, left, back, and top for air circulation. If the refrigerator does not have enough space, it can decrease the refrigerator's efficiency and increase its power consumption.
- A location that allows you to move the refrigerator easily if it needs maintenance or service.
Do not install the refrigerator in locations where the temperature is over 110 °F (43 °C) or below 50 °F (10°C ).
FLOORING
For proper installation, you must place this refrigerator on a level, hard surface that is the same height as the rest of the floor.
This surface should be strong enough to support a fully loaded refrigerator.
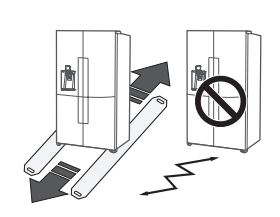
To protect the finish of the flooring, cut a large section of the cardboard carton and place it under the refrigerator where you are working.
When moving the refrigerator, you need to pull and push it straight forwards or back. Do not wiggle it from side to side.
REMOVING THE REFRIGERATOR DOORS
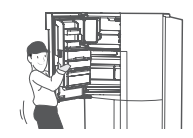
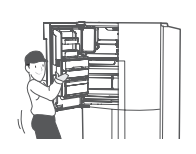
If the refrigerator is too large to pass through your doorways easily, you can remove the refrigerator doors.
If you need to remove the doors. continue below. If you do not need to remove the refrigerator doors, go to `Leveling the Refrigerator' on page 16.
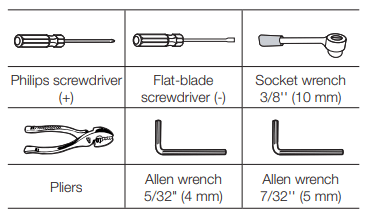
Tools you will need (Not provided)
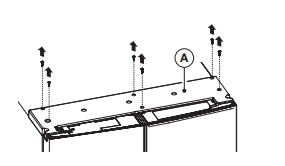
DISASSEMBLING THE REFRIGERATOR DOORS
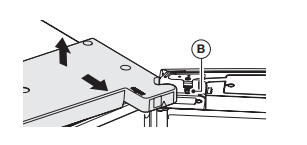
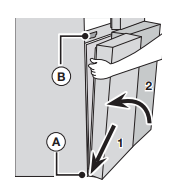
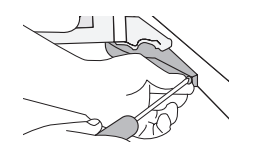
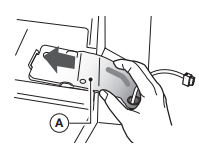
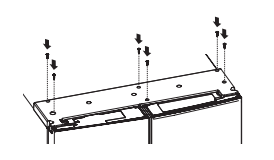
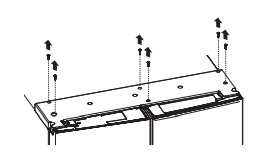
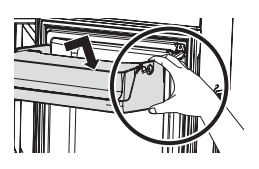
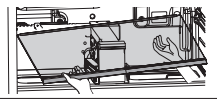
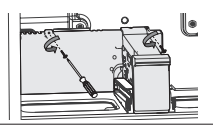
1. With the door closed, remove the 6 screws holding the Top Cover (A) with a Phillips (+)
Screwdriver, and then remove the Top Cover with the entire wire-harnesses attached.
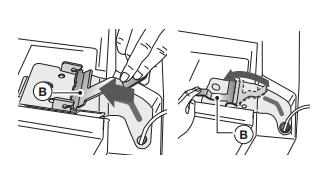
1.1 Open the right door to prevent interference between Bracket (B) and the Top Cover.
Hold the rear of the Top Cover, and pull it out to remove. (Optional)
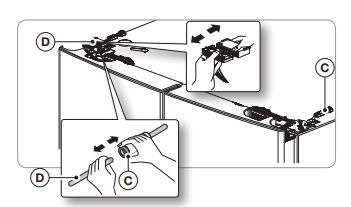
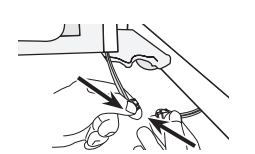
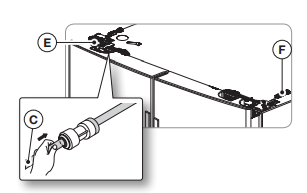
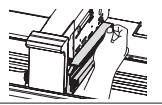
2. Separate the two connectors on the left door and the one connector on the right door.
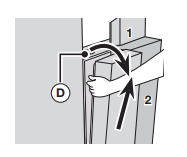
Press the white sleeve (C) of the Water Tube Coupler, and then separate the Water Tube (D).
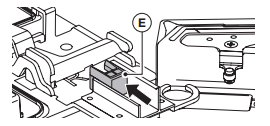
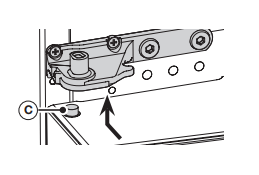
2.1 From the right hinge, slide Pusher (E) to the front to remove. (Optional)
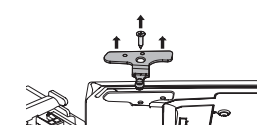
2.2 Loosen the screw on the right door to remove the Bracket. (Optional)
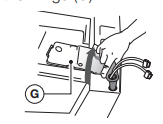
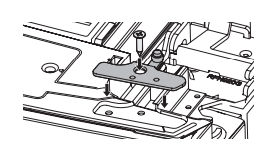
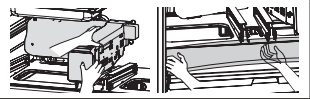
3. Pull up the Fixer Lever (F), and then pull it forward.

4. Remove the Hinge (G).
5. Open the door more than 90°.
Lift it up and take it off.
6. Repeat Steps 3 through 5 to remove the other Fridge door.
DISASSEMBLING THE FREEZER DOORS
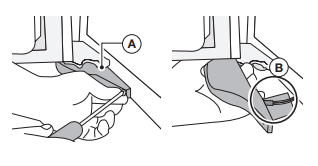
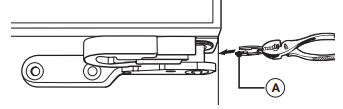
1. With the door open, remove the screw holding the cover (A) of the Adjustable Leg at the bottom of the door with a Phillips Screwdriver, and then disassemble the Connector (B).
2. While holding the axis of the center hinge (C) in the top of the Freezer Door, pull out the Freezer Door.
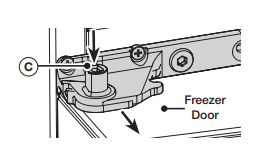
3. Tilt the Door forward a little, and then lift it up to remove.
4. Repeat Steps 1 through 3 to remove the other Freezer Door.
RE-ATTACHING THE REFRIGERATOR DOORS
Once you have moved the refrigerator to its installation location, follow the steps below to reattach the doors.
How to Re-attach the Freezer Door
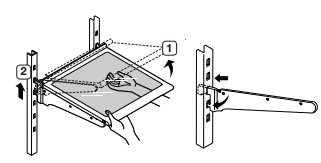
1. Insert the door into the lower hinge (A) in the direction of arrow (1) and then push the door in the direction of arrow (2).
2. Insert the hinge axis (C) into the lower hole of the center hinge.
3. With the door open, join the connectors on the bottom of the door.
- Be careful not to step on or damage the connectors.
4. Attach the Adjustable Leg Cover using a Phillips (+) Screwdriver.
5. Repeat Steps 1 through 4 to re-attach the other Freezer Door.
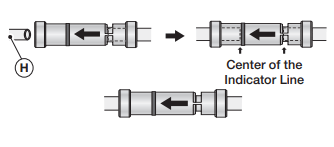
How to Re-attach Fridge Door
1. Attach the detached Fridge Door to the Mid Hinge. (Attach the Door in the open position.)
2. Slide the Fridge Hinge (A) into the fixing slot, and then press it down so that it is aligned with the hole in the door.
3. Insert the Fixer Lever (B) in the direction of the arrow, and then flip it down to assemble.
4. Repeat Steps 1 through 4 to re-attach the other Fridge Door.
4.1 Screw the hinge, and mount the bracket. (Optional)
5. Connect the Water Tube (C). Connect the connector (E) on the left door and the connector (F) on the right door.
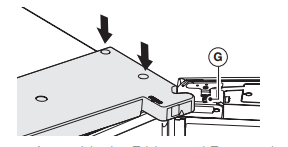
6. Attach the front of the Top Cover, and then press down on its back until it lies flat. Reattach the screws.
6.1 When attaching the Top Cover, open the right door to prevent interference between Bracket (G) and the Top Cover. (Optional)
- Assemble the Fridge and Freezer doors in the reverse order of disassembly.
- If the Wire Connectors are cross-assembled, the display will not work properly
6.2 Insert Pusher (J) in the arrow direction to attach. (Optional)

- Make sure Pusher (J) does not protrude.
LEVELING THE REFRIGERATOR AND ADJUSTING THE DOOR HEIGHT AND THE GAP BETWEEN THE DOORS
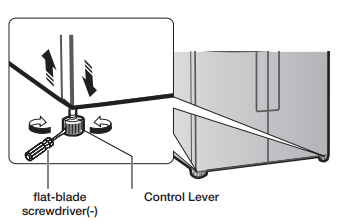
HOW TO LEVEL THE REFRIGERATOR
If the Refrigerator is not level, it can cause one Fridge door to be lower than the other.
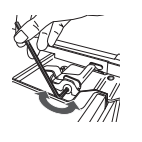
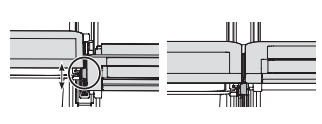
- Insert a Flat-Head (-) Screwdriver into the slot in the Leveling Leg Control Lever and adjust the level by turning the Control Lever clockwise or counter-clockwise. When you rotate the Lever clockwise, you raise the refrigerator. When you rotate the Lever counter-clockwise, you lower the refrigerator.
HOW TO ADJUST THE DOOR HEIGHT
If any one of the doors is lower than the other:
- Check if the Refrigerator is level before adjusting the door.
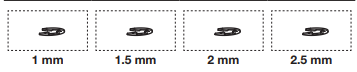
- Adjust the door height difference by inserting a
- Snap Ring (A) as shown between the door and the hinge. You can use the rings to raise the right side door of the fresh food compartment and both doors of the freezer compartment.
- After checking the height difference, select one Snap Ring with a suitable thickness.
- Lift up the lower door and insert the Snap Ring into the space between the Door and the Hinge.
Snap Rings included with the refrigerator:
HOW TO ADJUST THE DOOR GAP
If the gap between the left and right fridge compartment doors is not even.
- You can adjust the gap by turning the bolt at the top right of the cold storage compartment door.
- Do not turn the bolt too far. You can break it.
1. With the doors closed, remove the 6 screws holding the top cover using a Phillips screwdriver, and then remove the Top Cover together with the connected cables.
2. Turn the bolt with a 4 mm hexagonal L-wrench to adjust the gap. (Not provided)
3. Turn the bolt clockwise to ( ) widen the gap. Turn the bolt counter clockwise ( ) to narrow the gap.
4. When done, re-attach the Top Cover wit the connecting cables, and then press down on its back until it lies flat. Insert the 6 screws you removed, and then tighten each.
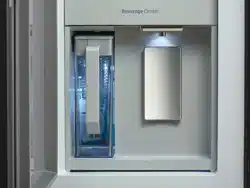
INSTALLING THE WATER DISPENSER LINE
A water dispenser with a filter is one of the helpful features on your new refrigerator. To help promote better health, the water filter removes unwanted particles from your water. However, it does not sterilize or destroy microorganisms. You may need to purchase a water purifying system to do that.
The water line also connects to the ice maker.
For the ice maker to operate properly, water pressure of 20~125 psi (138~862 kPa) is required. If the refrigerator is installed in an area with low water pressure (below 20 psi), you can install a booster pump to compensate for the low pressure.
After you have connected the water line, make sure the water storage tank inside the refrigerator is properly filled. To do this, press the water dispenser lever until water runs from the water outlet.
Connecting to the water supply line
1. First, shut off the main water supply.
2. Locate the nearest cold water drinking line and install the pipe clamp and shut off valve.
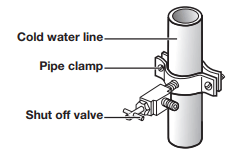
3. Connect the water line installation kit to the shut off valve.
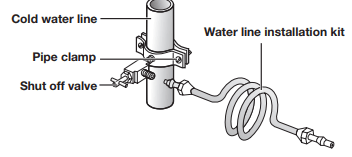
Connecting the water supply line to the refrigerator.
There are several items that you need to purchase to complete this connection.
You may find these items sold as a kit at your local hardware store.
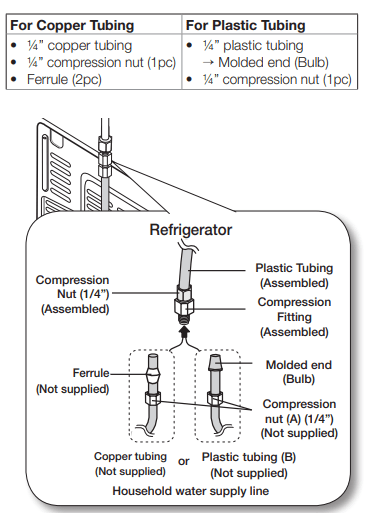
1. Connect the household water line to the assembled compression fitting.
- If you are using copper tubing, slip the compression nut ( A ) (not supplied) and ferrule (not supplied) on the copper tubing (not supplied) as shown.
- If you are using plastic tubing ( B ), insert the molded end (Bulb) of the plastic tubing ( B ) into the compression fitting.
2. Tighten the compression nut ( A ) onto the compression fitting.
Do not over-tighten the compression nut ( A ) .
3. Turn the water on and check for any leakage. If you find water drops or leakage in the connection areas, turn off the main water supply. Check the connections and, if necessary, tighten.
4. Flush 1 gallon of water through the filter before drinking or using the water from the refrigerator. (Flush approximately 6 minutes.) To flush, press a large glass or cup against the water dispenser lever. Fill the glass, empty it into the kitchen sink after it is filled, and then repeat.
5. After you turn on the refrigerator, let the ice maker make ice for 1 to 2 days. Over that period of time, throw out the first 1 or 2 buckets of ice the freezer makes to ensure all impurities have been removed from the water line.
INSTALLING A SODASTREAM 60L CO2 CARBONATOR (FOR SPARKLING WATER REFRIGERATORS ONLY - OPTIONAL)
Purchasing Sodastream 60L CO2 Carbonators
- Purchase SodaStream 60L Carbonators at the nearest SodaStream retailer
- USE ONLY SodaStream 60L Carbonators. SAMSUNG and SODASTREAM are not legally responsible for any damage, including, but not limited to, property damage caused by gas leakage from the use of generic carbonators (or CO2 cylinders (60L)). The sparkling water system in your SAMSUNG refrigerator is designed to work ONLY WITH Sodastream 60L Carbonators.
- We suggest buying extra Carbonators for later use. Store extra Carbonators in a cool, open space, well out of the reach of children.
Water Line Hookup
- Make sure that you have connected the refrigerator to a water line before installing the Sodastream Carbonator.
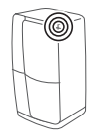
Installing a Carbonator into the Refrigerator
To install a new SodaStream 60L Carbonator in the refrigerator, follow these steps:
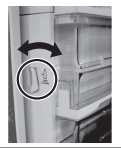
1. Open the Carbonator Cover.
- The refrigerator comes from the factory with the Sparkling Water function set to Off. If the Sparkling Water function is Off, the OFF icon is displayed on the Display Panel.
Refer to Page 41 : Turning Off the Sparkling Water Function.
2. Attach the SodaStream 60L Carbonator to the Regulator, and then rotate it clockwise. 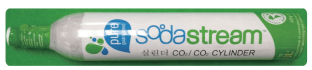
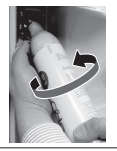
3. Push the SodaStream 60L Carbonator into the Support.

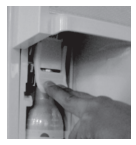
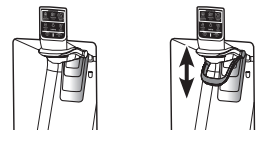
4. Lock the SodaStream 60L Carbonator into place by pressing the Lever.
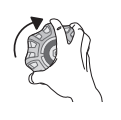
- The inner pressure of the Carbonator may make it difficult to press the lever down. Hold the lever as shown in the illustration on the right, and then push down.
- If you don’t lock the Carbonator into place, the refrigerator won’t produce sparkling water.
- If the Carbonator is not tightly connected to the Regulator, it will leak CO2 gas, producing a hiss. If this occurs, repeat Steps 2, 3, and 4, making sure that the Carbonator is firmly attached and locked into place.
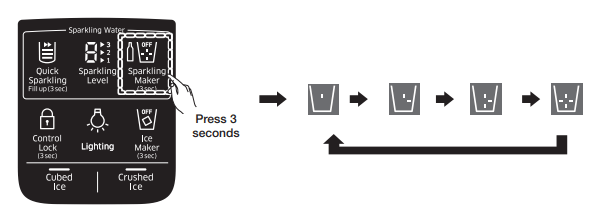
5. Press the Sparkling Maker button 3 seconds to run the Sparkling Making function. Wait about minutes. (the amount of time needed for a medium level of carbonation) while the refrigerator makes sparkling water.
- To make sparkling water, the refrigerator injects CO2 from the CO2 cylinder into water stored in the Sparkling Water tank. The water enters the tank through the refrigerator’s water supply line.
6. To remove any residual substances that may be in the water, dispense 2 or 3 large glass fulls of Sparkling Water and empty them into a sink.
COMPLETING THE SET UP
Now that you have your new refrigerator installed in place, you are ready to set up and enjoy the features and functions of the appliance. By completing the following steps, your refrigerator should be fully operational.
- Make sure your refrigerator is in an appropriate location with reasonable clearance between it and the wall. Refer to installation instructions in this manual.
- Once the refrigerator is plugged in, make sure the interior light comes on when you open the doors.
- Set the Temperature control to the coldest temperature and wait for an hour. The freezer will get slightly chilled and the motor will run smoothly. Reset the refrigerator and freezer to the temperatures you want.
- After you plug the refrigerator in. It will take a few hours to reach the appropriate temperature. You can store food and drinks in the refrigerator after the temperature is sufficiently cool.
Operating your French Door Refrigerator
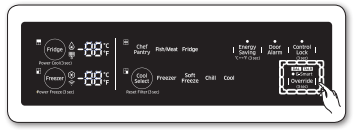
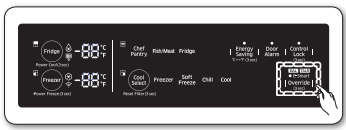
USING THE MAIN CONTROL PANEL
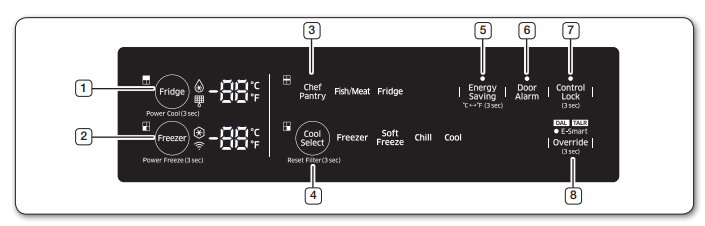
(1) Fridge (Hold 3sec for Power Cool)

- The Fridge button serves two purposes:
- To set the Fridge to your desired temperature.
- To turn the Power Cool function on and off.
- To set the Fridge temperature, touch the Fridge button. You can set the temperature between 34 °F (1 °C) and 44 °F (7 °C) .
- Power Cool functionN Touch and hold this button for 3 seconds to decrease the time needed to cool products in the Refrigerator. Power Cool can be helpful if you need to quickly cool easily spoiled items or if the temperature in the fridge has warmed dramatically (For example, if the door was left open). To turn Power Cool off, touch and hold this button again for 3 seconds.
(2) Freezer (Hold 3 sec for Power Freeze)

- The Freezer button serves two purposes:
- To set the Freezer to your desired temperature.
- To turn the Power Freeze function on and off.
- To set the Freezer temperature, touch the Freezer button to set the Freezer to your desired temperature. You can set the temperature between 5 °F (-15 °C) and -8 °F (-23 °C).
- Power Freezer function Touch and hold this button for 3 seconds to decrease the time needed to freeze products in the Freezer. Power Freeze can be helpful if you need to quickly freeze easily spoiled items or if the temperature in the freezer has warmed dramatically (For example, if the door was left open). When you use this function, the energy consumption of the refrigerator will increase. Remember to turn it off when you don’t need it and return the freezer to your original temperature setting. If you need to freeze a large amount of food, activate Power Freeze function at least 24 hours before. To turn Power Freeze off, touch and hold this button again for 3 seconds.
(3)Chef Pantry
Chef Pantry
- Chef pantry will change to Fish/Meat or Fridge Mode automatically depending on the set fridge temperature. The Fish/Meat Mode lets you store fish and meat at their freshest for a short period of time. To store fish or meat for longer, put it into the Cool Select Room and select the “Freezer” or “Soft Freeze” functions.
- If you set the fridge temperature to 34~36°F, the Chef Pantry changes to Fish/Meat Mode and the Fish/ Meat icon lights. The Chef Pantry is set to 30 °F (-1°C) in the Fish/Meat mode.
- If you set the fridge temperature to 37~44°F, the Chef Pantry changes to Fridge Mode and the Fridge Icon turns on.
(4)CoolSelect (Hold 3 sec for Reset Filter)
- The CoolSelect button lets you set the Cool Select Room on the bottom right of your refrigerator to one of four settings: Freezer, Soft Freezing, Chill, or Cool. Each time you touch the button, the setting changes.
- The CoolSelect button also lets you reset the water filter life indicator. After you replace the water filter, touch and hold this button for 3 seconds to reset the water filter life indicator
Freezer
- Select Freezer to set the Cool Select Room to the same temperature as the freezer.
- Use this setting to keep frozen food fresh.
Soft Freeze
- Select Soft Freeze to set the temperature in the Cool Select Room to 23 °F (-5 °C) .This feature helps keep meat and fish fresh longer.
Chill
- Select Chill to set the temperature of the Cool Select Room to 30 °F (-1°C)
Cool
- Select Cool to set the temperature of the Cool Select Room to 41 °F (5°C). You can keep water, juice, soft drinks, beer, etc. cold.
Filter

Water filter usage
- This icon lights when you need to change the filter, usually after the refrigerator has dispensed about 300 gallons of water (after about 6 months). The icon will blink red for several seconds when you open or close the door. After you install the new water filter, reset the filter indicator by touching and holding the CoolSelect/hold 3 sec for Filter Reset button for 3 seconds.
- If water is not dispensing or dispensing slowly, you need to replace the water filter because the water filter is clogged.
- Some areas have large amounts of lime in their water, which causes the water filter to clog more quickly.
(5)Energy Saving (Hold 3 sec for °C↔°F)
Energy Saving
- Touching this button turns Energy Saving mode on and off. When you turn Energy Saving on, the Energy Saving icon lights.
- Turn Energy Saving off and the icon goes off. The Energy Saving function is set to “ON” in the factory.
- If condensation or water drops appear on the doors, turn the Energy Saving mode off.
- This button also lets you switch the temperature displays between °C and °F. Touch and hold this button for 3 seconds to switch the temperature units between °C and °F.
(6)Door Alarm
Door Alarm
- The Door Alarm button lets you turn the door alarm on and off.
- If the door alarm is set to On, an alarm beeps if any refrigerator door is left open for more than two minutes.The beeping stops when you close the door.
- The Door Alarm function is pre-set to On in the factory. You can turn it off by touching and then releasing this button.
- You can turn it back on in the same fashion. The icon lights up when the function is on.
- When the Door Alarm function is on and the alarm sound is triggered, the Door Alarm Icon will blink while the alarm sounds.
(7)Main Control Panel Lock (3 sec)
Control Lock
- Touch and hold the Control Lock button for 3 seconds to lock the Main Control Panel. If the Main Control Lock is on, none of the buttons on the Main Control Panel work.
- (However, the dispenser control panel and the dispenser level will continue to work, because the dispenser control panel has its own, independent Control Lock button.)
- To unlock the Main Control Panel, touch and hold the main Control Lock button for 3 seconds again.
Cooling Off Mode
- North American (US, Canada) Models Only ; Cooling Off mode (also called Shop mode), is designed for use by retailers when they are displaying refrigerators on the shop floor. In Cooling Off mode, the refrigerator’s fan motor and lights work normally, but the compressors do not run, and the refrigerator and freezer do not get cold. To start Cooling Off mode, touch and hold the Fridge, Freezer, and Door Alarm buttons for 5 seconds during normal operation. The refrigerator chime sounds and the temperature display flashes “OFF”. The Star Display blinks slowly on and off when the refrigerator is in Cooling Off mode (17 seconds on, 3 seconds off).
- To cancel Cooling Off mode, touch and hold the Fridge, Freezer, and Door Alarm buttons again for 5 seconds.
(8)Override (3 sec)
- The Override function activates/ deactivates Smart Grid (page 27).
- Touch and hold the Override button for 3 seconds to set/clear the Override function.
E-SMART REFRIGERATOR FEATURES
How to get the most out of your E-Smart refrigerator.
Connected Product 
The E-Smart icon lets you check the status of the refrigerator’s AP connection (network connection).
- When connected to an AP: The E-Smart icon is on.
- When not connected to an AP: The E-Smart icon is off.
Getting Connected
To use the Smart Grid (Demand Response) and E-Smart function on your Refrigerator, you need the following devices and apps:
- Devices: 1) Wireless Router, 2) Samsung E-Smart Refrigerator, 3) Smartphone (Recommended: Galaxy S4, Galaxy Note 3/ Android OS Jelly bean).
- Applications: 1) “Samsung E-Smart App” from the Google Play Store or Samsung Apps.
In addition, you need to:
- Connect the Refrigerator and the Smartphone to the same Wi-Fi network in your home.
- Install and run the Samsung E-Smart App on your Smartphone (to use the Samsung E-Smart function).
In addition, to use the Smart Grid (Demand Response) function, you must register for the service with your electric company.
The company must have an EMS (Energy Management System) that supports SEP (Smart Energy profile).
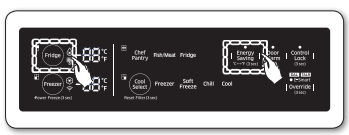
DOWNLOADING THE E-SMART APP AND CONNECTING THE REFRIGERATOR TO YOUR NETWORK
- On your Smartphone, connect to the app store e.g. Google Play, etc.).
- Search for the app using “Samsung E-Smart Ref.” as the keyword.
- Download the app and install it on your phone.
- Launch the app. The network configuration screen appears.
- Configure the AP information (SSID, Password, etc.) on the app screen.
- Configure the network settings according to the instructions in the app.
- On the refrigerator, press and hold the Fridge and Energy Saving buttons at the same time for seconds. The refrigerator enters the AP mode.
8. If you have completed the network settings properly, the app shows the home screen.
- Please confirm your Internet devices (AP, Smartphone) are working properly before configuring the network settings.
- This refrigerator supports the IEEE 802.11 a/b/ g/n protocols. Samsung Electronics recommends IEEE 802.11N
- To connect the refrigerator to a wireless network, you have to connect the refrigerator to an AP (router or modem). If the AP supports DHCP, you can connect the refrigerator to the Internet using DHCP or a fixed IP address.
- Set the channel of the AP to one not currently being used. If the channel set for the AP is being used by another device nearby, it may result in interference.
- Most wireless networks allow you to configure network security settings. If your network has a security password, you must enter the password to connect to the network.
- The refrigerator supports the following wireless security modes and encryption types:
- Security Mode: WEP, WPAPSK, WPA2PSK
- Encryption Type: WEP, TKIP, AES (WPA2PSK and AES are recommended.)
- The app supports indoor control only.
- The Samsung E-Smart Ref. app is optimized for Samsung Electronics Smartphones. (Galaxy S4, Galaxy Note 3) For other Smartphones, some functions may work differently.
- Supported Wireless Channels: 1 to 11.
MAC Address Display Mode
This function displays the MAC address of the WiFi module on the refrigerator for one minute.
1. Touch and hold the CoolSelect and ControlLock(3 sec) buttons at the same time for 3 seconds.
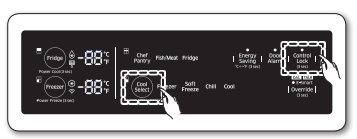
2. A Buzzer sounds. Four of the twelve Mac addresses of the Wi-Fi module are displayed in turns in the freezer and fridge temperature displays for 1 minute. For example, if the WiFi module’s MAC address is “11-22-33-44-55- 66" the MAC address is displayed as follows: “11 22” → “33 44” → “55 66” → “11 22” for 1 minute.
3. After 1 minute, the Buzzer sounds again and the display returns to the normal state.
SMART GRID Function (Demand Response)
When the refrigerator operates in SMART GRID (Demand Response) mode, the E-Smart Refrigerator function can control energy usage or delay the operation of some functions to save money when energy prices or demand are the highest.
Using the SMART GRID (Demand Response) Function
This feature monitors energy price and demand information from your utility company and sends notifications to the refrigerator to run high energyconsuming tasks during off-peak times when electricity costs and demand are lower.
If the refrigerator receives the control signal from the Utility Company, the refrigerator will display the  (L3) ~
  (L4) levels on the refrigerator display and control the power consumption according to the level.
[Exception condition] The and control signals from an Utility Company work as long as the product performance is maintained.
If the refrigerator receives the SMART GRID (Demand Response) signal ( or ), the refrigerator will operate in Delay Appliance Load (Star Display: L3) or Temporary Appliance Load Reduction (Star Display: L4) mode.
- Delay Appliance Load (L3): The refrigerator responds to a signal by providing a moderate load reduction for the duration of the delay period.
This function controls functions that consume large amounts of energy such as adjusting the Cooling system, running the defrost cycle, and making ice.
– When the refrigerator operates in (L3) mode, " " LED (Star Display: L3) is on.
– mode is automatically deactivated after it lasts for the amount of time stipulated by the signal (max. 4.5 hours) or when the Override key is pressed.
- Temporary Appliance Load Reduction (L4): The refrigerator responds to a signal by aggressively reducing the load for a short time period.
This function reduces energy consumption by stopping the compressor and controlling the functions that consume large amounts of energy such as the defrost cycle and making ice.)
– When the refrigerator operates in (L4) mode, " " LED (Star Display: L4) is on.
– (L4) mode is automatically deactivated after it lasts for the received duration (max. 15 minutes), or when the Override key is pressed.
The mode is immediately deactivated and the refrigerator returns to the normal state when the door is opened or closed, or the dispenser is used.
Override Mode
When you want to ignore the SMART GRID (Demand Response) signal from the Utility Company, you can activate OVERRIDE mode. If OVERRIDE mode is activated, the SMART GRID (Demand Response) signal is ignored and the refrigerator will not be controlled by the Utility Company.
Activating and deactivating Override mode
1. Touch and hold the [Override] button for 3 seconds.
2. A Buzzer sounds and ‘Or’ and ‘on’ is displayed on the fridge and freezer temperature displays for 5 seconds.
3. If the refrigerator receives the SMART GRID (Demand Response) signal from the Utility Company, ‘Or’ is displayed on the fridge temperature display.
4. To deactivate OVERRIDE mode, touch and hold the [Override] button for 3 seconds.
5. A Buzzer sounds and ‘Or’ and ‘oF’ is displayed on the fridge and freezer temperature displays for 5 seconds.
Using the E-SMART Function
The E-SMART function enables you to control and monitor your E-Smart refrigerator remotely for your convenience using your Samsung smart phone.
E-Smart Features
1. Operational Status, User Settings & Messages
- You can view the freezer and fridge temperature settings.
- You can receive an alarm when the freezer or fridge door is open for 2 minutes.
- You can check the DR and the Override status.
- You can check the operational condition of the ice maker in the freezer.
- The door-open alarm indicator appears on the status bar of the top area of your mobile phone.
2. Remote Management
- Power Freeze Setting: You can activate the
- Power Freeze function remotely.
- Power Cool Setting: You can activate the Power
- Cool function remotely.
- Ice On/Off Setting: You can set the Ice On/Off Setting function remotely.
3. Energy Consumption Reporting
- Shows the accumulated power consumption. ( Power consumption data is updated every 10 minutes.)
4. Delay Defrost Capability
- The Delay Defrost Capability function saves energy by delaying the defrost operation to a time specified by the user. You can configure the time, and this function will save energy during the specified period in a hour cycle. If the time is not set, the function works with the default time settings. The default time settings are below:
- 6 am to 10 am: 1st. November ~ 30th. April
- 3 pm to 7 pm: 1st. May ~ 31th. October
Provision FOR Open Access to the Connected Product Requirements
1. SGIP Open Standards
- Energy Consumption Reporting
- Demand Response
2. Samsung OPEN API
- Operational Status, User Settings & Messages
- ICE Maker Status: GET /external/ icestatus?icegetstatus=opt (relevant to the energy consumption of the product 1)
- Door Open Alarm: GET /devices/0/ Door?type=opt (relevant to the energy consumption of the product 2)
- DR Status: GET /external/drlc?drgetstatus=opt
- Delay Defrost Capability
- Set Schedule of the Defrost Delay: POST / devices/0/defrost/addSchedule
- Get Schedule of the Defrost Delay : GET / devices/0/defrost/getSchedule
- Delete Schedule of the Defrost Delay: POST / devices/0/defrost/delSchedule
- Defrost Delay On/OFF: PUT /devices/0/defrost/ delayevent.
STAR DISPLAY INDICATORS
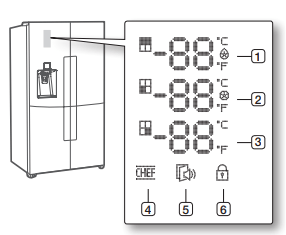
The Star Display contains indicators and icons that graphically display the state of your refrigerator. For example, the Power Cool indicator lights when the Power Cool mode is on.
(1) Fridge 
- Fridge temperature display (°C/°F).
- Power Cool’ Mode Indicator (
 ).
).
(2)Freezer 
- Freezer temperature display (°C/°F).
- Power Freezer’ Mode Indicator (
 ).
).
(3) Cool Select (Cool Select Room) 
The displayed temperature corresponds to the
Cool Select Room setting.
Freezer: Same as the freezer temperature (°C/°F).
Soft Freeze: 23 °F (-5 °C)
Chill: 30 °F (-1 °C)
Cool: 41 °F (5 °C)
(4)Chef Pantry
If this icon lights up, it means that the CHEF Mode is operating now.
(5)Door Open indicator 
If the door is open for a certain length of time, this indicator icon blinks and the refrigerator beeps.
(6) Dispenser Control Panel Lock 
If you Lock the Dispenser Control Panel, the Lock icon ( ) on the Door is displayed.
The Dispenser Lock doesn't affect the Main Control Panel. The Main Control Panel has its own lock button.
If you lock the Main Control Panel, the dot on the Main Control Lock (  ) will be displayed.
USING THE DISPENSER CONTROL PANEL
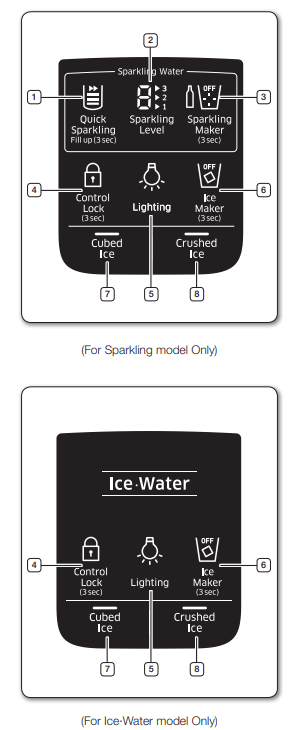
(1) Quick Sparkling / Fill up (3 sec)

When you touch the Quick Sparkling button, the (  ) icon lights and the refrigerator makes sparkling water rapidly at the level indicated by the
Sparkling Level icon. If there is no sparkling water in the Sparkling Water tank, the refrigerator will begin making sparkling water immediately. If there is sparkling water in the tank, the refrigerator applies the Quick Sparkling function the next time it makes sparkling water.
When you replace the SodaStream carbonator, press the ‘Quick Sparkling/
Fill up (3 sec)’ button for 3 seconds to activate the Fill up function.
The refrigerator will fill the sparkling water tank with water and inject CO2 gas into the water to make sparkling water. The sparkling level of the water may differ from the set level, depending on the amount and CO2 concentration of the sparkling water remaining in the tank. If the tank is empty or the concentration is very low, the refrigerator will make sparkling water at the level Indicated by the Sparkling Level icon.
The Quick Sparkling icon ( ) also indicates the amount of sparkling water in the sparkling water tank. When the tank is full, three bars light. The number of bars lit decreases as the amount of sparkling water decreases.
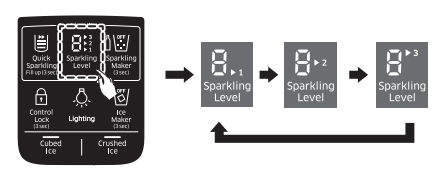
(2)Sparkling Level

The refrigerator can make sparkling water in three sparkling levels: low (1), medium and high (3). To set the sparkling level, tap the Sparkling Level button. Each time you tap the button, the small numbers on the right side (  ) change. Stop when you have selected the sparkling level you want.
The next time the refrigerator makes sparkling water, it will make it at the sparkling level you have selected.
The large number on the left ( ) indicates the current sparkling level. If there is previously produced sparkling water inside the Sparkling Water tank, the refrigerator dispenses sparkling water at this level. (Changes to the sparkling level do not take effect until the next time the refrigerator makes sparkling water.
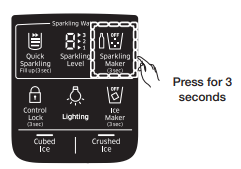
(3) Sparkling Maker (3 sec)

Touch and hold for 3 seconds to turn on the sparkling water maker. Touch and hold for 3 seconds again to turn it off.
If the SodaStream carbonator runs out of CO2, the icon turns on (  ) and you must replace the carbonator with a new one.
(4)Dispenser Control Panel Lock (3sec)

Touch this button for 3 seconds to turn on the Dispenser Control Lock which locks the dispenser and dispenser panel buttons so the buttons can not be used. The Control Lock icon lights up to indicate you’ve activated the
Control Lock function. Touch and hold this button for 3 seconds to unlock.
(5)Lighting

Touching this button sets the Dispenser LED lamp (under the display) to continuous mode so that it stays on continuously.
The button also lights up. If you want the Dispenser lamp to come on only when some one uses the dispenser, touch this button to turn the continuous mode off.
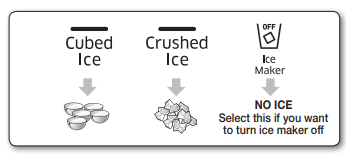
(6)Ice Maker (3 sec)

To turn the ice maker on or off, touch and hold the Ice Maker button for seconds.
The ‘Off’ LED lights and the Ice-Maker stops making ice. To turn the ice maker on, touch and hold the Ice Maker button again for 3 seconds. The ‘Off " LED turns off.
(7) Cubed Ice
(8)Crushed Ice
Touch the Cubed Ice or Crushed ice button to select the type of ice you want to dispense.
Each time you touch the button, the cubed and crushed ice modes alternate and the Cubed or Crushed ice icon lights up, indicating your selection.
CHANGING THE WATER FILTER
USE ONLY SAMSUNG BRAND WATER FILTERS.
SAMSUNG is not legally responsible for any damage, including, but not limited to, property damage caused by water leakage from the use of a generic water filter. SAMSUNG Refrigerators are designed to work ONLY WITH SAMSUNG Water Filter.
The Filter light turns red to let you know when it is time to change your water filter cartridge. To give you time to get a new filter, the red light comes on just before the capacity of the current filter runs out. Changing the filter on time provides you with the freshest, cleanest water from your refrigerator.
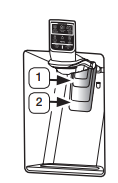
TO CHANGE THE WATER FILTER
1. Shut off the water supply. Pull down the filter cover, and then turn the water filter ( 1 ) about turn, counter-clockwise.
2. Pull the water filter ( 1 ) from the case filter ( 2 ).
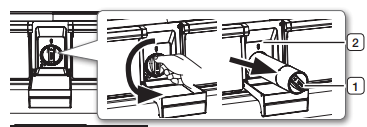
- When you pull out the water filter, a little water can leak from the opening. This is normal. To minimize the water leaks, keep the filter cartridge horizontal when you pull it.
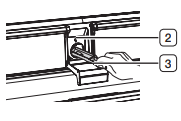
- To prevent overflow, empty the water filter tray(3) and dry around the filter case ( 2 ).
3. Insert the new filter into the filter case ( 2 ).
4. Push the filter in, and then turn it clockwise until it locks.

5. Touch the “CoolSelect” button for about 3 seconds to reset the water filter. The color of the indicator  changes from red to off.
6. If you turned off the water supply, turn it back on.
Removing any residual matter inside the water supply line after installing the water filter.
- Turn ON the main water supply if you turned it off when you installed the water filter.
- Run water through the dispenser until the water runs clear (approx. 6 to 7 minutes). This will clean the water supply system and remove air from the lines.
- Additional flushing may be required in some households.
- Open the Refrigerator door and make sure there are no water leaks coming from the water filter.

Reverse Osmosis Water Supply
IMPORTANT:
The pressure of the water supply coming out of a reverse osmosis system going to the water inlet valve of the refrigerator needs to be between 35 and 120 psi (241 and 827 kPa).
If a reverse osmosis water filtration system is connected to your cold water supply, the water pressure to the reverse osmosis system needs to be a minimum of 40 to 60 psi (276 to 414 kPa.) If the water pressure to the reverse osmosis system is less than 40 to 60 psi (276 to 414 kPa):
- Check to see whether the sediment filter in the reverse osmosis system is blocked. Replace the filter if necessary.
- Allow the storage tank on the reverse osmosis system to refill after heavy usage.
- If your refrigerator has a water filter, it may further reduce the water pressure when used in conjunction with a reverse osmosis system. Remove the water filter.
If you have questions about your water pressure, call a licensed, qualified plumber.
CONTROLLING THE TEMPERATURE
RECOMMENDED FREEZER AND REFRIGERATOR COMPARTMENT TEMPERATURES
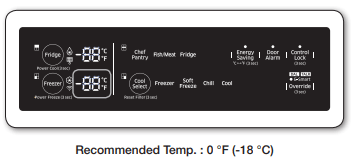
The recommended temperatures for the Freezer and Refrigerator Compartments are 0 °F and 37 °F (18°C and 3 °C) respectively.
If the temperature of the Freezer and Refrigerator Compartments are too high or low, adjust the temperature manually.
Controlling the Freezer temperature
Freezer
The Freezer temperature can be set between -8 °F and 5 °F (or between -23 °C and -15 °C) to suit your particular needs.
Press the Freezer button repeatedly until the desired temperature is shown in the temperature display. The temperature will change by 1 °F (or 1°C) with each press.
See below.
Fahrenheit : 0 °F ➞ -1 °F ➞ -2 °F ➞ -3 °F ➞ -4 °F ➞ F ➞ -6 °F ➞ -7 °F ➞ -8 °F ➞ 5 °F ➞ 4 °F ➞ F ➞ 2 °F ➞ 1 °F ➞ 0 °F.
Centigrade : -18 °C ➞ -19 °C ➞ -20 °C ➞ -21 °C ➞ C ➞ -23 °C ➞ -15 °C ➞ -16 °C ➞ -17 °C
Power Freeze
The Power Freeze function substantially speeds up the freezer compressor, causing the freezer to cool down rapidly to a temperature you choose.
This icon will light up when you press and hold the Freezer button for 3 seconds.
Power Freeze is useful if you need to quick freeze an item, to make a large quantity of ice, or to cool the freezer rapidly if it has warmed dramatically (for example, if the door was left open).
To turn the Power Freeze function off manually, press the Freezer button, and then re-set the Freezer temperature.
Power Freeze turns off automatically after 50 hours to decrease energy consumption.
When you use this function, the energy consumption of the refrigerator will increase.
If you need to freeze large amounts of food, activate the Power Freeze function at least hours before.
Controlling the fridge temperature
The fridge temperature can be set between 34 °F and 44 °F (or between 1 °C and 7 °C) to suit your particular needs. Press the Fridge button repeatedly until the desired temperature is shown in the temperature display. The temperature will change by 1 °F (or 1 °C) with each press.
See below.
Fahrenheit : 37 °F ➞ 36 °F ➞ 35 °F ➞ 34 °F ➞ F ➞ 43 °F ➞ 42 °F ➞ 41 °F ➞ 40 °F ➞ 39 °F ➞ F ➞ 37 °F.
Centigrade : 3 °C ➞ 2 °C ➞ 1 °C ➞ 7 °C ➞ 6 °C ➞C ➞ 4 °C ➞ 3 °C.
- This may cause the digital display to blink. Once the Freezer and Fridge temperature return to their normal set temperatures, the blinking will stop.
- If the blinking continues, you may need to “reset” the Refrigerator. Try unplugging the appliance, waiting for around 10 minutes, and then plugging the power cord back in.
- If there is a communication error between the Display and Main Controller, the Convertible Display light may blink. If the blinking continues for a long period of time, please contact a Samsung Electronics Service Center.
USING THE CLOD WATER & ICE DISPENSER
Push the appropriate ice type button to select what you want to dispense.
Using the ice lever ( 1 )
Push the Ice lever dispenser ( 1 ) gently with your glass. Ice will be released from the dispenser.
You can choose the type of ice by pushing the cubed or crushed button first.
Using the Water lever ( 2 )
Push the Water lever dispenser (2) gently with your glass. Water will be released from the dispenser.
Using the Ice & Water Dispenser together
To get Ice and water, push the Ice lever ( 1 ) first for ice, then move your glass down and press the water dispenser lever ( 2 ) for water.
Maintaining the Ice Bucket
- To clean the ice bin/bucket, wash with a mild detergent, rinse well, and dry thoroughly. Do not use harsh or abrasive cleaners or solvents.
- Ice is made in cubes. When you select Crushed”, the ice maker grinds the ice cubes into crushed ice.
- When you select Cubed Ice after using the Crushed Ice mode, a small amount of residual crushed ice might be produced.
- The ice cubes generated by the rapid ice making process will look white, which indicates they are generated normally.
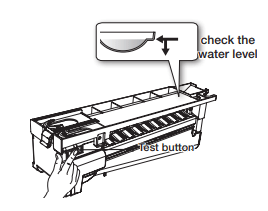
- If ice doesn’t come out, pull out the ice bucket and press the Test button located on the right side of ice maker. See the illustration under Making Ice below.
- Do not press the Test button continuously if the tray is filled with ice or water. Water may overflow or ice may jam the bucket.
Making Ice
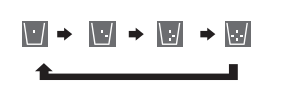
- To fill the ice bucket to maximum capacity after installation, follow these steps:
- Allow your refrigerator to operate and cool down for 24 hours (or 1 full day).
- Waiting 24 hours will allow your ice maker to cool properly.
2. Dispense 4 to 6 ice cubes into a glass.
3.After another 8, and then 16 hours, dispense a full glass of ice.
- To test the ice maker, press the Test button on the ice maker. You will hear the refrigerator chime (ding-dong). When the chime sounds, release the Test button.
- The chime sounds automatically again to let you know the ice maker is working well.
Using the ice off Function
When you select the Ice Off mode, remove all ice cubes from the bucket.
If you leave the ice cubes in the bucket, the ice cubes may clump together, making it difficult to remove them.
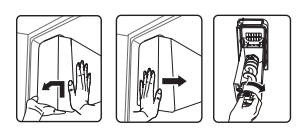
To remove the ice bucket safely and avoid injury, hold the bottom of the bucket with one hand and the side of the bucket with the other.
Then, lift up on the ice bucket, and pull it straight out.
To put the ice bucket back in, push it firmly straight back.
If the bucket does not fit, turn the helix 90 degree see the last illustration on the right, below) and try again.
Going on vacation...
If you are going on a long vacation or business trip and won’t use the water or ice dispensers for a long time:
- Close the water valve. Otherwise, water leakage may occur.
- Remove all food and ice in the ice bucket.
- Unplug the refrigerator.
- Wipe excess moisture from inside and leave the doors open. Otherwise, odor and mold may develop.
Ice Maker Do’s and Don’ts
- Do not put your fingers, hands or any other unsuitable objects in the chute or ice-maker bucket. You can hurt yourself or damage the refrigerator. Never put your finger or any other objects in the dispenser opening. You can injure yourself.
- Do not try to disassemble the ice maker.
- Do not wash or spray the ice bucket with water while it is in the refrigerator. Remove it to clean it.
Water clouding phenomenon
All water provided to the refrigerator flows through a core alkaline water filter.
In the filtering process, the pressure of the water that has flowed out of the filter has increased, and the water has become saturated with oxygen and nitrogen.
When this water flows out into the air, the pressure plummets and the oxygen and nitrogen get supersaturated, which results in gas bubbles.
The water may temporarily look misty or cloudy due to these oxygen bubbles.
After a few seconds, the water will look clear.
USING THE SPARKLING WATER FUNCTION (FOR SPARKLING WATER REFRIGERATORS ONLY - OPTIONAL)
With a Sodastream CO2 cylinder installed, your refrigerator can make and dispense sparkling (carbonated) water.
Making Sparkling Water
To produce sparkling water, press and hold the Sparkling Maker button for 3 seconds. When the carbonation process starts, the short lines inside the cup icon turn on one by one clockwise. When the process is complete, all short lines turn solid.
If you leave the Sparkling Water Production function on, and the amount of Sparkling Water becomes low, the refrigerator automatically enters the Sparkling Water production mode and makes more. However, if you turn off the Sparkling Water Production function, the refrigerator will not make additional sparkling water, even if there is little sparkling water left in the Sparkling Water tank.
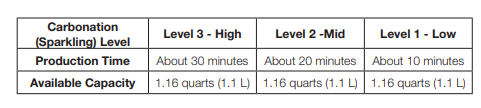
Sparkling Water Production Time
Depending on the Carbonation (Sparkling) Level you set (See Controlling the Carbonation Level on page the amount of time it takes the refrigerator to complete the sparkling water production process changes. The table below lists the production times by Carbonation Level. The refrigerator is pre-set at the factory to Level 2.
Quick Sparkling enables you to produce sparkling water within 10 minutes. (It consumes more CO2 gas than production at Level 3.)
Dispensing Sparkling Water
To dispense sparkling water, press the Sparkling-Selection lever above the dispenser down (See the illustration on page 40.) Then, push the Ice/Sparkling Water lever gently with a glass. As time passes, the sparkling water dispensing speed can change. When the water tastes strongly carbonated, the dispensing speed can be faster. When the carbonation is weaker, the dispensing speed can slow.
The dissolved CO2 in the sparkling water can also cause the water to pop out when you dispense it. In addition, due to the pressure fluctuations in the Sparkling Water Tank, the water stream may shake or become intermittent.
If you keep dispensing sparkling water, the water stream may become unstable or break up. This is caused by changes in pressure in the Sparkling Water Tank. It is not a defect.
After dispensing Sparkling water, lift the Sparklingselector lever up.
Water Dripping
Some time after you have dispensed sparkling water, a few drops of sparkling water can escape from the dispenser. The water dripping is not a product defect, but a natural result of mixing CO2 and water.
Controlling the Carbonation Level
You can change the sparkling water’s carbonation level by pressing the Sparkling Level button. Each time you press the Spakling Level button, the carbonation level changes as follows:
Medium (Level-2) → Strong (Level-3) → Weak (Level-1) → Medium (Level-2). As you press the button, the small numbers on the right side of the button light up in succession, indicating the level change.
The change in carbonation level is applied the next time the refrigerator makes sparkling water.
- If there is previously produced sparkling water inside the Sparkling Water tank, the refrigerator dispenses sparkling water with the previous carbonation level. (Again, changes in the carbonation level do not take effect until the next time the refrigerator makes sparkling water. The change does not affect sparkling water that is already made.)
- While the refrigerator is producing sparkling water, the Sparkling Level icons light up in rotation Level-1 → Level-2 → Level-3 → Level-1, etc.). If you press the Sparkling Water button again while the carbonation level is being displayed, the carbonation level changes. The change in the carbonation level will take effect the next time the refrigerator makes sparkling water.
- The main number on the left side indicates the sparkling level of the current sparkling water, while the small numbers on the right side indicate the sparkling level for the next process. Even if you change the sparkling level while the refrigerator is producing sparkling water, the change is not applied to the current process but is applied to the next process.
The Sparkling Level is set to Level 2 at the factory. If the sparkling water tastes too strong or too weak, change the carbonation level. Level 1 provides a milder carbonation, Level 3 a stronger carbonation.
- If there is a power interruption when the refrigerator is making sparkling water, the refrigerator may restart the carbonation process when power returns and put too much carbonation into the water. If this occurs, we recommend throwing out the overly carbonated water and starting the process again.
- The lifetime of the CO2 cylinder can vary, depending on the Sparkling Levels you choose.
Turning Off the Sparkling Water Function
To turn off the Sparkling Water function, press the Sparkling Maker button for 3 seconds.
Any sparkling water remaining in the Sparkling Water tank after you have turned off the Sparkling Water function can still be dispensed.
Replacing a SodaStream Carbonator
If the cylinder icon (  ) turns on, replace the SodaStream 60L Carbonator with a new one. To replace a Carbonator, follow these steps:
1. Lift up the Lever holding the SodaStream 60L Carbonator in place.
2. Pull the Carbonator out of the Support.

3. Rotate the Carbonator counterclockwise to remove it from the Regulator.
4. To install a new SodaStream 60L Carbonator, follow the directions for installing a Carbonator starting at Step 2 in Installing a Carbonator into the Refrigerator on pages 20 and 21.
PARTS AND FEATURES
Use this page to become more familiar with the parts and features of the Refrigerator.

Door bins
Your refrigerator ships with door bins of different types and sizes. If the door bins for your refrigerator were packaged separately, use the figure below to help you position the bins properly.
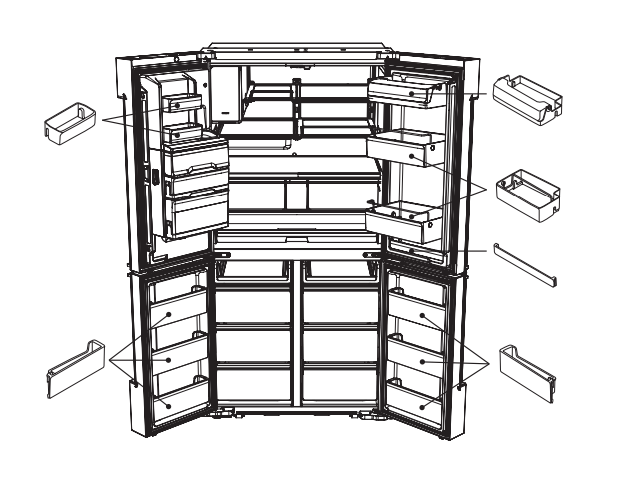
The number of door bins provided may differ with the model.
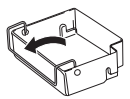
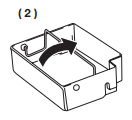
MULTI-PURPOSE DOOR BIN
A detachable divider makes it convenient to store food.
How to use the FLEX DIVIDER
- When not in use, leave the Flex Divider flipped over as shown in the diagram.
- Flip the Flex Divider to posltion (1) to prevent items from falling out and over.
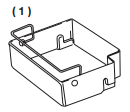
- Flip the Flex Divider to posltion (2) to use it as a divider.
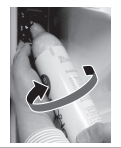
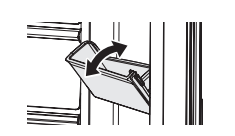
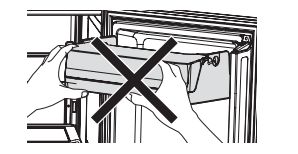
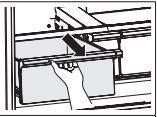
How to use the Tilting Door Bin
- The freezer door bin is designed to be tilted for easy access.
- Tilt the freezer door bin for easy access when inserting food, and put it back upright when closing the door.
- Do not insert too much food in the freezer door bin. The door may not close properly.
- To avoid collisions between the freezer door and drawers, leave the freezer door wide open when using the freezer drawers.
CHEF PAN
Using the Chef Pan for the first time
- Make sure to clean the Chef Pan before use.
- Put vinegar and neutral detergent in a 2:1 ratio into warm water. Apply this water to a sponge, and use this sponge to wipe out the Chef Pan. Rinse the pan in warm water.
Precautions on cooking on the Chef Pan
- The Chef Pan is not suitable for use in a microwave oven.
Storage
- Use a stainless steel detergent with a soft cloth or sponge to clean the pan.
REMOVING THE REFRIGERATOR ACCESSORIES
1. Door Bins Compartment
- To remove - Simply lift the bin up and pull straight out.
- To relocate - Slide the bin in above the desired location and push down until it stops. Alternatively, for the top bin of the refrigerator, insert the bin so that it is aligned with the marked line inside the door
- Do not hold the front side of the door bin when inserting it. The door bin may not fit the door.
- To replace, insert the door bin fully to the marked line of the door. Otherwise, it may not be attached to the door properly.
- Hold the rear side of the door bin with both hands, and press down and insert it fully to the marked line inside the door.
Removing bins with covers
- For bins with covers, open the Door Bin Cover, and then pull the bin out using both hands.
Removing the Chef Basket
- Tip the Chef Basket top towards you, and then pull the Basket out using both hands.
Removing bins
- Simply lift the bin up and pull straight out.
- To remove dust, wash the bins in water
2. Tempered Glass shelves
- To remove - Tilt up the front of the shelf in the direction shown (1) and lift it up vertically (2). Pull the shelf out.
- To relocate - Tilt the front of the shelf up and guide the shelf hooks into the slots at a desired height. Then, lower the front of the shelf so that the hooks can drop into the slots.
- When re-installing the glass shelves, make sure that all the hooks on both sides of the shelf are firmly engaged in the slots of the support.
3. Chef Pan
- To insert or remove the Chef Pan from the shelf, hold both sides of the pan with both hands. Pull out to remove. Push in to re-insert.
- Use only for stainless steel detergent when wash it.
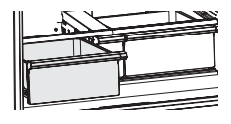
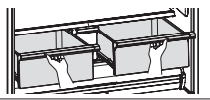
4. Vegetable & Fruit Drawers (EZ Fresh Zone)
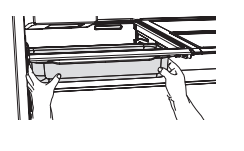
- Holding the drawer with one hand, lift it up a little bit while pulling it forward, and then pull it out of the refrigerator.
5. Removing the vegetable storage shelf
1. Slide out the left vegetable drawer.
2. Slide in the right foldable shelf.

3. While supporting the vegetable storage shelf with one hand, lift it up with the other hand.
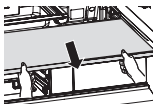
4. Through the empty space created by removing the foldable shelf, take out the vegetable storage shelf.
(Reinsert by following the removal steps in reverse.)
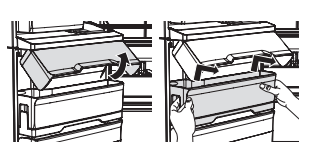
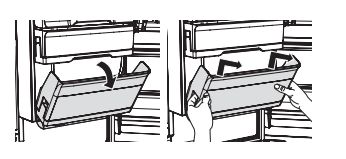
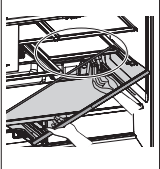
6. Removing the Shelf Pantry
1. Slide out the vegetable drawers.
2. Remove the vegetable storage shelf.
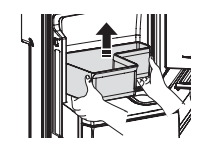
3. Loosen two screws at the back of the water tank.
4. Take the rear right corner of the water tank and pull it out a little. (Note: This is not to fully remove the water tank) Take care not to remove the Water Hose.
5. Lift up the water tank to remove it from the Shelf Pantry, and then bend the pantry cover to unlock it from the left.
6. Take out the Shelf Pantry. (Reinsert by following the removal steps in reverse.)
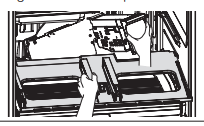
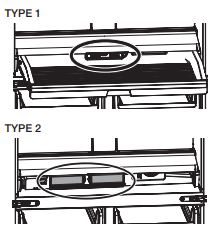
7. Removing the Deodorizer
TYPE 1
Pull out the Chef Pantry, and then pull out the Deodorizer while pushing the Deodorizer cover clip up with your finger.
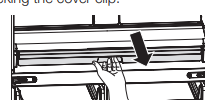
TYPE 2
Remove the Chef Pantry drawer, and remove the Deodorizer from inside the fridge room by unlocking the cover clip.
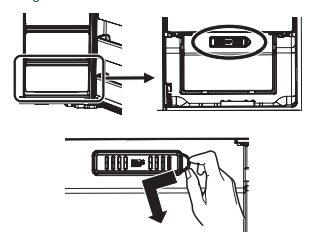
The appearance and detaching instructions of the deodorizer depend on the model. Please check your model first.
Freezer/Cool Select Room: Remove the bottom Drawer, and then pull out the Deodorizer while pushing the Deodorizer cover clip up with your finger
8. Cleaning the Deodorizer
- Clean the Deodorizer once every two years or whenever you feel its performance has diminished. Dry the Deodorizer under the sun for 24 hours and then replace it in the reverse order of its removal.
CLEANING THE REFRIGERATOR
Do not spray the refrigerator with water while it is plugged in. This can cause an electric shock. To clean the refrigerator, follow these steps:
- Unplug the power cord of the refrigerator.
- Slightly dampen a soft, lint-free cloth or paper towel with water
- Wipe the inside and outside of the refrigerator until it is clean and dry.
- Plug the power cord of the refrigerator back in.
CHANGING THE INTERIOR LIGHTS
Freezer / Fridge LED Lamp
- If the LED Lamp Cover is stained with foreign substances, the LED lamp may not look bright. Wipe the surface cover with clean dry cloth to return the light to full brighteness.
Sparkling Water: Operational Notes
- Be sure to use genuine Soda Stream Cylinders from authorized resellers.
- The refrigerator starts making sparkling water about 10 seconds after you turn on the Sparkling Water Production function.
- If you open the refrigerator door while the refrigerator is making sparkling water, it will stop. When you close the door, it will resume making sparkling water in about a minute.
- If there is a power interruption when the refrigerator is making sparkling water, the refrigerator may re-start the carbonation process when power returns and put too much carbonation into the water. If this occurs, we recommend throwing out the overly carbonated water and starting the process again.
- If you keep dispensing sparkling water, the water stream may become unstable or break up. This is caused by changes in pressure in the Sparkling Water Tank. It is not a defect.
- If the water hose is kinked or water is not supplied properly, the Carbonation Level of the Sparkling Water will be high. This occurs because the the same amount of the carbon dioxide (CO2) is dispensed by the Cylinder regardless of the amount of water in the Production Tank.
- The useful life of a SodaStream carbonator will vary, depending on the level of carbonation you select.
- If you are not going to be home for a long period of time, do not want to use the Sparkling Water function any more, or you are moving:
- Press the Sparkling Maker button for three seconds to turn off the Sparkling Water function.
- Empty the Sparkling Water tank by dispensing all the water in the tank.
- Remove the CO2 Cylinder.
To reduce the processing time, use the Quick Sparkling option. Quick Sparkling sets the Sparkling Level to high). The refrigerator applies the Quick Sparkling setting the next time it makes sparkling water. If the refrigerator is making sparkling water when you select the Quick Sparkling option, the refrigerator adjusts the Sparkling Level automatically.
To cancel this option, press the Quick Sparkling button again within 20 seconds after activating it.
- If the cylinder icon (
 ) turns on, replace the current SodaStream Carbonator with a new one.
- To dispense the sparkling water, pull down the Sparkling-Selector Lever, and push and hold
- Press the Sparkling Maker button for three seconds to turn off the Sparkling Water function.
- Empty the Sparkling Water tank by dispensing all the water in the tank.
- Remove the Soda Stream Carbonator.
Troubleshooting
The refrigerator does not work at all or it does not chill sufficiently.
- Check if the power plug is properly connected.
- Check if the set temperature on the digital display is warmer than the freezer or fridge inner temperature. If it is, set the freezer or fridge to a colder temperature.
- Is the refrigerator in direct sunlight or located near a heat source? If so, it may not be able to cool sufficiently. Install it in a location that is out of direct sunlight and not near a heat source.
- Is the back of the refrigerator too close to the wall, preventing proper ventilation? If so, it may not be able to cool sufficiently. Keep it an appropriate distance from the wall.
- Is there too much food inside so that the food is blocking the outlet vent? To keep the refrigerator at a suitable temperature, do not fill the refrigerator with too much food.
The food in the fridge is frozen.
- Check if the set temperature on the digital display is too low. If so, raise the set temperature inside the refrigerator.
- Is the temperature too low in the room? Set the refrigerator warmer.
- Did you store food with a high moisture content in the coldest part of the refrigerator or near the cooling outlet vent? Try moving those items to the other shelves in the fridge instead of keeping them in the colder areas or bins.
You hear unusual noise or sounds.
- Check if the refrigerator is level and stable.
- Is the back of the refrigerator too close to the wall, preventing proper ventilation? Try moving the back of the refrigerator at least 2 inches from the wall.
- Was anything dropped behind or under the refrigerator? If you hear a “ticking” sound from inside the refrigerator, this is normal.
- It occurs because various parts contract or expand in response to temperature changes in the refrigerator interior.
- If it sounds as if something is hitting something else inside the refrigerator, this is normal. The sound is caused by the compressor operating at high capacity.
The cabinet-door sealing area of the appliance is hot and condensation is occurring.
- Some heat is normal as anti-condensators are installed in the vertical hinged section of the refrigerator to prevent condensation.
- Is the refrigerator door ajar? Condensation can occur when you leave the door open for a long time.
The Ice Maker is not producing ice.
- It may take longer to make ice if the refrigerator is not sufficiently cool, such as when the refrigerator was first installed.
- Is the water line connected and the shut-off valve opened?
- Did you manually stop the ice making function?
- Check if the water filter is properly installed. If it is not properly installed, the ice making function may not work.
You can hear water bubbling in the refrigerator.
- This is normal. The bubbling comes from refrigerant circulating through the refrigerator.
There is a bad smell in the refrigerator.
- Check for spoiled food.
- Foods with strong odors (for example, fish) should be tightly covered.
- Clean out your freezer periodically and throw away any spoiled or suspicious food.
Frost forms on the walls of the freezer.
- Is the air vent blocked? Remove any obstructions so air can circulate freely.
- Allow sufficient space between the stored food for efficient air circulation.
- Is the freezer drawer closed properly?
The water dispenser is not functioning.
- Is the water line connected and the shut-off valve opened?
- Has the water supply line tubing been crushed or kinked?
- Make sure the tubing is free and clear of any obstruction.
- Is the water tank frozen because the fridge temperature is too low? Try selecting a warmer setting on the Digital display.
- Check if the water filter is properly installed. If it is not properly installed, the water dispenser may not work.
The freezer door auto close system does not work.
- Is there an imbalance between the right and left parts of the door?
- Open and close the door smoothly 1~2 times. After you do this, the auto close system usually works properly again.
- Try opening the door smoothly to avoid unbalancing the right part and the left part of the door.
Condensation or water drops forms on the vertical mullion and surroundings, etc.
- Condensation or water drops may form if the humidity is too high while the refrigerator is operating.
- If condensation or water drops appears on vertical mullion and surroundings, etc., turn the Energy Saving mode off after removing the condensation.
Sparkling water is not dispensed.
- Is the water line connected and the shut-off valve opened?
- Did you pull down the Sparkling-Selector Lever? (Applicable to Chef Collection models.)
- Is the Sparkling Water Production Function Off icon on? Press the Sparkling Maker button for 3 seconds to turn on sparkling water production. The Sparkling Water Production function is set to OFF at the factory. Set it ON to get sparkling water.
- Is the Sparkling Maker icon blinking? The blinking icon indicates the refrigerator is producing sparkling water. Please wait until the icon stops blinking.
- Check if the Quick Sparkling button's cross bar icon is lit. The cross bar icon shows how much carbonated water is left in the carbonated water tank. (Applicable to Chef Collection models.)
- Is the carbonated gas cylinder empty? If the refrigerator dispenses a small amount or no sparkling water, replace the SodaStream 60L Carbonator with a new one. If the SodaStream Carbonator runs out of CO2, the cylinder icon ( ) turns on. If the Exchange Carbonated Gas Cylinder icon is lit, check the SodaStream Carbonator. (Applicable to Chef Collection models.)
- Is the refrigerator door open? If the door is open, Sparkling water/Water/Ice are not dispensed.
- Is the cylinder lever unlocked? Open the cylinder cover and lock the cylinder lever.
- Is the Control Lock on?
- If carbonated water or regular water is dispensed continually for 1 minute or more, dispensing may temporarily stop. Press the lever again to continue dispensing.
The Quick Making option makes a wind noise while in process.
- While the Quick Making option is active, the SodaStream Carbonator cycles through injecting and discharging CO2 gas, which can make a wind-like noise.
The taste of the sparkling water is weak.
- Increase the Sparkling Level of the sparkling water.
- When the taste of the sparkling water is too weak or there is no other taste than water, replace the SodaStream Carbonator with a new one.
- If you use the Fill Up (3 sec) option immediately after replacing the Carbonator, the sparkling water tastes stronger or weaker than normal, depending on the amount and concentration of the CO2 remaining in the water tank.
The taste of the sparkling water is too high.
- Decrease the Sparkling Level of the sparkling water. (Sparkling Levels - 1: Low, 2: Medium, 3: High)
- Empty the sparkling water tank, and then set the Sparkling Level lower. When the refrigerator makes sparkling water, it will make water at a lower level of carbonation.
- To empty the sparkling water tank, press and hold the “Sparkling Maker” button for 3 seconds to turn the Sparkling water maker off. Dispense all the remaining sparkling water. After emptying the sparkling water, press and hold the “Sparkling Maker” button for 3 seconds to activate the sparkling water maker.
- Did you make sparkling water by pressing the “Quick Sparkling/Fill up” button and holding for 3 seconds? If there was still sparkling water in the tank before you started the Quick Fill function, sparkling water with a higher CO² concentration than the level you set can be produced. Once the sparkling water tank is emptied, the refrigerator will make sparkling water at the Sparkling Level you have set.
The taste of the sparkling water did not change after you changed the sparkling concentration level.
- If you change the concentration level, the new level is applied to the subsequent production. That is, the change does not affect the sparkling water in the sparkling water tank nor does it affect the sparkling water production currently in progress. The change is only applied to subsequent productions.
After you replaced the Sodastream Carbonator, no sparkling water is being produced.
- After replacing the SodaStream Carbonator, be sure to touch and hold the Quick Sparkling/Fill up” button for 3 seconds to reset the SodaStream Carbonator.
The sparkling water suddenly stops being dispensed even though the operation is still in progress.
- Check if the short lines inside the cup icon are turning on one by one in a clockwise direction. This indicates that the sparkling water is being produced. When production is complete, all of the short lines inside the cup icon turn on. When production is complete, the refrigerator will dispense sparkling water.
- If the refrigerator is not dispensing sparkling water, check if “OFF” is displayed above the cup icon over the Sparkling Maker button.
- This indicates that the sparkling water tank is empty and the automatic sparkling water production function is turned off. To produce sparkling water, touch and hold the “Sparkling Maker” button for 3 seconds to start production.
The Sparkling function is turned off but sparkling water continues to be dispensed.
- Even if you turn off the sparkling water production function, sparkling water is dispensed for as long as there is sparkling water in the sparkling water tank.
- If you do not use the sparkling water maker for an extended period of time, stop the automatic sparkling water production function and remove the sparkling water through the dispenser.
The sparkling water dispenses at a slower rate than regular water.
- Check if the tap water valve is closed or the hose is bent and if water is being supplied to your home at the normal pressure. If the tap water pressure is too low, the sparkling water maker may not work properly because too little water is being supplied to the sparkling water tank.
- When water is supplied to the sparkling water tank from a water purifier, sparkling water may not be produced properly because too much water is required over a short period of time. We recommend that you do not dispense water from a water purifier less than five minutes before you start a sparkling water production cycle.
- If this problem continues, please contact the water purifier manufacturer or ask a plumber to increase the tap water pressure to a normal level.
The sparkling water is not cold enough and tastes flat.
- If you continuously produce a lot of sparkling water, you may not be able to enjoy the true taste of sparkling water because there is too little time to cool the water. To drink sparkling water at its optimal state, you have to ensure sufficient cooling time before you dispense sparkling water.
- We recommend you wait at least four hours after connecting tap water to the refrigerator before making and dispensing sparkling water.
The sparkling OFF” icon is displayed, but the sparkling water maker is not turned off.
- Check if the short lines inside the cup icon are turning on one by one in a clockwise direction. This indicates that sparkling water is being produced and cannot be stopped immediately. However, if you press and hold the “Sparkling Maker” button for 3 seconds during production, then the OFF” icon is displayed over the cup icon and automatic sparkling water production will turn off after the current production cycle is complete.
The concentration control function is disabled during sparkling water production.
- Check if the short lines inside the cup icon are turning on one by one in a clockwise direction. This indicates that the sparkling water is being produced. Since the sparkling water concentration cannot be changed during a production operation, change the concentration level when production is complete and the blinking stops. The refrigerator applies the new Sparkling Level to the next production operation.
Sparkling water is produced continuously.
- Has the sparkling water production time limit been reached? The length of time during which sparkling water is generated is determined by the Sparkling Level setting. (Level 1: Approx. 10 mins; Level 2: Approx. mins; Level 3: Approx. 30 mins) Please wait until the sparkling water production time has been reached.
- Check if the refrigerator door is open. If the refrigerator door is open, the sparkling water maker stops to prevent noise that is generated by the sparkling water production. If you open the door frequently, the time during which sparkling water is produced may be extended depending on the Sparkling Level setting. Close the refrigerator door and wait until the sparkling water production time limit has been reached.
The cylinder icon did not turn on when the SodaStream Carbonator was removed.
- If you remove a SodaStream Carbonator that has a little gas remaining, the cylinder icon on the display may turn on after a several seconds.
- If you remove a SodaStream Carbonator that has gas remaining, the cylinder icon on the display may not turn on for a period of time.
What Do I Need to use the E-Smart and Smart Grid functions?
- To use the Smart Grid (Demand Response) and E-Smart function on your Refrigerator, you need the following devices and apps:
- Devices: 1) A Wireless Router, 2) A Samsung E-Smart Refrigerator, 3) A Smartphone. (Recommended: Galaxy S4, Galaxy Note3 or later models and Android OS Jelly Bean or later version)
- Applications: 1) “Samsung E-Smart App” from the Google Play Store or Samsung Apps.
You also need to:
- Connect the Refrigerator and the Smartphone to the same Wi-Fi network in your home.
- Install and run the Samsung E-Smart App on your Smartphone.
- In addition, to use the Smart Grid (Demand Response) function, you must Register for the service with your electric company. The company must have an EMS (Energy Management System) that supports SEP (Smart Energy profile).
Why isn’t the E-Smart function working normally?
- Confirm that the router in your home and the Internet are working properly.
- Connect a Smartphone to the router (AP, Access Point), and then confirm that you can browse the Internet on the phone.
- Confirm that refrigerator is connected to the AP.
- Check the E-Smart icon on the panel of the refrigerator. If the refrigerator is connected, the icon will be on.
- Confirm that the refrigerator and Smartphone are connected to the same router.
Why isn’t the Delay Defrost Capability working normally?
- Confirm that the router in your home and the Internet are working properly.
- Connect a Smartphone to the router (AP, Access Point), and then confirm that you can browse the Internet on the phone.
- Confirm that the area where you live is properly entered into the Samsung E-Smart App.
- Confirm that the Smart Grid function works correctly. (Check the panel. L3 andL4 should not be displayed on the panel.)
OPTIMUM OPERATING ENVIRONMENT FOR SPARKLING WATER
Item Descriptions
- [Water temperature] "We recommend that you only drink sparkling water after it is sufficiently cooled.”
- Since the temperature of the sparkling water greatly affects the taste of the water, if the temperature of water is not sufficiently low, you may not be able to get the right taste.
- We recommend you wait at least four hours after connecting tap water to the refrigerator before making and dispensing sparkling water.
- We also recommend that when the refrigerator is producing sparkling water, that you dispense as little regular water as possible so that the sparkling water is produced with cold water.
- If you drink 0.5 gallons (2 liters) or more a day, the water may not be cooled sufficiently.
- To store dispensed sparkling water, put the water in an air tight container and keep it in a cold section of the refrigerator for better taste.
- [CO2 concentration of sparkling water 1] "To ensure a precise CO2 concentration, dispense all the remaining sparkling water before producing additional sparkling water.”
- Because the current system does not measure the CO2 concentration of the sparkling water remaining in the sparkling water tank before it starts to produce additional sparkling water, the resulting concentration may differ from the desired level, depending on the remaining sparkling water in the sparkling water tank.
- If you haven't used the sparkling water function for an extended period of time (one week or longer), first remove all the sparkling from the sparkling water tank, and then produce fresh sparkling water for better quality and taste.
- [CO2 concentration of sparkling water 2] "To maintain a precise CO2 concentration of sparkling water, replace the CO2 cylinder before it is depleted.”
- As the time to replace the SodaStream Carbonator comes closer, the CO2 concentration decreases and sparkling water becomes weaker.
- If the SodaStream Carbonator runs out of CO2, the cylinder icon ( ) turns on. If this occurs, replace the SodaStream 60L Carbonator with a new one.
- [Preparing sparkling water – Capacity] "If you want to have sufficient sparkling water prepared in the morning, we recommend that you touch and hold the Sparkling Maker button for 3 seconds to start the sparkling water production before going to bed."
- If you do not press and hold the “Sparkling Maker” button for seconds to start the sparkling water production, the amount of sparkling water in the water tank may be less than the maximum production capacity of 1.1 liters.
- Since a production time of 10~30min is required if you need 1.1 liters or more of sparkling water, we recommend producing and storing enough sparkling water in advance or at least securing the maximum sparkling water capacity of 1.1 liter by pressing and holding the “Sparkling Maker” button for 3 seconds to start sparkling water production.
- [The water supply pressure and water taste] "If a water purifier is connected to the refrigerator, we recommend that you do not dispense water from the water purifier less than five minutes before you start a sparkling water production cycle.”
- If water pressure to the refrigerator is low, check if the water line valve is fully open and if the water line is kinked or bent.
- If a water purifier is connected to the refrigerator, there may be insufficient water supply for sparkling water production.
- If there is insufficient water supply, the concentration of the sparkling water increases or the amount of sparkling water may decrease.
OPEN SOURCE ANNOUNCEMENT
The software included in this product contains open source software
It is also possible to obtain the complete corresponding source code in a physical medium such as a CDROM; a minimal payment will be required.