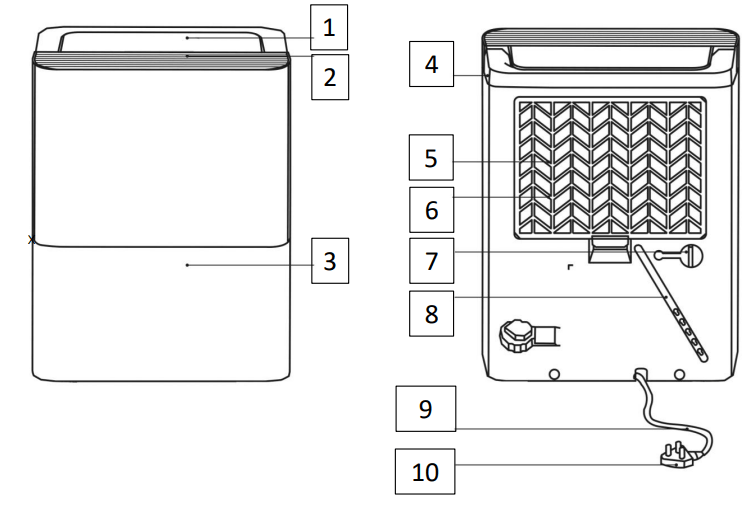
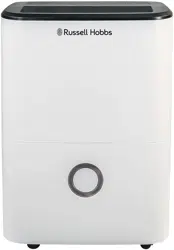
4. Handle 5. Air intake grille 6. Air filter (behind the air intake grille) 7. Drain hose outlet 8. Power cord storage band 9. Power cord 10. Plug
CONTROL PANEL DIAGRAM
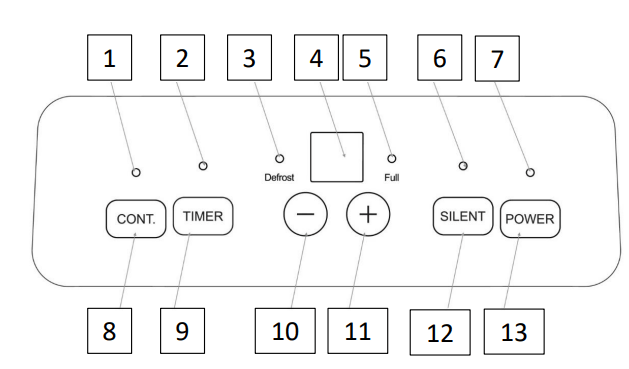
Continuous dehumidifier mode indicator
Timer indicator
Defrost indicator
LED display
Water tank full indicator
Silent mode indicator
Power indicator
Continuous dehumidifier mode button
Timer button
Up control button
Down control button
Silent mode button
Power button
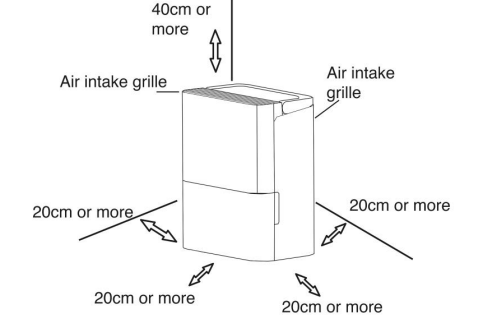
POSITIONING YOUR DEHUMIDIFIER
This dehumidifier is intended for indoor residential applications only. This dehumidifier should not be used for commercial or industrial applications.
Place the dehumidifier on a smooth, level floor strong enough to support the unit with a full drawer of water.
Allow at least 20cm of air space on all sides of the unit for good air circulation.
Allow at least 40cm of air space above the unit for good air circulation.
Place the unit in an area where the temperature will not fall below 5⁰C (41 ⁰ F). The coils can become covered with frost at temperatures below 5⁰C (41 ⁰ F), which may reduce performance.
Place the unit away from clothes dryers, heaters or radiators.
The dehumidifier must be operated in an enclosed area to be most effective.
Close all doors, windows and other outside openings
Do not use outdoors.
USING YOUR DEHUMIDIFIER
When using the dehumidifier for the first time, run the unit in continuous mode for 24 hours
When the water tank is full the unit will automatically shut off or when the tank is removed. The fan motor may continue for a period of 30 seconds after shut off, this is normal
After the unit has stopped, the unit cannot be restarted for 3 minutes.
This is a safety feature to protect the appliance. If the unit is not turned off then unit will automatically start after 3 minutes.
The unit has frost protection, this means that when frost builds up inside the unit the compressor with turn off and the fan will continue to run to remove the frost. Once the frost is removed the compressor will operate again.
If power to the unit is broken unexpectedly (power cut), once power is restored the unit will restart on the function it was running prior to the power being broken.
Turning the Unit On
Remove all packaging and plug the unit into a socket.
Ensure the water tank is correctly positioned, the drain plug is in place in the back of the unit if you are using the tank to collect the water.
Press the Power button to turn the dehumidifier on and off. The power indicator light will illuminate when the unit is turned on.
When the unit is first switched on, the display shows the actual room % humidity level (within 5% accuracy).
The humidity level can be set using the instructions for “Setting the Humidity”.
Continuous Dehumifier (Extraction) Mode
For maximum extraction rate, the Continuous Dehumidifier (Extraction) mode should be used.
Press the Continuous Dehumidifier (Extraction) button on the control panel. The Continuous Dehumidifier indicator light will illuminate when this mode is selected.
The unit will continue to run at the maximum extraction rate until the water tank reaches the max fill level.
Press the Continuous Extraction button again to cancel the continuous extraction.
Note: The humidity cannot be set when the unit is operating in Continuous Dehumidifier (Extraction) Mode
Setting the Humidity
The desired humidity level can be set within a range of 35% to 85% Relative Humidity in 5% increments / decrements by pressing the + and – keys.
To select the desired humidity level ensure the unit is not on the continuous mode. This can be done by checking the CONT. indicator is not illuminated. If it is then simply press the CONT button to de-activate the continuous mode and the CONT. indicator will switch off.
Use the Up and Down control buttons to select the desired humidity. The display will flash while the humidity is being set.
For drier air, press the pad and set to a lower percent value(%).
For damper air, press the pad and set a higher percent value(%).
Note: The humidity cannot be set when the unit is operating in
Continuous Dehumidifier (Extraction) Mode
Setting the Timer
Delayed Start
The unit must be switched OFF for the Auto Start function to be programmed.
With the unit switched off, press the Timer button until the Timer indicator light is illuminated. “0.0” will be displayed on the LED display.
Use the up and down control buttons to select the desired delayed start time.
The delayed start time can be adjusted in 0.5 hour increments up to 10 hours, and then in 1 hour increments up to 24 hours.
The selected time will stay on the display for 5 seconds, and will then disappear. The countdown to the start time can be viewed by pressing the Timer button again.
Auto Stop
The Auto Stop function can only be set when the unit is ON.
Press the Timer button until the Timer Off indicator is illuminated.
Use the up and down controls to select the desired end time.
The stop time can be adjusted in 0.5 hour increments up to 10 hours, and then in 1 hour increments up to 24 hours.
The selected time will stay on the display for 5 seconds, and will then disappear. The Auto Stop time can be viewed by pressing the Timer button again.
Both the Delayed Start and Auto Stop functions can be initiated in the same sequence. In this instance, both Timer On and Off indicators will be illuminated.
Note: Turning the unit On or Off at any time will cancel the Delayed Start or Auto Stop functions and the unit can take 2 minutes to restart. If the time is adjusted to “0.0” this will also cancel the Timer function. If the water drawer is full or “P2” is displayed, the Delayed Start and Auto Stop functions will be cancelled.
Silent Mode
To reduce the noise output, for example, when being used at night, the silent mode can be activated. In this mode, the fan speed is slower and the unit will be running at a lower extraction rate.
Press the Silent button. When the silent mode is selected the light will display green.
Press the Silent button again to cancel the Silent mode. The unit will return to the standard fan speed.
The humidity level can be set when the unit is running in Silent mode using the instructions for “Setting the Humidity”, however the fan speed and extraction rate will be lower.
Other features
Auto Shut Off
The dehumidifier will shut off automatically under the following conditions:
When the water tank is full
When the water tank is removed
When the water tank is not replaced in the proper position
When the selected humidity level is reached
Water Drawer Full Indicator light
The indicator light will illuminate under the following conditions:
When the water tank is full
When the water tank is removed
When the water tank is not replaced in the proper position
3 Minute Restart
After the unit has stopped, it cannot be restarted for 3 minutes. This is to protect the unit. Operation will automatically start after 3 minutes.
Auto Defrost
When frost builds up on the evaporator coils, the compressor will cycle off and the fan will continue to run until the frost disappears. When this function is enabled, the Defrost light will illuminate.
Auto-Restart
If the unit turns off unexpectedly due to a power cut, it will restart with the previous function setting automatically when the power resumes.
Error Codes
P2 – Water drawer is full or drawer is not in the right position. Empty the drawer and replace in the correct position.
AS - Humidity module sensor error. Unplug the unit and plug it back in. If error repeats, call customer service.
ES - Tube Temperature sensor error. Unplug the unit and plug it back in.
If error repeats, call customer service.
EC -Refrigerant leakage detection. With this new technology, the display area will appear EC when the unit detects refrigerant leakage, call customer service
EMPTYING YOUR DEHUMIDIFIER
There are two ways to remove collected water:
Collection in the Water Tank
When the water tank is full, the unit will automatically stop running, and the Full indicator light will illuminate.
Slowly pull out the tank and grip the left and right handles securely and carefully. Pull out the water tank straight so the water in the tank does not spill. Do not put the tank down because the bottom of the drawer is uneven.
Empty the water and replace the tank. The tank must be correctly inserted for the dehumidifier to restart operation.
The machine will restart operation after 3 minutes
When you remove the water tank, do not touch any parts inside of the unit. Doing so may damage the product.
Be sure to push the water tank gently all the way into the unit. Banging the tank against anything or failing to push it in securely may cause the unit not to operate.
When you remove the water tank, if there is some water in the unit you must dry it .
Continuous Draining
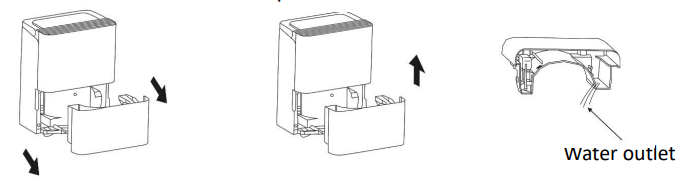
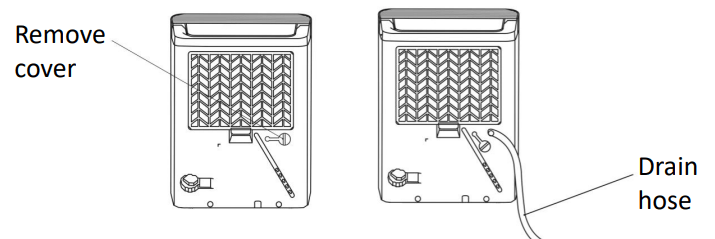
Water can be automatically emptied into a floor drain by attaching the unit with a inner diameter 13.5mm hose .
Remove the rubber bung from the Drain Hose Outlet on the back of the unit.
Attach the hose into the Drain Hose Outlet in the back of the unit as shown below.
Lead the water hose to a suitable drainage facility. The drainage facility should be lower than the drain outlet of the unit.
Be sure to run the water hose sloping downward and let the water to flow out smoothly.
NOTE: When the continuous drain feature is not being used, remove the drain hose from the outlet and attach the rubber plug back to the drain outlet.
CLEANING AND CARE
Cleaning the Air Filter
The air filter is located behind the air intake grill on the rear of the appliance and should be checked and cleaned at least every 30 days or more often if necessary.
NOTE: DO NOT PUT THE FILTER IN AN AUTOMATIC DISHWASHER
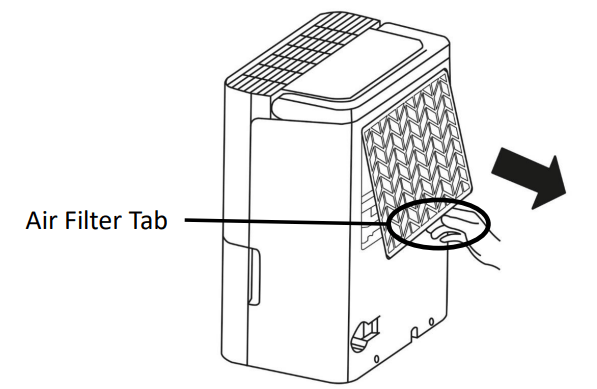
To Remove the Air Filter:
Grip the tab on the filter and pull the filter upwards and then out
Clean the filter with warm, soapy water. Rinse and let the filter dry before replacing it. Do not clean the filter in a dishwasher.
To Replace the Air Filter
Insert the filter into the unit, then push the filter upward.
When re-install the filter, please press the middle buckles of the filter first and then pat the bottom buckle
CAUTION:
DO NOT operate the dehumidifier without a filter. This will cause dirt and lint to build up and clog the unit and will reduce performance.
Cleaning the Grille and Case
Use water and a mild detergent. Do not use bleach or abrasives.
Do not splash water directly onto the main unit. Doing so may cause an electrical shock, cause the insulation to deteriorate, or cause the unit to rust.
The air intake and outlet grilles get soiled easily, so use a vacuum attachment or brush to clean.
Cleaning the Water Tank
Every few weeks, clean the tank to prevent growth of mould, mildew and bacteria. Partially fill the tank with clean water and add a little mild detergent. Swish it around in the tank, empty and rinse.
NOTE: Do not use a dishwasher to clean the tank. After clean, the tank must be in place and securely seated for the dehumidifier to operate.
When not using the unit for long time periods
After turning off the unit, wait 24 hours before emptying the drawer.
Clean the main unit, drawer and air filter.
Wrap the cord and bundle it with the band and cover the unit with a plastic bag.
Store the unit upright in a dry, well-ventilated place.
TROUBLE SHOOTING
Problem
What to check
Unit does not start
Make sure the dehumidifier’s plug is pushed completely into the socket outlet.
Check the house fuse/circuit breaker box.
Dehumidifier has reached its preset level or drawer is full.
Drawer is not in the proper position.
If the unit is being restarted there is a 3 min delay before the unit will start running.
Ensure the unit is not set on delayed start function.
Ensure the room humidity is not lower than 35%.
Dehumidifier does not dry the air as it should
Did not allow enough time to remove the moisture.
Make sure there are no curtains, blinds or furniture blocking the front or back of the dehumidifier.
The humidity selector may not be set low enough.
Check that all doors, windows and other openings are securely closed.
Room temperature is too low, below 50 C(410 F).
There is a kerosene heater or something giving off water vapour in the room.
The unit makes a loud sound when operating
The air filter is clogged.
The unit is tilted instead of upright as it should be.
The floor surface is not level.
Frost appears on the coils
• This is normal. The unit has Auto defrost feature.
Water on the floor
Hose to connector or hose connection may be loose.
Intend to use the drawer to collect water, but the back drain plug is removed.
Power indicator light flashes 5 times per second
Temperature sensor or humidity sensor error. Unplug the unit and plug it back in.
Q: good afternoon can you please try to explain how the timer works on this dehumidifier we have tried several times to set it but it does not respond Reply