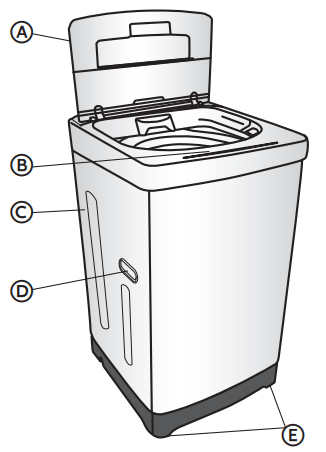
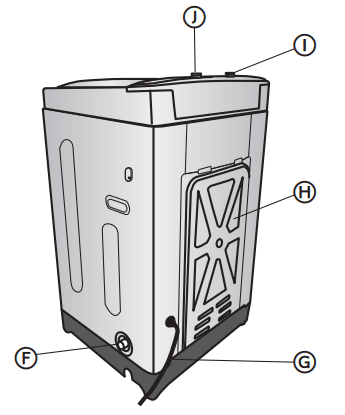
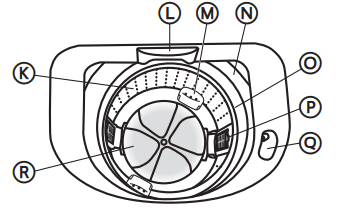
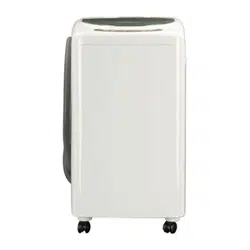
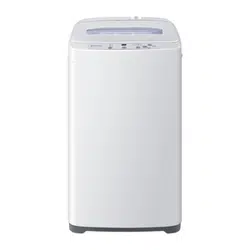
A. Top Lid B. Control Panel C. Cabinet D. Cabinet Handle (2) E. Leveling Legs (2) F. Drain Port G. Power Cord (120 Volt / 60 Hz) H. Access Panel I. Cold Water Inlet Valve J. Hot Water Inlet Valve K. Wash Basket L. Powdered Detergent Dispenser M. Power Jet (2) N. Outer Tub Cover O. Balance Ring P. Lint Filter (2) Q. Liquid Bleach Dispenser R. Pulsator
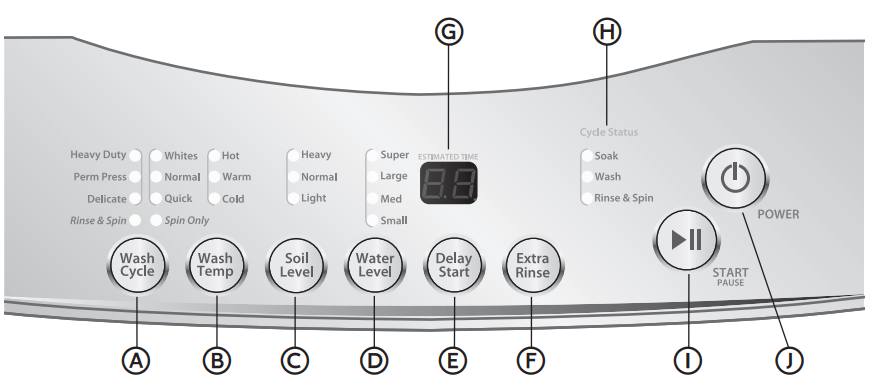
CONTROL PANEL
A. WASH CYCLE BUTTON
The standard default settings of each cycle will be displayed; the default settings can be changed by using the Setting buttons - Wash Temp, Soil Level, and Water Level.
There are 6 wash cycles and 2 specialty cycles from which to choose:
WASH CYCLES
Heavy Duty - Use this cycle for heavily soiled, durable, colorfast garments.
Whites - Use this cycle to deep clean white garments.
Perm Press - Use this cycle for wrinkle-free clothing, cotton/poly blend fabrics, and dress shirts and pants.
Normal - Use this cycle for normally soiled cottons and mixed garment loads.
Delicate - Use this cycle to gently wash delicate garments and lingerie with sheer fabrics with lace trim. Quick - Use this cycle to wash small loads of lightly soiled clothing.
SPECIALTY CYCLES
Rinse & Spin - Use this cycle to relax wrinkles, remove excess detergent, and refresh clean garments.
Spin Only - Use this cycle to extract water from sink washed or clean wet garments.
B. WASH TEMP BUTTON
Press the Wash Temp button to select a wash temperature; all rinses use cold water. For best results follow your garment label instructions and use the warmest water temperature that is safe for your fabric.
NOTE: Not all wash water temperatures are available for all wash cycles.
C. SOIL LEVEL BUTTON
Press the Soil Level button to select the soil level that is most appropriate for your load. Based on the soil level, the wash time will increase or decrease by 4-8 minute increments in the Estimated Time Remaining Display.
There are 3 soil levels from which to choose. - Heavy, Normal, Light
D. WATER LEVEL BUTTON
Press the Water Level button to select an appropriate water level for your load. Small is the lowest water level and Super is the highest.
E. DELAY START BUTTON
Press the Delay Start button to delay the start of your wash cycle between 1 - 24 hours in one hour increments.
The number of hours will be shown in the Estimated Time Remaining Display. Each press of the Delay Start Button will increase the time by 1 hour.
One button press after 24 will cancel the Delay Start feature. You can also cancel the Delay Start feature by pressing the power button to turn off the washer.
Press the Start/Pause button to begin the countdown.
F. EXTRA RINSE BUTTON
Press to add an extra rinse to your wash cycle.
NOTE: Some cycles have this option as a default. See the Cycle Guide for details.
G. ESTIMATED TIME DISPLAY
The Estimated Time display shows the estimated cycle time in minutes.
When using the Delay Start feature, this display will show the hours/minutes remaining as it counts down to the time set for the wash cycle to start.
H. CYCLE STATUS INDICATORS
The Cycle Status lights indicate the stages of the selected cycle.
I. START/PAUSE BUTTON
Press the Start/Pause button to start a selected cycle or to pause an operating cycle.
NOTE: After starting the wash cycle, you must pause the operating cycle to change the Wash Temp, Soil Level and Water Level settings.
J. POWER BUTTON
Press POWER to turn on and off the washer.
IMPORTANT:
Turning off power by pressing the Power button does NOT disconnect the washer from the power supply.
If the washer is powered on, but the Start/Pause button is not pressed within 5 minutes, the washer will turn off automatically.
CYCLE GUIDE
IMPORTANT:
Do not wash, spin, or dry water-proof seats, mats or clothing.
Check garment label laundering instructions to select the proper washer settings. The wrong settings could damage and discolor clothing. Certain garments should be dry-cleaned only.
NOTE: To protect your wash load, all options and settings are not available for all cycles. The shaded boxes indicate the default settings for each cycle.
CYCLE
FABRIC TYPE
WASH PROCESS
EST
TIME
(min.)
WASH TEMP
SOIL LEVEL
WATER LEVEL
EXTRA RINSEa
Heavy Duty
Heavily soiled, durable, colorfast fabrics
12 Min Soak
25 Min Wash
Rinse
Spin
68
Warm
Normal
Medium
•
Hot Cold
Heavy Light
Super
Large
Small
Whites
White garments
12 Min Soak
25 Min Wash
Rinse
Spin
75
Hot
Normal
Medium
•
Warm
Cold
Heavy Light
Super
Large
Small
Perm Press
Wrinkle-free and synthetic fabrics
16 Min Wash
Rinse
Spin
35
Warm
Normal
Medium
•
Cold
Heavy Light
Super
Large
Small
Normal
Cottons, linens, and mixed garments
16 Min Wash
Spray Rinse Spin
40
Warm
Normal
Medium
•
Hot Cold
Heavy Light
Super
Large
Small
Delicate
Lingerie, sheer fabrics, with lace trim
10 Min Wash
Rinse
Spin
29
Warm
Normal
Medium
•
Cold
Heavy Light
Super
Large
Small
Quick
Cottons, linens, and mixed garments
9 Min Wash Rinse
Spin
23
Warm
Normal
Medium
•
Hot Cold
Heavy Light
Super
Large
Small
Rinse & Spin
Unsoiled garments
Rinse Spin
17
Cold only
Normal only
Medium
•
Super
Large
Small
Spin Only
Clean, soaking wet garments
Spin
06
N/A
Normal only
N/A
a Extra Rinse will add between 7 and 10 minutes depending on the cycle selected.
WASHER USE
IMPORTANT: To reduce the risk of fire, electric shock, or injury to persons, read the IMPORTANT SAFETY INSTRUCTIONS before operating this appliance.
STEP 1 - PREPARE AND SORT LAUNDRY
WARNING
Fire Hazard
Never place items in the washer that are dampened with gasoline or other flammable fluids.
No washer can completely remove oil.
Do not dry anything that has ever had any type of oil on it (including cooking oils).
Failure to do so can result in death, explosion, or fire.
IMPORTANT: Do not wash, spin, or dry water-proof seats, mats or clothing.
PREPARE LAUNDRY
Check garment labels for manufacturer’s washing instructions.
Empty pockets and turn them inside out.
Turn down cuffs and remove any lint or dirt.
Tie strings and sashes so they don’t tangle.
Close zippers, snaps and hooks to avoid snagging.
Remove loose items (pins, bobby pins, coins, rings, earrings, napkins, etc.) from clothes to avoid scratching the wash basket or clogging the drain pump.
Pretreat all stains and heavily soiled areas.
Turn synthetic and wool knits inside out to avoid pilling.
SORT LAUNDRY
Sort laundry by the type of wash cycle required (water temperature and wash action).
Separate light colors from dark colors and colorfast items from non-colorfast items.
Separate heavy duty fabrics from light weight fabrics.
Separate fabrics that attract lint from fabrics that produce lint.
Separate bulky items such as blankets or pillows.
STEP 2 - ADD FABRIC CARE PRODUCTS
ADD DETERGENT
Use only High Efficiency detergent. HE detergents are specifically formulated with ingredients to avoid problems caused by excessive sudsing. Excess suds will prevent the complete rinsing of detergent residue from clothes.
Determine the amount of detergent. Follow the detergent use instructions on the container.
NOTE: The proper amount of detergent depends on the size of the load, the soil level of the clothes, and the softness of the water being supplied to the washer.
If you select the Quick cycle, it is recommended that you use a liquid laundry detergent to achieve optimum results. Powdered detergent may not dissolve fast enough to clean well in this cycle.
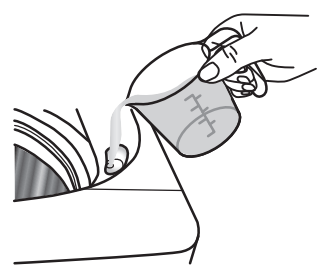
LIQUID DETERGENT
Fill washer with a small amount of water and pour liquid detergent directly into the wash basket. Liquid color safe bleach can be added with the liquid detergent.
NOTE:
For best results, add the detergent to the wash basket before loading with laundry.
Do not pour liquid detergent into the powdered detergent dispenser, it can drip onto clothing and cause damage.
Run washer for 30 seconds to dissolve detergent completely.
POWDERED DETERGENT
• Pour measured powdered detergent directly into the powdered detergent dispenser.
ADD BLEACH (IF DESIRED)
IMPORTANT: Be careful not to spill undiluted bleach onto the washer cabinet or your clothes. Chlorine bleach is a strong chemical that may damage clothes or the finish of the washer.
NOTE:
• Use only liquid bleach in this dispenser.
• Add bleach to the bleach dispenser at the same time as you add the detergent.
Follow manufacturer’s recommendations on garment label for use of bleach.
Pour measured liquid chlorine bleach into the liquid bleach dispenser.
The liquid bleach in the dispenser is dispensed immediately.
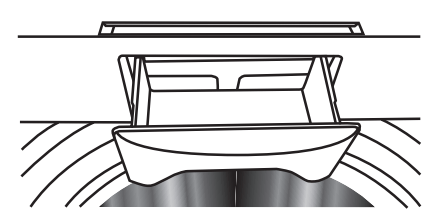
STEP 3 - LOAD THE WASHER
Open the washer lid and load clothes evenly and loosely in the wash basket for a balanced load.
Close the washer lid.
NOTE:
Do not overload or stuff items into the wash basket.
The washer will not pulsate or spin with the lid open.
STEP 4 - START THE WASHER
Follow the operation instructions specific to your type of installation.
FIXED INSTALLATION
Press the Power button to turn on the washer.
Press the Wash Cycle button to select a wash cycle.
Adjust the default settings and options if desired.
Press the Start/Pause button to start the wash cycle.
PORTABLE INSTALLATION
Press the Power button to turn on the washer.
Press the Wash Cycle button to select a wash cycle.
Adjust the default settings and options if desired. NOTE: - The temperature of the water supplied to the washer is determined by the temperature of the water coming out of the faucet NOT by the Wash Temp control. Temperature settings can be modified but will have no affect on the water temperature. - Open the water faucet valve completely and leave it fully open until the wash cycle has finished. IMPORTANT: The washer will not fill to the correct water level unless the inlet hose is connected to the COLD water inlet valve on the washer.
Press the Start/Pause button to start the wash cycle.
WASHER CARE
IMPORTANT: Avoid storing heavy objects such as jars or cans above the washer lid. Dropping a heavy or hard object onto the washer lid could cause it to break.
WARNING
Electrical Shock Hazard
Disconnect power before cleaning.
Failure to do so can result in death or electrical shock.
CLEANING AND MAINTENANCE
IMPORTANT: Before using cleaning products, always read and follow manufacturer’s instructions and warnings to avoid personal injury or product damage.
1. Unplug or disconnect power.
Use only a damp or sudsy cloth for cleaning the control panel.
If you spill liquid/powdered detergent, softener or bleach on the cabinet, wipe the cabinet immediately to avoid damage to the finish.
Do not use abrasive cleansers, harsh chemicals, ammonia, chlorine bleach, concentrated detergent, or solvents to clean the exterior of the washer. These chemicals may damage or discolor the washer.
After washing clothes, leave the lid open so that moisture inside the machine can evaporate and to prevent the growth of mold or mildew.
2. Plug in or reconnect power.
CLEANING THE POWDERED DETERGENT DISPENSER
Pull the dispenser drawer out to the stop and lift up slightly to remove.
Rinse the dispenser with warm water and dry it thoroughly with a soft cloth.
Insert the drawer at a slightly downward angle and push it back into place.
CLEANING THE BLEACH DISPENSER
To remove residue, wipe with a damp cloth and towel dry.
Do not attempt to remove the compartments or trims for cleaning.
CLEANING THE LINT FILTER
Push down on the tab at the top of the filter to release the filter from the wash basket.
Turn the filter over so the back side of the filter is facing upward.
While holding the filter firmly with one hand, lift up on the bottom of the filter to separate the front of the filter from the back, so you can access the filter screen.
Clean the filter screen and replace the back of the filter.
Wipe any lint residue away from the filter housing sides with a soft cloth.
Slide the filter into the wash basket and firmly press it into place.
IMPORTANT: Both lint filters must be in place during the wash cycles. Clean the lint screens after each wash load.
CLEANING THE WASH TUB
The washer interior should be cleaned once a month to reduce the buildup of soap film and to help keep the wash system odor free.
Make sure the washer is empty.
Pour 1 cup (250 ml) of liquid chlorine bleach into the bleach dispenser. IMPORTANT: Do not add detergent to the wash basket, and do not use more than 1 cup of bleach to avoid damaging the washer.
Close the washer lid.
Press the Power button to turn on the washer.
Press the Wash Cycle button to select Whites. IMPORTANT: Do not clean the wash tub when clothes are in the washer. This may damage laundry or cause a problem with the washer.
If connected to a sink faucet, turn on the hot water.
Press the Start/Pause button to begin the cycle.
NOTE: For best cleaning results, allow the wash cycle to complete. If you need to interrupt the cycle, press the Power button to turn off the washer. Then, run a Rinse & Spin cycle to ensure the bleach is completely removed. The bleach must be thoroughly rinsed out of the washer before washing clothes.
VACATIONING
Unplug or disconnect power.
Turn off both the cold water and hot water supply faucets. This will eliminate the potential for damage to your home if a water hose ruptures or leaks.
Dry the wash basket.
Leave the lid open so that moisture inside the machine can evaporate and to prevent the growth of mold or mildew.
MOVING OR STORAGE PREPARATION
IMPORTANT: Do not store your washer in a cold environment where temperatures fall below freezing. Water remaining in the washer will freeze and cause damage to the washer. Store at room temperature.
In addition to performing the Vacationing steps, complete the following steps:
Unplug or disconnect power.
Disconnect the water hoses and the drain hose and place them into the wash basket.
Turn the leveling legs so that they are fully retracted into the washer cabinet.
If moving the washer, place the wash basket brace from the original packing materials back into the top of the washer opening. Use masking tape to secure the washer lid. A. Wash Basket Brace
Move and store your washer in an upright position only.
REINSTALLING/USING WASHER AGAIN
WARNING
Electrical Shock Hazard
Plug into a grounded 3 prong outlet.
Do not remove the ground prong from the power cord plug.
Do not use an adapter.
Do not use an extension cord.
Failure to do so can result in death, fire or electrical shock.
To reinstall washer after non-use, vacation, winter storage, or moving:
Refer to Installation Instructions to unpack, locate, level, and connect washer.
Before using again, run washer through the following recommended procedure:
To use washer again:
Flush water pipes and hoses. Reconnect water inlet hoses. Turn on both water faucets.
Plug in washer or reconnect power.
Run the washer through a wash cycle to clean the wash tub and remove antifreeze, if used. Use only HE High (fficiency detergent. Use only half the amount recommended by the manufacturer for a medium-size load.
TROUBLESHOOTING
ERROR CODES
When the washer senses an error all machine operations will stop, a series of 4 beeps will sound and an error code will be shown in the Estimated Time remaining display.
ERROR CODE
DESCRIPTION
POSSIBLE CAUSE AND SOLUTION
dO
(Washer Lid is Open)
The washer has detected that the lid is open.
If the lid is opened during the wash cycle, the wash cycle will stop. Closing the lid should dismiss the error and resume normal operation.
Ld
(Too Long to Drain)
The washer has detected
that it is taking too long to completely drain water from the wash tub.
See Water in the
“Troubleshooting” section.
Call service center at 1-877-337-3639.
UL
(Unbalanced Load)
The washer has detected an out of balance load and has failed to self-correct the condition.
Open the washer lid, redistribute the load, close the lid, and press the Start/Pause button to resume operation.
The washer is not level from side to side, or from front to back.
Level the washer, open and close the washer lid and press the Start/Pause button to resume operation.
LF
(Too Long to
Fill)
The washer senses that it is taking too long to fill the wash tub or does not read a change in water level during a fill.
See Water in the
“Troubleshooting” section.
Check for water leakage.
Call service center at 1-877-337-3639.
FA
(Water Level
Sensor Error)
The washer has detected water level sensor errors.
Call service center at 1-877-337-3639.
F2
(Water Level is Too High)
The washer has detected higher than normal water levels, automatic draining has not resolved the issue.
Call service center at 1-877-337-3639.
OPERATION
PROBLEM
POSSIBLE CAUSE(S)
SOLUTION
Washer does not run
There is no electrical power going to the washer.
Plug the power cord into a grounded 3 prong outlet.
Circuit breaker tripped or fuse blown
Reset/Turn on circuit breaker or replace fuse.
The washer is overloaded or the wash load is not balanced.
Laundry may need to be removed or redistributed to rebalance the load.
The Heavy Duty or Whites cycle was selected.
The washer pauses during cycles for the laundry to soak. When the soak time ends, the washer will restart automatically.
Delay start has been selected.
Cancel the delay start.
The washer lid is open.
Close the washer lid.
WATER
PROBLEM
POSSIBLE CAUSE(S)
SOLUTION
Water flow is slow or filling
takes a long time
Hose filter screens on the water inlet valves may be clogged.
Disconnect hoses from inlet valves and clean the screens.
Water inlet faucets are not fully turned on.
Make sure that the water faucets are fully turned on.
Water fill hose is kinked.
Make sure the water hoses are not tangled, kinked, or pinched.
There is no water supply to the house or the water pressure is too low.
Check another faucet in the house to make sure that household water pressure is adequate.
Water temperature is too warm or cold
Water heater temperature is not set correctly.
Hot water needs to be at a temperature of at least 120°F -140°F (49°C - 60°C).
Water inlet hoses are not connected correctly.
Make sure the inlet hoses are properly connected (hot to hot and cold to cold).
Water leaks
Water hose connections are not tight.
Make sure the inlet hose connections at the faucets and washer are tight.
Drain hose connection is not secure or the hose is not properly positioned in the drain.
Make sure the drain hose connection at the washer is secure and that the drain hose is properly positioned at the drain location.
Undetermined water leaks
Call a qualified plumber.
Water will not
drain from washer
Drain hose is not properly connected to the washer.
Reconnect drain hose to the washer.
Drain hose is not positioned properly.
In order to drain properly, the top of drain outlet must not be higher than 60" (153 cm) above the floor.
Sink or drainpipe is clogged.
Remove blockages from the sink or drainpipe.
Water runs out of drain hose
when tub is filling
The end of the drain hose is too low.
NOTE: If the end of the drain hose is lower than the maximum tub water level, the wash tub will not fill or hold water properly.
Position the top of the drain hose so that it is at least 39" (99 cm) above the floor.
NOISE
PROBLEM
POSSIBLE CAUSE(S)
SOLUTION
Thumping
Wash load may be unbalanced.
Pause the washer and redistribute items in the wash basket.
Washer may not be level.
Level the washer. See “Level the Washer.”
Rattling or Clanking
Coins, buttons or other foreign objects may be in the washer.
Stop the washer and check for keys or coins and other foreign objects.
Squealing
Washer may be overloaded.
Stop the washer and remove part of the wash load.
Vibration
Washer may not be level.
Check that all four legs are resting firmly on the floor and that the washer is level.
Clinking/Water splashing and spraying
Wash and rinse cycles going on and off.
This sound is normal.
Water running
Drain pump is draining dirty water from the washer.
This sound is normal.
CLOTHING
PROBLEM
POSSIBLE CAUSE(S)
SOLUTION
Wrinkling
Improper wash load sorting, overloading or washing at the wrong temperature.
Avoid overloading and do not mix heavy clothing with light or delicate items.
Detergent residue
Detergent may not completely dissolve in extremely cold water.
Select a warm water wash temperature and make sure the hot water heater is providing hot water; at least 120°F (49°C).
Use less HE detergent
Use the Extra Rinse option.
Excessive sudsing or low cleaning performance
Used too much detergent.
Use less HE detergent.
Used wrong detergent type.
Must use HE detergent
Odor coming from washer basket
Wet clothing remained in the washer for too long.
Remove clothing immediately after cycle is finished.
The lint filters need to be cleaned.
Clean the lint filters after each cycle. See “Cleaning and Maintenance.”
Clothing is gray or yellowed
Wash load was not separated by color.
Separate darks from lights and whites to avoid the transfer of dyes.
Did not use enough detergent or the soil level of the wash load requires a warmer water temperature.
Large and heavily soiled laundry may need more detergent and hotter wash water. Refer to detergent manufacturer’s directions for recommended usage.
Clothing is torn or snagged
Wash load is not prepared for laundering.
Tie strings and sashes. Empty pockets, fasten belts, and close zippers, metal snaps or hook fasteners before loading.
Bleach Stains NOTE: Bleach stains may appear as color loss spots.
Laundry has direct contact with bleach.
Do not pour or splash bleach directly on clothing. If you are using the dispenser and still notice stains, try using diluted bleach.
Clothing appearing older and worn
Using the wrong wash cycle or water temperature.
Follow clothing manufacturer’s instructions for garment care.