USER GUIDE Mobile
Basic Functions
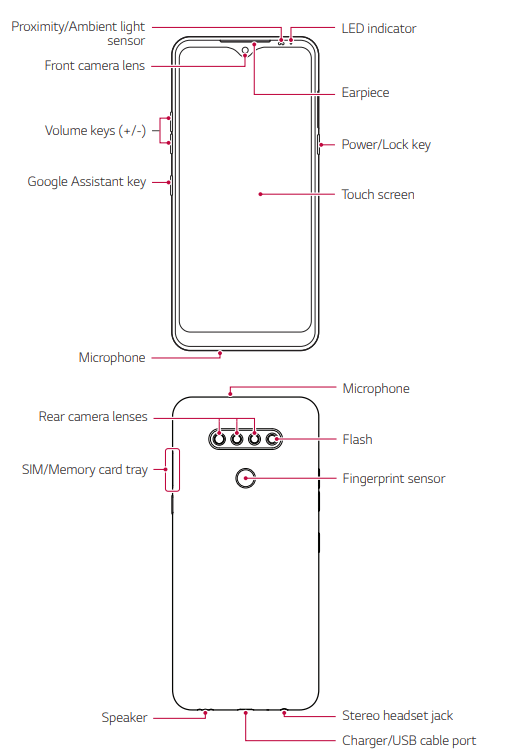
Parts overview
Do NOT attempt to remove the back cover. This device has a non-removable battery. Do not attempt to remove the back cover. Doing so may severely damage the battery and device, which could cause overheating, fire, and injury.
Press and hold the volume down key and Power/Lock key at the same time for a second to take a screenshot.
- Proximity/Ambient light sensor
- Proximity sensor: During a call, the proximity sensor turns off the screen and disables touch functionality when the device is in close proximity to the human body. It turns the screen back on and enables touch functionality when the device is outside a specific range.
- Ambient light sensor: The ambient light sensor analyzes the ambient light intensity when the auto-brightness control mode is turned on.
- Volume keys
- Adjust the volume for ringtones, calls or notifications.
- While using the Camera, gently press a Volume key to take a photo. To take continuous photos, press and hold the Volume key.
- Press the Volume Down key twice to launch the Camera app when the screen is locked or turned off. Press the Volume Up key twice to launch Screen-off memo.
- Power/Lock key
- Briefly press the key when you want to turn the screen on or off.
- Press and hold the key when you want to select a power control option.
- Google Assistant key
- Your device has Google Assistant built in. Find answers and get things done while on-the-go. To get started, just tap the Google Assistant key on the side of the phone.
- Activate Google assistant. See Google Assistant for details.
- Some functions may be restricted for access, depending on the device specifications.
- Do not put heavy objects on the device or sit on it. Doing so may damage the touch screen.
- Screen-protective film or accessories may interfere with the proximity sensor.
- If your device is wet or is being used in a humid place, the touch screen or buttons may not function properly.
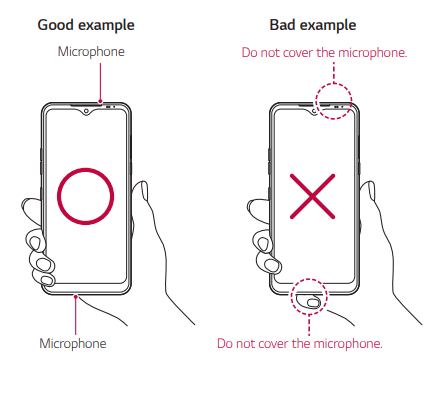
Hold the device correctly as shown below. If you cover the microphone hole with a hand, finger, or protective case while using the device, you may sound unclear during a call.
Turning the power on or off
Turning the power on
- When the power is turned off, press and hold the Power/Lock key.
- When the device is turned on for the first time, initial configuration takes place. The first booting time for the smart phone may be longer than usual
Turning the power off
- Press and hold the Power/Lock key, then select Power off.
Restarting the device: When the device is not working properly or does not respond, restart it by following the instructions below.
- Press and hold the Power/Lock key and the Volume Down key at the same time until the power is turned off.
- When the device restarts, release the key.
Power control options: Press and hold the Power/Lock key, then select an option.
- Power off: Turn the device off.
- Power off and restart: Restart the device.
Installing the SIM card and memory card
Insert the SIM card provided by your mobile service provider to start using your device.
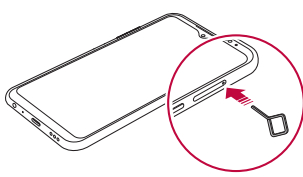
Be careful with the ejection pin since it has a sharp edge.
1 Insert the ejection pin into the hole on the card tray.
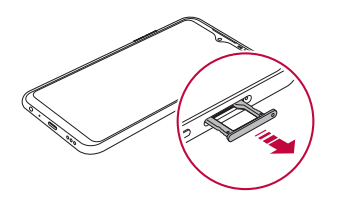
2 Pull out the card tray
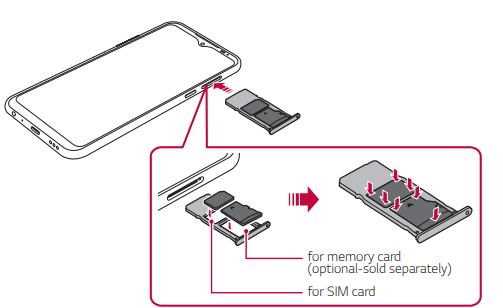
3 Put the SIM card (and a memory card; optional-sold separately) on the card tray with the gold-colored contacts facing downwards.
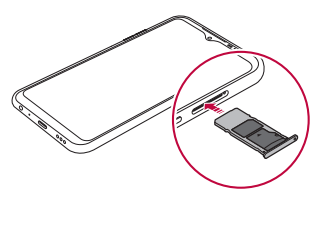
4 Insert the card tray back into the slot.
Touch screen
You can familiarize yourself with how to control your device by using touch screen gestures.
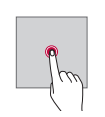
- Tapping: Lightly tap with your fingertip to select or run an app or option.
- Touching and holding: Touch and hold for several seconds to display a menu with available options.
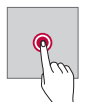
- Double-tapping: Tap twice quickly to zoom in or out on a web page or map.

- Dragging: Touch and hold an item, such as an app or widget, then move your finger to another location in a controlled motion. You can use this gesture to move an item.
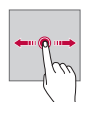
- Swiping: Touch the screen with your finger and move it quickly without pausing. You can use this gesture to scroll through a list, a web page, photos, screens, and more.

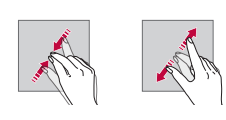
- Pinching and spreading: Pinch two fingers to zoom out such as on a photo or map. To zoom in, spread your fingers apart
Home screen
Home screen overview
- The Home screen is the starting point for accessing various functions and apps on your device. Swipe up from the bottom edge of any screen to directly go to the Home screen.
- You can manage all apps and widgets on the Home screen. Swipe the screen left or right to view all installed apps at a glance.
Home screen layout
- You can view all apps and organize widgets and folders on the Home screen.
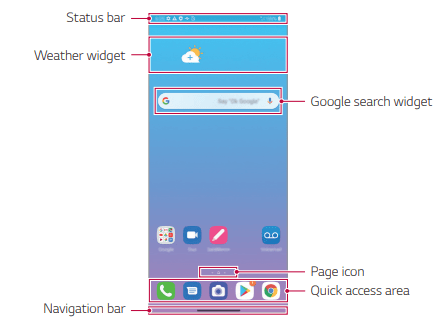
- Status bar: View status icons, the time and the battery level.
- Weather widget: View the information of weather and time for a specific area.
- Google Search widget: Type or speak to open Google Search.
- Folder: You can create folders to classify the app based on desired criteria.
- Page icon: Display the total number of Home screen canvases. You can tap the desired page icon to go to the page. The icon reflecting the current canvas will be highlighted.
- Quick access area: Fix main apps at the bottom of the screen so that they can be accessed from any Home screen canvas.
- Navigation bar: You can do some gestures to go to the Home screen, previous screen, Overview screen, or quickly switch between apps.
Using Navigation bar: Here is the gestures guide to control the Navigation bar.
- To go to Home screen, swipe up from the bottom edge of the screen.
- To go back to the previous screen, swipe in from the left or right edge of the screen.
- To go to Overview screen, swipe up and hold from the bottom edge of the screen.
- To quickly switch between apps, swipe right at the bottom edge of the screen to go to previously used apps.
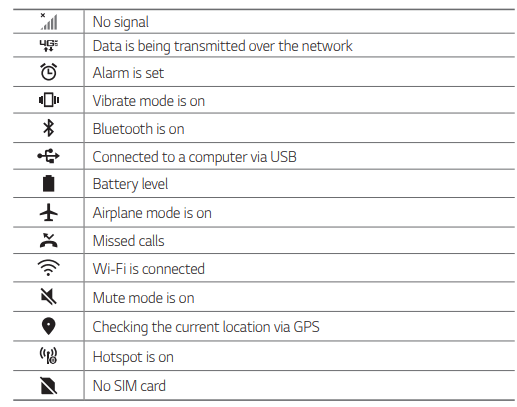
Status icons: When there is a notification for an unread message, calendar event or alarm, the status bar displays the corresponding notification icon. Check your device’s status by viewing notification icons displayed on the status bar
Useful Apps
Installing and uninstalling apps
Installing apps: Access an app store to search and download apps.
- You can use SmartWorld, Play Store or the app store provided by your service provider
Uninstalling apps
- Uninstall apps that you no longer use from your device.
- Uninstalling with the touch and hold gesture: Touch and hold any empty area of the Home screen, and then tap
 of the app you want to delete.
- Uninstalled apps can be reinstalled within 24 hours of uninstallation. See App trash for details.
- Uninstalling by using the settings menu: On the home screen, tap Settings -> Apps -> App info, select an app, then tap Uninstall.
Uninstalling apps from the app store: To uninstall an app, access the app store from which you downloaded the app and uninstall it.
Installing and uninstalling apps during the setup
- When you turn on the device for the first time, you can download recommended apps.
- You can skip to the next step without installation.
App trash
You can view the uninstalled apps on the Home screen. You can also reinstall apps within 24 hours of uninstallation.
- On the home screen, tap Management App trash. You can also touch and hold an empty area of the Home screen, then tap App trash.
- Choose the desired option.
- Restore: Restore the selected app.
 : Remove the uninstalled apps permanently from the device
App Shortcuts
On the Home screen, touch and hold an app icon such as Phone, Messages, Camera, Gallery and Settings to display a quick access menu. Use apps more easily through App Shortcuts.
- Tap
 to set a widget for the app.
- Tap
 to check the app information.

Phone
Voice call
Make a phone call by using one of the available methods, such as manually entering a phone number and making a call from the contact list or the list of recent calls.
Making a call from the keypad
- On the home screen, tap
 -> Dial.
- Make a call by using a method of your choice:
- Enter a phone number and tap
 .
.
- Touch and hold a speed dial number.
- Search for a contact by tapping the initial letter of a contact name in the contact list, and then tap
 .
.
Making Calls from Contacts
- On the home screen, tap -> Contacts.
- After selecting the number you want to call from the list of contacts, tap .
Answering/Ending a call
To answer a call, drag  on the incoming call screen.
- When the stereo headset is connected, you can make calls by using the call/end button on the headset.
- To end a call with the Power key, tap Settings on the home screen and tap Network & internet -> Call -> Answer and end calls and then activate End call with the Power key
Rejecting a call
To reject an incoming call, drag  across the incoming call screen.
- To send a rejection message, drag the rejection message option
 across the screen.
- To add or edit a rejection message, tap Settings on the home screen and tap Network & internet -> Call -> Call blocking & Ignore with message -> Allow ignore with message.
- When a call is coming in, press the Volume Up, Volume Down or Power/ Lock key to mute ringtone or vibration, or to hold the call.
Settings
Settings
- You can customize the device settings in accordance with your preferences.
- On the home screen, tap Settings.
- If you enter a keyword on the search window at the top of the screen, you can conveniently access the option that needs to be set.
Network & internet
Airplane mode: You can turn off the call and mobile data functions. When this mode is on, functions that do not involve data, such as games and music playback, remain available.
- On the settings screen, tap Network & internet Airplane mode.
- Tap Turn on in the confirmation screen.
Wi-Fi: You can connect to nearby devices over a Wi-Fi network.
Connecting to a Wi-Fi network
- On the settings screen, tap Network & internet Wi-Fi.
- Tap
 to activate it.
- Available Wi-Fi networks appear automatically.
- Select a network.
- You may need to enter the network’s Wi-Fi password.
- The device skips this process for previously accessed Wi-Fi networks. If you do not want to automatically connect to a certain Wi-Fi network, tap the network and then tap Forget.
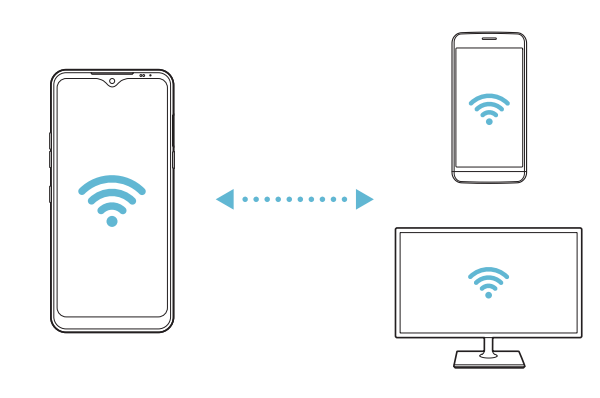
Wi-Fi Direct: You can connect your device to other devices that support Wi-Fi Direct to share data directly with them. You do not need an access point. You can connect with more than two devices by using Wi-Fi Direct.
- On the settings screen, tap Network & internet -> Wi-Fi Advanced -> Wi-Fi ->
 -> Wi-Fi Direct.
- Nearby devices that support Wi-Fi Direct automatically appear.
- Select a device.
- Connection occurs when the device accepts the connection request.
Mobile data
You can turn mobile data on and off. You can also manage mobile data usage.
Turning on mobile data
- On the settings screen, tap Network & internet Mobile data.
- Tap to activate it.
Customizing mobile data settings
- On the settings screen, tap Network & internet -> Mobile data.
- Customize the following settings:
- On: Enable to use data connections on mobile networks.
- Limit mobile data usage: Set a limit for mobile data usage to block mobile data if the limit is reached.
- Alert me about data usage: Enable this option so you can set the amount of data usage that will trigger an alert.
- : Customize mobile data settings.
Call
You can customize call settings, such as voice call and international call options.
- On the settings screen, tap Network & internet -> Call.
- Customize the settings.
Tethering
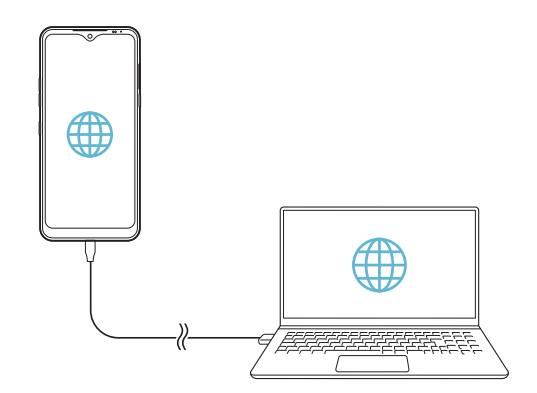
USB tethering: You can connect the device to another device via USB and share mobile data.
- Connect your device and other devices via USB cable.
- On the settings screen, tap Network & internet -> Tethering -> USB tethering and then tap to activate it.
Wi-Fi hotspot: You can set the device as a wireless router so that other devices can connect to the Internet by using your device’s mobile data.
- On the settings screen, tap Network & internet Tethering Wi-Fi hotspot and then tap to activate it.
- Tap Set up Wi-Fi hotspot, and enter the Wi-Fi name (SSID) and password.
- Turn on Wi-Fi on the other device, and select the name of the device network on the Wi-Fi list.
- Enter the network password.

- Timeout: When the Mobile hotspot has not been used for a specific period of time, it is automatically disconnected. You can set the time for automatic disconnection
Bluetooth tethering: A Bluetooth-connected device can connect to the Internet by using your device’s mobile data
- On the settings screen, tap Network & internet -> Tethering -> Bluetooth tethering and then tap to activate it.
- Turn on Bluetooth on both devices and pair them
Help
- You can view help on using tethering and hotspots.
- On the settings screen, tap Network & internet -> Tethering -> Help
Mobile networks
You can customize mobile data settings.
- On the settings screen, tap Network & internet -> Mobile networks.
- Customize the following settings:
- Data roaming: Turn data roaming on or off.
- System select: Select your preferred network mode.
- Access Point Names: View or change the access point for using mobile data services. To change the access point, select a choice from the access point list.
VPN
You can connect to a safe virtual network, such as an intranet. You can also manage connected virtual private networks.
Adding VPN
- On the settings screen, tap Network & internet -> VPN.
- Tap
 .
.
- This feature is available only when the screen lock is activated. If the screen lock is deactivated, a notification screen appears. Tap Change from the notification screen to activate the screen lock. See Setting a screen lock for details.
- Enter VPN details and tap Save.
Configuring VPN settings
- Tap a VPN from the VPNS list.
- Enter the VPN user account details and tap Connect.
- To save the account details, select the Save account information checkbox.
Wireless Emergency Alerts: You can view emergency alerts and customize your emergency alert settings. On the settings screen, tap Network & internet -> Wireless Emergency Alerts.
Private DNS: You can configure the Private DNS (Domain Name System) options.
- On the settings screen, tap Network & internet -> Private DNS.
- Select the desired option and tap Save
Sound
You can customize sound, vibration and notification settings.
On the settings screen, tap Sound and customize the following settings:
- Sound profile: Change the sound mode to Sound, Vibrate only, or Silent.
- Volume: Adjust the sound volume for various items.
- Ringtone: Select a ringtone for incoming calls. Add or delete ringtones.
- Notification sound: Select a notification ringtone. Set music saved on the device as a notification ringtone.
- Ring with vibration: Set the device to vibrate and play a ringtone simultaneously.
- Ringtone ID: Create a ringtone for an incoming call from a particular contact.
- Flash alert for incoming call: Set the device to flash alert for incoming calls.
- Do not disturb: Set the time, range and app type to receive notification messages. Receive notification messages only on particular days of the week.
- Sound quality and effects: Set the sound quality and effects.
- Vibration type: You can select the type of vibration when receiving calls.
- Vibrate on tap: Set the device to vibrate when you tap certain items on the screen.
- Dialing keypad sound: Enable the keypad sound effect.
- Touch sound: Enable the sound effect for tapping an item.
- Screen lock sound: Enable the sound effect to play when the screen is locked or unlocked.
- Emergency tone: Select the tone option for emergency alerts
Notifications
You can check a list of installed apps, and configure the settings for notifications.
- On the settings screen, tap Notifications.
- Customize the settings as desired.
Display
The Display category allows you to manage various display settings.
On the settings screen, tap Display and customize the following settings:
- Home screen: Customize settings for the Home screen. See Home screen settings for details.
- New Second Screen: Select how the status bar and app corners will look.
- Navigation bar: Configure the Navigation bar. See Using Navigation bar for details.
- Comfort view: Set the device to reduce amount of blue light on screen to reduce eye strain.
- Night mode: You can apply a dimmed screen theme to avoid glare on the screen at night time.
- Font: Change the font size, boldness, or face.
- Display size: Set the items on the screen to a size that is easy for you to see. Some items may change position.
- App scaling: Adjust the screen size of apps.
- Brightness: Use the slide bar to change the device’s screen brightness. To automatically adjust screen brightness according to ambient light intensity, tap the Auto switch.
- Screen timeout: Automatically turn off the screen when the device is left idle for a specified period of time.
- Auto-rotate screen: Automatically rotate the screen according to the device’s orientation.
- Screen saver: Display a screen saver when the device is connected to the holder or charger. Select a screen saver type to display.
- One-handed screen: Make the screen size smaller to conveniently use the device with one hand. Drag the Home touch button at the bottom of the screen to the left or right.
Wallpaper & theme
You can select wallpaper, screen theme or icon style for your device.
- On the settings screen, tap Wallpaper & theme.
- Tap Wallpaper or Theme to customize the settings.
Lock screen & security
You can customize lock screen and security settings.
On the settings screen, tap Lock screen & security.
- Google Play Protect: Scan the device periodically for potentially harmful codes or apps.
- Find My Device: Remotely track the device location. You can also protect your data securely if you lost your device.
- Security update: Check for software update and configure automatic installation settings.
- Select screen lock: Select the desired screen lock method. See Setting a screen lock for details.
- Customize Lock screen: Change the information displayed on the locked screen. See Customize Lock screen for details.
- Secure lock settings: Change the secure lock settings. See Secure lock settings for details.
- Fingerprints: Use your fingerprint to unlock the screen or content. See Fingerprint recognition overview for details.
- Content lock: Allows you to set a lock type (password or pattern) for your QuickMemo+ and Gallery files.
- Encryption & credentials: Configure the settings for SD card encryption and credentials.
- Encrypt SD card: Encrypt the memory card to prevent use on another device. See Memory card encryption for details.
- Credential protection: View the type of the storage where the security certificate will be saved.
- Trusted credentials: View your system’s root CA certificates and user-installed CA certificates.
- User credentials: View and change secure certificate information stored on your device.
- Install from storage: Install a secure certificate from a storage.
- Clear credentials: Delete user-installed secure certificates and related credentials.
- Set up SIM card lock: Lock or unlock the USIM card, or change the password (PIN).
- Phone administrators: Allows privileges to restrict the control or use of the device to particular apps.
- Trust agents: View and use trust agents installed on the device.
- Screen pin: Fix the app screen so that only the currently active app can be used.
- Usage access: View details on usage of apps on the device.
Privacy
You can find and adjust all your privacy settings.
- On the settings screen, tap Privacy.
- Customize the settings.
- Permission manager: Allows you to check and change the permissions granted to the apps.
- Lock screen: Allows you to set notifications to show on the lock screen.
- Make passwords visible: Enable this option to briefly show each character of the password as you type it so you can see what you’ve entered.
- Autofill service from Google: Enable this option to enter your information saved in your account such as password, address, or credit card number with a single tap. You can also disable this option, use the Google Autocomplete feature, or add a new service account.
- Google location history: Allows you to enable or disable Location History. When enabled, Google periodically stores and uses your phone’s most recent location data in connection with your Google Account. From the Location History screen, tap to view and/or manage your location data.
- Activity controls: Select activities and information which you want Google to save.
- Ads: Allows you to check the advertising ID and set the personalized ads.
- Usage & diagnostics: Enable this option to help improve the Android experience by automatically sending diagnostic, device, and app usage data to Google.
Location
- You can check how your location information is shared and configure the permission to access your location information.
- On the settings screen, tap Location and set the desired function.
Appendix
LG Language Settings
Select a language to use on your device.
- On the home screen, tap Settings -> System -> Language & keyboard -> Language -> Add language, and select a language.
- Touch and hold
 and drag it to the top of the language list to set it as a default language
LG Bridge
LG Bridge overview: LG Bridge is an app that helps you manage the photos, music, videos and documents saved on your LG smartphone from your computer conveniently. You can back up contacts, photos and more to the computer or update the device software.
- The supported features may vary depending on the device.
- LG USB driver is a necessary program to connect your LG smartphone with the computer and is installed when you install LG Bridge.
LG Bridge functions
- Manage the files on the device from a computer via Wi-Fi connection or mobile data connection.
- Back up data from the device to a computer or restore data from a computer to the device via USB cable connection.
- Update the device software from a computer via USB cable connection.
Installing LG Bridge on a computer
- Go to lg.com/us from your computer.
- In the search bar, enter the name of your device.
- Click Support Manuals and Downloads.
- Click the Software & Firmware tab, then click LG BRIDGE - COPY FILES, AND BACKUP YOUR DEVICE and download the setup file.
Phone software update
LG Mobile phone software update from the Internet
- For more information about using this function, please visit lg.com/common/index.jsp, select your country and language. This feature allows you to conveniently update the firmware on your phone to a newer version from the Internet without needing to contact the LG Authorized Service Center. This feature will only be available if and when LG makes a newer firmware version available for your device.
- Because the mobile phone firmware update requires the user’s full attention for the duration of the update process, please make sure you check all instructions and notes that appear at each step before proceeding. Please note that removing the USB cable during the upgrade may seriously damage your mobile phone.
- LG reserves the right to make firmware updates available only for selected models at its own discretion and does not guarantee the availability of the newer version of the firmware for all handset models.
LG Mobile Phone software update via Over-the-Air (OTA)
- This feature allows you to conveniently update your phone’s software to a newer version via OTA, without connecting a USB cable. This feature will only be available if and when LG makes a newer firmware version available for your device.
- To perform the phone software update, tap Settings -> System -> Update center -> Software update.
- Your personal data from internal phone storage—including information about your Google account and any other accounts, your system/ application data and settings, any downloaded applications and your DRM license—might be lost in the process of updating your phone’s software. Therefore, LG recommends that you backup your personal data before updating your phone’s software. LG does not take responsibility for any loss of personal data.
- This feature depends on the area or service provider
FAQ
This chapter lists some problems you might encounter when using your device. Some problems require you to call your service provider, but most are easy to fix yourself
Device overheats
1. Device overheats while it is in use.
In the following cases, the battery consumption increases and the device may overheat:
- When you turn on the device for the first time or back up the data
- When running multiple apps simultaneously
- When multiple apps are running in the background
- When downloading large files while making a video call or recording a video
- When using features that require high power
- When watching video streaming on the internet, or recording a long video
- When playing high-end games for long time
- When using the device with maximum screen brightness for a long time
- When using lots of mobile data
- When using Wi-Fi hotspot or tethering
- When synchronizing the data for multiple accounts simultaneously
- Other cases
- When roaming overseas
- When using the device in areas with weak signals or no reception
- When charging the device with the charger/USB cable port that is damaged or contaminated with foreign substance
Some of the above cases may not apply depending on the features and apps.
2. Device overheats while charging.
- The device and the charger may become hot while charging. During wireless charging or fast charging (if supported), the device may become even hotter. If the battery temperature rises above a certain level, the device may stop charging.
- Disconnect the charger from the device and close any running apps. Let the device cool down before charging the device or running an app again.
- Stop charging if the charger/USB cable port at the lower part of the device overheats, and contact the LG Authorized Service Center
3. How to solve overheating of the device
- Close any running apps or features, and let the device cool down.
- Always update the software to the latest version.
- Turn off Wi-Fi, Bluetooth, or GPS features while not using them.
- Close apps you don’t use.
- If you are using the device with maximum screen brightness, decrease the brightness.
- If the device overheats for a prolonged period, stop using it for a while. If the device continues to overheat, contact the LG Authorized Service Center.
4. Usage limitations when the device overheats
If the device overheats while using it or charging, some features, apps, or even the device may be turned off.
This is a normal operation for the devices that support this feature.
- If the device temperature rises above a certain level, a warning message appears.
- If you play high-end games, record videos, or upload large files, the device may overheat for a prolonged period. In this case, a warning message may appear to notify automatic shutdown. Turn off the device or close any running apps or features, and let the device cool down.
- The screen brightness and the operating speed may be limited to cool down the device. Any running apps or features may slow down or stop. The device may stop charging
SIM card error
- Make sure the SIM card is correctly inserted.
No network connection or dropped network
- Signal is weak. Move to a window or an open area.
- You are outside the carrier network area. Move and check the network.
Calls are not available
- New network not authorized.
- Make sure you have not set call barring for the incoming number.
- Make sure you have not set call barring for the number you are dialing.
Device cannot be turned on
- When the battery is completely discharged, your device will not turn on.
- Fully charge the battery before turning on the device.
Charging error
- Make sure the device is charging at a moderate temperature.
- Check the charger and its connection to the device.
- Use only in-box accessories which are authorized by LG.
The battery depletes faster than when first purchased
- When you expose the device or the battery to very cold or hot temperatures, the battery life may be reduced.
- Battery consumption will increase when you use certain features or apps, such as GPS, games or the Internet.
- The battery is consumable and the battery life will get shorter over time
Error messages appear when launching the camera
- Charge the battery.
- Free some memory by transferring files to a computer or deleting files from your device.
- Restart the device.
- If you are still having trouble with the camera app after trying these tips, contact the LG Authorized Service Center
The photo quality is poor
- The quality of your photos may vary, depending on the surroundings and the photography techniques you use.
- When you take photos and videos, keep in mind that the image quality with standard angle is better than that with wide-angle.
- If you take photos in dark areas, at night or indoors, image noise may occur or images may be out of focus.
- If you have any problems, reset the options.
The touch screen responds slowly or incorrectly
- If you attach a screen protector or optional accessories to the touch screen, the touch screen may not function properly.
- If you are wearing gloves, if your hands are not clean while touching the touch screen or if you tap the screen with sharp objects or your fingertips, the touch screen may malfunction.
- The touch screen may malfunction in humid conditions or when exposed to water.
- Restart your device to clear any temporary software bugs.
- If the touch screen is scratched or damaged, contact the LG Authorized Service Center
Hangs or freezes
1. Restart the device
- If your device freezes or hangs, you may need to close apps or turn the device off and then on again.
2. Perform a boot-up
- Press and hold the Power/Lock key and the Volume Down key until the device restarts.
3. Reset the device
- If the methods above do not solve your problem, perform a factory data reset.
- On the settings screen, tap System -> Restart & reset -> Factory data reset.
- Reset all settings for the device and delete data. Before performing the factory data reset, remember to make backup copies of all important data stored in the device.
- If you registered a Google account to the device, you must sign in to the same Google account after resetting the device
Bluetooth device is not located
- Make sure the Bluetooth wireless feature is activated on your device.
- Make sure the Bluetooth wireless feature is activated on the device you wish to connect to.
- Make sure your device and the other Bluetooth device are within the maximum Bluetooth range (10 m).
- If the tips above do not solve your problem, contact the LG Authorized Service Center
A connection is not established when you connect the device to a computer
- Make sure the USB cable you are using is compatible with your device.
- Make sure you have the proper driver installed and updated on your computer.
Downloaded application causes a lot of errors
- Application has problems.
- Remove and reinstall the application.